Free and open node based generative workflows.
See the code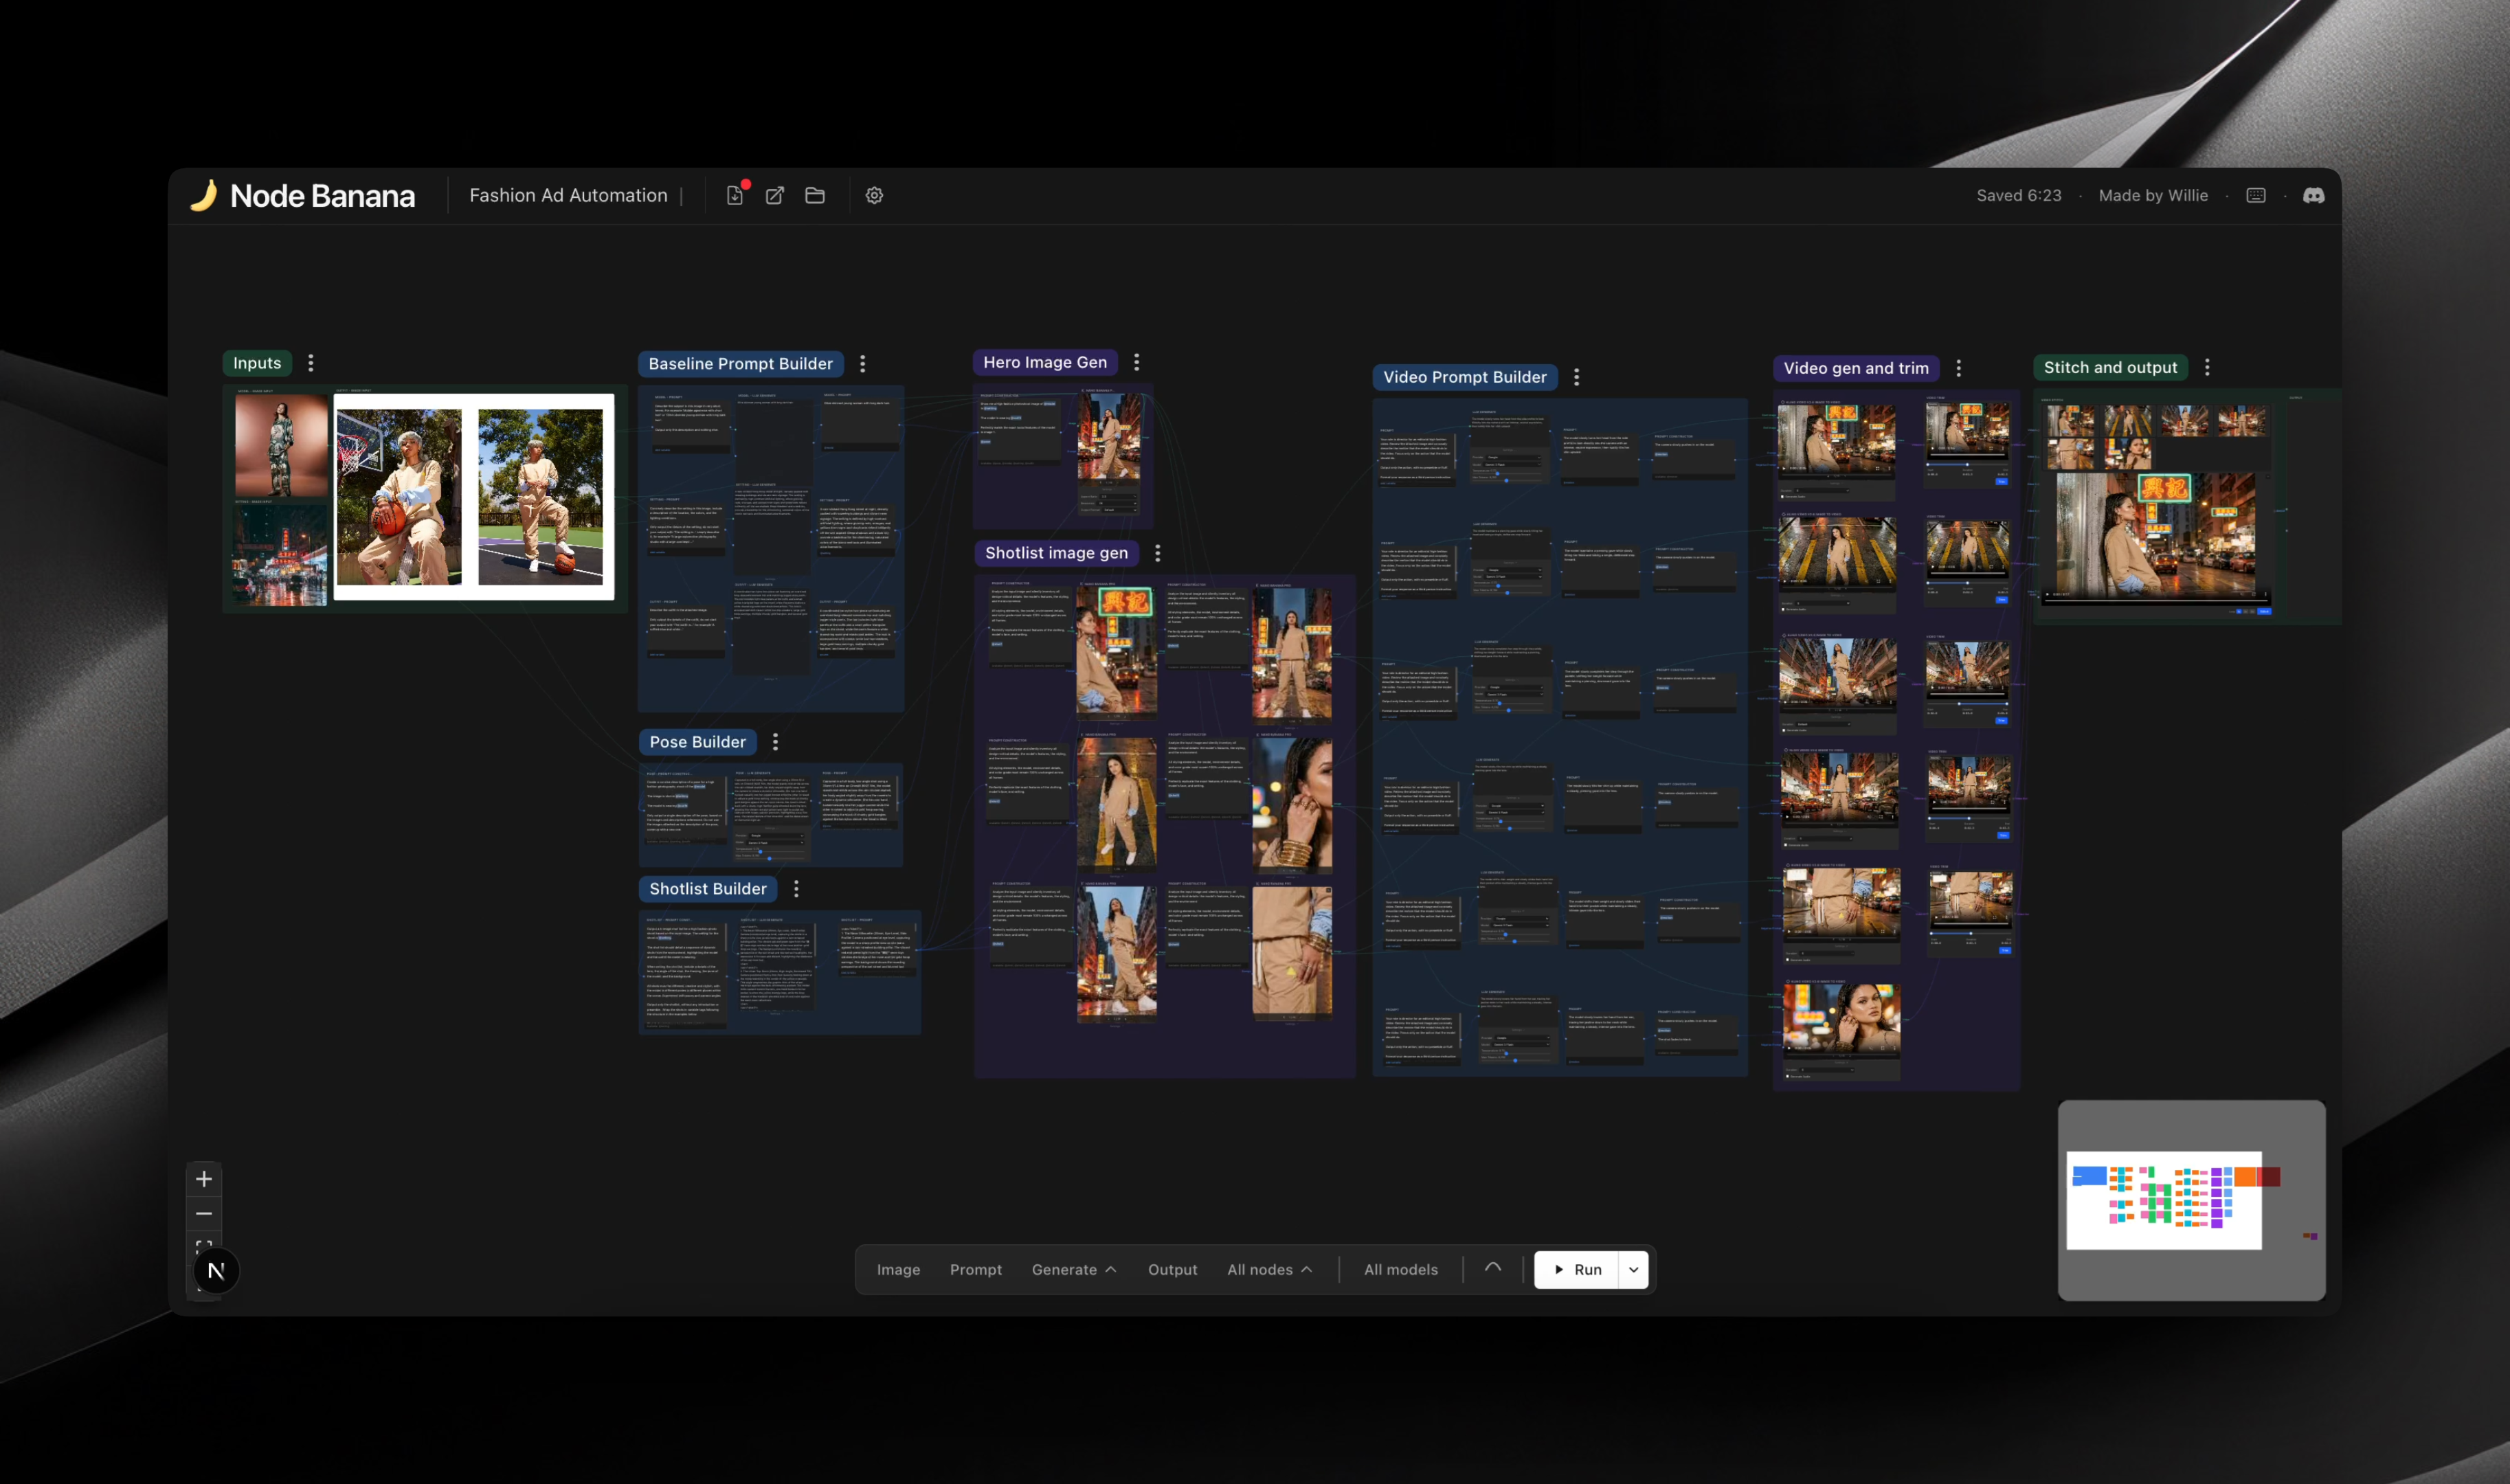


Build AI image, 3D, audio and video generation pipelines by connecting nodes on a visual canvas.
Multi-provider support. Dynamic prompting features. Local, private, MIT, BYOK.
Download for Mac · Apple Silicon • Download for Windows · x64
Website • Documentation • Discord • All releases
Node Banana is a node-based workflow editor for AI media generation. Drag nodes onto an infinite canvas, connect them with typed handles, and execute pipelines that call AI APIs in dependency order.
| Feature | Description |
|---|---|
| Desktop app | A signed Mac app (Apple Silicon) and a Windows installer (x64) that update themselves. Keys are encrypted at rest; workflows and media stay on your disk |
| Agent | A chat window that builds workflows, edits the canvas and changes node settings, running on your own Claude Code or Codex (ChatGPT) subscription through the vendor's CLI, never on API credits |
| Asset library | Everything you generate is saved as it is made and browsable in the Assets view, with filters, favourites, tags, and the workflow that made it |
| Dynamic Prompting | Build prompts with variables, LLM-powered text construction, and reusable prompt chains that adapt per run and per input |
| Prompt to Workflow | Generate complete workflows from natural language descriptions |
| Visual Node Editor | Drag-and-drop nodes onto an infinite canvas with pan and zoom |
| Image Generation | Generate images using Google Gemini, Replicate, fal.ai, Kie.ai, and more |
| Video Generation | Generate video via AI API providers |
| Audio Generation | Text-to-speech and AI audio generation |
| 3D Generation | Generate 3D models or use them as node inputs |
| Image Annotation | Full-screen editor with drawing tools (rectangles, circles, arrows, freehand, text) |
| Text Generation | Generate text using Google Gemini, OpenAI, or Anthropic models |
| Workflow Chaining | Connect multiple nodes to create complex multi-step pipelines |
| Group Locking | Lock node groups to skip them during execution |
| Batch runs | Run a workflow or a group N times, with each output tagged by its run |
| Save/Load | Cmd/Ctrl+S saves, autosave follows your edits, and workflows are portable JSON files |
| Provider | Status |
|---|---|
| Google Gemini | Fully supported |
| Replicate | Supported |
| fal.ai | Supported |
| Kie.ai | Supported |
| WaveSpeed | Supported |
| ComfyUI (Comfy Router: Flux, GPT Image, Nano Banana, Seedream, Kling, Veo, Runway, LTX and more) | Supported |
| OpenAI | LLM only |
Download the installer for your platform from nodebanana.app: Mac (Apple Silicon, macOS 13 or later) as a signed and notarised DMG, or Windows (x64, Windows 10 or later) as an installer. The Windows build is not code-signed, so SmartScreen may warn on first run. The app keeps itself up to date from GitHub Releases; every release also lists SHA-256 checksums for its installers.
Then open Settings → Providers and paste the API keys for the providers you use. Node Banana calls those providers directly with your keys, and their usage is billed to you by them. Keys are stored encrypted in your OS profile; workflows and generated media are files in the Node Banana folder (Documents by default). See the desktop guide for data locations, logs, recovery and updates.
git clone https://github.com/shrimbly/node-banana.git
cd node-banana
npm install
npm run dev
Open http://localhost:3000 in your browser.
npm run dev and npm start (after npm run build) listen on 127.0.0.1
only, and the API answers Node Banana's own page, not other websites. To reach
the app from another device, set HOST=0.0.0.0 (for example
HOST=0.0.0.0 npm start). Do that only on a trusted network or behind an
authenticated proxy: the API reads and writes local workflow files and spends
the provider keys in .env.local.
Use Node.js 22.12 or newer for the Electron tooling. After npm install, launch
the desktop development app:
npm run electron:dev
This opens Node Banana in an Electron window and starts its own local Next.js
server. UI edits reload automatically. Restart the command after changing files
in electron/. No separate npm run dev process is needed.
To run a production build locally:
npm run build
npm run electron:start
When running from source, the app reads the same .env.local as the browser version, and API keys can also
be entered in Settings. Desktop settings use a separate persistent Electron
profile; existing browser settings are not imported automatically. Workflows
remain ordinary files that either version can open. Folder selection uses a
native desktop dialog.
The desktop server binds to 127.0.0.1:47831 and only accepts authenticated
requests from the Electron session. Set NODE_BANANA_ELECTRON_PORT to override
the port if it is occupied. Keep that port consistent: browser storage is tied
to the origin. NODE_BANANA_ELECTRON_USER_DATA can point to an alternate absolute
profile directory. Electron development output lives in .next-electron, so
the browser dev server can run separately.
Run npm run electron:smoke to check the real desktop window, editor interaction,
local file save/load, native dialog bridge, settings persistence, and server
shutdown using a temporary profile. It needs a graphical desktop (or Xvfb on
Linux). Add -- --production to test an existing production build. These commands
run from source. Use npm run electron:package for an unsigned Apple Silicon app, DMG and ZIP (--sign signs and notarises it; on Windows it makes the installer), and npm run electron:acceptance for packaged crash/recovery checks. See the desktop guide for installation, encrypted credentials, recovery and how releases are cut. ComfyUI remains a separately installed or remote service.
For macOS title-bar changes, also run
npm run electron:smoke -- --production --native-input after building. This uses
cliclick (installed separately) with macOS Accessibility permission to test real
mouse hover, clicks, and window dragging; browser automation alone bypasses the
native draggable-region hit testing. It brings the test window to the front and
moves the mouse, so let it finish before interacting with the desktop.
Create a .env.local file in the root directory:
GEMINI_API_KEY=your_gemini_api_key          # Required for prompt-to-workflow
OPENAI_API_KEY=your_openai_api_key          # Optional
ANTHROPIC_API_KEY=your_anthropic_api_key    # Optional
REPLICATE_API_KEY=your_replicate_api_key    # Optional
FAL_API_KEY=your_fal_api_key                # Optional
KIE_API_KEY=your_kie_api_key                # Optional
WAVESPEED_API_KEY=your_wavespeed_api_key    # Optional
COMFY_API_KEY=your_comfy_api_key            # Optional, ComfyUI-hosted models via Comfy Router
API keys can also be entered in the app (Settings → Providers), which is the usual way — the environment variables are for headless or shared deployments.
Drop any ComfyUI workflow onto the canvas and it becomes a node. Shift + C
adds an empty ComfyUI node and opens the same dialog to pick a workflow for it.
If the workflow was set up as an app in ComfyUI — using App Mode to pick
its inputs and outputs — those selections become the node's handles and
settings directly; otherwise Node Banana detects them and asks you to confirm.
The Blueprints tab lists the ready-made pipelines your ComfyUI already
ships, so there is nothing to upload at all.
Choose where they run in Settings → ComfyUI:
http://127.0.0.1:8188. It needs the
models and custom nodes the workflow uses.API keys can also be configured in Project Settings within the app.
npm run build
npm run start
The /examples directory contains example workflow files. To try them:
npm run dev.json file from the /examples folder into the browser window| Type | Purpose |
|---|---|
| Image Input | Load or upload reference images |
| Audio Input | Load or upload audio files |
| Prompt | Text prompt input |
| Prompt Constructor | Build dynamic prompts with variables and LLM-powered text construction |
| Array | Batch process multiple inputs through a workflow |
| Generate | AI image generation (multi-provider) |
| Generate Video | AI video generation |
| Generate Audio | Text-to-speech and AI audio generation |
| Generate 3D | AI 3D model generation |
| LLM | AI text generation (Gemini, OpenAI, Anthropic) |
| Annotation | Draw on images with full-screen editor |
| Split Grid | Split image into grid cells |
| Video Stitch | Combine video clips into a single output |
| Video Trim | Trim video clips to a specific range |
| Video Frame Grab | Extract frames from video |
| Image Compare | Side-by-side image comparison |
| Ease Curve | Define easing curves for parameter interpolation |
| Router | Route data to different branches |
| Switch | Toggle between execution paths |
| Conditional Switch | Route data based on conditions |
| GLB Viewer | Load and display 3D GLB models |
| Output | Display final result |
| Output Gallery | Display multiple results in a gallery |


npm test              # Watch mode
npm run test:run      # Single run
npm run test:coverage # With coverage report
npm run electron:test # The desktop shell's own tests
npm run lint          # ESLint (Next.js rules)
npm run typecheck     # Type-check the app without its tests
PRs are welcome! Fork the repo, branch from develop, and open a PR back to develop.
This is primarily built for my own workflows — if a PR conflicts with my plans I'll politely decline. For larger contributions, join the Discord to coordinate first.
MIT
163 followers · starred Apr 2026
740 followers · starred Mar 2026
72 followers · starred Mar 2026
82 followers · starred Jan 2026
Free and open node based generative workflows.
See the code
Build AI image, 3D, audio and video generation pipelines by connecting nodes on a visual canvas.
Multi-provider support. Dynamic prompting features. Local, private, MIT, BYOK.
Download for Mac · Apple Silicon • Download for Windows · x64
Website • Documentation • Discord • All releases
Node Banana is a node-based workflow editor for AI media generation. Drag nodes onto an infinite canvas, connect them with typed handles, and execute pipelines that call AI APIs in dependency order.
| Feature | Description |
|---|---|
| Desktop app | A signed Mac app (Apple Silicon) and a Windows installer (x64) that update themselves. Keys are encrypted at rest; workflows and media stay on your disk |
| Agent | A chat window that builds workflows, edits the canvas and changes node settings, running on your own Claude Code or Codex (ChatGPT) subscription through the vendor's CLI, never on API credits |
| Asset library | Everything you generate is saved as it is made and browsable in the Assets view, with filters, favourites, tags, and the workflow that made it |
| Dynamic Prompting | Build prompts with variables, LLM-powered text construction, and reusable prompt chains that adapt per run and per input |
| Prompt to Workflow | Generate complete workflows from natural language descriptions |
| Visual Node Editor | Drag-and-drop nodes onto an infinite canvas with pan and zoom |
| Image Generation | Generate images using Google Gemini, Replicate, fal.ai, Kie.ai, and more |
| Video Generation | Generate video via AI API providers |
| Audio Generation | Text-to-speech and AI audio generation |
| 3D Generation | Generate 3D models or use them as node inputs |
| Image Annotation | Full-screen editor with drawing tools (rectangles, circles, arrows, freehand, text) |
| Text Generation | Generate text using Google Gemini, OpenAI, or Anthropic models |
| Workflow Chaining | Connect multiple nodes to create complex multi-step pipelines |
| Group Locking | Lock node groups to skip them during execution |
| Batch runs | Run a workflow or a group N times, with each output tagged by its run |
| Save/Load | Cmd/Ctrl+S saves, autosave follows your edits, and workflows are portable JSON files |
| Provider | Status |
|---|---|
| Google Gemini | Fully supported |
| Replicate | Supported |
| fal.ai | Supported |
| Kie.ai | Supported |
| WaveSpeed | Supported |
| ComfyUI (Comfy Router: Flux, GPT Image, Nano Banana, Seedream, Kling, Veo, Runway, LTX and more) | Supported |
| OpenAI | LLM only |
Download the installer for your platform from nodebanana.app: Mac (Apple Silicon, macOS 13 or later) as a signed and notarised DMG, or Windows (x64, Windows 10 or later) as an installer. The Windows build is not code-signed, so SmartScreen may warn on first run. The app keeps itself up to date from GitHub Releases; every release also lists SHA-256 checksums for its installers.
Then open Settings → Providers and paste the API keys for the providers you use. Node Banana calls those providers directly with your keys, and their usage is billed to you by them. Keys are stored encrypted in your OS profile; workflows and generated media are files in the Node Banana folder (Documents by default). See the desktop guide for data locations, logs, recovery and updates.
git clone https://github.com/shrimbly/node-banana.git
cd node-banana
npm install
npm run dev
Open http://localhost:3000 in your browser.
npm run dev and npm start (after npm run build) listen on 127.0.0.1
only, and the API answers Node Banana's own page, not other websites. To reach
the app from another device, set HOST=0.0.0.0 (for example
HOST=0.0.0.0 npm start). Do that only on a trusted network or behind an
authenticated proxy: the API reads and writes local workflow files and spends
the provider keys in .env.local.
Use Node.js 22.12 or newer for the Electron tooling. After npm install, launch
the desktop development app:
npm run electron:dev
This opens Node Banana in an Electron window and starts its own local Next.js
server. UI edits reload automatically. Restart the command after changing files
in electron/. No separate npm run dev process is needed.
To run a production build locally:
npm run build
npm run electron:start
When running from source, the app reads the same .env.local as the browser version, and API keys can also
be entered in Settings. Desktop settings use a separate persistent Electron
profile; existing browser settings are not imported automatically. Workflows
remain ordinary files that either version can open. Folder selection uses a
native desktop dialog.
The desktop server binds to 127.0.0.1:47831 and only accepts authenticated
requests from the Electron session. Set NODE_BANANA_ELECTRON_PORT to override
the port if it is occupied. Keep that port consistent: browser storage is tied
to the origin. NODE_BANANA_ELECTRON_USER_DATA can point to an alternate absolute
profile directory. Electron development output lives in .next-electron, so
the browser dev server can run separately.
Run npm run electron:smoke to check the real desktop window, editor interaction,
local file save/load, native dialog bridge, settings persistence, and server
shutdown using a temporary profile. It needs a graphical desktop (or Xvfb on
Linux). Add -- --production to test an existing production build. These commands
run from source. Use npm run electron:package for an unsigned Apple Silicon app, DMG and ZIP (--sign signs and notarises it; on Windows it makes the installer), and npm run electron:acceptance for packaged crash/recovery checks. See the desktop guide for installation, encrypted credentials, recovery and how releases are cut. ComfyUI remains a separately installed or remote service.
For macOS title-bar changes, also run
npm run electron:smoke -- --production --native-input after building. This uses
cliclick (installed separately) with macOS Accessibility permission to test real
mouse hover, clicks, and window dragging; browser automation alone bypasses the
native draggable-region hit testing. It brings the test window to the front and
moves the mouse, so let it finish before interacting with the desktop.
Create a .env.local file in the root directory:
GEMINI_API_KEY=your_gemini_api_key          # Required for prompt-to-workflow
OPENAI_API_KEY=your_openai_api_key          # Optional
ANTHROPIC_API_KEY=your_anthropic_api_key    # Optional
REPLICATE_API_KEY=your_replicate_api_key    # Optional
FAL_API_KEY=your_fal_api_key                # Optional
KIE_API_KEY=your_kie_api_key                # Optional
WAVESPEED_API_KEY=your_wavespeed_api_key    # Optional
COMFY_API_KEY=your_comfy_api_key            # Optional, ComfyUI-hosted models via Comfy Router
API keys can also be entered in the app (Settings → Providers), which is the usual way — the environment variables are for headless or shared deployments.
Drop any ComfyUI workflow onto the canvas and it becomes a node. Shift + C
adds an empty ComfyUI node and opens the same dialog to pick a workflow for it.
If the workflow was set up as an app in ComfyUI — using App Mode to pick
its inputs and outputs — those selections become the node's handles and
settings directly; otherwise Node Banana detects them and asks you to confirm.
The Blueprints tab lists the ready-made pipelines your ComfyUI already
ships, so there is nothing to upload at all.
Choose where they run in Settings → ComfyUI:
http://127.0.0.1:8188. It needs the
models and custom nodes the workflow uses.API keys can also be configured in Project Settings within the app.
npm run build
npm run start
The /examples directory contains example workflow files. To try them:
npm run dev.json file from the /examples folder into the browser window| Type | Purpose |
|---|---|
| Image Input | Load or upload reference images |
| Audio Input | Load or upload audio files |
| Prompt | Text prompt input |
| Prompt Constructor | Build dynamic prompts with variables and LLM-powered text construction |
| Array | Batch process multiple inputs through a workflow |
| Generate | AI image generation (multi-provider) |
| Generate Video | AI video generation |
| Generate Audio | Text-to-speech and AI audio generation |
| Generate 3D | AI 3D model generation |
| LLM | AI text generation (Gemini, OpenAI, Anthropic) |
| Annotation | Draw on images with full-screen editor |
| Split Grid | Split image into grid cells |
| Video Stitch | Combine video clips into a single output |
| Video Trim | Trim video clips to a specific range |
| Video Frame Grab | Extract frames from video |
| Image Compare | Side-by-side image comparison |
| Ease Curve | Define easing curves for parameter interpolation |
| Router | Route data to different branches |
| Switch | Toggle between execution paths |
| Conditional Switch | Route data based on conditions |
| GLB Viewer | Load and display 3D GLB models |
| Output | Display final result |
| Output Gallery | Display multiple results in a gallery |
npm test              # Watch mode
npm run test:run      # Single run
npm run test:coverage # With coverage report
npm run electron:test # The desktop shell's own tests
npm run lint          # ESLint (Next.js rules)
npm run typecheck     # Type-check the app without its tests
PRs are welcome! Fork the repo, branch from develop, and open a PR back to develop.
This is primarily built for my own workflows — if a PR conflicts with my plans I'll politely decline. For larger contributions, join the Discord to coordinate first.
MIT
163 followers · starred Apr 2026
740 followers · starred Mar 2026
72 followers · starred Mar 2026
82 followers · starred Jan 2026



