Using CV models: VGGT-Sonata pipeline for zero-shot robotics spatial navigation
Python
13
87 commits
updated Sep 10, 2025
Using CV models: VGGT-Sonata pipeline for zero-shot robotics spatial navigation
Reconstructing a 3D scene by scanning the environment is applicable in robotics simulation, and potentially enables zero-shot navigation. VGGT: Visual Geometry Grounded Transformer achieves this by predicting scene depth directly from RGB images—without requiring known camera parameters, in a faster and inexpensive way than traditional methods like DUSt3R.
This repository proposes a pipeline that enables 3D scene reconstruction from one single image or a video, with a simple RBG camera predict object depth, and achieve semantic segmentation of objects in the scene. It does this by running VGGT model inference, and feeds the output into Sonata which does the segmentation. Then in the repository, we use Lekiwi robot from LeRobot Hugging Face to autonomously have lekiwi navigate to any given target object.
This pipeline effectively works on another robots with either cartesian coordinate system, or like lekiwi with planar coordinate system with polar orientation. However, to operate on Cartesian system, some code modification needs to be carried out.
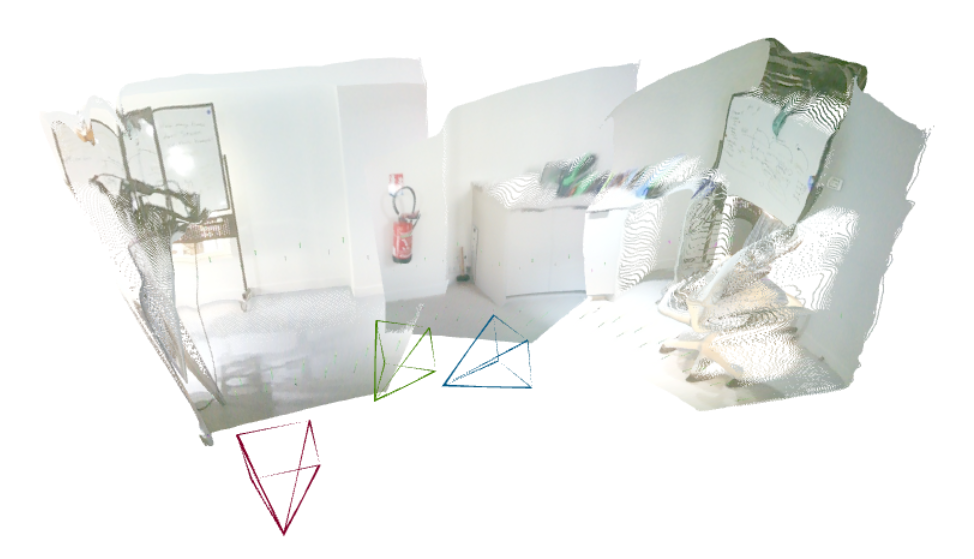
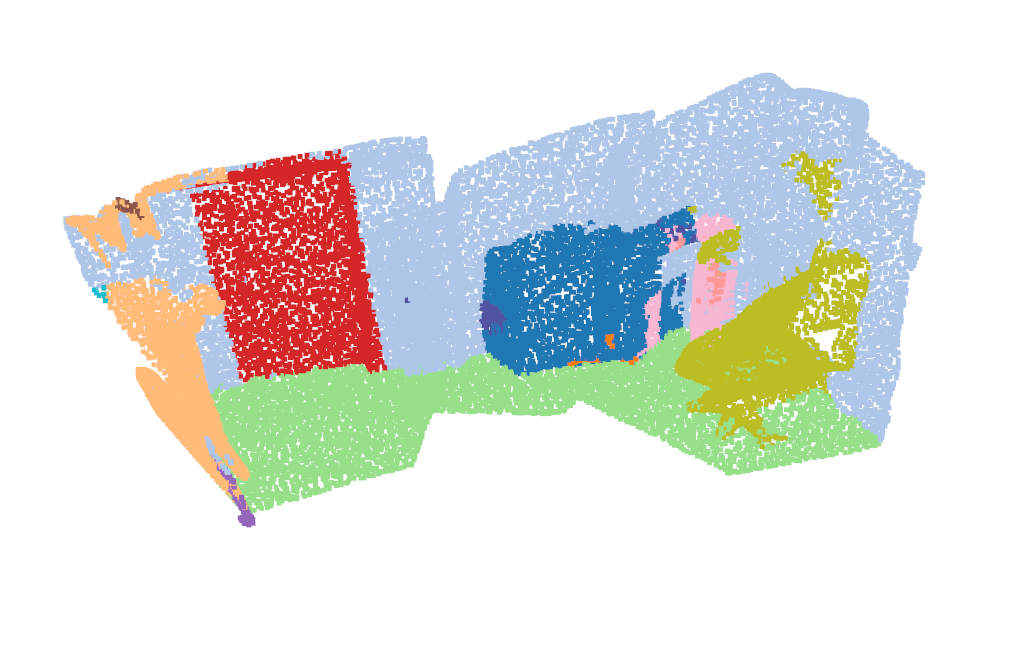
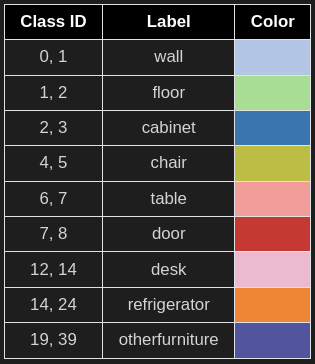
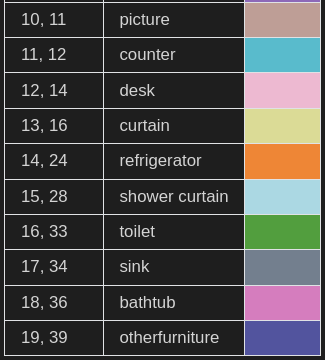
The pipeline reconstructs indoor scene taken from lekiwi's camera with clear segmentation of different furnitures, which are labeled in legend.html. Lekiwi then receives inference result and travels to the right object with accurate distance, all in zero shot.
 |  |
 |  |
Clone this repository to local by running:
git clone https://github.com/yyypsycheguy/VGGT-Sontata.git
cd VGGT-Sonata
Before running the pipeline, remember to set up dependencies for VGGT and Sonata, as well as lerobot. For now, we are just setting up virtual environments and installing packages. The repository is separated into three parts: VGGT, Sonata and lerobot, respectively have their own environments and dependencies. More detailed installation guide for trouble shooting can be found in their original repositories, but it is enough by following the commands down below for running the pipeline.
cd vggt
uv venv .venv
source .venv/bin/activate
uv pip install -r requirements.txt
uv pip install -r requirements_demo.txt

# Install a package in the new virtual environment if needed
uv pip install ruff
Also create an image folder for later use:
cd vggt
mkdir images
Moving on to setup Sonata. From root directory:
cd sonata
uv venv sonata-venv
source sonata-venv/bin/activate

# Ensure Cuda and Pytorch are already installed in your local environment

# CUDA_VERSION: cuda version of local environment (e.g., 124), check by running:
nvcc --version

# TORCH_VERSION: torch version of local environment (e.g., 2.5.0), check by running:
python -c "import torch; print(torch.__version__)"

# For Linux
# Replace ${} with version you are using
uv pip install spconv-cu${CUDA_VERSION}
# For MacOS
# Please checkout https://github.com/haixuantao/spconv

# For Linux
uv pip install torch-scatter -f https://data.pyg.org/whl/torch-{TORCH_VERSION}+cu${CUDA_VERSION}.html

# For MacOS
uv pip install torch_scatter --no-build-isolation

# install flash attention
uv pip install torch psutil packaging ninja
uv pip install git+https://github.com/Dao-AILab/flash-attention.git --no-build-isolation # Skip for MacOS
uv pip install huggingface_hub timm

# (optional, or directly copy the sonata folder to your project)
uv python setup.py install

uv pip install open3d fast_pytorch_kmeans psutil numpy==1.26.4  # currently, open3d does not support numpy 2.x
Please refer to original Sonata repository for trouble shooting.
If first time setting up lekiwi please refer to Hugging Face Lerobot installation guide first for details. Lekiwi works by having a leader arm guiding the motions of the follower arm with mobile base. On your laptop, you have to first SSH into the Raspberry Pi on the follower arm mobile base, as well as connect the laptop to the leader arm to start teleoperating. We also need to teleoperate it, though the pipeline disregards actions received from the leader arm, because we would only need the follower arm to raise straight up, and travel spontaneously the distance infered by VGGT-Sonata.
To teleoperate and run spatial navigation of this repository, first ensure you have installed lerobot by either following the original guide or on your laptop: cd into lerobot directory and create a virtual environment with Python 3.10, using Miniconda
cd lerobot
conda create -y -n lerobot python=3.10
conda activate lerobot
When using miniconda, install ffmpeg in your environment:
conda install ffmpeg -c conda-forge
Then, install the library in editable mode. This is useful if you plan to contribute to the code.
pip install -e .
Lekiwi contains an SO100 arm (follower arm) so for SO100/SO101/Moss install the Feetech SDK.
pip install -e ".[feetech]"
pip install -e ".[lekiwi]"
Now you have lerobot setup on your local machine, you have to do the same of the Raspberry Pi by repeating the same instructions as above. In addition if you need to setup the hardware, please refer to lewiki setup guide.
There are four main files that need to be executed in order respectively, clearly marked by each sections. Let's dive into each one, walk through how to execute them, and make sure some parameters are correct according to your own hardware.
First step is to collect images with le kiwi wrist camera, to store images for VGGT inference. Le Kiwi is designed to run by being teleoperated, which means it needs to be connected vis SSH as well as by running the teleoperate file locally. Therefore, we need to collect images by teleoperating it. Feel free to move it around, make sure you take pictures enough for inference.
Get into the directory containing the teleoperation file lerobot/examples/lekiwi/teleoperate_collect_images.py:
cd lerobot
conda activate lerobot
Make sure you have set the correct remote_ip that belongs to your Raspberry Pi, as well as port for example:
robot_config = LeKiwiClientConfig(remote_ip="172.18.134.136", id="my_lekiwi")
If you have questions on how to get the ip address and SSH into the Pi: connect it using ethernet cable for the first time: Get Wired IP (First Connection via ethernet)
ip addr
list connected devices to find your Pi’s IP:
arp -a
# or scan the subnet, replace the sample address with your pi's
nmap -sn 192.168.1.0/24
Inside the Pi: check its current ip:
hostname -I
This will show something like:
192.168.1.50 172.18.134.136
the first ip is ethernet, the second is the pi's via wifi. If Wi-Fi isn’t configured yet, do:
sudo nano /etc/wpa_supplicant/wpa_supplicant.conf
This opens the configuration file, add or modify with this format:
country=US # modify
ctrl_interface=DIR=/var/run/wpa_supplicant GROUP=netdev
update_config=1

network={
  ssid="YourWiFiName" # modify
  psk="YourWiFiPassword" # modify
}
Reboot the Pi to check its ip address through wifi:
sudo reboot
SSH back over ethernet (cable):
hostname - I
ip addr show wlan0
Now replace the ethernet ip with wirelss ip:
ssh [email protected] # modify into your pi's ip
Then on pi terminal run this command to prepare for teleoperation:
cd lerobot
conda activate lerobot

# start teleoperating
python -m lerobot.robots.lekiwi.lekiwi_host --robot.id=my_awesome_kiwi
At the same time on your laptop:
cd lerobot
conda activate lerobot

python examples/lekiwi/teleoperate_collect_images.py
You can modify the rate of image taking in the file:
busy_wait(max( 1.0/ FPS - interval, 0.0)) # modify FPS value, eg. FPS=1 takes 1 picture per second
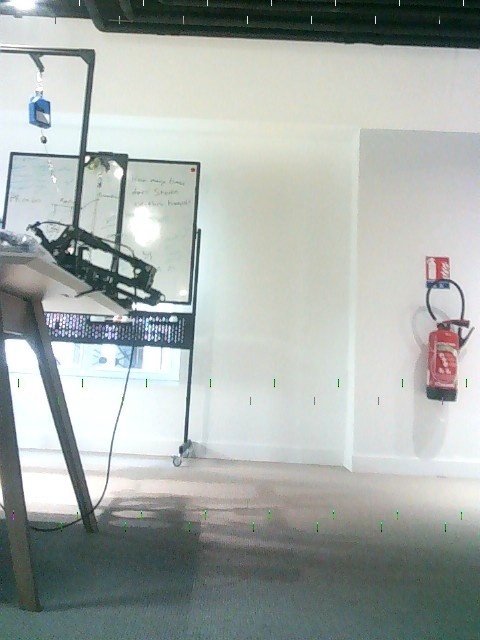
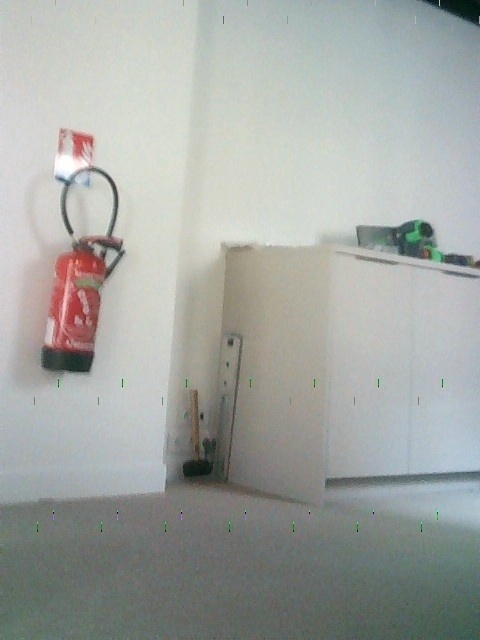
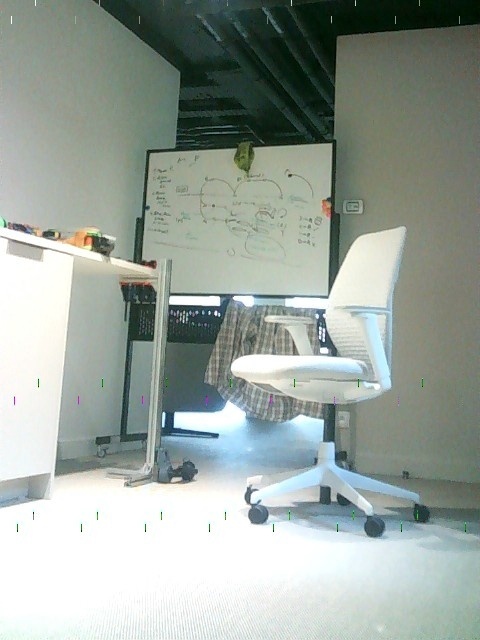
The images taken are stored in vggt/images directory. Beware to make sure the floor is in view of all images. For a 4090 GPU the maximum number of images that can run for inference is around 14 before encountering CUDA out of memory, depending on the resolution. For reference, 3 up to 14 images with overlapping objects in each, is enough to cover modelling of a corner of hallway.
 |  |  |
Often times, cameras are not well connected to the Raspberry Pi, so we need to reboot udev. On Linux, udev is the device manager daemon, and sometimes you might want to reload or restart it (for example, after adding new rules or if a device isn’t recognized). You have a few options depending on your system:
# Restart the udev daemon
sudo systemctl restart systemd-udevd

# Or reload rules without fully restarting the daemon
sudo udevadm control --reload-rules

# Trigger udev to reprocess devices
sudo udevadm trigger
VGGT inference is essential to construct the 3D point cloud predicted from your images. Its inference ouputs world points of which we then transform into input format needed for Sonata, the immediate step that follows.
cd vggt
source .venv/bin/activate
uv run vggt_inference.py
which takes images in vggt/images to run inference, then stores the predicted three pytorch tensor outputs:
vggt/predictions.ptpoint_cloud_img1.ptextrinsic.ptExtrinsics store the camera location and the direction of camera that is pointing, which is useful to track camera positions when each images are taken.
VGGT generates point cloud coordinates by taking the first image (index 0) as the origin of the axes. We make use of this property to allow Lekiwi to navigate from any location. By appending the last image to the first during inference, the model reconstructs the world coordinates relative to the new position, effectively resetting the reference point.
To visualise the point cloud run:
uv run vggt_visualisation.py
Sonata inference is responsible of sementic segementation of different objects in the scene. Recall in the demo sample point clouds representing floor is colored in green, wall is blue etc. The model is trained in indoor furniture dataset.
cd Sonata
source sonata-venv/bin/activate
uv run sonata_inference.py
Enables 3d point cloud segmentation by taking input from vggt_points.pt. You shall see the predicted categories in terminal output after running inference. The predictions is saved in dictionary format in sonata_points.pt.
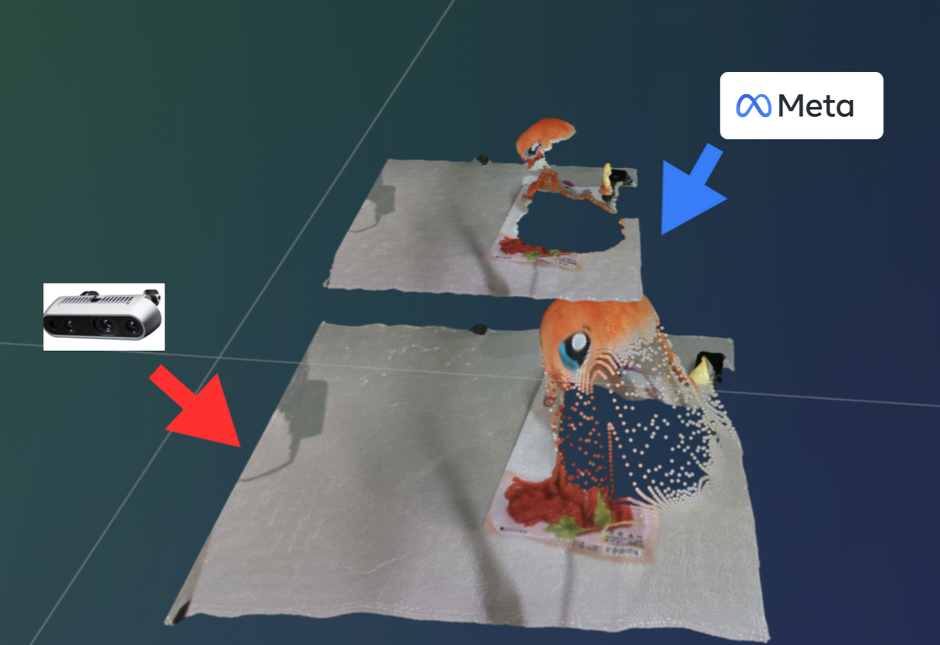
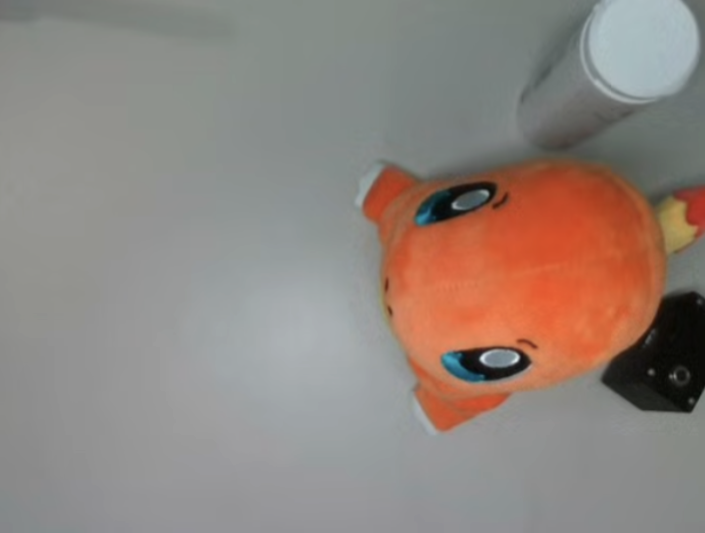
A drawback of VGGT point clouds is that their depth is normalised. The coordinate system is defined in regards to the first camera frame, different from the real world metric depth. This impacts robotic manipulation applications where true depth is required.
 | 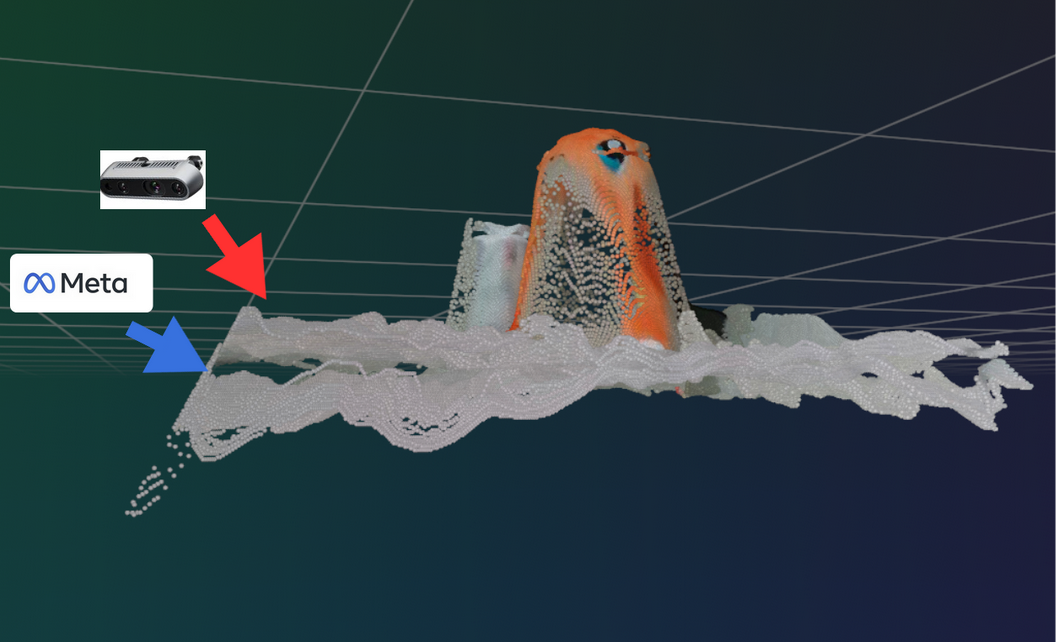 |  |
We need to compute a scale factor then denormalise our point cloud with it, to acheive a good estimation of depth.
To run scaling:
cd sonata
source sonata-venv/bin/activate
uv run compte_scale_factor.py
We obtain the scale factor by taking the minimum point of floor along the y-axis (pointing towards us) to camera saved in vggt/point_cloud_img1.pt(point cloud of first image in the series), divided by a known distance called camera distance that depending on your camera needs to be modified.
The computed scale factor is stored in sonata/share_var.py. This does not need to be ran every time, it is only necessary once each session.
Parameter modification:
If you are using other machines/robots from lekiwi to take input pictures, you have to modify this parameter at sonata/inference_visualize-sonata.py which is the Sonata inference file. You need to manually measure frame_distance:
frame_distance = 1.45 # no need to change if you are using lekiwi, using arm pose proposed by the pipeline
This is the distance from the camera to the point where the video frame first shows the ground. In other words, it’s how far away the ground appears in the video because the area immediately below the camera is “blind” to the view. For example:
You should measure the distance from where you are holding the camera to this part of the ground just visible in the picture.
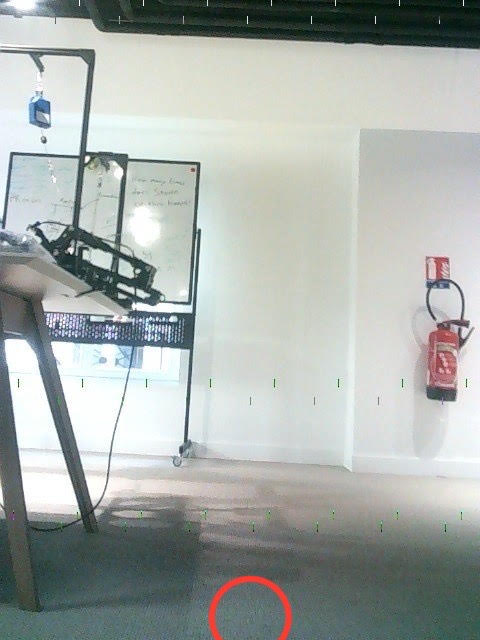
Why it matters: VGGT doesn't inherently know that the ground in the image is actually a certain distance away. To get accurate real-world measurements, we need to add this blind distance to the model’s output.
We also propose a functionality to view the camera trajectory with camera extrinsics. Extrinsics tell where the camera is (its position) and which way it’s facing (its orientation) relative to the world. Extrinsics store the camera location and the direction of camera that is pointing. When you have extrinsics for each frame, you can rebuild the camera’s path which is the trajectory.
It refers to robot translation in the pipeline. Run it with:
cd vggt
source .venv/bin/activate
uv run scale_extrinsic.py
It loads extrinsic.pt, the scaled result is stored in tensor extrinsic_scaled.pt. Extrinsic tracks camera position as a series of tensor:
t_extrinsic_scaled[0] column refers to x-axis (right)t_extrinsic_scaled[1] is y-axis (towards)t_extrinsic_scaled[2] is z-axis (up)
This will be plotted later for trajectory visualisation.Now scale factor is multiplied to the point cloud vggt_points.pt in script vggt/scale_pointcloud.py, as well as extrinsics.pt is also scaled.
To run it:
cd vggt

uv run scale_pointcloud.py
This script updates the two tensors into calibrated version regarding the real world distance. The result is saved in sonata/scaled_sonata_points.pt. We also store another copy of scaled floor point coordinates sonata/scaled_floor_coords.ptsegmented in the point cloud, for later use of visualisation.
To visualise the segmentation of the scaled point cloud, run:
cd Sonata
source sonata-venv/bin/activate
uv run sonata_visualise.py
It is observed that Sonata recognises the segements better after the point cloud is scaled.
We obtain a 3D point cloud with denormalized scale -- same as real world distance. Now, we are able to select the coordinates of our target object. The inputs are sonata/scaled_sonata_points.pt and sonata/name.pt that stores the object category name of each point.
Modify the furniture you would like to track in the view of camera, and in the proposed categories of Sonata.
target = "chair"
Then run:
cd Sonata
source sonata-venv/bin/activate
uv run get_target_distance.py
You should see the target object coordinates in terminal output.
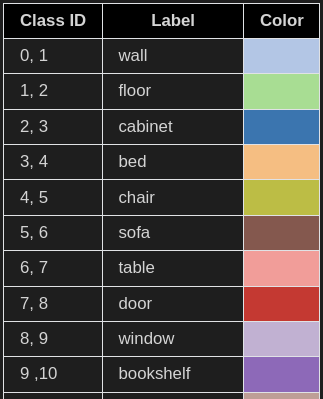
Categories proposed by Sonata are found in legend.html .
After scaling both the point cloud and camera extrinsics, we can visualize the navigation space in 2D. This allows us to confirm that the floor segmentation and the camera trajectory align properly in real-world coordinates.
The following script plots:
Run:
cd sonata
source sonata-venv/bin/activate
uv run construct_2Dmap.py
The output map is stored as 2Dmap_floor.pgn in the working directory.
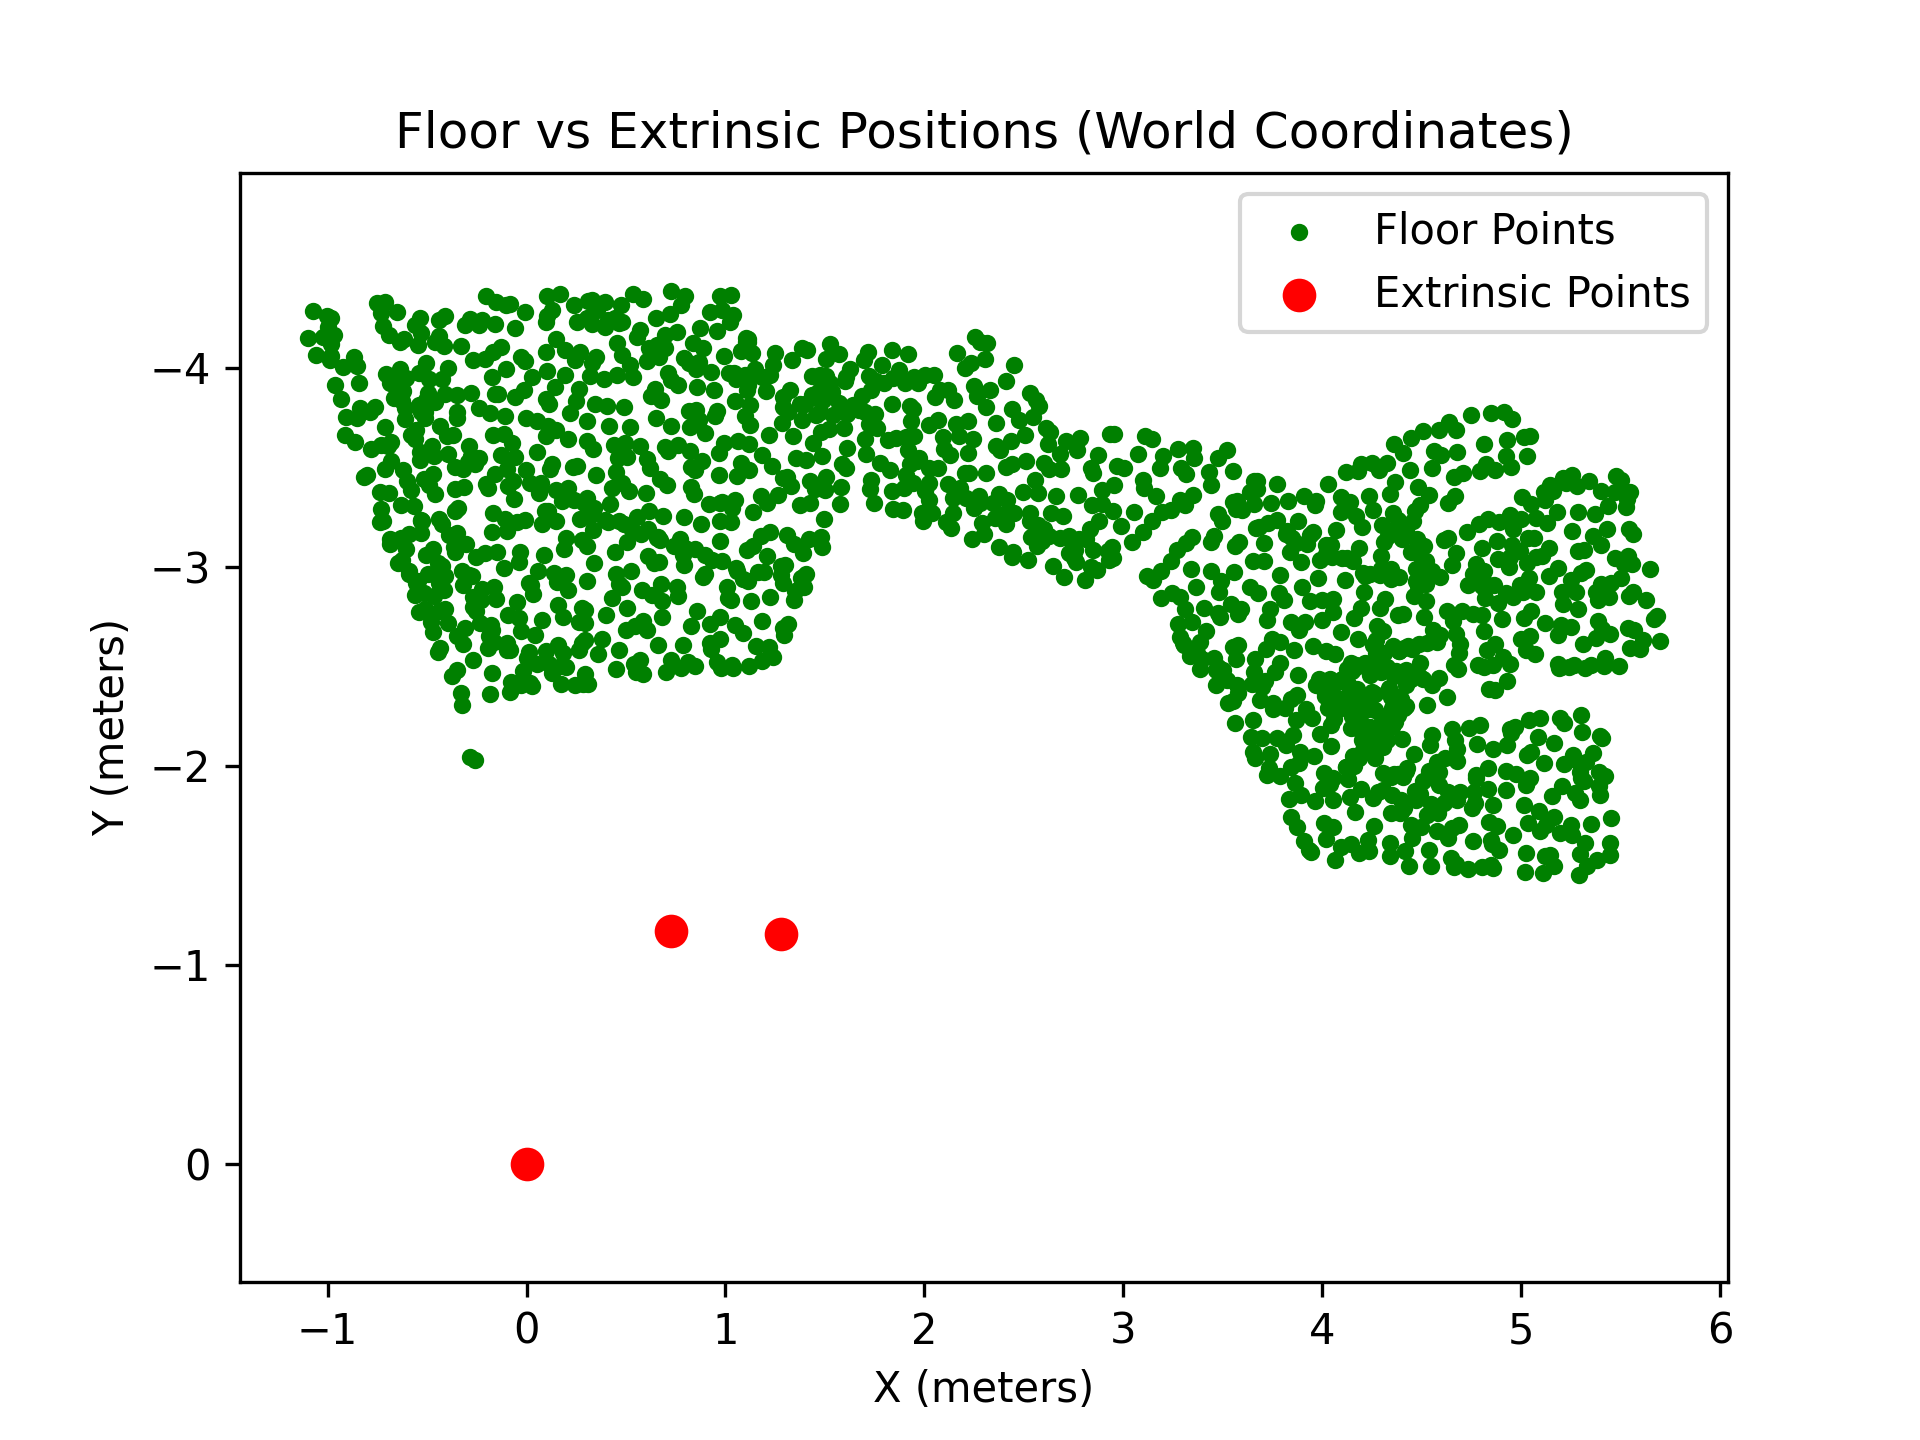
Our end goal is let le Kiwi travel to the target object predicted by the pipeline. Therefore, the last step it to have le Kiwi walk the target distance output by last inference of Sonata. The command to run this it is similar to previously: we need to SSH and run the same command as above on the Pi:
cd lerobot
conda activate lerobot

# start teleoperating
python -m lerobot.robots.lekiwi.lekiwi_host --robot.id=my_awesome_kiwi
As well as this on your laptop:
cd lerobot
conda activate lerobot

python examples/lekiwi/navigation.py
Le Kiwi does not travel in Cartesian coordinate system, the function
base_action, xy_speed, theta_speed, x_duration, y_duration, theta_duration = robot._from_keyboard_to_base_action_vggt(
    pressed_keys=keyboard_keys,
    dis_y=distance_y,
    dis_x=distance_x
)
takes in distance output from VGGT-Sonata, converts it into forward distance and rotate 90 degrees to complete distance in y direction Duration of each movement iteration is recorded and reduced from total duration, so when the required distance is completed on time.
The above is a proposed way to run infereces, scaling and getting target separately. However, in order to first compare real world distance with VGGT prediction for scale factor, there is a specific order of executing the files. Therefore, we propose a script to run this in a clean and simple manner in bash:
# add script into your executable
chmod +x bash-command.sh

# run
./bash-command.sh
This runs inference with vggt & sonata, gets scale factor, runs VGGT inference again with scaling, then outputs the calibrated distance to target object.
Le Kiwi is designed to hold a rigid arm when taking pictures, due how the wrist camera is attached, and calibration od each arm the proposed arm pose in our code is not always precise. Therefore, if you would like to recollect arm pose think about running:
cd lerobot
conda activate lerobot

python examples/lekiwi/collect_arm_pose.py
which stores new arm pose log in actions.txt.
VGGT is sensitive towards light, any light patches or shadows in the scene may affect its inference.
Darker scenes have more distinctly shaped shadows from the front and panoramic scenes; whereas brighter scene have more ambiguity, resembling more a flat 2D scene, giving the RGB camera difficulties identifying depth. This is due to the nature of depth cameras, they rely on capturing how a known pattern deforms from their projected infrared light, so under intense exposure to infrared with higher light intensity, incoming beams can flood the camera infrared sensor, thus disturbing it.
In one of the experiment scenes, we covered up all windows, which proves to have largely improved inference quality.
Using CV models: VGGT-Sonata pipeline for zero-shot robotics spatial navigation
Python
13
87 commits
updated Sep 10, 2025
Using CV models: VGGT-Sonata pipeline for zero-shot robotics spatial navigation
Reconstructing a 3D scene by scanning the environment is applicable in robotics simulation, and potentially enables zero-shot navigation. VGGT: Visual Geometry Grounded Transformer achieves this by predicting scene depth directly from RGB images—without requiring known camera parameters, in a faster and inexpensive way than traditional methods like DUSt3R.
This repository proposes a pipeline that enables 3D scene reconstruction from one single image or a video, with a simple RBG camera predict object depth, and achieve semantic segmentation of objects in the scene. It does this by running VGGT model inference, and feeds the output into Sonata which does the segmentation. Then in the repository, we use Lekiwi robot from LeRobot Hugging Face to autonomously have lekiwi navigate to any given target object.
This pipeline effectively works on another robots with either cartesian coordinate system, or like lekiwi with planar coordinate system with polar orientation. However, to operate on Cartesian system, some code modification needs to be carried out.
The pipeline reconstructs indoor scene taken from lekiwi's camera with clear segmentation of different furnitures, which are labeled in legend.html. Lekiwi then receives inference result and travels to the right object with accurate distance, all in zero shot.
| |
| |
Clone this repository to local by running:
git clone https://github.com/yyypsycheguy/VGGT-Sontata.git
cd VGGT-Sonata
Before running the pipeline, remember to set up dependencies for VGGT and Sonata, as well as lerobot. For now, we are just setting up virtual environments and installing packages. The repository is separated into three parts: VGGT, Sonata and lerobot, respectively have their own environments and dependencies. More detailed installation guide for trouble shooting can be found in their original repositories, but it is enough by following the commands down below for running the pipeline.
cd vggt
uv venv .venv
source .venv/bin/activate
uv pip install -r requirements.txt
uv pip install -r requirements_demo.txt

# Install a package in the new virtual environment if needed
uv pip install ruff
Also create an image folder for later use:
cd vggt
mkdir images
Moving on to setup Sonata. From root directory:
cd sonata
uv venv sonata-venv
source sonata-venv/bin/activate

# Ensure Cuda and Pytorch are already installed in your local environment

# CUDA_VERSION: cuda version of local environment (e.g., 124), check by running:
nvcc --version

# TORCH_VERSION: torch version of local environment (e.g., 2.5.0), check by running:
python -c "import torch; print(torch.__version__)"

# For Linux
# Replace ${} with version you are using
uv pip install spconv-cu${CUDA_VERSION}
# For MacOS
# Please checkout https://github.com/haixuantao/spconv

# For Linux
uv pip install torch-scatter -f https://data.pyg.org/whl/torch-{TORCH_VERSION}+cu${CUDA_VERSION}.html

# For MacOS
uv pip install torch_scatter --no-build-isolation

# install flash attention
uv pip install torch psutil packaging ninja
uv pip install git+https://github.com/Dao-AILab/flash-attention.git --no-build-isolation # Skip for MacOS
uv pip install huggingface_hub timm

# (optional, or directly copy the sonata folder to your project)
uv python setup.py install

uv pip install open3d fast_pytorch_kmeans psutil numpy==1.26.4  # currently, open3d does not support numpy 2.x
Please refer to original Sonata repository for trouble shooting.
If first time setting up lekiwi please refer to Hugging Face Lerobot installation guide first for details. Lekiwi works by having a leader arm guiding the motions of the follower arm with mobile base. On your laptop, you have to first SSH into the Raspberry Pi on the follower arm mobile base, as well as connect the laptop to the leader arm to start teleoperating. We also need to teleoperate it, though the pipeline disregards actions received from the leader arm, because we would only need the follower arm to raise straight up, and travel spontaneously the distance infered by VGGT-Sonata.
To teleoperate and run spatial navigation of this repository, first ensure you have installed lerobot by either following the original guide or on your laptop: cd into lerobot directory and create a virtual environment with Python 3.10, using Miniconda
cd lerobot
conda create -y -n lerobot python=3.10
conda activate lerobot
When using miniconda, install ffmpeg in your environment:
conda install ffmpeg -c conda-forge
Then, install the library in editable mode. This is useful if you plan to contribute to the code.
pip install -e .
Lekiwi contains an SO100 arm (follower arm) so for SO100/SO101/Moss install the Feetech SDK.
pip install -e ".[feetech]"
pip install -e ".[lekiwi]"
Now you have lerobot setup on your local machine, you have to do the same of the Raspberry Pi by repeating the same instructions as above. In addition if you need to setup the hardware, please refer to lewiki setup guide.
There are four main files that need to be executed in order respectively, clearly marked by each sections. Let's dive into each one, walk through how to execute them, and make sure some parameters are correct according to your own hardware.
First step is to collect images with le kiwi wrist camera, to store images for VGGT inference. Le Kiwi is designed to run by being teleoperated, which means it needs to be connected vis SSH as well as by running the teleoperate file locally. Therefore, we need to collect images by teleoperating it. Feel free to move it around, make sure you take pictures enough for inference.
Get into the directory containing the teleoperation file lerobot/examples/lekiwi/teleoperate_collect_images.py:
cd lerobot
conda activate lerobot
Make sure you have set the correct remote_ip that belongs to your Raspberry Pi, as well as port for example:
robot_config = LeKiwiClientConfig(remote_ip="172.18.134.136", id="my_lekiwi")
If you have questions on how to get the ip address and SSH into the Pi: connect it using ethernet cable for the first time: Get Wired IP (First Connection via ethernet)
ip addr
list connected devices to find your Pi’s IP:
arp -a
# or scan the subnet, replace the sample address with your pi's
nmap -sn 192.168.1.0/24
Inside the Pi: check its current ip:
hostname -I
This will show something like:
192.168.1.50 172.18.134.136
the first ip is ethernet, the second is the pi's via wifi. If Wi-Fi isn’t configured yet, do:
sudo nano /etc/wpa_supplicant/wpa_supplicant.conf
This opens the configuration file, add or modify with this format:
country=US # modify
ctrl_interface=DIR=/var/run/wpa_supplicant GROUP=netdev
update_config=1

network={
  ssid="YourWiFiName" # modify
  psk="YourWiFiPassword" # modify
}
Reboot the Pi to check its ip address through wifi:
sudo reboot
SSH back over ethernet (cable):
hostname - I
ip addr show wlan0
Now replace the ethernet ip with wirelss ip:
ssh [email protected] # modify into your pi's ip
Then on pi terminal run this command to prepare for teleoperation:
cd lerobot
conda activate lerobot

# start teleoperating
python -m lerobot.robots.lekiwi.lekiwi_host --robot.id=my_awesome_kiwi
At the same time on your laptop:
cd lerobot
conda activate lerobot

python examples/lekiwi/teleoperate_collect_images.py
You can modify the rate of image taking in the file:
busy_wait(max( 1.0/ FPS - interval, 0.0)) # modify FPS value, eg. FPS=1 takes 1 picture per second
The images taken are stored in vggt/images directory. Beware to make sure the floor is in view of all images. For a 4090 GPU the maximum number of images that can run for inference is around 14 before encountering CUDA out of memory, depending on the resolution. For reference, 3 up to 14 images with overlapping objects in each, is enough to cover modelling of a corner of hallway.
| | |
Often times, cameras are not well connected to the Raspberry Pi, so we need to reboot udev. On Linux, udev is the device manager daemon, and sometimes you might want to reload or restart it (for example, after adding new rules or if a device isn’t recognized). You have a few options depending on your system:
# Restart the udev daemon
sudo systemctl restart systemd-udevd

# Or reload rules without fully restarting the daemon
sudo udevadm control --reload-rules

# Trigger udev to reprocess devices
sudo udevadm trigger
VGGT inference is essential to construct the 3D point cloud predicted from your images. Its inference ouputs world points of which we then transform into input format needed for Sonata, the immediate step that follows.
cd vggt
source .venv/bin/activate
uv run vggt_inference.py
which takes images in vggt/images to run inference, then stores the predicted three pytorch tensor outputs:
vggt/predictions.ptpoint_cloud_img1.ptextrinsic.ptExtrinsics store the camera location and the direction of camera that is pointing, which is useful to track camera positions when each images are taken.
VGGT generates point cloud coordinates by taking the first image (index 0) as the origin of the axes. We make use of this property to allow Lekiwi to navigate from any location. By appending the last image to the first during inference, the model reconstructs the world coordinates relative to the new position, effectively resetting the reference point.
To visualise the point cloud run:
uv run vggt_visualisation.py
Sonata inference is responsible of sementic segementation of different objects in the scene. Recall in the demo sample point clouds representing floor is colored in green, wall is blue etc. The model is trained in indoor furniture dataset.
cd Sonata
source sonata-venv/bin/activate
uv run sonata_inference.py
Enables 3d point cloud segmentation by taking input from vggt_points.pt. You shall see the predicted categories in terminal output after running inference. The predictions is saved in dictionary format in sonata_points.pt.
A drawback of VGGT point clouds is that their depth is normalised. The coordinate system is defined in regards to the first camera frame, different from the real world metric depth. This impacts robotic manipulation applications where true depth is required.
| | |
We need to compute a scale factor then denormalise our point cloud with it, to acheive a good estimation of depth.
To run scaling:
cd sonata
source sonata-venv/bin/activate
uv run compte_scale_factor.py
We obtain the scale factor by taking the minimum point of floor along the y-axis (pointing towards us) to camera saved in vggt/point_cloud_img1.pt(point cloud of first image in the series), divided by a known distance called camera distance that depending on your camera needs to be modified.
The computed scale factor is stored in sonata/share_var.py. This does not need to be ran every time, it is only necessary once each session.
Parameter modification:
If you are using other machines/robots from lekiwi to take input pictures, you have to modify this parameter at sonata/inference_visualize-sonata.py which is the Sonata inference file. You need to manually measure frame_distance:
frame_distance = 1.45 # no need to change if you are using lekiwi, using arm pose proposed by the pipeline
This is the distance from the camera to the point where the video frame first shows the ground. In other words, it’s how far away the ground appears in the video because the area immediately below the camera is “blind” to the view. For example:
You should measure the distance from where you are holding the camera to this part of the ground just visible in the picture.
Why it matters: VGGT doesn't inherently know that the ground in the image is actually a certain distance away. To get accurate real-world measurements, we need to add this blind distance to the model’s output.
We also propose a functionality to view the camera trajectory with camera extrinsics. Extrinsics tell where the camera is (its position) and which way it’s facing (its orientation) relative to the world. Extrinsics store the camera location and the direction of camera that is pointing. When you have extrinsics for each frame, you can rebuild the camera’s path which is the trajectory.
It refers to robot translation in the pipeline. Run it with:
cd vggt
source .venv/bin/activate
uv run scale_extrinsic.py
It loads extrinsic.pt, the scaled result is stored in tensor extrinsic_scaled.pt. Extrinsic tracks camera position as a series of tensor:
t_extrinsic_scaled[0] column refers to x-axis (right)t_extrinsic_scaled[1] is y-axis (towards)t_extrinsic_scaled[2] is z-axis (up)
This will be plotted later for trajectory visualisation.Now scale factor is multiplied to the point cloud vggt_points.pt in script vggt/scale_pointcloud.py, as well as extrinsics.pt is also scaled.
To run it:
cd vggt

uv run scale_pointcloud.py
This script updates the two tensors into calibrated version regarding the real world distance. The result is saved in sonata/scaled_sonata_points.pt. We also store another copy of scaled floor point coordinates sonata/scaled_floor_coords.ptsegmented in the point cloud, for later use of visualisation.
To visualise the segmentation of the scaled point cloud, run:
cd Sonata
source sonata-venv/bin/activate
uv run sonata_visualise.py
It is observed that Sonata recognises the segements better after the point cloud is scaled.
We obtain a 3D point cloud with denormalized scale -- same as real world distance. Now, we are able to select the coordinates of our target object. The inputs are sonata/scaled_sonata_points.pt and sonata/name.pt that stores the object category name of each point.
Modify the furniture you would like to track in the view of camera, and in the proposed categories of Sonata.
target = "chair"
Then run:
cd Sonata
source sonata-venv/bin/activate
uv run get_target_distance.py
You should see the target object coordinates in terminal output.
Categories proposed by Sonata are found in legend.html .
After scaling both the point cloud and camera extrinsics, we can visualize the navigation space in 2D. This allows us to confirm that the floor segmentation and the camera trajectory align properly in real-world coordinates.
The following script plots:
Run:
cd sonata
source sonata-venv/bin/activate
uv run construct_2Dmap.py
The output map is stored as 2Dmap_floor.pgn in the working directory.
Our end goal is let le Kiwi travel to the target object predicted by the pipeline. Therefore, the last step it to have le Kiwi walk the target distance output by last inference of Sonata. The command to run this it is similar to previously: we need to SSH and run the same command as above on the Pi:
cd lerobot
conda activate lerobot

# start teleoperating
python -m lerobot.robots.lekiwi.lekiwi_host --robot.id=my_awesome_kiwi
As well as this on your laptop:
cd lerobot
conda activate lerobot

python examples/lekiwi/navigation.py
Le Kiwi does not travel in Cartesian coordinate system, the function
base_action, xy_speed, theta_speed, x_duration, y_duration, theta_duration = robot._from_keyboard_to_base_action_vggt(
    pressed_keys=keyboard_keys,
    dis_y=distance_y,
    dis_x=distance_x
)
takes in distance output from VGGT-Sonata, converts it into forward distance and rotate 90 degrees to complete distance in y direction Duration of each movement iteration is recorded and reduced from total duration, so when the required distance is completed on time.
The above is a proposed way to run infereces, scaling and getting target separately. However, in order to first compare real world distance with VGGT prediction for scale factor, there is a specific order of executing the files. Therefore, we propose a script to run this in a clean and simple manner in bash:
# add script into your executable
chmod +x bash-command.sh

# run
./bash-command.sh
This runs inference with vggt & sonata, gets scale factor, runs VGGT inference again with scaling, then outputs the calibrated distance to target object.
Le Kiwi is designed to hold a rigid arm when taking pictures, due how the wrist camera is attached, and calibration od each arm the proposed arm pose in our code is not always precise. Therefore, if you would like to recollect arm pose think about running:
cd lerobot
conda activate lerobot

python examples/lekiwi/collect_arm_pose.py
which stores new arm pose log in actions.txt.
VGGT is sensitive towards light, any light patches or shadows in the scene may affect its inference.
Darker scenes have more distinctly shaped shadows from the front and panoramic scenes; whereas brighter scene have more ambiguity, resembling more a flat 2D scene, giving the RGB camera difficulties identifying depth. This is due to the nature of depth cameras, they rely on capturing how a known pattern deforms from their projected infrared light, so under intense exposure to infrared with higher light intensity, incoming beams can flood the camera infrared sensor, thus disturbing it.
In one of the experiment scenes, we covered up all windows, which proves to have largely improved inference quality.



