Restore Anything Pipeline (RAP): Segment Anything Meets Image Restoration
See the codeClick anything in a photo. Give it its own restoration model. Dial it in with a slider.






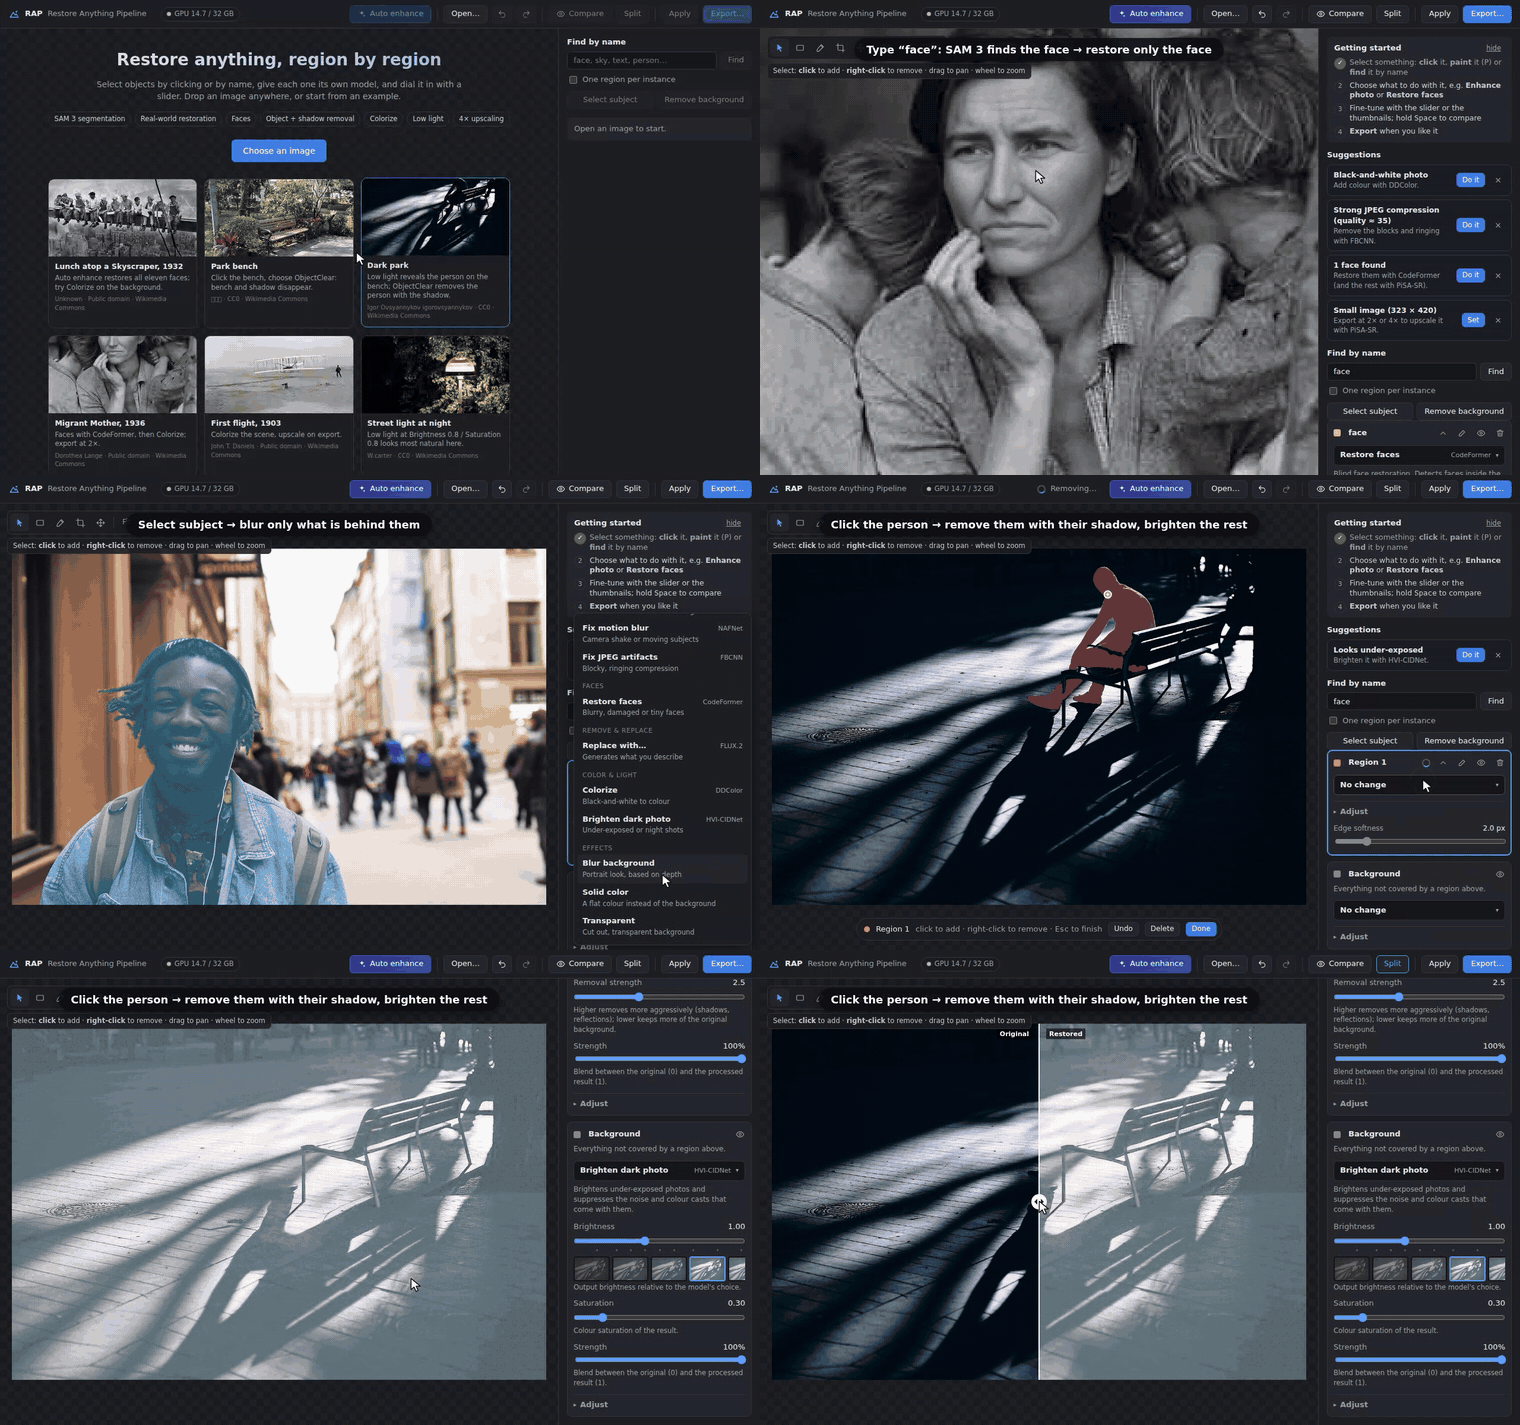
Select by name, as a subject or with a click, then give each region its own model: restore just the face, blur only what is behind the person, remove a person with their shadow. (Model waits are sped up in all demos.)
Most restoration tools treat a photo as one thing. Real photos are not: the face needs a face model, the sky is noisy, the sign is a JPEG mess, and the tourist in the back should go. The Restore Anything Pipeline (RAP) lets you select each part with SAM 3 and give it the right model, at the right strength, while you watch. It runs on your own GPU as a local web app.
This is the code for our RAP technical report (2023), rebuilt with current models and a full editing interface.
face, sky, text.The technical report paired Segment Anything with a controllable restoration model, so each object could get its own restoration, with several results to choose from. This release keeps that idea and builds it out:
face, sky), boxes, a brush and soft-edged subject mattes on top of clicks.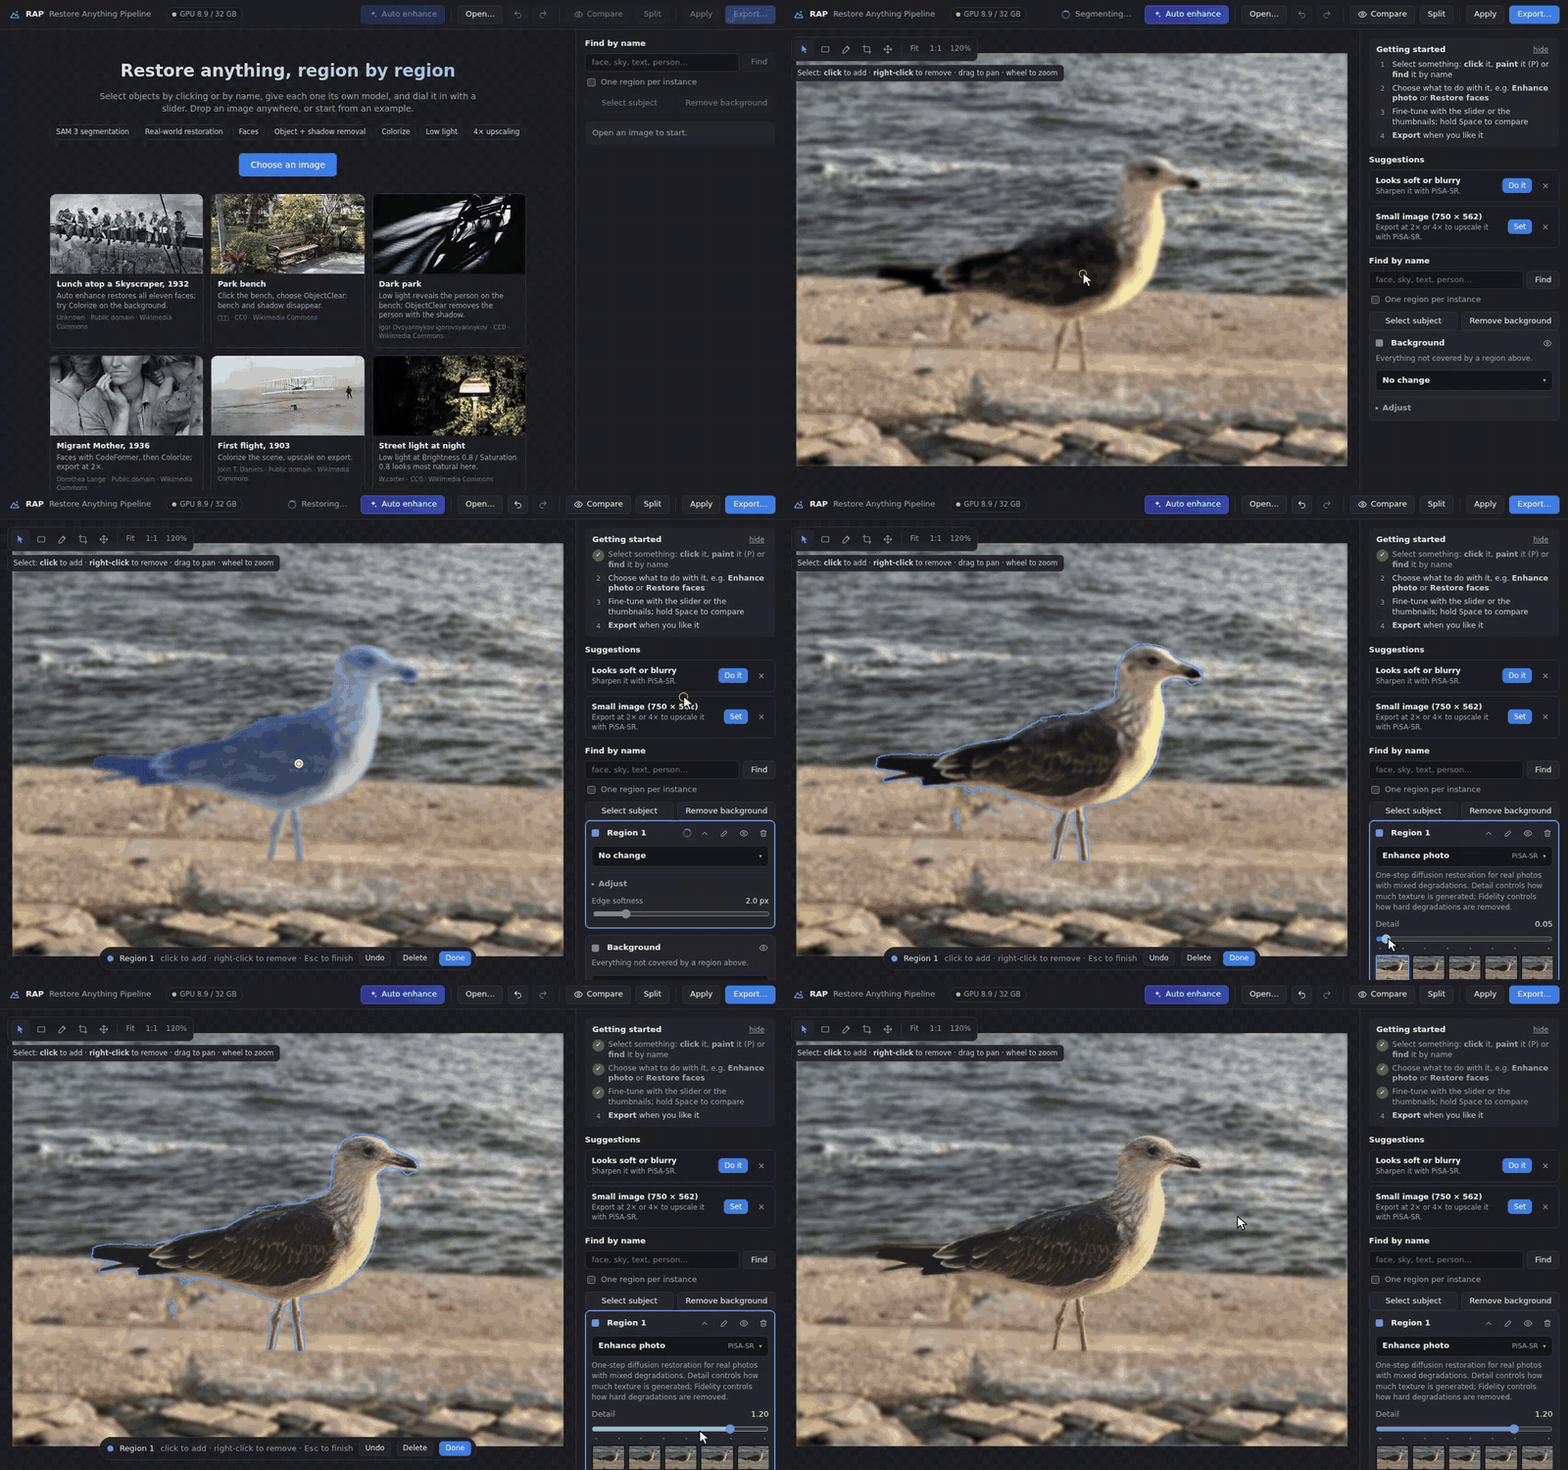
Click the bird, pick Enhance photo, and drag Detail. Hold Space to see the original.
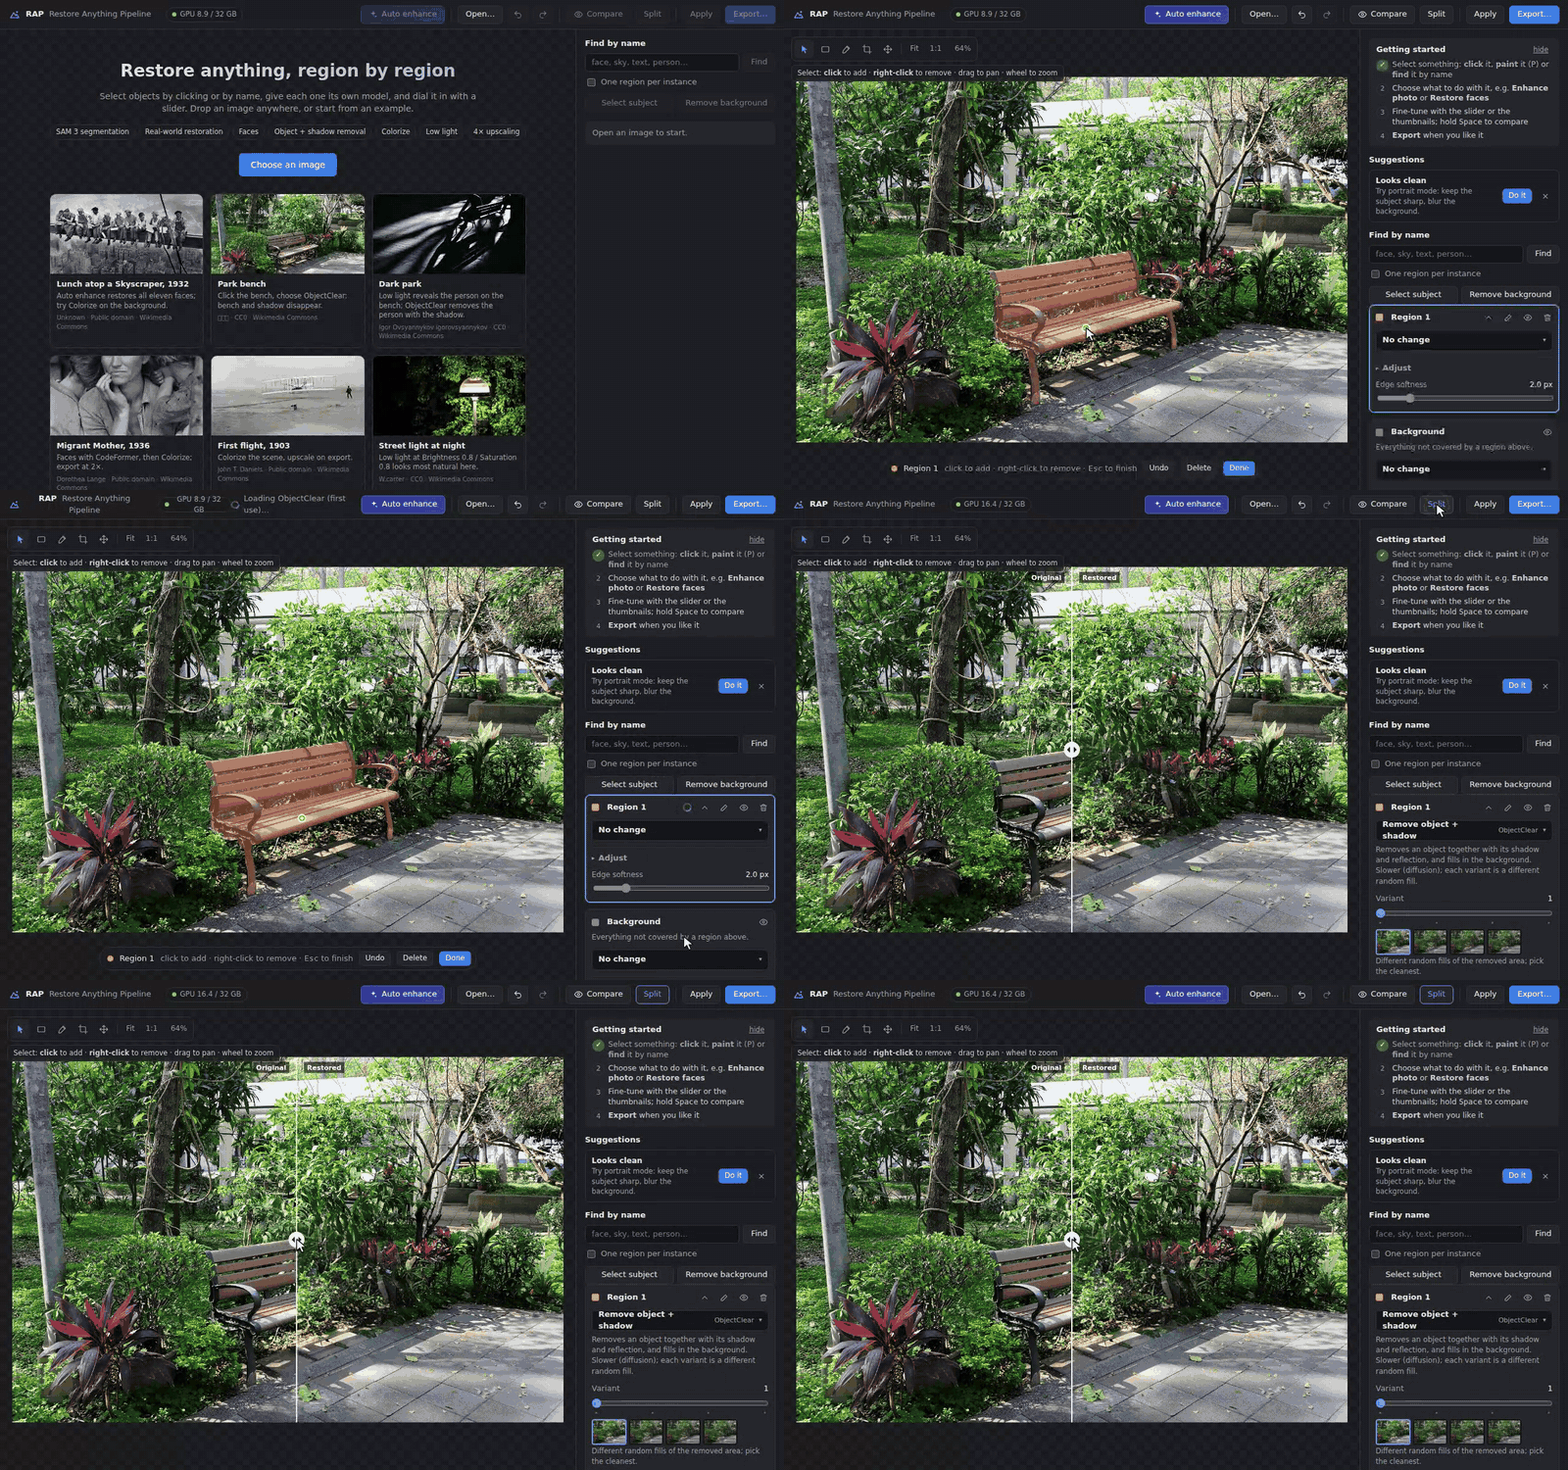
Click the bench and choose Remove object + shadow (ObjectClear). Its shadow goes too.
![Finding the sky by name and replacing it with a sunset using FLUX.2 [klein]](https://raw.githubusercontent.com/eth-siplab/RAP/0550ff39f08e97572457839f799c8fe368bcbfcc/docs/demos/find.gif)
Type sky, choose Replace with…, describe a sunset
(FLUX.2 [klein]),
then clean the noisy building with Remove noise
(SCUNet).
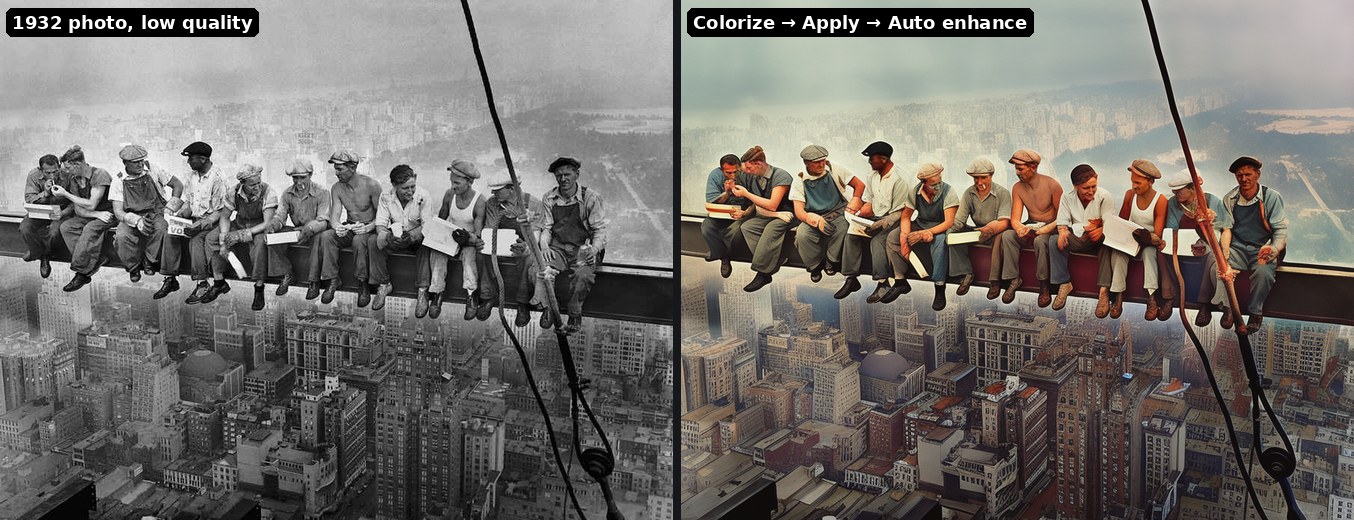 | 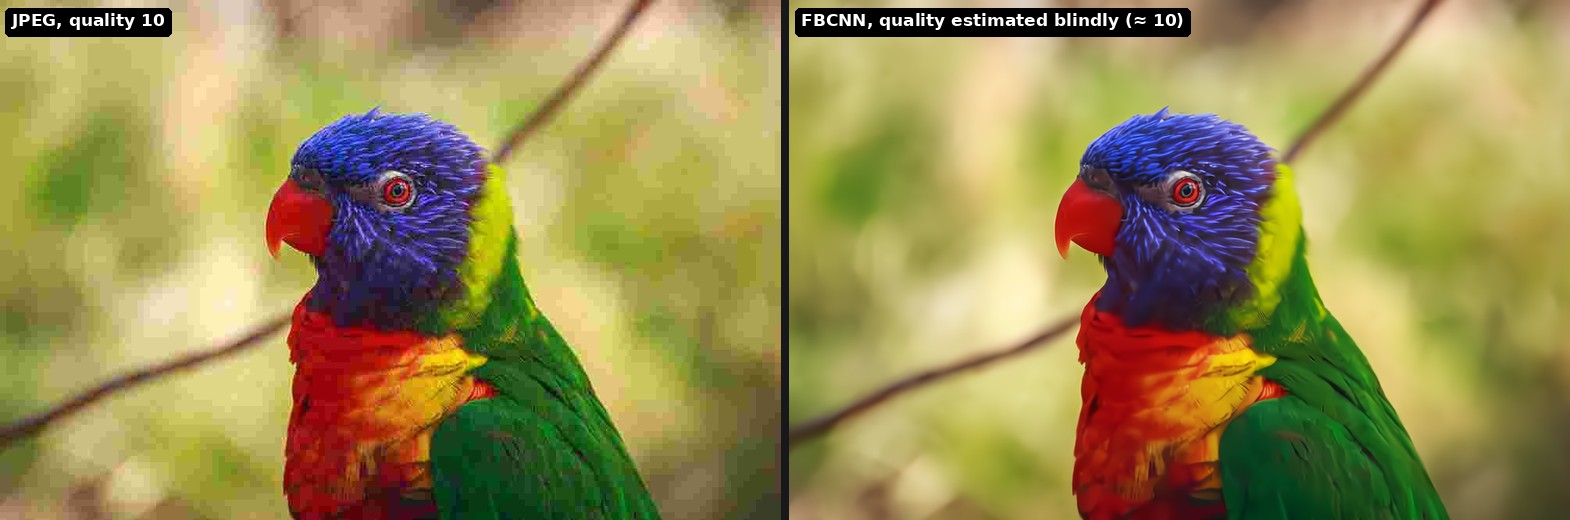 |
| Colorize, apply, then Auto enhance the faces | Heavy JPEG cleaned up; FBCNN finds the quality by itself |
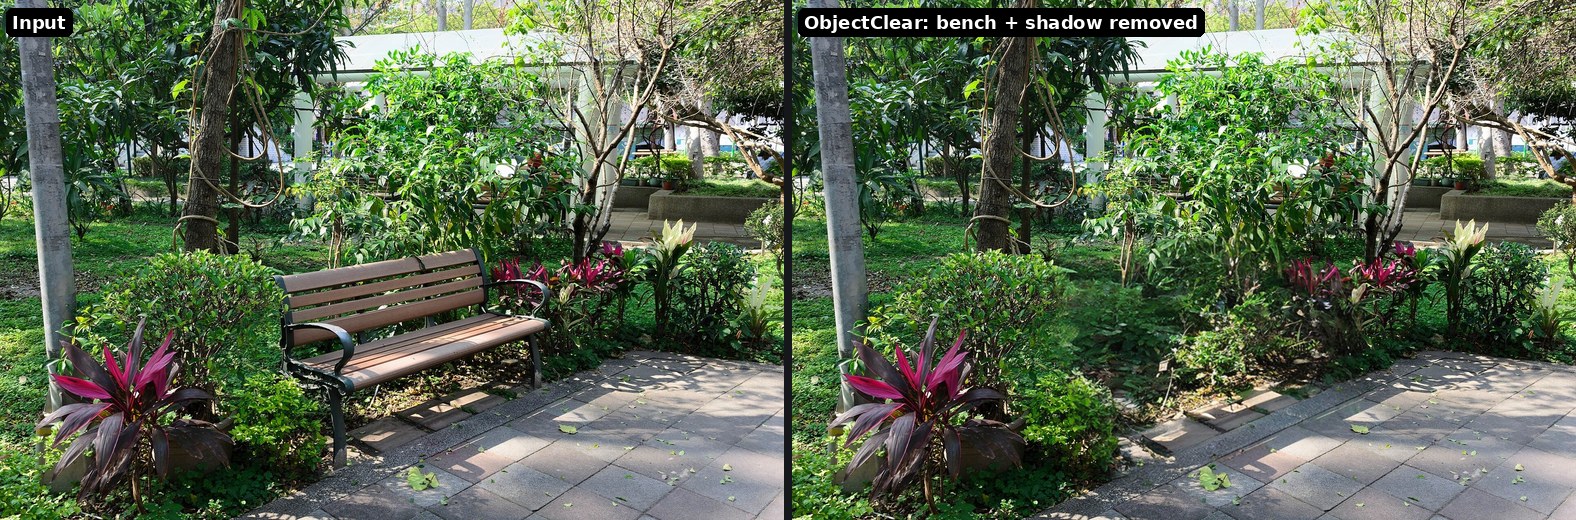 | 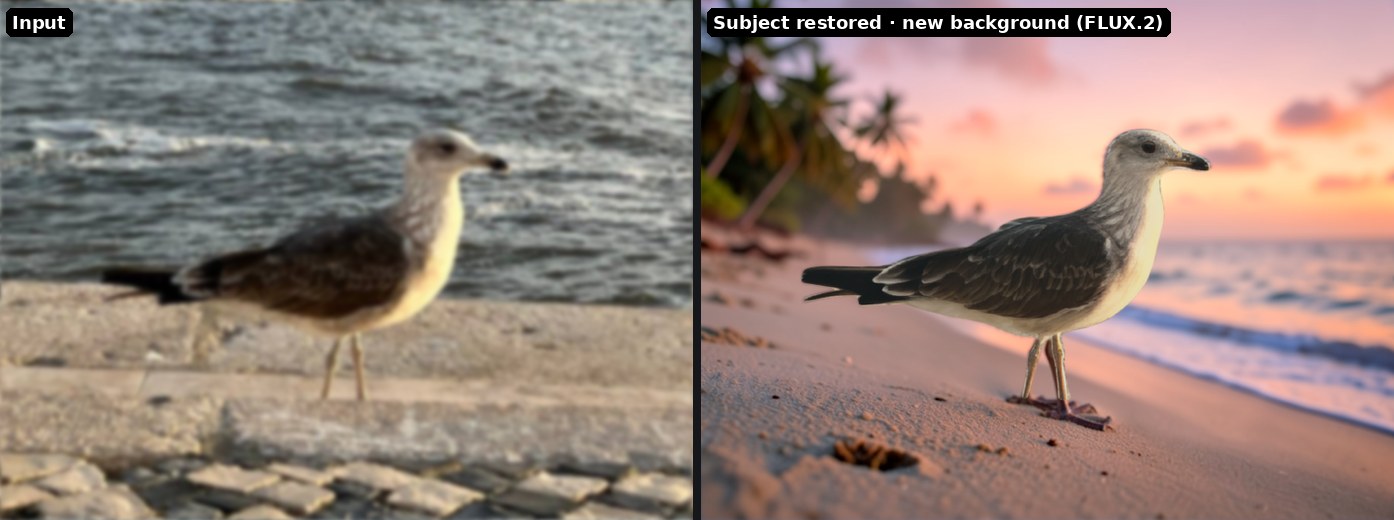 |
| A bench and its shadow removed | A new background from a prompt |
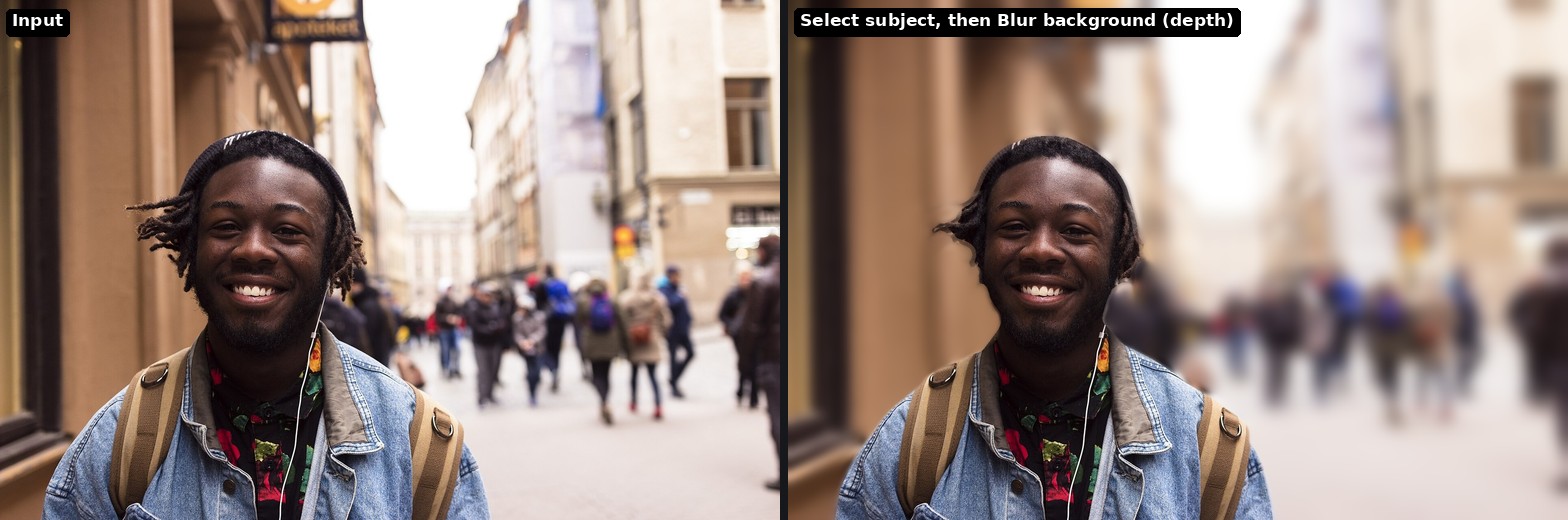 | 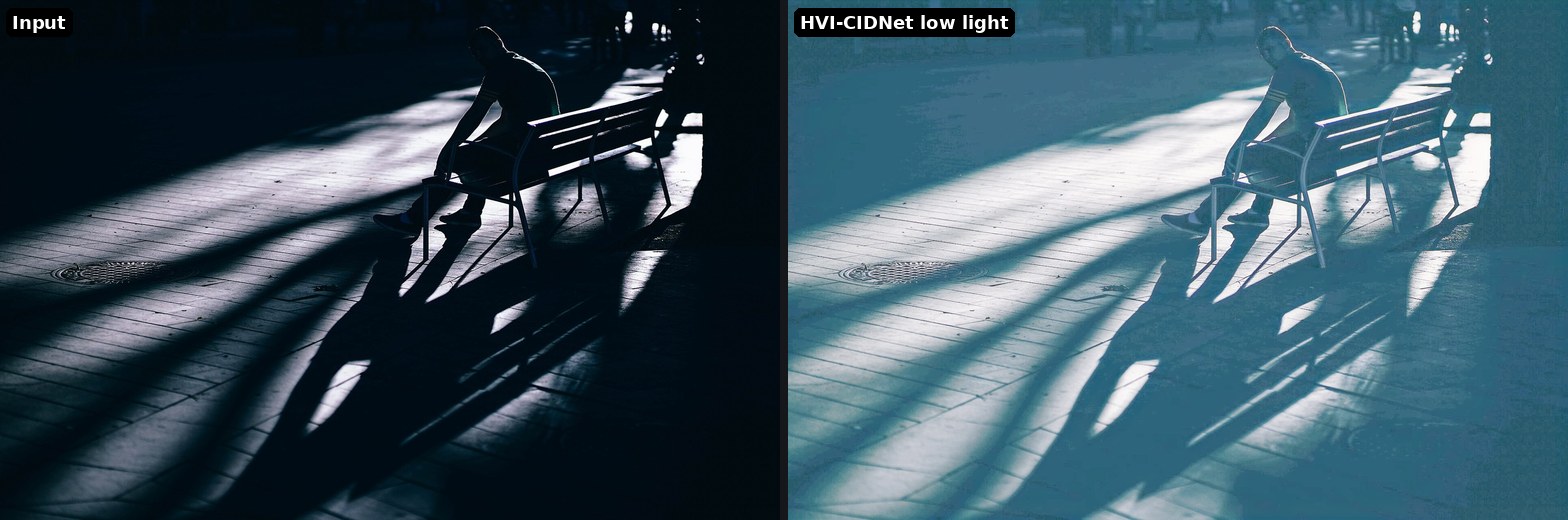 |
| Portrait look: background blurred by estimated depth | Night photo brightened |
1. Install (Linux with an NVIDIA GPU, conda):
git clone https://github.com/eth-siplab/RAP.git
cd RAP
bash scripts/setup.sh          # conda env "rap", third-party code at pinned commits, weights
hf auth login                  # SAM 3 checkpoints are gated on Hugging Face
Request access at https://huggingface.co/facebook/sam3 first. Some models are downloaded from Hugging Face the first time you use them:
sd2-community mirror; the Stability AI repository was taken down2. Run:
conda activate rap
python -m rap --gpu 0 --port 7860
3. Open http://localhost:7860. On a remote server, forward the port first:
ssh -N -L 7860:localhost:7860 <user>@<server>
Pick one of the example photos on the start page, or drop in your own.
Hardware. An NVIDIA GPU with 8 GB or more runs every feature.
| GPU memory | What changes |
|---|---|
| 8–12 GB | Models take turns on the GPU (a few seconds when switching). Generative fill streams its weights from CPU memory: four variants in about 10–20 s. |
| 16–24 GB | Most models stay loaded; switching is rarely needed. |
| 28 GB or more | Everything stays on the GPU, including generative fill. |
The app sizes itself to your GPU: by default about 60% of GPU memory holds
model weights (--gpu-budget), and models that don't fit wait in CPU memory,
capped at half of your RAM (32 GB of RAM recommended). If memory still runs
out, it moves other models out, works in smaller batches and retries instead
of failing. --max-gpu-memory limits the total on a shared GPU. The table was
measured on a server GPU limited to 8, 12, 16 and 24 GB with that option, where
the full test suite passes; a real consumer card has the same memory limits but
may be slower. 12-megapixel photos work.
Your work survives a restart. Sessions are saved to ~/.cache/rap/sessions
(--session-dir; empty keeps them in memory only), and reloading the page
brings yours back. --cpu-threads (default 8) caps OpenCV/torch CPU threads,
which matters on busy shared machines.
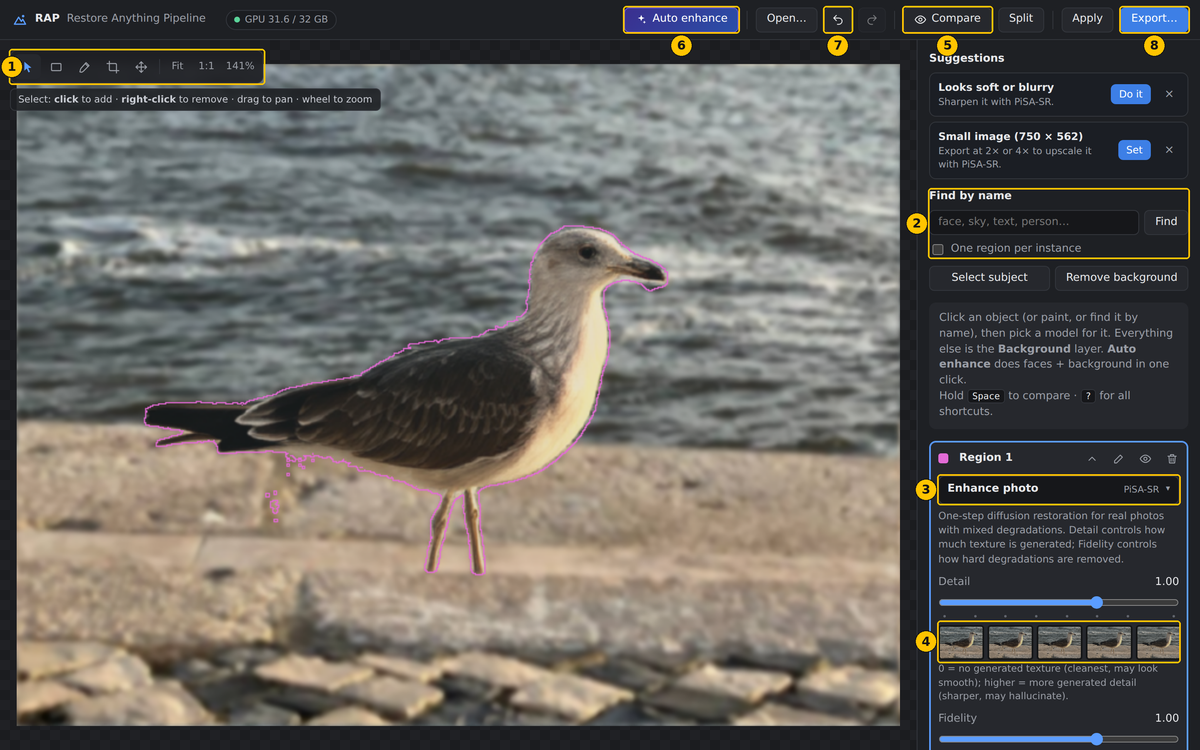
face, sky or text to select every match at once.Tips
| Key | Action |
|---|---|
| V | Select: click adds, right-click removes |
| B | Box select |
| P | Brush: paint adds, right-drag erases; [ ] change the size |
| C | Crop, rotate, straighten, flip (Enter applies) |
| H / middle-drag | Pan; the wheel zooms |
| F · 1 | Fit · actual pixels |
| hold Space | Compare with the original |
| Ctrl+Z / Ctrl+Shift+Z | Undo / redo |
| Enter / Esc | Finish the current selection |
| Delete | Delete the selected region |
| double-click a slider | Reset it |
| ? | All shortcuts, in the app |
Every model has continuous controls, and the main control is rendered in advance, so dragging it is instant.
| Model | For | Controls | License |
|---|---|---|---|
| PiSA-SR (CVPR 2025) | real photos with mixed degradations; 2×/4× export | Detail, Fidelity | Apache-2.0 |
| SCUNet (MIR 2023) | real noise: phones, high ISO, grainy scans | Texture (PSNR ↔ GAN model) | Apache-2.0 |
| DRUNet (TPAMI 2022) | noise at a strength you choose | Noise level σ with a blind estimate | MIT |
| NAFNet (ECCV 2022) | camera shake, motion blur | Passes | MIT |
| FBCNN (ICCV 2021) | JPEG artifacts | Quality factor with a blind estimate | Apache-2.0 |
| CodeFormer (NeurIPS 2022) | faces | Fidelity | S-Lab (non-commercial) |
| LaMa (WACV 2022) | erasing scratches, text, small objects | Mask expansion | Apache-2.0 |
| ObjectClear (CVPR 2026) | removing objects with their shadows and reflections | Variant, Removal strength | S-Lab (non-commercial) |
| FLUX.2 [klein] 4B | generative fill from a prompt; on the background it replaces the background | Variant, Repaint strength | Apache-2.0 |
| DDColor (ICCV 2023) | colorizing black-and-white photos | Color intensity | Apache-2.0 |
| HVI-CIDNet (CVPR 2025) | low light | Brightness, Saturation | MIT |
Also used: SAM 3 for selection, BiRefNet for Select subject, and Depth Anything V2 Small (Apache-2.0) for lens blur.
Effects per region: transparent background, solid color, lens blur (focused on the selected subject), and blur or pixelate for privacy, scaled to each selected part such as each face.
Adjust per region: exposure, contrast, highlights, shadows, whites, blacks, temperature, tint, vibrance, saturation, clarity, dehaze, sharpen, vignette, plus Auto tone and Auto color. These also work without a model, for example to brighten one backlit face.
prepare and a
cheap render. A sweep of the main control renders in one batch, and
releasing the slider renders the exact value.rap/adjust.py), matching the preview to within a few 8-bit levels.rap/
server.py FastAPI app: sessions, segmentation, sweeps, history, apply, crop, export
session.py regions (binary or soft masks), brush strokes, undo/redo, compositing
store.py sessions saved to disk, so a restart keeps everyone's work
models.py lazy loading, GPU budget, idle offload
segment.py SAM 3 wrapper (points / box / text)
subject.py BiRefNet subject matting, Depth Anything V2 depth
adjust.py tonal adjustments (reference implementation for export)
geometry.py crop / rotate / straighten / flip
restorers/
base.py Restorer interface
pisasr.py PiSA-SR on stock diffusers (LoRAs merged by hand) + upscaling
kair.py SCUNet and DRUNet denoisers (architectures vendored from KAIR in kair_arch.py)
nafnet.py NAFNet motion deblur (architecture vendored in nafnet_arch.py)
fbcnn.py FBCNN JPEG artifact removal (tiled for large crops)
codeformer.py CodeFormer with batched restore and paste-back
lama.py LaMa erase
objectclear.py ObjectClear object + effect removal
genfill.py FLUX.2 [klein] generative fill
ddcolor.py DDColor colorization
cidnet.py HVI-CIDNet low light
effects.py transparent, solid color, blur, pixelate, lens blur
static/ single-page UI, no build step
scripts/ setup, weights, example images, README demos
examples/ demo images (see examples/examples.json for sources and licenses)
tests/ end-to-end checks (API + headless browser)
docs/ README images and demo GIFs
Restorer.params. The first param is the one that gets swept.prepare(img, mask) and render (or render_many to batch).rap/restorers/__init__.py.Flags:
needs_mask, context, blend: for restorers that edit inside a region themselves.uses_foreground, bg_only, allow_bg: for background layers.prompt_hint: for text-driven restorers.tests/unit/ needs no GPU and runs on every push (GitHub Actions):
adjustments, crop/rotate, undo/redo and saving/restoring sessions.
python -m pytest tests/unit
tests/run_all.sh drives a running server through its API and a headless
browser (Playwright): segmentation, every restorer, adjustments, crop,
undo/redo, export. It reports which scripts failed; each script also prints
what it measured and saves screenshots to tests/out/.
pip install playwright && playwright install chromium
python -m rap --gpu 0                    # in one terminal
PYTHON=python tests/run_all.sh           # in another; RAP_URL=... to test another server
With the server running: python scripts/record_demos.py records the clips
(a drawn cursor clicks through the app), python scripts/make_gifs.py turns
them into GIFs with the model waits sped up (needs ffmpeg),
python scripts/make_ui_tour.py makes the annotated screenshot, and
python scripts/make_showcase.py the JPEG and portrait comparisons.
@article{jiang2023restore,
  title={Restore anything pipeline: Segment anything meets image restoration},
  author={Jiang, Jiaxi and Holz, Christian},
  journal={arXiv preprint arXiv:2305.13093},
  year={2023}
}
The code in this repository is released under the Apache License 2.0 (see
LICENSE). Code taken from other projects keeps its original license, noted at
the top of each file; the PiSA-SR wrapper follows the upstream inference code
(Apache-2.0). The crop, undo and
redo icons are adapted from Lucide (ISC). Each model keeps
its own license; see the table above. CodeFormer and ObjectClear are
non-commercial. The example photos are public domain or CC0 from Wikimedia
Commons (credits in examples/examples.json), except the RAP demo images from 2023.
143 followers · starred May 2023
Restore Anything Pipeline (RAP): Segment Anything Meets Image Restoration
See the codeClick anything in a photo. Give it its own restoration model. Dial it in with a slider.
Select by name, as a subject or with a click, then give each region its own model: restore just the face, blur only what is behind the person, remove a person with their shadow. (Model waits are sped up in all demos.)
Most restoration tools treat a photo as one thing. Real photos are not: the face needs a face model, the sky is noisy, the sign is a JPEG mess, and the tourist in the back should go. The Restore Anything Pipeline (RAP) lets you select each part with SAM 3 and give it the right model, at the right strength, while you watch. It runs on your own GPU as a local web app.
This is the code for our RAP technical report (2023), rebuilt with current models and a full editing interface.
face, sky, text.The technical report paired Segment Anything with a controllable restoration model, so each object could get its own restoration, with several results to choose from. This release keeps that idea and builds it out:
face, sky), boxes, a brush and soft-edged subject mattes on top of clicks.
Click the bird, pick Enhance photo, and drag Detail. Hold Space to see the original.
Click the bench and choose Remove object + shadow (ObjectClear). Its shadow goes too.
Type sky, choose Replace with…, describe a sunset
(FLUX.2 [klein]),
then clean the noisy building with Remove noise
(SCUNet).
| |
| Colorize, apply, then Auto enhance the faces | Heavy JPEG cleaned up; FBCNN finds the quality by itself |
| |
| A bench and its shadow removed | A new background from a prompt |
| |
| Portrait look: background blurred by estimated depth | Night photo brightened |
1. Install (Linux with an NVIDIA GPU, conda):
git clone https://github.com/eth-siplab/RAP.git
cd RAP
bash scripts/setup.sh          # conda env "rap", third-party code at pinned commits, weights
hf auth login                  # SAM 3 checkpoints are gated on Hugging Face
Request access at https://huggingface.co/facebook/sam3 first. Some models are downloaded from Hugging Face the first time you use them:
sd2-community mirror; the Stability AI repository was taken down2. Run:
conda activate rap
python -m rap --gpu 0 --port 7860
3. Open http://localhost:7860. On a remote server, forward the port first:
ssh -N -L 7860:localhost:7860 <user>@<server>
Pick one of the example photos on the start page, or drop in your own.
Hardware. An NVIDIA GPU with 8 GB or more runs every feature.
| GPU memory | What changes |
|---|---|
| 8–12 GB | Models take turns on the GPU (a few seconds when switching). Generative fill streams its weights from CPU memory: four variants in about 10–20 s. |
| 16–24 GB | Most models stay loaded; switching is rarely needed. |
| 28 GB or more | Everything stays on the GPU, including generative fill. |
The app sizes itself to your GPU: by default about 60% of GPU memory holds
model weights (--gpu-budget), and models that don't fit wait in CPU memory,
capped at half of your RAM (32 GB of RAM recommended). If memory still runs
out, it moves other models out, works in smaller batches and retries instead
of failing. --max-gpu-memory limits the total on a shared GPU. The table was
measured on a server GPU limited to 8, 12, 16 and 24 GB with that option, where
the full test suite passes; a real consumer card has the same memory limits but
may be slower. 12-megapixel photos work.
Your work survives a restart. Sessions are saved to ~/.cache/rap/sessions
(--session-dir; empty keeps them in memory only), and reloading the page
brings yours back. --cpu-threads (default 8) caps OpenCV/torch CPU threads,
which matters on busy shared machines.
face, sky or text to select every match at once.Tips
| Key | Action |
|---|---|
| V | Select: click adds, right-click removes |
| B | Box select |
| P | Brush: paint adds, right-drag erases; [ ] change the size |
| C | Crop, rotate, straighten, flip (Enter applies) |
| H / middle-drag | Pan; the wheel zooms |
| F · 1 | Fit · actual pixels |
| hold Space | Compare with the original |
| Ctrl+Z / Ctrl+Shift+Z | Undo / redo |
| Enter / Esc | Finish the current selection |
| Delete | Delete the selected region |
| double-click a slider | Reset it |
| ? | All shortcuts, in the app |
Every model has continuous controls, and the main control is rendered in advance, so dragging it is instant.
| Model | For | Controls | License |
|---|---|---|---|
| PiSA-SR (CVPR 2025) | real photos with mixed degradations; 2×/4× export | Detail, Fidelity | Apache-2.0 |
| SCUNet (MIR 2023) | real noise: phones, high ISO, grainy scans | Texture (PSNR ↔ GAN model) | Apache-2.0 |
| DRUNet (TPAMI 2022) | noise at a strength you choose | Noise level σ with a blind estimate | MIT |
| NAFNet (ECCV 2022) | camera shake, motion blur | Passes | MIT |
| FBCNN (ICCV 2021) | JPEG artifacts | Quality factor with a blind estimate | Apache-2.0 |
| CodeFormer (NeurIPS 2022) | faces | Fidelity | S-Lab (non-commercial) |
| LaMa (WACV 2022) | erasing scratches, text, small objects | Mask expansion | Apache-2.0 |
| ObjectClear (CVPR 2026) | removing objects with their shadows and reflections | Variant, Removal strength | S-Lab (non-commercial) |
| FLUX.2 [klein] 4B | generative fill from a prompt; on the background it replaces the background | Variant, Repaint strength | Apache-2.0 |
| DDColor (ICCV 2023) | colorizing black-and-white photos | Color intensity | Apache-2.0 |
| HVI-CIDNet (CVPR 2025) | low light | Brightness, Saturation | MIT |
Also used: SAM 3 for selection, BiRefNet for Select subject, and Depth Anything V2 Small (Apache-2.0) for lens blur.
Effects per region: transparent background, solid color, lens blur (focused on the selected subject), and blur or pixelate for privacy, scaled to each selected part such as each face.
Adjust per region: exposure, contrast, highlights, shadows, whites, blacks, temperature, tint, vibrance, saturation, clarity, dehaze, sharpen, vignette, plus Auto tone and Auto color. These also work without a model, for example to brighten one backlit face.
prepare and a
cheap render. A sweep of the main control renders in one batch, and
releasing the slider renders the exact value.rap/adjust.py), matching the preview to within a few 8-bit levels.rap/
server.py FastAPI app: sessions, segmentation, sweeps, history, apply, crop, export
session.py regions (binary or soft masks), brush strokes, undo/redo, compositing
store.py sessions saved to disk, so a restart keeps everyone's work
models.py lazy loading, GPU budget, idle offload
segment.py SAM 3 wrapper (points / box / text)
subject.py BiRefNet subject matting, Depth Anything V2 depth
adjust.py tonal adjustments (reference implementation for export)
geometry.py crop / rotate / straighten / flip
restorers/
base.py Restorer interface
pisasr.py PiSA-SR on stock diffusers (LoRAs merged by hand) + upscaling
kair.py SCUNet and DRUNet denoisers (architectures vendored from KAIR in kair_arch.py)
nafnet.py NAFNet motion deblur (architecture vendored in nafnet_arch.py)
fbcnn.py FBCNN JPEG artifact removal (tiled for large crops)
codeformer.py CodeFormer with batched restore and paste-back
lama.py LaMa erase
objectclear.py ObjectClear object + effect removal
genfill.py FLUX.2 [klein] generative fill
ddcolor.py DDColor colorization
cidnet.py HVI-CIDNet low light
effects.py transparent, solid color, blur, pixelate, lens blur
static/ single-page UI, no build step
scripts/ setup, weights, example images, README demos
examples/ demo images (see examples/examples.json for sources and licenses)
tests/ end-to-end checks (API + headless browser)
docs/ README images and demo GIFs
Restorer.params. The first param is the one that gets swept.prepare(img, mask) and render (or render_many to batch).rap/restorers/__init__.py.Flags:
needs_mask, context, blend: for restorers that edit inside a region themselves.uses_foreground, bg_only, allow_bg: for background layers.prompt_hint: for text-driven restorers.tests/unit/ needs no GPU and runs on every push (GitHub Actions):
adjustments, crop/rotate, undo/redo and saving/restoring sessions.
python -m pytest tests/unit
tests/run_all.sh drives a running server through its API and a headless
browser (Playwright): segmentation, every restorer, adjustments, crop,
undo/redo, export. It reports which scripts failed; each script also prints
what it measured and saves screenshots to tests/out/.
pip install playwright && playwright install chromium
python -m rap --gpu 0                    # in one terminal
PYTHON=python tests/run_all.sh           # in another; RAP_URL=... to test another server
With the server running: python scripts/record_demos.py records the clips
(a drawn cursor clicks through the app), python scripts/make_gifs.py turns
them into GIFs with the model waits sped up (needs ffmpeg),
python scripts/make_ui_tour.py makes the annotated screenshot, and
python scripts/make_showcase.py the JPEG and portrait comparisons.
@article{jiang2023restore,
  title={Restore anything pipeline: Segment anything meets image restoration},
  author={Jiang, Jiaxi and Holz, Christian},
  journal={arXiv preprint arXiv:2305.13093},
  year={2023}
}
The code in this repository is released under the Apache License 2.0 (see
LICENSE). Code taken from other projects keeps its original license, noted at
the top of each file; the PiSA-SR wrapper follows the upstream inference code
(Apache-2.0). The crop, undo and
redo icons are adapted from Lucide (ISC). Each model keeps
its own license; see the table above. CodeFormer and ObjectClear are
non-commercial. The example photos are public domain or CC0 from Wikimedia
Commons (credits in examples/examples.json), except the RAP demo images from 2023.
143 followers · starred May 2023



