A bridge betwwen the ROS ecosystem and AI Habitat.
Python
159
222 commits
updated Jan 10, 2024
A ROS package to bridge AI Habitat with the ROS ecosystem.
The package allows roboticists to
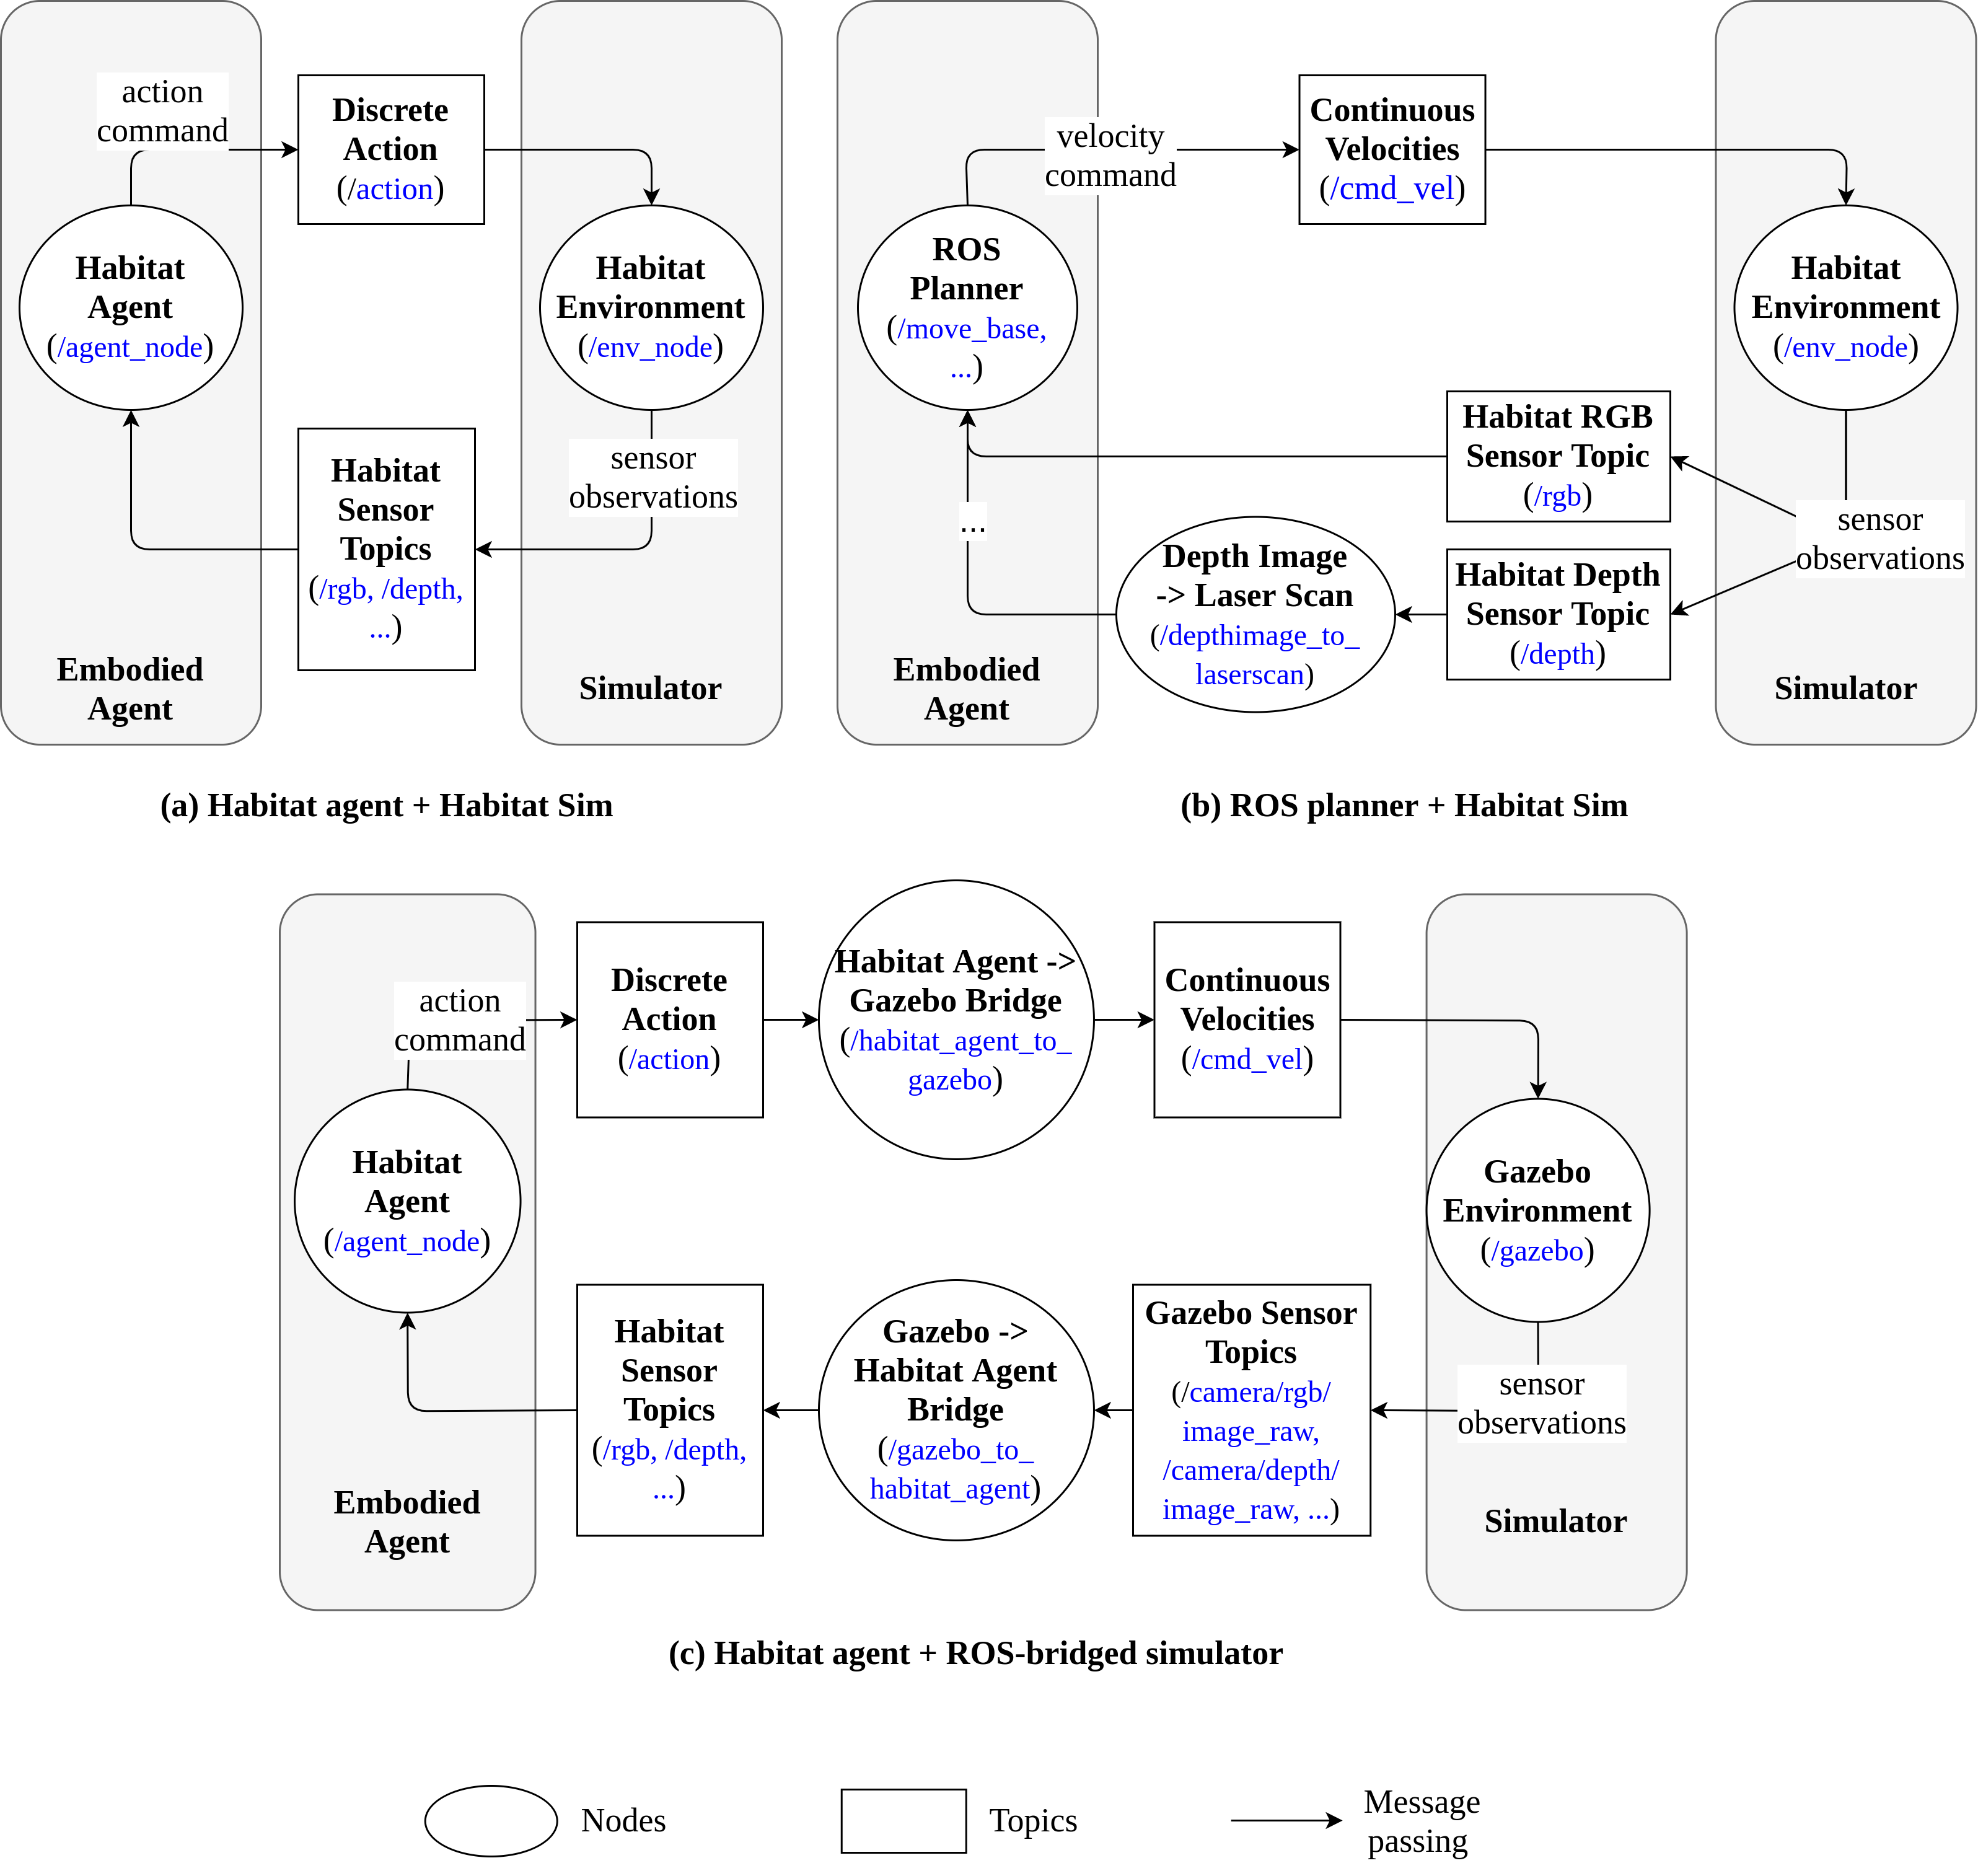
ros_x_habitat exists as a collection of ROS nodes, topics and services. For simplicity, we have omitted components not essential to the interface's operation:
conda create -n rosxhab python=3.6.13 cmake=3.14.0
conda activate rosxhab
pip install --upgrade pip
# if you have an NVIDIA GPU + driver properly installed, install CUDA-compiled torch:
pip install torch==1.10.2+cu111 -f https://download.pytorch.org/whl/cu111/torch_stable.html
# otherwise, install the CPU-compiled torch:
pip install torch==1.10.2+cpu -f https://download.pytorch.org/whl/cpu/torch_stable.html
pip install -r requirements.txt
0.2.0.
cd <path to Habitat Sim's root directory>
conda install habitat-sim=0.2.0 withbullet -c conda-forge -c aihabitat
conda install --use-local linux-64_habitat-sim-0.2.0-py3.6_bullet_linux_bfafd7934df465d79d807e4698659e2c20daf57d.tar.bz2
0.2.0 along with habitat-baselines in the same conda environment.
git clone --branch stable https://github.com/facebookresearch/habitat-lab.git
cd habitat-lab
git reset --hard adf90
pip install -r requirements.txt
python setup.py develop --all # install habitat and habitat_baselines
ros-noetic-depthimage-to-laserscanros-noetic-laser-scan-matcherros-noetic-rtabmap-rosros-noetic-hector-slamros-noetic-joyros-noetic-turtlebot3-gazeboros-noetic-turtlebot3-bringupros-noetic-turtlebot3-navigationsrc/ directory under your catkin workspace.catkin_make.Here we outline steps to reproduce experiments from our paper.
To set up your bash environment before you run any experiment, do the following:
$PYTHONPATH:
export PYTHONPATH=$PYTHONPATH:<path to the root directory of this repo>
$HOME/.bashrc:
alias erosxhab="export PYTHONPATH=$PYTHONPATH:<path to the root directory of this repo>"
alias sros="source /opt/ros/noetic/setup.bash && source <path to catkin_ws/devel>/setup.sh"
We can attempt to reproduce experiments from the Habitat v1 paper by evaluating a Habitat agent's performance in a MatterPort3D test scenario. Note that unlike what the authors did in the paper, we used the following experimental configurations:
download_mp.py), use argument --task_data habitat so you download just the subset we need.To run an evaluation, follow these steps:
data/ under the project's root directory. Then create the following directories:
data/checkpoints/v2/,data/datasets/pointnav/mp3d/v1/,data/objects/,data/scene_datasets/mp3d/.default.physics_config.json and place it under data/..pth files) to data/checkpoints/v2/. Extract the MP3D episode definitions to data/datasets/pointnav/mp3d/v1/ (then under v1/ you should see directory test/, train/, etc). Extract the MP3D scene files to data/scene_datasets/mp3d/.configs/. Our configurations are coded by numbers:
seeds/ a seed file or create one of your own for your experiment. The seed is used for initializing the Habitat agent.python src/scripts/eval_and_vis_habitat.py \
--input-type rgbd \
--model-path data/checkpoints/v2/gibson-rgbd-best.pth \
--task-config <path to config file> \
--episode-id <ID of last episode evaluated; -1 to evaluate from start> \
--seed-file-path <path to seed file> \
--log-dir <path to dir storing evaluation logs> \
--make-maps \
--map-dir <path to dir storing top-down maps> \
--make-plots \
--plot-dir <path to dir storing metric plots>
Under this mode we run a Habitat Agent still inside Habitat Sim but through our interface.
configs/. Our configurations are coded by numbers:
python src/scripts/eval_habitat_ros.py \
--input-type rgbd \
--model-path data/checkpoints/v2/gibson-rgbd-best.pth \
--task-config configs/setting_5_configs/pointnav_rgbd-mp3d_with_physics.yaml \
--episode-id <ID of last episode evaluated; -1 to evaluate from start> \
--seed-file-path <seed file path> \
--log-dir= <log dir path>
Here we demonstrate steps to posit a Habitat agent embodied on a TurtleBot in a Gazebo-simulated environment, and render sensor data with RViz.
export TURTLEBOT3_MODEL="waffle"
roslaunch turtlebot3_gazebo turtlebot3_house.launch
roslaunch turtlebot3_gazebo turtlebot3_gazebo_rviz.launch
python src/nodes/habitat_agent_node.py \
--node-name agent_node \
--input-type rgbd \
--model-path data/checkpoints/v2/gibson-rgbd-best.pth
rosservice call /ros_x_habitat/agent_node/reset_agent "{reset: 0, seed: 0}"
python src/nodes/habitat_agent_to_gazebo.py
python src/nodes/gazebo_to_habitat_agent.py \
--pointgoal-location <coordinates>
/camera/depth/image_raw and /camera/rgb/image_raw to render observations from the RGB and the depth sensor.Here we outline steps to 1) control, via a joystick, a ROS agent with RGBD sensors to roam and map a Habitat Sim-simulated scene; 2) control a planner from the move_base package to navigate to a manually-set goal position.
data/objects/ by running this command from Habitat Sim (more instructions from here):
python -m habitat_sim.utils.datasets_download --uids habitat_example_objects --data-path <path to ros_x_habitat/data/objects/>
roscore.configs/roam_configs/, e.g. pointnav_rgbd_roam_mp3d_test_scenes.yaml. You might want to change VIDEO_DIR to another directory of your liking.python src/scripts/roam_with_joy.py \
--hab-env-config-path <config file path> \
--episode-id <ID of episode to roam inside> \
--scene-id <path to the episode's scene file, e.g. data/scene_datasets/mp3d/2t7WUuJeko7/2t7WUuJeko7.glb> \
--video-frame-period <number of continuous steps for each frame recorded>
/rgb, /depth, /pointgoal_with_gps_compass. The script will fire up image_view nodes to listen to RGB/Depth readings but you need to fire up a dummy node yourself to listen to Pointgoal/GPS info. You can do this with the command
rostopic echo /pointgoal_with_gps_compass
rtabmap_ros. Run
roslaunch launch/rtabmap_mapping.launch
maps/.Next, we use a planner from the move_base package to navigate in the scene with the help of that
map we just built.
roslaunch launch/move_base.launch
map_file_path and map_file_base_name have been set correctly before you run. The launcher file should also start an rviz session which allows you to 1) specify the goal point and 2) visualize RGB/depth sensor readings.The experiments were run on a desktop with i7-10700K CPU, 64 GB of RAM, and an NVIDIA RTX 3070 GPU. We also tested the experiments on a desktop with 32 GB of RAM and an NVIDIA GT 1030 GPU.
If you are interested in using ros_x_habitat for your own research, please cite our CRV 2022 paper:
@INPROCEEDINGS{9867069,
author={Chen, Guanxiong and Yang, Haoyu and Mitchell, Ian M.},
booktitle={2022 19th Conference on Robots and Vision (CRV)},
title={ROS-X-Habitat: Bridging the ROS Ecosystem with Embodied AI},
year={2022},  volume={},  number={},  pages={24-31},
doi={10.1109/CRV55824.2022.00012}}
This work is under the Creative Commons CC BY 4.0 License.
We would like to thank Bruce Cui from the Department of Mechanical Engineering at UBC for his initial work on ros_x_habitat. Also, we would like to appreciate the AI Habitat team from Facebook AI Research, including Prof. Dhruv Batra, Alex Clegg, Prof. Manolis Savva, and Erik Wijmans for their generous support throughout our development process.
A bridge betwwen the ROS ecosystem and AI Habitat.
Python
159
222 commits
updated Jan 10, 2024
A ROS package to bridge AI Habitat with the ROS ecosystem.
The package allows roboticists to
ros_x_habitat exists as a collection of ROS nodes, topics and services. For simplicity, we have omitted components not essential to the interface's operation:
conda create -n rosxhab python=3.6.13 cmake=3.14.0
conda activate rosxhab
pip install --upgrade pip
# if you have an NVIDIA GPU + driver properly installed, install CUDA-compiled torch:
pip install torch==1.10.2+cu111 -f https://download.pytorch.org/whl/cu111/torch_stable.html
# otherwise, install the CPU-compiled torch:
pip install torch==1.10.2+cpu -f https://download.pytorch.org/whl/cpu/torch_stable.html
pip install -r requirements.txt
0.2.0.
cd <path to Habitat Sim's root directory>
conda install habitat-sim=0.2.0 withbullet -c conda-forge -c aihabitat
conda install --use-local linux-64_habitat-sim-0.2.0-py3.6_bullet_linux_bfafd7934df465d79d807e4698659e2c20daf57d.tar.bz2
0.2.0 along with habitat-baselines in the same conda environment.
git clone --branch stable https://github.com/facebookresearch/habitat-lab.git
cd habitat-lab
git reset --hard adf90
pip install -r requirements.txt
python setup.py develop --all # install habitat and habitat_baselines
ros-noetic-depthimage-to-laserscanros-noetic-laser-scan-matcherros-noetic-rtabmap-rosros-noetic-hector-slamros-noetic-joyros-noetic-turtlebot3-gazeboros-noetic-turtlebot3-bringupros-noetic-turtlebot3-navigationsrc/ directory under your catkin workspace.catkin_make.Here we outline steps to reproduce experiments from our paper.
To set up your bash environment before you run any experiment, do the following:
$PYTHONPATH:
export PYTHONPATH=$PYTHONPATH:<path to the root directory of this repo>
$HOME/.bashrc:
alias erosxhab="export PYTHONPATH=$PYTHONPATH:<path to the root directory of this repo>"
alias sros="source /opt/ros/noetic/setup.bash && source <path to catkin_ws/devel>/setup.sh"
We can attempt to reproduce experiments from the Habitat v1 paper by evaluating a Habitat agent's performance in a MatterPort3D test scenario. Note that unlike what the authors did in the paper, we used the following experimental configurations:
download_mp.py), use argument --task_data habitat so you download just the subset we need.To run an evaluation, follow these steps:
data/ under the project's root directory. Then create the following directories:
data/checkpoints/v2/,data/datasets/pointnav/mp3d/v1/,data/objects/,data/scene_datasets/mp3d/.default.physics_config.json and place it under data/..pth files) to data/checkpoints/v2/. Extract the MP3D episode definitions to data/datasets/pointnav/mp3d/v1/ (then under v1/ you should see directory test/, train/, etc). Extract the MP3D scene files to data/scene_datasets/mp3d/.configs/. Our configurations are coded by numbers:
seeds/ a seed file or create one of your own for your experiment. The seed is used for initializing the Habitat agent.python src/scripts/eval_and_vis_habitat.py \
--input-type rgbd \
--model-path data/checkpoints/v2/gibson-rgbd-best.pth \
--task-config <path to config file> \
--episode-id <ID of last episode evaluated; -1 to evaluate from start> \
--seed-file-path <path to seed file> \
--log-dir <path to dir storing evaluation logs> \
--make-maps \
--map-dir <path to dir storing top-down maps> \
--make-plots \
--plot-dir <path to dir storing metric plots>
Under this mode we run a Habitat Agent still inside Habitat Sim but through our interface.
configs/. Our configurations are coded by numbers:
python src/scripts/eval_habitat_ros.py \
--input-type rgbd \
--model-path data/checkpoints/v2/gibson-rgbd-best.pth \
--task-config configs/setting_5_configs/pointnav_rgbd-mp3d_with_physics.yaml \
--episode-id <ID of last episode evaluated; -1 to evaluate from start> \
--seed-file-path <seed file path> \
--log-dir= <log dir path>
Here we demonstrate steps to posit a Habitat agent embodied on a TurtleBot in a Gazebo-simulated environment, and render sensor data with RViz.
export TURTLEBOT3_MODEL="waffle"
roslaunch turtlebot3_gazebo turtlebot3_house.launch
roslaunch turtlebot3_gazebo turtlebot3_gazebo_rviz.launch
python src/nodes/habitat_agent_node.py \
--node-name agent_node \
--input-type rgbd \
--model-path data/checkpoints/v2/gibson-rgbd-best.pth
rosservice call /ros_x_habitat/agent_node/reset_agent "{reset: 0, seed: 0}"
python src/nodes/habitat_agent_to_gazebo.py
python src/nodes/gazebo_to_habitat_agent.py \
--pointgoal-location <coordinates>
/camera/depth/image_raw and /camera/rgb/image_raw to render observations from the RGB and the depth sensor.Here we outline steps to 1) control, via a joystick, a ROS agent with RGBD sensors to roam and map a Habitat Sim-simulated scene; 2) control a planner from the move_base package to navigate to a manually-set goal position.
data/objects/ by running this command from Habitat Sim (more instructions from here):
python -m habitat_sim.utils.datasets_download --uids habitat_example_objects --data-path <path to ros_x_habitat/data/objects/>
roscore.configs/roam_configs/, e.g. pointnav_rgbd_roam_mp3d_test_scenes.yaml. You might want to change VIDEO_DIR to another directory of your liking.python src/scripts/roam_with_joy.py \
--hab-env-config-path <config file path> \
--episode-id <ID of episode to roam inside> \
--scene-id <path to the episode's scene file, e.g. data/scene_datasets/mp3d/2t7WUuJeko7/2t7WUuJeko7.glb> \
--video-frame-period <number of continuous steps for each frame recorded>
/rgb, /depth, /pointgoal_with_gps_compass. The script will fire up image_view nodes to listen to RGB/Depth readings but you need to fire up a dummy node yourself to listen to Pointgoal/GPS info. You can do this with the command
rostopic echo /pointgoal_with_gps_compass
rtabmap_ros. Run
roslaunch launch/rtabmap_mapping.launch
maps/.Next, we use a planner from the move_base package to navigate in the scene with the help of that
map we just built.
roslaunch launch/move_base.launch
map_file_path and map_file_base_name have been set correctly before you run. The launcher file should also start an rviz session which allows you to 1) specify the goal point and 2) visualize RGB/depth sensor readings.The experiments were run on a desktop with i7-10700K CPU, 64 GB of RAM, and an NVIDIA RTX 3070 GPU. We also tested the experiments on a desktop with 32 GB of RAM and an NVIDIA GT 1030 GPU.
If you are interested in using ros_x_habitat for your own research, please cite our CRV 2022 paper:
@INPROCEEDINGS{9867069,
author={Chen, Guanxiong and Yang, Haoyu and Mitchell, Ian M.},
booktitle={2022 19th Conference on Robots and Vision (CRV)},
title={ROS-X-Habitat: Bridging the ROS Ecosystem with Embodied AI},
year={2022},  volume={},  number={},  pages={24-31},
doi={10.1109/CRV55824.2022.00012}}
This work is under the Creative Commons CC BY 4.0 License.
We would like to thank Bruce Cui from the Department of Mechanical Engineering at UBC for his initial work on ros_x_habitat. Also, we would like to appreciate the AI Habitat team from Facebook AI Research, including Prof. Dhruv Batra, Alex Clegg, Prof. Manolis Savva, and Erik Wijmans for their generous support throughout our development process.



