Base code for the Dingo quadruped; modified from Stanford Pupper and Notspot repositories. Includes integration with ROS Noetic and a simulation of the Dingo
Python
1,311
211 commits
updated Mar 27, 2026
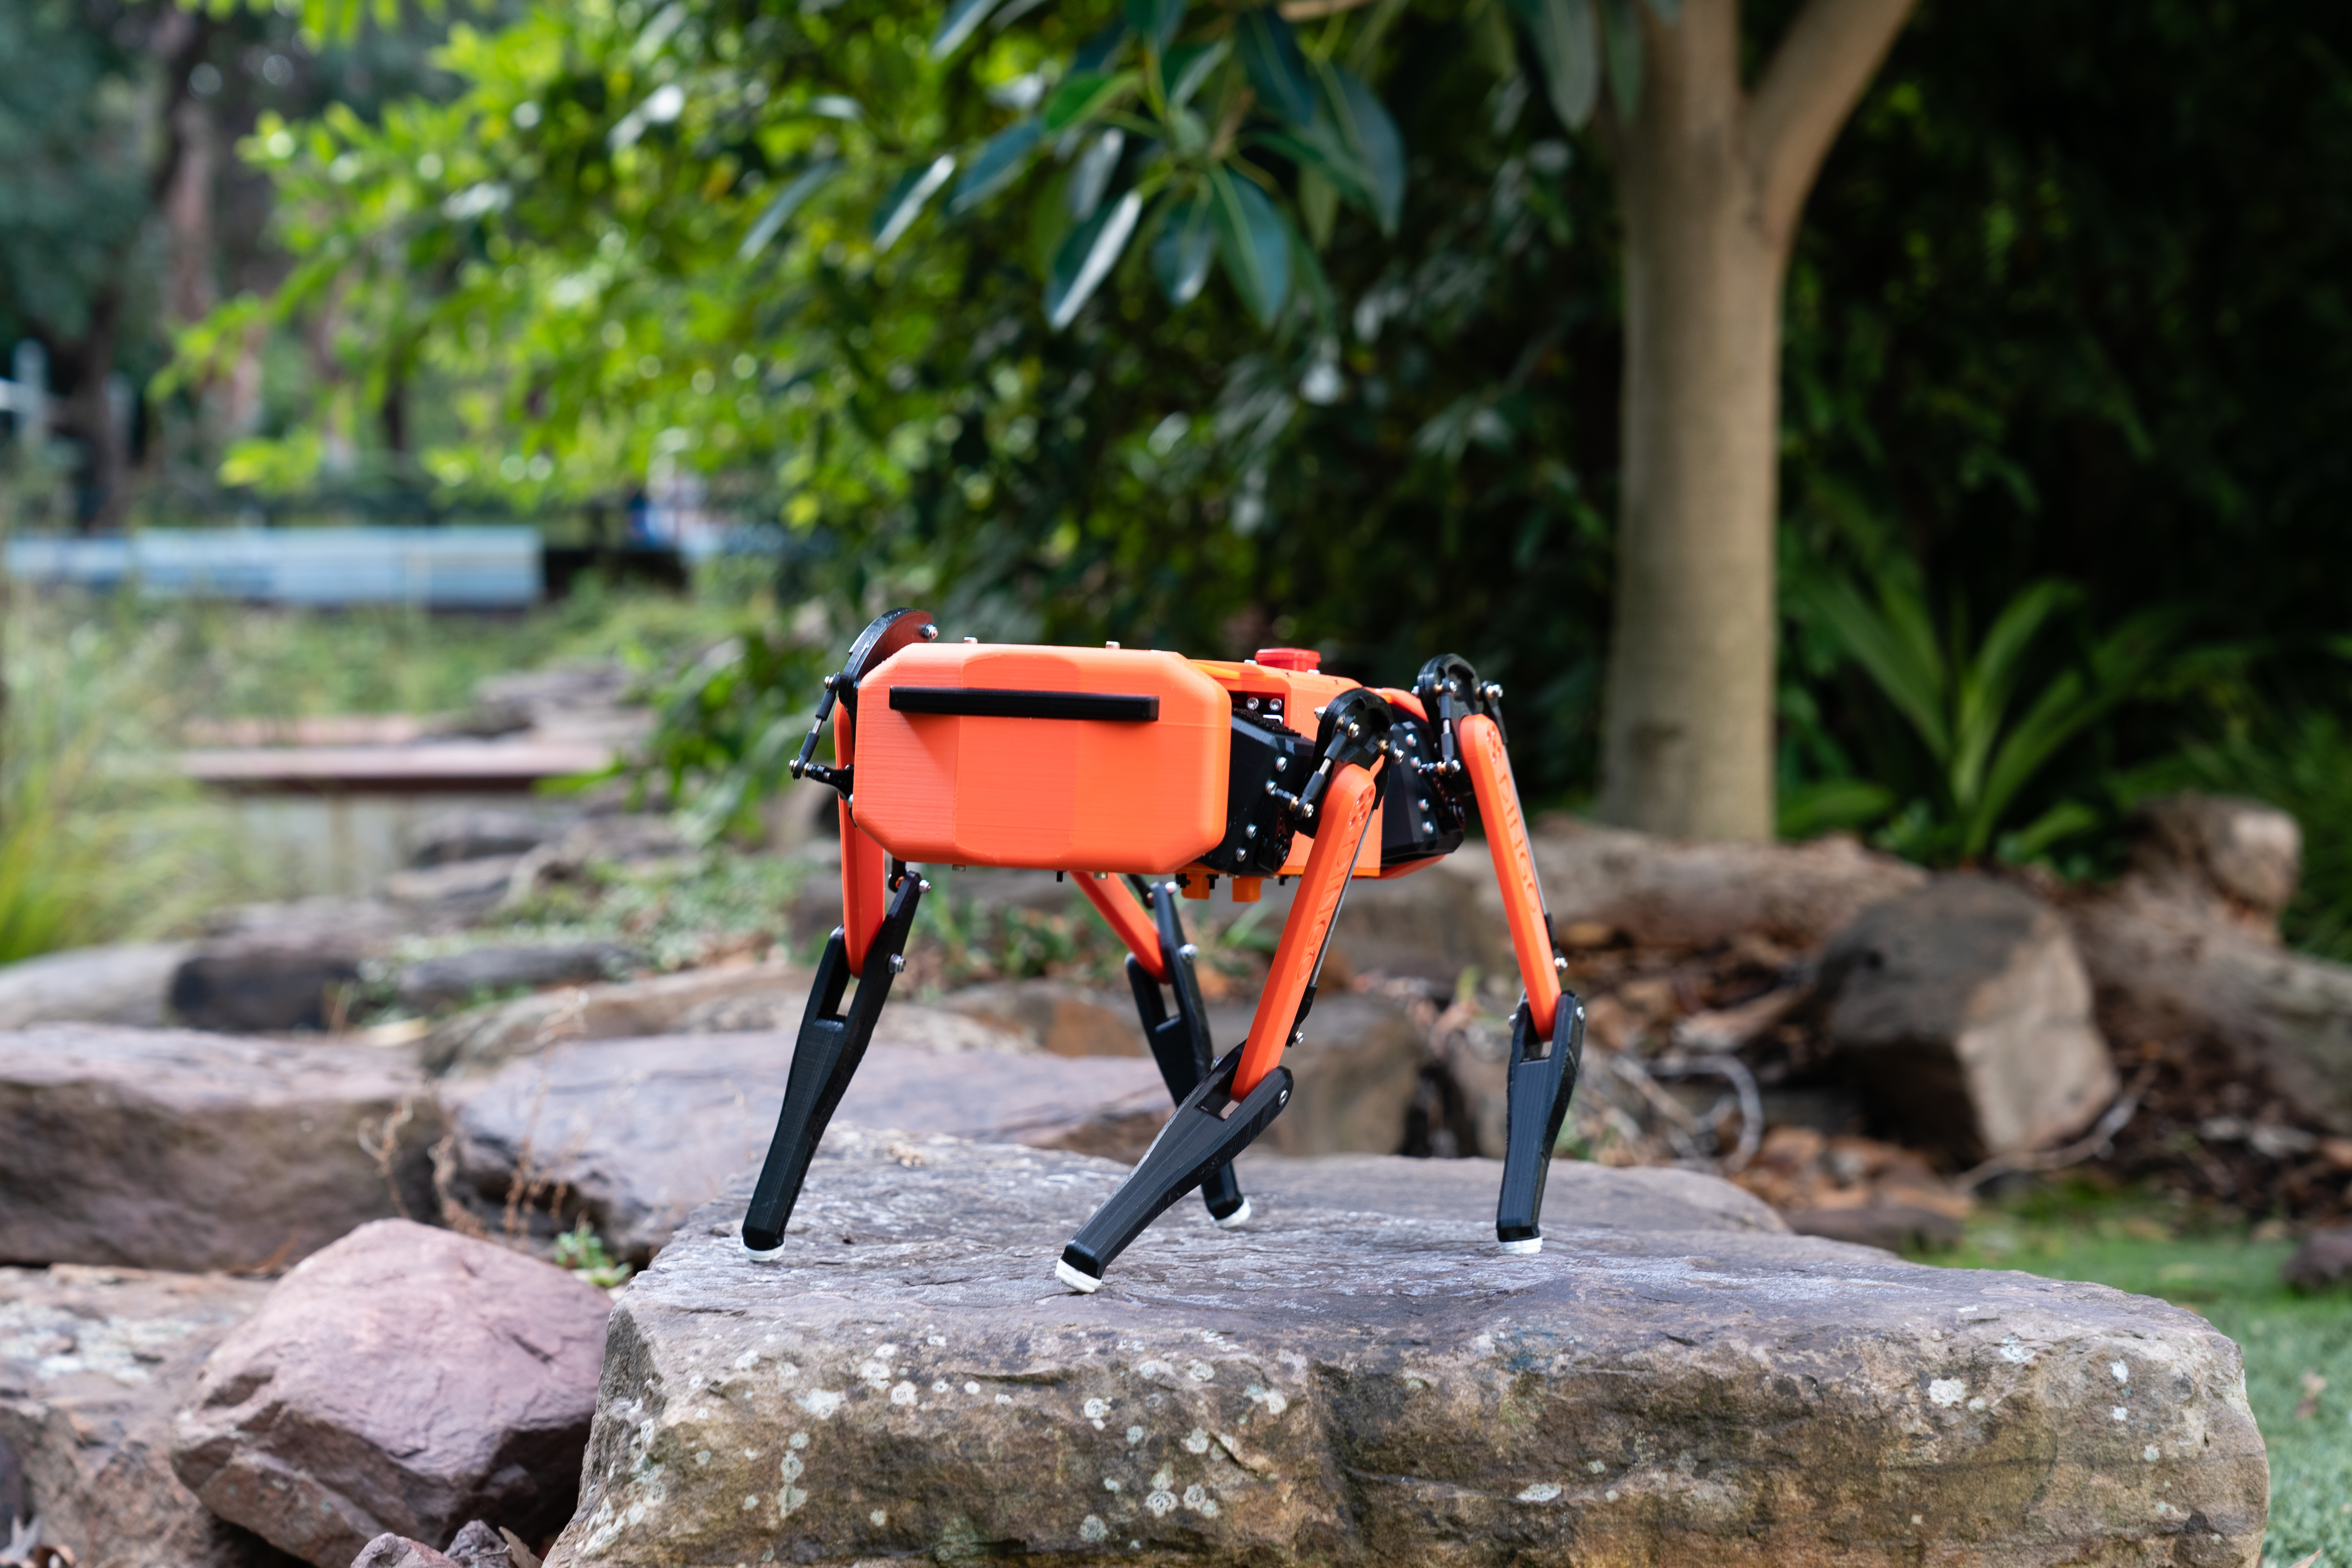
This repository hosts the code for the Dingo Quadruped, a robot designed to be low-cost but capable of conducting research and being extensively modified with additional actuators and sensors. CAD for the Dingo can be found here. A full Bill of materials for purchasable components can be found within this repo.
This code is based on the Stanford Pupper and notspot codebases, with extensive modifications, including integration into ROS 1 Noetic.
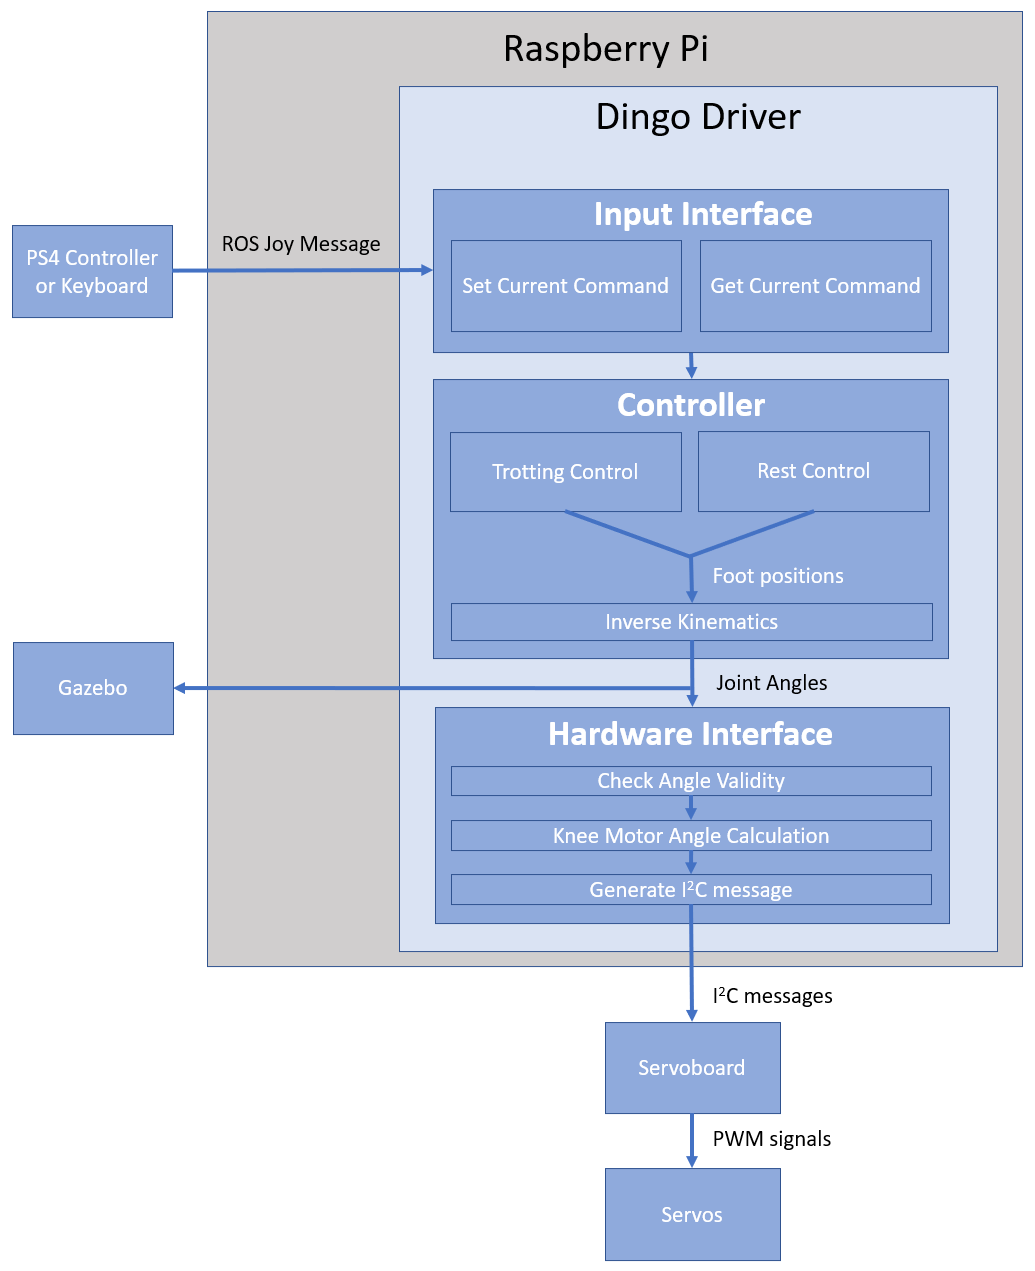
The repository includes a driver node, dingo_driver.py, which should be used anytime the code is run. This file enables joystick control of the Dingo, and allows joint and/or task space commands generated by any other code to be passed through the driver via the appropriate ROS command topics. The joystick can also be toggled on and off to override commands received via ROS command topics
The repo also includes a gazebo simulation of the Dingo, based on URDF file and meshes which are also provide.
The following flow diagram shows a simplified overview of how a joystick command is handled by the driver to affect joint movements:
├── assets                                    Images used in the readme file
├── dingo_nano                                Code for the Arduino Nano V3 to read sensor data and send it to the Raspberry Pi
└── dingo_ws                                  ROS workspace containing all required packages
   └── src
     ├── dingo                                Package containing node and launch files for running the robot
     ├── dingo_control                        Package containing all files related to control, including kinematics and default trot controller
     ├── dingo_description                    Package containing simulation files (URDF file and meshes)
     ├── dingo_gazebo                         Package containing gazebo files
     ├── dingo_hardware_interfacing
     |  ├── dingo_input_interfacing           Package containing files for receiving and interpreting commands (From a joystick or keyboard)
     |  ├── dingo_peripheral_interfacing      Package containing files for interfacing with the Arduino Nano, LCD screen and IMU
     |  └── dingo_servo_interfacing           Package containing the hardware interface for sending joint angles to the servo motors
     └── dingo_utilities                      Package containing useful utilities
sudo apt-get install python3-catkin-tools git python3-rosdep python3-rosinstall python3-rosinstall-generator python3-wstool python3-pip build-essential wireless-tools libraspberrypi-bin ros-noetic-joy ros-noetic-catkin python3-catkin-tools i2c-tools libi2c-dev python3-smbuspip install spidev transforms3d adafruit-circuitpython-bno055 pillow rpi.gpio pyserialcd ~git clone ...cd /DingoQuadruped/dingo_wssudo rosdep initrosdep updatecatkin buildsource devel/setup.bashecho "source ~/DingoQuadruped/dingo_ws/devel/setup.bash" >> ~/.bashrc, source ~/.bashrcFor getting bluetooth controller working (for instance PS4 controller)
sudo apt-get install bluetooth bluez bluez-toolssudo apt-get install pi-bluetoothbluetoothctl scan onbluetoothctl pair AA:BB:CC:11:22:33 (example device)bluetoothctl connect AA:BB:CC:11:22:33bluetoothctl trust AA:BB:CC:11:22:33jstest /dev/input/js0At this stage, the controller will only connect if you run bluetoothctl in the terminal, and then press the pair button on the controller. To bypass the step of running bluetoothctl, do the following:
#!/bin/bash

# Replace 'XX:XX:XX:XX:XX:XX' with your controller's MAC address
controller_mac="XX:XX:XX:XX:XX:XX"

# Use bluetoothctl to connect the controller
bluetoothctl <<EOF
connect $controller_mac
exit
EOF`
chmod +x connect_controller.shSUBSYSTEM=="bluetooth", KERNEL=="hci0", ACTION=="add", ENV{DEVTYPE}=="adapter", TAG+="systemd", SYMLINK+="bluetooth", RUN+="/bin/sleep 10", RUN+="/path/to/connect_controller.sh"sudo udevadm control --reload
The controller should now autopair every time the pair button is pressed, without needing to do anything on the PiTo get WiFi working
    wifis:
        wlan0:
            optional: true
            dhcp4: true
            access-points:
                "<wifi SSID>":
                    password: "<wifi password>"
If getting an error with "rounded_rectangle", need to install later version of Pillow.
pip3 install --upgrade PillowThe LCD node has been created following the waveshare tutorial here: https://www.waveshare.com/wiki/1.47inch_LCD_Module. Apart from installing the libraries listed there, the fonts also need to be moved into the ubuntu fonts folder to be used by executing the following lines:
cd ~sudo apt-get install unzip -ysudo wget https://files.waveshare.com/upload/8/8d/LCD_Module_RPI_code.zipsudo unzip ./LCD_Module_RPI_code.zipcd ~/LCD_Module_RPI_code/RaspberryPi/python/Fontsudo mv Font00.ttf /usr/share/fonts/truetype/Font00.ttfsudo mv Font01.ttf /usr/share/fonts/truetype/Font01.ttfsudo mv Font02.ttf /usr/share/fonts/truetype/Font02.ttfTo run ROS as non-root, must set permissions correctly via udev for several /dev files.
       KERNEL=="ttyS0", OWNER="root", GROUP="ros", MODE="0660"
       KERNEL=="spi", OWNER="root", GROUP="ros", MODE="0660"
       KERNEL=="i2c", OWNER="root", GROUP="ros", MODE="0660"
       KERNEL=="gpiomem", OWNER="root", GROUP="ros", MODE="0660"
       KERNEL=="mem", OWNER="root", GROUP="ros", MODE="0660"
sudo groupadd ros && sudo adduser <username> rossudo udevadm control --reload-rules && sudo udevadm triggersudo i2cdetect -y 1. If this doesnt work, try replacing the 1 with a 0. If this works, replace the 1 with a 0 in all subsequent steps.i2cdetect -y 1. If the same matrix appears, all is good. Otherwise, run the following: sudo groupadd i2c
sudo chown :i2c /dev/i2c-1
sudo chmod g+rw /dev/i2c-1
sudo usermod -aG i2c [INSERT YOUR USERNAME]
i2cdetect -y 1. The matrix should now appear for your user.Please run the code first before following these steps. If you do not receive an SPI permission error, there is no need to do the following SPI setup steps. Proceed if you receive an error
ls -la /dev/spidev* to list SPI devices sudo groupadd spi
sudo usermod -aG spi <yourusername>
sudo chown :spi <put the spi device name here>
sudo chmod g+rw <put the spi device name here>
sudo nano /etc/systemd/system/spi-permissions.service and put the following into the file, saving and exiting afterwards: [Unit]
Description=Set SPI Permissions
[Service]
ExecStart=/path/to/your/script.sh
User=root
Group=root
Restart=on-failure
RestartSec=5s
[Install]
WantedBy=multi-user.target
nano ~/startspi.sh and put the following into the file, saving and exiting afterwards. Note: If your SPI device names are different, please update them accordingly: #!/bin/bash
sudo usermod -aG spi <yourusername>
sudo chown :spi /dev/spidev0.0
sudo chmod g+rw /dev/spidev0.0
sudo chown :spi /dev/spidev0.1
sudo chmod g+rw /dev/spidev0.1
sudo chmod +x /path/to/your/script.shsudo systemctl daemon-reloadsudo systemctl enable spi-permissions.servicesudo systemctl start spi-permissions.serviceSPI should now work across restarts
Serial communications was one of the hardest parts of this project to get working. Unfortunately Ubuntu 20.04 in particular seems to have trouble on Raspberry Pi with serial communications via the tx and rx pins. If the following steps do not work for you, further research/trial and error may be required.
Do the following:
sudo apt-get updatesudo apt-get install ros-noetic-rosserial ros-noetic-rosserial-python ros-noetic-rosserial-arduinosudo systemctl disable serial-getty@ttyS0.service --nowsudo systemctl stop serial-getty@ttyS0.servicesudo systemctl mask serial-getty@ttyS0.serviceTest whether serial is working by running the Dingo code. It should attempt to connect to the Arduino and successfully do so, which can be seen via the code printing to the terminal that publishers have been established. If it errors, first check your wiring to the arduino, and that the arduino has been flashed correctly. If this does not work, further research and trial/error will be needed. Look for articles like this one
It's a good idea to backup the sdcard every so often. Here is how to do that on linux.
sudo dd if=/dev/sdb of=~/dingo_backup.img bs=4M status=progresssudo dd if=dingo_backup of=/dev/sdb bs=4M status=progressHelp with getting the servos calibrated
rosrun dingo_servo_interfacing CalibrateServos all cal (move all servos to calibration position)rosrun dingo_servo_interfacing CalibrateServos fr high (move front right servo to high position)The files inside the base directory enable a docker container to be built and the code to inspected and debugged in visual studio code. This is mostly for debugging purposes, and is best for an external device debugging or adding to the code, rather than being used on the quadruped itself. Note: These instructions assume a linux OS.
cd ~/any_folder_name/DingoQuadrupedcode . to open the dingo quadruped base folder in vscodeThe Dingo_Driver should be started before any other code is launched on the Dingo. It starts joystick control of the robot and allows joint and task space commands to be received from other code or controllers via command ROS topics, as long as joystick control is disabled. If enabled, joystick control will override any commands sent through the command topics. To launch it, run the following line:
roslaunch dingo dingo.launch
Arguments are:
With no arguments specified, it will assume a joystick controller is used for control and it will launch the hardware interface with IMU feedback disabled. No joint data will be published for Gazebo to use to simulate the robot.
As an example of how the arguments can be used, if the code is to be run purely in simulation with joystick control, you would launch the driver with the following arguments:
roslaunch dingo dingo.launch is_physical:=0 is_sim:=1
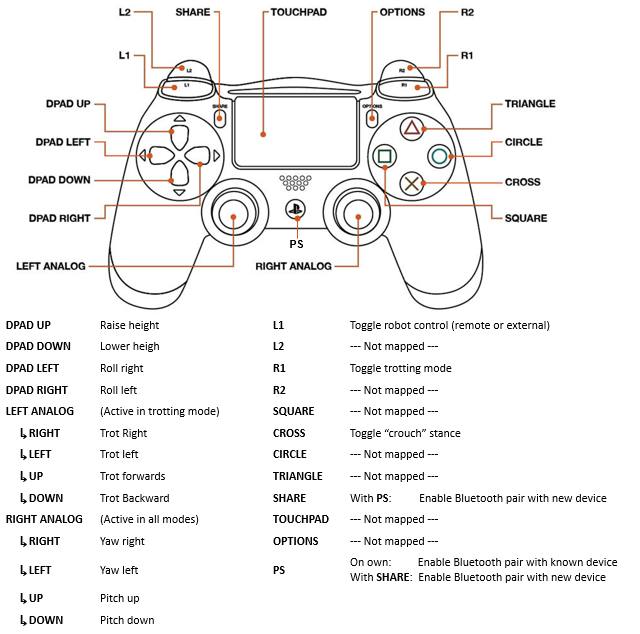
The diagram above shows the mapping of joystick commands for the Dingo. These instructions are based on a PS4 type controller. An alternative, more general description of joystick commands is below:
The Dingo has two main states: Rest and Trot.
Buttons:
Movement: (Speed proportional to how far stick is moved)
Gaze:
Orientation:
Make sure dingo_driver is running first, then:
roslaunch dingo_gazebo simulation.launch
The ROS extension provides options to roslaunch and rosrun files inside vscode via the inbuilt terminal without needing to use the native linux terminal. The commands to do so are the same as natively.
To start/stop a roscore daemon inside vscode, you can type ctrl+shift+P in vscode, and then type ROS: Start to start and ROS: Stop to stop the roscore daemon.
To build or rebuild the ros workspace, type ctrl+shift+B. If this does not work, you may need to edit the tasks.json file which tells vscode how to build the container. Ensure that the catkin build task defined in tasks.json includes the option -DCMAKE_BUILD_TYPE=Debug, as without this the vscode debugger will not work correctly.
An important note, as the entire ros workspace is volume mounted, files can be edited inside the container and reflected in your native linux filesystem and vice versa. This means the code can be changed and debugged in the vscode container but run natively, with all changes being reflected.
The ROS extension has two options to enable debugging. The first is to attach to a running node which you start via the terminal with rosrun package_name node_name. The second is to debug from a launch file, where you use the debugger menu in vscode to launch a launch file and then set waypoints in any nodes which the launch file starts. To set this up, please watch this video
If the debugger is not stopping at breakpoints, you may need to edit the tasks.json file which tells vscode how to build the container. Ensure that the catkin build task defined in tasks.json includes the option -DCMAKE_BUILD_TYPE=Debug.
1,961 followers · starred Jun 2023
217 followers · starred Jun 2023
189 followers · starred Jun 2023
124 followers · starred Jun 2023
Base code for the Dingo quadruped; modified from Stanford Pupper and Notspot repositories. Includes integration with ROS Noetic and a simulation of the Dingo
Python
1,311
211 commits
updated Mar 27, 2026
This repository hosts the code for the Dingo Quadruped, a robot designed to be low-cost but capable of conducting research and being extensively modified with additional actuators and sensors. CAD for the Dingo can be found here. A full Bill of materials for purchasable components can be found within this repo.
This code is based on the Stanford Pupper and notspot codebases, with extensive modifications, including integration into ROS 1 Noetic.
The repository includes a driver node, dingo_driver.py, which should be used anytime the code is run. This file enables joystick control of the Dingo, and allows joint and/or task space commands generated by any other code to be passed through the driver via the appropriate ROS command topics. The joystick can also be toggled on and off to override commands received via ROS command topics
The repo also includes a gazebo simulation of the Dingo, based on URDF file and meshes which are also provide.
The following flow diagram shows a simplified overview of how a joystick command is handled by the driver to affect joint movements:
├── assets                                    Images used in the readme file
├── dingo_nano                                Code for the Arduino Nano V3 to read sensor data and send it to the Raspberry Pi
└── dingo_ws                                  ROS workspace containing all required packages
   └── src
     ├── dingo                                Package containing node and launch files for running the robot
     ├── dingo_control                        Package containing all files related to control, including kinematics and default trot controller
     ├── dingo_description                    Package containing simulation files (URDF file and meshes)
     ├── dingo_gazebo                         Package containing gazebo files
     ├── dingo_hardware_interfacing
     |  ├── dingo_input_interfacing           Package containing files for receiving and interpreting commands (From a joystick or keyboard)
     |  ├── dingo_peripheral_interfacing      Package containing files for interfacing with the Arduino Nano, LCD screen and IMU
     |  └── dingo_servo_interfacing           Package containing the hardware interface for sending joint angles to the servo motors
     └── dingo_utilities                      Package containing useful utilities
sudo apt-get install python3-catkin-tools git python3-rosdep python3-rosinstall python3-rosinstall-generator python3-wstool python3-pip build-essential wireless-tools libraspberrypi-bin ros-noetic-joy ros-noetic-catkin python3-catkin-tools i2c-tools libi2c-dev python3-smbuspip install spidev transforms3d adafruit-circuitpython-bno055 pillow rpi.gpio pyserialcd ~git clone ...cd /DingoQuadruped/dingo_wssudo rosdep initrosdep updatecatkin buildsource devel/setup.bashecho "source ~/DingoQuadruped/dingo_ws/devel/setup.bash" >> ~/.bashrc, source ~/.bashrcFor getting bluetooth controller working (for instance PS4 controller)
sudo apt-get install bluetooth bluez bluez-toolssudo apt-get install pi-bluetoothbluetoothctl scan onbluetoothctl pair AA:BB:CC:11:22:33 (example device)bluetoothctl connect AA:BB:CC:11:22:33bluetoothctl trust AA:BB:CC:11:22:33jstest /dev/input/js0At this stage, the controller will only connect if you run bluetoothctl in the terminal, and then press the pair button on the controller. To bypass the step of running bluetoothctl, do the following:
#!/bin/bash

# Replace 'XX:XX:XX:XX:XX:XX' with your controller's MAC address
controller_mac="XX:XX:XX:XX:XX:XX"

# Use bluetoothctl to connect the controller
bluetoothctl <<EOF
connect $controller_mac
exit
EOF`
chmod +x connect_controller.shSUBSYSTEM=="bluetooth", KERNEL=="hci0", ACTION=="add", ENV{DEVTYPE}=="adapter", TAG+="systemd", SYMLINK+="bluetooth", RUN+="/bin/sleep 10", RUN+="/path/to/connect_controller.sh"sudo udevadm control --reload
The controller should now autopair every time the pair button is pressed, without needing to do anything on the PiTo get WiFi working
    wifis:
        wlan0:
            optional: true
            dhcp4: true
            access-points:
                "<wifi SSID>":
                    password: "<wifi password>"
If getting an error with "rounded_rectangle", need to install later version of Pillow.
pip3 install --upgrade PillowThe LCD node has been created following the waveshare tutorial here: https://www.waveshare.com/wiki/1.47inch_LCD_Module. Apart from installing the libraries listed there, the fonts also need to be moved into the ubuntu fonts folder to be used by executing the following lines:
cd ~sudo apt-get install unzip -ysudo wget https://files.waveshare.com/upload/8/8d/LCD_Module_RPI_code.zipsudo unzip ./LCD_Module_RPI_code.zipcd ~/LCD_Module_RPI_code/RaspberryPi/python/Fontsudo mv Font00.ttf /usr/share/fonts/truetype/Font00.ttfsudo mv Font01.ttf /usr/share/fonts/truetype/Font01.ttfsudo mv Font02.ttf /usr/share/fonts/truetype/Font02.ttfTo run ROS as non-root, must set permissions correctly via udev for several /dev files.
       KERNEL=="ttyS0", OWNER="root", GROUP="ros", MODE="0660"
       KERNEL=="spi", OWNER="root", GROUP="ros", MODE="0660"
       KERNEL=="i2c", OWNER="root", GROUP="ros", MODE="0660"
       KERNEL=="gpiomem", OWNER="root", GROUP="ros", MODE="0660"
       KERNEL=="mem", OWNER="root", GROUP="ros", MODE="0660"
sudo groupadd ros && sudo adduser <username> rossudo udevadm control --reload-rules && sudo udevadm triggersudo i2cdetect -y 1. If this doesnt work, try replacing the 1 with a 0. If this works, replace the 1 with a 0 in all subsequent steps.i2cdetect -y 1. If the same matrix appears, all is good. Otherwise, run the following: sudo groupadd i2c
sudo chown :i2c /dev/i2c-1
sudo chmod g+rw /dev/i2c-1
sudo usermod -aG i2c [INSERT YOUR USERNAME]
i2cdetect -y 1. The matrix should now appear for your user.Please run the code first before following these steps. If you do not receive an SPI permission error, there is no need to do the following SPI setup steps. Proceed if you receive an error
ls -la /dev/spidev* to list SPI devices sudo groupadd spi
sudo usermod -aG spi <yourusername>
sudo chown :spi <put the spi device name here>
sudo chmod g+rw <put the spi device name here>
sudo nano /etc/systemd/system/spi-permissions.service and put the following into the file, saving and exiting afterwards: [Unit]
Description=Set SPI Permissions
[Service]
ExecStart=/path/to/your/script.sh
User=root
Group=root
Restart=on-failure
RestartSec=5s
[Install]
WantedBy=multi-user.target
nano ~/startspi.sh and put the following into the file, saving and exiting afterwards. Note: If your SPI device names are different, please update them accordingly: #!/bin/bash
sudo usermod -aG spi <yourusername>
sudo chown :spi /dev/spidev0.0
sudo chmod g+rw /dev/spidev0.0
sudo chown :spi /dev/spidev0.1
sudo chmod g+rw /dev/spidev0.1
sudo chmod +x /path/to/your/script.shsudo systemctl daemon-reloadsudo systemctl enable spi-permissions.servicesudo systemctl start spi-permissions.serviceSPI should now work across restarts
Serial communications was one of the hardest parts of this project to get working. Unfortunately Ubuntu 20.04 in particular seems to have trouble on Raspberry Pi with serial communications via the tx and rx pins. If the following steps do not work for you, further research/trial and error may be required.
Do the following:
sudo apt-get updatesudo apt-get install ros-noetic-rosserial ros-noetic-rosserial-python ros-noetic-rosserial-arduinosudo systemctl disable serial-getty@ttyS0.service --nowsudo systemctl stop serial-getty@ttyS0.servicesudo systemctl mask serial-getty@ttyS0.serviceTest whether serial is working by running the Dingo code. It should attempt to connect to the Arduino and successfully do so, which can be seen via the code printing to the terminal that publishers have been established. If it errors, first check your wiring to the arduino, and that the arduino has been flashed correctly. If this does not work, further research and trial/error will be needed. Look for articles like this one
It's a good idea to backup the sdcard every so often. Here is how to do that on linux.
sudo dd if=/dev/sdb of=~/dingo_backup.img bs=4M status=progresssudo dd if=dingo_backup of=/dev/sdb bs=4M status=progressHelp with getting the servos calibrated
rosrun dingo_servo_interfacing CalibrateServos all cal (move all servos to calibration position)rosrun dingo_servo_interfacing CalibrateServos fr high (move front right servo to high position)The files inside the base directory enable a docker container to be built and the code to inspected and debugged in visual studio code. This is mostly for debugging purposes, and is best for an external device debugging or adding to the code, rather than being used on the quadruped itself. Note: These instructions assume a linux OS.
cd ~/any_folder_name/DingoQuadrupedcode . to open the dingo quadruped base folder in vscodeThe Dingo_Driver should be started before any other code is launched on the Dingo. It starts joystick control of the robot and allows joint and task space commands to be received from other code or controllers via command ROS topics, as long as joystick control is disabled. If enabled, joystick control will override any commands sent through the command topics. To launch it, run the following line:
roslaunch dingo dingo.launch
Arguments are:
With no arguments specified, it will assume a joystick controller is used for control and it will launch the hardware interface with IMU feedback disabled. No joint data will be published for Gazebo to use to simulate the robot.
As an example of how the arguments can be used, if the code is to be run purely in simulation with joystick control, you would launch the driver with the following arguments:
roslaunch dingo dingo.launch is_physical:=0 is_sim:=1
The diagram above shows the mapping of joystick commands for the Dingo. These instructions are based on a PS4 type controller. An alternative, more general description of joystick commands is below:
The Dingo has two main states: Rest and Trot.
Buttons:
Movement: (Speed proportional to how far stick is moved)
Gaze:
Orientation:
Make sure dingo_driver is running first, then:
roslaunch dingo_gazebo simulation.launch
The ROS extension provides options to roslaunch and rosrun files inside vscode via the inbuilt terminal without needing to use the native linux terminal. The commands to do so are the same as natively.
To start/stop a roscore daemon inside vscode, you can type ctrl+shift+P in vscode, and then type ROS: Start to start and ROS: Stop to stop the roscore daemon.
To build or rebuild the ros workspace, type ctrl+shift+B. If this does not work, you may need to edit the tasks.json file which tells vscode how to build the container. Ensure that the catkin build task defined in tasks.json includes the option -DCMAKE_BUILD_TYPE=Debug, as without this the vscode debugger will not work correctly.
An important note, as the entire ros workspace is volume mounted, files can be edited inside the container and reflected in your native linux filesystem and vice versa. This means the code can be changed and debugged in the vscode container but run natively, with all changes being reflected.
The ROS extension has two options to enable debugging. The first is to attach to a running node which you start via the terminal with rosrun package_name node_name. The second is to debug from a launch file, where you use the debugger menu in vscode to launch a launch file and then set waypoints in any nodes which the launch file starts. To set this up, please watch this video
If the debugger is not stopping at breakpoints, you may need to edit the tasks.json file which tells vscode how to build the container. Ensure that the catkin build task defined in tasks.json includes the option -DCMAKE_BUILD_TYPE=Debug.
1,961 followers · starred Jun 2023
217 followers · starred Jun 2023
189 followers · starred Jun 2023
124 followers · starred Jun 2023



