The python library for the ESPARGOS WiFi antenna array
See the code
pyespargos is the Python library for working with the ESPARGOS WiFi channel sounder. ESPARGOS is a real-time-capable, phase-synchronous 2 × 4 WiFi antenna array built from Espressif ESP32 chips that facilitates the development and deployment of WiFi sensing applications.
The library supports combining multiple ESPARGOS arrays into larger antenna arrays, various CSI preamble formats (L-LTF, HT20, HT40), and provides a flexible calibration system for multi-board setups.
| Your ESPARGOS looks like this: | Your ESPARGOS looks like this: |
|---|---|
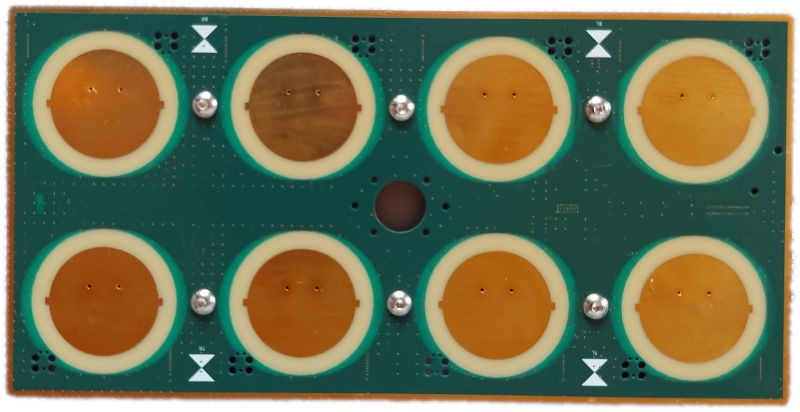 | 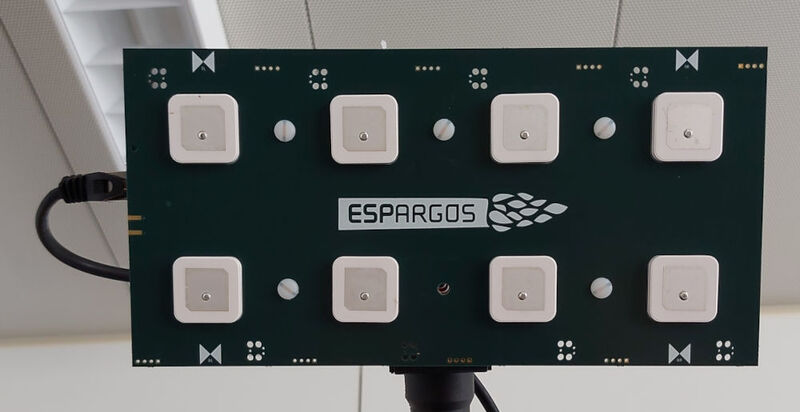 |
→ You have the current ESPARGOS, please use the main branch of this repository. | → You have the older prototype generation of ESPARGOS, please use the legacy-prototype branch of this repository. This hardware revision is no longer supported. |
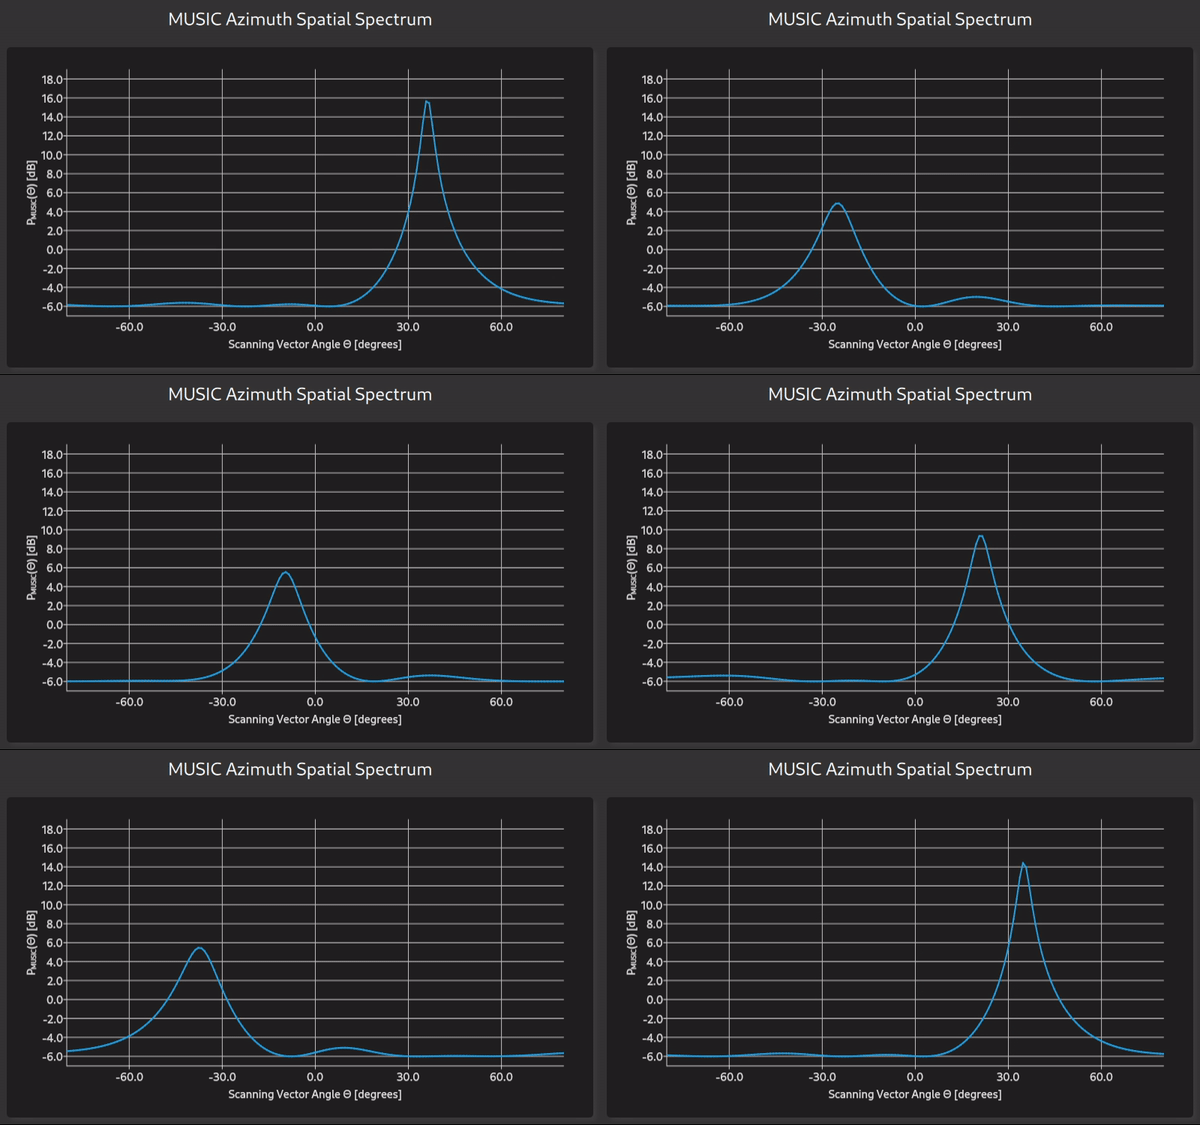
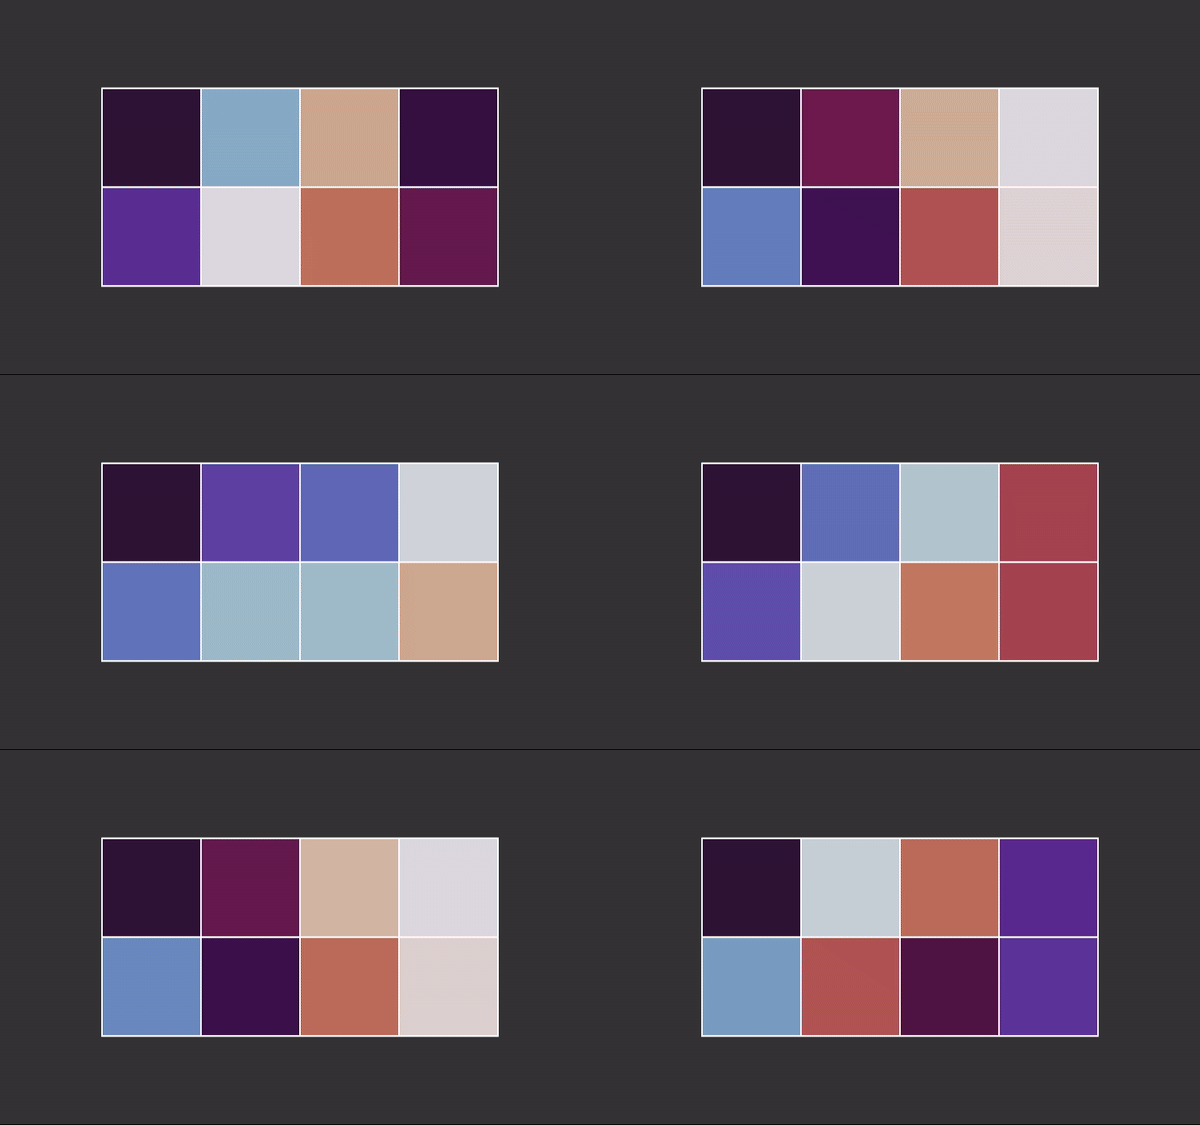
| MUSIC Spatial Spectrum | Receive Signal Phase by Antenna |
|---|---|
 |  |
| Instantaneous CSI: Frequency Domain | Instantaneous CSI: Time Domain |
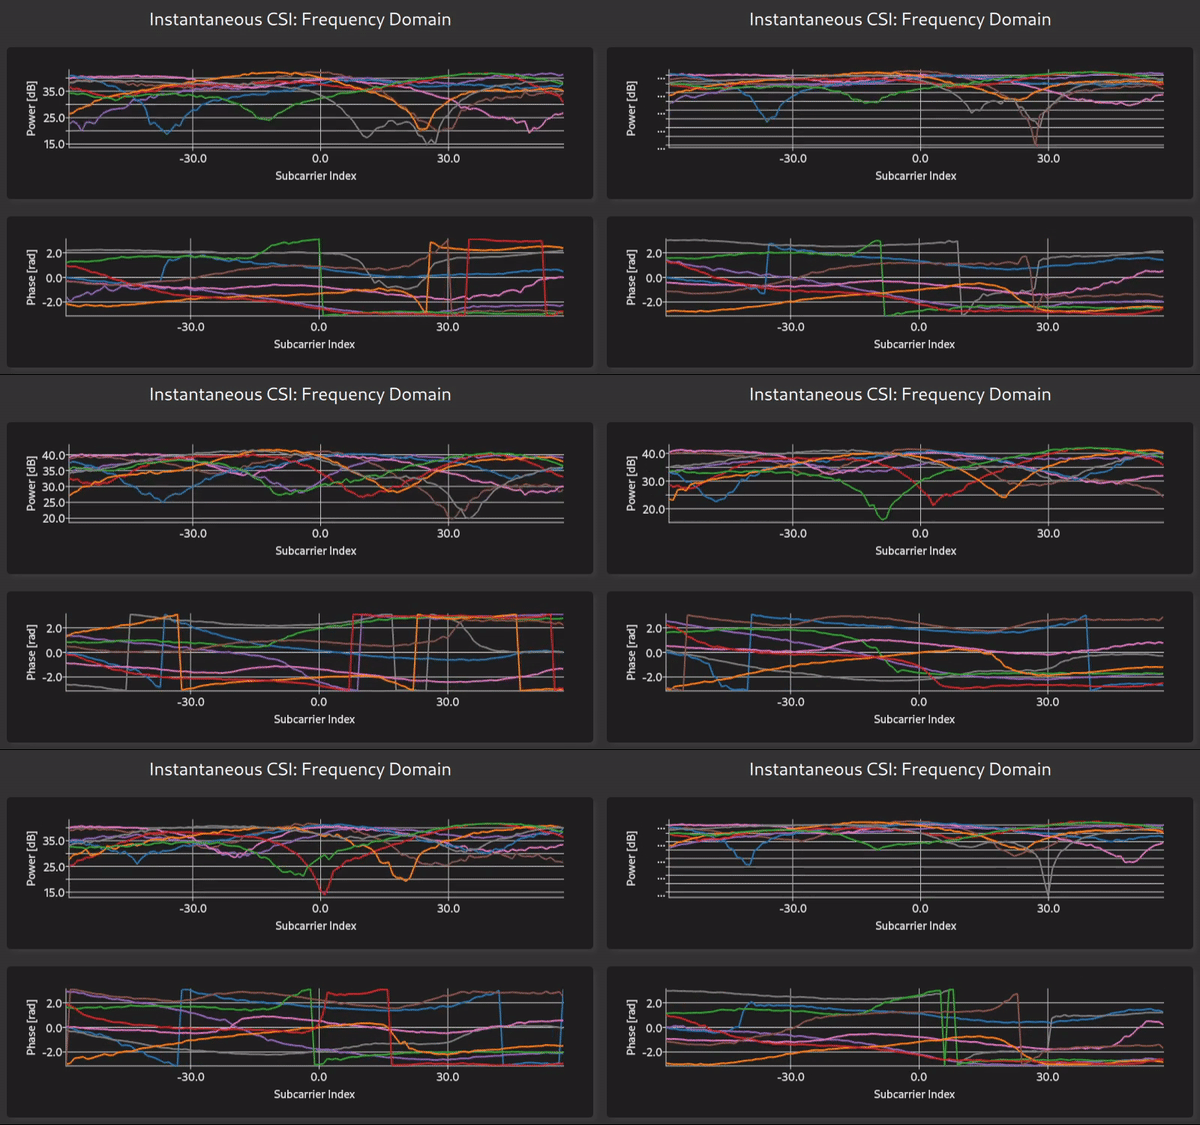 | 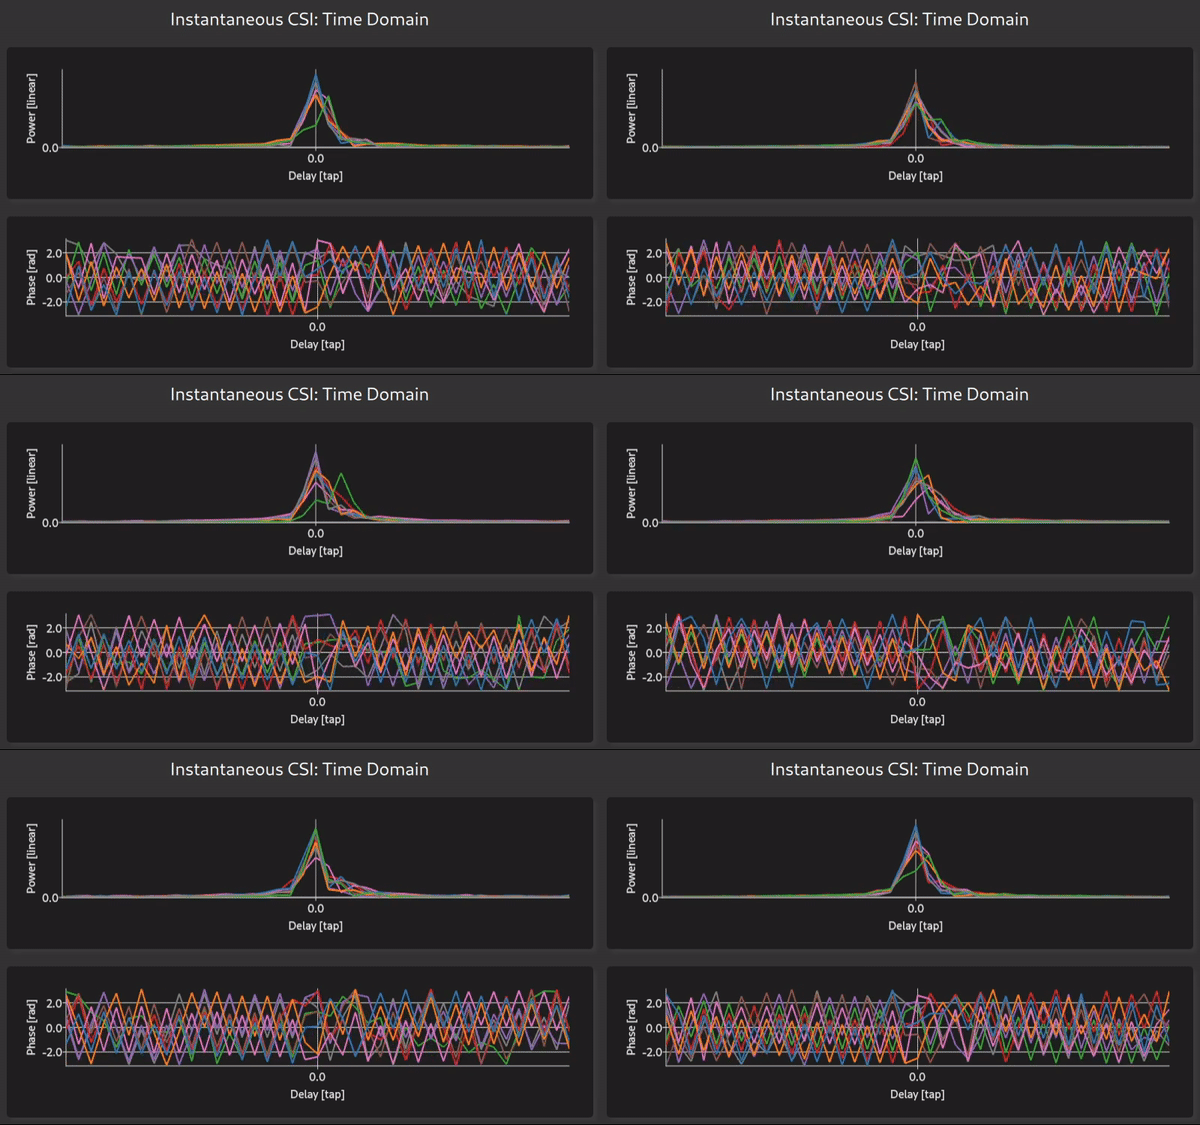 |
| Phases over Time | Combined 8 × 4 ESPARGOS Array |
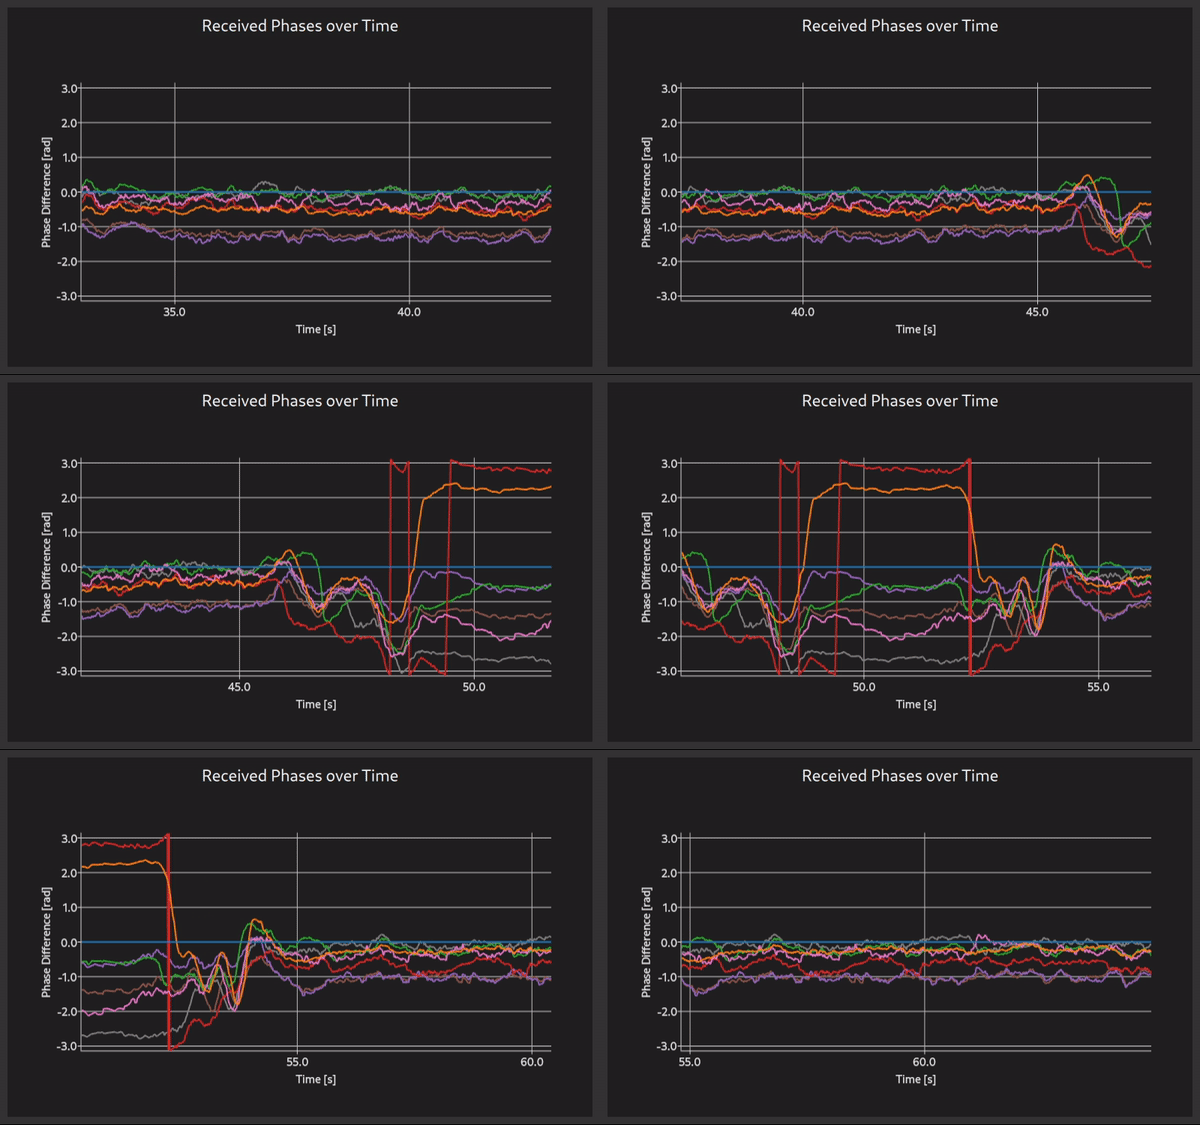 | 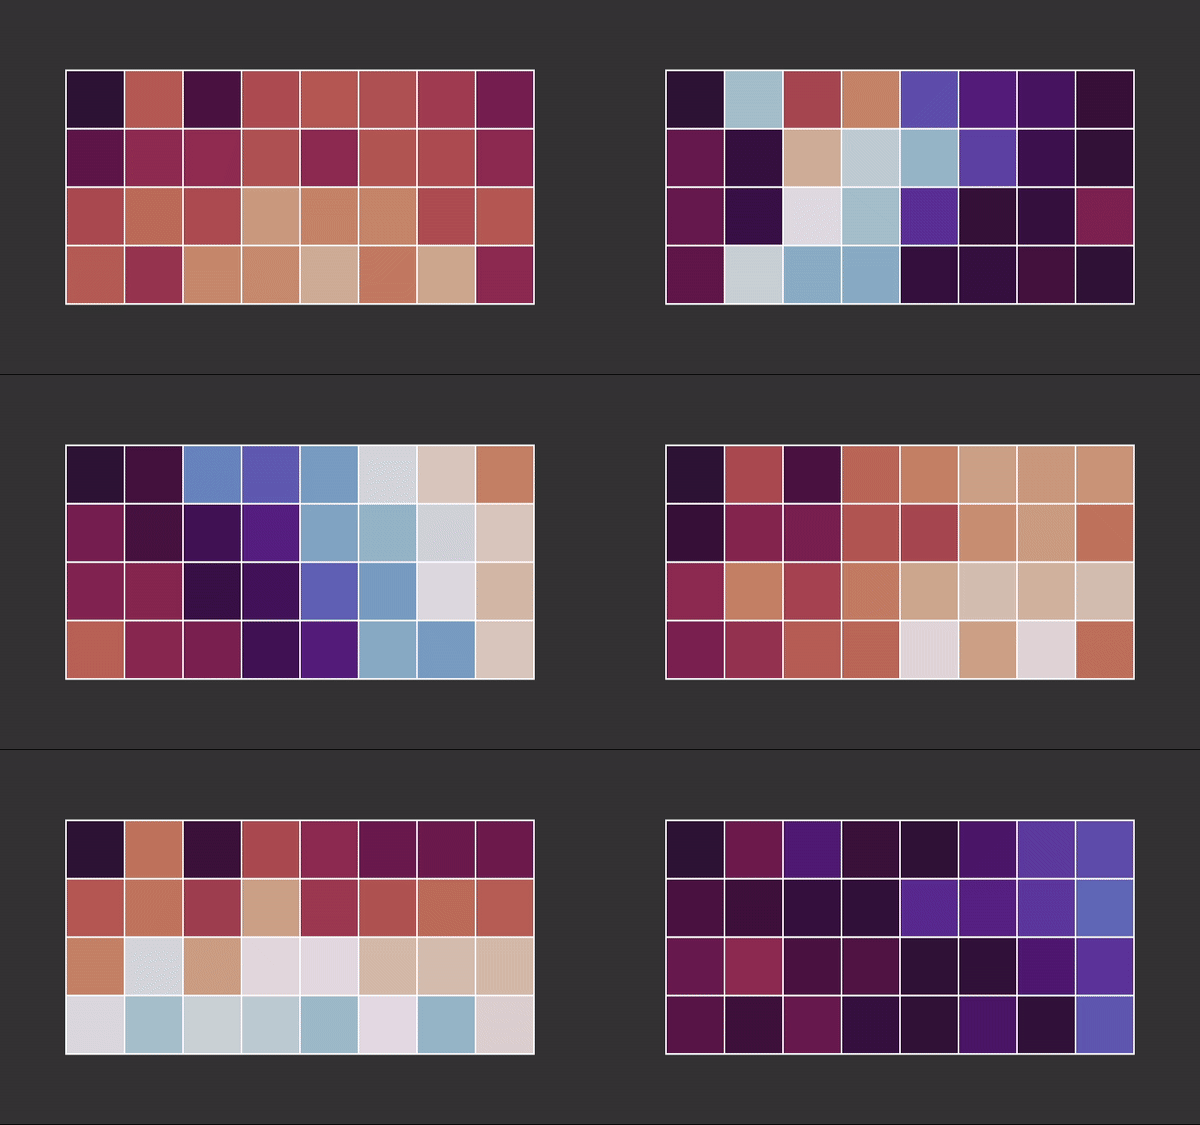 |
pyespargos comes with a selection of demo applications for testing ESPARGOS.
All demos are built on a common application framework (demos/common) that provides:
The following demos are provided in the demos folder of this repository:
| Demo | Description |
|---|---|
iq-signal-analyzer | Display synchronized raw IQ as power/phase waterfalls, I/Q traces, constellations, and spectra. Supports Interval, Accumulate, and Signal capture; see usage. |
music-spectrum | Use the MUSIC algorithm to display a spatial (angular) spectrum. Demonstrates angle of arrival (AoA) estimation. |
phases-over-space | Show the average received phase for each ESPARGOS antenna. |
instantaneous-csi | Plot the current frequency-domain or time-domain transfer function of the measured channel. |
phases-over-time | Plot the average received phase for every antenna over time. |
tdoas-over-time | Visualize time difference of arrival (TDOA) measurements over time. |
azimuth-delay | Display a 2D azimuth-delay diagram using beamspace processing. Ships with pre-compiled shaders; see demos/azimuth-delay/README.md in case of shader issues. |
polarization | Visualize WiFi signal polarization using constellation diagrams and polarization ellipses. |
speedtest | Measure CSI packet throughput from ESPARGOS. |
combined-array | Combine multiple ESPARGOS arrays into one large antenna array and visualize the average received phase for each antenna. Requires multiple ESPARGOS arrays. |
combined-array-calibration | Tool for calibrating combined multi-board antenna arrays. Visualizes and exports calibration data. |
camera | Overlay WiFi spatial spectrum on a live camera feed. Ships with pre-compiled shaders; see demos/camera/README.md in case of shader issues. |
radiation-pattern-3d | Interactive 3D radiation pattern visualization. Requires additional packages (see demos/radiation-pattern-3d/README.md). |
Most demos support both single ESPARGOS arrays and combined multi-board setups via command-line arguments or YAML configuration files.
pyespargos requires Python 3.11 or newer. Follow the instructions for your operating system below.
 Linux /
  Raspberry Pi
Most Linux distributions ship with Python pre-installed. Verify by running:
python3 --version
If Python is not installed or the version is too old, install it using your package manager:
# Debian / Ubuntu / Raspberry Pi OS (Raspbian)
sudo apt update && sudo apt install python3 python3-venv python3-pip

# Fedora
sudo dnf install python3 python3-pip

# Arch Linux
sudo pacman -S python python-pip
git clone https://github.com/ESPARGOS/pyespargos.git
cd pyespargos
python3 -m venv .venv
source .venv/bin/activate
Note: You need to run
source .venv/bin/activate(from thepyespargosdirectory) every time you open a new terminal before using pyespargos.
pip install -e .
If you want to run the demo applications:
pip install pyqt6 pyqt6-charts pyyaml matplotlib
Demos such as camera and azimuth-delay use shaders, which are shipped in pre-compiled form (.qsb files) in this repository, so normally no additional steps are required. Only if these demos do not work should you re-compile the shaders yourself using the compile_shader.sh scripts, which requires the Qt Shader Baker (qsb):
# Debian / Ubuntu / Raspberry Pi OS (Raspbian)
sudo apt install qt6-shader-baker

# Fedora
sudo dnf install qt6-qtshadertools

# Arch Linux
sudo pacman -S qt6-shadertools
Note: The
compile_shader.shscripts currently expectqsbat/usr/lib/qt6/bin/qsb. If your distribution installs it elsewhere, update the script accordingly.
 Windows
(not recommended)
If you don't have Python installed yet:
python --version
Tip: You can also install Python from the Microsoft Store by searching for "Python".
git clone https://github.com/ESPARGOS/pyespargos.git
Open a Command Prompt window (not PowerShell):
cd pyespargos
python -m venv .venv
.venv\Scripts\activate
Note: You need to activate the virtual environment every time you open a new terminal before using pyespargos.
pip install -e .
If you want to run the demo applications:
pip install pyqt6 pyqt6-charts pyyaml matplotlib
Demos such as camera and azimuth-delay use shaders, which are shipped in pre-compiled form (.qsb files) in this repository, so normally no additional steps are required. Only if these demos do not work should you re-compile the shaders yourself using the .bat scripts, which requires Qt 6 so that qsb.exe (Qt Shader Baker) is available. The simplest option is to use the Qt Online Installer and install a desktop Qt 6 kit.
Note: The shader batch scripts currently default to
C:\Qt\6.10.2\mingw_64\bin\qsb.exe. If your Qt installation is in a different location, either update theQSBpath in the.batscripts or add the Qtbindirectory toPATH.
 macOS
macOS(not recommended)
The recommended way to install Python on macOS is via Homebrew:
# Install Homebrew (if not already installed)
/bin/bash -c "$(curl -fsSL https://raw.githubusercontent.com/Homebrew/install/HEAD/install.sh)"

# Install Python
brew install python
Important: After installing Python with Homebrew, close and re-open your terminal so that the Homebrew-installed Python is used instead of the older macOS system Python.
Verify the installation:
python3 --version
Alternative: You can also download the installer from python.org/downloads.
git clone https://github.com/ESPARGOS/pyespargos.git
cd pyespargos
python3 -m venv .venv
source .venv/bin/activate
Note: You need to run
source .venv/bin/activate(from thepyespargosdirectory) every time you open a new terminal before using pyespargos.
pip install -e .
If you want to run the demo applications:
pip install pyqt6 pyqt6-charts pyyaml matplotlib
Demos such as camera and azimuth-delay use shaders, which are shipped in pre-compiled form (.qsb files) in this repository, so normally no additional steps are required. Only if these demos do not work should you re-compile the shaders yourself using the compile_shader.sh scripts, which requires the Qt Shader Baker (qsb). One option is:
brew install qt
Then verify that qsb is available:
qsb --version
Note: If
qsbis not on yourPATH, use the full path from your Qt installation when runningcompile_shader.sh.
After installing pyespargos and the demo dependencies (steps above), you can run a demo. Make sure the virtual environment is activated, then run the following from the pyespargos directory.
For example, to run the Instantaneous CSI demo with an ESPARGOS controller at 192.168.1.2:
Linux / macOS:
./demos/instantaneous-csi/instantaneous-csi.py 192.168.1.2
Windows (Command Prompt):
python demos\instantaneous-csi\instantaneous-csi.py 192.168.1.2
If you have multiple ESPARGOS boards, pass their addresses separated by commas:
python demos/instantaneous-csi/instantaneous-csi.py 192.168.1.2,192.168.1.3
Other demos may ask for different command line arguments.
Run any demo with --help to see the available options.
ESPARGOS can also tunnel its control and CSI traffic over the USB serial connection. This is useful if you do not have Ethernet available, or if you want to configure ESPARGOS network settings through USB before putting it on a network.
There are two ways to use the USB UART connection:
The tools/espargos-uart-router.py helper exposes an ESPARGOS USB serial connection as a local HTTP / WebSocket endpoint.
After connecting ESPARGOS to your computer via USB-C, run:
python tools/espargos-uart-router.py uart:/dev/ttyUSB0
Replace /dev/ttyUSB0 with the serial device used by ESPARGOS on your computer.
Typical examples are:
uart:/dev/ttyUSB0 or uart:/dev/ttyACM0uart:/dev/tty.usbserial-...uart:COM3By default, the router listens on 127.0.0.1:8400.
Open http://127.0.0.1:8400 in your browser to use the ESPARGOS web interface through USB.
Note: Firmware updates are not supported through the UART router. Use Ethernet for firmware updates.
All pyespargos demos and APIs that accept an ESPARGOS host can also use a UART host specifier instead of an IP address or hostname.
Use the format uart:<serial-device>.
For example, to run the Instantaneous CSI demo over USB on Linux:
./demos/instantaneous-csi/instantaneous-csi.py uart:/dev/ttyUSB0
On Windows:
python demos\instantaneous-csi\instantaneous-csi.py uart:COM3
In your own Python code, pass the same host string to espargos.Board:
board = espargos.Board("uart:/dev/ttyUSB0")
If you need to override the default UART baud rate, append it after @, for example uart:/dev/ttyUSB0@3000000.
Note: The UART router and pyespargos direct UART access both need exclusive access to the serial device. Do not run the router while a pyespargos demo or application is connected directly to the same
uart:...device.
To create your own ESPARGOS-based application, you have two options:
pyespargos libraryAfter installation, import the espargos package in your Python application. Use this minimal sample code to get started:
#!/usr/bin/env python

import espargos
import time

pool = espargos.CSIPool([espargos.Board("192.168.1.2")])
pool.set_csi_acquisition_config({"acquire_csi_force_lltf": True})
pool.start()
backlog = None
try:
    pool.calibrate(duration=2)
    backlog = espargos.CSIBacklog(
        pool,
        fields=["lltf", "rssi"],
        size=20,
    )
    backlog.add_filter(espargos.Exclude11bFilter())
    backlog.start()

    # Wait a moment so the backlog can collect some WiFi packets.
    time.sleep(4)

    if backlog.has_data:
        csi_lltf, rssi = backlog.get_multiple(("lltf", "rssi"))
        print("L-LTF backlog shape:", csi_lltf.shape)
        print("RSSI backlog:", rssi)
    else:
        print("No CSI data received yet.")
finally:
    if backlog is not None:
        backlog.stop()
    pool.stop()
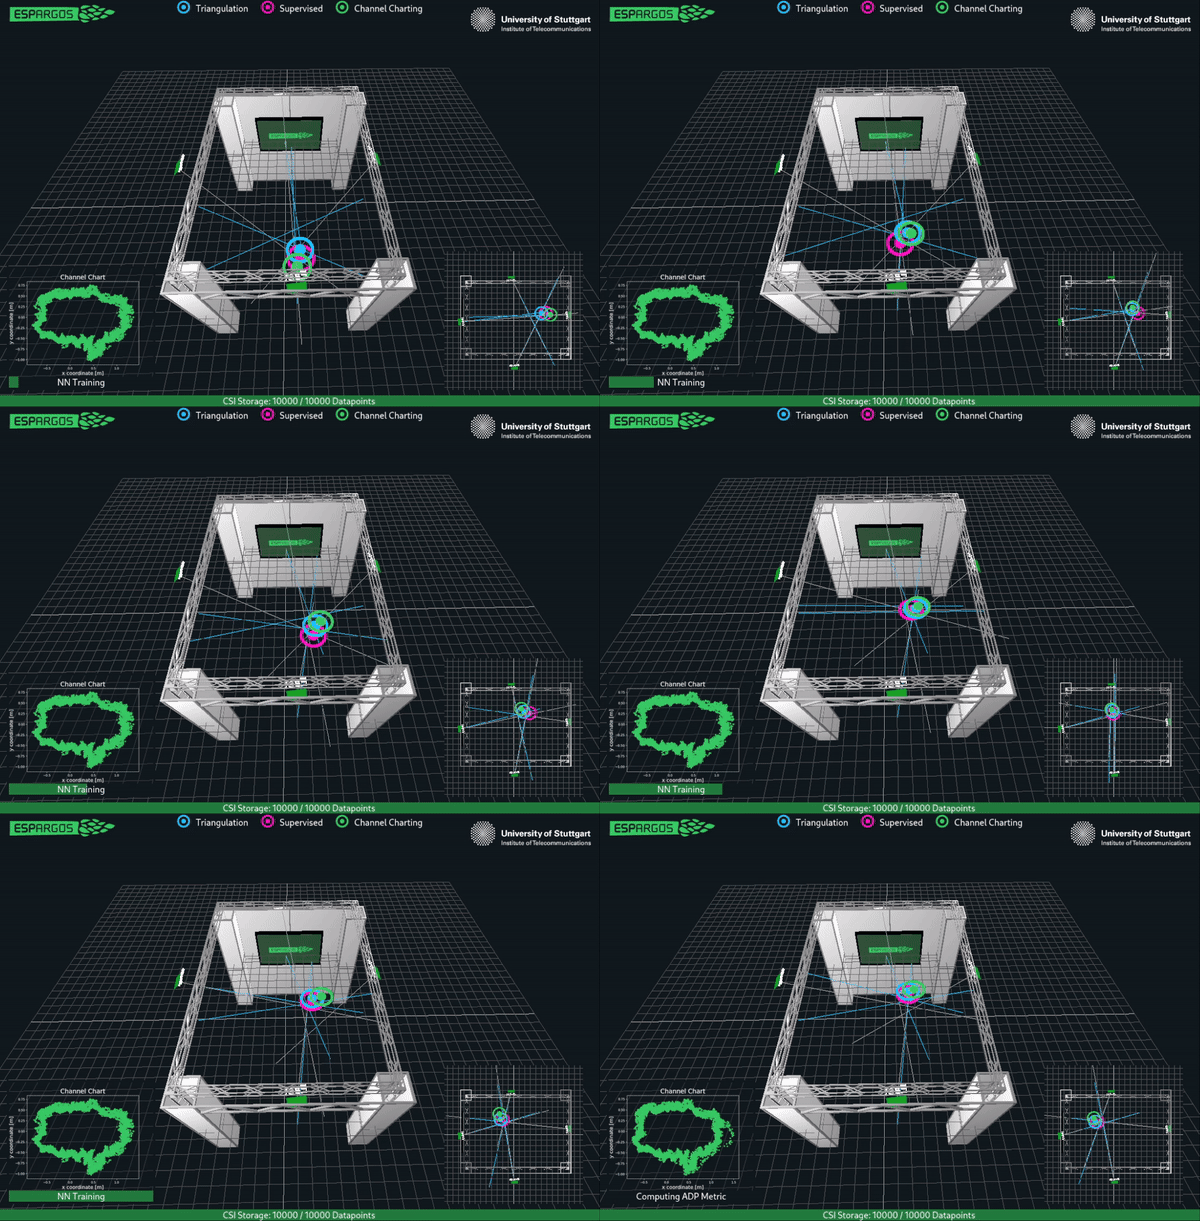
lltf): legacy long training field from 802.11g-style packets, represented as 53 subcarriers (-26..26, with DC reconstructed/interpolated when needed). In fact, even the newer HT/HE packets contain L-LTF fields. In a force L-LTF mode you can change the behavior of ESPARGOS to always extract the L-LTF CSI instead of the other training fields. The L-LTF CSI supports 12-bit encoding of the real and imaginary components (instead of just 8-bit encoding like the other preamble formats), which makes this mode preferable for situations in which dynamic range is important.ht20): 802.11n HT-LTF for 20 MHz packets, represented as 57 subcarriers (-28..28).ht40): 802.11n HT-LTF for 40 MHz channel bonding, represented as 117 bins (-58..58, including the 3-bin gap between the bonded channels).he20): 802.11ax HE-LTF for 20 MHz packets, represented as 245 bins (-122..122, with invalid/null tones around DC zeroed by pyespargos).Exclude11bFilter.Board owns controller identity, transport and raw sensor-message delivery. Feature-specific operations are grouped into lazily created capabilities: receive/CSI controls live on board.wifi_rx, while scheduled-transmission controls live on board.wifi_tx.Board.register_capability(name, factory). The resulting API is available as board.<name> without changing how applications construct a board. A capability can use the public, transport-independent board.control request interface instead of depending on HTTP or UART internals./stream_udp, waits for a magic packet, and sends periodic keepalives to keep firewall/NAT state alive. Older controllers expose the same operation as /csi_udp, which remains supported as a fallback./stream): more compatible transport and the endpoint used by recent versions of the web interface. Controllers from before the generic endpoint was introduced expose the same sensor stream as /csi, which pyespargos retains as a fallback.uart:/dev/ttyUSB0 or uart:COM3. Control RPCs and sensor-message streaming are then tunnelled over the serial link.Board.start() chooses transports automatically: network hosts try UDP first and fall back to WebSocket; UART hosts use the UART transport.Board dispatches them through callbacks filtered by their four-byte type header. Callbacks receive the raw SensorMessage, including its UID and antenna ID. Capabilities own format-specific parsing: board.wifi_rx.subscribe_csi(...) delivers decoded CSI, and board.wifi_tx.subscribe_reports(...) delivers decoded transmit reports. Optional features can do the same without adding their formats to board.py.CSIBacklog keeps the last N CSI clusters in a ringbuffer and lets application code read consistent snapshots with get() or get_multiple().lltf, ht20, ht40, he20, rssi, cfo, rf_switch_state, timestamp, host_timestamp, mac, radar_tx_timestamp and radar_tx_index.(datapoints, boards, rows, antennas, subcarriers). Per-antenna metadata uses the same board/row/antenna layout.CSIBacklog applies the pool calibration before storing CSI. Pass apply_calibration=False if you need raw, uncalibrated CSI, or change the apply_calibration property at runtime.MACFilter and Exclude11bFilter can drop packets before they enter the ringbuffer.espargos/util.py provide common CSI post-processing helpers, including subcarrier frequency axes, gap interpolation, feed separation, time-domain transforms and AoA/ToA helpers.CSIPool groups those sensor reports into CSICluster objects that represent one WiFi packet across one or more ESPARGOS boards.WiFiFrameKey containing source/destination MAC addresses and sequence control, with separate caches for calibration packets and over-the-air packets.CSIPool.run(). A call waits up to its timeout for the first message and processes one bounded batch. Use timeout=0 in GUI/event loops; dedicated workers may use a longer timeout such as 0.5 seconds.CSICluster exposes deserializers for lltf, ht20, ht40 and he20, plus metadata such as RSSI, CFO, RF switch state, source MAC, primary/secondary channel, host timestamp and per-sensor hardware timestamps.CSIBacklog, clustering happens underneath it and you usually only interact with the backlog arrays.pool.calibrate(duration=...). The resulting CSICalibration stores phase calibration values for L-LTF, HT20, HT40 and HE20, plus per-sensor clock offsets.CSICalibration applies phase-only calibration to CSI and can compensate board-specific trace delays. For multi-board setups, it can also compensate external sync-cable lengths and velocity factors.CSIPool clusters packets across all boards and presents CSI in (boards, rows, antennas, subcarriers) layout.reference_generator_boards can be used when separate ESPARGOS controllers generate calibration packets but are not part of the receive array.espargos/util.py can map board data into larger array layouts, and the combined-array / combined-array-calibration demos show typical workflows.board.wifi_tx.set_config() / CSIPool.set_radar_config() configure per-antenna transmit activity, timing, MAC addresses, PHY mode/rate and TX power.CSICluster and CSIBacklog expose this through fields such as radar_tx_timestamp and radar_tx_index, which are useful when correcting CSI using known transmit timing.espargos.radar helpers provide higher-level utilities for building radar pool configurations and correcting radar CSI phase using TX timestamps.dataset-recorder: Application to record ESPARGOS datasets for publication on https://espargos.net/datasets/. Please contact me to get access.realtime-localization: Real-time Localization Demo: Channel Charting vs. Triangulation vs. Supervised Training. Requires multiple ESPARGOS. Please contact me to get access.
pyespargos is licensed under the GNU Lesser General Public License version 3 (LGPLv3), see LICENSE for details.
646 followers · starred Feb 2025
489 followers · starred Jun 2026
267 followers · starred Feb 2025
158 followers · starred Feb 2025
The python library for the ESPARGOS WiFi antenna array
See the code
pyespargos is the Python library for working with the ESPARGOS WiFi channel sounder. ESPARGOS is a real-time-capable, phase-synchronous 2 × 4 WiFi antenna array built from Espressif ESP32 chips that facilitates the development and deployment of WiFi sensing applications.
The library supports combining multiple ESPARGOS arrays into larger antenna arrays, various CSI preamble formats (L-LTF, HT20, HT40), and provides a flexible calibration system for multi-board setups.
| Your ESPARGOS looks like this: | Your ESPARGOS looks like this: |
|---|---|
| |
→ You have the current ESPARGOS, please use the main branch of this repository. | → You have the older prototype generation of ESPARGOS, please use the legacy-prototype branch of this repository. This hardware revision is no longer supported. |
| MUSIC Spatial Spectrum | Receive Signal Phase by Antenna |
|---|---|
| |
| Instantaneous CSI: Frequency Domain | Instantaneous CSI: Time Domain |
| |
| Phases over Time | Combined 8 × 4 ESPARGOS Array |
| |
pyespargos comes with a selection of demo applications for testing ESPARGOS.
All demos are built on a common application framework (demos/common) that provides:
The following demos are provided in the demos folder of this repository:
| Demo | Description |
|---|---|
iq-signal-analyzer | Display synchronized raw IQ as power/phase waterfalls, I/Q traces, constellations, and spectra. Supports Interval, Accumulate, and Signal capture; see usage. |
music-spectrum | Use the MUSIC algorithm to display a spatial (angular) spectrum. Demonstrates angle of arrival (AoA) estimation. |
phases-over-space | Show the average received phase for each ESPARGOS antenna. |
instantaneous-csi | Plot the current frequency-domain or time-domain transfer function of the measured channel. |
phases-over-time | Plot the average received phase for every antenna over time. |
tdoas-over-time | Visualize time difference of arrival (TDOA) measurements over time. |
azimuth-delay | Display a 2D azimuth-delay diagram using beamspace processing. Ships with pre-compiled shaders; see demos/azimuth-delay/README.md in case of shader issues. |
polarization | Visualize WiFi signal polarization using constellation diagrams and polarization ellipses. |
speedtest | Measure CSI packet throughput from ESPARGOS. |
combined-array | Combine multiple ESPARGOS arrays into one large antenna array and visualize the average received phase for each antenna. Requires multiple ESPARGOS arrays. |
combined-array-calibration | Tool for calibrating combined multi-board antenna arrays. Visualizes and exports calibration data. |
camera | Overlay WiFi spatial spectrum on a live camera feed. Ships with pre-compiled shaders; see demos/camera/README.md in case of shader issues. |
radiation-pattern-3d | Interactive 3D radiation pattern visualization. Requires additional packages (see demos/radiation-pattern-3d/README.md). |
Most demos support both single ESPARGOS arrays and combined multi-board setups via command-line arguments or YAML configuration files.
pyespargos requires Python 3.11 or newer. Follow the instructions for your operating system below.
Linux / Raspberry PiMost Linux distributions ship with Python pre-installed. Verify by running:
python3 --version
If Python is not installed or the version is too old, install it using your package manager:
# Debian / Ubuntu / Raspberry Pi OS (Raspbian)
sudo apt update && sudo apt install python3 python3-venv python3-pip

# Fedora
sudo dnf install python3 python3-pip

# Arch Linux
sudo pacman -S python python-pip
git clone https://github.com/ESPARGOS/pyespargos.git
cd pyespargos
python3 -m venv .venv
source .venv/bin/activate
Note: You need to run
source .venv/bin/activate(from thepyespargosdirectory) every time you open a new terminal before using pyespargos.
pip install -e .
If you want to run the demo applications:
pip install pyqt6 pyqt6-charts pyyaml matplotlib
Demos such as camera and azimuth-delay use shaders, which are shipped in pre-compiled form (.qsb files) in this repository, so normally no additional steps are required. Only if these demos do not work should you re-compile the shaders yourself using the compile_shader.sh scripts, which requires the Qt Shader Baker (qsb):
# Debian / Ubuntu / Raspberry Pi OS (Raspbian)
sudo apt install qt6-shader-baker

# Fedora
sudo dnf install qt6-qtshadertools

# Arch Linux
sudo pacman -S qt6-shadertools
Note: The
compile_shader.shscripts currently expectqsbat/usr/lib/qt6/bin/qsb. If your distribution installs it elsewhere, update the script accordingly.
Windows(not recommended)
If you don't have Python installed yet:
python --version
Tip: You can also install Python from the Microsoft Store by searching for "Python".
git clone https://github.com/ESPARGOS/pyespargos.git
Open a Command Prompt window (not PowerShell):
cd pyespargos
python -m venv .venv
.venv\Scripts\activate
Note: You need to activate the virtual environment every time you open a new terminal before using pyespargos.
pip install -e .
If you want to run the demo applications:
pip install pyqt6 pyqt6-charts pyyaml matplotlib
Demos such as camera and azimuth-delay use shaders, which are shipped in pre-compiled form (.qsb files) in this repository, so normally no additional steps are required. Only if these demos do not work should you re-compile the shaders yourself using the .bat scripts, which requires Qt 6 so that qsb.exe (Qt Shader Baker) is available. The simplest option is to use the Qt Online Installer and install a desktop Qt 6 kit.
Note: The shader batch scripts currently default to
C:\Qt\6.10.2\mingw_64\bin\qsb.exe. If your Qt installation is in a different location, either update theQSBpath in the.batscripts or add the Qtbindirectory toPATH.
macOS(not recommended)
The recommended way to install Python on macOS is via Homebrew:
# Install Homebrew (if not already installed)
/bin/bash -c "$(curl -fsSL https://raw.githubusercontent.com/Homebrew/install/HEAD/install.sh)"

# Install Python
brew install python
Important: After installing Python with Homebrew, close and re-open your terminal so that the Homebrew-installed Python is used instead of the older macOS system Python.
Verify the installation:
python3 --version
Alternative: You can also download the installer from python.org/downloads.
git clone https://github.com/ESPARGOS/pyespargos.git
cd pyespargos
python3 -m venv .venv
source .venv/bin/activate
Note: You need to run
source .venv/bin/activate(from thepyespargosdirectory) every time you open a new terminal before using pyespargos.
pip install -e .
If you want to run the demo applications:
pip install pyqt6 pyqt6-charts pyyaml matplotlib
Demos such as camera and azimuth-delay use shaders, which are shipped in pre-compiled form (.qsb files) in this repository, so normally no additional steps are required. Only if these demos do not work should you re-compile the shaders yourself using the compile_shader.sh scripts, which requires the Qt Shader Baker (qsb). One option is:
brew install qt
Then verify that qsb is available:
qsb --version
Note: If
qsbis not on yourPATH, use the full path from your Qt installation when runningcompile_shader.sh.
After installing pyespargos and the demo dependencies (steps above), you can run a demo. Make sure the virtual environment is activated, then run the following from the pyespargos directory.
For example, to run the Instantaneous CSI demo with an ESPARGOS controller at 192.168.1.2:
Linux / macOS:
./demos/instantaneous-csi/instantaneous-csi.py 192.168.1.2
Windows (Command Prompt):
python demos\instantaneous-csi\instantaneous-csi.py 192.168.1.2
If you have multiple ESPARGOS boards, pass their addresses separated by commas:
python demos/instantaneous-csi/instantaneous-csi.py 192.168.1.2,192.168.1.3
Other demos may ask for different command line arguments.
Run any demo with --help to see the available options.
ESPARGOS can also tunnel its control and CSI traffic over the USB serial connection. This is useful if you do not have Ethernet available, or if you want to configure ESPARGOS network settings through USB before putting it on a network.
There are two ways to use the USB UART connection:
The tools/espargos-uart-router.py helper exposes an ESPARGOS USB serial connection as a local HTTP / WebSocket endpoint.
After connecting ESPARGOS to your computer via USB-C, run:
python tools/espargos-uart-router.py uart:/dev/ttyUSB0
Replace /dev/ttyUSB0 with the serial device used by ESPARGOS on your computer.
Typical examples are:
uart:/dev/ttyUSB0 or uart:/dev/ttyACM0uart:/dev/tty.usbserial-...uart:COM3By default, the router listens on 127.0.0.1:8400.
Open http://127.0.0.1:8400 in your browser to use the ESPARGOS web interface through USB.
Note: Firmware updates are not supported through the UART router. Use Ethernet for firmware updates.
All pyespargos demos and APIs that accept an ESPARGOS host can also use a UART host specifier instead of an IP address or hostname.
Use the format uart:<serial-device>.
For example, to run the Instantaneous CSI demo over USB on Linux:
./demos/instantaneous-csi/instantaneous-csi.py uart:/dev/ttyUSB0
On Windows:
python demos\instantaneous-csi\instantaneous-csi.py uart:COM3
In your own Python code, pass the same host string to espargos.Board:
board = espargos.Board("uart:/dev/ttyUSB0")
If you need to override the default UART baud rate, append it after @, for example uart:/dev/ttyUSB0@3000000.
Note: The UART router and pyespargos direct UART access both need exclusive access to the serial device. Do not run the router while a pyespargos demo or application is connected directly to the same
uart:...device.
To create your own ESPARGOS-based application, you have two options:
pyespargos libraryAfter installation, import the espargos package in your Python application. Use this minimal sample code to get started:
#!/usr/bin/env python

import espargos
import time

pool = espargos.CSIPool([espargos.Board("192.168.1.2")])
pool.set_csi_acquisition_config({"acquire_csi_force_lltf": True})
pool.start()
backlog = None
try:
    pool.calibrate(duration=2)
    backlog = espargos.CSIBacklog(
        pool,
        fields=["lltf", "rssi"],
        size=20,
    )
    backlog.add_filter(espargos.Exclude11bFilter())
    backlog.start()

    # Wait a moment so the backlog can collect some WiFi packets.
    time.sleep(4)

    if backlog.has_data:
        csi_lltf, rssi = backlog.get_multiple(("lltf", "rssi"))
        print("L-LTF backlog shape:", csi_lltf.shape)
        print("RSSI backlog:", rssi)
    else:
        print("No CSI data received yet.")
finally:
    if backlog is not None:
        backlog.stop()
    pool.stop()
lltf): legacy long training field from 802.11g-style packets, represented as 53 subcarriers (-26..26, with DC reconstructed/interpolated when needed). In fact, even the newer HT/HE packets contain L-LTF fields. In a force L-LTF mode you can change the behavior of ESPARGOS to always extract the L-LTF CSI instead of the other training fields. The L-LTF CSI supports 12-bit encoding of the real and imaginary components (instead of just 8-bit encoding like the other preamble formats), which makes this mode preferable for situations in which dynamic range is important.ht20): 802.11n HT-LTF for 20 MHz packets, represented as 57 subcarriers (-28..28).ht40): 802.11n HT-LTF for 40 MHz channel bonding, represented as 117 bins (-58..58, including the 3-bin gap between the bonded channels).he20): 802.11ax HE-LTF for 20 MHz packets, represented as 245 bins (-122..122, with invalid/null tones around DC zeroed by pyespargos).Exclude11bFilter.Board owns controller identity, transport and raw sensor-message delivery. Feature-specific operations are grouped into lazily created capabilities: receive/CSI controls live on board.wifi_rx, while scheduled-transmission controls live on board.wifi_tx.Board.register_capability(name, factory). The resulting API is available as board.<name> without changing how applications construct a board. A capability can use the public, transport-independent board.control request interface instead of depending on HTTP or UART internals./stream_udp, waits for a magic packet, and sends periodic keepalives to keep firewall/NAT state alive. Older controllers expose the same operation as /csi_udp, which remains supported as a fallback./stream): more compatible transport and the endpoint used by recent versions of the web interface. Controllers from before the generic endpoint was introduced expose the same sensor stream as /csi, which pyespargos retains as a fallback.uart:/dev/ttyUSB0 or uart:COM3. Control RPCs and sensor-message streaming are then tunnelled over the serial link.Board.start() chooses transports automatically: network hosts try UDP first and fall back to WebSocket; UART hosts use the UART transport.Board dispatches them through callbacks filtered by their four-byte type header. Callbacks receive the raw SensorMessage, including its UID and antenna ID. Capabilities own format-specific parsing: board.wifi_rx.subscribe_csi(...) delivers decoded CSI, and board.wifi_tx.subscribe_reports(...) delivers decoded transmit reports. Optional features can do the same without adding their formats to board.py.CSIBacklog keeps the last N CSI clusters in a ringbuffer and lets application code read consistent snapshots with get() or get_multiple().lltf, ht20, ht40, he20, rssi, cfo, rf_switch_state, timestamp, host_timestamp, mac, radar_tx_timestamp and radar_tx_index.(datapoints, boards, rows, antennas, subcarriers). Per-antenna metadata uses the same board/row/antenna layout.CSIBacklog applies the pool calibration before storing CSI. Pass apply_calibration=False if you need raw, uncalibrated CSI, or change the apply_calibration property at runtime.MACFilter and Exclude11bFilter can drop packets before they enter the ringbuffer.espargos/util.py provide common CSI post-processing helpers, including subcarrier frequency axes, gap interpolation, feed separation, time-domain transforms and AoA/ToA helpers.CSIPool groups those sensor reports into CSICluster objects that represent one WiFi packet across one or more ESPARGOS boards.WiFiFrameKey containing source/destination MAC addresses and sequence control, with separate caches for calibration packets and over-the-air packets.CSIPool.run(). A call waits up to its timeout for the first message and processes one bounded batch. Use timeout=0 in GUI/event loops; dedicated workers may use a longer timeout such as 0.5 seconds.CSICluster exposes deserializers for lltf, ht20, ht40 and he20, plus metadata such as RSSI, CFO, RF switch state, source MAC, primary/secondary channel, host timestamp and per-sensor hardware timestamps.CSIBacklog, clustering happens underneath it and you usually only interact with the backlog arrays.pool.calibrate(duration=...). The resulting CSICalibration stores phase calibration values for L-LTF, HT20, HT40 and HE20, plus per-sensor clock offsets.CSICalibration applies phase-only calibration to CSI and can compensate board-specific trace delays. For multi-board setups, it can also compensate external sync-cable lengths and velocity factors.CSIPool clusters packets across all boards and presents CSI in (boards, rows, antennas, subcarriers) layout.reference_generator_boards can be used when separate ESPARGOS controllers generate calibration packets but are not part of the receive array.espargos/util.py can map board data into larger array layouts, and the combined-array / combined-array-calibration demos show typical workflows.board.wifi_tx.set_config() / CSIPool.set_radar_config() configure per-antenna transmit activity, timing, MAC addresses, PHY mode/rate and TX power.CSICluster and CSIBacklog expose this through fields such as radar_tx_timestamp and radar_tx_index, which are useful when correcting CSI using known transmit timing.espargos.radar helpers provide higher-level utilities for building radar pool configurations and correcting radar CSI phase using TX timestamps.dataset-recorder: Application to record ESPARGOS datasets for publication on https://espargos.net/datasets/. Please contact me to get access.realtime-localization: Real-time Localization Demo: Channel Charting vs. Triangulation vs. Supervised Training. Requires multiple ESPARGOS. Please contact me to get access.
pyespargos is licensed under the GNU Lesser General Public License version 3 (LGPLv3), see LICENSE for details.
646 followers · starred Feb 2025
489 followers · starred Jun 2026
267 followers · starred Feb 2025
158 followers · starred Feb 2025



