
VibeVoiceFusion is a full-stack, multi-speaker voice generation web system featuring LoRA fine-tuning, batch generation, and VRAM optimization. Based on Microsoft's VibeVoice (AR + diffusion architecture)
Python
490
292 commits
updated Oct 5, 2026
README
VibeVoiceFusion

A Complete Web Application for Multi-Speaker Voice Generation
Built on Microsoft's VibeVoice Model







Features • Demo Samples • Get Started • Documentation • Community • Contributing
Overview
Introduction
VibeVoiceFusion is a web application for multi-speaker speech generation with voice cloning and speech recognition, built on Microsoft's VibeVoice models. It brings text-to-speech, file transcription and live microphone transcription together in one bilingual (English/Chinese) web interface. It also covers LoRA fine-tuning and an OpenAI-compatible API, and it runs on consumer GPUs with 10GB+ of VRAM.
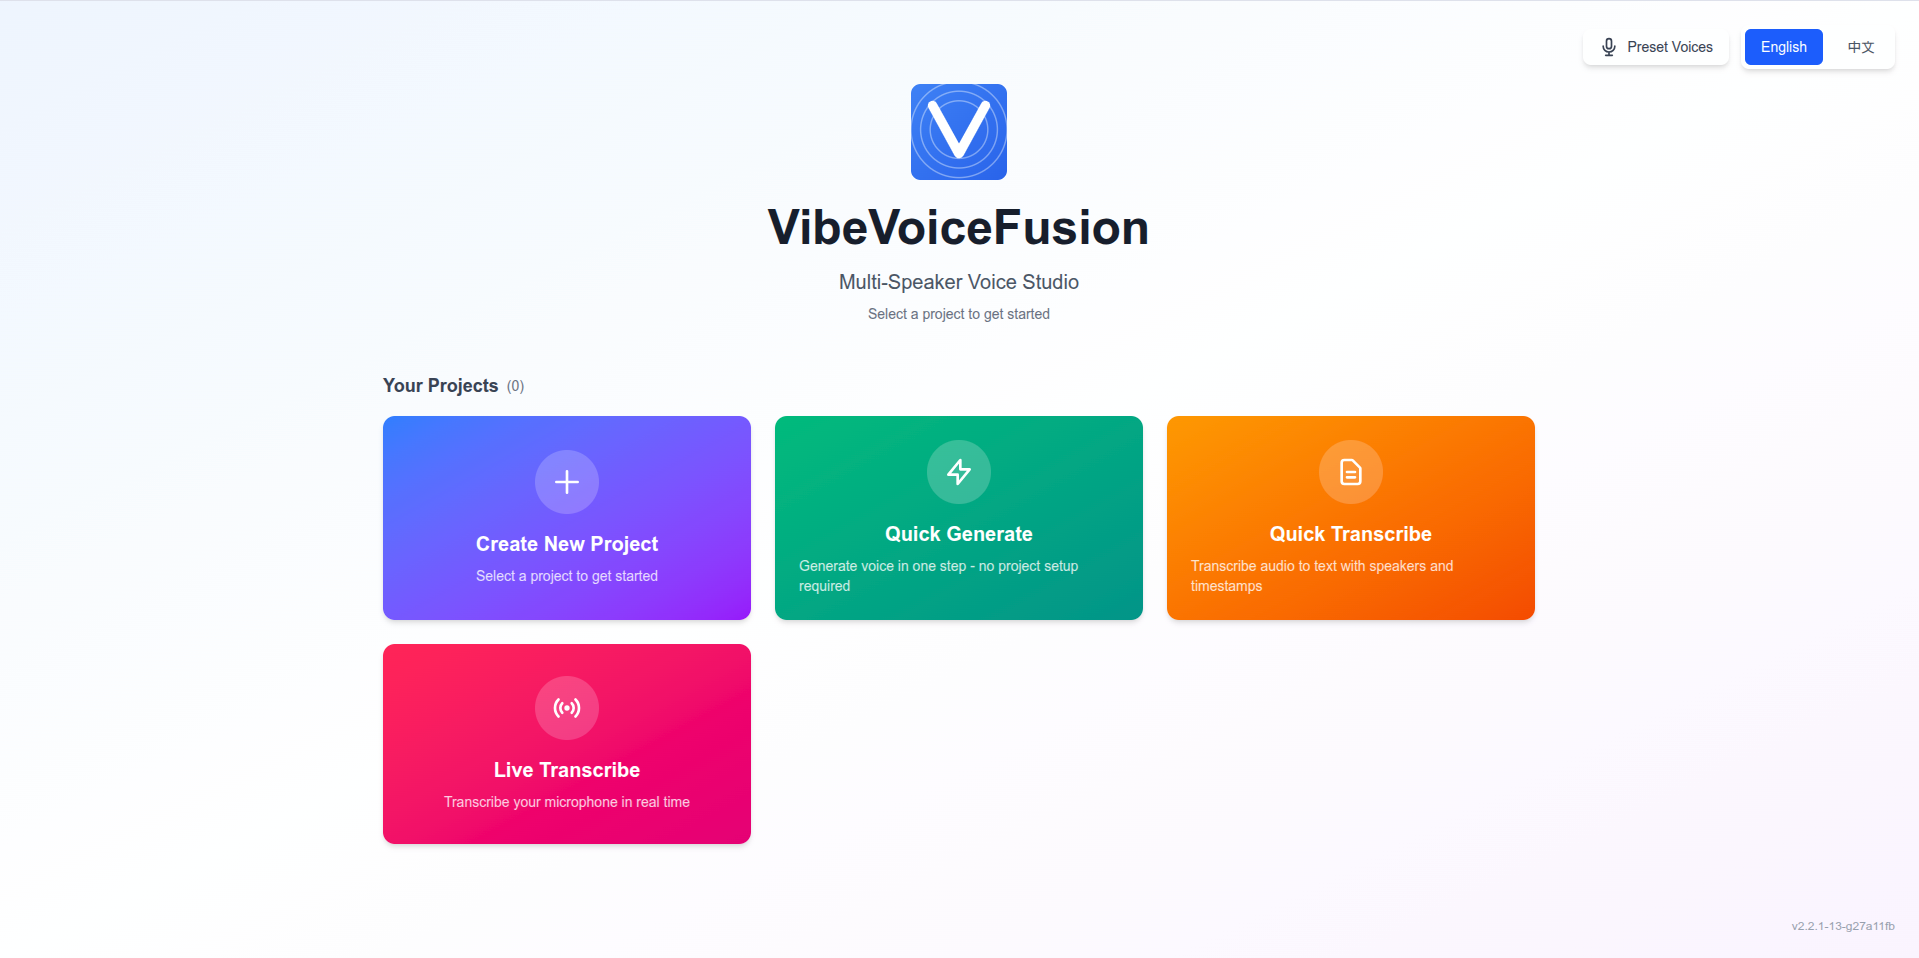
Features
Speech Generation
- Multi-speaker dialogue with voice cloning from short reference samples
- Narration mode for single-speaker content such as audiobooks and articles
- Quick Generate: generate without any project setup, using uploaded or preset voices
- Multi-Generation: 2-20 variations with different seeds in one run
- Dialog editor with a visual editor and a text editor
Speech Recognition
- File transcription with VibeVoice-ASR: segments with timestamps and speaker labels, downloadable as TXT or JSON
- Live transcription from the browser microphone, with text streaming in as you speak
- Saved transcription history, standalone or inside a project
LoRA Fine-Tuning
- Dataset management with ZIP or folder import and export
- LoRA training with live loss and learning-rate charts
- Trained LoRAs can be applied during generation with an adjustable weight
Runs on Consumer GPUs
- Float8 quantization halves model memory (RTX 40 series and newer)
- Layer offloading presets (Balanced / Aggressive / Extreme) for GPUs with 10GB+ of VRAM. See VRAM Requirements.
Integration & Deployment
- OpenAI-compatible API:
/v1/audio/speech,/v1/audio/transcriptionsand the Realtime WebSocket/v1/realtime, so existing OpenAI SDKs work as-is - Full English/Chinese UI with automatic language detection
- Docker image on Docker Hub
- CLI tools for TTS, streaming TTS with Realtime 0.5B, ASR, and model conversion
Demo Samples
Listen to voice generation samples created with VibeVoiceFusion. Click the links below to download and play:
Single Speaker
🎧 Pandora's Box Story (BFloat16 Model)
Generated with bfloat16 precision model - Full quality, 14GB VRAM
🎧 Pandora's Box Story (Float8 Model)
Generated with float8 quantization - Optimized for 7GB VRAM with comparable quality
Multi-Speaker (3 Speakers)
🎭 东邪西毒 - 西游版 (Journey to the West Version)
Multi-speaker dialog with distinct voice characteristics for each character
Get Started
Prerequisites
- Python: 3.9 or higher
- Node.js: 16.x or higher (for frontend development)
- CUDA: Compatible GPU with CUDA support (recommended)
- VRAM: Minimum 6GB for extreme offloading, 14GB recommended for best performance
- Docker: Optional, for containerized deployment
Installation
Option 1: Docker (Recommended for Production)
Build docker image
# Clone the repository
git clone https://github.com/zhao-kun/vibevoicefusion.git
cd vibevoicefusion
# Build and the docker image
docker compose build vibevoice
After build successfully, run command:
docker run -d \
  --name vibevoicefusion \
  --gpus all \
  -p 9527:9527 \
  -v $(pwd)/workspace:/workspace/zhao-kun/vibevoice/workspace \
  zhaokundev/vibevoicefusion:latest
Access the application at http://localhost:9527
The Docker image is available on Docker Hub, and you can launch VibeVoiceFusion using the following command.
docker pull zhaokundev/vibevoicefusion
docker run -d \
  --name vibevoicefusion \
  --gpus all \
  -p 9527:9527 \
  -v $(pwd)/workspace:/workspace/zhao-kun/vibevoice/workspace \
  zhaokundev/vibevoicefusion:latest
Build Time: 18-28 minutes | Image Size: ~12-15GB
Option 2: Manual Installation
1. Install Backend Dependencies
# Clone the repository
git clone https://github.com/zhao-kun/vibevoice.git
cd vibevoice

# Install Python package
pip install -e .
2. Download Pre-trained Model
Download from HuggingFace (choose one):
- Float8 (Recommended): vibevoice7b_float8_e4m3fn.safetensors (~7GB) (Supported by RTX 40 series and above graphics cards.)
- BFloat16 (Full Precision): vibevoice7b_bf16.safetensors (~14GB)
- Config: config.json
Place files in ./models/vibevoice/
3. Install Frontend Dependencies (for development)
cd frontend
npm install
4. Build Frontend (for production)
cd frontend
npm run build
cp -r out/* ../backend/dist/
Usage
Web Application (Recommended)
Production Mode (single server):
# Start backend server (serves both API and frontend)
python backend/run.py

# Access at http://localhost:9527
Development Mode (separate servers):
# Terminal 1: Start backend API
python backend/run.py  # http://localhost:9527

# Terminal 2: Start frontend dev server
cd frontend
npm run dev  # http://localhost:3000
Quick Generation (No Project Required)
For quick testing without setting up projects:
- Click "Quick Generate" from the home page
- Select Voice Source:
- Upload: Drag & drop your audio file (supports up to 4 files)
- Preset: Choose from preset voices with language/gender filters
- Enter Text: Type dialogue (
Speaker 1: Hello) or narration (plain text) - Configure: Set seed, batch size (2-20), and offloading options
- Generate: Click generate and monitor per-item progress
- Download: Play or download generated audio
Key Points:
- Auto-detects dialogue vs narration mode
- All speakers use the same voice in dialogue mode
- No LoRA support (base model only)
- History persists across sessions
Complete Workflow Guide
This guide walks you through the complete process of creating multi-speaker voice generation from start to finish.
Step 1: Create a Project
Start by creating a new project or selecting an existing one. Projects help organize your voice generation work with metadata and descriptions.
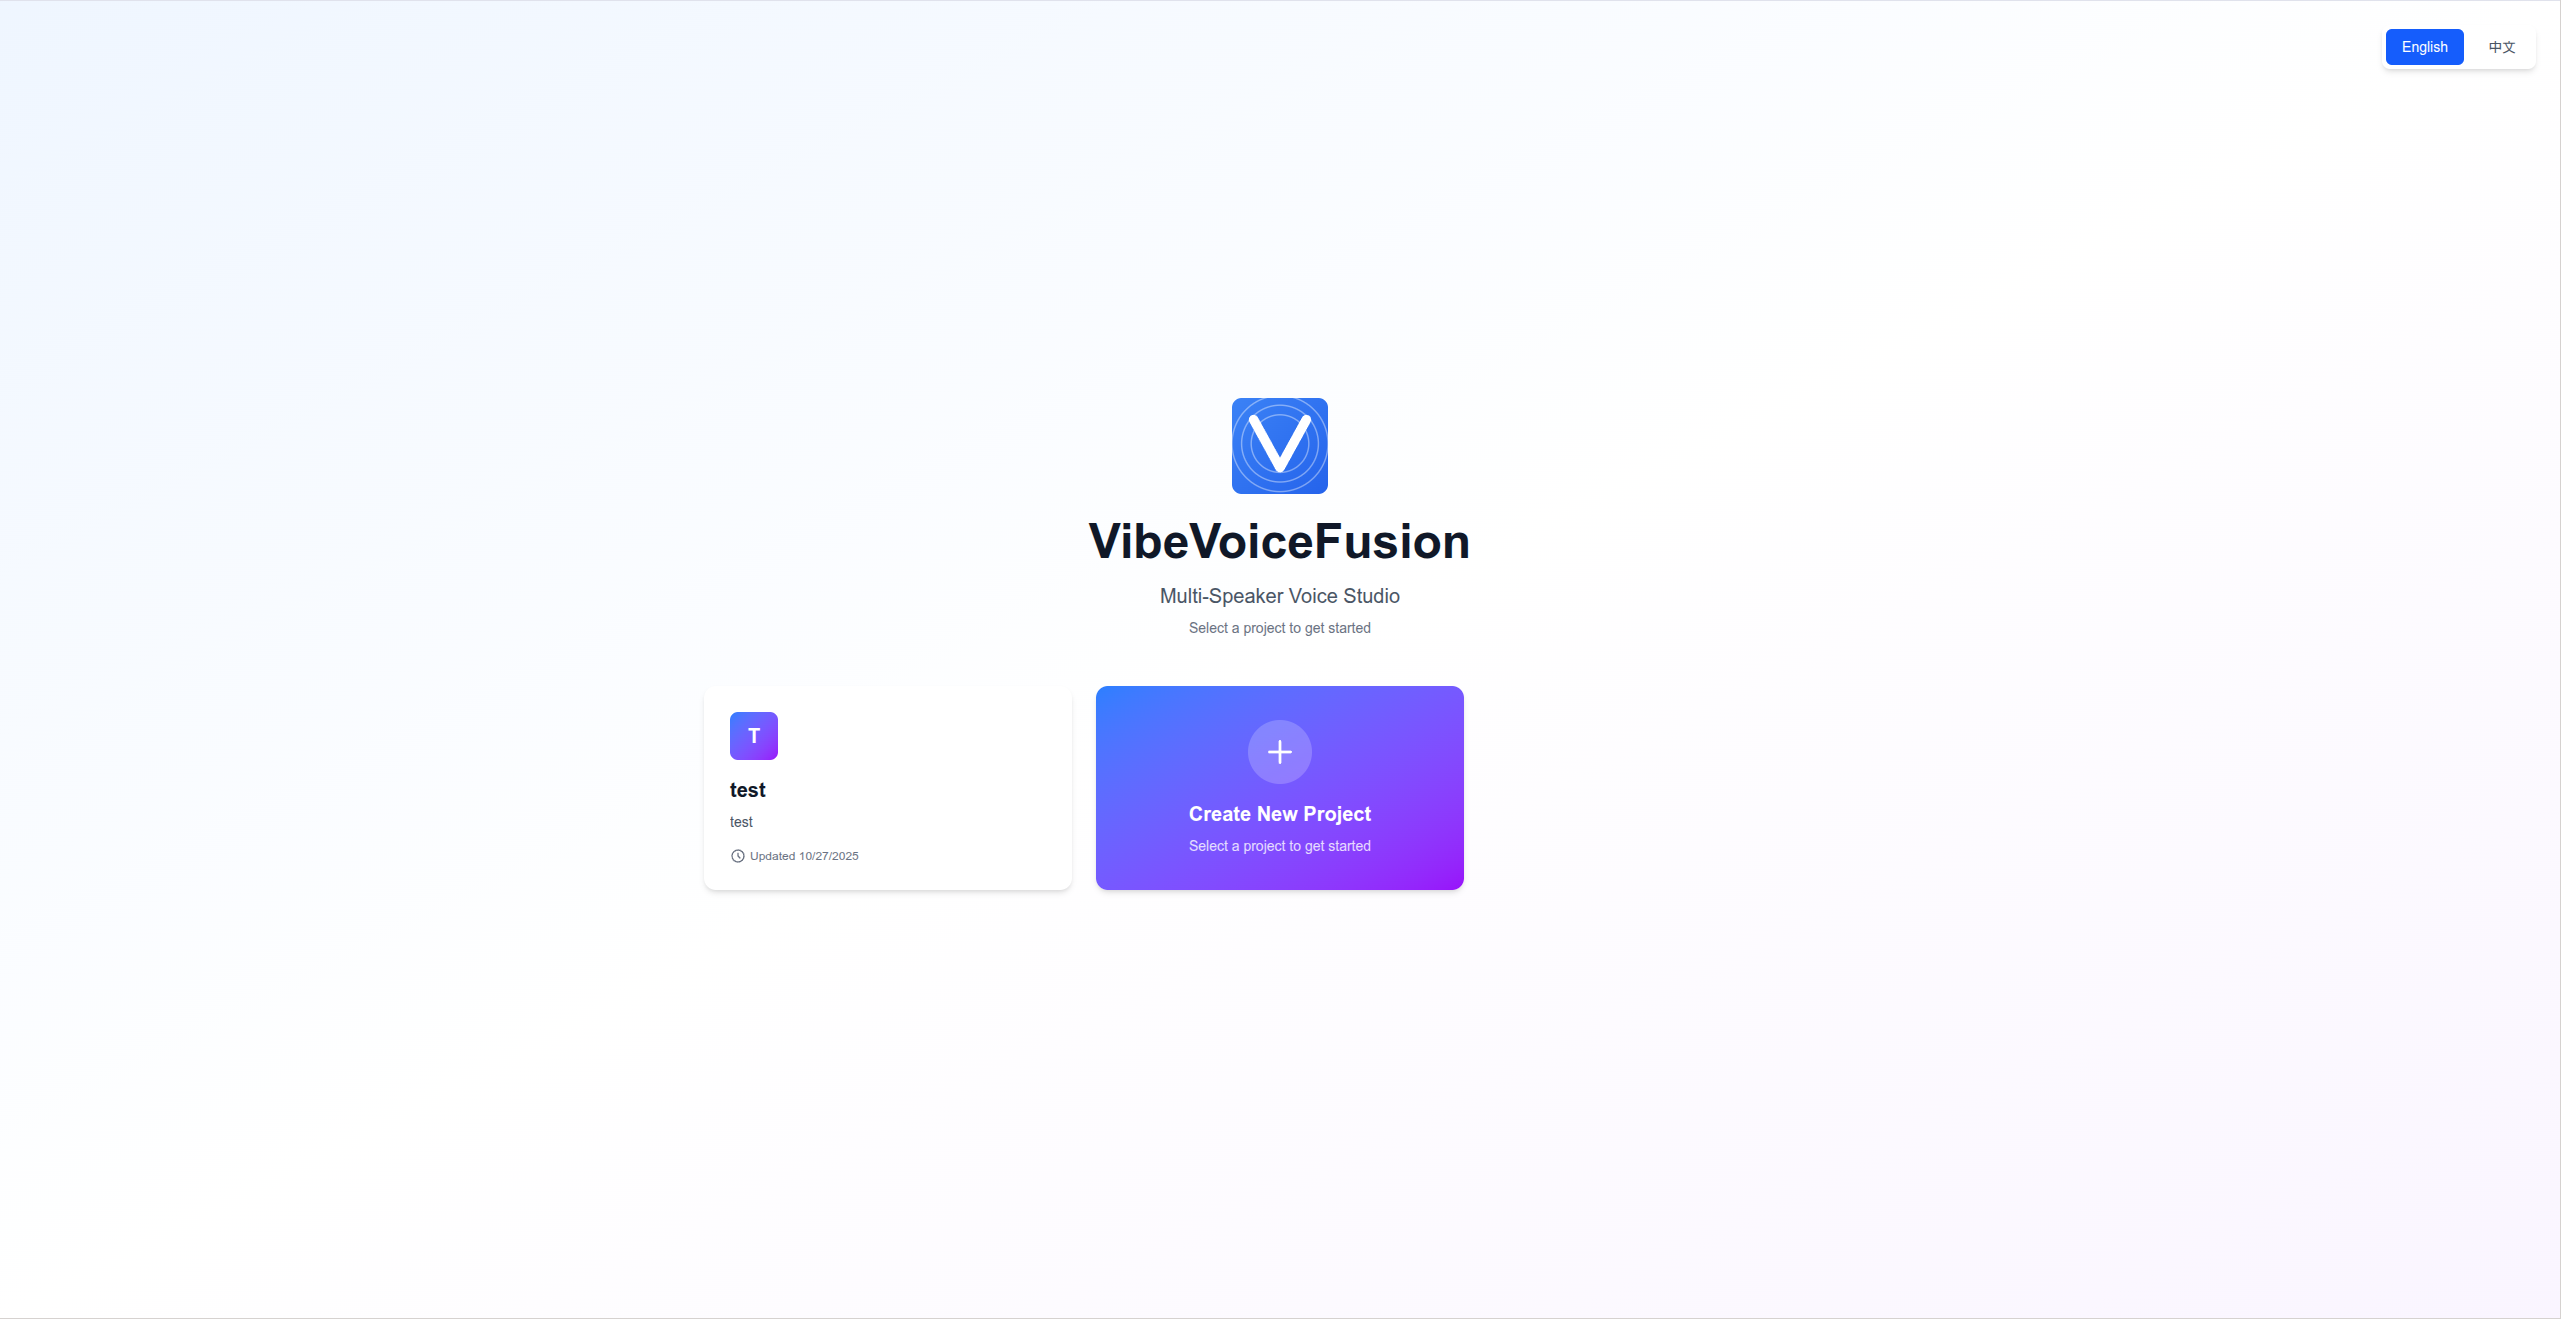
Create and manage projects from the home page
Actions:
- Click "Create New Project" card
- Enter a project name (e.g., "Podcast Episode 1")
- Optionally add a description
- Click "Create Project"
The project will be automatically selected and you'll be navigated to the Speaker Role page.
Step 2: Add Speakers and Upload Voice Samples
Upload reference voice samples for each speaker. The system supports various audio formats (WAV, MP3, M4A, FLAC, WebM).
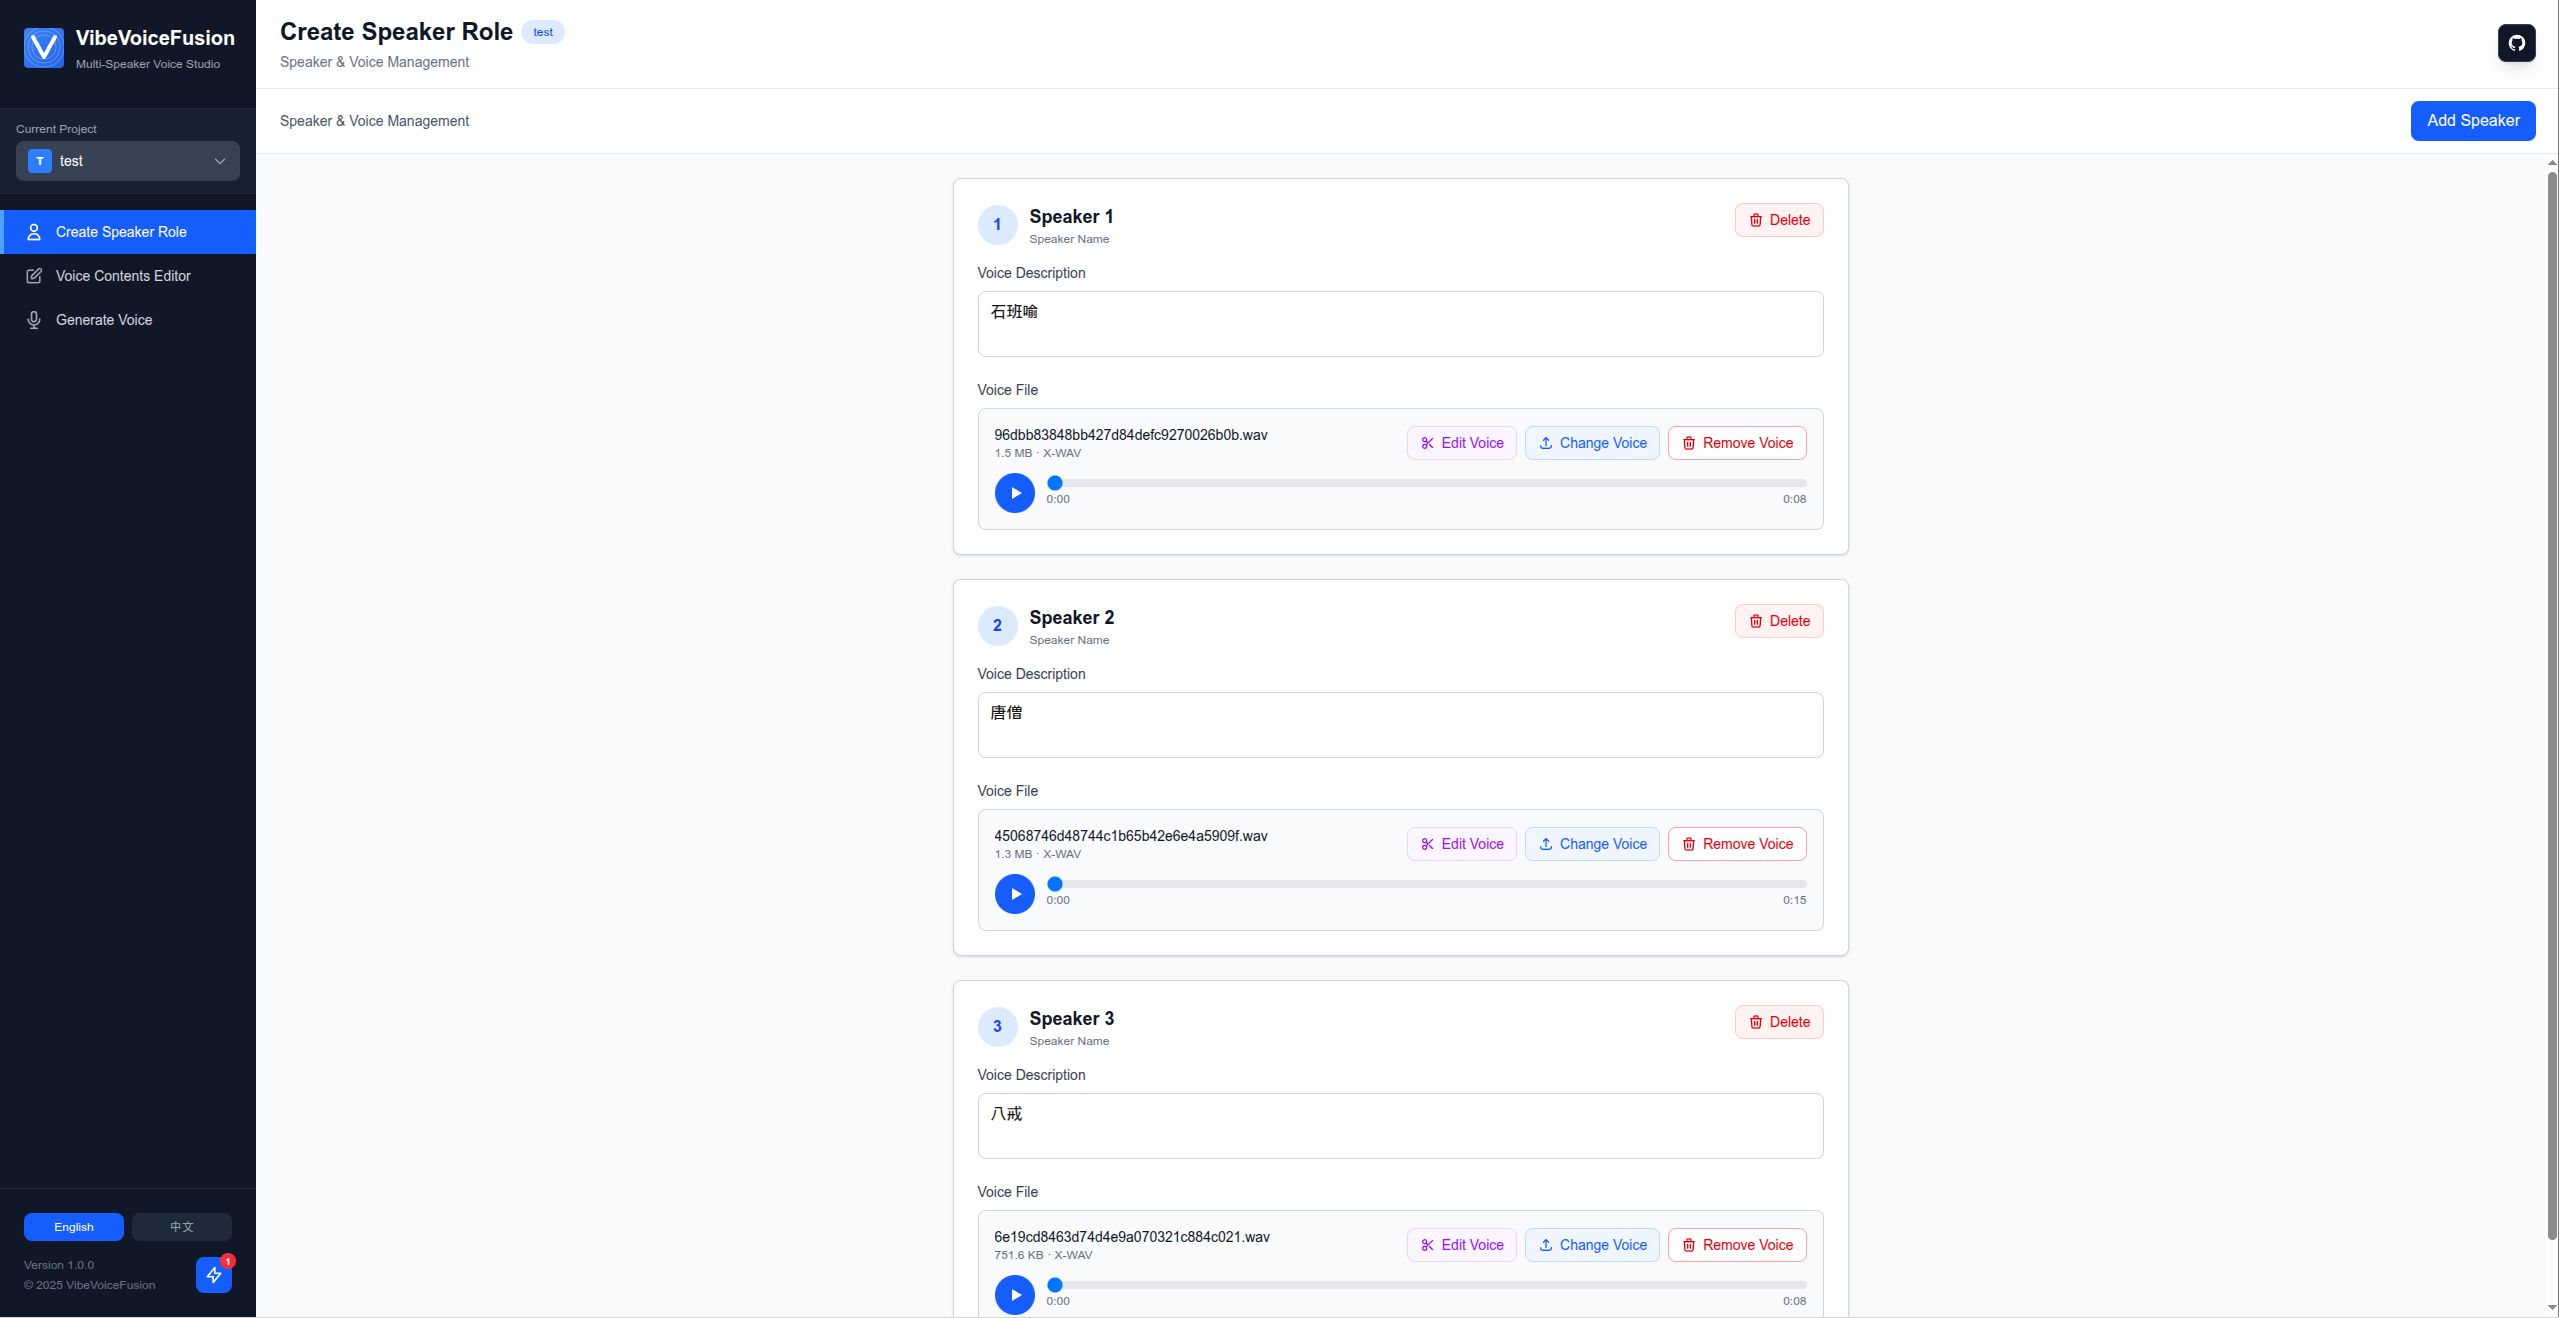
Upload and manage voice samples for each speaker
Actions:
- Click "Add New Speaker" button
- The speaker will be automatically named (e.g., "Speaker 1", "Speaker 2")
- Click "Upload Voice" to select a reference audio file (3-30 seconds recommended)
- Preview the uploaded voice using the audio player
- Repeat for additional speakers (supports 2-4+ speakers)
Tips:
- Use clean audio with minimal background noise
- 5-15 seconds of speech is ideal for voice cloning
- Each speaker needs a unique voice sample
- You can replace voice files later by clicking "Change Voice"
Step 3: Create and Edit Dialog
Create a dialog session and write the multi-speaker conversation. The dialog editor supports drag-and-drop reordering and real-time preview.
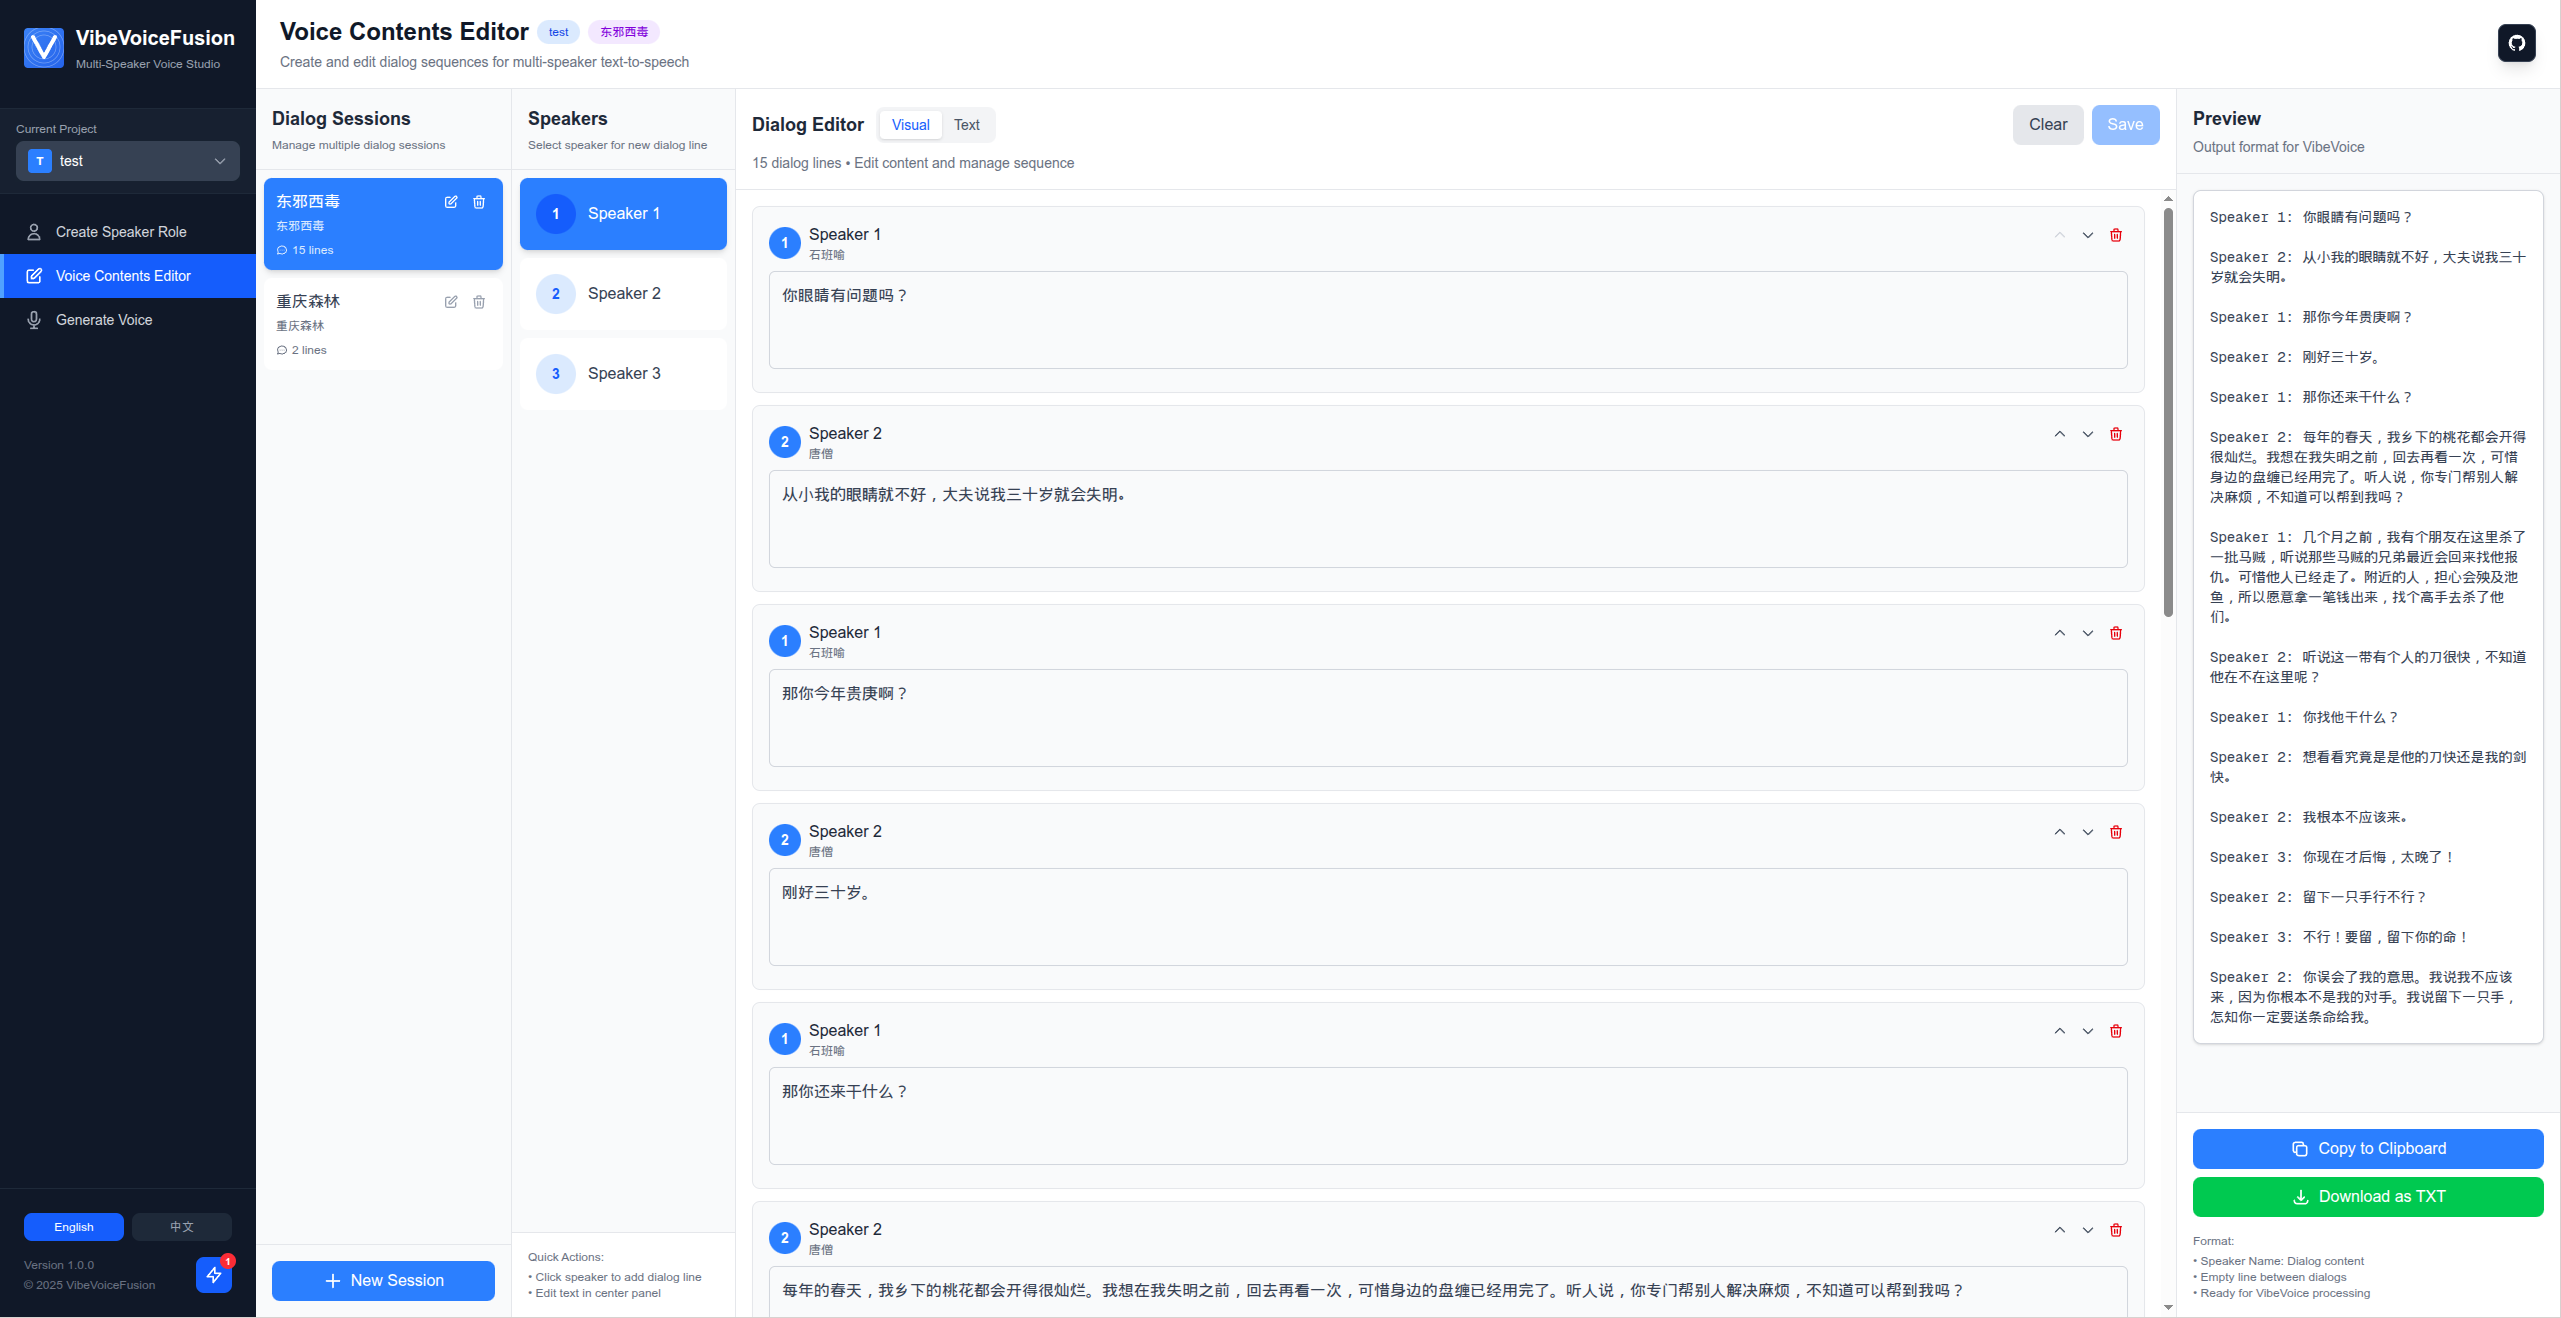
Multi-speaker dialog editor with visual and text modes
Actions:
- Click "Create New Session" in the session list
- Enter a session name (e.g., "Chapter 1")
- In the dialog editor, add lines for each speaker:
- Select a speaker from the dropdown
- Enter the dialog text
- Click "Add Line" or press Enter
- Reorder lines by dragging the handle icons
- Use "Text Editor" mode for bulk editing
- Click "Save" to persist your changes
Dialog Format (Text Mode):
Speaker 1: Welcome to our podcast!

Speaker 2: Thanks for having me. It's great to be here.

Speaker 1: Let's dive into today's topic.
Narration Mode:
For single-speaker content like audiobooks, articles, or podcasts, use Narration Mode:
- When creating a new session, toggle to "Narration" mode
- Select a narrator voice from your uploaded speakers
- Enter plain text without
Speaker N:prefixes - Each paragraph will be spoken by the selected narrator
This is the first paragraph of your narration.

This is the second paragraph. No speaker formatting needed.

The narrator voice you selected will read all the text.
Features:
- Visual editor with drag-and-drop
- Text editor for bulk editing
- Real-time preview
- Copy and download functionality
- Format validation
- Narration mode for single-speaker content
Step 4: Generate Voice
Configure generation parameters and start the voice synthesis process. Monitor real-time progress and manage generation history.
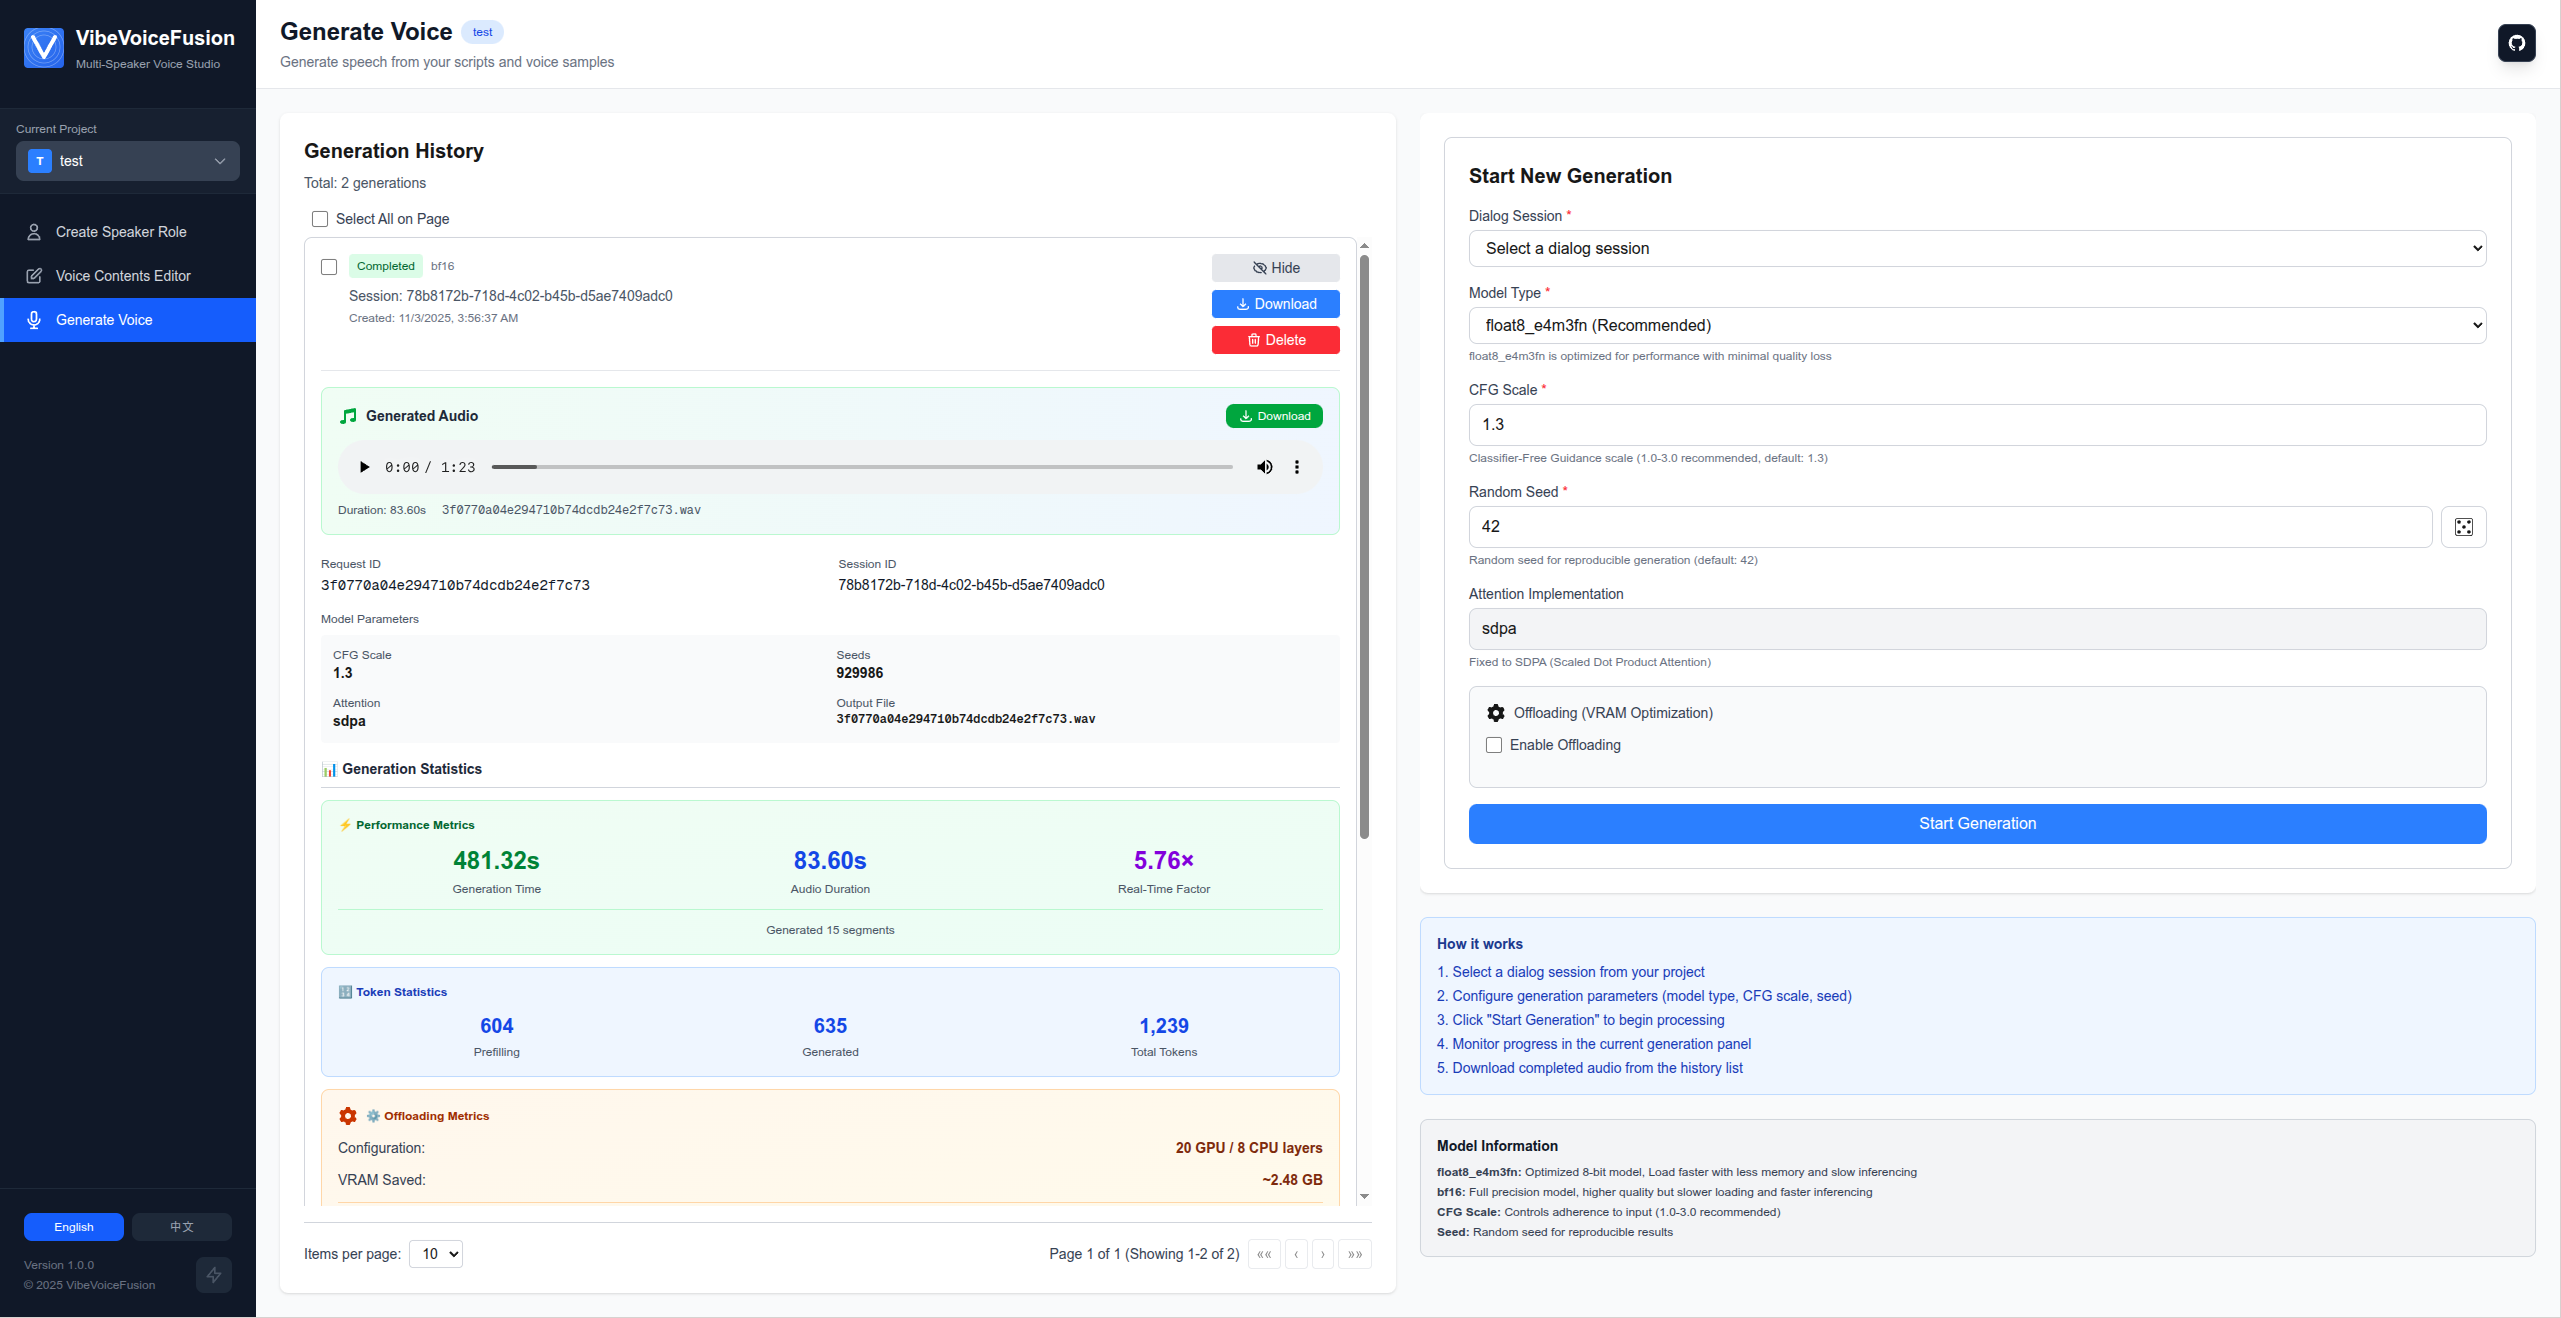
Generation interface with parameters, live progress, and history
Actions:
- Navigate to "Generate Voice" page
- Select a dialog session from the dropdown
- Configure parameters:
- Model Type:
float8_e4m3fn(recommended): 7GB VRAM, faster loadingbfloat16: 14GB VRAM, full precision
- CFG Scale (1.0-2.0): Controls generation adherence to text
- Lower (1.0-1.3): More natural, varied
- Higher (1.5-2.0): More controlled, may sound robotic
- Default: 1.3
- Random Seed: Any positive integer for reproducibility
- Offloading (optional): Enable if VRAM < 14GB
- Balanced: 12 GPU layers, ~5GB savings, 2.0x slower (RTX 3070 12GB, 4070)
- Aggressive: 8 GPU layers, ~6GB savings, 2.5x slower (RTX 3080 12GB)
- Extreme: 4 GPU layers, ~7GB savings, 3.5x slower (minimum 10GB VRAM)
- Model Type:
- Click "Start Generation"
Real-Time Monitoring:
- Progress bar shows completion percentage
- Phase indicators: Preprocessing → Inferencing → Saving
- Live token generation count
- Estimated time remaining
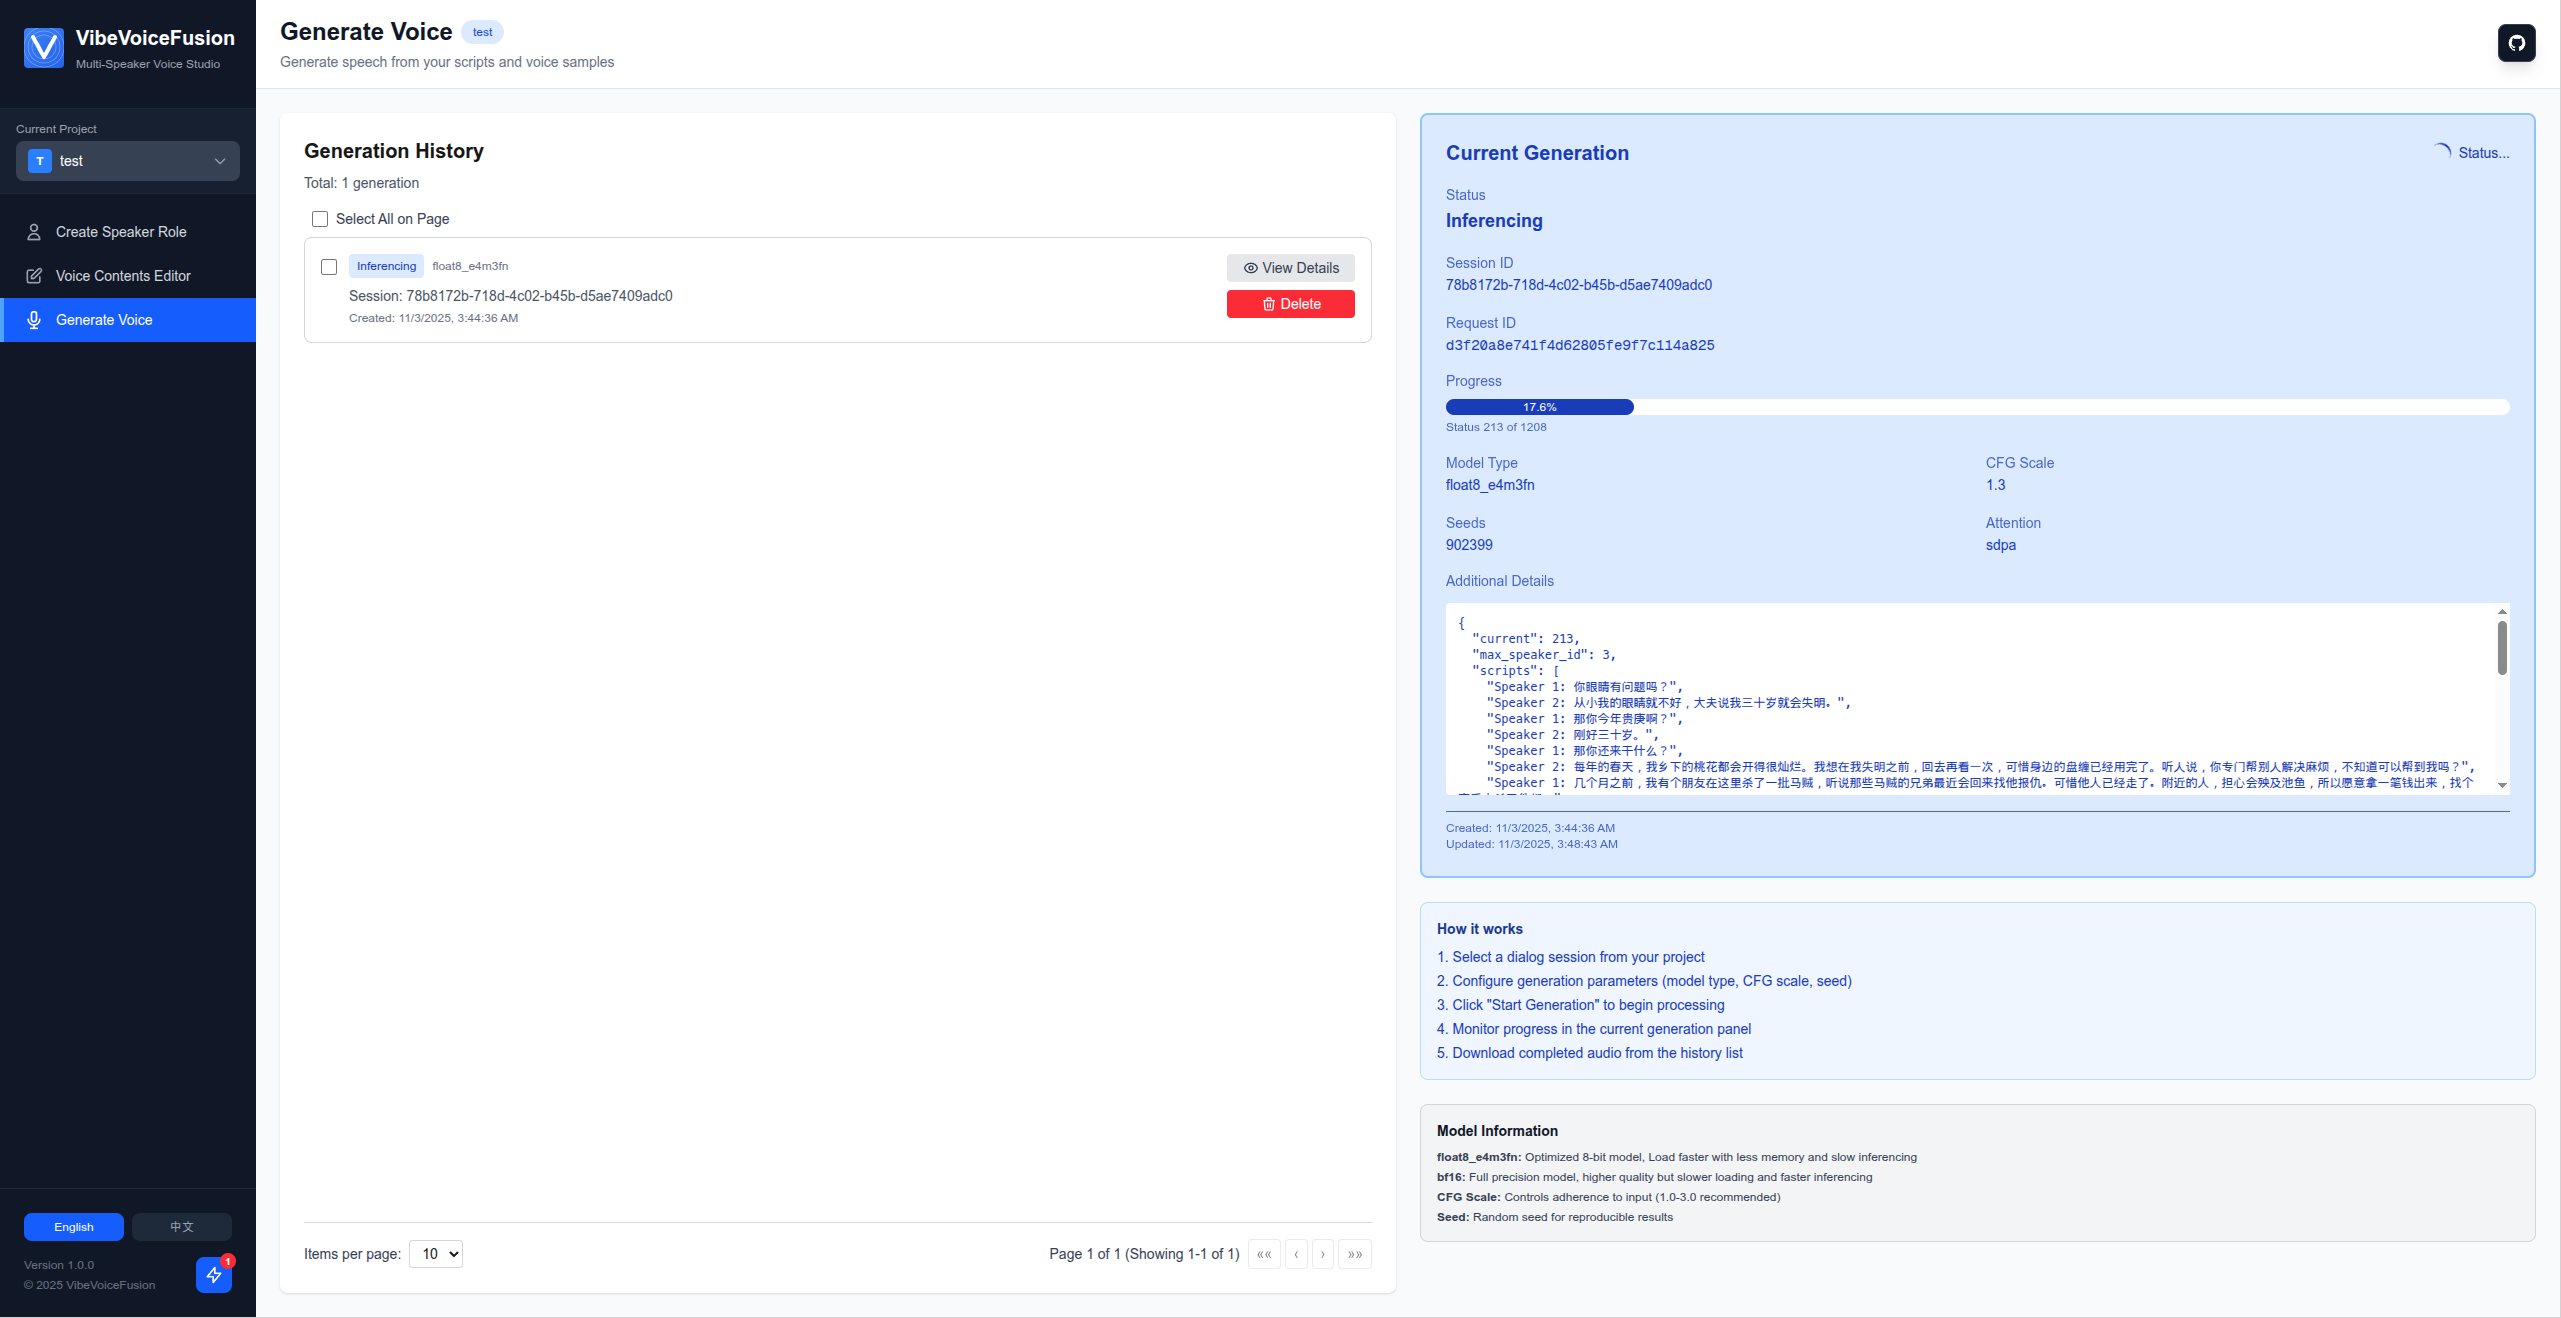
Generation interface with parameters, live progress, and history
Generation History:
- View all past generations with status (completed, failed, running)
- Filter and sort by date, status, or session
- Play generated audio inline
- Download WAV files
- Delete unwanted generations
- View detailed metrics (tokens, duration, RTF, VRAM usage)
Command-Line Interface
For CLI-based generation without the web UI:
python demo/local_file_inference.py \
    --model_file ./models/vibevoice/vibevoice7b_float8_e4m3fn.safetensors \
    --txt_path demo/text_examples/1p_pandora_box.txt \
    --speaker_names zh-007 \
    --output_dir ./outputs \
    --dtype float8_e4m3fn \
    --cfg_scale 1.3 \
    --seed 42
CLI Arguments:
--model_file: Path to model.safetensorsfile--config: Path toconfig.json(optional)--txt_path: Input text file with speaker-labeled dialog--speaker_names: Speaker name(s) for voice file mapping--output_dir: Output directory for generated audio--device:cuda,mps, orcpu(auto-detected)--dtype:float8_e4m3fnorbfloat16--cfg_scale: Classifier-Free Guidance scale (default: 1.3)--seed: Random seed for reproducibility
See Demo Model Tools for all command-line tools: TTS, Realtime 0.5B, ASR, and model/voice-preset conversion.
Configuration
Backend Configuration
Environment variables (optional):
export WORKSPACE_DIR=/path/to/workspace  # Default: ./workspace
export FLASK_DEBUG=False  # Production mode
VRAM Requirements
| Configuration | GPU Layers | VRAM Usage | Speed | Target Hardware |
|---|---|---|---|---|
| No offloading | 28 | 11-14GB | 1.0x | RTX 4090, A100, 3090 |
| Balanced | 12 | 6-8GB | 0.70x | RTX 4070, 3080 16GB |
| Aggressive | 8 | 5-7GB | 0.55x | RTX 3060 12GB |
| Extreme | 4 | 4-5GB | 0.40x | RTX 3080 10GB |
Float8 quantization is only supported on NVIDIA RTX 40 and 50 series GPUs. See docs/offloading.md for offloading details.
Frontend Configuration
Development API URL (frontend/.env.local):
NEXT_PUBLIC_API_URL=http://localhost:9527/api/v1
Documentation
Architecture Overview
vibevoice/
├── backend/                 # Flask API server
│   ├── api/                # REST API endpoints
│   │   ├── projects.py     # Project CRUD
│   │   ├── speakers.py     # Speaker management
│   │   ├── dialog_sessions.py  # Dialog CRUD
│   │   ├── generation.py   # Voice generation
│   │   ├── dataset.py      # Dataset management
│   │   └── training.py     # LoRA training
│   ├── services/           # Business logic layer
│   ├── models/             # Data models
│   ├── task_manager/       # Background task queue
│   ├── inference/          # Inference engine
│   ├── training/           # Training engine & state management
│   ├── i18n/              # Backend translations
│   └── dist/              # Frontend static files (production)
├── frontend/               # Next.js web application
│   ├── app/               # Next.js pages
│   │   ├── page.tsx       # Home/Project selector
│   │   ├── quick-generate/ # Quick generation (no project)
│   │   ├── speaker-role/  # Speaker management
│   │   ├── voice-editor/  # Dialog editor
│   │   ├── generate-voice/ # Generation page
│   │   ├── dataset/       # Dataset management
│   │   └── fine-tuning/   # LoRA training page
│   ├── components/        # React components
│   ├── lib/              # Context providers & utilities
│   │   ├── ProjectContext.tsx
│   │   ├── SessionContext.tsx
│   │   ├── SpeakerRoleContext.tsx
│   │   ├── GenerationContext.tsx
│   │   ├── TrainingContext.tsx
│   │   ├── GlobalTaskContext.tsx
│   │   ├── i18n/         # Frontend translations
│   │   └── api.ts        # API client
│   └── types/            # TypeScript type definitions
└── vibevoice/            # Core inference library
    ├── modular/          # Model implementations
    │   ├── custom_offloading_utils.py  # Layer offloading
    │   └── adaptive_offload.py         # Auto VRAM config
    ├── processor/        # Input processing
    └── schedule/         # Diffusion scheduling
API Reference
For complete API documentation including request/response examples, see docs/APIs.md.
Workspace Structure
workspace/
├── projects.json          # All projects metadata
├── _quick-generate/       # Quick generation storage
│   ├── voices/            # Uploaded voice samples
│   ├── outputs/           # Generated audio files
│   └── history.json       # Generation history
└── {project-id}/
    ├── voices/
    │   ├── speakers.json  # Speaker metadata
    │   └── {uuid}.wav     # Voice files
    ├── scripts/
    │   ├── sessions.json  # Session metadata
    │   └── {uuid}.txt     # Dialog text files
    ├── output/
    │   ├── generation.json  # Generation metadata
    │   └── {request_id}.wav # Generated audio files
    ├── datasets/
    │   ├── datasets.json    # Dataset metadata
    │   └── {dataset-id}/
    │       ├── datasets.jsonl  # Dataset items (one JSON per line)
    │       ├── audio/          # Audio files
    │       └── voice_prompts/  # Voice prompt files
    └── training/
        ├── training_history.json  # Training job metadata
        └── lora_output/
            └── {lora-name}/
                ├── model_epoch_*.safetensors  # Checkpoint files
                └── model_final.safetensors    # Final model
Performance Benchmarks
RTX 4090 (24GB VRAM):
| Configuration | VRAM | Generation Time | RTF | Quality |
|---|---|---|---|---|
| BFloat16, No offload | 14GB | 15s (50s audio) | 0.30x | Excellent |
| Float8, No offload | 7GB | 16s (50s audio) | 0.32x | Excellent |
RTX 3060 12GB:
| Configuration | VRAM | Generation Time | RTF | Quality |
|---|---|---|---|---|
| Float8, Balanced | 7GB | 30s (50s audio) | 0.60x | Excellent |
| Float8, Aggressive | 6GB | 40s (50s audio) | 0.80x | Good |
RTF (Real-Time Factor) < 1.0 means faster than real-time
Community
Getting Help
- Issues: GitHub Issues - Bug reports and feature requests
- Discussions: GitHub Discussions - Questions and community support
Showcase
Share your projects and experiences:
- Demo Audio: Submit your generated samples to the showcase
- Use Cases: Share how you're using VibeVoice
- Improvements: Contribute optimizations and enhancements
Responsible AI
Important: This project is for research and development purposes only.
Risks
- Deepfakes & Impersonation: Synthetic speech can be misused for fraud or disinformation
- Voice Cloning Ethics: Always obtain explicit consent before cloning voices
- Biases: Model may inherit biases from training data
- Unexpected Outputs: Generated audio may contain artifacts or inaccuracies
Guidelines
DO:
- Clearly disclose when audio is AI-generated
- Obtain explicit consent for voice cloning
- Use responsibly for legitimate purposes
- Respect privacy and intellectual property
- Follow all applicable laws and regulations
DO NOT:
- Create deepfakes or impersonation without consent
- Spread disinformation or misleading content
- Use for fraud, scams, or malicious purposes
- Violate laws or ethical guidelines
By using this software, you agree to use it ethically and responsibly.
Contributing
We welcome contributions from the community! Here's how you can help:
Ways to Contribute
- Report Bugs: Open an issue with detailed reproduction steps
- Suggest Features: Propose new features via GitHub issues
- Submit Pull Requests:
- Fix bugs
- Add features
- Improve documentation
- Add translations
- Improve Documentation: Help make the project more accessible
- Share Use Cases: Show how you're using VibeVoice
Testing
# Backend tests (when available)
pytest tests/

# Frontend tests (when available)
cd frontend
npm test

# Manual testing
# 1. Create project
# 2. Add speakers
# 3. Create dialog
# 4. Generate voice
# 5. Verify output quality
License
This project follows the same license terms as the original Microsoft VibeVoice repository. Please refer to the LICENSE file for details.
Third-Party Licenses
- Frontend: React, Next.js, Tailwind CSS (MIT License)
- Backend: Flask, PyTorch (Various open-source licenses)
- Model Weights: Microsoft VibeVoice (subject to Microsoft's terms)
Acknowledgments
- Microsoft Research: Original VibeVoice model and architecture
- ComfyUI: Float8 casting techniques inspiration
- kohya-ss/musubi-tuner: Offloading implementation and LoRA network reference
- voicepowered-ai/VibeVoice-finetuning: Training dataloader implementation
- HuggingFace: Model hosting and distribution
- Open Source Community: Libraries and frameworks that made this possible
Citation
If you use this implementation in your research, please cite both this project and the original VibeVoice paper:
@software{vibevoice_webapp_2024,
  title={VibeVoice: Complete Web Application for Multi-Speaker Voice Generation},
  author={Zhao, Kun},
  year={2024},
  url={https://github.com/zhao-kun/vibevoice}
}

@article{vibevoice2024,
  title={VibeVoice: Unified Autoregressive and Diffusion for Speech Generation},
  author={Microsoft Research},
  year={2024}
}
Troubleshooting
CUDA Out of Memory
# Try Float8 model
--dtype float8_e4m3fn

# Enable layer offloading in web UI
# Or use CLI with manual configuration
Audio Quality Issues
# Adjust CFG scale (try 1.0 - 2.0)
--cfg_scale 1.5

# Use higher precision model
--dtype bfloat16
Port Already in Use
# Change port in backend/run.py
app.run(host='0.0.0.0', port=9528)
Frontend Build Errors
cd frontend
rm -rf node_modules .next
npm install
npm run build
Made by the VibeVoice Community
Similar repos


VibeVoiceFusion is a full-stack, multi-speaker voice generation web system featuring LoRA fine-tuning, batch generation, and VRAM optimization. Based on Microsoft's VibeVoice (AR + diffusion architecture)
Python
490
292 commits
updated Oct 5, 2026
README
VibeVoiceFusion
A Complete Web Application for Multi-Speaker Voice Generation
Built on Microsoft's VibeVoice Model
Features • Demo Samples • Get Started • Documentation • Community • Contributing
Overview
Introduction
VibeVoiceFusion is a web application for multi-speaker speech generation with voice cloning and speech recognition, built on Microsoft's VibeVoice models. It brings text-to-speech, file transcription and live microphone transcription together in one bilingual (English/Chinese) web interface. It also covers LoRA fine-tuning and an OpenAI-compatible API, and it runs on consumer GPUs with 10GB+ of VRAM.
Features
Speech Generation
- Multi-speaker dialogue with voice cloning from short reference samples
- Narration mode for single-speaker content such as audiobooks and articles
- Quick Generate: generate without any project setup, using uploaded or preset voices
- Multi-Generation: 2-20 variations with different seeds in one run
- Dialog editor with a visual editor and a text editor
Speech Recognition
- File transcription with VibeVoice-ASR: segments with timestamps and speaker labels, downloadable as TXT or JSON
- Live transcription from the browser microphone, with text streaming in as you speak
- Saved transcription history, standalone or inside a project
LoRA Fine-Tuning
- Dataset management with ZIP or folder import and export
- LoRA training with live loss and learning-rate charts
- Trained LoRAs can be applied during generation with an adjustable weight
Runs on Consumer GPUs
- Float8 quantization halves model memory (RTX 40 series and newer)
- Layer offloading presets (Balanced / Aggressive / Extreme) for GPUs with 10GB+ of VRAM. See VRAM Requirements.
Integration & Deployment
- OpenAI-compatible API:
/v1/audio/speech,/v1/audio/transcriptionsand the Realtime WebSocket/v1/realtime, so existing OpenAI SDKs work as-is - Full English/Chinese UI with automatic language detection
- Docker image on Docker Hub
- CLI tools for TTS, streaming TTS with Realtime 0.5B, ASR, and model conversion
Demo Samples
Listen to voice generation samples created with VibeVoiceFusion. Click the links below to download and play:
Single Speaker
🎧 Pandora's Box Story (BFloat16 Model)
Generated with bfloat16 precision model - Full quality, 14GB VRAM
🎧 Pandora's Box Story (Float8 Model)
Generated with float8 quantization - Optimized for 7GB VRAM with comparable quality
Multi-Speaker (3 Speakers)
🎭 东邪西毒 - 西游版 (Journey to the West Version)
Multi-speaker dialog with distinct voice characteristics for each character
Get Started
Prerequisites
- Python: 3.9 or higher
- Node.js: 16.x or higher (for frontend development)
- CUDA: Compatible GPU with CUDA support (recommended)
- VRAM: Minimum 6GB for extreme offloading, 14GB recommended for best performance
- Docker: Optional, for containerized deployment
Installation
Option 1: Docker (Recommended for Production)
Build docker image
# Clone the repository
git clone https://github.com/zhao-kun/vibevoicefusion.git
cd vibevoicefusion
# Build and the docker image
docker compose build vibevoice
After build successfully, run command:
docker run -d \
  --name vibevoicefusion \
  --gpus all \
  -p 9527:9527 \
  -v $(pwd)/workspace:/workspace/zhao-kun/vibevoice/workspace \
  zhaokundev/vibevoicefusion:latest
Access the application at http://localhost:9527
The Docker image is available on Docker Hub, and you can launch VibeVoiceFusion using the following command.
docker pull zhaokundev/vibevoicefusion
docker run -d \
  --name vibevoicefusion \
  --gpus all \
  -p 9527:9527 \
  -v $(pwd)/workspace:/workspace/zhao-kun/vibevoice/workspace \
  zhaokundev/vibevoicefusion:latest
Build Time: 18-28 minutes | Image Size: ~12-15GB
Option 2: Manual Installation
1. Install Backend Dependencies
# Clone the repository
git clone https://github.com/zhao-kun/vibevoice.git
cd vibevoice

# Install Python package
pip install -e .
2. Download Pre-trained Model
Download from HuggingFace (choose one):
- Float8 (Recommended): vibevoice7b_float8_e4m3fn.safetensors (~7GB) (Supported by RTX 40 series and above graphics cards.)
- BFloat16 (Full Precision): vibevoice7b_bf16.safetensors (~14GB)
- Config: config.json
Place files in ./models/vibevoice/
3. Install Frontend Dependencies (for development)
cd frontend
npm install
4. Build Frontend (for production)
cd frontend
npm run build
cp -r out/* ../backend/dist/
Usage
Web Application (Recommended)
Production Mode (single server):
# Start backend server (serves both API and frontend)
python backend/run.py

# Access at http://localhost:9527
Development Mode (separate servers):
# Terminal 1: Start backend API
python backend/run.py  # http://localhost:9527

# Terminal 2: Start frontend dev server
cd frontend
npm run dev  # http://localhost:3000
Quick Generation (No Project Required)
For quick testing without setting up projects:
- Click "Quick Generate" from the home page
- Select Voice Source:
- Upload: Drag & drop your audio file (supports up to 4 files)
- Preset: Choose from preset voices with language/gender filters
- Enter Text: Type dialogue (
Speaker 1: Hello) or narration (plain text) - Configure: Set seed, batch size (2-20), and offloading options
- Generate: Click generate and monitor per-item progress
- Download: Play or download generated audio
Key Points:
- Auto-detects dialogue vs narration mode
- All speakers use the same voice in dialogue mode
- No LoRA support (base model only)
- History persists across sessions
Complete Workflow Guide
This guide walks you through the complete process of creating multi-speaker voice generation from start to finish.
Step 1: Create a Project
Start by creating a new project or selecting an existing one. Projects help organize your voice generation work with metadata and descriptions.
Create and manage projects from the home page
Actions:
- Click "Create New Project" card
- Enter a project name (e.g., "Podcast Episode 1")
- Optionally add a description
- Click "Create Project"
The project will be automatically selected and you'll be navigated to the Speaker Role page.
Step 2: Add Speakers and Upload Voice Samples
Upload reference voice samples for each speaker. The system supports various audio formats (WAV, MP3, M4A, FLAC, WebM).
Upload and manage voice samples for each speaker
Actions:
- Click "Add New Speaker" button
- The speaker will be automatically named (e.g., "Speaker 1", "Speaker 2")
- Click "Upload Voice" to select a reference audio file (3-30 seconds recommended)
- Preview the uploaded voice using the audio player
- Repeat for additional speakers (supports 2-4+ speakers)
Tips:
- Use clean audio with minimal background noise
- 5-15 seconds of speech is ideal for voice cloning
- Each speaker needs a unique voice sample
- You can replace voice files later by clicking "Change Voice"
Step 3: Create and Edit Dialog
Create a dialog session and write the multi-speaker conversation. The dialog editor supports drag-and-drop reordering and real-time preview.
Multi-speaker dialog editor with visual and text modes
Actions:
- Click "Create New Session" in the session list
- Enter a session name (e.g., "Chapter 1")
- In the dialog editor, add lines for each speaker:
- Select a speaker from the dropdown
- Enter the dialog text
- Click "Add Line" or press Enter
- Reorder lines by dragging the handle icons
- Use "Text Editor" mode for bulk editing
- Click "Save" to persist your changes
Dialog Format (Text Mode):
Speaker 1: Welcome to our podcast!

Speaker 2: Thanks for having me. It's great to be here.

Speaker 1: Let's dive into today's topic.
Narration Mode:
For single-speaker content like audiobooks, articles, or podcasts, use Narration Mode:
- When creating a new session, toggle to "Narration" mode
- Select a narrator voice from your uploaded speakers
- Enter plain text without
Speaker N:prefixes - Each paragraph will be spoken by the selected narrator
This is the first paragraph of your narration.

This is the second paragraph. No speaker formatting needed.

The narrator voice you selected will read all the text.
Features:
- Visual editor with drag-and-drop
- Text editor for bulk editing
- Real-time preview
- Copy and download functionality
- Format validation
- Narration mode for single-speaker content
Step 4: Generate Voice
Configure generation parameters and start the voice synthesis process. Monitor real-time progress and manage generation history.
Generation interface with parameters, live progress, and history
Actions:
- Navigate to "Generate Voice" page
- Select a dialog session from the dropdown
- Configure parameters:
- Model Type:
float8_e4m3fn(recommended): 7GB VRAM, faster loadingbfloat16: 14GB VRAM, full precision
- CFG Scale (1.0-2.0): Controls generation adherence to text
- Lower (1.0-1.3): More natural, varied
- Higher (1.5-2.0): More controlled, may sound robotic
- Default: 1.3
- Random Seed: Any positive integer for reproducibility
- Offloading (optional): Enable if VRAM < 14GB
- Balanced: 12 GPU layers, ~5GB savings, 2.0x slower (RTX 3070 12GB, 4070)
- Aggressive: 8 GPU layers, ~6GB savings, 2.5x slower (RTX 3080 12GB)
- Extreme: 4 GPU layers, ~7GB savings, 3.5x slower (minimum 10GB VRAM)
- Model Type:
- Click "Start Generation"
Real-Time Monitoring:
- Progress bar shows completion percentage
- Phase indicators: Preprocessing → Inferencing → Saving
- Live token generation count
- Estimated time remaining
Generation interface with parameters, live progress, and history
Generation History:
- View all past generations with status (completed, failed, running)
- Filter and sort by date, status, or session
- Play generated audio inline
- Download WAV files
- Delete unwanted generations
- View detailed metrics (tokens, duration, RTF, VRAM usage)
Command-Line Interface
For CLI-based generation without the web UI:
python demo/local_file_inference.py \
    --model_file ./models/vibevoice/vibevoice7b_float8_e4m3fn.safetensors \
    --txt_path demo/text_examples/1p_pandora_box.txt \
    --speaker_names zh-007 \
    --output_dir ./outputs \
    --dtype float8_e4m3fn \
    --cfg_scale 1.3 \
    --seed 42
CLI Arguments:
--model_file: Path to model.safetensorsfile--config: Path toconfig.json(optional)--txt_path: Input text file with speaker-labeled dialog--speaker_names: Speaker name(s) for voice file mapping--output_dir: Output directory for generated audio--device:cuda,mps, orcpu(auto-detected)--dtype:float8_e4m3fnorbfloat16--cfg_scale: Classifier-Free Guidance scale (default: 1.3)--seed: Random seed for reproducibility
See Demo Model Tools for all command-line tools: TTS, Realtime 0.5B, ASR, and model/voice-preset conversion.
Configuration
Backend Configuration
Environment variables (optional):
export WORKSPACE_DIR=/path/to/workspace  # Default: ./workspace
export FLASK_DEBUG=False  # Production mode
VRAM Requirements
| Configuration | GPU Layers | VRAM Usage | Speed | Target Hardware |
|---|---|---|---|---|
| No offloading | 28 | 11-14GB | 1.0x | RTX 4090, A100, 3090 |
| Balanced | 12 | 6-8GB | 0.70x | RTX 4070, 3080 16GB |
| Aggressive | 8 | 5-7GB | 0.55x | RTX 3060 12GB |
| Extreme | 4 | 4-5GB | 0.40x | RTX 3080 10GB |
Float8 quantization is only supported on NVIDIA RTX 40 and 50 series GPUs. See docs/offloading.md for offloading details.
Frontend Configuration
Development API URL (frontend/.env.local):
NEXT_PUBLIC_API_URL=http://localhost:9527/api/v1
Documentation
Architecture Overview
vibevoice/
├── backend/                 # Flask API server
│   ├── api/                # REST API endpoints
│   │   ├── projects.py     # Project CRUD
│   │   ├── speakers.py     # Speaker management
│   │   ├── dialog_sessions.py  # Dialog CRUD
│   │   ├── generation.py   # Voice generation
│   │   ├── dataset.py      # Dataset management
│   │   └── training.py     # LoRA training
│   ├── services/           # Business logic layer
│   ├── models/             # Data models
│   ├── task_manager/       # Background task queue
│   ├── inference/          # Inference engine
│   ├── training/           # Training engine & state management
│   ├── i18n/              # Backend translations
│   └── dist/              # Frontend static files (production)
├── frontend/               # Next.js web application
│   ├── app/               # Next.js pages
│   │   ├── page.tsx       # Home/Project selector
│   │   ├── quick-generate/ # Quick generation (no project)
│   │   ├── speaker-role/  # Speaker management
│   │   ├── voice-editor/  # Dialog editor
│   │   ├── generate-voice/ # Generation page
│   │   ├── dataset/       # Dataset management
│   │   └── fine-tuning/   # LoRA training page
│   ├── components/        # React components
│   ├── lib/              # Context providers & utilities
│   │   ├── ProjectContext.tsx
│   │   ├── SessionContext.tsx
│   │   ├── SpeakerRoleContext.tsx
│   │   ├── GenerationContext.tsx
│   │   ├── TrainingContext.tsx
│   │   ├── GlobalTaskContext.tsx
│   │   ├── i18n/         # Frontend translations
│   │   └── api.ts        # API client
│   └── types/            # TypeScript type definitions
└── vibevoice/            # Core inference library
    ├── modular/          # Model implementations
    │   ├── custom_offloading_utils.py  # Layer offloading
    │   └── adaptive_offload.py         # Auto VRAM config
    ├── processor/        # Input processing
    └── schedule/         # Diffusion scheduling
API Reference
For complete API documentation including request/response examples, see docs/APIs.md.
Workspace Structure
workspace/
├── projects.json          # All projects metadata
├── _quick-generate/       # Quick generation storage
│   ├── voices/            # Uploaded voice samples
│   ├── outputs/           # Generated audio files
│   └── history.json       # Generation history
└── {project-id}/
    ├── voices/
    │   ├── speakers.json  # Speaker metadata
    │   └── {uuid}.wav     # Voice files
    ├── scripts/
    │   ├── sessions.json  # Session metadata
    │   └── {uuid}.txt     # Dialog text files
    ├── output/
    │   ├── generation.json  # Generation metadata
    │   └── {request_id}.wav # Generated audio files
    ├── datasets/
    │   ├── datasets.json    # Dataset metadata
    │   └── {dataset-id}/
    │       ├── datasets.jsonl  # Dataset items (one JSON per line)
    │       ├── audio/          # Audio files
    │       └── voice_prompts/  # Voice prompt files
    └── training/
        ├── training_history.json  # Training job metadata
        └── lora_output/
            └── {lora-name}/
                ├── model_epoch_*.safetensors  # Checkpoint files
                └── model_final.safetensors    # Final model
Performance Benchmarks
RTX 4090 (24GB VRAM):
| Configuration | VRAM | Generation Time | RTF | Quality |
|---|---|---|---|---|
| BFloat16, No offload | 14GB | 15s (50s audio) | 0.30x | Excellent |
| Float8, No offload | 7GB | 16s (50s audio) | 0.32x | Excellent |
RTX 3060 12GB:
| Configuration | VRAM | Generation Time | RTF | Quality |
|---|---|---|---|---|
| Float8, Balanced | 7GB | 30s (50s audio) | 0.60x | Excellent |
| Float8, Aggressive | 6GB | 40s (50s audio) | 0.80x | Good |
RTF (Real-Time Factor) < 1.0 means faster than real-time
Community
Getting Help
- Issues: GitHub Issues - Bug reports and feature requests
- Discussions: GitHub Discussions - Questions and community support
Showcase
Share your projects and experiences:
- Demo Audio: Submit your generated samples to the showcase
- Use Cases: Share how you're using VibeVoice
- Improvements: Contribute optimizations and enhancements
Responsible AI
Important: This project is for research and development purposes only.
Risks
- Deepfakes & Impersonation: Synthetic speech can be misused for fraud or disinformation
- Voice Cloning Ethics: Always obtain explicit consent before cloning voices
- Biases: Model may inherit biases from training data
- Unexpected Outputs: Generated audio may contain artifacts or inaccuracies
Guidelines
DO:
- Clearly disclose when audio is AI-generated
- Obtain explicit consent for voice cloning
- Use responsibly for legitimate purposes
- Respect privacy and intellectual property
- Follow all applicable laws and regulations
DO NOT:
- Create deepfakes or impersonation without consent
- Spread disinformation or misleading content
- Use for fraud, scams, or malicious purposes
- Violate laws or ethical guidelines
By using this software, you agree to use it ethically and responsibly.
Contributing
We welcome contributions from the community! Here's how you can help:
Ways to Contribute
- Report Bugs: Open an issue with detailed reproduction steps
- Suggest Features: Propose new features via GitHub issues
- Submit Pull Requests:
- Fix bugs
- Add features
- Improve documentation
- Add translations
- Improve Documentation: Help make the project more accessible
- Share Use Cases: Show how you're using VibeVoice
Testing
# Backend tests (when available)
pytest tests/

# Frontend tests (when available)
cd frontend
npm test

# Manual testing
# 1. Create project
# 2. Add speakers
# 3. Create dialog
# 4. Generate voice
# 5. Verify output quality
License
This project follows the same license terms as the original Microsoft VibeVoice repository. Please refer to the LICENSE file for details.
Third-Party Licenses
- Frontend: React, Next.js, Tailwind CSS (MIT License)
- Backend: Flask, PyTorch (Various open-source licenses)
- Model Weights: Microsoft VibeVoice (subject to Microsoft's terms)
Acknowledgments
- Microsoft Research: Original VibeVoice model and architecture
- ComfyUI: Float8 casting techniques inspiration
- kohya-ss/musubi-tuner: Offloading implementation and LoRA network reference
- voicepowered-ai/VibeVoice-finetuning: Training dataloader implementation
- HuggingFace: Model hosting and distribution
- Open Source Community: Libraries and frameworks that made this possible
Citation
If you use this implementation in your research, please cite both this project and the original VibeVoice paper:
@software{vibevoice_webapp_2024,
  title={VibeVoice: Complete Web Application for Multi-Speaker Voice Generation},
  author={Zhao, Kun},
  year={2024},
  url={https://github.com/zhao-kun/vibevoice}
}

@article{vibevoice2024,
  title={VibeVoice: Unified Autoregressive and Diffusion for Speech Generation},
  author={Microsoft Research},
  year={2024}
}
Troubleshooting
CUDA Out of Memory
# Try Float8 model
--dtype float8_e4m3fn

# Enable layer offloading in web UI
# Or use CLI with manual configuration
Audio Quality Issues
# Adjust CFG scale (try 1.0 - 2.0)
--cfg_scale 1.5

# Use higher precision model
--dtype bfloat16
Port Already in Use
# Change port in backend/run.py
app.run(host='0.0.0.0', port=9528)
Frontend Build Errors
cd frontend
rm -rf node_modules .next
npm install
npm run build
Made by the VibeVoice Community