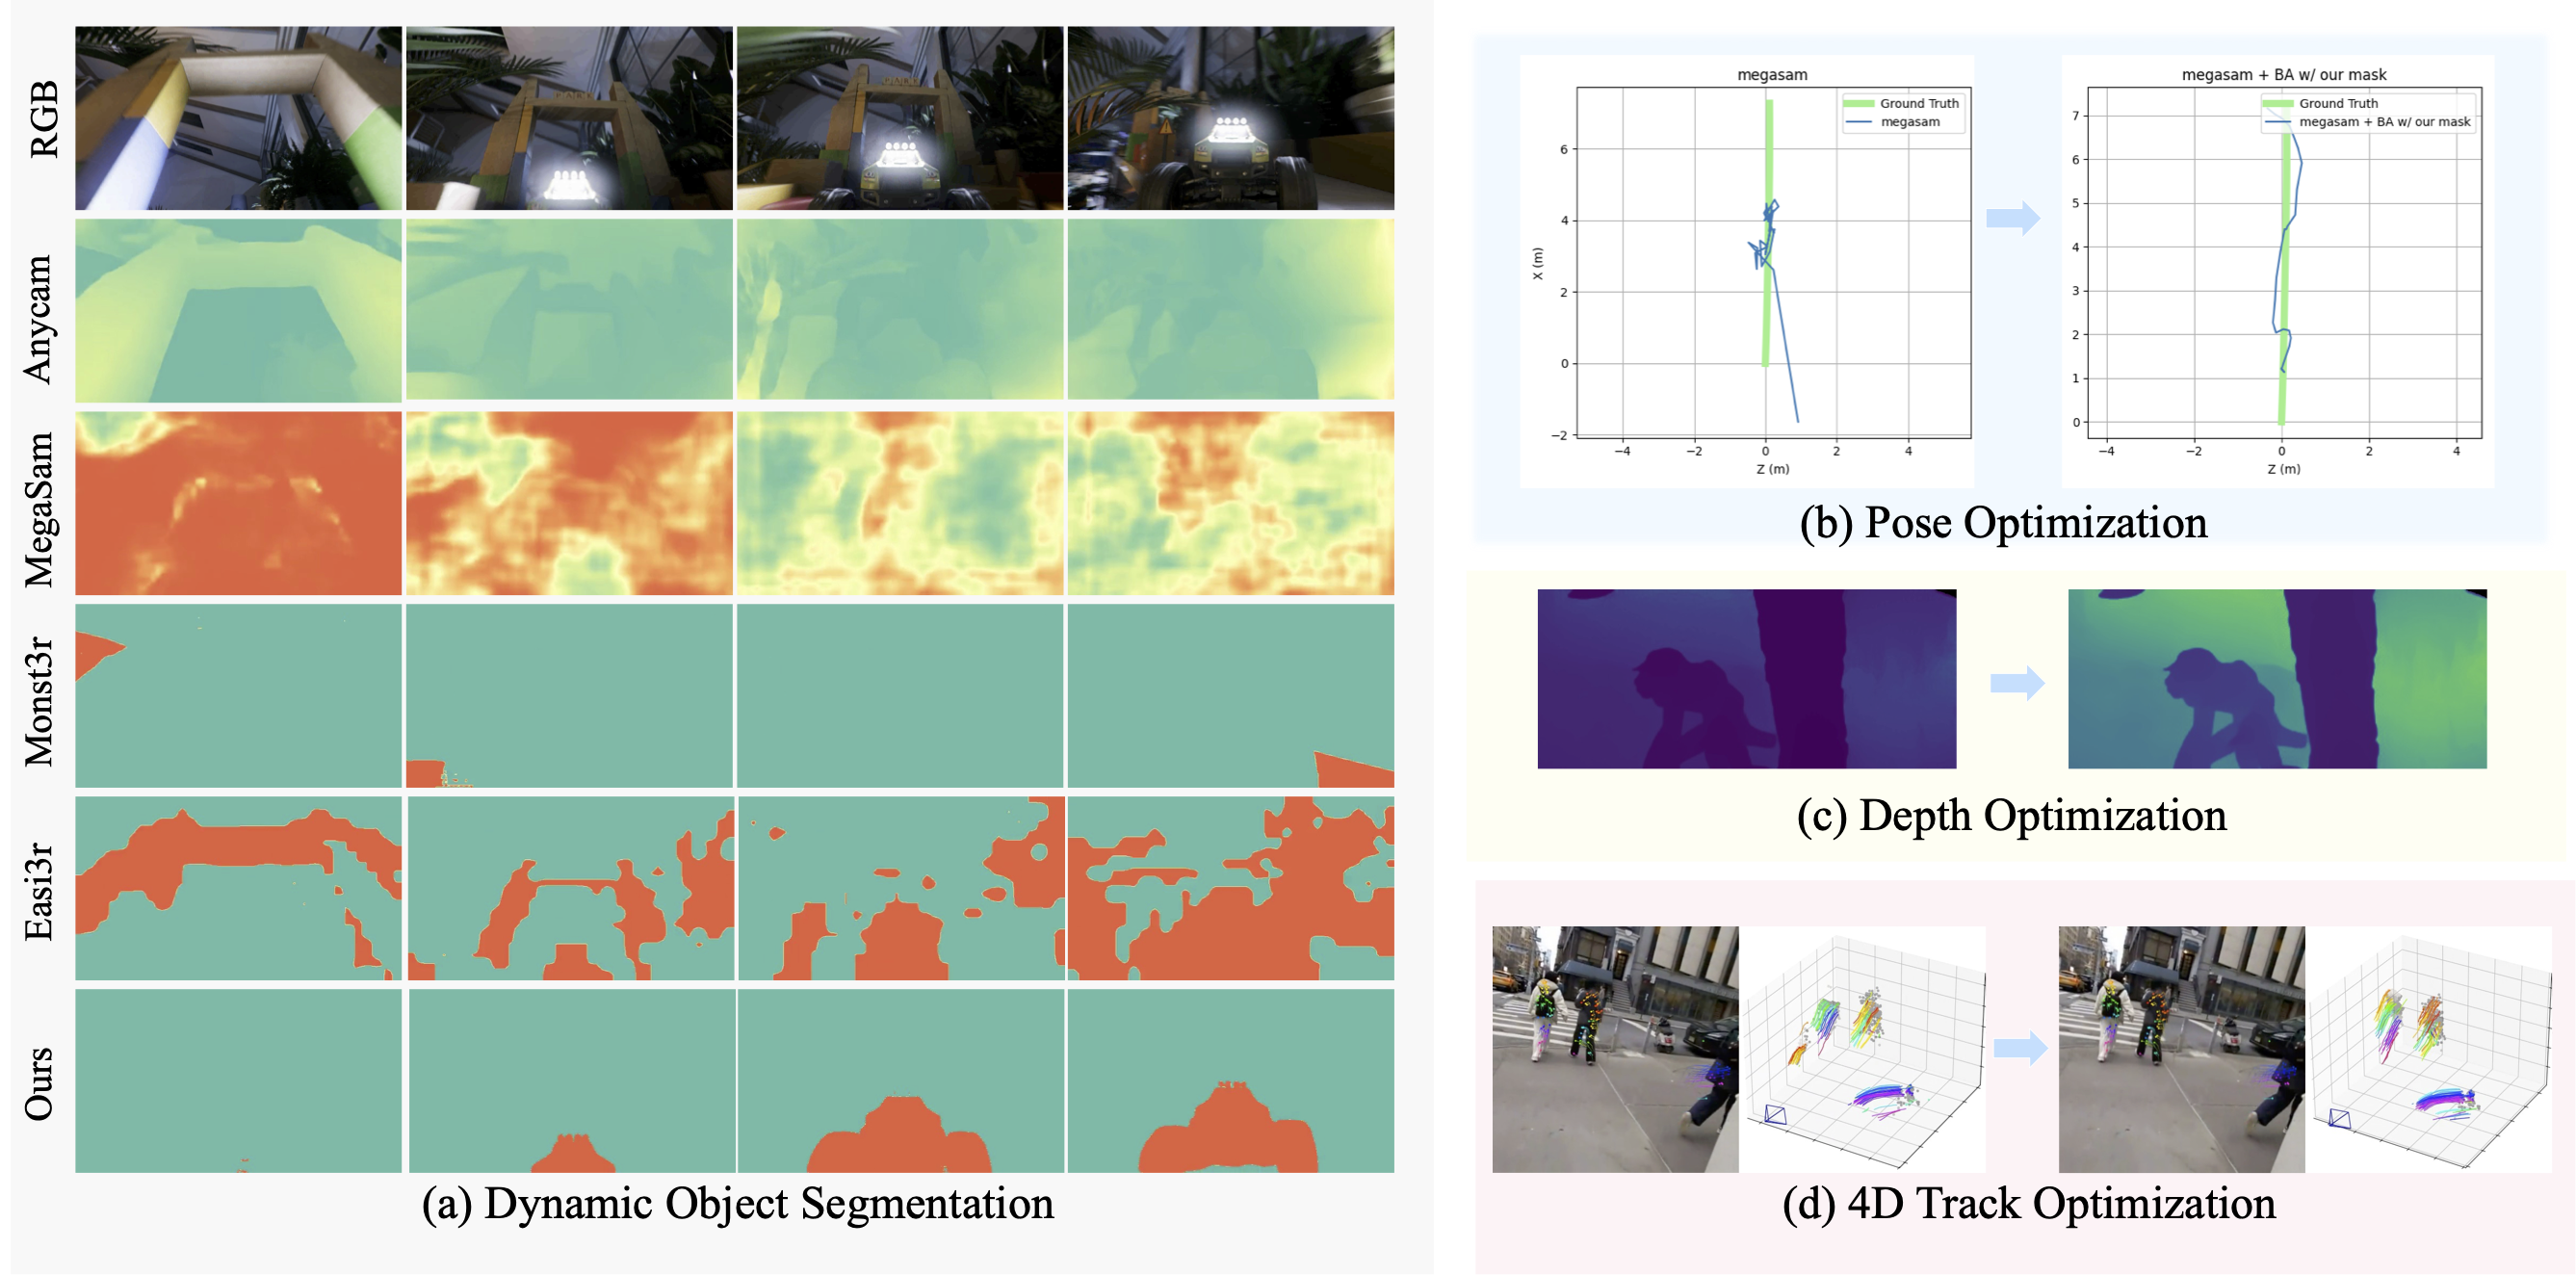
This code accompanies the paper
The Dynamic Prior: Understanding 3D Structures for Casual Dynamic Videos
Zhuoyuan Wu, Xurui Yang, Jiahui Huang, Yue Wang, Jun Gao
2025/12 We release the code and paper.
!!!The codebase is still being sorted out and it may take some time. Please stay tuned!
The dynamic object segmentation is built on Sa2VA, you can install the sa2va/demo/requirements.txt to avoid training-only packages.
cd dynamic_prior && \
conda create -n sa2va python=3.11 -y && \
conda activate sa2va && \
pip install -r demo/requirements.txt
The script supports GPT-4o, Gemini-2.5Pro, and open-sourced models like Qwen2.5-VL, Qwen3-VL, InternVL3.5, gemma. You can run the demo for dynamic object reasoning. In case you want to run GPT-4o, you need to set your openai_api_key.
python keyframe_selector/dynamic_scene_reasoning.py \
     --scene_name walking \
     --images_dir assets/images \
     --vlm gpt4o \
     --openai_api_key your_openai_key \
     --num_samples 8 \
     --max_new_tokens 4096 \
     --output_dir ./gpt4o_outputs/
Dynamic object segmentation relies on the reasoning results. It calls Sa2VA for keyframe segmentation and propagate the object mask to the entire video. Finally we merge instance-level masks for later application.
python demo/demo_local.py assets/images \
    --keyframes-json ./gpt4o_outputs/walking/mllm_raw.json \
    --model_path ByteDance/Sa2VA-8B \
    --work-dir ./sa2va_outputs/walking
Feel free to swith to other MLLM backbones:
| Model Name | Base MLLM | Language Part | HF Link |
|---|---|---|---|
| Sa2VA-1B | InternVL2.0-1B | Qwen2-0.5B-Instruct | 🤗 link |
| Sa2VA-4B | InternVL2.5-4B | Qwen2.5-3B-Instruct | 🤗 link |
| Sa2VA-8B | InternVL2.5-8B | internlm2_5-7b-chat | 🤗 link |
| Sa2VA-26B | InternVL2.5-26B | internlm2_5-20b-chat | 🤗 link |
We provide our dynamic object segmentation results on LightSpeed, FBMS, SegTrackv2, Sintel, TUMRGBD, and Dycheck for metrics evaluation and later diverse applications.
Our pose optimization pipeline is built upon bundle adjustment in Anycam.
cd pose_optimization && \
conda create -n anycam python=3.11 -y && \
conda activate anycam && \
pip install torch==2.5.1 torchvision==0.20.1 torchaudio==2.5.1 --index-url https://download.pytorch.org/whl/cu124 && \
conda install -c nvidia cuda-toolkit -y && \
pip install -r requirements.txt
./download_checkpoints.sh anycam_seq8
We provide a demo script to run the pose optimization based on Anycam where Anycam predicts camera intrinsic, extrinsic and depth.
python anycam/scripts/anycam_demo.py \
    ++model_name=anycam \
    ++input_path=/path/to/frames \
    ++seq_name=cave_4 \
    ++model_path=pretrained_models/anycam_seq8 \
    ++ba_refinement=true \
    ++fit_video.do_ba_refinement=true \
    ++fit_video.ba_refinement_level=2 \
    ++visualize=true \
    ++rerun_mode=connect \
    ++rerun_address=localhost:9877 \
    ++fit_video.prediction.use_provided_masks=true \
    ++fit_video.prediction.mask_path=/path/to/dynamic/masks.mp4
If you are developing on a remote server, you can start rerun.io as a webserver. First, open a new terminal on your remote machine and start the viewer:
# On your local machine, forward both web server and websocket ports:
ssh -L 9090:localhost:9090 -L 9877:localhost:9877 user@remote-server
On the remote machine:
# Kill any existing rerun processes, clear all history visualization
pkill -f "rerun"
# On remote server, start rerun in web server mode:
rerun --serve-web --bind 0.0.0.0
Then, forward port 9090 to your local machine. Finally, make sure to launch the script with the ++rerun_mode=connect ++rerun_address=localhost:9877. You should be able to view the results in your browser under:
http://localhost:9090/?url=ws://localhost:9877
To evaluate the pose optimization on LightSpeed, run the following command. Replace the path of ++fit_video.prediction.mask_path with the dynamic masks. Note that you need to modify data_path_training and data_path_testing in anycam/configs/dataset_cfgs/lightspeed.yaml
python anycam/scripts/evaluate_trajectories.py \
    -cn evaluate_trajectories \
    ++model_path=pretrained_models/anycam_seq8 \
    ++dataset=anycam/configs/dataset_cfgs/lightspeed.yaml \
    ++fit_video.dataset_type=lightspeed \
    ++fit_video.do_ba_refinement=true \
    ++fit_video.ba_refinement.max_uncert=0.5 \
    ++fit_video.ba_refinement.lr=1e-4 \
    ++fit_video.ba_refinement_level=0 \
    ++fit_video.ba_refinement.with_rerun=false \
    ++fit_video.ba_refinement.grid_size=16 \
    ++out_path=./anycam_exp/ \
    ++fit_video.prediction.use_provided_masks=true \
    ++fit_video.prediction.mask_path=path/to/lightspeed/masks
Our depth optimization is build upon CVD proposed in MegaSam
cd depth_optimization && \
conda env create -f environment.yml && \
wget https://anaconda.org/xformers/xformers/0.0.22.post7/download/linux-64/xformers-0.0.22.post7-py310_cu11.8.0_pyt2.0.1.tar.bz2 && \
conda install xformers-0.0.22.post7-py310_cu11.8.0_pyt2.0.1.tar.bz2 && \
cd base; python setup.py install
Download DepthAnything checkpoint to
mega-sam/Depth-Anything/checkpoints/depth_anything_vitl14.pth
Download and include RAFT checkpoint at mega-sam/cvd_opt/raft-things.pth
Download and unzip Sintel data.
Precompute mono-depth (Please modify img-path in the script):
./mono_depth_scripts/run_mono-depth_sintel.sh
Run camera tracking (Please modify DATA_PATH in the script. Adding
argument --opt_focal to enable focal length optimization):
./tools/evaluate_sintel.sh
Running depth optimization given estimated cameras (Please
modify datapath and mask_path in the script): ./cvd_opt/cvd_opt_sintel_our_mask.sh \
Our 4D track optimization is based on Stereo4D.
cd 4D_track_optimization && \
conda env create --file=environment.yml
# Install gcloud sdk
curl -O https://dl.google.com/dl/cloudsdk/channels/rapid/downloads/google-cloud-cli-linux-x86_64.tar.gz
tar -xf google-cloud-cli-linux-x86_64.tar.gz
./google-cloud-sdk/install.sh
./google-cloud-sdk/bin/gcloud init
# To download one example
mkdir -p stereo4d_dataset/npz
gcloud storage cp gs://stereo4d/train/CMwZrkhQ0ck_130030030.npz stereo4d_dataset/npz
Download demo data, bash demo_run.bash, or
TIMESTAMP=66957
VIDEOID=9876543210b
VID="${VIDEOID}_${TIMESTAMP}"

echo "=== Downloading Dataset ==="
gsutil -m cp -R gs://stereo4d/demo .
mv demo stereo4d_dataset
mkdir -p stereo4d_dataset/npz stereo4d_dataset/raw
mv stereo4d_dataset/${VIDEOID}.mp4 stereo4d_dataset/raw
mv stereo4d_dataset/${VID}.npz stereo4d_dataset/npz
# Rectify raw videos and convert to perspective projections
JAX_PLATFORMS=cpu python rectify.py \
--vid=9876543210b_66957
# Disparity from stereo matching
python inference_raft.py \
--vid=9876543210b_66957
# Dense point tracking
python tracking.py \
--vid=9876543210b_66957
# Filter Drifting tracks
python segmentation.py \
--vid=9876543210b_66957
# Track optimization
python track_optimization.py \
--vid=9876543210b_66957 \
--motion_mask_path=./stereo4d_dataset/segmentation_mask/9876543210b_66957/segmentation_mask.mp4
This code accompanies the paper
The Dynamic Prior: Understanding 3D Structures for Casual Dynamic Videos
Zhuoyuan Wu, Xurui Yang, Jiahui Huang, Yue Wang, Jun Gao
2025/12 We release the code and paper.
!!!The codebase is still being sorted out and it may take some time. Please stay tuned!
The dynamic object segmentation is built on Sa2VA, you can install the sa2va/demo/requirements.txt to avoid training-only packages.
cd dynamic_prior && \
conda create -n sa2va python=3.11 -y && \
conda activate sa2va && \
pip install -r demo/requirements.txt
The script supports GPT-4o, Gemini-2.5Pro, and open-sourced models like Qwen2.5-VL, Qwen3-VL, InternVL3.5, gemma. You can run the demo for dynamic object reasoning. In case you want to run GPT-4o, you need to set your openai_api_key.
python keyframe_selector/dynamic_scene_reasoning.py \
     --scene_name walking \
     --images_dir assets/images \
     --vlm gpt4o \
     --openai_api_key your_openai_key \
     --num_samples 8 \
     --max_new_tokens 4096 \
     --output_dir ./gpt4o_outputs/
Dynamic object segmentation relies on the reasoning results. It calls Sa2VA for keyframe segmentation and propagate the object mask to the entire video. Finally we merge instance-level masks for later application.
python demo/demo_local.py assets/images \
    --keyframes-json ./gpt4o_outputs/walking/mllm_raw.json \
    --model_path ByteDance/Sa2VA-8B \
    --work-dir ./sa2va_outputs/walking
Feel free to swith to other MLLM backbones:
| Model Name | Base MLLM | Language Part | HF Link |
|---|---|---|---|
| Sa2VA-1B | InternVL2.0-1B | Qwen2-0.5B-Instruct | 🤗 link |
| Sa2VA-4B | InternVL2.5-4B | Qwen2.5-3B-Instruct | 🤗 link |
| Sa2VA-8B | InternVL2.5-8B | internlm2_5-7b-chat | 🤗 link |
| Sa2VA-26B | InternVL2.5-26B | internlm2_5-20b-chat | 🤗 link |
We provide our dynamic object segmentation results on LightSpeed, FBMS, SegTrackv2, Sintel, TUMRGBD, and Dycheck for metrics evaluation and later diverse applications.
Our pose optimization pipeline is built upon bundle adjustment in Anycam.
cd pose_optimization && \
conda create -n anycam python=3.11 -y && \
conda activate anycam && \
pip install torch==2.5.1 torchvision==0.20.1 torchaudio==2.5.1 --index-url https://download.pytorch.org/whl/cu124 && \
conda install -c nvidia cuda-toolkit -y && \
pip install -r requirements.txt
./download_checkpoints.sh anycam_seq8
We provide a demo script to run the pose optimization based on Anycam where Anycam predicts camera intrinsic, extrinsic and depth.
python anycam/scripts/anycam_demo.py \
    ++model_name=anycam \
    ++input_path=/path/to/frames \
    ++seq_name=cave_4 \
    ++model_path=pretrained_models/anycam_seq8 \
    ++ba_refinement=true \
    ++fit_video.do_ba_refinement=true \
    ++fit_video.ba_refinement_level=2 \
    ++visualize=true \
    ++rerun_mode=connect \
    ++rerun_address=localhost:9877 \
    ++fit_video.prediction.use_provided_masks=true \
    ++fit_video.prediction.mask_path=/path/to/dynamic/masks.mp4
If you are developing on a remote server, you can start rerun.io as a webserver. First, open a new terminal on your remote machine and start the viewer:
# On your local machine, forward both web server and websocket ports:
ssh -L 9090:localhost:9090 -L 9877:localhost:9877 user@remote-server
On the remote machine:
# Kill any existing rerun processes, clear all history visualization
pkill -f "rerun"
# On remote server, start rerun in web server mode:
rerun --serve-web --bind 0.0.0.0
Then, forward port 9090 to your local machine. Finally, make sure to launch the script with the ++rerun_mode=connect ++rerun_address=localhost:9877. You should be able to view the results in your browser under:
http://localhost:9090/?url=ws://localhost:9877
To evaluate the pose optimization on LightSpeed, run the following command. Replace the path of ++fit_video.prediction.mask_path with the dynamic masks. Note that you need to modify data_path_training and data_path_testing in anycam/configs/dataset_cfgs/lightspeed.yaml
python anycam/scripts/evaluate_trajectories.py \
    -cn evaluate_trajectories \
    ++model_path=pretrained_models/anycam_seq8 \
    ++dataset=anycam/configs/dataset_cfgs/lightspeed.yaml \
    ++fit_video.dataset_type=lightspeed \
    ++fit_video.do_ba_refinement=true \
    ++fit_video.ba_refinement.max_uncert=0.5 \
    ++fit_video.ba_refinement.lr=1e-4 \
    ++fit_video.ba_refinement_level=0 \
    ++fit_video.ba_refinement.with_rerun=false \
    ++fit_video.ba_refinement.grid_size=16 \
    ++out_path=./anycam_exp/ \
    ++fit_video.prediction.use_provided_masks=true \
    ++fit_video.prediction.mask_path=path/to/lightspeed/masks
Our depth optimization is build upon CVD proposed in MegaSam
cd depth_optimization && \
conda env create -f environment.yml && \
wget https://anaconda.org/xformers/xformers/0.0.22.post7/download/linux-64/xformers-0.0.22.post7-py310_cu11.8.0_pyt2.0.1.tar.bz2 && \
conda install xformers-0.0.22.post7-py310_cu11.8.0_pyt2.0.1.tar.bz2 && \
cd base; python setup.py install
Download DepthAnything checkpoint to
mega-sam/Depth-Anything/checkpoints/depth_anything_vitl14.pth
Download and include RAFT checkpoint at mega-sam/cvd_opt/raft-things.pth
Download and unzip Sintel data.
Precompute mono-depth (Please modify img-path in the script):
./mono_depth_scripts/run_mono-depth_sintel.sh
Run camera tracking (Please modify DATA_PATH in the script. Adding
argument --opt_focal to enable focal length optimization):
./tools/evaluate_sintel.sh
Running depth optimization given estimated cameras (Please
modify datapath and mask_path in the script): ./cvd_opt/cvd_opt_sintel_our_mask.sh \
Our 4D track optimization is based on Stereo4D.
cd 4D_track_optimization && \
conda env create --file=environment.yml
# Install gcloud sdk
curl -O https://dl.google.com/dl/cloudsdk/channels/rapid/downloads/google-cloud-cli-linux-x86_64.tar.gz
tar -xf google-cloud-cli-linux-x86_64.tar.gz
./google-cloud-sdk/install.sh
./google-cloud-sdk/bin/gcloud init
# To download one example
mkdir -p stereo4d_dataset/npz
gcloud storage cp gs://stereo4d/train/CMwZrkhQ0ck_130030030.npz stereo4d_dataset/npz
Download demo data, bash demo_run.bash, or
TIMESTAMP=66957
VIDEOID=9876543210b
VID="${VIDEOID}_${TIMESTAMP}"

echo "=== Downloading Dataset ==="
gsutil -m cp -R gs://stereo4d/demo .
mv demo stereo4d_dataset
mkdir -p stereo4d_dataset/npz stereo4d_dataset/raw
mv stereo4d_dataset/${VIDEOID}.mp4 stereo4d_dataset/raw
mv stereo4d_dataset/${VID}.npz stereo4d_dataset/npz
# Rectify raw videos and convert to perspective projections
JAX_PLATFORMS=cpu python rectify.py \
--vid=9876543210b_66957
# Disparity from stereo matching
python inference_raft.py \
--vid=9876543210b_66957
# Dense point tracking
python tracking.py \
--vid=9876543210b_66957
# Filter Drifting tracks
python segmentation.py \
--vid=9876543210b_66957
# Track optimization
python track_optimization.py \
--vid=9876543210b_66957 \
--motion_mask_path=./stereo4d_dataset/segmentation_mask/9876543210b_66957/segmentation_mask.mp4



