A native, open-source RAW photo editor for Mac, iPad and iPhone that feels immediately familiar to Lightroom users.
See the code

A native, open-source RAW photo editor for Mac, iPad, and iPhone that anyone who knows Lightroom will find familiar.





Redlamp is built from scratch in Swift and Metal for Apple Silicon. It focuses on one thing, developing photos, and aims to do it faster and more natively than anything else on the platform.
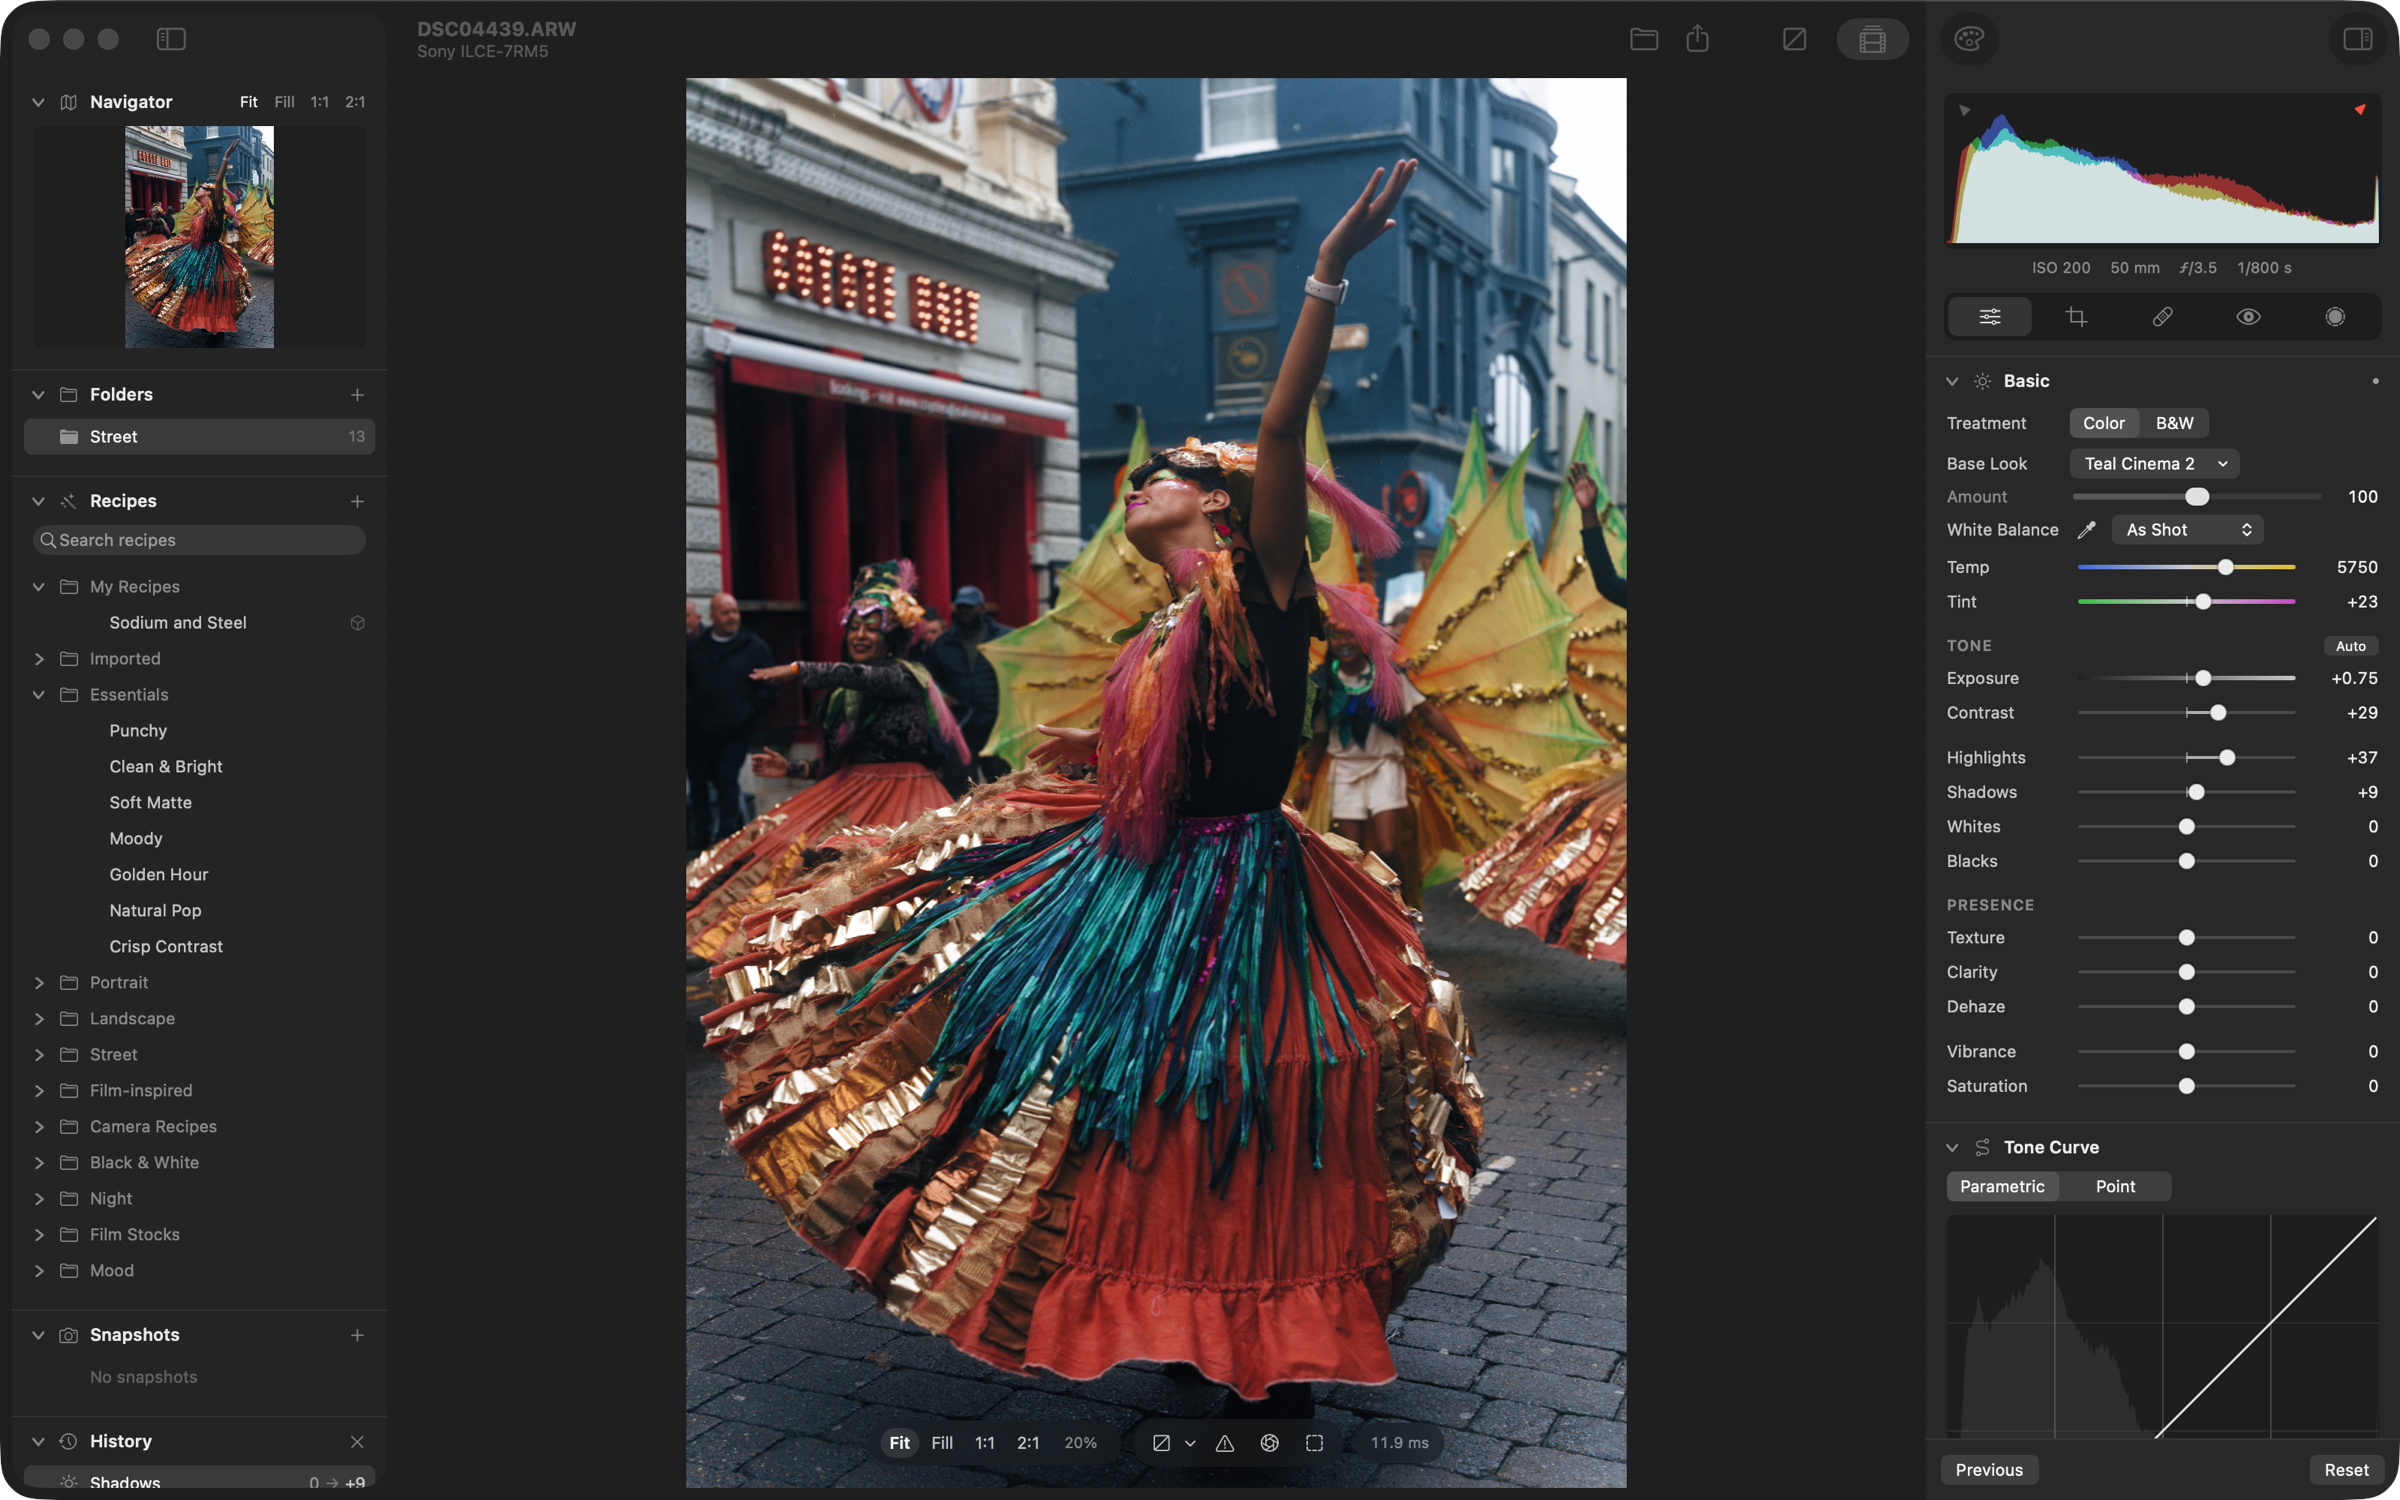
Watch the film: Introducing Redlamp (1:42, on YouTube)
Status: pre-alpha, iteration 2 (macOS). The core RAW pipeline and the Develop workspace work today: Basic (with Texture, Clarity and Dehaze), Tone Curve, Color Mixer, Color Grading, Detail (noise reduction and sharpening), Effects, lens corrections, crop and Upright, masking (gradients, brush, color and luminance range, Subject, Sky, Background, People and its parts, Objects, Landscape and Depth Range) with local adjustments, healing and removal (Heal, Clone, Remove, content-aware or generative, and Remove Dust), focus stacking, and Recipes, Redlamp's presets, profiles and LUTs in one, with film looks measured from cameras' own renderings and film simulations of 36 film looks from 30 stocks, built from the manufacturers' datasheets. AI Denoise and the rest of Develop parity are next, then 1.0 and the iPad and iPhone apps. See Where we are, the Roadmap, and how Redlamp compares with Lightroom.
This README is the project's primary status page and is kept up to date as work lands. Last updated: 4 October 2026.

A red lamp is the darkroom safelight: the one light you can work by without fogging the paper. That is the idea behind the project: you can see and shape your photo freely, and the original is never harmed.
Lightroom defined how millions of photographers edit, but it is a cross-platform application that doesn't feel at home on a Mac, iPad, or iPhone, and it is tied to a subscription and a cloud. Redlamp keeps the workflow photographers already know, including the panel layout, slider names and ranges, and keyboard shortcuts, and rebuilds everything underneath as a native, GPU-first, open-source application.
Redlamp is an editor, not a catalog. It keeps a working set of folders, as Lightroom Classic's Folders panel does, and stores edits in small sidecar files next to the photos. Library management is a separate, later track.
RAW pipeline (our own, GPU-first)
Develop adjustments that render
Masking (Lightroom's model)
K): A and B brushes and Erase (hold Option), with Size, Feather, Flow, Density and Auto Mask, and pen pressure. Strokes are kept as vectors in the edit and painted on the GPU in mask space (up to 4096 px), redrawing only the stroke being painted. [ and ] or ⌘-scroll change the size, with Shift the feather; the brush's ring shows its size as it changes, also from the panel's sliders, and Space-drag moves the photo while you paint. In every tool the wheel and pinch zoom.⇧Q) and Color Range (⇧J): sample with the eyedropper, then shape the range with four handles (Show Luminance Map) or Refine up to five color samples. They select on the photo with its global edit, so the selection follows white balance and exposure.O) in Lightroom's modes (Color Overlay, on B&W, Image on Black or White, B&W, Image on B&W), colors and opacity, and a mask list where you can show and hide, rename, duplicate, "duplicate and invert", reset, delete, and drag to reorder masks and their components.Focus stacking (a separate Stack workspace)
.redlampstack document beside the frames; the merged pixels are cached and rebuilt when needed.redlamp stack does the same from the command line.Workspace
.redrecipe, .cube, .3dl and HaldCLUT files (LUTs made for camera log footage too, with their input space chosen on import, in the panel and the Recipe Lab). Lightroom develop presets (.xmp) import too, one, several or a folder at a time, by the menu or by dropping them on the panel, with a report of what came across exactly, approximately or not at all (what maps). Snapshots are also available.⌥J) marks the photosites the camera clipped, in the colour of each clipped channel (black where all three did), whatever the edit has done since; the colour-assessment view (⇧L) puts the photo on middle grey inside a white frame (ISO 12646). Before/After (\) in three layouts, full frame, side by side and a diagonal split, cycled with Y and ⇧Y; the original is rendered once and cached, so edits don't re-render it.x+0.3. A run of presses is one history step.exposure 0.7 or temp 5600k, sets it straight from the search.x+10.I), Lights Out (L), full-screen preview (F), and Paste from Previous (⌥⌘V and the Previous button).⇧⌘C) opens a checklist of every setting and mask, remembered for next time; Paste (⇧⌘V) applies what was ticked, and recomputes the pasted AI masks for the photo. ⌘- and ⇧-click select several photos in the filmstrip: Sync… (⇧⌘S) and Paste reach all of them in the background, with Undo, and Auto Sync (⌥⇧⌘A) repeats every change. Right-click a photo in the filmstrip to copy its settings or paste onto it without opening it; on a selected photo, the menu has the same Copy, Paste and Sync items.IMG_1234.ARW.redlamp).⇧⌘E): JPEG, HEIC and AVIF (lossy, with quality and an optional file size limit) or PNG and TIFF (lossless, with TIFF compression), 8, 10 or 16 bits, sRGB or Display P3. Resize by long edge, short edge, width and height, megapixels or percentage, keep all metadata, all but the location, or none (the first two also embed the edit recipe in the file's XMP, format), and choose the folder and file name. Built-in and saved presets, and Export with Previous (⌥⇧⌘E) repeats the last export without the dialog.redlamp camera-bench runs the same checks from the command line.redlamp command-line tool for rendering and export. Exports smaller than the photo are developed at full resolution and downscaled last, so sharpening, noise reduction and texture look the same at every size. One .redrecipe format for presets, profiles and LUTs: an explicit list of setting groups, an optional Base Look pinned by content hash, immutable versions, and namespaced ids ready for sharing (format, JSON Schema).
Camera recipe cards: Fujifilm-style recipes (film simulation, dynamic range, highlight and shadow tone, color, Color Chrome, white balance shift, grain) are a recipe dialect you can type in as the card lists them (mapping).
Measured film looks. The profiler fits a look to cameras' own JPEGs of the same raw files: Fujifilm raws carry the camera's rendering inside. On photos the fit never saw:
| Base Look | Like | Measured from | ΔE to the camera (lower is closer) |
|---|---|---|---|
| Standard v3 | Provia | 120 photos, 50 bodies | 3.26 (Redlamp Color: 5.38) |
| Vivid Slide v2 | Velvia | 10 bodies | 3.39 (4.45) |
| Chrome v3 | Classic Chrome | 18 photos, 5 bodies | 4.61 (5.72) |
| Soft Slide v2 | Astia | 5 photos, 3 bodies, provisional | 4.57 (12.84) |
The others are hand-designed until there's data for them (look development). Looks keep Redlamp's own names.
Film simulations: 36 looks from 30 stocks, built physically from the manufacturers' datasheets, including pushed, overexposed, bleach-bypass and cross-processed variants, with halation, bloom and film grain, a Film Looks window and film icons in the Base Look menu (details).
Look-development tools: lint (neutral axis, skin hue, monotonic lightness, banding, clipping) on a synthetic chart, golden renders per recipe version, style fingerprints and a fitter, and the Recipe Lab in the component harness.
An agent recipe studio (docs): curator, colorist and critic agents work through redlamp mcp on briefs drawn from public-domain references. People approve the briefs and pick the winners in the Recipe Lab, and the critics are only trusted after they agree with human picks on held-out pairs.
Q): click the photo to add a spot. Remove fills it from the photo around it, patch by patch, continuing edges that run into it (content-aware fill), and with Click picks set to Person or Object, a click removes the whole person or object, shaped by its mask. Find outlines things named in words wherever they are in the photo (trash, litter, plastic bags, bottles, cans, cigarette butts, power lines, cables, signs, traffic cones, cars, people and birds, with OWLv2 from Settings › Models), and a click on one removes it the same way, or Remove All removes them all; Heal and Clone find their own source nearby; drag the spot or its source to move it, or its handle to resize it, and change Heal or Clone, Size, Feather and Opacity in the panel. Heal matches the source's texture to the light around the spot. Drag instead of clicking to brush a spot along a scratch, wire or twig. Remove Dust finds the soft, colourless specks sensor dust leaves on smooth areas (sky, walls, water) and heals them in one step; with several photos selected, it heals the specks found in the same place on the sensor in two or more of them (frames showing the same scene around a speck, as from a tripod, count as one), in all of them (one Undo puts the others back), and Visualize Spots shows the photo's edges in white so the rest stand out. Spots are saved with the edit, paste with Copy Settings, and redlamp render --remove x,y,radius, --heal or --clone (or --remove-brush and the others through several points) adds one from the command line, as --remove-dust 50 heals the dust found and --remove-found car removes what's found by name.Measured on an Apple M1 Ultra with a Release build. Every figure since 29 September, the benchmark harness's runs, and what's got faster or slower are at redlamp.app/performance, from docs/performance/history.jsonl; scripts/perf-record.sh records a run. The card at the top of this README is drawn from the same history by scripts/perf-card.py, each figure from its latest quiet record, and CI fails when the card falls behind the history.
Each release's download and installed size is recorded from its zip on GitHub (scripts/perf-history.py release). 0.2.7 is a 22.1 MB download and 44.9 MB installed; the AI models download only when a feature first needs them. 0.2.5 added Generative Remove and its MLX frameworks and grew to 115.6 MB installed; 0.2.6 ships stripped of debugging symbols, with LibRaw built hidden so unused code is dropped and the decode service sharing the app's frameworks (AUD-11), and is smaller than 0.2.4 was. 0.2.7 ships its 69 Base Look tables compressed, each read when a render first uses it (AUD-11), and is 17% smaller installed than 0.2.6. The release check fails a bundle with an Intel slice, debugging symbols or more than its size budget (scripts/check-release-bundle.sh).
| Operation | Time |
|---|---|
| Open a 24–26 MP raw file (decode, GPU upload, demosaic, pyramid) | 70–250 ms |
| Interactive render at Fit (every adjustment, fused) | 0.6–3 ms |
| Interactive render at Fit with two gradient masks | ~1.3 ms |
| Interactive render at 1:1 (full 26 MP frame) | ~13 ms |
| Full-resolution export render (24–26 MP) | ~45 ms |
| Full-resolution export render with noise reduction (24 MP, tiled) | ~100 ms |
| Focus stack of 25 × 17 MP Canon CR3 frames (decode, align, depth map, fuse) | ~8 s |
| Focus stack of 109 × 4 MP JPEG frames | ~15 s |
| Reopen a merged focus stack from its cache | ~0.1 s |
| Detail stage on a 1:1 region (about 10 MP of pyramid texels), GPU time: noise reduction, Texture and Clarity | ~5 ms, ~1 ms |
| Detail stage for a 2560 × 1600 view at 1:1 of a 24 MP frame, GPU time: noise reduction alone (Luminance 50); default sharpening, first render; while dragging Radius; while dragging Amount, Detail or Masking (cached analysis); while dragging Luminance | ~3.6 ms, ~7.2 ms, ~5.5 ms, ~2.2 ms, ~4.3 ms |
The detail stage holds about 1.3 GB of GPU memory at 1:1 on a 24 MP photo and 2.3 GB on a 60 MP one, with noise reduction and sharpening on (3.1 GB and 7.5 GB before the memory audit, AUD-03); large views render in tiles within its budget, and nothing is kept once rendering stops for half a second.
Folders and the filmstrip on 50,000 photos in 500 folders (scripts/make-folder-fixture.sh, then --folders-perf), measured while the Mac was busy with other work (load average about 18):
| Operation | Time |
|---|---|
| First photos in the filmstrip, Show Photos in Subfolders on | 14 ms |
| All 50,000 photos listed (500 folders, in parallel, in order) | 209 ms |
| The visible thumbnails, decoded from the raw files | 33 ms |
| Background warming from the raw files | 705 a second |
| Thumbnails from the disk cache | 6,210 a second |
| Main thread while listing, decoding and warming (p99) | 0.15 ms |
| Main thread while scrolling the filmstrip end to end (p99) | 1.4 ms |
| Peak memory, 152 MB before opening | 317 MB (531 MB before the memory budgets); 207 MB idle after a memory-pressure trim |
Dragging a slider at 120 events a second (scripts/perf-sweep.sh), with every panel open:
| Main thread during the drag | Iteration 2 | Off-main rendering | AppKit panels |
|---|---|---|---|
| Time busy | 100% | ~54% | ~34% |
| Typical run-loop iteration (median) | — | 2.3 ms | 0.17 ms |
| Slowest 5% of iterations | 157 ms | ~8 ms | ~5 ms |
| Slowest 1% of iterations | — | ~13 ms | ~8 ms |
With both side panels in AppKit, most of what remains is Core Animation committing the redrawn layers and the engine's frames arriving; SwiftUI is down to about 2% of the main thread.
.dcp files is deferred.RedlampDecoder.xpc, sent each file's bytes), never in the app, so a damaged file can't crash the editor while it decodes. These reads still parse files in the app itself: filmstrip thumbnails (a raw's embedded preview, through LibRaw, or ImageIO), the Portrait mattes and depth a photo carries, focus-stack detection, the metadata an export copies from its source, an imported HALD look, and the Camera Bench window (Help › Test Your Camera…). iPad and iPhone come in Phase 5.Fixed in iteration 2:
Redlamp's film looks are physical simulations, built from the data in each manufacturer's own datasheet: characteristic curves, spectral sensitivities and dye spectra, digitised into research/film-data/. Most film presets are tuned by eye.
 Portra 160 Colour negative |  Portra 400 Colour negative |  Portra 800 Colour negative |  Ektar 100 Colour negative |  Gold 200 Colour negative |  UltraMax 400 Colour negative |
 Superia 400 Colour negative |  Pro 400H Colour negative |  CineStill 800T Tungsten negative |  CineStill 50D Daylight negative |  Vision3 500T Cinema print |  Vision3 250D Cinema print |
 Vision3 50D Cinema print |  Eterna Vivid Cinema print |  Provia 100F Slide |  Velvia 50 Slide |  Velvia 100 Slide |  Ektachrome Slide |
 Kodachrome 64 Slide |  Tri-X 400 Black and white |  T-Max 100 Black and white |  T-Max 400 Black and white |  HP5 Plus Black and white |  Delta 100 Black and white |
 Delta 3200 Black and white |  FP4 Plus Black and white |  Pan F Plus Black and white |  Darkroom Print Grade 2 print |  Soft Print Grade 1 print |  Hard Print Grade 4 print |
 Portra 400 · +2 Overexposed |  Portra 800 · 1600 Pushed |  Tri-X · 1600 Pushed |  2383 Bleach Bypass Cinema print |  Velvia 50 · Cross Cross-processed |  Provia 100F · Cross Cross-processed |
The datasheets drive an offline model that bakes each film into a Base Look table and its effects settings. Only those ship, and the GPU applies them while you edit:
flowchart LR
    pdf["Makers' datasheets<br/>Kodak · Fujifilm · Ilford"] --> data["research/film-data<br/>curves · sensitivities · dyes · granularity"]
    subgraph model["Film model (offline)"]
        direction LR
        spectrum["Scene colour<br/>to spectrum"] --> layers["Layer exposures<br/>spectral sensitivities"]
        layers --> density["Dye density<br/>curves · interlayer · masking"]
        density --> view["Print, scan<br/>or light box"]
        view --> eye["Colour as seen<br/>CIE observer"]
    end
    data --> model
    eye --> table["Base Look<br/>scene-referred 33³ table"]
    data -- granularity --> effects["Grain · halation · bloom"]
    table --> recipe["Bundled film recipe"]
    effects --> recipe
    recipe --> engine["Develop kernel (Metal)<br/>halation and bloom → film table → grain"]
The film model follows the scene's light through the film:
Each look ships as a scene-referred Base Look. It takes the place of Redlamp's tone curve, so the film's own toe, shoulder and colour crossovers reach the photo. Each look also comes with the film's grain, halation and bloom in the Effects panel. Grain follows each datasheet's published granularity, and halation is strongest on CineStill, which has no anti-halation layer.
Using them:
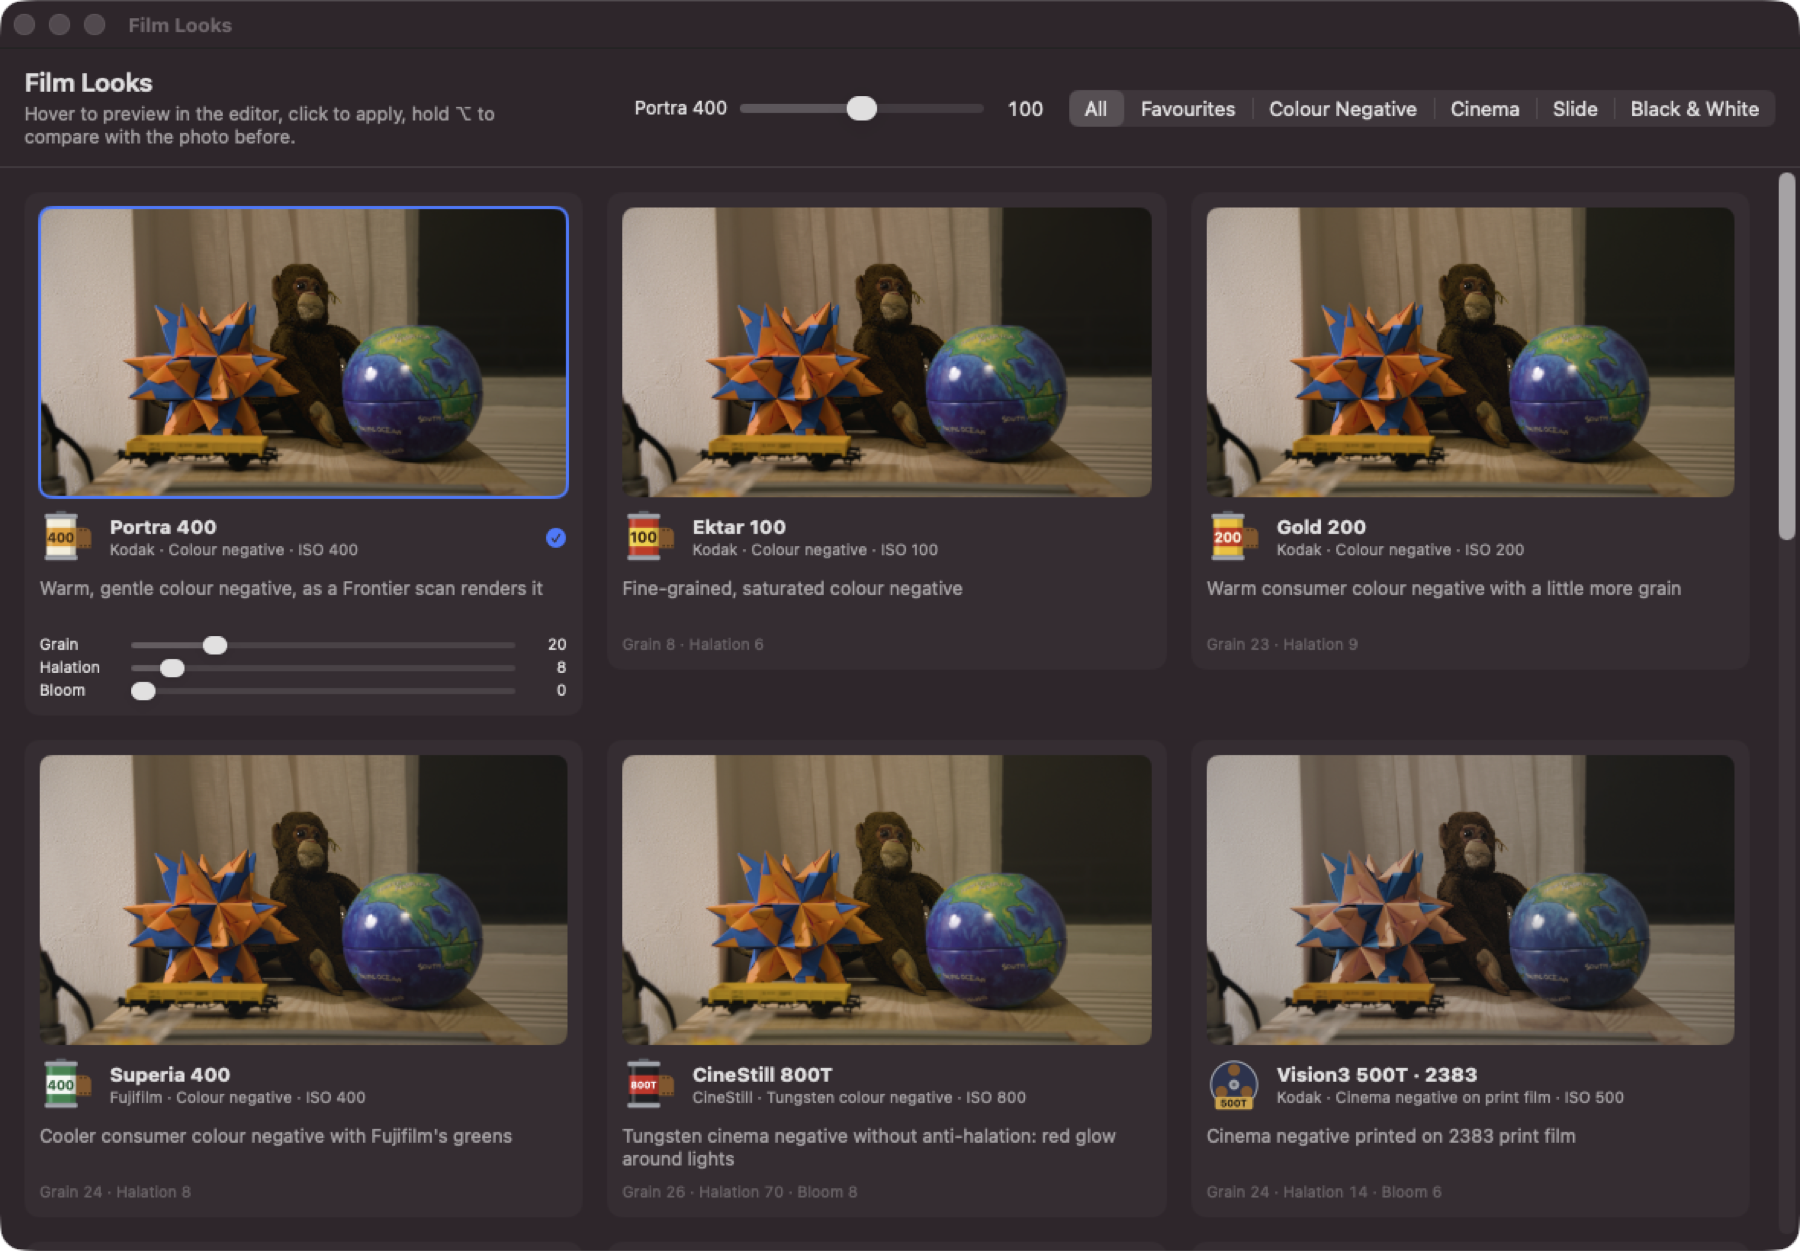
⇧⌘L) shows the open photo in every film. Hover over a card to preview the look in the editor; click to apply it with its grain, halation and bloom. Hold ⌥ over a card to see the photo before the look. Star a look to keep it under Favourites. The applied look's card has Grain, Halation and Bloom sliders, and the header an Amount slider. Tabs filter by colour negative, cinema, slide, and black and white.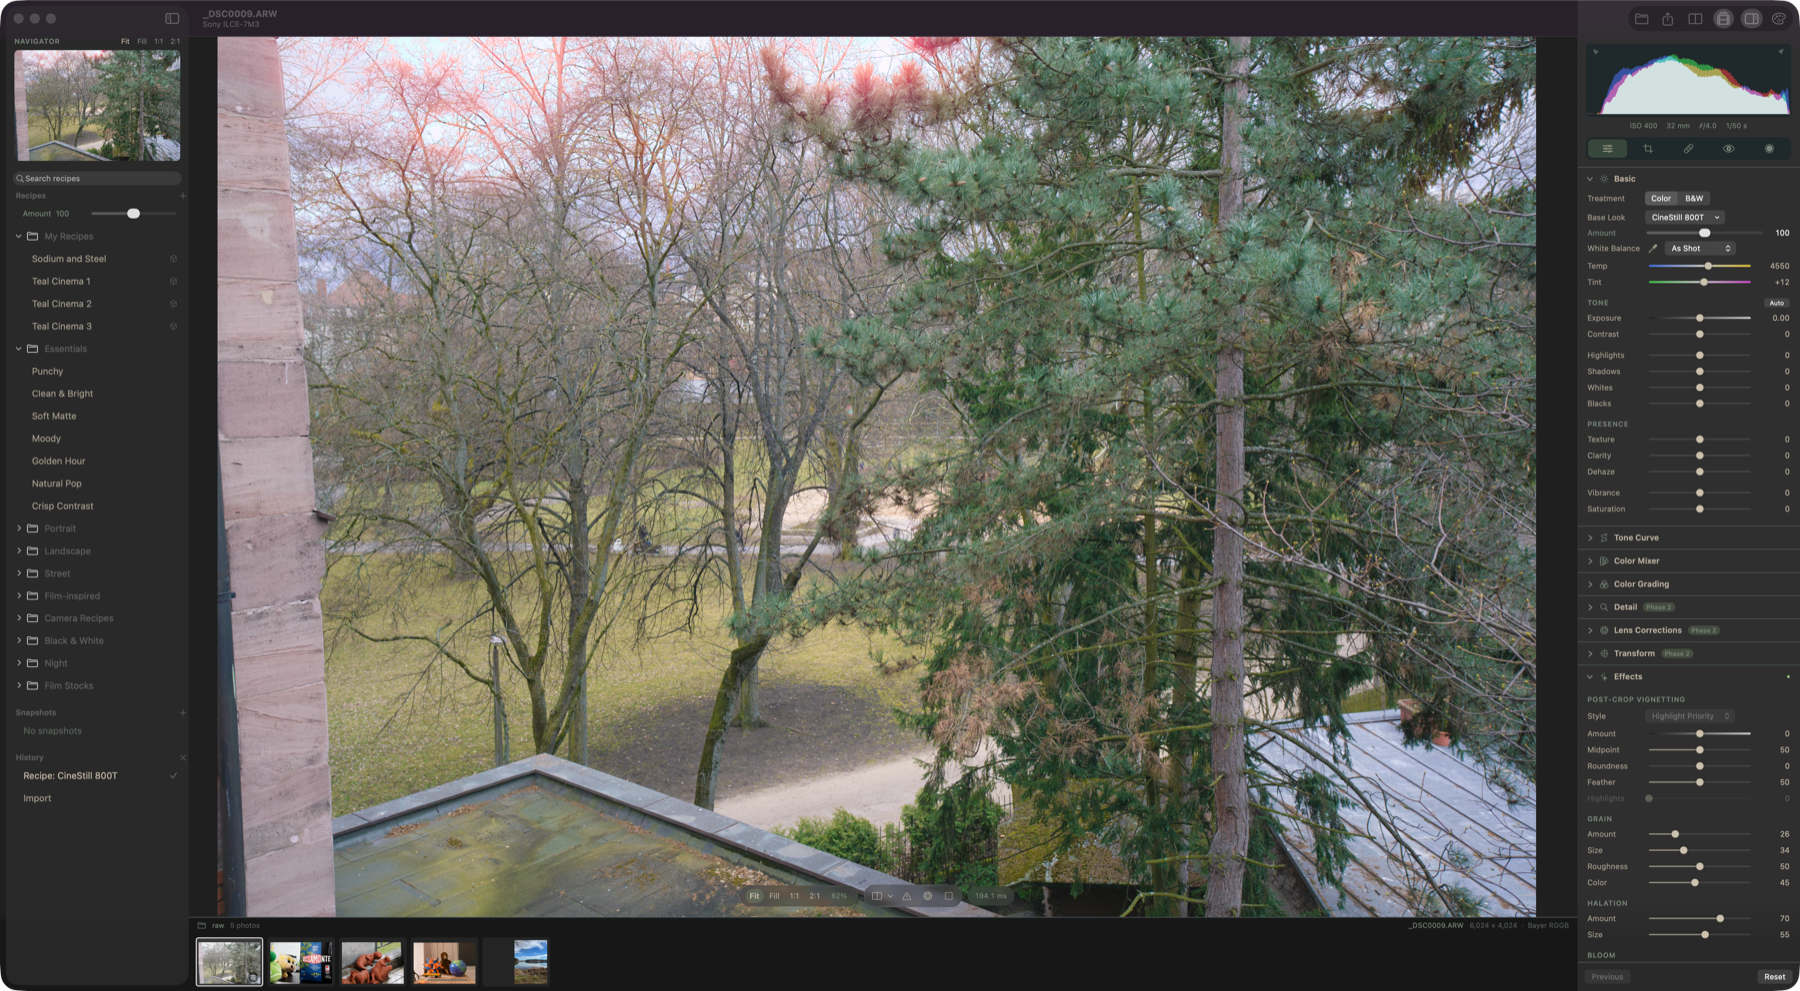
| Look | Film | Rendered as | Grain / halation | |
|---|---|---|---|---|
| Portra 160 | Kodak · Colour negative · ISO 160 | Scanned, Frontier-like | 15 / 7 |
| Portra 400 | Kodak · Colour negative · ISO 400 | Scanned, Frontier-like | 20 / 8 |
| Portra 800 | Kodak · Colour negative · ISO 800 | Scanned, Frontier-like | 27 / 9 |
| Portra 800 · Pushed to 1600 | Kodak · Colour negative · ISO 800 pushed to 1600 | Scanned, Frontier-like | 32 / 9 |
| Ektar 100 | Kodak · Colour negative · ISO 100 | Scanned, Frontier-like | 8 / 6 |
| Gold 200 | Kodak · Colour negative · ISO 200 | Scanned, Frontier-like | 23 / 9 |
| UltraMax 400 | Kodak · Colour negative · ISO 400 | Scanned, Frontier-like | 25 / 9 |
| Superia 400 | Fujifilm · Colour negative · ISO 400 | Scanned, Frontier-like | 24 / 8 |
| Pro 400H | Fujifilm · Colour negative · ISO 400 (discontinued) | Scanned, Frontier-like | 24 / 8 |
| CineStill 800T | CineStill · Tungsten colour negative · ISO 800 | Scanned, Noritsu-like | 26 / 70, bloom 8 |
| CineStill 50D | CineStill · Daylight colour negative · ISO 50 | Scanned, Noritsu-like | 12 / 60, bloom 6 |
| Vision3 500T · 2383 | Kodak · Cinema negative on print film · ISO 500 | Printed on 2383 and projected | 24 / 14, bloom 6 |
| Vision3 250D · 2383 | Kodak · Cinema negative on print film · ISO 250 | Printed on 2383 and projected | 20 / 12, bloom 6 |
| Vision3 50D · 2383 | Kodak · Cinema negative on print film · ISO 50 | Printed on 2383 and projected | 12 / 10, bloom 5 |
| Eterna Vivid 250D · 2383 | Fujifilm · Cinema negative on print film · ISO 250 (discontinued) | Printed on 2383 and projected | 21 / 12, bloom 6 |
| Provia 100F | Fujifilm · Slide film · ISO 100 | Slide, viewed on a light box | 8 / 4 |
| Velvia 50 | Fujifilm · Slide film · ISO 50 | Slide, viewed on a light box | 9 / 4 |
| Velvia 100 | Fujifilm · Slide film · ISO 100 | Slide, viewed on a light box | 8 / 4 |
| Ektachrome E100 | Kodak · Slide film · ISO 100 | Slide, viewed on a light box | 8 / 4 |
| Kodachrome 64 | Kodak · Slide film · ISO 64 (discontinued) | Slide, viewed on a light box | 10 / 4 |
| Tri-X 400 | Kodak · Black and white negative · ISO 400 | Scanned | 37 / 5 |
| T-Max 100 | Kodak · Black and white negative · ISO 100 | Scanned | 18 / 4 |
| T-Max 400 | Kodak · Black and white negative · ISO 400 | Scanned | 22 / 5 |
| HP5 Plus | Ilford · Black and white negative · ISO 400 | Scanned | 40 / 5 |
| Delta 100 | Ilford · Black and white negative · ISO 100 | Scanned | 16 / 4 |
| Delta 3200 | Ilford · Black and white negative · ISO 3200 | Scanned | 52 / 6 |
| FP4 Plus | Ilford · Black and white negative · ISO 125 | Scanned | 24 / 5 |
| Pan F Plus | Ilford · Black and white negative · ISO 50 | Scanned | 12 / 4 |
| Tri-X · Darkroom Print | Kodak · Ilford · Black and white print · grade 2 | Printed on paper | 34 / 5 |
| Portra 400 · +2 | Kodak · Colour negative · ISO 400 rated 100 | Scanned, Frontier-like | 16 / 8 |
| Tri-X 400 · Pushed to 1600 | Kodak · Black and white negative · ISO 400 pushed to 1600 | Scanned | 46 / 6 |
| Tri-X · Soft Print | Kodak · Ilford · Black and white print · grade 1 | Printed on paper | 34 / 5 |
| Tri-X · Hard Print | Kodak · Ilford · Black and white print · grade 4 | Printed on paper | 34 / 5 |
| Vision3 500T · 2383 Bleach Bypass | Kodak · Cinema negative on print film, bleach bypass · ISO 500 | Printed on 2383 and projected | 26 / 12, bloom 6 |
| Velvia 50 · Cross-Processed | Fujifilm · Slide film in C-41 · ISO 50 | Developed in C-41, scanned | 12 / 5 |
| Provia 100F · Cross-Processed | Fujifilm · Slide film in C-41 · ISO 100 | Developed in C-41, scanned | 11 / 5 |
Every look on the same photo:
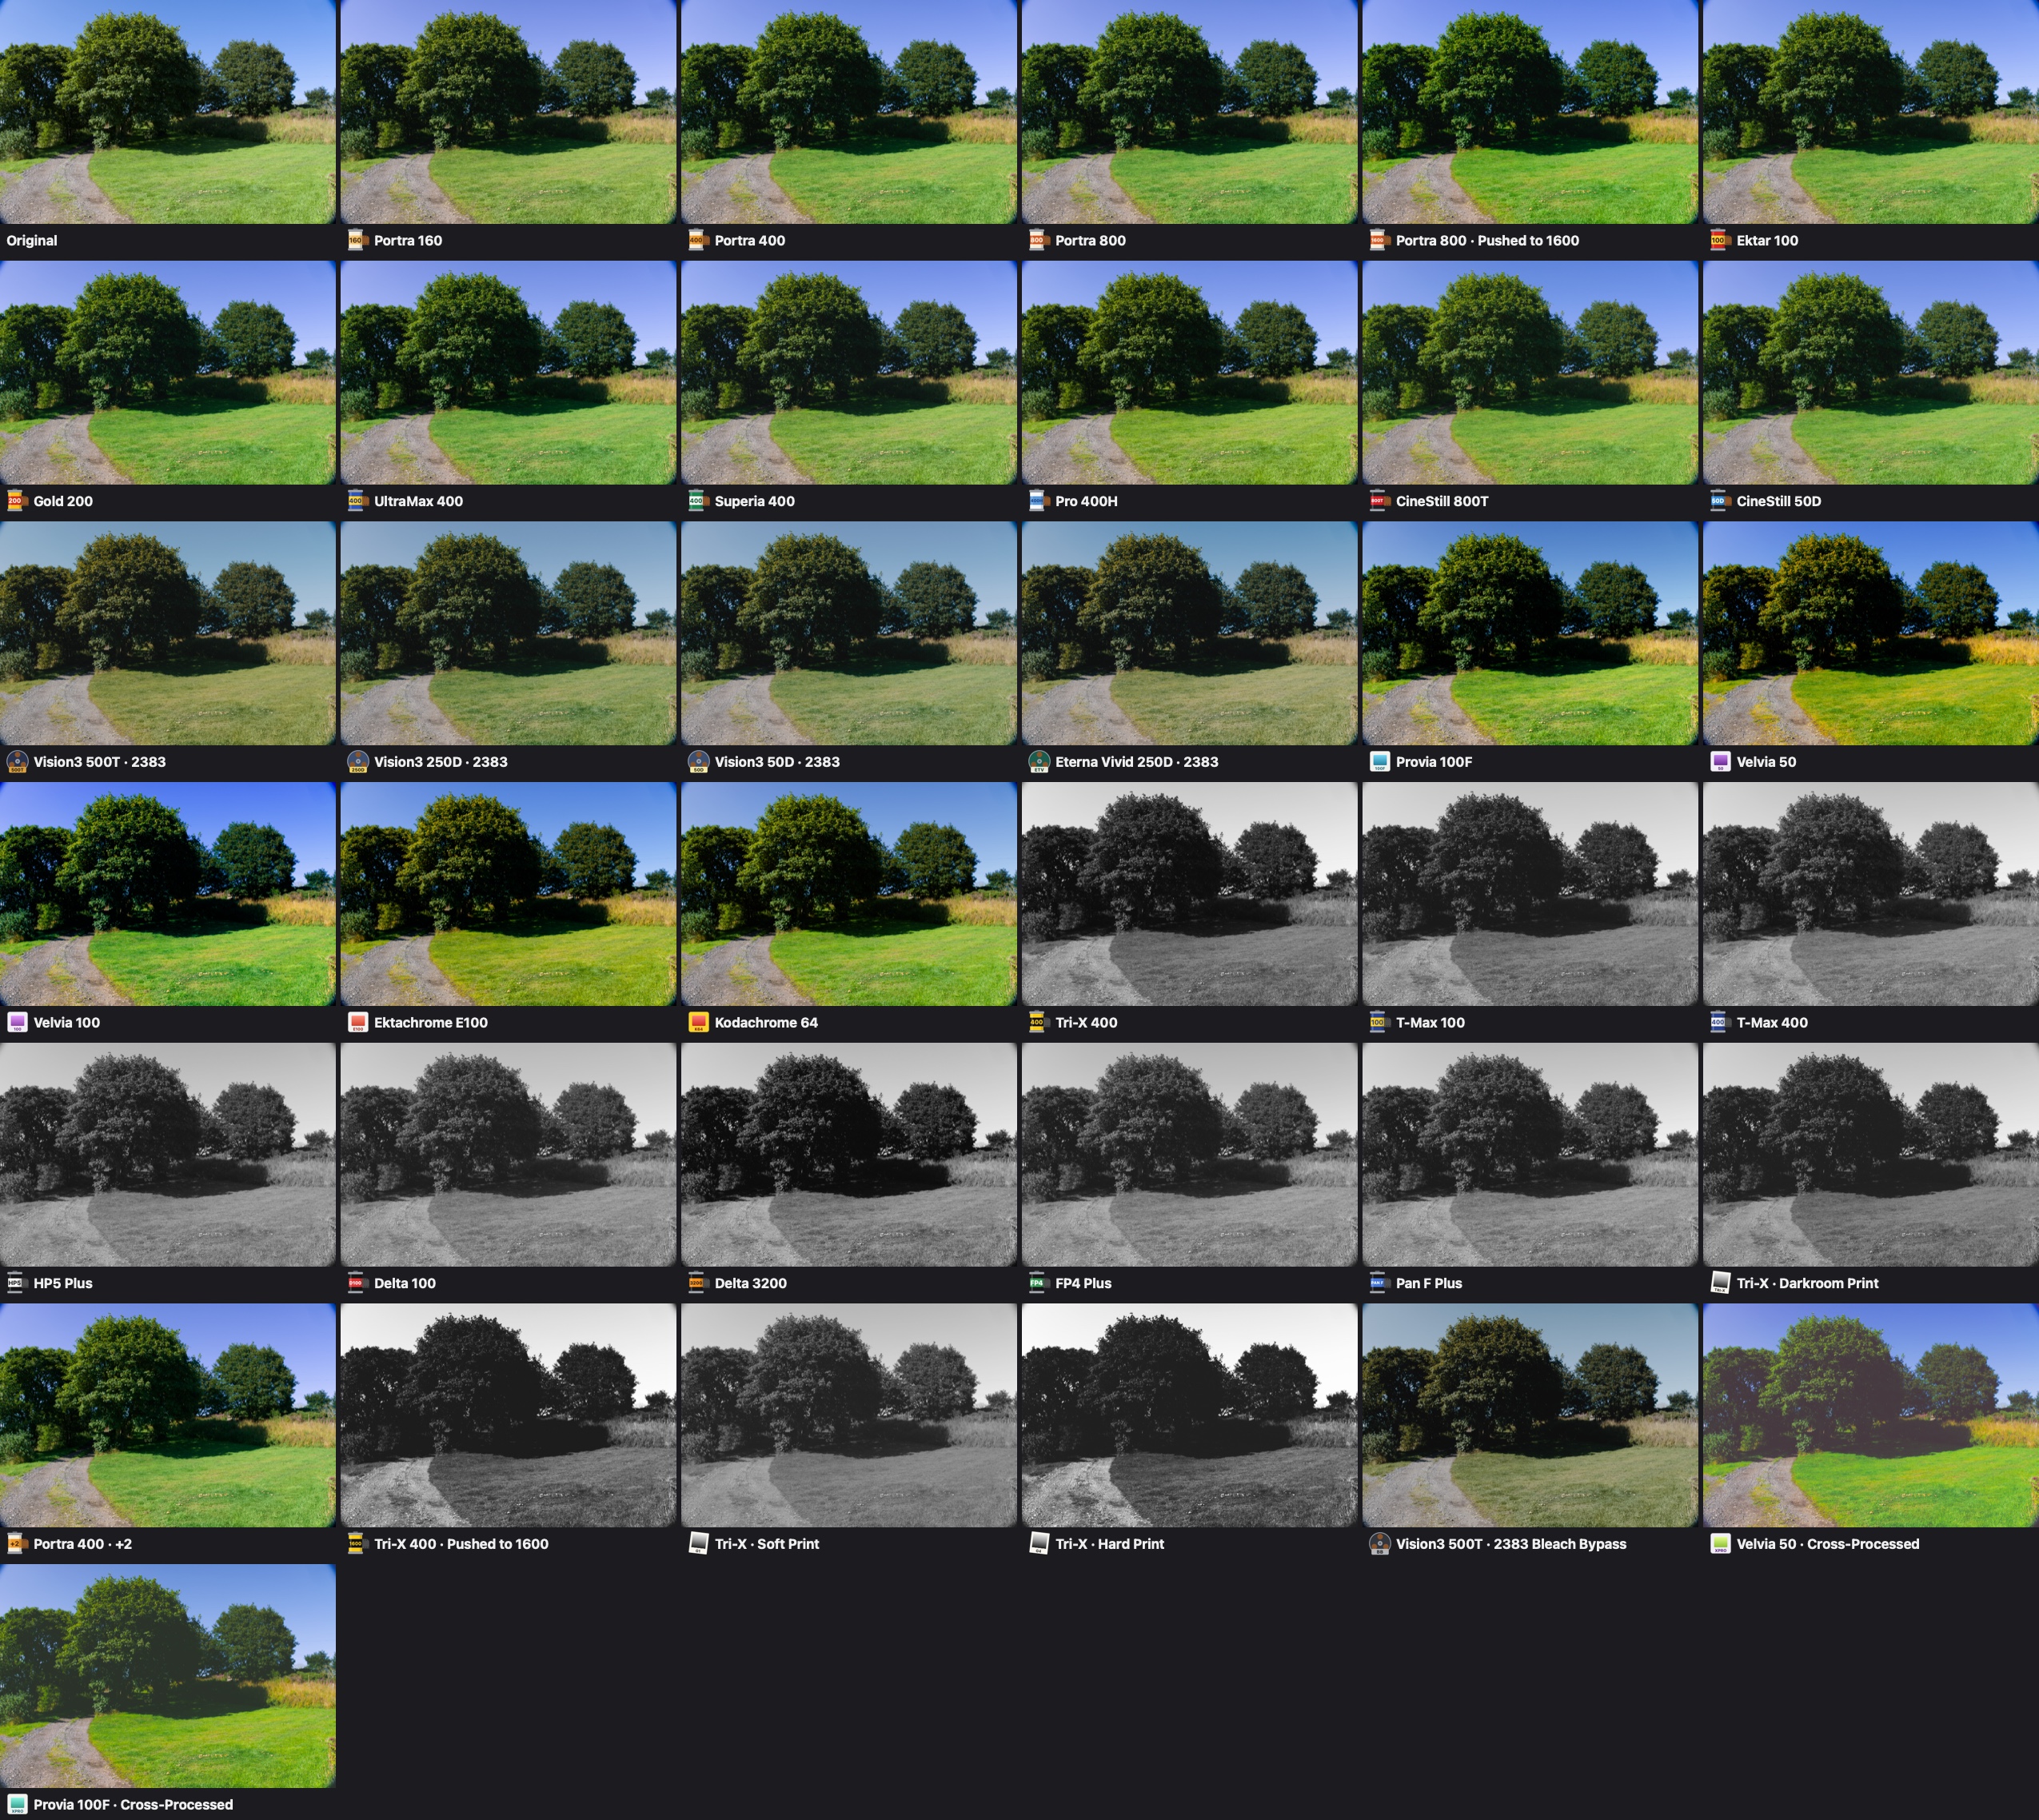
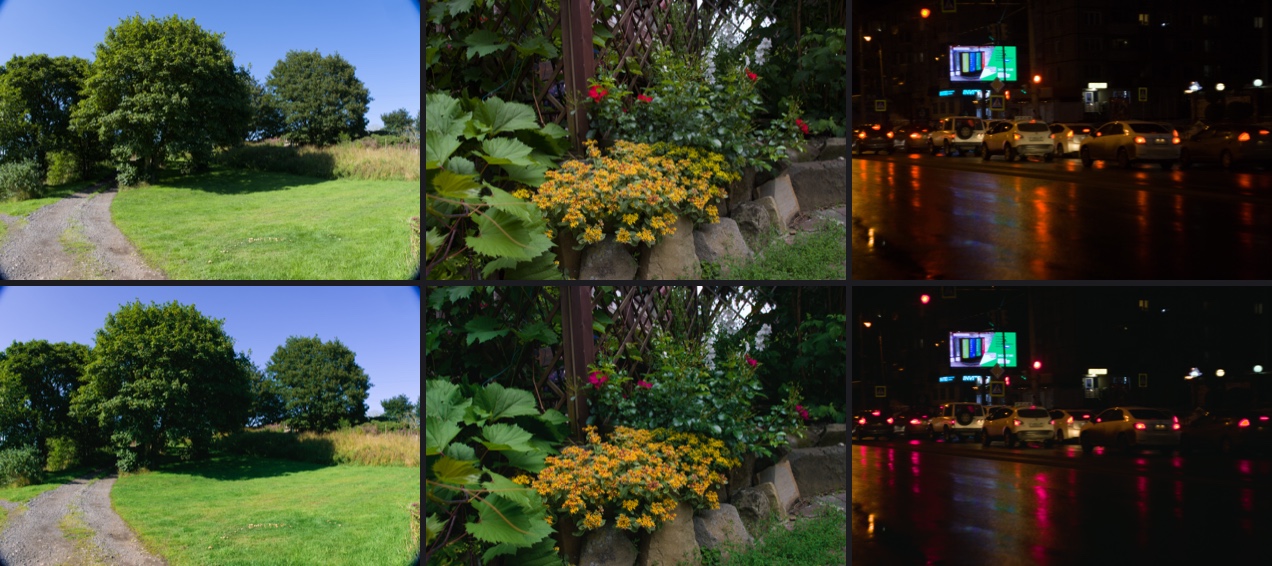
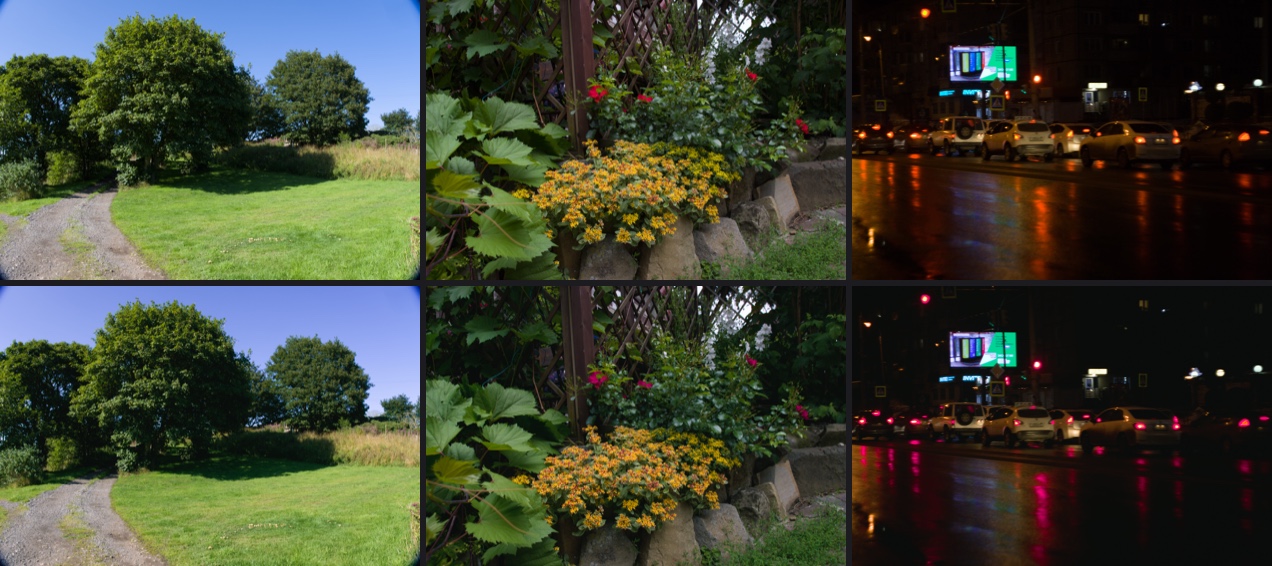
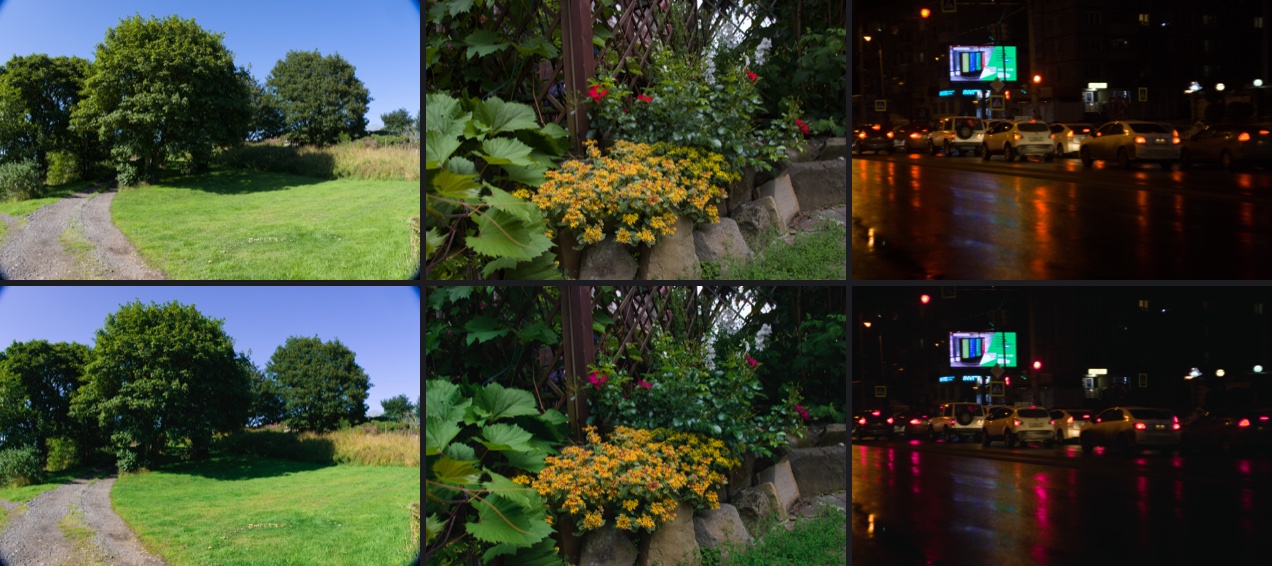
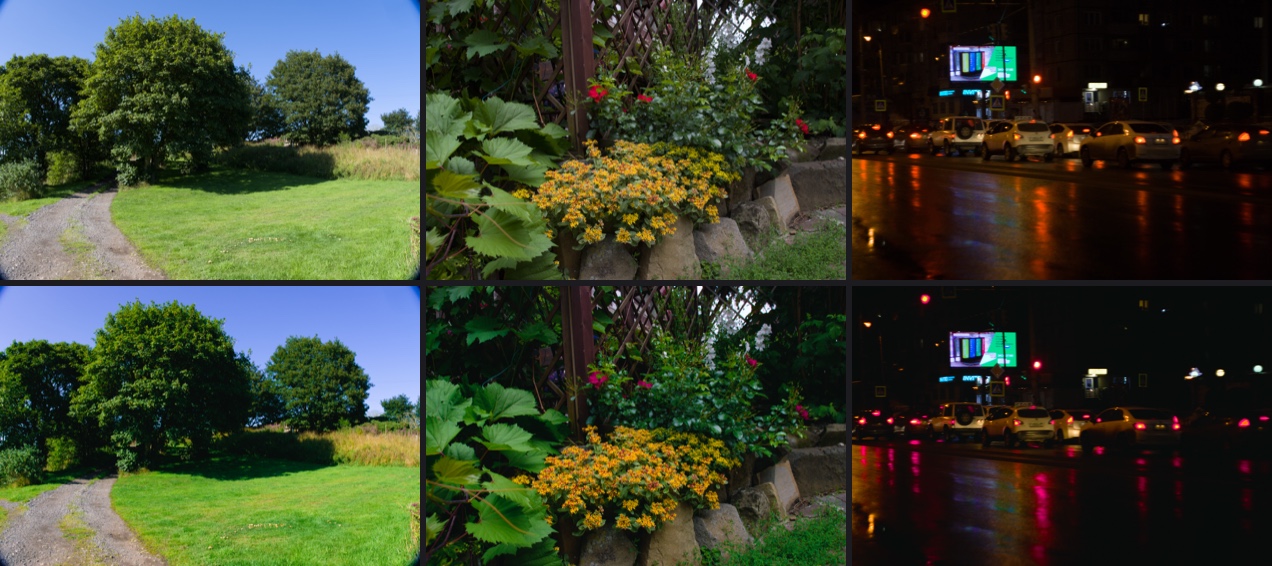
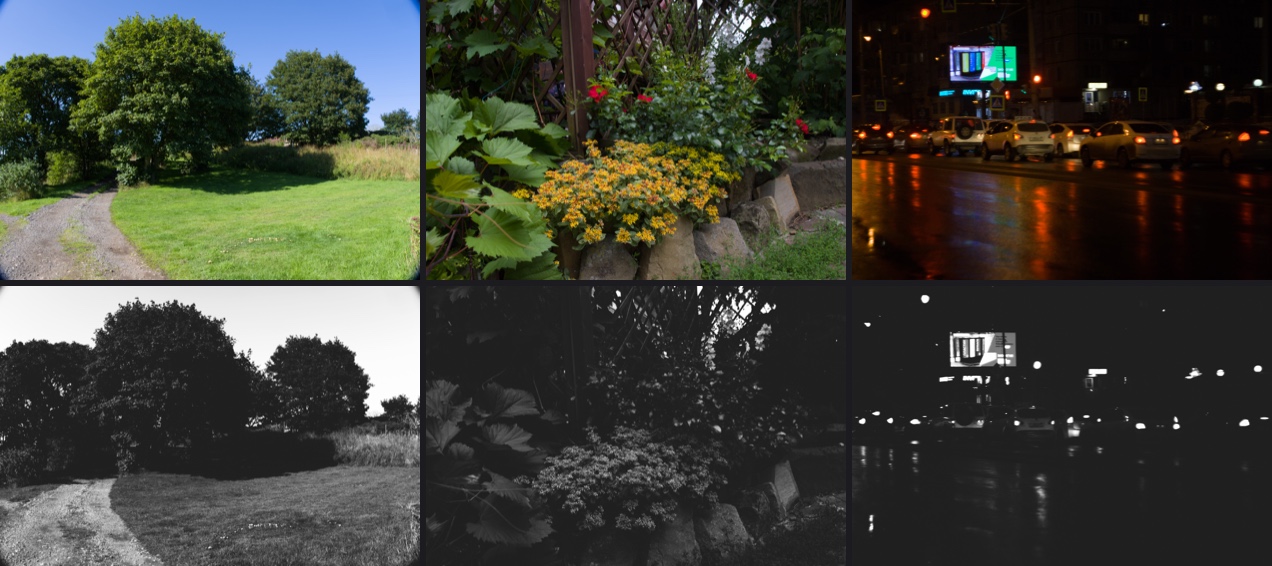
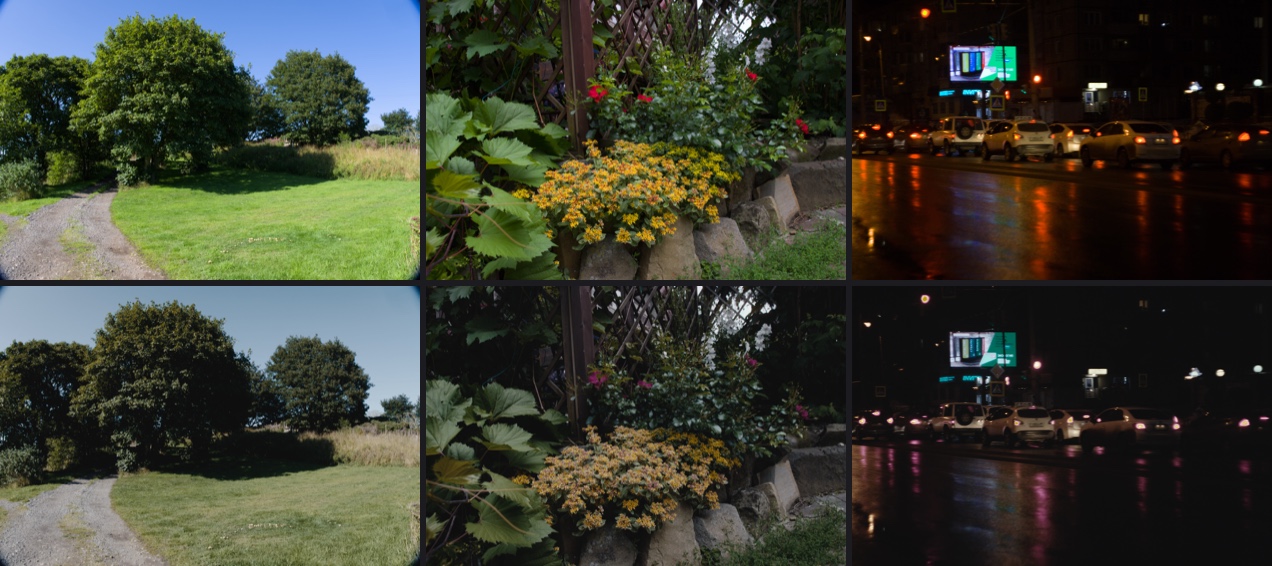
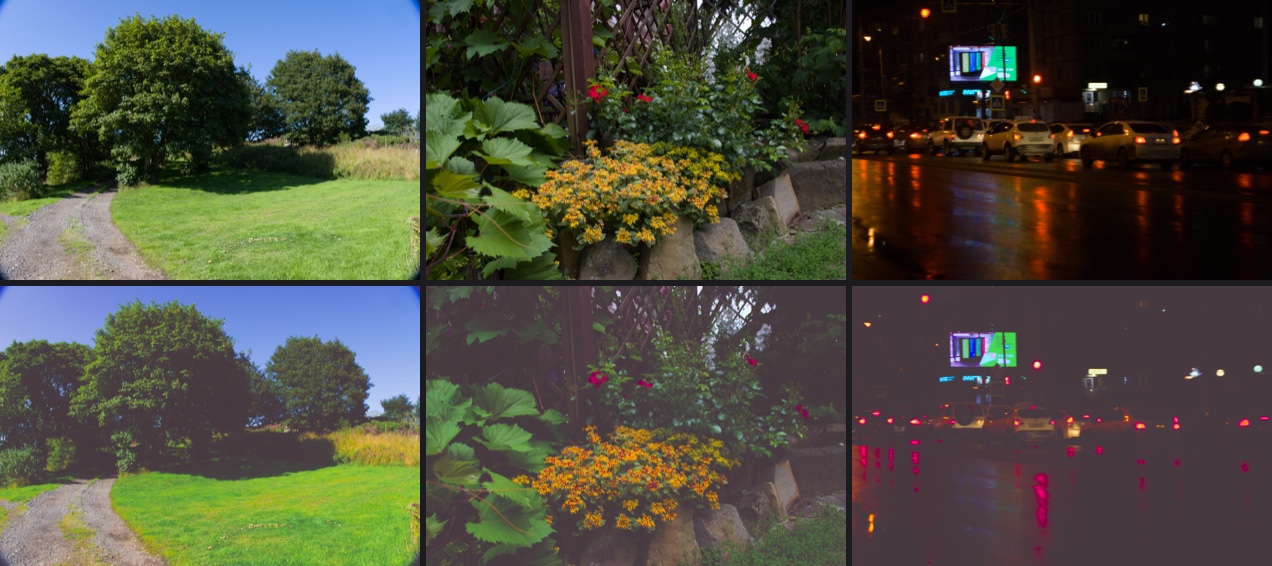
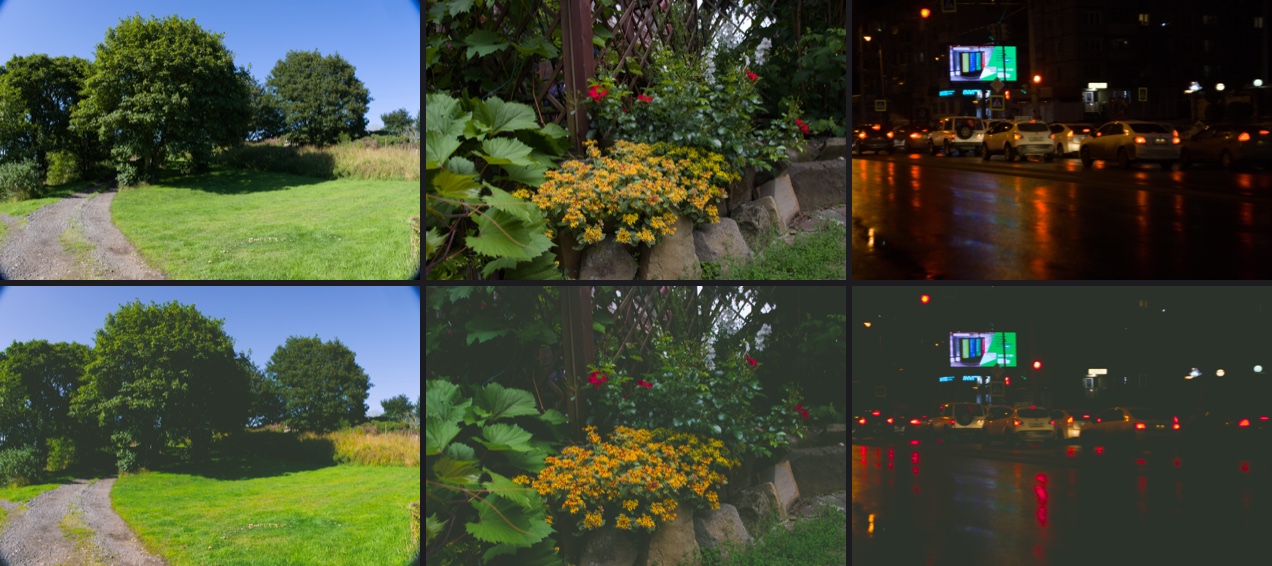
Each example shows three CC0 photos from the look-development set: a landscape, flowers and a night street. The top row is Redlamp's default rendering, the bottom row the film look with its grain, halation and bloom.
Portra 400Warm and gentle. Kind to skin, with soft greens and a little extra warmth in the highlights, as a Frontier lab scan renders it.
Portra 160Portra's slower sister: finer grain and an even gentler rendering, for portraits in good light.
Portra 800Fast Portra: warmer and richer, with more grain and a little more contrast.
Portra 800 · Pushed to 1600Portra 800 rated at 1600 and pushed a stop, from Kodak's own push curves: denser shadows, more contrast and grain.
Ektar 100Kodak's finest-grained colour negative: richer reds and deeper colour than Portra.
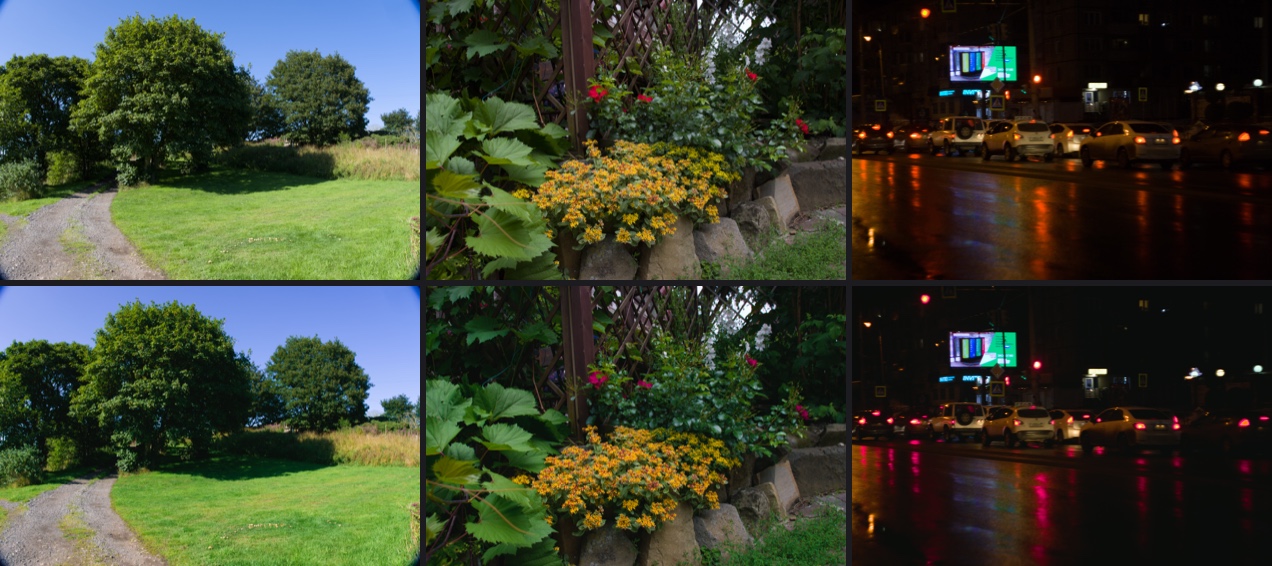
Gold 200Warm consumer film. Golden yellows, slightly greener foliage and more grain.
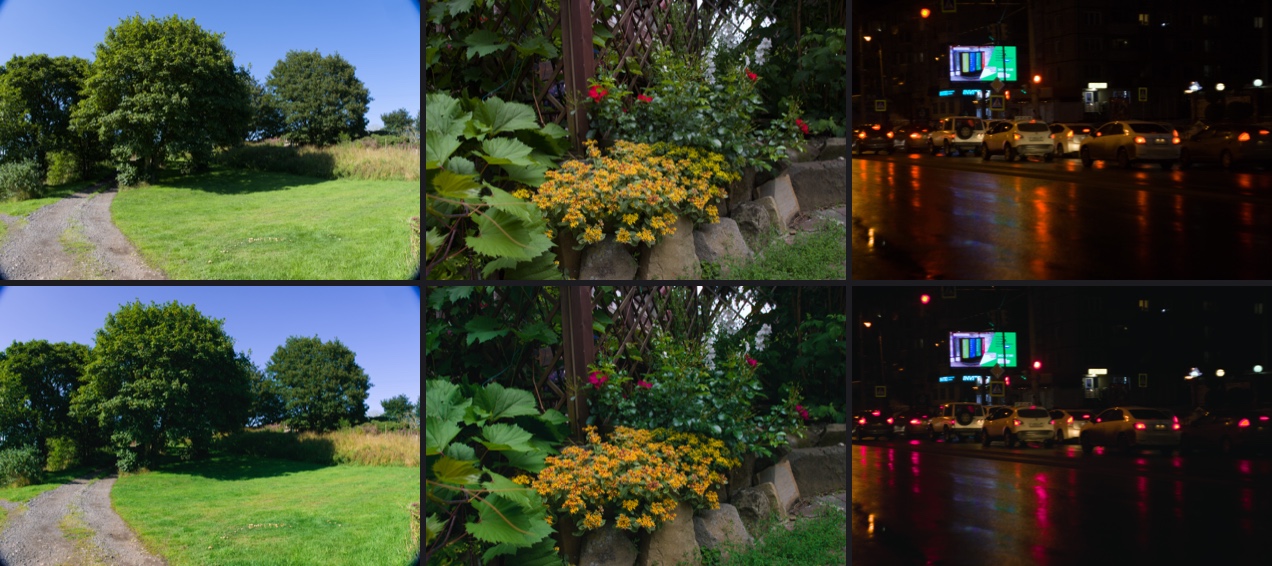
UltraMax 400Kodak's punchy everyday film: warm, saturated and a little grainy.
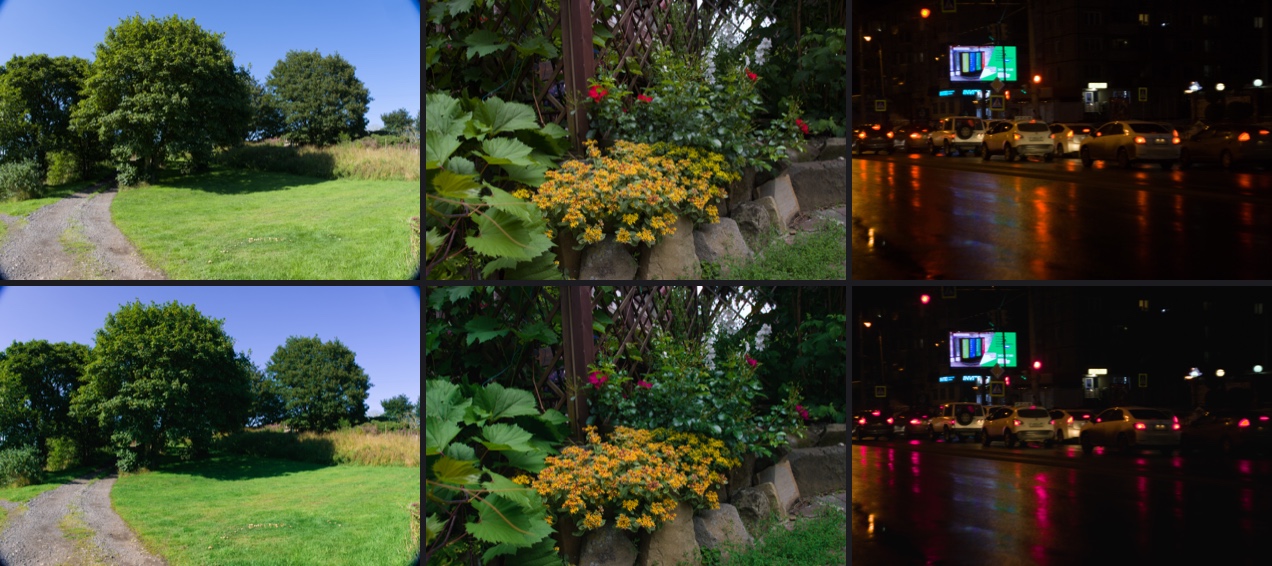
Superia 400Cooler than the Kodak stocks, with Fujifilm's greens.
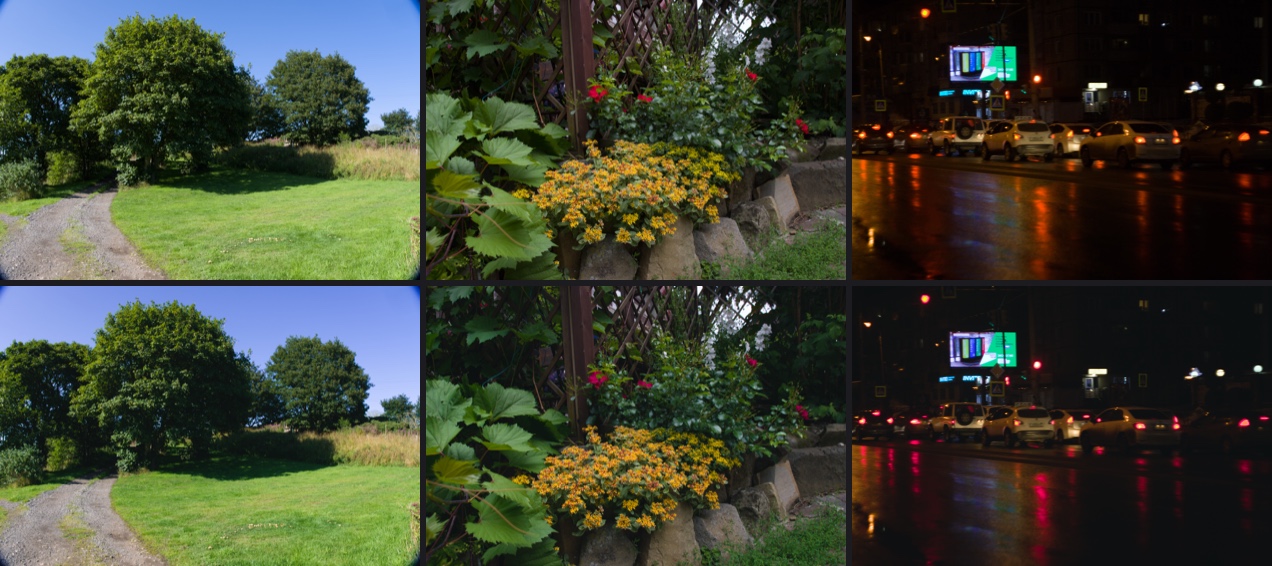
Pro 400HFujifilm's discontinued wedding film, with its fourth colour layer: soft contrast, pastel skin and minty greens.
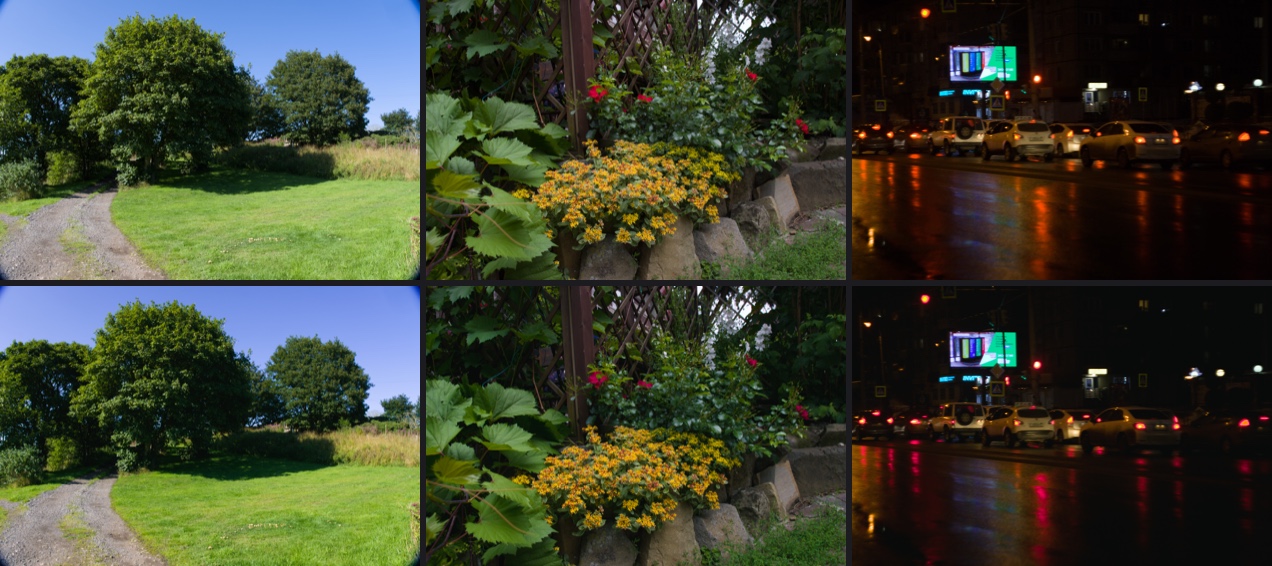
CineStill 800TVision3 500T without its anti-halation backing. Bright lights glow red-orange, the look of night streets and neon.
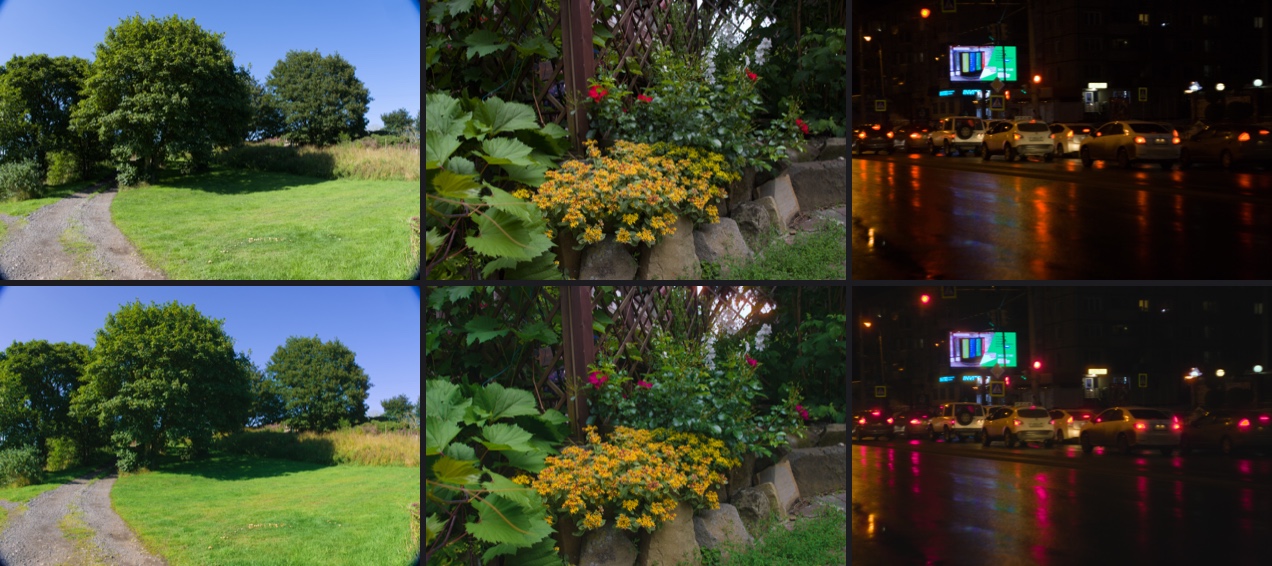
CineStill 50DVision3 50D without its anti-halation backing: very fine grain, daylight colour and glowing highlights.
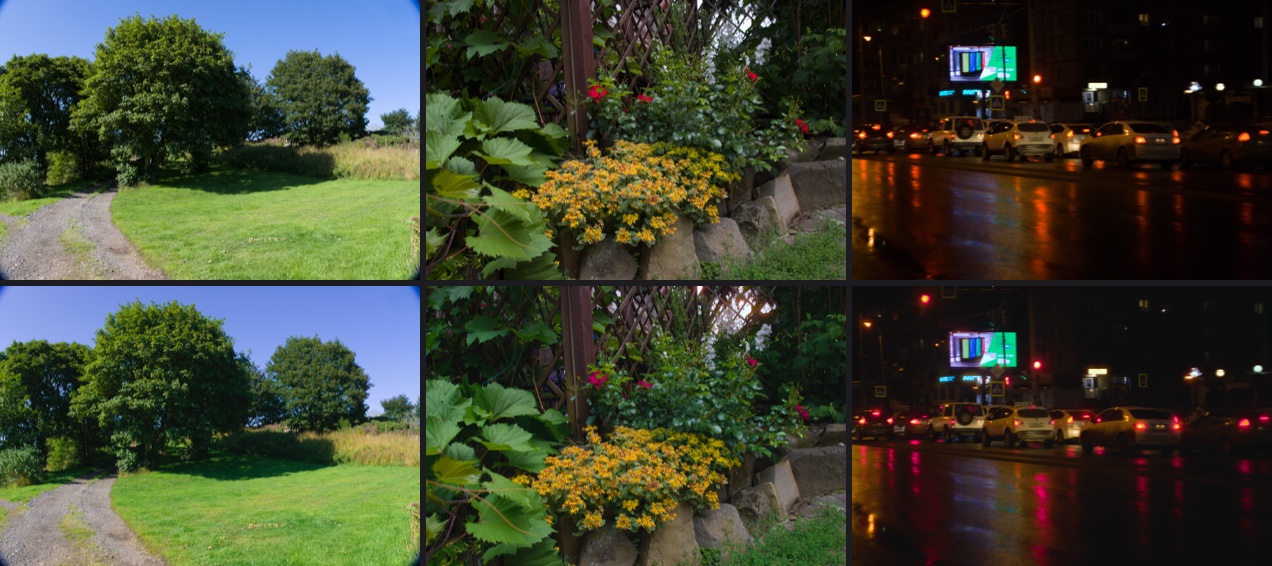
Vision3 500T · 2383The motion-picture look: a cinema negative printed on release print film. Softer and denser, with cool shadows and warm highlights.
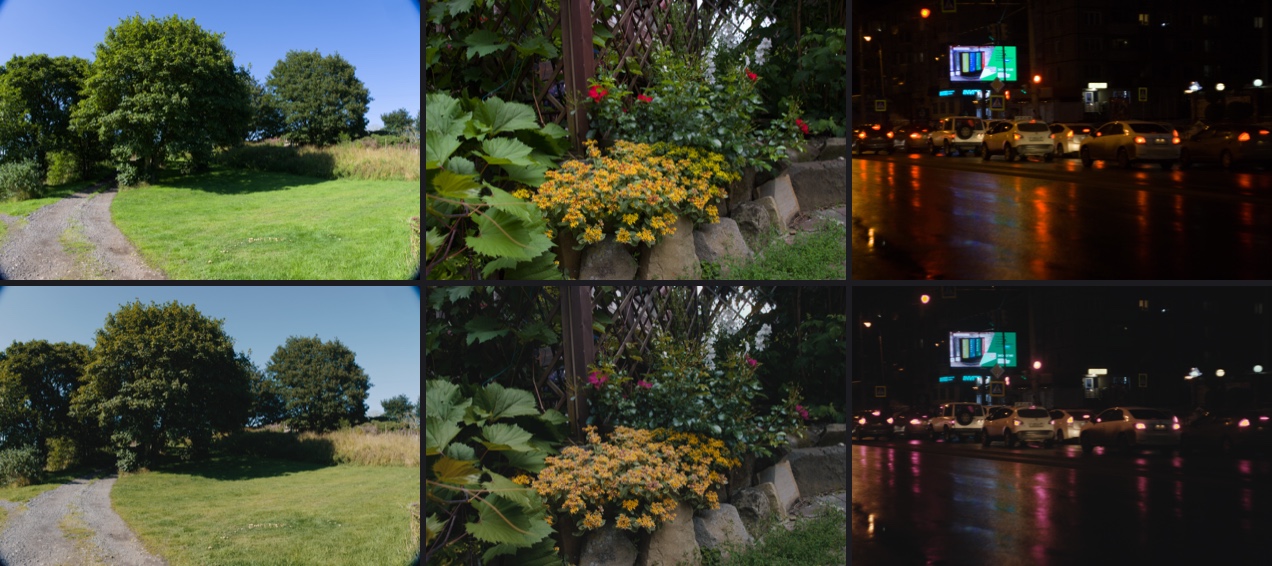
Vision3 250D · 2383Kodak's daylight cinema negative printed on 2383: the bright exterior look of feature films.
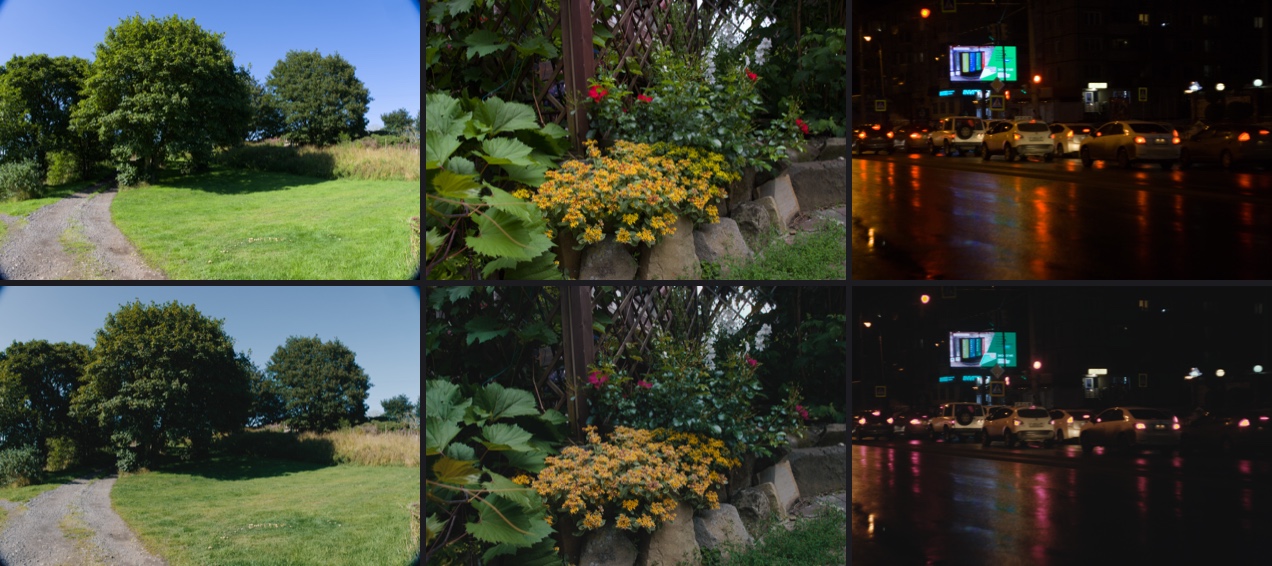
Vision3 50D · 2383The finest-grained cinema negative on 2383: clean, saturated daylight.
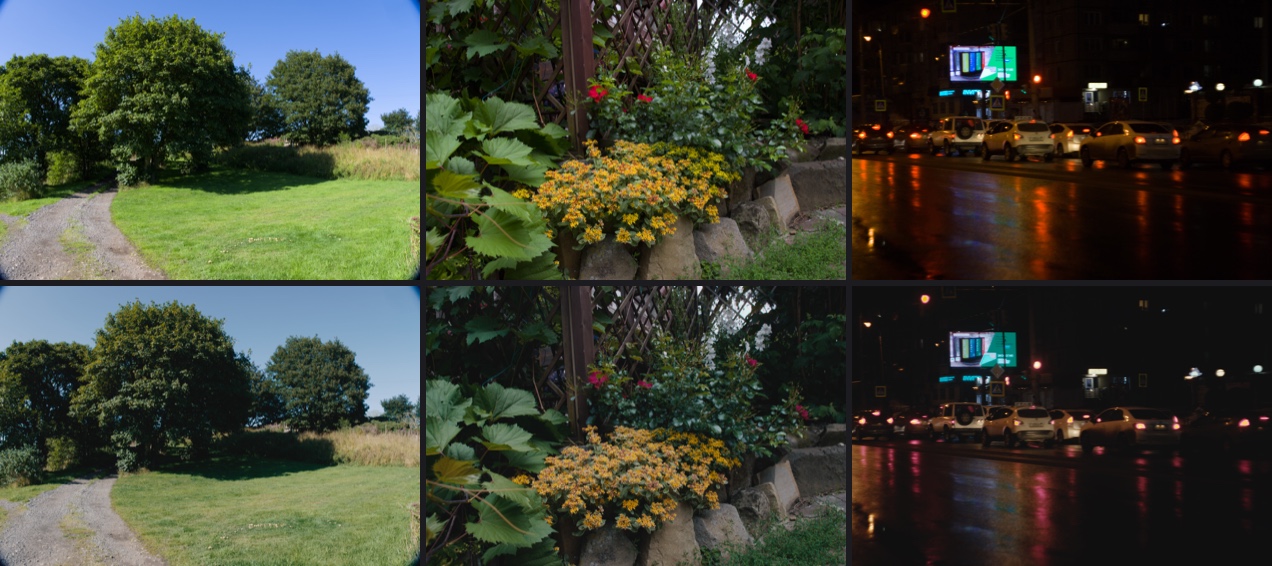
Eterna Vivid 250D · 2383Fujifilm's discontinued vivid daylight cinema negative, printed on 2383: more saturated than Vision3.
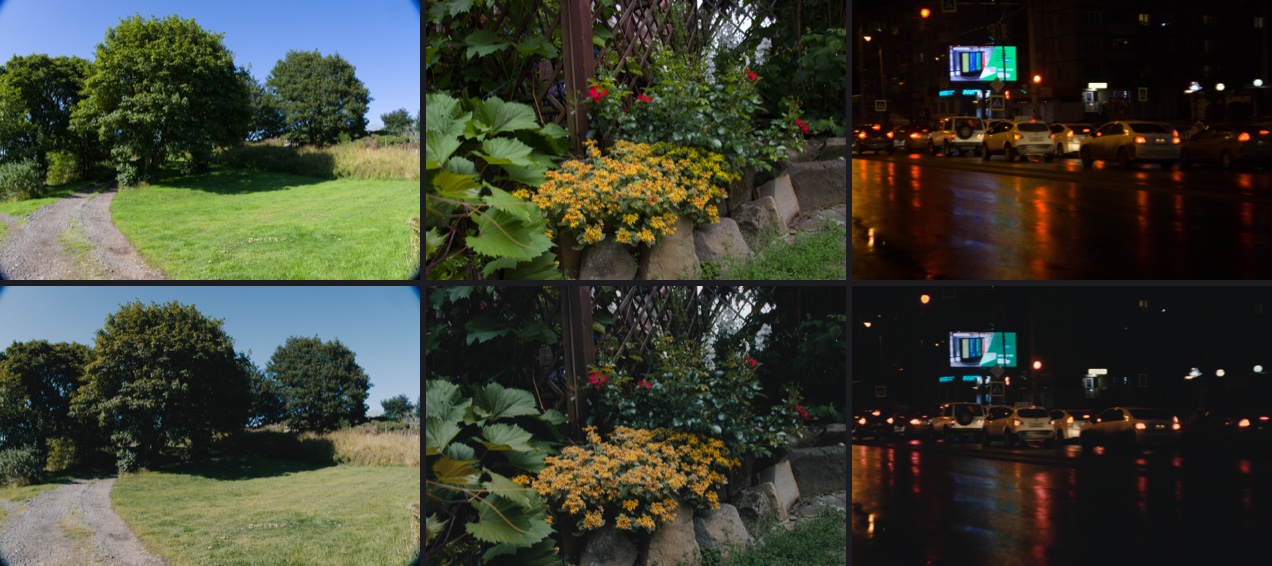
Provia 100FClean, natural slide film. Contrasty, with deep skies and dense shadows, exposed for the highlights.
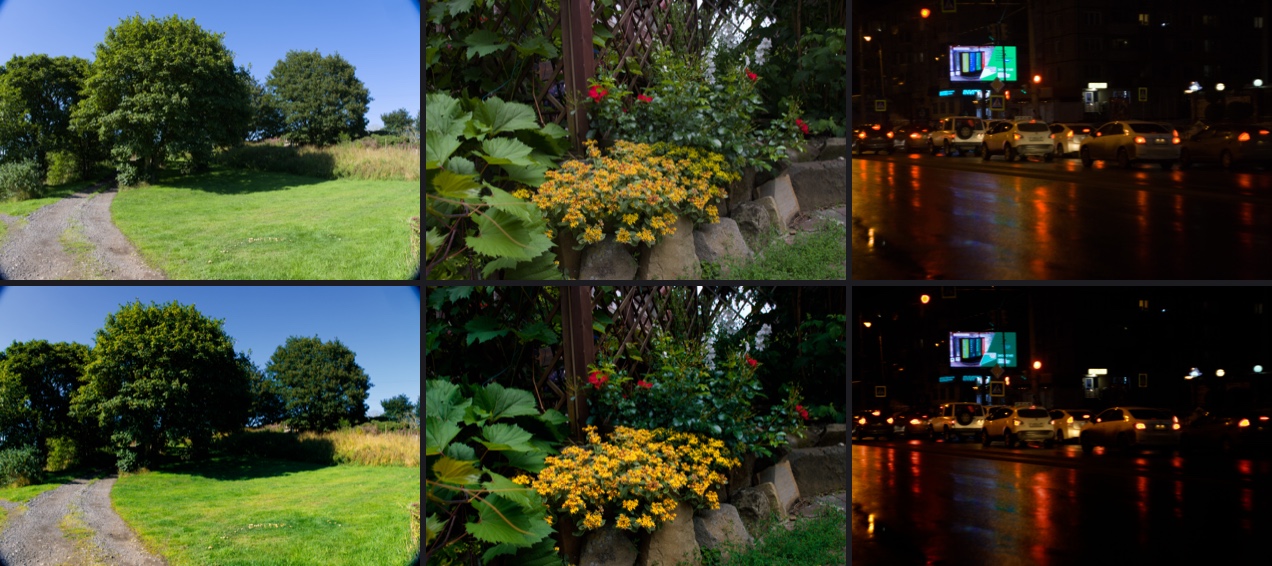
Velvia 50The landscape slide: saturated greens, yellows and blues, and more contrast still.
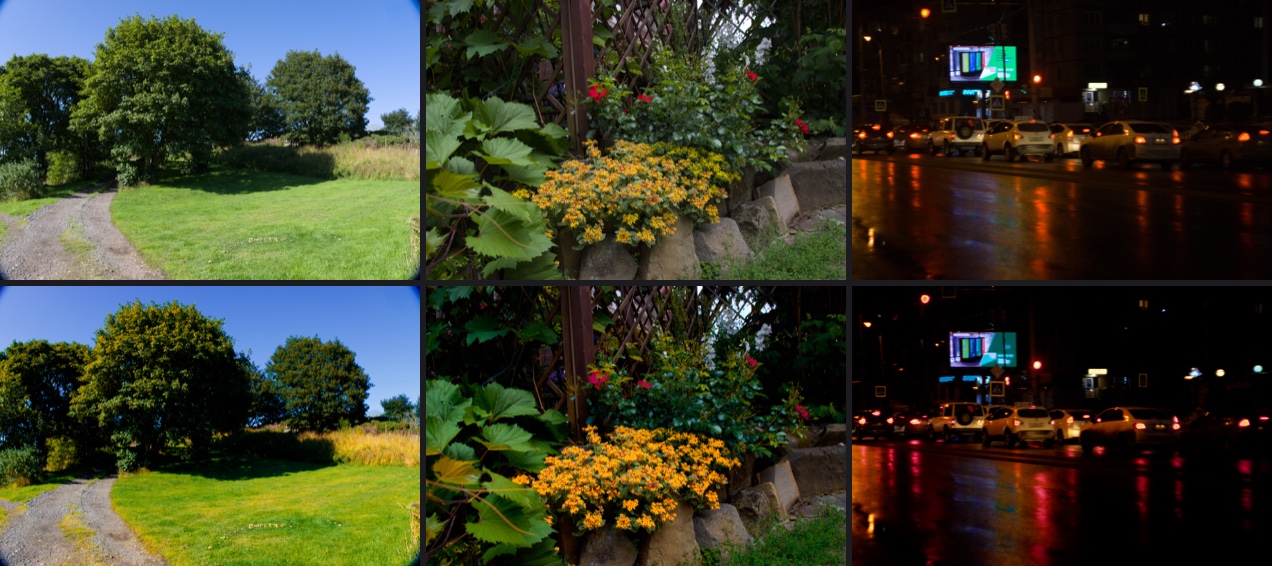
Velvia 100Velvia's faster sibling: just as saturated, a touch gentler in the shadows.
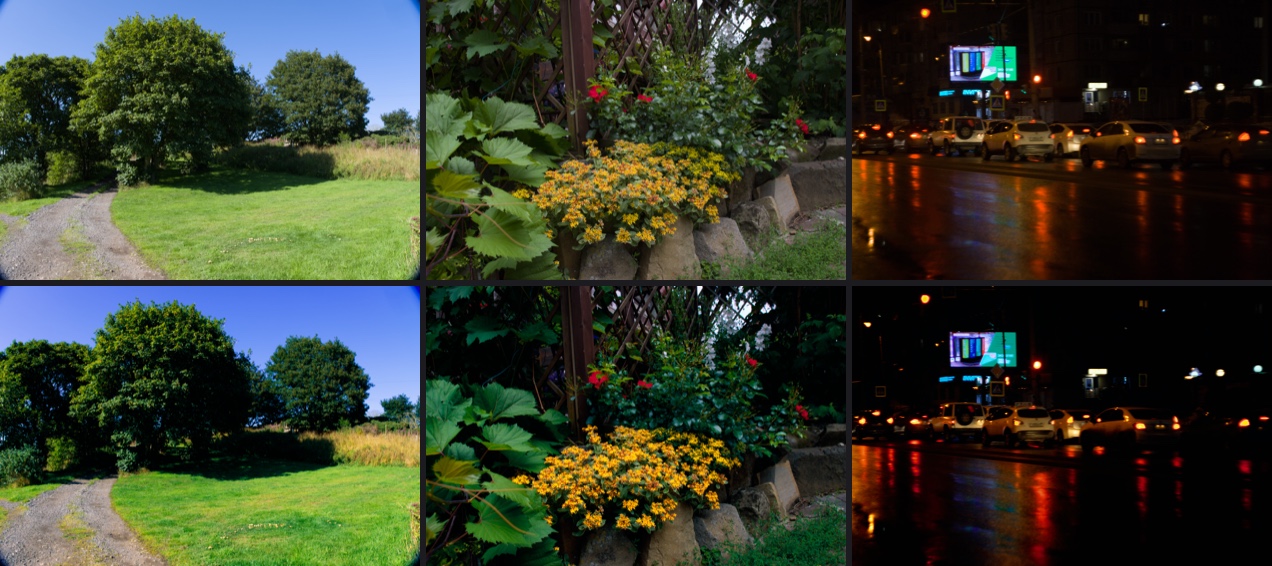
Ektachrome E100Kodak's modern slide film: clean, neutral to cool, with fine grain.
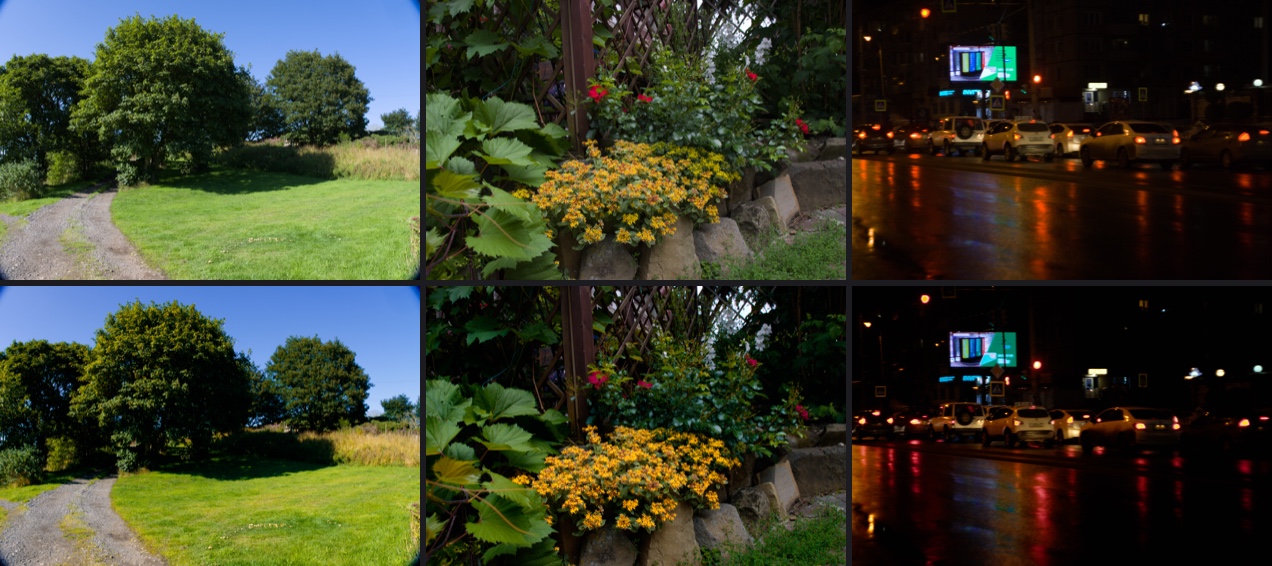
Kodachrome 64The legendary K-14 slide film, from Kodak's archived datasheet: warm reds, deep blues and dense shadows.
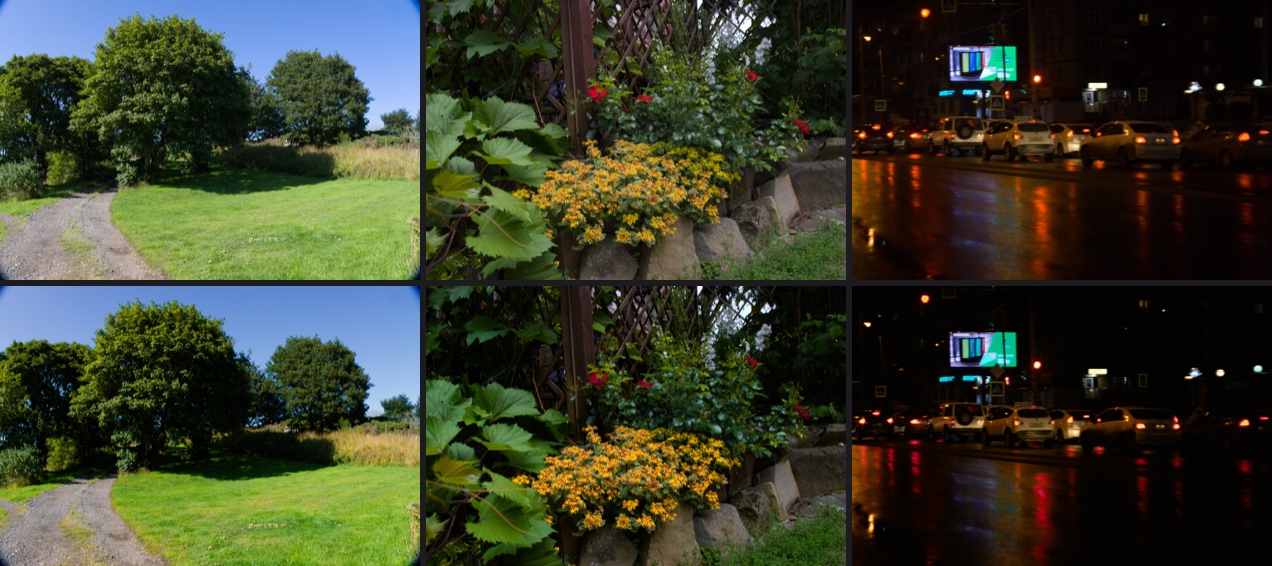
Tri-X 400Classic black and white. Bright and crisp, with pronounced, sharp grain.
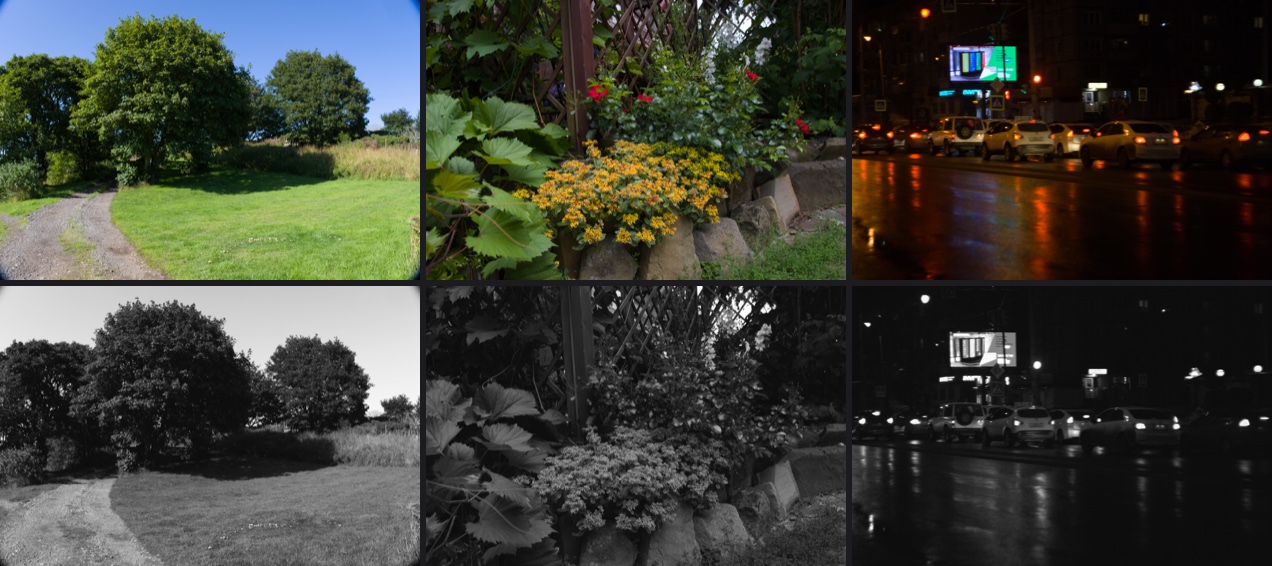
T-Max 100Kodak's finest-grained black and white: smooth, sharp and long in tone.
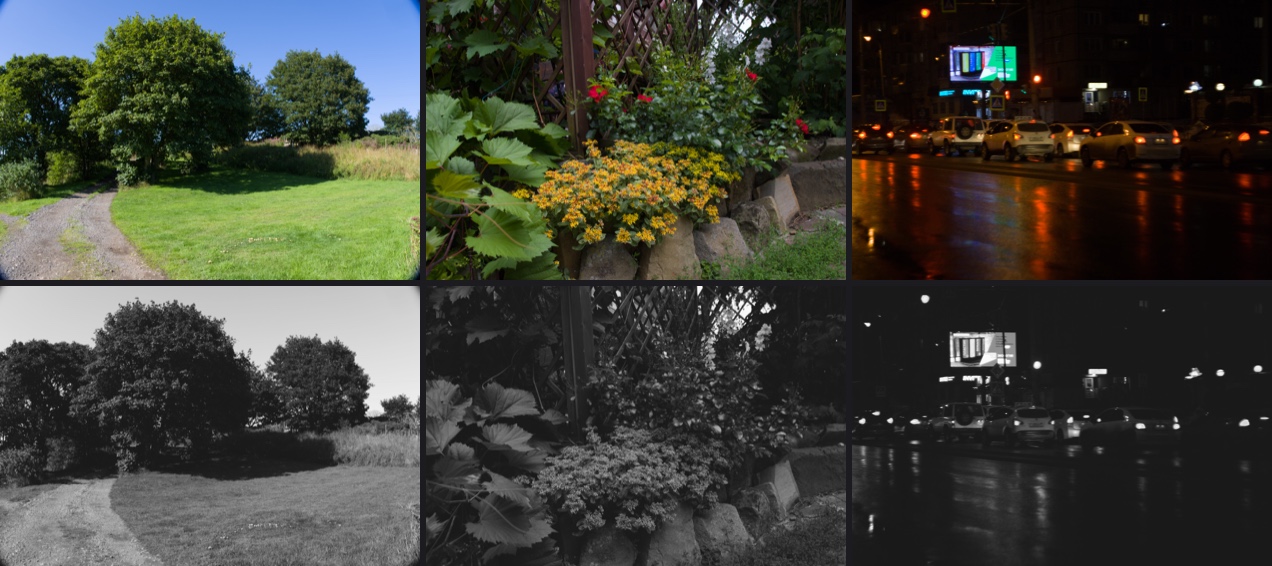
T-Max 400Modern fast black and white: tighter grain than Tri-X and a longer tonal range.
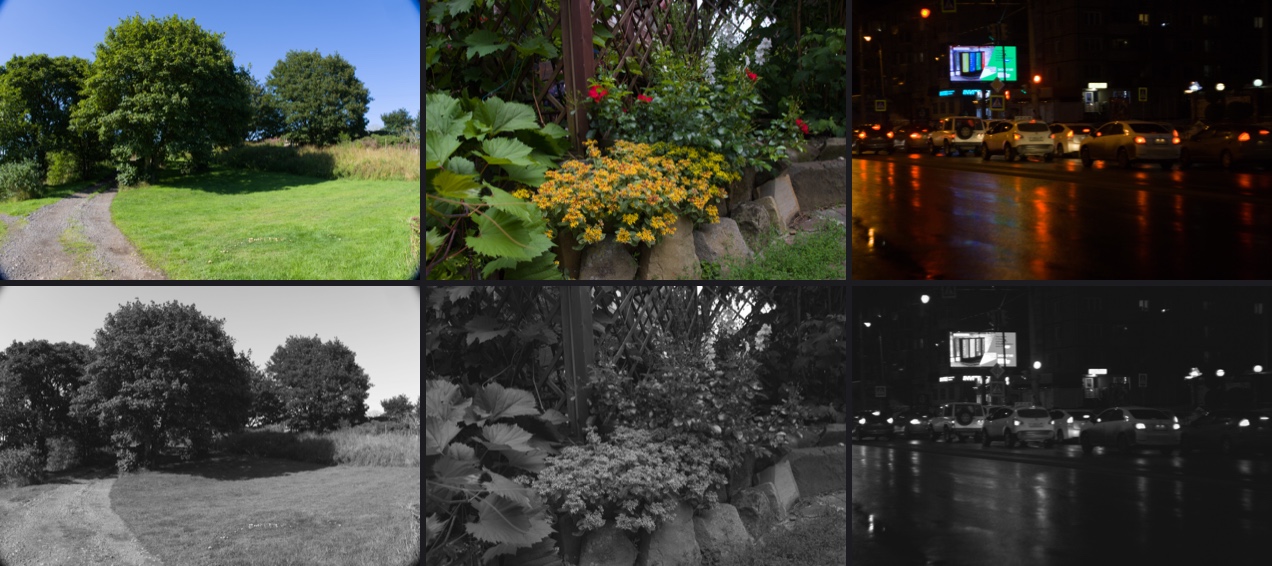
HP5 PlusSofter and grainier than Tri-X, with a gentler shoulder.
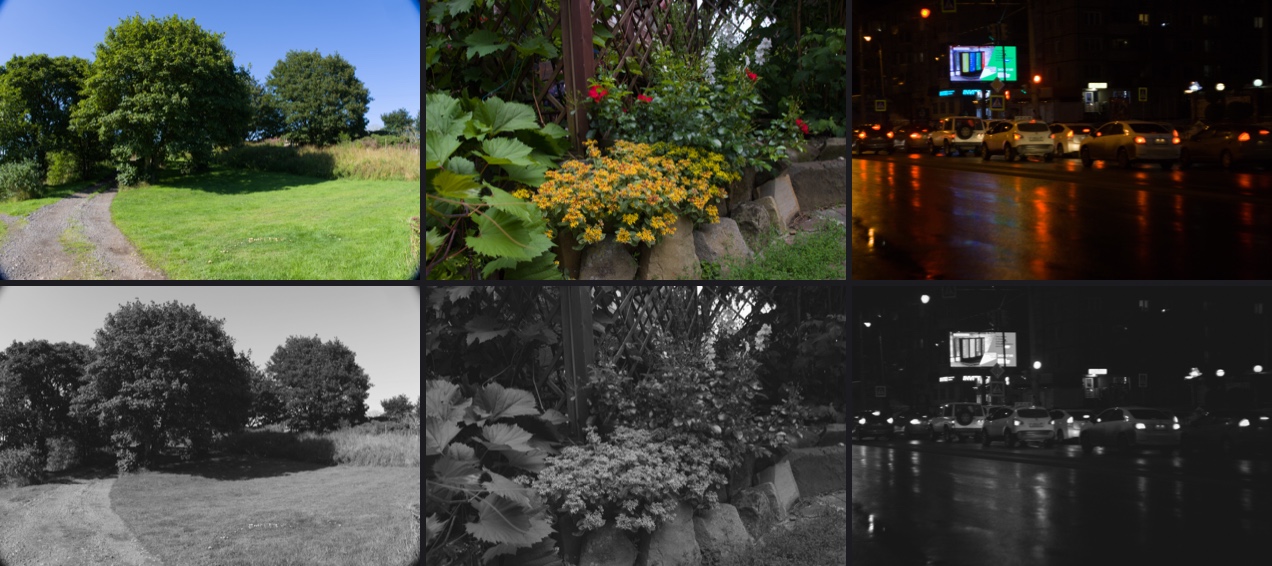
Delta 100Ilford's fine-grained modern black and white.
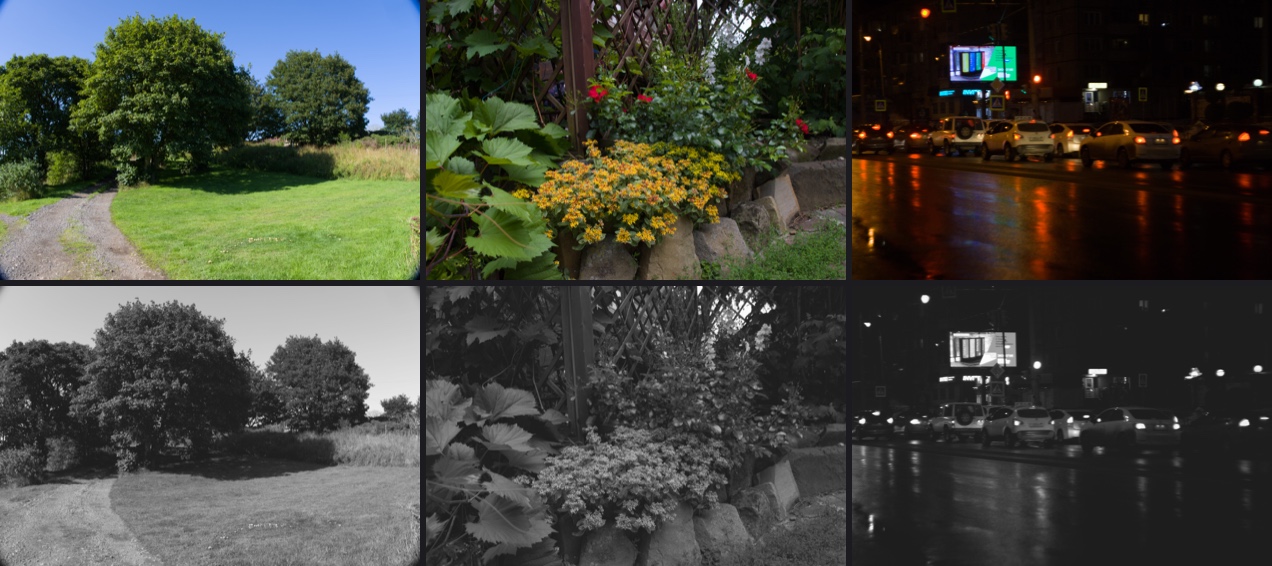
Delta 3200Ilford's fastest film: big, gritty grain and hard contrast for low light.
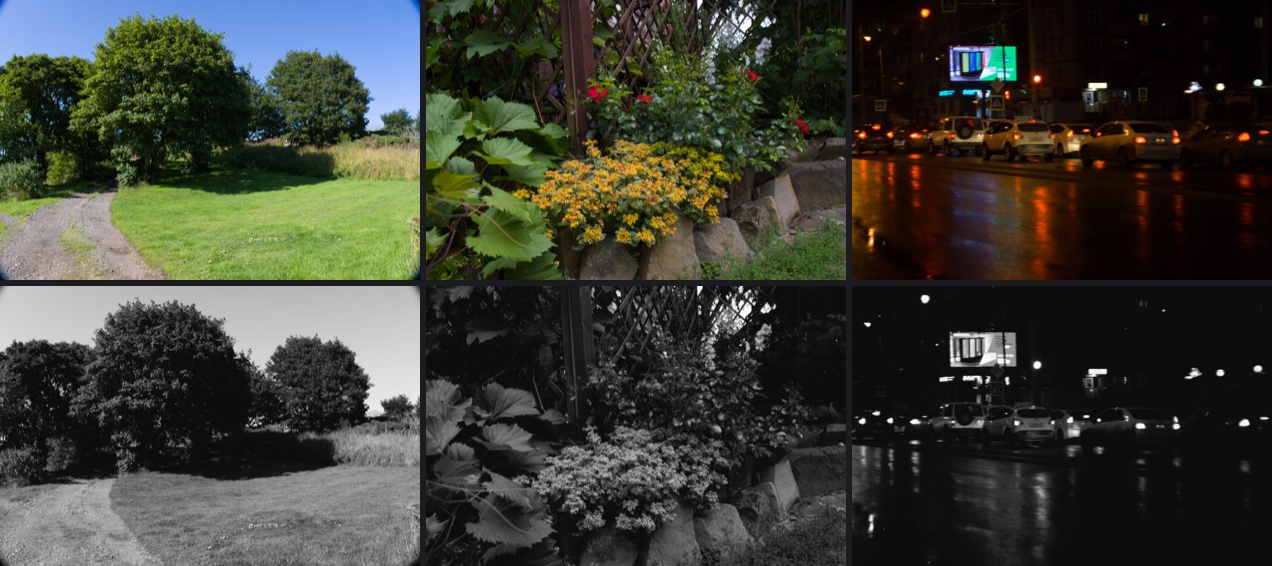
FP4 PlusClassic medium-speed black and white with a gentle shoulder.
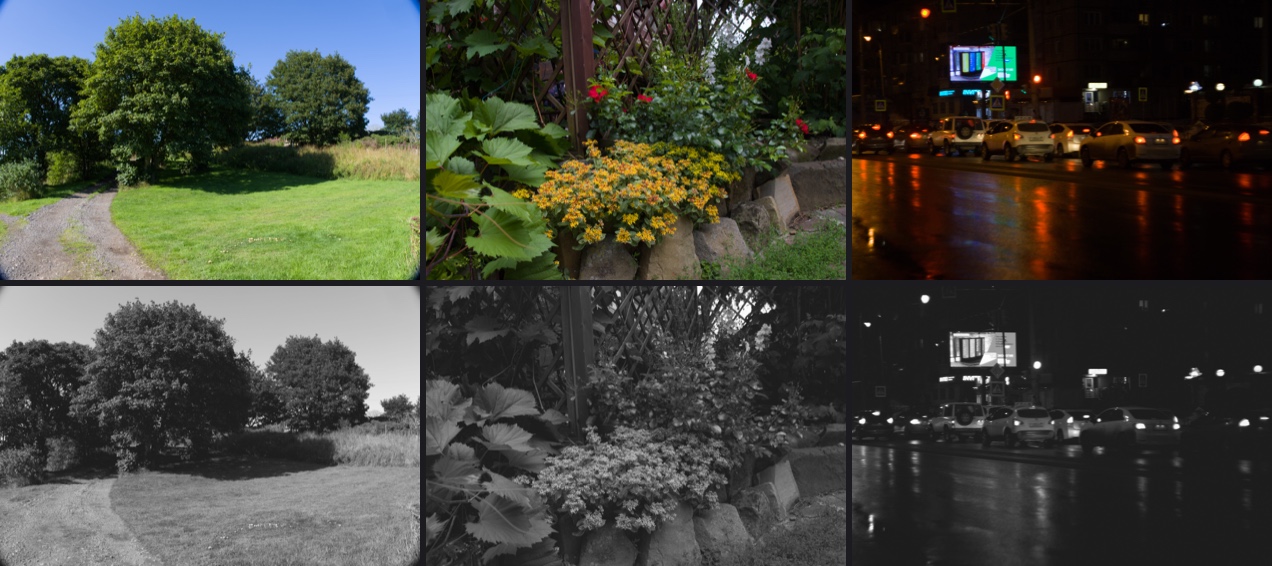
Pan F PlusSlow, ultra-fine black and white with rich contrast.
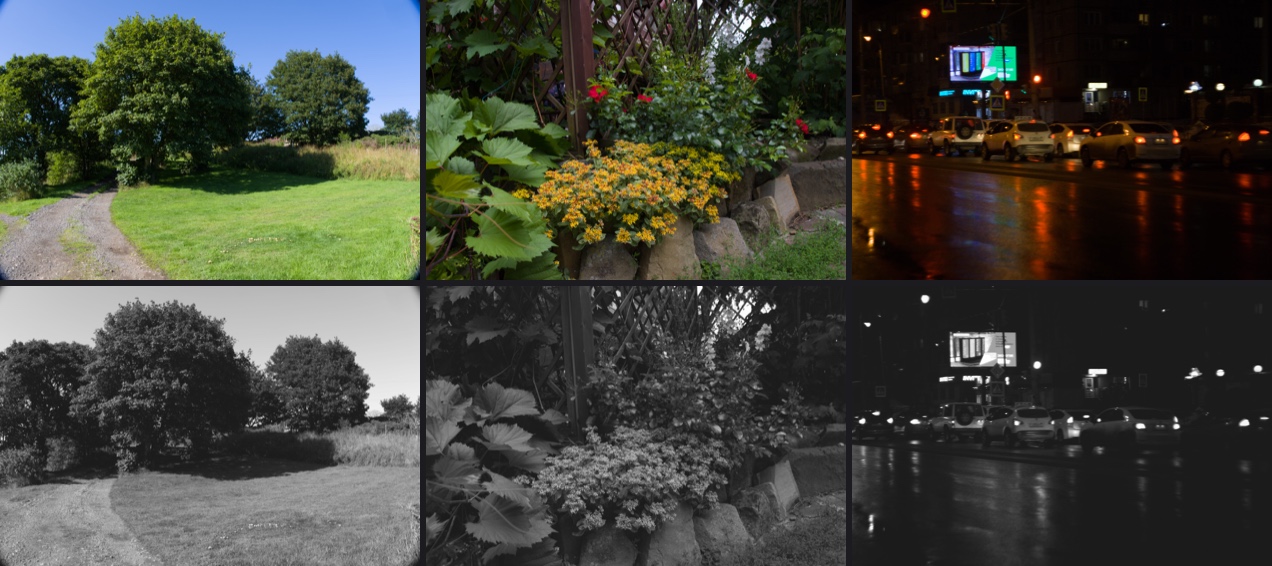
Tri-X · Darkroom PrintA darkroom print: deeper blacks and the paper's own contrast.
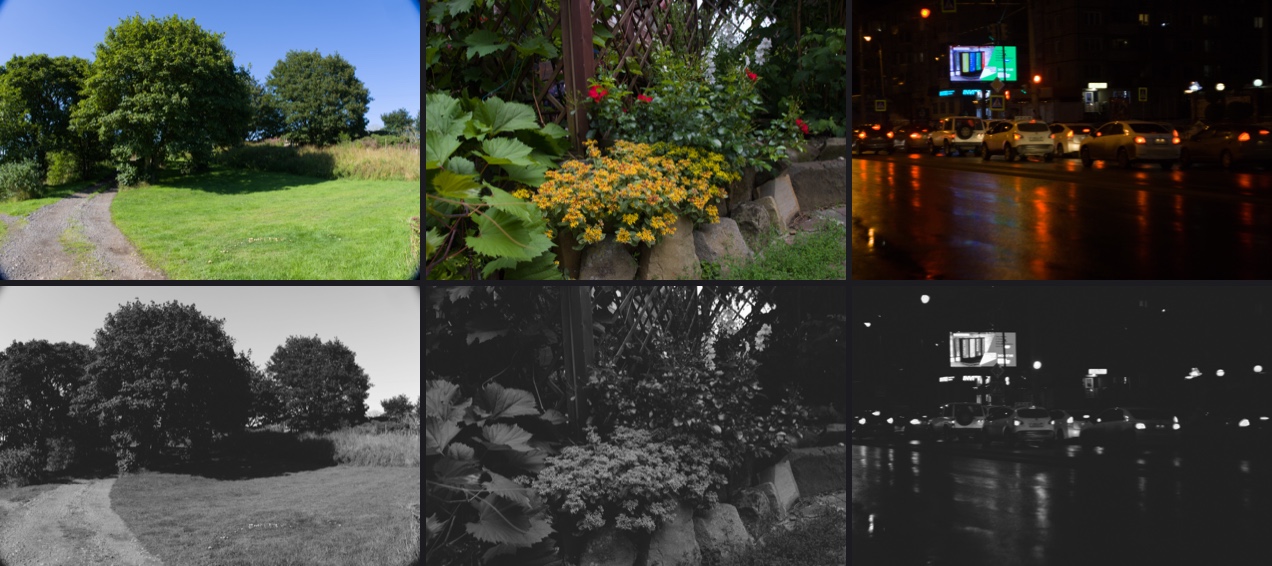
The same datasheets also describe how a film behaves when it's exposed or processed differently, and the model follows them:
Portra 400 · +2The popular overexposed Portra: two stops of extra exposure crowd the highlights onto the film's shoulder, for an airy, pastel, soft look.
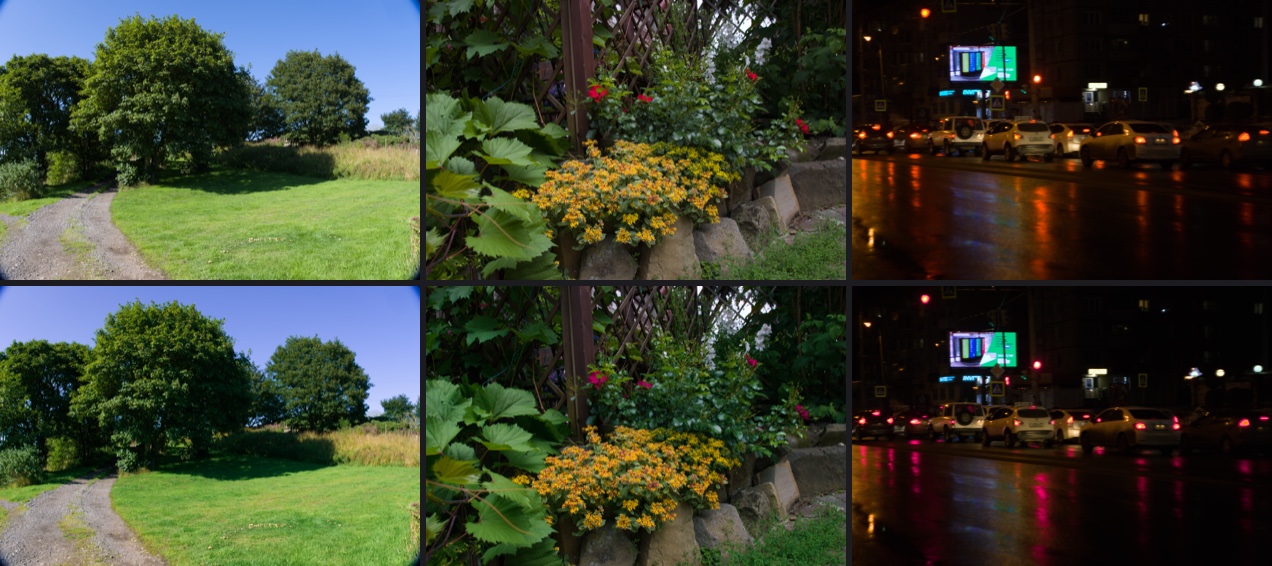
Tri-X 400 · Pushed to 1600Push processing: two stops underexposed and developed longer, using the datasheet's own longest D-76 curve. The shadows block up and grain and contrast rise.
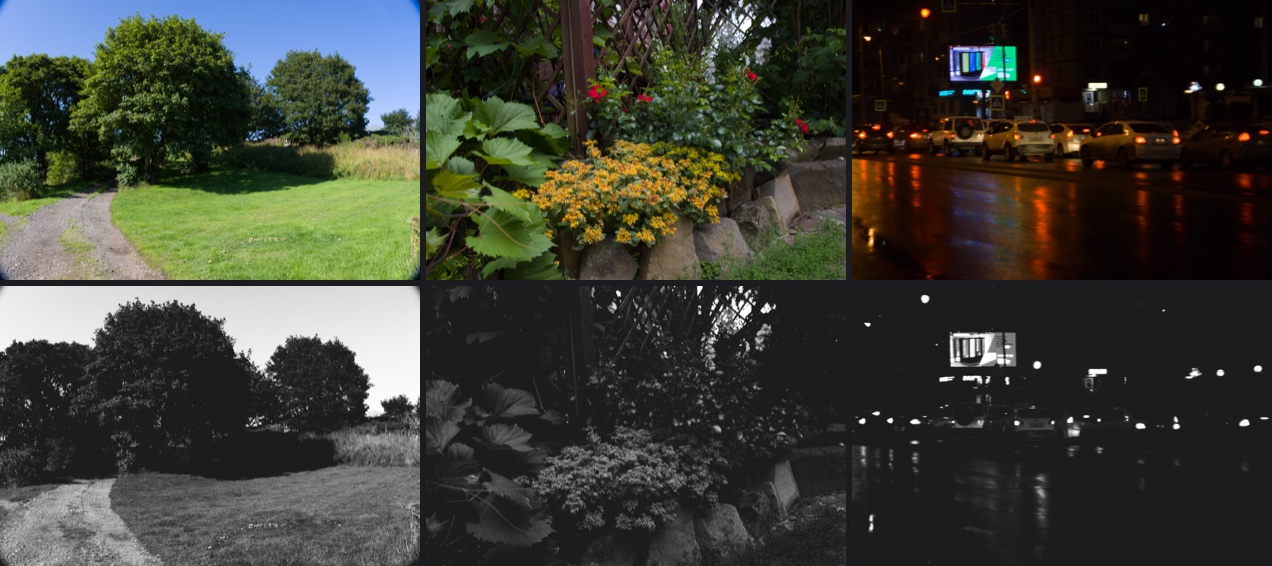
Tri-X · Soft PrintA gentle, open darkroom print on a soft grade, using Ilford's published grade 1 curve.
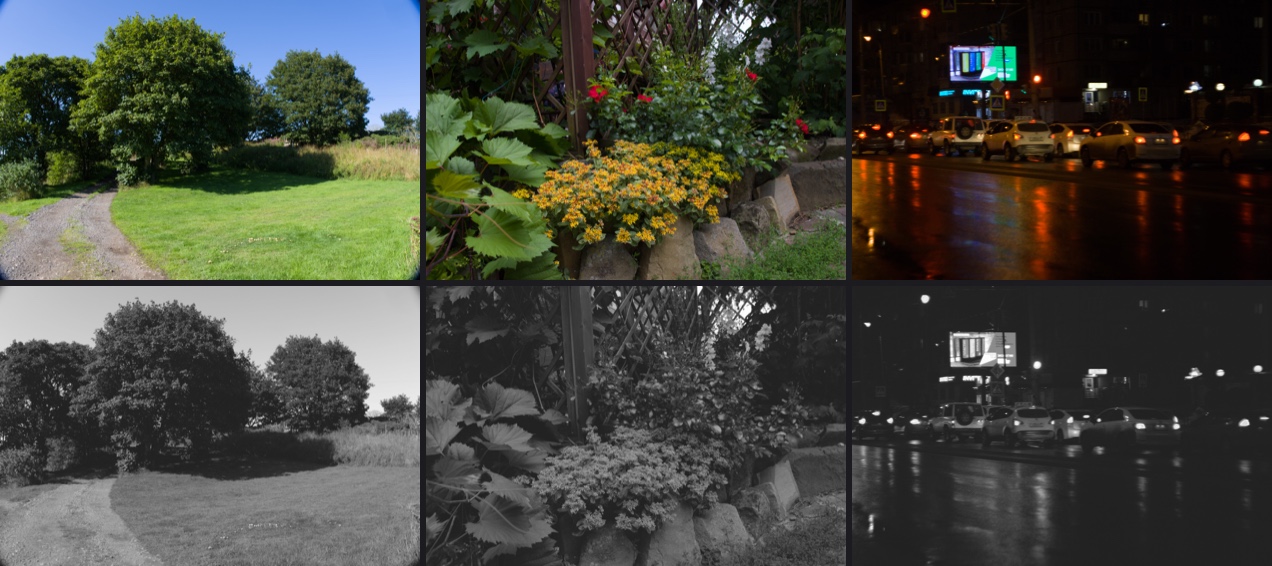
Tri-X · Hard PrintA hard grade: deep blacks and bright whites, using Ilford's published grade 4 curve.
Vision3 500T · 2383 Bleach BypassThe bleach-bypass print: the silver is left in with the dyes, so the image is desaturated, dense and hard, the look of many war films.
Velvia 50 · Cross-ProcessedSlide film developed as a negative: punchy, with the colour shifts that a slide emulsion with no orange mask gives.
Provia 100F · Cross-ProcessedProvia cross-processed: contrasty, with cool green-cyan shadows.
One-tap looks in the spirit of Prequel's filters. Each starts from a film look, with its grain, halation and bloom, and adds the new Effects: Light Leak (Amount, Warmth and Variation), Dust & Scratches, and a Frame. Frames come as a keyline, a white print border, a 35 mm rebate with its sprocket holes, or a slide mount. They're in the sidebar under Recipes ▸ Mood, and the effects work on any photo.
| Mood | Built on | Adds |
|---|---|---|
| Golden Leak | Portra 400 · +2 | a warm light leak and soft bloom |
| Lost Roll | Gold 200 | leaks, dust, scratches and the 35 mm rebate |
| Summer '98 | UltraMax 400 | a warm leak and a white print border |
| Night Glow | CineStill 800T | strong halation, bloom and a little dust |
| Blue Hour | Pro 400H | a cool leak and a soft mist |
| Mist | Portra 160 | a diffusion filter's glow and gentler contrast |
| Home Movie | Vision3 50D · 2383 | projector scratches, dust, a dark edge and a keyline |
| Slide Show | Kodachrome 64 | a slide mount and a few specks of dust |
| Contact Sheet | Tri-X · Hard Print | the 35 mm rebate and darkroom dust |
| Neon Rain | Provia 100F · Cross-Processed | halation and a cool leak |

Ten more are tuned on the photographs shot on each film. redlamp recipe film --fit-moods fits the style fingerprint of a film's 20 reference photographs with the recipe studio's fitter, adjusting tone, saturation, grading and grain on top of the film's own look. The fitted values are pinned in the source. Shared film scans are bright and open, and the moods carry that. The fit leaves out per-colour hue and saturation, which follow the photographs' subjects more than the film.
| Mood | Built on | Fitted to |
|---|---|---|
| Portra Days | Portra 400 | bright, airy scans |
| Ektar Colour | Ektar 100 | warm, vivid colour with open shadows |
| Gold Summer | Gold 200 | sunny warmth, soft contrast, more grain |
| Superia Snapshots | Superia 400 | bright, cool-leaning snapshots |
| Wedding Day | Pro 400H | pastel, soft wedding scans |
| CineStill Nights | CineStill 800T | deep shadows and a cool split tone |
| Velvia Landscapes | Velvia 50 | open shadows and rich colour |
| Kodachrome Memories | Kodachrome 64 | bright slides with cool shadows |
| Tri-X Street | Tri-X 400 | open, bright street prints |
| HP5 Documentary | HP5 Plus | bright midtones with deep blacks |

research/film-references/ lists 477 photographs from Wikimedia Commons whose pages name the film. There are 8 to 20 per stock, licensed CC0, CC BY or CC BY-SA, and they're used as references only, never shipped or committed. redlamp recipe film --validate renders each look on the look-development set, and research/film-references/analyse.py compares them with the photographs in OKLab. It compares contrast and saturation, and the colour of foliage, sky, skin and near-neutral shadows and highlights.
The two sets show different scenes, so the useful tests are relative ones:
The check found one clear error, now fixed. The slides were less saturated than Redlamp's default, though in the photographs slide films are the most saturated of all. Slides get much of their saturation from strong interimage effects between their layers, which the model had set as mildly as for negatives. With stronger effects calibrated to the photographs' order (version 2 of the slide looks), saturation against the default rendering is:
| Look | Saturation |
|---|---|
| Velvia 50 | +31% |
| Velvia 100 | +20% |
| Provia 100F | +10% |
| Ektachrome E100 | +10% |
| Kodachrome 64 | +7% |
The colour negatives stay within a few percent of the default in saturation and are slightly softer, as lab scans are. The reference photographs differ too much in subject for finer conclusions: Pro 400H's are mostly weddings, CineStill's night streets, and Velvia's landscapes.
Kodak, Portra, Ektar, Gold, Vision3, Tri-X, Fujifilm, Superia, Provia, Velvia, Ilford, HP5, Multigrade and CineStill are trademarks of their owners. Redlamp isn't affiliated with them: its looks are built from the published technical data.
Rebuilding them: redlamp recipe film --all --install --readme builds every look from the datasheets, installs the tables the app bundles, and regenerates the icons and images on this page. Bundled looks are versioned and never change once published; a test fails if the datasheets or the model would build a different look under the same version.
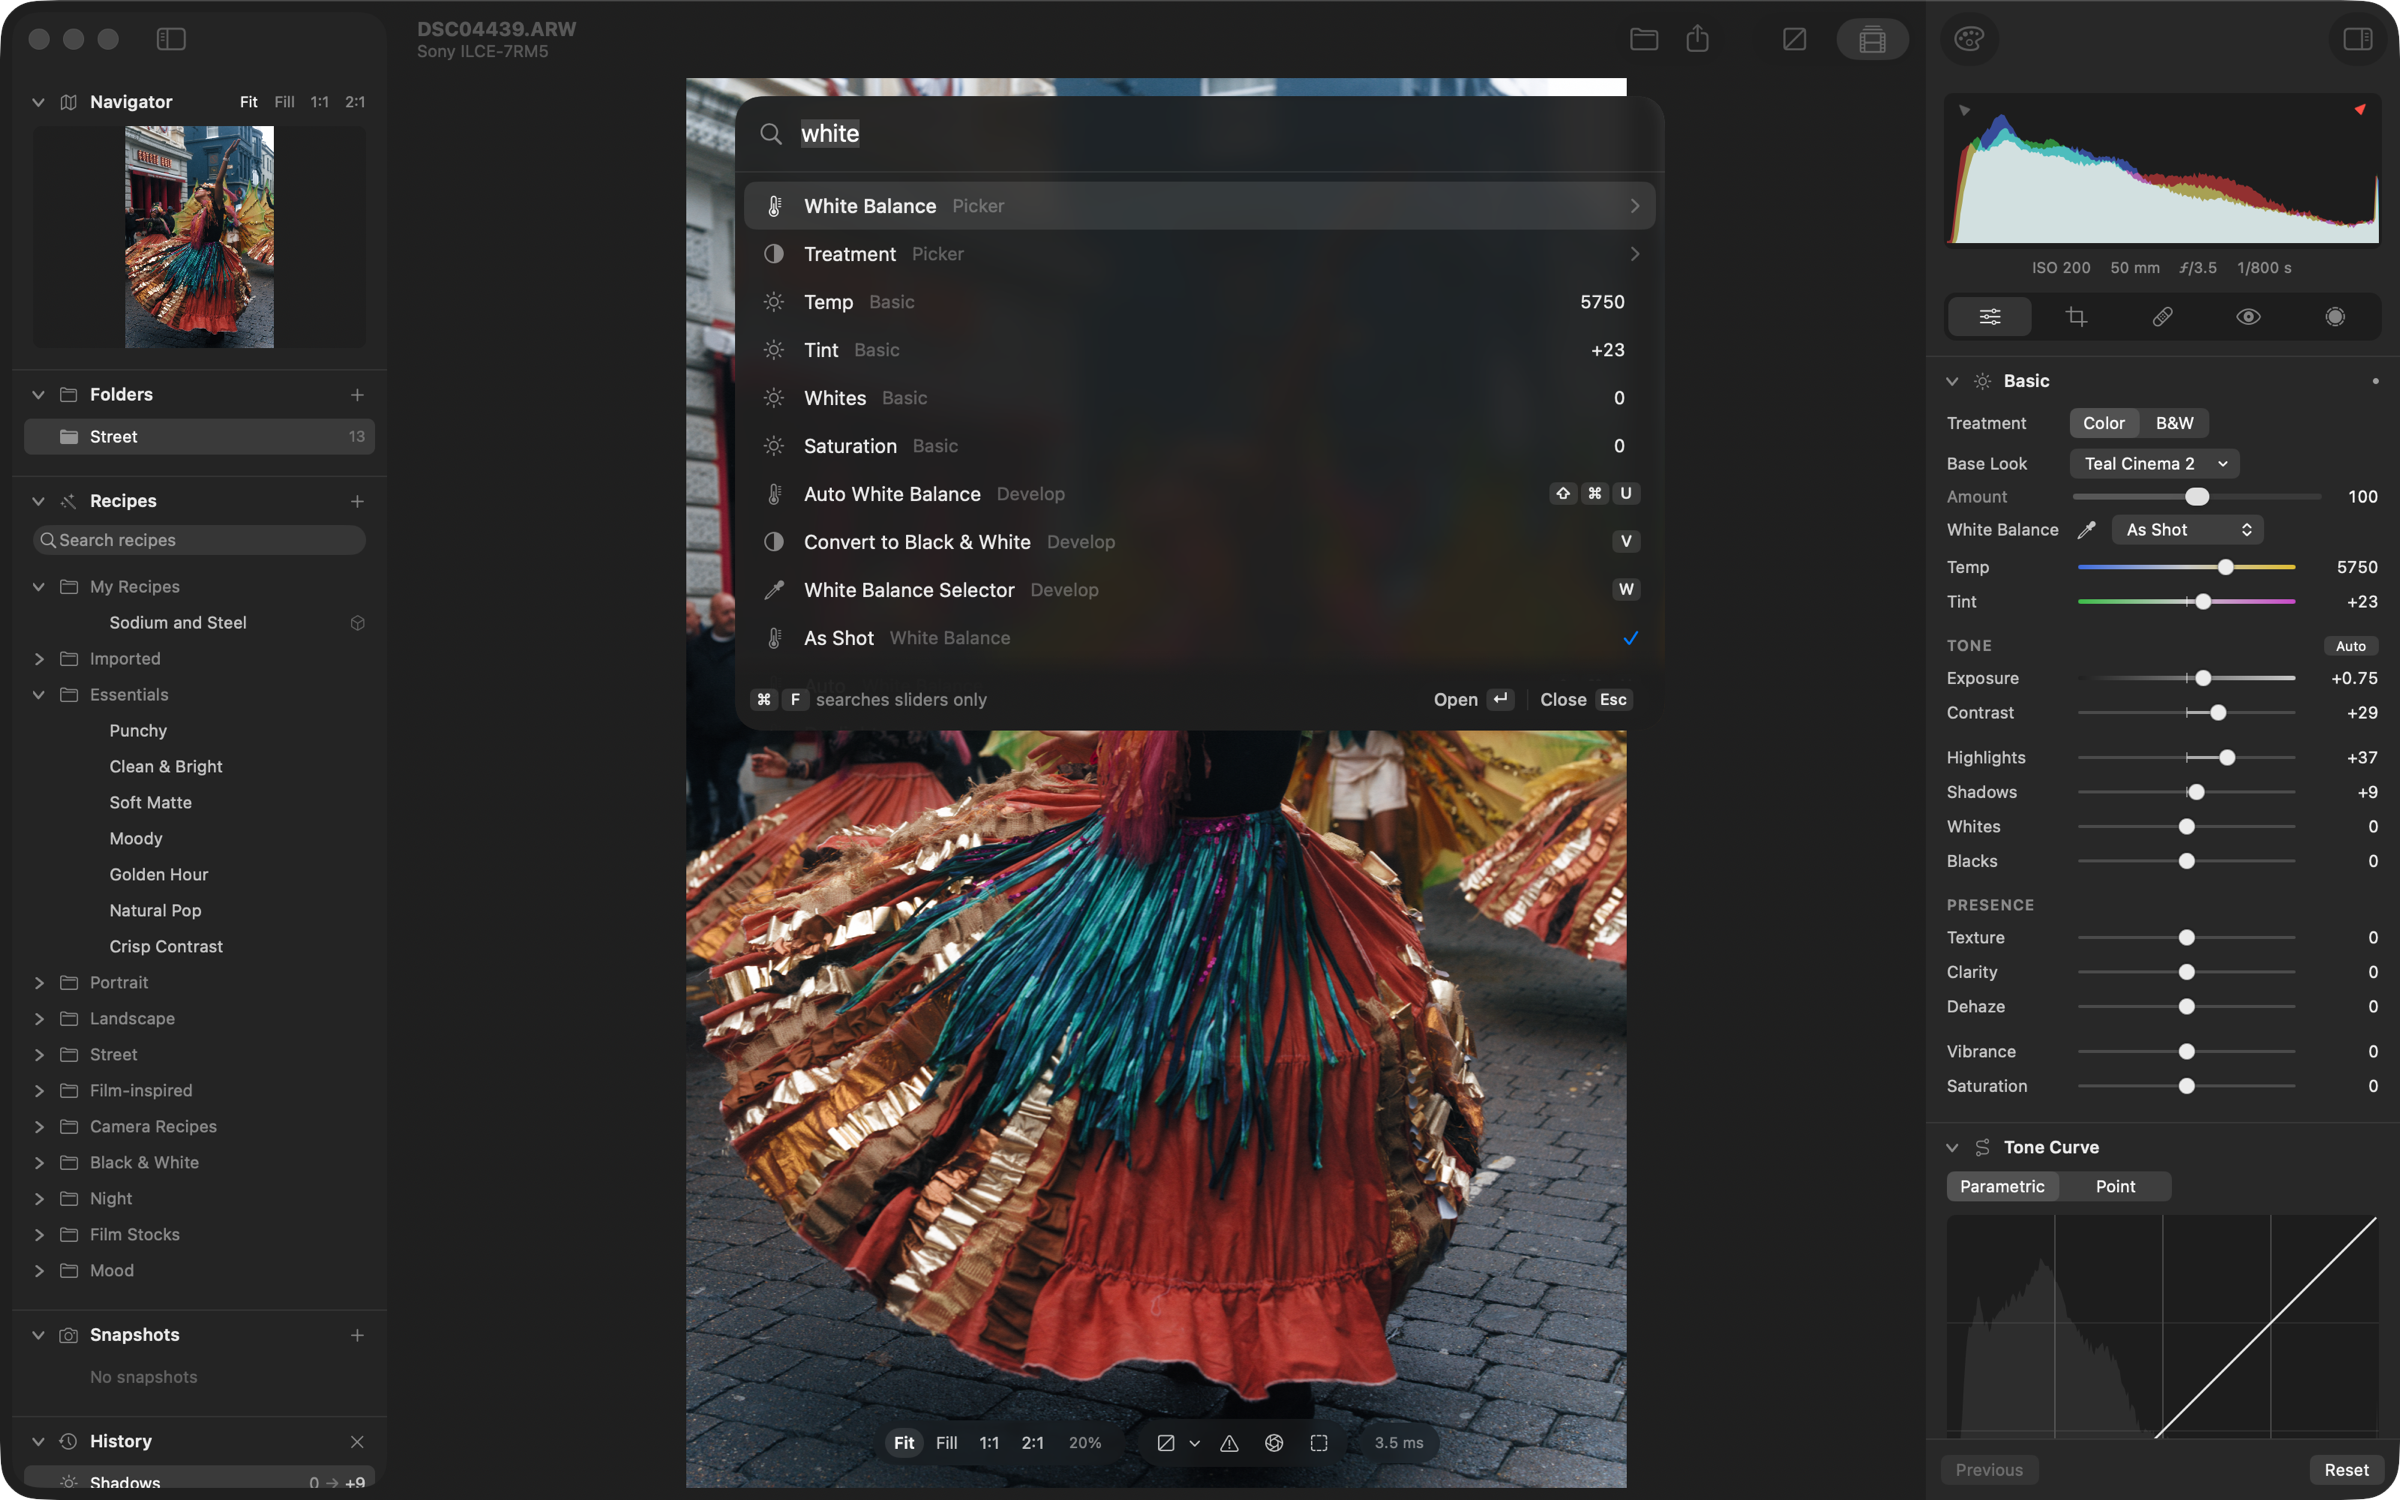
The command palette (⌘K). One search for every action, with its shortcut beside it, every Develop slider with its value, and pickers for white balance, treatment, Base Looks, recipes, Before / After, snapshots and history.
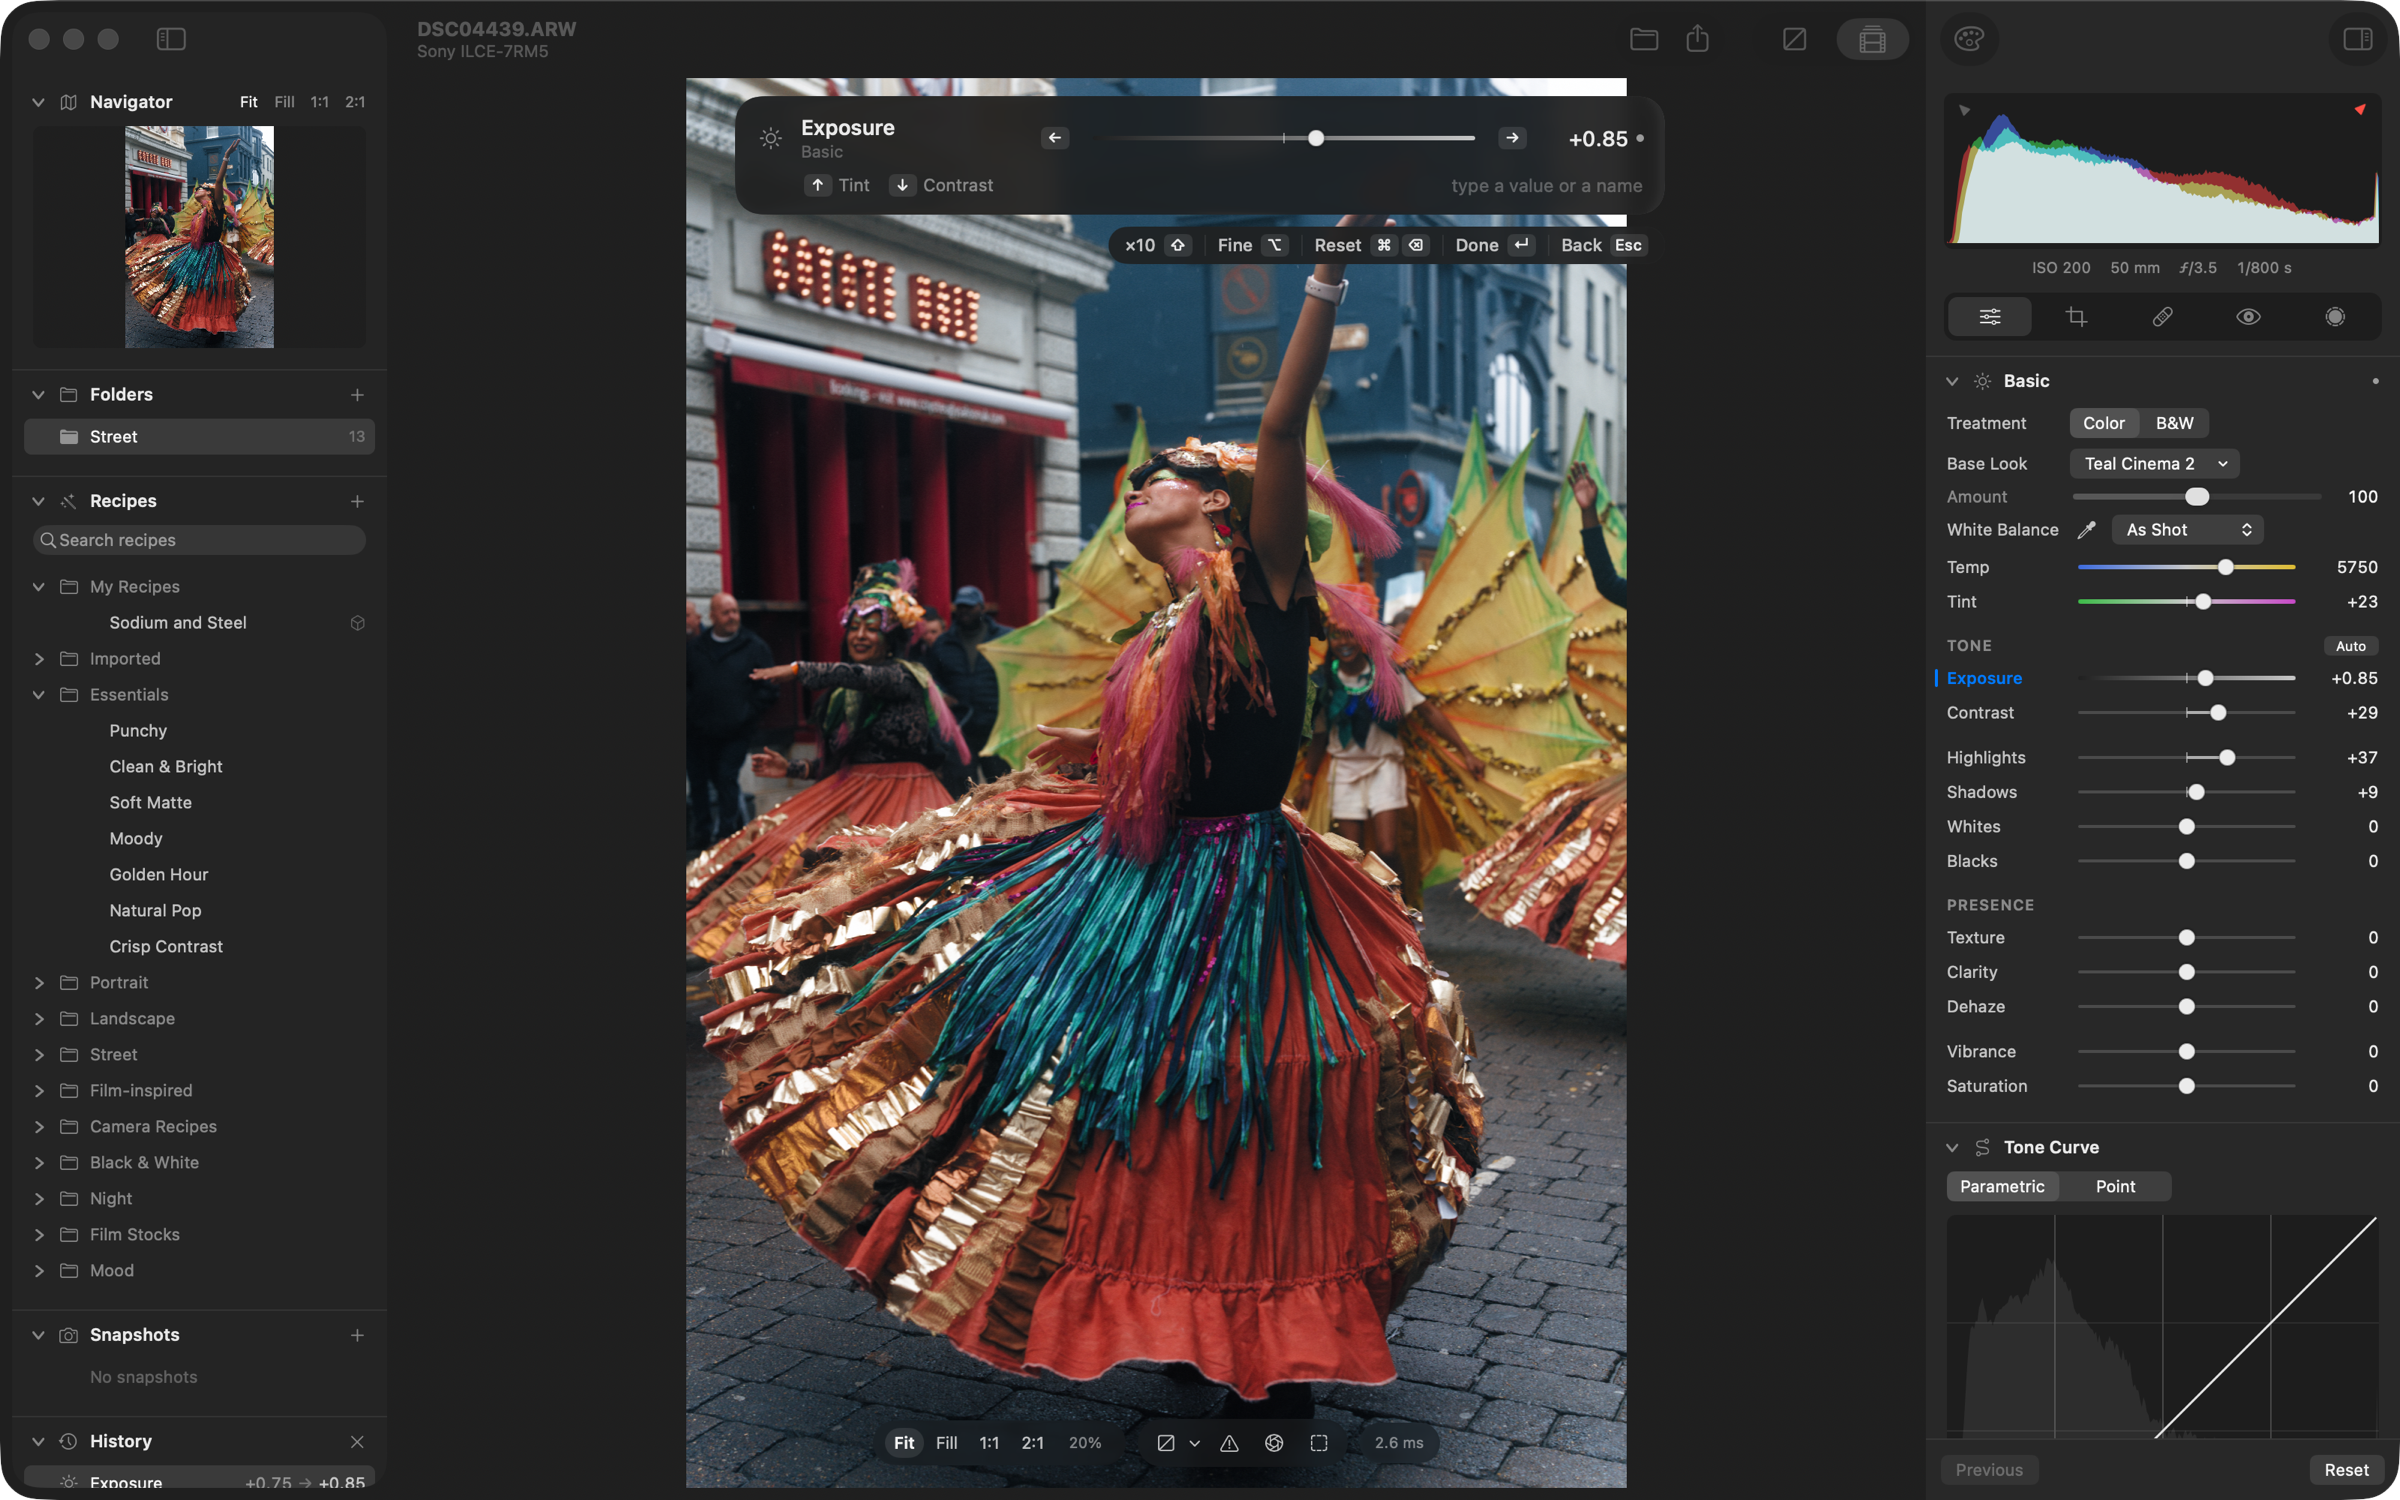
Adjusting from the keyboard. ↵ on a slider shrinks the palette to a slider bar over the photo: ← → step it (⇧ ×10, ⌥ finer), ↑ ↓ move to the next slider, and you can type a value or x+0.3. A run of presses is one history step.
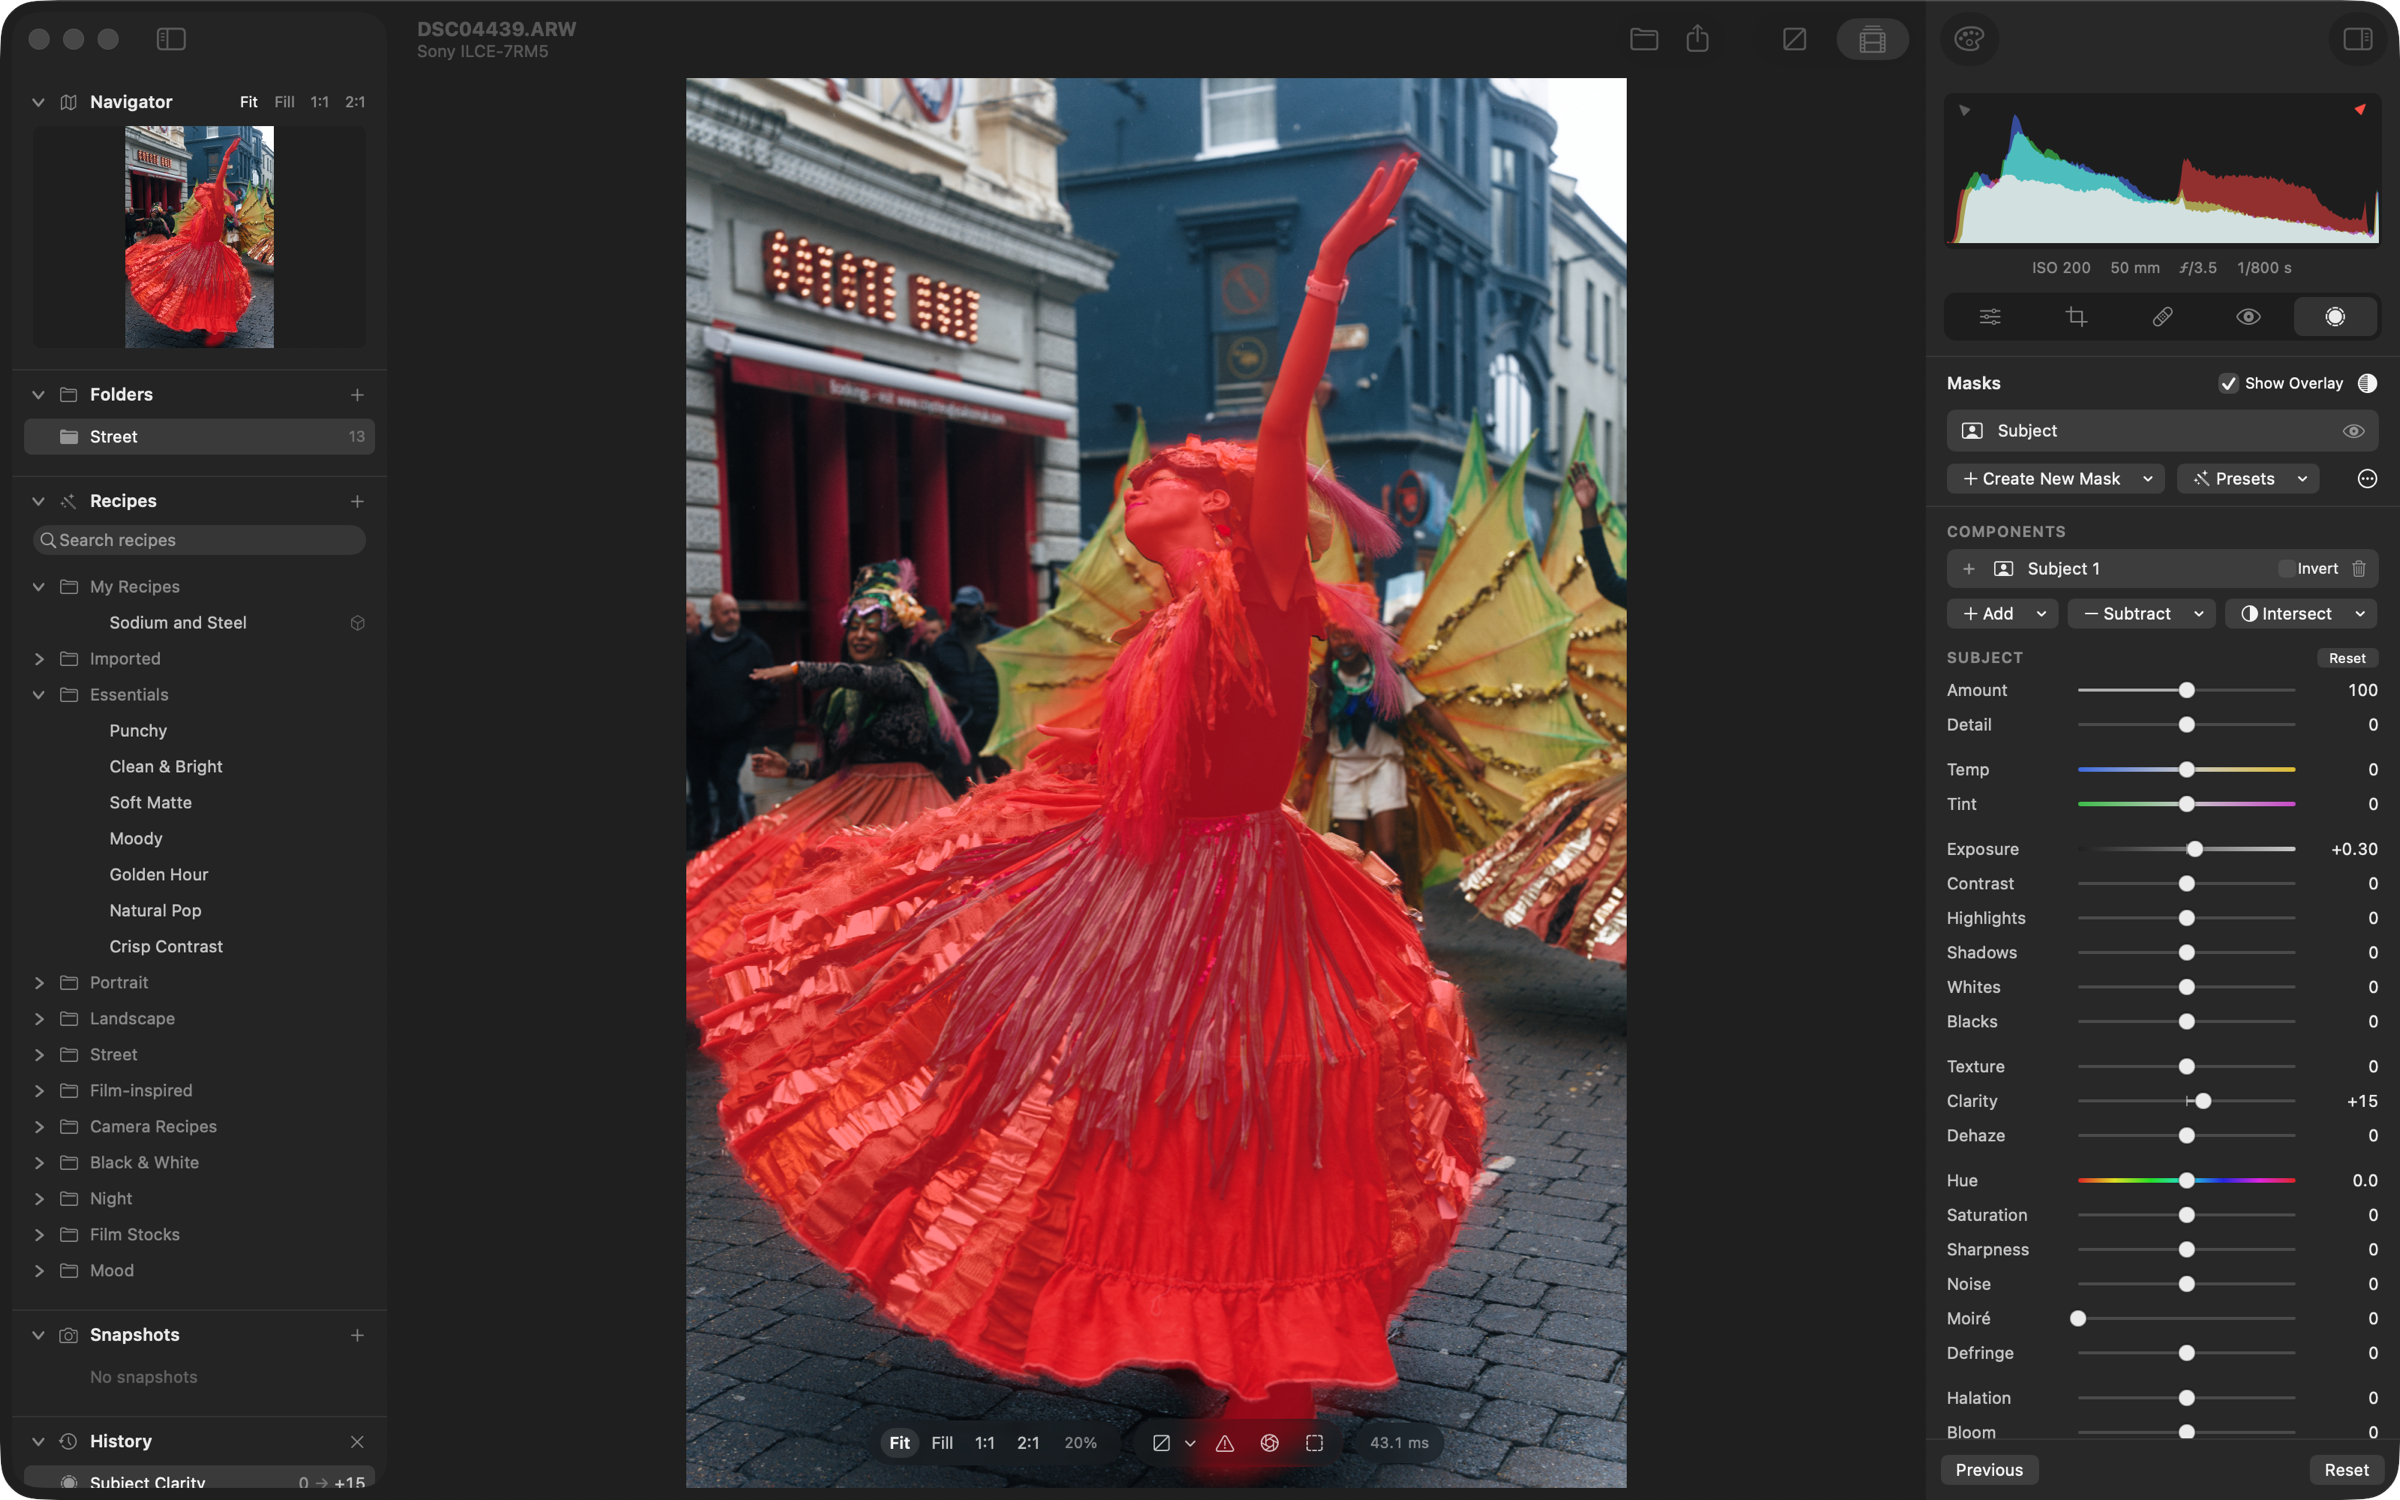
A Subject mask in the red overlay. Made on the device by Apple Vision, with nothing to download, and given its own Exposure and Clarity. The Masks panel lists the mask's components, which combine by add, subtract and intersect.
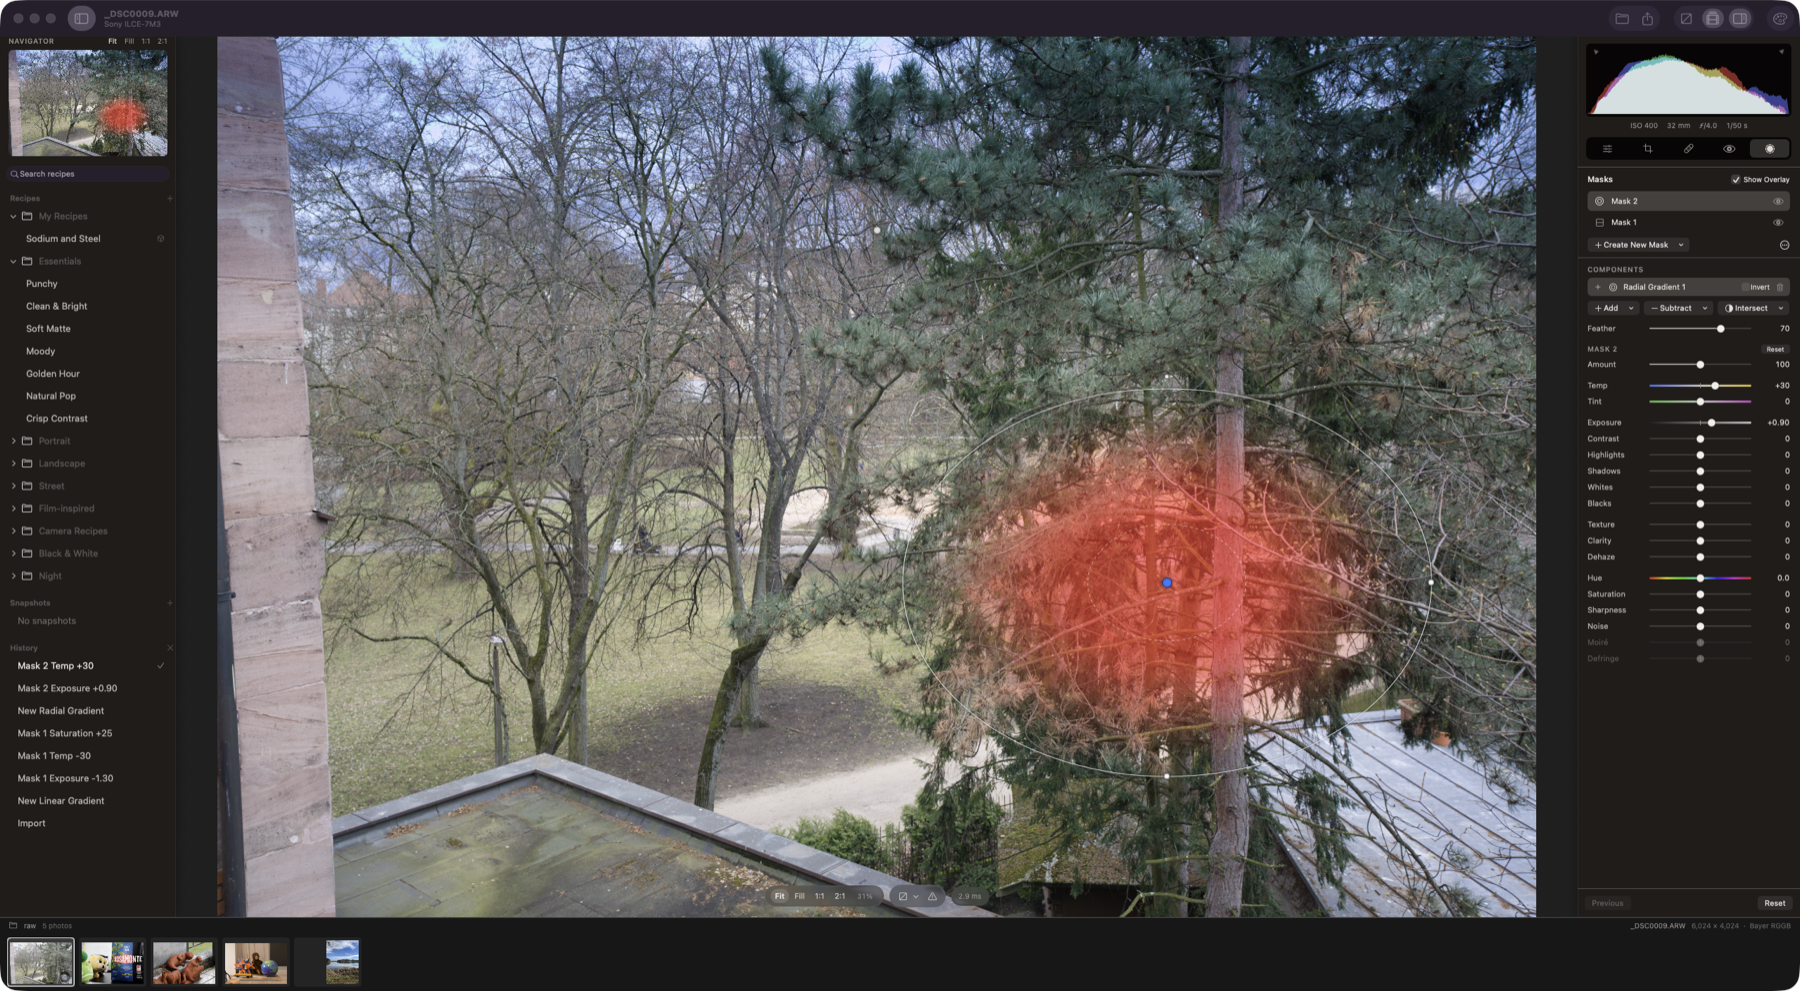
Masking on a Sony A7 III ARW. A linear gradient darkens and cools the sky, and a feathered radial gradient warms and lifts the trees. The red overlay shows the selected mask's coverage.
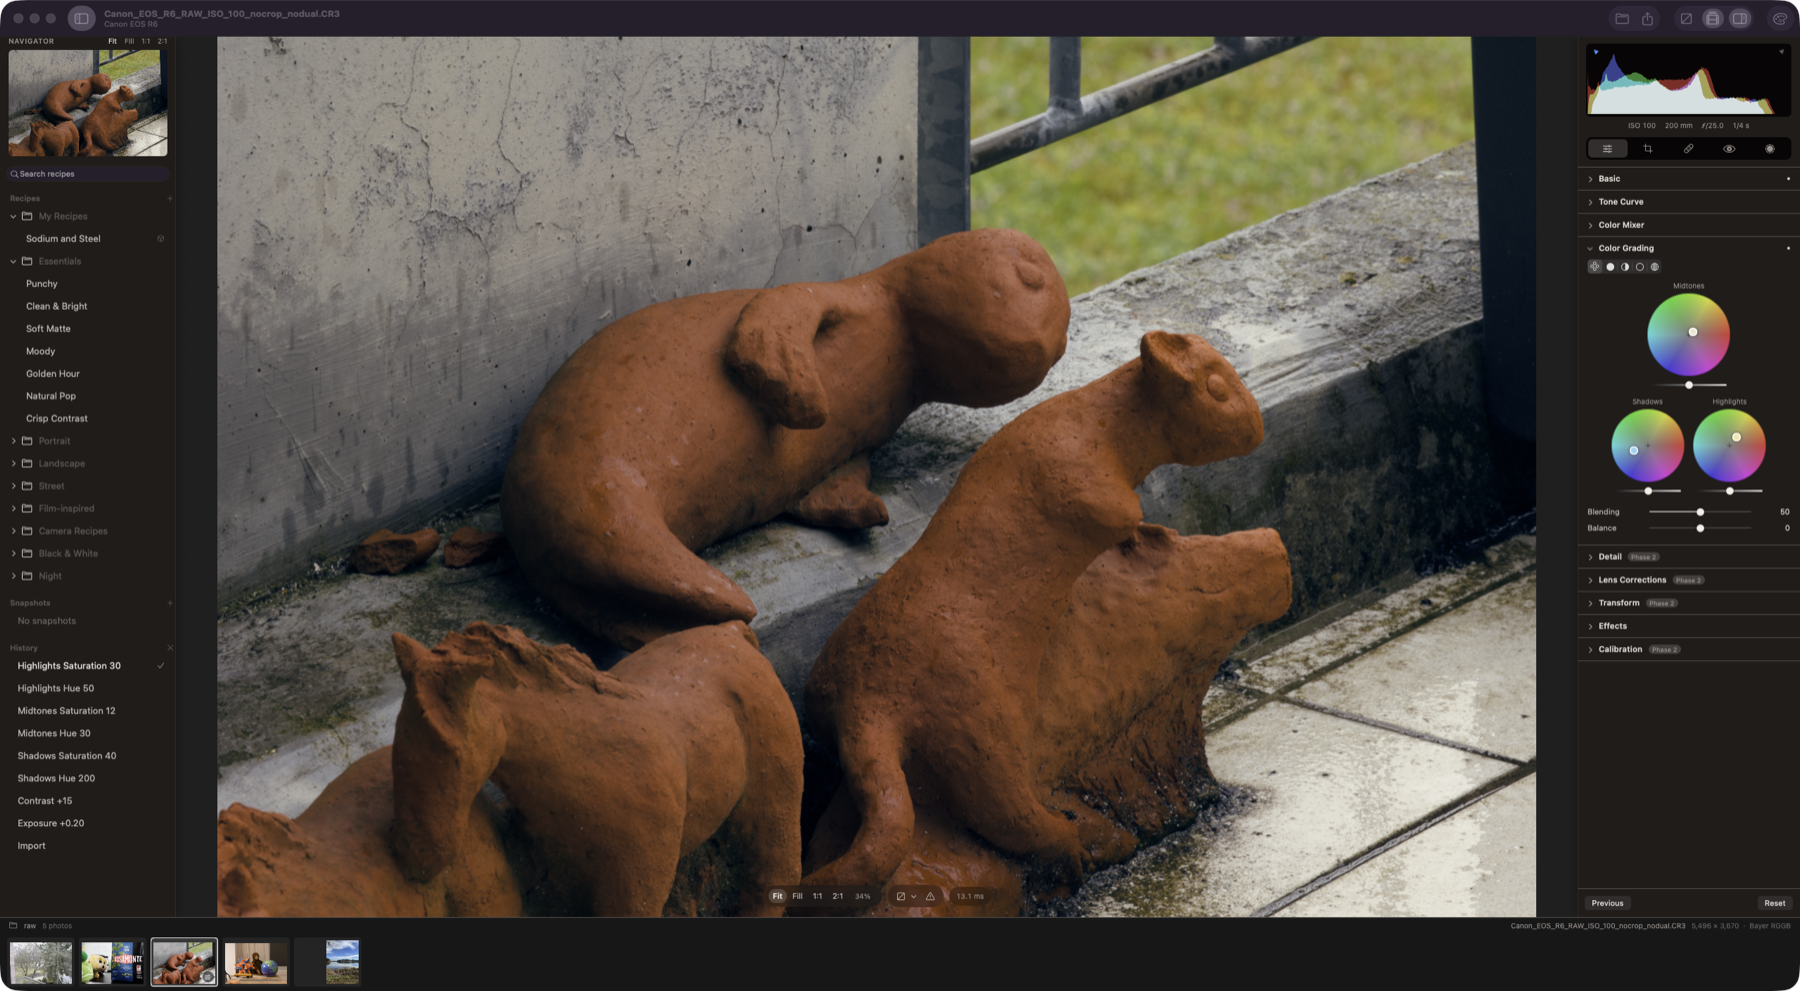
Color grading on a Canon EOS R6 CR3. Split-toned shadows and highlights with the 3-way wheels.
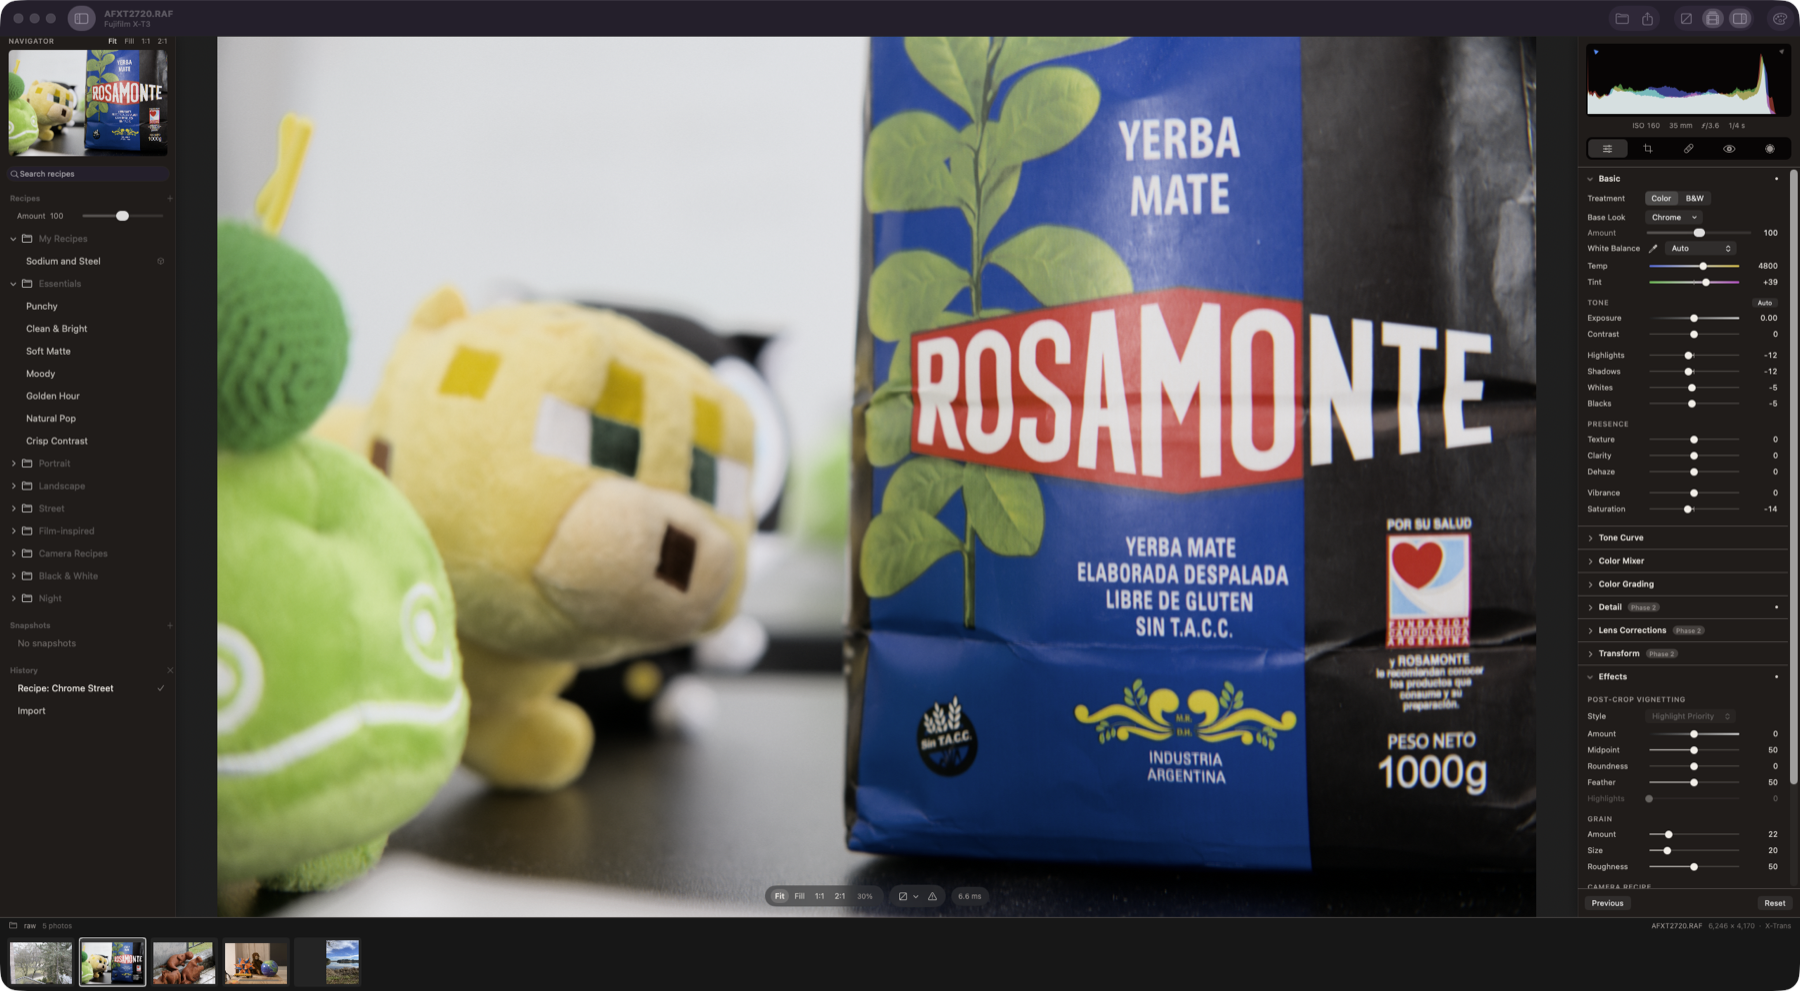
A camera recipe on a Fujifilm X-T3 RAF. Chrome Street, built from a Fujifilm-style recipe card, on the measured Chrome Base Look. The recipe's Amount is in the Recipes panel, and its tone, Color Chrome and grain settings land in the Basic and Effects panels like any other edit.
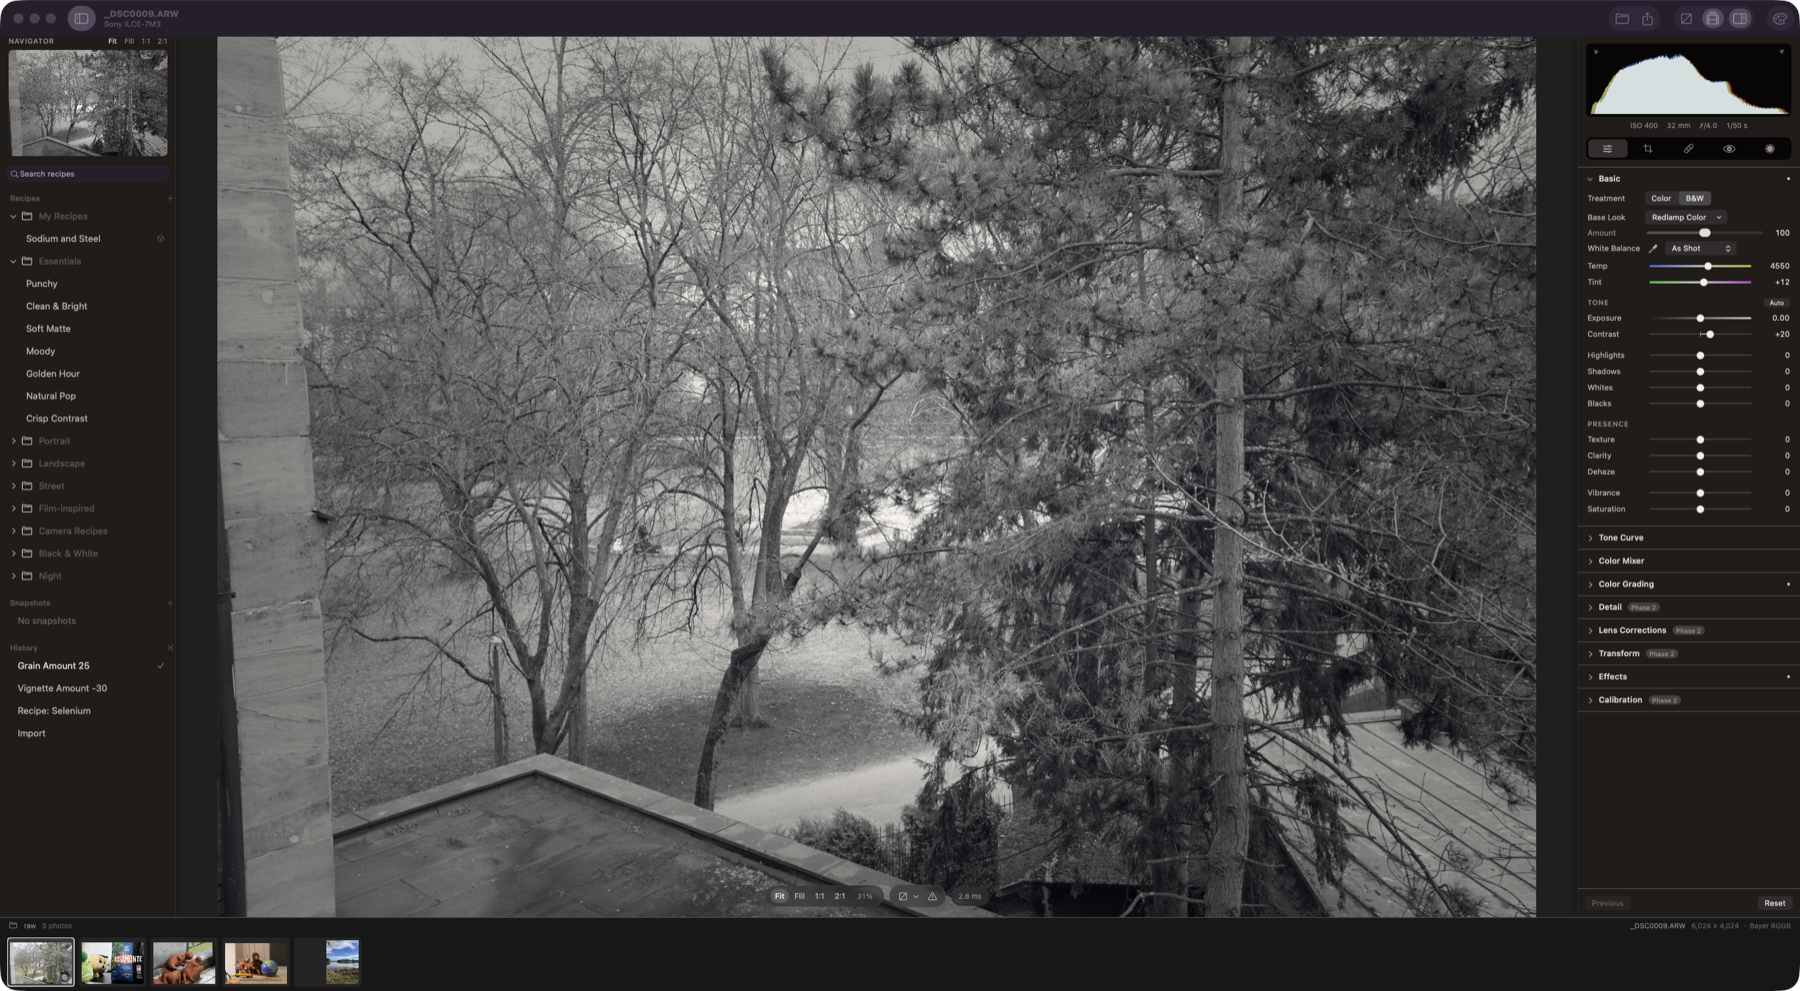
Black & white on a Sony A7 III ARW. The Selenium recipe plus vignette and grain, with every step in History.
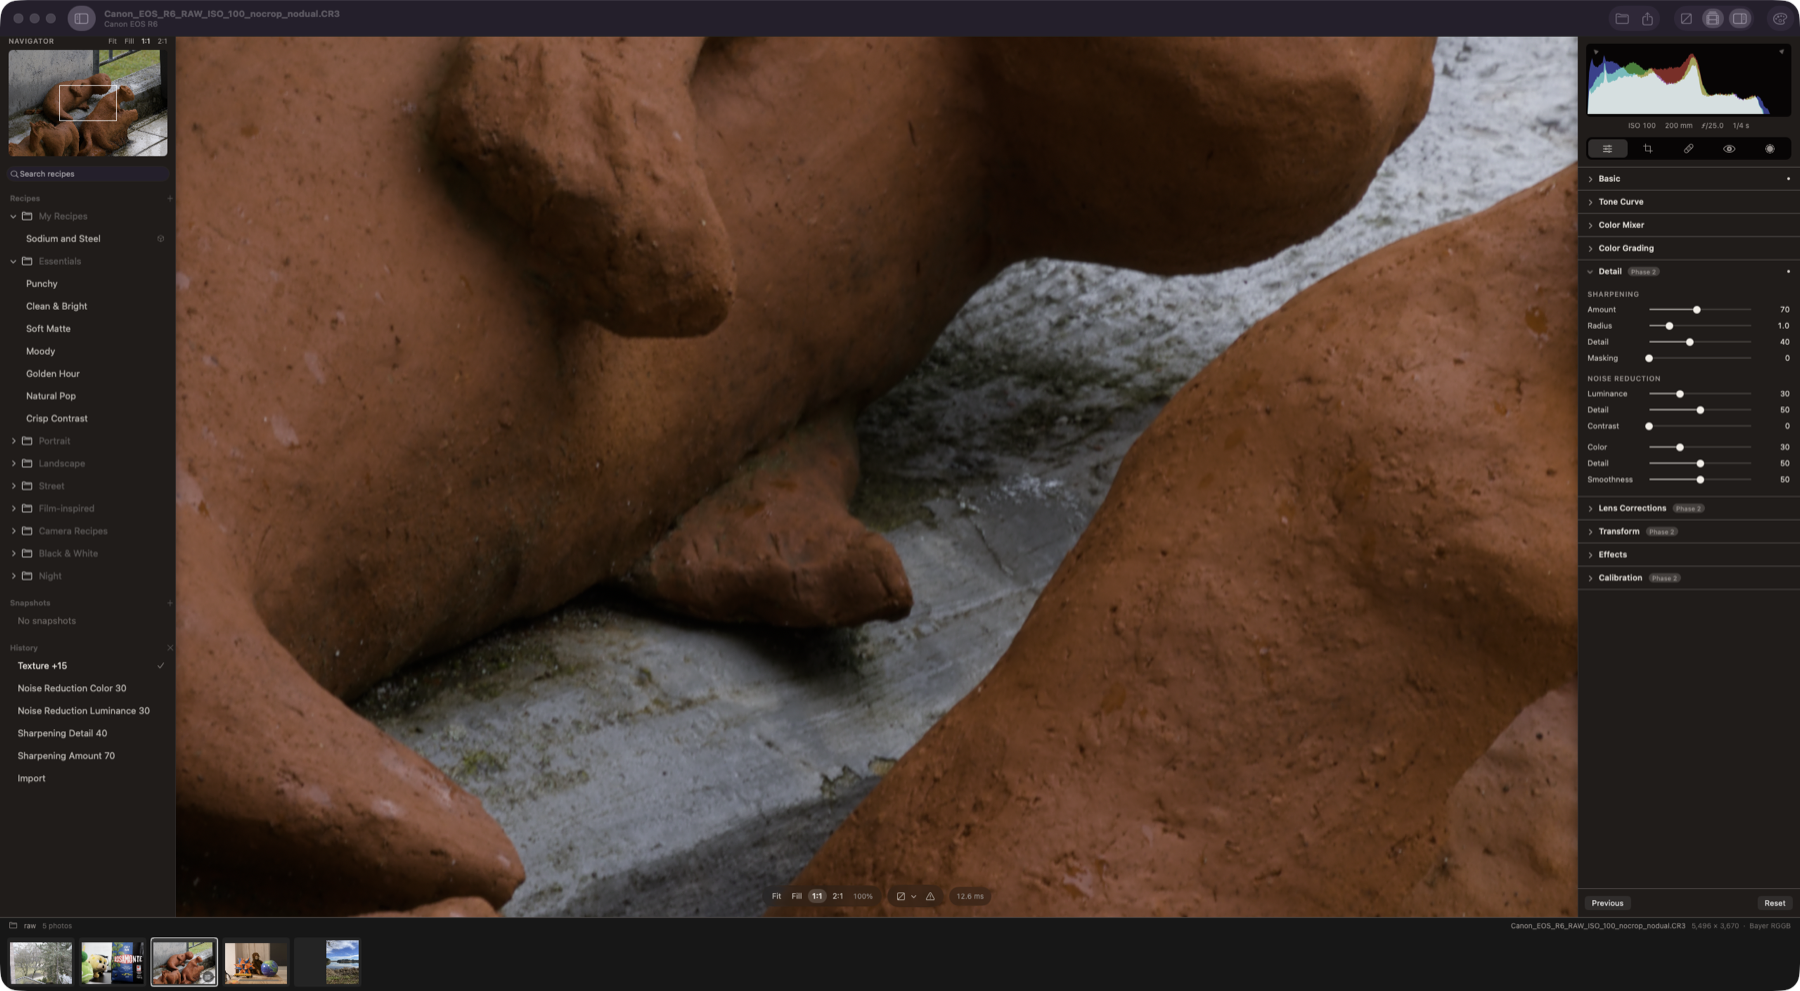
Detail at 1:1 on a Canon EOS R6 CR3. Noise reduction scaled to the photo's measured noise, and noise-aware sharpening that measures detail on a denoised copy, so grain isn't sharpened.
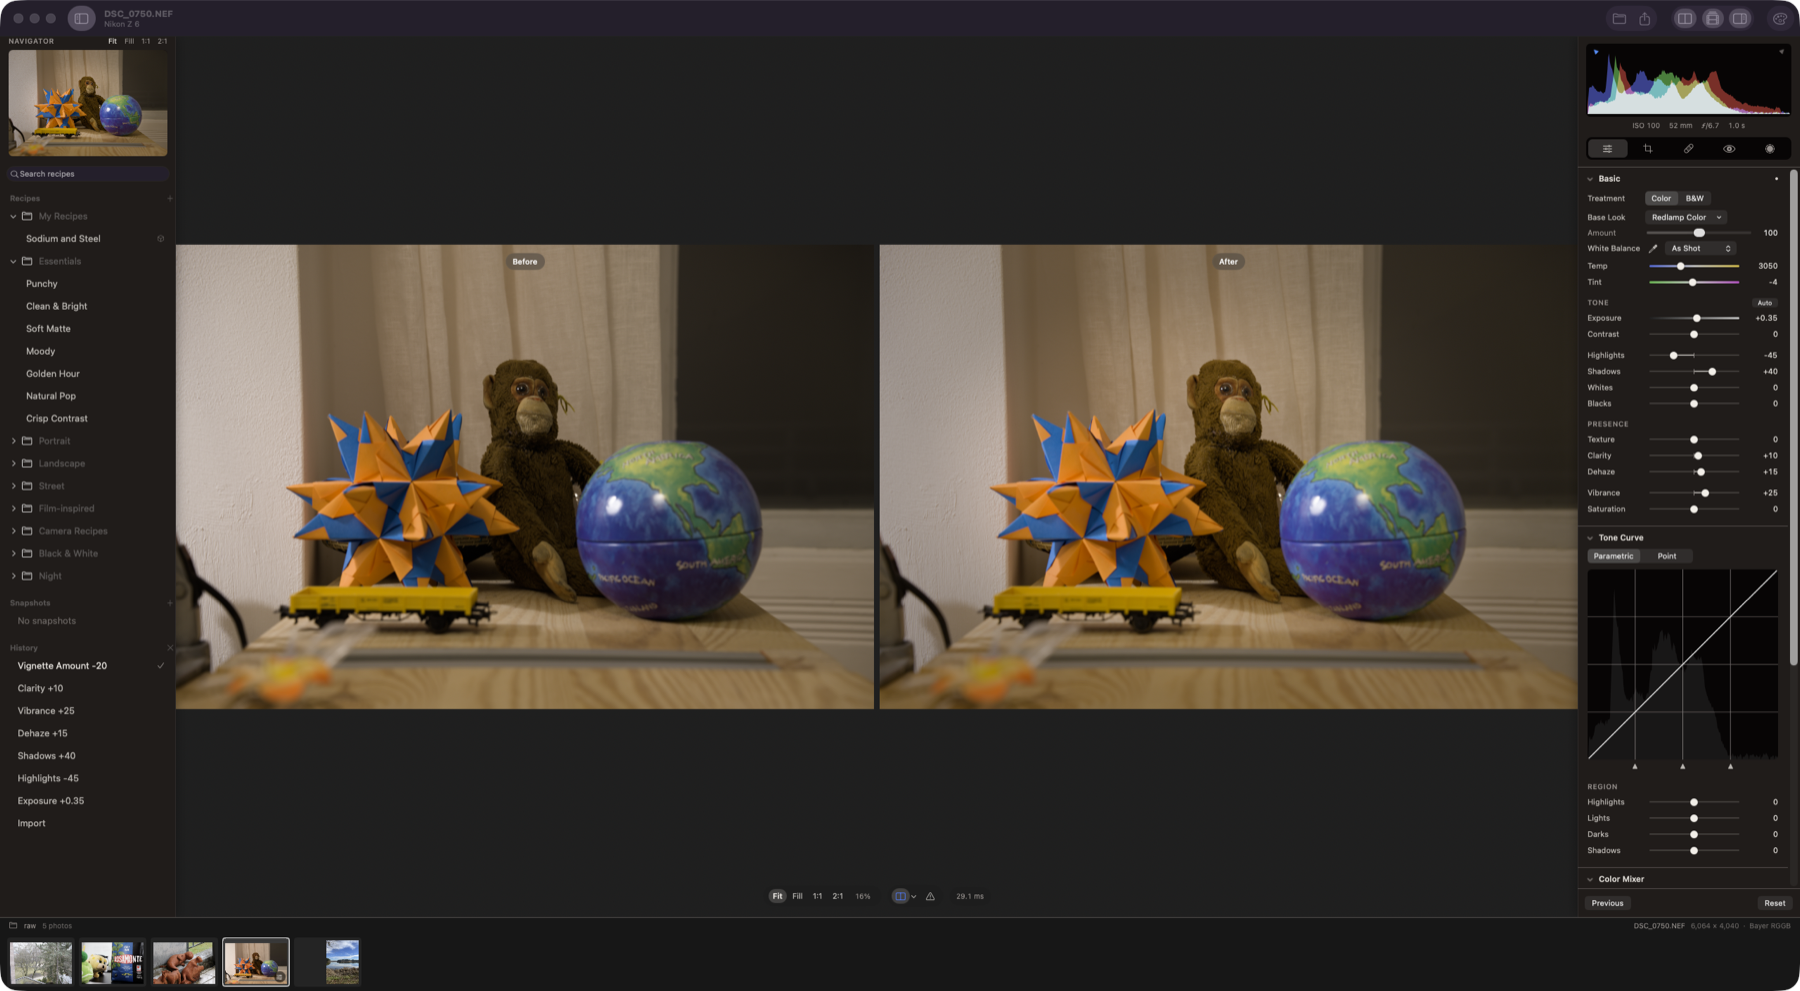
Before and after, side by side, on a Nikon Z 6 NEF. Exposure, Highlights, Shadows, Dehaze, Clarity and Vibrance; the original renders once and is cached.
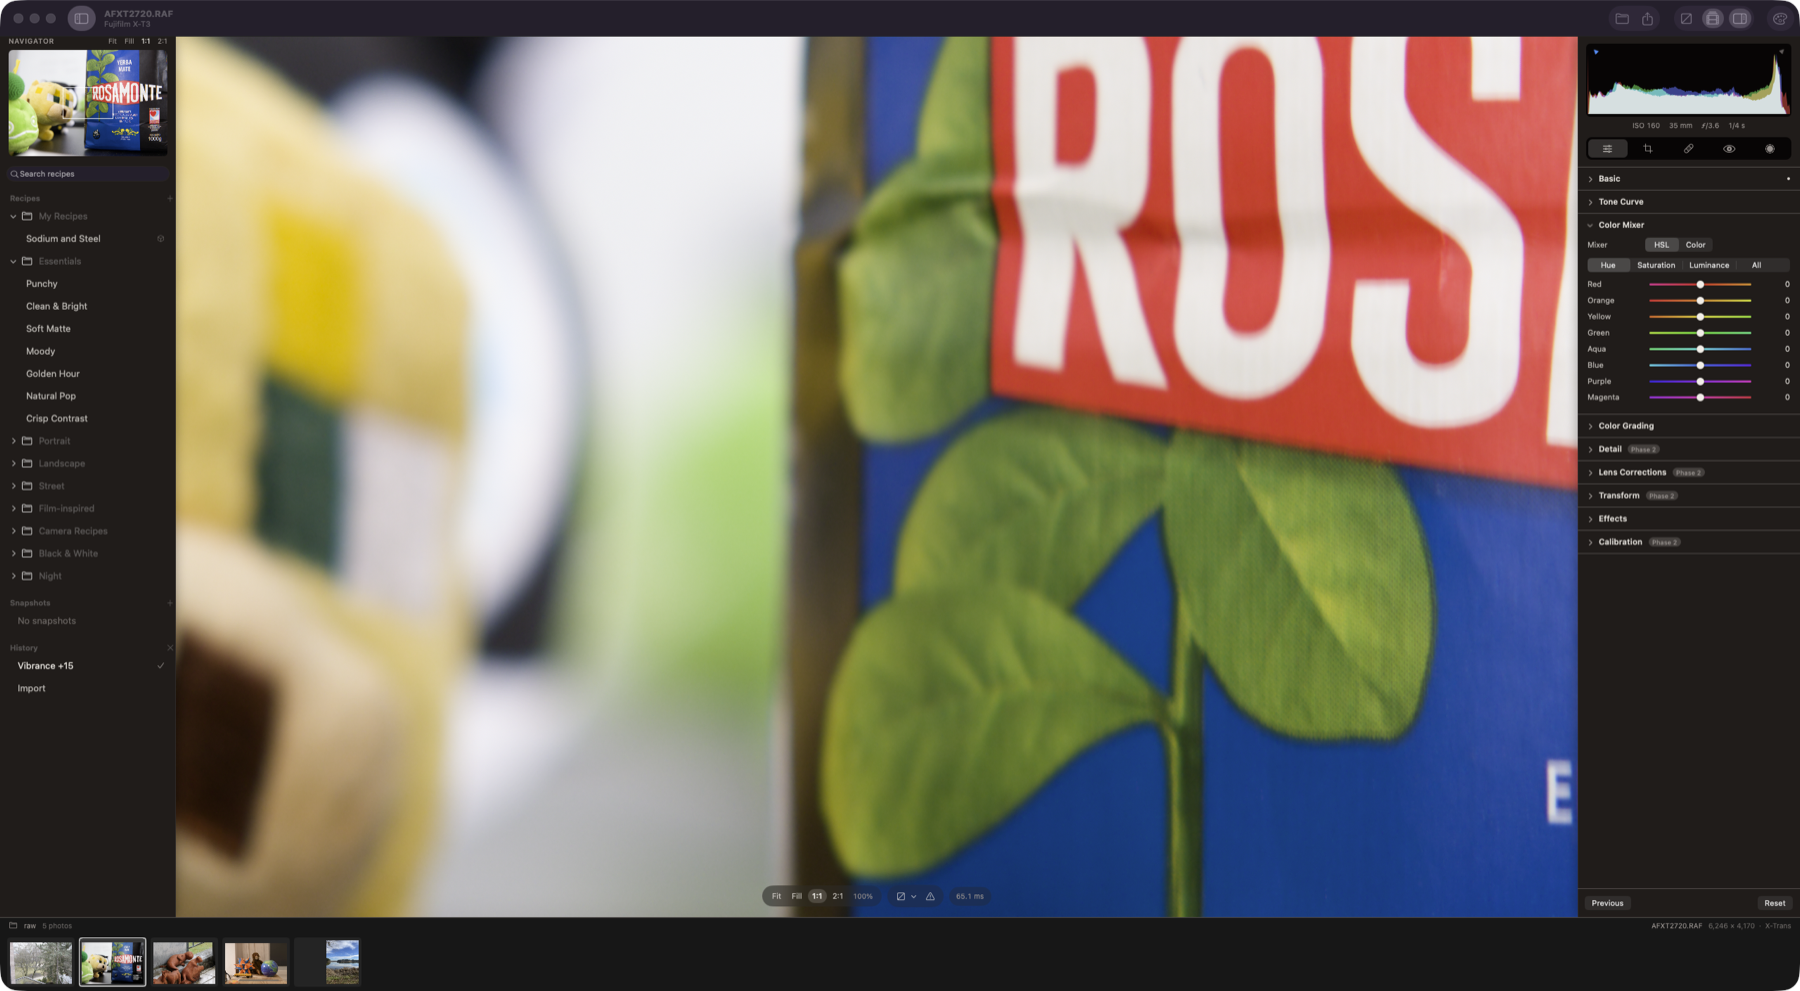
Fujifilm X-T3 X-Trans RAF at 1:1. The full-resolution frame renders in about 13 ms, and the Color Mixer is shown in HSL mode.
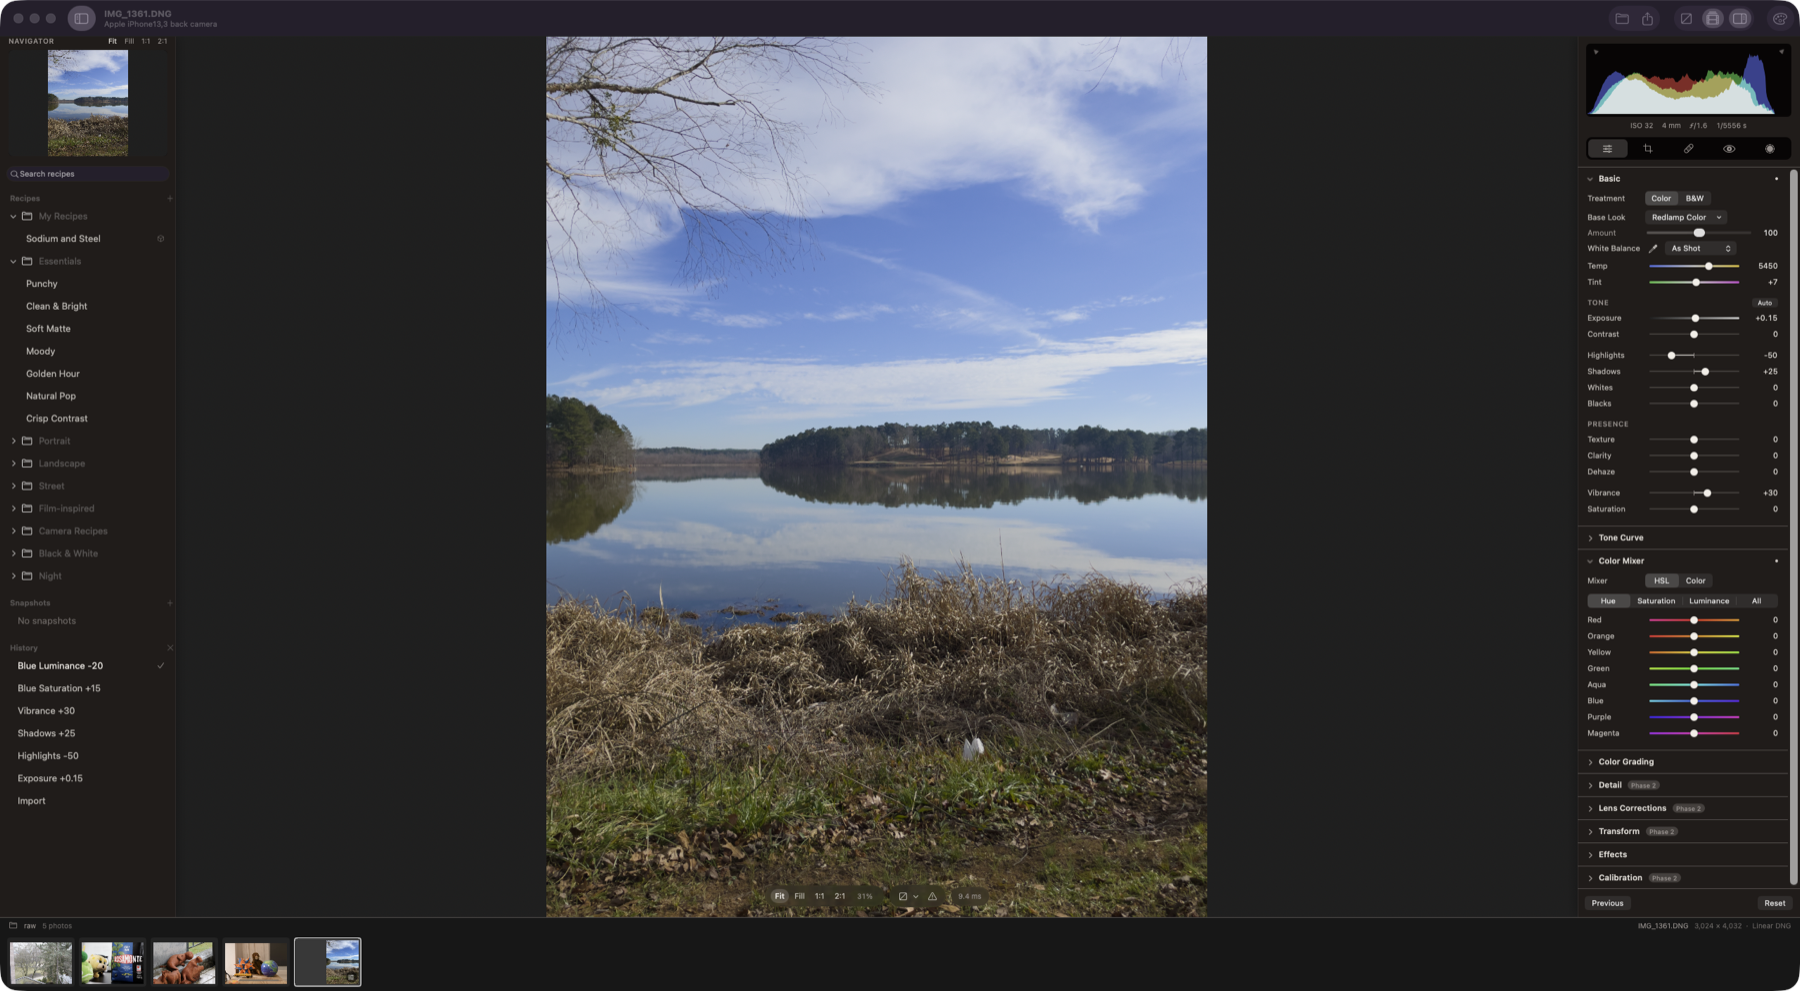
iPhone 12 Pro ProRAW (linear DNG). Portrait orientation, with highlight recovery and blues tuned in the Color Mixer.
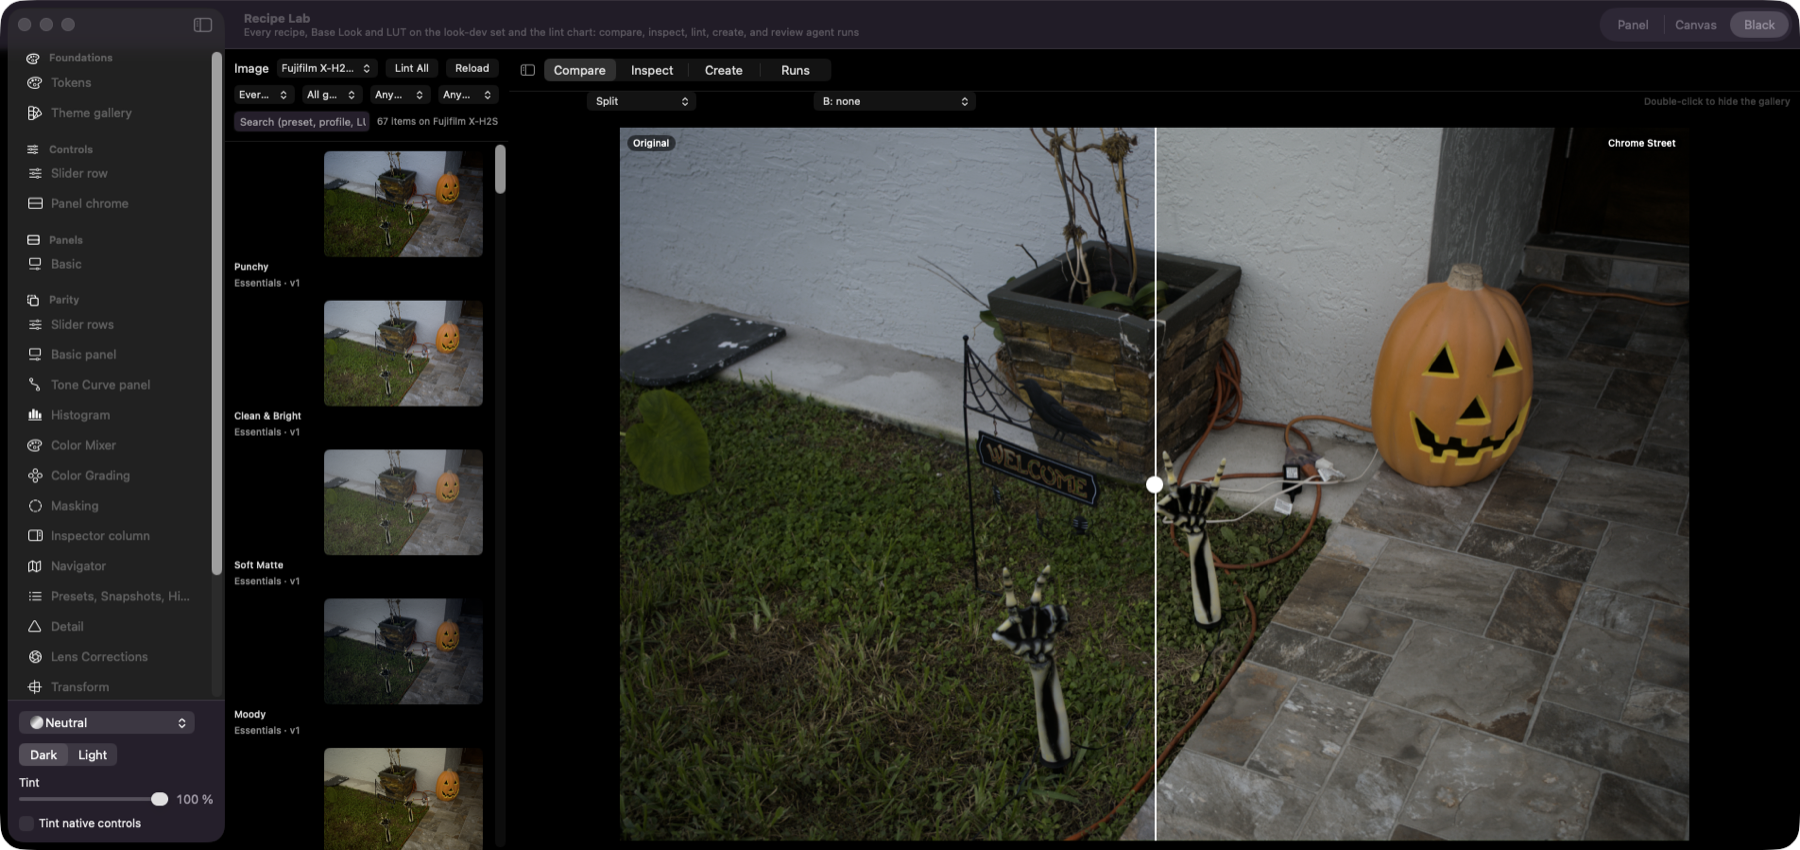
The Lab lives in the component harness. It renders every recipe, Base Look and imported LUT on a 40-image CC0 look-development set.
Gallery and split compare. Thumbnails of every item on the chosen photo, filtered by kind, group, tag and lint result. On the right, the selected recipe (Chrome Street) against the original, with a draggable divider.
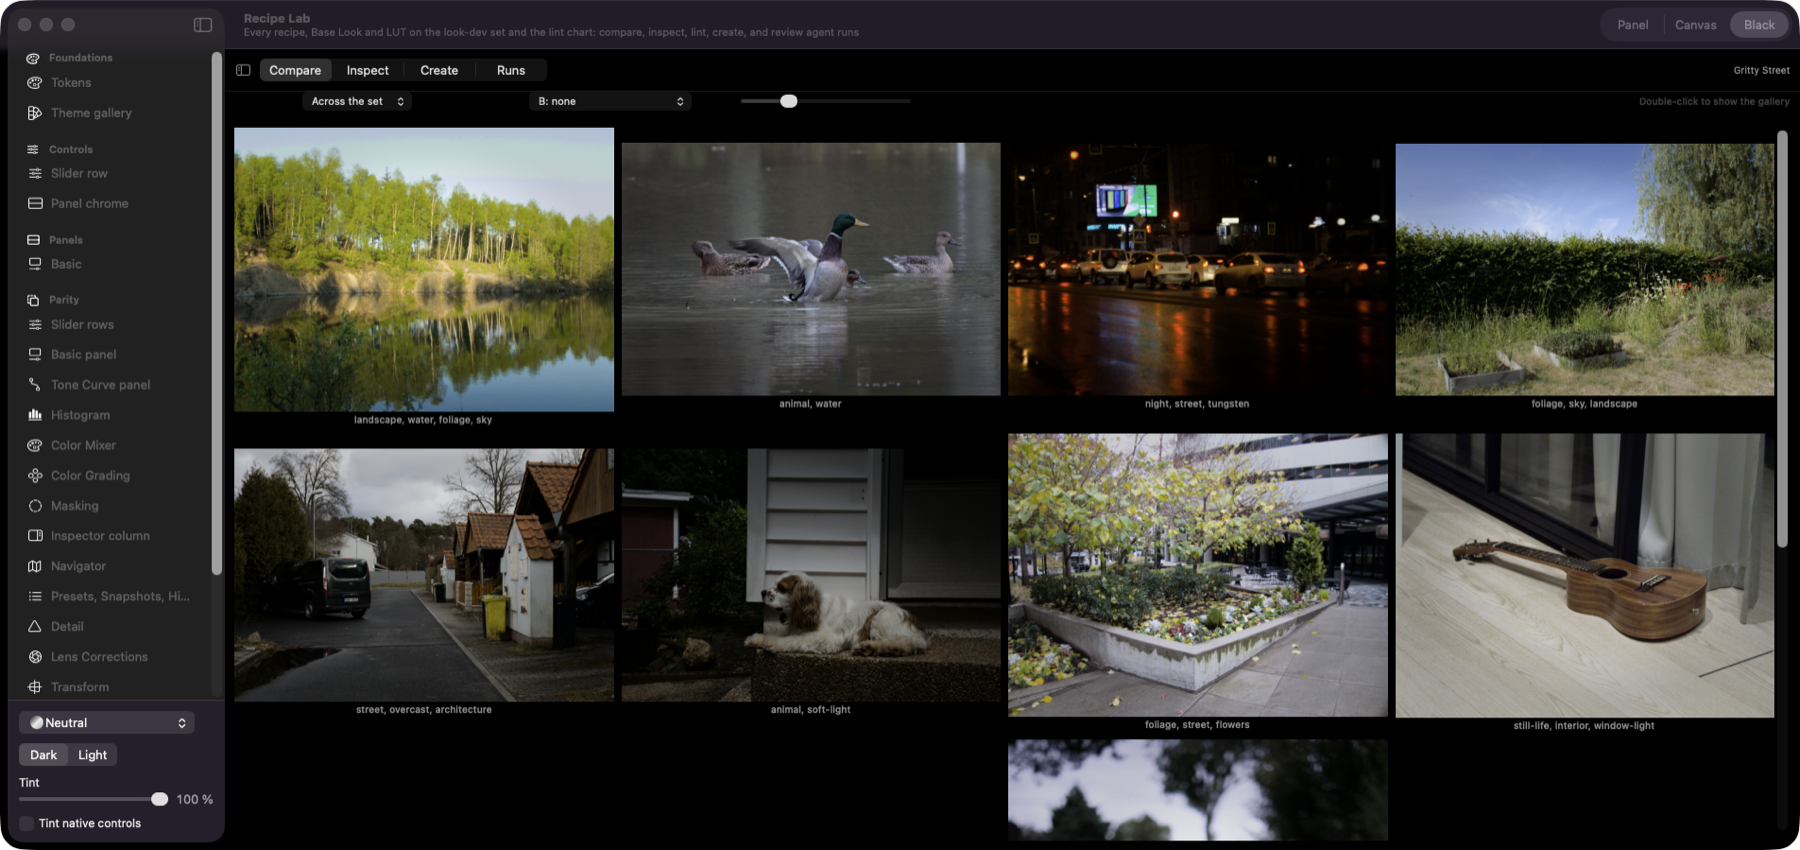
One recipe across the set. Gritty Street on landscapes, animals, night streets, foliage and interiors at once, to catch a look that only works on one kind of photo.
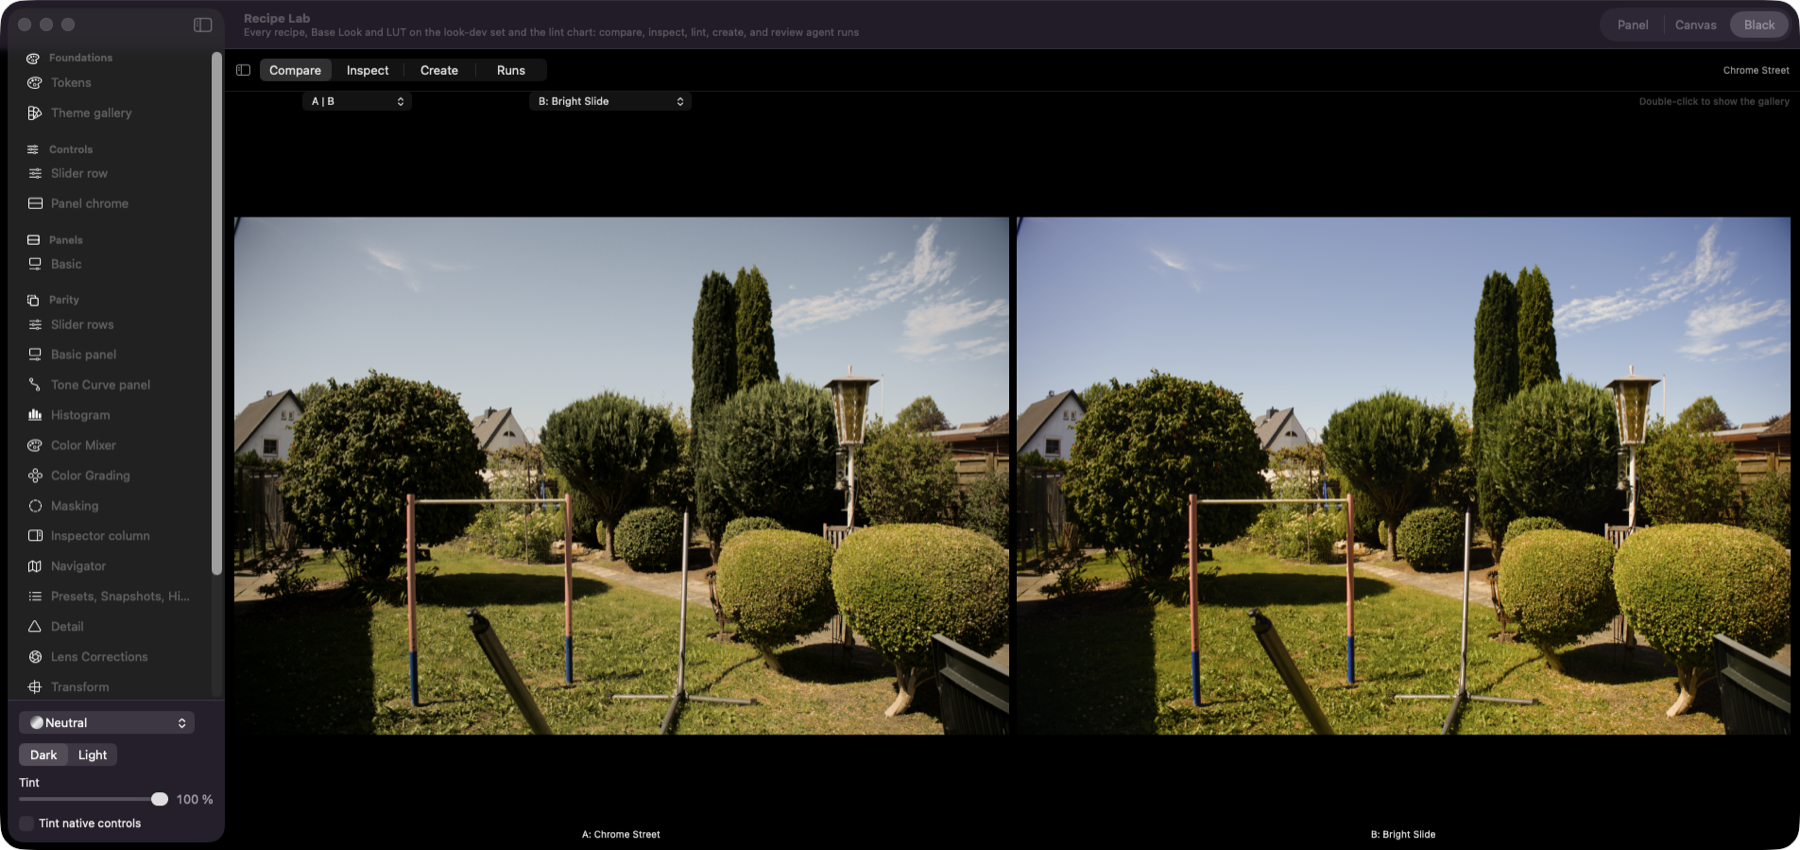
A against B. Two camera recipes, Chrome Street and Bright Slide, on the same photo.
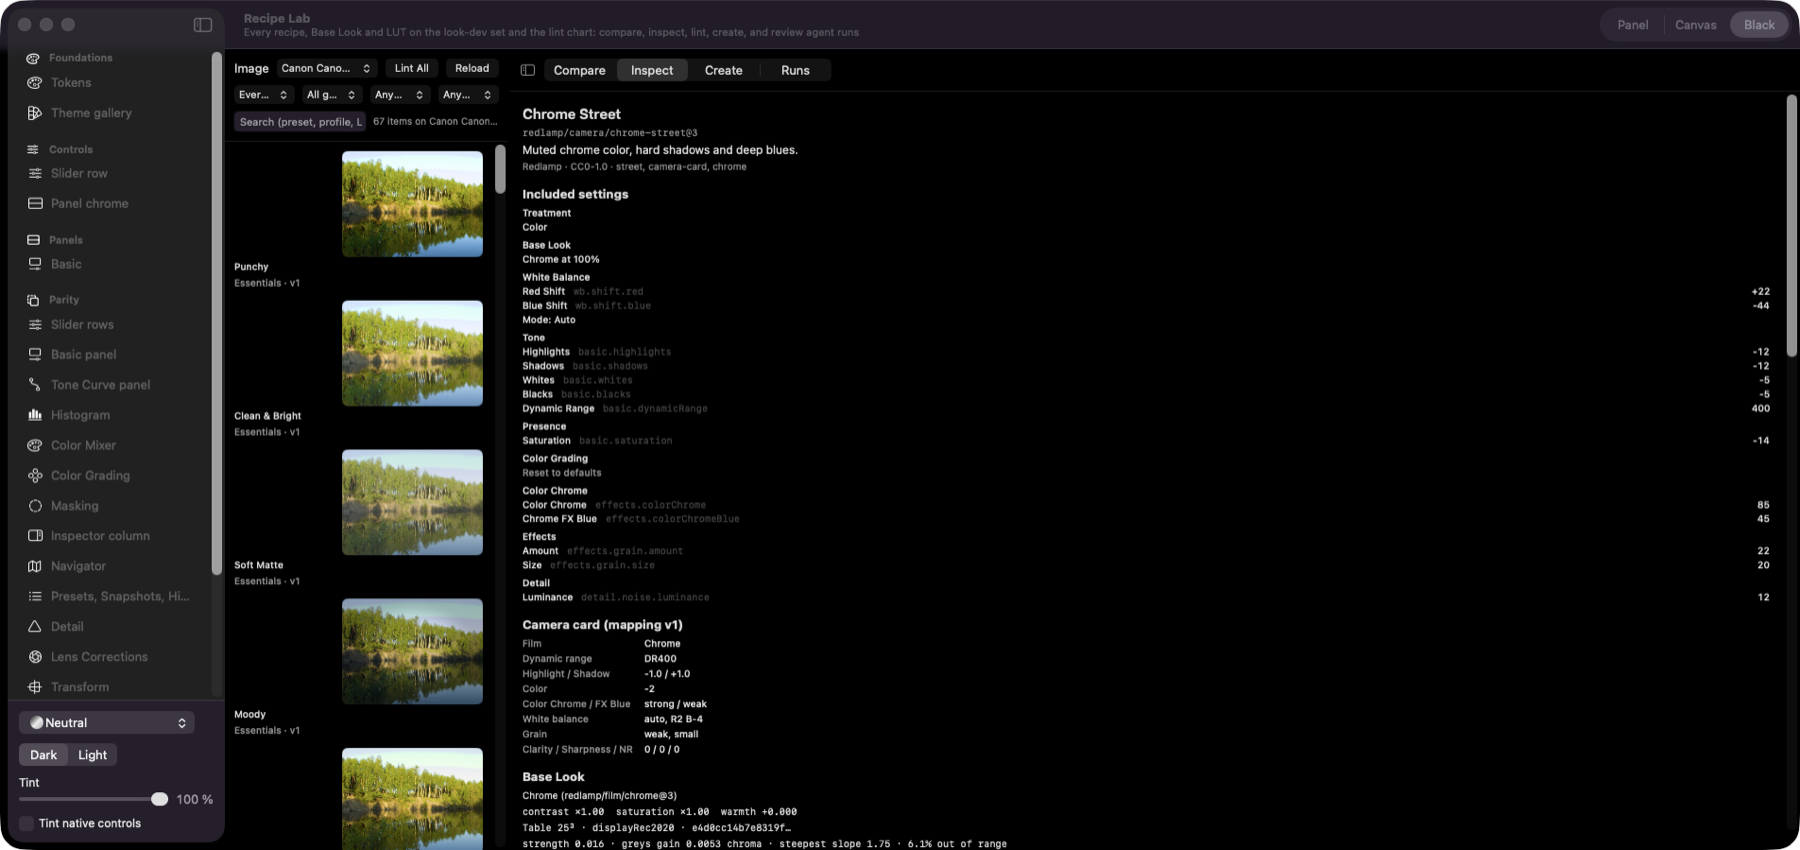
Inspect. Every included setting with its key, the camera card the recipe was built from, and the Base Look's table statistics and lint.
Agent studio runs. A brief with the public-domain references it was drawn from, and the candidates developed against it with their lineage, lint and distance to the references. Each candidate opens in Compare at full size; pairwise picks and final picks are recorded for the critics' evals.
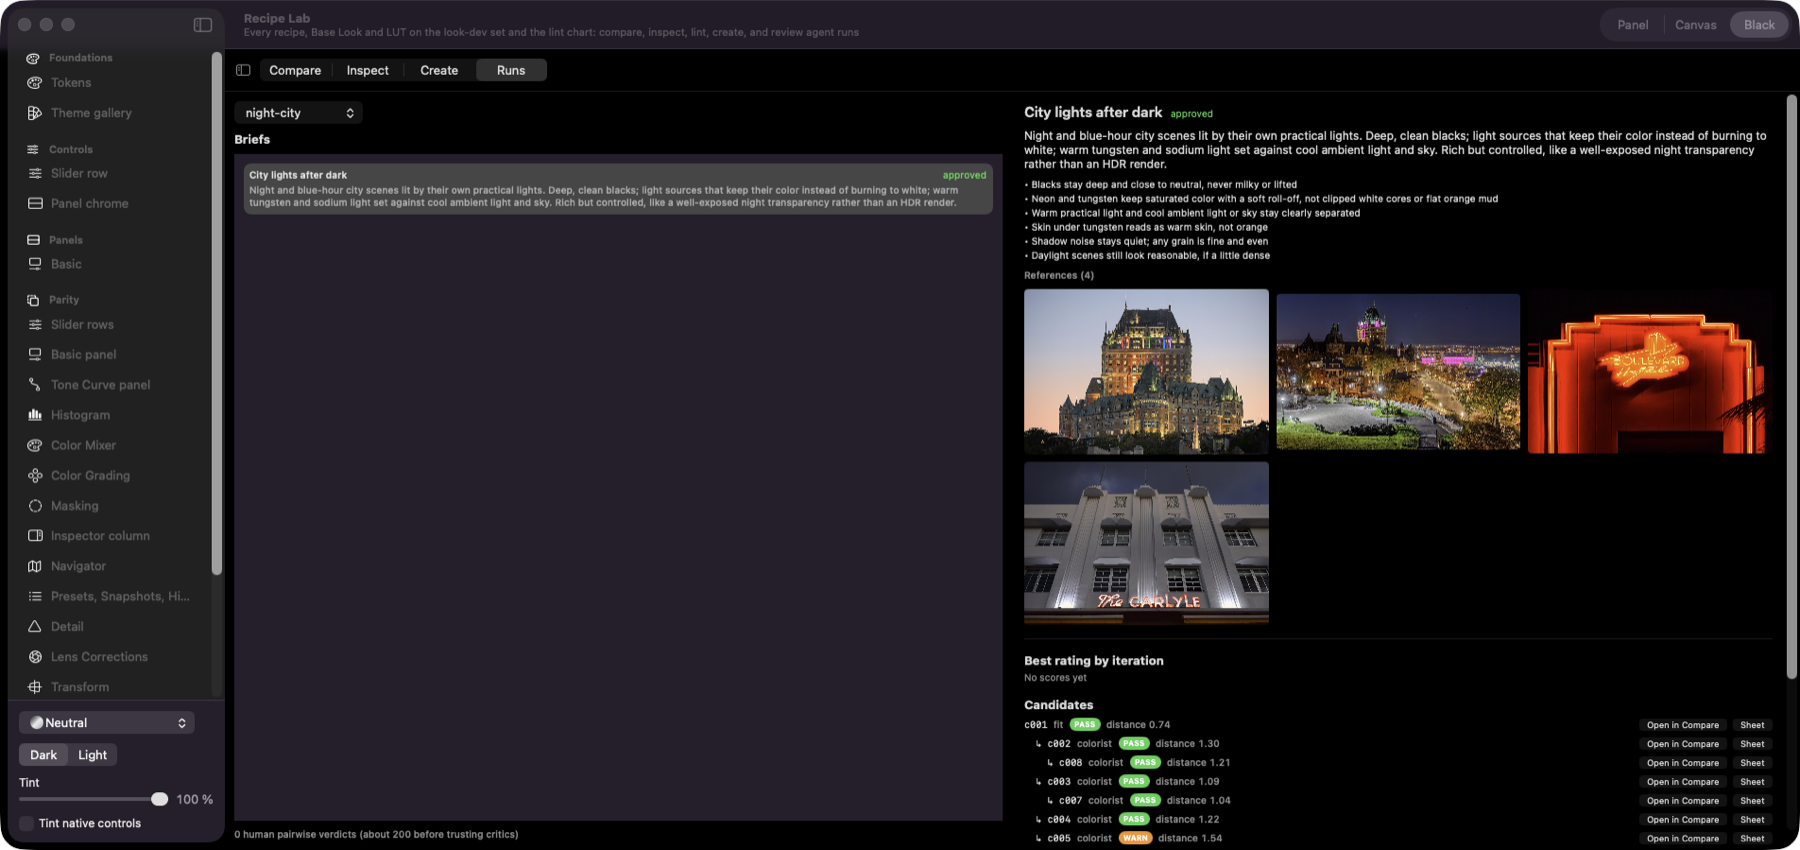
The hero image at the top and the first three screenshots are the author's own photos, captured in the default Neutral theme by scripts/capture-hero.sh. The other sample images are CC0 files from raw.pixls.us; the brief's references are public-domain and CC0 photos from Wikimedia Commons. Those screenshots are generated by mise run screenshots.
The Mac comes first: Phases 1 to 4 build a high-quality editor and engine on macOS, and iPad and iPhone follow in Phase 5, once the main features are complete. The engine stays platform-neutral throughout, so the port is a new shell rather than a rewrite. Where each Lightroom feature stands, done, in progress, planned or left out, is in Redlamp and Lightroom compared, also at redlamp.app/compare; the Lightroom feature inventory is the detailed reference.
Each item names the tracker rows behind it in a comment, and scripts/roadmap-sync.py keeps the boxes in step with them.
.cube, .3dl and HaldCLUT import (with LUTs for S-Log3, LogC3, V-Log and Apple Log footage), 39 bundled recipes, and the Recipe Lab redlamp-profiler: look matching by black-box measurement against cameras' own JPEGs; four measured film looks ship.dcp camera profiles (deferred in October 2026)The AI and computational photography brief covers denoise, AI across the product (upscaling, masks, removal, auto settings), and focus stacking. Its first round of findings gives a verdict for each workstream, a license matrix for every candidate model and dataset, the engine AI architecture, measured Core ML and focus-stacking prototypes (in research/prototypes/), and proposed changes to the phases above.
A study of darktable, the most complete open-source raw developer, covers how it handles cameras, color science, modules and masks, presets and sidecars, lenses, performance and UX, and what Redlamp should adopt, do better or skip in each area. A study of Topaz-style upscaling and sharpening includes a measured bake-off of open models. A study of RapidRAW, an open-source raw editor whose AI runs built in, on a ComfyUI server the photographer runs or on a paid cloud, compares its AI with Redlamp's and leads to fills from a server on the local network, an AI-Free mode and Generative Remove on 8 GB Macs. Every recommendation from these studies is tracked, with its decision, phase and status, in the research intake tracker.
Redlamp runs on Apple Silicon Macs with macOS 26 or later. Download the latest release, a signed and notarized Redlamp.app, install it with Homebrew, or build it yourself from source. Move a downloaded copy to Applications before you open it: a copy opened from Downloads or from the disk image can't update itself.
brew tap pdcgomes/redlamp https://github.com/pdcgomes/redlamp
brew install --cask redlamp
This installs the latest signed and notarized Redlamp.app in /Applications and puts the redlamp command-line tool on your PATH. The tap is this repository, so the explicit URL is needed the first time.
brew upgrade --cask redlamp          # update to the latest release
brew uninstall --cask redlamp        # remove the app and the CLI
brew uninstall --zap --cask redlamp  # also remove your recipes, looks and preferences
Edits live in sidecars next to your photos (see where edits are stored), so no uninstall touches them.
From 0.2.0-prealpha, Redlamp keeps itself up to date with Sparkle, however you installed it. On its second launch it asks whether to check for updates automatically. Redlamp › Check for Updates… checks at any time, and Settings › About turns the automatic checks on or off. Copies of 0.1.0-prealpha and 0.1.1-prealpha can't update themselves, so download the latest release once more or run brew upgrade --cask redlamp. Builds from source never check for updates.
After an update, Redlamp asks redlamp.app for the release's highlights, its What's New, on the first launch of each new version and at most once a day after that. The request sends nothing about you, your Mac or your photos: the whole list comes down, and the app picks what its version has. Settings › About turns this off, and builds from source show What's New only from the Help menu.
You need Xcode 26 or later and mise. Then:
git clone https://github.com/pdcgomes/redlamp.git && cd redlamp
mise install                                   # Tuist, SwiftFormat, SwiftLint at pinned versions
mise run generate                              # builds vendored LibRaw, then generates Redlamp.xcworkspace
CONFIGURATION=Release mise run build           # the app
SCHEME=redlamp CONFIGURATION=Release mise run build   # the CLI
Both land in build/DerivedData/Build/Products/Release/. Copy the app into /Applications, and link the CLI from somewhere on your PATH. The CLI loads the frameworks next to it, so link it rather than copying it:
ditto build/DerivedData/Build/Products/Release/Redlamp.app /Applications/Redlamp.app
mkdir -p ~/.local/bin && ln -sf "$PWD/build/DerivedData/Build/Products/Release/redlamp" ~/.local/bin/redlamp
Builds are signed with the project's development team. To sign with your own, set redlampDevelopmentTeam in Tuist/ProjectDescriptionHelpers/Module.swift to your team ID and run mise run generate again.
This section is for working on Redlamp. To just use it, see Installation.
git clone https://github.com/pdcgomes/redlamp.git && cd redlamp
mise install              # Tuist, SwiftFormat, SwiftLint at pinned versions
mise run generate         # builds vendored LibRaw, then generates Redlamp.xcworkspace
mise run fixtures         # optional: downloads CC0 sample raw files (about 1.4 GB) into tests/fixtures
mise run fixtures-shoots  # optional: about 800 MB more, for the dust evaluation
mise run run -- tests/fixtures/raw    # build and launch, opening a folder
You can also run mise run run on its own and choose File → Open Folder… (⌘O), or drop a folder or files onto the window: folders join the Folders panel. Redlamp remembers them and reopens the last folder, on the photo you were on.
The redlamp CLI uses the same engine API as the app. It is useful for scripting, quick checks, and reproducing renders.
mise run render -- info ~/Pictures/DSC01234.ARW
mise run render -- render ~/Pictures/DSC01234.ARW -o out.jpg --size 2048 \
  --set exposure=0.5 --set shadows=30 --wb auto --base-look vivid
redlamp stack <frames or folder> -o out.jpg [--strategy auto|smooth|detail] [--depth depth.png] merges a focus stack; --save stack.redlampstack writes a stack document instead, which render and the app open like any photo, and --detect <folder> lists the stacks the library would suggest.
redlamp recipe … holds the look-development tools: list, lint, render, contact sheets, .cube, .3dl and HaldCLUT import (--space for camera log LUTs), export, style fingerprints and fitting, golden renders, and rebuilding the bundled looks. redlamp mcp serves the engine and recipe library as an MCP server for agents. See look development and the agent recipe studio.
redlamp camera-bench <raws or folders…> runs the camera bench: it checks how each raw decodes and compares Redlamp's default rendering with the JPEG the camera embedded, choosing up to eight photos per camera mode (--all for every file), and writes the report the app would send (-o) and side-by-side pairs (--pairs). scripts/camera-bench-seed.py runs it over raw.pixls.us, one CC0 file per camera without a verified sample, and scripts/camera-bench.py turns reports into the evidence on the cameras page (the camera bench).
redlamp noise calibrate <frames…> fits a camera's noise profile from calibration frames (pairs of flat frames at several brightnesses per ISO, and bias frames), and redlamp noise check <photos…> shows which noise each photo renders with: its file's, its camera's profile or the measurement. Profiles ship in packages/RedlampServices/Resources/NoiseProfiles.
| Task | What it does |
|---|---|
mise run setup | Once per clone: use the repository's git hooks. The pre-commit hook lints the staged Swift files with SwiftFormat as CI does, and the pre-push hook runs the push gate before anything is pushed to main |
mise run generate (g) | Vendor LibRaw and generate the Xcode workspace |
mise run build (b) | Build the macOS app |
mise run run (r) | Build and launch; pass a folder after -- |
mise run test (t) | Engine purity gate plus all unit and engine tests |
mise run gate | The push gate, which the pre-push hook runs before every push to main and which stops a push that fails. It checks a commit (HEAD by default, or -- <commit>) in a worktree of its own beside the main checkout that holds only what's committed: CI's quick checks, and for a push that changes code, SwiftFormat, a build of everything with its tests, and the reference tests, which compare what the code makes with what the repository records (golden renders, process references, recorded reports, the sidecar schema, scenario coverage), in a few minutes. A push that changes only docs, the site, the video, research notes or tools takes seconds. A commit whose files have passed isn't checked again, so running it before pushing makes the push itself immediate. -- --suite runs the whole test suite instead, and -- --full adds CI's Release builds |
mise run e2e (e) | The end-to-end regression suite: the smoke tier by default, -- --tier full, release, performance or soak (see Regression suite) |
mise run lint (l) | Purity gate, SwiftFormat (lint mode), and SwiftLint |
mise run vendor (v) | Build the vendored C/C++ libraries (pinned version and SHA in config/vendored-libs.json) |
mise run fixtures | Download CC0 sample raw files: the development samples into tests/fixtures/raw, and the camera coverage set (tests/decode/samples.json, checksums verified) into tests/fixtures/cameras |
mise run lookdev | Download the 40-image CC0 look-development set into build/look-dev (checksums verified) |
mise run profile-data | Download the CC0 Fujifilm raw and camera-JPEG pairs the look profiler fits against |
mise run render | Build and run the redlamp CLI |
mise run screenshots | Regenerate the README screenshots of the app and the harness, on temporary copies of the fixtures (needs Screen Recording permission, the fixtures and the look-development set) |
scripts/capture-hero.sh <folder> | Regenerate the hero shots for the README and redlamp.app (docs/images/hero*.png) from a folder of your own photos, in the default Neutral theme, through scripts/capture-promo.sh, whose header describes the folder's promo.txt (needs Screen Recording permission and a Debug build) |
mise run harness (h) | Build and launch the UI component harness |
mise run release | Build origin/main in a clean worktree, with the patch version bumped if it's been released, then sign, notarize and publish it as a GitHub release with its update feed (see Releasing). DRY_RUN=1 pushes nothing and stops after signing, and with it REF=<commit> builds another commit |
mise run notarize -- <path> | Notarize a signed .app, .dmg or .zip, then staple and check it with Gatekeeper |
scripts/test-update.sh [--auto] | Update an old copy of a dry run to the dry run itself through Sparkle, from a feed on 127.0.0.1 (see Releasing) |
scripts/perf-sweep.sh [Debug|Release] [parameter] [script] | Drag a slider for 3 s and report main-thread smoothness, each frame's time from request to frame and the app's CPU, with every panel open by default (select=3,panel=all); REPORT_DIR names where the run's reports go. IDLE=<seconds> then leaves the app alone that long with the photo open and reports its CPU, wakeups and memory; PROFILE=1 adds a main-thread profile; PANELS=swiftui measures the SwiftUI panels |
scripts/perf-card.py [--apply|--check] | Redraw the performance card at the top of this README (docs/images/performance-card*.svg) from docs/performance/history.jsonl; scripts/perf-history.py runs it whenever it adds a record |
scripts/make-folder-fixture.sh <folder> [folders] [per-folder] | Build a tree of photos (500 folders of 100 by default) from APFS clones of one sample raw, using no disk space. Put it in a folder ending in .noindex so Spotlight leaves it alone |
--folders-perf <folder> [--folders-perf-warm N] [--folders-perf-quit] (development builds) | Open a tree of photos in an editor of its own and measure listing, thumbnails, warming, the disk cache, the main thread while the filmstrip scrolls, the cores and memory; writes /tmp/redlamp-perf.txt, or perf.txt in the directory given with --perf-report <directory> |
scripts/harness-capture.sh <scene> <png> [mode] | Screenshot a harness scene; with side mode, swift scripts/parity-diff.swift <png> scores it and scripts/parity-rows.swift compares it row by row |
mise run e2e works the real app through its features the way a person does, by keys, menu items, clicks and drags, and fails if something is missing, not wired up, behaving wrongly, crashing, stalling the main thread or slow. Whether an edit renders correctly stays with the engine and golden tests; the suite checks that the features are there and work (design).
scripts/e2e.py builds a copy of the app with the suite's driver compiled in (packages/RedlampAutomation, in Debug and profiling builds only) under the bundle ID app.redlamp.mac.e2e, gives it a home of its own (CFFIXED_USER_HOME) with clones of the sample raws and of your downloaded models, points Report a Bug and the camera bench at a stub relay on 127.0.0.1, and launches it in the background: it never takes your mouse or keyboard, and checks before and after that your own Redlamp files and preferences are untouched. The driver writes what happens to events-*.jsonl as it goes; the supervisor stops a launch that makes no progress, collects crash reports, retries a failed scenario once in a fresh app (a pass on retry is reported as flaky), and writes report.md and report.json under build/e2e/<commit>-<time>/, with a window snapshot of each failure and the stack of any main-thread stall over 2 seconds.smoke (the default, about 2 to 3 minutes): every photo format opens, every action runs from its key and its menu item, every Develop slider moves and resets, the Export dialog exports, and a relaunch restores the folder, the photo and its edit. full: every scenario pack, with Metal's validation layer on. soak: a seeded random walk (5 minutes, --soak-seconds) over actions, sliders, masks and undo, checked after every step: no error, a consistent history, an edit that survives leaving the photo, and memory that stops growing once caches fill; a failure names its seed and its steps, which --replay <soak-steps.jsonl> walks again. performance: launch, opening, a slider drag, export, the palette and memory, on the optimised test build with validation off, against the budgets in tests/e2e/budgets.json. Budgets are judged only on a quiet Mac (a load average of 8 or below): a busy run waits up to 15 minutes for quiet (--quiet-wait), then asks whether to accept it unjudged (--accept-busy answers yes); --record adds the run to docs/performance/history.jsonl as source e2e. release: full and soak, which the release task runs.--scenario <id> and --step <name> run part of it, --focus lets the scenarios that need a key window (gestures on the canvas) take focus, --app <path> uses a test app built already, and --scenario diagnostics.identifiers lists every identifier on screen for writing scenarios.RedlampAutomationTests (in mise run test and CI) require every action, parameter, panel, left panel, tool, mask kind and Report a Bug feature to be claimed by a scenario, or exempted with a reason in tests/e2e/exemptions.json, so a feature added without a scenario fails its pull request. Steps known to fail are listed with why in tests/e2e/known-issues.json; the report shows them, and says when one starts passing.Releases are built and notarized on a Mac with the team's Developer ID Application certificate in the keychain. Notarization uses the notarytool keychain profile named by REDLAMP_NOTARY_PROFILE in mise.toml. It defaults to driftstation-notarize, since the credentials belong to the team's Apple ID rather than one app. On a Mac without that profile, create one with an app-specific password, and override the name in .mise.local.toml if you pick another:
xcrun notarytool store-credentials driftstation-notarize --apple-id <apple-id> --team-id 3JP75Z3F98
Updates are signed with an EdDSA key that only the release Mac holds, in its login keychain. Installed copies check every update against its public half, SUPublicEDKey in apps/RedlampMac/Project.swift. Create the key once with Sparkle's generate_keys, which mise run generate installs, and keep a backup in your password manager:
Tuist/.build/artifacts/sparkle/Sparkle/bin/generate_keys --account redlamp      # create it, or print its public half
Tuist/.build/artifacts/sparkle/Sparkle/bin/generate_keys --account redlamp -x redlamp-sparkle.key   # export a backup, then delete the file
Import the backup on another Mac with -f. If the key is ever lost, the next release has to carry a new public key, which Sparkle accepts only from an app signed by the same Developer ID team.
Versions follow semver, with the stage as a pre-release suffix until 1.0: 0.1.0-prealpha, then -alpha and -beta. The build number is the count of commits on main, so it only goes up.
To release, push to main and run mise run release. If the version in Version.xcconfig has been released already, the task first bumps its patch number, 0.2.0-prealpha to 0.2.1-prealpha, and pushes that to main as a commit of its own, so pull before you push again. For a minor or major release, set MARKETING_VERSION yourself and push it before you run the task. It always builds origin/main in a clean worktree, so uncommitted or untracked work in your checkout never ships. It builds the app and CLI, puts the CLI in Redlamp.app/Contents/Helpers, and signs everything, Sparkle's helpers included. It then notarizes and staples through mise run notarize, and zips the app without the extended attributes the build gave its files: Finder puts them back when it unpacks a download, and Gatekeeper on macOS 26 then refuses to open the app. scripts/check-release-zip.sh stops the release if the zip holds any, or if plain unzip doesn't unpack it to an app whose signature verifies, with its ticket stapled. Updates and Homebrew take the zip. The site's download is a disk image, Redlamp.app beside a link to /Applications, since Sparkle won't update a copy opened from Downloads or from the image: scripts/release-dmg.sh copies the app into a read-write image, clears its extended attributes there (whatever runs the release tags each file it writes with com.apple.provenance, and an image keeps the tags), and converts it to a compressed image. Its window shows them over a picture, scripts/dmg/background.tiff, which scripts/dmg/background.sh renders from background.html, in a layout Finder made once: scripts/dmg/layout.sh, run in Terminal, has Finder arrange a scratch image's window and keeps its .DS_Store as scripts/dmg/DS_Store, which every image carries. The task signs, notarizes and staples the image, and scripts/check-release-dmg.sh stops the release if it holds anything else or another window, if anything in the app carries an extended attribute, or if a signature or ticket is missing. Both scripts mount the image, which the agent's sandbox refuses; SKIP_DMG="<why>" leaves the image out, and the download button then offers the zip. The task then tags v<version> and publishes Redlamp-<version>.zip and Redlamp-<version>.dmg as the latest GitHub release, with appcast.xml beside them. That's the update feed: installed copies check https://redlamp.app/appcast.xml, which the site redirects to the latest release's appcast.xml, and the release fails if the feed doesn't offer the new build. The update window and the GitHub release show the same notes: the release's highlights from docs/releases/<version>.md when there is one, then the subjects of the commits since the previous release. The Update cask workflow then points Casks/redlamp.rb at the new release, so brew upgrade finds it, and the download button on redlamp.app links to its disk image within the hour.
Before notarizing, the release runs the regression suite on a test build of the same worktree, at E2E_TIER (release by default: the full and soak tiers on the optimised test build, then the performance tier), unless a passing run of that commit is in build/e2e already, as mise run e2e -- --tier release on a clean main leaves one; a quick rehearsal can set E2E_TIER=smoke. It then checks the signed app as a black box: its signature, that it carries none of the driver's code, that a copy of it opens photos, stays up and quits cleanly with no crash report, that its bundled CLI renders, and that Sparkle updates an older copy to it (scripts/test-update.sh --auto). A failure stops the release; SKIP_E2E="<why>" skips both, saying why. A dry run rehearses all of it.
To try a change to releasing or updating before it's on main, REF=HEAD DRY_RUN=1 mise run release builds your latest local commit. scripts/test-update.sh then updates an old copy of that build to it, from a feed on 127.0.0.1 and under a bundle ID of its own: choose Check for Updates… in the copy it opens, or pass --auto to let Sparkle install the update when the app quits.
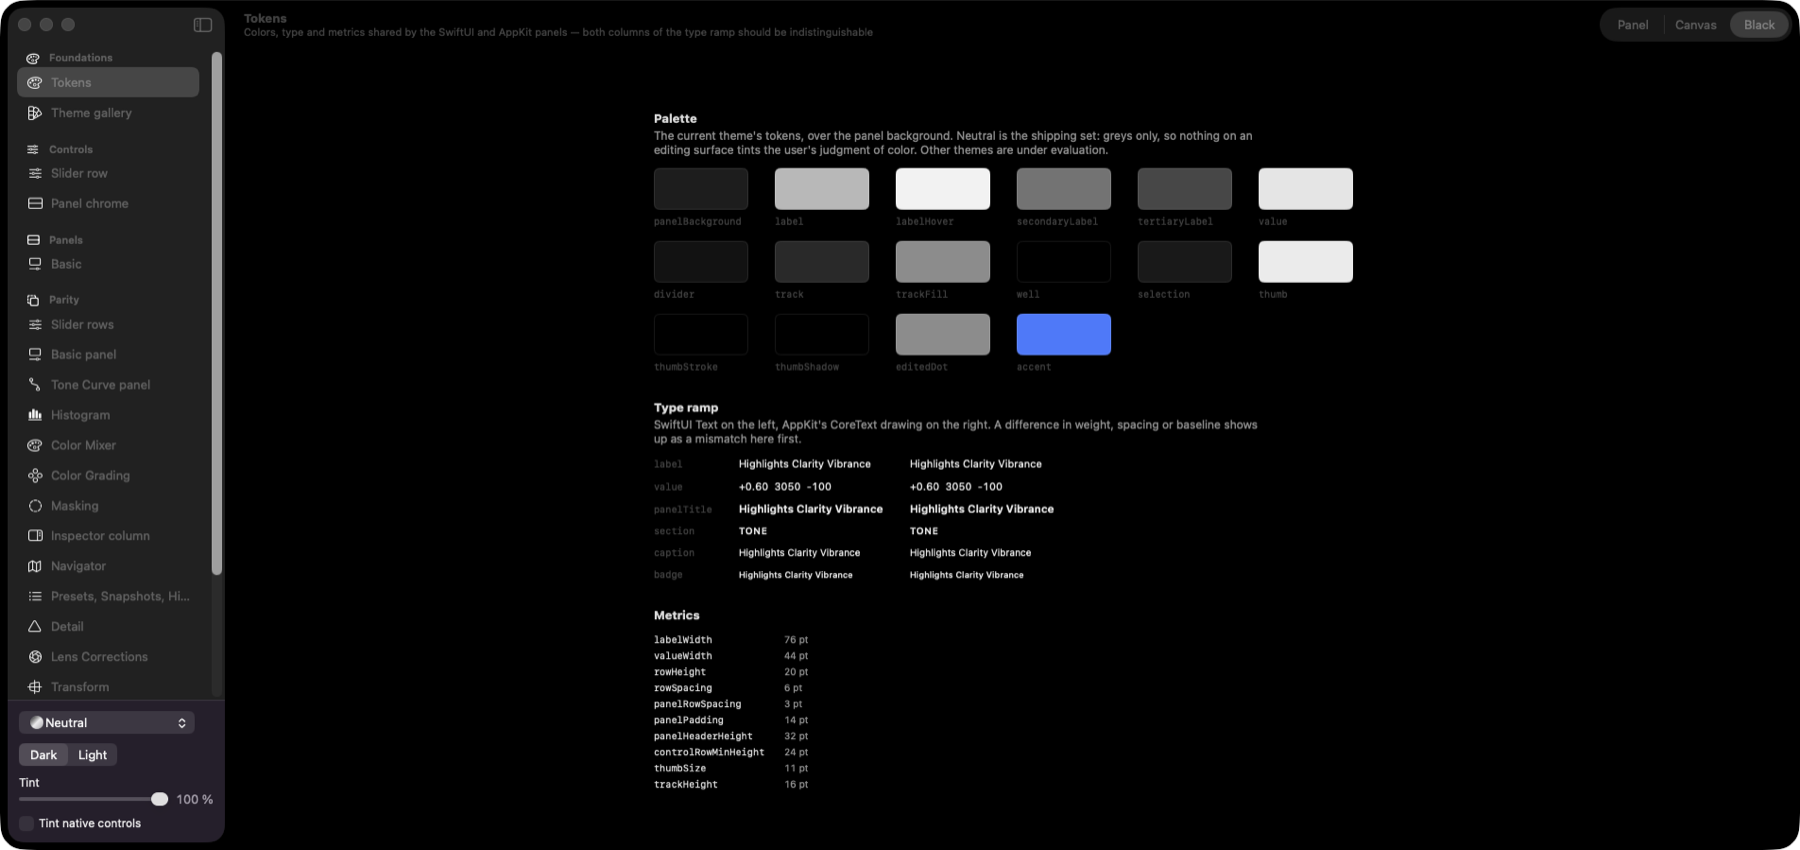
mise run harness opens Redlamp Harness, a development app for building and reviewing Redlamp's UI in isolation, in the spirit of a design-system workbench. It links the real frameworks and hosts the real editor, with a sample photo copied to a temporary folder so reviews never write sidecars. Scenes are listed on the left by section. The stage in the middle can sit on the panel background, the canvas grey or black (top right), and the theme, dark or light appearance and tint are under the scene list, so every scene can be checked in every theme.
| Section | Scenes | What they're for |
|---|---|---|
| Foundations | Tokens, Theme gallery | The palette, the type ramp (SwiftUI and AppKit side by side) and metrics; every theme at once |
| Controls | Slider row, Panel chrome | Each component in every state worth reviewing, with a note on what would be wrong with it |
| Panels | Basic, History, Folders | Panels wired to the live editor. History plays every kind of step, then opens the photo again so an earlier session shows, at the sidebar's normal and narrowest widths. Folders shows the Folders panel and the AppKit filmstrip on a folder of real photos (--folders-root, the fixtures by default) |
| Parity | Slider rows, Basic, Tone Curve, Histogram, Color Mixer, Color Grading, Detail, Effects, Lens Corrections, Transform, Calibration, Masking, Inspector column, Navigator, the sidebar lists | A SwiftUI original and its AppKit port at the same width: side by side, as a difference blend (identical pixels are black), as an onion skin, or flickering. The inspector has knobs for drawing constants and a Copy values button |
| Performance | Basic panel drag | Drags a slider at 120 events a second through each implementation and reports how busy the main thread got |
| Recipes | Recipe Lab | Every recipe, Base Look and imported LUT on the look-development set and a lint chart (see below) |
| Command Palette | Live, States | Live: the palette over the sample photo on the real editor, with its state, a log of every key and what it did, a checklist that ticks each interaction as it's tried, conditions (photo, clipboard, Masking tool, transparency, its own theme, tip), timing knobs and a Play walkthrough. States: every state as a still specimen |
| Export | Live, States | Live: the real Export dialog on the harness window, exporting the sample photo to a temporary folder, and Export with Previous. States: the dialog for each format, size mode and problem |
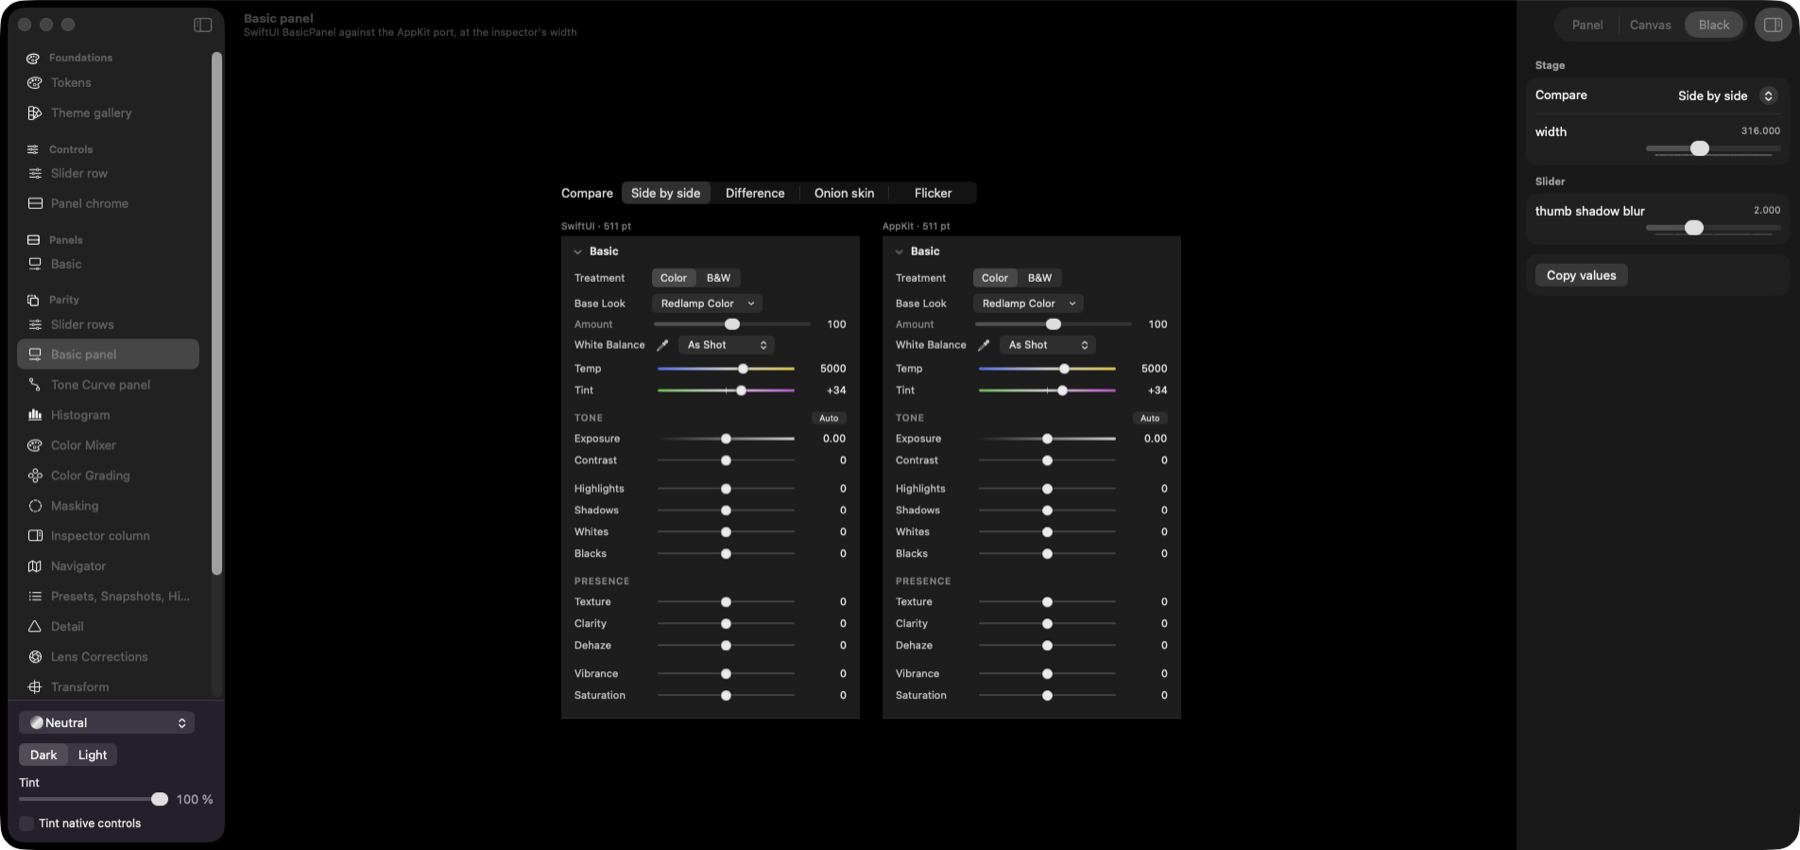
Against their SwiftUI originals, the AppKit ports score a mean difference of 0.05 (Tone Curve) to 0.12 (Basic) grey levels, with at least 99.97% of pixels within 24 levels; the rest is anti-aliasing on the slider thumbs.
The Recipe Lab (screenshots above) has four tabs:
.cube, .3dl or HaldCLUT (a camera log LUT too, with its input space chosen on import), saved to My Recipes.Launch options, for reviews and scripted screenshots: --scene <id>, --background panel|canvas|black, --parity-mode, --theme <id>, --appearance dark|light, --tint <0…1>, --stage-only (no sidebar or inspector), --window <width>x<height> (in points, on a Retina screen when one is connected), --history-height <points> for the History scene's lists, --folders-root <path> for the Folders scene, and for the Lab --lab-tab, --lab-select <recipe id>, --lab-compare <recipe id>, --lab-mode split|beforeAfter|sideBySide|flicker|acrossSet, --lab-image <camera>, --lab-run <run> and --lab-hide-gallery. --probe measures SwiftUI and AppKit elements one by one and writes the sizes to /tmp/redlamp-probe.txt. scripts/harness-capture.sh <scene> <png> [mode] [options…] screenshots a scene; scripts/theme-sweep.sh captures scenes in every theme.
To add a component, write a scene in apps/RedlampHarness/Sources/Scenes/ and register it in BuiltInScenes.swift.
tests/decode/cameras.json), which checks layout, crop, black and white levels, white balance, color matrix, orientation and the sensor data on every test run, and compares its colours at the default edit with a recorded reference. 26 cameras are verified: medium format from Hasselblad (the X2D 100C in 3FR and FFF, the X1D II 50C) and Phase One (the IQ4 150MP), and one or more bodies from Fujifilm (the GFX100 II among them), Canon, Nikon, Sony, Panasonic, OM System, Pentax, Ricoh, Leica, Sigma, Samsung, DJI, Apple and Google, listed with their samples in tests/decode/samples.json (mise run fixtures downloads them). Cameras (also at redlamp.app/cameras) lists every camera LibRaw reads and which ones Redlamp's tests verify; scripts/camera-list.py --apply regenerates it when a sample is added or LibRaw is updated.Redlamp follows Lightroom Classic's Develop-module shortcuts. Press ⌘/ in the app for the complete, always-current list (generated from the same registry the app uses). Shortcuts for tools that arrive later are already reserved and shown dimmed, with the phase they arrive in.
| Area | Keys |
|---|---|
| View | \ before/after · Z or Space toggle Fit/100% · scroll or pinch to zoom, in every tool · hold Space and drag to move the photo in a tool · ⌘= / ⌘- zoom in/out · J clipping · ⌥J sensor clipping · ⇧L colour-assessment view · I cycle info overlay · L cycle Lights Out · F full-screen preview · T / F5 toolbar · Y, ⌥Y, ⇧Y side-by-side before/after (Phase 2) |
| Panels | Tab hide side panels · ⇧Tab hide all · F6 filmstrip · F7 left panel · F8 right panel · ⌘1–⌘9 open or close Basic, Tone Curve, Color Mixer, Color Grading, Detail, Lens Corrections, Transform, Effects, Calibration |
| Navigation | ← → or ⌘← ⌘→ previous/next photo |
| Develop | , . select previous/next setting · - = decrease/increase it (⇧ for larger steps) · V black & white · W white-balance selector · ⌘U auto settings · ⇧⌘U auto white balance · ⇧⌘C / ⇧⌘V copy/paste settings · ⌥⌘V paste from previous · ⇧⌘R reset all · ⌘N new snapshot · ⌘Z / ⇧⌘Z undo/redo · hold ⌥ to turn group titles into "Reset …" |
| Tools | D Edit · ⇧W Masking · M linear gradient · ⇧M radial gradient · K brush · ⇧J color range · ⇧Q luminance range · ⇧Z depth range · R crop, A crop aspect lock, ⌘[ / ⌘] rotate left and right · Q healing, [ ] or ⌘-scroll size its brush (⇧ feather), ⌫ deletes the selected spot |
| Masking | O show/hide overlay · ⇧O cycle overlay color · H show/hide pins · ⌫ delete selected mask · Esc finish drawing or leave the tool · brushing: [ ] or ⌘-scroll size (⇧ feather), hold ⌥ to erase · Objects: drag a box or brush (the panel chooses), ⌥-click or ⌥-brush to take away |
| Rating & flags | 0–5 star rating · [ ] decrease/increase rating · P pick · X reject · U unflag · 6–9 red, yellow, green, blue label · add ⇧ to any of these to also move to the next photo |
| File | ⌘O open folder · ⇧⌘E export · ⌥⇧⌘E export with previous · ⌘/ keyboard shortcuts · ⇧⌘L Film Looks window · ⌘K command palette (⌘F for sliders only) |
Ratings, flags and color labels are saved in the photo's sidecar and shown on the filmstrip.
Slider gestures:
Edits are saved next to the photo, in IMG_1234.ARW.redlamp. It is a package (Finder shows it as one file): edit.json holds the edit recipe and any snapshots, and masks/ holds the bitmaps of AI masks as 8-bit PNGs named by their SHA-256, which the JSON refers to. Brush strokes and range masks are part of the JSON. Only values that differ from the defaults are stored, so sidecars stay small. history/ holds one file per editing session: its first step's edit, then each later step as a JSON Patch from the one before, so a slider step stores one value. Resetting a photo completely deletes its sidecar, unless it still holds history. Filmstrip thumbnails are cached apart from the photos, in ~/Library/Caches/app.redlamp/Thumbnails, one file per folder. The sidecar format is published, with a JSON Schema (format).
Sidecars carry two version numbers:
Settings a newer Redlamp wrote, but this version doesn't know, are kept and written back unchanged, at every level of the edit. A sidecar that a save would change in any other way opens read-only, as does one written with a newer format or process version and one that can't be read; none of them is ever overwritten or deleted, and the photo says why it can't be edited. One that can't be read for now, such as an iCloud file not yet downloaded, is read again until it can be, and nothing else that writes edits (a rating, Sync or Paste) writes over it meanwhile. A damaged one, whose edit file is cut short or isn't JSON, can be started over: the damaged file stays in the sidecar, renamed, and the photo opens with a new edit. Conflicting iCloud copies are merged only when every one of them can be. Sidecars are only rewritten when their content changes. Saves are written one at a time, in order, at most 2 seconds after an edit (or when a drag pauses); quitting saves first. If a save fails, the photo says so, with Retry, and Redlamp keeps trying; a failed edit is kept and retried when the photo is opened again, and quitting with edits that still can't be saved asks first. When another app or Mac saved the open photo's sidecar meanwhile, Redlamp merges the two edits, keeping each side's changes, and keeps the other edit as a snapshot where both changed the same setting. An interrupted save or delete leaves nothing half-written behind. An export, from the app or the redlamp CLI, never replaces a photo: not its source, not a raw file, and not an image Redlamp didn't export. Format 2 renamed profile to baseLook; format-1 sidecars still read. Format 3 added brush, range and AI mask components and made sidecars packages; a single-file sidecar is read as it is and becomes a package on its next save.
Recipes are single .redrecipe JSON files (format). Yours are in ~/Library/Application Support/Redlamp/Recipes/, installed ones in Recipes/Installed/, and every Base Look ever installed in Looks/, by content. Applying a recipe writes its resolved values into the photo's edit, and a look table is pinned by its SHA-256, so deleting or updating a recipe never changes a photo already edited with it. If a pinned look is missing, the photo shows without it and says so. Recipe files are data, never code, and every value is checked when a file is read.
The rendering engine and the UI are completely separate. The UI talks to the engine only through RedlampEngineAPI, a small, message-based, value-type API. Rendered frames come back as IOSurfaces, so pixels are never copied across the boundary.
flowchart LR
    subgraph ui [UI - macOS; iPad and iPhone in Phase 5]
        Views["AppKit panels + RedlampDesign"] --> Model["EditorModel"]
        Canvas["Metal canvas"]
    end
    subgraph api [RedlampEngineAPI - value types only]
        Req["RenderRequest / EditRecipe"]
        Frame["RenderedFrame: IOSurface + histogram"]
    end
    subgraph engine [Engine - platform-neutral, no UI imports]
        Sched["Latest-wins render loop"] --> Kernels["Fused Metal develop kernel"]
        Pyramid["Demosaiced mip pyramid"] --> Kernels
        Pyramid --> Detail["Detail stage: denoise, sharpen, local contrast (cached)"] --> Kernels
        Decode["LibRaw / ImageIO decode"] --> Pyramid
    end
    Model --> Req --> Sched
    Kernels --> Frame --> Canvas
The pipeline:
Packages (packages/; Tuist/ProjectDescriptionHelpers/Module.swift is the single source of truth for which package may depend on which):
| Package | Role |
|---|---|
RedlampEngineAPI | Public contract: EditRecipe, parameter schema, render requests and frames, EditingEngine |
RedlampKernels | Metal shaders (demosaic, develop, histogram) and their parameter layouts |
RedlampColor | Color spaces, color-temperature math (Robertson), camera color model, OKLab |
RedlampServices | Decoding (LibRaw, ImageIO) and thumbnails |
RedlampDocument | Sidecars, snapshots, library scanning, export writers |
RedlampRecipes | Recipes and Base Looks: the .redrecipe format and validator, the library and look store, camera recipe cards, .cube, .3dl and HaldCLUT import with camera log input spaces, lint, style fingerprints and the fitter, and the agent studio's run format. Platform-neutral and UI-free, so the apps, the CLI and a future companion app share it |
RedlampEngine | Sessions, the GPU pyramid, render loop, analysis (auto WB, auto tone, eyedropper) |
RedlampCanvas | Metal canvas that samples frame IOSurfaces directly, presented from its own display-link thread; zoom and pan |
RedlampDesign | Design tokens (colors, type, metrics) for SwiftUI and AppKit, and the AppKit panel components: slider rows, panel sections, control rows |
RedlampUI | Develop panels, sidebar, filmstrip, EditorModel |
Apps (apps/): RedlampMac, the macOS app and composition root; RedlampCLI, the headless redlamp tool; and RedlampHarness, the UI component harness (see Component harness).
The panels are AppKit, drawn to match SwiftUI pixel for pixel. SwiftUI re-walks its whole view tree on every change, however small, so dragging one slider in a window full of panels kept the main thread busy. The Develop panels are built from RedlampDesign's AppKit components instead: each control observes only the values it shows (a small Tracker over Swift Observation) and redraws only itself. Native controls such as menus and segmented pickers stay SwiftUI, each hosted on its own. The SwiftUI originals are kept as the reference the ports are checked against (--swiftui-panels runs the app with them).
Engineering principles:
scripts/check-engine-purity.sh fails the build if an engine package imports a UI framework, or if a UI package imports engine internals.RedlampEngineAPI, and both the engine and the UI read them.Report a Bug or Send Feedback (the toolbar's Feedback button, or Help › Report a Bug or Send Feedback…) files an issue in Redlamp's GitHub issues, which are public. It goes through redlamp.app, which files it as the Redlamp Feedback bot, so you don't need a GitHub account. The first time, a short note asks you to keep reports friendly; Preview the Report shows exactly what will be posted.
You choose the area (Develop › Noise Reduction, Masking › Objects, Export › Formats and Quality, and so on through every part of the app; the list is in docs/feedback/areas.json), and the sheet suggests the one you were using. Each of these goes with your words unless you turn it off: the Redlamp version and the Mac (model, chip, memory, GPU, displays, macOS); the open photo's format, camera, lens, exposure, size and the kind of disk it's on; its edit (the settings you changed, masks and how they were made, the recipe) and this session's history; what you did in the last 15 minutes (photos opened, tools, panels, actions, edits, messages, exports, slow renders); and Redlamp's own log. A diagnostics.json beside the issue holds the same in full, with the edit in the sidecar format, so it can be tried on another photo from the same camera.
Paths, folder names, location and serial numbers are never included, and neither is the photo: photos are named Photo A, Photo B unless you choose to include file names, and a screenshot of Redlamp's window is sent only if you tick it. Images you add lose their metadata first. Screenshots and diagnostics.json are stored in the public redlamp-feedback repository. To show a video, add it to the issue on GitHub once it's sent.
Help › Your Reports lists the reports sent from this Mac (kept in ~/Library/Application Support/Redlamp/Feedback), each opening on GitHub, where anyone can read it and its replies. Once you've sent one, Redlamp asks redlamp.app every few hours how your reports are doing, and the Feedback button counts replies and changes; turn this off in Your Reports. A report that can't be sent waits there and goes when redlamp.app can be reached, or can be saved as files or filed on GitHub's own page instead. Debug builds send dry runs (see web/README.md to try the relay locally).
Redlamp is at an early stage and moving quickly. Issues and discussion are very welcome: Report a Bug or Send Feedback in the app files an issue for you, with the details that help. To ask a question or follow along, join the Redlamp Discord.
DemosaicXTrans.metal, XTransDemosaic.swift), are CDDL-1.0 too (LICENSES/CDDL-1.0.txt). MLX Swift (MIT) and Swift Numerics (Apache-2.0) run generative fill's models on the Mac. Planned additions are lcms2 (MIT) and the lensfun database (CC-BY-SA, data only).mise run setup once, so commits are linted and pushes to main are tested, and mise run lint and mise run test before sending changes.RedlampEngineAPI/Sources/ParameterSpec.swift.mise run fixtures downloads CC0 samples. Please don't commit RAW files.Redlamp is free, with no subscription and no cloud. If you'd like to support its development, you can do so on Ko-fi.
Redlamp is licensed under the Mozilla Public License 2.0; see LICENSE.
Redlamp builds on the work of others:
Redlamp is not affiliated with Adobe. Lightroom is a trademark of Adobe Inc. and is referenced only to describe familiar workflows.
1,442 followers · starred Oct 2026
69 followers · starred Oct 2026
76 followers · starred Oct 2026
A native, open-source RAW photo editor for Mac, iPad and iPhone that feels immediately familiar to Lightroom users.
See the code
A native, open-source RAW photo editor for Mac, iPad, and iPhone that anyone who knows Lightroom will find familiar.
Redlamp is built from scratch in Swift and Metal for Apple Silicon. It focuses on one thing, developing photos, and aims to do it faster and more natively than anything else on the platform.
Watch the film: Introducing Redlamp (1:42, on YouTube)
Status: pre-alpha, iteration 2 (macOS). The core RAW pipeline and the Develop workspace work today: Basic (with Texture, Clarity and Dehaze), Tone Curve, Color Mixer, Color Grading, Detail (noise reduction and sharpening), Effects, lens corrections, crop and Upright, masking (gradients, brush, color and luminance range, Subject, Sky, Background, People and its parts, Objects, Landscape and Depth Range) with local adjustments, healing and removal (Heal, Clone, Remove, content-aware or generative, and Remove Dust), focus stacking, and Recipes, Redlamp's presets, profiles and LUTs in one, with film looks measured from cameras' own renderings and film simulations of 36 film looks from 30 stocks, built from the manufacturers' datasheets. AI Denoise and the rest of Develop parity are next, then 1.0 and the iPad and iPhone apps. See Where we are, the Roadmap, and how Redlamp compares with Lightroom.
This README is the project's primary status page and is kept up to date as work lands. Last updated: 4 October 2026.
A red lamp is the darkroom safelight: the one light you can work by without fogging the paper. That is the idea behind the project: you can see and shape your photo freely, and the original is never harmed.
Lightroom defined how millions of photographers edit, but it is a cross-platform application that doesn't feel at home on a Mac, iPad, or iPhone, and it is tied to a subscription and a cloud. Redlamp keeps the workflow photographers already know, including the panel layout, slider names and ranges, and keyboard shortcuts, and rebuilds everything underneath as a native, GPU-first, open-source application.
Redlamp is an editor, not a catalog. It keeps a working set of folders, as Lightroom Classic's Folders panel does, and stores edits in small sidecar files next to the photos. Library management is a separate, later track.
RAW pipeline (our own, GPU-first)
Develop adjustments that render
Masking (Lightroom's model)
K): A and B brushes and Erase (hold Option), with Size, Feather, Flow, Density and Auto Mask, and pen pressure. Strokes are kept as vectors in the edit and painted on the GPU in mask space (up to 4096 px), redrawing only the stroke being painted. [ and ] or ⌘-scroll change the size, with Shift the feather; the brush's ring shows its size as it changes, also from the panel's sliders, and Space-drag moves the photo while you paint. In every tool the wheel and pinch zoom.⇧Q) and Color Range (⇧J): sample with the eyedropper, then shape the range with four handles (Show Luminance Map) or Refine up to five color samples. They select on the photo with its global edit, so the selection follows white balance and exposure.O) in Lightroom's modes (Color Overlay, on B&W, Image on Black or White, B&W, Image on B&W), colors and opacity, and a mask list where you can show and hide, rename, duplicate, "duplicate and invert", reset, delete, and drag to reorder masks and their components.Focus stacking (a separate Stack workspace)
.redlampstack document beside the frames; the merged pixels are cached and rebuilt when needed.redlamp stack does the same from the command line.Workspace
.redrecipe, .cube, .3dl and HaldCLUT files (LUTs made for camera log footage too, with their input space chosen on import, in the panel and the Recipe Lab). Lightroom develop presets (.xmp) import too, one, several or a folder at a time, by the menu or by dropping them on the panel, with a report of what came across exactly, approximately or not at all (what maps). Snapshots are also available.⌥J) marks the photosites the camera clipped, in the colour of each clipped channel (black where all three did), whatever the edit has done since; the colour-assessment view (⇧L) puts the photo on middle grey inside a white frame (ISO 12646). Before/After (\) in three layouts, full frame, side by side and a diagonal split, cycled with Y and ⇧Y; the original is rendered once and cached, so edits don't re-render it.x+0.3. A run of presses is one history step.exposure 0.7 or temp 5600k, sets it straight from the search.x+10.I), Lights Out (L), full-screen preview (F), and Paste from Previous (⌥⌘V and the Previous button).⇧⌘C) opens a checklist of every setting and mask, remembered for next time; Paste (⇧⌘V) applies what was ticked, and recomputes the pasted AI masks for the photo. ⌘- and ⇧-click select several photos in the filmstrip: Sync… (⇧⌘S) and Paste reach all of them in the background, with Undo, and Auto Sync (⌥⇧⌘A) repeats every change. Right-click a photo in the filmstrip to copy its settings or paste onto it without opening it; on a selected photo, the menu has the same Copy, Paste and Sync items.IMG_1234.ARW.redlamp).⇧⌘E): JPEG, HEIC and AVIF (lossy, with quality and an optional file size limit) or PNG and TIFF (lossless, with TIFF compression), 8, 10 or 16 bits, sRGB or Display P3. Resize by long edge, short edge, width and height, megapixels or percentage, keep all metadata, all but the location, or none (the first two also embed the edit recipe in the file's XMP, format), and choose the folder and file name. Built-in and saved presets, and Export with Previous (⌥⇧⌘E) repeats the last export without the dialog.redlamp camera-bench runs the same checks from the command line.redlamp command-line tool for rendering and export. Exports smaller than the photo are developed at full resolution and downscaled last, so sharpening, noise reduction and texture look the same at every size. One .redrecipe format for presets, profiles and LUTs: an explicit list of setting groups, an optional Base Look pinned by content hash, immutable versions, and namespaced ids ready for sharing (format, JSON Schema).
Camera recipe cards: Fujifilm-style recipes (film simulation, dynamic range, highlight and shadow tone, color, Color Chrome, white balance shift, grain) are a recipe dialect you can type in as the card lists them (mapping).
Measured film looks. The profiler fits a look to cameras' own JPEGs of the same raw files: Fujifilm raws carry the camera's rendering inside. On photos the fit never saw:
| Base Look | Like | Measured from | ΔE to the camera (lower is closer) |
|---|---|---|---|
| Standard v3 | Provia | 120 photos, 50 bodies | 3.26 (Redlamp Color: 5.38) |
| Vivid Slide v2 | Velvia | 10 bodies | 3.39 (4.45) |
| Chrome v3 | Classic Chrome | 18 photos, 5 bodies | 4.61 (5.72) |
| Soft Slide v2 | Astia | 5 photos, 3 bodies, provisional | 4.57 (12.84) |
The others are hand-designed until there's data for them (look development). Looks keep Redlamp's own names.
Film simulations: 36 looks from 30 stocks, built physically from the manufacturers' datasheets, including pushed, overexposed, bleach-bypass and cross-processed variants, with halation, bloom and film grain, a Film Looks window and film icons in the Base Look menu (details).
Look-development tools: lint (neutral axis, skin hue, monotonic lightness, banding, clipping) on a synthetic chart, golden renders per recipe version, style fingerprints and a fitter, and the Recipe Lab in the component harness.
An agent recipe studio (docs): curator, colorist and critic agents work through redlamp mcp on briefs drawn from public-domain references. People approve the briefs and pick the winners in the Recipe Lab, and the critics are only trusted after they agree with human picks on held-out pairs.
Q): click the photo to add a spot. Remove fills it from the photo around it, patch by patch, continuing edges that run into it (content-aware fill), and with Click picks set to Person or Object, a click removes the whole person or object, shaped by its mask. Find outlines things named in words wherever they are in the photo (trash, litter, plastic bags, bottles, cans, cigarette butts, power lines, cables, signs, traffic cones, cars, people and birds, with OWLv2 from Settings › Models), and a click on one removes it the same way, or Remove All removes them all; Heal and Clone find their own source nearby; drag the spot or its source to move it, or its handle to resize it, and change Heal or Clone, Size, Feather and Opacity in the panel. Heal matches the source's texture to the light around the spot. Drag instead of clicking to brush a spot along a scratch, wire or twig. Remove Dust finds the soft, colourless specks sensor dust leaves on smooth areas (sky, walls, water) and heals them in one step; with several photos selected, it heals the specks found in the same place on the sensor in two or more of them (frames showing the same scene around a speck, as from a tripod, count as one), in all of them (one Undo puts the others back), and Visualize Spots shows the photo's edges in white so the rest stand out. Spots are saved with the edit, paste with Copy Settings, and redlamp render --remove x,y,radius, --heal or --clone (or --remove-brush and the others through several points) adds one from the command line, as --remove-dust 50 heals the dust found and --remove-found car removes what's found by name.Measured on an Apple M1 Ultra with a Release build. Every figure since 29 September, the benchmark harness's runs, and what's got faster or slower are at redlamp.app/performance, from docs/performance/history.jsonl; scripts/perf-record.sh records a run. The card at the top of this README is drawn from the same history by scripts/perf-card.py, each figure from its latest quiet record, and CI fails when the card falls behind the history.
Each release's download and installed size is recorded from its zip on GitHub (scripts/perf-history.py release). 0.2.7 is a 22.1 MB download and 44.9 MB installed; the AI models download only when a feature first needs them. 0.2.5 added Generative Remove and its MLX frameworks and grew to 115.6 MB installed; 0.2.6 ships stripped of debugging symbols, with LibRaw built hidden so unused code is dropped and the decode service sharing the app's frameworks (AUD-11), and is smaller than 0.2.4 was. 0.2.7 ships its 69 Base Look tables compressed, each read when a render first uses it (AUD-11), and is 17% smaller installed than 0.2.6. The release check fails a bundle with an Intel slice, debugging symbols or more than its size budget (scripts/check-release-bundle.sh).
| Operation | Time |
|---|---|
| Open a 24–26 MP raw file (decode, GPU upload, demosaic, pyramid) | 70–250 ms |
| Interactive render at Fit (every adjustment, fused) | 0.6–3 ms |
| Interactive render at Fit with two gradient masks | ~1.3 ms |
| Interactive render at 1:1 (full 26 MP frame) | ~13 ms |
| Full-resolution export render (24–26 MP) | ~45 ms |
| Full-resolution export render with noise reduction (24 MP, tiled) | ~100 ms |
| Focus stack of 25 × 17 MP Canon CR3 frames (decode, align, depth map, fuse) | ~8 s |
| Focus stack of 109 × 4 MP JPEG frames | ~15 s |
| Reopen a merged focus stack from its cache | ~0.1 s |
| Detail stage on a 1:1 region (about 10 MP of pyramid texels), GPU time: noise reduction, Texture and Clarity | ~5 ms, ~1 ms |
| Detail stage for a 2560 × 1600 view at 1:1 of a 24 MP frame, GPU time: noise reduction alone (Luminance 50); default sharpening, first render; while dragging Radius; while dragging Amount, Detail or Masking (cached analysis); while dragging Luminance | ~3.6 ms, ~7.2 ms, ~5.5 ms, ~2.2 ms, ~4.3 ms |
The detail stage holds about 1.3 GB of GPU memory at 1:1 on a 24 MP photo and 2.3 GB on a 60 MP one, with noise reduction and sharpening on (3.1 GB and 7.5 GB before the memory audit, AUD-03); large views render in tiles within its budget, and nothing is kept once rendering stops for half a second.
Folders and the filmstrip on 50,000 photos in 500 folders (scripts/make-folder-fixture.sh, then --folders-perf), measured while the Mac was busy with other work (load average about 18):
| Operation | Time |
|---|---|
| First photos in the filmstrip, Show Photos in Subfolders on | 14 ms |
| All 50,000 photos listed (500 folders, in parallel, in order) | 209 ms |
| The visible thumbnails, decoded from the raw files | 33 ms |
| Background warming from the raw files | 705 a second |
| Thumbnails from the disk cache | 6,210 a second |
| Main thread while listing, decoding and warming (p99) | 0.15 ms |
| Main thread while scrolling the filmstrip end to end (p99) | 1.4 ms |
| Peak memory, 152 MB before opening | 317 MB (531 MB before the memory budgets); 207 MB idle after a memory-pressure trim |
Dragging a slider at 120 events a second (scripts/perf-sweep.sh), with every panel open:
| Main thread during the drag | Iteration 2 | Off-main rendering | AppKit panels |
|---|---|---|---|
| Time busy | 100% | ~54% | ~34% |
| Typical run-loop iteration (median) | — | 2.3 ms | 0.17 ms |
| Slowest 5% of iterations | 157 ms | ~8 ms | ~5 ms |
| Slowest 1% of iterations | — | ~13 ms | ~8 ms |
With both side panels in AppKit, most of what remains is Core Animation committing the redrawn layers and the engine's frames arriving; SwiftUI is down to about 2% of the main thread.
.dcp files is deferred.RedlampDecoder.xpc, sent each file's bytes), never in the app, so a damaged file can't crash the editor while it decodes. These reads still parse files in the app itself: filmstrip thumbnails (a raw's embedded preview, through LibRaw, or ImageIO), the Portrait mattes and depth a photo carries, focus-stack detection, the metadata an export copies from its source, an imported HALD look, and the Camera Bench window (Help › Test Your Camera…). iPad and iPhone come in Phase 5.Fixed in iteration 2:
Redlamp's film looks are physical simulations, built from the data in each manufacturer's own datasheet: characteristic curves, spectral sensitivities and dye spectra, digitised into research/film-data/. Most film presets are tuned by eye.
Portra 160 Colour negative | Portra 400 Colour negative | Portra 800 Colour negative | Ektar 100 Colour negative | Gold 200 Colour negative | UltraMax 400 Colour negative |
Superia 400 Colour negative | Pro 400H Colour negative | CineStill 800T Tungsten negative | CineStill 50D Daylight negative | Vision3 500T Cinema print | Vision3 250D Cinema print |
Vision3 50D Cinema print | Eterna Vivid Cinema print | Provia 100F Slide | Velvia 50 Slide | Velvia 100 Slide | Ektachrome Slide |
Kodachrome 64 Slide | Tri-X 400 Black and white | T-Max 100 Black and white | T-Max 400 Black and white | HP5 Plus Black and white | Delta 100 Black and white |
Delta 3200 Black and white | FP4 Plus Black and white | Pan F Plus Black and white | Darkroom Print Grade 2 print | Soft Print Grade 1 print | Hard Print Grade 4 print |
Portra 400 · +2 Overexposed | Portra 800 · 1600 Pushed | Tri-X · 1600 Pushed | 2383 Bleach Bypass Cinema print | Velvia 50 · Cross Cross-processed | Provia 100F · Cross Cross-processed |
The datasheets drive an offline model that bakes each film into a Base Look table and its effects settings. Only those ship, and the GPU applies them while you edit:
flowchart LR
    pdf["Makers' datasheets<br/>Kodak · Fujifilm · Ilford"] --> data["research/film-data<br/>curves · sensitivities · dyes · granularity"]
    subgraph model["Film model (offline)"]
        direction LR
        spectrum["Scene colour<br/>to spectrum"] --> layers["Layer exposures<br/>spectral sensitivities"]
        layers --> density["Dye density<br/>curves · interlayer · masking"]
        density --> view["Print, scan<br/>or light box"]
        view --> eye["Colour as seen<br/>CIE observer"]
    end
    data --> model
    eye --> table["Base Look<br/>scene-referred 33³ table"]
    data -- granularity --> effects["Grain · halation · bloom"]
    table --> recipe["Bundled film recipe"]
    effects --> recipe
    recipe --> engine["Develop kernel (Metal)<br/>halation and bloom → film table → grain"]
The film model follows the scene's light through the film:
Each look ships as a scene-referred Base Look. It takes the place of Redlamp's tone curve, so the film's own toe, shoulder and colour crossovers reach the photo. Each look also comes with the film's grain, halation and bloom in the Effects panel. Grain follows each datasheet's published granularity, and halation is strongest on CineStill, which has no anti-halation layer.
Using them:
⇧⌘L) shows the open photo in every film. Hover over a card to preview the look in the editor; click to apply it with its grain, halation and bloom. Hold ⌥ over a card to see the photo before the look. Star a look to keep it under Favourites. The applied look's card has Grain, Halation and Bloom sliders, and the header an Amount slider. Tabs filter by colour negative, cinema, slide, and black and white.
| Look | Film | Rendered as | Grain / halation | |
|---|---|---|---|---|
| Portra 160 | Kodak · Colour negative · ISO 160 | Scanned, Frontier-like | 15 / 7 |
| Portra 400 | Kodak · Colour negative · ISO 400 | Scanned, Frontier-like | 20 / 8 |
| Portra 800 | Kodak · Colour negative · ISO 800 | Scanned, Frontier-like | 27 / 9 |
| Portra 800 · Pushed to 1600 | Kodak · Colour negative · ISO 800 pushed to 1600 | Scanned, Frontier-like | 32 / 9 |
| Ektar 100 | Kodak · Colour negative · ISO 100 | Scanned, Frontier-like | 8 / 6 |
| Gold 200 | Kodak · Colour negative · ISO 200 | Scanned, Frontier-like | 23 / 9 |
| UltraMax 400 | Kodak · Colour negative · ISO 400 | Scanned, Frontier-like | 25 / 9 |
| Superia 400 | Fujifilm · Colour negative · ISO 400 | Scanned, Frontier-like | 24 / 8 |
| Pro 400H | Fujifilm · Colour negative · ISO 400 (discontinued) | Scanned, Frontier-like | 24 / 8 |
| CineStill 800T | CineStill · Tungsten colour negative · ISO 800 | Scanned, Noritsu-like | 26 / 70, bloom 8 |
| CineStill 50D | CineStill · Daylight colour negative · ISO 50 | Scanned, Noritsu-like | 12 / 60, bloom 6 |
| Vision3 500T · 2383 | Kodak · Cinema negative on print film · ISO 500 | Printed on 2383 and projected | 24 / 14, bloom 6 |
| Vision3 250D · 2383 | Kodak · Cinema negative on print film · ISO 250 | Printed on 2383 and projected | 20 / 12, bloom 6 |
| Vision3 50D · 2383 | Kodak · Cinema negative on print film · ISO 50 | Printed on 2383 and projected | 12 / 10, bloom 5 |
| Eterna Vivid 250D · 2383 | Fujifilm · Cinema negative on print film · ISO 250 (discontinued) | Printed on 2383 and projected | 21 / 12, bloom 6 |
| Provia 100F | Fujifilm · Slide film · ISO 100 | Slide, viewed on a light box | 8 / 4 |
| Velvia 50 | Fujifilm · Slide film · ISO 50 | Slide, viewed on a light box | 9 / 4 |
| Velvia 100 | Fujifilm · Slide film · ISO 100 | Slide, viewed on a light box | 8 / 4 |
| Ektachrome E100 | Kodak · Slide film · ISO 100 | Slide, viewed on a light box | 8 / 4 |
| Kodachrome 64 | Kodak · Slide film · ISO 64 (discontinued) | Slide, viewed on a light box | 10 / 4 |
| Tri-X 400 | Kodak · Black and white negative · ISO 400 | Scanned | 37 / 5 |
| T-Max 100 | Kodak · Black and white negative · ISO 100 | Scanned | 18 / 4 |
| T-Max 400 | Kodak · Black and white negative · ISO 400 | Scanned | 22 / 5 |
| HP5 Plus | Ilford · Black and white negative · ISO 400 | Scanned | 40 / 5 |
| Delta 100 | Ilford · Black and white negative · ISO 100 | Scanned | 16 / 4 |
| Delta 3200 | Ilford · Black and white negative · ISO 3200 | Scanned | 52 / 6 |
| FP4 Plus | Ilford · Black and white negative · ISO 125 | Scanned | 24 / 5 |
| Pan F Plus | Ilford · Black and white negative · ISO 50 | Scanned | 12 / 4 |
| Tri-X · Darkroom Print | Kodak · Ilford · Black and white print · grade 2 | Printed on paper | 34 / 5 |
| Portra 400 · +2 | Kodak · Colour negative · ISO 400 rated 100 | Scanned, Frontier-like | 16 / 8 |
| Tri-X 400 · Pushed to 1600 | Kodak · Black and white negative · ISO 400 pushed to 1600 | Scanned | 46 / 6 |
| Tri-X · Soft Print | Kodak · Ilford · Black and white print · grade 1 | Printed on paper | 34 / 5 |
| Tri-X · Hard Print | Kodak · Ilford · Black and white print · grade 4 | Printed on paper | 34 / 5 |
| Vision3 500T · 2383 Bleach Bypass | Kodak · Cinema negative on print film, bleach bypass · ISO 500 | Printed on 2383 and projected | 26 / 12, bloom 6 |
| Velvia 50 · Cross-Processed | Fujifilm · Slide film in C-41 · ISO 50 | Developed in C-41, scanned | 12 / 5 |
| Provia 100F · Cross-Processed | Fujifilm · Slide film in C-41 · ISO 100 | Developed in C-41, scanned | 11 / 5 |
Every look on the same photo:
Each example shows three CC0 photos from the look-development set: a landscape, flowers and a night street. The top row is Redlamp's default rendering, the bottom row the film look with its grain, halation and bloom.
Portra 400Warm and gentle. Kind to skin, with soft greens and a little extra warmth in the highlights, as a Frontier lab scan renders it.
Portra 160Portra's slower sister: finer grain and an even gentler rendering, for portraits in good light.
Portra 800Fast Portra: warmer and richer, with more grain and a little more contrast.
Portra 800 · Pushed to 1600Portra 800 rated at 1600 and pushed a stop, from Kodak's own push curves: denser shadows, more contrast and grain.
Ektar 100Kodak's finest-grained colour negative: richer reds and deeper colour than Portra.
Gold 200Warm consumer film. Golden yellows, slightly greener foliage and more grain.
UltraMax 400Kodak's punchy everyday film: warm, saturated and a little grainy.
Superia 400Cooler than the Kodak stocks, with Fujifilm's greens.
Pro 400HFujifilm's discontinued wedding film, with its fourth colour layer: soft contrast, pastel skin and minty greens.
CineStill 800TVision3 500T without its anti-halation backing. Bright lights glow red-orange, the look of night streets and neon.
CineStill 50DVision3 50D without its anti-halation backing: very fine grain, daylight colour and glowing highlights.
Vision3 500T · 2383The motion-picture look: a cinema negative printed on release print film. Softer and denser, with cool shadows and warm highlights.
Vision3 250D · 2383Kodak's daylight cinema negative printed on 2383: the bright exterior look of feature films.
Vision3 50D · 2383The finest-grained cinema negative on 2383: clean, saturated daylight.
Eterna Vivid 250D · 2383Fujifilm's discontinued vivid daylight cinema negative, printed on 2383: more saturated than Vision3.
Provia 100FClean, natural slide film. Contrasty, with deep skies and dense shadows, exposed for the highlights.
Velvia 50The landscape slide: saturated greens, yellows and blues, and more contrast still.
Velvia 100Velvia's faster sibling: just as saturated, a touch gentler in the shadows.
Ektachrome E100Kodak's modern slide film: clean, neutral to cool, with fine grain.
Kodachrome 64The legendary K-14 slide film, from Kodak's archived datasheet: warm reds, deep blues and dense shadows.
Tri-X 400Classic black and white. Bright and crisp, with pronounced, sharp grain.
T-Max 100Kodak's finest-grained black and white: smooth, sharp and long in tone.
T-Max 400Modern fast black and white: tighter grain than Tri-X and a longer tonal range.
HP5 PlusSofter and grainier than Tri-X, with a gentler shoulder.
Delta 100Ilford's fine-grained modern black and white.
Delta 3200Ilford's fastest film: big, gritty grain and hard contrast for low light.
FP4 PlusClassic medium-speed black and white with a gentle shoulder.
Pan F PlusSlow, ultra-fine black and white with rich contrast.
Tri-X · Darkroom PrintA darkroom print: deeper blacks and the paper's own contrast.
The same datasheets also describe how a film behaves when it's exposed or processed differently, and the model follows them:
Portra 400 · +2The popular overexposed Portra: two stops of extra exposure crowd the highlights onto the film's shoulder, for an airy, pastel, soft look.
Tri-X 400 · Pushed to 1600Push processing: two stops underexposed and developed longer, using the datasheet's own longest D-76 curve. The shadows block up and grain and contrast rise.
Tri-X · Soft PrintA gentle, open darkroom print on a soft grade, using Ilford's published grade 1 curve.
Tri-X · Hard PrintA hard grade: deep blacks and bright whites, using Ilford's published grade 4 curve.
Vision3 500T · 2383 Bleach BypassThe bleach-bypass print: the silver is left in with the dyes, so the image is desaturated, dense and hard, the look of many war films.
Velvia 50 · Cross-ProcessedSlide film developed as a negative: punchy, with the colour shifts that a slide emulsion with no orange mask gives.
Provia 100F · Cross-ProcessedProvia cross-processed: contrasty, with cool green-cyan shadows.
One-tap looks in the spirit of Prequel's filters. Each starts from a film look, with its grain, halation and bloom, and adds the new Effects: Light Leak (Amount, Warmth and Variation), Dust & Scratches, and a Frame. Frames come as a keyline, a white print border, a 35 mm rebate with its sprocket holes, or a slide mount. They're in the sidebar under Recipes ▸ Mood, and the effects work on any photo.
| Mood | Built on | Adds |
|---|---|---|
| Golden Leak | Portra 400 · +2 | a warm light leak and soft bloom |
| Lost Roll | Gold 200 | leaks, dust, scratches and the 35 mm rebate |
| Summer '98 | UltraMax 400 | a warm leak and a white print border |
| Night Glow | CineStill 800T | strong halation, bloom and a little dust |
| Blue Hour | Pro 400H | a cool leak and a soft mist |
| Mist | Portra 160 | a diffusion filter's glow and gentler contrast |
| Home Movie | Vision3 50D · 2383 | projector scratches, dust, a dark edge and a keyline |
| Slide Show | Kodachrome 64 | a slide mount and a few specks of dust |
| Contact Sheet | Tri-X · Hard Print | the 35 mm rebate and darkroom dust |
| Neon Rain | Provia 100F · Cross-Processed | halation and a cool leak |
Ten more are tuned on the photographs shot on each film. redlamp recipe film --fit-moods fits the style fingerprint of a film's 20 reference photographs with the recipe studio's fitter, adjusting tone, saturation, grading and grain on top of the film's own look. The fitted values are pinned in the source. Shared film scans are bright and open, and the moods carry that. The fit leaves out per-colour hue and saturation, which follow the photographs' subjects more than the film.
| Mood | Built on | Fitted to |
|---|---|---|
| Portra Days | Portra 400 | bright, airy scans |
| Ektar Colour | Ektar 100 | warm, vivid colour with open shadows |
| Gold Summer | Gold 200 | sunny warmth, soft contrast, more grain |
| Superia Snapshots | Superia 400 | bright, cool-leaning snapshots |
| Wedding Day | Pro 400H | pastel, soft wedding scans |
| CineStill Nights | CineStill 800T | deep shadows and a cool split tone |
| Velvia Landscapes | Velvia 50 | open shadows and rich colour |
| Kodachrome Memories | Kodachrome 64 | bright slides with cool shadows |
| Tri-X Street | Tri-X 400 | open, bright street prints |
| HP5 Documentary | HP5 Plus | bright midtones with deep blacks |
research/film-references/ lists 477 photographs from Wikimedia Commons whose pages name the film. There are 8 to 20 per stock, licensed CC0, CC BY or CC BY-SA, and they're used as references only, never shipped or committed. redlamp recipe film --validate renders each look on the look-development set, and research/film-references/analyse.py compares them with the photographs in OKLab. It compares contrast and saturation, and the colour of foliage, sky, skin and near-neutral shadows and highlights.
The two sets show different scenes, so the useful tests are relative ones:
The check found one clear error, now fixed. The slides were less saturated than Redlamp's default, though in the photographs slide films are the most saturated of all. Slides get much of their saturation from strong interimage effects between their layers, which the model had set as mildly as for negatives. With stronger effects calibrated to the photographs' order (version 2 of the slide looks), saturation against the default rendering is:
| Look | Saturation |
|---|---|
| Velvia 50 | +31% |
| Velvia 100 | +20% |
| Provia 100F | +10% |
| Ektachrome E100 | +10% |
| Kodachrome 64 | +7% |
The colour negatives stay within a few percent of the default in saturation and are slightly softer, as lab scans are. The reference photographs differ too much in subject for finer conclusions: Pro 400H's are mostly weddings, CineStill's night streets, and Velvia's landscapes.
Kodak, Portra, Ektar, Gold, Vision3, Tri-X, Fujifilm, Superia, Provia, Velvia, Ilford, HP5, Multigrade and CineStill are trademarks of their owners. Redlamp isn't affiliated with them: its looks are built from the published technical data.
Rebuilding them: redlamp recipe film --all --install --readme builds every look from the datasheets, installs the tables the app bundles, and regenerates the icons and images on this page. Bundled looks are versioned and never change once published; a test fails if the datasheets or the model would build a different look under the same version.
The command palette (⌘K). One search for every action, with its shortcut beside it, every Develop slider with its value, and pickers for white balance, treatment, Base Looks, recipes, Before / After, snapshots and history.
Adjusting from the keyboard. ↵ on a slider shrinks the palette to a slider bar over the photo: ← → step it (⇧ ×10, ⌥ finer), ↑ ↓ move to the next slider, and you can type a value or x+0.3. A run of presses is one history step.
A Subject mask in the red overlay. Made on the device by Apple Vision, with nothing to download, and given its own Exposure and Clarity. The Masks panel lists the mask's components, which combine by add, subtract and intersect.
Masking on a Sony A7 III ARW. A linear gradient darkens and cools the sky, and a feathered radial gradient warms and lifts the trees. The red overlay shows the selected mask's coverage.
Color grading on a Canon EOS R6 CR3. Split-toned shadows and highlights with the 3-way wheels.
A camera recipe on a Fujifilm X-T3 RAF. Chrome Street, built from a Fujifilm-style recipe card, on the measured Chrome Base Look. The recipe's Amount is in the Recipes panel, and its tone, Color Chrome and grain settings land in the Basic and Effects panels like any other edit.
Black & white on a Sony A7 III ARW. The Selenium recipe plus vignette and grain, with every step in History.
Detail at 1:1 on a Canon EOS R6 CR3. Noise reduction scaled to the photo's measured noise, and noise-aware sharpening that measures detail on a denoised copy, so grain isn't sharpened.
Before and after, side by side, on a Nikon Z 6 NEF. Exposure, Highlights, Shadows, Dehaze, Clarity and Vibrance; the original renders once and is cached.
Fujifilm X-T3 X-Trans RAF at 1:1. The full-resolution frame renders in about 13 ms, and the Color Mixer is shown in HSL mode.
iPhone 12 Pro ProRAW (linear DNG). Portrait orientation, with highlight recovery and blues tuned in the Color Mixer.
The Lab lives in the component harness. It renders every recipe, Base Look and imported LUT on a 40-image CC0 look-development set.
Gallery and split compare. Thumbnails of every item on the chosen photo, filtered by kind, group, tag and lint result. On the right, the selected recipe (Chrome Street) against the original, with a draggable divider.
One recipe across the set. Gritty Street on landscapes, animals, night streets, foliage and interiors at once, to catch a look that only works on one kind of photo.
A against B. Two camera recipes, Chrome Street and Bright Slide, on the same photo.
Inspect. Every included setting with its key, the camera card the recipe was built from, and the Base Look's table statistics and lint.
Agent studio runs. A brief with the public-domain references it was drawn from, and the candidates developed against it with their lineage, lint and distance to the references. Each candidate opens in Compare at full size; pairwise picks and final picks are recorded for the critics' evals.
The hero image at the top and the first three screenshots are the author's own photos, captured in the default Neutral theme by scripts/capture-hero.sh. The other sample images are CC0 files from raw.pixls.us; the brief's references are public-domain and CC0 photos from Wikimedia Commons. Those screenshots are generated by mise run screenshots.
The Mac comes first: Phases 1 to 4 build a high-quality editor and engine on macOS, and iPad and iPhone follow in Phase 5, once the main features are complete. The engine stays platform-neutral throughout, so the port is a new shell rather than a rewrite. Where each Lightroom feature stands, done, in progress, planned or left out, is in Redlamp and Lightroom compared, also at redlamp.app/compare; the Lightroom feature inventory is the detailed reference.
Each item names the tracker rows behind it in a comment, and scripts/roadmap-sync.py keeps the boxes in step with them.
.cube, .3dl and HaldCLUT import (with LUTs for S-Log3, LogC3, V-Log and Apple Log footage), 39 bundled recipes, and the Recipe Lab redlamp-profiler: look matching by black-box measurement against cameras' own JPEGs; four measured film looks ship.dcp camera profiles (deferred in October 2026)The AI and computational photography brief covers denoise, AI across the product (upscaling, masks, removal, auto settings), and focus stacking. Its first round of findings gives a verdict for each workstream, a license matrix for every candidate model and dataset, the engine AI architecture, measured Core ML and focus-stacking prototypes (in research/prototypes/), and proposed changes to the phases above.
A study of darktable, the most complete open-source raw developer, covers how it handles cameras, color science, modules and masks, presets and sidecars, lenses, performance and UX, and what Redlamp should adopt, do better or skip in each area. A study of Topaz-style upscaling and sharpening includes a measured bake-off of open models. A study of RapidRAW, an open-source raw editor whose AI runs built in, on a ComfyUI server the photographer runs or on a paid cloud, compares its AI with Redlamp's and leads to fills from a server on the local network, an AI-Free mode and Generative Remove on 8 GB Macs. Every recommendation from these studies is tracked, with its decision, phase and status, in the research intake tracker.
Redlamp runs on Apple Silicon Macs with macOS 26 or later. Download the latest release, a signed and notarized Redlamp.app, install it with Homebrew, or build it yourself from source. Move a downloaded copy to Applications before you open it: a copy opened from Downloads or from the disk image can't update itself.
brew tap pdcgomes/redlamp https://github.com/pdcgomes/redlamp
brew install --cask redlamp
This installs the latest signed and notarized Redlamp.app in /Applications and puts the redlamp command-line tool on your PATH. The tap is this repository, so the explicit URL is needed the first time.
brew upgrade --cask redlamp          # update to the latest release
brew uninstall --cask redlamp        # remove the app and the CLI
brew uninstall --zap --cask redlamp  # also remove your recipes, looks and preferences
Edits live in sidecars next to your photos (see where edits are stored), so no uninstall touches them.
From 0.2.0-prealpha, Redlamp keeps itself up to date with Sparkle, however you installed it. On its second launch it asks whether to check for updates automatically. Redlamp › Check for Updates… checks at any time, and Settings › About turns the automatic checks on or off. Copies of 0.1.0-prealpha and 0.1.1-prealpha can't update themselves, so download the latest release once more or run brew upgrade --cask redlamp. Builds from source never check for updates.
After an update, Redlamp asks redlamp.app for the release's highlights, its What's New, on the first launch of each new version and at most once a day after that. The request sends nothing about you, your Mac or your photos: the whole list comes down, and the app picks what its version has. Settings › About turns this off, and builds from source show What's New only from the Help menu.
You need Xcode 26 or later and mise. Then:
git clone https://github.com/pdcgomes/redlamp.git && cd redlamp
mise install                                   # Tuist, SwiftFormat, SwiftLint at pinned versions
mise run generate                              # builds vendored LibRaw, then generates Redlamp.xcworkspace
CONFIGURATION=Release mise run build           # the app
SCHEME=redlamp CONFIGURATION=Release mise run build   # the CLI
Both land in build/DerivedData/Build/Products/Release/. Copy the app into /Applications, and link the CLI from somewhere on your PATH. The CLI loads the frameworks next to it, so link it rather than copying it:
ditto build/DerivedData/Build/Products/Release/Redlamp.app /Applications/Redlamp.app
mkdir -p ~/.local/bin && ln -sf "$PWD/build/DerivedData/Build/Products/Release/redlamp" ~/.local/bin/redlamp
Builds are signed with the project's development team. To sign with your own, set redlampDevelopmentTeam in Tuist/ProjectDescriptionHelpers/Module.swift to your team ID and run mise run generate again.
This section is for working on Redlamp. To just use it, see Installation.
git clone https://github.com/pdcgomes/redlamp.git && cd redlamp
mise install              # Tuist, SwiftFormat, SwiftLint at pinned versions
mise run generate         # builds vendored LibRaw, then generates Redlamp.xcworkspace
mise run fixtures         # optional: downloads CC0 sample raw files (about 1.4 GB) into tests/fixtures
mise run fixtures-shoots  # optional: about 800 MB more, for the dust evaluation
mise run run -- tests/fixtures/raw    # build and launch, opening a folder
You can also run mise run run on its own and choose File → Open Folder… (⌘O), or drop a folder or files onto the window: folders join the Folders panel. Redlamp remembers them and reopens the last folder, on the photo you were on.
The redlamp CLI uses the same engine API as the app. It is useful for scripting, quick checks, and reproducing renders.
mise run render -- info ~/Pictures/DSC01234.ARW
mise run render -- render ~/Pictures/DSC01234.ARW -o out.jpg --size 2048 \
  --set exposure=0.5 --set shadows=30 --wb auto --base-look vivid
redlamp stack <frames or folder> -o out.jpg [--strategy auto|smooth|detail] [--depth depth.png] merges a focus stack; --save stack.redlampstack writes a stack document instead, which render and the app open like any photo, and --detect <folder> lists the stacks the library would suggest.
redlamp recipe … holds the look-development tools: list, lint, render, contact sheets, .cube, .3dl and HaldCLUT import (--space for camera log LUTs), export, style fingerprints and fitting, golden renders, and rebuilding the bundled looks. redlamp mcp serves the engine and recipe library as an MCP server for agents. See look development and the agent recipe studio.
redlamp camera-bench <raws or folders…> runs the camera bench: it checks how each raw decodes and compares Redlamp's default rendering with the JPEG the camera embedded, choosing up to eight photos per camera mode (--all for every file), and writes the report the app would send (-o) and side-by-side pairs (--pairs). scripts/camera-bench-seed.py runs it over raw.pixls.us, one CC0 file per camera without a verified sample, and scripts/camera-bench.py turns reports into the evidence on the cameras page (the camera bench).
redlamp noise calibrate <frames…> fits a camera's noise profile from calibration frames (pairs of flat frames at several brightnesses per ISO, and bias frames), and redlamp noise check <photos…> shows which noise each photo renders with: its file's, its camera's profile or the measurement. Profiles ship in packages/RedlampServices/Resources/NoiseProfiles.
| Task | What it does |
|---|---|
mise run setup | Once per clone: use the repository's git hooks. The pre-commit hook lints the staged Swift files with SwiftFormat as CI does, and the pre-push hook runs the push gate before anything is pushed to main |
mise run generate (g) | Vendor LibRaw and generate the Xcode workspace |
mise run build (b) | Build the macOS app |
mise run run (r) | Build and launch; pass a folder after -- |
mise run test (t) | Engine purity gate plus all unit and engine tests |
mise run gate | The push gate, which the pre-push hook runs before every push to main and which stops a push that fails. It checks a commit (HEAD by default, or -- <commit>) in a worktree of its own beside the main checkout that holds only what's committed: CI's quick checks, and for a push that changes code, SwiftFormat, a build of everything with its tests, and the reference tests, which compare what the code makes with what the repository records (golden renders, process references, recorded reports, the sidecar schema, scenario coverage), in a few minutes. A push that changes only docs, the site, the video, research notes or tools takes seconds. A commit whose files have passed isn't checked again, so running it before pushing makes the push itself immediate. -- --suite runs the whole test suite instead, and -- --full adds CI's Release builds |
mise run e2e (e) | The end-to-end regression suite: the smoke tier by default, -- --tier full, release, performance or soak (see Regression suite) |
mise run lint (l) | Purity gate, SwiftFormat (lint mode), and SwiftLint |
mise run vendor (v) | Build the vendored C/C++ libraries (pinned version and SHA in config/vendored-libs.json) |
mise run fixtures | Download CC0 sample raw files: the development samples into tests/fixtures/raw, and the camera coverage set (tests/decode/samples.json, checksums verified) into tests/fixtures/cameras |
mise run lookdev | Download the 40-image CC0 look-development set into build/look-dev (checksums verified) |
mise run profile-data | Download the CC0 Fujifilm raw and camera-JPEG pairs the look profiler fits against |
mise run render | Build and run the redlamp CLI |
mise run screenshots | Regenerate the README screenshots of the app and the harness, on temporary copies of the fixtures (needs Screen Recording permission, the fixtures and the look-development set) |
scripts/capture-hero.sh <folder> | Regenerate the hero shots for the README and redlamp.app (docs/images/hero*.png) from a folder of your own photos, in the default Neutral theme, through scripts/capture-promo.sh, whose header describes the folder's promo.txt (needs Screen Recording permission and a Debug build) |
mise run harness (h) | Build and launch the UI component harness |
mise run release | Build origin/main in a clean worktree, with the patch version bumped if it's been released, then sign, notarize and publish it as a GitHub release with its update feed (see Releasing). DRY_RUN=1 pushes nothing and stops after signing, and with it REF=<commit> builds another commit |
mise run notarize -- <path> | Notarize a signed .app, .dmg or .zip, then staple and check it with Gatekeeper |
scripts/test-update.sh [--auto] | Update an old copy of a dry run to the dry run itself through Sparkle, from a feed on 127.0.0.1 (see Releasing) |
scripts/perf-sweep.sh [Debug|Release] [parameter] [script] | Drag a slider for 3 s and report main-thread smoothness, each frame's time from request to frame and the app's CPU, with every panel open by default (select=3,panel=all); REPORT_DIR names where the run's reports go. IDLE=<seconds> then leaves the app alone that long with the photo open and reports its CPU, wakeups and memory; PROFILE=1 adds a main-thread profile; PANELS=swiftui measures the SwiftUI panels |
scripts/perf-card.py [--apply|--check] | Redraw the performance card at the top of this README (docs/images/performance-card*.svg) from docs/performance/history.jsonl; scripts/perf-history.py runs it whenever it adds a record |
scripts/make-folder-fixture.sh <folder> [folders] [per-folder] | Build a tree of photos (500 folders of 100 by default) from APFS clones of one sample raw, using no disk space. Put it in a folder ending in .noindex so Spotlight leaves it alone |
--folders-perf <folder> [--folders-perf-warm N] [--folders-perf-quit] (development builds) | Open a tree of photos in an editor of its own and measure listing, thumbnails, warming, the disk cache, the main thread while the filmstrip scrolls, the cores and memory; writes /tmp/redlamp-perf.txt, or perf.txt in the directory given with --perf-report <directory> |
scripts/harness-capture.sh <scene> <png> [mode] | Screenshot a harness scene; with side mode, swift scripts/parity-diff.swift <png> scores it and scripts/parity-rows.swift compares it row by row |
mise run e2e works the real app through its features the way a person does, by keys, menu items, clicks and drags, and fails if something is missing, not wired up, behaving wrongly, crashing, stalling the main thread or slow. Whether an edit renders correctly stays with the engine and golden tests; the suite checks that the features are there and work (design).
scripts/e2e.py builds a copy of the app with the suite's driver compiled in (packages/RedlampAutomation, in Debug and profiling builds only) under the bundle ID app.redlamp.mac.e2e, gives it a home of its own (CFFIXED_USER_HOME) with clones of the sample raws and of your downloaded models, points Report a Bug and the camera bench at a stub relay on 127.0.0.1, and launches it in the background: it never takes your mouse or keyboard, and checks before and after that your own Redlamp files and preferences are untouched. The driver writes what happens to events-*.jsonl as it goes; the supervisor stops a launch that makes no progress, collects crash reports, retries a failed scenario once in a fresh app (a pass on retry is reported as flaky), and writes report.md and report.json under build/e2e/<commit>-<time>/, with a window snapshot of each failure and the stack of any main-thread stall over 2 seconds.smoke (the default, about 2 to 3 minutes): every photo format opens, every action runs from its key and its menu item, every Develop slider moves and resets, the Export dialog exports, and a relaunch restores the folder, the photo and its edit. full: every scenario pack, with Metal's validation layer on. soak: a seeded random walk (5 minutes, --soak-seconds) over actions, sliders, masks and undo, checked after every step: no error, a consistent history, an edit that survives leaving the photo, and memory that stops growing once caches fill; a failure names its seed and its steps, which --replay <soak-steps.jsonl> walks again. performance: launch, opening, a slider drag, export, the palette and memory, on the optimised test build with validation off, against the budgets in tests/e2e/budgets.json. Budgets are judged only on a quiet Mac (a load average of 8 or below): a busy run waits up to 15 minutes for quiet (--quiet-wait), then asks whether to accept it unjudged (--accept-busy answers yes); --record adds the run to docs/performance/history.jsonl as source e2e. release: full and soak, which the release task runs.--scenario <id> and --step <name> run part of it, --focus lets the scenarios that need a key window (gestures on the canvas) take focus, --app <path> uses a test app built already, and --scenario diagnostics.identifiers lists every identifier on screen for writing scenarios.RedlampAutomationTests (in mise run test and CI) require every action, parameter, panel, left panel, tool, mask kind and Report a Bug feature to be claimed by a scenario, or exempted with a reason in tests/e2e/exemptions.json, so a feature added without a scenario fails its pull request. Steps known to fail are listed with why in tests/e2e/known-issues.json; the report shows them, and says when one starts passing.Releases are built and notarized on a Mac with the team's Developer ID Application certificate in the keychain. Notarization uses the notarytool keychain profile named by REDLAMP_NOTARY_PROFILE in mise.toml. It defaults to driftstation-notarize, since the credentials belong to the team's Apple ID rather than one app. On a Mac without that profile, create one with an app-specific password, and override the name in .mise.local.toml if you pick another:
xcrun notarytool store-credentials driftstation-notarize --apple-id <apple-id> --team-id 3JP75Z3F98
Updates are signed with an EdDSA key that only the release Mac holds, in its login keychain. Installed copies check every update against its public half, SUPublicEDKey in apps/RedlampMac/Project.swift. Create the key once with Sparkle's generate_keys, which mise run generate installs, and keep a backup in your password manager:
Tuist/.build/artifacts/sparkle/Sparkle/bin/generate_keys --account redlamp      # create it, or print its public half
Tuist/.build/artifacts/sparkle/Sparkle/bin/generate_keys --account redlamp -x redlamp-sparkle.key   # export a backup, then delete the file
Import the backup on another Mac with -f. If the key is ever lost, the next release has to carry a new public key, which Sparkle accepts only from an app signed by the same Developer ID team.
Versions follow semver, with the stage as a pre-release suffix until 1.0: 0.1.0-prealpha, then -alpha and -beta. The build number is the count of commits on main, so it only goes up.
To release, push to main and run mise run release. If the version in Version.xcconfig has been released already, the task first bumps its patch number, 0.2.0-prealpha to 0.2.1-prealpha, and pushes that to main as a commit of its own, so pull before you push again. For a minor or major release, set MARKETING_VERSION yourself and push it before you run the task. It always builds origin/main in a clean worktree, so uncommitted or untracked work in your checkout never ships. It builds the app and CLI, puts the CLI in Redlamp.app/Contents/Helpers, and signs everything, Sparkle's helpers included. It then notarizes and staples through mise run notarize, and zips the app without the extended attributes the build gave its files: Finder puts them back when it unpacks a download, and Gatekeeper on macOS 26 then refuses to open the app. scripts/check-release-zip.sh stops the release if the zip holds any, or if plain unzip doesn't unpack it to an app whose signature verifies, with its ticket stapled. Updates and Homebrew take the zip. The site's download is a disk image, Redlamp.app beside a link to /Applications, since Sparkle won't update a copy opened from Downloads or from the image: scripts/release-dmg.sh copies the app into a read-write image, clears its extended attributes there (whatever runs the release tags each file it writes with com.apple.provenance, and an image keeps the tags), and converts it to a compressed image. Its window shows them over a picture, scripts/dmg/background.tiff, which scripts/dmg/background.sh renders from background.html, in a layout Finder made once: scripts/dmg/layout.sh, run in Terminal, has Finder arrange a scratch image's window and keeps its .DS_Store as scripts/dmg/DS_Store, which every image carries. The task signs, notarizes and staples the image, and scripts/check-release-dmg.sh stops the release if it holds anything else or another window, if anything in the app carries an extended attribute, or if a signature or ticket is missing. Both scripts mount the image, which the agent's sandbox refuses; SKIP_DMG="<why>" leaves the image out, and the download button then offers the zip. The task then tags v<version> and publishes Redlamp-<version>.zip and Redlamp-<version>.dmg as the latest GitHub release, with appcast.xml beside them. That's the update feed: installed copies check https://redlamp.app/appcast.xml, which the site redirects to the latest release's appcast.xml, and the release fails if the feed doesn't offer the new build. The update window and the GitHub release show the same notes: the release's highlights from docs/releases/<version>.md when there is one, then the subjects of the commits since the previous release. The Update cask workflow then points Casks/redlamp.rb at the new release, so brew upgrade finds it, and the download button on redlamp.app links to its disk image within the hour.
Before notarizing, the release runs the regression suite on a test build of the same worktree, at E2E_TIER (release by default: the full and soak tiers on the optimised test build, then the performance tier), unless a passing run of that commit is in build/e2e already, as mise run e2e -- --tier release on a clean main leaves one; a quick rehearsal can set E2E_TIER=smoke. It then checks the signed app as a black box: its signature, that it carries none of the driver's code, that a copy of it opens photos, stays up and quits cleanly with no crash report, that its bundled CLI renders, and that Sparkle updates an older copy to it (scripts/test-update.sh --auto). A failure stops the release; SKIP_E2E="<why>" skips both, saying why. A dry run rehearses all of it.
To try a change to releasing or updating before it's on main, REF=HEAD DRY_RUN=1 mise run release builds your latest local commit. scripts/test-update.sh then updates an old copy of that build to it, from a feed on 127.0.0.1 and under a bundle ID of its own: choose Check for Updates… in the copy it opens, or pass --auto to let Sparkle install the update when the app quits.
mise run harness opens Redlamp Harness, a development app for building and reviewing Redlamp's UI in isolation, in the spirit of a design-system workbench. It links the real frameworks and hosts the real editor, with a sample photo copied to a temporary folder so reviews never write sidecars. Scenes are listed on the left by section. The stage in the middle can sit on the panel background, the canvas grey or black (top right), and the theme, dark or light appearance and tint are under the scene list, so every scene can be checked in every theme.
| Section | Scenes | What they're for |
|---|---|---|
| Foundations | Tokens, Theme gallery | The palette, the type ramp (SwiftUI and AppKit side by side) and metrics; every theme at once |
| Controls | Slider row, Panel chrome | Each component in every state worth reviewing, with a note on what would be wrong with it |
| Panels | Basic, History, Folders | Panels wired to the live editor. History plays every kind of step, then opens the photo again so an earlier session shows, at the sidebar's normal and narrowest widths. Folders shows the Folders panel and the AppKit filmstrip on a folder of real photos (--folders-root, the fixtures by default) |
| Parity | Slider rows, Basic, Tone Curve, Histogram, Color Mixer, Color Grading, Detail, Effects, Lens Corrections, Transform, Calibration, Masking, Inspector column, Navigator, the sidebar lists | A SwiftUI original and its AppKit port at the same width: side by side, as a difference blend (identical pixels are black), as an onion skin, or flickering. The inspector has knobs for drawing constants and a Copy values button |
| Performance | Basic panel drag | Drags a slider at 120 events a second through each implementation and reports how busy the main thread got |
| Recipes | Recipe Lab | Every recipe, Base Look and imported LUT on the look-development set and a lint chart (see below) |
| Command Palette | Live, States | Live: the palette over the sample photo on the real editor, with its state, a log of every key and what it did, a checklist that ticks each interaction as it's tried, conditions (photo, clipboard, Masking tool, transparency, its own theme, tip), timing knobs and a Play walkthrough. States: every state as a still specimen |
| Export | Live, States | Live: the real Export dialog on the harness window, exporting the sample photo to a temporary folder, and Export with Previous. States: the dialog for each format, size mode and problem |
Against their SwiftUI originals, the AppKit ports score a mean difference of 0.05 (Tone Curve) to 0.12 (Basic) grey levels, with at least 99.97% of pixels within 24 levels; the rest is anti-aliasing on the slider thumbs.
The Recipe Lab (screenshots above) has four tabs:
.cube, .3dl or HaldCLUT (a camera log LUT too, with its input space chosen on import), saved to My Recipes.Launch options, for reviews and scripted screenshots: --scene <id>, --background panel|canvas|black, --parity-mode, --theme <id>, --appearance dark|light, --tint <0…1>, --stage-only (no sidebar or inspector), --window <width>x<height> (in points, on a Retina screen when one is connected), --history-height <points> for the History scene's lists, --folders-root <path> for the Folders scene, and for the Lab --lab-tab, --lab-select <recipe id>, --lab-compare <recipe id>, --lab-mode split|beforeAfter|sideBySide|flicker|acrossSet, --lab-image <camera>, --lab-run <run> and --lab-hide-gallery. --probe measures SwiftUI and AppKit elements one by one and writes the sizes to /tmp/redlamp-probe.txt. scripts/harness-capture.sh <scene> <png> [mode] [options…] screenshots a scene; scripts/theme-sweep.sh captures scenes in every theme.
To add a component, write a scene in apps/RedlampHarness/Sources/Scenes/ and register it in BuiltInScenes.swift.
tests/decode/cameras.json), which checks layout, crop, black and white levels, white balance, color matrix, orientation and the sensor data on every test run, and compares its colours at the default edit with a recorded reference. 26 cameras are verified: medium format from Hasselblad (the X2D 100C in 3FR and FFF, the X1D II 50C) and Phase One (the IQ4 150MP), and one or more bodies from Fujifilm (the GFX100 II among them), Canon, Nikon, Sony, Panasonic, OM System, Pentax, Ricoh, Leica, Sigma, Samsung, DJI, Apple and Google, listed with their samples in tests/decode/samples.json (mise run fixtures downloads them). Cameras (also at redlamp.app/cameras) lists every camera LibRaw reads and which ones Redlamp's tests verify; scripts/camera-list.py --apply regenerates it when a sample is added or LibRaw is updated.Redlamp follows Lightroom Classic's Develop-module shortcuts. Press ⌘/ in the app for the complete, always-current list (generated from the same registry the app uses). Shortcuts for tools that arrive later are already reserved and shown dimmed, with the phase they arrive in.
| Area | Keys |
|---|---|
| View | \ before/after · Z or Space toggle Fit/100% · scroll or pinch to zoom, in every tool · hold Space and drag to move the photo in a tool · ⌘= / ⌘- zoom in/out · J clipping · ⌥J sensor clipping · ⇧L colour-assessment view · I cycle info overlay · L cycle Lights Out · F full-screen preview · T / F5 toolbar · Y, ⌥Y, ⇧Y side-by-side before/after (Phase 2) |
| Panels | Tab hide side panels · ⇧Tab hide all · F6 filmstrip · F7 left panel · F8 right panel · ⌘1–⌘9 open or close Basic, Tone Curve, Color Mixer, Color Grading, Detail, Lens Corrections, Transform, Effects, Calibration |
| Navigation | ← → or ⌘← ⌘→ previous/next photo |
| Develop | , . select previous/next setting · - = decrease/increase it (⇧ for larger steps) · V black & white · W white-balance selector · ⌘U auto settings · ⇧⌘U auto white balance · ⇧⌘C / ⇧⌘V copy/paste settings · ⌥⌘V paste from previous · ⇧⌘R reset all · ⌘N new snapshot · ⌘Z / ⇧⌘Z undo/redo · hold ⌥ to turn group titles into "Reset …" |
| Tools | D Edit · ⇧W Masking · M linear gradient · ⇧M radial gradient · K brush · ⇧J color range · ⇧Q luminance range · ⇧Z depth range · R crop, A crop aspect lock, ⌘[ / ⌘] rotate left and right · Q healing, [ ] or ⌘-scroll size its brush (⇧ feather), ⌫ deletes the selected spot |
| Masking | O show/hide overlay · ⇧O cycle overlay color · H show/hide pins · ⌫ delete selected mask · Esc finish drawing or leave the tool · brushing: [ ] or ⌘-scroll size (⇧ feather), hold ⌥ to erase · Objects: drag a box or brush (the panel chooses), ⌥-click or ⌥-brush to take away |
| Rating & flags | 0–5 star rating · [ ] decrease/increase rating · P pick · X reject · U unflag · 6–9 red, yellow, green, blue label · add ⇧ to any of these to also move to the next photo |
| File | ⌘O open folder · ⇧⌘E export · ⌥⇧⌘E export with previous · ⌘/ keyboard shortcuts · ⇧⌘L Film Looks window · ⌘K command palette (⌘F for sliders only) |
Ratings, flags and color labels are saved in the photo's sidecar and shown on the filmstrip.
Slider gestures:
Edits are saved next to the photo, in IMG_1234.ARW.redlamp. It is a package (Finder shows it as one file): edit.json holds the edit recipe and any snapshots, and masks/ holds the bitmaps of AI masks as 8-bit PNGs named by their SHA-256, which the JSON refers to. Brush strokes and range masks are part of the JSON. Only values that differ from the defaults are stored, so sidecars stay small. history/ holds one file per editing session: its first step's edit, then each later step as a JSON Patch from the one before, so a slider step stores one value. Resetting a photo completely deletes its sidecar, unless it still holds history. Filmstrip thumbnails are cached apart from the photos, in ~/Library/Caches/app.redlamp/Thumbnails, one file per folder. The sidecar format is published, with a JSON Schema (format).
Sidecars carry two version numbers:
Settings a newer Redlamp wrote, but this version doesn't know, are kept and written back unchanged, at every level of the edit. A sidecar that a save would change in any other way opens read-only, as does one written with a newer format or process version and one that can't be read; none of them is ever overwritten or deleted, and the photo says why it can't be edited. One that can't be read for now, such as an iCloud file not yet downloaded, is read again until it can be, and nothing else that writes edits (a rating, Sync or Paste) writes over it meanwhile. A damaged one, whose edit file is cut short or isn't JSON, can be started over: the damaged file stays in the sidecar, renamed, and the photo opens with a new edit. Conflicting iCloud copies are merged only when every one of them can be. Sidecars are only rewritten when their content changes. Saves are written one at a time, in order, at most 2 seconds after an edit (or when a drag pauses); quitting saves first. If a save fails, the photo says so, with Retry, and Redlamp keeps trying; a failed edit is kept and retried when the photo is opened again, and quitting with edits that still can't be saved asks first. When another app or Mac saved the open photo's sidecar meanwhile, Redlamp merges the two edits, keeping each side's changes, and keeps the other edit as a snapshot where both changed the same setting. An interrupted save or delete leaves nothing half-written behind. An export, from the app or the redlamp CLI, never replaces a photo: not its source, not a raw file, and not an image Redlamp didn't export. Format 2 renamed profile to baseLook; format-1 sidecars still read. Format 3 added brush, range and AI mask components and made sidecars packages; a single-file sidecar is read as it is and becomes a package on its next save.
Recipes are single .redrecipe JSON files (format). Yours are in ~/Library/Application Support/Redlamp/Recipes/, installed ones in Recipes/Installed/, and every Base Look ever installed in Looks/, by content. Applying a recipe writes its resolved values into the photo's edit, and a look table is pinned by its SHA-256, so deleting or updating a recipe never changes a photo already edited with it. If a pinned look is missing, the photo shows without it and says so. Recipe files are data, never code, and every value is checked when a file is read.
The rendering engine and the UI are completely separate. The UI talks to the engine only through RedlampEngineAPI, a small, message-based, value-type API. Rendered frames come back as IOSurfaces, so pixels are never copied across the boundary.
flowchart LR
    subgraph ui [UI - macOS; iPad and iPhone in Phase 5]
        Views["AppKit panels + RedlampDesign"] --> Model["EditorModel"]
        Canvas["Metal canvas"]
    end
    subgraph api [RedlampEngineAPI - value types only]
        Req["RenderRequest / EditRecipe"]
        Frame["RenderedFrame: IOSurface + histogram"]
    end
    subgraph engine [Engine - platform-neutral, no UI imports]
        Sched["Latest-wins render loop"] --> Kernels["Fused Metal develop kernel"]
        Pyramid["Demosaiced mip pyramid"] --> Kernels
        Pyramid --> Detail["Detail stage: denoise, sharpen, local contrast (cached)"] --> Kernels
        Decode["LibRaw / ImageIO decode"] --> Pyramid
    end
    Model --> Req --> Sched
    Kernels --> Frame --> Canvas
The pipeline:
Packages (packages/; Tuist/ProjectDescriptionHelpers/Module.swift is the single source of truth for which package may depend on which):
| Package | Role |
|---|---|
RedlampEngineAPI | Public contract: EditRecipe, parameter schema, render requests and frames, EditingEngine |
RedlampKernels | Metal shaders (demosaic, develop, histogram) and their parameter layouts |
RedlampColor | Color spaces, color-temperature math (Robertson), camera color model, OKLab |
RedlampServices | Decoding (LibRaw, ImageIO) and thumbnails |
RedlampDocument | Sidecars, snapshots, library scanning, export writers |
RedlampRecipes | Recipes and Base Looks: the .redrecipe format and validator, the library and look store, camera recipe cards, .cube, .3dl and HaldCLUT import with camera log input spaces, lint, style fingerprints and the fitter, and the agent studio's run format. Platform-neutral and UI-free, so the apps, the CLI and a future companion app share it |
RedlampEngine | Sessions, the GPU pyramid, render loop, analysis (auto WB, auto tone, eyedropper) |
RedlampCanvas | Metal canvas that samples frame IOSurfaces directly, presented from its own display-link thread; zoom and pan |
RedlampDesign | Design tokens (colors, type, metrics) for SwiftUI and AppKit, and the AppKit panel components: slider rows, panel sections, control rows |
RedlampUI | Develop panels, sidebar, filmstrip, EditorModel |
Apps (apps/): RedlampMac, the macOS app and composition root; RedlampCLI, the headless redlamp tool; and RedlampHarness, the UI component harness (see Component harness).
The panels are AppKit, drawn to match SwiftUI pixel for pixel. SwiftUI re-walks its whole view tree on every change, however small, so dragging one slider in a window full of panels kept the main thread busy. The Develop panels are built from RedlampDesign's AppKit components instead: each control observes only the values it shows (a small Tracker over Swift Observation) and redraws only itself. Native controls such as menus and segmented pickers stay SwiftUI, each hosted on its own. The SwiftUI originals are kept as the reference the ports are checked against (--swiftui-panels runs the app with them).
Engineering principles:
scripts/check-engine-purity.sh fails the build if an engine package imports a UI framework, or if a UI package imports engine internals.RedlampEngineAPI, and both the engine and the UI read them.Report a Bug or Send Feedback (the toolbar's Feedback button, or Help › Report a Bug or Send Feedback…) files an issue in Redlamp's GitHub issues, which are public. It goes through redlamp.app, which files it as the Redlamp Feedback bot, so you don't need a GitHub account. The first time, a short note asks you to keep reports friendly; Preview the Report shows exactly what will be posted.
You choose the area (Develop › Noise Reduction, Masking › Objects, Export › Formats and Quality, and so on through every part of the app; the list is in docs/feedback/areas.json), and the sheet suggests the one you were using. Each of these goes with your words unless you turn it off: the Redlamp version and the Mac (model, chip, memory, GPU, displays, macOS); the open photo's format, camera, lens, exposure, size and the kind of disk it's on; its edit (the settings you changed, masks and how they were made, the recipe) and this session's history; what you did in the last 15 minutes (photos opened, tools, panels, actions, edits, messages, exports, slow renders); and Redlamp's own log. A diagnostics.json beside the issue holds the same in full, with the edit in the sidecar format, so it can be tried on another photo from the same camera.
Paths, folder names, location and serial numbers are never included, and neither is the photo: photos are named Photo A, Photo B unless you choose to include file names, and a screenshot of Redlamp's window is sent only if you tick it. Images you add lose their metadata first. Screenshots and diagnostics.json are stored in the public redlamp-feedback repository. To show a video, add it to the issue on GitHub once it's sent.
Help › Your Reports lists the reports sent from this Mac (kept in ~/Library/Application Support/Redlamp/Feedback), each opening on GitHub, where anyone can read it and its replies. Once you've sent one, Redlamp asks redlamp.app every few hours how your reports are doing, and the Feedback button counts replies and changes; turn this off in Your Reports. A report that can't be sent waits there and goes when redlamp.app can be reached, or can be saved as files or filed on GitHub's own page instead. Debug builds send dry runs (see web/README.md to try the relay locally).
Redlamp is at an early stage and moving quickly. Issues and discussion are very welcome: Report a Bug or Send Feedback in the app files an issue for you, with the details that help. To ask a question or follow along, join the Redlamp Discord.
DemosaicXTrans.metal, XTransDemosaic.swift), are CDDL-1.0 too (LICENSES/CDDL-1.0.txt). MLX Swift (MIT) and Swift Numerics (Apache-2.0) run generative fill's models on the Mac. Planned additions are lcms2 (MIT) and the lensfun database (CC-BY-SA, data only).mise run setup once, so commits are linted and pushes to main are tested, and mise run lint and mise run test before sending changes.RedlampEngineAPI/Sources/ParameterSpec.swift.mise run fixtures downloads CC0 samples. Please don't commit RAW files.Redlamp is free, with no subscription and no cloud. If you'd like to support its development, you can do so on Ko-fi.
Redlamp is licensed under the Mozilla Public License 2.0; see LICENSE.
Redlamp builds on the work of others:
Redlamp is not affiliated with Adobe. Lightroom is a trademark of Adobe Inc. and is referenced only to describe familiar workflows.
1,442 followers · starred Oct 2026
69 followers · starred Oct 2026
76 followers · starred Oct 2026



