
Teach a local AI what your camera sees and turn it into Home Assistant sensors — garage door open/closed, gate shut, car parked. 100% local, any CPU.
Python
20
70 commits
updated Oct 3, 2026
See what people are saying
README

Teach a local AI what your camera sees — and turn it into a Home Assistant sensor.
Garage door open, closed or halfway? Gate shut? Click a few examples and you have a sensor.
Person at the door, car in the driveway, cat on the lawn? Pick the objects — no training needed.
kWh on the meter, minutes left on the washer? Read the number.







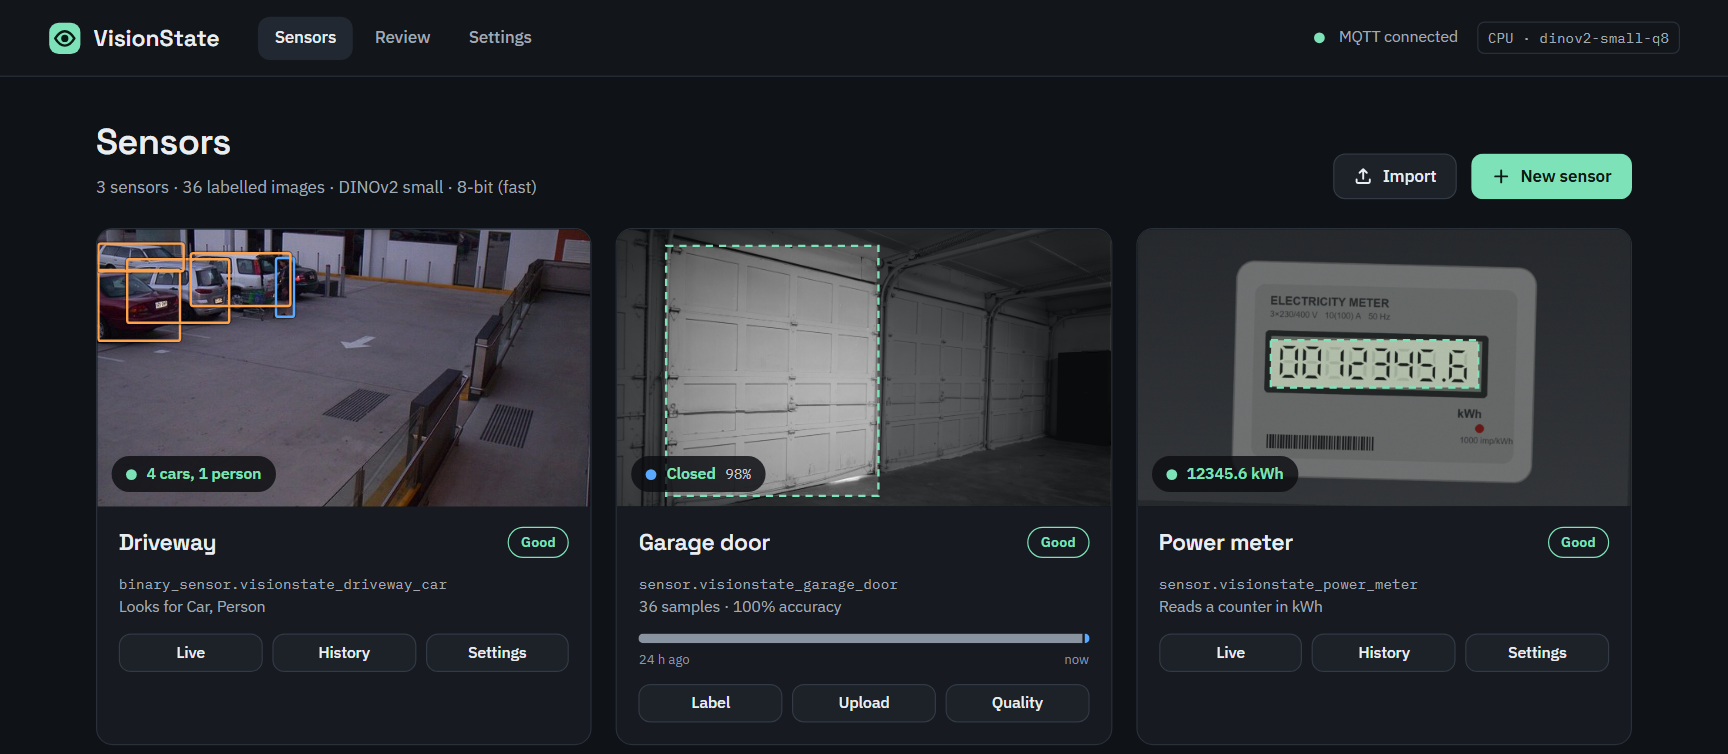
Why VisionState?
Your cameras already see whether the garage door is half open, the gate is shut or the lights in the shed are still on. VisionState turns what they see into states you can use in Home Assistant — and because every home is different, you teach it yourself, in minutes, without writing code or leaving Home Assistant:
- 📸 Train by clicking — look at the live image and press the matching state (or keys
1–9). The model retrains in about a second after every click. - 🐕 Find objects without training — people, cars, bicycles, cats, dogs and 75 more, with a count and an on/off sensor for each. Pick them, done.
- 🔢 Read numbers — power meters, the rolling digits of water and gas meters, prices, the minutes left on the washing machine. Counters only go up and land straight in the Energy dashboard; implausible readings are rejected.
- 🎯 Watch only what matters — draw a box (or any shape) around the door or the driveway; the AI ignores everything else.
- 📦 Bulk upload — drop images, ZIP archives or a video; frames are extracted, duplicates skipped, and the current model suggests a label for each one.
- ⚡ Smart triggers — check when a motion sensor, door contact or the garage opener changes, or when the image itself changes. No more polling every few seconds.
- 🩺 Finds its own mistakes — flags training images whose label looks wrong, so one slip doesn't drag the sensor down.
- 🔁 Gets better as you use it — a review queue collects the frames the AI was unsure about; one click turns them into training data.
- 🧠 Runs locally on any CPU — Intel, AMD and Raspberry Pi 4/5. No cloud, no GPU, no subscription.
- 🏠 Native Home Assistant — sidebar app with Ingress; sensors appear through MQTT discovery.
- 🎥 Any camera — every
camera.*entity in Home Assistant (ESP32-CAM, IP cameras, NVRs…), or a direct RTSP / HTTP snapshot URL.
A look inside
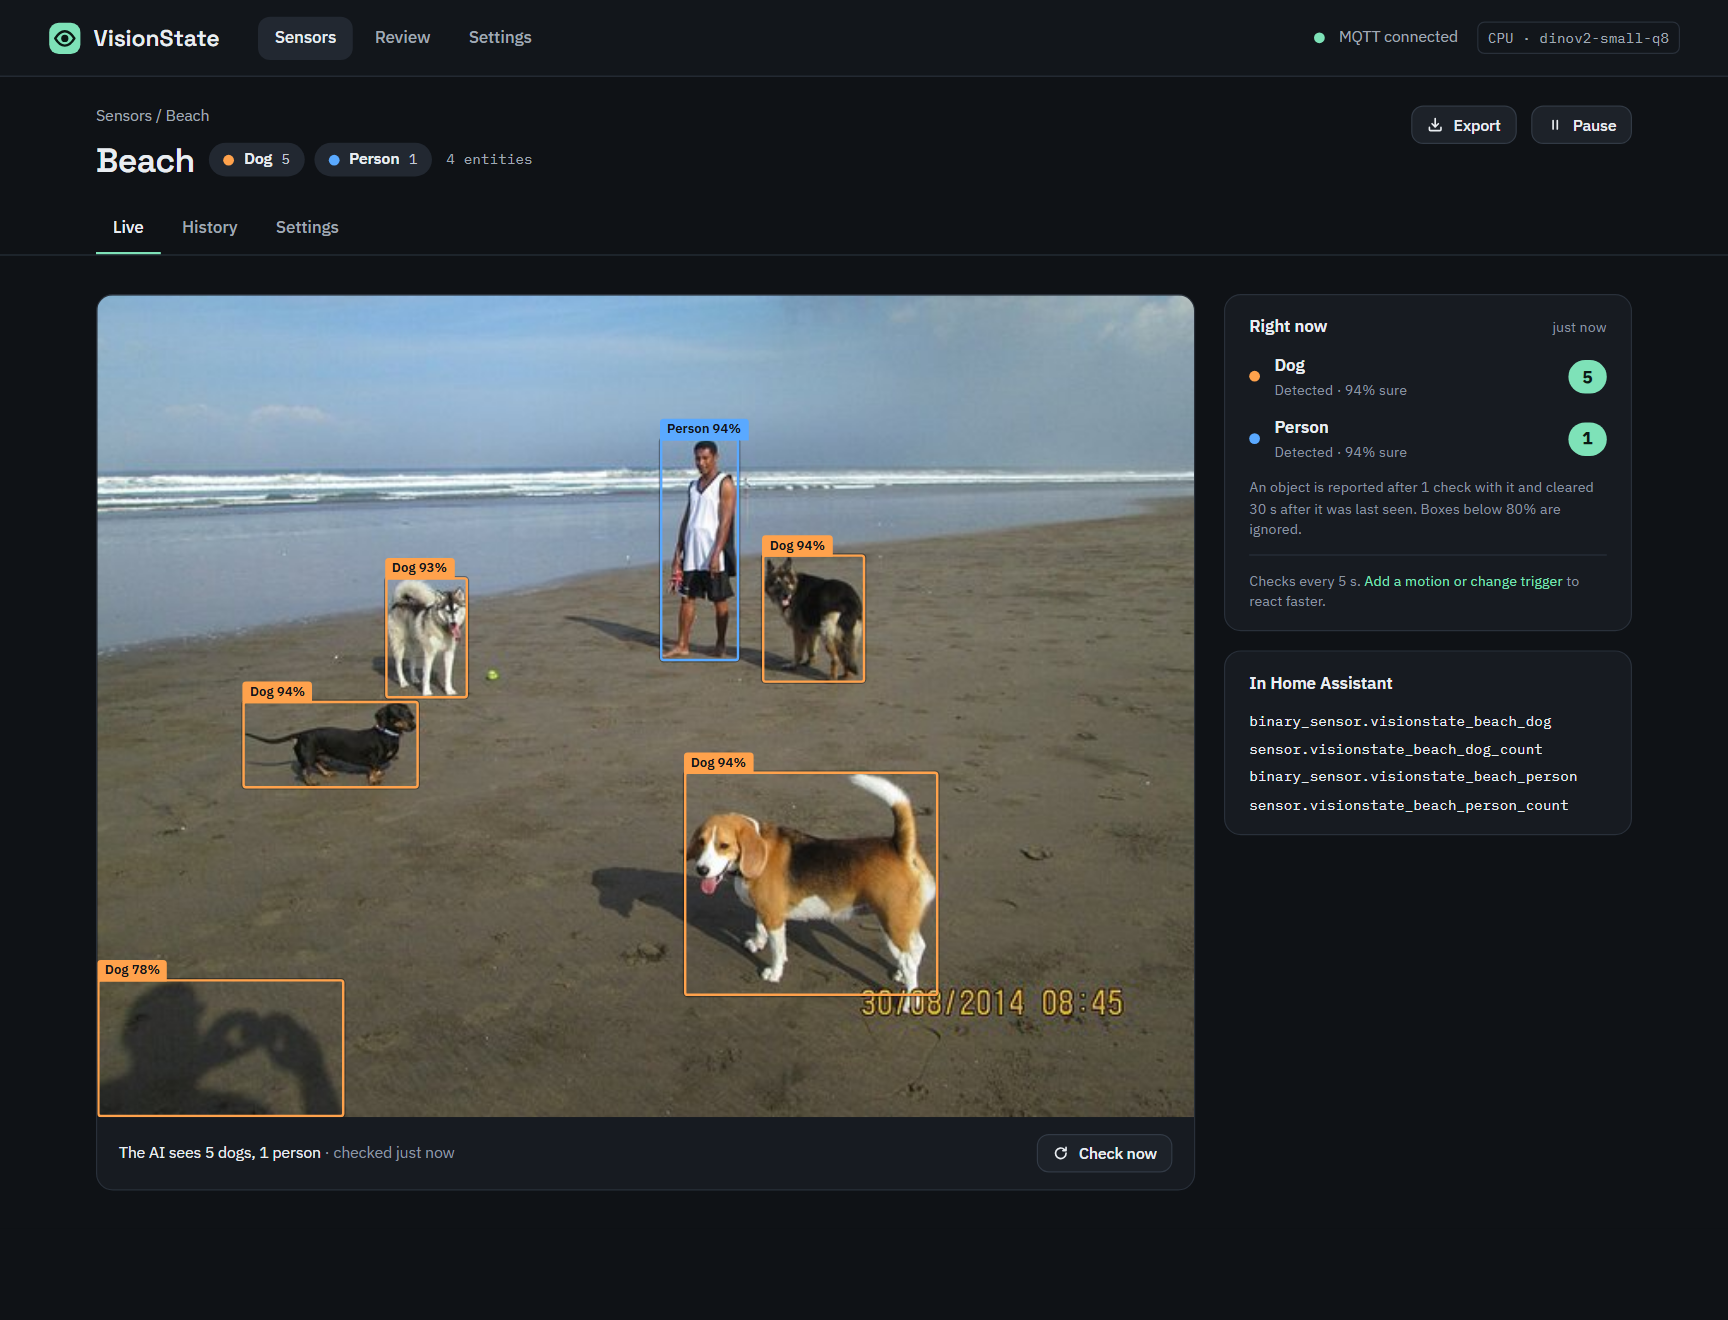 | 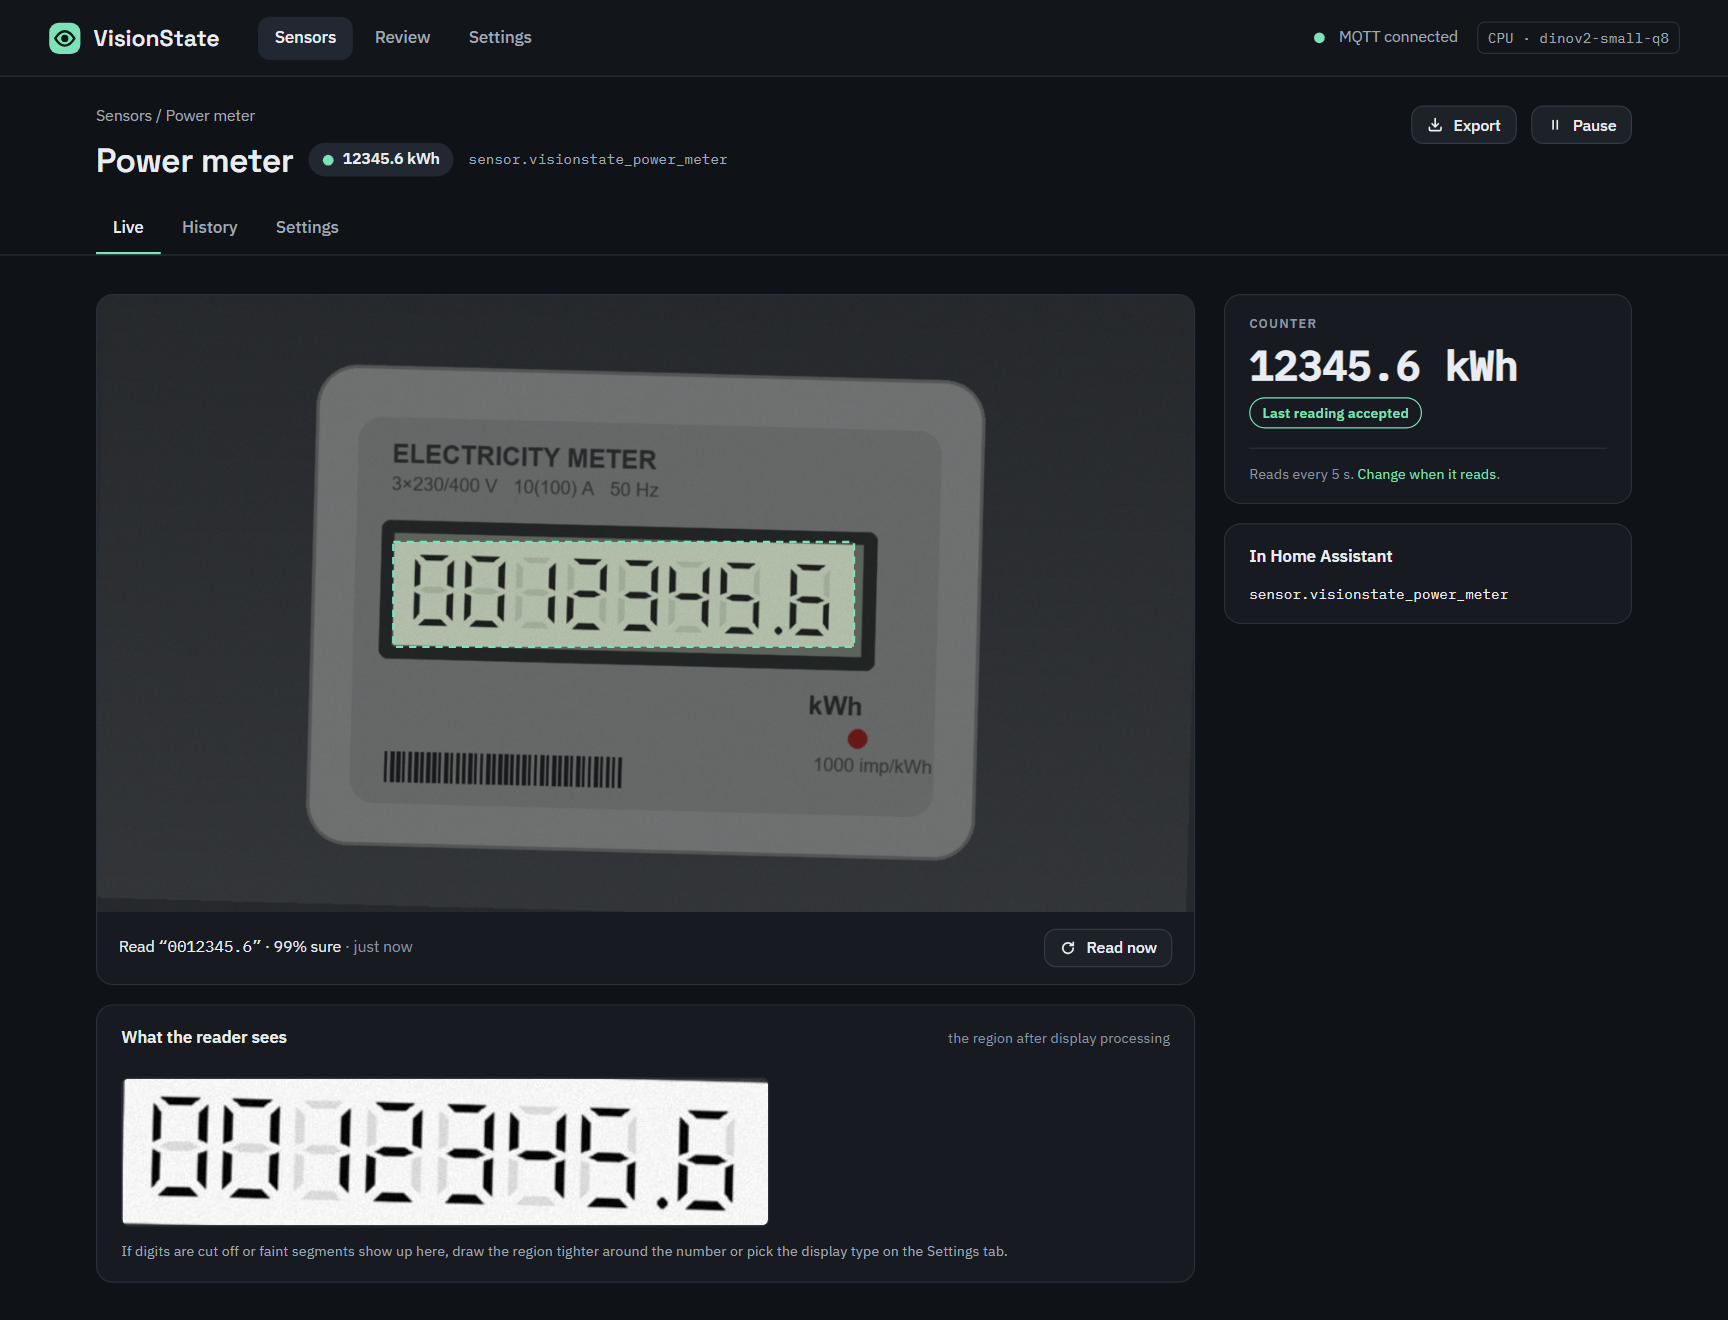 |
| Objects — people, cars, animals and more, found without any training. Each one becomes an on/off sensor and a count in Home Assistant. | Reading — the number on a display or on the rolling wheels of a water or gas meter, checked before it is published: a counter never goes down. |
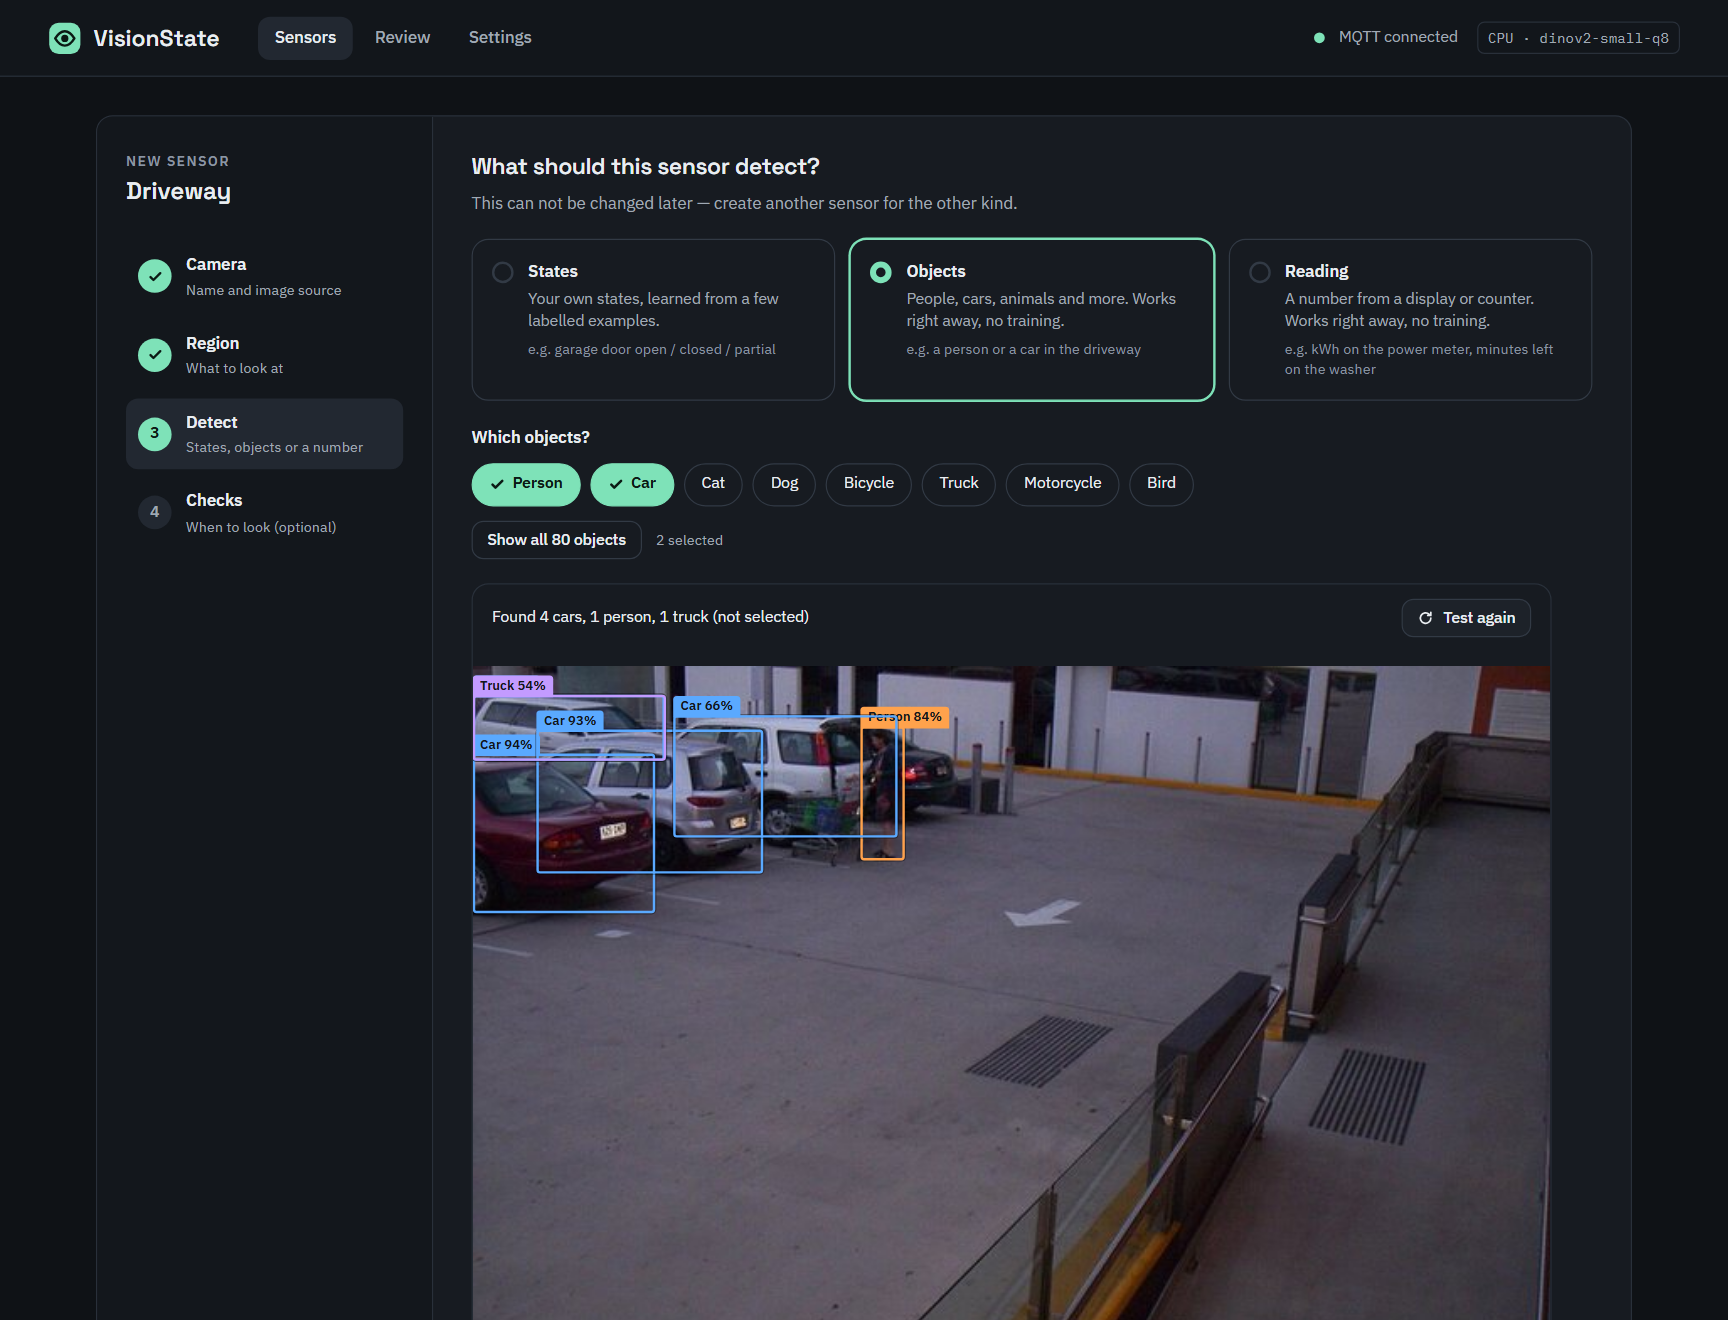 | |
| New sensor — pick a camera, draw the region and choose what to detect: your own states, objects or a number. The wizard tests it on a fresh frame right away. | |
In Home Assistant
Every sensor is a normal Home Assistant device, set up automatically through MQTT discovery — ready for dashboards, automations and the history graph.
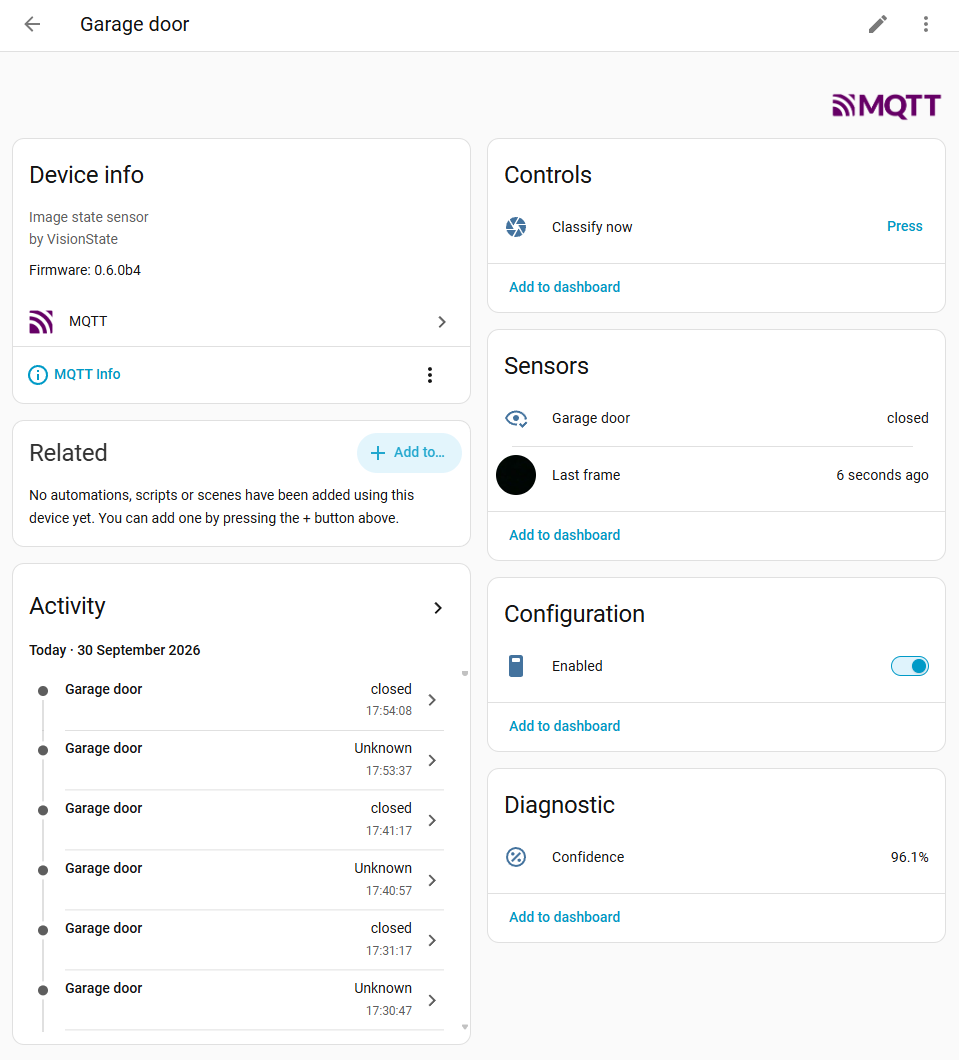 | 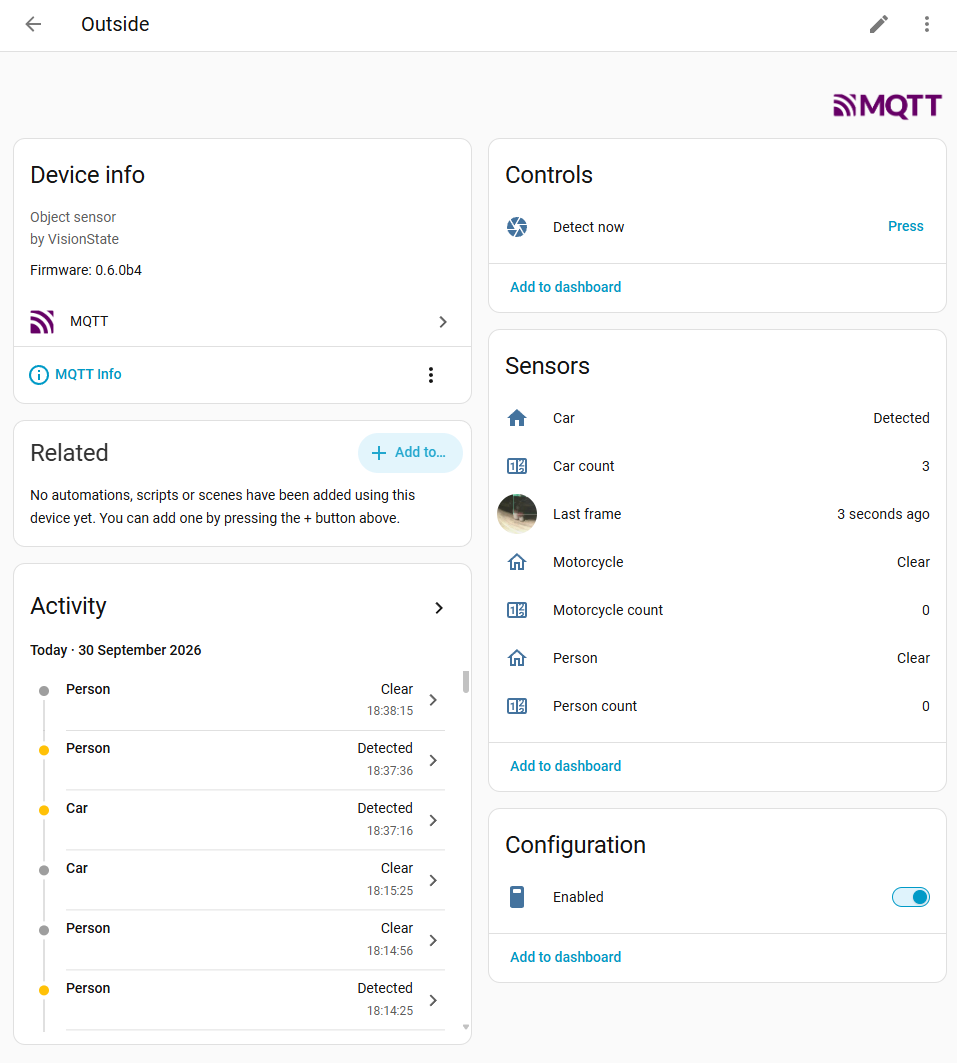 |
State sensor — the state (closed, open, …) with its confidence, the last frame, a button to check now and a switch to pause it. | Object sensor — an on/off sensor and a count for every object you picked, plus the last frame with the boxes drawn in. |
Install
Requirements: Home Assistant OS or Supervised, the Mosquitto broker app and the MQTT integration, and at least one camera.
- Click Add repository above — or go to Settings → Apps (called Add-ons in older
versions) → App store → ⋮ → Repositories and add
https://github.com/oleost/VisionState. - Install VisionState (it downloads a ready-made image for your machine).
- Start it and open VisionState from the sidebar.
Beta channel
New features are released as beta first and move to the stable app once they are tested. To
help test them, add https://github.com/oleost/VisionState#beta as a repository and install
VisionState (beta).
- The beta is a separate app with its own data; move sensors over with Export (stable) and Import (beta). Entity ids stay the same, so automations keep working.
- Run only one of the two apps at a time — both publish the same sensors.
Get your first sensor in five minutes
- New sensor → name it, pick a camera.
- Draw a box around the thing to watch (drag its corners to shape it to the object).
- Name the states, e.g. Open, Closed, Partial.
- On the Label tab, press the matching state a few times for each situation — about 20 per state, including some at night.
- Under Settings → When to check, add your motion sensor or garage opener as a trigger.
That's it — sensor.visionstate_garage_door is now in Home Assistant:
| Entity | What it is |
|---|---|
sensor.visionstate_<name> | The state (open, closed, …) — or unknown when the AI isn't sure |
sensor.visionstate_<name>_confidence | How sure the AI is, in % |
image.visionstate_<name>_frame | The region that was classified |
button.visionstate_<name>_classify | Check right now (handy in automations) |
switch.visionstate_<name>_enabled | Pause / resume |
sensor.visionstate_review_queue | Frames waiting for review (all sensors) |
# Example: notify when the garage door has been open for 10 minutes
alias: Garage door left open
triggers:
  - trigger: state
    entity_id: sensor.visionstate_garage_door
    to: open
    for: "00:10:00"
actions:
  - action: notify.mobile_app_phone
    data:
      message: The garage door has been open for 10 minutes.
The full user guide is in visionstate/DOCS.md (also on the app's
Documentation tab).
How it works
camera ─► crop to your region ─► DINOv2 (ONNX, 8-bit) ─► feature vector ─► tiny per-sensor classifier
                                                                                     │
Home Assistant ◄── MQTT discovery ◄── debounce + "unknown" below threshold ◄─────────┘
A pre-trained vision model (DINOv2) turns the region into a feature vector. On top of that, each sensor gets its own small classifier trained on your labelled images — which is why a handful of examples is enough and training takes about a second. Results are debounced so someone walking past doesn't flip the state.
Object sensors use a pretrained detector instead (D-FINE, Apache-2.0, trained on the COCO objects). It finds every object in the region; each object you picked is reported with a count and cleared a while after it was last seen.
Reading sensors read the digits in the region with a small text recognizer (PaddleOCR, Apache-2.0) that may only output digits, then check the value (a counter never goes down) before publishing it.
Everything stays on your machine: images live in /media/visionstate, models and settings in
the app's data folder (included in Home Assistant backups).
Privacy & security
- 100 % local — no cloud services, no telemetry.
- Only reachable through Home Assistant Ingress (requires a Home Assistant login).
- Camera passwords are hidden in logs and removed from exported sensor bundles.
Development
visionstate/            Home Assistant app (config.yaml, Dockerfile, docs)
  backend/              Python 3.14 · FastAPI · ONNX Runtime · scikit-learn
  frontend/             Svelte 5 · Vite · TypeScript
scripts/channel.py      Switches the app config between the stable and beta channel
scripts/fake_camera.py  A fake camera (garage door, real photos, drawn displays and counters) for local testing
docs/SCOPE.md           Design as built, decisions and roadmap
CLAUDE.md               Contributor guide: conventions, how to test and verify, release steps
New features land on the beta branch first and reach main (stable) only after testing;
please open pull requests against beta. CLAUDE.md explains the conventions, how to
test changes locally (fake camera, MQTT, UI tests on desktop and phone) and the pitfalls we ran
into — it is written for people and AI coding assistants alike.
Run it locally
Backend:
cd visionstate/backend
python3.14 -m venv .venv && . .venv/bin/activate  # Windows: py -3.14 -m venv .venv; .venv\Scripts\activate
pip install -r requirements-dev.txt
python -m visionstate.backbones models            # download the bundled model once
pytest
VISIONSTATE_DATA=./dev/data VISIONSTATE_MEDIA=./dev/media VISIONSTATE_BUNDLED_MODELS=./models \
  HA_URL=http://homeassistant.local:8123 HA_TOKEN=<long-lived token> \
  VISIONSTATE_MQTT_HOST=<broker> python -m visionstate
⚠️ Outside Home Assistant the app has no login: anyone who can reach port 8099 can use it. Only run it like this on your own machine or behind a reverse proxy with authentication.
Frontend (proxies /api to the backend on port 8099):
cd visionstate/frontend
npm install
npm run dev
UI tests (Playwright) start the backend and a fake camera by themselves and run every page on a desktop browser and on an emulated phone with touch:
cd visionstate/frontend
npx playwright install chromium   # once
npm run build
VS_PYTHON=../backend/.venv/bin/python npm run e2e
Issues and ideas are welcome in GitHub Issues.
Licence
Apache-2.0. The bundled models are Apache-2.0 as well: DINOv2 (Meta), D-FINE and PaddleOCR PP-OCRv6.
If VisionState is useful to you, you can buy me a coffee ☕
Similar repos


Languages
Python
53.3%
Svelte
33.2%
TypeScript
11.8%
CSS
1.4%
Teach a local AI what your camera sees and turn it into Home Assistant sensors — garage door open/closed, gate shut, car parked. 100% local, any CPU.
Python
20
70 commits
updated Oct 3, 2026
See what people are saying
README
Teach a local AI what your camera sees — and turn it into a Home Assistant sensor.
Garage door open, closed or halfway? Gate shut? Click a few examples and you have a sensor.
Person at the door, car in the driveway, cat on the lawn? Pick the objects — no training needed.
kWh on the meter, minutes left on the washer? Read the number.
Why VisionState?
Your cameras already see whether the garage door is half open, the gate is shut or the lights in the shed are still on. VisionState turns what they see into states you can use in Home Assistant — and because every home is different, you teach it yourself, in minutes, without writing code or leaving Home Assistant:
- 📸 Train by clicking — look at the live image and press the matching state (or keys
1–9). The model retrains in about a second after every click. - 🐕 Find objects without training — people, cars, bicycles, cats, dogs and 75 more, with a count and an on/off sensor for each. Pick them, done.
- 🔢 Read numbers — power meters, the rolling digits of water and gas meters, prices, the minutes left on the washing machine. Counters only go up and land straight in the Energy dashboard; implausible readings are rejected.
- 🎯 Watch only what matters — draw a box (or any shape) around the door or the driveway; the AI ignores everything else.
- 📦 Bulk upload — drop images, ZIP archives or a video; frames are extracted, duplicates skipped, and the current model suggests a label for each one.
- ⚡ Smart triggers — check when a motion sensor, door contact or the garage opener changes, or when the image itself changes. No more polling every few seconds.
- 🩺 Finds its own mistakes — flags training images whose label looks wrong, so one slip doesn't drag the sensor down.
- 🔁 Gets better as you use it — a review queue collects the frames the AI was unsure about; one click turns them into training data.
- 🧠 Runs locally on any CPU — Intel, AMD and Raspberry Pi 4/5. No cloud, no GPU, no subscription.
- 🏠 Native Home Assistant — sidebar app with Ingress; sensors appear through MQTT discovery.
- 🎥 Any camera — every
camera.*entity in Home Assistant (ESP32-CAM, IP cameras, NVRs…), or a direct RTSP / HTTP snapshot URL.
A look inside
| |
| Objects — people, cars, animals and more, found without any training. Each one becomes an on/off sensor and a count in Home Assistant. | Reading — the number on a display or on the rolling wheels of a water or gas meter, checked before it is published: a counter never goes down. |
| |
| New sensor — pick a camera, draw the region and choose what to detect: your own states, objects or a number. The wizard tests it on a fresh frame right away. | |
In Home Assistant
Every sensor is a normal Home Assistant device, set up automatically through MQTT discovery — ready for dashboards, automations and the history graph.
| |
State sensor — the state (closed, open, …) with its confidence, the last frame, a button to check now and a switch to pause it. | Object sensor — an on/off sensor and a count for every object you picked, plus the last frame with the boxes drawn in. |
Install
Requirements: Home Assistant OS or Supervised, the Mosquitto broker app and the MQTT integration, and at least one camera.
- Click Add repository above — or go to Settings → Apps (called Add-ons in older
versions) → App store → ⋮ → Repositories and add
https://github.com/oleost/VisionState. - Install VisionState (it downloads a ready-made image for your machine).
- Start it and open VisionState from the sidebar.
Beta channel
New features are released as beta first and move to the stable app once they are tested. To
help test them, add https://github.com/oleost/VisionState#beta as a repository and install
VisionState (beta).
- The beta is a separate app with its own data; move sensors over with Export (stable) and Import (beta). Entity ids stay the same, so automations keep working.
- Run only one of the two apps at a time — both publish the same sensors.
Get your first sensor in five minutes
- New sensor → name it, pick a camera.
- Draw a box around the thing to watch (drag its corners to shape it to the object).
- Name the states, e.g. Open, Closed, Partial.
- On the Label tab, press the matching state a few times for each situation — about 20 per state, including some at night.
- Under Settings → When to check, add your motion sensor or garage opener as a trigger.
That's it — sensor.visionstate_garage_door is now in Home Assistant:
| Entity | What it is |
|---|---|
sensor.visionstate_<name> | The state (open, closed, …) — or unknown when the AI isn't sure |
sensor.visionstate_<name>_confidence | How sure the AI is, in % |
image.visionstate_<name>_frame | The region that was classified |
button.visionstate_<name>_classify | Check right now (handy in automations) |
switch.visionstate_<name>_enabled | Pause / resume |
sensor.visionstate_review_queue | Frames waiting for review (all sensors) |
# Example: notify when the garage door has been open for 10 minutes
alias: Garage door left open
triggers:
  - trigger: state
    entity_id: sensor.visionstate_garage_door
    to: open
    for: "00:10:00"
actions:
  - action: notify.mobile_app_phone
    data:
      message: The garage door has been open for 10 minutes.
The full user guide is in visionstate/DOCS.md (also on the app's
Documentation tab).
How it works
camera ─► crop to your region ─► DINOv2 (ONNX, 8-bit) ─► feature vector ─► tiny per-sensor classifier
                                                                                     │
Home Assistant ◄── MQTT discovery ◄── debounce + "unknown" below threshold ◄─────────┘
A pre-trained vision model (DINOv2) turns the region into a feature vector. On top of that, each sensor gets its own small classifier trained on your labelled images — which is why a handful of examples is enough and training takes about a second. Results are debounced so someone walking past doesn't flip the state.
Object sensors use a pretrained detector instead (D-FINE, Apache-2.0, trained on the COCO objects). It finds every object in the region; each object you picked is reported with a count and cleared a while after it was last seen.
Reading sensors read the digits in the region with a small text recognizer (PaddleOCR, Apache-2.0) that may only output digits, then check the value (a counter never goes down) before publishing it.
Everything stays on your machine: images live in /media/visionstate, models and settings in
the app's data folder (included in Home Assistant backups).
Privacy & security
- 100 % local — no cloud services, no telemetry.
- Only reachable through Home Assistant Ingress (requires a Home Assistant login).
- Camera passwords are hidden in logs and removed from exported sensor bundles.
Development
visionstate/            Home Assistant app (config.yaml, Dockerfile, docs)
  backend/              Python 3.14 · FastAPI · ONNX Runtime · scikit-learn
  frontend/             Svelte 5 · Vite · TypeScript
scripts/channel.py      Switches the app config between the stable and beta channel
scripts/fake_camera.py  A fake camera (garage door, real photos, drawn displays and counters) for local testing
docs/SCOPE.md           Design as built, decisions and roadmap
CLAUDE.md               Contributor guide: conventions, how to test and verify, release steps
New features land on the beta branch first and reach main (stable) only after testing;
please open pull requests against beta. CLAUDE.md explains the conventions, how to
test changes locally (fake camera, MQTT, UI tests on desktop and phone) and the pitfalls we ran
into — it is written for people and AI coding assistants alike.
Run it locally
Backend:
cd visionstate/backend
python3.14 -m venv .venv && . .venv/bin/activate  # Windows: py -3.14 -m venv .venv; .venv\Scripts\activate
pip install -r requirements-dev.txt
python -m visionstate.backbones models            # download the bundled model once
pytest
VISIONSTATE_DATA=./dev/data VISIONSTATE_MEDIA=./dev/media VISIONSTATE_BUNDLED_MODELS=./models \
  HA_URL=http://homeassistant.local:8123 HA_TOKEN=<long-lived token> \
  VISIONSTATE_MQTT_HOST=<broker> python -m visionstate
⚠️ Outside Home Assistant the app has no login: anyone who can reach port 8099 can use it. Only run it like this on your own machine or behind a reverse proxy with authentication.
Frontend (proxies /api to the backend on port 8099):
cd visionstate/frontend
npm install
npm run dev
UI tests (Playwright) start the backend and a fake camera by themselves and run every page on a desktop browser and on an emulated phone with touch:
cd visionstate/frontend
npx playwright install chromium   # once
npm run build
VS_PYTHON=../backend/.venv/bin/python npm run e2e
Issues and ideas are welcome in GitHub Issues.
Licence
Apache-2.0. The bundled models are Apache-2.0 as well: DINOv2 (Meta), D-FINE and PaddleOCR PP-OCRv6.
If VisionState is useful to you, you can buy me a coffee ☕
Similar repos
Languages
Python
53.3%
Svelte
33.2%
TypeScript
11.8%
CSS
1.4%