CISO Assistant is a one-stop-shop GRC platform for Risk Management, AppSec, Compliance & Audit, TPRM, BIA, Privacy, and Reporting. It supports 200+ global frameworks with automatic control mapping, including ISO 27001, NIST CSF, SOC 2, CIS, PCI DSS, NIS2, DORA, GDPR, HIPAA, CMMC, and more.
See the codeStar the project 🌟 to get releases notification and help growing the community!
intuitem.com
·
SaaS Free trial
·
Roadmap
·
Docs
·
Languages
·
Discord
·
Frameworks






CISO Assistant offers a fresh perspective on Cybersecurity Management and GRC (Governance, Risk, and Compliance) practices:
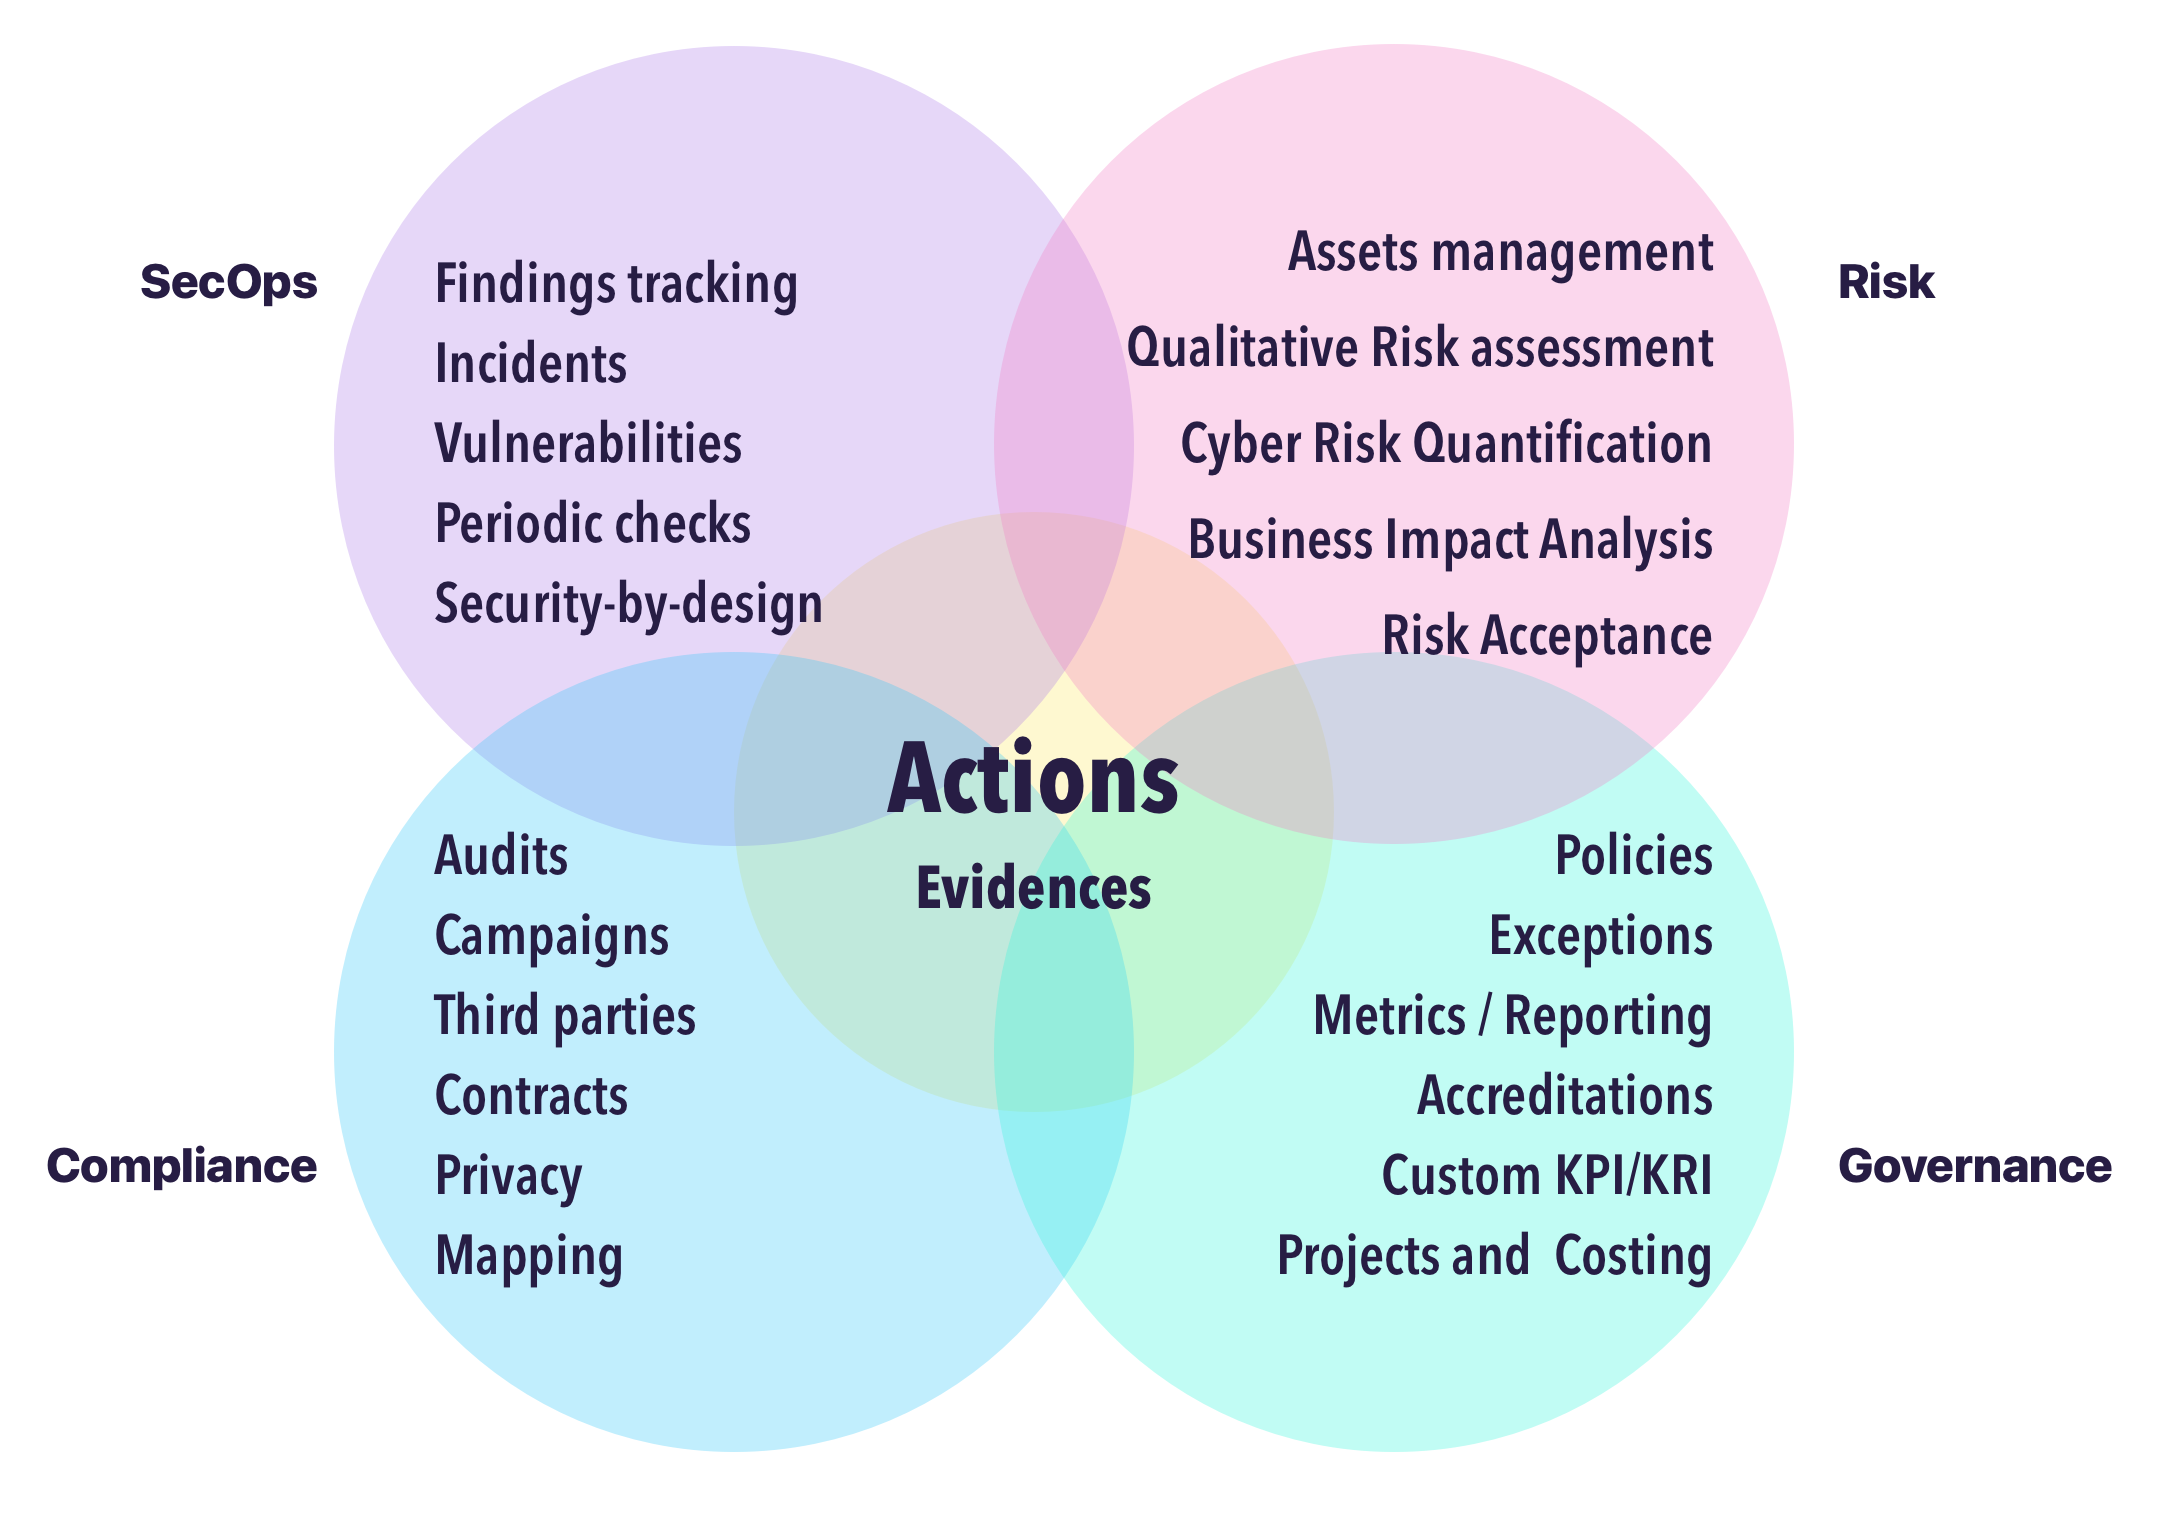
Our vision is to create a one-stop-shop for cybersecurity management—modernizing GRC through simplification and interoperability.
As practitioners working with cybersecurity and IT professionals, we've faced the same issues: tool fragmentation, data duplication, and a lack of intuitive, integrated solutions. CISO Assistant was born from those lessons, and we're building a community around pragmatic, common-sense principles.
We’re constantly evolving with input from users and customers. Like an octopus 🐙, CISO Assistant keeps growing extra arms—bringing clarity, automation, and productivity to cybersecurity teams while reducing the effort of data input and output.




[!TIP] The easiest way to get started is through the free trial of cloud instance available here.
Alternatively, once you have Docker and Docker-compose installed, on your workstation or server:
clone the repo:
git clone --single-branch -b main https://github.com/intuitem/ciso-assistant-community.git
and run the starter script
./docker-compose.sh     # Linux/MacOS
./docker-compose.ps1    # Windows
If you are looking for other installation options for self-hosting, check the config builder and the docs.
[!NOTE] The docker-compose script uses prebuilt Docker images supporting most of the standard hardware architecture. If you're using Windows, make sure to have Docker Desktop with WSL2 installed and trigger the PowerShell script. It will feed Docker Desktop on your behalf.
The docker compose file can be adjusted to pass extra parameters to suit your setup (e.g. Mailer settings).
[!WARNING] If you're getting warnings or errors about image's platform not matching host platform, raise an issue with the details and we'll add it shortly after. You can also use
docker-compose-build.shinstead (see below) to build for your specific architecture.
[!CAUTION] Don't use the
mainbranch code directly for production as it's the merge upstream and can have breaking changes during our development. Either use thetagsfor stable versions or prebuilt images.
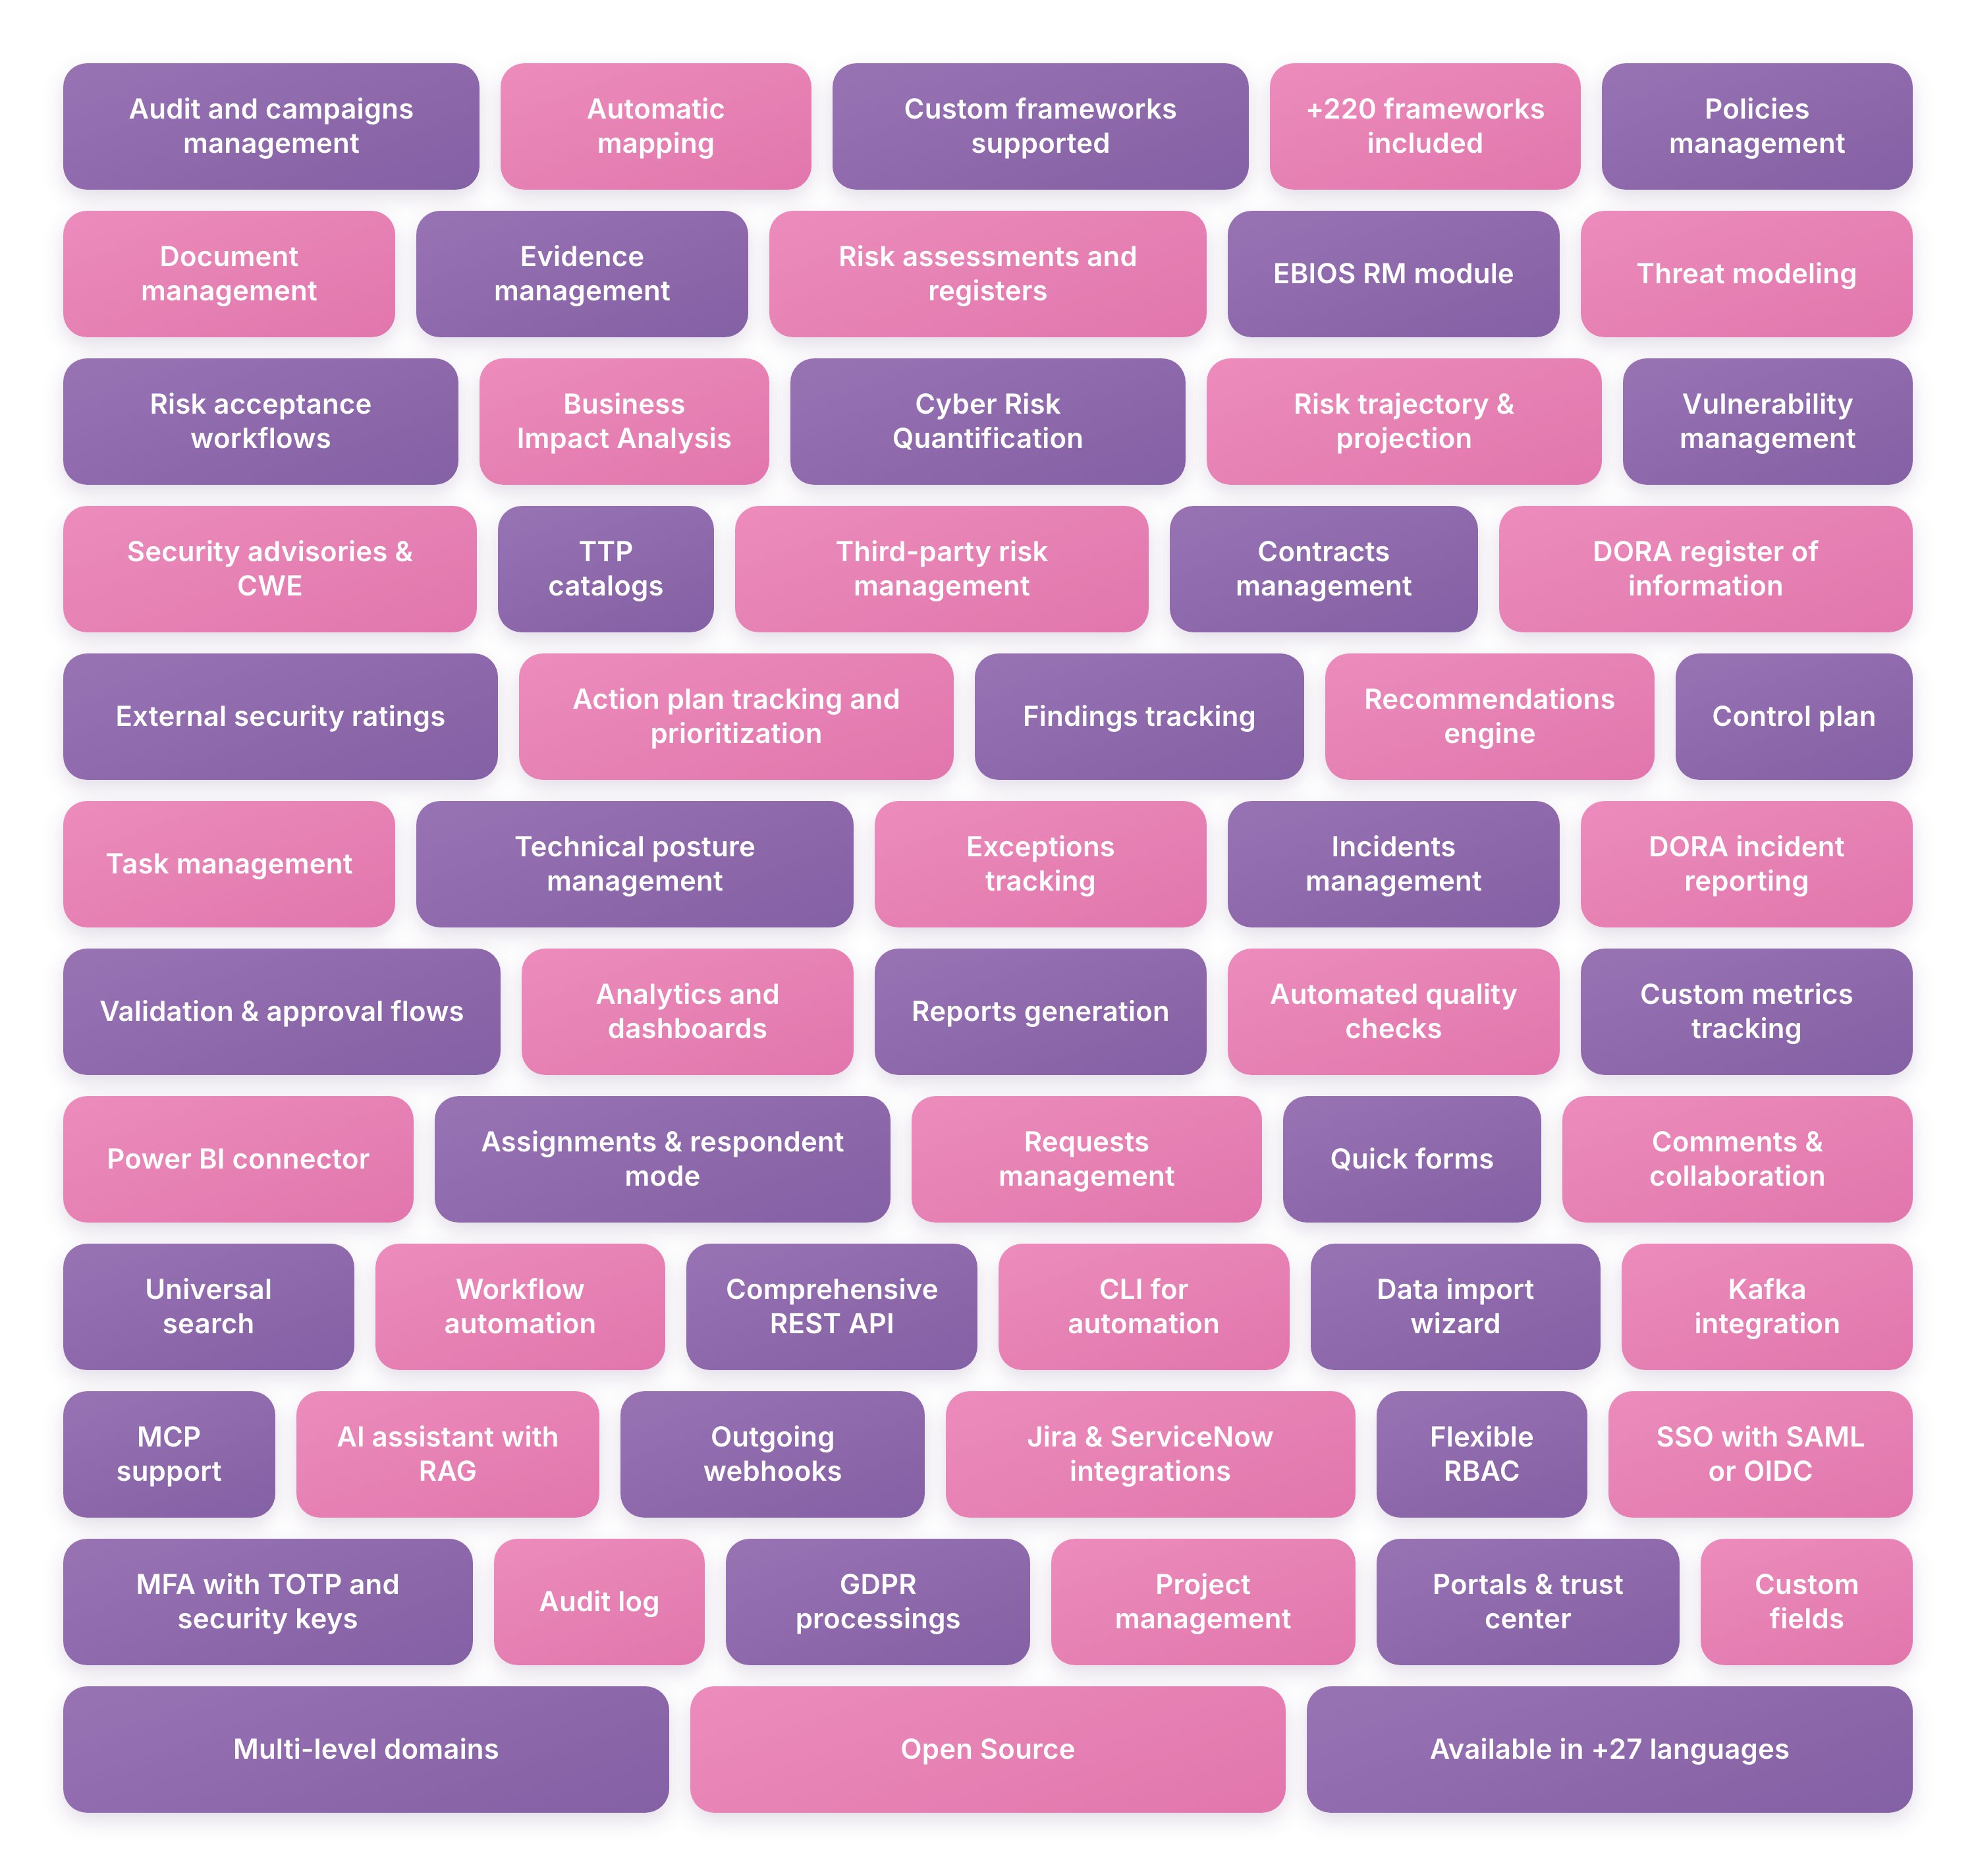
Compliance & frameworks
Risk management
Third-party risk
Operations & remediation
Reporting & analytics
Collaboration & productivity
Automation & integrations
Security & access
Privacy
Programme management
Platform
Upcoming features are listed on the roadmap.
CISO Assistant is developed and maintained by Intuitem, a company specialized in Cybersecurity, Cloud, and Data/AI.
Here’s an extract of some of the building blocks in CISO Assistant to illustrate the decoupling concept that encourages reusability:
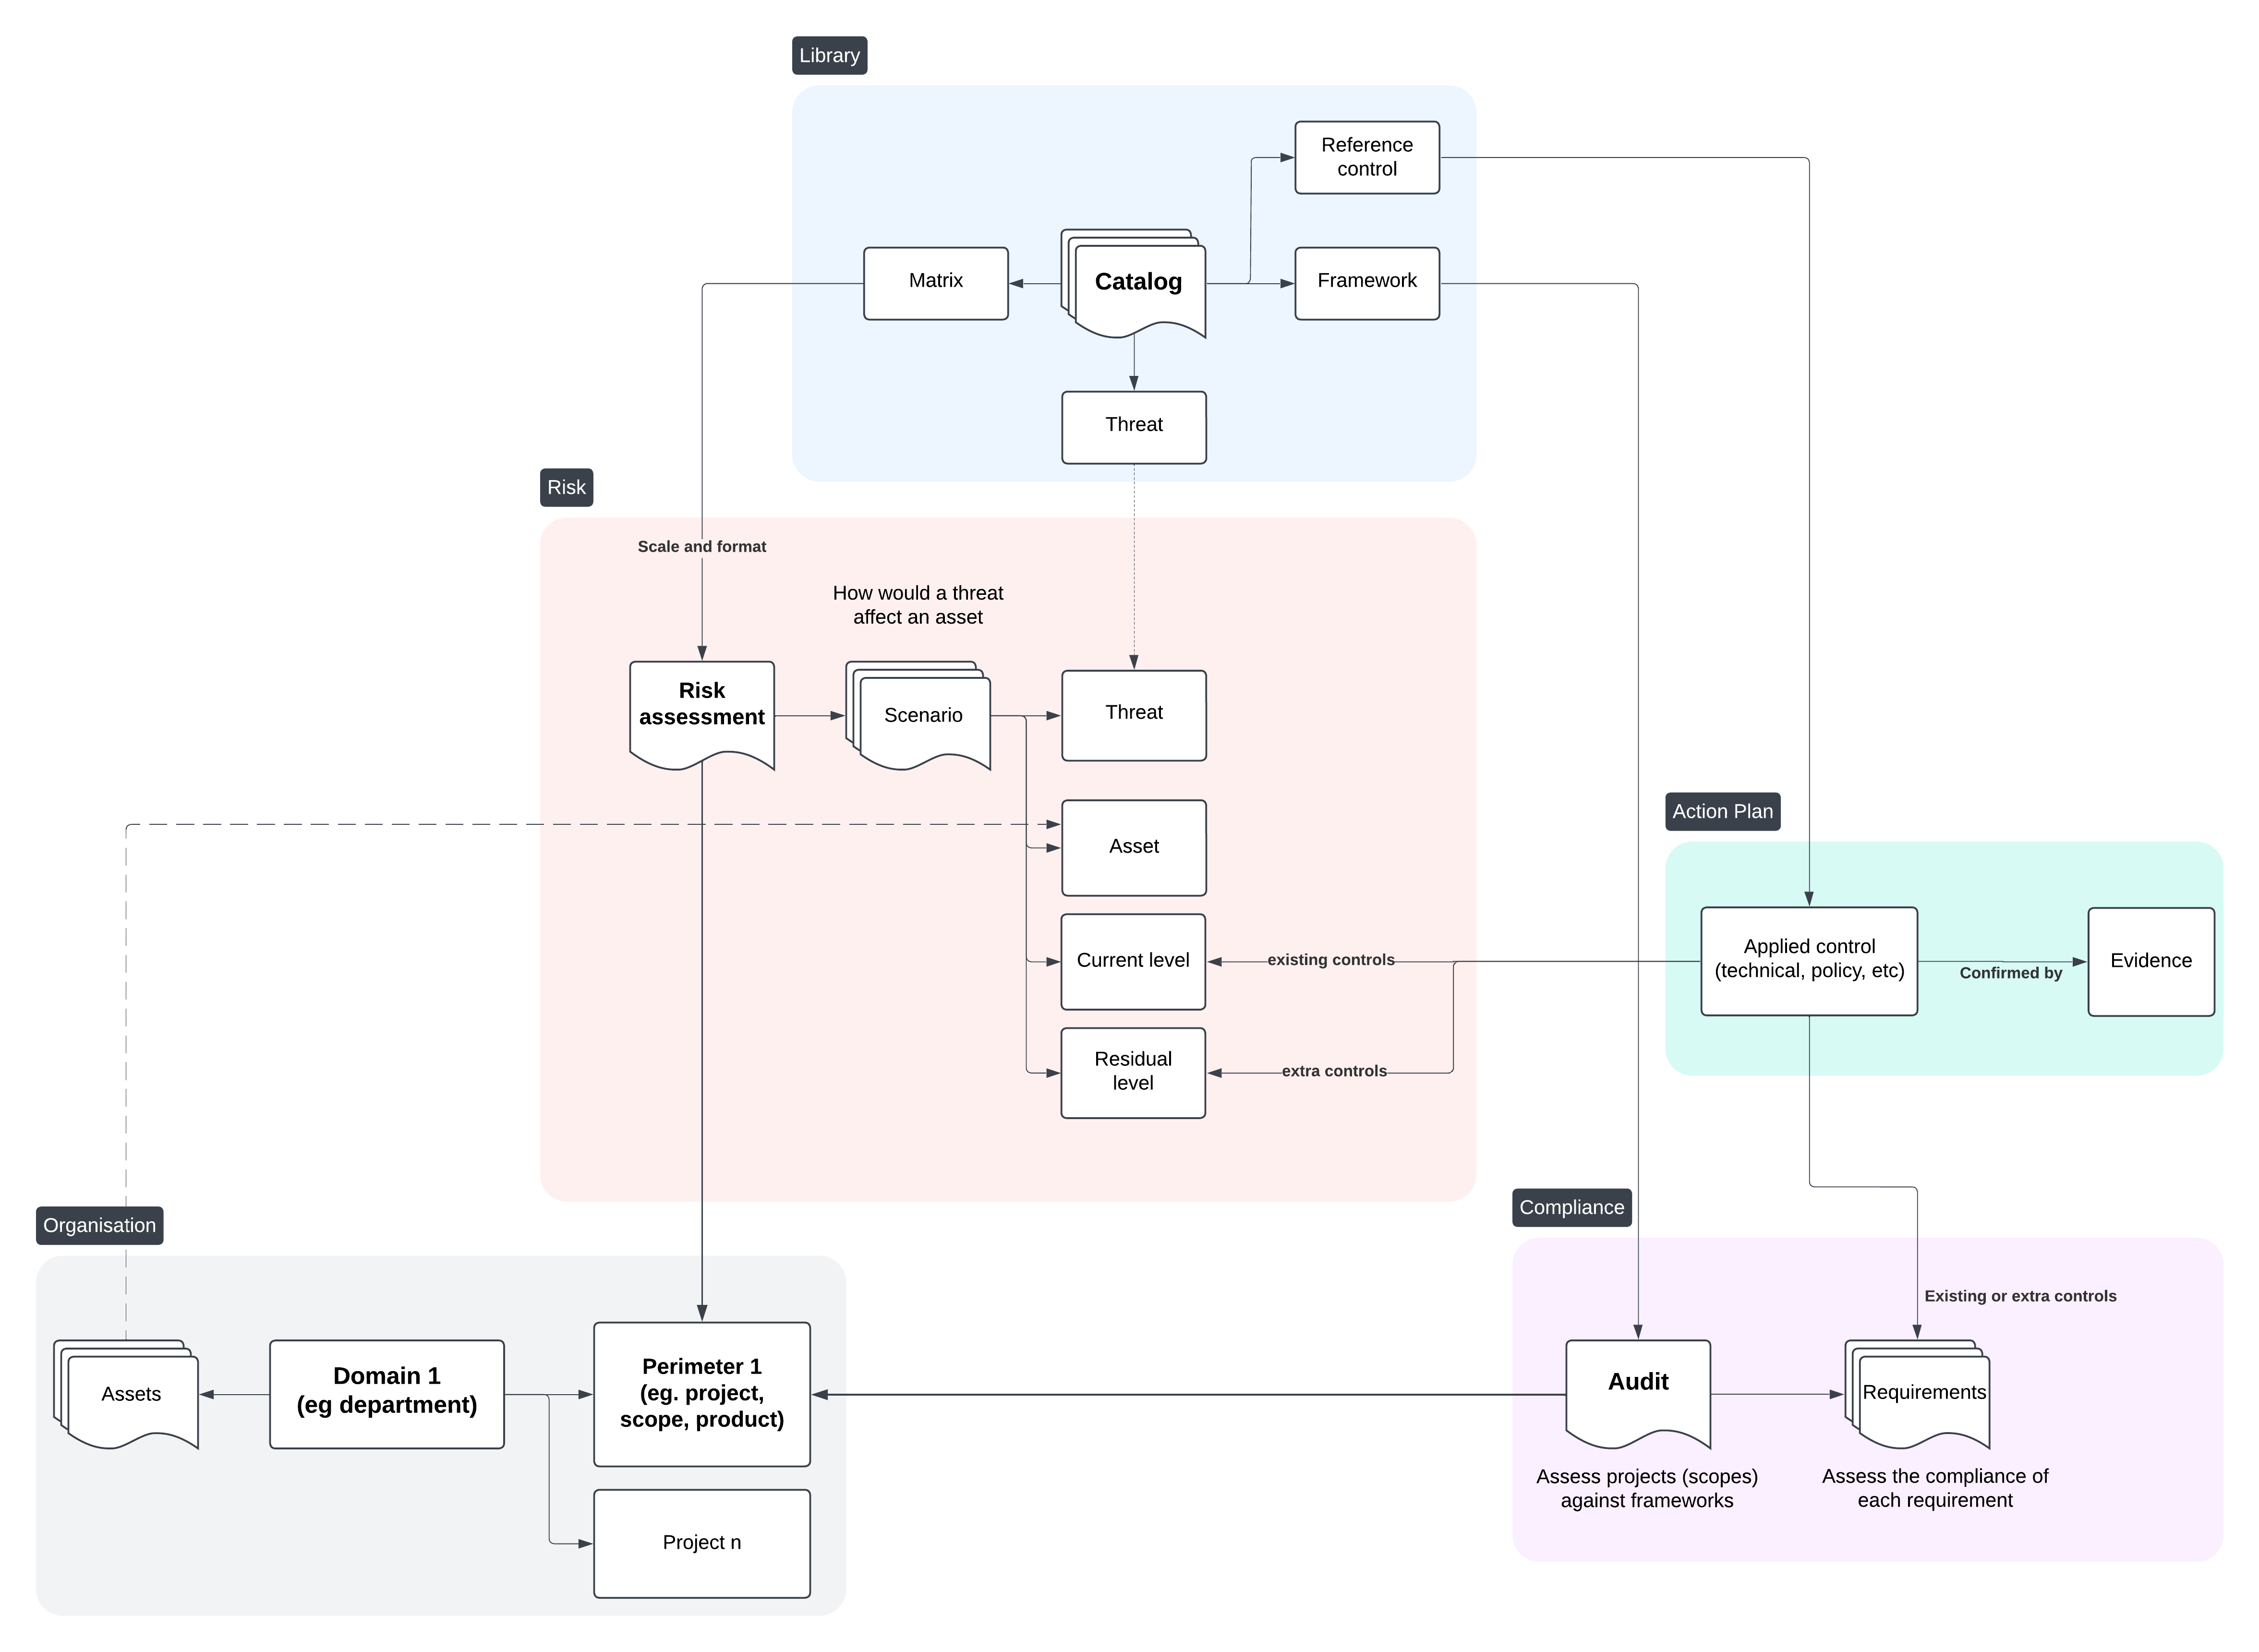
For full details, check the data model documentation.
At the heart of CISO Assistant lies the decoupling principle, which enables powerful use cases and major time savings:
Here is an illustration of the decoupling principle and its advantages:
https://github.com/user-attachments/assets/87bd4497-5cc2-4221-aeff-396f6b6ebe62
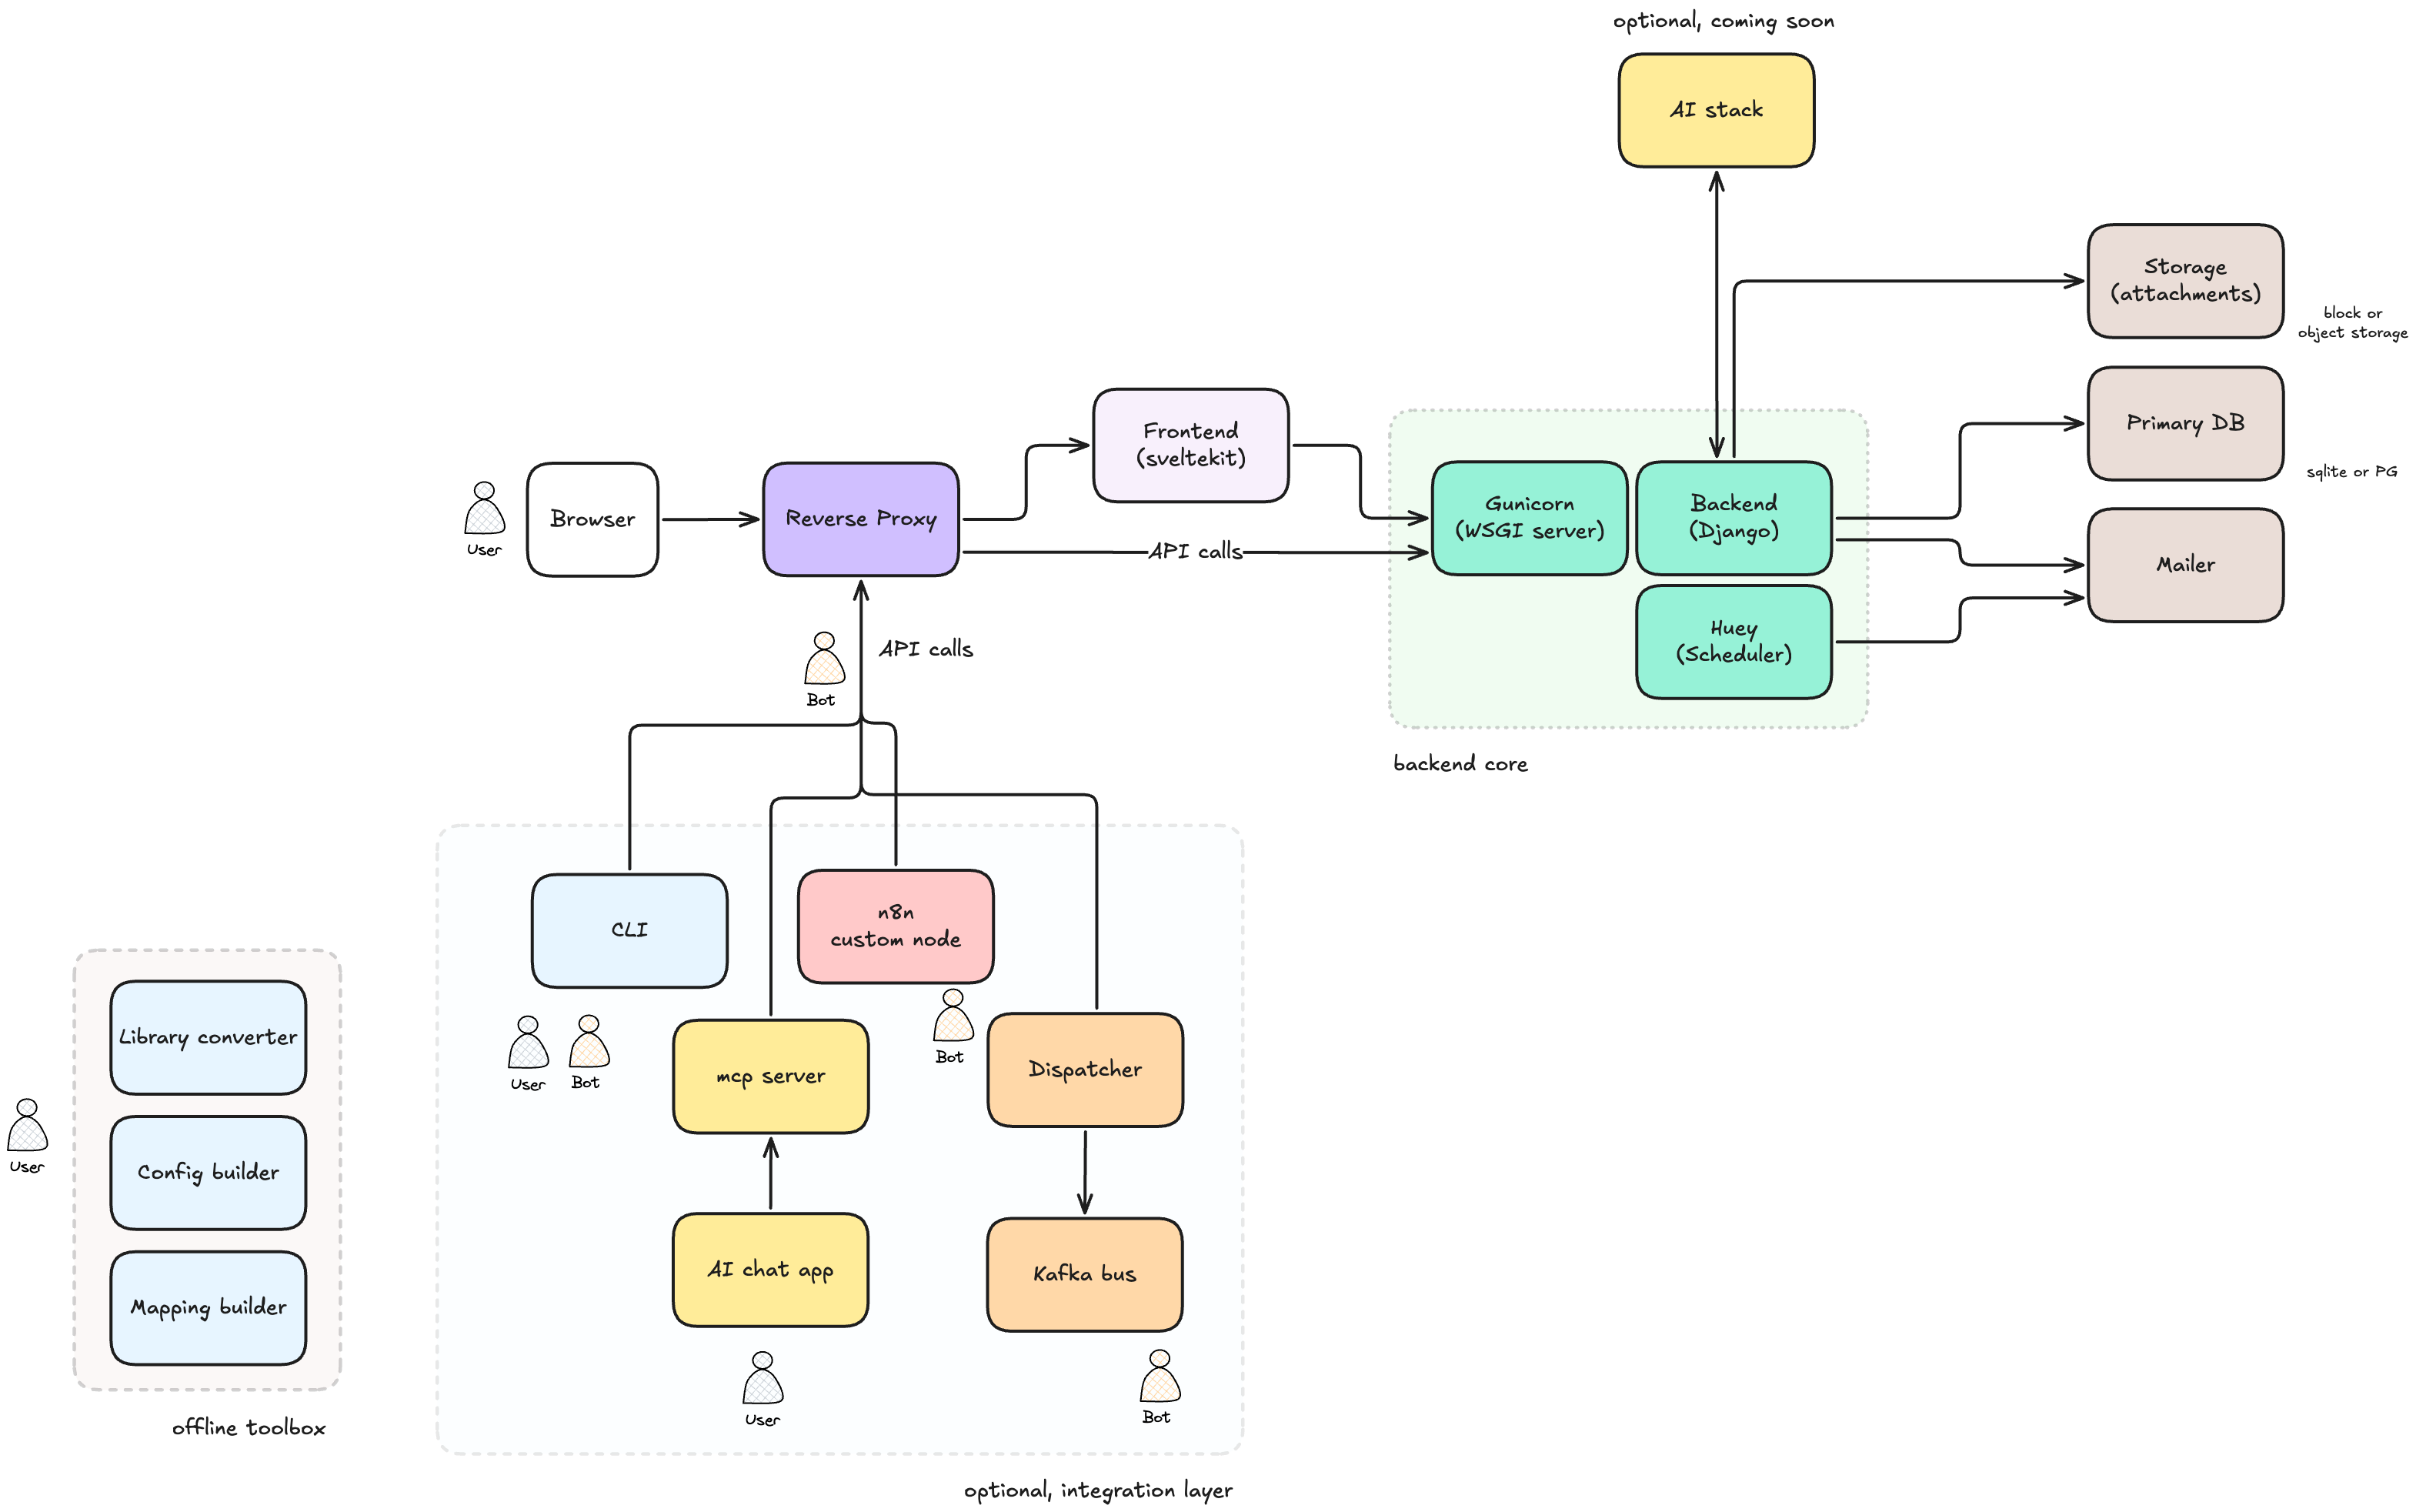
Check out the online documentation on https://intuitem.gitbook.io/ciso-assistant.
Read more here: AI engine
[!NOTE] Frameworks with
*require an extra manual step of getting the latest Excel sheet through their website as their license prevent direct usage. You can load the Excel sheet directly as a library.
Checkout the library and tools for the Domain Specific Language used and how you can define your own.
Indonesia PDP 🇮🇩
COBAC R-2024/01
ICO Data protection self-assessment 🇬🇧
ASD ISM 🇦🇺
and much more: just ask on Discord. If it's an open standard, we'll do it for you, free of charge 😉
A library can represent a framework, a threat catalog, a set of reference controls, or even a custom risk matrix.
Libraries can now be loaded directly from Excel files. There is no need to manually convert them to YAML beforehand—the conversion is handled internally when an Excel file is uploaded.
Take a look at the tools directory and its dedicated README, which describes the expected format of library source files in Excel. The excel subdirectory contains example XLSX files used as sources for the existing libraries and can be used as templates for creating your own.
To load a library from an Excel file, go to the Governance → Library page, click Load, and select your Excel source file. Any validation or parsing errors will be reported during the import process.
While Excel files can be loaded directly, it is still possible to convert library source files to YAML using external Python scripts:
convert_library_v2.py helps you generate a library from a simple Excel file. Once your items are structured in the expected format, run the script to produce the corresponding YAML file.tools directory also contains specialized converters for specific frameworks (for example, CIS or CCM Controls).To facilitate the creation of mappings between frameworks, you can use the prepare_mapping_v2.py tool. It generates an Excel file based on two existing framework libraries in YAML format. After filling in the mappings, the resulting Excel file can be:
convert_library_v2.py.Join our open Discord community to interact with the team and other GRC experts.
The fastest and easiest way to get started is through the free trial of cloud instance available here.
To run CISO Assistant locally in a straightforward way, you can use Docker compose.
Make sure you have a recent version of docker (>= 27.0).
git clone --single-branch -b main https://github.com/intuitem/ciso-assistant-community.git
cd ciso-assistant-community
./docker-compose.sh     # Linux/MacOS
./docker-compose.ps1    # Windows
Alternatively, you can use this variant to build the docker images for your specific architecture:
./docker-compose-build.sh     # Linux/MacOS
./docker-compose-build.ps1    # Windows
When asked for, enter your email and password for your superuser.
You can then reach CISO Assistant using your web browser at https://localhost:8443/
For the following executions, use "docker compose up" directly.
[!WARNING]
Important note for Windows users
The best working solution for users developing on Windows is to use Ubuntu installed on WSL2 (Docker is not required).
It is now also possible to run and develop CISO Assistant natively on Windows without WSL2 nor Docker, but it will require some extra steps. Please note that the native running on Windows is still in EXPERIMENTAL PHASE and should NOT be used if you are unsure of what you are doing, or if you want to ensure stability throughout development. Nevertheless, we would love to hear any suggestions in order to enhance the development experience for Windows users. Please feel free to open an Issue/PR about it!
brew install yaml-cpp libyaml or apt install libyaml-cpp-dev)If you want to develop the project without WSL2, you will need to install MSYS2, add the MSYS2 UCRT64 binaries to your system PATH environment variable (usually, the binaries are in C:\msys64\ucrt64\bin) and then install the following dependencies via pacman using MSYS2 UCRT64.
pacman -S mingw-w64-ucrt-x86_64-file mingw-w64-ucrt-x86_64-pango
You will also have to add those 2 system environment variables after installing the dependencies:
MAGIC=Full path to the `magic.mgc` file (usually `C:\msys64\ucrt64\share\misc\magic.mgc`)
WEASYPRINT_DLL_DIRECTORIES=Same path as your MSYS2 UCRT64 binaries
Given that the default encoding on Windows isn't UTF-8 but cp1252, certain python script printing UTF-8 characters such as emojis may cause the backend crash or malfunction in some cases (e.g. library importation).
To avoid this issue with this project, enforce the UTF-8 encoding by adding these 2 user environment variables:
PYTHONUTF8=1
PYTHONIOENCODING=utf-8:replace
[!NOTE]
Known issues
- The
libmagiclibrary on Windows (MIME detection) struggles to recognize an Excel file (.xlsx) by reading its first2048bits as it returnsapplication/octet-streammost of the time when importing an Excel library (backend displays the warning message[warning ] Invalid MIME type). This doesn't prevent the Excel file from being imported thanks to the fallback method inbackend/library/views.py:StoredLibraryViewSet.upload_library.
git clone git@github.com:intuitem/ciso-assistant-community.git
cd ciso-assistant-community
"<XXX>" by your private values. Take care not to commit this file in your git repo.Mandatory variables
All variables in the backend have handy default values.
Recommended variables
export DJANGO_DEBUG=True

# Default url is set to http://localhost:5173 but you can change it, e.g. to use https with a caddy proxy
export CISO_ASSISTANT_URL=https://localhost:8443

# Setup a development mailer with Mailpit for example
export EMAIL_HOST_USER=''
export EMAIL_HOST_PASSWORD=''
export DEFAULT_FROM_EMAIL=ciso-assistant@ciso-assistantcloud.com
export EMAIL_HOST=localhost
export EMAIL_PORT=1025
export EMAIL_USE_TLS=True  # true for STARTTLS
export EMAIL_USE_SSL=False # true for SMTPS
Other variables
# CISO Assistant will use SQLite by default, but you can setup PostgreSQL by declaring these variables
export POSTGRES_NAME=ciso-assistant
export POSTGRES_USER=ciso-assistantuser
export POSTGRES_PASSWORD=<XXX>
export POSTGRES_PASSWORD_FILE=<XXX>  # alternative way to specify password
export DB_HOST=localhost
export DB_PORT=5432  # optional, default value is 5432

# CISO Assistant will use filesystem storage backend by default.
# Only one cloud storage backend can be active at a time (USE_S3 and USE_AZURE are mutually exclusive).

# --- AWS S3 ---
# You can use a S3 Bucket by declaring these variables
# The S3 bucket must be created before starting CISO Assistant
export USE_S3=True
export AWS_STORAGE_BUCKET_NAME=<your-bucket-name>
export AWS_S3_REGION_NAME=<aws-region>  # optional, e.g., us-east-1

# S3 Authentication Option 1: Access Key (for standalone deployments or S3-compatible services)
export AWS_ACCESS_KEY_ID=<XXX>
export AWS_SECRET_ACCESS_KEY=<XXX>
export AWS_S3_ENDPOINT_URL=<your-bucket-endpoint>  # required for S3-compatible services (e.g., MinIO)

# S3 Authentication Option 2: IRSA (for Kubernetes/EKS deployments)
# When running on EKS with IAM Roles for Service Accounts (IRSA) enabled,
# these environment variables are automatically injected by the pod's service account.
# No explicit configuration is needed - just ensure USE_S3=True and AWS_STORAGE_BUCKET_NAME are set.
# export AWS_WEB_IDENTITY_TOKEN_FILE=/var/run/secrets/eks.amazonaws.com/serviceaccount/token
# export AWS_ROLE_ARN=arn:aws:iam::123456789012:role/ciso-assistant-s3-role

# --- Azure Blob Storage ---
# You can use an Azure Blob Storage container instead of S3.
# The container must be created before starting CISO Assistant.
# export USE_AZURE=True
# export AZURE_CONTAINER=<your-container-name>          # default: ciso-assistant-container
# export AZURE_CUSTOM_DOMAIN=<your-custom-domain>       # optional, e.g., cdn.example.com
# export AZURE_LOCATION=<path-prefix>                   # optional, path prefix within the container (e.g., "media")

# Azure Authentication Option 1: Account Key
# export AZURE_ACCOUNT_NAME=<your-storage-account-name>
# export AZURE_ACCOUNT_KEY=<your-storage-account-key>

# Azure Authentication Option 2: Connection String
# export AZURE_CONNECTION_STRING=<your-connection-string>

# Azure Authentication Option 3: Managed Identity (for Azure-hosted deployments)
# Requires AZURE_ACCOUNT_NAME. The pod/VM's assigned managed identity is used automatically.
# export AZURE_ACCOUNT_NAME=<your-storage-account-name>
# export AZURE_USE_MANAGED_IDENTITY=True

# Add a second backup mailer (will be deprecated, not recommended anymore)
export EMAIL_HOST_RESCUE=<XXX>
export EMAIL_PORT_RESCUE=587
export EMAIL_HOST_USER_RESCUE=<XXX>
export EMAIL_HOST_PASSWORD_RESCUE=<XXX>
export EMAIL_USE_TLS_RESCUE=True
export EMAIL_USE_SSL_RESCUE=False

# You can define the email of the first superuser, useful for automation. A mail is sent to the superuser for password initialization
export CISO_SUPERUSER_EMAIL=<XXX>

# By default, Django secret key is generated randomly at each start of CISO Assistant. This is convenient for quick test,
# but not recommended for production, as it can break the sessions (see
# this [topic](https://stackoverflow.com/questions/15170637/effects-of-changing-djangos-secret-key) for more information).
# To set a fixed secret key, use the environment variable DJANGO_SECRET_KEY.
export DJANGO_SECRET_KEY=...

# Sandbox mode for running untrusted code (e.g. library excel files)
# WARNING: Sandboxing must be enabled in production environments.
export ENABLE_SANDBOX=True  # optional, default value is True in production enfironments (DJANGO_DEBUG=False) and False in development environments (DJANGO_DEBUG=True).

# Logging configuration
export LOG_LEVEL=INFO # optional, default value is INFO. Available options: DEBUG, INFO, WARNING, ERROR, CRITICAL
export LOG_FORMAT=plain # optional, default value is plain. Available options: json, plain
# LOG_FORMAT=json emits one JSON object per line (timestamp, level, logger, event, ...),
# which SIEMs (Splunk, Sentinel, ADX) ingest natively without custom parsing.
# Set the same LOG_FORMAT=json on the frontend container to get structured JSON
# from the SvelteKit SSR process (auth events, errors) on the same schema; the
# backend and huey worker share this setting automatically.

# Authentication options
export AUTH_TOKEN_TTL=3600 # optional, default value is 3600 seconds (60 minutes). It defines the time to live of the authentication token
export AUTH_TOKEN_AUTO_REFRESH=True # optional, default value is True. It defines if the token TTL should be refreshed automatically after each request authenticated with the token
export AUTH_TOKEN_AUTO_REFRESH_TTL=36000 # optional, default value is 36000 seconds (10 hours). It defines the time to live of the authentication token after auto refresh. You can disable it by setting it to 0.
Only PostgreSQL custom variables can be configured.
Use the helper scripts documented in tools/.windows/README.md for more information.
Visit the uv website for instructions: https://docs.astral.sh/uv/getting-started/installation/
cd backend
uv sync
pre-commit install
psql as superadminsudo su postgrespsqlcreate database ciso-assistant;create user ciso-assistantuser with password '<POSTGRES_PASSWORD>';grant all privileges on database ciso-assistant to ciso-assistantuser;For more information, see the documentation in tools/.windows/README.md.
docker run -p 9000:9000 -p 9001:9001 -e "MINIO_ROOT_USER=XXX" -e "MINIO_ROOT_PASSWORD=XXX" quay.io/minio/minio server /data --console-address ":9001"uv run python manage.py migrate
For more information, see the documentation in tools/.windows/README.md.
If you have set a mailer and CISO_SUPERUSER_EMAIL variable, there's no need to create a Django superuser with
createsuperuser, as it will be created automatically on first start. You should receive an email with a link to setup your password.
uv run python manage.py createsuperuser
For more information, see the documentation in tools/.windows/README.md.
uv run python manage.py runserver
When running Django's development server natively on Windows, SvelteKit SSR can open enough concurrent API connections to hit the server's small default listen backlog. This may cause intermittent ECONNREFUSED / TypeError: fetch failed errors in the frontend.
Use the helper scripts documented in tools/.windows/README.md for the native Windows development setup.
python manage.py run_huey -w 2 -k process or equivalent in a separate shell.MAIL_DEBUG to have mail on the console for easier debugcd frontend
npm install -g pnpm
pnpm install
pnpm run dev
[!NOTE] Safari will not properly work in this setup, as it requires https for secure cookies. The simplest solution is to use Chrome or Firefox. An alternative is to use a caddy proxy. Please see the readme file in frontend directory for more information on this.
All variables in the frontend have handy default values.
If you move the frontend on another host, you should set the following variable: PUBLIC_BACKEND_API_URL. Its default value is http://localhost:8000/api.
The PUBLIC_BACKEND_API_EXPOSED_URL is necessary for proper functioning of the SSO. It points to the URL of the API as seen from the browser. It should be equal to the concatenation of CISO_ASSISTANT_URL (in the backend) with "/api".
When you launch "node server" instead of "pnpm run dev", you need to set the ORIGIN variable to the same value as CISO_ASSISTANT_URL in the backend (e.g. http://localhost:3000).
The migrations are tracked by version control, https://docs.djangoproject.com/en/4.2/topics/migrations/#version-control
For the first version of the product, it is recommended to start from a clean migration.
Note: to clean existing migrations, type:
find . -path "*/migrations/*.py" -not -name "__init__.py" -delete
find . -path "*/migrations/*.pyc"  -delete
After a change (or a clean), it is necessary to re-generate migration files:
uv run python manage.py makemigrations
uv run python manage.py migrate
These migration files should be tracked by version control.
To run API tests on the backend, simply type uv run pytest in a shell in the backend folder.
To run functional tests on the frontend, do the following actions:
tests/e2e-tests.sh
The goal of the test harness is to prevent any regression, i.e. all the tests shall be successful, both for backend and frontend.
export DJANGO_DEBUG=True before starting the backend.<backend_endpoint>/api/schema/swagger/,
for example: http://127.0.0.1:8000/api/schema/swagger/.To interact with the API via Swagger or directly with HTTP calls:
Authorization: Token <token>⚠️ Note: use Token, not Bearer.
PATs respect MFA: they are issued from an authenticated session, so an account protected by MFA stays protected. For interactive/browser flows, authentication goes through the standard login (which enforces MFA when enabled).
The docker-compose.yml highlights a relevant configuration for testing, with a Caddy proxy in front of the frontend. It exposes the full API, which is not yet recommended for production.
For production, the config builder can be used to generate a more hardened and tailored docker-compose.yml file, though several hardening steps are still required.
The following recommendations apply for production:
DJANGO_DEBUG=False for security reasons./api/iam/sso/redirect//api/accounts/saml/0/acs//api/accounts/saml/0/acs/finish//api/accounts/oidc/openid_connect/login/callback//api/accounts/saml/0/sls/ (only with SAML single logout enabled)[!NOTE] The frontend cannot infer the host automatically, so you need to either set the ORIGIN variable, or the
HOST_HEADERandPROTOCOL_HEADERvariables. Please see the sveltekit doc on this tricky issue. Beware that this approach does not work with "pnpm run dev", which should not be a worry for production.
[!NOTE] Caddy needs to receive a SNI header. Therefore, for your public URL (the one declared in
CISO_ASSISTANT_URL), you need to use a FQDN, not an IP address, as the SNI is not transmitted by a browser if the host is an IP address. Another tricky issue!
[!NOTE] The docker-compose template files are now launching the backend, huey and frontend in non-root mode. If you use an old docker-compose.yml file, it is recommended to update it. The containers are compatible with both root and non-root modes.
docker-compose.yml now relies on a non-root user 1001:1001, which is available in the image. Older deployments are using root user, which is still supported. To transition to non-root, use the following steps in the host:
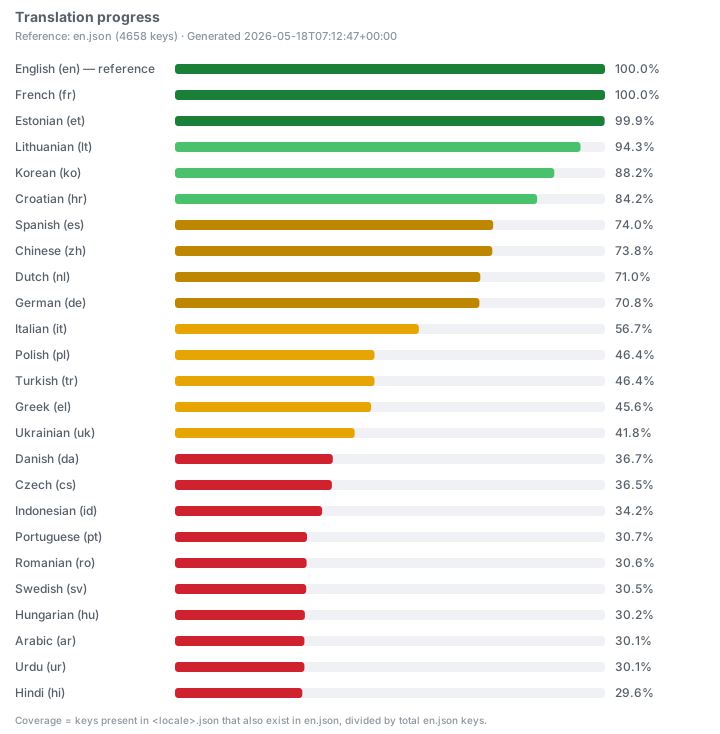
Reference is en.json; coverage = share of reference keys present in each locale file. Auto-refreshed daily — full breakdown at the dashboard.
Great care has been taken to follow security best practices. Please report any issue to security@intuitem.com.
This repository contains the source code for both the Open Source edition of CISO Assistant (Community Edition), released under the AGPL v3, as well as the commercial edition of CISO Assistant (Pro and Enterprise Editions), released under the intuitem Commercial Software License. This mono-repository approach is adopted for simplicity.
All the files within the top-level "enterprise" directory are released under the intuitem Commercial Software License.
All the files outside the top-level "enterprise" directory are released under the AGPLv3.
See LICENSE.md for details. For more details about the commercial editions, you can reach us on contact@intuitem.com.
Unless otherwise noted, all files are © intuitem.
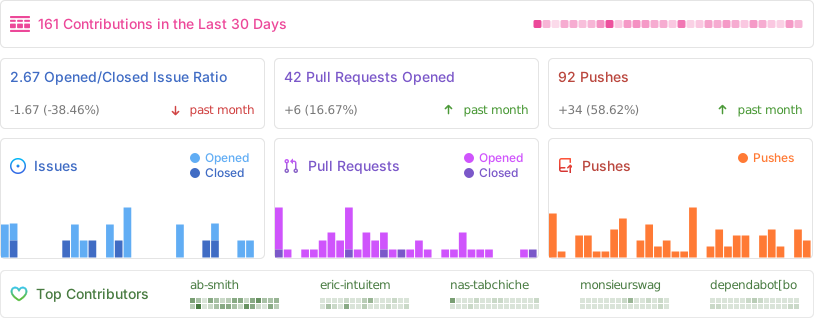
234 followers · starred Jan 2025
92 followers · starred Jan 2026
36 followers · starred May 2026
48 followers · starred Apr 2025
CISO Assistant is a one-stop-shop GRC platform for Risk Management, AppSec, Compliance & Audit, TPRM, BIA, Privacy, and Reporting. It supports 200+ global frameworks with automatic control mapping, including ISO 27001, NIST CSF, SOC 2, CIS, PCI DSS, NIS2, DORA, GDPR, HIPAA, CMMC, and more.
See the codeStar the project 🌟 to get releases notification and help growing the community!
intuitem.com
·
SaaS Free trial
·
Roadmap
·
Docs
·
Languages
·
Discord
·
Frameworks
CISO Assistant offers a fresh perspective on Cybersecurity Management and GRC (Governance, Risk, and Compliance) practices:
Our vision is to create a one-stop-shop for cybersecurity management—modernizing GRC through simplification and interoperability.
As practitioners working with cybersecurity and IT professionals, we've faced the same issues: tool fragmentation, data duplication, and a lack of intuitive, integrated solutions. CISO Assistant was born from those lessons, and we're building a community around pragmatic, common-sense principles.
We’re constantly evolving with input from users and customers. Like an octopus 🐙, CISO Assistant keeps growing extra arms—bringing clarity, automation, and productivity to cybersecurity teams while reducing the effort of data input and output.
[!TIP] The easiest way to get started is through the free trial of cloud instance available here.
Alternatively, once you have Docker and Docker-compose installed, on your workstation or server:
clone the repo:
git clone --single-branch -b main https://github.com/intuitem/ciso-assistant-community.git
and run the starter script
./docker-compose.sh     # Linux/MacOS
./docker-compose.ps1    # Windows
If you are looking for other installation options for self-hosting, check the config builder and the docs.
[!NOTE] The docker-compose script uses prebuilt Docker images supporting most of the standard hardware architecture. If you're using Windows, make sure to have Docker Desktop with WSL2 installed and trigger the PowerShell script. It will feed Docker Desktop on your behalf.
The docker compose file can be adjusted to pass extra parameters to suit your setup (e.g. Mailer settings).
[!WARNING] If you're getting warnings or errors about image's platform not matching host platform, raise an issue with the details and we'll add it shortly after. You can also use
docker-compose-build.shinstead (see below) to build for your specific architecture.
[!CAUTION] Don't use the
mainbranch code directly for production as it's the merge upstream and can have breaking changes during our development. Either use thetagsfor stable versions or prebuilt images.
Compliance & frameworks
Risk management
Third-party risk
Operations & remediation
Reporting & analytics
Collaboration & productivity
Automation & integrations
Security & access
Privacy
Programme management
Platform
Upcoming features are listed on the roadmap.
CISO Assistant is developed and maintained by Intuitem, a company specialized in Cybersecurity, Cloud, and Data/AI.
Here’s an extract of some of the building blocks in CISO Assistant to illustrate the decoupling concept that encourages reusability:
For full details, check the data model documentation.
At the heart of CISO Assistant lies the decoupling principle, which enables powerful use cases and major time savings:
Here is an illustration of the decoupling principle and its advantages:
https://github.com/user-attachments/assets/87bd4497-5cc2-4221-aeff-396f6b6ebe62
Check out the online documentation on https://intuitem.gitbook.io/ciso-assistant.
Read more here: AI engine
[!NOTE] Frameworks with
*require an extra manual step of getting the latest Excel sheet through their website as their license prevent direct usage. You can load the Excel sheet directly as a library.
Checkout the library and tools for the Domain Specific Language used and how you can define your own.
Indonesia PDP 🇮🇩
COBAC R-2024/01
ICO Data protection self-assessment 🇬🇧
ASD ISM 🇦🇺
and much more: just ask on Discord. If it's an open standard, we'll do it for you, free of charge 😉
A library can represent a framework, a threat catalog, a set of reference controls, or even a custom risk matrix.
Libraries can now be loaded directly from Excel files. There is no need to manually convert them to YAML beforehand—the conversion is handled internally when an Excel file is uploaded.
Take a look at the tools directory and its dedicated README, which describes the expected format of library source files in Excel. The excel subdirectory contains example XLSX files used as sources for the existing libraries and can be used as templates for creating your own.
To load a library from an Excel file, go to the Governance → Library page, click Load, and select your Excel source file. Any validation or parsing errors will be reported during the import process.
While Excel files can be loaded directly, it is still possible to convert library source files to YAML using external Python scripts:
convert_library_v2.py helps you generate a library from a simple Excel file. Once your items are structured in the expected format, run the script to produce the corresponding YAML file.tools directory also contains specialized converters for specific frameworks (for example, CIS or CCM Controls).To facilitate the creation of mappings between frameworks, you can use the prepare_mapping_v2.py tool. It generates an Excel file based on two existing framework libraries in YAML format. After filling in the mappings, the resulting Excel file can be:
convert_library_v2.py.Join our open Discord community to interact with the team and other GRC experts.
The fastest and easiest way to get started is through the free trial of cloud instance available here.
To run CISO Assistant locally in a straightforward way, you can use Docker compose.
Make sure you have a recent version of docker (>= 27.0).
git clone --single-branch -b main https://github.com/intuitem/ciso-assistant-community.git
cd ciso-assistant-community
./docker-compose.sh     # Linux/MacOS
./docker-compose.ps1    # Windows
Alternatively, you can use this variant to build the docker images for your specific architecture:
./docker-compose-build.sh     # Linux/MacOS
./docker-compose-build.ps1    # Windows
When asked for, enter your email and password for your superuser.
You can then reach CISO Assistant using your web browser at https://localhost:8443/
For the following executions, use "docker compose up" directly.
[!WARNING]
Important note for Windows users
The best working solution for users developing on Windows is to use Ubuntu installed on WSL2 (Docker is not required).
It is now also possible to run and develop CISO Assistant natively on Windows without WSL2 nor Docker, but it will require some extra steps. Please note that the native running on Windows is still in EXPERIMENTAL PHASE and should NOT be used if you are unsure of what you are doing, or if you want to ensure stability throughout development. Nevertheless, we would love to hear any suggestions in order to enhance the development experience for Windows users. Please feel free to open an Issue/PR about it!
brew install yaml-cpp libyaml or apt install libyaml-cpp-dev)If you want to develop the project without WSL2, you will need to install MSYS2, add the MSYS2 UCRT64 binaries to your system PATH environment variable (usually, the binaries are in C:\msys64\ucrt64\bin) and then install the following dependencies via pacman using MSYS2 UCRT64.
pacman -S mingw-w64-ucrt-x86_64-file mingw-w64-ucrt-x86_64-pango
You will also have to add those 2 system environment variables after installing the dependencies:
MAGIC=Full path to the `magic.mgc` file (usually `C:\msys64\ucrt64\share\misc\magic.mgc`)
WEASYPRINT_DLL_DIRECTORIES=Same path as your MSYS2 UCRT64 binaries
Given that the default encoding on Windows isn't UTF-8 but cp1252, certain python script printing UTF-8 characters such as emojis may cause the backend crash or malfunction in some cases (e.g. library importation).
To avoid this issue with this project, enforce the UTF-8 encoding by adding these 2 user environment variables:
PYTHONUTF8=1
PYTHONIOENCODING=utf-8:replace
[!NOTE]
Known issues
- The
libmagiclibrary on Windows (MIME detection) struggles to recognize an Excel file (.xlsx) by reading its first2048bits as it returnsapplication/octet-streammost of the time when importing an Excel library (backend displays the warning message[warning ] Invalid MIME type). This doesn't prevent the Excel file from being imported thanks to the fallback method inbackend/library/views.py:StoredLibraryViewSet.upload_library.
git clone git@github.com:intuitem/ciso-assistant-community.git
cd ciso-assistant-community
"<XXX>" by your private values. Take care not to commit this file in your git repo.Mandatory variables
All variables in the backend have handy default values.
Recommended variables
export DJANGO_DEBUG=True

# Default url is set to http://localhost:5173 but you can change it, e.g. to use https with a caddy proxy
export CISO_ASSISTANT_URL=https://localhost:8443

# Setup a development mailer with Mailpit for example
export EMAIL_HOST_USER=''
export EMAIL_HOST_PASSWORD=''
export DEFAULT_FROM_EMAIL=ciso-assistant@ciso-assistantcloud.com
export EMAIL_HOST=localhost
export EMAIL_PORT=1025
export EMAIL_USE_TLS=True  # true for STARTTLS
export EMAIL_USE_SSL=False # true for SMTPS
Other variables
# CISO Assistant will use SQLite by default, but you can setup PostgreSQL by declaring these variables
export POSTGRES_NAME=ciso-assistant
export POSTGRES_USER=ciso-assistantuser
export POSTGRES_PASSWORD=<XXX>
export POSTGRES_PASSWORD_FILE=<XXX>  # alternative way to specify password
export DB_HOST=localhost
export DB_PORT=5432  # optional, default value is 5432

# CISO Assistant will use filesystem storage backend by default.
# Only one cloud storage backend can be active at a time (USE_S3 and USE_AZURE are mutually exclusive).

# --- AWS S3 ---
# You can use a S3 Bucket by declaring these variables
# The S3 bucket must be created before starting CISO Assistant
export USE_S3=True
export AWS_STORAGE_BUCKET_NAME=<your-bucket-name>
export AWS_S3_REGION_NAME=<aws-region>  # optional, e.g., us-east-1

# S3 Authentication Option 1: Access Key (for standalone deployments or S3-compatible services)
export AWS_ACCESS_KEY_ID=<XXX>
export AWS_SECRET_ACCESS_KEY=<XXX>
export AWS_S3_ENDPOINT_URL=<your-bucket-endpoint>  # required for S3-compatible services (e.g., MinIO)

# S3 Authentication Option 2: IRSA (for Kubernetes/EKS deployments)
# When running on EKS with IAM Roles for Service Accounts (IRSA) enabled,
# these environment variables are automatically injected by the pod's service account.
# No explicit configuration is needed - just ensure USE_S3=True and AWS_STORAGE_BUCKET_NAME are set.
# export AWS_WEB_IDENTITY_TOKEN_FILE=/var/run/secrets/eks.amazonaws.com/serviceaccount/token
# export AWS_ROLE_ARN=arn:aws:iam::123456789012:role/ciso-assistant-s3-role

# --- Azure Blob Storage ---
# You can use an Azure Blob Storage container instead of S3.
# The container must be created before starting CISO Assistant.
# export USE_AZURE=True
# export AZURE_CONTAINER=<your-container-name>          # default: ciso-assistant-container
# export AZURE_CUSTOM_DOMAIN=<your-custom-domain>       # optional, e.g., cdn.example.com
# export AZURE_LOCATION=<path-prefix>                   # optional, path prefix within the container (e.g., "media")

# Azure Authentication Option 1: Account Key
# export AZURE_ACCOUNT_NAME=<your-storage-account-name>
# export AZURE_ACCOUNT_KEY=<your-storage-account-key>

# Azure Authentication Option 2: Connection String
# export AZURE_CONNECTION_STRING=<your-connection-string>

# Azure Authentication Option 3: Managed Identity (for Azure-hosted deployments)
# Requires AZURE_ACCOUNT_NAME. The pod/VM's assigned managed identity is used automatically.
# export AZURE_ACCOUNT_NAME=<your-storage-account-name>
# export AZURE_USE_MANAGED_IDENTITY=True

# Add a second backup mailer (will be deprecated, not recommended anymore)
export EMAIL_HOST_RESCUE=<XXX>
export EMAIL_PORT_RESCUE=587
export EMAIL_HOST_USER_RESCUE=<XXX>
export EMAIL_HOST_PASSWORD_RESCUE=<XXX>
export EMAIL_USE_TLS_RESCUE=True
export EMAIL_USE_SSL_RESCUE=False

# You can define the email of the first superuser, useful for automation. A mail is sent to the superuser for password initialization
export CISO_SUPERUSER_EMAIL=<XXX>

# By default, Django secret key is generated randomly at each start of CISO Assistant. This is convenient for quick test,
# but not recommended for production, as it can break the sessions (see
# this [topic](https://stackoverflow.com/questions/15170637/effects-of-changing-djangos-secret-key) for more information).
# To set a fixed secret key, use the environment variable DJANGO_SECRET_KEY.
export DJANGO_SECRET_KEY=...

# Sandbox mode for running untrusted code (e.g. library excel files)
# WARNING: Sandboxing must be enabled in production environments.
export ENABLE_SANDBOX=True  # optional, default value is True in production enfironments (DJANGO_DEBUG=False) and False in development environments (DJANGO_DEBUG=True).

# Logging configuration
export LOG_LEVEL=INFO # optional, default value is INFO. Available options: DEBUG, INFO, WARNING, ERROR, CRITICAL
export LOG_FORMAT=plain # optional, default value is plain. Available options: json, plain
# LOG_FORMAT=json emits one JSON object per line (timestamp, level, logger, event, ...),
# which SIEMs (Splunk, Sentinel, ADX) ingest natively without custom parsing.
# Set the same LOG_FORMAT=json on the frontend container to get structured JSON
# from the SvelteKit SSR process (auth events, errors) on the same schema; the
# backend and huey worker share this setting automatically.

# Authentication options
export AUTH_TOKEN_TTL=3600 # optional, default value is 3600 seconds (60 minutes). It defines the time to live of the authentication token
export AUTH_TOKEN_AUTO_REFRESH=True # optional, default value is True. It defines if the token TTL should be refreshed automatically after each request authenticated with the token
export AUTH_TOKEN_AUTO_REFRESH_TTL=36000 # optional, default value is 36000 seconds (10 hours). It defines the time to live of the authentication token after auto refresh. You can disable it by setting it to 0.
Only PostgreSQL custom variables can be configured.
Use the helper scripts documented in tools/.windows/README.md for more information.
Visit the uv website for instructions: https://docs.astral.sh/uv/getting-started/installation/
cd backend
uv sync
pre-commit install
psql as superadminsudo su postgrespsqlcreate database ciso-assistant;create user ciso-assistantuser with password '<POSTGRES_PASSWORD>';grant all privileges on database ciso-assistant to ciso-assistantuser;For more information, see the documentation in tools/.windows/README.md.
docker run -p 9000:9000 -p 9001:9001 -e "MINIO_ROOT_USER=XXX" -e "MINIO_ROOT_PASSWORD=XXX" quay.io/minio/minio server /data --console-address ":9001"uv run python manage.py migrate
For more information, see the documentation in tools/.windows/README.md.
If you have set a mailer and CISO_SUPERUSER_EMAIL variable, there's no need to create a Django superuser with
createsuperuser, as it will be created automatically on first start. You should receive an email with a link to setup your password.
uv run python manage.py createsuperuser
For more information, see the documentation in tools/.windows/README.md.
uv run python manage.py runserver
When running Django's development server natively on Windows, SvelteKit SSR can open enough concurrent API connections to hit the server's small default listen backlog. This may cause intermittent ECONNREFUSED / TypeError: fetch failed errors in the frontend.
Use the helper scripts documented in tools/.windows/README.md for the native Windows development setup.
python manage.py run_huey -w 2 -k process or equivalent in a separate shell.MAIL_DEBUG to have mail on the console for easier debugcd frontend
npm install -g pnpm
pnpm install
pnpm run dev
[!NOTE] Safari will not properly work in this setup, as it requires https for secure cookies. The simplest solution is to use Chrome or Firefox. An alternative is to use a caddy proxy. Please see the readme file in frontend directory for more information on this.
All variables in the frontend have handy default values.
If you move the frontend on another host, you should set the following variable: PUBLIC_BACKEND_API_URL. Its default value is http://localhost:8000/api.
The PUBLIC_BACKEND_API_EXPOSED_URL is necessary for proper functioning of the SSO. It points to the URL of the API as seen from the browser. It should be equal to the concatenation of CISO_ASSISTANT_URL (in the backend) with "/api".
When you launch "node server" instead of "pnpm run dev", you need to set the ORIGIN variable to the same value as CISO_ASSISTANT_URL in the backend (e.g. http://localhost:3000).
The migrations are tracked by version control, https://docs.djangoproject.com/en/4.2/topics/migrations/#version-control
For the first version of the product, it is recommended to start from a clean migration.
Note: to clean existing migrations, type:
find . -path "*/migrations/*.py" -not -name "__init__.py" -delete
find . -path "*/migrations/*.pyc"  -delete
After a change (or a clean), it is necessary to re-generate migration files:
uv run python manage.py makemigrations
uv run python manage.py migrate
These migration files should be tracked by version control.
To run API tests on the backend, simply type uv run pytest in a shell in the backend folder.
To run functional tests on the frontend, do the following actions:
tests/e2e-tests.sh
The goal of the test harness is to prevent any regression, i.e. all the tests shall be successful, both for backend and frontend.
export DJANGO_DEBUG=True before starting the backend.<backend_endpoint>/api/schema/swagger/,
for example: http://127.0.0.1:8000/api/schema/swagger/.To interact with the API via Swagger or directly with HTTP calls:
Authorization: Token <token>⚠️ Note: use Token, not Bearer.
PATs respect MFA: they are issued from an authenticated session, so an account protected by MFA stays protected. For interactive/browser flows, authentication goes through the standard login (which enforces MFA when enabled).
The docker-compose.yml highlights a relevant configuration for testing, with a Caddy proxy in front of the frontend. It exposes the full API, which is not yet recommended for production.
For production, the config builder can be used to generate a more hardened and tailored docker-compose.yml file, though several hardening steps are still required.
The following recommendations apply for production:
DJANGO_DEBUG=False for security reasons./api/iam/sso/redirect//api/accounts/saml/0/acs//api/accounts/saml/0/acs/finish//api/accounts/oidc/openid_connect/login/callback//api/accounts/saml/0/sls/ (only with SAML single logout enabled)[!NOTE] The frontend cannot infer the host automatically, so you need to either set the ORIGIN variable, or the
HOST_HEADERandPROTOCOL_HEADERvariables. Please see the sveltekit doc on this tricky issue. Beware that this approach does not work with "pnpm run dev", which should not be a worry for production.
[!NOTE] Caddy needs to receive a SNI header. Therefore, for your public URL (the one declared in
CISO_ASSISTANT_URL), you need to use a FQDN, not an IP address, as the SNI is not transmitted by a browser if the host is an IP address. Another tricky issue!
[!NOTE] The docker-compose template files are now launching the backend, huey and frontend in non-root mode. If you use an old docker-compose.yml file, it is recommended to update it. The containers are compatible with both root and non-root modes.
docker-compose.yml now relies on a non-root user 1001:1001, which is available in the image. Older deployments are using root user, which is still supported. To transition to non-root, use the following steps in the host:
Reference is en.json; coverage = share of reference keys present in each locale file. Auto-refreshed daily — full breakdown at the dashboard.
Great care has been taken to follow security best practices. Please report any issue to security@intuitem.com.
This repository contains the source code for both the Open Source edition of CISO Assistant (Community Edition), released under the AGPL v3, as well as the commercial edition of CISO Assistant (Pro and Enterprise Editions), released under the intuitem Commercial Software License. This mono-repository approach is adopted for simplicity.
All the files within the top-level "enterprise" directory are released under the intuitem Commercial Software License.
All the files outside the top-level "enterprise" directory are released under the AGPLv3.
See LICENSE.md for details. For more details about the commercial editions, you can reach us on contact@intuitem.com.
Unless otherwise noted, all files are © intuitem.
234 followers · starred Jan 2025
92 followers · starred Jan 2026
36 followers · starred May 2026
48 followers · starred Apr 2025



