
$ uv tool install wav2vecPython package and cli tool to convert wave files (WAV or AIFF) to vector graphics (SVG, PostScript, CVS)
PostScript
111
78 commits
updated Jan 3, 2026
README
Introduction
wav2vec is a Python script and package for converting waveform files (WAV or AIFF) to vector graphics (SVG or PostScript). Use cases include using an audio waveform as an element in a graphic design or including a waveform in a document.
- Note
-
This project is completely unrelated to the wav2vec speech recognition model (which was published after this tool).
Features
-
Portable: runs on Python 2.7+ and Python 3 and does not depend on any third-party packages.
-
Python 3.13 removed several modules this tool relies on (see https://peps.python.org/pep-0594/), but those packages are still available on pypi (as
standard-aifcandstandard-sndhdr) and will be installed automatically if you installwav2vecwith uv or pip.
-
-
Supported PCM input file formats:
-
8-bit signed AIFF
-
8-bit unsigned WAV
-
16-bit signed WAV and AIFF
-
32-bit signed WAV and AIFF
-
Floating point WAV files are not supported because they are not yet supported by the Python
wavemodule (https://github.com/cristoper/wav2vec/issues/5)
-
-
Input file format is automatically detected and handled (the file name/extension is unimportant)
-
Output file formats:
-
Scalable Vector Graphics (SVG)
-
PostScript
-
Comma-Separated Values (CSV)
-
-
Easy to write a custom output formatter
-
Options to scale the output data
-
Can process input files in chunks so large files can be processed with minimal memory
Install
From PyPI with PIP
The easiest way to install wav2vec is to use pip to install from the Python Package Index:
or
$ pip install wav2vecDepending on your system, in order to install in the Python 3 path, you may have to use pip3 instead of pip.
From git repo
Alternatively, clone the git repository:
$ git clone https://github.com/cristoper/wav2vec.git
$ cd wav2vec
If you are running Python >=3.13 then you’ll also need to install the aifc and sndhdr modules:
$ pip install standard-aifc standard-sndhdror on Debian:
$ apt install python3-standard-aifc python3-standard-sndhdrNow you can run wav2vec.py directly:
$ python wav2vec.py -hOr install the package with PIP:
$ pip install .
$ wav2vec -h
Usage
Once the package is installed using pip (see above), the command can be invoked as wav2vec. It takes an input file and outputs (SVG, by default) to stdout:
$ wav2vec filename.wav > filename.svgRun wav2vec -h to get a usage summary:
usage: wav2vec [-h] [--format {PostScript,SVG,CSV}] [--width WIDTH]
               [--height HEIGHT] [--stream BS] [--downtoss N]
               [--log {DEBUG,INFO,WARNING,ERROR,CRITICAL}]
               filename

Convert WAV and AIFF files to vector (SVG, PostScript, CSV) graphics.

positional arguments:
  filename              The WAV file to read

optional arguments:
  -h, --help            show this help message and exit
  --format {PostScript,SVG,CSV}, -f {PostScript,SVG,CSV}
                        The output format, one of: SVG, CSV, PostScript.
                        Default is SVG.
  --width WIDTH         Maximum width of generated SVG (graphic will be scaled
                        down to this size in px)
  --height HEIGHT       Maximum height of generated SVG (graphic will be
                        scaled down to this size in px). Note that this scales
                        according to the highest possible amplitude (given the
                        sample bit depth), not the highest amplitude that
                        actually occurs in the data.
  --stream BS           Stream the input file size in chunks (of BS number of
                        frames at a time) and process/format each chunk
                        separately. Useful for conserving memory when
                        processing large files, but note that multi-channel
                        paths will be split up into BS-sized chunks. By
                        default BS=0, which causes the entire file to be read
                        into memory before processing.
  --downtoss N          Downsample by keeping only 1 out of every N samples.
  --log {DEBUG,INFO,WARNING,ERROR,CRITICAL}
                        Set the logging level.

The output is sent to stdout.
Options
Output format
The --format flag sets the output format. wav2vec includes three formatters: SVG (default if no --format is given), PostScript, and CSV.
$ wav2vec filename.wav --format PostScript > output.psScale output
Use the --width and --height options to scale the output so that its maximum bounds are equal to or less than the values following the flags. In SVG these values are pixels ("user units"); in PostScript the values are interpreted as pts (1/72 of an inch). By default (if the flags are not given), the width is set to 1000 and the height to 500.
$ wav2vec filename.wav --width 500 --height 350 > output.svgStream input file
By default, wav2vec reads the entire input file into memory and then streams the output to stdout as it process it. Passing the --stream flag will cause wav2vec to process the input file in chunks. This can be useful if the input file is very big and won’t fit into available memory. The --stream flag requires one argument, the number of frames to read and process at a time (each frame includes one sample from each channel). A value of around 1024 seems to work well.
$ wav2vec filename.aiff --stream 1024 > output.svgNote that using the --stream flag on files with multiple channels will result in non-continuous paths in the output (because channel data is interleaved in WAV/AIF files).
Note also that converting very large audio files to SVG may not be practical: most SVG editors will not handle paths with hundreds of thousands or millions of points well.
Downsampling
The --downtoss N flag will keep only 1 out of every N samples. This is a brutal form of downsampling which will clobber high frequency and add aliasing noise. It’s best to instead downsample in your waveform recorder/editor before processing (or in your drawing program after processing).
API
You can also import wav2vec in order to convert wave files to the supported output formats in your own Python scripts. The package provides two main classes: WavDecoder and the abstract Formatter (and the concrete implementations: SVGFormatter, PSFormatter, and CSVFormatter). The documentation is currently contained in the source files; look at main.py for an example of usage.
The WavDecoder class wraps the standard library’s wave and aifc modules and provides an easy way to read and decode WAV/AIFF files. Use it as a context manager to ensure close() is called. Use it as an iterator to process all frames:
>>> wd = WavDecoder('filename')
>>> with wd as data:
>>>     for frames in data:
>>> print(frames)The Formatter class is an abstract base class which defines the interface for all formatters which output WAV data in textual formats. Each concrete subclass of Formatter takes a WavDecoder object in its constructor which is what is responsible for reading/decoding data from a WAV or AIFF file.
The output() method will stream output to a file (stdout by default), but the entire output string can be captured using the str() method.
>>> wd = WavDecoder("filename")
>>> svgformatter = SVGFormatter(wd)
>>> svgformatter.output() # outputs SVG to stdout
>>> svg_str = str(svgformatter) # get SVG as a stringExamples
SVG
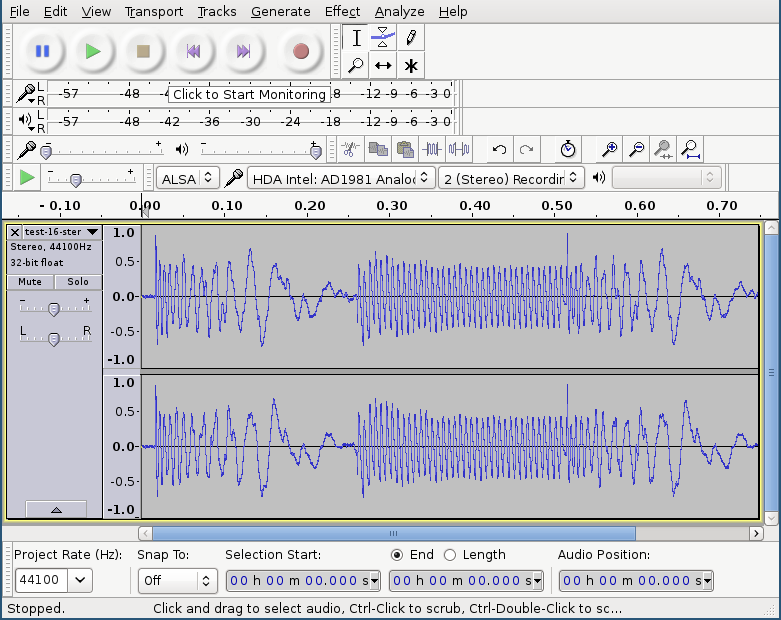
Here’s what the tests/valfiles/snd/test-16-stereo.wav file looks like in Audacity:
We can convert it to an SVG and then open it in Inkscape:
$ wav2vec tests/valfiles/snd/test-16-stereo.wav > test.svg
$ inkscape test.svg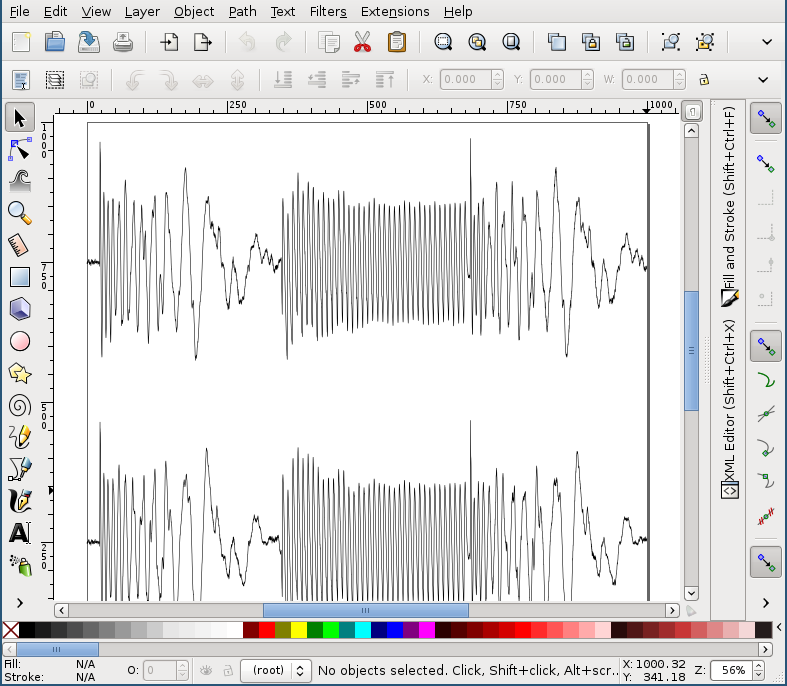
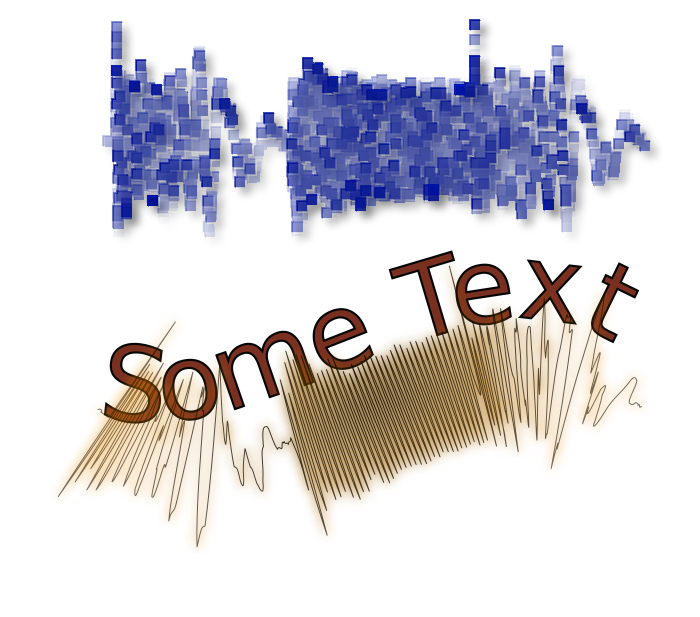
Then we can use Inkscape to non-destructively add filters and path effects and otherwise incorporate the waveform into a design:
PostScript
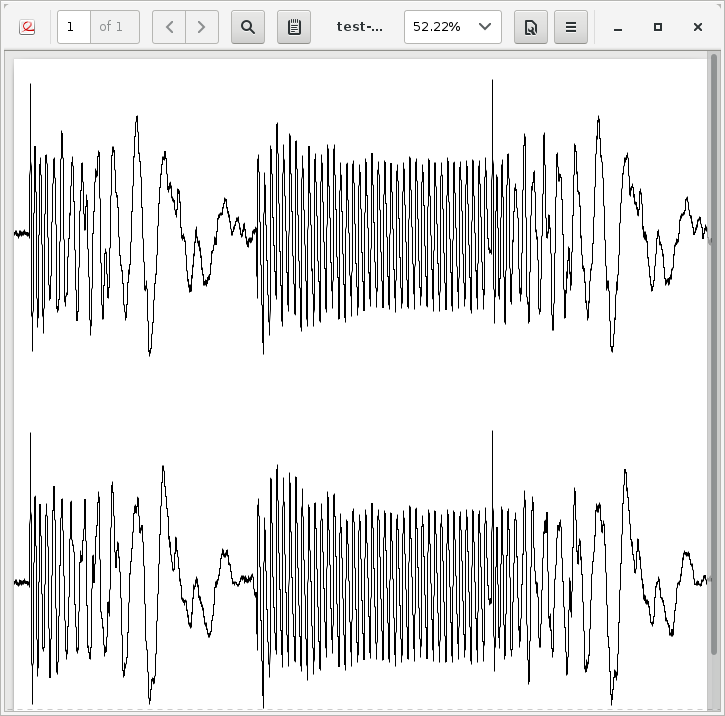
To convert to PostScript instead of SVG:
$ wav2vec tests/valfiles/snd/test-16-stereo.wav -f PostScript > test.ps
$ ps2pdf test.ps
$ evince test.pdf
The above uses the Ghostscript ps2pdf tool to convert the resulting PostScript file to PDF and then opens it in the evince PDF reader (shown in the screenshot below). You could instead open test.ps directly in a PostScript viewer (or send it to a printer/plotter, or embed it in a LaTeX document, etc).
CSV
wav2vec also comes with a CSV formatter, which is useful to get WAV data into a spreadsheet:
$ wav2vec tests/valfiles/snd/test-16-stereo.wav -f CSV --height 0 > test.csv
$ libreoffice test.csv
Note the --height 0 option which prevents wav2vec from scaling the raw PCM values.
Hacking
Run tests
To run unit and validation tests (requires python3):
$ python -m unittest discoverWrite custom formatter
Creating a custom formatter is simply a matter of subclassing Formatter and overriding the five abstract methods it defines. Use the included SVGFormatter, PSFormatter, or CSVFormatter as a template (see wav2vec/formatter/formatters.py).
Issues
Please feel free to use the Github issue tracker as a support forum for any questions, suggestions, bug reports, or feature requests. Thanks! https://github.com/cristoper/wav2vec/issues
See also
-
Audacity is a good Free audio recorder and waveform editor.
-
Inkscape is a Free SVG-based drawing program
-
Ghostscript is a Free PostScript interpreter which can distill to PDF.
-
php-waveform-svg is a PHP script for converting mp3→wav→svg. (It looks simple, but I haven’t tried it.)
aiff
audio
cli
graphics
postscript
python
python3
svg
wav
waveform
Similar repos


Languages
PostScript
99.5%
Python package and cli tool to convert wave files (WAV or AIFF) to vector graphics (SVG, PostScript, CVS)
PostScript
111
78 commits
updated Jan 3, 2026
README
Introduction
wav2vec is a Python script and package for converting waveform files (WAV or AIFF) to vector graphics (SVG or PostScript). Use cases include using an audio waveform as an element in a graphic design or including a waveform in a document.
- Note
-
This project is completely unrelated to the wav2vec speech recognition model (which was published after this tool).
Features
-
Portable: runs on Python 2.7+ and Python 3 and does not depend on any third-party packages.
-
Python 3.13 removed several modules this tool relies on (see https://peps.python.org/pep-0594/), but those packages are still available on pypi (as
standard-aifcandstandard-sndhdr) and will be installed automatically if you installwav2vecwith uv or pip.
-
-
Supported PCM input file formats:
-
8-bit signed AIFF
-
8-bit unsigned WAV
-
16-bit signed WAV and AIFF
-
32-bit signed WAV and AIFF
-
Floating point WAV files are not supported because they are not yet supported by the Python
wavemodule (https://github.com/cristoper/wav2vec/issues/5)
-
-
Input file format is automatically detected and handled (the file name/extension is unimportant)
-
Output file formats:
-
Scalable Vector Graphics (SVG)
-
PostScript
-
Comma-Separated Values (CSV)
-
-
Easy to write a custom output formatter
-
Options to scale the output data
-
Can process input files in chunks so large files can be processed with minimal memory
Install
From PyPI with PIP
The easiest way to install wav2vec is to use pip to install from the Python Package Index:
$ uv tool install wav2vecor
$ pip install wav2vecDepending on your system, in order to install in the Python 3 path, you may have to use pip3 instead of pip.
From git repo
Alternatively, clone the git repository:
$ git clone https://github.com/cristoper/wav2vec.git
$ cd wav2vec
If you are running Python >=3.13 then you’ll also need to install the aifc and sndhdr modules:
$ pip install standard-aifc standard-sndhdror on Debian:
$ apt install python3-standard-aifc python3-standard-sndhdrNow you can run wav2vec.py directly:
$ python wav2vec.py -hOr install the package with PIP:
$ pip install .
$ wav2vec -h
Usage
Once the package is installed using pip (see above), the command can be invoked as wav2vec. It takes an input file and outputs (SVG, by default) to stdout:
$ wav2vec filename.wav > filename.svgRun wav2vec -h to get a usage summary:
usage: wav2vec [-h] [--format {PostScript,SVG,CSV}] [--width WIDTH]
               [--height HEIGHT] [--stream BS] [--downtoss N]
               [--log {DEBUG,INFO,WARNING,ERROR,CRITICAL}]
               filename

Convert WAV and AIFF files to vector (SVG, PostScript, CSV) graphics.

positional arguments:
  filename              The WAV file to read

optional arguments:
  -h, --help            show this help message and exit
  --format {PostScript,SVG,CSV}, -f {PostScript,SVG,CSV}
                        The output format, one of: SVG, CSV, PostScript.
                        Default is SVG.
  --width WIDTH         Maximum width of generated SVG (graphic will be scaled
                        down to this size in px)
  --height HEIGHT       Maximum height of generated SVG (graphic will be
                        scaled down to this size in px). Note that this scales
                        according to the highest possible amplitude (given the
                        sample bit depth), not the highest amplitude that
                        actually occurs in the data.
  --stream BS           Stream the input file size in chunks (of BS number of
                        frames at a time) and process/format each chunk
                        separately. Useful for conserving memory when
                        processing large files, but note that multi-channel
                        paths will be split up into BS-sized chunks. By
                        default BS=0, which causes the entire file to be read
                        into memory before processing.
  --downtoss N          Downsample by keeping only 1 out of every N samples.
  --log {DEBUG,INFO,WARNING,ERROR,CRITICAL}
                        Set the logging level.

The output is sent to stdout.
Options
Output format
The --format flag sets the output format. wav2vec includes three formatters: SVG (default if no --format is given), PostScript, and CSV.
$ wav2vec filename.wav --format PostScript > output.psScale output
Use the --width and --height options to scale the output so that its maximum bounds are equal to or less than the values following the flags. In SVG these values are pixels ("user units"); in PostScript the values are interpreted as pts (1/72 of an inch). By default (if the flags are not given), the width is set to 1000 and the height to 500.
$ wav2vec filename.wav --width 500 --height 350 > output.svgStream input file
By default, wav2vec reads the entire input file into memory and then streams the output to stdout as it process it. Passing the --stream flag will cause wav2vec to process the input file in chunks. This can be useful if the input file is very big and won’t fit into available memory. The --stream flag requires one argument, the number of frames to read and process at a time (each frame includes one sample from each channel). A value of around 1024 seems to work well.
$ wav2vec filename.aiff --stream 1024 > output.svgNote that using the --stream flag on files with multiple channels will result in non-continuous paths in the output (because channel data is interleaved in WAV/AIF files).
Note also that converting very large audio files to SVG may not be practical: most SVG editors will not handle paths with hundreds of thousands or millions of points well.
Downsampling
The --downtoss N flag will keep only 1 out of every N samples. This is a brutal form of downsampling which will clobber high frequency and add aliasing noise. It’s best to instead downsample in your waveform recorder/editor before processing (or in your drawing program after processing).
API
You can also import wav2vec in order to convert wave files to the supported output formats in your own Python scripts. The package provides two main classes: WavDecoder and the abstract Formatter (and the concrete implementations: SVGFormatter, PSFormatter, and CSVFormatter). The documentation is currently contained in the source files; look at main.py for an example of usage.
The WavDecoder class wraps the standard library’s wave and aifc modules and provides an easy way to read and decode WAV/AIFF files. Use it as a context manager to ensure close() is called. Use it as an iterator to process all frames:
>>> wd = WavDecoder('filename')
>>> with wd as data:
>>>     for frames in data:
>>> print(frames)The Formatter class is an abstract base class which defines the interface for all formatters which output WAV data in textual formats. Each concrete subclass of Formatter takes a WavDecoder object in its constructor which is what is responsible for reading/decoding data from a WAV or AIFF file.
The output() method will stream output to a file (stdout by default), but the entire output string can be captured using the str() method.
>>> wd = WavDecoder("filename")
>>> svgformatter = SVGFormatter(wd)
>>> svgformatter.output() # outputs SVG to stdout
>>> svg_str = str(svgformatter) # get SVG as a stringExamples
SVG
Here’s what the tests/valfiles/snd/test-16-stereo.wav file looks like in Audacity:
We can convert it to an SVG and then open it in Inkscape:
$ wav2vec tests/valfiles/snd/test-16-stereo.wav > test.svg
$ inkscape test.svg
Then we can use Inkscape to non-destructively add filters and path effects and otherwise incorporate the waveform into a design:
PostScript
To convert to PostScript instead of SVG:
$ wav2vec tests/valfiles/snd/test-16-stereo.wav -f PostScript > test.ps
$ ps2pdf test.ps
$ evince test.pdf
The above uses the Ghostscript ps2pdf tool to convert the resulting PostScript file to PDF and then opens it in the evince PDF reader (shown in the screenshot below). You could instead open test.ps directly in a PostScript viewer (or send it to a printer/plotter, or embed it in a LaTeX document, etc).
CSV
wav2vec also comes with a CSV formatter, which is useful to get WAV data into a spreadsheet:
$ wav2vec tests/valfiles/snd/test-16-stereo.wav -f CSV --height 0 > test.csv
$ libreoffice test.csv
Note the --height 0 option which prevents wav2vec from scaling the raw PCM values.
Hacking
Run tests
To run unit and validation tests (requires python3):
$ python -m unittest discoverWrite custom formatter
Creating a custom formatter is simply a matter of subclassing Formatter and overriding the five abstract methods it defines. Use the included SVGFormatter, PSFormatter, or CSVFormatter as a template (see wav2vec/formatter/formatters.py).
Issues
Please feel free to use the Github issue tracker as a support forum for any questions, suggestions, bug reports, or feature requests. Thanks! https://github.com/cristoper/wav2vec/issues
See also
-
Audacity is a good Free audio recorder and waveform editor.
-
Inkscape is a Free SVG-based drawing program
-
Ghostscript is a Free PostScript interpreter which can distill to PDF.
-
php-waveform-svg is a PHP script for converting mp3→wav→svg. (It looks simple, but I haven’t tried it.)
aiff
audio
cli
graphics
postscript
python
python3
svg
wav
waveform
Similar repos
Languages
PostScript
99.5%