
See what people are saying
README
weather-display
ESP32 + WS2812B (48 LEDs) wall-art weather station, fed by Home Assistant.
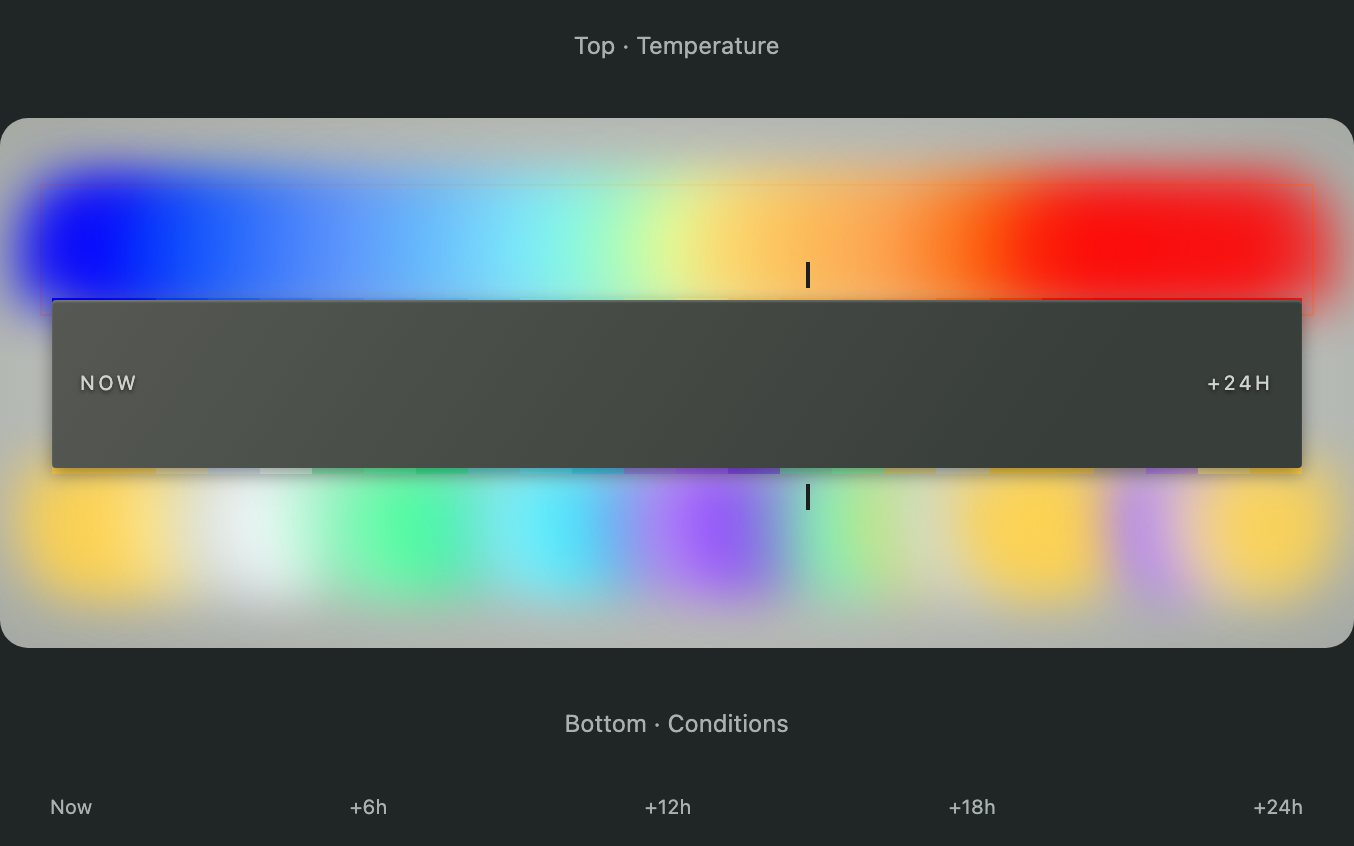
Each LED is one hour of the next 24. The top row is temperature, the bottom row is sky conditions. "Now" is at the left end of each row; tomorrow at this time is at the right. Storm hours flash yellow, windy hours shimmer, and the sunrise and sunset cells breathe.
Home Assistant publishes forecast categories and temperatures over MQTT every
15 minutes. The ESP32 applies the Android app's default color rules from
include/weather_colors.h:
- Temperature blends smoothly between color stops at 0, 20, 32, 50, 65, 78 and 90°F using OKLCH interpolation. Colder/hotter values hold the end colors.
- Conditions use sunny yellow, partly cloudy gold-gray, cloudy blue-gray, near-white fog, green rain, teal-blue snow and violet sleet.
- Wet hours use three strengths: buckets 1–3 are light, 4–7 medium, 8–10 heavy. The color gets darker as strength increases. Dry conditions keep their color.
- Conditions render the same color day and night. Missing conditions stay off.
Wind and lightning retain their existing LED animations. The strip also retains its global night brightness setting and HA's 20:00–07:00 night-time estimate.
To update an existing installation, flash the firmware, replace the HA Python script, then run Weather Display - Publish Forecast. Both updates are needed for smooth temperature colors. Physical LED appearance still needs an on-device check; these defaults use the same RGB values as the app.
What this assumes
Everything here runs on a stock Home Assistant OS install, but some choices are baked in. Know them before you build:
- 48 LEDs in two rows of 24. Firmware, dashboard card and preview all
assume this shape. Which corner LED 0 sits in, and whether the strip snakes,
is a setting in the dashboard tab. A different LED count means edits in
src/main.cpp,include/display_engine.handweb/display-model.js. - Hourly forecasts over
weather.get_forecasts. met.no (built in) and NWS are tested. Other integrations work if their condition strings are inCOND_MAP; unknown strings render off. Units and timestamp offsets are normalized on the HA side. - Night is 20:00-06:59 local, fixed in the publisher. It only drives the strip's global night brightness and the sunrise/sunset breathing cells.
- Fahrenheit and mph for the palette stops, the legacy buckets and the wind threshold. Temperatures are converted from °C on the HA side; metric users move the color stops in the dashboard tab rather than editing code.
- MQTT topics are fixed under
weather/. You need a broker HA can reach (the Mosquitto add-on is the easy path) and thepython_script:integration. - The installer wants SSH.
scripts/install-ha.pyedits dashboard storage, so it needs the SSH add-on and stops HA core for about 30 seconds. Without SSH, everything it does can be pasted by hand (see step 6).
Build one
Order of operations for a first build: parts, wire, mount, then the software side. Software steps assume Home Assistant OS with the Mosquitto add-on.
Parts (about $40 before the mount)
| Part | Notes | Approx. |
|---|---|---|
| ESP32 dev board | esp32dev in platformio.ini; change board for other modules | $8 |
| WS2812B strip, 60 LEDs/m, 1 m | Cut to 48. SK6812 works too (LED_TYPE) | $12 |
| 5V supply, 3A | Barrel jack or USB-C PD trigger; shares GND with the ESP32 | $10 |
| Wire, connectors, 330-470 ohm resistor, 1000 uF cap | Resistor in series on data, cap across 5V at the strip. Both optional at 48 LEDs, both cheap insurance | $5 |
| Mount | Aluminum LED channel with a frosted diffuser reads best. Two 60 cm lengths, or a routed board | varies |
Software: Home Assistant with the Mosquitto broker add-on (or any MQTT broker HA is connected to), a weather entity with hourly forecasts (met.no is built in; NWS if you are in the US), and PlatformIO to build and flash. Node is only needed for the dashboard tab.
1. Wire it
- ESP32
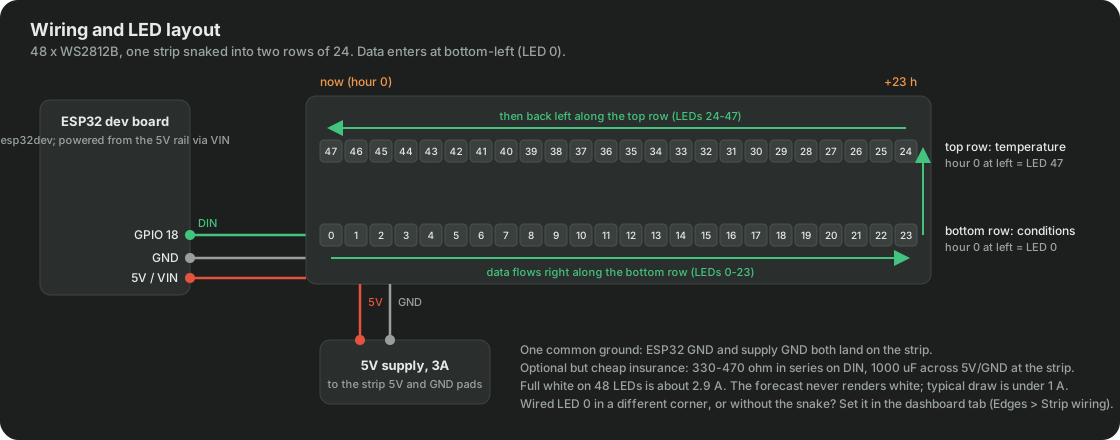
GPIO 18to the strip'sDIN(DATA_PINinsrc/main.cpp). - Supply
5Vto the strip's5Vand to the ESP32's5V/VIN; supplyGNDto both. One common ground, always. - Do not power the strip from the ESP32's 3.3V rail. If you would rather run
the ESP32 from USB, leave
VINdisconnected and share onlyGNDandDIN; never feedVINand USB at the same time. - Full white on 48 LEDs is about 2.9A. The forecast never renders white, so a 3A supply has headroom; typical draw is under 1A.
2. Mount it
Cut the strip after LED 23 and rejoin with three short jumpers so the two halves sit as parallel rows, or fold the strip at the right edge if your channel allows it. Either way the data path is a snake:
Bottom row (LEDs  0..23): physically L -> R. Hour h at LED h.
Top row    (LEDs 24..47): physically R -> L. Hour h at LED (47 - h).
That is the default: LED 0 bottom-left, LED 47 top-left. Hour 0 is the current hour at the left end of both rows; +23h is at the right. By default the top row shows temperature and the bottom row conditions.
Wired yours differently? Nothing to recompile. In the dashboard tab, under
Edges > Strip wiring, pick the corner where LED 0 sits and whether the
strip snakes back on the second row, then turn on the LED guide and check the
numbers against your strip. The layout is stored on the device with the rest
of the settings (layout: {origin, serpentine}).
3. Home Assistant
Everything HA needs is in ha/:
| File | Where it goes |
|---|---|
ha/python_scripts/weather_display_publish.py | /config/python_scripts/ (create the folder if needed) |
ha/scripts.yaml | Append to your scripts.yaml. Change weather.forecast_home and weather.nws_home to your met.no and NWS entities. |
ha/automations.yaml | Append to your automations.yaml. |
ha/configuration.yaml | Add python_script: to configuration.yaml. The mqtt: sensor: block is optional. |
Restart HA. Then run the script Weather Display - Publish Forecast once
from Settings > Automations & Scenes > Scripts. You should see a retained
message on the weather/hourly topic (MQTT add-on > Configure > Listen to a
topic).
4. Firmware
cp include/secrets.h.example include/secrets.h   # WiFi + MQTT credentials
pio run -t upload && pio device monitor            # first flash over USB
The first flash installs an ArduinoOTA listener. After that, flash over WiFi:
pio run -e esp32dev-ota -t upload
Set the device IP in platformio_local.ini (gitignored, see the comment in
platformio.ini). Reserve the IP in your router so it doesn't move. OTA is
dual-bank, so a failed flash leaves the previous firmware intact, and the
firmware blanks the LEDs during an OTA so FastLED isn't fighting the flash.
5. First boot
The strip shows a slow blue breath on LED 0 until the first MQTT message arrives. Once the retained payload lands (a second or two after connecting) the full forecast appears.
6. Dashboard tab (optional)
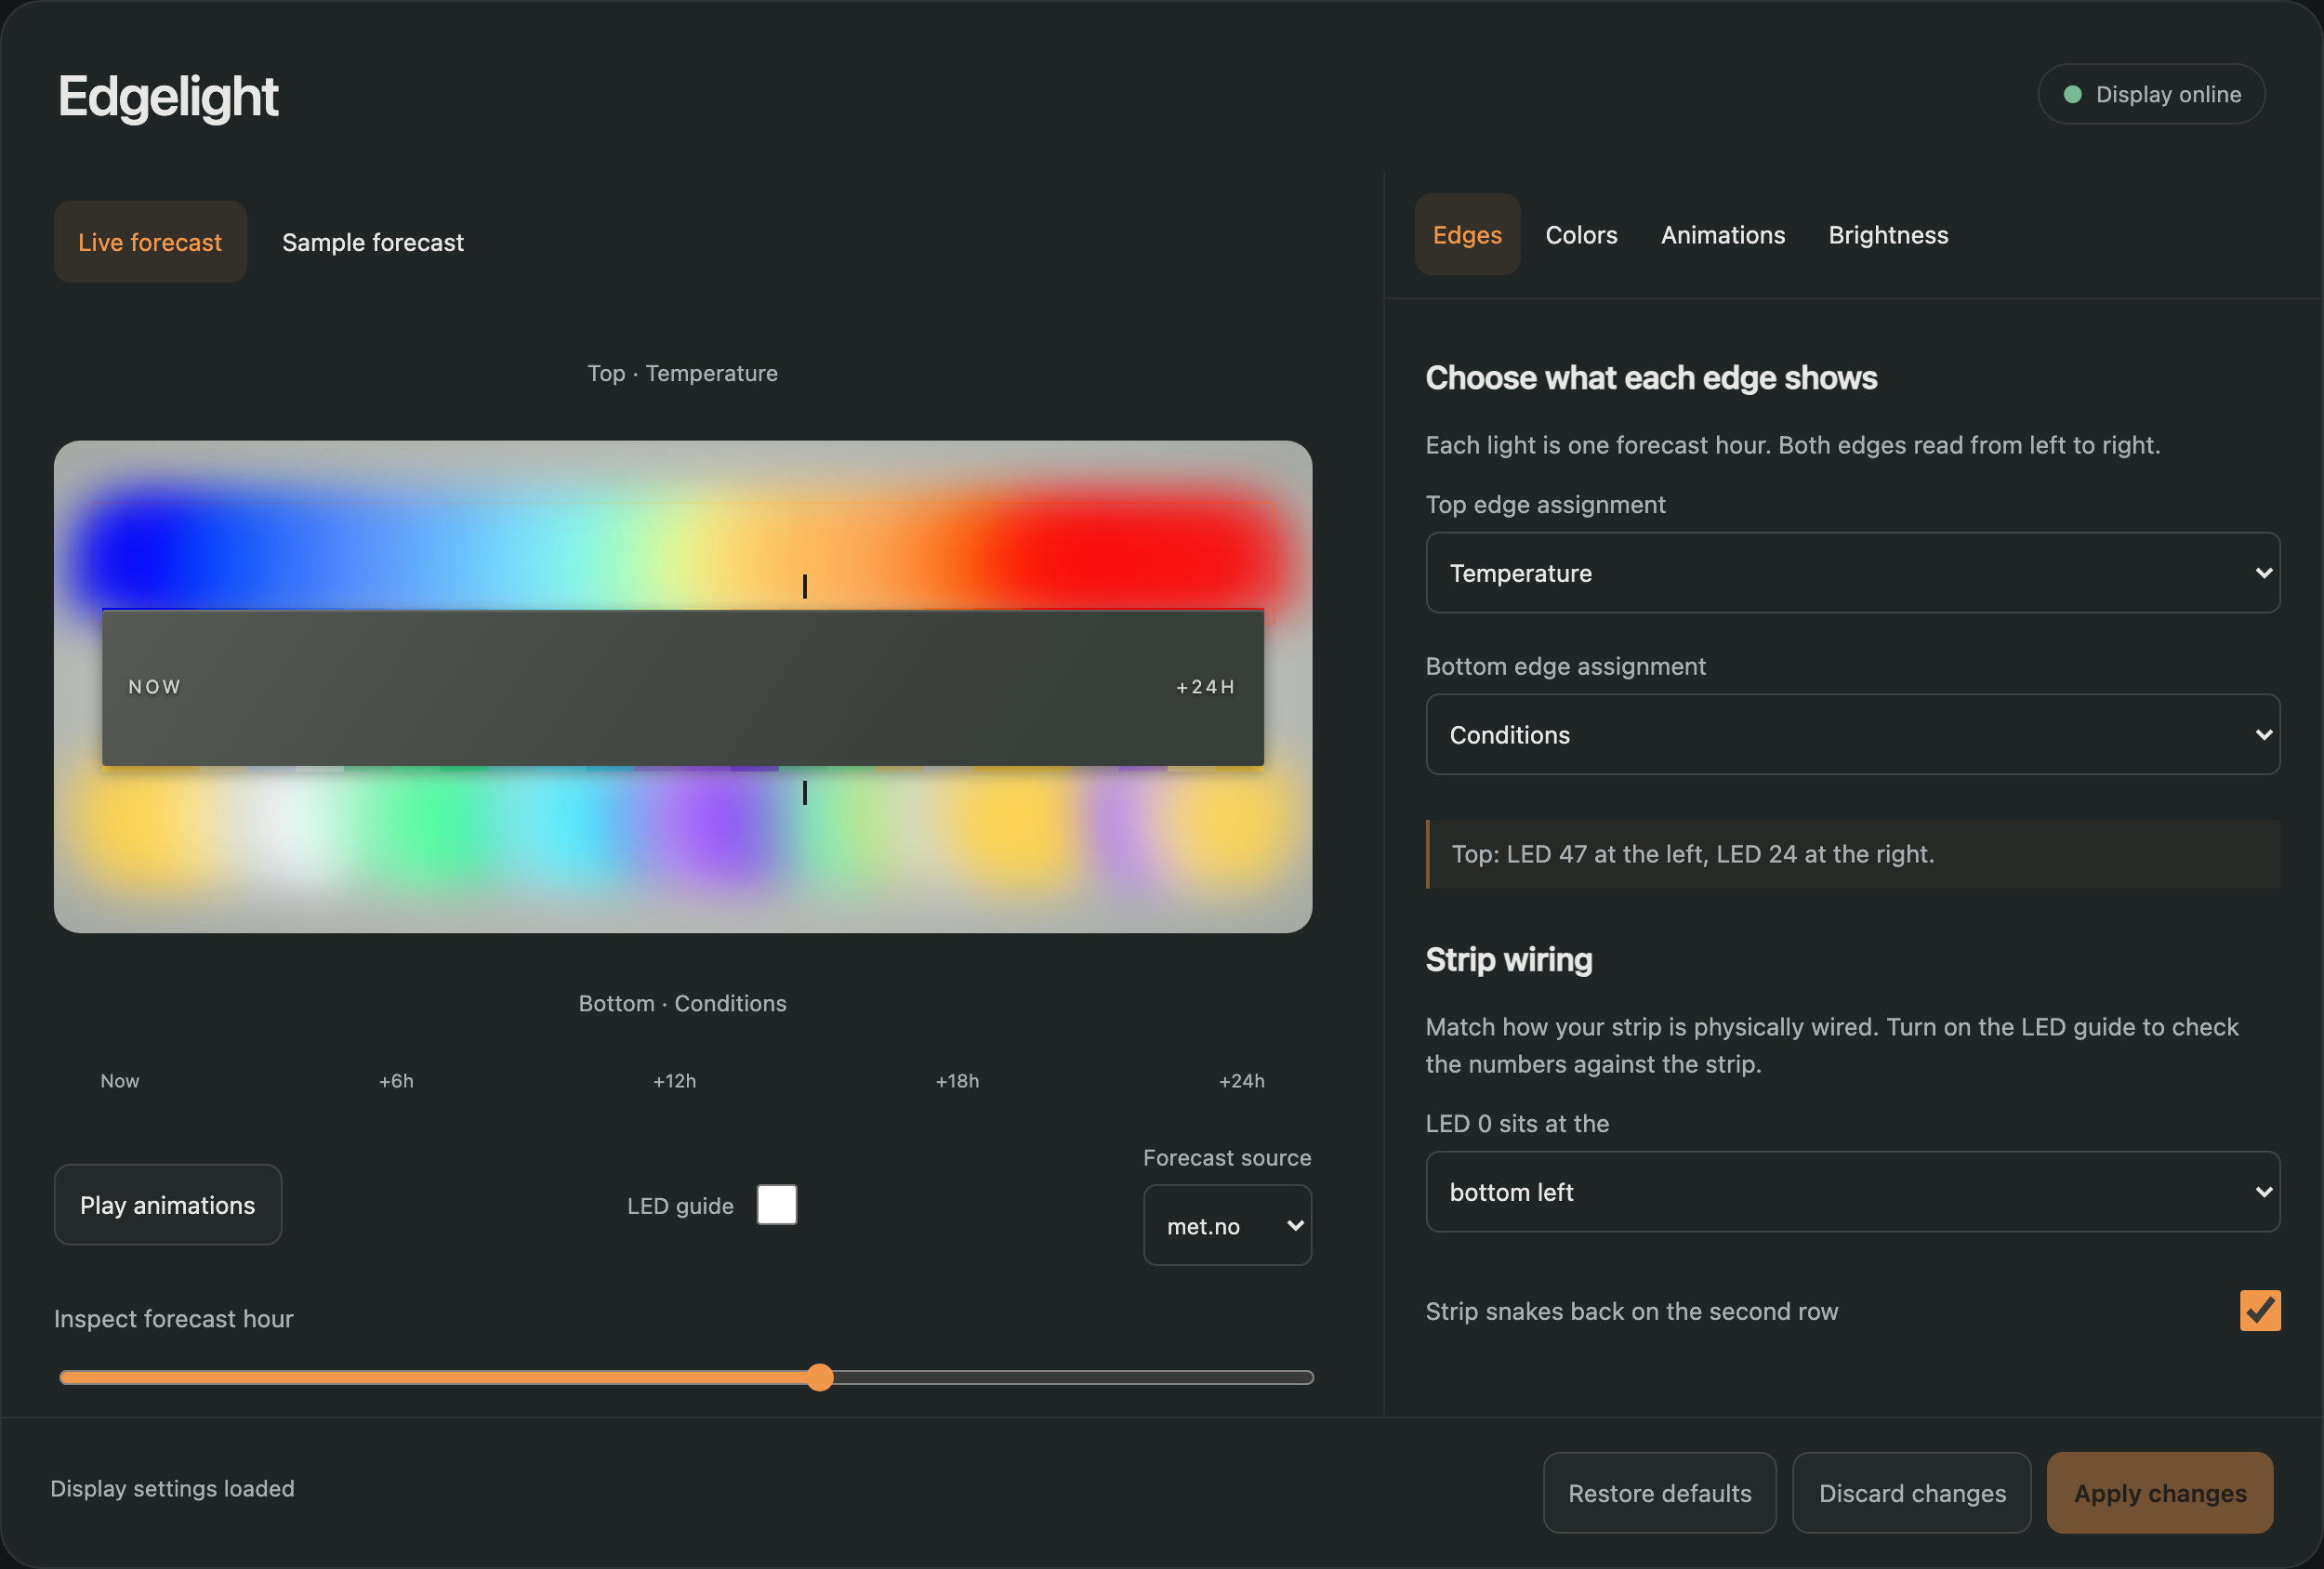
A Lovelace card mirrors the wall and edits its settings: edge assignments, temperature stops, condition colors, the three animations, day/night brightness, and the met.no / NWS source picker. The preview uses the same color math as the firmware, so what the card shows is what the strip shows.
npm install && npm run build
python3 scripts/install-ha.py --host root@ha.local --dashboard dashboard_desktop           # dry run
python3 scripts/install-ha.py --host root@ha.local --dashboard dashboard_desktop --install
--dashboard is the storage suffix of the dashboard to add the tab to
(/config/.storage/lovelace.<suffix>). The installer copies the card to
/config/www/edgelight/<stamp>/, registers it as a module resource, adds an
"Edgelight" panel tab, installs ha/display-editor.yaml as a package (MQTT
sensors, input_select.edgelight_weather_source, script.edgelight_apply),
and writes the publisher. It backs up every file it touches.
By hand instead: copy dist/ to /config/www/edgelight/, add
/local/edgelight/edgelight-card.js as a module resource, add a panel view
with one custom:edgelight-display-card card, and include
ha/display-editor.yaml as a package.
MQTT topics
weather/hourly (retained, published by HA)
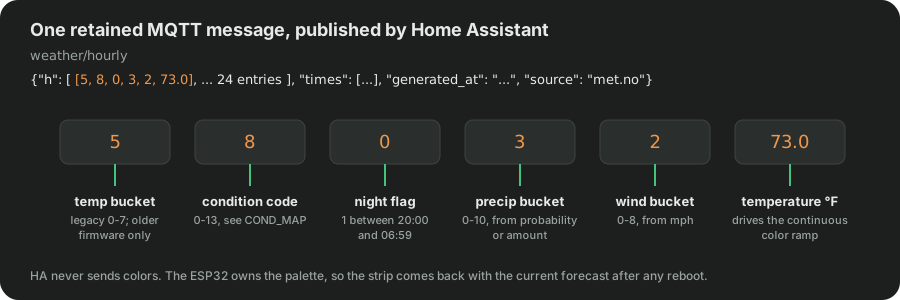
{"h": [[temp_bucket, cond_code, is_night, precip_bucket, wind_bucket, temperature_f], ... 24 entries]}
| Field | Range | Meaning |
|---|---|---|
temp_bucket | 0-7 | 0 unknown, 1 <20°F, 2 20-31, 3 32-49, 4 50-64, 5 65-77, 6 78-89, 7 90+ |
cond_code | 0-13 | Stable HA wire codes mapped to seven visual categories; see below. |
is_night | 0/1 | 20:00-06:59 local. Drives global night brightness and the sunrise/sunset breathing hours. No per-cell dimming. |
precip_bucket | 0-10 | From precipitation_probability (10% bands), falling back to amount in mm. Selects light/medium/heavy treatment on wet hours only. |
wind_bucket | 0-8 | Wind speed normalized to mph, then banded. Scales the shimmer amplitude. |
temperature_f | number or null | Actual temperature in °F, converted automatically from °C. Null means no data. |
The first five fields retain their meaning for older firmware. Updated firmware also accepts older 2-, 3- and 5-field payloads, using the first field's temperature bucket when the sixth field is absent. Missing precip/wind values default to off. Temperature, wind and precipitation units are read from the weather entity; missing units default to °F, mph and mm.
Condition codes: 0 unknown, 1 sunny, 2 clear-night, 3 partlycloudy, 4 cloudy, 5 windy, 6 windy-variant, 7 fog, 8 rainy/pouring, 9 snowy, 10 snowy-rainy, 11 lightning/lightning-rainy, 12 exceptional, 13 hail. Clear-night uses sunny's color with night treatment. Windy uses sunny, windy-variant uses cloudy, and hail uses sleet. Thunder uses rain plus lightning. Exceptional has no known sky category and stays off; it no longer paints an alert-red condition cell.
weather/display/mode (retained, plain string)
"forecast" or "demo". Demo mode walks every palette color side by side so
you can check wiring and color order. The publish script sets forecast on
every refresh, so a device left in demo returns to the forecast within 15
minutes.
Animations
- Sunrise / sunset breathe. The temperature cells at the day/night transitions dip and recover once every 6 seconds.
- Wind shimmer. Windy hours flow with Perlin-noise brightness; amplitude
scales with
wind_bucket. - Lightning. Storm hours render as rain with a yellow bolt blended on top on a ~12.7 second cycle (rumble, build, peak, flicker, decay).
Firmware structure
Color rules are in include/weather_colors.h; hardware and animations are in
src/main.cpp:
TEMP_PALETTE,CONDITION_PALETTE,WET_COLORS: Android default colorsLIGHTNING_BOLT: animation overlay colorrenderForecast()/renderDemo(): build the static frameapplyBreathing()/applyWind()/applyLightning(): per-frame overlaysonMqtt(): parses both topics and handles the mode switch
Keep COND_MAP in ha/python_scripts/weather_display_publish.py in step with
the condition enum in src/main.cpp. A new condition needs both.
Verification
pio run -e esp32dev
python3 -m unittest discover -s tests -v
npm test && npx playwright test
The Python tests compile the portable color rules with a host C++ compiler and
exercise the HA publisher with fake forecast data. The Node and Playwright
tests drive the card against a fake hass and check its preview against the
real firmware renderer. No broker or device is contacted.
Related
The same idea, ported to a phone: Edgelight Weather is an Android live wallpaper that renders the 24-hour forecast as a glow along the screen edges.
License
MIT. See LICENSE.
Contributors

43 commits
Similar repos


Languages
C++
38.1%
JavaScript
37.8%
Python
21.9%
HTML
2.1%
See what people are saying
README
weather-display
ESP32 + WS2812B (48 LEDs) wall-art weather station, fed by Home Assistant.
Each LED is one hour of the next 24. The top row is temperature, the bottom row is sky conditions. "Now" is at the left end of each row; tomorrow at this time is at the right. Storm hours flash yellow, windy hours shimmer, and the sunrise and sunset cells breathe.
Home Assistant publishes forecast categories and temperatures over MQTT every
15 minutes. The ESP32 applies the Android app's default color rules from
include/weather_colors.h:
- Temperature blends smoothly between color stops at 0, 20, 32, 50, 65, 78 and 90°F using OKLCH interpolation. Colder/hotter values hold the end colors.
- Conditions use sunny yellow, partly cloudy gold-gray, cloudy blue-gray, near-white fog, green rain, teal-blue snow and violet sleet.
- Wet hours use three strengths: buckets 1–3 are light, 4–7 medium, 8–10 heavy. The color gets darker as strength increases. Dry conditions keep their color.
- Conditions render the same color day and night. Missing conditions stay off.
Wind and lightning retain their existing LED animations. The strip also retains its global night brightness setting and HA's 20:00–07:00 night-time estimate.
To update an existing installation, flash the firmware, replace the HA Python script, then run Weather Display - Publish Forecast. Both updates are needed for smooth temperature colors. Physical LED appearance still needs an on-device check; these defaults use the same RGB values as the app.
What this assumes
Everything here runs on a stock Home Assistant OS install, but some choices are baked in. Know them before you build:
- 48 LEDs in two rows of 24. Firmware, dashboard card and preview all
assume this shape. Which corner LED 0 sits in, and whether the strip snakes,
is a setting in the dashboard tab. A different LED count means edits in
src/main.cpp,include/display_engine.handweb/display-model.js. - Hourly forecasts over
weather.get_forecasts. met.no (built in) and NWS are tested. Other integrations work if their condition strings are inCOND_MAP; unknown strings render off. Units and timestamp offsets are normalized on the HA side. - Night is 20:00-06:59 local, fixed in the publisher. It only drives the strip's global night brightness and the sunrise/sunset breathing cells.
- Fahrenheit and mph for the palette stops, the legacy buckets and the wind threshold. Temperatures are converted from °C on the HA side; metric users move the color stops in the dashboard tab rather than editing code.
- MQTT topics are fixed under
weather/. You need a broker HA can reach (the Mosquitto add-on is the easy path) and thepython_script:integration. - The installer wants SSH.
scripts/install-ha.pyedits dashboard storage, so it needs the SSH add-on and stops HA core for about 30 seconds. Without SSH, everything it does can be pasted by hand (see step 6).
Build one
Order of operations for a first build: parts, wire, mount, then the software side. Software steps assume Home Assistant OS with the Mosquitto add-on.
Parts (about $40 before the mount)
| Part | Notes | Approx. |
|---|---|---|
| ESP32 dev board | esp32dev in platformio.ini; change board for other modules | $8 |
| WS2812B strip, 60 LEDs/m, 1 m | Cut to 48. SK6812 works too (LED_TYPE) | $12 |
| 5V supply, 3A | Barrel jack or USB-C PD trigger; shares GND with the ESP32 | $10 |
| Wire, connectors, 330-470 ohm resistor, 1000 uF cap | Resistor in series on data, cap across 5V at the strip. Both optional at 48 LEDs, both cheap insurance | $5 |
| Mount | Aluminum LED channel with a frosted diffuser reads best. Two 60 cm lengths, or a routed board | varies |
Software: Home Assistant with the Mosquitto broker add-on (or any MQTT broker HA is connected to), a weather entity with hourly forecasts (met.no is built in; NWS if you are in the US), and PlatformIO to build and flash. Node is only needed for the dashboard tab.
1. Wire it
- ESP32
GPIO 18to the strip'sDIN(DATA_PINinsrc/main.cpp). - Supply
5Vto the strip's5Vand to the ESP32's5V/VIN; supplyGNDto both. One common ground, always. - Do not power the strip from the ESP32's 3.3V rail. If you would rather run
the ESP32 from USB, leave
VINdisconnected and share onlyGNDandDIN; never feedVINand USB at the same time. - Full white on 48 LEDs is about 2.9A. The forecast never renders white, so a 3A supply has headroom; typical draw is under 1A.
2. Mount it
Cut the strip after LED 23 and rejoin with three short jumpers so the two halves sit as parallel rows, or fold the strip at the right edge if your channel allows it. Either way the data path is a snake:
Bottom row (LEDs  0..23): physically L -> R. Hour h at LED h.
Top row    (LEDs 24..47): physically R -> L. Hour h at LED (47 - h).
That is the default: LED 0 bottom-left, LED 47 top-left. Hour 0 is the current hour at the left end of both rows; +23h is at the right. By default the top row shows temperature and the bottom row conditions.
Wired yours differently? Nothing to recompile. In the dashboard tab, under
Edges > Strip wiring, pick the corner where LED 0 sits and whether the
strip snakes back on the second row, then turn on the LED guide and check the
numbers against your strip. The layout is stored on the device with the rest
of the settings (layout: {origin, serpentine}).
3. Home Assistant
Everything HA needs is in ha/:
| File | Where it goes |
|---|---|
ha/python_scripts/weather_display_publish.py | /config/python_scripts/ (create the folder if needed) |
ha/scripts.yaml | Append to your scripts.yaml. Change weather.forecast_home and weather.nws_home to your met.no and NWS entities. |
ha/automations.yaml | Append to your automations.yaml. |
ha/configuration.yaml | Add python_script: to configuration.yaml. The mqtt: sensor: block is optional. |
Restart HA. Then run the script Weather Display - Publish Forecast once
from Settings > Automations & Scenes > Scripts. You should see a retained
message on the weather/hourly topic (MQTT add-on > Configure > Listen to a
topic).
4. Firmware
cp include/secrets.h.example include/secrets.h   # WiFi + MQTT credentials
pio run -t upload && pio device monitor            # first flash over USB
The first flash installs an ArduinoOTA listener. After that, flash over WiFi:
pio run -e esp32dev-ota -t upload
Set the device IP in platformio_local.ini (gitignored, see the comment in
platformio.ini). Reserve the IP in your router so it doesn't move. OTA is
dual-bank, so a failed flash leaves the previous firmware intact, and the
firmware blanks the LEDs during an OTA so FastLED isn't fighting the flash.
5. First boot
The strip shows a slow blue breath on LED 0 until the first MQTT message arrives. Once the retained payload lands (a second or two after connecting) the full forecast appears.
6. Dashboard tab (optional)
A Lovelace card mirrors the wall and edits its settings: edge assignments, temperature stops, condition colors, the three animations, day/night brightness, and the met.no / NWS source picker. The preview uses the same color math as the firmware, so what the card shows is what the strip shows.
npm install && npm run build
python3 scripts/install-ha.py --host root@ha.local --dashboard dashboard_desktop           # dry run
python3 scripts/install-ha.py --host root@ha.local --dashboard dashboard_desktop --install
--dashboard is the storage suffix of the dashboard to add the tab to
(/config/.storage/lovelace.<suffix>). The installer copies the card to
/config/www/edgelight/<stamp>/, registers it as a module resource, adds an
"Edgelight" panel tab, installs ha/display-editor.yaml as a package (MQTT
sensors, input_select.edgelight_weather_source, script.edgelight_apply),
and writes the publisher. It backs up every file it touches.
By hand instead: copy dist/ to /config/www/edgelight/, add
/local/edgelight/edgelight-card.js as a module resource, add a panel view
with one custom:edgelight-display-card card, and include
ha/display-editor.yaml as a package.
MQTT topics
weather/hourly (retained, published by HA)
{"h": [[temp_bucket, cond_code, is_night, precip_bucket, wind_bucket, temperature_f], ... 24 entries]}
| Field | Range | Meaning |
|---|---|---|
temp_bucket | 0-7 | 0 unknown, 1 <20°F, 2 20-31, 3 32-49, 4 50-64, 5 65-77, 6 78-89, 7 90+ |
cond_code | 0-13 | Stable HA wire codes mapped to seven visual categories; see below. |
is_night | 0/1 | 20:00-06:59 local. Drives global night brightness and the sunrise/sunset breathing hours. No per-cell dimming. |
precip_bucket | 0-10 | From precipitation_probability (10% bands), falling back to amount in mm. Selects light/medium/heavy treatment on wet hours only. |
wind_bucket | 0-8 | Wind speed normalized to mph, then banded. Scales the shimmer amplitude. |
temperature_f | number or null | Actual temperature in °F, converted automatically from °C. Null means no data. |
The first five fields retain their meaning for older firmware. Updated firmware also accepts older 2-, 3- and 5-field payloads, using the first field's temperature bucket when the sixth field is absent. Missing precip/wind values default to off. Temperature, wind and precipitation units are read from the weather entity; missing units default to °F, mph and mm.
Condition codes: 0 unknown, 1 sunny, 2 clear-night, 3 partlycloudy, 4 cloudy, 5 windy, 6 windy-variant, 7 fog, 8 rainy/pouring, 9 snowy, 10 snowy-rainy, 11 lightning/lightning-rainy, 12 exceptional, 13 hail. Clear-night uses sunny's color with night treatment. Windy uses sunny, windy-variant uses cloudy, and hail uses sleet. Thunder uses rain plus lightning. Exceptional has no known sky category and stays off; it no longer paints an alert-red condition cell.
weather/display/mode (retained, plain string)
"forecast" or "demo". Demo mode walks every palette color side by side so
you can check wiring and color order. The publish script sets forecast on
every refresh, so a device left in demo returns to the forecast within 15
minutes.
Animations
- Sunrise / sunset breathe. The temperature cells at the day/night transitions dip and recover once every 6 seconds.
- Wind shimmer. Windy hours flow with Perlin-noise brightness; amplitude
scales with
wind_bucket. - Lightning. Storm hours render as rain with a yellow bolt blended on top on a ~12.7 second cycle (rumble, build, peak, flicker, decay).
Firmware structure
Color rules are in include/weather_colors.h; hardware and animations are in
src/main.cpp:
TEMP_PALETTE,CONDITION_PALETTE,WET_COLORS: Android default colorsLIGHTNING_BOLT: animation overlay colorrenderForecast()/renderDemo(): build the static frameapplyBreathing()/applyWind()/applyLightning(): per-frame overlaysonMqtt(): parses both topics and handles the mode switch
Keep COND_MAP in ha/python_scripts/weather_display_publish.py in step with
the condition enum in src/main.cpp. A new condition needs both.
Verification
pio run -e esp32dev
python3 -m unittest discover -s tests -v
npm test && npx playwright test
The Python tests compile the portable color rules with a host C++ compiler and
exercise the HA publisher with fake forecast data. The Node and Playwright
tests drive the card against a fake hass and check its preview against the
real firmware renderer. No broker or device is contacted.
Related
The same idea, ported to a phone: Edgelight Weather is an Android live wallpaper that renders the 24-hour forecast as a glow along the screen edges.
License
MIT. See LICENSE.
Similar repos
Contributors
43 commits
Languages
C++
38.1%
JavaScript
37.8%
Python
21.9%
HTML
2.1%