
Official implementation of NeurIPS2025 paper "PlanarGS: High-Fidelity Indoor 3D Gaussian Splatting Guided by Vision-Language Planar Priors"
See the codeREADME
PlanarGS: High-Fidelity Indoor 3D Gaussian Splatting Guided by Vision-Language Planar Priors
Xirui Jin, Renbiao Jin, Boying Li, Danping Zou, Wenxian Yu
NeurIPS 2025
Project Page | arXiv
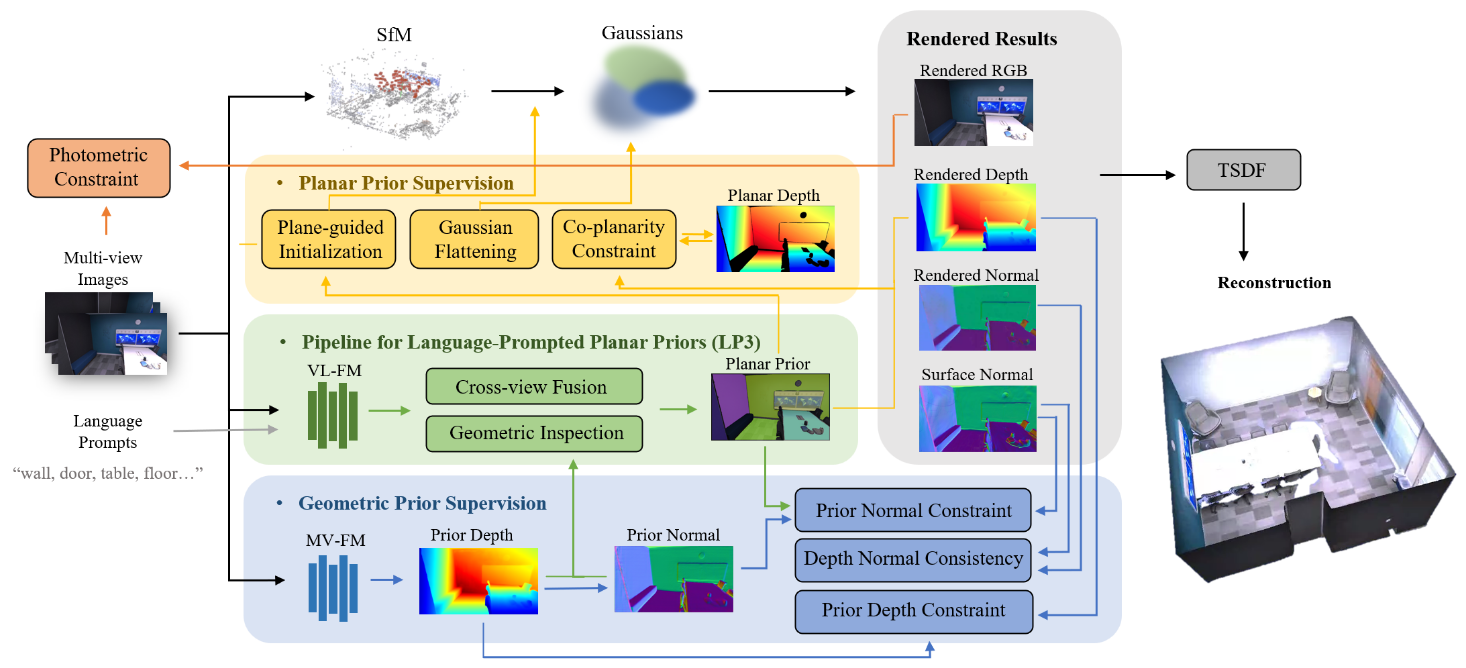
PlanarGS combines planar priors from the LP3 pipeline and geometric priors from the pretrained multi-view foundation model with 3D Gaussian Splatting to achieve high-fidelity indoor surface reconstruction from multi-view images. We acheive up to 36.8% and 43.4% relative improvements in accuracy on the MuSHRoom and Replica datasets, respectively, with Chamfer distance below 5 cm. The experiments require one RTX 3090 GPU and take approximately 1 hour to reconstruct a scene.
Todo List
-
Push main code and provide COLMAP-processed datasets. -
Offer code for alignment and evaluation of reconstructed mesh.
Installation
git clone https://github.com/SJTU-ViSYS-team/PlanarGS.git --recursive
cd PlanarGS

conda create -n planargs python=3.10
conda activate planargs
pip install cmake==3.20.*

pip install torch==2.4.1 torchvision==0.19.1 torchaudio==2.4.1 --index-url https://download.pytorch.org/whl/cu118  #replace your cuda version

pip install -r requirements.txt
Install submodules:
pip install -e submodules/simple-knn --no-build-isolation
pip install -e submodules/pytorch3d --no-build-isolation
pip install submodules/diff-plane-rasterization --no-build-isolation
Installation of GroundedSAM
We use the pre-trained vision-language foundational model GroundedSAM in the Pipeline for Language-prompted planar priors (LP3). You can download and install it following:
cd submodules
git clone https://github.com/IDEA-Research/Grounded-Segment-Anything.git
mv Grounded-Segment-Anything groundedsam

cd groundedsam && pip install -e segment_anything
pip install --no-build-isolation -e GroundingDINO
&& cd ../..
Dataset Preprocess
We evaluate our method on multi-view images from three indoor datasets:
-
Replica: We use eight scenes (office0–office4 and room0–room2), sampling 100 views from each scene.
-
ScanNet++: We select four DSLR-captured sequences: 8b5caf3398, b20a261fdf, 66c98f4a9b, and 88cf747085.
-
MuSHRoom: Our experiments include five iPhone-captured short sequences: coffee_room, classroom, honka, kokko, and vr_room.
We provide all the above above data preprocessed by COLMAP, which can be downloaded from Google Drive or the PlanarGS_dataset folder of our Hugging Face Datasets. Starting from these data, you can skip the alignment calculation to GT mesh and conveniently evaluate the reconstructed mesh.
❗Custom Data :
If you want to try PlanarGS on other scenes, please use COLMAP to obtain camera poses and sparse point cloud from multi-view images, and organize the COLMAP results into the images and sparse directories as shown in our overview of data directory below.
Generation of Geometric Priors
We use the pre-trained multi-view foundational model DUSt3R (code is in the submodule folder) to generate geometric priors. Please download the checkpoints of DUSt3R from link3 and put it into the ckpt folder.
# data_path represents the path to a scene folder of a dataset.
python run_geomprior.py -s <data_path> --group_size 40 #--vis
- By default, we sample and extract 40 images per group to run DUSt3R. If your GPU has limited memory (e.g., RTX 3090 with 24GB VRAM), setting
--group_size 25can help reduce memory usage. However, this may slightly reduce the accuracy of DUSt3R and consequently impact the quality of PlanarGS reconstruction. - DUSt3R can be swapped out for another multi-view foundation model by adding the model to the
submodulesdirectory and writing the corresponding./geomprior/run_dust3r.pycode.
Pipeline for Language-prompted planar priors (LP3)
One of the advantages of using the open-vocabulary foundation model is that, for the scene-specific training of PlanarGS, you can freely design prompts tailored to the characteristics of each scene, which may further improve the LP3 pipeline and enhance the reconstruction performance of PlanarGS.
- The prompts provided with the
-toption below are suitable for most indoor scenes. - You may also add or remove prompts according to the planar objects present in the scene, especially for planes that appear curved in the reconstructed meshes.
python run_lp3.py -s <data_path> -t "wall. floor. door. screen. window. ceiling. table" #--vis
- GroundedSAM can be swapped out for another vision-language foundation model by adding the model to the
submodulesdirectory and writing the corresponding./lp3/run_groundedsam.pycode.
Overview of Data Directory
The data directory after preprocession should contain the following components to be complete for training.
└── <data_path>
    ├── images
    ├── sparse
    │   ├── cameras.bin
    │   ├── images.bin
    │   └── points3D.bin
    ├── geomprior
    │   ├── aligned_depth
    │   ├── resized_confs
    │   ├── prior_normal
    │   └── depth_weights.json
    └── planarprior
        └── mask
Training and Evaluation
Run train.py for 30,000 iterations to obtain the Gaussian reconstruction result point_cloud.ply. Then run render.py to render color images, depth maps, and normal maps from the reconstructed Gaussians, and generate a mesh tsdf_fusion_post.ply using the TSDF method. (The meshes can be viewed with MeshLab).
- For mesh generation, you can adjust the parameters
--voxel_sizeand--max_depthaccording to the scene. - The
--evaloption splits the scene into training and test sets for novel view synthesis evaluation.
python train.py -s <data_path> -m <output_path>  #--eval
python render.py -m <output_path> --voxel_size 0.02 --max_depth 100.0  #--eval
If you enable --eval during training and rendering, you can run metrics.py to evaluate the quality of novel view synthesis.
python metrics.py -m <output_path>
Evaluation of Reconstructed Mesh
We provide a comprehensive evaluation pipeline including alignment and metric calculation. The evaluation consists of two steps:
1. Alignment Preprocessing
Quick Start (Pre-computed Alignment):
For the datasets used in our paper (Replica, ScanNet++, and MuSHRoom), if you start from our COLMAP-processed data, we provide pre-calculated alignment files align_params.npz to the GT mesh mesh.ply.
- Download them from the
align_infofolder of our Hugging Face Dataset. - Place the
align_params.npzandmesh.plyfile into the <data_path> of each scene. - Skip this step and proceed directly to Step 2: Metric Calculation.
For Custom Data:
If you are evaluating on a new scene or want to run the alignment from scratch, you should have the ground truth data (including GT mesh, depth maps, and poses) to calculate the scale and coordinate transformation.
- For Replica, ScanNet++, and MuSHRoom, we provide the required GT data structure in the
align_gtfolder of our Hugging Face Dataset. Please download and extract it (e.g., toalign_gt_path). - For your own custom dataset, please organize your GT data to match the structure expected by the script (refer to
eval_preprocess.pyfor details on required depth/pose files). - Generate the
align_params.npzby specifying thealign_gt_path:
# Available dataset_types: [scannetpp, replica, mushroom]
python eval_preprocess.py -s <data_path> -m <output_path> --dataset_type <dataset_type> --gt_data_path <align_gt_path>
2. Metric Calculation
Once aligned, run the evaluation script to compute reconstruction metrics.
For PlanarGS:
python eval_recon.py -s <data_path> -m <output_path>
For Other Methods (e.g., 2DGS, PGSR, DN-Splatter):
Our evaluation script supports comparing other methods by specifying the method name and mesh path. Note: For dn_splatter, we automatically apply necessary coordinate system fixes.
python eval_recon.py -s <data_path> -m <output_path> \
    --method 2dgs \
    --rec_mesh_path /path/to/other/mesh.ply
Acknowledgements
This project is built upon 3DGS and PGSR, and evaluation scripts are based on NICE-SLAM. For the usage of the foundation models, we make modifications on the demo code of DUSt3R and GroundedSAM. We thank the authors for their great work and repos.
Citation
If you find this code useful for your research, please use the following BibTeX entry.
@inproceedings{
    jin2025planargs,
    title={PlanarGS: High-Fidelity Indoor 3D Gaussian Splatting Guided by Vision-Language Planar Priors},
    author={Xirui Jin and Renbiao Jin and Boying Li and Danping Zou and Wenxian Yu},
    booktitle={The Thirty-ninth Annual Conference on Neural Information Processing Systems},
    year={2025},
    url={https://openreview.net/forum?id=38GF07Tmtr}
}
Similar repos


Official implementation of NeurIPS2025 paper "PlanarGS: High-Fidelity Indoor 3D Gaussian Splatting Guided by Vision-Language Planar Priors"
See the codeREADME
PlanarGS: High-Fidelity Indoor 3D Gaussian Splatting Guided by Vision-Language Planar Priors
Xirui Jin, Renbiao Jin, Boying Li, Danping Zou, Wenxian Yu
NeurIPS 2025
Project Page | arXiv
PlanarGS combines planar priors from the LP3 pipeline and geometric priors from the pretrained multi-view foundation model with 3D Gaussian Splatting to achieve high-fidelity indoor surface reconstruction from multi-view images. We acheive up to 36.8% and 43.4% relative improvements in accuracy on the MuSHRoom and Replica datasets, respectively, with Chamfer distance below 5 cm. The experiments require one RTX 3090 GPU and take approximately 1 hour to reconstruct a scene.
Todo List
-
Push main code and provide COLMAP-processed datasets. -
Offer code for alignment and evaluation of reconstructed mesh.
Installation
git clone https://github.com/SJTU-ViSYS-team/PlanarGS.git --recursive
cd PlanarGS

conda create -n planargs python=3.10
conda activate planargs
pip install cmake==3.20.*

pip install torch==2.4.1 torchvision==0.19.1 torchaudio==2.4.1 --index-url https://download.pytorch.org/whl/cu118  #replace your cuda version

pip install -r requirements.txt
Install submodules:
pip install -e submodules/simple-knn --no-build-isolation
pip install -e submodules/pytorch3d --no-build-isolation
pip install submodules/diff-plane-rasterization --no-build-isolation
Installation of GroundedSAM
We use the pre-trained vision-language foundational model GroundedSAM in the Pipeline for Language-prompted planar priors (LP3). You can download and install it following:
cd submodules
git clone https://github.com/IDEA-Research/Grounded-Segment-Anything.git
mv Grounded-Segment-Anything groundedsam

cd groundedsam && pip install -e segment_anything
pip install --no-build-isolation -e GroundingDINO
&& cd ../..
Dataset Preprocess
We evaluate our method on multi-view images from three indoor datasets:
-
Replica: We use eight scenes (office0–office4 and room0–room2), sampling 100 views from each scene.
-
ScanNet++: We select four DSLR-captured sequences: 8b5caf3398, b20a261fdf, 66c98f4a9b, and 88cf747085.
-
MuSHRoom: Our experiments include five iPhone-captured short sequences: coffee_room, classroom, honka, kokko, and vr_room.
We provide all the above above data preprocessed by COLMAP, which can be downloaded from Google Drive or the PlanarGS_dataset folder of our Hugging Face Datasets. Starting from these data, you can skip the alignment calculation to GT mesh and conveniently evaluate the reconstructed mesh.
❗Custom Data :
If you want to try PlanarGS on other scenes, please use COLMAP to obtain camera poses and sparse point cloud from multi-view images, and organize the COLMAP results into the images and sparse directories as shown in our overview of data directory below.
Generation of Geometric Priors
We use the pre-trained multi-view foundational model DUSt3R (code is in the submodule folder) to generate geometric priors. Please download the checkpoints of DUSt3R from link3 and put it into the ckpt folder.
# data_path represents the path to a scene folder of a dataset.
python run_geomprior.py -s <data_path> --group_size 40 #--vis
- By default, we sample and extract 40 images per group to run DUSt3R. If your GPU has limited memory (e.g., RTX 3090 with 24GB VRAM), setting
--group_size 25can help reduce memory usage. However, this may slightly reduce the accuracy of DUSt3R and consequently impact the quality of PlanarGS reconstruction. - DUSt3R can be swapped out for another multi-view foundation model by adding the model to the
submodulesdirectory and writing the corresponding./geomprior/run_dust3r.pycode.
Pipeline for Language-prompted planar priors (LP3)
One of the advantages of using the open-vocabulary foundation model is that, for the scene-specific training of PlanarGS, you can freely design prompts tailored to the characteristics of each scene, which may further improve the LP3 pipeline and enhance the reconstruction performance of PlanarGS.
- The prompts provided with the
-toption below are suitable for most indoor scenes. - You may also add or remove prompts according to the planar objects present in the scene, especially for planes that appear curved in the reconstructed meshes.
python run_lp3.py -s <data_path> -t "wall. floor. door. screen. window. ceiling. table" #--vis
- GroundedSAM can be swapped out for another vision-language foundation model by adding the model to the
submodulesdirectory and writing the corresponding./lp3/run_groundedsam.pycode.
Overview of Data Directory
The data directory after preprocession should contain the following components to be complete for training.
└── <data_path>
    ├── images
    ├── sparse
    │   ├── cameras.bin
    │   ├── images.bin
    │   └── points3D.bin
    ├── geomprior
    │   ├── aligned_depth
    │   ├── resized_confs
    │   ├── prior_normal
    │   └── depth_weights.json
    └── planarprior
        └── mask
Training and Evaluation
Run train.py for 30,000 iterations to obtain the Gaussian reconstruction result point_cloud.ply. Then run render.py to render color images, depth maps, and normal maps from the reconstructed Gaussians, and generate a mesh tsdf_fusion_post.ply using the TSDF method. (The meshes can be viewed with MeshLab).
- For mesh generation, you can adjust the parameters
--voxel_sizeand--max_depthaccording to the scene. - The
--evaloption splits the scene into training and test sets for novel view synthesis evaluation.
python train.py -s <data_path> -m <output_path>  #--eval
python render.py -m <output_path> --voxel_size 0.02 --max_depth 100.0  #--eval
If you enable --eval during training and rendering, you can run metrics.py to evaluate the quality of novel view synthesis.
python metrics.py -m <output_path>
Evaluation of Reconstructed Mesh
We provide a comprehensive evaluation pipeline including alignment and metric calculation. The evaluation consists of two steps:
1. Alignment Preprocessing
Quick Start (Pre-computed Alignment):
For the datasets used in our paper (Replica, ScanNet++, and MuSHRoom), if you start from our COLMAP-processed data, we provide pre-calculated alignment files align_params.npz to the GT mesh mesh.ply.
- Download them from the
align_infofolder of our Hugging Face Dataset. - Place the
align_params.npzandmesh.plyfile into the <data_path> of each scene. - Skip this step and proceed directly to Step 2: Metric Calculation.
For Custom Data:
If you are evaluating on a new scene or want to run the alignment from scratch, you should have the ground truth data (including GT mesh, depth maps, and poses) to calculate the scale and coordinate transformation.
- For Replica, ScanNet++, and MuSHRoom, we provide the required GT data structure in the
align_gtfolder of our Hugging Face Dataset. Please download and extract it (e.g., toalign_gt_path). - For your own custom dataset, please organize your GT data to match the structure expected by the script (refer to
eval_preprocess.pyfor details on required depth/pose files). - Generate the
align_params.npzby specifying thealign_gt_path:
# Available dataset_types: [scannetpp, replica, mushroom]
python eval_preprocess.py -s <data_path> -m <output_path> --dataset_type <dataset_type> --gt_data_path <align_gt_path>
2. Metric Calculation
Once aligned, run the evaluation script to compute reconstruction metrics.
For PlanarGS:
python eval_recon.py -s <data_path> -m <output_path>
For Other Methods (e.g., 2DGS, PGSR, DN-Splatter):
Our evaluation script supports comparing other methods by specifying the method name and mesh path. Note: For dn_splatter, we automatically apply necessary coordinate system fixes.
python eval_recon.py -s <data_path> -m <output_path> \
    --method 2dgs \
    --rec_mesh_path /path/to/other/mesh.ply
Acknowledgements
This project is built upon 3DGS and PGSR, and evaluation scripts are based on NICE-SLAM. For the usage of the foundation models, we make modifications on the demo code of DUSt3R and GroundedSAM. We thank the authors for their great work and repos.
Citation
If you find this code useful for your research, please use the following BibTeX entry.
@inproceedings{
    jin2025planargs,
    title={PlanarGS: High-Fidelity Indoor 3D Gaussian Splatting Guided by Vision-Language Planar Priors},
    author={Xirui Jin and Renbiao Jin and Boying Li and Danping Zou and Wenxian Yu},
    booktitle={The Thirty-ninth Annual Conference on Neural Information Processing Systems},
    year={2025},
    url={https://openreview.net/forum?id=38GF07Tmtr}
}