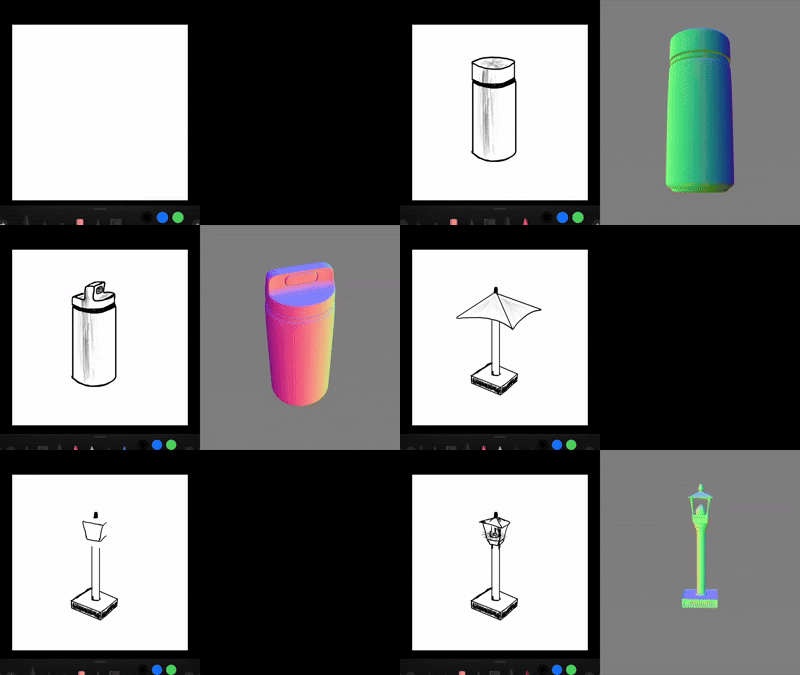
Current 3D generation approaches often struggle to balance diversity with structural consistency. Existing models either lack diversity when the topology is well-preserved, or they lose topological stability over multiple iterations when diversity is high.
This limitation motivates our primary research question:
"Can we generate highly diverse and high-fidelity meshes through diffusion models, and edit parts while preserving the topology of the unedited part?"
To address this, we leverage existing diffusion-based generation models (FLUX.2 and TRELLIS) to achieve high diversity and propose a novel attention-caching and masking mechanism (KV-Cache Engine and Automatic Bounding Box extraction) for the latent space to ensure topological stability during local sketch-based edits.
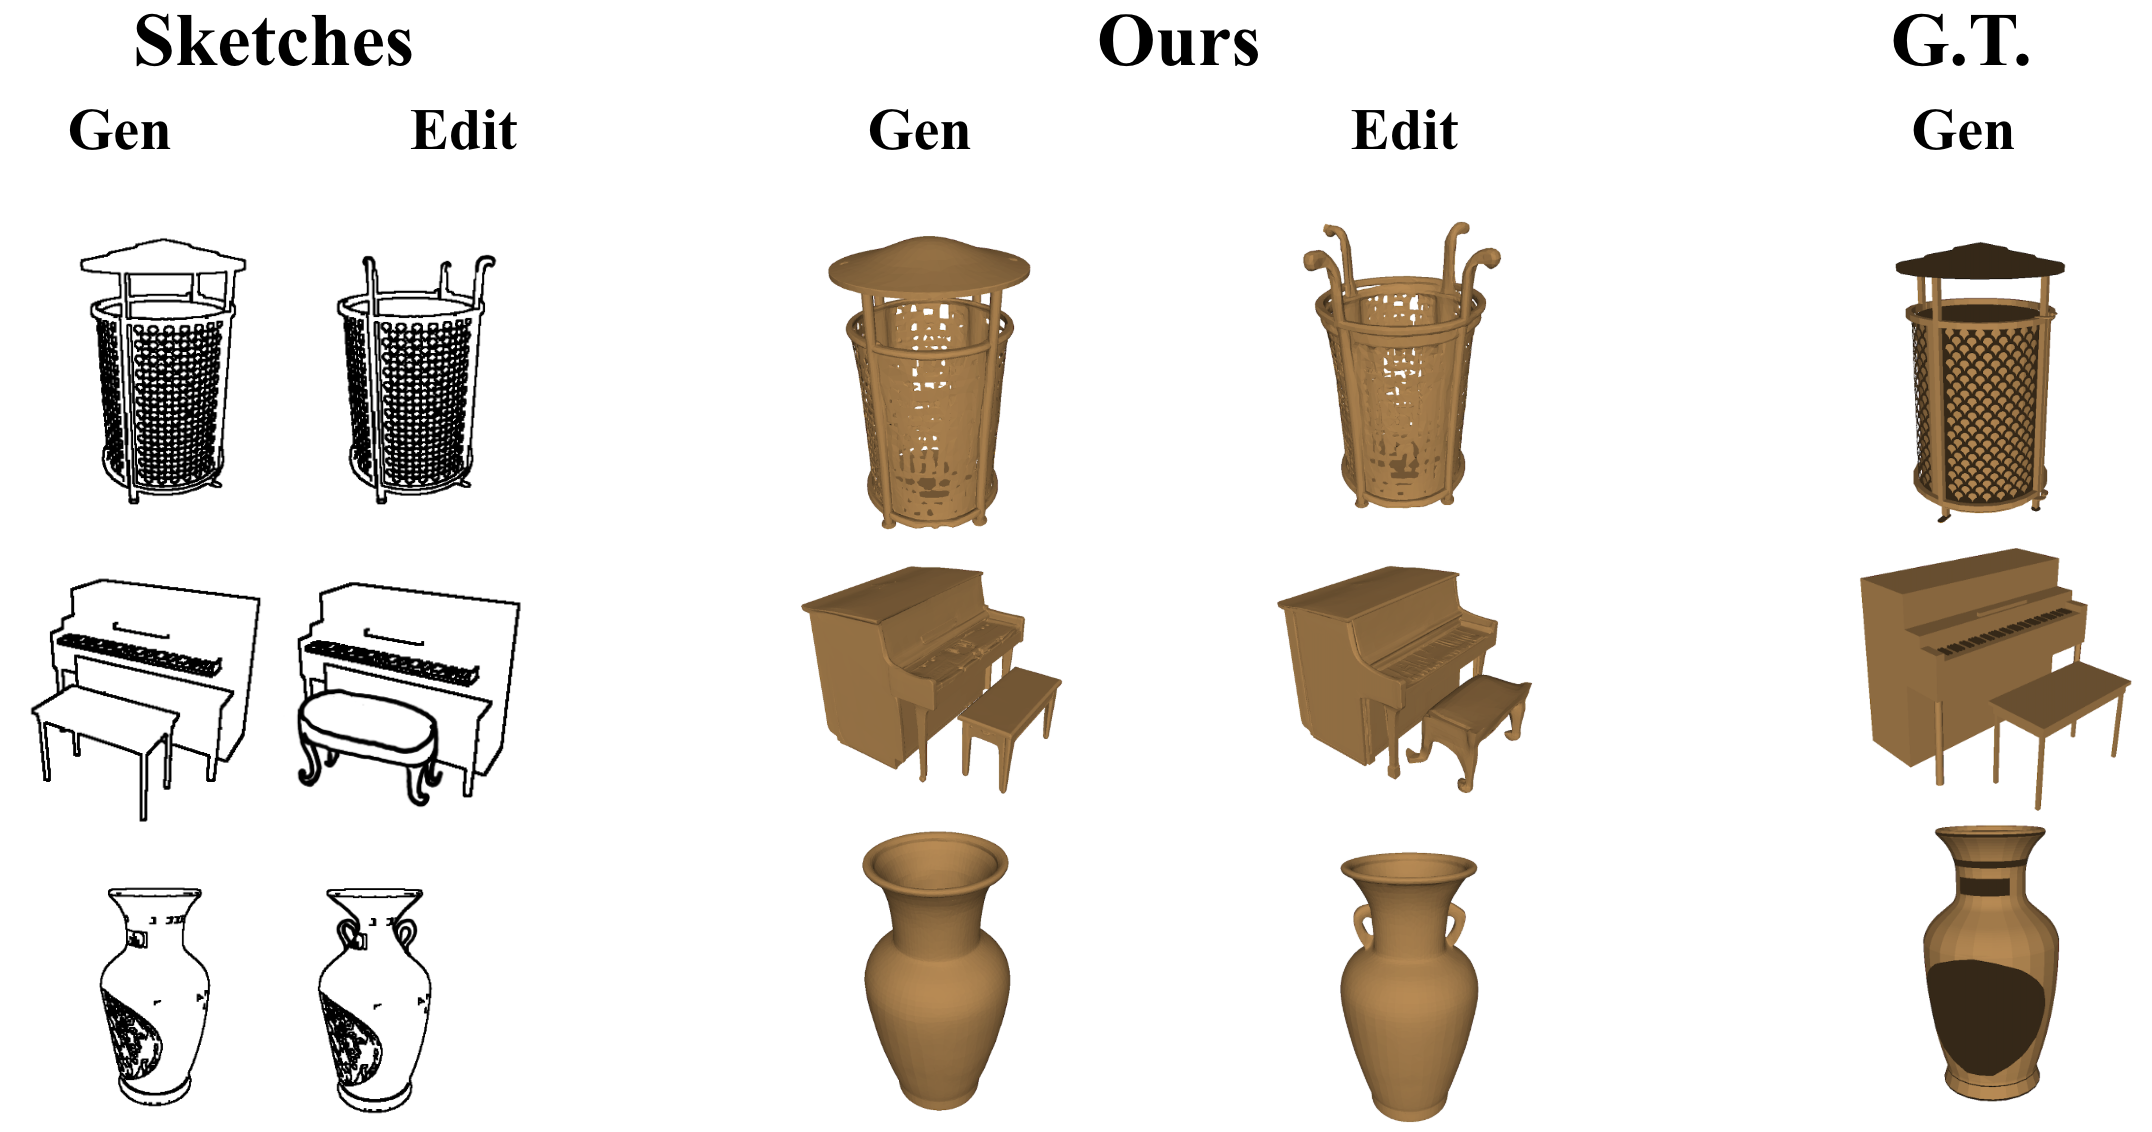
Our method is capable of generating meshes that closely resemble ground-truth shapes. It accurately interprets user edits in specific regions (such as replacements or removals) while preserving the unedited parts of the original geometry.
Clone the repository
git clone --recurse-submodules https://github.com/Namozbey/t-pres.git
cd t-pres
Due to the complex interactions between 3D generation (Trellis), Image Generation (Flux.2), and Depth Estimation (Depth Anything 3), strict environment management is required to prevent CUDA and PyTorch conflicts.
1. Create the environment:
conda create -n t_pres python=3.11
conda activate t_pres
2. Install PyTorch & Core Attention (Xformers):
pip install torch==2.4.0 torchvision==0.19.0 torchaudio==2.4.0 --index-url https://download.pytorch.org/whl/cu118
pip install xformers==0.0.27.post2 --index-url https://download.pytorch.org/whl/cu118
3. Install Project Dependencies:
pip install -r requirements.txt
4. Install 3D Rendering Libraries:
pip install kaolin==0.18.0 -f https://nvidia-kaolin.s3.us-east-2.amazonaws.com/torch-2.4.0_cu118.html
(Windows Users: Building nvdiffrast requires Visual Studio C++ Build Tools. To avoid Ninja parallel-build crashes and NumPy build errors, run these exact commands in your active Command Prompt to safely compile it):
call "C:\Program Files (x86)\Microsoft Visual Studio\2022\BuildTools\VC\Auxiliary\Build\vcvars64.bat" -vcvars_ver=14.29
set DISTUTILS_USE_SDK=1
set USE_NINJA=0

pip install git+https://github.com/NVlabs/nvdiffrast.git --no-build-isolation
pip install "git+https://github.com/autonomousvision/mip-splatting.git#subdirectory=submodules/diff-gaussian-rasterization" --no-build-isolation
pip install git+https://github.com/nerfstudio-project/gsplat.git@0b4dddf04cb687367602c01196913cde6a743d70 --no-build-isolation
(If you are using VS Community instead of BuildTools, adjust the path to \2022\Community\...)
5. Install Depth Anything V3:
cd Depth-Anything-V3
pip install -e . --no-deps
cd ..
The pipeline is stateful and automatically saves intermediate outputs, generated meshes, and model states in the state/ directory. By default, consecutive runs will attempt to use this cache to edit the previous generation.
To generate a 3D mesh from a sketch for the first time, simply provide the path to your sketch:
python sketch2mesh.py -s samples/truck_1.png
To edit the previously generated mesh, run the script again with the edited sketch. The pipeline will automatically detect the previous state in the state/ folder, calculate the differences, and apply a localized edit:
python sketch2mesh.py -s samples/truck_2.png
If you want to start a completely new generation (clearing the previous cache), use the --not-from-cache or -nc flag:
python sketch2mesh.py -s samples/bottle_1.png -nc
Once the initial generation is complete, you can edit this new object normally without the flag:
python sketch2mesh.py -s samples/bottle_2.png
If you need to verify the spatial math and want to see the 3D bounding box coverage of the edited region:
sketch2mesh.py.sample_mesh_surface(prev_mesh) and visualize_bounding_box(...) on lines 181 and 182.This will pop up a 3D visualizer showing the mesh and the calculated bounding box area before the edit is applied.
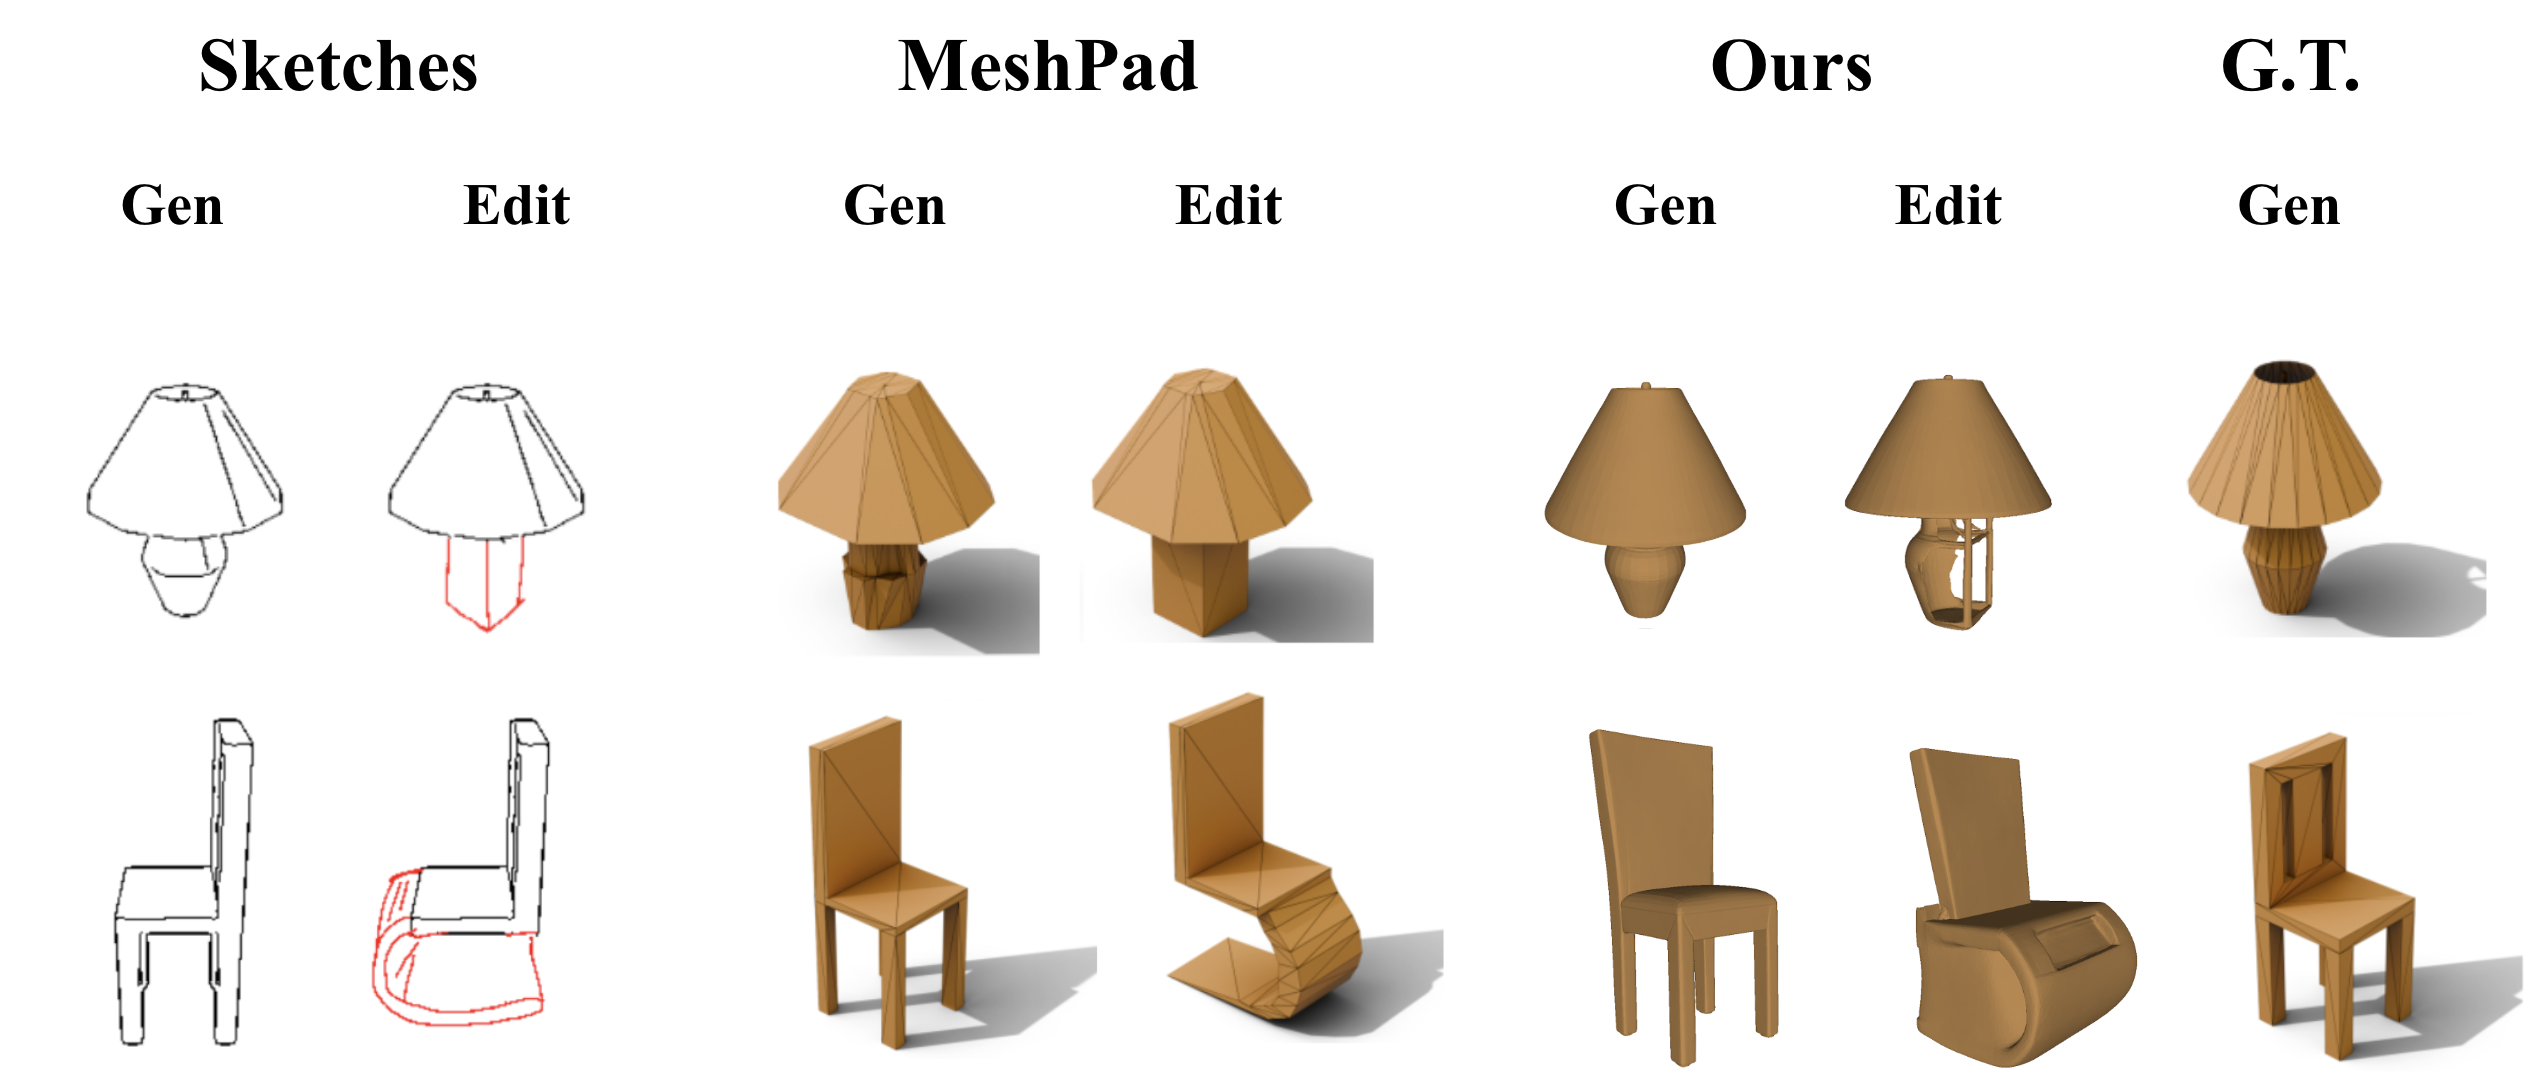
Sketch-to-Image Limitations. Since we utilize the image-to-image generative model FLUX.2, there are certain limitations on how the model interprets sketches as solid images. In the Figure, second row, the edited result was caused by FLUX.2, since it generated the chair image with a solid bottom half.
ABB Limitations. Our ABB method has two main limitations. First, because it computes the bounding box (BB) from a 3D reconstruction of the changed part, it is inherently unable to capture regions behind rounded, spherical parts (the Figure, 1st row, our edited example). Second, the ABB mechanism utilizes the depth map from the initially generated mesh; thereby, it lacks depth information for the added part in the new sketch, making it unable to capture the addition's BB.
Current 3D generation approaches often struggle to balance diversity with structural consistency. Existing models either lack diversity when the topology is well-preserved, or they lose topological stability over multiple iterations when diversity is high.
This limitation motivates our primary research question:
"Can we generate highly diverse and high-fidelity meshes through diffusion models, and edit parts while preserving the topology of the unedited part?"
To address this, we leverage existing diffusion-based generation models (FLUX.2 and TRELLIS) to achieve high diversity and propose a novel attention-caching and masking mechanism (KV-Cache Engine and Automatic Bounding Box extraction) for the latent space to ensure topological stability during local sketch-based edits.
Our method is capable of generating meshes that closely resemble ground-truth shapes. It accurately interprets user edits in specific regions (such as replacements or removals) while preserving the unedited parts of the original geometry.
Clone the repository
git clone --recurse-submodules https://github.com/Namozbey/t-pres.git
cd t-pres
Due to the complex interactions between 3D generation (Trellis), Image Generation (Flux.2), and Depth Estimation (Depth Anything 3), strict environment management is required to prevent CUDA and PyTorch conflicts.
1. Create the environment:
conda create -n t_pres python=3.11
conda activate t_pres
2. Install PyTorch & Core Attention (Xformers):
pip install torch==2.4.0 torchvision==0.19.0 torchaudio==2.4.0 --index-url https://download.pytorch.org/whl/cu118
pip install xformers==0.0.27.post2 --index-url https://download.pytorch.org/whl/cu118
3. Install Project Dependencies:
pip install -r requirements.txt
4. Install 3D Rendering Libraries:
pip install kaolin==0.18.0 -f https://nvidia-kaolin.s3.us-east-2.amazonaws.com/torch-2.4.0_cu118.html
(Windows Users: Building nvdiffrast requires Visual Studio C++ Build Tools. To avoid Ninja parallel-build crashes and NumPy build errors, run these exact commands in your active Command Prompt to safely compile it):
call "C:\Program Files (x86)\Microsoft Visual Studio\2022\BuildTools\VC\Auxiliary\Build\vcvars64.bat" -vcvars_ver=14.29
set DISTUTILS_USE_SDK=1
set USE_NINJA=0

pip install git+https://github.com/NVlabs/nvdiffrast.git --no-build-isolation
pip install "git+https://github.com/autonomousvision/mip-splatting.git#subdirectory=submodules/diff-gaussian-rasterization" --no-build-isolation
pip install git+https://github.com/nerfstudio-project/gsplat.git@0b4dddf04cb687367602c01196913cde6a743d70 --no-build-isolation
(If you are using VS Community instead of BuildTools, adjust the path to \2022\Community\...)
5. Install Depth Anything V3:
cd Depth-Anything-V3
pip install -e . --no-deps
cd ..
The pipeline is stateful and automatically saves intermediate outputs, generated meshes, and model states in the state/ directory. By default, consecutive runs will attempt to use this cache to edit the previous generation.
To generate a 3D mesh from a sketch for the first time, simply provide the path to your sketch:
python sketch2mesh.py -s samples/truck_1.png
To edit the previously generated mesh, run the script again with the edited sketch. The pipeline will automatically detect the previous state in the state/ folder, calculate the differences, and apply a localized edit:
python sketch2mesh.py -s samples/truck_2.png
If you want to start a completely new generation (clearing the previous cache), use the --not-from-cache or -nc flag:
python sketch2mesh.py -s samples/bottle_1.png -nc
Once the initial generation is complete, you can edit this new object normally without the flag:
python sketch2mesh.py -s samples/bottle_2.png
If you need to verify the spatial math and want to see the 3D bounding box coverage of the edited region:
sketch2mesh.py.sample_mesh_surface(prev_mesh) and visualize_bounding_box(...) on lines 181 and 182.This will pop up a 3D visualizer showing the mesh and the calculated bounding box area before the edit is applied.
Sketch-to-Image Limitations. Since we utilize the image-to-image generative model FLUX.2, there are certain limitations on how the model interprets sketches as solid images. In the Figure, second row, the edited result was caused by FLUX.2, since it generated the chair image with a solid bottom half.
ABB Limitations. Our ABB method has two main limitations. First, because it computes the bounding box (BB) from a 3D reconstruction of the changed part, it is inherently unable to capture regions behind rounded, spherical parts (the Figure, 1st row, our edited example). Second, the ABB mechanism utilizes the depth map from the initially generated mesh; thereby, it lacks depth information for the added part in the new sketch, making it unable to capture the addition's BB.



