[DEIMv2] Real Time Object Detection Meets DINOv3
See the code🎉 We’re excited to introduce EdgeCrafter with SOTA performance on object detection, pose estimation as well as instance segmentation.🎉






DEIMv2 is an evolution of the DEIM framework while leveraging the rich features from DINOv3. Our method is designed with various model sizes, from an ultra-light version up to S, M, L, and X, to be adaptable for a wide range of scenarios. Across these variants, DEIMv2 achieves state-of-the-art performance, with the S-sized model notably surpassing 50 AP on the challenging COCO benchmark.
1. Intellindust AI Lab 2. Xiamen University
* Equal Contribution † Corresponding Author
If you like our work, please give us a ⭐!
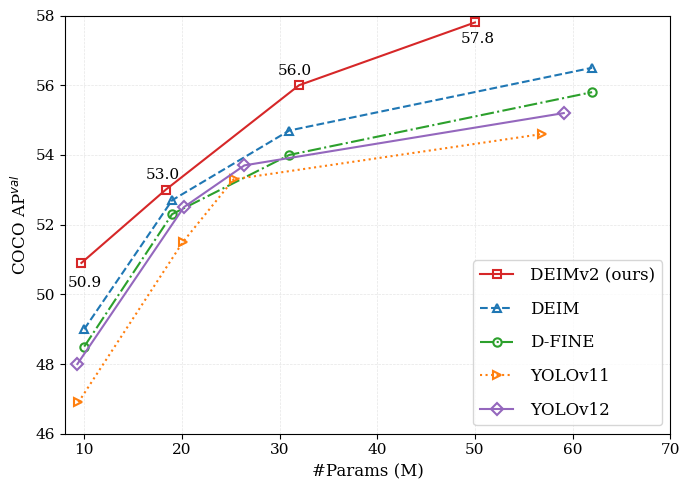
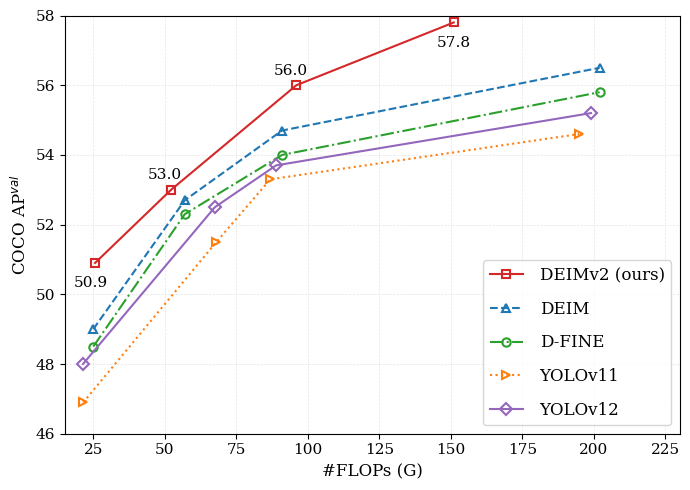
| Model | Dataset | AP | #Params | GFLOPs | Latency (ms) | config | Hugging Face | checkpoint | log |
|---|---|---|---|---|---|---|---|---|---|
| Atto | COCO | 23.8 | 0.5M | 0.8 | 1.10 | yml | huggingface | Google / Quark | Google / Quark |
| Femto | COCO | 31.0 | 1.0M | 1.7 | 1.45 | yml | huggingface | Google / Quark | Google / Quark |
| Pico | COCO | 38.5 | 1.5M | 5.2 | 2.13 | yml | huggingface | Google / Quark | Google / Quark |
| N | COCO | 43.0 | 3.6M | 6.8 | 2.32 | yml | huggingface | Google / Quark | Google / Quark |
| S | COCO | 50.9 | 9.7M | 25.6 | 5.78 | yml | huggingface | Google / Quark | Google / Quark |
| M | COCO | 53.0 | 18.1M | 52.2 | 8.80 | yml | huggingface | Google / Quark | Google / Quark |
| L | COCO | 56.0 | 32.2M | 96.7 | 10.47 | yml | huggingface | Google / Quark | Google / Quark |
| X | COCO | 57.8 | 50.3M | 151.6 | 13.75 | yml | huggingface | Google / Quark | Google / Quark |
We currently release our models on Hugging Face! Here's a simple example. You can see detailed configs and more examples in hf_models.ipynb.
Create a .py file in the directory of DEIMv2, make sure all components are loaded successfully.
import torch.nn as nn
from huggingface_hub import PyTorchModelHubMixin

from engine.backbone import HGNetv2, DINOv3STAs
from engine.deim import HybridEncoder, LiteEncoder
from engine.deim import DFINETransformer, DEIMTransformer
from engine.deim.postprocessor import PostProcessor


class DEIMv2(nn.Module, PyTorchModelHubMixin):
    def __init__(self, config):
        super().__init__()
        self.backbone = DINOv3STAs(**config["DINOv3STAs"])
        self.encoder = HybridEncoder(**config["HybridEncoder"])
        self.decoder = DEIMTransformer(**config["DEIMTransformer"])
        self.postprocessor = PostProcessor(**config["PostProcessor"])

    def forward(self, x, orig_target_sizes):
        x = self.backbone(x)
        x = self.encoder(x)
        x = self.decoder(x)
        x = self.postprocessor(x, orig_target_sizes)

        return x

deimv2_s_config = {
  "DINOv3STAs": {
    ...
  },
  ...
}

deimv2_s_hf = DEIMv2.from_pretrained("Intellindust/DEIMv2_DINOv3_S_COCO")
# You can use PyTorch 2.5.1 or 2.4.1. We have not tried other versions, but we recommend that the PyTorch version be 2.0 or higher.

conda create -n deimv2 python=3.11 -y
conda activate deimv2
pip install -r requirements.txt
Follow the steps below to prepare COCO dataset:
Download COCO2017 from OpenDataLab or COCO.
Modify paths in coco_detection.yml
train_dataloader:
    img_folder: /data/COCO2017/train2017/
    ann_file: /data/COCO2017/annotations/instances_train2017.json
val_dataloader:
    img_folder: /data/COCO2017/val2017/
    ann_file: /data/COCO2017/annotations/instances_val2017.json
To train on your custom dataset, you need to organize it in the COCO format. Follow the steps below to prepare your dataset:
Set remap_mscoco_category to False:
This prevents the automatic remapping of category IDs to match the MSCOCO categories.
remap_mscoco_category: False
Organize Images:
Structure your dataset directories as follows:
dataset/
├── images/
│   ├── train/
│   │   ├── image1.jpg
│   │   ├── image2.jpg
│   │   └── ...
│   ├── val/
│   │   ├── image1.jpg
│   │   ├── image2.jpg
│   │   └── ...
└── annotations/
    ├── instances_train.json
    ├── instances_val.json
    └── ...
images/train/: Contains all training images.images/val/: Contains all validation images.annotations/: Contains COCO-formatted annotation files.Convert Annotations to COCO Format:
If your annotations are not already in COCO format, you'll need to convert them. You can use the following Python script as a reference or utilize existing tools:
import json

def convert_to_coco(input_annotations, output_annotations):
    # Implement conversion logic here
    pass

if __name__ == "__main__":
    convert_to_coco('path/to/your_annotations.json', 'dataset/annotations/instances_train.json')
Update Configuration Files:
Modify your custom_detection.yml.
task: detection

evaluator:
  type: CocoEvaluator
  iou_types: ['bbox', ]

num_classes: 777 # your dataset classes
remap_mscoco_category: False

train_dataloader:
  type: DataLoader
  dataset:
    type: CocoDetection
    img_folder: /data/yourdataset/train
    ann_file: /data/yourdataset/train/train.json
    return_masks: False
    transforms:
      type: Compose
      ops: ~
  shuffle: True
  num_workers: 4
  drop_last: True
  collate_fn:
    type: BatchImageCollateFunction

val_dataloader:
  type: DataLoader
  dataset:
    type: CocoDetection
    img_folder: /data/yourdataset/val
    ann_file: /data/yourdataset/val/ann.json
    return_masks: False
    transforms:
      type: Compose
      ops: ~
  shuffle: False
  num_workers: 4
  drop_last: False
  collate_fn:
    type: BatchImageCollateFunction
Versions based on HGNetv2: Backbones will be downloaded automatically during training, so you don't need to worry.
DEIMv2-L and X: We use DINOv3-S and S+ as backbone, you can download them following the guide in DINOv3.
DEIMv2-S and M: We use our ViT-Tiny and ViT-Tiny+ distilled from DINOv3-S, you can download them from ViT-Tiny and ViT-Tiny+.
Place dinov3 and vits into ./ckpts folder as:
ckpts/
├── dinov3_vits16.pth
├── vitt_distill.pt
├── vittplus_distill.pt
└── ...
Training
# for ViT-based variants
CUDA_VISIBLE_DEVICES=0,1,2,3 torchrun --master_port=7777 --nproc_per_node=4 train.py -c configs/deimv2/deimv2_dinov3_${model}_coco.yml --use-amp --seed=0

# for HGNetv2-based variants
CUDA_VISIBLE_DEVICES=0,1,2,3 torchrun --master_port=7777 --nproc_per_node=4 train.py -c configs/deimv2/deimv2_hgnetv2_${model}_coco.yml --use-amp --seed=0
Testing
# for ViT-based variants
CUDA_VISIBLE_DEVICES=0,1,2,3 torchrun --master_port=7777 --nproc_per_node=4 train.py -c configs/deimv2/deimv2_dinov3_${model}_coco.yml --test-only -r model.pth

# for HGNetv2-based variants
CUDA_VISIBLE_DEVICES=0,1,2,3 torchrun --master_port=7777 --nproc_per_node=4 train.py -c configs/deimv2/deimv2_hgnetv2_${model}_coco.yml --test-only -r model.pth
Tuning
# for ViT-based variants
CUDA_VISIBLE_DEVICES=0,1,2,3 torchrun --master_port=7777 --nproc_per_node=4 train.py -c configs/deimv2/deimv2_dinov3_${model}_coco.yml --use-amp --seed=0 -t model.pth

# for HGNetv2-based variants
CUDA_VISIBLE_DEVICES=0,1,2,3 torchrun --master_port=7777 --nproc_per_node=4 train.py -c configs/deimv2/deimv2_hgnetv2_${model}_coco.yml --use-amp --seed=0 -t model.pth
For example, if you want to use DEIMv2-S and double the total batch size to 64 when training DEIMv2 on COCO2017, here are the steps you should follow:
Modify your deimv2_dinov3_s_coco.yml to increase the total_batch_size:
train_dataloader:
  total_batch_size: 64
  dataset:
    transforms:
      ops:
        ...

  collate_fn:
    ...
Modify your deimv2_dinov3_s_coco.yml. Here’s how the key parameters should be adjusted:
optimizer:
  type: AdamW

  params:
    -
      # except norm/bn/bias in self.dinov3
      params: '^(?=.*.dinov3)(?!.*(?:norm|bn|bias)).*$'
      lr: 0.00005  # doubled, linear scaling law
    -
      # including all norm/bn/bias in self.dinov3
      params: '^(?=.*.dinov3)(?=.*(?:norm|bn|bias)).*$'
      lr: 0.00005   # doubled, linear scaling law
      weight_decay: 0.
    -
      # including all norm/bn/bias except for the self.dinov3
      params: '^(?=.*(?:sta|encoder|decoder))(?=.*(?:norm|bn|bias)).*$'
      weight_decay: 0.

  lr: 0.0005   # linear scaling law if needed
  betas: [0.9, 0.999]
  weight_decay: 0.0001

ema:  # added EMA settings
  decay: 0.9998  # adjusted by 1 - (1 - decay) * 2
  warmups: 500  # halved

lr_warmup_scheduler:
  warmup_duration: 250  # halved
If you'd like to train DEIMv2-S on COCO2017 with an input size of 320x320, follow these steps:
Modify your deimv2_dinov3_s_coco.yml:
eval_spatial_size: [320, 320]

train_dataloader:
  # Here we set the total_batch_size to 64 as an example.
  total_batch_size: 64
  dataset:
    transforms:
      ops:
        #  Especially for Mosaic augmentation, it is recommended that output_size = input_size / 2.
        - {type: Mosaic, output_size: 160, rotation_range: 10, translation_range: [0.1, 0.1], scaling_range: [0.5, 1.5],
           probability: 1.0, fill_value: 0, use_cache: True, max_cached_images: 50, random_pop: True}
        ...
        - {type: Resize, size: [320, 320], }
        ...
    collate_fn:
      base_size: 320
      ...

val_dataloader:
  dataset:
    transforms:
      ops:
        - {type: Resize, size: [320, 320], }
        ...
If you want to finetune DEIMv2-S for 20 epochs, follow these steps (for reference only; feel free to adjust them according to your needs):
epoches: 32 #  Total epochs: 20 for training + EMA  for 4n = 12. n refers to the model size in the matched config.

flat_epoch: 14    # 4 + 20 // 2
no_aug_epoch: 12  # 4n

train_dataloader:
  dataset:
    transforms:
      ops:
        ...
      policy:
        epoch: [4, 14, 20]   # [start_epoch, flat_epoch, epoches - no_aug_epoch]

  collate_fn:
    ...
    mixup_epochs: [4, 14]  # [start_epoch, flat_epoch]
    stop_epoch: 20  # epoches - no_aug_epoch
    copyblend_epochs: [4, 20]  # [start_epoch, epoches - no_aug_epoch]

DEIMCriterion:
  matcher:
    ...
    matcher_change_epoch: 18  # ~90% of (epoches - no_aug_epoch)
Setup
pip install onnx onnxsim
Export onnx
python tools/deployment/export_onnx.py --check -c configs/deimv2/deimv2_dinov3_${model}_coco.yml -r model.pth
Export tensorrt
trtexec --onnx="model.onnx" --saveEngine="model.engine" --fp16
⚠️ TensorRT Version Notes
✅ Recommended: Use TensorRT ≥ 10.6 for FP16 inference to ensure stable execution and correct detection results.
❗ Known Issue: With TensorRT 10.4, FP16 inference may produce incorrect outputs.
🔧 Workarounds for older versions (e.g., 10.4):
Run inference in FP32 mode, or
Carefully validate the exported engine and end-to-end pipeline to confirm numerical correctness and detection performance.
Setup
pip install -r tools/inference/requirements.txt
Inference (onnxruntime / tensorrt / torch)
Inference on images and videos is now supported.
python tools/inference/onnx_inf.py --onnx model.onnx --input image.jpg  # video.mp4
python tools/inference/trt_inf.py --trt model.engine --input image.jpg
python tools/inference/torch_inf.py -c configs/deimv2/deimv2_dinov3_${model}_coco.yml -r model.pth --input image.jpg --device cuda:0
Setup
pip install -r tools/benchmark/requirements.txt
Model FLOPs, MACs, and Params
python tools/benchmark/get_info.py -c configs/deimv2/deimv2_dinov3_${model}_coco.yml
TensorRT Latency
python tools/benchmark/trt_benchmark.py --COCO_dir path/to/COCO2017 --engine_dir model.engine
pip install fiftyone
python tools/visualization/fiftyone_vis.py -c configs/deimv2/deimv2_dinov3_${model}_coco.yml -r model.pth
Auto Resume Training
bash reference/safe_training.sh
Converting Model Weights
python reference/convert_weight.py model.pth
If you use DEIMv2 or its methods in your work, please cite the following BibTeX entries:
@article{huang2025deimv2,
  title={Real-Time Object Detection Meets DINOv3},
  author={Huang, Shihua and Hou, Yongjie and Liu, Longfei and Yu, Xuanlong and Shen, Xi},
  journal={arXiv},
  year={2025}
}
This project is released under the DEIMv2 License. See the LICENSE file for details.
For commercial licensing inquiries, please Contact Us or email shenxi@intellindust.com.
Our work is built upon LightlyTrain, D-FINE, RT-DETR, DEIM, and DINOv3. Thanks for their great work!
✨ Feel free to contribute and reach out if you have any questions! ✨
586 followers · starred Sep 2026
346 followers · starred Sep 2025
4,065 followers · starred Nov 2025
886 followers · starred Sep 2025
[DEIMv2] Real Time Object Detection Meets DINOv3
See the code🎉 We’re excited to introduce EdgeCrafter with SOTA performance on object detection, pose estimation as well as instance segmentation.🎉
DEIMv2 is an evolution of the DEIM framework while leveraging the rich features from DINOv3. Our method is designed with various model sizes, from an ultra-light version up to S, M, L, and X, to be adaptable for a wide range of scenarios. Across these variants, DEIMv2 achieves state-of-the-art performance, with the S-sized model notably surpassing 50 AP on the challenging COCO benchmark.
1. Intellindust AI Lab 2. Xiamen University
* Equal Contribution † Corresponding Author
If you like our work, please give us a ⭐!
| Model | Dataset | AP | #Params | GFLOPs | Latency (ms) | config | Hugging Face | checkpoint | log |
|---|---|---|---|---|---|---|---|---|---|
| Atto | COCO | 23.8 | 0.5M | 0.8 | 1.10 | yml | huggingface | Google / Quark | Google / Quark |
| Femto | COCO | 31.0 | 1.0M | 1.7 | 1.45 | yml | huggingface | Google / Quark | Google / Quark |
| Pico | COCO | 38.5 | 1.5M | 5.2 | 2.13 | yml | huggingface | Google / Quark | Google / Quark |
| N | COCO | 43.0 | 3.6M | 6.8 | 2.32 | yml | huggingface | Google / Quark | Google / Quark |
| S | COCO | 50.9 | 9.7M | 25.6 | 5.78 | yml | huggingface | Google / Quark | Google / Quark |
| M | COCO | 53.0 | 18.1M | 52.2 | 8.80 | yml | huggingface | Google / Quark | Google / Quark |
| L | COCO | 56.0 | 32.2M | 96.7 | 10.47 | yml | huggingface | Google / Quark | Google / Quark |
| X | COCO | 57.8 | 50.3M | 151.6 | 13.75 | yml | huggingface | Google / Quark | Google / Quark |
We currently release our models on Hugging Face! Here's a simple example. You can see detailed configs and more examples in hf_models.ipynb.
Create a .py file in the directory of DEIMv2, make sure all components are loaded successfully.
import torch.nn as nn
from huggingface_hub import PyTorchModelHubMixin

from engine.backbone import HGNetv2, DINOv3STAs
from engine.deim import HybridEncoder, LiteEncoder
from engine.deim import DFINETransformer, DEIMTransformer
from engine.deim.postprocessor import PostProcessor


class DEIMv2(nn.Module, PyTorchModelHubMixin):
    def __init__(self, config):
        super().__init__()
        self.backbone = DINOv3STAs(**config["DINOv3STAs"])
        self.encoder = HybridEncoder(**config["HybridEncoder"])
        self.decoder = DEIMTransformer(**config["DEIMTransformer"])
        self.postprocessor = PostProcessor(**config["PostProcessor"])

    def forward(self, x, orig_target_sizes):
        x = self.backbone(x)
        x = self.encoder(x)
        x = self.decoder(x)
        x = self.postprocessor(x, orig_target_sizes)

        return x

deimv2_s_config = {
  "DINOv3STAs": {
    ...
  },
  ...
}

deimv2_s_hf = DEIMv2.from_pretrained("Intellindust/DEIMv2_DINOv3_S_COCO")
# You can use PyTorch 2.5.1 or 2.4.1. We have not tried other versions, but we recommend that the PyTorch version be 2.0 or higher.

conda create -n deimv2 python=3.11 -y
conda activate deimv2
pip install -r requirements.txt
Follow the steps below to prepare COCO dataset:
Download COCO2017 from OpenDataLab or COCO.
Modify paths in coco_detection.yml
train_dataloader:
    img_folder: /data/COCO2017/train2017/
    ann_file: /data/COCO2017/annotations/instances_train2017.json
val_dataloader:
    img_folder: /data/COCO2017/val2017/
    ann_file: /data/COCO2017/annotations/instances_val2017.json
To train on your custom dataset, you need to organize it in the COCO format. Follow the steps below to prepare your dataset:
Set remap_mscoco_category to False:
This prevents the automatic remapping of category IDs to match the MSCOCO categories.
remap_mscoco_category: False
Organize Images:
Structure your dataset directories as follows:
dataset/
├── images/
│   ├── train/
│   │   ├── image1.jpg
│   │   ├── image2.jpg
│   │   └── ...
│   ├── val/
│   │   ├── image1.jpg
│   │   ├── image2.jpg
│   │   └── ...
└── annotations/
    ├── instances_train.json
    ├── instances_val.json
    └── ...
images/train/: Contains all training images.images/val/: Contains all validation images.annotations/: Contains COCO-formatted annotation files.Convert Annotations to COCO Format:
If your annotations are not already in COCO format, you'll need to convert them. You can use the following Python script as a reference or utilize existing tools:
import json

def convert_to_coco(input_annotations, output_annotations):
    # Implement conversion logic here
    pass

if __name__ == "__main__":
    convert_to_coco('path/to/your_annotations.json', 'dataset/annotations/instances_train.json')
Update Configuration Files:
Modify your custom_detection.yml.
task: detection

evaluator:
  type: CocoEvaluator
  iou_types: ['bbox', ]

num_classes: 777 # your dataset classes
remap_mscoco_category: False

train_dataloader:
  type: DataLoader
  dataset:
    type: CocoDetection
    img_folder: /data/yourdataset/train
    ann_file: /data/yourdataset/train/train.json
    return_masks: False
    transforms:
      type: Compose
      ops: ~
  shuffle: True
  num_workers: 4
  drop_last: True
  collate_fn:
    type: BatchImageCollateFunction

val_dataloader:
  type: DataLoader
  dataset:
    type: CocoDetection
    img_folder: /data/yourdataset/val
    ann_file: /data/yourdataset/val/ann.json
    return_masks: False
    transforms:
      type: Compose
      ops: ~
  shuffle: False
  num_workers: 4
  drop_last: False
  collate_fn:
    type: BatchImageCollateFunction
Versions based on HGNetv2: Backbones will be downloaded automatically during training, so you don't need to worry.
DEIMv2-L and X: We use DINOv3-S and S+ as backbone, you can download them following the guide in DINOv3.
DEIMv2-S and M: We use our ViT-Tiny and ViT-Tiny+ distilled from DINOv3-S, you can download them from ViT-Tiny and ViT-Tiny+.
Place dinov3 and vits into ./ckpts folder as:
ckpts/
├── dinov3_vits16.pth
├── vitt_distill.pt
├── vittplus_distill.pt
└── ...
Training
# for ViT-based variants
CUDA_VISIBLE_DEVICES=0,1,2,3 torchrun --master_port=7777 --nproc_per_node=4 train.py -c configs/deimv2/deimv2_dinov3_${model}_coco.yml --use-amp --seed=0

# for HGNetv2-based variants
CUDA_VISIBLE_DEVICES=0,1,2,3 torchrun --master_port=7777 --nproc_per_node=4 train.py -c configs/deimv2/deimv2_hgnetv2_${model}_coco.yml --use-amp --seed=0
Testing
# for ViT-based variants
CUDA_VISIBLE_DEVICES=0,1,2,3 torchrun --master_port=7777 --nproc_per_node=4 train.py -c configs/deimv2/deimv2_dinov3_${model}_coco.yml --test-only -r model.pth

# for HGNetv2-based variants
CUDA_VISIBLE_DEVICES=0,1,2,3 torchrun --master_port=7777 --nproc_per_node=4 train.py -c configs/deimv2/deimv2_hgnetv2_${model}_coco.yml --test-only -r model.pth
Tuning
# for ViT-based variants
CUDA_VISIBLE_DEVICES=0,1,2,3 torchrun --master_port=7777 --nproc_per_node=4 train.py -c configs/deimv2/deimv2_dinov3_${model}_coco.yml --use-amp --seed=0 -t model.pth

# for HGNetv2-based variants
CUDA_VISIBLE_DEVICES=0,1,2,3 torchrun --master_port=7777 --nproc_per_node=4 train.py -c configs/deimv2/deimv2_hgnetv2_${model}_coco.yml --use-amp --seed=0 -t model.pth
For example, if you want to use DEIMv2-S and double the total batch size to 64 when training DEIMv2 on COCO2017, here are the steps you should follow:
Modify your deimv2_dinov3_s_coco.yml to increase the total_batch_size:
train_dataloader:
  total_batch_size: 64
  dataset:
    transforms:
      ops:
        ...

  collate_fn:
    ...
Modify your deimv2_dinov3_s_coco.yml. Here’s how the key parameters should be adjusted:
optimizer:
  type: AdamW

  params:
    -
      # except norm/bn/bias in self.dinov3
      params: '^(?=.*.dinov3)(?!.*(?:norm|bn|bias)).*$'
      lr: 0.00005  # doubled, linear scaling law
    -
      # including all norm/bn/bias in self.dinov3
      params: '^(?=.*.dinov3)(?=.*(?:norm|bn|bias)).*$'
      lr: 0.00005   # doubled, linear scaling law
      weight_decay: 0.
    -
      # including all norm/bn/bias except for the self.dinov3
      params: '^(?=.*(?:sta|encoder|decoder))(?=.*(?:norm|bn|bias)).*$'
      weight_decay: 0.

  lr: 0.0005   # linear scaling law if needed
  betas: [0.9, 0.999]
  weight_decay: 0.0001

ema:  # added EMA settings
  decay: 0.9998  # adjusted by 1 - (1 - decay) * 2
  warmups: 500  # halved

lr_warmup_scheduler:
  warmup_duration: 250  # halved
If you'd like to train DEIMv2-S on COCO2017 with an input size of 320x320, follow these steps:
Modify your deimv2_dinov3_s_coco.yml:
eval_spatial_size: [320, 320]

train_dataloader:
  # Here we set the total_batch_size to 64 as an example.
  total_batch_size: 64
  dataset:
    transforms:
      ops:
        #  Especially for Mosaic augmentation, it is recommended that output_size = input_size / 2.
        - {type: Mosaic, output_size: 160, rotation_range: 10, translation_range: [0.1, 0.1], scaling_range: [0.5, 1.5],
           probability: 1.0, fill_value: 0, use_cache: True, max_cached_images: 50, random_pop: True}
        ...
        - {type: Resize, size: [320, 320], }
        ...
    collate_fn:
      base_size: 320
      ...

val_dataloader:
  dataset:
    transforms:
      ops:
        - {type: Resize, size: [320, 320], }
        ...
If you want to finetune DEIMv2-S for 20 epochs, follow these steps (for reference only; feel free to adjust them according to your needs):
epoches: 32 #  Total epochs: 20 for training + EMA  for 4n = 12. n refers to the model size in the matched config.

flat_epoch: 14    # 4 + 20 // 2
no_aug_epoch: 12  # 4n

train_dataloader:
  dataset:
    transforms:
      ops:
        ...
      policy:
        epoch: [4, 14, 20]   # [start_epoch, flat_epoch, epoches - no_aug_epoch]

  collate_fn:
    ...
    mixup_epochs: [4, 14]  # [start_epoch, flat_epoch]
    stop_epoch: 20  # epoches - no_aug_epoch
    copyblend_epochs: [4, 20]  # [start_epoch, epoches - no_aug_epoch]

DEIMCriterion:
  matcher:
    ...
    matcher_change_epoch: 18  # ~90% of (epoches - no_aug_epoch)
Setup
pip install onnx onnxsim
Export onnx
python tools/deployment/export_onnx.py --check -c configs/deimv2/deimv2_dinov3_${model}_coco.yml -r model.pth
Export tensorrt
trtexec --onnx="model.onnx" --saveEngine="model.engine" --fp16
⚠️ TensorRT Version Notes
✅ Recommended: Use TensorRT ≥ 10.6 for FP16 inference to ensure stable execution and correct detection results.
❗ Known Issue: With TensorRT 10.4, FP16 inference may produce incorrect outputs.
🔧 Workarounds for older versions (e.g., 10.4):
Run inference in FP32 mode, or
Carefully validate the exported engine and end-to-end pipeline to confirm numerical correctness and detection performance.
Setup
pip install -r tools/inference/requirements.txt
Inference (onnxruntime / tensorrt / torch)
Inference on images and videos is now supported.
python tools/inference/onnx_inf.py --onnx model.onnx --input image.jpg  # video.mp4
python tools/inference/trt_inf.py --trt model.engine --input image.jpg
python tools/inference/torch_inf.py -c configs/deimv2/deimv2_dinov3_${model}_coco.yml -r model.pth --input image.jpg --device cuda:0
Setup
pip install -r tools/benchmark/requirements.txt
Model FLOPs, MACs, and Params
python tools/benchmark/get_info.py -c configs/deimv2/deimv2_dinov3_${model}_coco.yml
TensorRT Latency
python tools/benchmark/trt_benchmark.py --COCO_dir path/to/COCO2017 --engine_dir model.engine
pip install fiftyone
python tools/visualization/fiftyone_vis.py -c configs/deimv2/deimv2_dinov3_${model}_coco.yml -r model.pth
Auto Resume Training
bash reference/safe_training.sh
Converting Model Weights
python reference/convert_weight.py model.pth
If you use DEIMv2 or its methods in your work, please cite the following BibTeX entries:
@article{huang2025deimv2,
  title={Real-Time Object Detection Meets DINOv3},
  author={Huang, Shihua and Hou, Yongjie and Liu, Longfei and Yu, Xuanlong and Shen, Xi},
  journal={arXiv},
  year={2025}
}
This project is released under the DEIMv2 License. See the LICENSE file for details.
For commercial licensing inquiries, please Contact Us or email shenxi@intellindust.com.
Our work is built upon LightlyTrain, D-FINE, RT-DETR, DEIM, and DINOv3. Thanks for their great work!
✨ Feel free to contribute and reach out if you have any questions! ✨
586 followers · starred Sep 2026
346 followers · starred Sep 2025
4,065 followers · starred Nov 2025
886 followers · starred Sep 2025



