
C
129
130 commits
updated Apr 16, 2026
README
Himax examples for Seeed Grove Vision AI Module V2
This is a repository which step by step teaches you how to build your own examples and run on Seeed Grove Vision AI Module V2. Finally, teach you how to restore to the original factory settings and run SenseCraft AI from Seeed Studio.
Outline
- How to build the firmware?
- How to flash the firmware?
- How to restore to the original factory settings?
| scenario_app | project name |
|---|---|
| face mesh | tflm_fd_fm |
| yolov8n object detection | tflm_yolov8_od |
| yolov8n pose | tflm_yolov8_pose |
| yolov8n gender classification | tflm_yolov8_gender_cls |
| pdm mic record | pdm_record |
| KeyWord Spotting using Transformers | kws_pdm_record |
| imu read | imu_read |
| peoplenet from TAO | tflm_peoplenet |
| yolo11n object detection | tflm_yolo11_od |
| mobilenet classification converted by TinyNN | tflm_mb_cls |
| mobilenetV2 classification using ExecuTorch | torch_mb_cls |
-
How to use CMSIS-CV at the project?
- please clone the project by following command to download CMSIS-CV library
git clone --recursive https://github.com/HimaxWiseEyePlus/Seeed_Grove_Vision_AI_Module_V2.git
- please clone the project by following command to download CMSIS-CV library
-
How to run Edge Impulse Example: standalone inferencing using Grove Vision AI Module V2 (Himax WiseEye2)?
How to build the firmware?
This part explains how you can build the firmware for Grove Vision AI Module V2.
Build the firmware at Linux environment
Note: The following has been tested to work on Ubuntu 20.04 PC
- Step 1: Install the following prerequisites
sudo apt install make - Step 2: Download Arm GNU Toolchain (arm-gnu-toolchain-13.2.rel1-x86_64-arm-none-eabi.tar.xz)
cd ~ wget https://developer.arm.com/-/media/Files/downloads/gnu/13.2.rel1/binrel/arm-gnu-toolchain-13.2.rel1-x86_64-arm-none-eabi.tar.xz - Step 3: Extract the file
tar -xvf arm-gnu-toolchain-13.2.rel1-x86_64-arm-none-eabi.tar.xz - Step 4: Add arm-gnu-toolchain-13.2.Rel1-x86_64-arm-none-eabi/bin/: to PATH
(hint: the path about [$HOME/arm-gnu-toolchain-13.2.Rel1-x86_64-arm-none-eabi/bin/] should set your own path, you can not just copy and paste)#this is just the example, you can not just copy and paste !! export PATH="$HOME/arm-gnu-toolchain-13.2.Rel1-x86_64-arm-none-eabi/bin/:$PATH" - Step 5: Clone the following repository and go into Seeed_Grove_Vision_AI_Module_V2 folder
git clone --recursive https://github.com/HimaxWiseEyePlus/Seeed_Grove_Vision_AI_Module_V2.git cd Seeed_Grove_Vision_AI_Module_V2 - Step 6: Compile the firmware
cd EPII_CM55M_APP_S make clean make - Output elf file:
./obj_epii_evb_icv30_bdv10/gnu_epii_evb_WLCSP65/EPII_CM55M_gnu_epii_evb_WLCSP65_s.elf
- Step 7: Generate firmware image file
cd ../we2_image_gen_local/ cp ../EPII_CM55M_APP_S/obj_epii_evb_icv30_bdv10/gnu_epii_evb_WLCSP65/EPII_CM55M_gnu_epii_evb_WLCSP65_s.elf input_case1_secboot/ ./we2_local_image_gen project_case1_blp_wlcsp.json - Output firmware image:
./output_case1_sec_wlcsp/output.img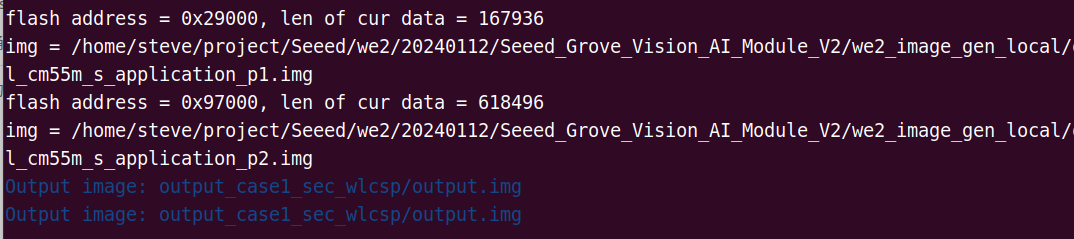
Build the firmware at MacOS environment
Note: The steps are almost the same as the Linux environment except Step 1 and Step 7.
- Step 1:
- You should make sure your
makeis usingGNU version makenotBSD version make.make --version
- If it is not
GNU make, you should download it by following command.brew install make - After installation, you can access it with the command gmake to avoid conflicts with the default make.
gmake - So, you should create an alias in your shell configuration file (like .bash_profile or .zshrc):
alias make='gmake'
- You should make sure your
- Step 7: Generate firmware image file (using
./we2_local_image_gen_macOS_arm64for MacOS)cd ../we2_image_gen_local/ cp ../EPII_CM55M_APP_S/obj_epii_evb_icv30_bdv10/gnu_epii_evb_WLCSP65/EPII_CM55M_gnu_epii_evb_WLCSP65_s.elf input_case1_secboot/ ./we2_local_image_gen_macOS_arm64 project_case1_blp_wlcsp.json
Build the firmware at Windows environment
- Step 1: Install the
makecommand for prerequisites , you can reference here - Step 2: Download Arm GNU Toolchain arm-gnu-toolchain-13.2.rel1-mingw-w64-i686-arm-none-eabi.zip
- Step 3: Extract the file
tar -xvf arm-gnu-toolchain-13.2.rel1-mingw-w64-i686-arm-none-eabi.zip - Step 4: Add arm-gnu-toolchain-13.2.rel1-mingw-w64-i686-arm-none-eabi/bin/ to your environment variables
- option1: add the gnu-toolchain to your environment variables manually
- option2: add the gnu-toolchain by command
(hint: the path about [location of your gnu-toolchain-13.2 ROOT] should set your own path, you can not just copy and paste)
#this is just the example, you can not just copy and paste !!
setx PATH "%PATH%;[location of your gnu-toolchain-13.2 ROOT]\arm-gnu-toolchain-13.2.rel1-mingw-w64-i686-arm-none-eabi\bin"
- Step 5: Clone the following repository and go into Seeed_Grove_Vision_AI_Module_V2 folder
git clone --recursive https://github.com/HimaxWiseEyePlus/Seeed_Grove_Vision_AI_Module_V2.git cd Seeed_Grove_Vision_AI_Module_V2 - Step 6: Compile the firmware
cd EPII_CM55M_APP_S make clean make - Output elf file:
./obj_epii_evb_icv30_bdv10/gnu_epii_evb_WLCSP65/EPII_CM55M_gnu_epii_evb_WLCSP65_s.elf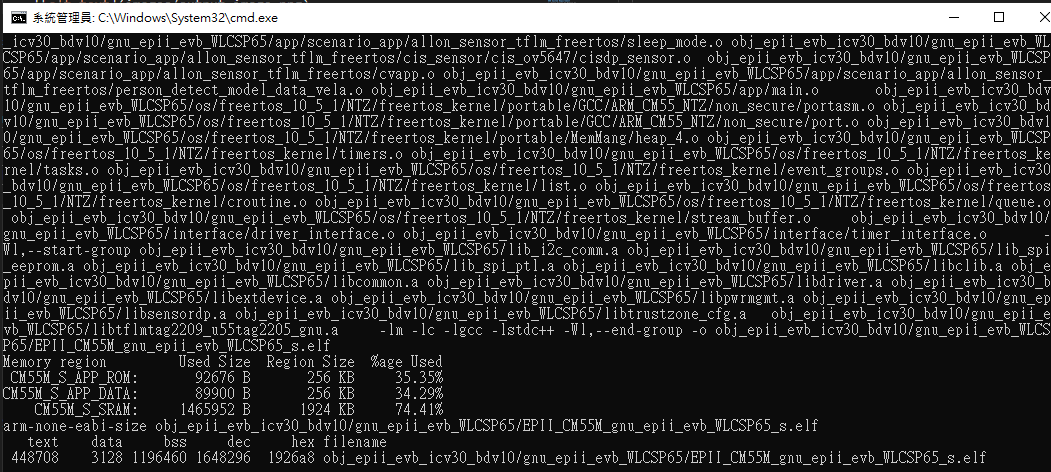
- Step 7: Generate firmware image file
cd ../we2_image_gen_local/ cp ../EPII_CM55M_APP_S/obj_epii_evb_icv30_bdv10/gnu_epii_evb_WLCSP65/EPII_CM55M_gnu_epii_evb_WLCSP65_s.elf input_case1_secboot/ we2_local_image_gen project_case1_blp_wlcsp.json - Output firmware image:
./output_case1_sec_wlcsp/output.img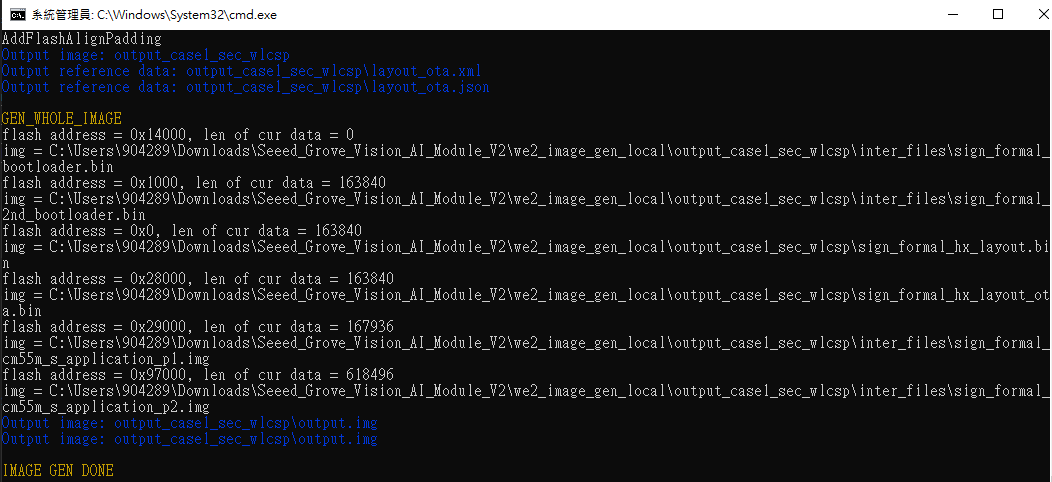
How to flash the firmware?
This part explains how you can flash the firmware to Grove Vision AI Module V2.
System Requirement
- Driver
- If you find that the Grove Vision AI V2 is not recognised after connecting it to your computer, you should install the driver which can reference here.
- Grove Vision AI Module V2
- Connection cable
- Micro usb cable: connect to EVB (as Power/UART)
- Software Tools
Serial terminal emulation application
- In the following description,
TeraTermandMinicomwill be used.- Serial terminal emulation application Setting
- Baud Rate 921600 bps
- Data 8 bit
- Parity none
- Stop 1 bit
- Flow control none
- please check xmodem protocol is supported.
- Minicom (for Linux PC)
- Install minicom command
sudo apt-get install minicom - Burn application to flash by using xmodem send application binary.
- Minicom will extra install "lrzsz" package to support xmodem protocol
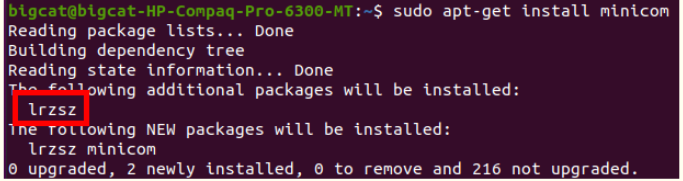
- If you did not have “lrzsz” instruction, please install by following instruction.
sudo apt-get install lrzsz #(to support xmodem protocol)
- Minicom will extra install "lrzsz" package to support xmodem protocol
- Open the permissions to access the device
sudo setfacl -m u:[USERNAME]:rw /dev/ttyUSB0
# in my case
# sudo setfacl -m u:kris:rw /dev/ttyACM0
- Open minicom
sudo minicom -s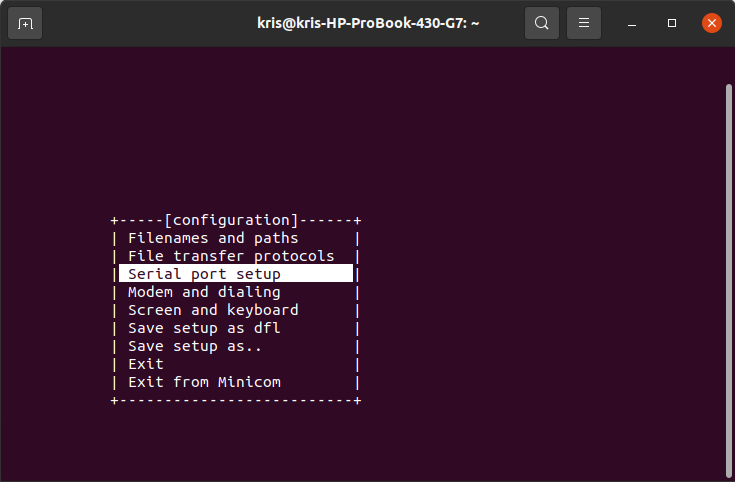
- Setup serial port and COM Port name
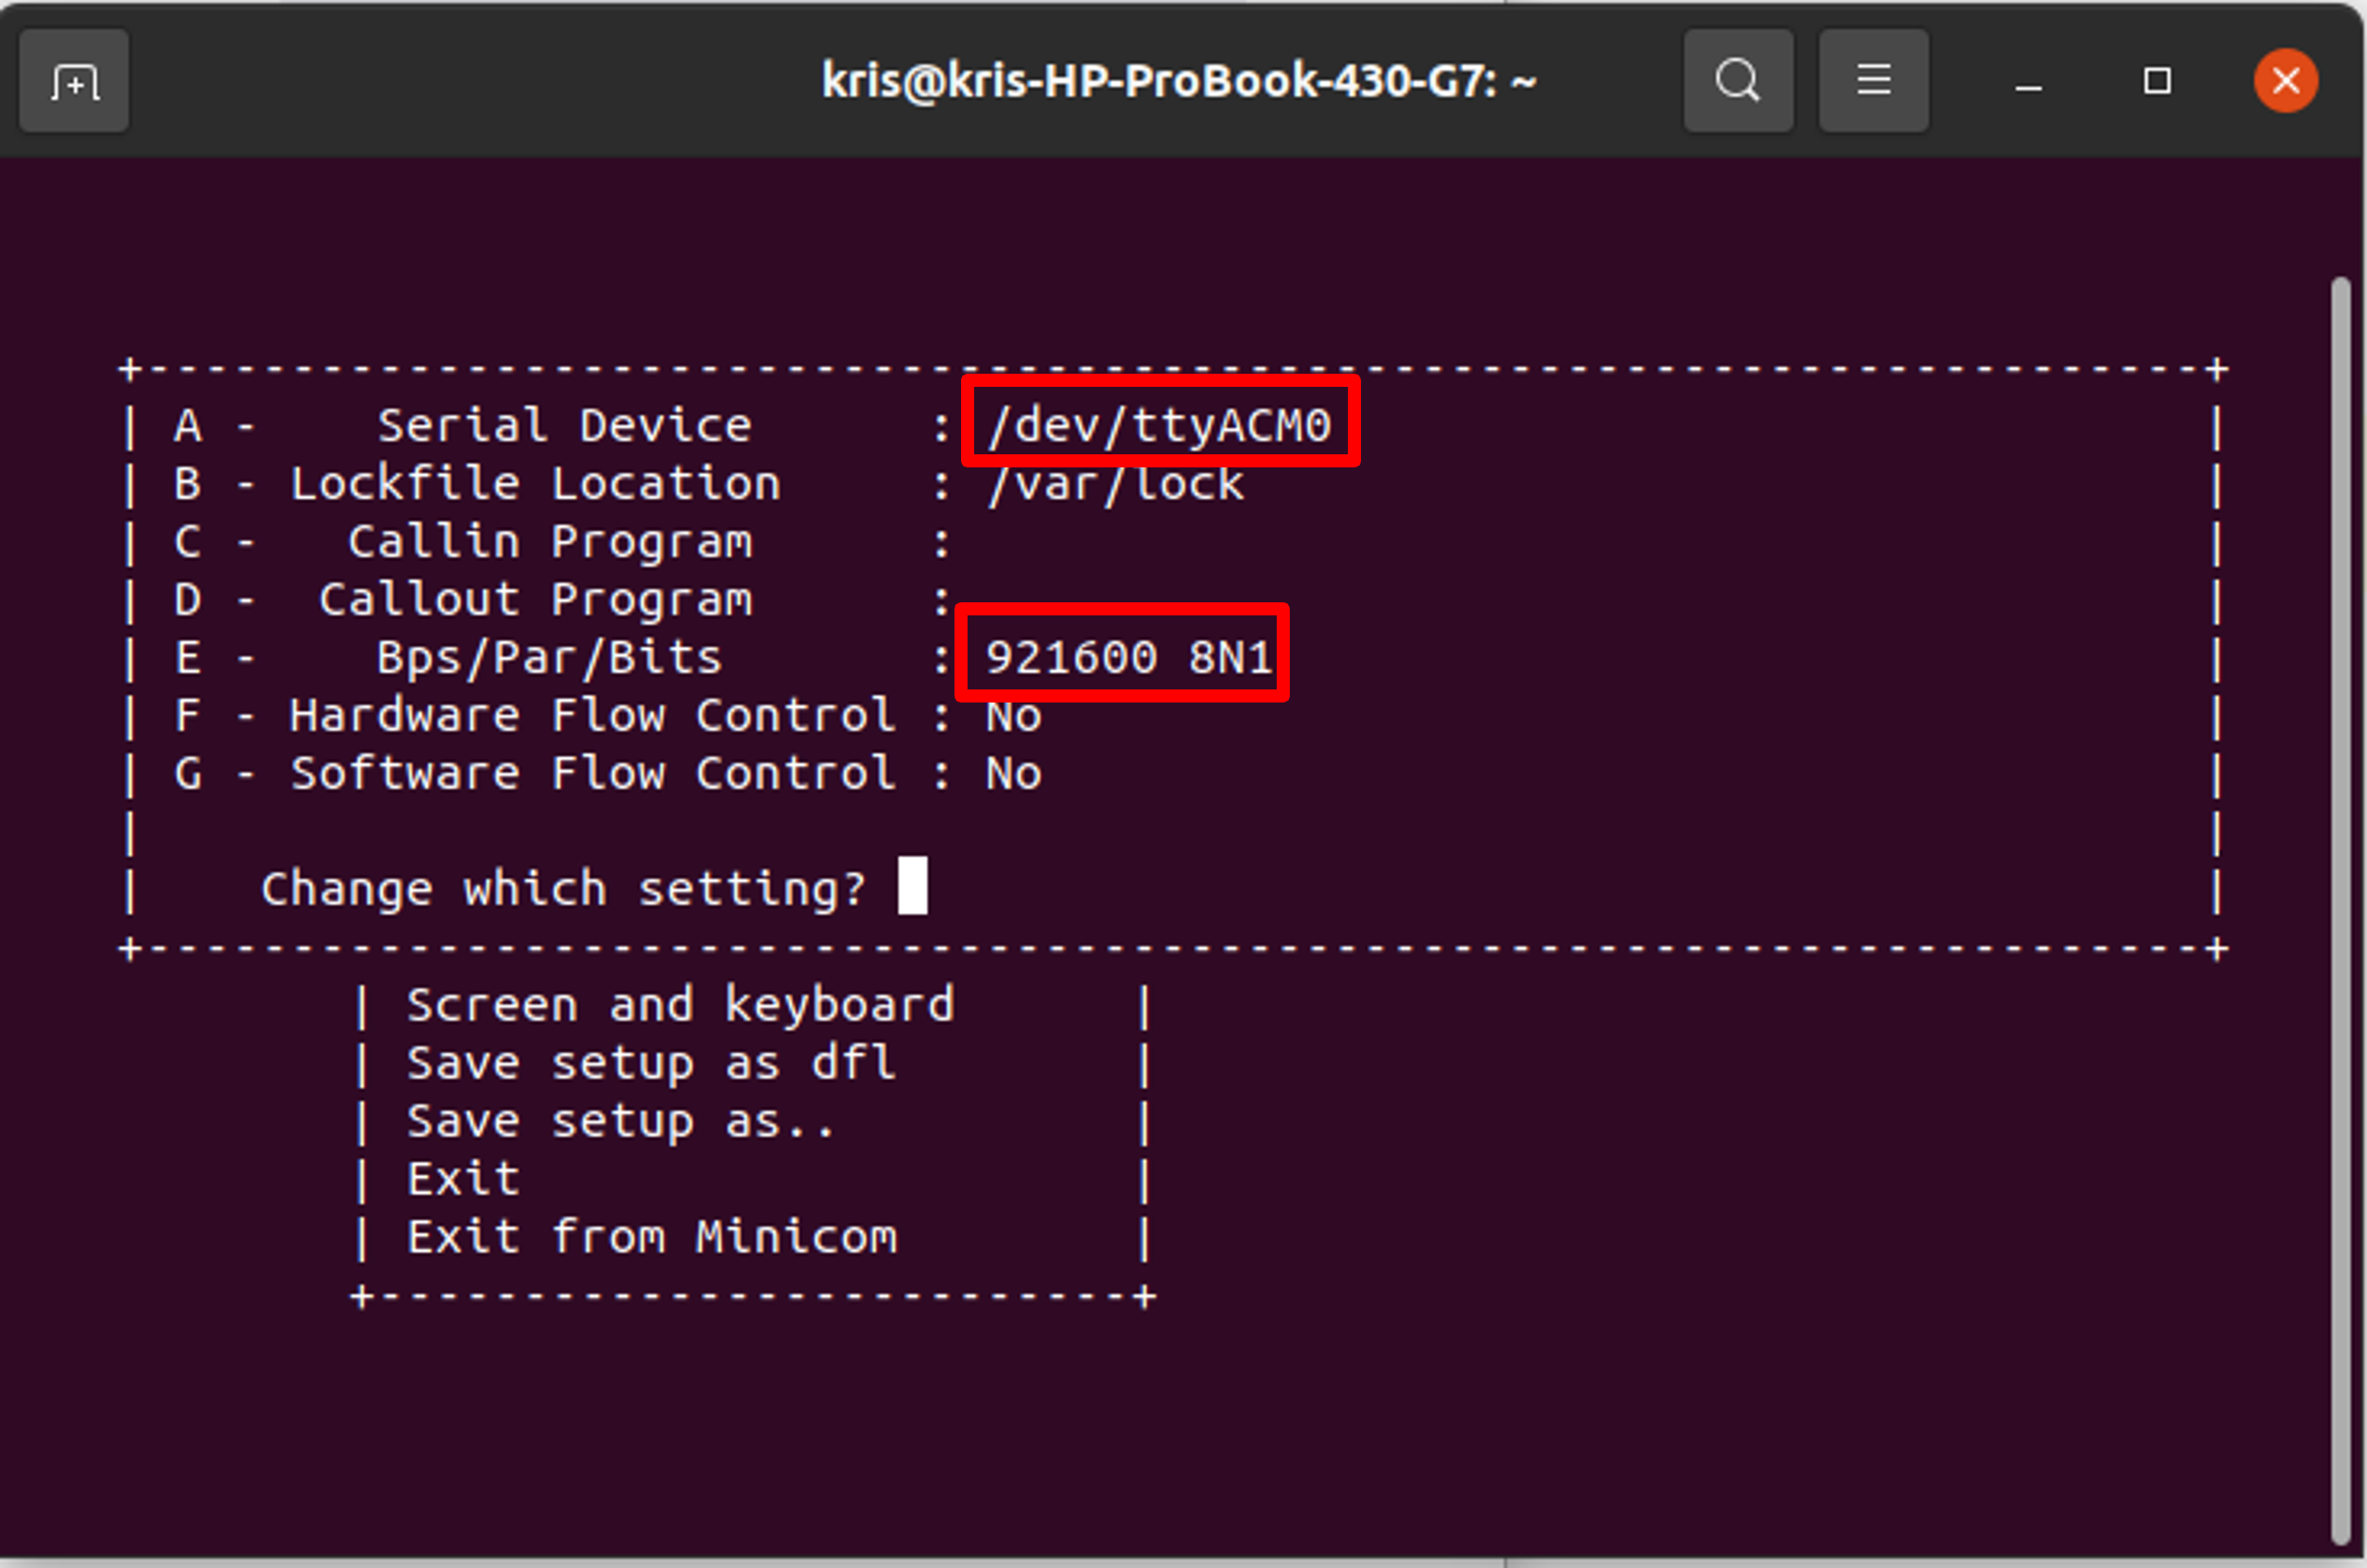
- Tips for finding the COM Port name.
- You can use google chrome to connect to Seeed SenseCraft AI, select
Grove Vision(V2)and pressConnect.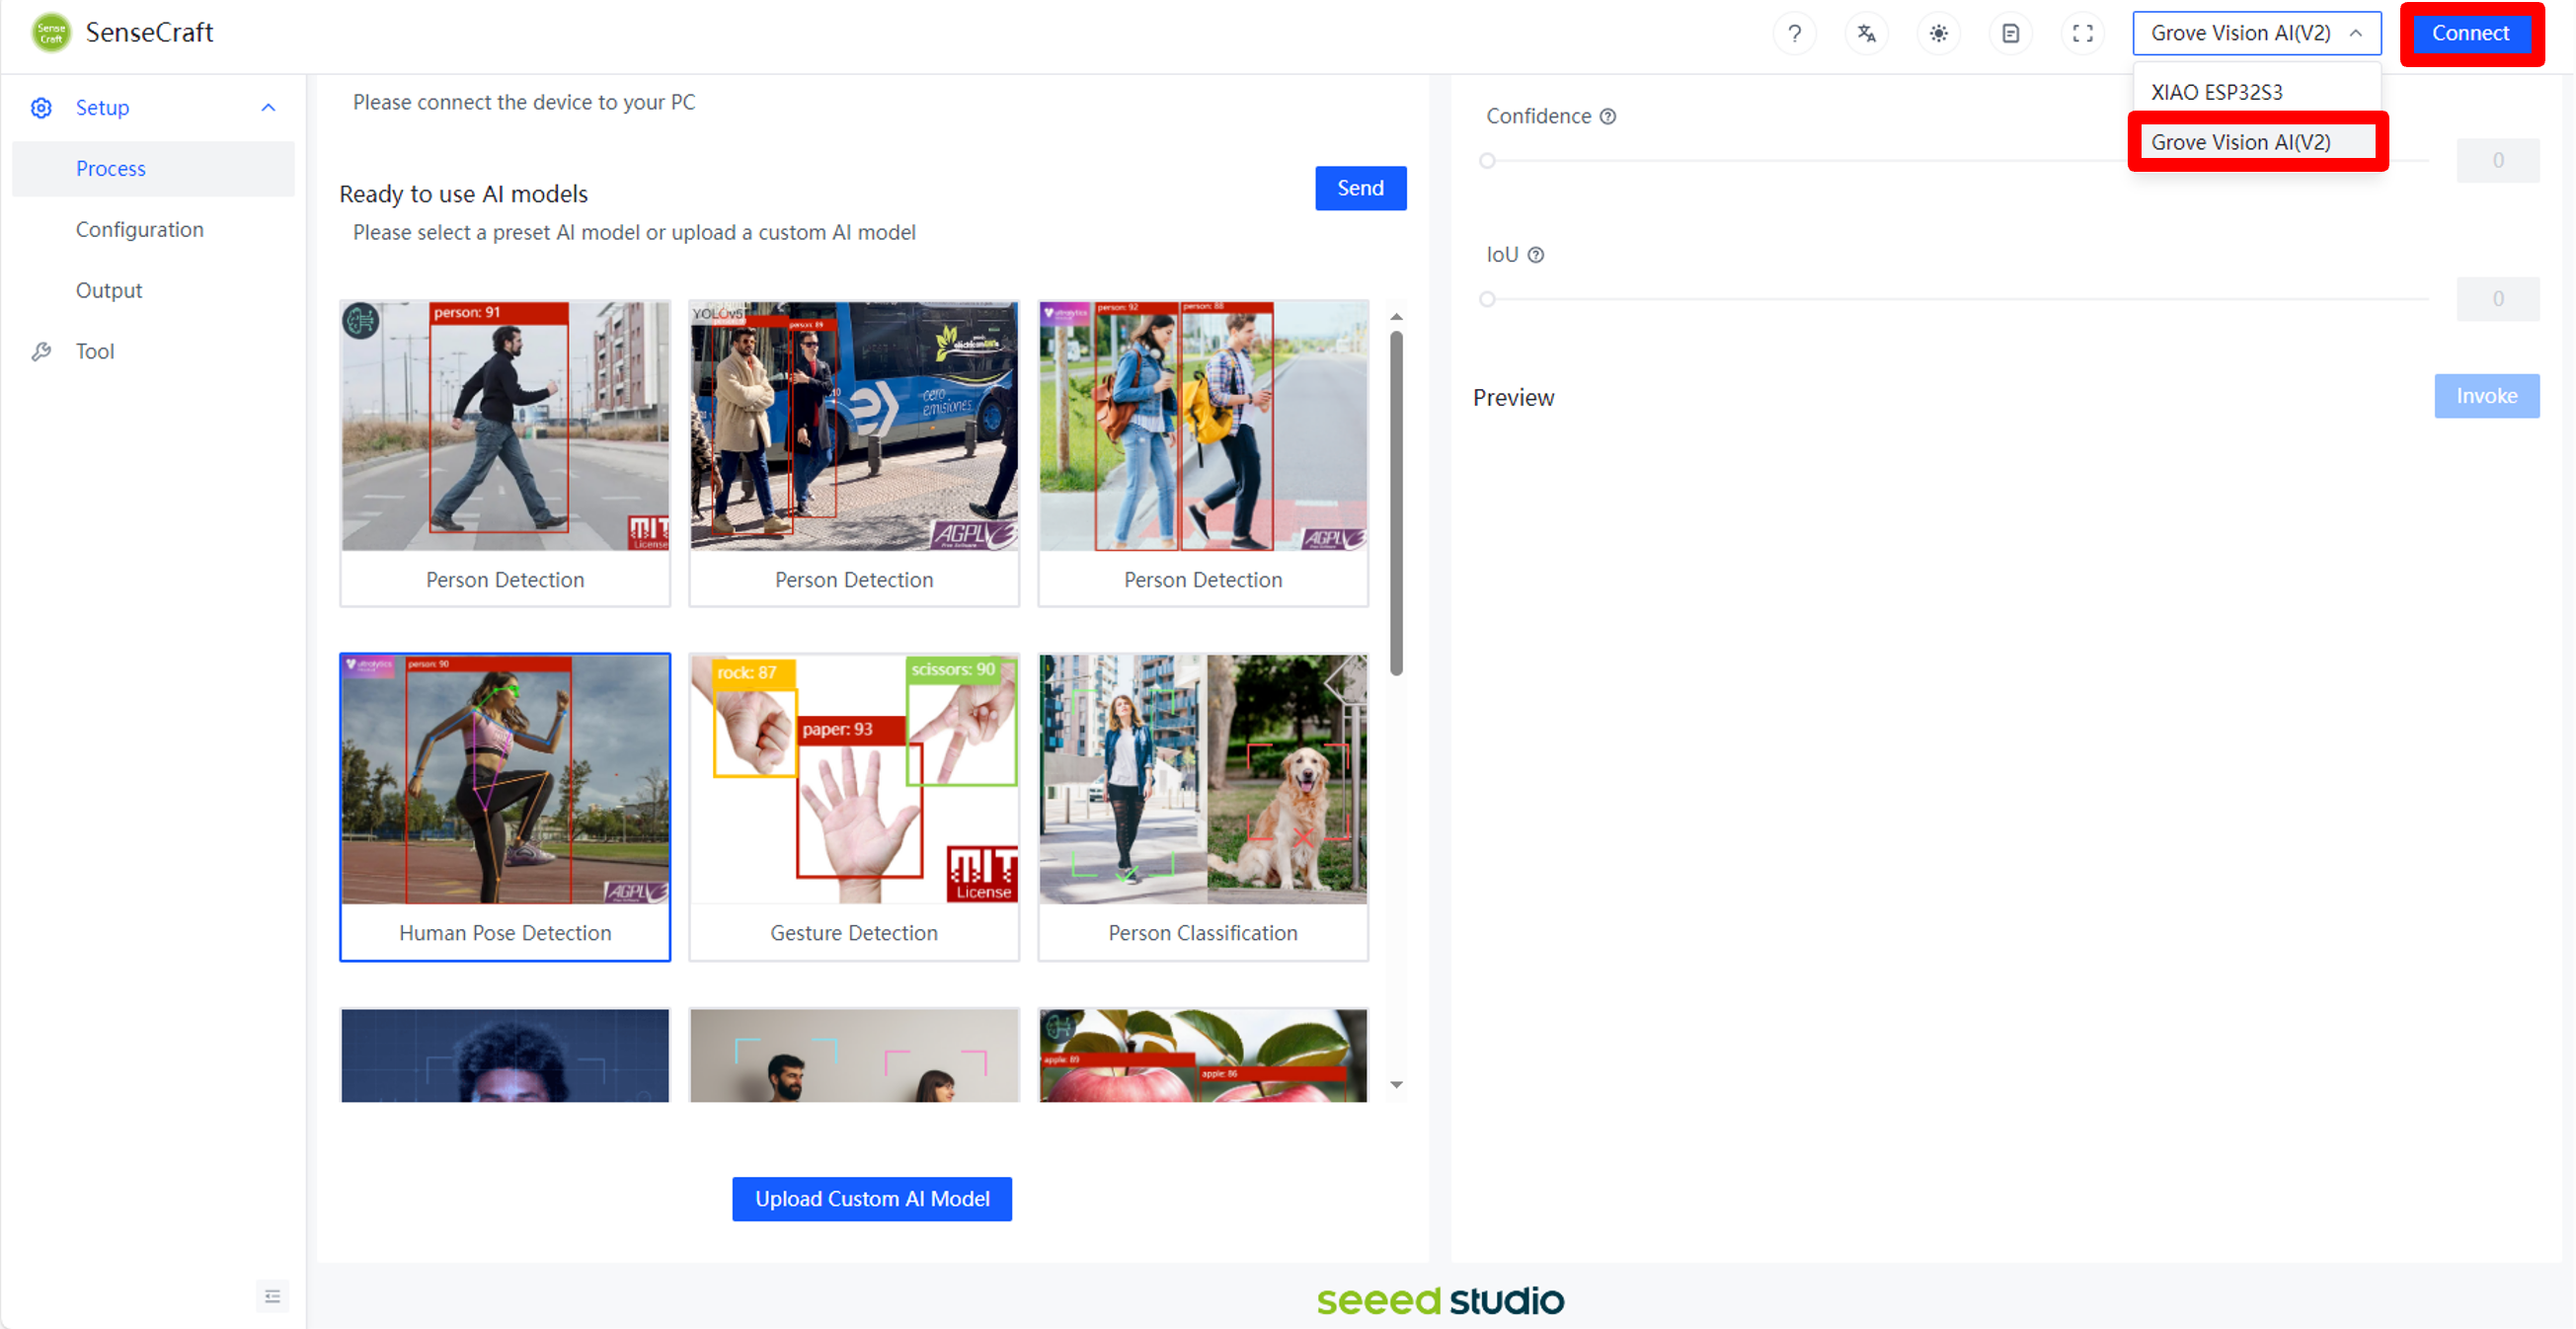
- Then, you would get the COM Port name.
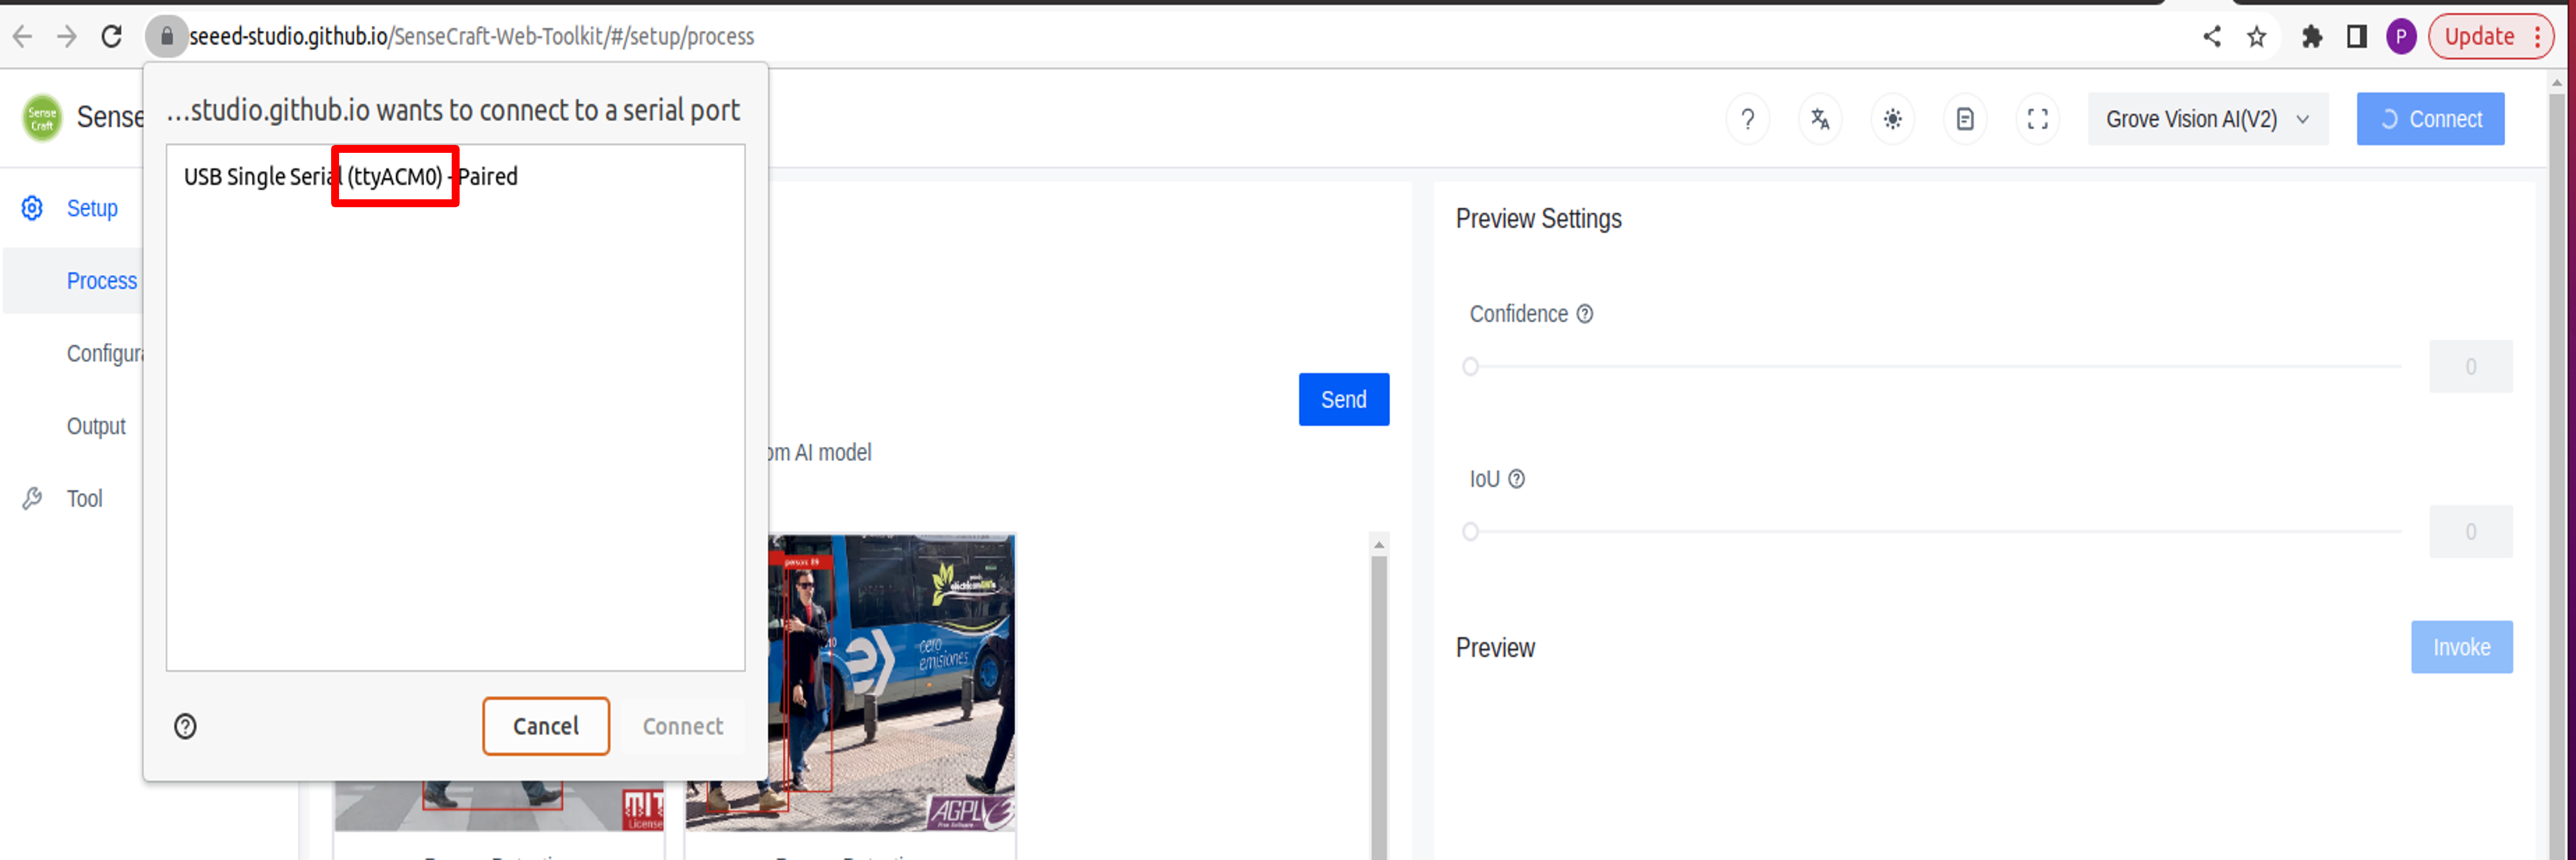
- You can use google chrome to connect to Seeed SenseCraft AI, select
- Tips for finding the COM Port name.
- Install minicom command
- TeraTerm (for Windows PC)
- Setup serial port
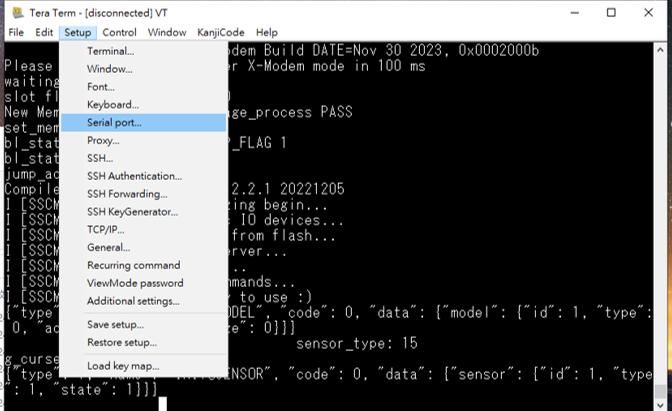
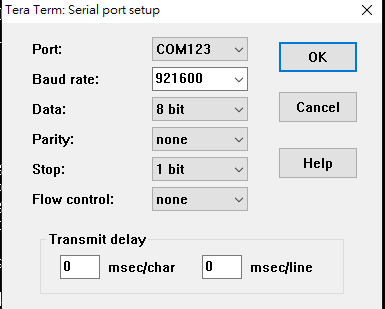
- Setup serial port
- Serial terminal emulation application Setting
- In the following description,
Flash Image Update at Linux Environment by python code
- Prerequisites for xmodem
- Please install the package at xmodem/requirements.txt
pip install -r xmodem/requirements.txt
- Please install the package at xmodem/requirements.txt
- Disconnect
Minicom - Make sure your
Seeed Grove Vision AI Module V2is connect to PC. - Open the permissions to acceess the deivce
sudo setfacl -m u:[USERNAME]:rw /dev/ttyUSB0
# in my case
# sudo setfacl -m u:kris:rw /dev/ttyACM0
- Open
Terminaland key-in following command - port: the COM number of your
Seeed Grove Vision AI Module V2, for example,/dev/ttyACM0 - baudrate: 921600
- file: your firmware image [maximum size is 1MB]
python3 xmodem/xmodem_send.py --port=[your COM number] --baudrate=921600 --protocol=xmodem --file=we2_image_gen_local/output_case1_sec_wlcsp/output.img # example: # python3 xmodem/xmodem_send.py --port=/dev/ttyACM0 --baudrate=921600 --protocol=xmodem --file=we2_image_gen_local/output_case1_sec_wlcsp/output.img - model(optional): you can burn multiple models "[model tflite] [position of model on flash] [offset]"
- Position of model on flash is defined at the code ~/tflm_yolov8_od/common_config.h (take tflm_yolov8_od for example)
python3 xmodem/xmodem_send.py --port=[your COM number] --baudrate=921600 --protocol=xmodem --file=we2_image_gen_local/output_case1_sec_wlcsp/output.img --model="model_zoo/tflm_yolov8_od/yolov8n_od_192_delete_transpose_0xB7B000.tflite 0xB7B000 0x00000" # example: # python3 xmodem/xmodem_send.py --port=/dev/ttyACM0 --baudrate=921600 --protocol=xmodem --file=we2_image_gen_local/output_case1_sec_wlcsp/output.img --model="model_zoo/tflm_yolov8_od/yolov8n_od_192_delete_transpose_0xB7B000.tflite 0xB7B000 0x00000" - It will start to burn firmware image.
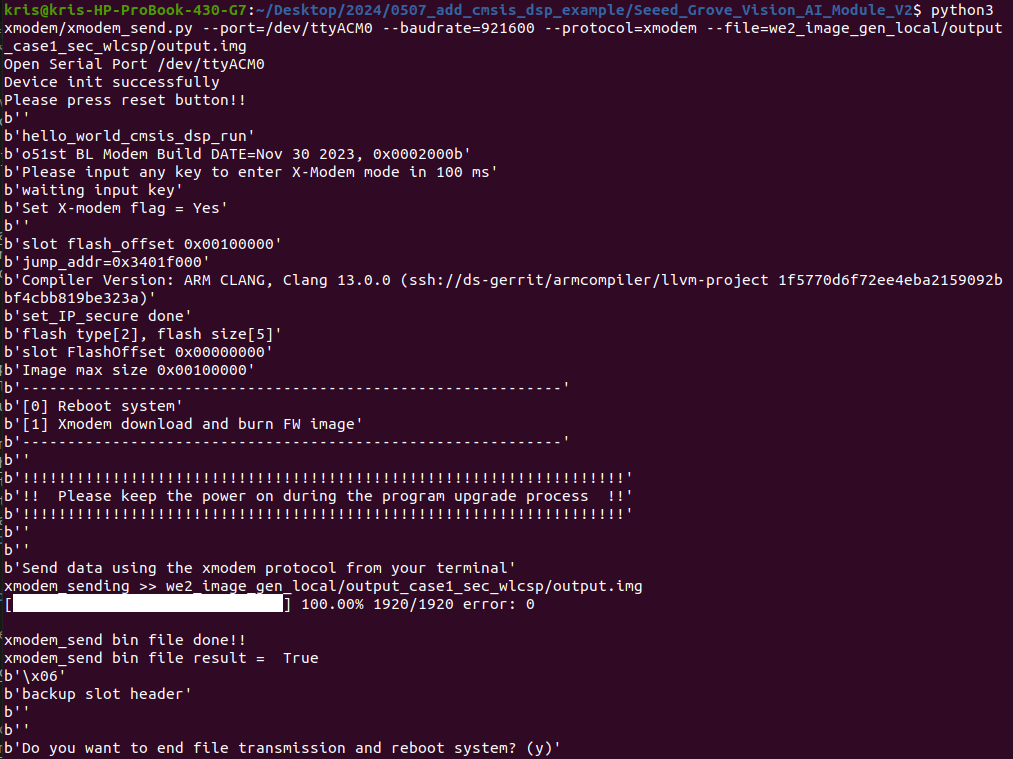
- Please press
resetbuttun onSeeed Grove Vision AI Module V2.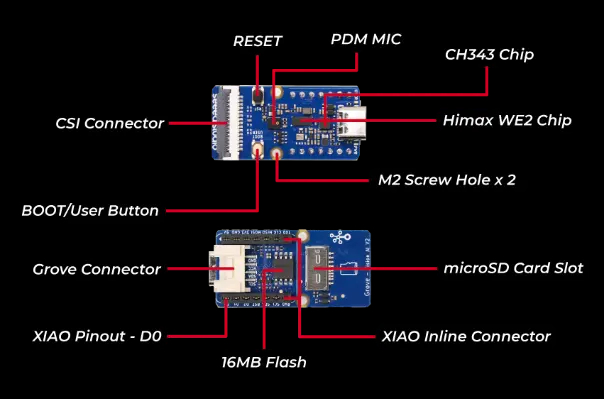
- It will success to run the algorithm.
Flash Image Update at Windows Environment by python code
- Prerequisites for xmodem
- Please install the package at xmodem/requirements.txt
pip install -r xmodem/requirements.txt
- Please install the package at xmodem/requirements.txt
- Disconnect
Tera Term - Make sure your
Seeed Grove Vision AI Module V2is connect to PC. - Open
CMDand key-in following command - port: the COM number of your
Seeed Grove Vision AI Module V2 - baudrate: 921600
- file: your firmware image [maximum size is 1MB]
python xmodem\xmodem_send.py --port=[your COM number] --baudrate=921600 --protocol=xmodem --file=we2_image_gen_local\output_case1_sec_wlcsp\output.img # example: # python xmodem\xmodem_send.py --port=COM123 --baudrate=921600 --protocol=xmodem --file=we2_image_gen_local\output_case1_sec_wlcsp\output.img - model: you can burn multiple models "[model tflite] [position of model on flash] [offset]"
- Position of model on flash is defined at the code ~/tflm_yolov8_od/common_config.h (take tflm_yolov8_od for example)
python xmodem\xmodem_send.py --port=[your COM number] --baudrate=921600 --protocol=xmodem --file=we2_image_gen_local\output_case1_sec_wlcsp\output.img --model="model_zoo\tflm_yolov8_od\yolov8n_od_192_delete_transpose_0xB7B000.tflite 0xB7B000 0x00000" # example: # python xmodem\xmodem_send.py --port=COM123 --baudrate=921600 --protocol=xmodem --file=we2_image_gen_local\output_case1_sec_wlcsp\output.img --model="model_zoo\tflm_yolov8_od\yolov8n_od_192_delete_transpose_0xB7B000.tflite 0xB7B000 0x00000" - It will start to burn firmware image automatically.
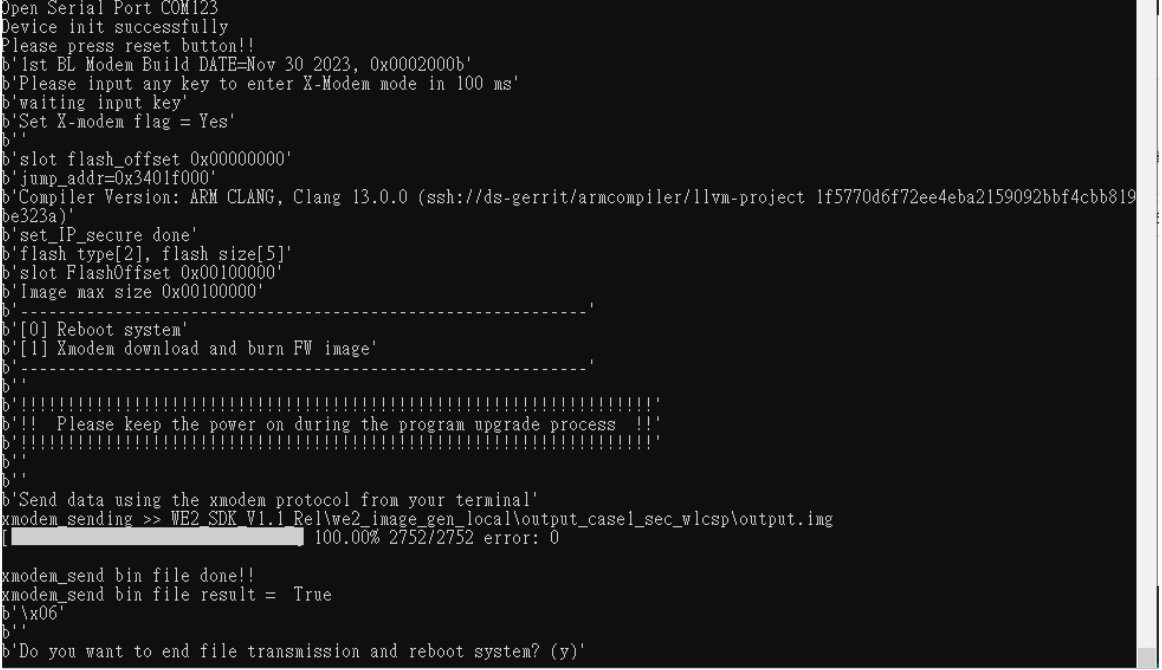
- Please press
resetbuttun onSeeed Grove Vision AI Module V2. - It will success to run the algorithm.
Flash Image Update at Linux Environment
Following steps update application in the flash.
- Step 1: Open
Minicom, setup serial port and COM Port name-> connect to Grove Vision AI Module V2. (Please reference the minicom part of System Requirement)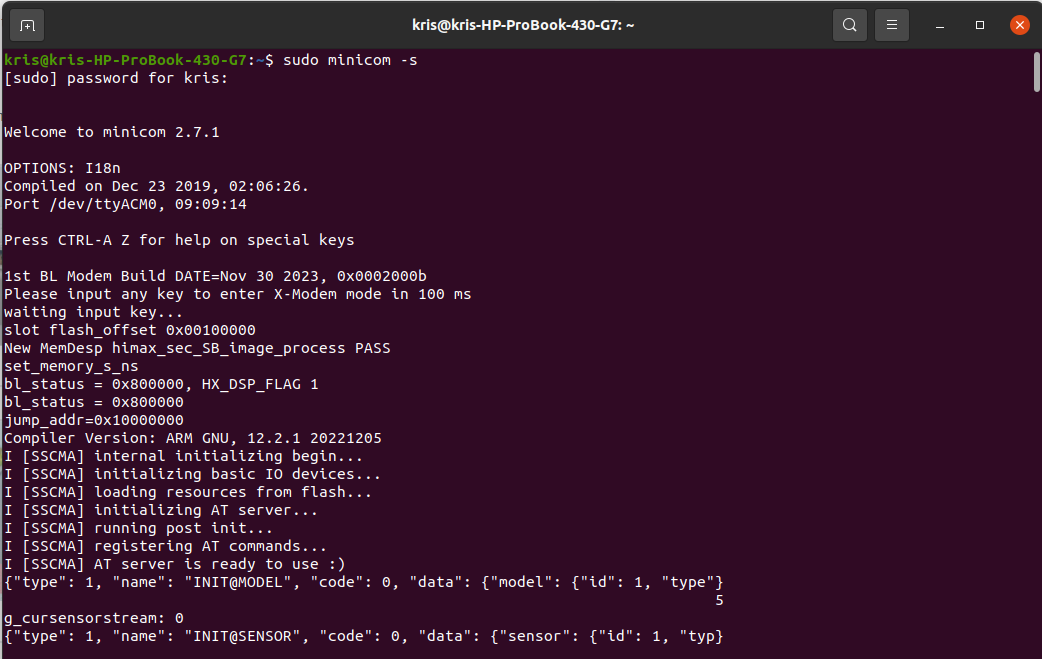
- Step 2: Hold down any key on the keyboard (except the Enter key) and press the reset button to reset Grove Vision AI Module V2 and the startup options will be displayed.
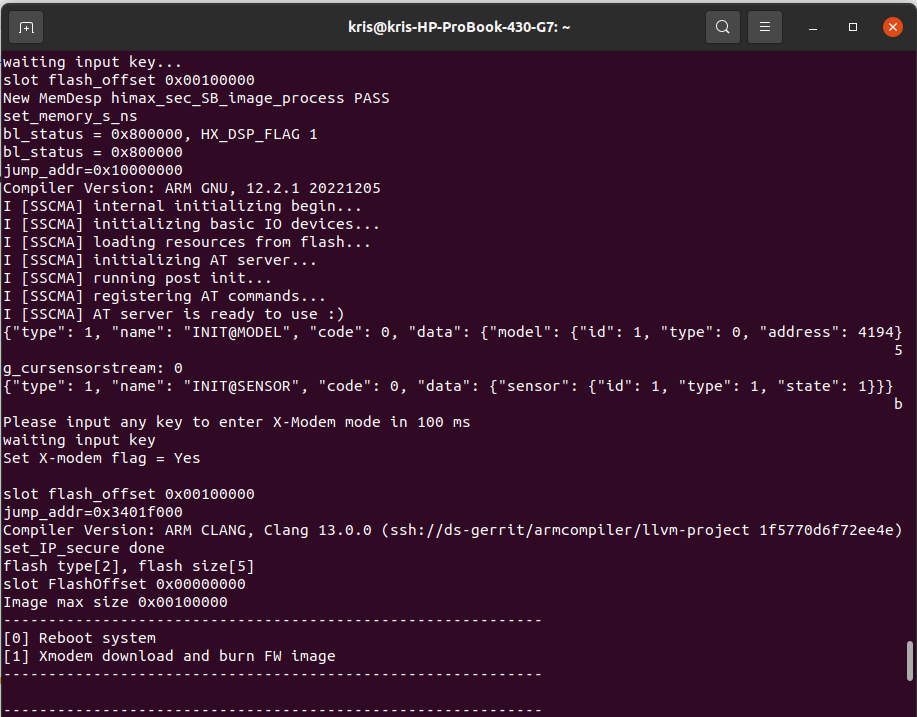
- Step 3: Press button “1” and Grove Vision AI Module V2 will enter receiving mode after then.
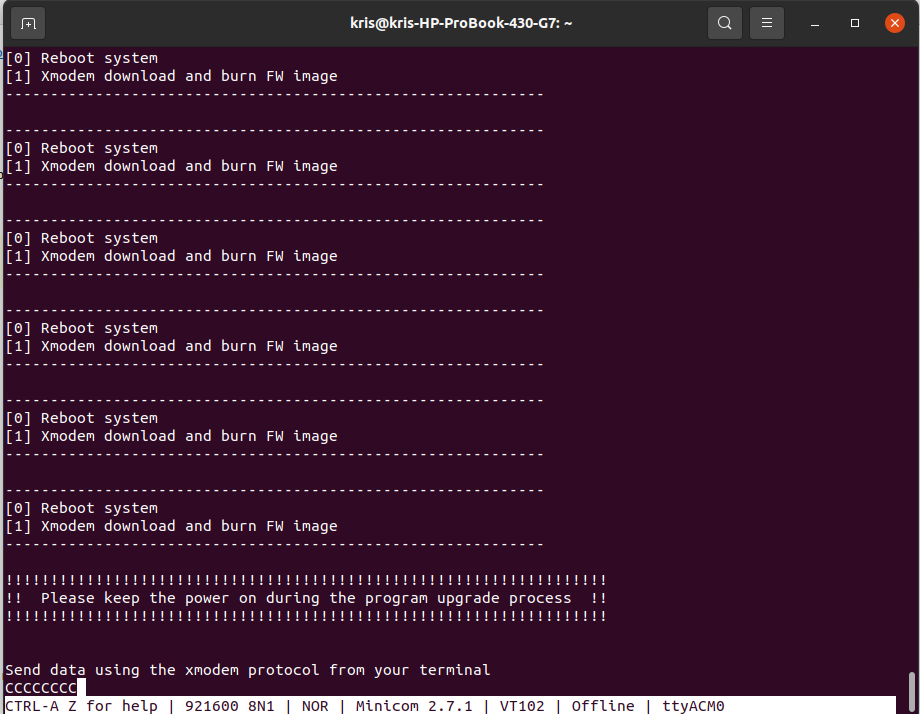
- Step 4: Press
Ctrl+Aon keyboard to enter minicom menu, and then pressson keyboard to upload file and selectxmodem.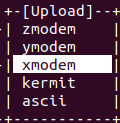
- Step 5: Select the firmware image at
Seeed_Grove_Vision_AI_Module_V2\we2_image_gen_local\output_case1_sec_wlcsp\output.imgand pressenterto burn.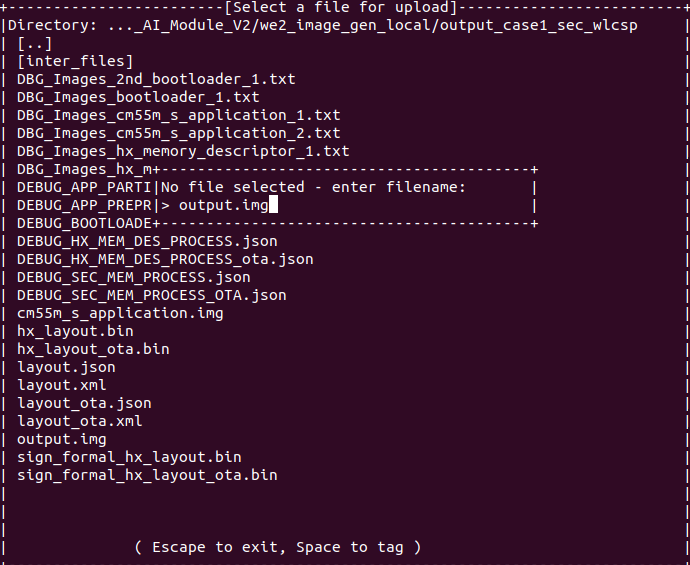
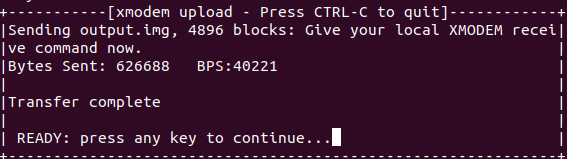
- Step 6: After burning is compelete, press any key to be continue.
- Step 7: Then, you will see the message "Do you want to end file transmission and reboot system? (y)" is displayed. Press button
yto restart.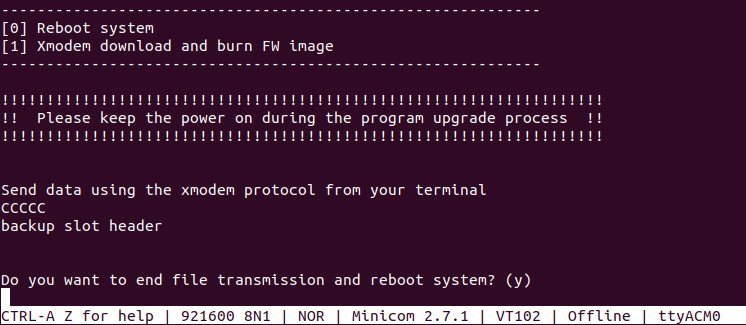
- Step 8: You will see the uart on
minicomwhich is runing your algorithm.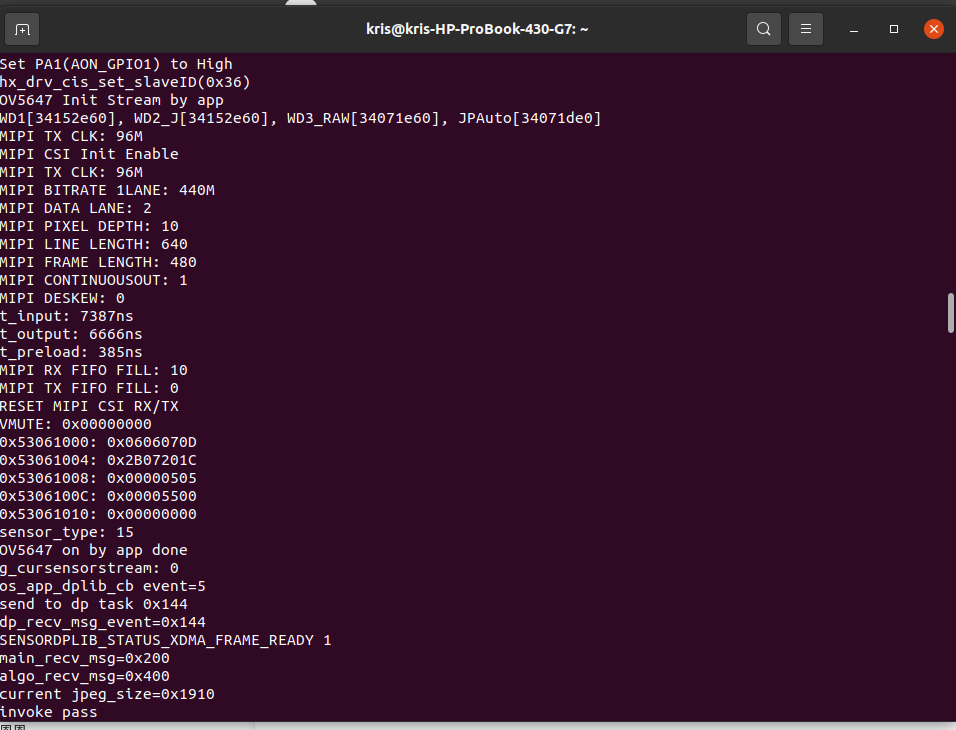
Flash Image Update at Windows Environment
Following steps update application in the flash.
- Step 1: Open
TeraTermand select File -> New connection, connect to Grove Vision AI Module V2.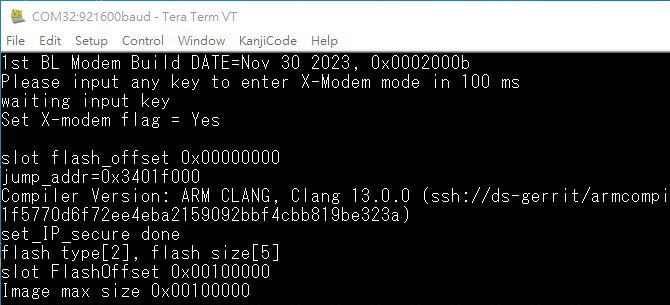
- Step 2: Hold down any key on the keyboard (except the Enter key) and press the reset button to reset Grove Vision AI Module V2 and the startup options will be displayed.
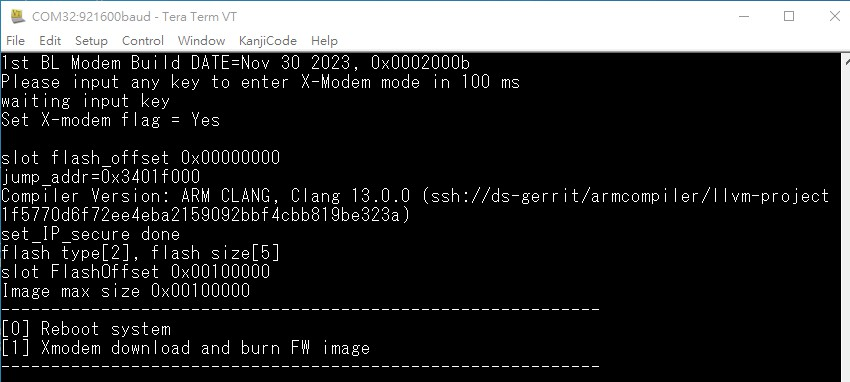
- Step 3: Press button “1” and Grove Vision AI Module V2 will enter receiving mode after then. Select target flash image(output.img) by File->Transfer->XMODEM->Send.
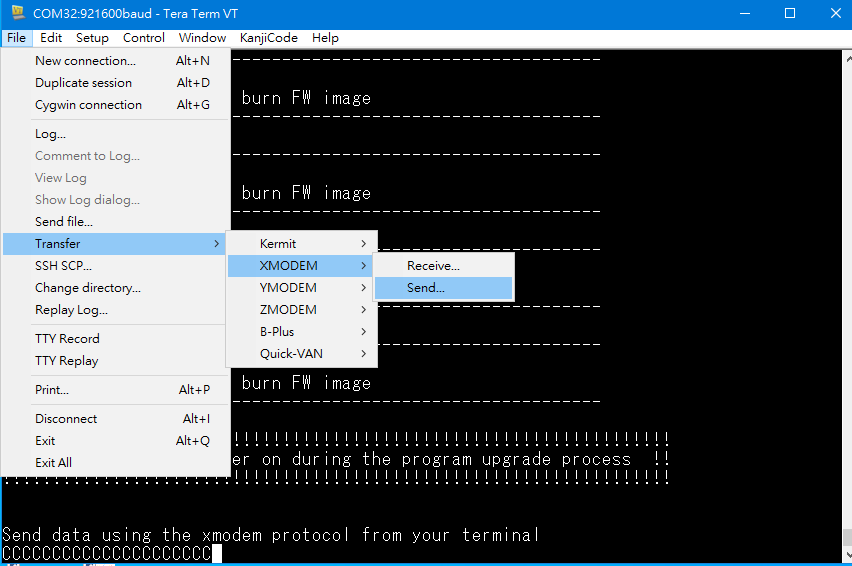
- Step 4: After the firmware image burning is completed, the message "Do you want to end file transmission and reboot system? (y)" is displayed. Press button
yto restart.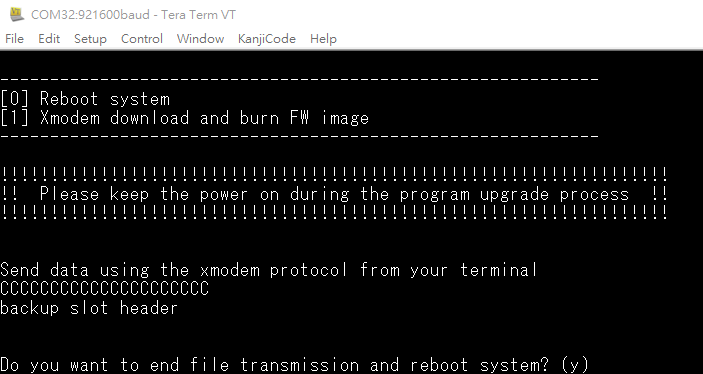
- Step 5: You will see the uart on
TeraTermwhich is runing your algorithm.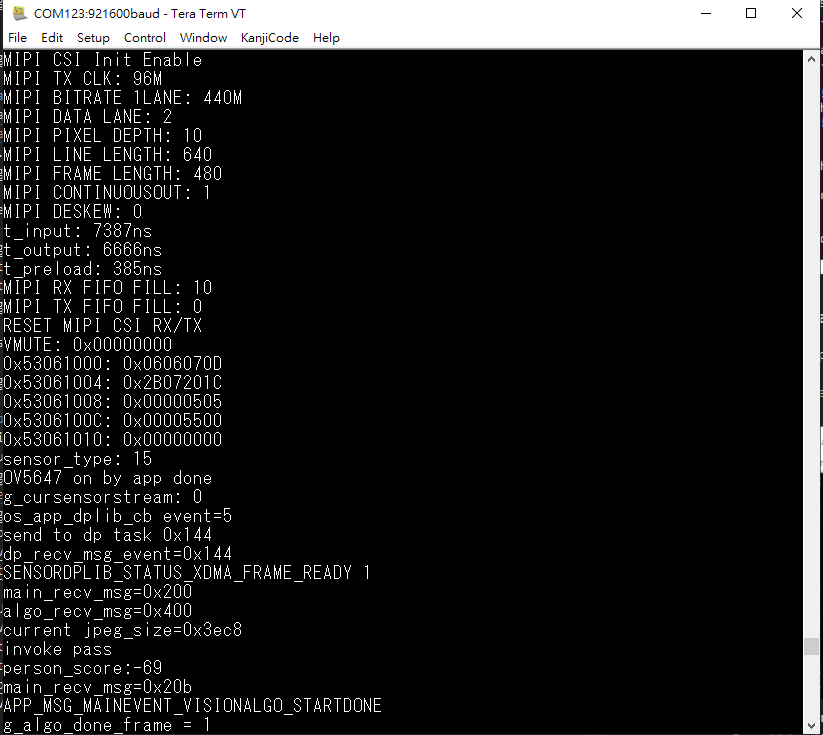
Flash using Edge Impulse CLI tools
This method works on all supported operating systems (Windows/Linux/MacOS...)
- Step 1: Install the Edge Impulse CLI tools
- Step 2: Open any system terminal and run the following command
himax-flash-tool -d WiseEye2 -f <path_to_four_firmware_img_file> - Step 3: Wait until you see the following message:
[HMX] Press **RESET** to start the application...
[HMX] Firmware update completed
Note: if the flashing process hangs, just cancel it (Ctrl+C) and start once again.
How to restore to the original factory settings
Linux Environment
-
Update the flash image
Seeed_SenseCraft_AI*.imgto Grove Vision AI Module V2 and pressresetbuttun. -
Disconnect the
Minicom:- Please press
Ctrl+Aon keyboard and presszon keyboard to go to the menu ofminicom.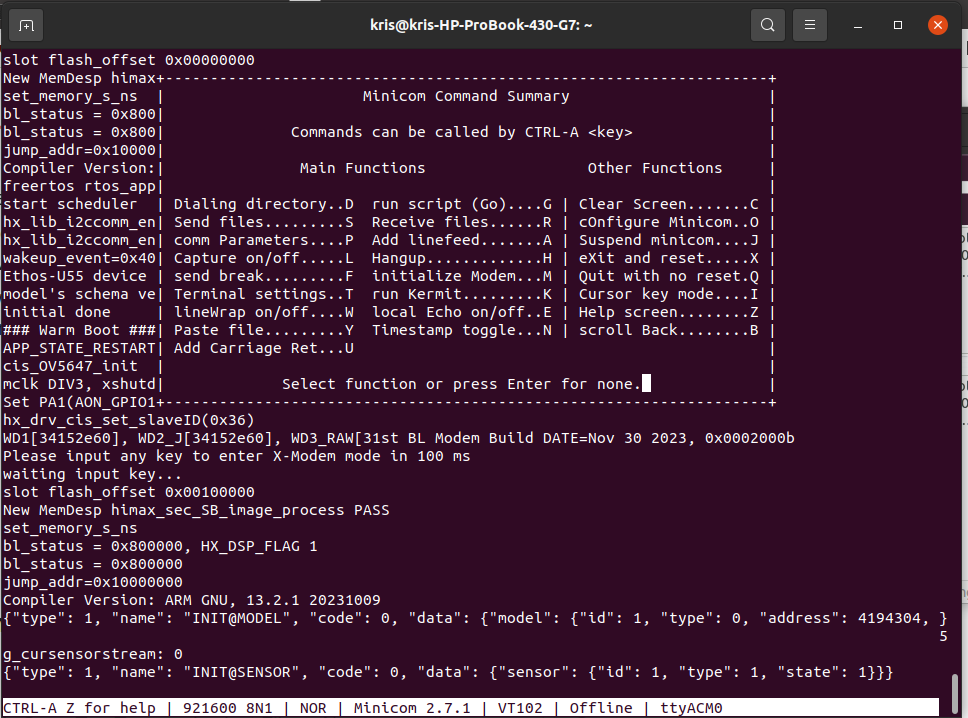
- Then, press
qon keyboard to quit with no resetminicom, and pressyesto leave.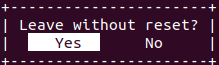
- Please press
-
Open the permissions to acceess the deivce
sudo setfacl -m u:[USERNAME]:rw /dev/ttyUSB0 # in my case # sudo setfacl -m u:kris:rw /dev/ttyACM0 -
After doing the above steps, you can run the SenseCraft AI on Grove Vision AI Module V2.
- Introduction : https://wiki.seeedstudio.com/grove_vision_ai_v2/
- Connect Grove Vision AI Module to NB USB port
- Open "Google Chrome" browser
- Open SenseCraft Homepage
- Select "Grove Vision AI(WE2)" and connect (serial port)
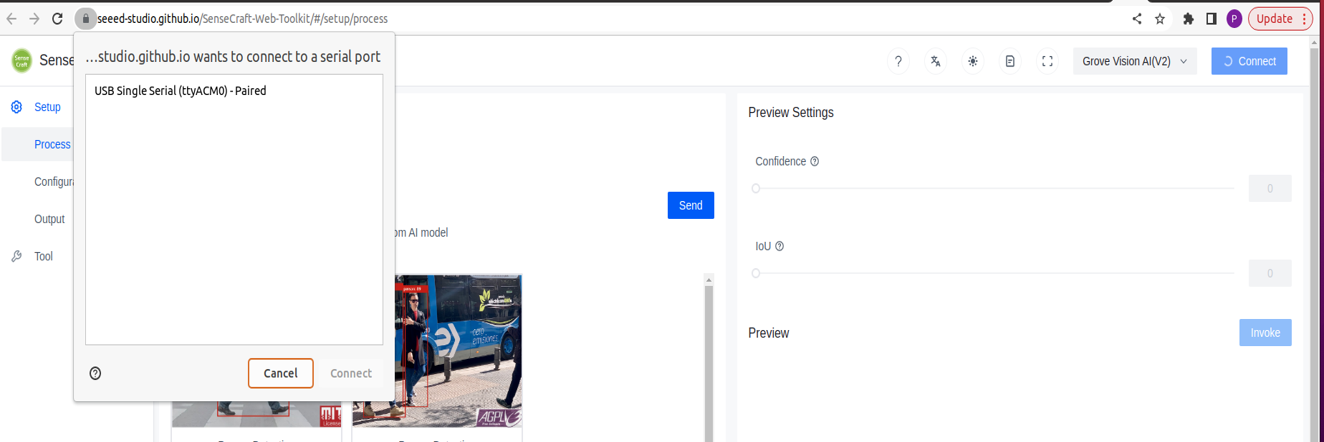
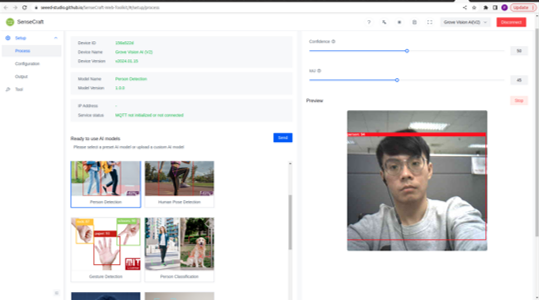
Windows Environment
- Update the flash image
Seeed_SenseCraft AI*.imgto Grove Vision AI Module V2 and pressresetbuttun.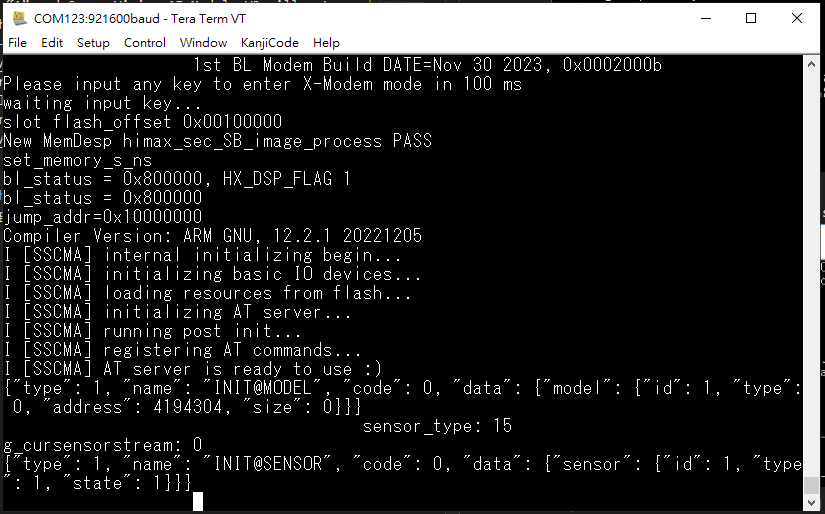
- Disconnect the
TeraTerm.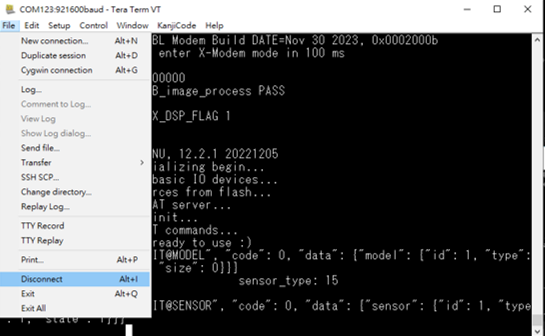
- After doing the above steps, you can run the SenseCraft AI on Grove Vision AI Module V2.
- Introduction : https://wiki.seeedstudio.com/grove_vision_ai_v2/
- Install CH343 UART driver (CH343SER.ZIP) (Optional)
- Connect Grove Vision AI Module to NB USB port
- Open "Microsoft Edge" browser
- Open SenseCraft Homepage
- Select "Grove Vision AI(WE2)" and connect (serial port)
How to add support for raspberry pi camera?
You can reference the scenario app allon_sensor_tflm , allon_sensor_tflm_freertos and tflm_fd_fm. Take allon_sensor_tflm for example, you should only modify the allon_sensor_tflm.mk from cis_ov5647 to cis_imx219 or cis_imx477.
#CIS_SUPPORT_INAPP_MODEL = cis_ov5647
CIS_SUPPORT_INAPP_MODEL = cis_imx219
#CIS_SUPPORT_INAPP_MODEL = cis_imx477
So that, it can support cis_imx219 or cis_imx477 camera.
How to use CMSIS-NN at the project?
- Modify the setting at the makefile
- Enable the flag
LIB_CMSIS_NN_ENALBEto build CMSIS-NN libraryLIB_CMSIS_NN_ENALBE = 1 - You can reference the scenario app example about allon_sensor_tflm_cmsis_nn which is the example running the model without passing vela and using the CMSIS-NN library.
- Change the
APP_TYPEtoallon_sensor_tflm_cmsis_nnat the makefileAPP_TYPE = allon_sensor_tflm_cmsis_nn
- Change the
- Enable the flag
Contributors


Similar repos


Languages
C
62.9%
C++
34.3%
C
129
130 commits
updated Apr 16, 2026
README
Himax examples for Seeed Grove Vision AI Module V2
This is a repository which step by step teaches you how to build your own examples and run on Seeed Grove Vision AI Module V2. Finally, teach you how to restore to the original factory settings and run SenseCraft AI from Seeed Studio.
Outline
- How to build the firmware?
- How to flash the firmware?
- How to restore to the original factory settings?
| scenario_app | project name |
|---|---|
| face mesh | tflm_fd_fm |
| yolov8n object detection | tflm_yolov8_od |
| yolov8n pose | tflm_yolov8_pose |
| yolov8n gender classification | tflm_yolov8_gender_cls |
| pdm mic record | pdm_record |
| KeyWord Spotting using Transformers | kws_pdm_record |
| imu read | imu_read |
| peoplenet from TAO | tflm_peoplenet |
| yolo11n object detection | tflm_yolo11_od |
| mobilenet classification converted by TinyNN | tflm_mb_cls |
| mobilenetV2 classification using ExecuTorch | torch_mb_cls |
-
How to use CMSIS-CV at the project?
- please clone the project by following command to download CMSIS-CV library
git clone --recursive https://github.com/HimaxWiseEyePlus/Seeed_Grove_Vision_AI_Module_V2.git
- please clone the project by following command to download CMSIS-CV library
-
How to run Edge Impulse Example: standalone inferencing using Grove Vision AI Module V2 (Himax WiseEye2)?
How to build the firmware?
This part explains how you can build the firmware for Grove Vision AI Module V2.
Build the firmware at Linux environment
Note: The following has been tested to work on Ubuntu 20.04 PC
- Step 1: Install the following prerequisites
sudo apt install make - Step 2: Download Arm GNU Toolchain (arm-gnu-toolchain-13.2.rel1-x86_64-arm-none-eabi.tar.xz)
cd ~ wget https://developer.arm.com/-/media/Files/downloads/gnu/13.2.rel1/binrel/arm-gnu-toolchain-13.2.rel1-x86_64-arm-none-eabi.tar.xz - Step 3: Extract the file
tar -xvf arm-gnu-toolchain-13.2.rel1-x86_64-arm-none-eabi.tar.xz - Step 4: Add arm-gnu-toolchain-13.2.Rel1-x86_64-arm-none-eabi/bin/: to PATH
(hint: the path about [$HOME/arm-gnu-toolchain-13.2.Rel1-x86_64-arm-none-eabi/bin/] should set your own path, you can not just copy and paste)#this is just the example, you can not just copy and paste !! export PATH="$HOME/arm-gnu-toolchain-13.2.Rel1-x86_64-arm-none-eabi/bin/:$PATH" - Step 5: Clone the following repository and go into Seeed_Grove_Vision_AI_Module_V2 folder
git clone --recursive https://github.com/HimaxWiseEyePlus/Seeed_Grove_Vision_AI_Module_V2.git cd Seeed_Grove_Vision_AI_Module_V2 - Step 6: Compile the firmware
cd EPII_CM55M_APP_S make clean make - Output elf file:
./obj_epii_evb_icv30_bdv10/gnu_epii_evb_WLCSP65/EPII_CM55M_gnu_epii_evb_WLCSP65_s.elf - Step 7: Generate firmware image file
cd ../we2_image_gen_local/ cp ../EPII_CM55M_APP_S/obj_epii_evb_icv30_bdv10/gnu_epii_evb_WLCSP65/EPII_CM55M_gnu_epii_evb_WLCSP65_s.elf input_case1_secboot/ ./we2_local_image_gen project_case1_blp_wlcsp.json - Output firmware image:
./output_case1_sec_wlcsp/output.img
Build the firmware at MacOS environment
Note: The steps are almost the same as the Linux environment except Step 1 and Step 7.
- Step 1:
- You should make sure your
makeis usingGNU version makenotBSD version make.make --version - If it is not
GNU make, you should download it by following command.brew install make - After installation, you can access it with the command gmake to avoid conflicts with the default make.
gmake - So, you should create an alias in your shell configuration file (like .bash_profile or .zshrc):
alias make='gmake'
- You should make sure your
- Step 7: Generate firmware image file (using
./we2_local_image_gen_macOS_arm64for MacOS)cd ../we2_image_gen_local/ cp ../EPII_CM55M_APP_S/obj_epii_evb_icv30_bdv10/gnu_epii_evb_WLCSP65/EPII_CM55M_gnu_epii_evb_WLCSP65_s.elf input_case1_secboot/ ./we2_local_image_gen_macOS_arm64 project_case1_blp_wlcsp.json
Build the firmware at Windows environment
- Step 1: Install the
makecommand for prerequisites , you can reference here - Step 2: Download Arm GNU Toolchain arm-gnu-toolchain-13.2.rel1-mingw-w64-i686-arm-none-eabi.zip
- Step 3: Extract the file
tar -xvf arm-gnu-toolchain-13.2.rel1-mingw-w64-i686-arm-none-eabi.zip - Step 4: Add arm-gnu-toolchain-13.2.rel1-mingw-w64-i686-arm-none-eabi/bin/ to your environment variables
- option1: add the gnu-toolchain to your environment variables manually
- option2: add the gnu-toolchain by command
(hint: the path about [location of your gnu-toolchain-13.2 ROOT] should set your own path, you can not just copy and paste)
#this is just the example, you can not just copy and paste !!
setx PATH "%PATH%;[location of your gnu-toolchain-13.2 ROOT]\arm-gnu-toolchain-13.2.rel1-mingw-w64-i686-arm-none-eabi\bin"
- Step 5: Clone the following repository and go into Seeed_Grove_Vision_AI_Module_V2 folder
git clone --recursive https://github.com/HimaxWiseEyePlus/Seeed_Grove_Vision_AI_Module_V2.git cd Seeed_Grove_Vision_AI_Module_V2 - Step 6: Compile the firmware
cd EPII_CM55M_APP_S make clean make - Output elf file:
./obj_epii_evb_icv30_bdv10/gnu_epii_evb_WLCSP65/EPII_CM55M_gnu_epii_evb_WLCSP65_s.elf - Step 7: Generate firmware image file
cd ../we2_image_gen_local/ cp ../EPII_CM55M_APP_S/obj_epii_evb_icv30_bdv10/gnu_epii_evb_WLCSP65/EPII_CM55M_gnu_epii_evb_WLCSP65_s.elf input_case1_secboot/ we2_local_image_gen project_case1_blp_wlcsp.json - Output firmware image:
./output_case1_sec_wlcsp/output.img
How to flash the firmware?
This part explains how you can flash the firmware to Grove Vision AI Module V2.
System Requirement
- Driver
- If you find that the Grove Vision AI V2 is not recognised after connecting it to your computer, you should install the driver which can reference here.
- Grove Vision AI Module V2
- Connection cable
- Micro usb cable: connect to EVB (as Power/UART)
- Software Tools
Serial terminal emulation application
- In the following description,
TeraTermandMinicomwill be used.- Serial terminal emulation application Setting
- Baud Rate 921600 bps
- Data 8 bit
- Parity none
- Stop 1 bit
- Flow control none
- please check xmodem protocol is supported.
- Minicom (for Linux PC)
- Install minicom command
sudo apt-get install minicom - Burn application to flash by using xmodem send application binary.
- Minicom will extra install "lrzsz" package to support xmodem protocol
- If you did not have “lrzsz” instruction, please install by following instruction.
sudo apt-get install lrzsz #(to support xmodem protocol)
- Minicom will extra install "lrzsz" package to support xmodem protocol
- Open the permissions to access the device
sudo setfacl -m u:[USERNAME]:rw /dev/ttyUSB0 # in my case # sudo setfacl -m u:kris:rw /dev/ttyACM0 - Open minicom
sudo minicom -s - Setup serial port and COM Port name
- Tips for finding the COM Port name.
- You can use google chrome to connect to Seeed SenseCraft AI, select
Grove Vision(V2)and pressConnect. - Then, you would get the COM Port name.
- You can use google chrome to connect to Seeed SenseCraft AI, select
- Tips for finding the COM Port name.
- Install minicom command
- TeraTerm (for Windows PC)
- Setup serial port
- Setup serial port
- Serial terminal emulation application Setting
- In the following description,
Flash Image Update at Linux Environment by python code
- Prerequisites for xmodem
- Please install the package at xmodem/requirements.txt
pip install -r xmodem/requirements.txt
- Please install the package at xmodem/requirements.txt
- Disconnect
Minicom - Make sure your
Seeed Grove Vision AI Module V2is connect to PC. - Open the permissions to acceess the deivce
sudo setfacl -m u:[USERNAME]:rw /dev/ttyUSB0
# in my case
# sudo setfacl -m u:kris:rw /dev/ttyACM0
- Open
Terminaland key-in following command - port: the COM number of your
Seeed Grove Vision AI Module V2, for example,/dev/ttyACM0 - baudrate: 921600
- file: your firmware image [maximum size is 1MB]
python3 xmodem/xmodem_send.py --port=[your COM number] --baudrate=921600 --protocol=xmodem --file=we2_image_gen_local/output_case1_sec_wlcsp/output.img # example: # python3 xmodem/xmodem_send.py --port=/dev/ttyACM0 --baudrate=921600 --protocol=xmodem --file=we2_image_gen_local/output_case1_sec_wlcsp/output.img - model(optional): you can burn multiple models "[model tflite] [position of model on flash] [offset]"
- Position of model on flash is defined at the code ~/tflm_yolov8_od/common_config.h (take tflm_yolov8_od for example)
python3 xmodem/xmodem_send.py --port=[your COM number] --baudrate=921600 --protocol=xmodem --file=we2_image_gen_local/output_case1_sec_wlcsp/output.img --model="model_zoo/tflm_yolov8_od/yolov8n_od_192_delete_transpose_0xB7B000.tflite 0xB7B000 0x00000" # example: # python3 xmodem/xmodem_send.py --port=/dev/ttyACM0 --baudrate=921600 --protocol=xmodem --file=we2_image_gen_local/output_case1_sec_wlcsp/output.img --model="model_zoo/tflm_yolov8_od/yolov8n_od_192_delete_transpose_0xB7B000.tflite 0xB7B000 0x00000" - It will start to burn firmware image.
- Please press
resetbuttun onSeeed Grove Vision AI Module V2. - It will success to run the algorithm.
Flash Image Update at Windows Environment by python code
- Prerequisites for xmodem
- Please install the package at xmodem/requirements.txt
pip install -r xmodem/requirements.txt
- Please install the package at xmodem/requirements.txt
- Disconnect
Tera Term - Make sure your
Seeed Grove Vision AI Module V2is connect to PC. - Open
CMDand key-in following command - port: the COM number of your
Seeed Grove Vision AI Module V2 - baudrate: 921600
- file: your firmware image [maximum size is 1MB]
python xmodem\xmodem_send.py --port=[your COM number] --baudrate=921600 --protocol=xmodem --file=we2_image_gen_local\output_case1_sec_wlcsp\output.img # example: # python xmodem\xmodem_send.py --port=COM123 --baudrate=921600 --protocol=xmodem --file=we2_image_gen_local\output_case1_sec_wlcsp\output.img - model: you can burn multiple models "[model tflite] [position of model on flash] [offset]"
- Position of model on flash is defined at the code ~/tflm_yolov8_od/common_config.h (take tflm_yolov8_od for example)
python xmodem\xmodem_send.py --port=[your COM number] --baudrate=921600 --protocol=xmodem --file=we2_image_gen_local\output_case1_sec_wlcsp\output.img --model="model_zoo\tflm_yolov8_od\yolov8n_od_192_delete_transpose_0xB7B000.tflite 0xB7B000 0x00000" # example: # python xmodem\xmodem_send.py --port=COM123 --baudrate=921600 --protocol=xmodem --file=we2_image_gen_local\output_case1_sec_wlcsp\output.img --model="model_zoo\tflm_yolov8_od\yolov8n_od_192_delete_transpose_0xB7B000.tflite 0xB7B000 0x00000" - It will start to burn firmware image automatically.
- Please press
resetbuttun onSeeed Grove Vision AI Module V2. - It will success to run the algorithm.
Flash Image Update at Linux Environment
Following steps update application in the flash.
- Step 1: Open
Minicom, setup serial port and COM Port name-> connect to Grove Vision AI Module V2. (Please reference the minicom part of System Requirement) - Step 2: Hold down any key on the keyboard (except the Enter key) and press the reset button to reset Grove Vision AI Module V2 and the startup options will be displayed.
- Step 3: Press button “1” and Grove Vision AI Module V2 will enter receiving mode after then.
- Step 4: Press
Ctrl+Aon keyboard to enter minicom menu, and then pressson keyboard to upload file and selectxmodem. - Step 5: Select the firmware image at
Seeed_Grove_Vision_AI_Module_V2\we2_image_gen_local\output_case1_sec_wlcsp\output.imgand pressenterto burn. - Step 6: After burning is compelete, press any key to be continue.
- Step 7: Then, you will see the message "Do you want to end file transmission and reboot system? (y)" is displayed. Press button
yto restart. - Step 8: You will see the uart on
minicomwhich is runing your algorithm.
Flash Image Update at Windows Environment
Following steps update application in the flash.
- Step 1: Open
TeraTermand select File -> New connection, connect to Grove Vision AI Module V2. - Step 2: Hold down any key on the keyboard (except the Enter key) and press the reset button to reset Grove Vision AI Module V2 and the startup options will be displayed.
- Step 3: Press button “1” and Grove Vision AI Module V2 will enter receiving mode after then. Select target flash image(output.img) by File->Transfer->XMODEM->Send.
- Step 4: After the firmware image burning is completed, the message "Do you want to end file transmission and reboot system? (y)" is displayed. Press button
yto restart. - Step 5: You will see the uart on
TeraTermwhich is runing your algorithm.
Flash using Edge Impulse CLI tools
This method works on all supported operating systems (Windows/Linux/MacOS...)
- Step 1: Install the Edge Impulse CLI tools
- Step 2: Open any system terminal and run the following command
himax-flash-tool -d WiseEye2 -f <path_to_four_firmware_img_file> - Step 3: Wait until you see the following message:
[HMX] Press **RESET** to start the application...
[HMX] Firmware update completed
Note: if the flashing process hangs, just cancel it (Ctrl+C) and start once again.
How to restore to the original factory settings
Linux Environment
-
Update the flash image
Seeed_SenseCraft_AI*.imgto Grove Vision AI Module V2 and pressresetbuttun. -
Disconnect the
Minicom:- Please press
Ctrl+Aon keyboard and presszon keyboard to go to the menu ofminicom. - Then, press
qon keyboard to quit with no resetminicom, and pressyesto leave.
- Please press
-
Open the permissions to acceess the deivce
sudo setfacl -m u:[USERNAME]:rw /dev/ttyUSB0 # in my case # sudo setfacl -m u:kris:rw /dev/ttyACM0 -
After doing the above steps, you can run the SenseCraft AI on Grove Vision AI Module V2.
- Introduction : https://wiki.seeedstudio.com/grove_vision_ai_v2/
- Connect Grove Vision AI Module to NB USB port
- Open "Google Chrome" browser
- Open SenseCraft Homepage
- Select "Grove Vision AI(WE2)" and connect (serial port)
Windows Environment
- Update the flash image
Seeed_SenseCraft AI*.imgto Grove Vision AI Module V2 and pressresetbuttun. - Disconnect the
TeraTerm. - After doing the above steps, you can run the SenseCraft AI on Grove Vision AI Module V2.
- Introduction : https://wiki.seeedstudio.com/grove_vision_ai_v2/
- Install CH343 UART driver (CH343SER.ZIP) (Optional)
- Connect Grove Vision AI Module to NB USB port
- Open "Microsoft Edge" browser
- Open SenseCraft Homepage
- Select "Grove Vision AI(WE2)" and connect (serial port)
How to add support for raspberry pi camera?
You can reference the scenario app allon_sensor_tflm , allon_sensor_tflm_freertos and tflm_fd_fm. Take allon_sensor_tflm for example, you should only modify the allon_sensor_tflm.mk from cis_ov5647 to cis_imx219 or cis_imx477.
#CIS_SUPPORT_INAPP_MODEL = cis_ov5647
CIS_SUPPORT_INAPP_MODEL = cis_imx219
#CIS_SUPPORT_INAPP_MODEL = cis_imx477
So that, it can support cis_imx219 or cis_imx477 camera.
How to use CMSIS-NN at the project?
- Modify the setting at the makefile
- Enable the flag
LIB_CMSIS_NN_ENALBEto build CMSIS-NN libraryLIB_CMSIS_NN_ENALBE = 1 - You can reference the scenario app example about allon_sensor_tflm_cmsis_nn which is the example running the model without passing vela and using the CMSIS-NN library.
- Change the
APP_TYPEtoallon_sensor_tflm_cmsis_nnat the makefileAPP_TYPE = allon_sensor_tflm_cmsis_nn
- Change the
- Enable the flag
Similar repos
Contributors
Languages
C
62.9%
C++
34.3%