
Visual Novel Character Creation Suite is a comprehensive tool for creating character sprites for visual novels. It allows you to create unique characters with a consistent appearance across all images, which was previously a challenging task when using neural networks.
Python
1,627
221 commits
updated Oct 4, 2026
See what people are saying
README
|
Join The Community Share results, ask questions, and follow VNCCS updates. 
|
Support VNCCS VNCCS is developed independently. Support helps keep the project moving. 
|
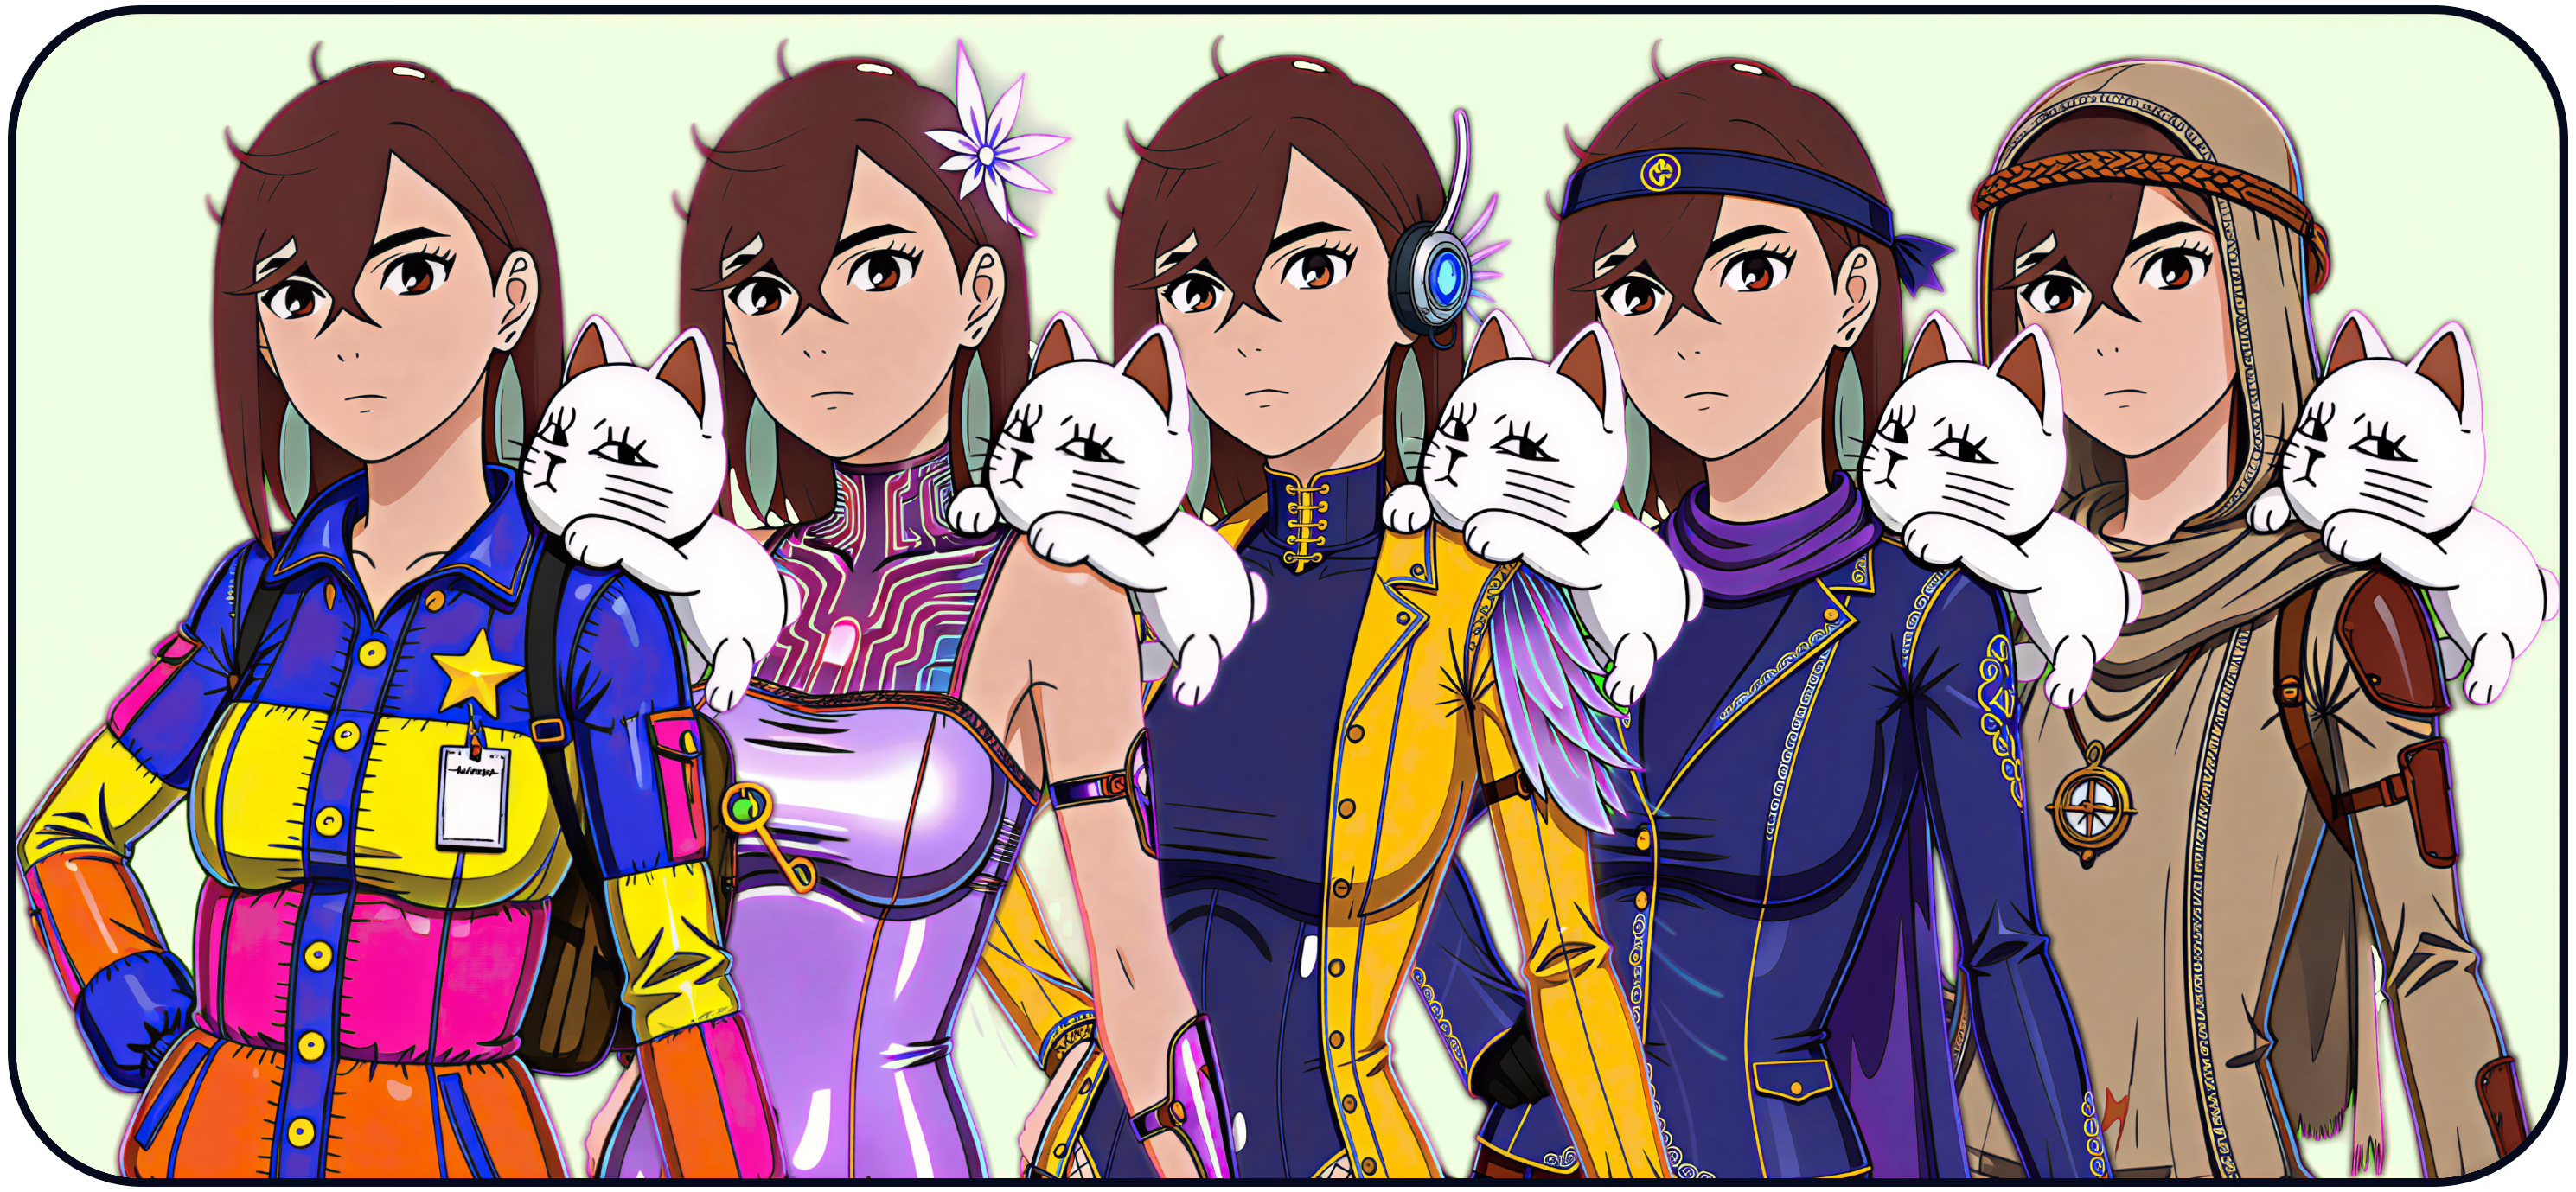
VNCCS is NOT just another workflow for creating consistent characters, it is a complete pipeline for creating sprites for any purpose. It allows you to create unique characters with a consistent appearance across all images, organise them, manage emotions, clothing, poses, and conduct a full cycle of work with characters.
Description
Many people want to use neural networks to create graphics, but making a unique character that looks the same in every image is much harder than generating a single picture. With VNCCS, it's as simple as pressing a button (just 4 times).
Installation
For new ComfyUI users: Use VNCCS Easy Install. It installs ComfyUI with a preconfigured setup and working VNCCS nodes.
For experienced users:
Find VNCCS - Visual Novel Character Creation Suite in Custom Nodes Manager and click install latest version
Manual install:
- Place the downloaded folder into
ComfyUI/custom_nodes/ - Alternatively, in the console: go to
ComfyUI/custom_nodes/and rungit clone https://github.com/AHEKOT/ComfyUI_VNCCS.git - cd ComfyUI_VNCCS_Utils
- pip install -r requirements.txt
Post install steps: Launch ComfyUI and open Comfy Manager Click "Install missing custom nodes"
VNCCS 3.0 Workflow
Hi! My name is V-chan, and I am going to show you how to use the new VNCCS!
We got a BIIIIIIG update, and now everything is completely new, so listen carefully!
Step 0: Migration assistant
If you used VNCCS before - you characters are safe. But you need to do one extra step: Open VNCCS_MigrationAssistant.json, select your characters and click migrate. It will transfer you characters in new VNCCS format.
!!!MAKE SURE THAT THEY WORK CORRECTLY BEFORE DELETING OLD FOLDER!!!
Step 1: Character Creator
Open the workflow:
VNCCS_3.0_Step1_CharacterCreator.json
Let's start from the very beginning. The first thing you need to do, besides opening the workflow, silly, is figure out the VNCCS Control Center.
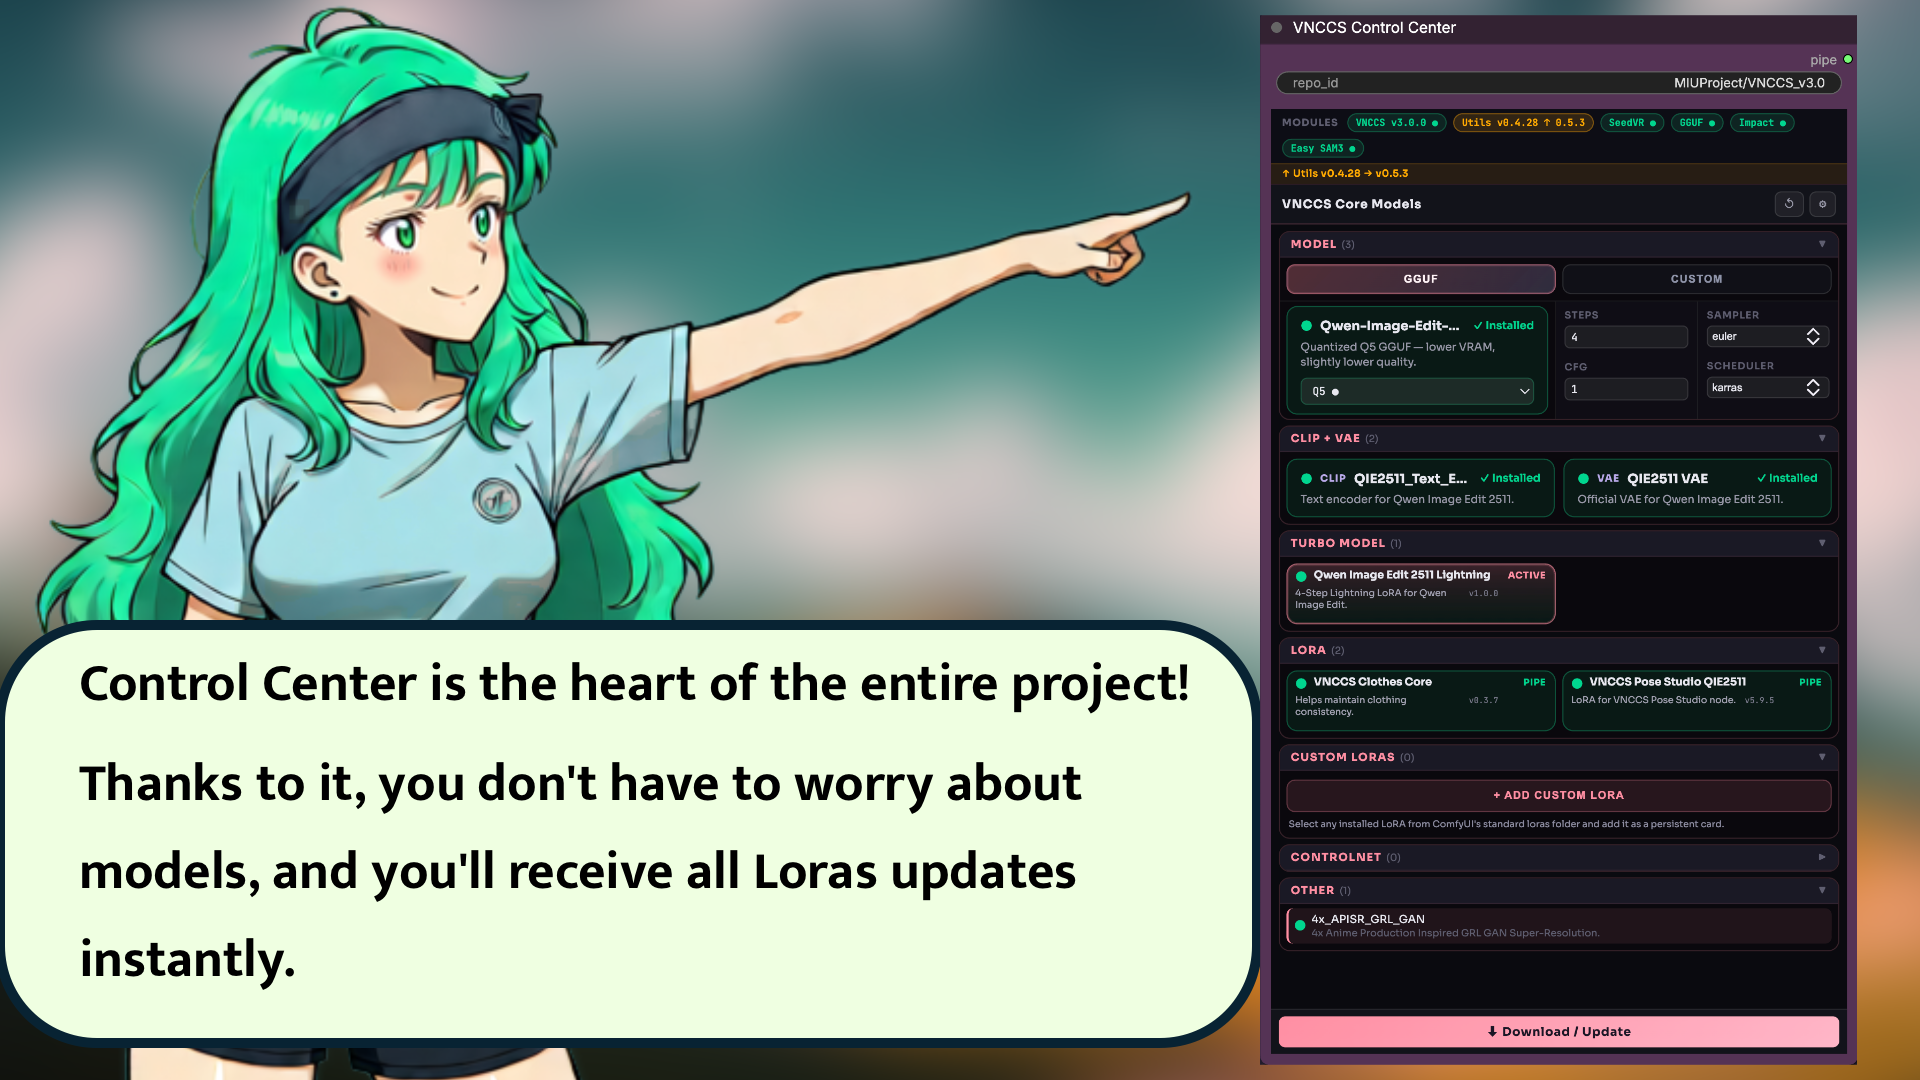
Inside it, you will find the models that turn your character into different poses and outfits. Choose the one that fits your computer and press Download.
- Qwen Image 2.1 works from your character image to change poses and clothes. It can even give you a transparent background. Less green-screen trouble, yay!
- Flux Klein9b makes your sprites in just 4 steps. Want less waiting while trying poses and outfits? Give it a try!
- MiniMax H3 is a video model, but here it helps you make character sprites! Try it for poses and clothes too, and see which result you like more.
Choose wisely, but in the end nobody is stopping you from trying them all and deciding later.
And then, at the very bottom of the widget, you can click the big Download button and the magic will do everything by itself.
Next, go to VNCCS Character Creator V2.
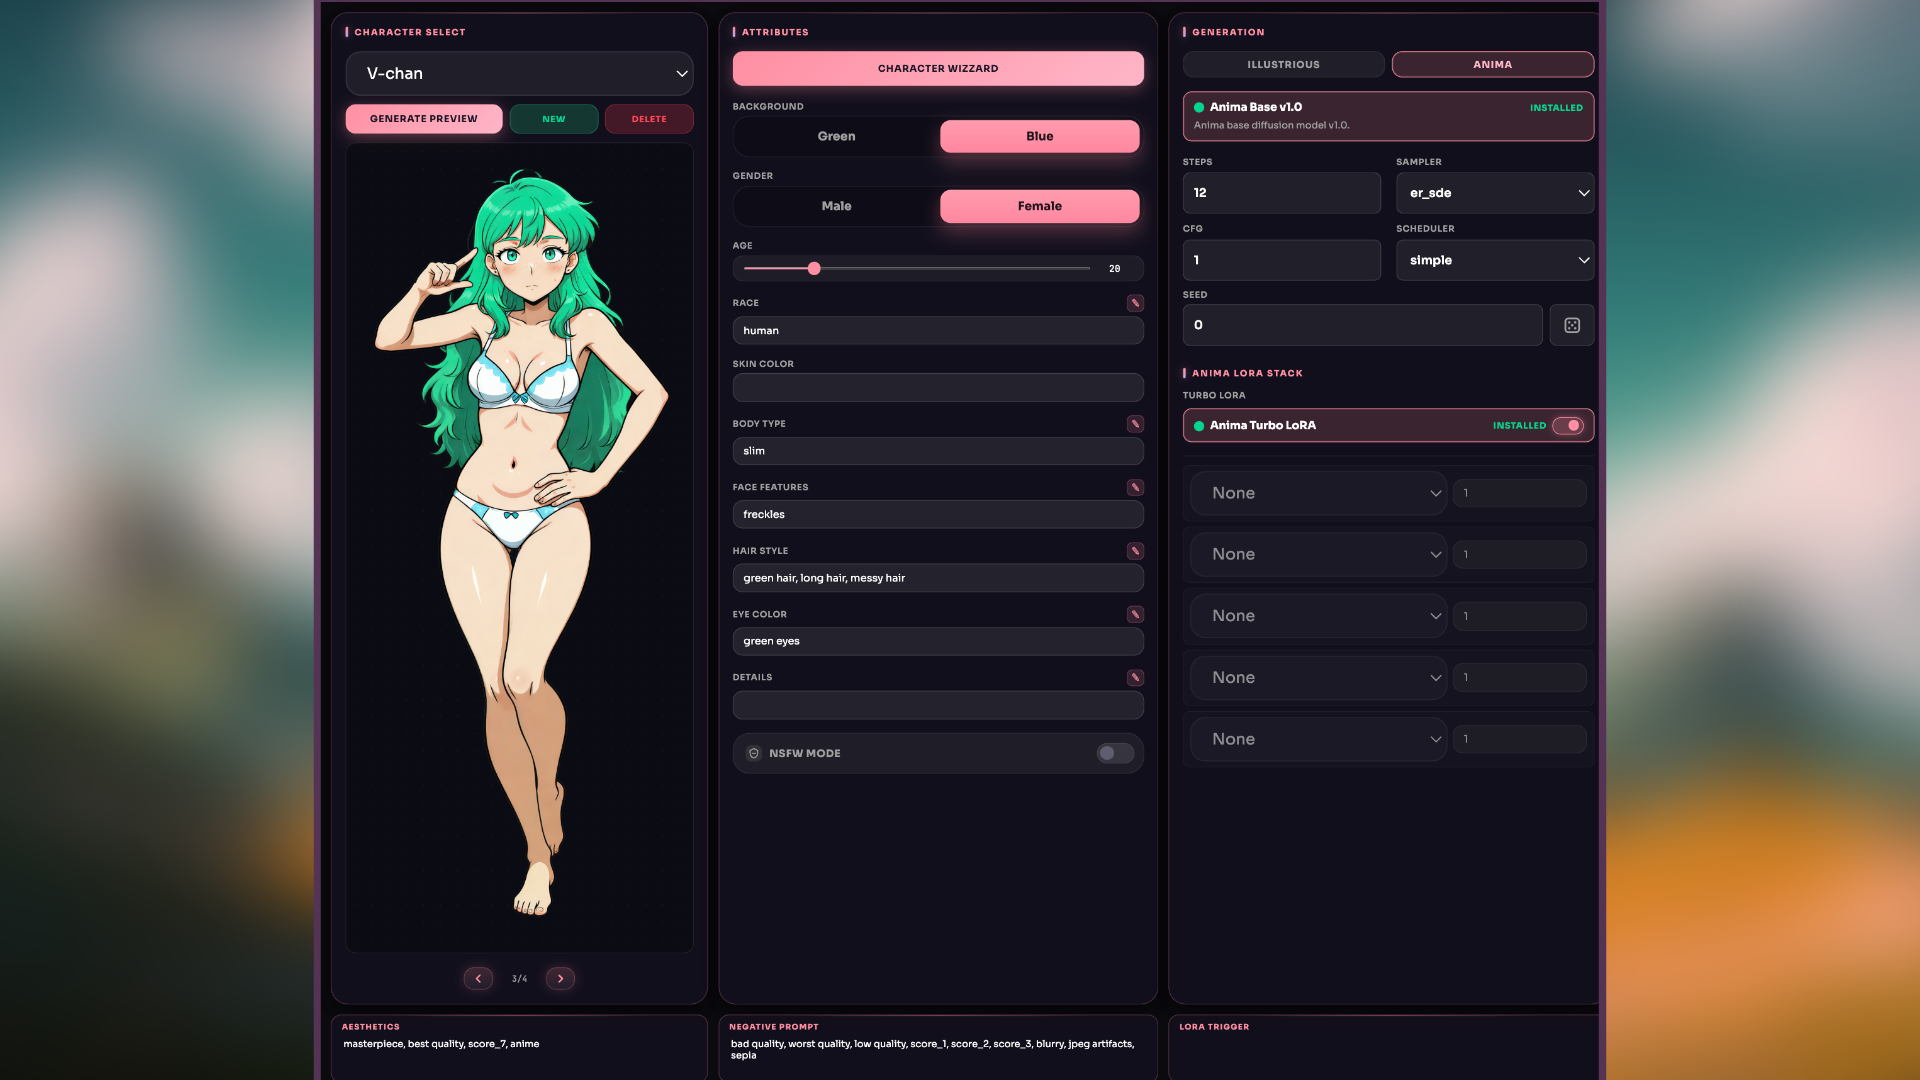 The most important thing here is to create a new character and choose the model for generation.
Illustrious may be considered old, but it makes excellent characters and has a huge selection of LoRAs for every style and occasion. Do not worry about quality, it will not disappoint you!
Anima is a new and cool model. It can do almost everything, but it will need a bit more resources, and there are not as many LoRAs for it yet.
Qwen Image 2.1 is here too! It can create your character with a transparent background, and the Turbo option cuts down the number of generation steps. More time to try different characters, hehe!
I recommend trying all three and deciding for yourself.
Right now you do not have any characters yet, so press NEW and give him or her a name! The name is very important!!! Be creative and unique!
Done? Good job! Now you have two paths:
- Enter character descriptions or use the pencil buttons to choose curated presets for race, skin tone, body type, face, hair, eyes, and details. Choose sex, age, and generation type. The NSFW switch controls whether the base character will have clothes or not :3
- Press CHARACTER WIZZARD, describe the character you want, and after a little magic the system will set all the needed options by itself. Do not forget to check them!
Race presets include natural-language descriptions of their distinctive anatomy, added automatically to generation prompts in Illustrious, Anima, and Qwen Image 2.1. Select multiple species for hybrids, or enter custom traits; the prompt gives explicit character traits priority over preset defaults. Existing character fields and custom text remain supported. Breast-size presets retain their original tags. Creator V2 uses character_template/character_presets_v2.json; the legacy catalog remains available to Character Cloner.
A new little feature is the GENERATE PREVIEW button. It lets you see what the character will look like without restarting the whole generation. So press it already, and if you like everything, move on. If you want to make changes, edit the descriptions and press it again!
VNCCS Pose Studio
The next key node is VNCCS Pose Studio.
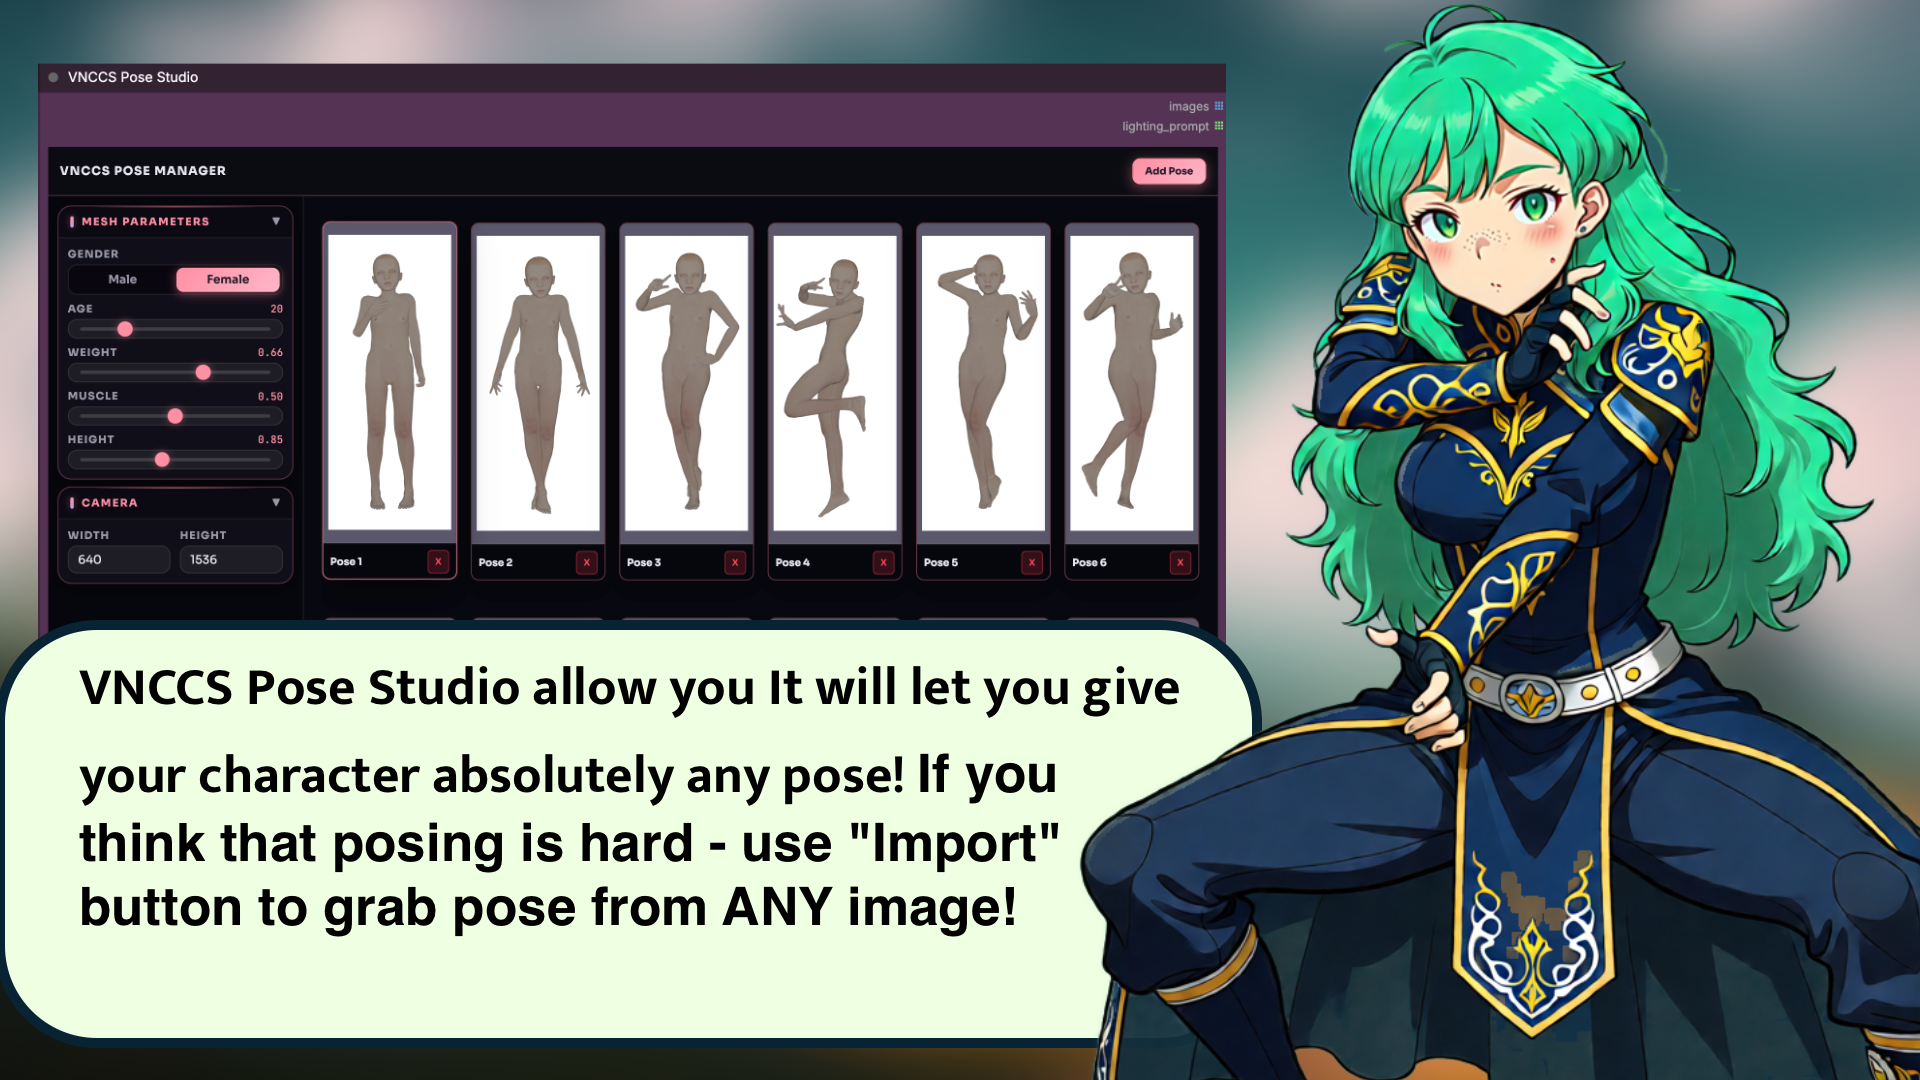
It is downloaded from my second project, VNCCS-Utils, so do not forget to install that too!
Here, the most important thing is to choose the poses you need and how many of them there should be. You can control the model however you want and make absolutely any poses. Also, using the Import button, you can load any picture with a character and get a pose just like the one in the picture!
It is also very important that the body proportions of the model fit your character. Age will be set automatically from the previous step, but nobody will stop you from setting it manually. Also choose height and body type, the result will be much better that way.
In VNCCS Character Generator, you do not really need to worry about the settings, but if you want, you can choose the upscaler model or even turn it off.
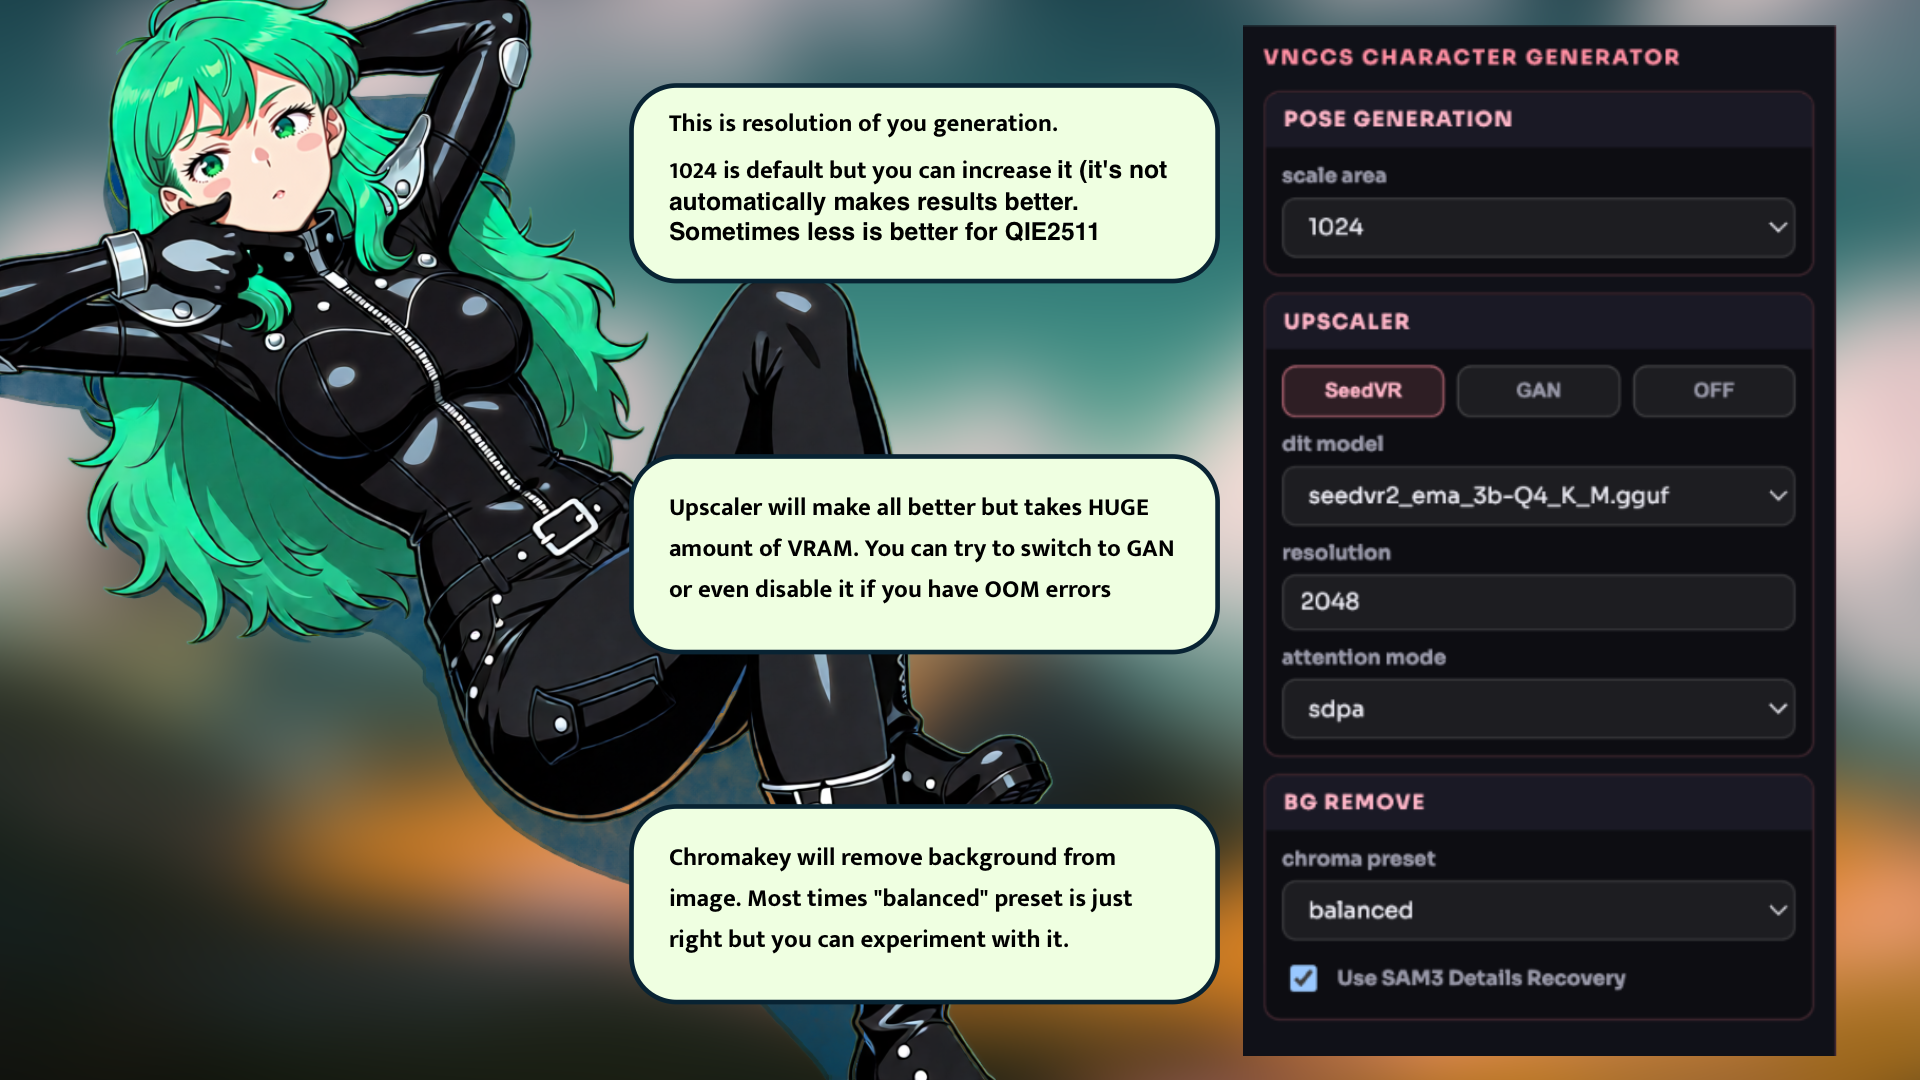
In BG Remove, you can choose a chroma key preset. Balanced is a very good preset, but if it is not enough for you, or if it is too much and starts damaging the character, choose a lighter one.
SAM3 Details Recovery makes background removal slower, but it lets you worry less about eye color and clothing elements that are the same color as the background. We will talk about clothes a little later.
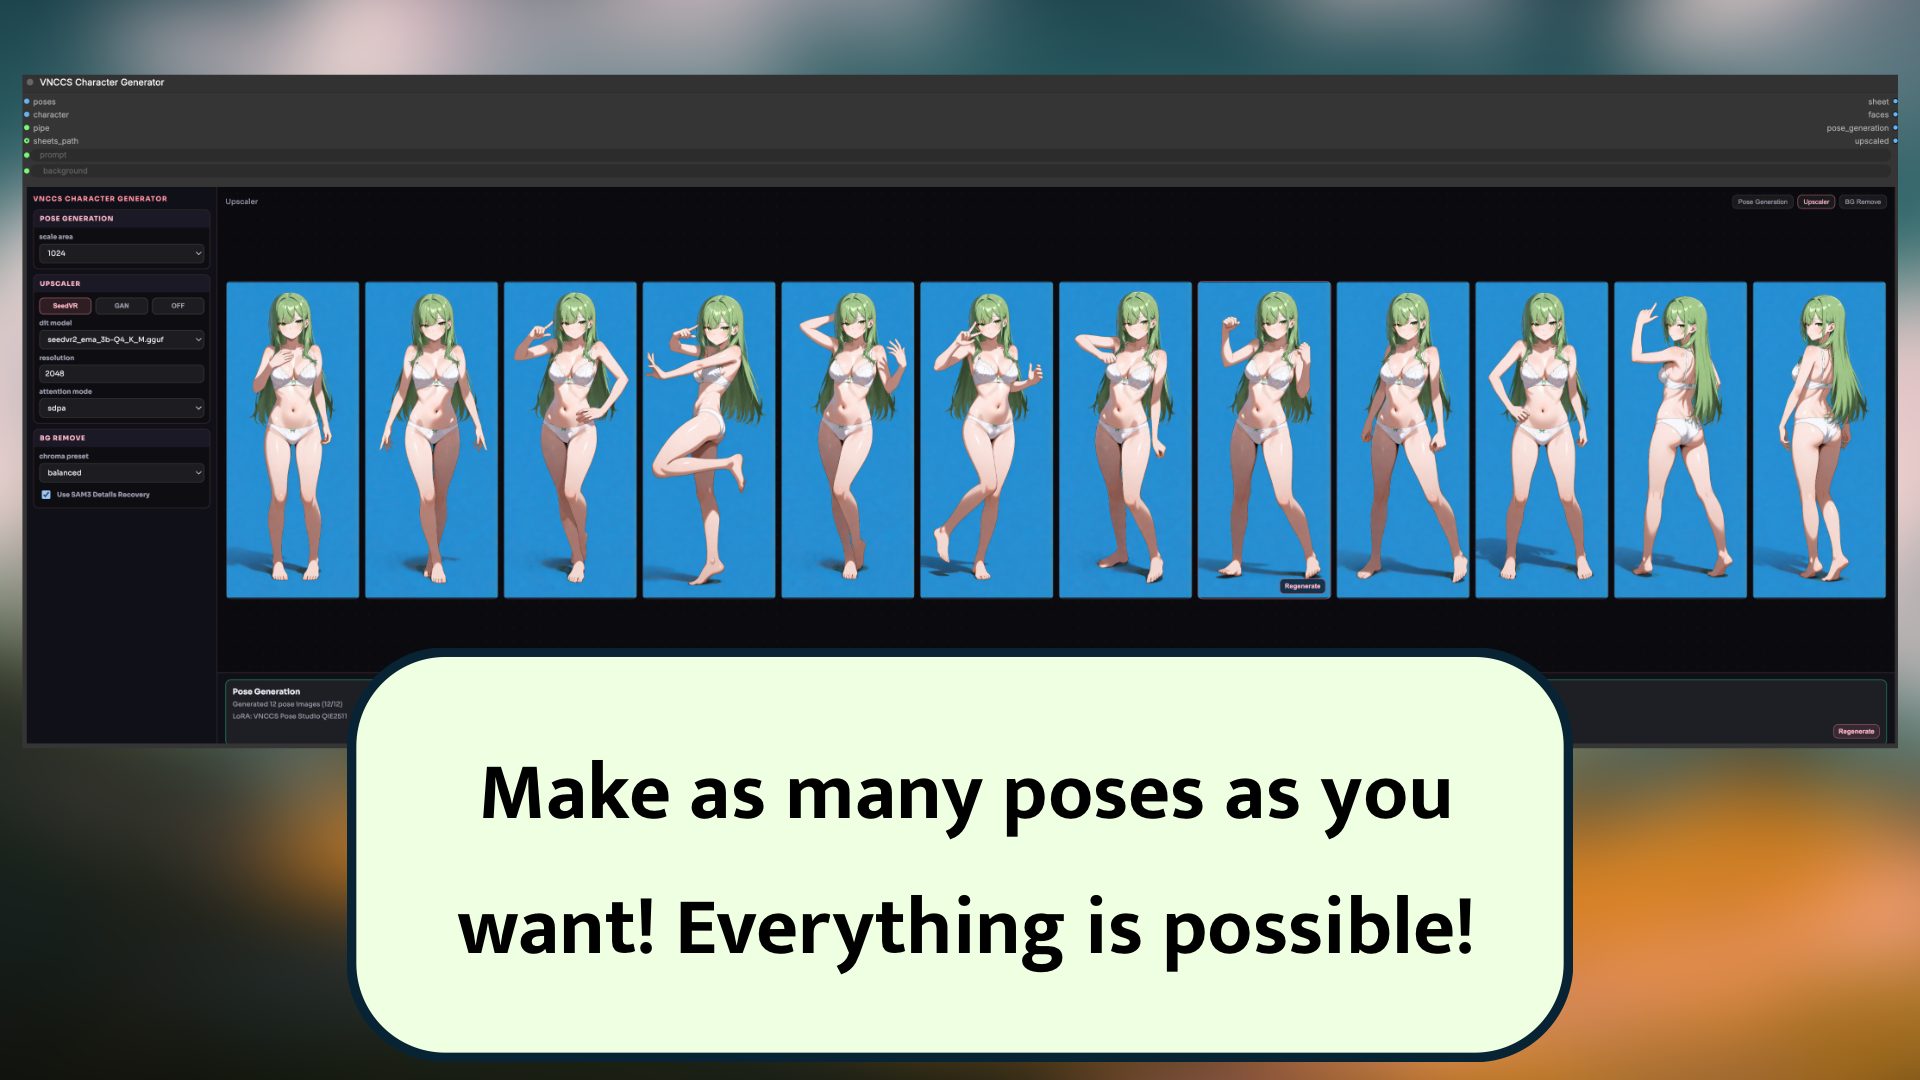
Ready? Then press Run! Now just wait, and the magic will do everything for you!
Step 1.1: Character Cloner
Open the workflow:
VNCCS_3.0_Step1_CharacterCloner.json
This workflow is basically a complete copy of Character Creator, but it is made for cloning existing character images.
Did you generate the character with another model? Download it from the internet? Take a screenshot from your favorite anime? Draw it yourself, with your own hands? Good job!
Try to make sure the picture is good quality and that the character is full body, otherwise the model will invent everything that is not visible in the picture!
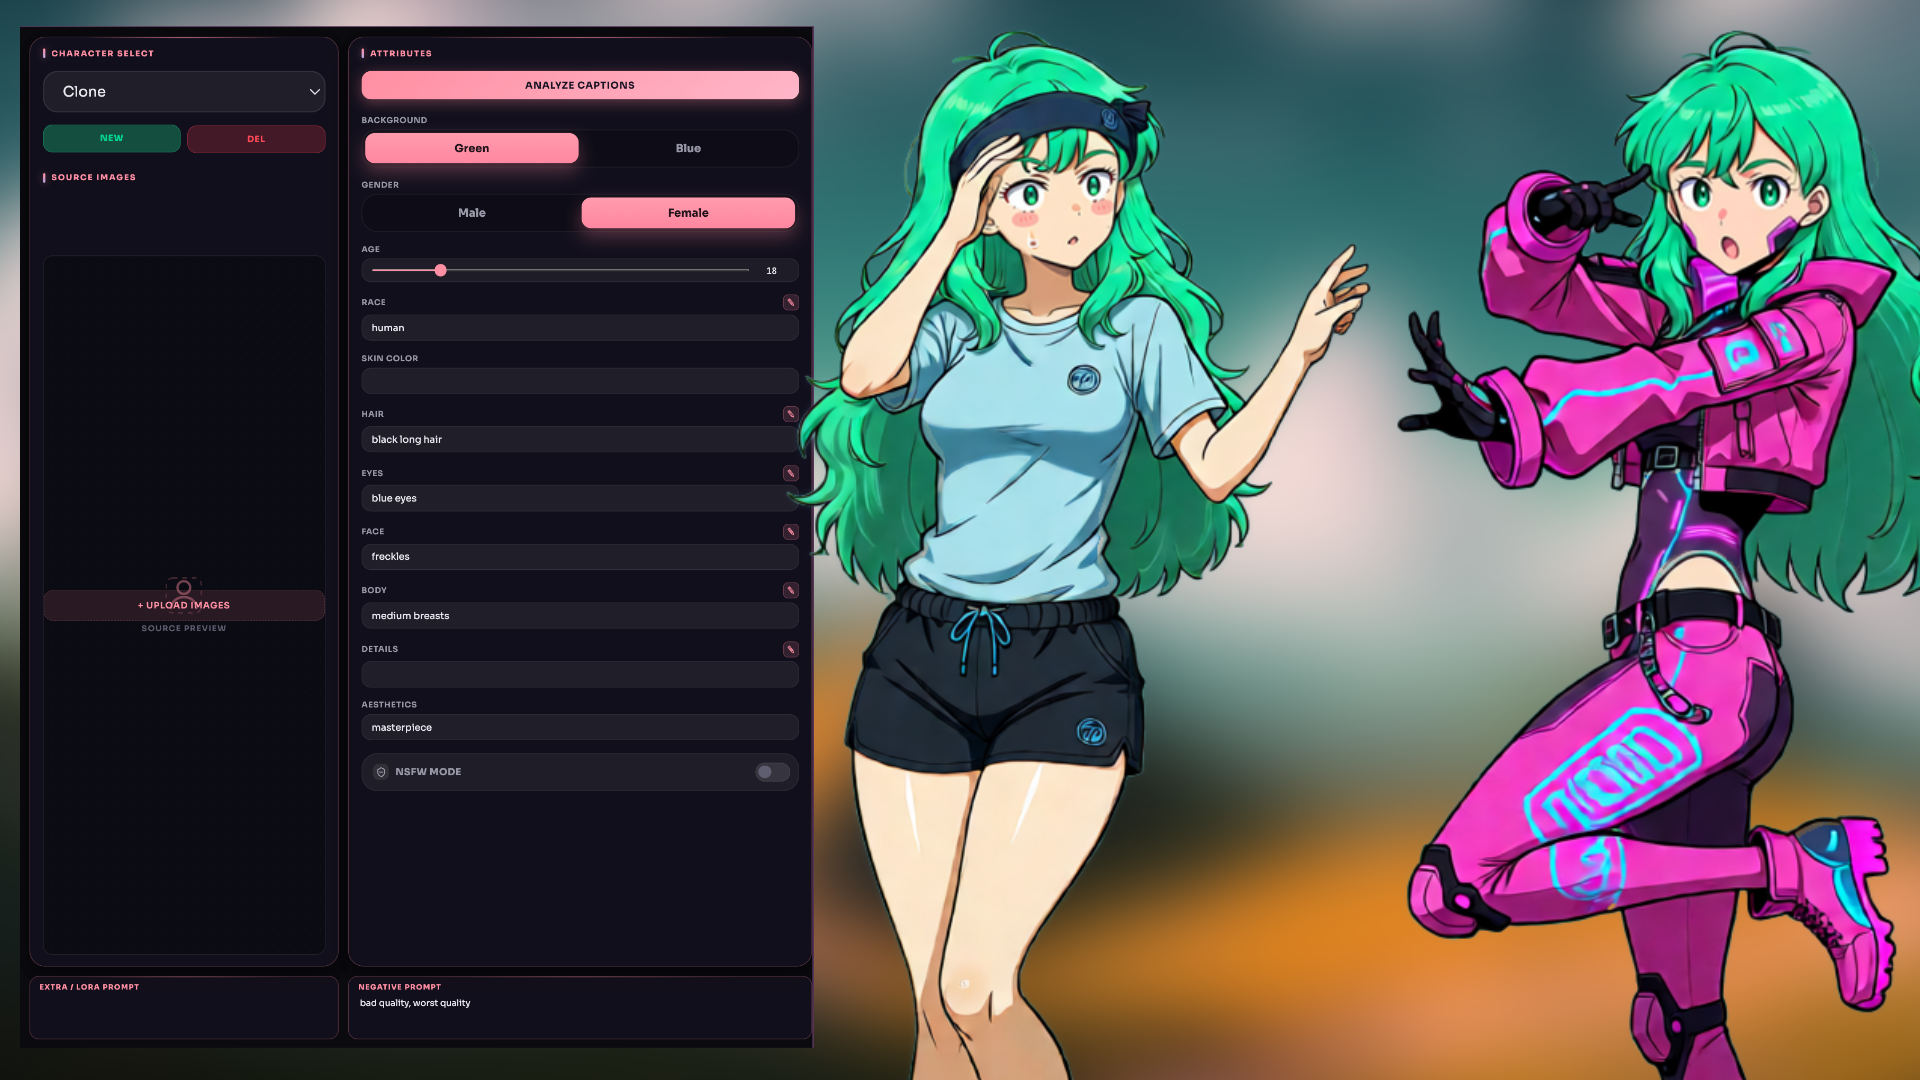
Now load it into VNCCS Character Cloner, write tags or press ANALYZE CAPTIONS, set up everything you need in VNCCS Pose Studio, and do not forget to choose whether you need separate undressed sprites with the NSFW button. They are not mandatory, but dressing these characters later will be MUCH easier!
Also try to choose a background color that appears the least in the character. Look at the eyes and hair. If they are green, choose blue. Or the other way around.
Now press Run and look at the result!
Step 2: Character Clothes
Open the workflow:
VNCCS_3.0_Step2_CharacterClothes.json
Now we move to the tastiest part! In this workflow, you will make clothes for the character. As many sets as you think you need.
Choose a character in VNCCS Clothes Designer and press New. Give the outfit set a name and get ready to create!
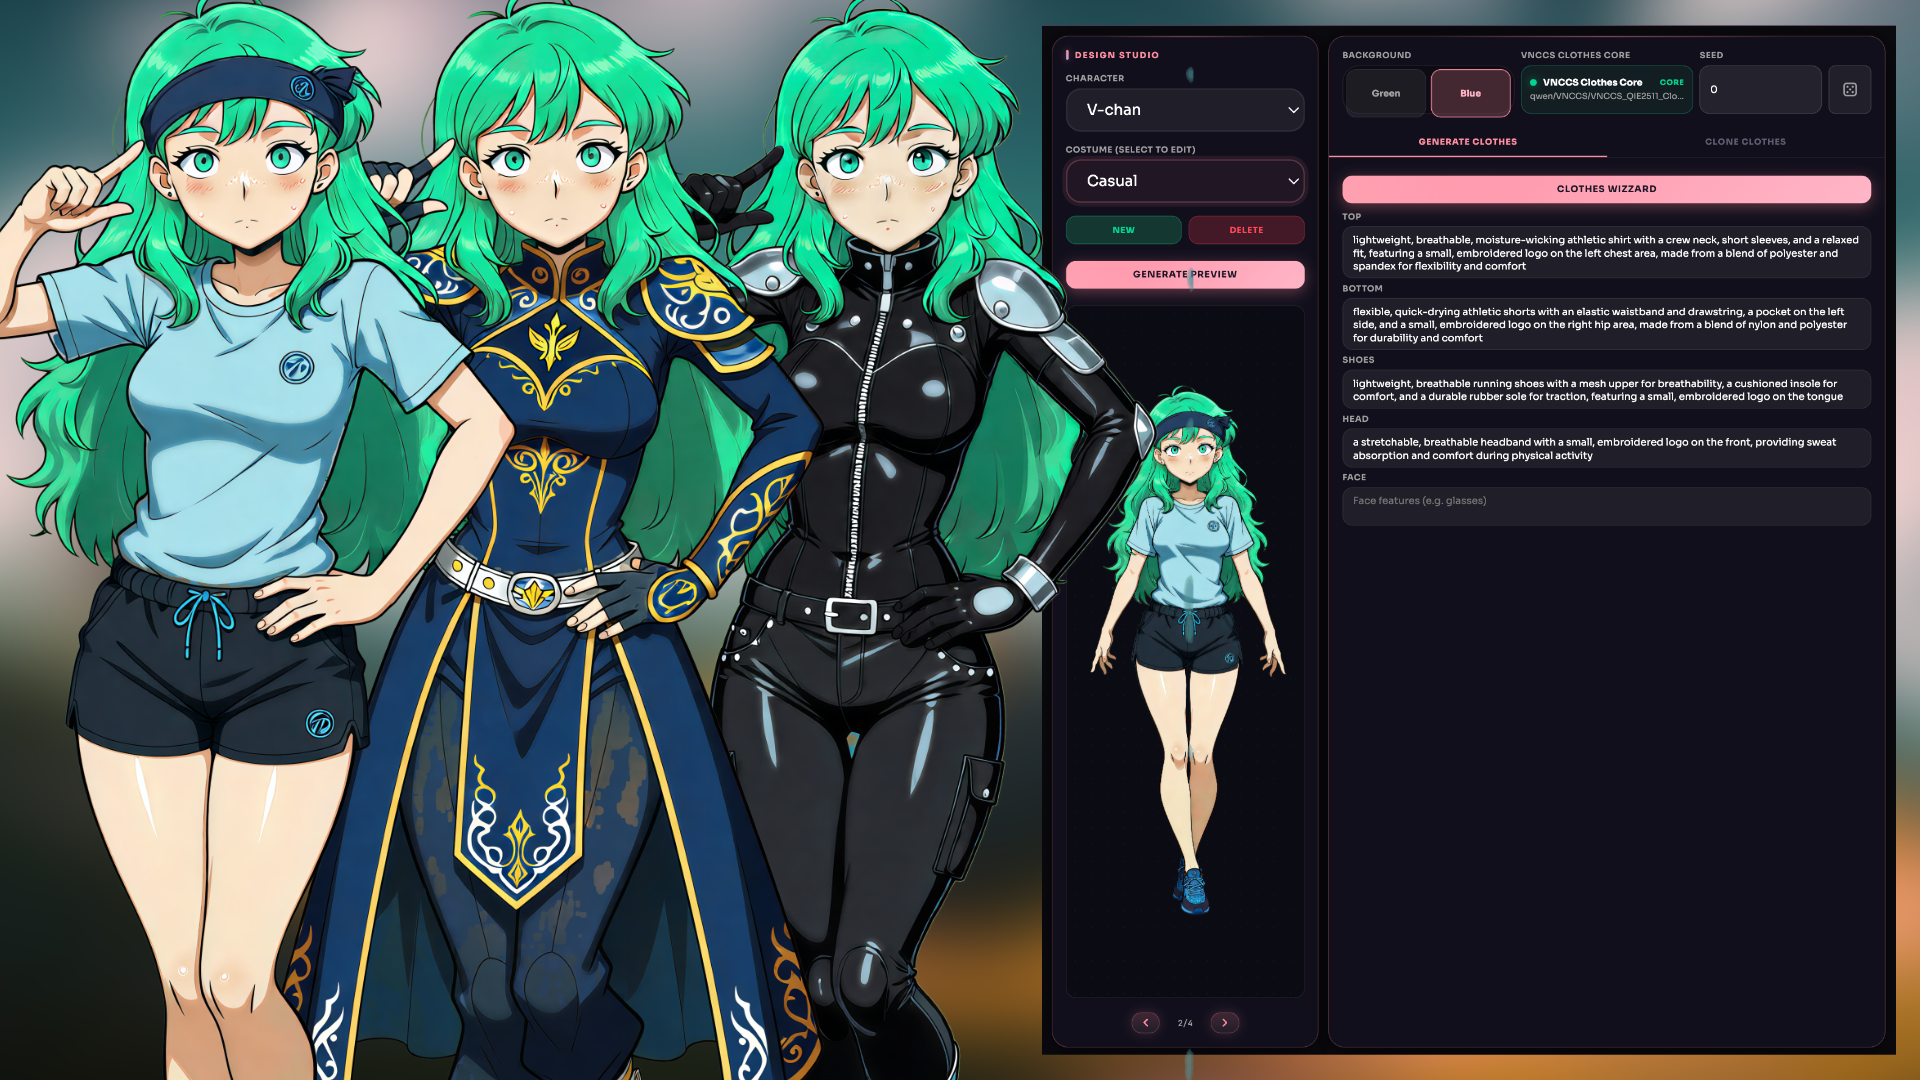
You have two options again:
- Describe all clothing elements in the needed fields. You do not have to follow them exactly, but the head and face sections will help you later not to lose details during emotion generation, so do not slack off! If the character has glasses, write them in face. A hat goes in head. Easy!
- Press Clothes Wizzard and simply describe the clothes you want!
You also have an option to clone any clothes from any picture! Open the CLONE CLOTHES tab and upload an image of clothes, or a character wearing clothes.
The GENERATE PREVIEW button will help you see what your character will look like before starting the big and heavy generation of all poses.
And that is all! Again, do not forget about VNCCS Pose Studio, and press Run!
When you finish the first set, you can press New again and create as many outfits as you want!
Step 3: Character Emotions
Open the workflow:
VNCCS_3.0_Step3_CharacterEmotions.json
Here we will create emotions for the character! Up to this moment, all sprites had a calm facial expression. This will be our base.
In the VNCCS Emotion Studio widget, choose the character you are going to make emotions for. In Selected costumes, choose all costumes you want to work with.
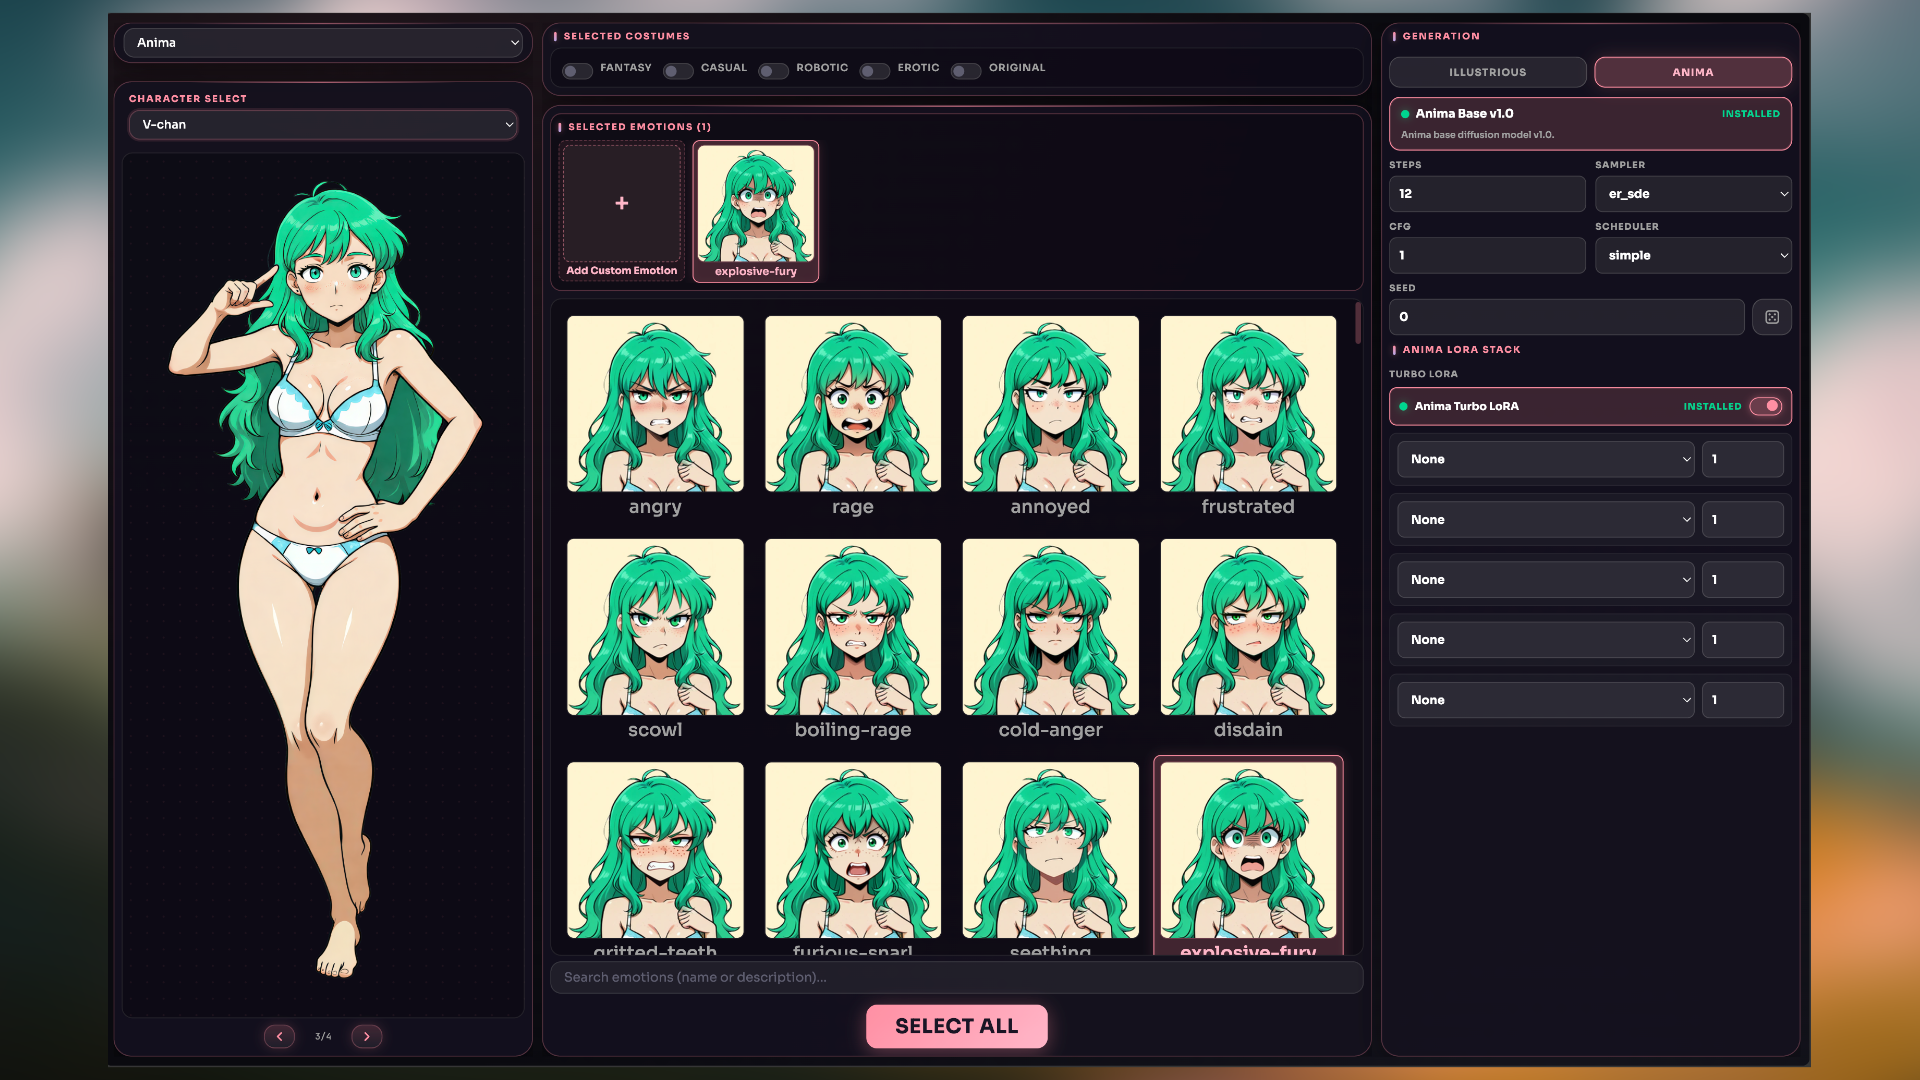
Now, in the huge list, click the emotions you need and add them to the selected ones. Also, if by some miracle you did not find what you need, you can add a Custom emotion and describe what you want yourself.
After that, you again need to decide which model will do the generation.
Illustrious is stable, but the variety of emotions depends very strongly on the exact character, style, and model. Not all emotions may come out equally well.
Anima makes very cool emotions, but it is still too young, so it can be unstable. It can change character details too much, so try it yourself and decide what you like better.
Qwen Image 2.1 can make emotions too! It works on the face and puts it back into your sprite, keeping the rest of the image in place. Describe the expression you want and give it a try!
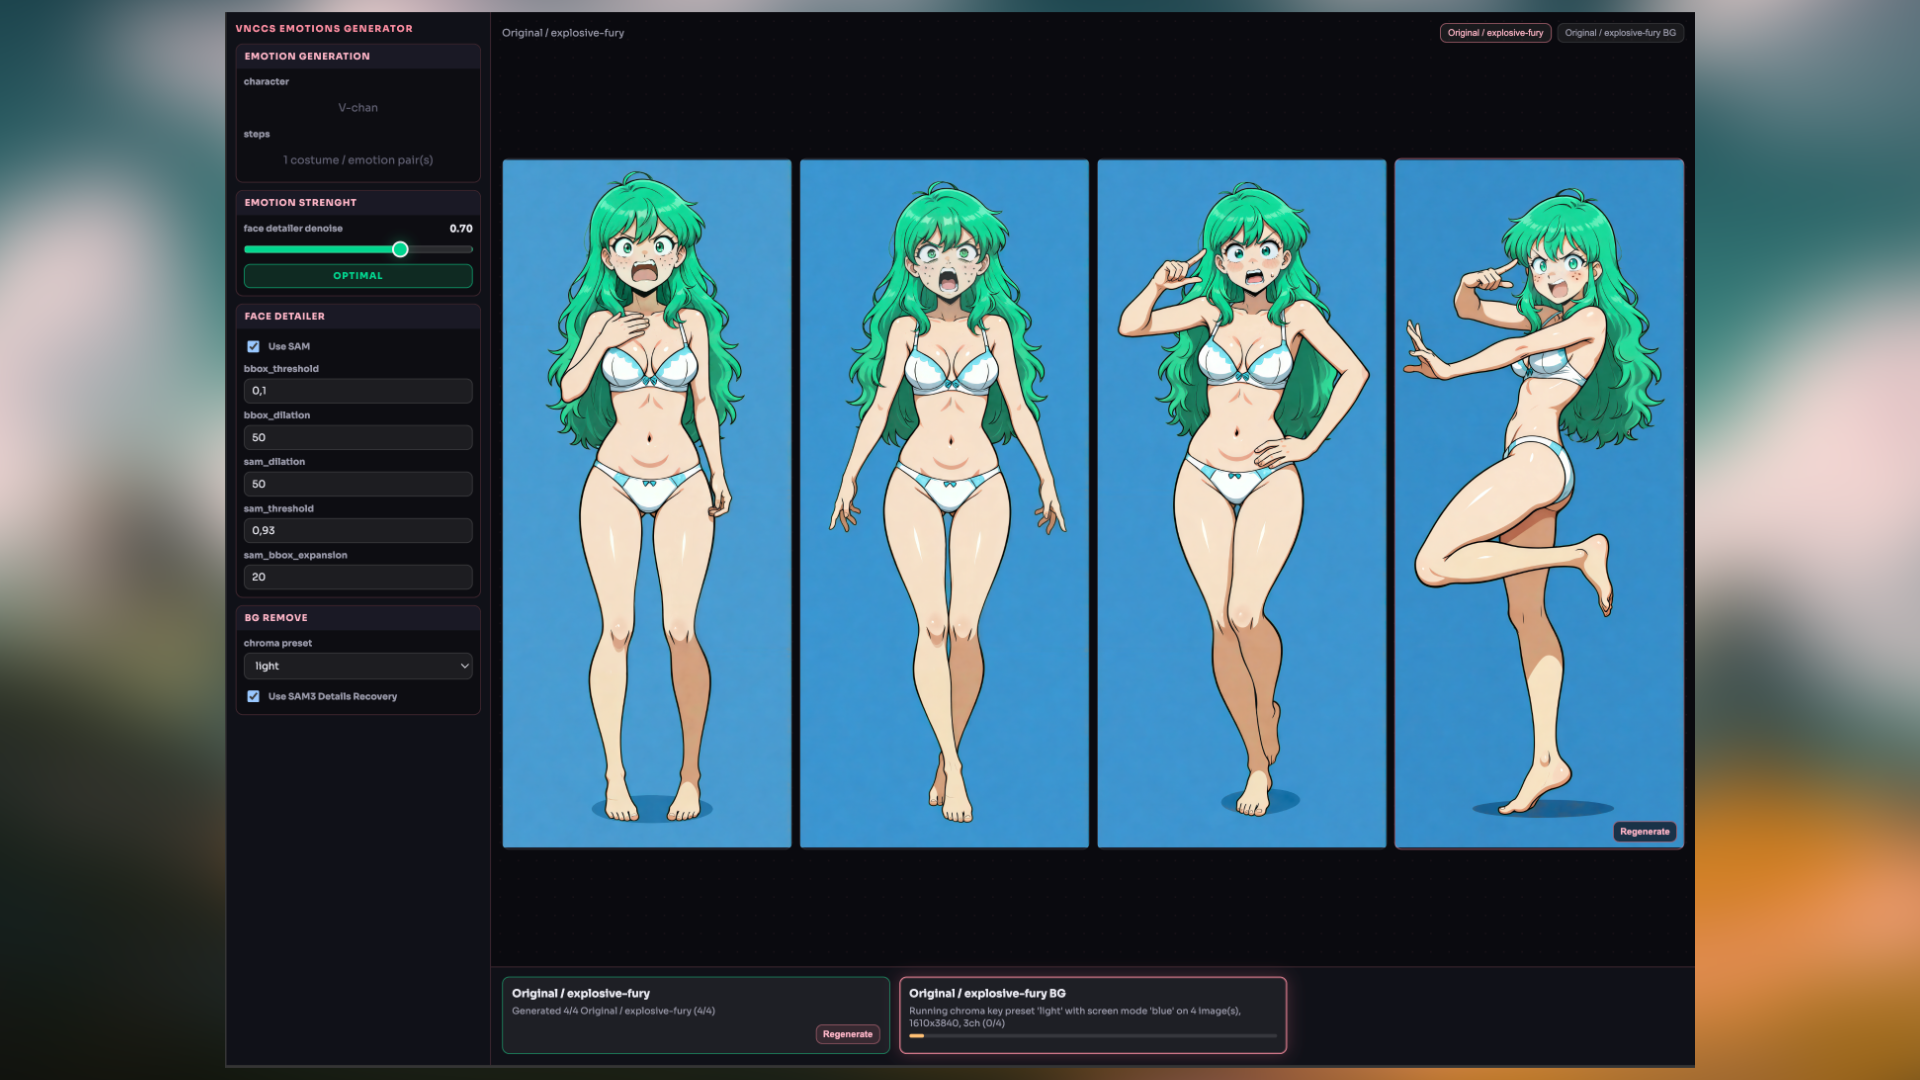
If you chose Illustrious or Anima, the most important setting in VNCCS Emotions Generator is Face Detailer Denoise. It will suggest optimal values by itself, but remember one basic idea: the higher the denoise, the more the original image changes.
More denoise means a brighter emotion, but the character may stop looking like themselves.
Less denoise means a more accurate character, but the emotion may be weaker.
There is no ready-made recipe here. It all depends on the character and the selected model, so be creative and a tiny bit more patient.
For the first try, do not select all costumes and emotions at once. It will take a long time, and if the result does not satisfy you, it will be sad. Better find the optimal settings first, and then go all in!
Press Run, and may luck be with you!
At this point, the current VNCCS features end, but not for long! Planned features include animations, 3D environments and CG image creation inside them, character voice generation, and music track generation for your game or project.
You will find all your sprites inside ComfyUI in:ComfyUI\output\VNCCS\Characters\ folder
Be careful with them, and do not delete them by accident while cleaning your disk!
Significant stargazers

251 followers · starred Aug 2026

7,821 followers · starred Jul 2026

22 followers · starred Jun 2026

263 followers · starred Jul 2026
Similar repos


Visual Novel Character Creation Suite is a comprehensive tool for creating character sprites for visual novels. It allows you to create unique characters with a consistent appearance across all images, which was previously a challenging task when using neural networks.
Python
1,627
221 commits
updated Oct 4, 2026
See what people are saying
README
|
Join The Community Share results, ask questions, and follow VNCCS updates.
|
Support VNCCS VNCCS is developed independently. Support helps keep the project moving.
|
VNCCS is NOT just another workflow for creating consistent characters, it is a complete pipeline for creating sprites for any purpose. It allows you to create unique characters with a consistent appearance across all images, organise them, manage emotions, clothing, poses, and conduct a full cycle of work with characters.
Description
Many people want to use neural networks to create graphics, but making a unique character that looks the same in every image is much harder than generating a single picture. With VNCCS, it's as simple as pressing a button (just 4 times).
Installation
For new ComfyUI users: Use VNCCS Easy Install. It installs ComfyUI with a preconfigured setup and working VNCCS nodes.
For experienced users:
Find VNCCS - Visual Novel Character Creation Suite in Custom Nodes Manager and click install latest version
Manual install:
- Place the downloaded folder into
ComfyUI/custom_nodes/ - Alternatively, in the console: go to
ComfyUI/custom_nodes/and rungit clone https://github.com/AHEKOT/ComfyUI_VNCCS.git - cd ComfyUI_VNCCS_Utils
- pip install -r requirements.txt
Post install steps: Launch ComfyUI and open Comfy Manager Click "Install missing custom nodes"
VNCCS 3.0 Workflow
Hi! My name is V-chan, and I am going to show you how to use the new VNCCS!
We got a BIIIIIIG update, and now everything is completely new, so listen carefully!
Step 0: Migration assistant
If you used VNCCS before - you characters are safe. But you need to do one extra step: Open VNCCS_MigrationAssistant.json, select your characters and click migrate. It will transfer you characters in new VNCCS format.
!!!MAKE SURE THAT THEY WORK CORRECTLY BEFORE DELETING OLD FOLDER!!!
Step 1: Character Creator
Open the workflow:
VNCCS_3.0_Step1_CharacterCreator.json
Let's start from the very beginning. The first thing you need to do, besides opening the workflow, silly, is figure out the VNCCS Control Center.
Inside it, you will find the models that turn your character into different poses and outfits. Choose the one that fits your computer and press Download.
- Qwen Image 2.1 works from your character image to change poses and clothes. It can even give you a transparent background. Less green-screen trouble, yay!
- Flux Klein9b makes your sprites in just 4 steps. Want less waiting while trying poses and outfits? Give it a try!
- MiniMax H3 is a video model, but here it helps you make character sprites! Try it for poses and clothes too, and see which result you like more.
Choose wisely, but in the end nobody is stopping you from trying them all and deciding later.
And then, at the very bottom of the widget, you can click the big Download button and the magic will do everything by itself.
Next, go to VNCCS Character Creator V2.
The most important thing here is to create a new character and choose the model for generation.
Illustrious may be considered old, but it makes excellent characters and has a huge selection of LoRAs for every style and occasion. Do not worry about quality, it will not disappoint you!
Anima is a new and cool model. It can do almost everything, but it will need a bit more resources, and there are not as many LoRAs for it yet.
Qwen Image 2.1 is here too! It can create your character with a transparent background, and the Turbo option cuts down the number of generation steps. More time to try different characters, hehe!
I recommend trying all three and deciding for yourself.
Right now you do not have any characters yet, so press NEW and give him or her a name! The name is very important!!! Be creative and unique!
Done? Good job! Now you have two paths:
- Enter character descriptions or use the pencil buttons to choose curated presets for race, skin tone, body type, face, hair, eyes, and details. Choose sex, age, and generation type. The NSFW switch controls whether the base character will have clothes or not :3
- Press CHARACTER WIZZARD, describe the character you want, and after a little magic the system will set all the needed options by itself. Do not forget to check them!
Race presets include natural-language descriptions of their distinctive anatomy, added automatically to generation prompts in Illustrious, Anima, and Qwen Image 2.1. Select multiple species for hybrids, or enter custom traits; the prompt gives explicit character traits priority over preset defaults. Existing character fields and custom text remain supported. Breast-size presets retain their original tags. Creator V2 uses character_template/character_presets_v2.json; the legacy catalog remains available to Character Cloner.
A new little feature is the GENERATE PREVIEW button. It lets you see what the character will look like without restarting the whole generation. So press it already, and if you like everything, move on. If you want to make changes, edit the descriptions and press it again!
VNCCS Pose Studio
The next key node is VNCCS Pose Studio.
It is downloaded from my second project, VNCCS-Utils, so do not forget to install that too!
Here, the most important thing is to choose the poses you need and how many of them there should be. You can control the model however you want and make absolutely any poses. Also, using the Import button, you can load any picture with a character and get a pose just like the one in the picture!
It is also very important that the body proportions of the model fit your character. Age will be set automatically from the previous step, but nobody will stop you from setting it manually. Also choose height and body type, the result will be much better that way.
In VNCCS Character Generator, you do not really need to worry about the settings, but if you want, you can choose the upscaler model or even turn it off.
In BG Remove, you can choose a chroma key preset. Balanced is a very good preset, but if it is not enough for you, or if it is too much and starts damaging the character, choose a lighter one.
SAM3 Details Recovery makes background removal slower, but it lets you worry less about eye color and clothing elements that are the same color as the background. We will talk about clothes a little later.
Ready? Then press Run! Now just wait, and the magic will do everything for you!
Step 1.1: Character Cloner
Open the workflow:
VNCCS_3.0_Step1_CharacterCloner.json
This workflow is basically a complete copy of Character Creator, but it is made for cloning existing character images.
Did you generate the character with another model? Download it from the internet? Take a screenshot from your favorite anime? Draw it yourself, with your own hands? Good job!
Try to make sure the picture is good quality and that the character is full body, otherwise the model will invent everything that is not visible in the picture!
Now load it into VNCCS Character Cloner, write tags or press ANALYZE CAPTIONS, set up everything you need in VNCCS Pose Studio, and do not forget to choose whether you need separate undressed sprites with the NSFW button. They are not mandatory, but dressing these characters later will be MUCH easier!
Also try to choose a background color that appears the least in the character. Look at the eyes and hair. If they are green, choose blue. Or the other way around.
Now press Run and look at the result!
Step 2: Character Clothes
Open the workflow:
VNCCS_3.0_Step2_CharacterClothes.json
Now we move to the tastiest part! In this workflow, you will make clothes for the character. As many sets as you think you need.
Choose a character in VNCCS Clothes Designer and press New. Give the outfit set a name and get ready to create!
You have two options again:
- Describe all clothing elements in the needed fields. You do not have to follow them exactly, but the head and face sections will help you later not to lose details during emotion generation, so do not slack off! If the character has glasses, write them in face. A hat goes in head. Easy!
- Press Clothes Wizzard and simply describe the clothes you want!
You also have an option to clone any clothes from any picture! Open the CLONE CLOTHES tab and upload an image of clothes, or a character wearing clothes.
The GENERATE PREVIEW button will help you see what your character will look like before starting the big and heavy generation of all poses.
And that is all! Again, do not forget about VNCCS Pose Studio, and press Run!
When you finish the first set, you can press New again and create as many outfits as you want!
Step 3: Character Emotions
Open the workflow:
VNCCS_3.0_Step3_CharacterEmotions.json
Here we will create emotions for the character! Up to this moment, all sprites had a calm facial expression. This will be our base.
In the VNCCS Emotion Studio widget, choose the character you are going to make emotions for. In Selected costumes, choose all costumes you want to work with.
Now, in the huge list, click the emotions you need and add them to the selected ones. Also, if by some miracle you did not find what you need, you can add a Custom emotion and describe what you want yourself.
After that, you again need to decide which model will do the generation.
Illustrious is stable, but the variety of emotions depends very strongly on the exact character, style, and model. Not all emotions may come out equally well.
Anima makes very cool emotions, but it is still too young, so it can be unstable. It can change character details too much, so try it yourself and decide what you like better.
Qwen Image 2.1 can make emotions too! It works on the face and puts it back into your sprite, keeping the rest of the image in place. Describe the expression you want and give it a try!
If you chose Illustrious or Anima, the most important setting in VNCCS Emotions Generator is Face Detailer Denoise. It will suggest optimal values by itself, but remember one basic idea: the higher the denoise, the more the original image changes.
More denoise means a brighter emotion, but the character may stop looking like themselves.
Less denoise means a more accurate character, but the emotion may be weaker.
There is no ready-made recipe here. It all depends on the character and the selected model, so be creative and a tiny bit more patient.
For the first try, do not select all costumes and emotions at once. It will take a long time, and if the result does not satisfy you, it will be sad. Better find the optimal settings first, and then go all in!
Press Run, and may luck be with you!
At this point, the current VNCCS features end, but not for long! Planned features include animations, 3D environments and CG image creation inside them, character voice generation, and music track generation for your game or project.
You will find all your sprites inside ComfyUI in:ComfyUI\output\VNCCS\Characters\ folder
Be careful with them, and do not delete them by accident while cleaning your disk!
Similar repos
Significant stargazers
251 followers · starred Aug 2026
7,821 followers · starred Jul 2026
22 followers · starred Jun 2026
263 followers · starred Jul 2026