



Setup | Dataset | Training | Inference | Evaluation
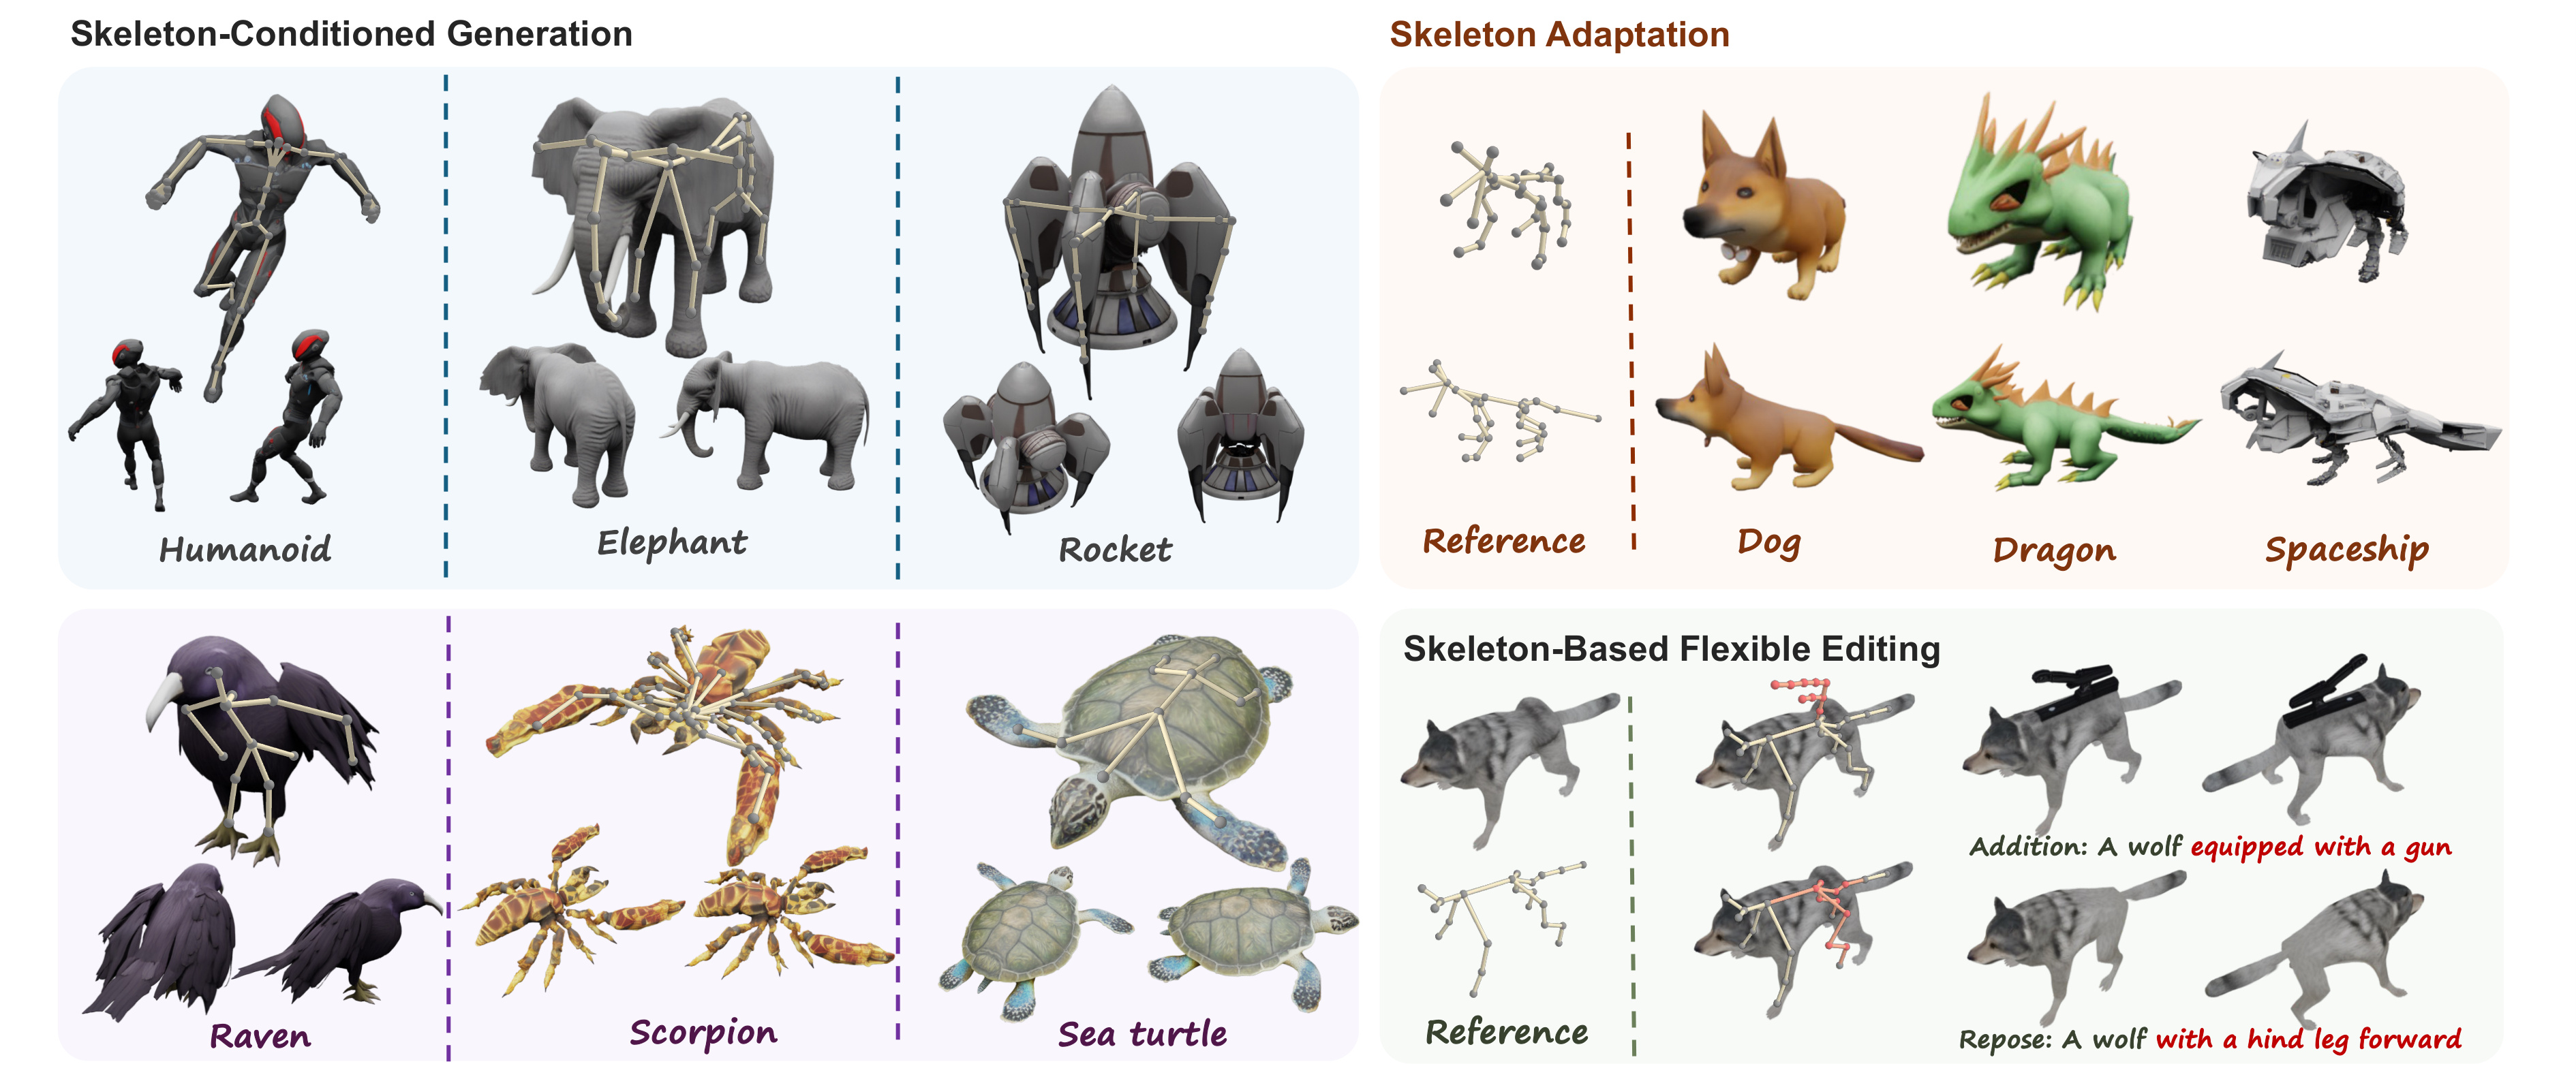
SK-Adapter is a lightweight and effective framework that unlocks precise skeletal manipulation for native 3D generation. Moving beyond text or image prompts, which can be ambiguous for precise structure, we treat the 3D skeleton as a first-class control signal. SK-Adapter encodes joint coordinates and topology into learnable tokens, which are injected into the frozen 3D generation backbone via cross-attention. This design allows the model to effectively "attend" to specific 3D structural constraints while preserving its original generative priors.
Create the environment and install the TRELLIS backend plus SK-Adapter dependencies:
bash setup.sh
conda activate sk-adapter
export PYTHONPATH=.:./TRELLIS
On Windows PowerShell:
$env:PYTHONPATH=".;.\TRELLIS"
By default, setup.sh creates a conda environment named sk-adapter with Python 3.10 and PyTorch CUDA 11.8. You can override it with environment variables:
ENV_NAME=my-env CUDA_VERSION=12.1 bash setup.sh
Use bash setup.sh --eval-weights to also download the Anymate and Michelangelo weights needed by the evaluation tools.
configs/
  sk_adapter_text.yaml       # Text SK-Adapter training config
  sk_adapter_image.yaml      # Image SK-Adapter training config
  inference_text.yaml        # Text full-pipeline inference run config
  inference_image.yaml       # Image full-pipeline inference run config
  splits/                    # Test and validation split files
dataset/
  download/                  # Objaverse and Objaverse-XL download scripts
  data_process/              # Standard and XL .pt builders
  data_analysis/             # Rigging quality checks
src/
  data/                      # Required TMS/skeleton datasets
  models/                    # SK-Adapter, Image SK-Adapter, TopologyEncoder
  trainers/                  # Text and image trainers
tools/
  train/                     # Training entry points
  vis/                       # Inference and rendering utilities
  eval/                      # CLIP, PickScore, DINO-KID, and Anymate metrics
TRELLIS/
Third_Party/
  Anymate/
The dataset/ folder contains the data-preparation pipeline for the TMS dataset. It downloads standard Objaverse and Objaverse-XL assets, builds processed .pt files, and records voxels, skeletons, captions, bone names, parent mappings, and normalization metadata. The checked-in manifest is dataset/docs/anymate_cap3d_intersection.json, which covers the intersection of Anymate and Cap3D assets.
Standard Objaverse assets:
cd dataset
python download/download_objaverse_standard.py \
  --json_file docs/anymate_cap3d_intersection.json \
  --output_dir <standard-mesh-dir> \
  --only_standard

INPUT_DIR=<standard-mesh-dir> \
OUTPUT_DIR=<standard-pt-dir> \
bash run_build_standard_pt.sh
Objaverse-XL assets:
cd dataset
python download/download_objaverse_xl.py \
  --json_file docs/anymate_cap3d_intersection.json \
  --output_dir <xl-mesh-dir> \
  --cache_dir <objaverse-xl-cache-dir>

INPUT_DIR=<xl-mesh-dir> \
OUTPUT_DIR=<xl-pt-dir> \
bash run_build_xl_pt.sh
The standard .pt builder uses Anymate's Blender script to extract skeleton and mesh information. By default, anymate_dir points to Third_Party/Anymate/Anymate; override it with --anymate_dir or ANYMATE_DIR if you keep Anymate elsewhere. See dataset/README.md for the full pipeline, optional incomplete-rigging detection.
Text-conditioned SK-Adapter:
python tools/train/train_sk_adapter.py --config configs/sk_adapter_text.yaml
Image-conditioned SK-Adapter:
python tools/train/train_sk_adapter_image.py --config configs/sk_adapter_image.yaml
Edit dataset paths, checkpoint paths, and output paths in the config files before launching training.
Text-conditioned full pipeline:
python tools/vis/run_sk_adapter_text.py --run_config configs/inference_text.yaml
Image-conditioned full pipeline:
python tools/vis/run_sk_adapter_image.py --run_config configs/inference_image.yaml
Both inference configs support dataset ids through samples[].id. The text pipeline also supports custom samples[].skeleton plus samples[].prompt; the image pipeline supports custom samples[].skeleton plus samples[].image.
Inference outputs include voxel/skeleton visualization PNGs, Gaussian splatting PT files, GLB files when export succeeds, and Gaussian render views.
Evaluation scripts live in tools/eval/ and support the following metrics:
| Script | Metric |
|---|---|
eval_clip_score.py | CLIP |
eval_pick_score.py | PickScore |
eval_dino_kid.py | DINOv2 KID |
eval_auto_rig.py | Anymate joint Chamfer |
The default test split is available at configs/splits/test.json. Use configs/eval_text.yaml (no samples: block) so --all iterates the whole test split. A typical evaluation flow is:
VIS=vis/test_eval
export CUDA_HOME=$CONDA_PREFIX HF_HUB_DISABLE_XET=1

# 1. Run inference over the whole test set.
python tools/vis/run_sk_adapter_text.py --run_config configs/eval_text.yaml --all --output_dir "$VIS"

# 2. Bridge the flat output into the per-sample layout the eval scripts expect.
python tools/eval/prepare_eval_layout.py --vis_dir "$VIS"

# 3. Compute metrics (run individually; run_metrics.sh aborts on first error).
python tools/eval/eval_clip_score.py --vis_dir  "$VIS" --category_json configs/splits/test.json
python tools/eval/eval_pick_score.py --vis_dir  "$VIS" --category_json configs/splits/test.json
python tools/eval/eval_auto_rig.py   --vis_root "$VIS" --category_json configs/splits/test.json
Faster inference. Step 1 is the bottleneck. tools/vis/run_sharded.py runs K
concurrent workers over disjoint shards of the test set (single or multi GPU):
python tools/vis/run_sharded.py --run_config configs/eval_text.yaml \
  --output_dir "$VIS" --num_workers 2          # multi-GPU: add --gpus 0,1,2
Resume. run_sk_adapter_text.py --skip_existing skips samples that are already
fully rendered (also forwardable through run_sharded.py via -- --skip_existing).
Ground-truth renders (DINOv2 KID only) follow gt_dir/{model_id}/view_*.png. Results
are written under the run directory as clip_scores_test.json, pick_scores_test.json,
anymate_cd_test.json. See tools/eval/README.md for one-time
setup (eval weights, extra deps) and full details.
If you find this work useful, please cite:
@Article{wang2026skadapterskeletonbasedstructuralcontrol,
  title     = {SK-Adapter: Skeleton-Based Structural Control for Native 3D Generation},
  author    = {Anbang Wang and Yuzhuo Ao and Shangzhe Wu and Chi-Keung Tang},
  journal   = {arXiv preprint arXiv:2603.14152},
  year      = {2026}
}
This folder implements the SK-Adapter++ Stage 2 workflow:
prompt + skeleton.render_04.png view.The OpenRouter key is read from OPENROUTER_API_KEY. Do not commit API keys into this repository. Optional ranking headers can be set with OPENROUTER_HTTP_REFERER and OPENROUTER_TITLE.
OpenRouter calls require the OpenAI Python SDK in the active environment:
python -m pip install -U openai
Dry-run with the checked-in example render:
python tools/refine/refine_2d_edit.py \
  --input_image example_output/sample_wolf_repose_idx0_s420_render_04.png \
  --prompt "A realistic wolf." \
  --output_dir temp/refine_example \
  --llm_backend template \
  --dry_run
Actual refinement:
export OPENROUTER_API_KEY=...
python tools/refine/refine_2d_edit.py \
  --input_image example_output/sample_wolf_repose_idx0_s420_render_04.png \
  --prompt "A realistic wolf." \
  --output_dir vis/refine_example \
  --llm_backend qwen
Use --coarse_output_dir <dir> --render_index 4 instead of --input_image when consuming a fresh output directory from visualize_sk_full_pipeline.py.
export OPENROUTER_API_KEY=...
python tools/refine/run_refinement_pipeline.py \
  --skeleton_json path/to/skeleton.json \
  --prompt "A realistic wolf." \
  --workspace vis/sk_adapter_pp \
  --text_run_config configs/inference_text.yaml \
  --image_run_config configs/inference_image.yaml
The text and image checkpoints are normally read from configs/inference_text.yaml and configs/inference_image.yaml. Use --text_checkpoint or --image_checkpoint only when you need to override the checkpoint path from those configs. The Stage 1 negative prompt defaults to an empty string, matching the checked-in inference run config; override it with --text_negative_prompt only when needed.
To continue from an already generated Stage 1 output directory:
export OPENROUTER_API_KEY=...
python tools/refine/run_refinement_pipeline.py \
  --skip_text_stage \
  --coarse_output_dir vis/sk_adapter_pp/01_text_sk_adapter \
  --skeleton_json path/to/skeleton.json \
  --prompt "A realistic wolf." \
  --workspace vis/sk_adapter_pp \
  --image_run_config configs/inference_image.yaml
For local pipeline wiring checks without running the heavy text stage, OpenRouter calls, or image-conditioned generation:
python tools/refine/run_refinement_pipeline.py \
  --skip_text_stage \
  --coarse_output_dir example_output \
  --skeleton_json path/to/skeleton.json \
  --prompt "A realistic wolf." \
  --workspace temp/refine_pipeline_check \
  --llm_backend template \
  --dry_run_refine
Setup | Dataset | Training | Inference | Evaluation
SK-Adapter is a lightweight and effective framework that unlocks precise skeletal manipulation for native 3D generation. Moving beyond text or image prompts, which can be ambiguous for precise structure, we treat the 3D skeleton as a first-class control signal. SK-Adapter encodes joint coordinates and topology into learnable tokens, which are injected into the frozen 3D generation backbone via cross-attention. This design allows the model to effectively "attend" to specific 3D structural constraints while preserving its original generative priors.
Create the environment and install the TRELLIS backend plus SK-Adapter dependencies:
bash setup.sh
conda activate sk-adapter
export PYTHONPATH=.:./TRELLIS
On Windows PowerShell:
$env:PYTHONPATH=".;.\TRELLIS"
By default, setup.sh creates a conda environment named sk-adapter with Python 3.10 and PyTorch CUDA 11.8. You can override it with environment variables:
ENV_NAME=my-env CUDA_VERSION=12.1 bash setup.sh
Use bash setup.sh --eval-weights to also download the Anymate and Michelangelo weights needed by the evaluation tools.
configs/
  sk_adapter_text.yaml       # Text SK-Adapter training config
  sk_adapter_image.yaml      # Image SK-Adapter training config
  inference_text.yaml        # Text full-pipeline inference run config
  inference_image.yaml       # Image full-pipeline inference run config
  splits/                    # Test and validation split files
dataset/
  download/                  # Objaverse and Objaverse-XL download scripts
  data_process/              # Standard and XL .pt builders
  data_analysis/             # Rigging quality checks
src/
  data/                      # Required TMS/skeleton datasets
  models/                    # SK-Adapter, Image SK-Adapter, TopologyEncoder
  trainers/                  # Text and image trainers
tools/
  train/                     # Training entry points
  vis/                       # Inference and rendering utilities
  eval/                      # CLIP, PickScore, DINO-KID, and Anymate metrics
TRELLIS/
Third_Party/
  Anymate/
The dataset/ folder contains the data-preparation pipeline for the TMS dataset. It downloads standard Objaverse and Objaverse-XL assets, builds processed .pt files, and records voxels, skeletons, captions, bone names, parent mappings, and normalization metadata. The checked-in manifest is dataset/docs/anymate_cap3d_intersection.json, which covers the intersection of Anymate and Cap3D assets.
Standard Objaverse assets:
cd dataset
python download/download_objaverse_standard.py \
  --json_file docs/anymate_cap3d_intersection.json \
  --output_dir <standard-mesh-dir> \
  --only_standard

INPUT_DIR=<standard-mesh-dir> \
OUTPUT_DIR=<standard-pt-dir> \
bash run_build_standard_pt.sh
Objaverse-XL assets:
cd dataset
python download/download_objaverse_xl.py \
  --json_file docs/anymate_cap3d_intersection.json \
  --output_dir <xl-mesh-dir> \
  --cache_dir <objaverse-xl-cache-dir>

INPUT_DIR=<xl-mesh-dir> \
OUTPUT_DIR=<xl-pt-dir> \
bash run_build_xl_pt.sh
The standard .pt builder uses Anymate's Blender script to extract skeleton and mesh information. By default, anymate_dir points to Third_Party/Anymate/Anymate; override it with --anymate_dir or ANYMATE_DIR if you keep Anymate elsewhere. See dataset/README.md for the full pipeline, optional incomplete-rigging detection.
Text-conditioned SK-Adapter:
python tools/train/train_sk_adapter.py --config configs/sk_adapter_text.yaml
Image-conditioned SK-Adapter:
python tools/train/train_sk_adapter_image.py --config configs/sk_adapter_image.yaml
Edit dataset paths, checkpoint paths, and output paths in the config files before launching training.
Text-conditioned full pipeline:
python tools/vis/run_sk_adapter_text.py --run_config configs/inference_text.yaml
Image-conditioned full pipeline:
python tools/vis/run_sk_adapter_image.py --run_config configs/inference_image.yaml
Both inference configs support dataset ids through samples[].id. The text pipeline also supports custom samples[].skeleton plus samples[].prompt; the image pipeline supports custom samples[].skeleton plus samples[].image.
Inference outputs include voxel/skeleton visualization PNGs, Gaussian splatting PT files, GLB files when export succeeds, and Gaussian render views.
Evaluation scripts live in tools/eval/ and support the following metrics:
| Script | Metric |
|---|---|
eval_clip_score.py | CLIP |
eval_pick_score.py | PickScore |
eval_dino_kid.py | DINOv2 KID |
eval_auto_rig.py | Anymate joint Chamfer |
The default test split is available at configs/splits/test.json. Use configs/eval_text.yaml (no samples: block) so --all iterates the whole test split. A typical evaluation flow is:
VIS=vis/test_eval
export CUDA_HOME=$CONDA_PREFIX HF_HUB_DISABLE_XET=1

# 1. Run inference over the whole test set.
python tools/vis/run_sk_adapter_text.py --run_config configs/eval_text.yaml --all --output_dir "$VIS"

# 2. Bridge the flat output into the per-sample layout the eval scripts expect.
python tools/eval/prepare_eval_layout.py --vis_dir "$VIS"

# 3. Compute metrics (run individually; run_metrics.sh aborts on first error).
python tools/eval/eval_clip_score.py --vis_dir  "$VIS" --category_json configs/splits/test.json
python tools/eval/eval_pick_score.py --vis_dir  "$VIS" --category_json configs/splits/test.json
python tools/eval/eval_auto_rig.py   --vis_root "$VIS" --category_json configs/splits/test.json
Faster inference. Step 1 is the bottleneck. tools/vis/run_sharded.py runs K
concurrent workers over disjoint shards of the test set (single or multi GPU):
python tools/vis/run_sharded.py --run_config configs/eval_text.yaml \
  --output_dir "$VIS" --num_workers 2          # multi-GPU: add --gpus 0,1,2
Resume. run_sk_adapter_text.py --skip_existing skips samples that are already
fully rendered (also forwardable through run_sharded.py via -- --skip_existing).
Ground-truth renders (DINOv2 KID only) follow gt_dir/{model_id}/view_*.png. Results
are written under the run directory as clip_scores_test.json, pick_scores_test.json,
anymate_cd_test.json. See tools/eval/README.md for one-time
setup (eval weights, extra deps) and full details.
If you find this work useful, please cite:
@Article{wang2026skadapterskeletonbasedstructuralcontrol,
  title     = {SK-Adapter: Skeleton-Based Structural Control for Native 3D Generation},
  author    = {Anbang Wang and Yuzhuo Ao and Shangzhe Wu and Chi-Keung Tang},
  journal   = {arXiv preprint arXiv:2603.14152},
  year      = {2026}
}
This folder implements the SK-Adapter++ Stage 2 workflow:
prompt + skeleton.render_04.png view.The OpenRouter key is read from OPENROUTER_API_KEY. Do not commit API keys into this repository. Optional ranking headers can be set with OPENROUTER_HTTP_REFERER and OPENROUTER_TITLE.
OpenRouter calls require the OpenAI Python SDK in the active environment:
python -m pip install -U openai
Dry-run with the checked-in example render:
python tools/refine/refine_2d_edit.py \
  --input_image example_output/sample_wolf_repose_idx0_s420_render_04.png \
  --prompt "A realistic wolf." \
  --output_dir temp/refine_example \
  --llm_backend template \
  --dry_run
Actual refinement:
export OPENROUTER_API_KEY=...
python tools/refine/refine_2d_edit.py \
  --input_image example_output/sample_wolf_repose_idx0_s420_render_04.png \
  --prompt "A realistic wolf." \
  --output_dir vis/refine_example \
  --llm_backend qwen
Use --coarse_output_dir <dir> --render_index 4 instead of --input_image when consuming a fresh output directory from visualize_sk_full_pipeline.py.
export OPENROUTER_API_KEY=...
python tools/refine/run_refinement_pipeline.py \
  --skeleton_json path/to/skeleton.json \
  --prompt "A realistic wolf." \
  --workspace vis/sk_adapter_pp \
  --text_run_config configs/inference_text.yaml \
  --image_run_config configs/inference_image.yaml
The text and image checkpoints are normally read from configs/inference_text.yaml and configs/inference_image.yaml. Use --text_checkpoint or --image_checkpoint only when you need to override the checkpoint path from those configs. The Stage 1 negative prompt defaults to an empty string, matching the checked-in inference run config; override it with --text_negative_prompt only when needed.
To continue from an already generated Stage 1 output directory:
export OPENROUTER_API_KEY=...
python tools/refine/run_refinement_pipeline.py \
  --skip_text_stage \
  --coarse_output_dir vis/sk_adapter_pp/01_text_sk_adapter \
  --skeleton_json path/to/skeleton.json \
  --prompt "A realistic wolf." \
  --workspace vis/sk_adapter_pp \
  --image_run_config configs/inference_image.yaml
For local pipeline wiring checks without running the heavy text stage, OpenRouter calls, or image-conditioned generation:
python tools/refine/run_refinement_pipeline.py \
  --skip_text_stage \
  --coarse_output_dir example_output \
  --skeleton_json path/to/skeleton.json \
  --prompt "A realistic wolf." \
  --workspace temp/refine_pipeline_check \
  --llm_backend template \
  --dry_run_refine



