
GS-SR: Gaussian Splatting for Surface Reconstruction
Python
93
48 commits
updated Sep 20, 2026
README
GS-SR: Gaussian Splatting for Surface Reconstruction
This project aims to solve the task of surface reconstruction for large scenes.
😜 Just for fun!!!
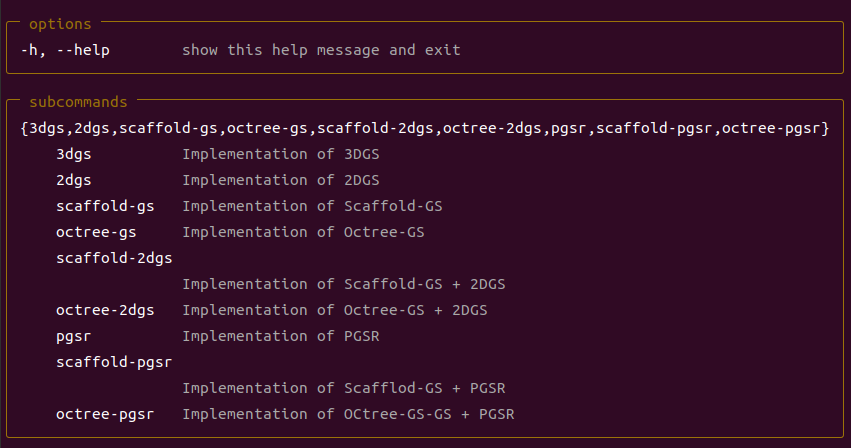
We have reorganized the 3DGS pipeline according to sdfstudio to facilitate the introduction of various surface reconstruction methods. Please use the following command to see the currently supported methods.
python train.py -h
Main Components
-
Partition: This project follows the idea of VastGaussian to partition the scene. By inputting a COLMAP-SfM output, each tile remains in COLMAP-SfM format after partitioning. This ensures that partitioning is completely independent of subsequent algorithms.
-
Representation: Scaffold-GS was chosen as the scene representation for this project due to its robustness against view-dependent effects (e.g., reflection, shadowing). It also alleviates artifacts such as floaters and structural errors caused by redundant 3D Gaussians, providing more accurate surface reconstruction in texture-less areas. Additionally, Octree-GS supports levels of detail (LOD), making it very suitable for large scene reconstruction.
-
Surface Reconstruction: Two surface reconstruction methods, 2DGS and PGSR, were selected for this project. 2DGS is one of the fastest surface reconstruction methods, while PGSR offers the best reconstruction quality.
-
Orthographic Rendering: The project supports orthographic image rendering for all methods, enabling the generation of high-quality orthophotos and digital surface models (DSM) from trained Gaussian splatting models. This capability is essential for photogrammetric applications and large-scale mapping.
-
Satellite Image Rendering and DSM Extraction: The project supports rendering satellite images and extracting digital surface models (DSM) from trained Gaussian splatting models, enabling large-scale geospatial applications.
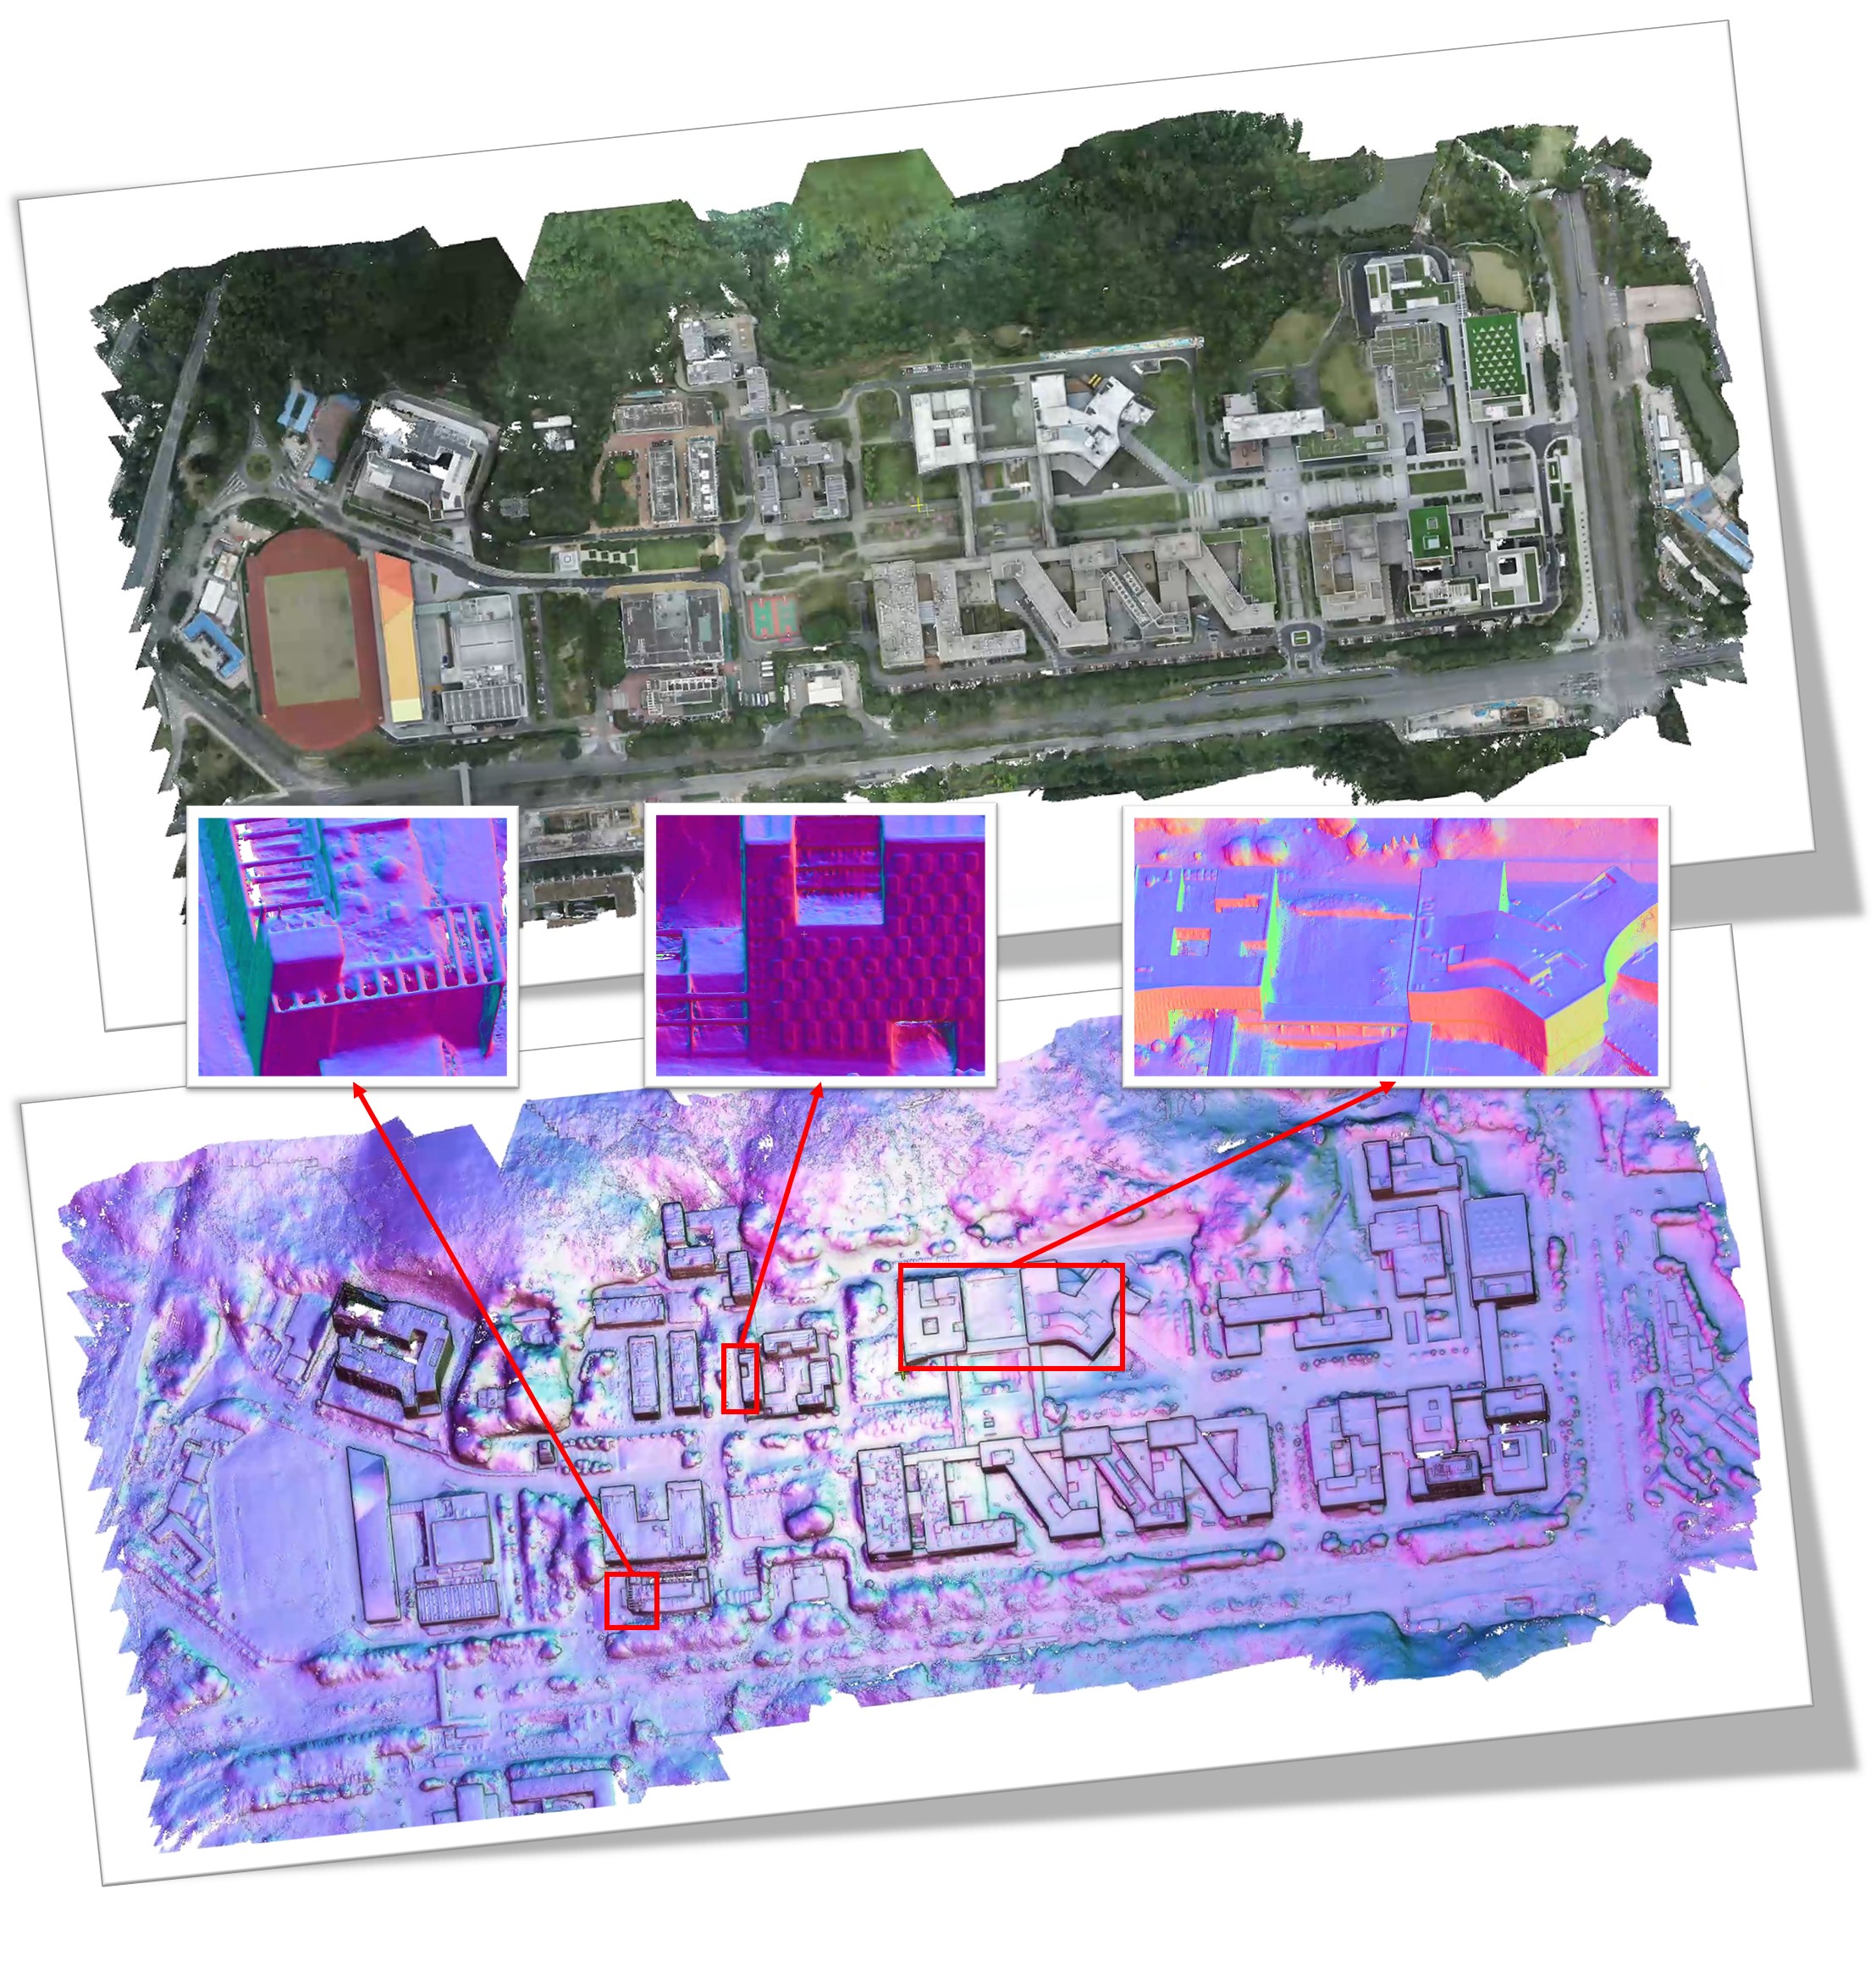
We used UAV data from the Lower-Campus (see GauU-Scene for detailed information). The results in the figure were obtained using the "VastGaussian + Octree-2DGS" method. Compared to other methods, the approach used in this project is very robust and achieves more accurate results in the marginal areas of the scene and in texture-less areas. Notably, we did not apply any special processing to the marginal areas of the scene.
Installation
We conducted our tests on a server configured with Ubuntu 22.04, CUDA 12.3, and GCC 11.4.0. While other similar configurations should also work, we have not verified each one individually.
- Clone this repo:
git clone https://github.com/yanxian-ll/GS-SR
cd GS-SR
- Install dependencies
# Run inside GS-SR; local pip packages use ./submodules paths.
CUDA_HOME="$(conda info --base)/envs/gssr" conda env create --file environment.yml
conda activate gssr

# For an existing, incomplete gssr environment, use this instead of create:
# CUDA_HOME="$(conda info --base)/envs/gssr" conda env update -n gssr --file environment.yml

python -c "import torch; print(torch.__version__, torch.version.cuda, torch.cuda.is_available())"
python train.py scaffold-2dgs --help
Usage
Data Preprocessing
- First, create a
test/folder inside the project path:
mkdir test
The input data structure should be organized as shown below:
test/
├── scene/
│   ├── input
│   │   ├── IMG_0.jpg
│   │   ├── IMG_1.jpg
│   │   ├── ...
...
- Then, use COLMAP to compute SfM, obtaining the camera intrinsics, extrinsics, and sparse point cloud:
# If you need to use partitioned reconstruction, use --use_aligner parameter to ensure the reconstruction coordinate system is parallel to the ground
python ./script/convert.py -s ./test/scene --use_aligner
# If not needed
python ./script/convert.py -s ./test/scene
The output structure should be as follows:
test/
├── scene/
│   ├── images
│   │   ├── IMG_0.jpg
│   │   ├── IMG_1.jpg
│   │   ├── ...
│   ├── sparse/
│       └──0 / cameras.bin
│       └──0 / images.bin
│       └──0 / points3D.bin
...
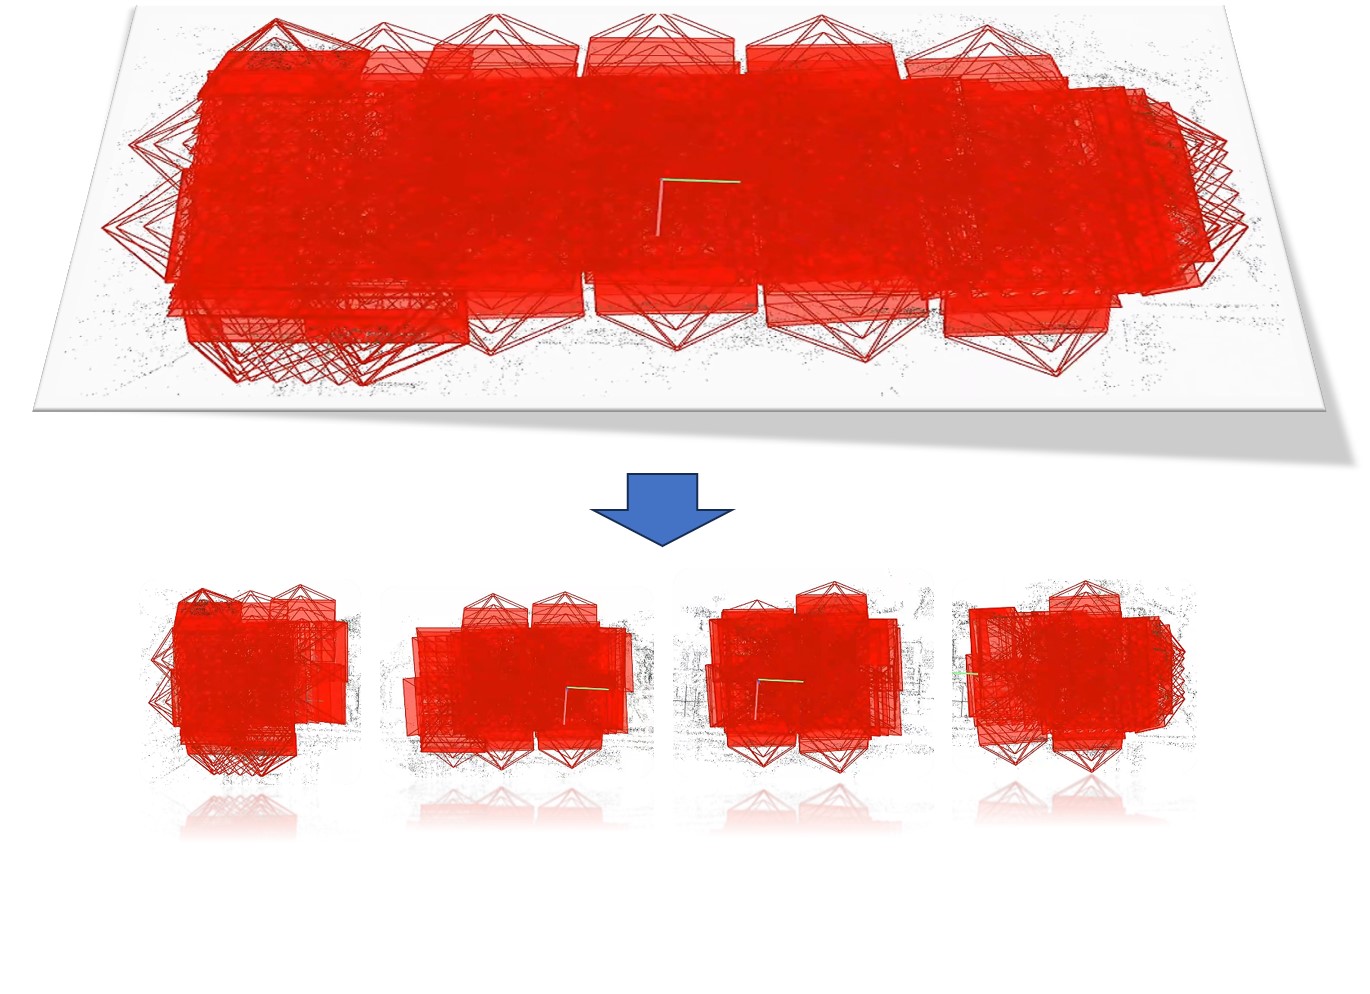
- If you need to partition the scene, run the following command:
python ./script/split_scene.py --source-path ./test/scene
You can manually determine the number of rows (--num-row) and columns (--num-col) for dividing the scene based on the scene range and coordinate system direction. You can also automatically determine the tiling by setting the maximum number of images (--max_num_images) per tile.
The output structure should be as follows:
test/
├── scene/
│   ├── sparse/
│   │   ├──0/
│   │   └──aligned/
│   ├── tile_0000
│   │   ├── sparse
│   │   └── images
│   ├── tile_0001
│   │   ├── sparse
│   │   └── images
│   ├── ...
...
Training
python3 train.py --help
python3 train.py 3dgs --help
Small Scene Training (without partition)
- Training:
python3 train.py octree-2dgs --source-path ./test/scene --output-path ./output
- Extract mesh (Note: 3dgs, scaffold-gs, octree-gs do not support mesh extraction):
python3 ./script/extract_mesh.py --load-config <path to config> --skip-video
Large Scene Training (with partition)
- Training:
python3 ./script/train_split.py octree-2dgs --source-path ./test/scene --output-path ./output
The output folder structure should be as follows:
output/test/octree-2dgs/timestamp/
├── config.yml
├── tile_0000
│   ├── config.yml
│   ├── logs
│   └── pointcloud
├── tile_0001
...
- Extract mesh:
python3 ./script/extract_mesh_split.py --load-config <path to config> --data_device "cpu"
Try importing data to the CPU to avoid out-of-memory issues.
Experimental Results
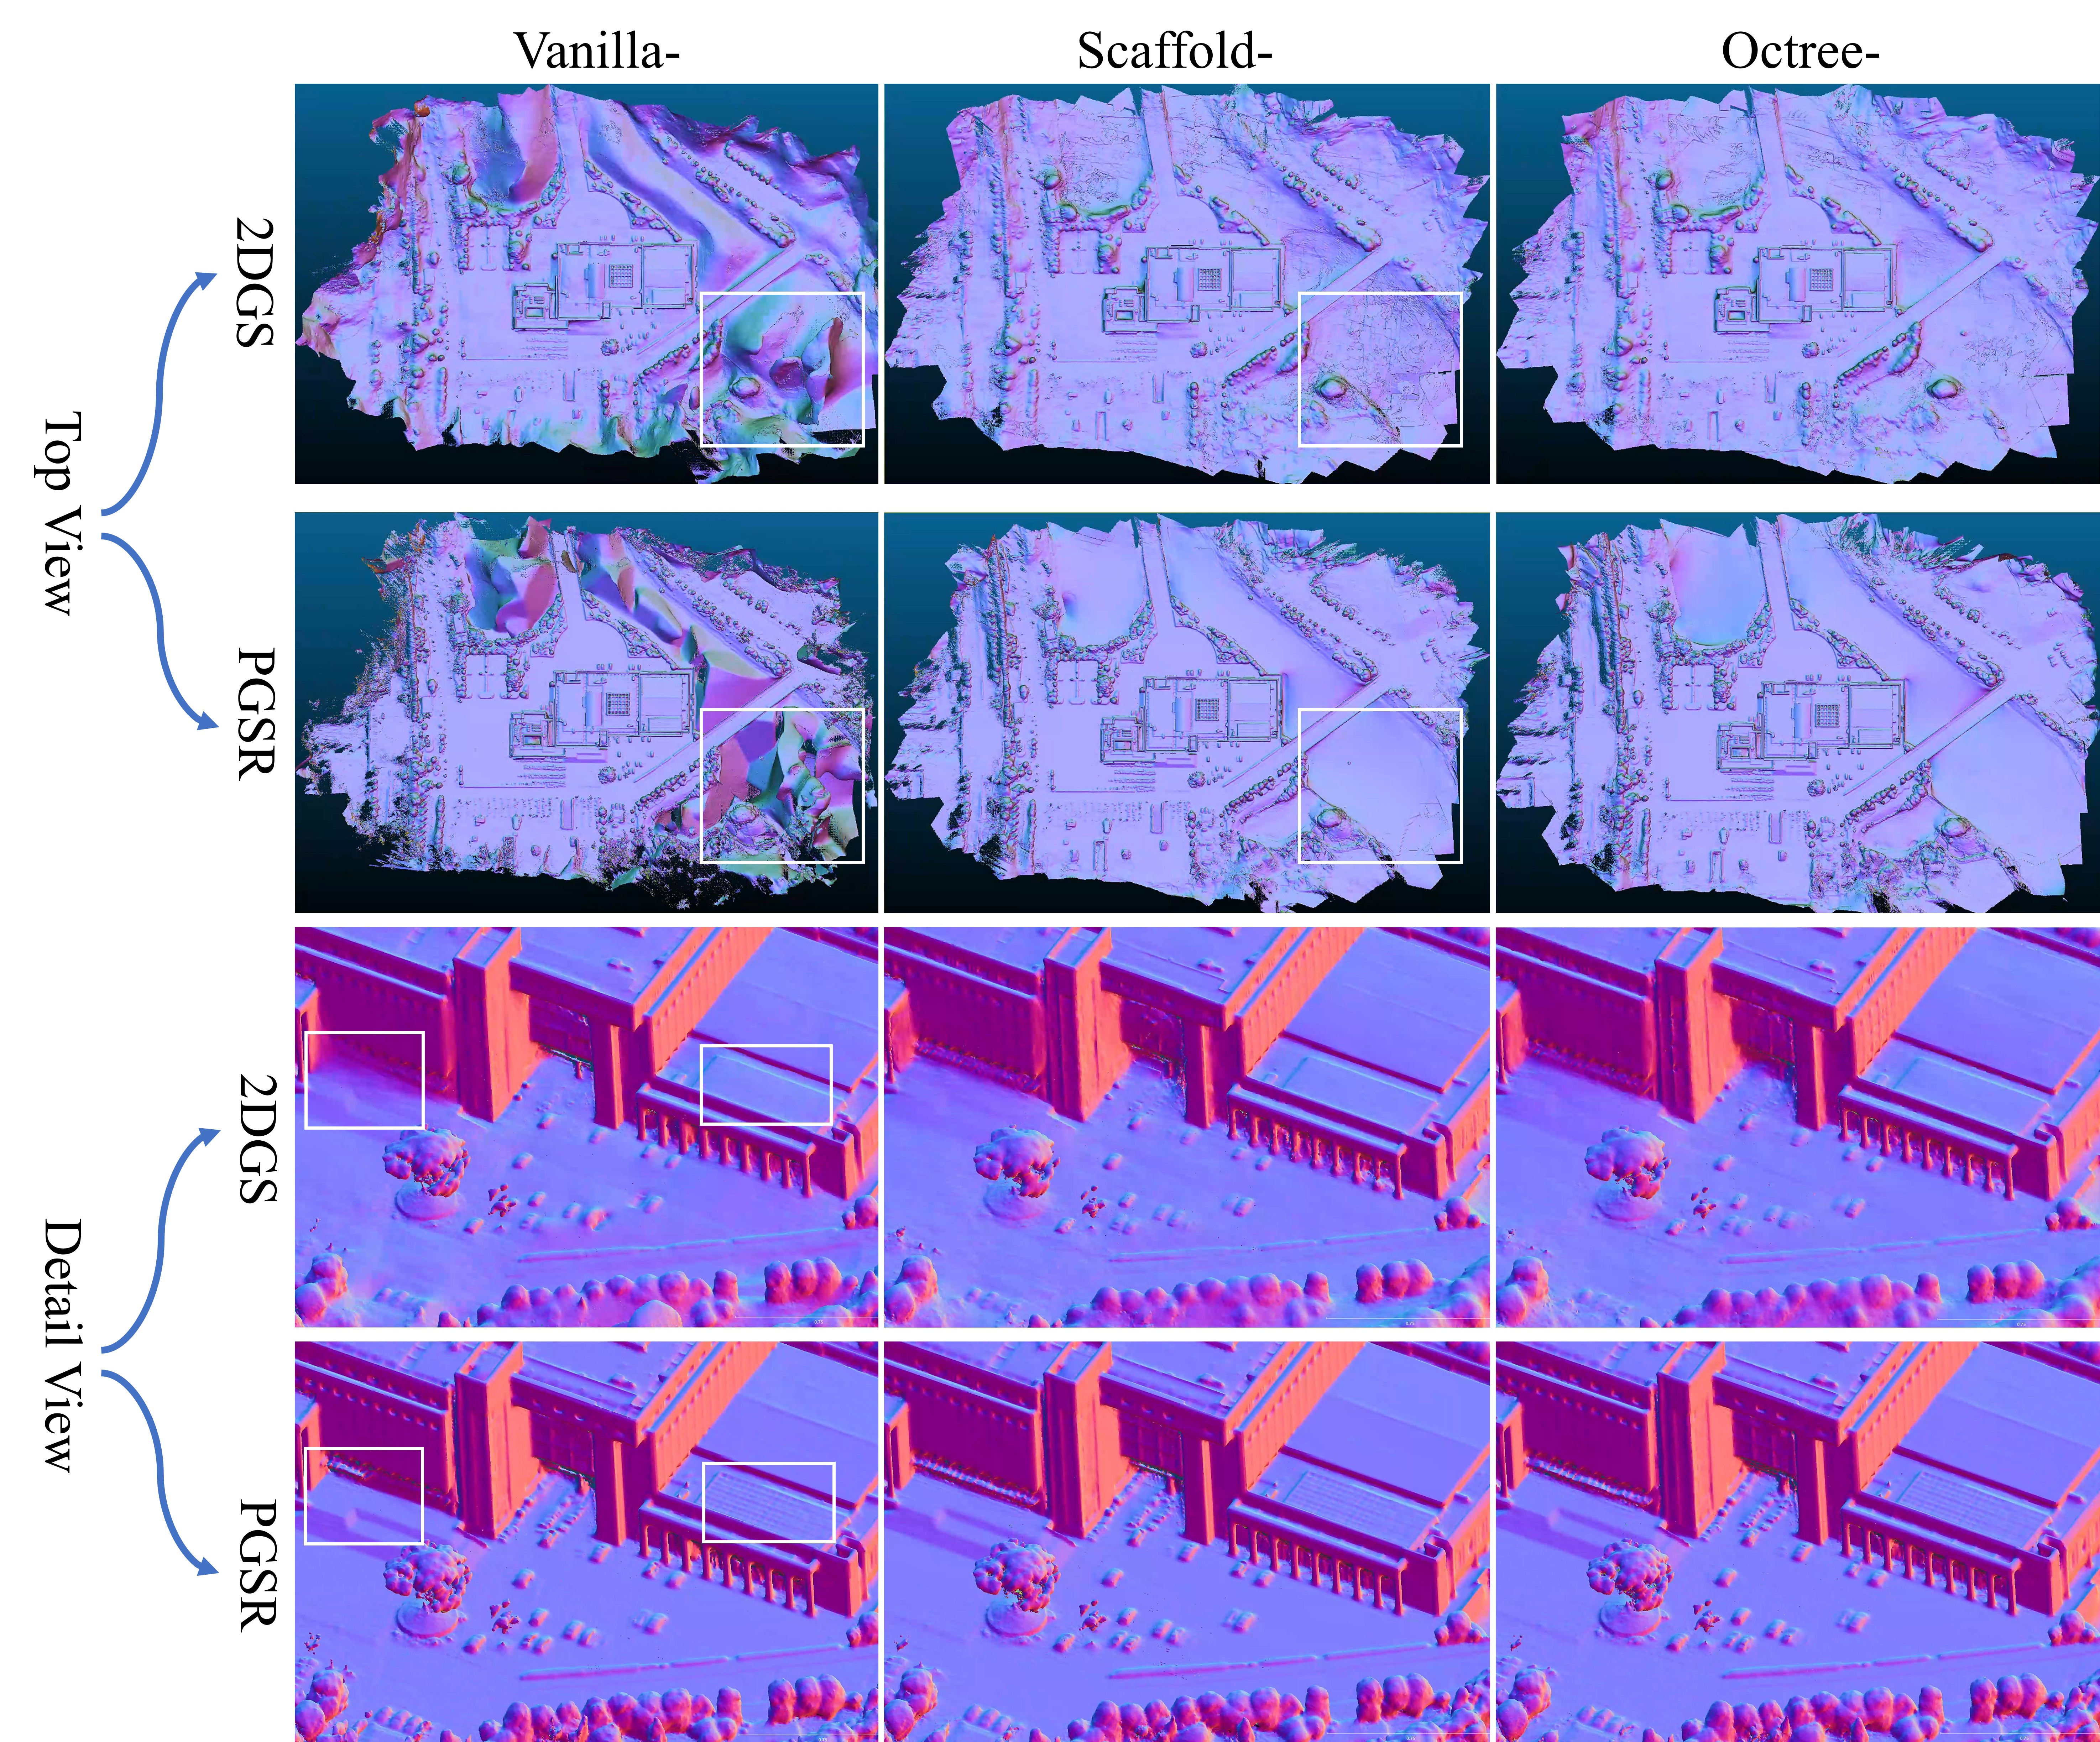
Due to time and computational power constraints, we only tested on the CSU-Library dataset. Our main purpose is to compare the speed of training and the quality of reconstruction.
For 3dgs/2dgs/scaffold/octree-gs, we use the default parameters. For PGSR, to avoid out-of-memory issues, we made the following parameter adjustments:
--opacity_cull_threshold 0.05   # for reduce the number of Gaussians, avoid out-of-memory
--max_abs_split_points 0        # for texture-less scenes
For detailed commands, please refer to test.sh. The experimental results are shown in the following table and figure.
| Method | Vanilla Time | GSSR Time | Vanilla PSNR | GSSR PSNR |
|---|---|---|---|---|
| 3DGS | 39m | 41m | 27.9 | 28.9 |
| Scaffold-GS | 35m | 32m | 30.6 | 30.9 |
| Octree-GS | 40m | 33m | 30.9 | 30.4 |
| 2DGS | 45m | 47m | \ | 26.8 |
| PGSR | 1h26m | 1h25m | \ | 26.2 |
| Scaffold-2DGS | \ | 51m | \ | 29.7 |
| Scaffold-PGSR | \ | 1h27m | \ | 30.5 |
| Octree-2DGS | \ | 49m | \ | 29.2 |
| Octree-PGSR | \ | 1h21m | \ | 29.9 |
-
Training Speed: The training speed of GS-SR is comparable to the original version, with variations primarily due to evaluation and logging.
-
Rendering Quality: Methods like Scaffold / Octree-2DGS / PGSR significantly increase PSNR while maintaining similar training speeds.
-
Reconstruction Quality: These methods ensure more robust training, especially in texture-less and marginal regions of scenes, with minimal deterioration in surface reconstruction quality.
Recommendations
- For faster performance, octree-2dgs is recommended:
python train.py octree-2dgs --source-path ./test/scene --output-path ./output
- For more accurate surface reconstruction, octree-pgsr is recommended:
python train.py octree-pgsr --source-path ./test/scene --output-path ./output
Datasets
Public Datasets (copied from 2dgs):
- The MipNeRF360 scenes are provided by the paper author here.
- The SfM datasets for Tanks&Temples and Deep Blending are hosted by 3D-Gaussian-Splatting here.
- The BungeeNeRF dataset is available in Google Drive/Baidu Netdisk [code:4whv].
- The MatrixCity dataset can be downloaded from Hugging Face/Openxlab/Baidu Netdisk [code:hqnn]. The point clouds used for training are also available.
Our Test Datasets:
-
The Lower-Campus dataset is available for download from the official address. This dataset includes raw images, ground truth point clouds.
-
The CSU-Library dataset can be downloaded from Baidu Netdisk. This building-level dataset contains over 300 images and features numerous repeated textures and texture-less areas, making it particularly challenging to work with.
Custom Data:
For custom data, process the image sequences using Colmap to obtain the SfM points and camera poses.
If you need to partition the scene, you can use colmap model_orientation_aligner to automatically align the model's coordinate axes. However, for large scenes, this process is very time-consuming. Therefore, it is recommended to manually align using CloudCompare.
Orthophoto Rendering & Satellite Image Reconstruction
Orthophoto Rendering
The project supports orthographic image rendering for all methods, enabling the generation of high-quality orthophotos from trained Gaussian splatting models.
It is recommended to use Metashape for absolute orientation and export to COLMAP format. Refer to this script for exporting to Gaussian splatting format.
After training the scene:
For small scenes (without partition):
python3 ./script/render_ortho.py --load-config <path to config>
For large scenes (with partition):
python3 ./script/render_ortho_split.py --load-config <path to config>
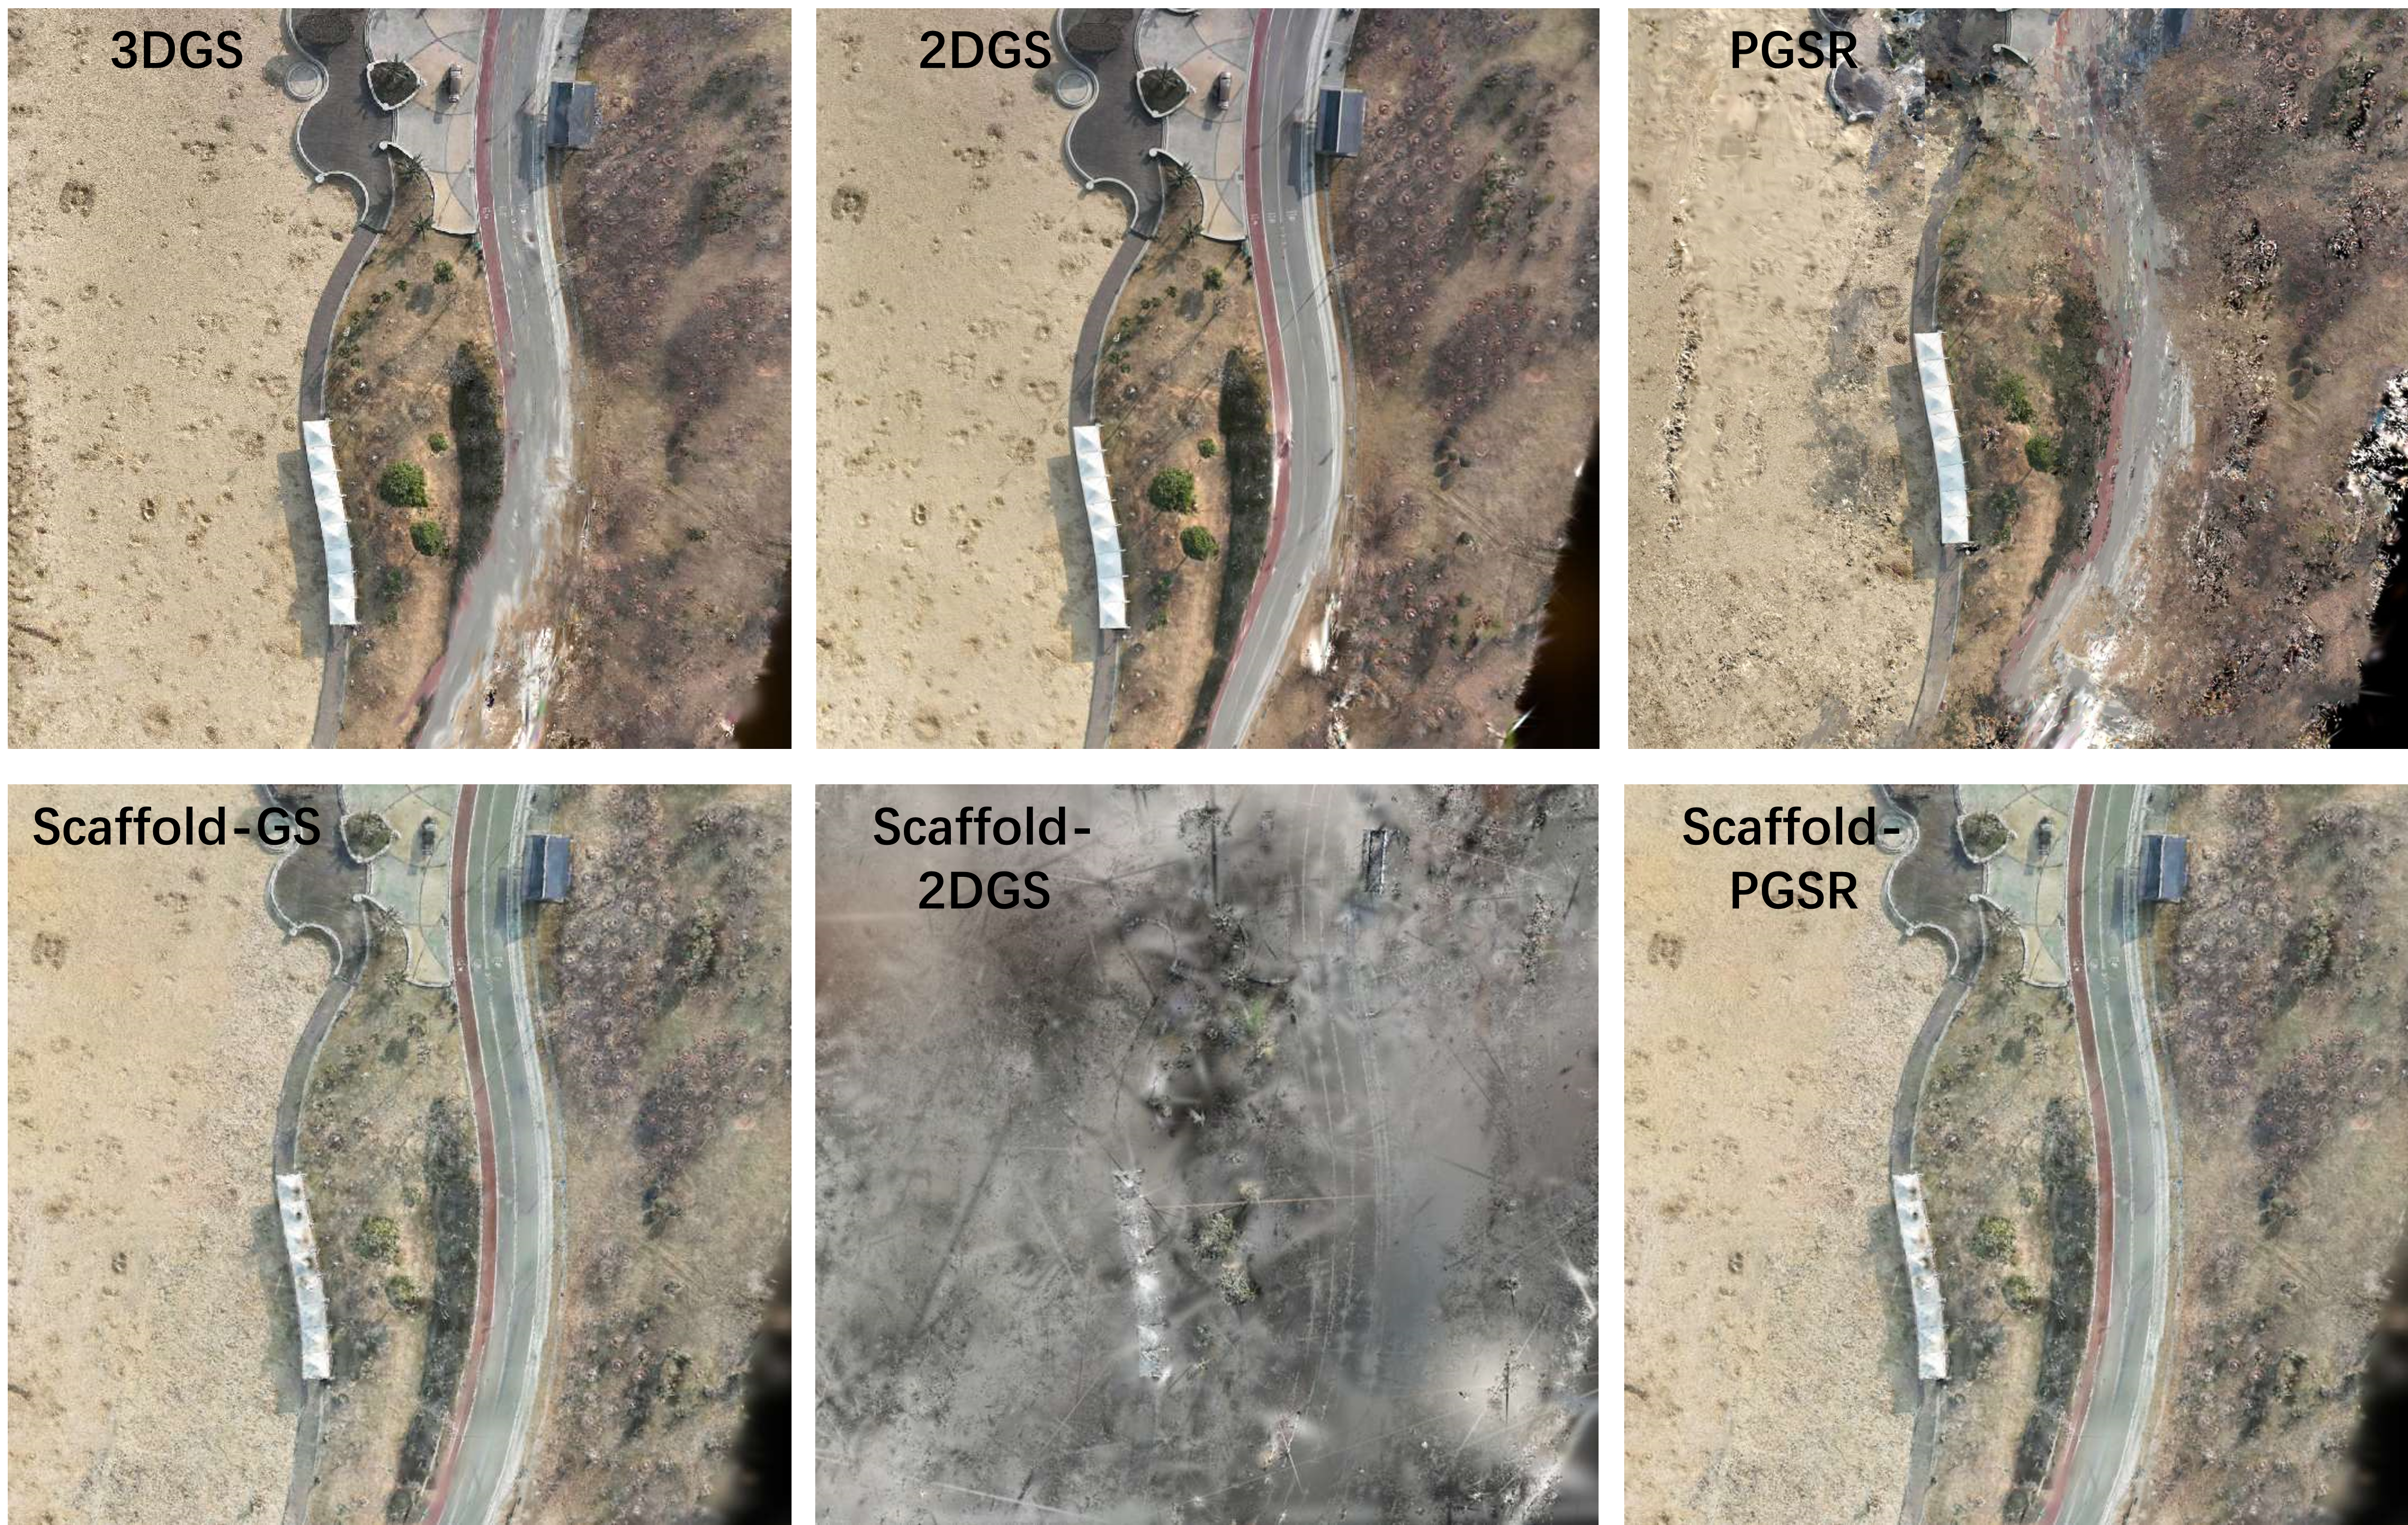
The test results are shown in the figure below. Due to sparse training viewpoints, the PGSR method performs poorly, with ghosting artifacts appearing in edge regions. Scaffold-related methods also show suboptimal results, possibly because MLP optimization during training causes blurring in orthographic views.
Satellite Image Reconstruction
The project also supports satellite image rendering and DSM extraction. For satellite data processing:
- Data Processing: We use SatCorrect to process satellite images, which can directly export SfM results in COLMAP format.
- Model Training:
python3 ./train.py sate-scaffold-2dgs --source-path ./test/scene --output-path ./output
- DSM Extraction:
python3 ./script/generate_dsm.py --load-config <path to config>
The test results are shown in the figure below, using DFC2019 data and training with the sate-scaffold-2dgs method. The sate-scaffold-2dgs method trains the fastest, while sate-scaffold-pgsr produces better results (limited testing was conducted due to time constraints).
Acknowledgements
The project builds on the following works:
- https://github.com/autonomousvision/sdfstudio
- https://github.com/kangpeilun/VastGaussian
- https://github.com/graphdeco-inria/gaussian-splatting
- https://github.com/city-super/Scaffold-GS
- https://github.com/city-super/Octree-GS
- https://github.com/hbb1/2d-gaussian-splatting
- https://github.com/zju3dv/PGSR
Similar repos


Languages
Python
57.2%
Cuda
31.5%
C++
8.8%
Shell
1.7%
GS-SR: Gaussian Splatting for Surface Reconstruction
Python
93
48 commits
updated Sep 20, 2026
README
GS-SR: Gaussian Splatting for Surface Reconstruction
This project aims to solve the task of surface reconstruction for large scenes.
😜 Just for fun!!!
We have reorganized the 3DGS pipeline according to sdfstudio to facilitate the introduction of various surface reconstruction methods. Please use the following command to see the currently supported methods.
python train.py -h
Main Components
-
Partition: This project follows the idea of VastGaussian to partition the scene. By inputting a COLMAP-SfM output, each tile remains in COLMAP-SfM format after partitioning. This ensures that partitioning is completely independent of subsequent algorithms.
-
Representation: Scaffold-GS was chosen as the scene representation for this project due to its robustness against view-dependent effects (e.g., reflection, shadowing). It also alleviates artifacts such as floaters and structural errors caused by redundant 3D Gaussians, providing more accurate surface reconstruction in texture-less areas. Additionally, Octree-GS supports levels of detail (LOD), making it very suitable for large scene reconstruction.
-
Surface Reconstruction: Two surface reconstruction methods, 2DGS and PGSR, were selected for this project. 2DGS is one of the fastest surface reconstruction methods, while PGSR offers the best reconstruction quality.
-
Orthographic Rendering: The project supports orthographic image rendering for all methods, enabling the generation of high-quality orthophotos and digital surface models (DSM) from trained Gaussian splatting models. This capability is essential for photogrammetric applications and large-scale mapping.
-
Satellite Image Rendering and DSM Extraction: The project supports rendering satellite images and extracting digital surface models (DSM) from trained Gaussian splatting models, enabling large-scale geospatial applications.
We used UAV data from the Lower-Campus (see GauU-Scene for detailed information). The results in the figure were obtained using the "VastGaussian + Octree-2DGS" method. Compared to other methods, the approach used in this project is very robust and achieves more accurate results in the marginal areas of the scene and in texture-less areas. Notably, we did not apply any special processing to the marginal areas of the scene.
Installation
We conducted our tests on a server configured with Ubuntu 22.04, CUDA 12.3, and GCC 11.4.0. While other similar configurations should also work, we have not verified each one individually.
- Clone this repo:
git clone https://github.com/yanxian-ll/GS-SR
cd GS-SR
- Install dependencies
# Run inside GS-SR; local pip packages use ./submodules paths.
CUDA_HOME="$(conda info --base)/envs/gssr" conda env create --file environment.yml
conda activate gssr

# For an existing, incomplete gssr environment, use this instead of create:
# CUDA_HOME="$(conda info --base)/envs/gssr" conda env update -n gssr --file environment.yml

python -c "import torch; print(torch.__version__, torch.version.cuda, torch.cuda.is_available())"
python train.py scaffold-2dgs --help
Usage
Data Preprocessing
- First, create a
test/folder inside the project path:
mkdir test
The input data structure should be organized as shown below:
test/
├── scene/
│   ├── input
│   │   ├── IMG_0.jpg
│   │   ├── IMG_1.jpg
│   │   ├── ...
...
- Then, use COLMAP to compute SfM, obtaining the camera intrinsics, extrinsics, and sparse point cloud:
# If you need to use partitioned reconstruction, use --use_aligner parameter to ensure the reconstruction coordinate system is parallel to the ground
python ./script/convert.py -s ./test/scene --use_aligner
# If not needed
python ./script/convert.py -s ./test/scene
The output structure should be as follows:
test/
├── scene/
│   ├── images
│   │   ├── IMG_0.jpg
│   │   ├── IMG_1.jpg
│   │   ├── ...
│   ├── sparse/
│       └──0 / cameras.bin
│       └──0 / images.bin
│       └──0 / points3D.bin
...
- If you need to partition the scene, run the following command:
python ./script/split_scene.py --source-path ./test/scene
You can manually determine the number of rows (--num-row) and columns (--num-col) for dividing the scene based on the scene range and coordinate system direction. You can also automatically determine the tiling by setting the maximum number of images (--max_num_images) per tile.
The output structure should be as follows:
test/
├── scene/
│   ├── sparse/
│   │   ├──0/
│   │   └──aligned/
│   ├── tile_0000
│   │   ├── sparse
│   │   └── images
│   ├── tile_0001
│   │   ├── sparse
│   │   └── images
│   ├── ...
...
Training
python3 train.py --help
python3 train.py 3dgs --help
Small Scene Training (without partition)
- Training:
python3 train.py octree-2dgs --source-path ./test/scene --output-path ./output
- Extract mesh (Note: 3dgs, scaffold-gs, octree-gs do not support mesh extraction):
python3 ./script/extract_mesh.py --load-config <path to config> --skip-video
Large Scene Training (with partition)
- Training:
python3 ./script/train_split.py octree-2dgs --source-path ./test/scene --output-path ./output
The output folder structure should be as follows:
output/test/octree-2dgs/timestamp/
├── config.yml
├── tile_0000
│   ├── config.yml
│   ├── logs
│   └── pointcloud
├── tile_0001
...
- Extract mesh:
python3 ./script/extract_mesh_split.py --load-config <path to config> --data_device "cpu"
Try importing data to the CPU to avoid out-of-memory issues.
Experimental Results
Due to time and computational power constraints, we only tested on the CSU-Library dataset. Our main purpose is to compare the speed of training and the quality of reconstruction.
For 3dgs/2dgs/scaffold/octree-gs, we use the default parameters. For PGSR, to avoid out-of-memory issues, we made the following parameter adjustments:
--opacity_cull_threshold 0.05   # for reduce the number of Gaussians, avoid out-of-memory
--max_abs_split_points 0        # for texture-less scenes
For detailed commands, please refer to test.sh. The experimental results are shown in the following table and figure.
| Method | Vanilla Time | GSSR Time | Vanilla PSNR | GSSR PSNR |
|---|---|---|---|---|
| 3DGS | 39m | 41m | 27.9 | 28.9 |
| Scaffold-GS | 35m | 32m | 30.6 | 30.9 |
| Octree-GS | 40m | 33m | 30.9 | 30.4 |
| 2DGS | 45m | 47m | \ | 26.8 |
| PGSR | 1h26m | 1h25m | \ | 26.2 |
| Scaffold-2DGS | \ | 51m | \ | 29.7 |
| Scaffold-PGSR | \ | 1h27m | \ | 30.5 |
| Octree-2DGS | \ | 49m | \ | 29.2 |
| Octree-PGSR | \ | 1h21m | \ | 29.9 |
-
Training Speed: The training speed of GS-SR is comparable to the original version, with variations primarily due to evaluation and logging.
-
Rendering Quality: Methods like Scaffold / Octree-2DGS / PGSR significantly increase PSNR while maintaining similar training speeds.
-
Reconstruction Quality: These methods ensure more robust training, especially in texture-less and marginal regions of scenes, with minimal deterioration in surface reconstruction quality.
Recommendations
- For faster performance, octree-2dgs is recommended:
python train.py octree-2dgs --source-path ./test/scene --output-path ./output
- For more accurate surface reconstruction, octree-pgsr is recommended:
python train.py octree-pgsr --source-path ./test/scene --output-path ./output
Datasets
Public Datasets (copied from 2dgs):
- The MipNeRF360 scenes are provided by the paper author here.
- The SfM datasets for Tanks&Temples and Deep Blending are hosted by 3D-Gaussian-Splatting here.
- The BungeeNeRF dataset is available in Google Drive/Baidu Netdisk [code:4whv].
- The MatrixCity dataset can be downloaded from Hugging Face/Openxlab/Baidu Netdisk [code:hqnn]. The point clouds used for training are also available.
Our Test Datasets:
-
The Lower-Campus dataset is available for download from the official address. This dataset includes raw images, ground truth point clouds.
-
The CSU-Library dataset can be downloaded from Baidu Netdisk. This building-level dataset contains over 300 images and features numerous repeated textures and texture-less areas, making it particularly challenging to work with.
Custom Data:
For custom data, process the image sequences using Colmap to obtain the SfM points and camera poses.
If you need to partition the scene, you can use colmap model_orientation_aligner to automatically align the model's coordinate axes. However, for large scenes, this process is very time-consuming. Therefore, it is recommended to manually align using CloudCompare.
Orthophoto Rendering & Satellite Image Reconstruction
Orthophoto Rendering
The project supports orthographic image rendering for all methods, enabling the generation of high-quality orthophotos from trained Gaussian splatting models.
It is recommended to use Metashape for absolute orientation and export to COLMAP format. Refer to this script for exporting to Gaussian splatting format.
After training the scene:
For small scenes (without partition):
python3 ./script/render_ortho.py --load-config <path to config>
For large scenes (with partition):
python3 ./script/render_ortho_split.py --load-config <path to config>
The test results are shown in the figure below. Due to sparse training viewpoints, the PGSR method performs poorly, with ghosting artifacts appearing in edge regions. Scaffold-related methods also show suboptimal results, possibly because MLP optimization during training causes blurring in orthographic views.
Satellite Image Reconstruction
The project also supports satellite image rendering and DSM extraction. For satellite data processing:
- Data Processing: We use SatCorrect to process satellite images, which can directly export SfM results in COLMAP format.
- Model Training:
python3 ./train.py sate-scaffold-2dgs --source-path ./test/scene --output-path ./output
- DSM Extraction:
python3 ./script/generate_dsm.py --load-config <path to config>
The test results are shown in the figure below, using DFC2019 data and training with the sate-scaffold-2dgs method. The sate-scaffold-2dgs method trains the fastest, while sate-scaffold-pgsr produces better results (limited testing was conducted due to time constraints).
Acknowledgements
The project builds on the following works:
- https://github.com/autonomousvision/sdfstudio
- https://github.com/kangpeilun/VastGaussian
- https://github.com/graphdeco-inria/gaussian-splatting
- https://github.com/city-super/Scaffold-GS
- https://github.com/city-super/Octree-GS
- https://github.com/hbb1/2d-gaussian-splatting
- https://github.com/zju3dv/PGSR
Similar repos
Languages
Python
57.2%
Cuda
31.5%
C++
8.8%
Shell
1.7%