
Web agents with frontier models from scratch in 400 lines of Python
Python
0
119 commits
updated Oct 5, 2026
See what people are saying
README
Web agents from scratch in under 400 lines
We wanted to understand how web agents in tools like Dots, Muse, and Codex work: how frontier models see a page, choose actions, and decide when a task is done.
mini-web-agent explores that loop in fewer than 400 lines of Python. This makes it easier to follow the code and see how changes affect the agent. Give a model screenshots and browser controls, then follow along as it works through a task.
Why keep it small?
mini-swe-agent asks how much work a capable model can do with a small agent around it. We wanted to explore that idea in a browser, with screenshots and the same controls you use to navigate a website.
A short implementation gives you room to experiment. Change the instructions, try another model, or add an action. You can follow the run and see how those changes affect it.
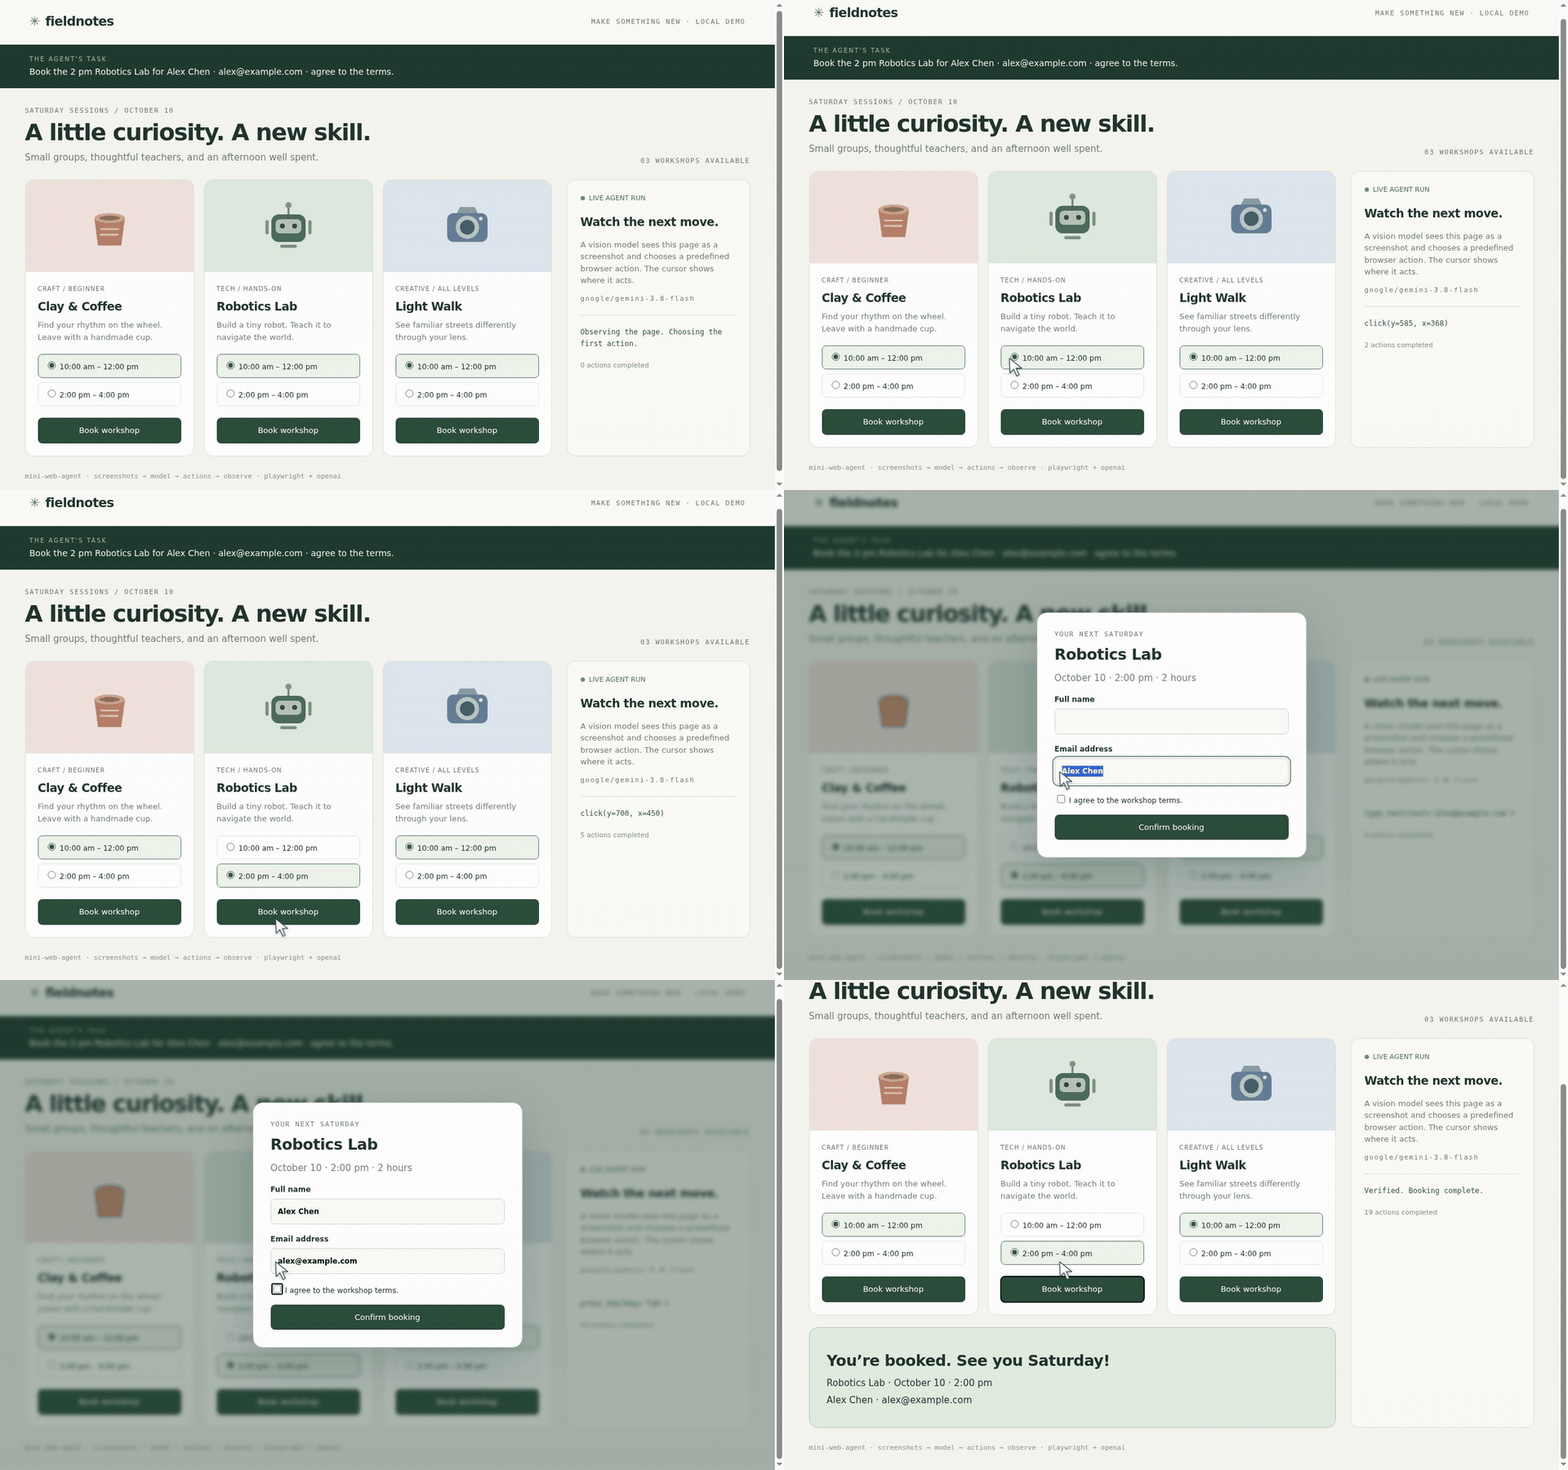
| Gemini 3.8 Flash uses screenshots and browser controls to book a Robotics Lab workshop and verify the confirmation. Pauses between actions are shortened. Action log. |
|---|
 |
The browser controls, model loop, and command line entry point all fit in this file:
| Section | What it does | Lines |
|---|---|---|
| Imports | Standard library, OpenAI SDK, and Playwright | 17 |
| Actions | 24 browser and conversation functions | 94 |
| Helpers | Prompts, browser setup, tab lookup, tool schemas, and screenshot formatting | 72 |
| WebAgent | Chrome lifecycle, tabs, actions, and screenshots | 124 |
| run() | Model calls, results, callbacks, history, and recovery | 51 |
| CLI | Options, browser setup, model run, and cleanup | 38 |
| Total | 396 |
Record your own demo
Once you have completed the setup below, install FFmpeg and record a run:
uv run demo/record.py --model google/gemini-3.8-flash
The agent works through a booking on a local page while the recorder captures the browser
and logs its actions. It checks the final confirmation, then saves demo/demo.gif and
demo/demo.json. FFmpeg is only needed to make the GIF.
Quick start
Start with a task you can watch from beginning to end. With uv installed:
git clone https://github.com/xhluca/mini-web-agent.git
cd mini-web-agent
uv run playwright install chromium --no-shell

export OPENAI_API_KEY="your-openrouter-key"
export OPENAI_BASE_URL=https://openrouter.ai/api/v1

uv run agent.py --headed --cursor --model google/gemini-3.8-flash \
  'Open https://example.com and tell me the heading.'
uv handles the Python environment, dependencies, and Chromium installation. Chrome opens in a window, with an animated cursor showing where the agent moves and clicks. Actions, results, and questions appear in your terminal. Press Ctrl+C to interrupt.
Replace the task in quotes with something you want to try. Leave out --headed to run
Chrome headless and --cursor to hide the cursor. The project runs on Linux and macOS.
Install from PyPI
To run the agent without cloning the source:
python -m pip install mini-web-agent
python -m playwright install chromium --no-shell

export OPENAI_API_KEY="your-openrouter-key"
export OPENAI_BASE_URL=https://openrouter.ai/api/v1

mini-web-agent --headed --cursor --model google/gemini-3.8-flash \
  'Open https://example.com and tell me the heading.'
The installed command uses the same CLI as python agent.py. You can also run
python -u -m agent with the same options.
Manual setup with venv
If you prefer to set up Python yourself, use Python 3.10+ and install the project this way:
git clone https://github.com/xhluca/mini-web-agent.git
cd mini-web-agent
python3 -m venv .venv
source .venv/bin/activate
python -m pip install .
python -m playwright install chromium --no-shell

export OPENAI_API_KEY="your-openrouter-key"
export OPENAI_BASE_URL=https://openrouter.ai/api/v1

python -u agent.py --headed --cursor --model google/gemini-3.8-flash \
  'Open https://example.com and tell me the heading.'
You will see the same browser window and terminal output as in the uv example.
CLI options and connecting to Chrome
As you try longer tasks, you can change the model, set a turn limit, or keep using a browser that is already open:
| Option | Purpose |
|---|---|
--model | Required model ID, e.g. google/gemini-3.8-flash |
--max-steps | Maximum model turns; defaults to 100 |
--profile | Persistent Chrome profile; defaults to .chrome |
--port | Launch port; a new profile defaults to a random localhost port |
--connect | Attach to Chrome already running with the selected profile |
--headed | Show Chrome; new launches are headless by default |
--cursor | Animate pointer actions before execution |
To run another task from the project directory, replace the text in quotes:
uv run agent.py --headed --cursor --model google/gemini-3.8-flash \
  'Open https://example.com and tell me the heading.'
To try another provider, set OPENAI_API_KEY and OPENAI_BASE_URL for its endpoint.
The endpoint must support the Responses API, and the model needs image input and function calling.
If Chrome is still running from an earlier session, connect using the same profile:
uv run agent.py --connect --profile .chrome --model google/gemini-3.8-flash \
  'Tell me what is open in the current tab.'
You pick up the browser with its existing tabs and display mode. Adding --headed prints
a warning and continues, since connecting cannot change how Chrome was launched.
The CLI closes browsers it launches. When you use --connect, it leaves Chrome running.
When launching Chrome, the CLI replaces restored tabs with one blank tab and keeps profile data.
Use --port 9222 for a fixed launch port. With --port 0, Chrome chooses a port for a new
profile. Existing profiles reuse their recorded port. --connect reads the
profile's address and cannot be combined with a nonzero --port.
The CLI prints the CDP address after connecting.
On minimal Linux systems, Chromium may also need system dependencies. Install them with
uv run playwright install-deps chromium.
How it works
At each turn, the model gets a screenshot and a list of open tabs. It chooses from the
functions in Actions: click, type, scroll, open a tab, or talk to the user.
Python calls those functions, sends back the results, and takes another screenshot.
The model decides what to try next. When it considers the task complete, it calls finish
and the loop returns its answer.
You can follow this cycle in run(). The same function is used by the CLI, Python example,
and demo recorder.
What goes to the model?
The default instructions include the source of agent.py, so the model can read the
functions it may call. Their signatures and docstrings also provide the tool definitions
sent to the API.
The implementation has two dependencies: Playwright for browser control and the OpenAI SDK for model requests. Requests use an OpenAI-compatible Responses API; the quick start uses OpenRouter. Models need to support both images and function calls.
The first screenshot is sent as a user message. After each batch of actions, the last tool result includes a new screenshot and the current tab information. Earlier screenshots and reasoning stay in history, so you can follow what the model received at each turn. Appending to that history also lets providers cache the unchanged prefix. Longer tasks use more context, and cache hits depend on the provider.
Available actions
The model has 24 actions to choose from. They are ordinary functions grouped in Actions,
so you can read exactly what each one does:
| Interaction | Actions |
|---|---|
| Navigation | navigate, back, forward, reload |
| Pointer | click, double_click, right_click, hover, mouse_down, mouse_up, drag |
| Scroll and keyboard | scroll, type_text, press_key, key_down, key_up |
| Tabs | list_tabs, new_tab, switch_tab, close_tab |
| Timing and conversation | wait, send_message, wait_for_reply, finish |
Clicks and pointer movements use coordinates from the screenshot. The viewport defaults to
1280×800; pass w and h to WebAgent to change it. type_text types into the focused field,
with 10 ms between characters. Tab indices come from the latest observation and can shift
after closing a tab.
When a step goes wrong
A failed action becomes feedback for the next turn. Each action returns one of:
{"state": "success", "output": ...}
{"state": "error", "output": "..."}
The model sees the error and can try another action. If it returns no tool calls, the loop asks it to choose one. Incomplete responses are discarded and retried before any of their actions execute.
Each model turn counts toward max_steps, including retries. At the limit, the loop stops
with an unfinished-task message. A successful finish returns the model's final answer.
What can it see and control?
The model sees screenshots and tab information. It uses the browser controls in the action dictionary to interact with pages. It has no tools for reading the DOM, parsing accessibility trees, running generated code, managing uploads or downloads, or controlling the OS.
The action dictionary limits which functions the model can call. The browser can still visit websites and interact with them normally.
Use it from Python
To experiment with the loop from your own code, call it as a Python function. Keep the API environment variables from the quick start set, then:
from openai import OpenAI
from agent import WebAgent, get_action_space, get_instructions, run

agent = WebAgent(".chrome", action_space=get_action_space())
try:
    agent.launch().connect()
    with OpenAI(timeout=60, max_retries=1) as client:
        answer = run(
            agent, "Find the heading on https://example.com.", client,
            model="google/gemini-3.8-flash", instructions=get_instructions(),
            max_steps=20, callbacks=[dict(type="after", function=print)],
        )
        print(answer)
finally:
    agent.shutdown()
Use agent.launch(headed=True) for a visible browser. To leave Chrome running for another task,
call agent.disconnect() instead of agent.shutdown().
Browser lifecycle
Chrome runs as a separate process, so you can leave it open between tasks. Starting Chrome, connecting to it, and closing it are separate operations:
| Function | What it does |
|---|---|
agent.launch() | Start detached Chrome |
agent.connect() | Attach Playwright to Chrome |
agent.ctx | Browser context assigned when connecting |
agent.get_page() | Get the active tab and set its viewport |
agent.observe() | Return tab metadata as JSON and a screenshot data URL |
agent.act(name, arguments) | Execute an allowed action and return its result |
run(agent, task, client, model, instructions, ...) | Run the model loop |
agent.disconnect() | Detach Playwright, leaving Chrome running |
agent.shutdown() | Close Chrome and disconnect, even if Chrome was already running when you connected |
Use port=9222 for a fixed port, or leave it at 0 to let the agent choose. After launch,
agent.port holds the port Chrome is using. To return to this browser later, create another
WebAgent with the same profile and call connect().
Playwright connects through Chrome's debugging interface, CDP. It finds the current WebSocket address over HTTP, then uses that connection to control the browser.
Customize actions, instructions, and callbacks
Start by changing what you tell the model or what you let it do. action_space and
instructions are required, so each run uses the actions and prompt you supply.
get_action_space() and get_instructions() provide the defaults used in the example.
The action dictionary determines which functions the model can call and which tool definitions are sent to the API. Add or remove a function there to change its options.
Callbacks let you watch an action before or after it happens. Each receives
(step, action, result): the model-turn index, the action's name and arguments, and its
result. Before execution, result is None. For example, show the cursor before an
action and print the result afterward:
from functools import partial
from callbacks.cursor import show_cursor

callbacks = [
    dict(type="before", function=partial(show_cursor, agent)),
    dict(type="after", function=print),
]
The cursor.py overlay
glides between targets, follows drags, and pulses on
clicks. It respects reduced-motion preferences and lets clicks pass through to the page.
The CLI loads it when you pass --cursor.
When the model needs to talk to you, on_message displays its message and on_reply
collects your answer. They default to print and input; replace them to use your own UI.
Development
If you want to change the loop, start with agent.py. The animated cursor lives in callbacks/cursor.py, and the demo recorder shows how to record a run. Tests live in tests/:
uv run python -m unittest discover -s tests -v
uv run python -m tests.test_live  # Optional paid OpenRouter test.
The local tests exercise browser actions, tabs, cleanup, API results, and error recovery using Chromium and a test server. The live test asks a model to complete a signup form, then checks what it submitted.
Similar repos


Web agents with frontier models from scratch in 400 lines of Python
Python
0
119 commits
updated Oct 5, 2026
See what people are saying
README
Web agents from scratch in under 400 lines
We wanted to understand how web agents in tools like Dots, Muse, and Codex work: how frontier models see a page, choose actions, and decide when a task is done.
mini-web-agent explores that loop in fewer than 400 lines of Python. This makes it easier to follow the code and see how changes affect the agent. Give a model screenshots and browser controls, then follow along as it works through a task.
Why keep it small?
mini-swe-agent asks how much work a capable model can do with a small agent around it. We wanted to explore that idea in a browser, with screenshots and the same controls you use to navigate a website.
A short implementation gives you room to experiment. Change the instructions, try another model, or add an action. You can follow the run and see how those changes affect it.
| Gemini 3.8 Flash uses screenshots and browser controls to book a Robotics Lab workshop and verify the confirmation. Pauses between actions are shortened. Action log. |
|---|
|
The browser controls, model loop, and command line entry point all fit in this file:
| Section | What it does | Lines |
|---|---|---|
| Imports | Standard library, OpenAI SDK, and Playwright | 17 |
| Actions | 24 browser and conversation functions | 94 |
| Helpers | Prompts, browser setup, tab lookup, tool schemas, and screenshot formatting | 72 |
| WebAgent | Chrome lifecycle, tabs, actions, and screenshots | 124 |
| run() | Model calls, results, callbacks, history, and recovery | 51 |
| CLI | Options, browser setup, model run, and cleanup | 38 |
| Total | 396 |
Record your own demo
Once you have completed the setup below, install FFmpeg and record a run:
uv run demo/record.py --model google/gemini-3.8-flash
The agent works through a booking on a local page while the recorder captures the browser
and logs its actions. It checks the final confirmation, then saves demo/demo.gif and
demo/demo.json. FFmpeg is only needed to make the GIF.
Quick start
Start with a task you can watch from beginning to end. With uv installed:
git clone https://github.com/xhluca/mini-web-agent.git
cd mini-web-agent
uv run playwright install chromium --no-shell

export OPENAI_API_KEY="your-openrouter-key"
export OPENAI_BASE_URL=https://openrouter.ai/api/v1

uv run agent.py --headed --cursor --model google/gemini-3.8-flash \
  'Open https://example.com and tell me the heading.'
uv handles the Python environment, dependencies, and Chromium installation. Chrome opens in a window, with an animated cursor showing where the agent moves and clicks. Actions, results, and questions appear in your terminal. Press Ctrl+C to interrupt.
Replace the task in quotes with something you want to try. Leave out --headed to run
Chrome headless and --cursor to hide the cursor. The project runs on Linux and macOS.
Install from PyPI
To run the agent without cloning the source:
python -m pip install mini-web-agent
python -m playwright install chromium --no-shell

export OPENAI_API_KEY="your-openrouter-key"
export OPENAI_BASE_URL=https://openrouter.ai/api/v1

mini-web-agent --headed --cursor --model google/gemini-3.8-flash \
  'Open https://example.com and tell me the heading.'
The installed command uses the same CLI as python agent.py. You can also run
python -u -m agent with the same options.
Manual setup with venv
If you prefer to set up Python yourself, use Python 3.10+ and install the project this way:
git clone https://github.com/xhluca/mini-web-agent.git
cd mini-web-agent
python3 -m venv .venv
source .venv/bin/activate
python -m pip install .
python -m playwright install chromium --no-shell

export OPENAI_API_KEY="your-openrouter-key"
export OPENAI_BASE_URL=https://openrouter.ai/api/v1

python -u agent.py --headed --cursor --model google/gemini-3.8-flash \
  'Open https://example.com and tell me the heading.'
You will see the same browser window and terminal output as in the uv example.
CLI options and connecting to Chrome
As you try longer tasks, you can change the model, set a turn limit, or keep using a browser that is already open:
| Option | Purpose |
|---|---|
--model | Required model ID, e.g. google/gemini-3.8-flash |
--max-steps | Maximum model turns; defaults to 100 |
--profile | Persistent Chrome profile; defaults to .chrome |
--port | Launch port; a new profile defaults to a random localhost port |
--connect | Attach to Chrome already running with the selected profile |
--headed | Show Chrome; new launches are headless by default |
--cursor | Animate pointer actions before execution |
To run another task from the project directory, replace the text in quotes:
uv run agent.py --headed --cursor --model google/gemini-3.8-flash \
  'Open https://example.com and tell me the heading.'
To try another provider, set OPENAI_API_KEY and OPENAI_BASE_URL for its endpoint.
The endpoint must support the Responses API, and the model needs image input and function calling.
If Chrome is still running from an earlier session, connect using the same profile:
uv run agent.py --connect --profile .chrome --model google/gemini-3.8-flash \
  'Tell me what is open in the current tab.'
You pick up the browser with its existing tabs and display mode. Adding --headed prints
a warning and continues, since connecting cannot change how Chrome was launched.
The CLI closes browsers it launches. When you use --connect, it leaves Chrome running.
When launching Chrome, the CLI replaces restored tabs with one blank tab and keeps profile data.
Use --port 9222 for a fixed launch port. With --port 0, Chrome chooses a port for a new
profile. Existing profiles reuse their recorded port. --connect reads the
profile's address and cannot be combined with a nonzero --port.
The CLI prints the CDP address after connecting.
On minimal Linux systems, Chromium may also need system dependencies. Install them with
uv run playwright install-deps chromium.
How it works
At each turn, the model gets a screenshot and a list of open tabs. It chooses from the
functions in Actions: click, type, scroll, open a tab, or talk to the user.
Python calls those functions, sends back the results, and takes another screenshot.
The model decides what to try next. When it considers the task complete, it calls finish
and the loop returns its answer.
You can follow this cycle in run(). The same function is used by the CLI, Python example,
and demo recorder.
What goes to the model?
The default instructions include the source of agent.py, so the model can read the
functions it may call. Their signatures and docstrings also provide the tool definitions
sent to the API.
The implementation has two dependencies: Playwright for browser control and the OpenAI SDK for model requests. Requests use an OpenAI-compatible Responses API; the quick start uses OpenRouter. Models need to support both images and function calls.
The first screenshot is sent as a user message. After each batch of actions, the last tool result includes a new screenshot and the current tab information. Earlier screenshots and reasoning stay in history, so you can follow what the model received at each turn. Appending to that history also lets providers cache the unchanged prefix. Longer tasks use more context, and cache hits depend on the provider.
Available actions
The model has 24 actions to choose from. They are ordinary functions grouped in Actions,
so you can read exactly what each one does:
| Interaction | Actions |
|---|---|
| Navigation | navigate, back, forward, reload |
| Pointer | click, double_click, right_click, hover, mouse_down, mouse_up, drag |
| Scroll and keyboard | scroll, type_text, press_key, key_down, key_up |
| Tabs | list_tabs, new_tab, switch_tab, close_tab |
| Timing and conversation | wait, send_message, wait_for_reply, finish |
Clicks and pointer movements use coordinates from the screenshot. The viewport defaults to
1280×800; pass w and h to WebAgent to change it. type_text types into the focused field,
with 10 ms between characters. Tab indices come from the latest observation and can shift
after closing a tab.
When a step goes wrong
A failed action becomes feedback for the next turn. Each action returns one of:
{"state": "success", "output": ...}
{"state": "error", "output": "..."}
The model sees the error and can try another action. If it returns no tool calls, the loop asks it to choose one. Incomplete responses are discarded and retried before any of their actions execute.
Each model turn counts toward max_steps, including retries. At the limit, the loop stops
with an unfinished-task message. A successful finish returns the model's final answer.
What can it see and control?
The model sees screenshots and tab information. It uses the browser controls in the action dictionary to interact with pages. It has no tools for reading the DOM, parsing accessibility trees, running generated code, managing uploads or downloads, or controlling the OS.
The action dictionary limits which functions the model can call. The browser can still visit websites and interact with them normally.
Use it from Python
To experiment with the loop from your own code, call it as a Python function. Keep the API environment variables from the quick start set, then:
from openai import OpenAI
from agent import WebAgent, get_action_space, get_instructions, run

agent = WebAgent(".chrome", action_space=get_action_space())
try:
    agent.launch().connect()
    with OpenAI(timeout=60, max_retries=1) as client:
        answer = run(
            agent, "Find the heading on https://example.com.", client,
            model="google/gemini-3.8-flash", instructions=get_instructions(),
            max_steps=20, callbacks=[dict(type="after", function=print)],
        )
        print(answer)
finally:
    agent.shutdown()
Use agent.launch(headed=True) for a visible browser. To leave Chrome running for another task,
call agent.disconnect() instead of agent.shutdown().
Browser lifecycle
Chrome runs as a separate process, so you can leave it open between tasks. Starting Chrome, connecting to it, and closing it are separate operations:
| Function | What it does |
|---|---|
agent.launch() | Start detached Chrome |
agent.connect() | Attach Playwright to Chrome |
agent.ctx | Browser context assigned when connecting |
agent.get_page() | Get the active tab and set its viewport |
agent.observe() | Return tab metadata as JSON and a screenshot data URL |
agent.act(name, arguments) | Execute an allowed action and return its result |
run(agent, task, client, model, instructions, ...) | Run the model loop |
agent.disconnect() | Detach Playwright, leaving Chrome running |
agent.shutdown() | Close Chrome and disconnect, even if Chrome was already running when you connected |
Use port=9222 for a fixed port, or leave it at 0 to let the agent choose. After launch,
agent.port holds the port Chrome is using. To return to this browser later, create another
WebAgent with the same profile and call connect().
Playwright connects through Chrome's debugging interface, CDP. It finds the current WebSocket address over HTTP, then uses that connection to control the browser.
Customize actions, instructions, and callbacks
Start by changing what you tell the model or what you let it do. action_space and
instructions are required, so each run uses the actions and prompt you supply.
get_action_space() and get_instructions() provide the defaults used in the example.
The action dictionary determines which functions the model can call and which tool definitions are sent to the API. Add or remove a function there to change its options.
Callbacks let you watch an action before or after it happens. Each receives
(step, action, result): the model-turn index, the action's name and arguments, and its
result. Before execution, result is None. For example, show the cursor before an
action and print the result afterward:
from functools import partial
from callbacks.cursor import show_cursor

callbacks = [
    dict(type="before", function=partial(show_cursor, agent)),
    dict(type="after", function=print),
]
The cursor.py overlay
glides between targets, follows drags, and pulses on
clicks. It respects reduced-motion preferences and lets clicks pass through to the page.
The CLI loads it when you pass --cursor.
When the model needs to talk to you, on_message displays its message and on_reply
collects your answer. They default to print and input; replace them to use your own UI.
Development
If you want to change the loop, start with agent.py. The animated cursor lives in callbacks/cursor.py, and the demo recorder shows how to record a run. Tests live in tests/:
uv run python -m unittest discover -s tests -v
uv run python -m tests.test_live  # Optional paid OpenRouter test.
The local tests exercise browser actions, tabs, cleanup, API results, and error recovery using Chromium and a test server. The live test asks a model to complete a signup form, then checks what it submitted.