RAG (Retrieval Augmented Generation) Framework for building modular, open source applications for production by TrueFoundry
See the code[!Note] This project is no longer actively maintained. We thank all contributors for their contributions.
Langchain/LlamaIndex provide easy to use abstractions that can be used for quick experimentation and prototyping on jupyter notebooks. But, when things move to production, there are constraints like the components should be modular, easily scalable and extendable. This is where Cognita comes in action. Cognita uses Langchain/Llamaindex under the hood and provides an organisation to your codebase, where each of the RAG component is modular, API driven and easily extendible. Cognita can be used easily in a local setup, at the same time, offers you a production ready environment along with no-code UI support. Cognita also supports incremental indexing by default.
You can try out Cognita at: https://cognita.truefoundry.com
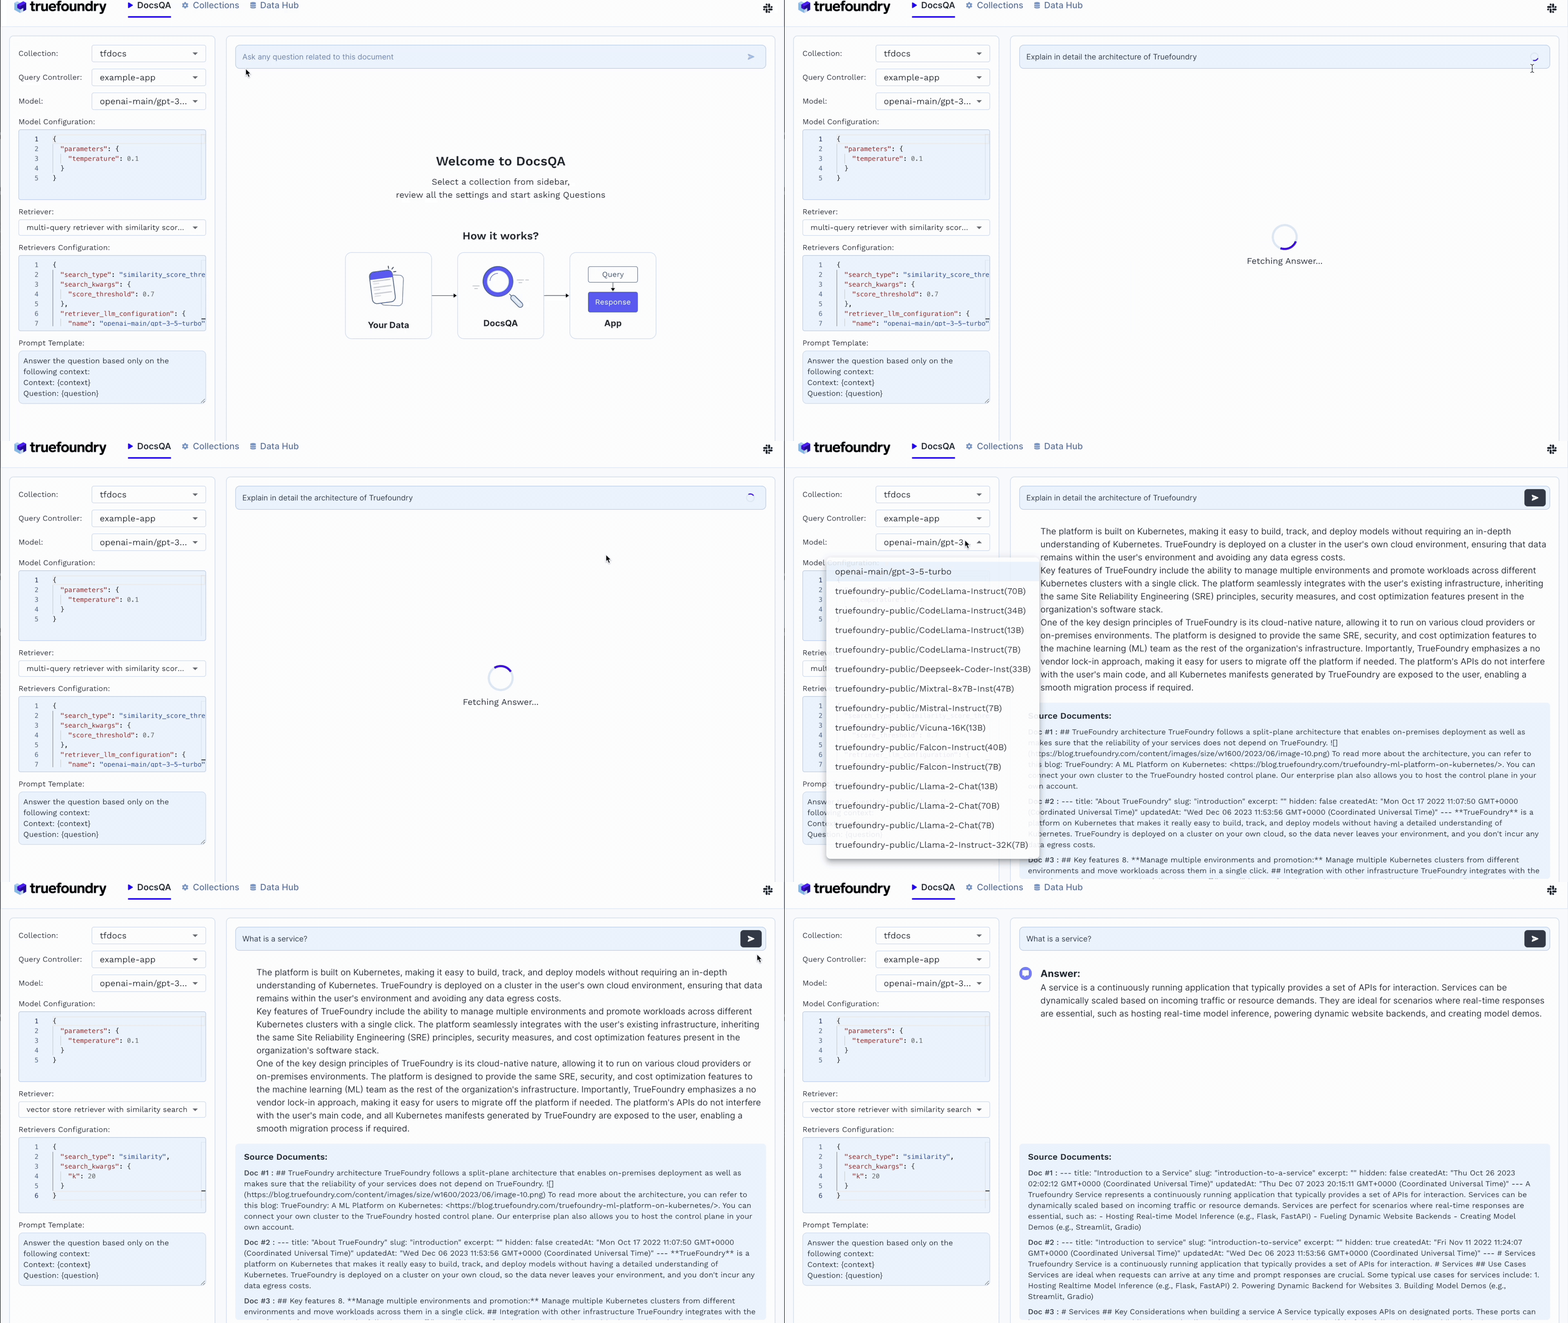
model gateway a single file to manage all the models and their configurations.local.metadata.yaml file. You can create collections, data sources, and index them via UI. This makes it easier to use Cognita without any code changes.Cognita is an open-source framework to organize your RAG codebase along with a frontend to play around with different RAG customizations. It provides a simple way to organize your codebase so that it becomes easy to test it locally while also being able to deploy it in a production ready environment. The key issues that arise while productionizing RAG system from a Jupyter Notebook are:
Cognita makes it really easy to customize and experiment everything about a RAG system and still be able to deploy it in a good way. It also ships with a UI that makes it easier to try out different RAG configurations and see the results in real time. You can use it locally or with/without using any Truefoundry components. However, using Truefoundry components makes it easier to test different models and deploy the system in a scalable way. Cognita allows you to host multiple RAG systems using one app.
If you use Cognita with Truefoundry AI Gateway, you can get logging, metrics and feedback mechanism for your user queries.
Similarity Search, Query Decompostion, Document Reranking, etcmixedbread-aiollamaCognita and all of its services can be run using docker-compose. This is the recommended way to run Cognita locally. Install Docker and docker-compose for your system from: Docker Compose
Before starting the services, we need to configure model providers that we would need for embedding and generating answers.
To start, copy models_config.sample.yaml to models_config.yaml
cp models_config.sample.yaml models_config.yaml
By default, the config has local providers enabled that need infinity and ollama server to run embedding and LLMs locally.
However, if you have a OpenAI API Key, you can uncomment the openai provider in models_config.yaml and update OPENAI_API_KEY in compose.env
Now, you can run the following command to start the services:
docker-compose --env-file compose.env up
compose.env file for environment variables. You can modify it as per your needs.cognita-db - Postgres instance used to store metadata for collections and data sources.qdrant-server - Used to start local vector db server.cognita-backend - Used to start the FastAPI backend server for Cognita.cognita-frontend - Used to start the frontend for Cognita.http://localhost:6333, the backend at http://localhost:8000 and frontend at http://localhost:5001.To start additional services such as ollama and infinity-server you can run the following command:
docker-compose --env-file compose.env --profile ollama --profile infinity up
This will start additional servers for ollama and infinity-server which can be used for LLM, Embeddings and reranking respectively. You can access the infinity-server at http://localhost:7997.
If you want to build backend / frontend image locally, for e.g when you add new requirements/packages/take a new pull from Github you can add --build flag to the command.
docker-compose --env-file compose.env up --build
OR
docker-compose --env-file compose.env --profile ollama --profile infinity up --build
Docker compose is a great way to run the entire Cognita system locally. Any changes that you make in the backend folder will be automatically reflected in the running backend server. You can test out different APIs and endpoints by making changes in the backend code.
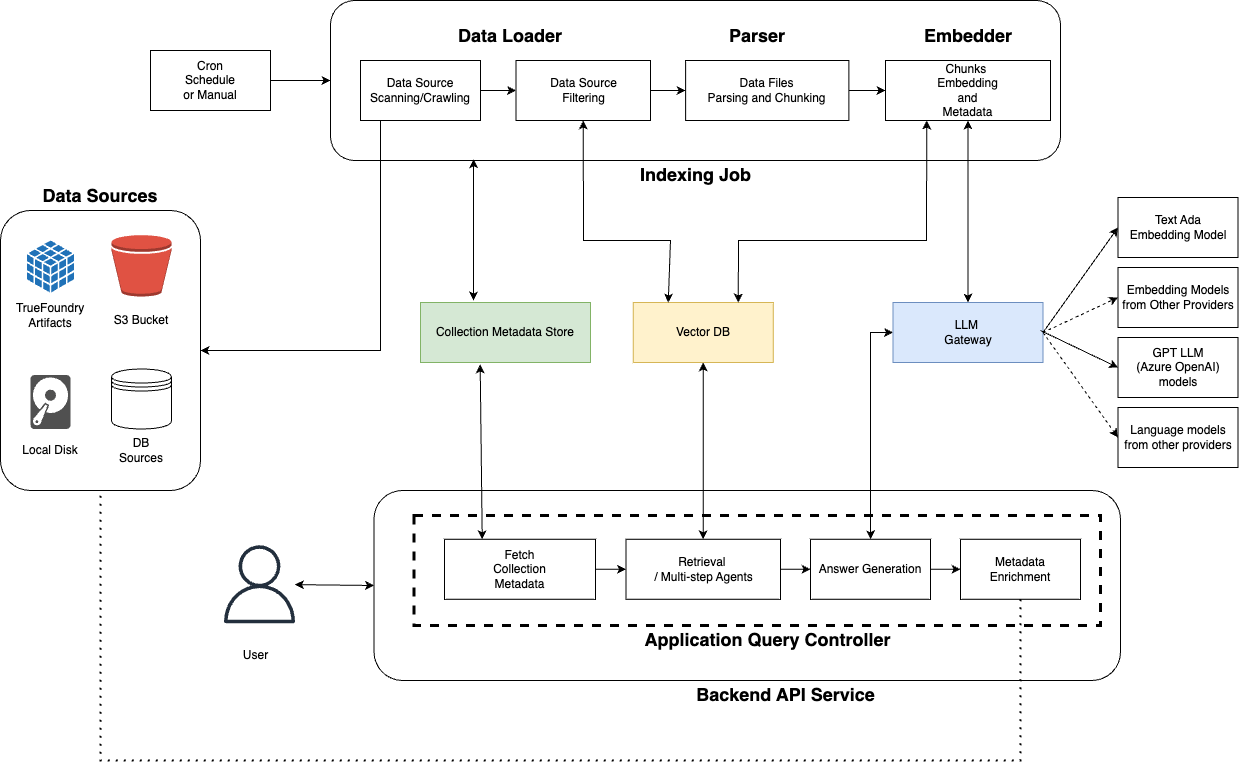
Overall the architecture of Cognita is composed of several entities
Data Sources - These are the places that contain your documents to be indexed. Usually these are S3 buckets, databases, TrueFoundry Artifacts or even local disk
Metadata Store - This store contains metadata about the collection themselves. A collection refers to a set of documents from one or more data sources combined. For each collection, the collection metadata stores
LLM Gateway - This is a central proxy that allows proxying requests to various Embedding and LLM models across many providers with a unified API format. This can be OpenAIChat, OllamaChat, or even TruefoundryChat that uses TF LLM Gateway.
Vector DB - This stores the embeddings and metadata for parsed files for the collection. It can be queried to get similar chunks or exact matches based on filters. We are currently supporting Qdrant and SingleStore as our choice of vector database.
Indexing Job - This is an asynchronous Job responsible for orchestrating the indexing flow. Indexing can be started manually or run regularly on a cron schedule. It will
The source code for this is in the
backend/indexer/
API Server - This component processes the user query to generate answers with references synchronously. Each application has full control over the retrieval and answer process. Broadly speaking, when a user sends a request
The code for this component is in
backend/server/
text-ada-002 from openai or mxbai-embed-large-v1 from mixedbread-aiUsers sends a request with their query
It is routed to one of the app's query controller
One or more retrievers are constructed on top of the Vector DB
Then a Question Answering chain / agent is constructed. It embeds the user query and fetches similar chunks.
A single shot Question Answering chain just generates an answer given similar chunks. An agent can do multi step reasoning and use many tools before arriving at an answer. In both cases, the API server uses LLM models (like GPT 3.5, GPT 4, etc)
Before returning the answer, the metadata for relevant chunks can be updated with things like presigned urls, surrounding slides, external data source links.
The answer and relevant document chunks are returned in response.
Note: In case of agents the intermediate steps can also be streamed. It is up to the specific app to decide.
Cognita goes by the tagline -
Everything is available and Everything is customizable.
Cognita makes it really easy to switch between parsers, loaders, models and retrievers.
You can write your own data loader by inherting the BaseDataLoader class from backend/modules/dataloaders/loader.py
Finally, register the loader in backend/modules/dataloaders/__init__.py
Testing a dataloader on localdir, in root dir, copy the following code as test.py and execute it. We show how to test an existing LocalDirLoader here:
from backend.modules.dataloaders import LocalDirLoader
from backend.types import DataSource

data_source = DataSource(
type="local",
uri="sample-data/creditcards",
)

loader = LocalDirLoader()


loaded_data_pts = loader.load_full_data(
    data_source=data_source,
    dest_dir="test/creditcards",
)


for data_pt in loaded_data_pts:
    print(data_pt)
OpenAIEmbeddings by Langchain by default to generate embeddingsmodels_config.yaml file and restart the server to make it work.You can write your own parser by inherting the BaseParser class from backend/modules/parsers/parser.py
Finally, register the parser in backend/modules/parsers/__init__.py
Testing a Parser on a local file, in root dir, copy the following code as test.py and execute it. Here we show how we can test existing MarkdownParser:
import asyncio
from backend.modules.parsers import MarkdownParser

parser = MarkdownParser()
chunks =  asyncio.run(
    parser.get_chunks(
        filepath="sample-data/creditcards/diners-club-black.md",
    )
)
print(chunks)
To add your own interface for a VectorDB you can inhertit BaseVectorDB from backend/modules/vector_db/base.py
Register the vectordb under backend/modules/vector_db/__init__.py
Code responsible for implementing the Query interface of RAG application. The methods defined in these query controllers are added routes to your FastAPI server.
Add your Query controller class in backend/modules/query_controllers/
Add query_controller decorator to your class and pass the name of your custom controller as argument
from backend.server.decorator import query_controller

@query_controller("/my-controller")
class MyCustomController():
    ...
post, get, delete to make your methods an APIfrom backend.server.decorator import post
@query_controller("/my-controller")
class MyCustomController():
...
@post("/answer")
def answer(query: str):
# Write code to express your logic for answer
# This API will be exposed as POST /my-controller/answer
...
backend/modules/query_controllers/__init__.py...
from backend.modules.query_controllers.sample_controller.controller import MyCustomController
As an example, we have implemented sample controller in
backend/modules/query_controllers/example. Please refer for better understanding
To be able to Query on your own documents, follow the steps below:
Register at TrueFoundry, follow here
Submit, you will be redirected to your dashboard endpoint ie https://<org_name>.truefoundry.cloudNote: Keep your dashboard endpoint handy, we will refer it as "TFY_HOST" and it should have structure like "https://<org_name>.truefoundry.cloud"
Setup a cluster, use TrueFoundry managed for quick setup
Register for the pre-filled IPAdd a Docker Registry to push your docker images to.Skip this stepAdd a Storage Integration
Create a ML Repo
Navigate to ML Repo tab
Click on + New ML Repo button on top-right
Give a unique name to your ML Repo (say 'docs-qa-llm')
Select Storage Integration
On Submit, your ML Repo will be created
For more details: link
Create a Workspace
+ New Workspace button on top-rightAdd ML Repo AccessSubmit, a new Workspace will be created. You can copy the Workspace FQN by clicking on FQN.For more details: link
Deploy RAG Application
+ New Deployment buttton on top-rightApplication Cataloguemain branch is used for deployment (You will find this option in Show Advance fields). You can change the branch name and git repository if required.
Make sure to re-select the main branch, as the SHA commit, does not get updated automatically.
Submit your application will be deployed.The following steps will showcase how to use the cognita UI to query documents:
Create Data Source
Data Sources tab
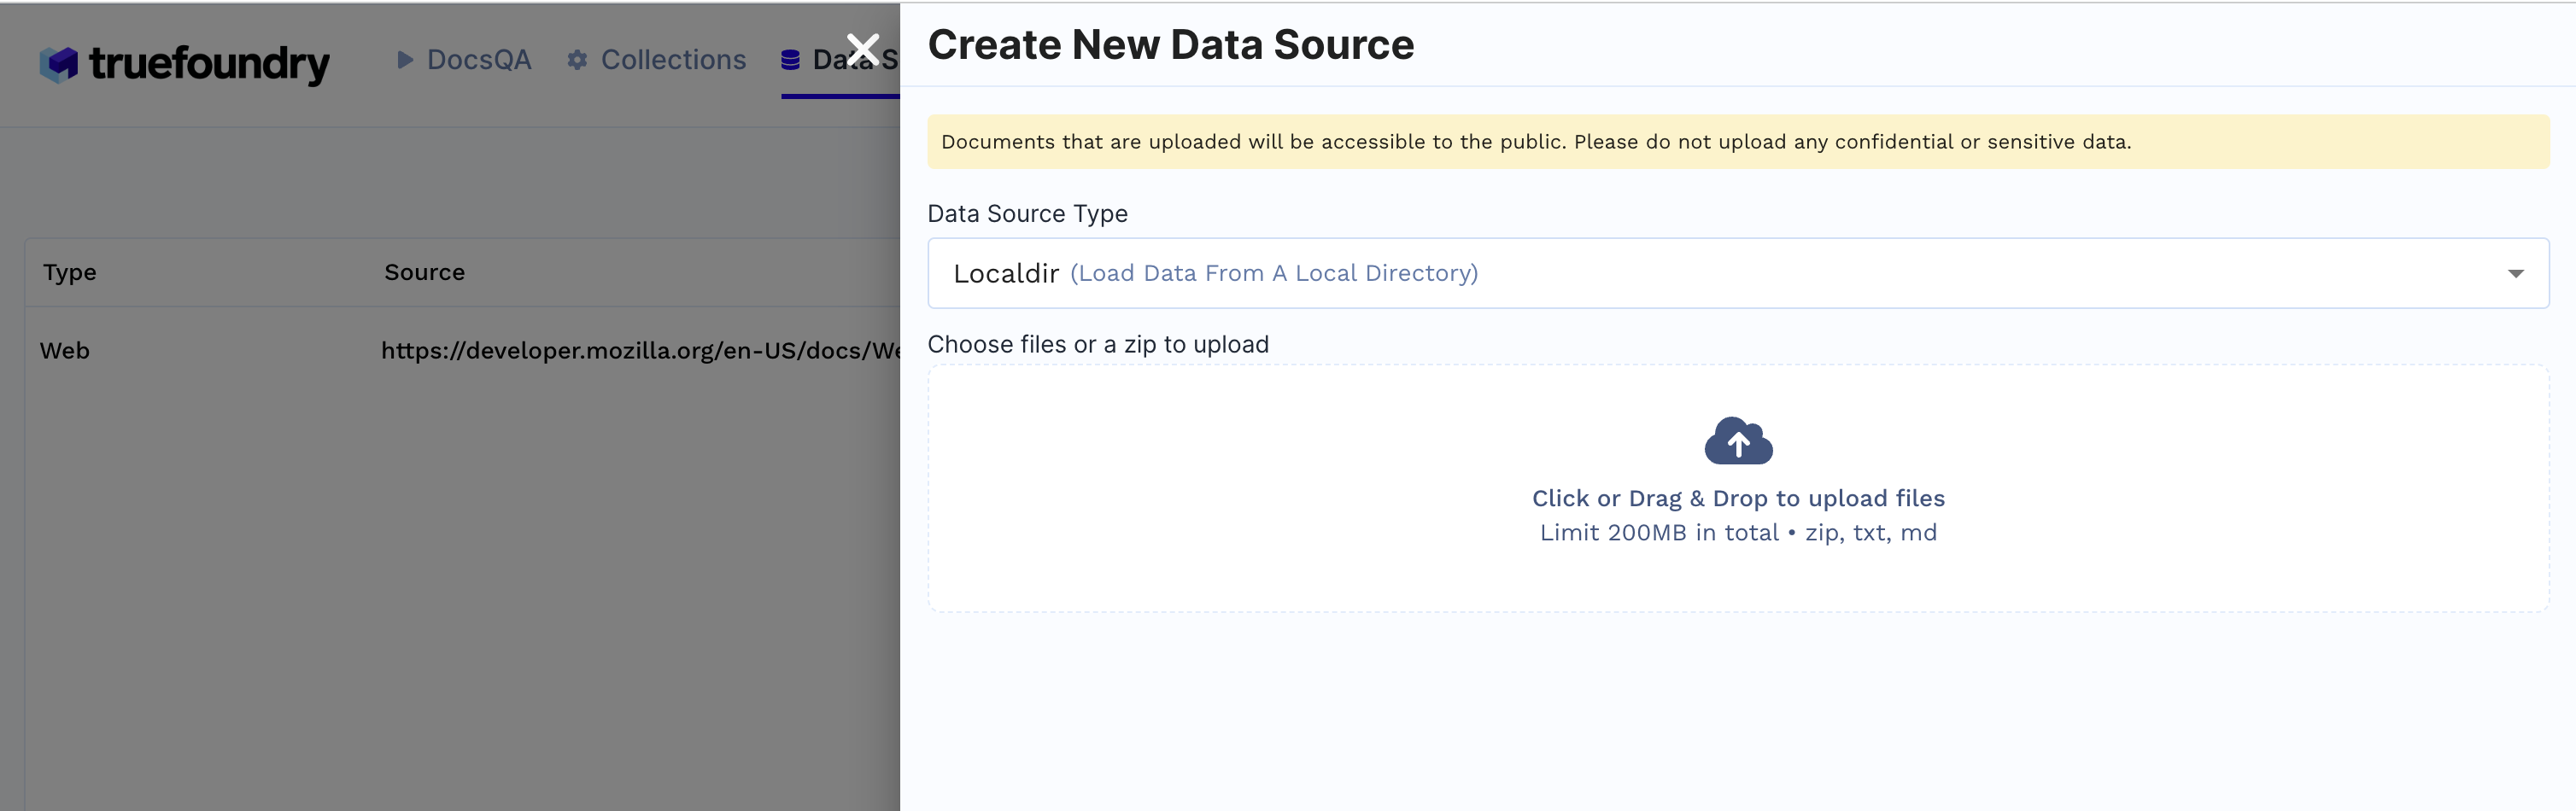
+ New DatasourceLocaldir is selected upload files from your machine and click Submit.
Create Collection
Collections tab+ New Collection
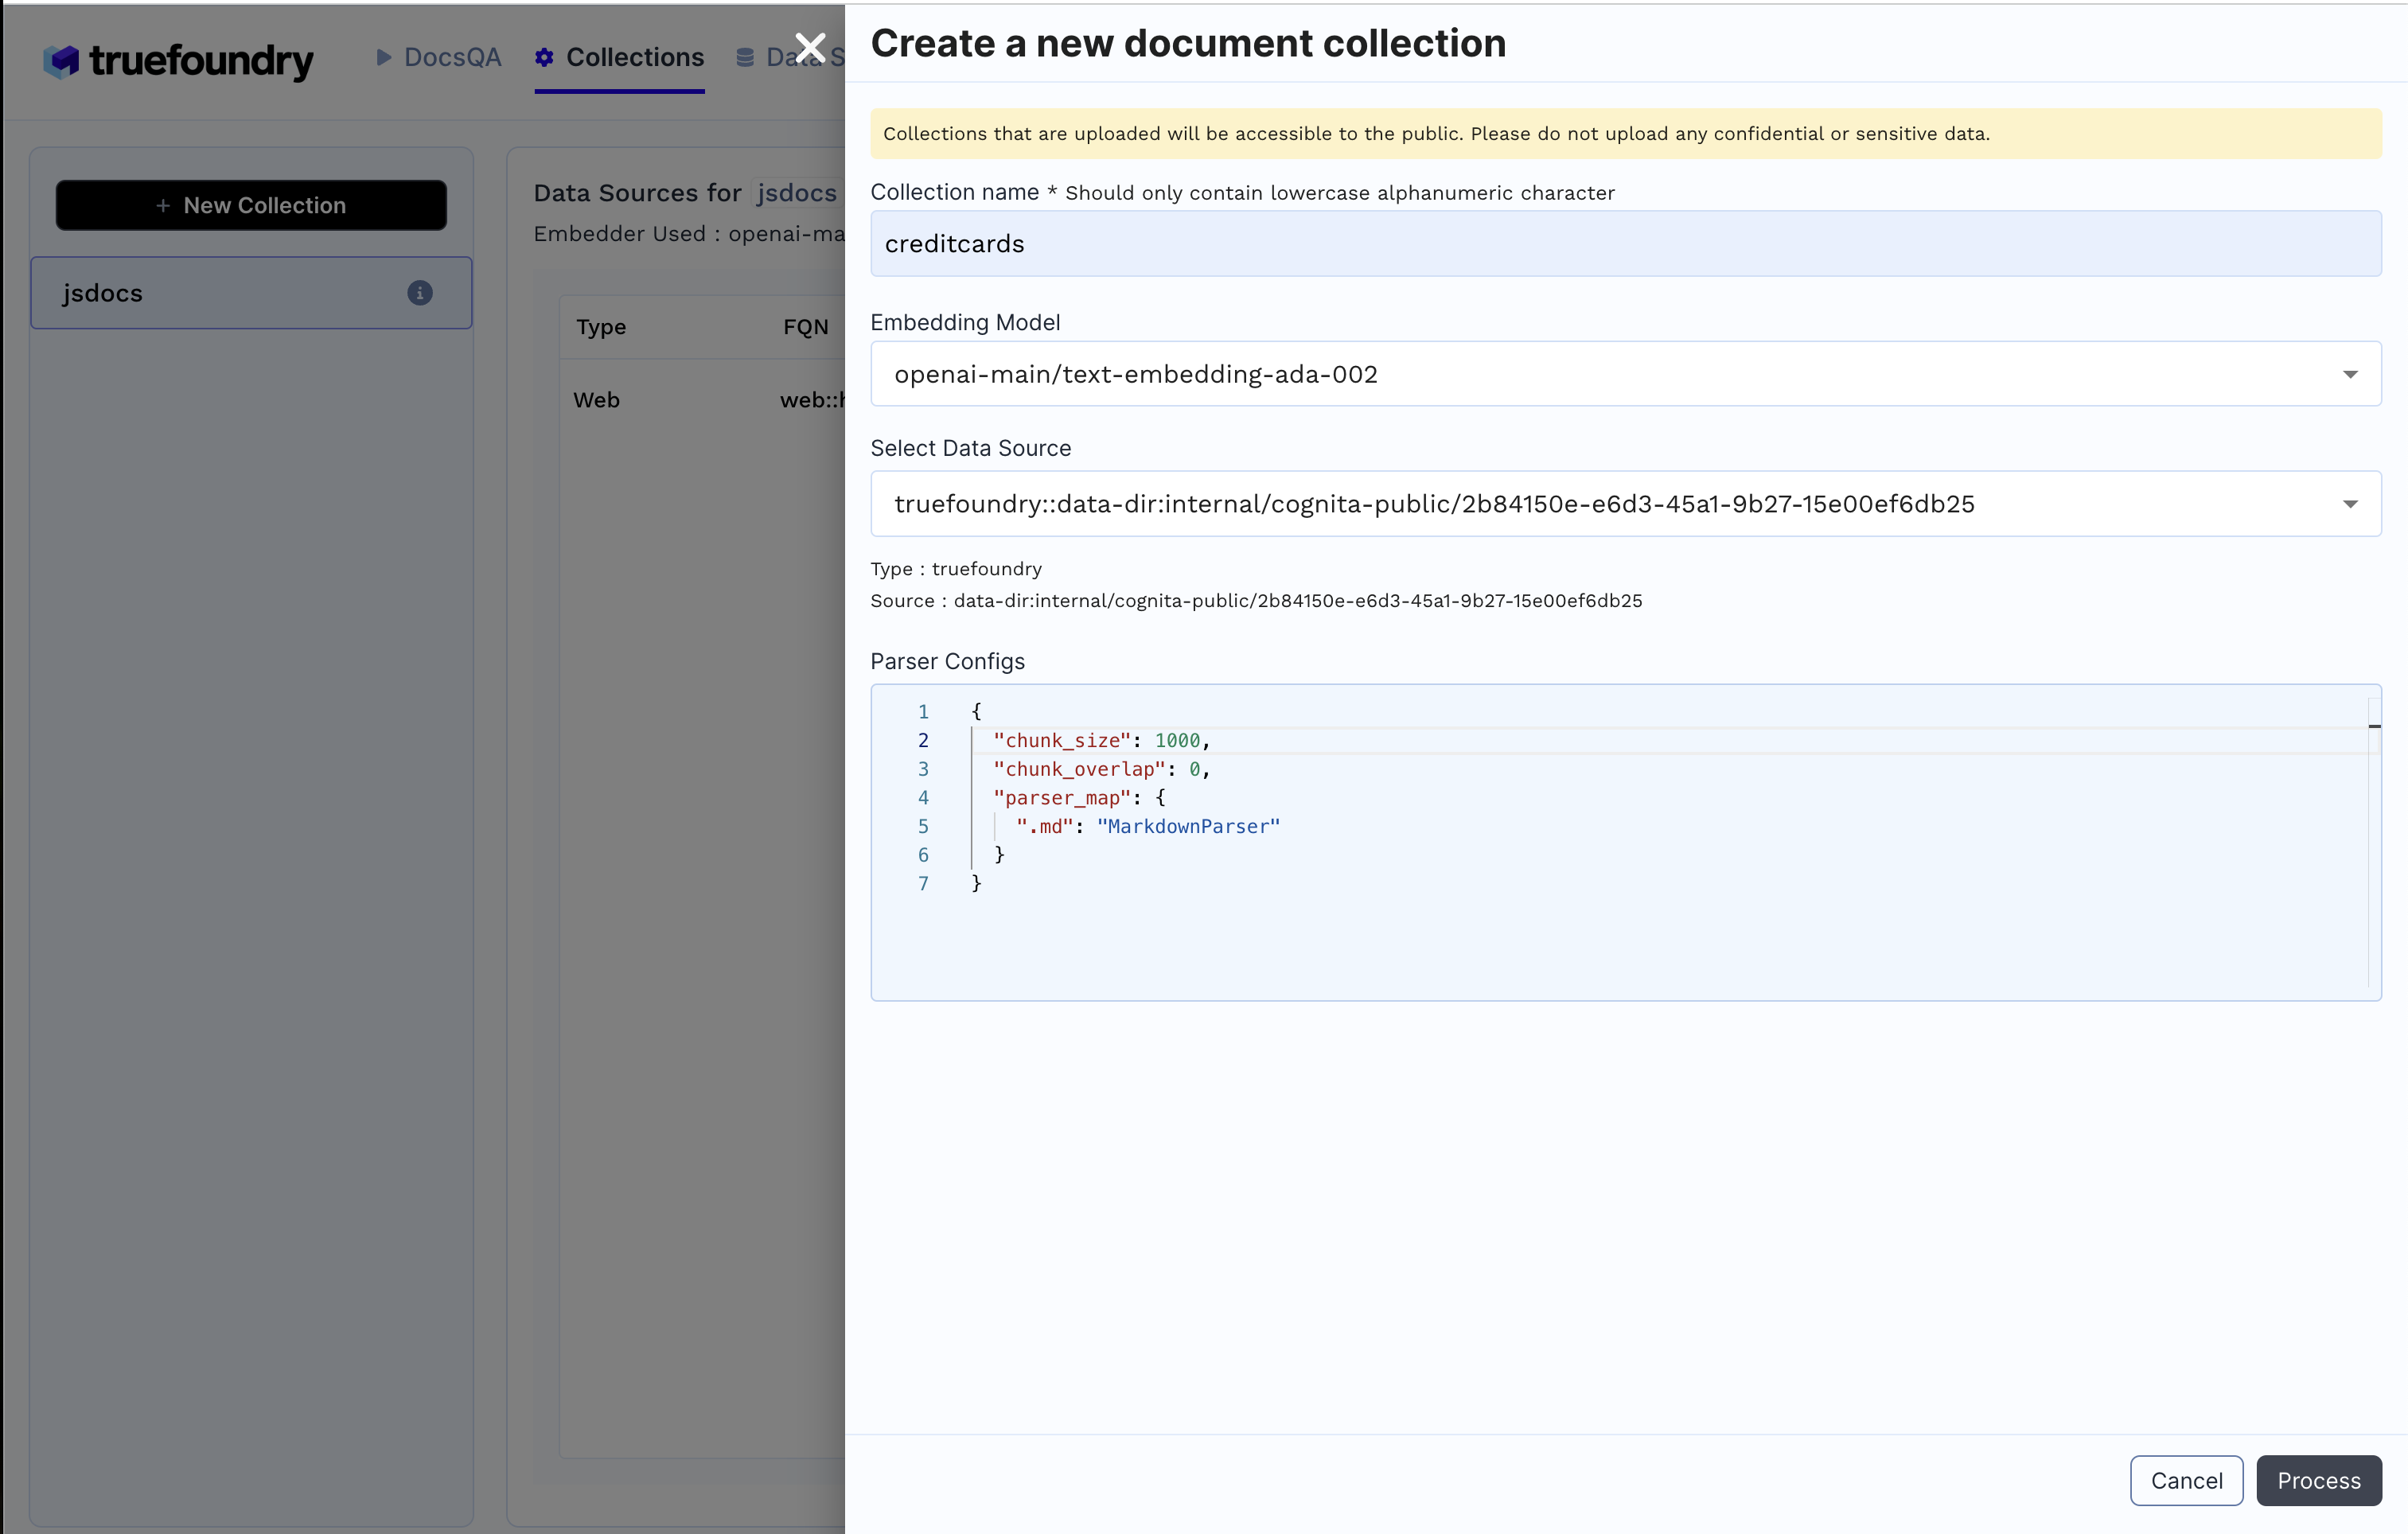
Process to create the collection and index the data.
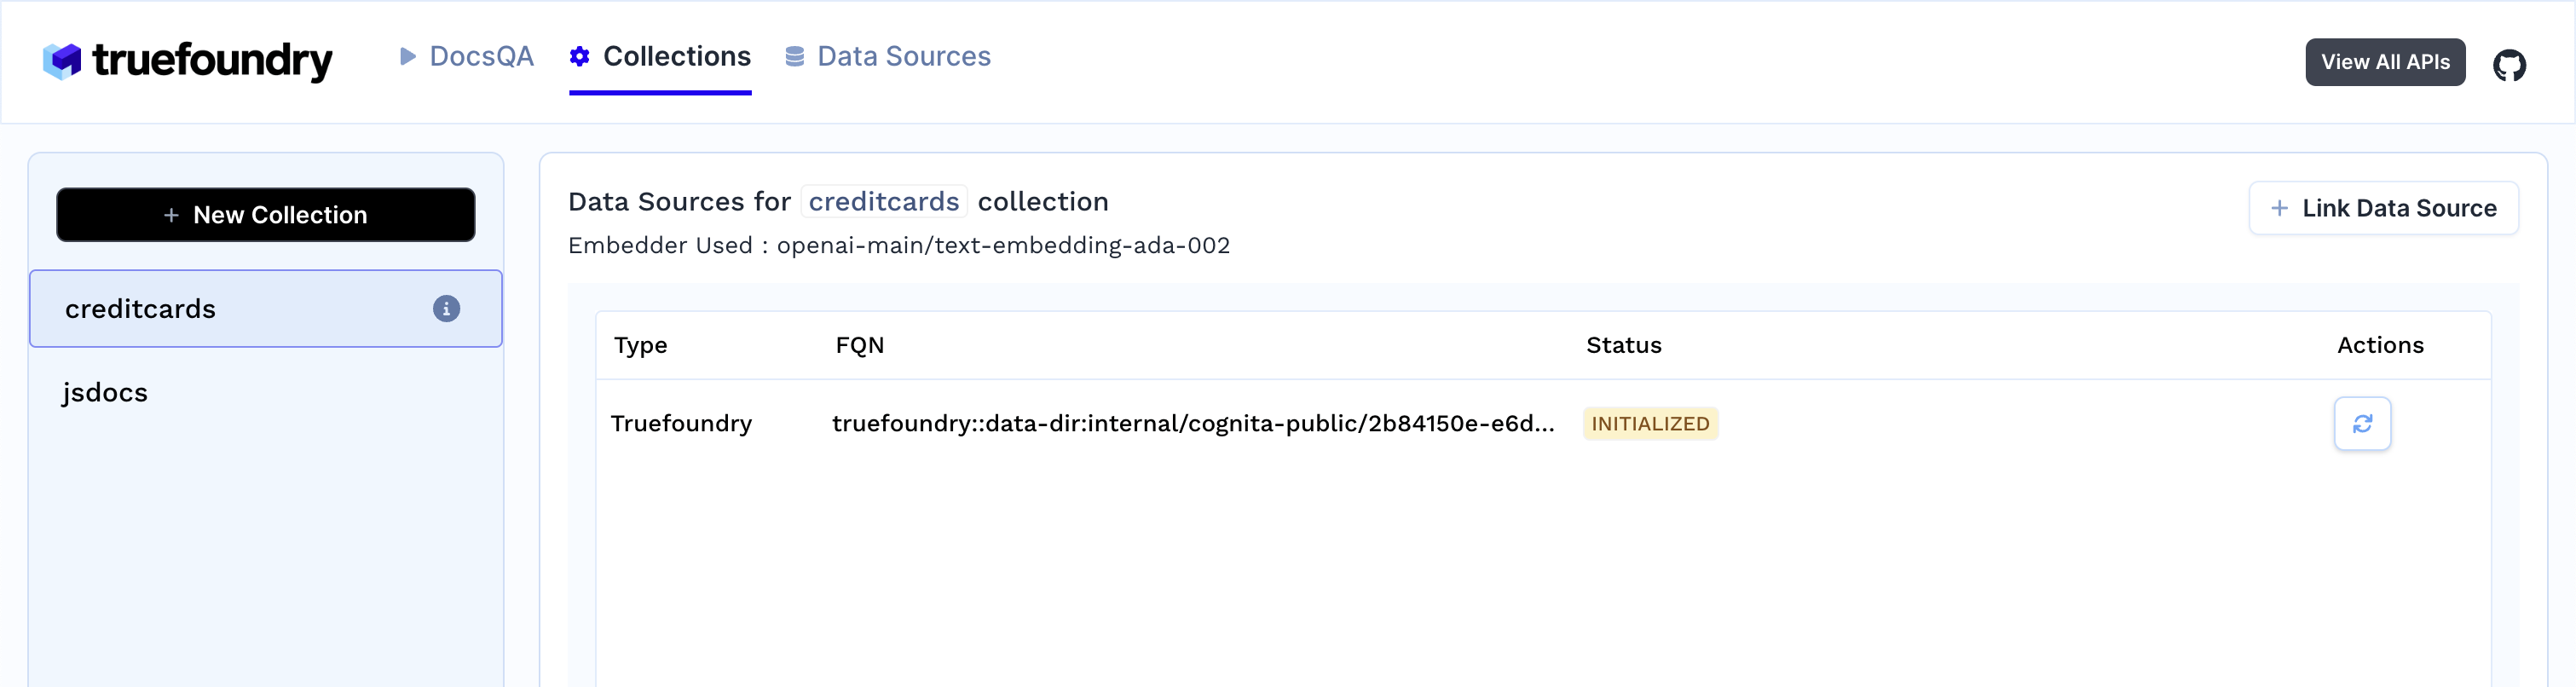
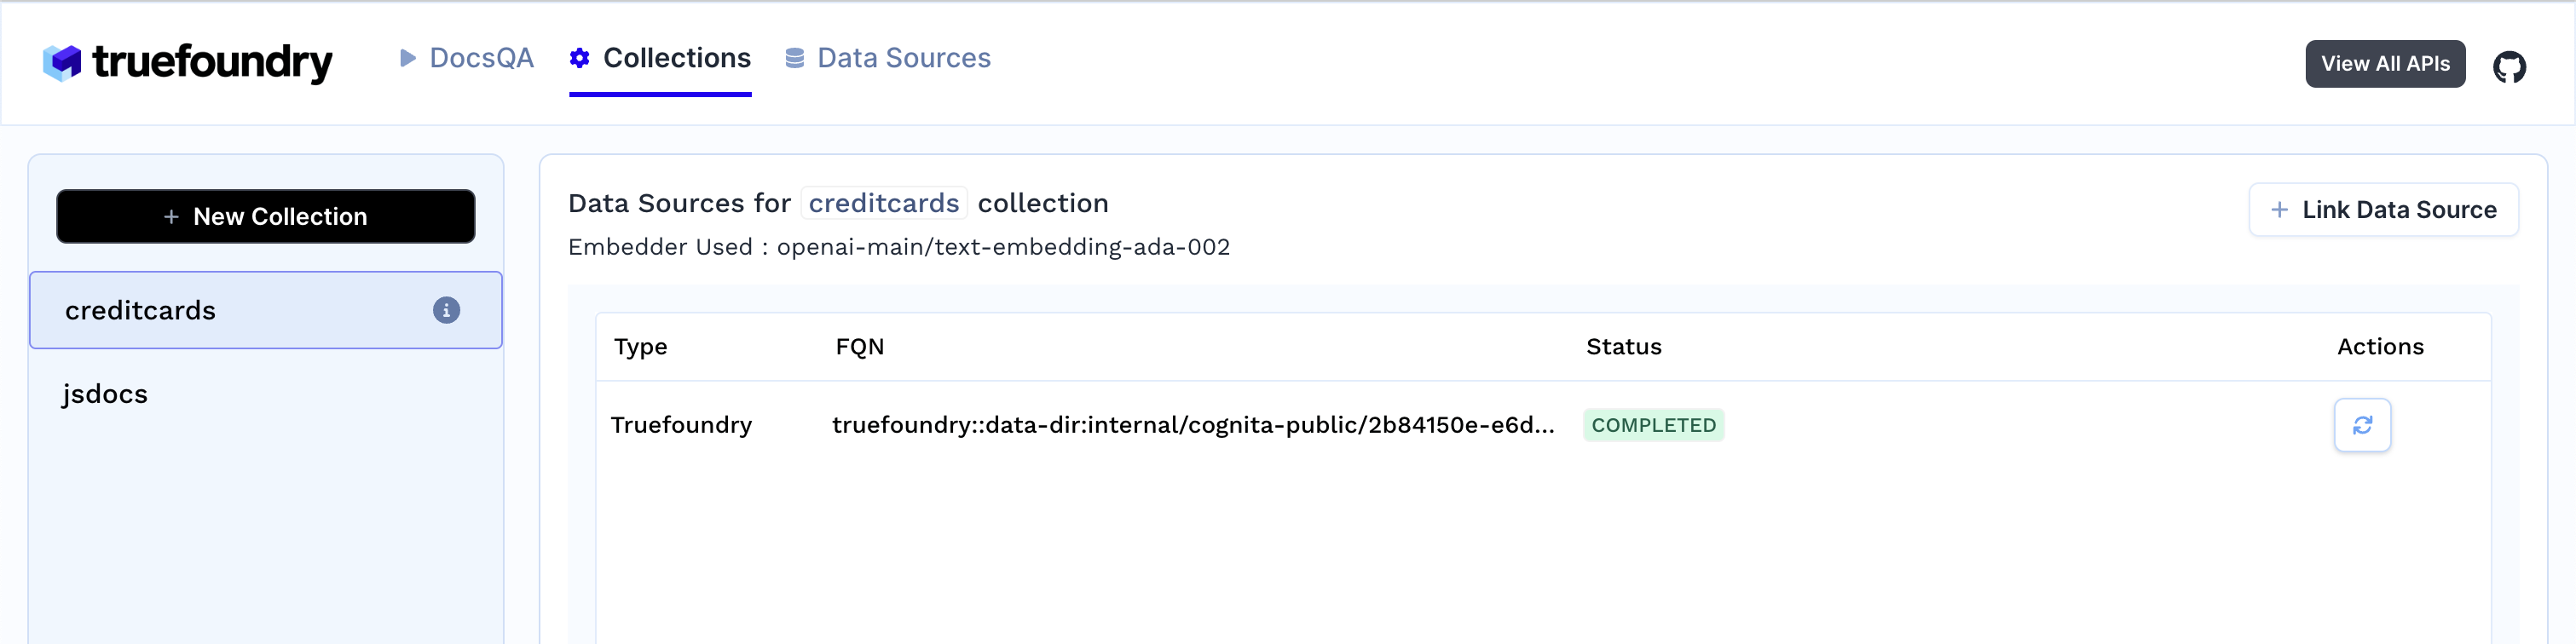
As soon as you create the collection, data ingestion begins, you can view it's status by selecting your collection in collections tab. You can also add additional data sources later on and index them in the collection.
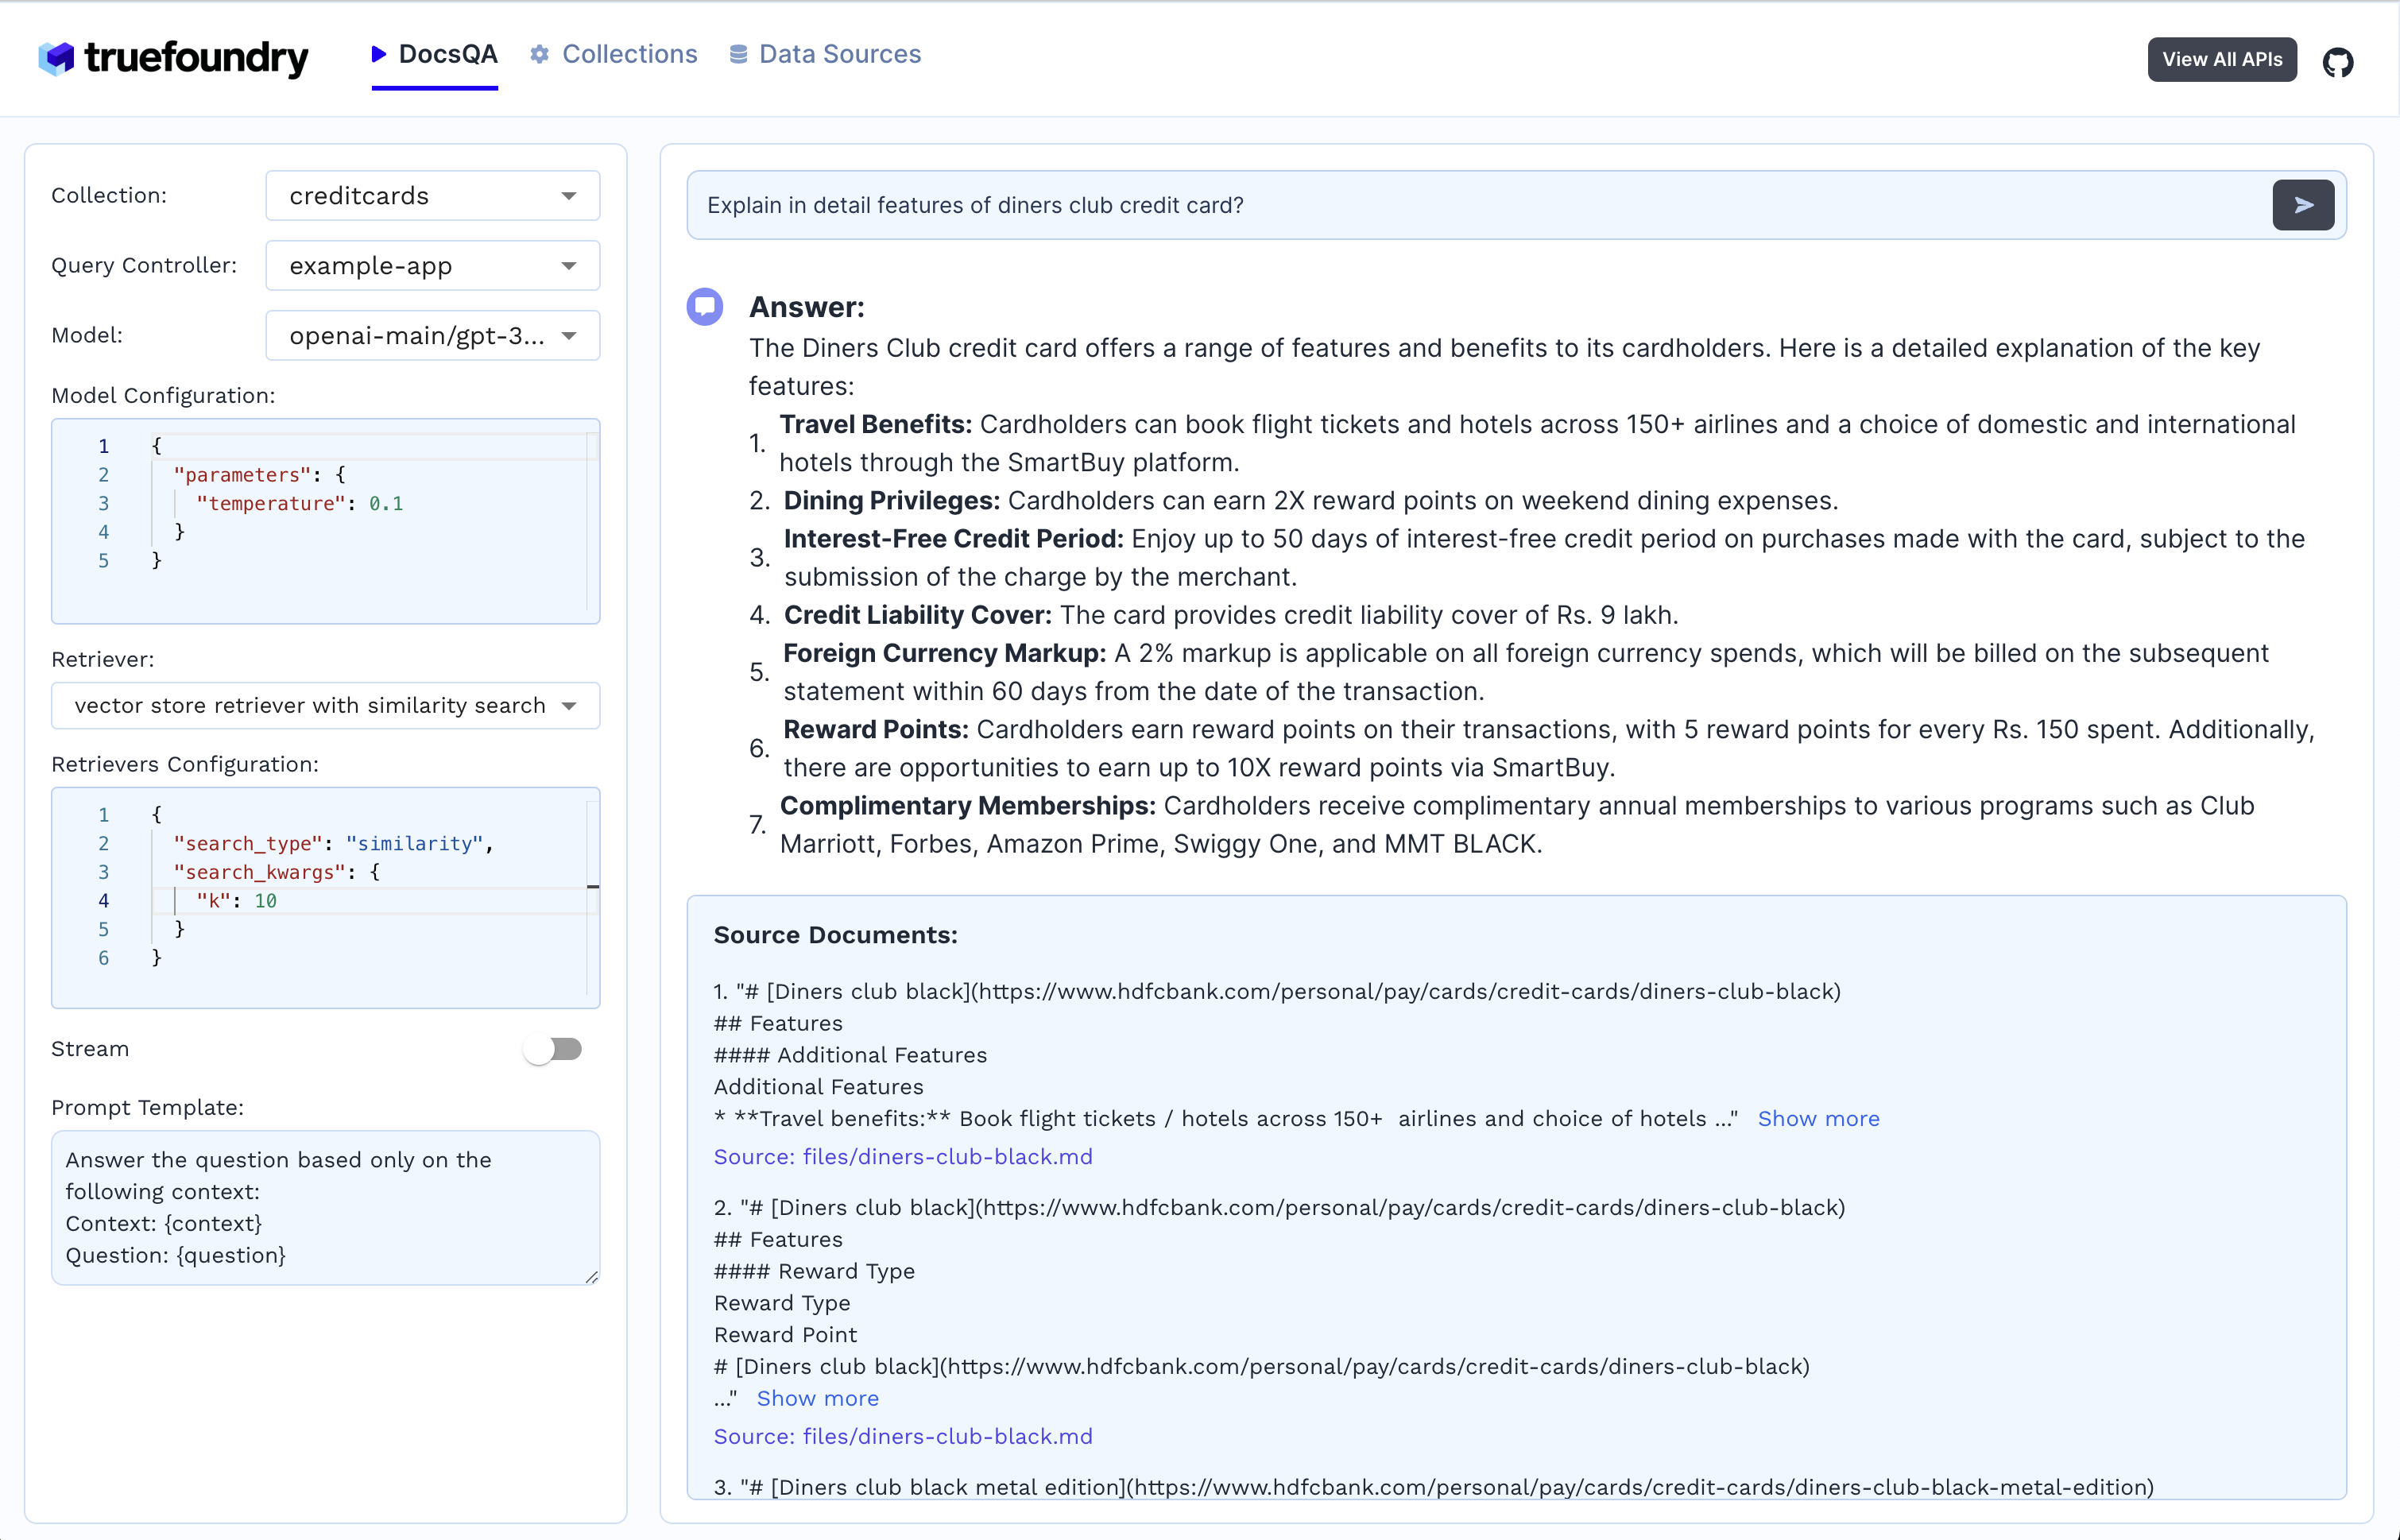
Response generation
Your contributions are always welcome! Feel free to contribute ideas, feedback, or create issues and bug reports if you find any! Before contributing, please read the Contribution Guide.
Contributions are welcomed for the following upcoming developments:
Chroma, Weaviate, etcScalar + Binary Quantization embeddings.RAG Evalutaion of different retrievers.RAG Visualization.stable-lm-3b, dragon-yi-6b, etcGraphDB187 followers · starred Jun 2025
9 followers · starred Jun 2024
530 followers · starred Jun 2026
433 followers · starred Apr 2024
RAG (Retrieval Augmented Generation) Framework for building modular, open source applications for production by TrueFoundry
See the code[!Note] This project is no longer actively maintained. We thank all contributors for their contributions.
Langchain/LlamaIndex provide easy to use abstractions that can be used for quick experimentation and prototyping on jupyter notebooks. But, when things move to production, there are constraints like the components should be modular, easily scalable and extendable. This is where Cognita comes in action. Cognita uses Langchain/Llamaindex under the hood and provides an organisation to your codebase, where each of the RAG component is modular, API driven and easily extendible. Cognita can be used easily in a local setup, at the same time, offers you a production ready environment along with no-code UI support. Cognita also supports incremental indexing by default.
You can try out Cognita at: https://cognita.truefoundry.com
model gateway a single file to manage all the models and their configurations.local.metadata.yaml file. You can create collections, data sources, and index them via UI. This makes it easier to use Cognita without any code changes.Cognita is an open-source framework to organize your RAG codebase along with a frontend to play around with different RAG customizations. It provides a simple way to organize your codebase so that it becomes easy to test it locally while also being able to deploy it in a production ready environment. The key issues that arise while productionizing RAG system from a Jupyter Notebook are:
Cognita makes it really easy to customize and experiment everything about a RAG system and still be able to deploy it in a good way. It also ships with a UI that makes it easier to try out different RAG configurations and see the results in real time. You can use it locally or with/without using any Truefoundry components. However, using Truefoundry components makes it easier to test different models and deploy the system in a scalable way. Cognita allows you to host multiple RAG systems using one app.
If you use Cognita with Truefoundry AI Gateway, you can get logging, metrics and feedback mechanism for your user queries.
Similarity Search, Query Decompostion, Document Reranking, etcmixedbread-aiollamaCognita and all of its services can be run using docker-compose. This is the recommended way to run Cognita locally. Install Docker and docker-compose for your system from: Docker Compose
Before starting the services, we need to configure model providers that we would need for embedding and generating answers.
To start, copy models_config.sample.yaml to models_config.yaml
cp models_config.sample.yaml models_config.yaml
By default, the config has local providers enabled that need infinity and ollama server to run embedding and LLMs locally.
However, if you have a OpenAI API Key, you can uncomment the openai provider in models_config.yaml and update OPENAI_API_KEY in compose.env
Now, you can run the following command to start the services:
docker-compose --env-file compose.env up
compose.env file for environment variables. You can modify it as per your needs.cognita-db - Postgres instance used to store metadata for collections and data sources.qdrant-server - Used to start local vector db server.cognita-backend - Used to start the FastAPI backend server for Cognita.cognita-frontend - Used to start the frontend for Cognita.http://localhost:6333, the backend at http://localhost:8000 and frontend at http://localhost:5001.To start additional services such as ollama and infinity-server you can run the following command:
docker-compose --env-file compose.env --profile ollama --profile infinity up
This will start additional servers for ollama and infinity-server which can be used for LLM, Embeddings and reranking respectively. You can access the infinity-server at http://localhost:7997.
If you want to build backend / frontend image locally, for e.g when you add new requirements/packages/take a new pull from Github you can add --build flag to the command.
docker-compose --env-file compose.env up --build
OR
docker-compose --env-file compose.env --profile ollama --profile infinity up --build
Docker compose is a great way to run the entire Cognita system locally. Any changes that you make in the backend folder will be automatically reflected in the running backend server. You can test out different APIs and endpoints by making changes in the backend code.
Overall the architecture of Cognita is composed of several entities
Data Sources - These are the places that contain your documents to be indexed. Usually these are S3 buckets, databases, TrueFoundry Artifacts or even local disk
Metadata Store - This store contains metadata about the collection themselves. A collection refers to a set of documents from one or more data sources combined. For each collection, the collection metadata stores
LLM Gateway - This is a central proxy that allows proxying requests to various Embedding and LLM models across many providers with a unified API format. This can be OpenAIChat, OllamaChat, or even TruefoundryChat that uses TF LLM Gateway.
Vector DB - This stores the embeddings and metadata for parsed files for the collection. It can be queried to get similar chunks or exact matches based on filters. We are currently supporting Qdrant and SingleStore as our choice of vector database.
Indexing Job - This is an asynchronous Job responsible for orchestrating the indexing flow. Indexing can be started manually or run regularly on a cron schedule. It will
The source code for this is in the
backend/indexer/
API Server - This component processes the user query to generate answers with references synchronously. Each application has full control over the retrieval and answer process. Broadly speaking, when a user sends a request
The code for this component is in
backend/server/
text-ada-002 from openai or mxbai-embed-large-v1 from mixedbread-aiUsers sends a request with their query
It is routed to one of the app's query controller
One or more retrievers are constructed on top of the Vector DB
Then a Question Answering chain / agent is constructed. It embeds the user query and fetches similar chunks.
A single shot Question Answering chain just generates an answer given similar chunks. An agent can do multi step reasoning and use many tools before arriving at an answer. In both cases, the API server uses LLM models (like GPT 3.5, GPT 4, etc)
Before returning the answer, the metadata for relevant chunks can be updated with things like presigned urls, surrounding slides, external data source links.
The answer and relevant document chunks are returned in response.
Note: In case of agents the intermediate steps can also be streamed. It is up to the specific app to decide.
Cognita goes by the tagline -
Everything is available and Everything is customizable.
Cognita makes it really easy to switch between parsers, loaders, models and retrievers.
You can write your own data loader by inherting the BaseDataLoader class from backend/modules/dataloaders/loader.py
Finally, register the loader in backend/modules/dataloaders/__init__.py
Testing a dataloader on localdir, in root dir, copy the following code as test.py and execute it. We show how to test an existing LocalDirLoader here:
from backend.modules.dataloaders import LocalDirLoader
from backend.types import DataSource

data_source = DataSource(
type="local",
uri="sample-data/creditcards",
)

loader = LocalDirLoader()


loaded_data_pts = loader.load_full_data(
    data_source=data_source,
    dest_dir="test/creditcards",
)


for data_pt in loaded_data_pts:
    print(data_pt)
OpenAIEmbeddings by Langchain by default to generate embeddingsmodels_config.yaml file and restart the server to make it work.You can write your own parser by inherting the BaseParser class from backend/modules/parsers/parser.py
Finally, register the parser in backend/modules/parsers/__init__.py
Testing a Parser on a local file, in root dir, copy the following code as test.py and execute it. Here we show how we can test existing MarkdownParser:
import asyncio
from backend.modules.parsers import MarkdownParser

parser = MarkdownParser()
chunks =  asyncio.run(
    parser.get_chunks(
        filepath="sample-data/creditcards/diners-club-black.md",
    )
)
print(chunks)
To add your own interface for a VectorDB you can inhertit BaseVectorDB from backend/modules/vector_db/base.py
Register the vectordb under backend/modules/vector_db/__init__.py
Code responsible for implementing the Query interface of RAG application. The methods defined in these query controllers are added routes to your FastAPI server.
Add your Query controller class in backend/modules/query_controllers/
Add query_controller decorator to your class and pass the name of your custom controller as argument
from backend.server.decorator import query_controller

@query_controller("/my-controller")
class MyCustomController():
    ...
post, get, delete to make your methods an APIfrom backend.server.decorator import post
@query_controller("/my-controller")
class MyCustomController():
...
@post("/answer")
def answer(query: str):
# Write code to express your logic for answer
# This API will be exposed as POST /my-controller/answer
...
backend/modules/query_controllers/__init__.py...
from backend.modules.query_controllers.sample_controller.controller import MyCustomController
As an example, we have implemented sample controller in
backend/modules/query_controllers/example. Please refer for better understanding
To be able to Query on your own documents, follow the steps below:
Register at TrueFoundry, follow here
Submit, you will be redirected to your dashboard endpoint ie https://<org_name>.truefoundry.cloudNote: Keep your dashboard endpoint handy, we will refer it as "TFY_HOST" and it should have structure like "https://<org_name>.truefoundry.cloud"
Setup a cluster, use TrueFoundry managed for quick setup
Register for the pre-filled IPAdd a Docker Registry to push your docker images to.Skip this stepAdd a Storage Integration
Create a ML Repo
Navigate to ML Repo tab
Click on + New ML Repo button on top-right
Give a unique name to your ML Repo (say 'docs-qa-llm')
Select Storage Integration
On Submit, your ML Repo will be created
For more details: link
Create a Workspace
+ New Workspace button on top-rightAdd ML Repo AccessSubmit, a new Workspace will be created. You can copy the Workspace FQN by clicking on FQN.For more details: link
Deploy RAG Application
+ New Deployment buttton on top-rightApplication Cataloguemain branch is used for deployment (You will find this option in Show Advance fields). You can change the branch name and git repository if required.
Make sure to re-select the main branch, as the SHA commit, does not get updated automatically.
Submit your application will be deployed.The following steps will showcase how to use the cognita UI to query documents:
Create Data Source
Data Sources tab
+ New DatasourceLocaldir is selected upload files from your machine and click Submit.Create Collection
Collections tab+ New Collection
Process to create the collection and index the data.
As soon as you create the collection, data ingestion begins, you can view it's status by selecting your collection in collections tab. You can also add additional data sources later on and index them in the collection.
Response generation
Your contributions are always welcome! Feel free to contribute ideas, feedback, or create issues and bug reports if you find any! Before contributing, please read the Contribution Guide.
Contributions are welcomed for the following upcoming developments:
Chroma, Weaviate, etcScalar + Binary Quantization embeddings.RAG Evalutaion of different retrievers.RAG Visualization.stable-lm-3b, dragon-yi-6b, etcGraphDB187 followers · starred Jun 2025
9 followers · starred Jun 2024
530 followers · starred Jun 2026
433 followers · starred Apr 2024



