
README
eliza_arbitrum
This project is an AI agent based on Eliza that mints NFTs after collecting information from the user. In the stylus folder, you can find the smart contract that has been created and deployed on Arbitrum, which the agent interacts with to mint the NFTs. The NFTs' metadata is stored on IPFS using Pinata.
The demo of this project can be found on Youtube
In the project root add these variables to the .env file: Set the following environment variables
ANTHROPIC_API_KEY=your-anthropic-api-key
EVM_PRIVATE_KEY=your-private-key-here
ETHEREUM_PROVIDER_ARBITRUMSEPOLIA=https://your-custom-rpc-url
PINATA_JWT=your-pinata-jwt-here
PINATA_GATEWAY_URL=your-pinata-gateway-url-here
Run pnpm i && pnpm build to install the dependencies
The following command starts the agent in development mode (including the build and also run the Vite client to chat with the agent):
pnpm run dev
Otherwise just start the agent:
pnpm start
In this second case you must run the Vite client to chat with the agent by executing pnpm start:client
To test the agent you can say something like:
I want to create a new NFT called Audi R8 V10 Plus with this description: A high-performance supercar powered by a naturally aspirated V10 engine, blending German engineering with cutting-edge technology. It offers razor-sharp handling, a sophisticated design, and an exhilarating driving experience.
I want the label to be sent to the address 0x20c6F9006d563240031A1388f4f25726029a6368
It will mint a new NFT on Arbitrum Sepolia with the name and description provided, which will be stored on IPFS.
This project also integrates the plugin-evm and is configured for Arbitrum Sepolia, allowing you to perform token transfers, swaps, and bridging. For example, if you want to send Ether to another account, you can write:
Transfer 0.0000000001 ETH to 0x1F0c72E13718D9136FfE51b89289b239A1BcfE28 on Arbitrum Sepolia
Check the README of the plugin-evm for more details about the configuration and instructions on how to call the actions.
Eliza 🤖

📖 Documentation | 🎯 Examples
🌍 README Translations
中文说明 | 日本語の説明 | 한국어 설명 | Français | Português | Türkçe | Русский | Español | Italiano | ไทย | Deutsch | Tiếng Việt | עִברִית | Tagalog | Polski | Arabic | Hungarian | Srpski
🚩 Overview
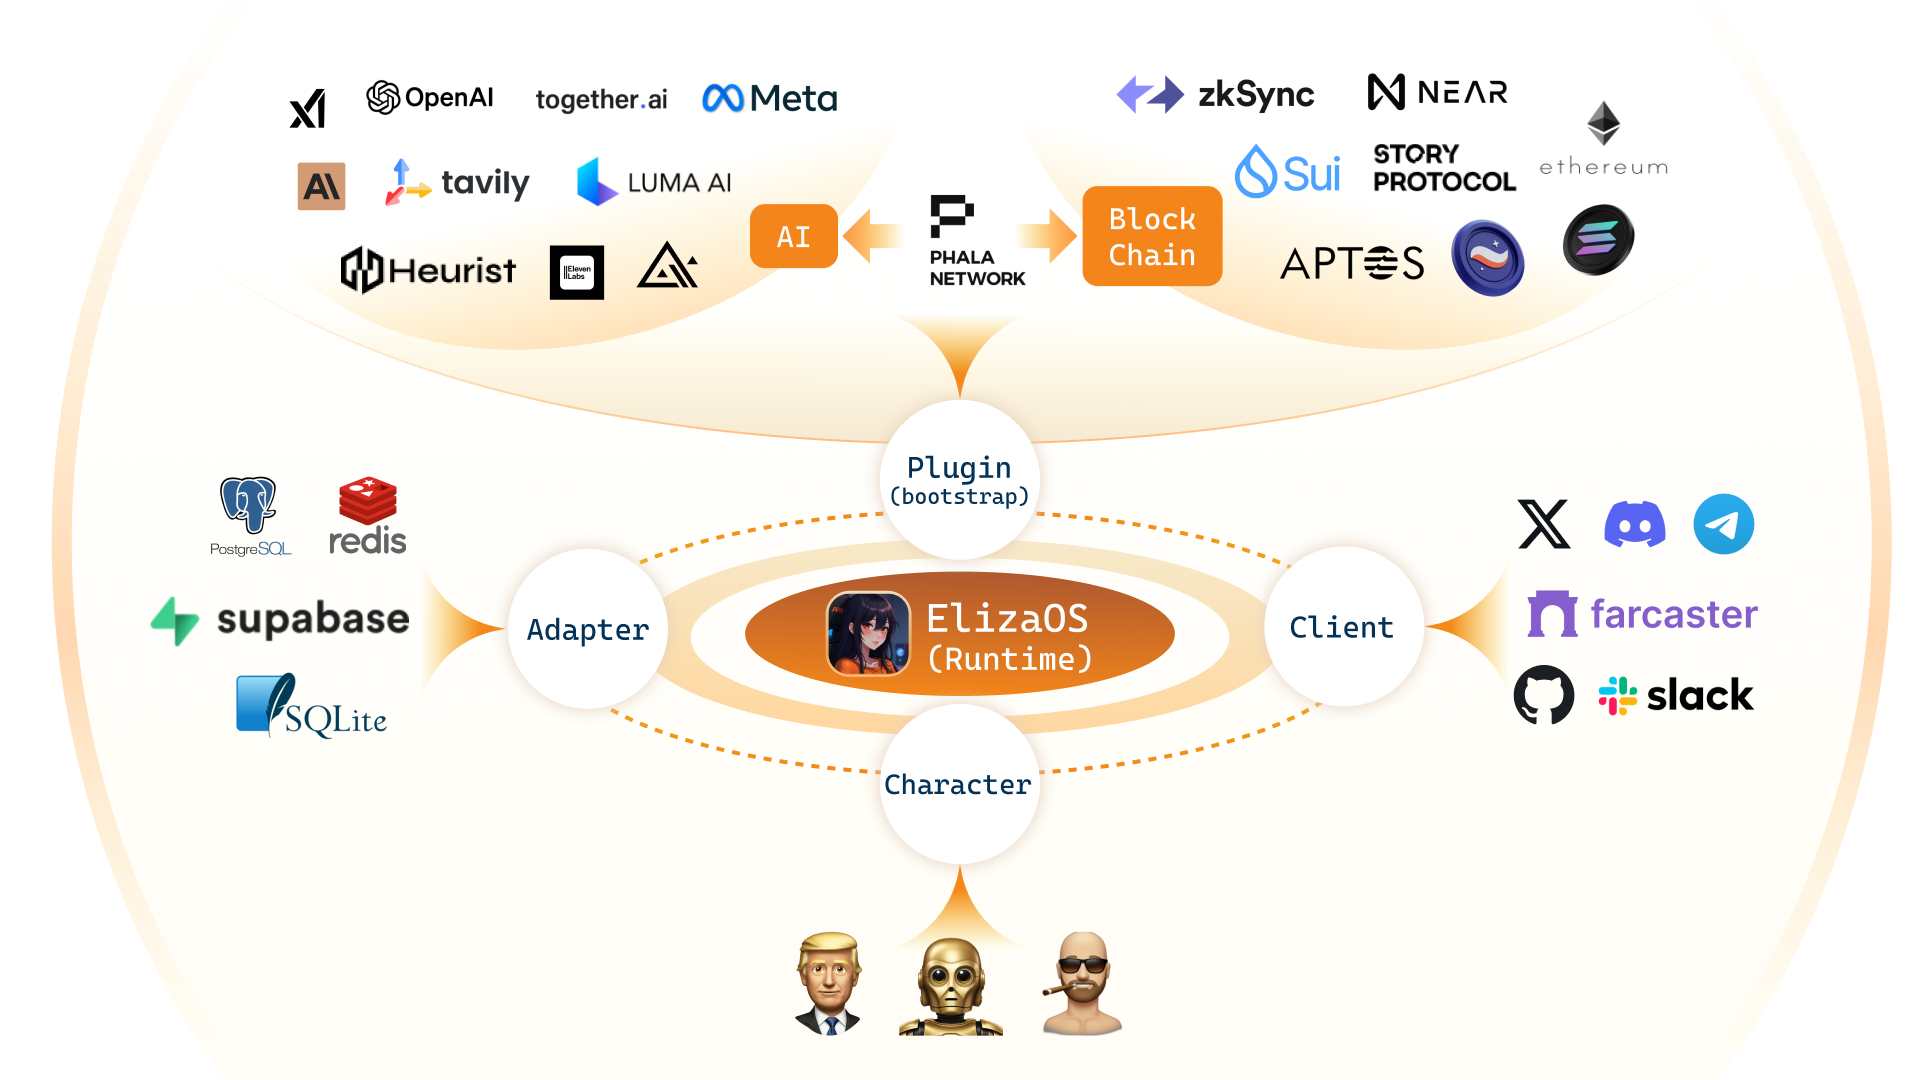
✨ Features
- 🛠️ Full-featured Discord, Twitter and Telegram connectors
- 🔗 Support for every model (Llama, Grok, OpenAI, Anthropic, etc.)
- 👥 Multi-agent and room support
- 📚 Easily ingest and interact with your documents
- 💾 Retrievable memory and document store
- 🚀 Highly extensible - create your own actions and clients
- ☁️ Supports many models (local Llama, OpenAI, Anthropic, Groq, etc.)
- 📦 Just works!
Video Tutorials
🎯 Use Cases
- 🤖 Chatbots
- 🕵️ Autonomous Agents
- 📈 Business Process Handling
- 🎮 Video Game NPCs
- 🧠 Trading
🚀 Quick Start
Prerequisites
Note for Windows Users: WSL 2 is required.
Use the Starter (Recommended)
git clone https://github.com/elizaos/eliza-starter.git
cd eliza-starter
cp .env.example .env
pnpm i && pnpm build && pnpm start
Once the agent is running, you should see the message to run "pnpm start:client" at the end. Open another terminal and move to same directory and then run below command and follow the URL to chat to your agent.
pnpm start:client
Then read the Documentation to learn how to customize your Eliza.
Manually Start Eliza (Only recommended if you know what you are doing)
# Clone the repository
git clone https://github.com/elizaos/eliza.git

# Checkout the latest release
# This project iterates fast, so we recommend checking out the latest release
git checkout $(git describe --tags --abbrev=0)
Start Eliza with Gitpod

Edit the .env file
Copy .env.example to .env and fill in the appropriate values.
cp .env.example .env
Note: .env is optional. If you're planning to run multiple distinct agents, you can pass secrets through the character JSON Note: .env is optional. If you're planning to run multiple distinct agents, you can pass secrets through the character JSON
Automatically Start Eliza
This will run everything to set up the project and start the bot with the default character.
sh scripts/start.sh
Edit the character file
-
Open
packages/core/src/defaultCharacter.tsto modify the default character. Uncomment and edit. -
To load custom characters:
- Use
pnpm start --characters="path/to/your/character.json" - Multiple character files can be loaded simultaneously
- Use
-
Connect with X (Twitter)
- change
"clients": []to"clients": ["twitter"]in the character file to connect with X
- change
Manually Start Eliza
pnpm i
pnpm build
pnpm start

# The project iterates fast, sometimes you need to clean the project if you are coming back to the project
pnpm clean
Additional Requirements
You may need to install Sharp. If you see an error when starting up, try installing it with the following command:
pnpm install --include=optional sharp
Community & contact
- GitHub Issues. Best for: bugs you encounter using Eliza, and feature proposals.
- Discord. Best for: sharing your applications and hanging out with the community.
Contributors
Star History
Contributors

13 commits
Similar repos


Languages
TypeScript
95.4%
PLpgSQL
1.4%
JavaScript
1.4%
README
eliza_arbitrum
This project is an AI agent based on Eliza that mints NFTs after collecting information from the user. In the stylus folder, you can find the smart contract that has been created and deployed on Arbitrum, which the agent interacts with to mint the NFTs. The NFTs' metadata is stored on IPFS using Pinata.
The demo of this project can be found on Youtube
In the project root add these variables to the .env file: Set the following environment variables
ANTHROPIC_API_KEY=your-anthropic-api-key
EVM_PRIVATE_KEY=your-private-key-here
ETHEREUM_PROVIDER_ARBITRUMSEPOLIA=https://your-custom-rpc-url
PINATA_JWT=your-pinata-jwt-here
PINATA_GATEWAY_URL=your-pinata-gateway-url-here
Run pnpm i && pnpm build to install the dependencies
The following command starts the agent in development mode (including the build and also run the Vite client to chat with the agent):
pnpm run dev
Otherwise just start the agent:
pnpm start
In this second case you must run the Vite client to chat with the agent by executing pnpm start:client
To test the agent you can say something like:
I want to create a new NFT called Audi R8 V10 Plus with this description: A high-performance supercar powered by a naturally aspirated V10 engine, blending German engineering with cutting-edge technology. It offers razor-sharp handling, a sophisticated design, and an exhilarating driving experience.
I want the label to be sent to the address 0x20c6F9006d563240031A1388f4f25726029a6368
It will mint a new NFT on Arbitrum Sepolia with the name and description provided, which will be stored on IPFS.
This project also integrates the plugin-evm and is configured for Arbitrum Sepolia, allowing you to perform token transfers, swaps, and bridging. For example, if you want to send Ether to another account, you can write:
Transfer 0.0000000001 ETH to 0x1F0c72E13718D9136FfE51b89289b239A1BcfE28 on Arbitrum Sepolia
Check the README of the plugin-evm for more details about the configuration and instructions on how to call the actions.
Eliza 🤖
📖 Documentation | 🎯 Examples
🌍 README Translations
中文说明 | 日本語の説明 | 한국어 설명 | Français | Português | Türkçe | Русский | Español | Italiano | ไทย | Deutsch | Tiếng Việt | עִברִית | Tagalog | Polski | Arabic | Hungarian | Srpski
🚩 Overview
✨ Features
- 🛠️ Full-featured Discord, Twitter and Telegram connectors
- 🔗 Support for every model (Llama, Grok, OpenAI, Anthropic, etc.)
- 👥 Multi-agent and room support
- 📚 Easily ingest and interact with your documents
- 💾 Retrievable memory and document store
- 🚀 Highly extensible - create your own actions and clients
- ☁️ Supports many models (local Llama, OpenAI, Anthropic, Groq, etc.)
- 📦 Just works!
Video Tutorials
🎯 Use Cases
- 🤖 Chatbots
- 🕵️ Autonomous Agents
- 📈 Business Process Handling
- 🎮 Video Game NPCs
- 🧠 Trading
🚀 Quick Start
Prerequisites
Note for Windows Users: WSL 2 is required.
Use the Starter (Recommended)
git clone https://github.com/elizaos/eliza-starter.git
cd eliza-starter
cp .env.example .env
pnpm i && pnpm build && pnpm start
Once the agent is running, you should see the message to run "pnpm start:client" at the end. Open another terminal and move to same directory and then run below command and follow the URL to chat to your agent.
pnpm start:client
Then read the Documentation to learn how to customize your Eliza.
Manually Start Eliza (Only recommended if you know what you are doing)
# Clone the repository
git clone https://github.com/elizaos/eliza.git

# Checkout the latest release
# This project iterates fast, so we recommend checking out the latest release
git checkout $(git describe --tags --abbrev=0)
Start Eliza with Gitpod
Edit the .env file
Copy .env.example to .env and fill in the appropriate values.
cp .env.example .env
Note: .env is optional. If you're planning to run multiple distinct agents, you can pass secrets through the character JSON Note: .env is optional. If you're planning to run multiple distinct agents, you can pass secrets through the character JSON
Automatically Start Eliza
This will run everything to set up the project and start the bot with the default character.
sh scripts/start.sh
Edit the character file
-
Open
packages/core/src/defaultCharacter.tsto modify the default character. Uncomment and edit. -
To load custom characters:
- Use
pnpm start --characters="path/to/your/character.json" - Multiple character files can be loaded simultaneously
- Use
-
Connect with X (Twitter)
- change
"clients": []to"clients": ["twitter"]in the character file to connect with X
- change
Manually Start Eliza
pnpm i
pnpm build
pnpm start

# The project iterates fast, sometimes you need to clean the project if you are coming back to the project
pnpm clean
Additional Requirements
You may need to install Sharp. If you see an error when starting up, try installing it with the following command:
pnpm install --include=optional sharp
Community & contact
- GitHub Issues. Best for: bugs you encounter using Eliza, and feature proposals.
- Discord. Best for: sharing your applications and hanging out with the community.
Contributors
Star History
Similar repos
Contributors
13 commits
Languages
TypeScript
95.4%
PLpgSQL
1.4%
JavaScript
1.4%