
Direct MiniMax H3 like a pro: Idea in, finished video out. A complete MiniMax H3 studio that lives in your ComfyUI.
Python
32
3 commits
updated Oct 6, 2026
See what people are saying
README
ComfyUI-MiniMaxH3-Studio
https://github.com/user-attachments/assets/ac7c74e5-69b0-459f-b4e2-925e4c182308
Turn a description into a MiniMax H3 video without leaving ComfyUI. Build a prompt you can inspect, generate clips with the official H3 workflows, plan a longer video, then cut and render the result in a built-in editor.
Everything lives in one ComfyUI sidebar, backed by 28 canvas nodes that share the same prompt pipeline. This is an independent custom-node project, not MiniMax's official Context-IR implementation.
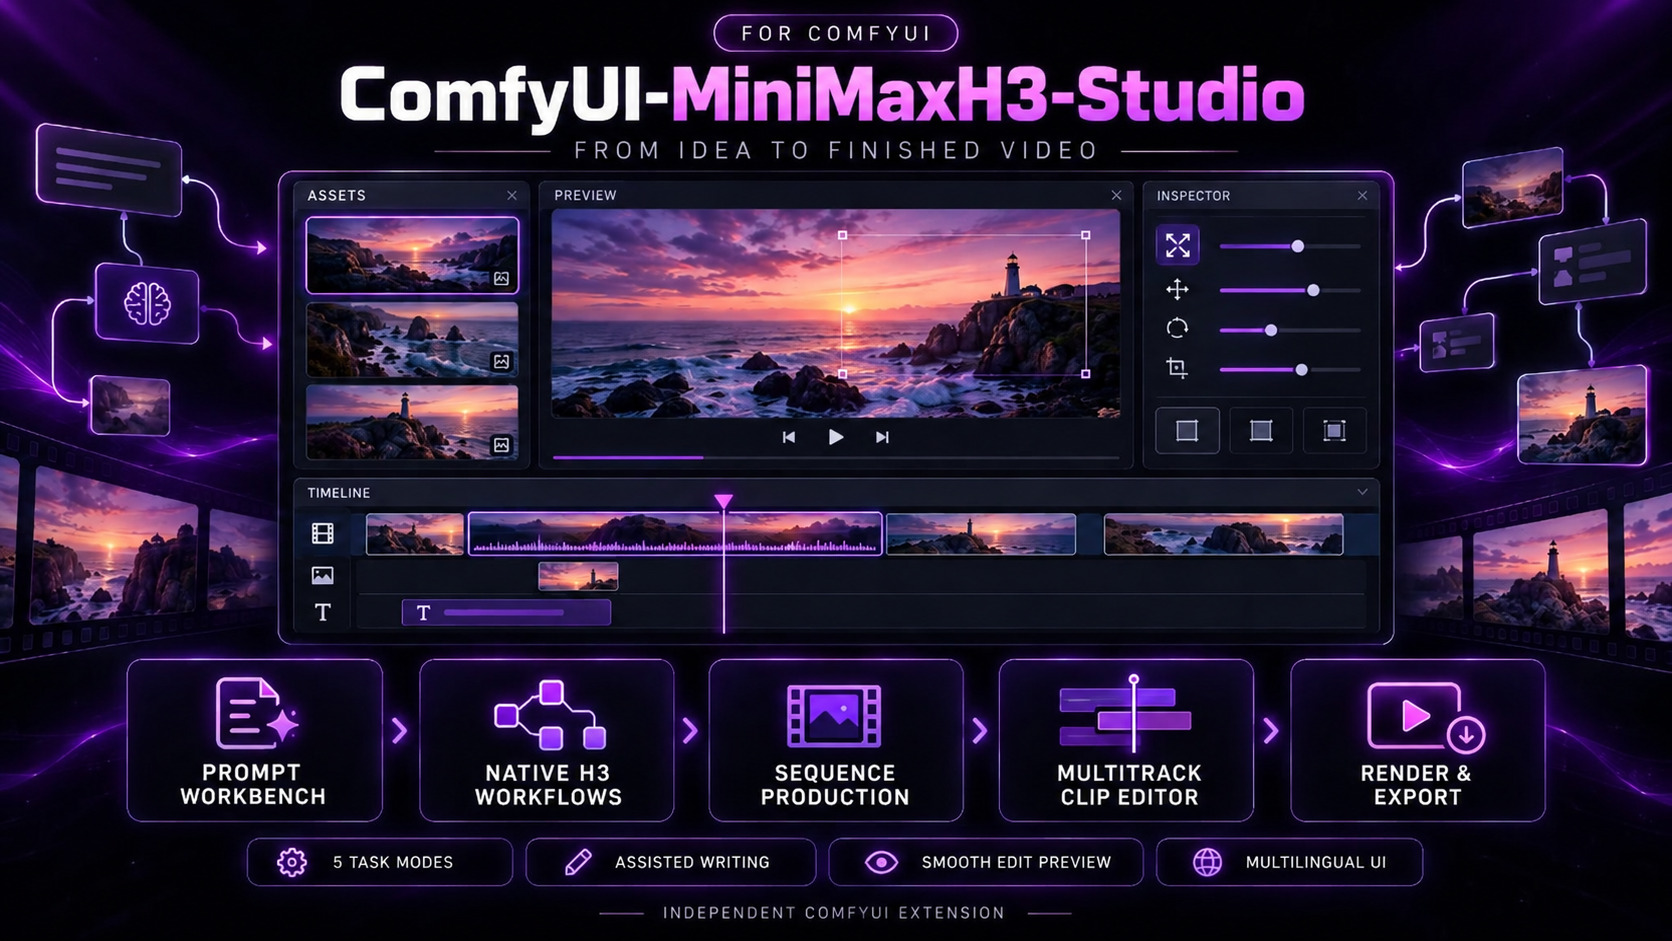
Latest Updates - Click to expand
1.0.2 — Assisted prompt writing and model setup
- Set up Ollama or a remote provider, reload available models and choose an exact model; readiness is checked automatically, and reloading keeps the selection when the model is still available.
- Browse provider-reported model dates, limits and lifecycle labels, with a local filter for large model lists and requests adapted to each provider's API.
- Use Refine prompt to direct a revision while preserving exact dialogue, visible text, reference roles and timing. Every suggestion remains yours to review before applying.
- Read and compare prompts without losing local edits, focus, text selection or scroll position.
- Review typed semantic suggestions with a bounded repair attempt for invalid responses. The canvas H3 Semantic Proposal Producer can use an exact installed Ollama model while keeping historical workflows compatible.
Contents
- Features
- Before you start
- Install and update
- Quick start
- The sidebar at a glance
- Create a clip
- Production
- Clip editor
- Longer videos
- Canvas nodes
- Assisted authoring (optional)
- Privacy and storage
- Known limitations
- Troubleshooting
- More documentation
- License
Features
- Inspectable prompts. Turn your intent, references, duration and exact dialogue or on-screen text into a structured plan, a prompt and a validation report. Missing information stays visible instead of being guessed.
- Five task modes. Text to video, opening image, first and last frames, ending image, or a reference set of image, video and audio with explicit roles.
- One-click official workflows. App Mode writes the official MiniMax H3 workflow for your mode onto the canvas using the H3 weights you have installed, or connects your prompt to an H3 graph you already have.
- Production workbench. Collect generated clips as segments of a project; reorder, replace or regenerate them, preview them and pick which ones to edit.
- Longer videos. Plan a 4 to 60 second video as a storyboard, generate its segments one after another and join them.
- Built-in editor. Arrange clips on up to eight tracks, trim and split, add text, picture and video overlays, adjust position, crop, colour, transitions and each clip's volume and fades, then render and download an MP4.
- Optional assisted authoring. Ask Ollama or Gemini to suggest prompt improvements; you accept or reject every suggestion. OpenAI and Anthropic connections support model discovery and readiness checks.
- Three languages. English, Traditional Chinese and Simplified Chinese.
Before you start
Requirements
- ComfyUI with its native MiniMax H3 nodes (
MiniMaxH3ImageToVideo,MiniMaxH3ReferenceToVideo), the officialvideo_minimax_h3_*workflow templates and a frontend that supports sidebar extensions. Python 3.10 or newer. - MiniMax H3 model weights and suitable hardware to generate video. Building and checking prompts needs no weights.
- Windows x64 with 64-bit Python for the clip editor, Production import, longer-video assembly and final rendering, plus the media tools, which are found or installed for you.
The package has no required Python dependencies and never installs or changes ComfyUI, its frontend or your models.
Compatibility
The sidebar checks what your host actually provides (the native H3 nodes, their inputs, the templates and the frontend functions it uses), not a version number. If something is missing, the message names it. The canvas nodes keep working even when the sidebar cannot load.
- The prompt pipeline runs on Windows, Linux and WSL. The media features need Windows x64.
- The clip editor has been tested on ComfyUI 0.38.0 with frontend 1.53.6. This is a tested combination, not a minimum version.
- Longer-video generation checks the installed H3 implementation separately. If it reports an incompatibility, use a complete, compatible ComfyUI installation; installing FFmpeg or waiting does not fix it.
If you open ComfyUI through a reverse proxy, a port mapping or a host name other than localhost,
see opening ComfyUI from another address.
Install and update
Install
To install manually:
-
Stop ComfyUI.
-
Clone or copy the complete repository into
ComfyUI/custom_nodes/ComfyUI-MiniMaxH3-Studio:cd ComfyUI/custom_nodes git clone https://github.com/rookiestar28/ComfyUI-MiniMaxH3-Studio.gitKeep both the root
__init__.pyand thecomfyui_h3_context/folder. -
Start ComfyUI and check that the H3 Context nodes and the MiniMax H3 Studio sidebar appear.
Installation does not download models, contact a provider or run a frontend build; the browser extension comes prebuilt.
If the package is available through your Comfy Registry or ComfyUI Manager, search for ComfyUI-MiniMaxH3-Studio, or run:
comfy node install minimax-h3-studio
Update an existing installation
- Save your workflows and download the videos you want to keep.
- Replace the whole package with the new version. Do not mix files from two versions, and do not keep a second copy of this pack beside the first.
- Restart ComfyUI and refresh the browser. If the old interface still shows, hard-refresh after checking that the host loaded the intended version. The sidebar header shows the loaded version.
Keep the previous version for rollback. An update does not turn editor work into saved projects; saved workflows and downloaded videos are the copies you keep.
Media tools
The clip editor, Production import, longer-video assembly and final rendering use one exact FFmpeg
build on Windows x64 with 64-bit Python: the gyan.dev full build 2026-02-26-git-6695528af6. No
path setup is needed.
- Already installed. If that build's
ffmpeg.exeandffprobe.exeare in your Python environment or onPATH, they are found the first time you use a media feature. - Not installed. When a feature needs the tools, a Media tools card appears with Install and continue. It downloads the build from its GitHub release (about 235 MB), checks it, keeps only the two programs with their license and readme, then carries on with what you started. Cancel setup stops the download without changing your work. The same Install button is in Settings → Media tools.
- Where it goes. The installed copy (about 425 MB) lives in ComfyUI's private user data, outside this package, and is reused after restarts.
- Offline or managed computers. In Settings → Media tools → Advanced, enter a folder that holds both programs of that build and choose Use this folder. Use automatic setup returns to the default. The download never uses a proxy, so use this option on computers that need one.
- Administrators can set
H3_CONTEXT_AUTHORIZED_FFMPEG_PATHandH3_CONTEXT_AUTHORIZED_FFPROBE_PATHto the two programs in one folder; this overrides everything else.H3_CONTEXT_AUTHORIZED_MEDIA_SCRATCH_ROOTcan name the temporary media folder.
Any other FFmpeg build, a modified file, Windows on ARM, 32-bit Python or a non-Windows host is not used, and the card says why. To check a copy yourself, compare these SHA-256 fingerprints:
ffmpeg.exe:abf5e1652dfdd3f8d7cfbb4900a4b590b7e8d192876164b7b7e9efaebe26d67fffprobe.exe:fb81e32ea05d77049291d9cffb0ec2677cfbe5e1ce2021bbcb9eb5abdc6ac576
FFmpeg is licensed separately under GPL-3.0-or-later and is not shipped with this package.
Quick start
- Open MiniMax H3 Studio in the ComfyUI sidebar.
- On the Context page, choose a task mode, describe the video and set a duration of 4 to 15 seconds.
- Select the images, video or audio that mode needs.
- Press Start H3 App Mode. The official workflow appears on the canvas; check its settings and queue it.
- When the video is ready it appears on the Production page. Each new run from the same workflow adds a segment to the same project.
The sidebar at a glance
Open MiniMax H3 Studio from the ComfyUI sidebar. It has three pages:
| Page | What it is for |
|---|---|
| Context | Choose a task mode, describe the video, pick references, review the prompt and start App Mode |
| Production | Your generated clips as a project, longer-video planning, and the entry to the clip editor |
| Settings | Language, the media tools and the optional assisted-authoring provider |
Settings → Language offers Automatic (ComfyUI locale), English, 繁體中文 and 简体中文.
The prompt is built on the ComfyUI host by the same nodes you can use on the canvas, so the sidebar and the canvas never disagree.
Create a clip
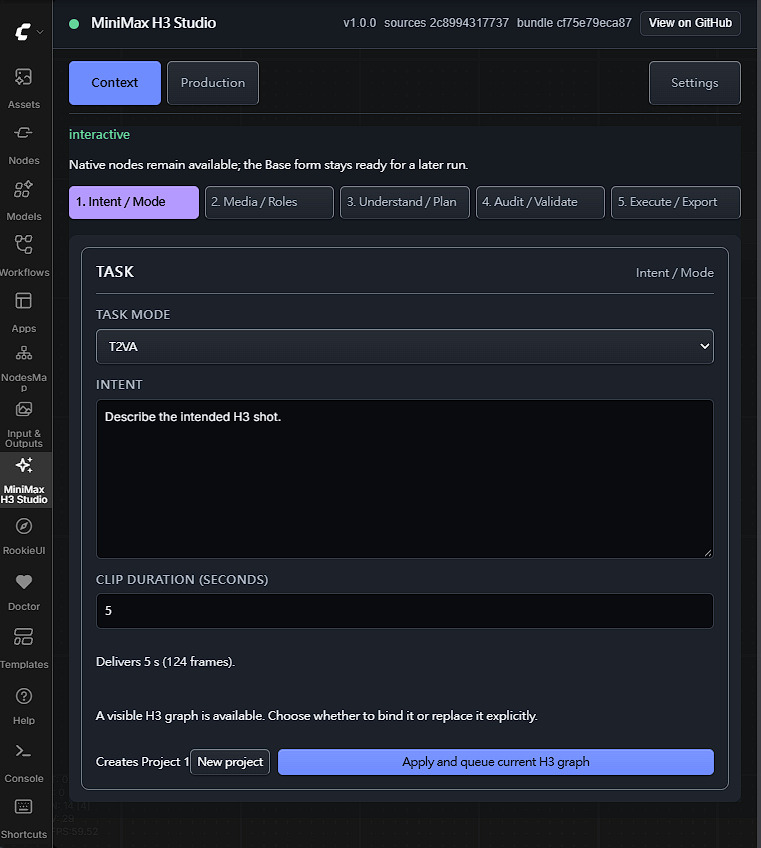
The Context page walks through five stages, shown as numbered tabs: Intent / Mode, Media / Roles, Understand / Plan, Audit / Validate and Execute / Export. You can also simply fill in the request and choose Start H3 App Mode.
Task modes and references
| Task mode | You provide |
|---|---|
| T2VA | Text to video: a description only |
| I2VA | Image to video: a First frame source |
| FL2VA | First and last frame: two different images |
| L2VA | Last frame: a Last frame source |
| Ref2VA | Reference set: an image, a video and/or audio, each with a clear role |
References are image, video and audio nodes already on your canvas. For a reference set, choose at most one of each kind under Reference images, Reference videos and Reference audio. Audio cannot be the only reference; add an image or a video with it. When you choose a reference video, Reference video soundtrack lets you Submit the video's own soundtrack (the default) or Do not submit a soundtrack.
Roles and order are never guessed: a missing or conflicting role is reported so you can fix it.
Dialogue and exact text
Enter dialogue, lyrics, on-screen text and anything that must or must not appear as hard constraints when the exact wording matters. They are kept word for word.
For dialogue you can also set:
- the language:
autoor one of Arabic, Chinese, English, French, German, Italian, Japanese, Korean, Portuguese, Russian and Spanish.autorecognizes Korean, Japanese and Chinese from their scripts; other scripts stay untagged with a warning. The spoken words never change; - the speaker, as a short identity phrase such as
the guide; - the delivery: spoken on screen, or an off-screen voiceover (the speaker's lips stay closed).
Duration
Enter Clip duration (seconds) as a whole number from 4 to 15 (default 5). The extension converts it to a length H3 can produce and shows the delivered seconds and frame count. Start H3 App Mode stays disabled until that is resolved; if it fails, choose Retry duration resolution. The workflow uses this one duration everywhere, so there are never two conflicting length settings.
Review the prompt
Before generating, the Context page shows the prompt, the plan behind it and a validation report. Fix errors before queueing; warnings point out uncertainties you may accept. You can also:
- type
@in the prompt to insert a reference; - edit the prompt and choose Validate revision to check your edit;
- Copy prompt, Export JSON or Import JSON;
- choose Optimize prompt when assisted authoring is set up, then edit, accept or reject the proposal;
- open Revision instruction to give a wording or style direction and choose Refine prompt;
- use Reader for the complete prompt, or Compare with current report for an active AI proposal.
Guide readiness is a separate check against the official H3 prompt guide: Ready means every known requirement is covered, Incomplete means something the guide expects is missing, even if the prompt is valid. Neither judges visual quality.
Start H3 App Mode
Start H3 App Mode writes the official ComfyUI MiniMax H3 workflow for your task mode onto the current workflow tab, without queueing it:
| Task mode | Official template |
|---|---|
| T2VA | video_minimax_h3_t2v |
| I2VA, FL2VA, L2VA | the video_minimax_h3_i2v family |
| Ref2VA | video_minimax_h3_r2v |
Model loaders are filled from your installed official H3 weights. If a model cannot be matched, it is named as a warning and left for you to pick on the canvas; ComfyUI checks the models when the workflow is queued. The workflow is a normal ComfyUI graph that you can inspect and change. Queue it with Apply and queue current H3 graph or ComfyUI's own Queue button.
If the canvas already has nodes, App Mode asks first:
- Replace canvas and start H3 App Mode replaces the graph with the official workflow;
- Connect and queue current canvas keeps your graph, connects the prompt to the H3 generation node you choose and queues it once. Your models, LoRAs, sampler and other settings stay as they are;
- Keep canvas and exit H3 App Mode leaves everything untouched.
Connect works with your own H3 workflows, not only the official ones. It looks for the native H3 generation nodes on the canvas and one subgraph level inside it; when there are several, choose one under H3 generation node to connect. The task mode must match how that node is wired: a connected first frame means I2VA, a last frame L2VA, both FL2VA, and neither T2VA. Connect is not offered when the canvas already contains H3 Context nodes; use Apply and queue current H3 graph instead.
Cancel App Mode stops while App Mode is working, and Continue with native nodes leaves App Mode so you can work on the canvas yourself.
During and after a run
A run is queued once through the normal ComfyUI queue. It is reported as finished only after the saved video has been checked against that run; a video that cannot be matched is reported as unconfirmed and never retried automatically. If the connection to ComfyUI drops, the sidebar picks the run up again when it reconnects.
The finished video is added to the Production project shown above the App Mode buttons ("Adds to Project …" or "Creates Project …"):
- every new run from the same workflow adds one segment to the same project;
- choose New project before starting when the next result should go elsewhere;
- Edit App Mode setup returns to the request for the next run.
If App Mode declines a run, it shows the reason and a remedy, with Retry H3 App Mode or Retry output verification where they apply. Copy diagnostics copies a short report for support; it never contains your prompt, workflow, file paths or credentials.
Production
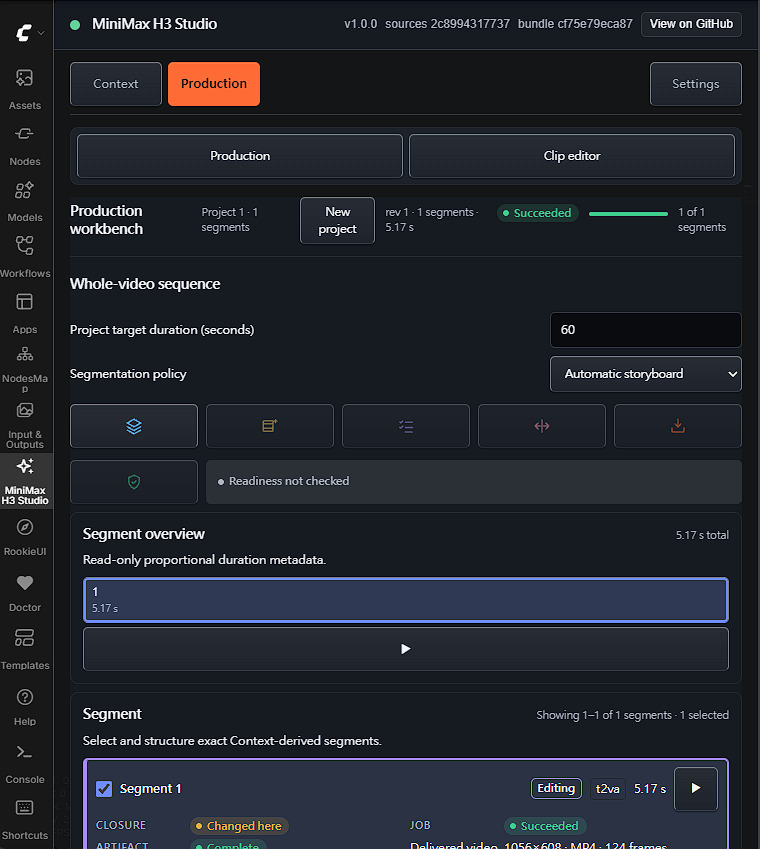
The Production page has two views, switched at the top: Production for your project and Clip editor for the editor.
Project and segments
- The status band names the project and its segment count, with New project and a progress meter while segments generate.
- Segment overview shows each segment's share of the video. Its seconds are marked "snapped" when H3 delivers a slightly different length from the one requested.
- The segment list shows 32 segments per page. Tick segments to select them; with exactly one selected, its row expands to show its state, output, continuity and boundary.
- Project target duration (seconds), from 4 to 60, is the intended length of the whole video. It is used by longer-video planning, is separate from the next App Mode clip's 4–15 seconds, and never starts a generation when changed.
Arrange and generate segments
- Reorder by dragging a tile in the segment overview, with the arrows on a selected segment, or by typing its Position and choosing Apply.
- Add current Context adds a segment from the current Context request. With one segment selected, Replace segment N with current Context or Delete segment N (the last segment cannot be deleted).
- Relationship for segment N sets how a segment joins the previous one: Independent, Predecessor, Adjacent pair, Cut or Reset; the second and third need an earlier segment. Choose Apply relationship to segment N to keep it. Changing a segment only reruns what depends on it.
- Generate segment N queues one segment when it is ready; Blockers says why it is not.
- Release workspace closes this Production workspace after Confirm release. The Context and earlier outputs stay unchanged.
Previews and intent proposals
- Preview segment N (the play button on a tile) and Preview aggregate output play a copy on the host. The aggregate preview marks where each segment begins, and its sample thumbnails jump to that point. A missing button means that output cannot be previewed yet.
- Understand segment N and Understand selected open a proposal review when the segment kept an intent proposal from its original Context run. A segment without one is still valid.
To edit outputs, open the clip editor and use its Import button (see Media bin).
Clip editor
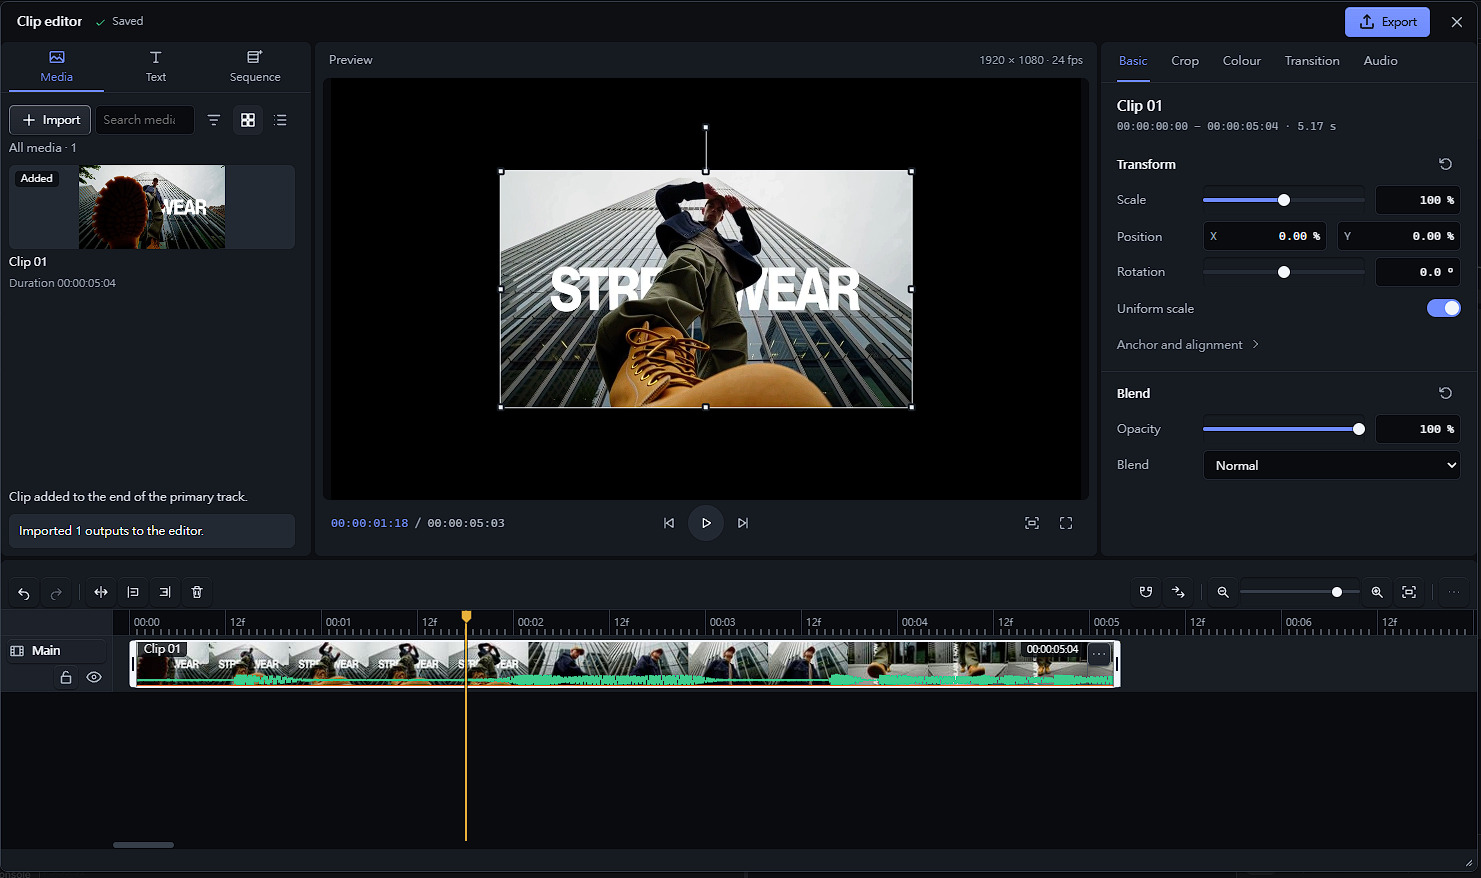
In short: in Production, tick up to three finished segments, switch to Clip editor and choose Open full editor. Bring the segments in with Import in the media bin, place them on the timeline, trim and arrange them, add titles and overlays, then choose Export → Render final video. The result is a 1920 × 1080, 24 fps MP4 that you download with Download original.
Open the editor
Switch the Production page to Clip editor and choose Open full editor. If there is no editor project yet, choose Start authoring from this context first. The editor opens as one window over ComfyUI; all editing, selection, undo and redo happen there. Close it with its close button or Escape.
The Clip editor view in the sidebar summarizes the editor project and offers Refresh workspace and Release workspace (not while the editor is open).
Layout
The window has a top bar and four regions: the Media bin on the left, the Preview monitor in the middle, the Inspector on the right and the Timeline across the bottom. The media bin has three tabs: Media, Text and Sequence (for longer videos).
- Drag the dividers between regions to resize them, or focus one and use the arrow keys (Shift for bigger steps). Enter or a double-click resets a divider.
- Drag the window's corner grip to resize the window, down to 720 × 480 pixels. In a small window the regions scroll.
- The top bar shows the edit status: Saving…, Saved, Edit refused, Save status unknown and similar. Saved means ComfyUI accepted the edit; it is not a project file. If the status is unknown, let the editor re-read the host and follow its message before editing again.
Media bin
The Media tab holds the clips available to this editor project.
- Import brings in the outputs selected in Production: up to three finished segments. If the selection also contains unfinished segments, the button reads Import ready (2 of 3) and imports only the finished ones. Importing adds sources to the bin; it does not place them on the timeline or start a generation.
- Search media, Sort and filter (source or reverse order; all media, videos, pictures, or those already added to the timeline) and Grid view / List view help in a full bin.
- Click a card, or its +, to add it: a video goes to the end of the Main track, a picture goes to a picture overlay track at the playhead.
- Right-click a card, or use its More clip actions button, for Add to timeline, Insert at playhead and Overwrite at playhead.
The Text tab adds titles: enter Title text, pick a Font and choose Add title. The title is placed at the playhead on the first unlocked text track that is free there; if there is no such track, the editor creates one within the eight-track limit. A new title lasts one second; trim it like any clip to change its length. One Undo removes both the new track and its title. You can add the first title to an empty project. If insertion is unavailable, the disabled button's explanation says what to change, such as freeing a track or choosing a font.
Timeline
The timeline has the Main video track plus video, picture and text overlay tracks: up to eight tracks, 128 clips and 2.5 minutes in total.
- Track headers show or hide a track (eye button) and lock or unlock it. The track name opens its menu, where you can Add track, Reorder track or Remove track; Main cannot be removed.
- Selecting: click a clip; Shift-click to extend the selection, Ctrl-click to add or remove one, or drag across an empty lane to box-select.
- Moving: drag a clip to another time or a compatible track (hold Alt to suspend snapping). With a clip focused, Enter starts a keyboard move: arrow keys move it, Alt+Up/Down changes track, Enter applies and Escape cancels.
- Trimming: drag a selected clip's edge, or focus the edge and use the arrow keys, Enter and Escape. Turn on Main-track ripple to make trims and deletes shift the clips that follow on the same track.
- Roll edits move a shared cut between two neighbouring clips with the handle on the cut.
- Clip menu (right-click a clip): one-frame trims, Replace clip asset, Slip clip, Slide clip, Merge clips with the next one, and Clip enabled. Menus close when you press elsewhere.
- Toolbar: Undo, Redo, Split at playhead, Trim start to playhead, Trim end to playhead, Delete (or Ripple delete), Snapping, Main-track ripple, zoom and Fit timeline. More timeline tools adds roll edits, numeric moves, selection, clip navigation and panning.
- Ruler: click or drag to move the playhead. Ctrl + mouse wheel zooms; Shift + wheel pans.
Each completed edit is one undo step. An edit can be refused, for example by a locked track or the source's length; read the reason before trying again. Refused edits are never replayed automatically. If the timeline changed under you, a banner offers Rebase rejected edit.
The workspace summary shows Content extent (up to the end of the last placed clip, including a disabled one) and Edit capacity (the space available). The final video covers the content extent, gaps included. An empty timeline cannot be rendered.
Keyboard shortcuts
| Action | Keys |
|---|---|
| Undo / Redo | Ctrl+Z / Ctrl+Shift+Z |
| Split at playhead | Ctrl+B |
| Trim start / end to playhead | Q / W |
| Delete / Ripple delete | Delete / Shift+Delete |
| Select all clips | Ctrl+A |
| Zoom in / out | Ctrl+= / Ctrl+- |
| Fit timeline | Shift+Z |
| Play or pause | Space |
| Step one frame | , and . |
Edit and view shortcuts also work after clicking a clip, a timeline tool, a trim grip or a roll handle. Space and Enter keep the focused button's own action. A keyboard move, trim or roll draft keeps its keys until you commit or cancel it. Fields, value controls, menus and buttons outside the timeline keep their own keys, so typing in the Inspector never edits the timeline.
Keys used inside the editor stay within its window, including undo and redo. If the host cannot keep the editor's keys separate from ComfyUI's own shortcuts, the full editor reports that it is unavailable.
Inspector
Select a clip to edit its properties. The tabs depend on the clip:
| Tab | What it changes |
|---|---|
| Basic | Scale, position, rotation, anchor and alignment; opacity and blend mode |
| Crop | The four edges |
| Colour | Brightness, contrast and saturation (choose Color adjustment as the effect) |
| Text | A title's text, size, weight and colour |
| Transition | A Cross dissolve with the neighbouring clip, and its length in frames |
| Audio | Volume (−60 to +12 dB), mute, fade in and fade out (up to 10 seconds each) |
The Text tab appears for titles and the Audio tab for videos with sound.
- Sliders apply when you release them. Number fields apply on Enter or the group's apply button; moving focus away does not apply them. Escape cancels a change, and Reset restores the whole group as one undo step.
- Audio settings are heard only while the clip is on the Main track, because overlay videos are silent. Raising the volume of already loud audio can distort it.
- With no clip selected, the Inspector shows the read-only project settings: resolution, frame rate, duration, audio and export format.
Preview monitor
The monitor previews the timeline in your browser with the main track's sound. Its transport has Previous frame, Play / Pause, Next frame, Fit picture / Actual size and Full screen. With the monitor focused, Space plays or pauses and Left/Right (or , and .) steps one frame.
- On-picture handles move, scale and rotate the selected clip when one enabled clip on an enabled, unlocked track is selected and the playhead is inside it. One drag is one undo step; Escape cancels it.
- Thumbnails, filmstrips and waveforms load from the source media. Waveforms show the main track's embedded sound; they do not reflect volume, mute or fades.
- If the monitor shows Preview unavailable, read the reason and choose Retry.
The monitor is a preview. Render the final video to check the exact result.
Render the final video
Open Export in the top bar and choose Render final video. The host renders a 1920 × 1080, 24 fps MP4 (H.264, with 48 kHz mono AAC sound when the main track has audio) using each clip's audio settings. You can follow progress, Cancel render, Preview output and Download original. A render made before later edits is labelled Output from an earlier revision. Titles use the bundled Noto Sans fonts.
Rendered files are kept for about an hour, at most 16 at a time. Download the ones you want to keep.
Keeping your work
- Closing the editor or switching sidebar pages does not undo accepted edits. While the page stays open, the editor also remembers its layout, selected tab, playhead and zoom.
- Unapplied Inspector changes stay with their clip; if the clip or timeline changes, the old draft is cleared with a notice instead of being applied elsewhere.
- None of this is a saved project. A page reload can reconnect while the current editor workspace is still available; restarting ComfyUI ends it. The active, visible editor renews its workspace, but hidden or disconnected workspaces can expire after about 15 minutes without workspace activity. Save workflows and download videos you want to keep; these do not back up the timeline.
- Imported clips depend on their Production project. Releasing that project or replacing a source makes the clip unavailable; select a current output and import it again.
Longer videos
A longer video, from 4 to 60 seconds, is planned in Production and then generated and joined in the clip editor's Sequence tab.
Plan in Production
- Set Project target duration and a Segmentation policy: Automatic storyboard, or fixed 5, 10, 12 or 15 second segments. To keep the plan apart from your current project, Create planned project starts a new one from the current Context.
- Choose Prepare planning context.
- Give the plan its shots: choose Review storyboard rows, write a storyboard script, choose Split script into shots, check the rows (you can edit them or Add shot) and choose Use reviewed rows. Use generated storyboard is enough when the target equals the Context's own clip length.
- Choose Propose segments. Cuts fall on shot boundaries where 4 to 15 second segments allow it. If the proposal cannot be used, the reason is shown, for example a cut inside a line of dialogue.
- Choose Approve and import to Production. This creates the segments in the project; nothing is generated yet.
Write a storyboard script
The Context describes one clip of 4 to 15 seconds: the style, subjects, sound and hard constraints every segment keeps. The storyboard script describes what happens across the whole video:
- Start each shot with
[Shot 1],[Shot 2]and so on, or separate shots with a blank line. - To set the cuts yourself, give every shot after the first a start time, such as
[Shot 2] At 00:08.000, the courier crosses the bridge.(At 0:08,also works). Times must increase and stay within the target. Give times to all of those shots or to none. - Without times, the shots share the target duration evenly.
Example for a 60 second target:
[Shot 1] The courier leaves the depot at dawn.
[Shot 2] At 00:08.000, the courier crosses the bridge.
[Shot 3] At 00:20.000, rain starts over the market.
[Shot 4] At 00:33.000, the courier shelters under an awning.
[Shot 5] At 00:47.000, the parcel is delivered.
This gives five segments of 8, 12, 13, 14 and 13 seconds. Shots shorter than 4 seconds are grouped, a shot longer than 15 seconds is split, and a shot marked as a Hard boundary is never split (so it must fit in 15 seconds). A script holds up to 32 shots. Load shots from Context copies the shots the Context already describes as a starting point.
Exact dialogue, on-screen text and timing instructions from the Context stay in the opening part of the video, and no cut is placed inside a shot that holds exact text. Plans that use reference media can be proposed and reviewed, but generation currently accepts text-to-video plans only.
Generate and assemble in the editor
- Open the clip editor's Sequence tab and choose Check readiness. It confirms that your host, models and extension can generate the plan; the result is valid for about a minute.
- Choose Generate approved sequence. Segments are generated one after another. A failed segment can be retried with Retry segment N, and Cancel sequence stops the rest.
- To leave while it runs, choose Continue current segment while I leave: the current segment finishes and the rest pause. Later choose Reconnect to running sequence and Resume remaining segments before the deadline shown.
- Choose Assemble sequence to join the segments into one 30 fps video with 48 kHz stereo sound.
Assembly does not apply editor overlays or effects. To edit the result, import the segments into the media bin, place them on the timeline and render the final video there.
Canvas nodes
Every sidebar feature is built on canvas nodes you can also use directly. The smallest route is:
Request -> Plan -> Compiler -> Validator -> Preview
H3 Context Request holds your intent, task mode, duration and hard constraints. H3 Context Plan and H3 Context Compiler turn it into a plan and the final prompt. H3 Context Validator reports problems without rewriting anything, and H3 Context Preview shows the result. Add H3 Reference Registry for reference media, and H3 Native MiniMax H3 Adapter to connect the prompt to ComfyUI's H3 nodes. Media always stays on its own connections.
All 28 nodes, grouped by purpose:
| Group | Nodes |
|---|---|
| Core prompt pipeline | Context Request, Reference Registry, Context Plan, Full-Reference Plan, Context Compiler, Context Validator, Context Preview, Context Audit Override |
| Detailed planning | Hard Constraint Producer, Intent Graph Producer, Evidence Fusion Producer, Cross Reference Producer, Directive Authority Producer, Full Reference Timeline Producer, Feasible AV Timeline, Hierarchical Evidence Reduction, Constrained Semantic Planning, Source-Profiled Renderer |
| Media and perception | Media Admission Producer, Visual Perception Producer, Audio Perception Producer |
| Generation and sidebar | Native MiniMax H3 Adapter, Product Shell Boundary, Local Reconstruction Acceptance |
| Providers and status | Provider Transparency, Reliability Status, Semantic Proposal Producer, Official Context-IR |
A few nodes worth knowing:
- H3 Context Audit Override records a deliberate decision to proceed with a prompt edit while keeping the original diagnostics visible.
- H3 Intent Graph Producer has a
complete_silenceoption. Turn it on only when silence is the intended sound; an empty soundscape otherwise counts as unspecified. - H3 Provider Transparency and H3 Reliability Status only display information; they never call a provider or start, retry or cancel work.
- H3 Visual Perception Producer and H3 Audio Perception Producer describe short media
locally after a host operator sets them up (see host integration).
Without that setup, perception reports
unavailable; describe the fact yourself or enter it as a hard constraint. - H3 Official Context-IR needs a connection supplied by the host and otherwise refuses to run.
Bundled files:
subgraphs/: the reusable H3 Context Assistant (base and reference) and H3 Product Shell Boundary graphs.workflows/: example graphs that need no models, in ComfyUI's API format (each file'spromptsection), covering the base, reference and full-reference routes and the other node groups.examples/minimal_core_pipeline.py: a pure-Python example that needs neither ComfyUI nor a provider.
None of these load model weights or promise a particular result.
Assisted authoring (optional)
Assisted authoring is off by default, and the normal path needs no provider; None selected is the default. It powers Optimize prompt and Refine prompt on the Context page. Set it up in Settings → Assisted authoring provider:
| Profile | Runs on |
|---|---|
ollama.local | Your own Ollama on the ComfyUI host |
anthropic.remote | Anthropic |
openai.remote | OpenAI |
gemini.remote | Google Gemini |
Prompt generation is enabled for Ollama and Gemini in this release. OpenAI and Anthropic support connection setup, model discovery and readiness checks; prompt generation is currently unavailable for those connections.
For Ollama:
- Choose Ollama, then Reload available models.
- Pick the Exact model. Its readiness check runs automatically.
For Anthropic, OpenAI or Gemini:
- Choose the provider and read What leaves this computer.
- Enter your API key and choose Allow text-only requests and reload models.
- Pick the Exact model. Its readiness check runs automatically; switching models within the same connection keeps the permission you granted.
Use Optimize prompt or Refine prompt when the selected connection is ready and assisted execution is available. A reachable provider may still show that execution is unavailable. Withdraw consent removes the permission and Discard removes the API key.
The model list uses the provider's exact identifiers. Large lists offer a local filter; model dates, limits and lifecycle labels appear only when the provider reports them. Reload available models keeps the selected model and refreshes its readiness if it is still present. If the model disappears, the selection and readiness are cleared; choose a model from the current list.
Refine prompt takes a revision instruction of up to 2,048 characters and 8,192 UTF-8 bytes. It directs wording within the current facts; it cannot change protected dialogue, visible text, reference roles or timing. Change typed facts through their existing controls. Stage an unstaged prompt edit first, and resolve any active proposal before asking for another suggestion. Your instruction stays in browser memory for the current workspace.
Reader retains your text, selection and scrolling when you return to the editor. Compare with current report shows the report and the active proposal separately and retains newer local edits. These views do not send requests or accept a proposal. Copy and export continue to use the current report; viewing a candidate does not make it the accepted prompt.
- Only prompt text, revision instructions and derived text are sent, never media. A suggestion is shown for you to accept, edit or reject; nothing is applied automatically, and a failure never switches to another provider.
- Switching providers or replacing credentials requires permission for the new setup. Sessions expire after 30 minutes without use or eight hours in total, and a ComfyUI restart clears them.
- Billing, quota and data retention are between you and your provider.
The canvas H3 Semantic Proposal Producer is configured separately. Choose ollama.local and
enter an exact installed Ollama model identifier in ollama_model. It checks the model's current
native identity and completion capability before generating, and finishes cleanup before a proposal
can be reviewed. The previous exact-model profile remains available for historical workflows.
Semantic suggestions have separate subject, scene, action, camera, style and audio fields, grounded in the facts you supplied. Exact dialogue and text bindings remain protected. An invalid semantic response can receive one bounded repair attempt; a repaired suggestion still needs your review and is never applied automatically.
See Security and providers for what is sent and checked.
Privacy and storage
Prompt building, previews and final rendering happen on the ComfyUI host and in your browser. If ComfyUI runs on another computer, your prompts and media are processed there too, and the sidebar adds no sign-in of its own. No feature sends media to an assisted-authoring provider, and credentials are never saved into workflows, reports or diagnostics.
| What | Where and for how long |
|---|---|
| Copies of verified generated videos | ComfyUI's temporary folder; cleared when ComfyUI starts or stops (seven days at most) |
| Rendered final videos | The media tools' temporary folder; about one hour, at most 16 |
| App Mode diagnostics | Browser storage, 32 KiB across the four latest runs; codes only, no prompts or media |
| Sequence reconnect pointer | Browser storage until it expires |
| Production and editor workspace contents | Host memory; cleared on restart or after about 15 minutes without workspace activity |
| Project and provider session pointers | Tab session storage, cleared when the tab closes; these are not saved projects |
| Provider credentials and permission | Host memory only; 30 minutes idle or eight hours, cleared on restart |
Thumbnails, filmstrips and waveforms are made from your media and can reveal private content. Review workflows and screenshots before sharing them. More detail is in Security and providers.
Known limitations
- Longer videos generate text-to-video plans only. Readiness is valid for about a minute. After a page reload, a running sequence can be viewed but not resumed: cancel it and start again.
- Audio as the only reference is not offered.
- Media features (clip editor, import, assembly, rendering) need Windows x64 and the media tools.
- Audio in the editor comes from the main track's video only, with each clip's volume, mute and fades. Overlay videos are silent and there are no separate audio tracks.
- Frame rates: assembly produces 30 fps; the editor's final render is 24 fps, up to 2.5 minutes.
- No saved projects: a host restart or workspace expiry ends editor work. Download finished videos; rendered files are kept for about an hour.
- Previews in the monitor are approximate; check the rendered file.
- Quality: validation and guide readiness check the prompt, not the visual result, and do not make this equivalent to MiniMax's own implementation.
- Visual timeline: the H3 Full Reference Timeline Producer cannot be queued in this release,
with or without a connected
visual_result(validation reportsperception_profile_unavailable). Write full-reference prompts with the Plan and Compiler nodes instead. - Official Context-IR needs a host-supplied connection.
Troubleshooting
Setup and App Mode
| Problem | What to check |
|---|---|
| H3 Context nodes are missing | The complete repository must be directly under custom_nodes. Restart ComfyUI once. |
| The sidebar is missing | The host must provide the native H3 nodes and a frontend that supports sidebar extensions. The canvas nodes still work. |
| An old interface remains after updating | Make sure only one complete version is installed, restart ComfyUI and hard-refresh the browser. |
| Start H3 App Mode stays disabled | The duration has not resolved yet, or a required image or reference is not selected. |
| A model role is reported missing | Install an official MiniMax H3 weight for that role (any subfolder works) and pick it on the canvas loader. |
| App Mode refuses a run | Follow the reason shown. Copy diagnostics gives a report for support with private details left out. |
| A request is rejected | Read the first diagnostic and supply the named input, or fix the mode or duration conflict. |
| Validation passes but Guide readiness is Incomplete | Add the missing information named in the reason. For intended silence, enable complete_silence on H3 Intent Graph Producer. |
Perception reports unavailable | No perception was set up for that fact; enter it yourself or leave it unknown. |
| Actions fail when ComfyUI is opened through a proxy or host name | The ComfyUI log shows H3 Context refused a browser request. Add the page's exact origin to H3_CONTEXT_PUBLIC_ORIGINS and restart, or open the page at the address ComfyUI serves. |
Media, editor and longer videos
| Problem | What to check |
|---|---|
| A media feature says it is unavailable | Open Settings → Media tools and follow the card: Install, Check again, or the reason shown. |
| Import is missing or does nothing | Select up to three finished segments in Production first. |
| An imported clip is in the bin but not on the timeline | Import only adds sources; press + on its card. |
| An imported clip became unavailable | Keep its Production project available. A released or replaced source must be selected and imported again. |
| Add title is unavailable | Read the reason beside the button. Choose an available font, shorten the text, or free a text track at the playhead when all eight track slots are in use. |
| A number changed but the picture did not | Number fields apply on Enter or the group's apply button. |
| On-picture handles are missing | Select one clip, put the playhead inside it, and make sure the clip and track are enabled and unlocked. |
| The Audio tab is missing or has no effect | It appears only for a video with sound, and is heard only on the Main track. |
| A keyboard shortcut does nothing | Finish or cancel a keyboard edit draft. Fields, menus and buttons outside the timeline keep their own keys. |
| Thumbnails or waveforms stay on Loading | Check the media tools and that the source is still available. Importing the same source again does not help. |
| The monitor shows Preview unavailable | Read the reason and choose Retry. |
| An edit is refused | Read the reason (source length, locked track or placement) before trying again. |
| The final video is longer than expected | Check Content extent, including disabled clips at the end. |
| The render is labelled as an earlier revision | You edited after rendering; render again. |
| A sequence cannot be resumed after a reload | Cancel it and start again. |
| Readiness expired before generating | Choose Check readiness again. |
Readiness reports qualification_composition_unqualified | The loaded native H3 implementation is not supported; use a complete, compatible ComfyUI installation. |
| A remote assisted-authoring profile does not run | Check the message, profile, permission, API key and your provider quota. |
When reporting a problem, include the node name, the diagnostic code and the profile or contract version. Remove credentials, URLs, private paths, media and provider responses from logs and screenshots.
More documentation
- Security and providers: what is sent, stored and checked.
- Host integration: optional services for host operators and developers.
License
Apache-2.0; see LICENSE and NOTICE. The bundled Noto Sans fonts use the SIL
Open Font License 1.1. FFmpeg is not included: it is downloaded only when you choose Install
and is licensed separately under GPL-3.0-or-later. The official workflow templates are served by
the ComfyUI frontend (Comfy-Org workflow_templates, MIT) and are not redistributed here. Models
and provider services have their own terms. This project is not affiliated with or endorsed by
MiniMax.
Similar repos





Direct MiniMax H3 like a pro: Idea in, finished video out. A complete MiniMax H3 studio that lives in your ComfyUI.
Python
32
3 commits
updated Oct 6, 2026
See what people are saying
README
ComfyUI-MiniMaxH3-Studio
https://github.com/user-attachments/assets/ac7c74e5-69b0-459f-b4e2-925e4c182308
Turn a description into a MiniMax H3 video without leaving ComfyUI. Build a prompt you can inspect, generate clips with the official H3 workflows, plan a longer video, then cut and render the result in a built-in editor.
Everything lives in one ComfyUI sidebar, backed by 28 canvas nodes that share the same prompt pipeline. This is an independent custom-node project, not MiniMax's official Context-IR implementation.
Latest Updates - Click to expand
1.0.2 — Assisted prompt writing and model setup
- Set up Ollama or a remote provider, reload available models and choose an exact model; readiness is checked automatically, and reloading keeps the selection when the model is still available.
- Browse provider-reported model dates, limits and lifecycle labels, with a local filter for large model lists and requests adapted to each provider's API.
- Use Refine prompt to direct a revision while preserving exact dialogue, visible text, reference roles and timing. Every suggestion remains yours to review before applying.
- Read and compare prompts without losing local edits, focus, text selection or scroll position.
- Review typed semantic suggestions with a bounded repair attempt for invalid responses. The canvas H3 Semantic Proposal Producer can use an exact installed Ollama model while keeping historical workflows compatible.
Contents
- Features
- Before you start
- Install and update
- Quick start
- The sidebar at a glance
- Create a clip
- Production
- Clip editor
- Longer videos
- Canvas nodes
- Assisted authoring (optional)
- Privacy and storage
- Known limitations
- Troubleshooting
- More documentation
- License
Features
- Inspectable prompts. Turn your intent, references, duration and exact dialogue or on-screen text into a structured plan, a prompt and a validation report. Missing information stays visible instead of being guessed.
- Five task modes. Text to video, opening image, first and last frames, ending image, or a reference set of image, video and audio with explicit roles.
- One-click official workflows. App Mode writes the official MiniMax H3 workflow for your mode onto the canvas using the H3 weights you have installed, or connects your prompt to an H3 graph you already have.
- Production workbench. Collect generated clips as segments of a project; reorder, replace or regenerate them, preview them and pick which ones to edit.
- Longer videos. Plan a 4 to 60 second video as a storyboard, generate its segments one after another and join them.
- Built-in editor. Arrange clips on up to eight tracks, trim and split, add text, picture and video overlays, adjust position, crop, colour, transitions and each clip's volume and fades, then render and download an MP4.
- Optional assisted authoring. Ask Ollama or Gemini to suggest prompt improvements; you accept or reject every suggestion. OpenAI and Anthropic connections support model discovery and readiness checks.
- Three languages. English, Traditional Chinese and Simplified Chinese.
Before you start
Requirements
- ComfyUI with its native MiniMax H3 nodes (
MiniMaxH3ImageToVideo,MiniMaxH3ReferenceToVideo), the officialvideo_minimax_h3_*workflow templates and a frontend that supports sidebar extensions. Python 3.10 or newer. - MiniMax H3 model weights and suitable hardware to generate video. Building and checking prompts needs no weights.
- Windows x64 with 64-bit Python for the clip editor, Production import, longer-video assembly and final rendering, plus the media tools, which are found or installed for you.
The package has no required Python dependencies and never installs or changes ComfyUI, its frontend or your models.
Compatibility
The sidebar checks what your host actually provides (the native H3 nodes, their inputs, the templates and the frontend functions it uses), not a version number. If something is missing, the message names it. The canvas nodes keep working even when the sidebar cannot load.
- The prompt pipeline runs on Windows, Linux and WSL. The media features need Windows x64.
- The clip editor has been tested on ComfyUI 0.38.0 with frontend 1.53.6. This is a tested combination, not a minimum version.
- Longer-video generation checks the installed H3 implementation separately. If it reports an incompatibility, use a complete, compatible ComfyUI installation; installing FFmpeg or waiting does not fix it.
If you open ComfyUI through a reverse proxy, a port mapping or a host name other than localhost,
see opening ComfyUI from another address.
Install and update
Install
To install manually:
-
Stop ComfyUI.
-
Clone or copy the complete repository into
ComfyUI/custom_nodes/ComfyUI-MiniMaxH3-Studio:cd ComfyUI/custom_nodes git clone https://github.com/rookiestar28/ComfyUI-MiniMaxH3-Studio.gitKeep both the root
__init__.pyand thecomfyui_h3_context/folder. -
Start ComfyUI and check that the H3 Context nodes and the MiniMax H3 Studio sidebar appear.
Installation does not download models, contact a provider or run a frontend build; the browser extension comes prebuilt.
If the package is available through your Comfy Registry or ComfyUI Manager, search for ComfyUI-MiniMaxH3-Studio, or run:
comfy node install minimax-h3-studio
Update an existing installation
- Save your workflows and download the videos you want to keep.
- Replace the whole package with the new version. Do not mix files from two versions, and do not keep a second copy of this pack beside the first.
- Restart ComfyUI and refresh the browser. If the old interface still shows, hard-refresh after checking that the host loaded the intended version. The sidebar header shows the loaded version.
Keep the previous version for rollback. An update does not turn editor work into saved projects; saved workflows and downloaded videos are the copies you keep.
Media tools
The clip editor, Production import, longer-video assembly and final rendering use one exact FFmpeg
build on Windows x64 with 64-bit Python: the gyan.dev full build 2026-02-26-git-6695528af6. No
path setup is needed.
- Already installed. If that build's
ffmpeg.exeandffprobe.exeare in your Python environment or onPATH, they are found the first time you use a media feature. - Not installed. When a feature needs the tools, a Media tools card appears with Install and continue. It downloads the build from its GitHub release (about 235 MB), checks it, keeps only the two programs with their license and readme, then carries on with what you started. Cancel setup stops the download without changing your work. The same Install button is in Settings → Media tools.
- Where it goes. The installed copy (about 425 MB) lives in ComfyUI's private user data, outside this package, and is reused after restarts.
- Offline or managed computers. In Settings → Media tools → Advanced, enter a folder that holds both programs of that build and choose Use this folder. Use automatic setup returns to the default. The download never uses a proxy, so use this option on computers that need one.
- Administrators can set
H3_CONTEXT_AUTHORIZED_FFMPEG_PATHandH3_CONTEXT_AUTHORIZED_FFPROBE_PATHto the two programs in one folder; this overrides everything else.H3_CONTEXT_AUTHORIZED_MEDIA_SCRATCH_ROOTcan name the temporary media folder.
Any other FFmpeg build, a modified file, Windows on ARM, 32-bit Python or a non-Windows host is not used, and the card says why. To check a copy yourself, compare these SHA-256 fingerprints:
ffmpeg.exe:abf5e1652dfdd3f8d7cfbb4900a4b590b7e8d192876164b7b7e9efaebe26d67fffprobe.exe:fb81e32ea05d77049291d9cffb0ec2677cfbe5e1ce2021bbcb9eb5abdc6ac576
FFmpeg is licensed separately under GPL-3.0-or-later and is not shipped with this package.
Quick start
- Open MiniMax H3 Studio in the ComfyUI sidebar.
- On the Context page, choose a task mode, describe the video and set a duration of 4 to 15 seconds.
- Select the images, video or audio that mode needs.
- Press Start H3 App Mode. The official workflow appears on the canvas; check its settings and queue it.
- When the video is ready it appears on the Production page. Each new run from the same workflow adds a segment to the same project.
The sidebar at a glance
Open MiniMax H3 Studio from the ComfyUI sidebar. It has three pages:
| Page | What it is for |
|---|---|
| Context | Choose a task mode, describe the video, pick references, review the prompt and start App Mode |
| Production | Your generated clips as a project, longer-video planning, and the entry to the clip editor |
| Settings | Language, the media tools and the optional assisted-authoring provider |
Settings → Language offers Automatic (ComfyUI locale), English, 繁體中文 and 简体中文.
The prompt is built on the ComfyUI host by the same nodes you can use on the canvas, so the sidebar and the canvas never disagree.
Create a clip
The Context page walks through five stages, shown as numbered tabs: Intent / Mode, Media / Roles, Understand / Plan, Audit / Validate and Execute / Export. You can also simply fill in the request and choose Start H3 App Mode.
Task modes and references
| Task mode | You provide |
|---|---|
| T2VA | Text to video: a description only |
| I2VA | Image to video: a First frame source |
| FL2VA | First and last frame: two different images |
| L2VA | Last frame: a Last frame source |
| Ref2VA | Reference set: an image, a video and/or audio, each with a clear role |
References are image, video and audio nodes already on your canvas. For a reference set, choose at most one of each kind under Reference images, Reference videos and Reference audio. Audio cannot be the only reference; add an image or a video with it. When you choose a reference video, Reference video soundtrack lets you Submit the video's own soundtrack (the default) or Do not submit a soundtrack.
Roles and order are never guessed: a missing or conflicting role is reported so you can fix it.
Dialogue and exact text
Enter dialogue, lyrics, on-screen text and anything that must or must not appear as hard constraints when the exact wording matters. They are kept word for word.
For dialogue you can also set:
- the language:
autoor one of Arabic, Chinese, English, French, German, Italian, Japanese, Korean, Portuguese, Russian and Spanish.autorecognizes Korean, Japanese and Chinese from their scripts; other scripts stay untagged with a warning. The spoken words never change; - the speaker, as a short identity phrase such as
the guide; - the delivery: spoken on screen, or an off-screen voiceover (the speaker's lips stay closed).
Duration
Enter Clip duration (seconds) as a whole number from 4 to 15 (default 5). The extension converts it to a length H3 can produce and shows the delivered seconds and frame count. Start H3 App Mode stays disabled until that is resolved; if it fails, choose Retry duration resolution. The workflow uses this one duration everywhere, so there are never two conflicting length settings.
Review the prompt
Before generating, the Context page shows the prompt, the plan behind it and a validation report. Fix errors before queueing; warnings point out uncertainties you may accept. You can also:
- type
@in the prompt to insert a reference; - edit the prompt and choose Validate revision to check your edit;
- Copy prompt, Export JSON or Import JSON;
- choose Optimize prompt when assisted authoring is set up, then edit, accept or reject the proposal;
- open Revision instruction to give a wording or style direction and choose Refine prompt;
- use Reader for the complete prompt, or Compare with current report for an active AI proposal.
Guide readiness is a separate check against the official H3 prompt guide: Ready means every known requirement is covered, Incomplete means something the guide expects is missing, even if the prompt is valid. Neither judges visual quality.
Start H3 App Mode
Start H3 App Mode writes the official ComfyUI MiniMax H3 workflow for your task mode onto the current workflow tab, without queueing it:
| Task mode | Official template |
|---|---|
| T2VA | video_minimax_h3_t2v |
| I2VA, FL2VA, L2VA | the video_minimax_h3_i2v family |
| Ref2VA | video_minimax_h3_r2v |
Model loaders are filled from your installed official H3 weights. If a model cannot be matched, it is named as a warning and left for you to pick on the canvas; ComfyUI checks the models when the workflow is queued. The workflow is a normal ComfyUI graph that you can inspect and change. Queue it with Apply and queue current H3 graph or ComfyUI's own Queue button.
If the canvas already has nodes, App Mode asks first:
- Replace canvas and start H3 App Mode replaces the graph with the official workflow;
- Connect and queue current canvas keeps your graph, connects the prompt to the H3 generation node you choose and queues it once. Your models, LoRAs, sampler and other settings stay as they are;
- Keep canvas and exit H3 App Mode leaves everything untouched.
Connect works with your own H3 workflows, not only the official ones. It looks for the native H3 generation nodes on the canvas and one subgraph level inside it; when there are several, choose one under H3 generation node to connect. The task mode must match how that node is wired: a connected first frame means I2VA, a last frame L2VA, both FL2VA, and neither T2VA. Connect is not offered when the canvas already contains H3 Context nodes; use Apply and queue current H3 graph instead.
Cancel App Mode stops while App Mode is working, and Continue with native nodes leaves App Mode so you can work on the canvas yourself.
During and after a run
A run is queued once through the normal ComfyUI queue. It is reported as finished only after the saved video has been checked against that run; a video that cannot be matched is reported as unconfirmed and never retried automatically. If the connection to ComfyUI drops, the sidebar picks the run up again when it reconnects.
The finished video is added to the Production project shown above the App Mode buttons ("Adds to Project …" or "Creates Project …"):
- every new run from the same workflow adds one segment to the same project;
- choose New project before starting when the next result should go elsewhere;
- Edit App Mode setup returns to the request for the next run.
If App Mode declines a run, it shows the reason and a remedy, with Retry H3 App Mode or Retry output verification where they apply. Copy diagnostics copies a short report for support; it never contains your prompt, workflow, file paths or credentials.
Production
The Production page has two views, switched at the top: Production for your project and Clip editor for the editor.
Project and segments
- The status band names the project and its segment count, with New project and a progress meter while segments generate.
- Segment overview shows each segment's share of the video. Its seconds are marked "snapped" when H3 delivers a slightly different length from the one requested.
- The segment list shows 32 segments per page. Tick segments to select them; with exactly one selected, its row expands to show its state, output, continuity and boundary.
- Project target duration (seconds), from 4 to 60, is the intended length of the whole video. It is used by longer-video planning, is separate from the next App Mode clip's 4–15 seconds, and never starts a generation when changed.
Arrange and generate segments
- Reorder by dragging a tile in the segment overview, with the arrows on a selected segment, or by typing its Position and choosing Apply.
- Add current Context adds a segment from the current Context request. With one segment selected, Replace segment N with current Context or Delete segment N (the last segment cannot be deleted).
- Relationship for segment N sets how a segment joins the previous one: Independent, Predecessor, Adjacent pair, Cut or Reset; the second and third need an earlier segment. Choose Apply relationship to segment N to keep it. Changing a segment only reruns what depends on it.
- Generate segment N queues one segment when it is ready; Blockers says why it is not.
- Release workspace closes this Production workspace after Confirm release. The Context and earlier outputs stay unchanged.
Previews and intent proposals
- Preview segment N (the play button on a tile) and Preview aggregate output play a copy on the host. The aggregate preview marks where each segment begins, and its sample thumbnails jump to that point. A missing button means that output cannot be previewed yet.
- Understand segment N and Understand selected open a proposal review when the segment kept an intent proposal from its original Context run. A segment without one is still valid.
To edit outputs, open the clip editor and use its Import button (see Media bin).
Clip editor
In short: in Production, tick up to three finished segments, switch to Clip editor and choose Open full editor. Bring the segments in with Import in the media bin, place them on the timeline, trim and arrange them, add titles and overlays, then choose Export → Render final video. The result is a 1920 × 1080, 24 fps MP4 that you download with Download original.
Open the editor
Switch the Production page to Clip editor and choose Open full editor. If there is no editor project yet, choose Start authoring from this context first. The editor opens as one window over ComfyUI; all editing, selection, undo and redo happen there. Close it with its close button or Escape.
The Clip editor view in the sidebar summarizes the editor project and offers Refresh workspace and Release workspace (not while the editor is open).
Layout
The window has a top bar and four regions: the Media bin on the left, the Preview monitor in the middle, the Inspector on the right and the Timeline across the bottom. The media bin has three tabs: Media, Text and Sequence (for longer videos).
- Drag the dividers between regions to resize them, or focus one and use the arrow keys (Shift for bigger steps). Enter or a double-click resets a divider.
- Drag the window's corner grip to resize the window, down to 720 × 480 pixels. In a small window the regions scroll.
- The top bar shows the edit status: Saving…, Saved, Edit refused, Save status unknown and similar. Saved means ComfyUI accepted the edit; it is not a project file. If the status is unknown, let the editor re-read the host and follow its message before editing again.
Media bin
The Media tab holds the clips available to this editor project.
- Import brings in the outputs selected in Production: up to three finished segments. If the selection also contains unfinished segments, the button reads Import ready (2 of 3) and imports only the finished ones. Importing adds sources to the bin; it does not place them on the timeline or start a generation.
- Search media, Sort and filter (source or reverse order; all media, videos, pictures, or those already added to the timeline) and Grid view / List view help in a full bin.
- Click a card, or its +, to add it: a video goes to the end of the Main track, a picture goes to a picture overlay track at the playhead.
- Right-click a card, or use its More clip actions button, for Add to timeline, Insert at playhead and Overwrite at playhead.
The Text tab adds titles: enter Title text, pick a Font and choose Add title. The title is placed at the playhead on the first unlocked text track that is free there; if there is no such track, the editor creates one within the eight-track limit. A new title lasts one second; trim it like any clip to change its length. One Undo removes both the new track and its title. You can add the first title to an empty project. If insertion is unavailable, the disabled button's explanation says what to change, such as freeing a track or choosing a font.
Timeline
The timeline has the Main video track plus video, picture and text overlay tracks: up to eight tracks, 128 clips and 2.5 minutes in total.
- Track headers show or hide a track (eye button) and lock or unlock it. The track name opens its menu, where you can Add track, Reorder track or Remove track; Main cannot be removed.
- Selecting: click a clip; Shift-click to extend the selection, Ctrl-click to add or remove one, or drag across an empty lane to box-select.
- Moving: drag a clip to another time or a compatible track (hold Alt to suspend snapping). With a clip focused, Enter starts a keyboard move: arrow keys move it, Alt+Up/Down changes track, Enter applies and Escape cancels.
- Trimming: drag a selected clip's edge, or focus the edge and use the arrow keys, Enter and Escape. Turn on Main-track ripple to make trims and deletes shift the clips that follow on the same track.
- Roll edits move a shared cut between two neighbouring clips with the handle on the cut.
- Clip menu (right-click a clip): one-frame trims, Replace clip asset, Slip clip, Slide clip, Merge clips with the next one, and Clip enabled. Menus close when you press elsewhere.
- Toolbar: Undo, Redo, Split at playhead, Trim start to playhead, Trim end to playhead, Delete (or Ripple delete), Snapping, Main-track ripple, zoom and Fit timeline. More timeline tools adds roll edits, numeric moves, selection, clip navigation and panning.
- Ruler: click or drag to move the playhead. Ctrl + mouse wheel zooms; Shift + wheel pans.
Each completed edit is one undo step. An edit can be refused, for example by a locked track or the source's length; read the reason before trying again. Refused edits are never replayed automatically. If the timeline changed under you, a banner offers Rebase rejected edit.
The workspace summary shows Content extent (up to the end of the last placed clip, including a disabled one) and Edit capacity (the space available). The final video covers the content extent, gaps included. An empty timeline cannot be rendered.
Keyboard shortcuts
| Action | Keys |
|---|---|
| Undo / Redo | Ctrl+Z / Ctrl+Shift+Z |
| Split at playhead | Ctrl+B |
| Trim start / end to playhead | Q / W |
| Delete / Ripple delete | Delete / Shift+Delete |
| Select all clips | Ctrl+A |
| Zoom in / out | Ctrl+= / Ctrl+- |
| Fit timeline | Shift+Z |
| Play or pause | Space |
| Step one frame | , and . |
Edit and view shortcuts also work after clicking a clip, a timeline tool, a trim grip or a roll handle. Space and Enter keep the focused button's own action. A keyboard move, trim or roll draft keeps its keys until you commit or cancel it. Fields, value controls, menus and buttons outside the timeline keep their own keys, so typing in the Inspector never edits the timeline.
Keys used inside the editor stay within its window, including undo and redo. If the host cannot keep the editor's keys separate from ComfyUI's own shortcuts, the full editor reports that it is unavailable.
Inspector
Select a clip to edit its properties. The tabs depend on the clip:
| Tab | What it changes |
|---|---|
| Basic | Scale, position, rotation, anchor and alignment; opacity and blend mode |
| Crop | The four edges |
| Colour | Brightness, contrast and saturation (choose Color adjustment as the effect) |
| Text | A title's text, size, weight and colour |
| Transition | A Cross dissolve with the neighbouring clip, and its length in frames |
| Audio | Volume (−60 to +12 dB), mute, fade in and fade out (up to 10 seconds each) |
The Text tab appears for titles and the Audio tab for videos with sound.
- Sliders apply when you release them. Number fields apply on Enter or the group's apply button; moving focus away does not apply them. Escape cancels a change, and Reset restores the whole group as one undo step.
- Audio settings are heard only while the clip is on the Main track, because overlay videos are silent. Raising the volume of already loud audio can distort it.
- With no clip selected, the Inspector shows the read-only project settings: resolution, frame rate, duration, audio and export format.
Preview monitor
The monitor previews the timeline in your browser with the main track's sound. Its transport has Previous frame, Play / Pause, Next frame, Fit picture / Actual size and Full screen. With the monitor focused, Space plays or pauses and Left/Right (or , and .) steps one frame.
- On-picture handles move, scale and rotate the selected clip when one enabled clip on an enabled, unlocked track is selected and the playhead is inside it. One drag is one undo step; Escape cancels it.
- Thumbnails, filmstrips and waveforms load from the source media. Waveforms show the main track's embedded sound; they do not reflect volume, mute or fades.
- If the monitor shows Preview unavailable, read the reason and choose Retry.
The monitor is a preview. Render the final video to check the exact result.
Render the final video
Open Export in the top bar and choose Render final video. The host renders a 1920 × 1080, 24 fps MP4 (H.264, with 48 kHz mono AAC sound when the main track has audio) using each clip's audio settings. You can follow progress, Cancel render, Preview output and Download original. A render made before later edits is labelled Output from an earlier revision. Titles use the bundled Noto Sans fonts.
Rendered files are kept for about an hour, at most 16 at a time. Download the ones you want to keep.
Keeping your work
- Closing the editor or switching sidebar pages does not undo accepted edits. While the page stays open, the editor also remembers its layout, selected tab, playhead and zoom.
- Unapplied Inspector changes stay with their clip; if the clip or timeline changes, the old draft is cleared with a notice instead of being applied elsewhere.
- None of this is a saved project. A page reload can reconnect while the current editor workspace is still available; restarting ComfyUI ends it. The active, visible editor renews its workspace, but hidden or disconnected workspaces can expire after about 15 minutes without workspace activity. Save workflows and download videos you want to keep; these do not back up the timeline.
- Imported clips depend on their Production project. Releasing that project or replacing a source makes the clip unavailable; select a current output and import it again.
Longer videos
A longer video, from 4 to 60 seconds, is planned in Production and then generated and joined in the clip editor's Sequence tab.
Plan in Production
- Set Project target duration and a Segmentation policy: Automatic storyboard, or fixed 5, 10, 12 or 15 second segments. To keep the plan apart from your current project, Create planned project starts a new one from the current Context.
- Choose Prepare planning context.
- Give the plan its shots: choose Review storyboard rows, write a storyboard script, choose Split script into shots, check the rows (you can edit them or Add shot) and choose Use reviewed rows. Use generated storyboard is enough when the target equals the Context's own clip length.
- Choose Propose segments. Cuts fall on shot boundaries where 4 to 15 second segments allow it. If the proposal cannot be used, the reason is shown, for example a cut inside a line of dialogue.
- Choose Approve and import to Production. This creates the segments in the project; nothing is generated yet.
Write a storyboard script
The Context describes one clip of 4 to 15 seconds: the style, subjects, sound and hard constraints every segment keeps. The storyboard script describes what happens across the whole video:
- Start each shot with
[Shot 1],[Shot 2]and so on, or separate shots with a blank line. - To set the cuts yourself, give every shot after the first a start time, such as
[Shot 2] At 00:08.000, the courier crosses the bridge.(At 0:08,also works). Times must increase and stay within the target. Give times to all of those shots or to none. - Without times, the shots share the target duration evenly.
Example for a 60 second target:
[Shot 1] The courier leaves the depot at dawn.
[Shot 2] At 00:08.000, the courier crosses the bridge.
[Shot 3] At 00:20.000, rain starts over the market.
[Shot 4] At 00:33.000, the courier shelters under an awning.
[Shot 5] At 00:47.000, the parcel is delivered.
This gives five segments of 8, 12, 13, 14 and 13 seconds. Shots shorter than 4 seconds are grouped, a shot longer than 15 seconds is split, and a shot marked as a Hard boundary is never split (so it must fit in 15 seconds). A script holds up to 32 shots. Load shots from Context copies the shots the Context already describes as a starting point.
Exact dialogue, on-screen text and timing instructions from the Context stay in the opening part of the video, and no cut is placed inside a shot that holds exact text. Plans that use reference media can be proposed and reviewed, but generation currently accepts text-to-video plans only.
Generate and assemble in the editor
- Open the clip editor's Sequence tab and choose Check readiness. It confirms that your host, models and extension can generate the plan; the result is valid for about a minute.
- Choose Generate approved sequence. Segments are generated one after another. A failed segment can be retried with Retry segment N, and Cancel sequence stops the rest.
- To leave while it runs, choose Continue current segment while I leave: the current segment finishes and the rest pause. Later choose Reconnect to running sequence and Resume remaining segments before the deadline shown.
- Choose Assemble sequence to join the segments into one 30 fps video with 48 kHz stereo sound.
Assembly does not apply editor overlays or effects. To edit the result, import the segments into the media bin, place them on the timeline and render the final video there.
Canvas nodes
Every sidebar feature is built on canvas nodes you can also use directly. The smallest route is:
Request -> Plan -> Compiler -> Validator -> Preview
H3 Context Request holds your intent, task mode, duration and hard constraints. H3 Context Plan and H3 Context Compiler turn it into a plan and the final prompt. H3 Context Validator reports problems without rewriting anything, and H3 Context Preview shows the result. Add H3 Reference Registry for reference media, and H3 Native MiniMax H3 Adapter to connect the prompt to ComfyUI's H3 nodes. Media always stays on its own connections.
All 28 nodes, grouped by purpose:
| Group | Nodes |
|---|---|
| Core prompt pipeline | Context Request, Reference Registry, Context Plan, Full-Reference Plan, Context Compiler, Context Validator, Context Preview, Context Audit Override |
| Detailed planning | Hard Constraint Producer, Intent Graph Producer, Evidence Fusion Producer, Cross Reference Producer, Directive Authority Producer, Full Reference Timeline Producer, Feasible AV Timeline, Hierarchical Evidence Reduction, Constrained Semantic Planning, Source-Profiled Renderer |
| Media and perception | Media Admission Producer, Visual Perception Producer, Audio Perception Producer |
| Generation and sidebar | Native MiniMax H3 Adapter, Product Shell Boundary, Local Reconstruction Acceptance |
| Providers and status | Provider Transparency, Reliability Status, Semantic Proposal Producer, Official Context-IR |
A few nodes worth knowing:
- H3 Context Audit Override records a deliberate decision to proceed with a prompt edit while keeping the original diagnostics visible.
- H3 Intent Graph Producer has a
complete_silenceoption. Turn it on only when silence is the intended sound; an empty soundscape otherwise counts as unspecified. - H3 Provider Transparency and H3 Reliability Status only display information; they never call a provider or start, retry or cancel work.
- H3 Visual Perception Producer and H3 Audio Perception Producer describe short media
locally after a host operator sets them up (see host integration).
Without that setup, perception reports
unavailable; describe the fact yourself or enter it as a hard constraint. - H3 Official Context-IR needs a connection supplied by the host and otherwise refuses to run.
Bundled files:
subgraphs/: the reusable H3 Context Assistant (base and reference) and H3 Product Shell Boundary graphs.workflows/: example graphs that need no models, in ComfyUI's API format (each file'spromptsection), covering the base, reference and full-reference routes and the other node groups.examples/minimal_core_pipeline.py: a pure-Python example that needs neither ComfyUI nor a provider.
None of these load model weights or promise a particular result.
Assisted authoring (optional)
Assisted authoring is off by default, and the normal path needs no provider; None selected is the default. It powers Optimize prompt and Refine prompt on the Context page. Set it up in Settings → Assisted authoring provider:
| Profile | Runs on |
|---|---|
ollama.local | Your own Ollama on the ComfyUI host |
anthropic.remote | Anthropic |
openai.remote | OpenAI |
gemini.remote | Google Gemini |
Prompt generation is enabled for Ollama and Gemini in this release. OpenAI and Anthropic support connection setup, model discovery and readiness checks; prompt generation is currently unavailable for those connections.
For Ollama:
- Choose Ollama, then Reload available models.
- Pick the Exact model. Its readiness check runs automatically.
For Anthropic, OpenAI or Gemini:
- Choose the provider and read What leaves this computer.
- Enter your API key and choose Allow text-only requests and reload models.
- Pick the Exact model. Its readiness check runs automatically; switching models within the same connection keeps the permission you granted.
Use Optimize prompt or Refine prompt when the selected connection is ready and assisted execution is available. A reachable provider may still show that execution is unavailable. Withdraw consent removes the permission and Discard removes the API key.
The model list uses the provider's exact identifiers. Large lists offer a local filter; model dates, limits and lifecycle labels appear only when the provider reports them. Reload available models keeps the selected model and refreshes its readiness if it is still present. If the model disappears, the selection and readiness are cleared; choose a model from the current list.
Refine prompt takes a revision instruction of up to 2,048 characters and 8,192 UTF-8 bytes. It directs wording within the current facts; it cannot change protected dialogue, visible text, reference roles or timing. Change typed facts through their existing controls. Stage an unstaged prompt edit first, and resolve any active proposal before asking for another suggestion. Your instruction stays in browser memory for the current workspace.
Reader retains your text, selection and scrolling when you return to the editor. Compare with current report shows the report and the active proposal separately and retains newer local edits. These views do not send requests or accept a proposal. Copy and export continue to use the current report; viewing a candidate does not make it the accepted prompt.
- Only prompt text, revision instructions and derived text are sent, never media. A suggestion is shown for you to accept, edit or reject; nothing is applied automatically, and a failure never switches to another provider.
- Switching providers or replacing credentials requires permission for the new setup. Sessions expire after 30 minutes without use or eight hours in total, and a ComfyUI restart clears them.
- Billing, quota and data retention are between you and your provider.
The canvas H3 Semantic Proposal Producer is configured separately. Choose ollama.local and
enter an exact installed Ollama model identifier in ollama_model. It checks the model's current
native identity and completion capability before generating, and finishes cleanup before a proposal
can be reviewed. The previous exact-model profile remains available for historical workflows.
Semantic suggestions have separate subject, scene, action, camera, style and audio fields, grounded in the facts you supplied. Exact dialogue and text bindings remain protected. An invalid semantic response can receive one bounded repair attempt; a repaired suggestion still needs your review and is never applied automatically.
See Security and providers for what is sent and checked.
Privacy and storage
Prompt building, previews and final rendering happen on the ComfyUI host and in your browser. If ComfyUI runs on another computer, your prompts and media are processed there too, and the sidebar adds no sign-in of its own. No feature sends media to an assisted-authoring provider, and credentials are never saved into workflows, reports or diagnostics.
| What | Where and for how long |
|---|---|
| Copies of verified generated videos | ComfyUI's temporary folder; cleared when ComfyUI starts or stops (seven days at most) |
| Rendered final videos | The media tools' temporary folder; about one hour, at most 16 |
| App Mode diagnostics | Browser storage, 32 KiB across the four latest runs; codes only, no prompts or media |
| Sequence reconnect pointer | Browser storage until it expires |
| Production and editor workspace contents | Host memory; cleared on restart or after about 15 minutes without workspace activity |
| Project and provider session pointers | Tab session storage, cleared when the tab closes; these are not saved projects |
| Provider credentials and permission | Host memory only; 30 minutes idle or eight hours, cleared on restart |
Thumbnails, filmstrips and waveforms are made from your media and can reveal private content. Review workflows and screenshots before sharing them. More detail is in Security and providers.
Known limitations
- Longer videos generate text-to-video plans only. Readiness is valid for about a minute. After a page reload, a running sequence can be viewed but not resumed: cancel it and start again.
- Audio as the only reference is not offered.
- Media features (clip editor, import, assembly, rendering) need Windows x64 and the media tools.
- Audio in the editor comes from the main track's video only, with each clip's volume, mute and fades. Overlay videos are silent and there are no separate audio tracks.
- Frame rates: assembly produces 30 fps; the editor's final render is 24 fps, up to 2.5 minutes.
- No saved projects: a host restart or workspace expiry ends editor work. Download finished videos; rendered files are kept for about an hour.
- Previews in the monitor are approximate; check the rendered file.
- Quality: validation and guide readiness check the prompt, not the visual result, and do not make this equivalent to MiniMax's own implementation.
- Visual timeline: the H3 Full Reference Timeline Producer cannot be queued in this release,
with or without a connected
visual_result(validation reportsperception_profile_unavailable). Write full-reference prompts with the Plan and Compiler nodes instead. - Official Context-IR needs a host-supplied connection.
Troubleshooting
Setup and App Mode
| Problem | What to check |
|---|---|
| H3 Context nodes are missing | The complete repository must be directly under custom_nodes. Restart ComfyUI once. |
| The sidebar is missing | The host must provide the native H3 nodes and a frontend that supports sidebar extensions. The canvas nodes still work. |
| An old interface remains after updating | Make sure only one complete version is installed, restart ComfyUI and hard-refresh the browser. |
| Start H3 App Mode stays disabled | The duration has not resolved yet, or a required image or reference is not selected. |
| A model role is reported missing | Install an official MiniMax H3 weight for that role (any subfolder works) and pick it on the canvas loader. |
| App Mode refuses a run | Follow the reason shown. Copy diagnostics gives a report for support with private details left out. |
| A request is rejected | Read the first diagnostic and supply the named input, or fix the mode or duration conflict. |
| Validation passes but Guide readiness is Incomplete | Add the missing information named in the reason. For intended silence, enable complete_silence on H3 Intent Graph Producer. |
Perception reports unavailable | No perception was set up for that fact; enter it yourself or leave it unknown. |
| Actions fail when ComfyUI is opened through a proxy or host name | The ComfyUI log shows H3 Context refused a browser request. Add the page's exact origin to H3_CONTEXT_PUBLIC_ORIGINS and restart, or open the page at the address ComfyUI serves. |
Media, editor and longer videos
| Problem | What to check |
|---|---|
| A media feature says it is unavailable | Open Settings → Media tools and follow the card: Install, Check again, or the reason shown. |
| Import is missing or does nothing | Select up to three finished segments in Production first. |
| An imported clip is in the bin but not on the timeline | Import only adds sources; press + on its card. |
| An imported clip became unavailable | Keep its Production project available. A released or replaced source must be selected and imported again. |
| Add title is unavailable | Read the reason beside the button. Choose an available font, shorten the text, or free a text track at the playhead when all eight track slots are in use. |
| A number changed but the picture did not | Number fields apply on Enter or the group's apply button. |
| On-picture handles are missing | Select one clip, put the playhead inside it, and make sure the clip and track are enabled and unlocked. |
| The Audio tab is missing or has no effect | It appears only for a video with sound, and is heard only on the Main track. |
| A keyboard shortcut does nothing | Finish or cancel a keyboard edit draft. Fields, menus and buttons outside the timeline keep their own keys. |
| Thumbnails or waveforms stay on Loading | Check the media tools and that the source is still available. Importing the same source again does not help. |
| The monitor shows Preview unavailable | Read the reason and choose Retry. |
| An edit is refused | Read the reason (source length, locked track or placement) before trying again. |
| The final video is longer than expected | Check Content extent, including disabled clips at the end. |
| The render is labelled as an earlier revision | You edited after rendering; render again. |
| A sequence cannot be resumed after a reload | Cancel it and start again. |
| Readiness expired before generating | Choose Check readiness again. |
Readiness reports qualification_composition_unqualified | The loaded native H3 implementation is not supported; use a complete, compatible ComfyUI installation. |
| A remote assisted-authoring profile does not run | Check the message, profile, permission, API key and your provider quota. |
When reporting a problem, include the node name, the diagnostic code and the profile or contract version. Remove credentials, URLs, private paths, media and provider responses from logs and screenshots.
More documentation
- Security and providers: what is sent, stored and checked.
- Host integration: optional services for host operators and developers.
License
Apache-2.0; see LICENSE and NOTICE. The bundled Noto Sans fonts use the SIL
Open Font License 1.1. FFmpeg is not included: it is downloaded only when you choose Install
and is licensed separately under GPL-3.0-or-later. The official workflow templates are served by
the ComfyUI frontend (Comfy-Org workflow_templates, MIT) and are not redistributed here. Models
and provider services have their own terms. This project is not affiliated with or endorsed by
MiniMax.