NO ENGLISH VERSION FOR NOW. READ MORE - https://github.com/rashevskyv/dbi/issues/370

This guide is based on Brikachu's work.
The ultimate solution to install NSP, NSZ, XCI and XCZ and work with Nintendo Switch. Supports installation over MTP, USB, http (from your personal server), external USB and more. Support for viewing images in jpg, png and psd formats. Support for working with zip and rar archives, as well as with cbr/cbz containers. Support for text files, plain text view and hex view. Can be used as a file manager (copy, move, delete files and folders, create folders). Work with saves (including backup and restore) and much more.
[General])[MainMenu])[Applications])[Install])[MTP])[MTP Storages])[FTP])[Access point])dbi.nro и dbi.config в папку sdmc:/switch/DBI/ на вашей каре памяти. Запускайте из режима апплета (через альбомы), или из режима тайтла с помощью Homebrew Launcher, или игры.Copy dbi.nro and dbi.config to your SD card at sdmc:/switch/DBI/ DBI can be then be launched in either applet mode (from Album) or application mode (title override), however it is primarily designed to be used in applet mode.
ba104f1701d0284e626a4c99e55d2353a4369aa2
If you have successfully launched DBI in applet mode you will see a blue background, launching in application mode will display a black background.
<<<<<<< HEAD
NSP/NSZ/XCI/XCZ-файлов из карты памяти.NSP/NSZ/XCI/XCZ-файлов с внешнего USB-накопителя в exFAT/FAT32: флешки, жёсткого диска, проч.NSP/NSZ/XCI/XCZ из ПК по USB 2.0 и 3.0-проводу, через прилагаемую программу dbibackend. Горячая клавиша для этой опции: кнопка (Y).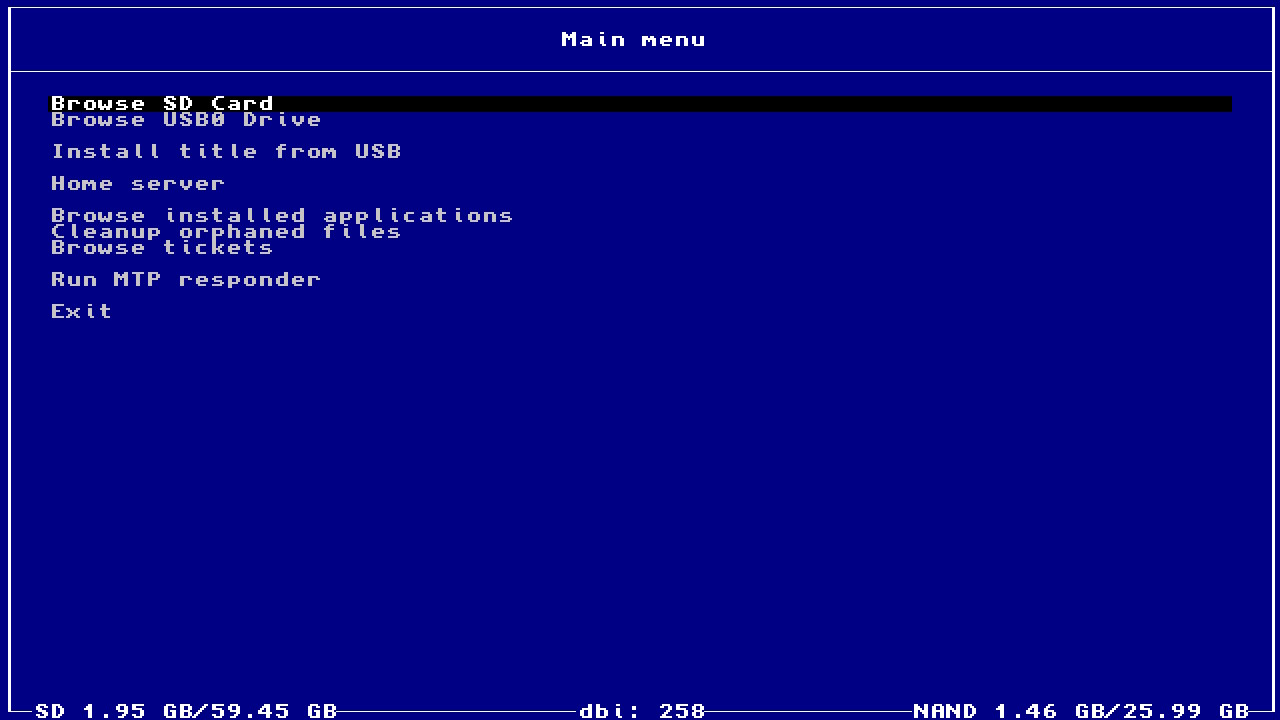
NSP/NSZ/XCI/XCZ files from the memory card.NSP/NSZ/XCI/XCZ files from an external exFAT/FAT32 USB drive, such as a flash drive, hard drive, etc.ba104f1701d0284e626a4c99e55d2353a4369aa2
The bottom left corner of DBI displays the total amount of data currently on your SD card along with the full capacity. The bottom right corner gives you the same information for your NAND's usable space in HOS.
Bottom center (dbi: XXX) is the DBI version number - you should always use the most recent version.
Select these options if you want to install games, updates and DLC from files present on your SD card or from an external USB drive. Press (A) to open the folder and (B) to return. After opening the folder containing your installation files use the (X) button to select single or multiple files for installation. The (Y) button inverts your selections and the color of the name of the selected files will change from white to light blue.
Press the (A) button to confirm. A window with installation options will appear:
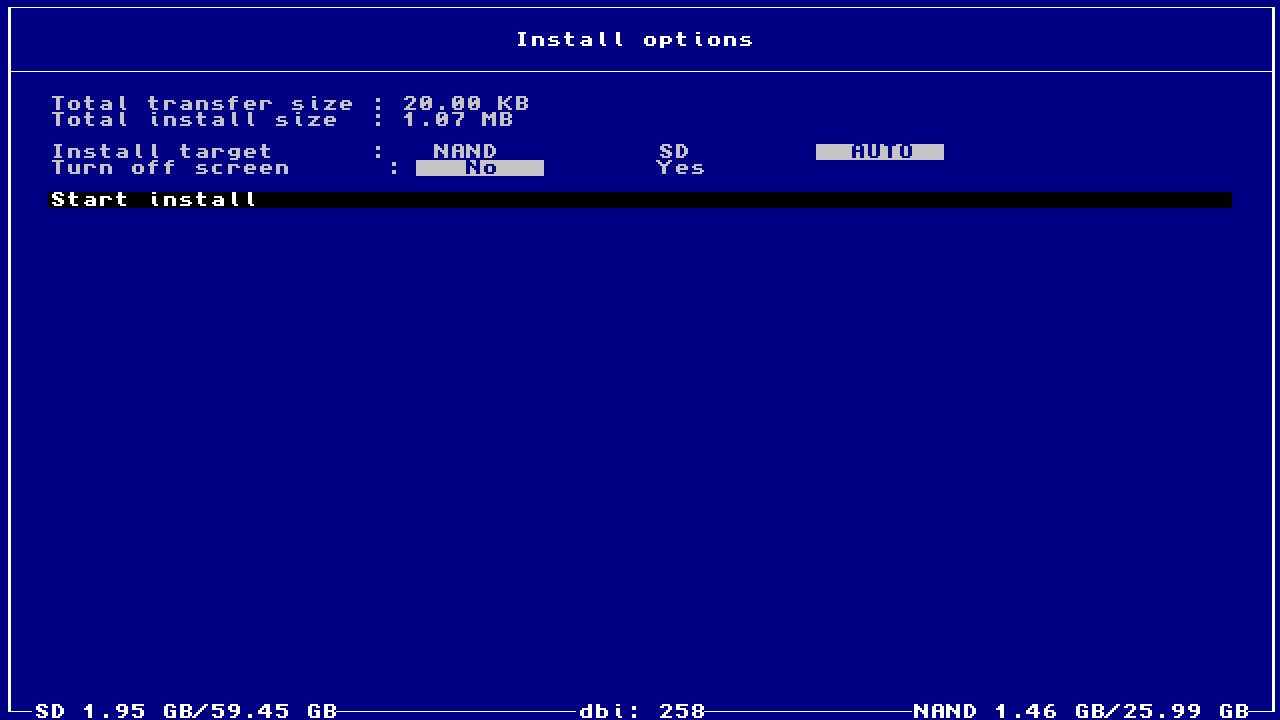
DBI will automatically and immediately remove old updates when installing a new update for a game, so you don't have to worry about the extra space they occupy.
You can also navigate to your homebrew files and launch .nro files directly by highlighting them and pressing (A).
If you cannot use DBI's MTP responder this is another convenient method for installing titles over USB. Installing over USB allows you to transfer files directly from your PC for example, which avoids the inconvenience and of having to first move the file to your SD card and then install it.
Main menu hotkey for this option: (Y) button
In order to use this option you will first require dbibackend (dbibackend.exe for Windows, or the dbibackend script for all operating systems). Launch dbibackend, select the files to install, select Start server, connect a USB-C cable from your PC to your Switch and select Install title from DBIbackend in DBI.
For proper operation of dbibackend on Windows, you need to install the "libusbK (v3.1.0.0)" drivers. They can be installed through the Zadig program by entering DBI into the "Install title from DBIbackend" mode and selecting the device that appears in the program.
From here you can select and install your files on the Switch in the same fashion as using Browse SD Card/Browse USB0 Drive.
To quickly send files or folders with games for installation, right-click on them, select Send from dbibackend and the installation files will be immediately placed in dbibackend's queue. To configure this in Windows, press Win + R, enter shell: sendto and create a shortcut for dbibackend.exe in the folder.
There are alternative clients for working with DBIbackend, for example headless implementation, NSW-DBI 2.0.0 on nodegui (requires installation of libusb driver for Linux or WinUSB (libusb) for Windows via Zadig).
You can pass commands to the script by running it from the command line and then specifying the path to the game or games you need to install. For example:
python ~/dbi/dbibackend ~/Switch/File1.nsp ~/Switch/File2.nsp ~/Switch/File3.nsp
dbibackend.exe "e:\Switch\Games\File1.nsp" "e:\Switch\Games\File2.nsp" "e:\Switch\Games\File3.nsp"
brew install python-tk
pip3 install pyusb
This will install DBI dependencies and create a udev rule to allow a non-root user to access a Switch connected via USB.
sudo apt install python-tk
echo 'SUBSYSTEM=="usb", ATTRS{idVendor}=="057e", ATTRS{idProduct}=="3000", MODE="0666"' | sudo tee /etc/udev/rules.d/nintendo-switch.rules
sudo udevadm control --reload-rules
The "Home server" option will appear if the Network install sources section has been configured in dbi.config. You can specify the name of the option as required in the configuration file.
To install games over your network, edit the dbi.config file located in the sdmc:/switch/DBI/ folder as required. For example:
; Network install sources
[Network sources]
; <display name>=<type>|<URL>
Home server=ApacheHTTP|http://192.168.1.47/Nintendo/Switch/
Install any HTTP server with DirectoryListing enabled on your PC: Apache, Mongoose, Python SimpleHTTP, sheret, rclone, etc.
Example for nginx on Windows:
Edit the file /nginx/conf/nginx.conf, registering the address of your Switch in location, instead of the 127.0.0.1 specified in the example (or your entire subnet like 192.168.1.1/24 or 192.168.0.0/16); it can be found on Switch in System Preferences > Internet:
location / {
root html;
index index.html index.htm;
}
location /Nintendo/Switch/ {
allow 127.0.0.1;
deny all;
autoindex on;
}
Save the config, run nginx.exe, allow the program to access the network, then copy the desired game to the local /nginx/html/Nintendo/Switch/ folder on your PC, and on the Switch select “Home server”.
You will now be presented with the usual interface for installing files and you can start installing files over the network. You can stop the web server via nginx -s stop.
For the server address in dbi.config, you can also use a domain name, for example, your remote VPS - suggested to use with HTTP Basic authentication e.g.: http://user:password@host:port/Nintendo/Switch/
For example:
ApacheHTTP|Network repo|http://127.0.0.1/Nintendo/Switch/
ApacheHTTP|WWW VPS repo|http://www.myveryownswitchvpsdomain.su/Nintendo/Switch/
Generate the htpasswd file, put it in /nginx/conf/, then adjust the nginx.conf file as follows:
        location /Nintendo/Switch/ {
			   satisfy all;
			   allow 127.0.0.1;
			   deny all;
			   auth_basic "Password Protected Area";
			   auth_basic_user_file htpasswd;
               autoindex on;
        }
Login "switch", password "pwd":
htpasswd-file:
switch:{SHA}N/omUzCtg+qoee+x4ttjgIls9jk=
In Browse installed applications you can see a list of installed programs, updates and DLC with their occupied space, version (display version and hex version), their titleID, the total game time and the number of launches and the presence of installed LayeredFS mods for the game (for Atmosphére).
Main menu hotkey for this option: (L) button
At the top center, the total number of installed games and the sorting type is displayed.
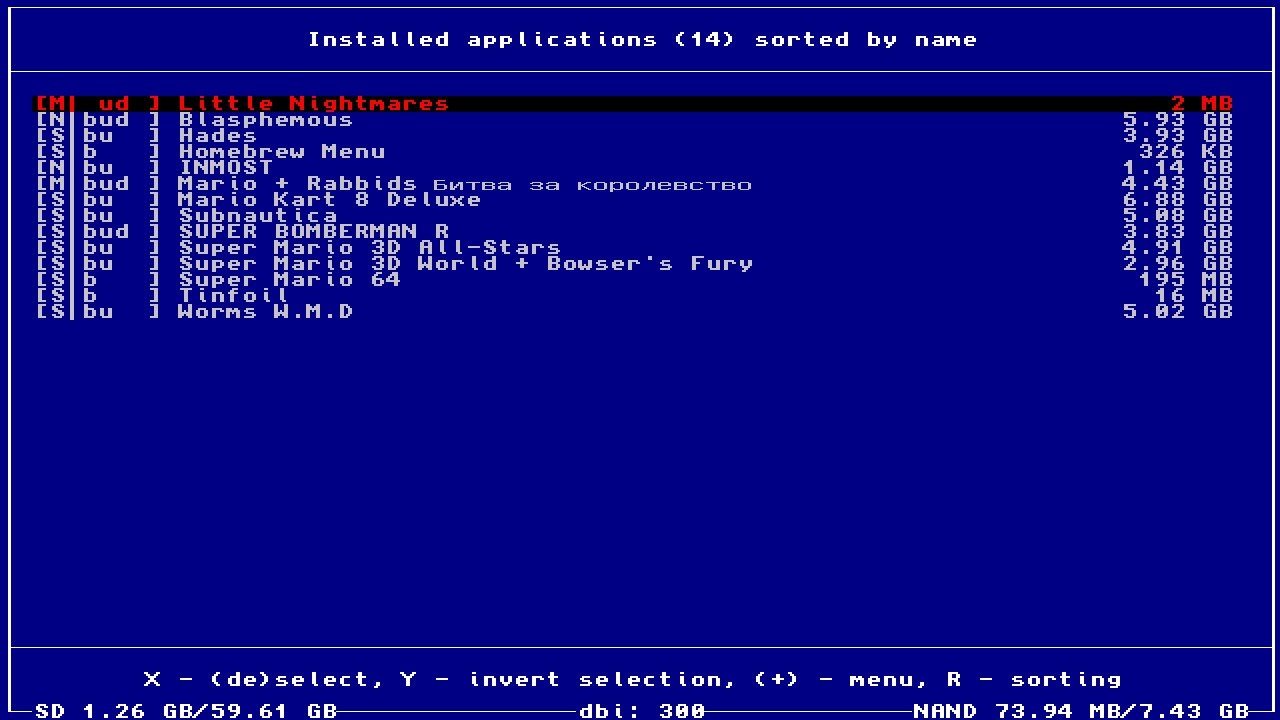
On the left hand side in square brackets, information on the game installation location, installed file type and the presence of LayeredFS mods or cheats is denoted:
sdmc:/atmosphere/contents/%titleID%/You can quick launch a game directly from the list by highlighting it and pressing (L3).
Please note! If the game is highlighted in red only an update and/or DLC is installed, the game itself is NOT installed.
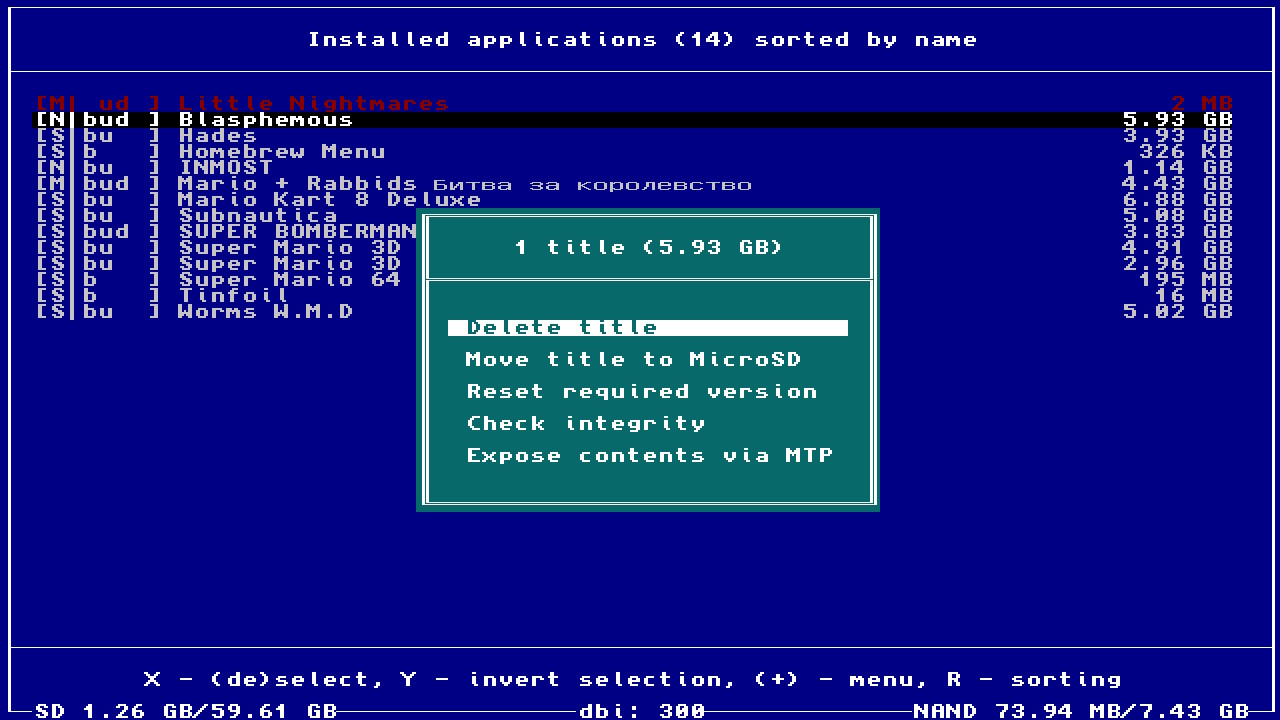
Displayed by clicking on (+) on the selected title(s).
switch/DBI/dumps)If you press the (A) button on the title, the detailed game menu will open.
The detailed game menu opens when you press the (A) button on a title while in the menu for browsing installed games (Browse installed applications)
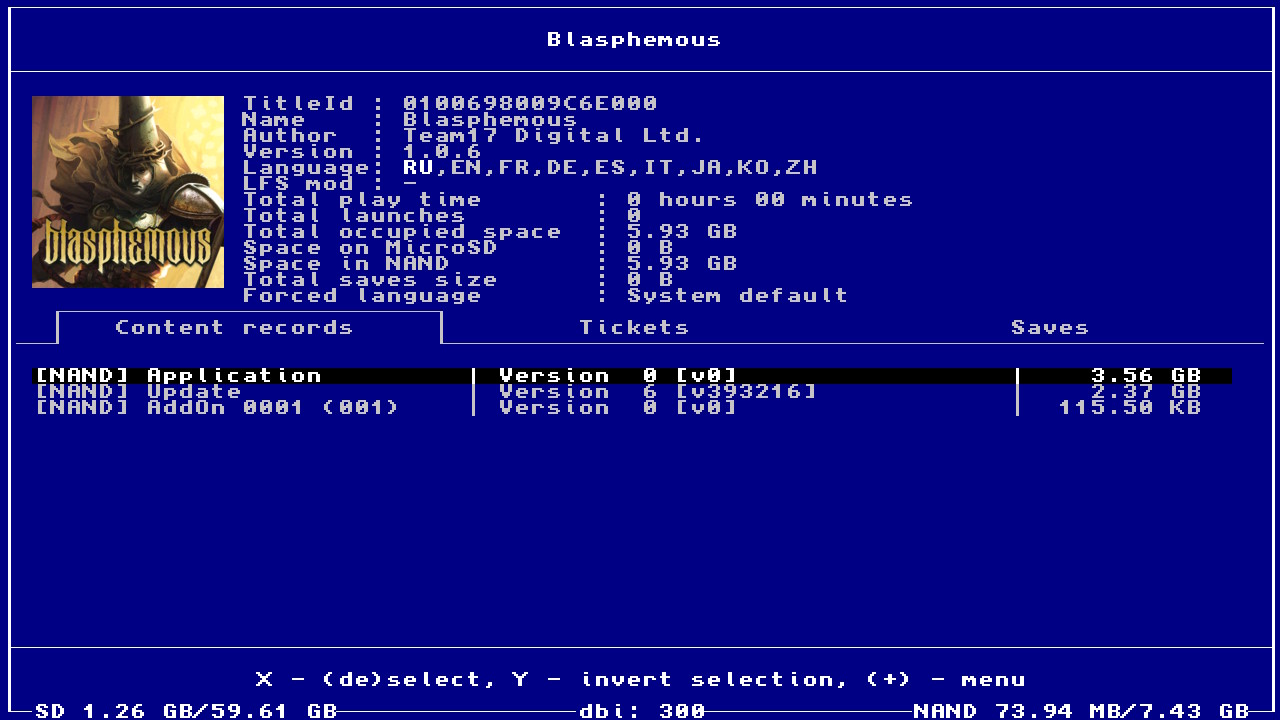
The game's icon, TitleID, name, author, version, supported languages, and the presence of an LFS mod are displayed in the detailed game menu, which can be accessed by pressing the (A) button on the game's tile while in the browse installed applications menu.
Additionally, the menu displays the total playtime, total launches, total occupied space, space in NAND and on SD, total saves size, and the game's forced language.
Below that, there are three tabs that can be switched between using the (L) and (R) buttons:
The information is displayed in the following format:
[Location] Type | version [version number] | Size
Location - NAND or SD, depending on where the content is installed Type - Application for the base game, Update for updates, Addon for DLC, and the number of the DLC will be indicated next to it version [version number] - the content version in dec and [hex] (for example, 786432 is 0.12.0.0) Size - occupied space
By pressing the (A) button on the content, you can view its contents. The content can be copied by selecting the corresponding item in the context menu (which opens by pressing the (+) button). The content opens in "read-only" mode.
When you press the (+) button on the selected content, you can access the context menu, which includes:
A ticket (or encrypted title key) is a unique encrypted information about the rights to launch game content that is installed in the system during the installation of each game (ending in 000 in the titleID)/update (ending in 800 in the titleID)/DLC.
Installed tickets for content are displayed, including:
The game databases on Nintendo servers are encrypted with the same key, but this key is encrypted with its own unique key for each game purchaser (generated on the console). Therefore, the key for decrypting the game can only be obtained from the personalized ticket on the console for which it was created. Thus, while personalized tickets differ for each purchaser, they all contain the same decryption key. Common tickets do not have encryption, only a signature.
By clicking the (+) button on the selected content, you can access a context menu where you can delete selected tickets.
In some cases, if a specific error occurs and you are sure of what you are doing, you can delete it for a specific game and its updates/DLC. However, it is generally better to leave the tickets alone to avoid errors when launching games.
Viewing and deleting saves. If there is no save, it can be created through the context menu (button (+)) for the selected account. If there is a save:
switch/DBI/saves folder.View and delete game tickets. Ticket (or encrypted title key) is a special encrypted unique information about the rights to launch the content of the game, which is installed in the system during the installation of each game (000 at the end of the titleID) / update (800 at the end of titleID) / of each DLC.
Game databases on Nintendo servers are encrypted with the same key, but this key is encrypted with a unique key for each purchased game (this key is generated on the console itself), so it is only possible to obtain the decryption key for a game from a Personalized ticket on the console it was created for. This means that all Personalized tickets purchased are different, but they contain the same decryption key for the game. Common tickets, on the other hand, do not have encryption, only a signature.
Sometimes if a specific error occurs and you know exactly what you are doing, it can be removed from a specific game and its update/DLC.
In most cases it is better not to touch anything here, in order to avoid errors when starting games.
Displayed by clicking on (+) on selected tickets
The number of selected tickets is displayed at the top of the context window.
Delete tickets - delete selected tickets
Select same game - highlight all tickets related to the selected game
View, backup and delete saves.
In general, saves are displayed in the following format:
[Account] Game-Name Backup-date Size
Below, there are three tabs that can be switched using the (L) and (R) buttons:
Displayed when (+) is pressed on selected saves
Displayed by clicking on (+) on selected saves
If multiple backups are selected for one game and user in the list, only the most recent backup will be restored.
Run MTP responder activates the built-in MTP server in DBI for exchanging data with a PC or an Android device via USB-C OTG (phone/tablet/other devices). Hotkey to call this option from the main menu: the (X) button (also used to exit MTP). After connecting the USB cable to the PC and starting the MTP server in DBI, the following window will appear on the PC:
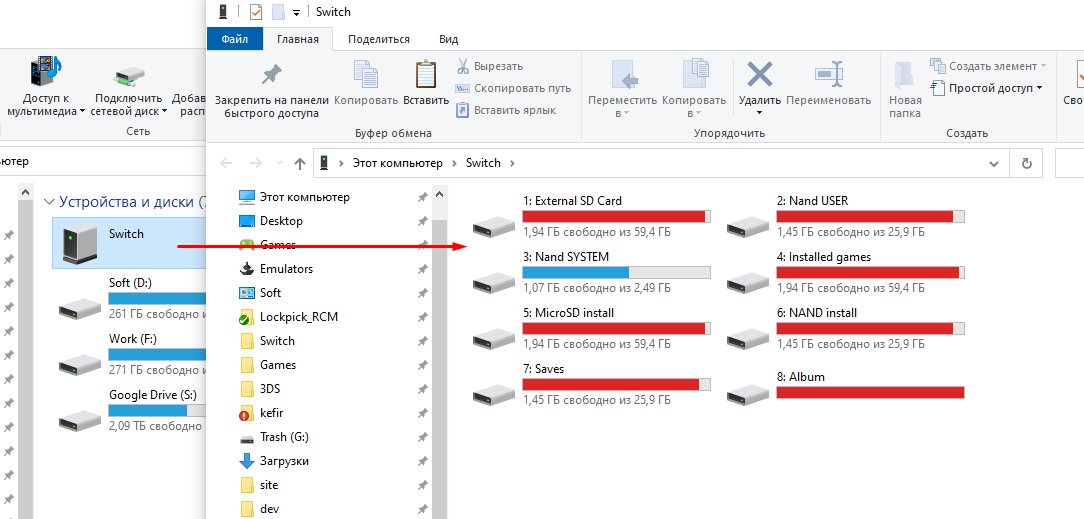
1: SD Card - for viewing, copying and deleting files and folders from/to a PC and from/to your SD card. Drop a file larger than 4GB onto the SD card and DBI will automatically split the file into an archived folder which allows the Switch to see it as a single file, with this you can for example very easily add a >4GB .XCI for use in SX OS or add a >4GB movie for watching in NXMP or pPlay.
2: NAND User - view and copy files and folders to a PC from the Switch's internal memory USER partition (this partition is read-only).
3: NAND System - view and copy files and folders to a PC from the Switch's internal memory SYSTEM partition (the partition is read-only).
4: Installed games - all installed games are displayed from both NAND (internal memory of the Switch) and SD card. To dump installed games to your PC in NSP format, just copy the folder with the name of the game from Installed games to your PC. A common ticket with completely cleared personal information is generated based on your personalized ticket. Your dump will be in separate files - the game itself, the update and any DLC files. If cheats or mods have been installed for the game, they will be located in the Mods & Cheats folder. You can also dump a single combined multicontent file containing the game itself, the update and all DLC, these files are located at the root of the Installed games directory.
5: SD install - Drop or copy your NSP/NSZ/XCI or XCZ files in this folder. When the transfer is complete the game will be installed on the SD card of your console. When installing NSZ or XCZ files, keep in mind that their actual size may differ greatly from their original size after installation: so if for example you start with 2GB free on your SD card and you do not have enough space to install an NSZ of 1GB in size, that is because NSZ and XCZ files are compressed and must be decompressed for installation.
6: NAND install - Drop or copy your NSP/NSZ/XCI or XCZ files in this folder. When the transfer is complete the game will be installed on the internal memory of your console.
7: Saves - Access to all save types stored in the internal memory of the Switch: accounts (Account), system programs (System), Background Content Asymmetric synchronized delivery and Transmission (BCAT, for example: events in ACNH), temporary (Temporary), cache (Cache, for example: addons in DOOM), system BCAT (SystemBCAT) and Device Saves (Device)
Backup, restore and manage save data for both installed and uninstalled games. You can make a backup of them by copying them to a PC and also delete saves that you no longer want or need - to do this open the folder with the name of the game you need, then delete the required save folder. In order to restore saves, copy them to the appropriate folder from your PC. DBI does not require pre-launching the game before restoring a save.
8: Album - direct access to official Album screenshots and videos per game/title, similar to the official feature added in OFW 11.0.0.
9: Gamecard - with a gamecard inserted into the Switch you can dump to .XCI or trimmed .XCI on the PC, along with the update built into it if present. The personal RSA certificate automatically removed and is dumped separately.
After activating the MTP server on the Switch a window will appear with your account nickname and its UID, as well as the number of game saves:
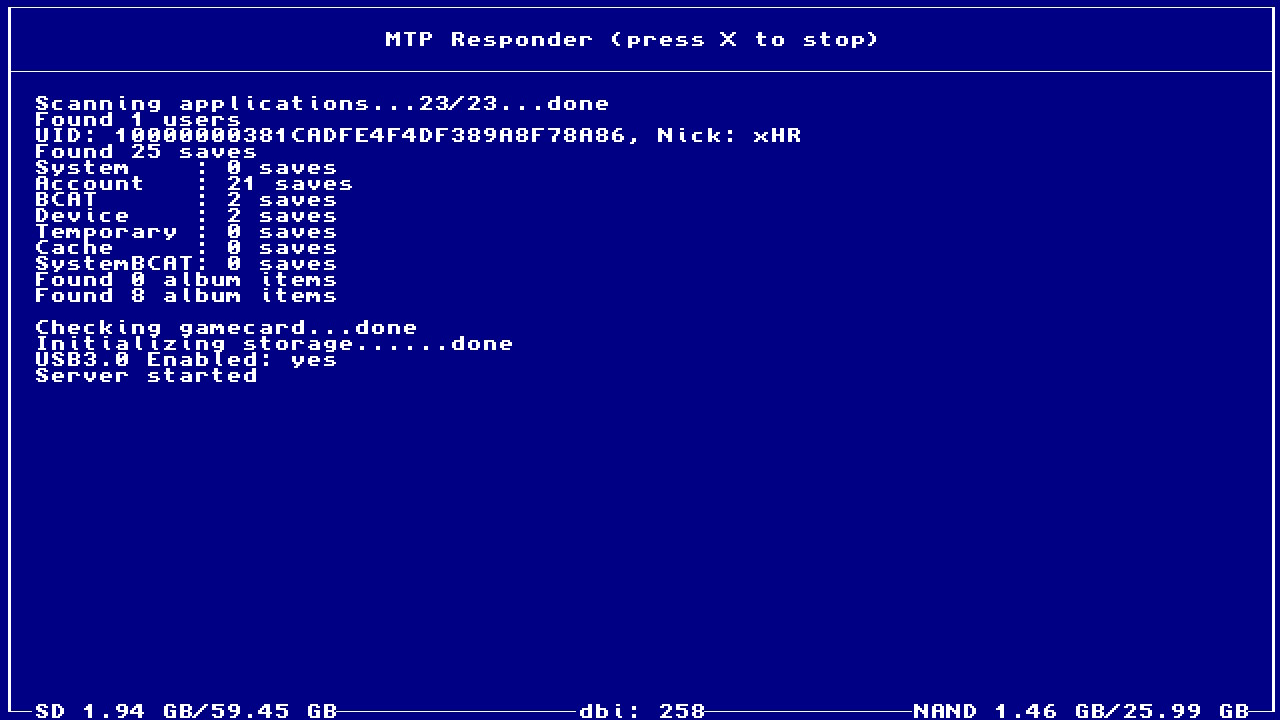
#: Custom Storage - If you have defined a custom virtual MTP drive in the dbi.config file it will appear here.
To turn off the MTP server and exit to the main menu, press either the (X) or (B) button.
Displays activity graphs in games by dates for all existing users for each specific game.
Upon launch, two tabs are shown, which can be switched between using the (L) and (R) buttons:
Hotkeys:
A list of games for which there is launch statistics is shown. At the top of the window is a status line of the following type:
[player] period. Total: number of hours (sorting method). For example, the line [All players] 2023 January. Total: 72 hours (by play time) means that the screen displays statistics for all players for January 2023, sorted by game time, where 72 hours have been played
The window is divided into three columns. From left to right:
When you press (A) on a game, you enter the Activity for the current game, where statistics for the selected game are shown. When you press (A) on an item, you will go deeper (year -> month -> day -> hour)
Activity is shown as a diagram for all games at once. To go to the diagram for a specific game, go to the Applications tab and select a game to display.
The program configuration manager allows easy configuration of the program without editing dbi.config.
Below are the configuration items through GUI / The corresponding items in dbi.config will be indicated in parentheses.
true in the configuration corresponds to Yes in the settings, false - No
[General])UseLibUsbHsFS) - true enables the libusbhsfs library for working with external USB drives through USB-OTG on the Switch, false disables it.ExitToHomeScreen) - if false, exiting DBI will go to hbmenu, if true, to the Switch home screen.LogEvents) - whether or not to save logs for "Install", "Check integrity", and "Cleanup" events.HighlightUpdates) - whether or not to highlight updates for installed games in the file manager.RotateScreen) - rotates the screen by 180 degrees.RotateJoycon) - flips the controls to match the flipped screen.OptimizeClockSpeed) - disables optimization of the SoC frequency during idle time. Disabled by default because it may cause lag on the startup screen when exiting DBI incorrectly! The correct exit method is through the Exit menu item.ROSaveFS) - view saves in read-only mode.ShowUpdateFromHere) - show the "Update all titles" button in the context menu for automatically updating installed games from all available sources (SD/USB/HTTP/FTP).SavesFolder) - folder for storing save backups.LogsFolder) - folder for storing logs.DumpsFolder) - folder on the memory card to which games will be dumped.VersionsURL) - can accept a direct link to a file on a remote server or a file on the memory card. Examples: https://raw.githubusercontent.com/blawar/titledb/master/versions.txt or sdmc:/versions.txt.ShowCacheWarmingIndicator) - show a notification when caching information about installed programs.MoveDownAfterX) - whether or not to move the cursor down after marking a game with the (X) button.ScreenIdleTimeout) - screen shutdown timeout.Autorepeat) - navigate through the menu by holding the buttonSecondcursor) - whether to display the cursor on the inactive panel or notExists in the config, but not in the menu:
[MainMenu])Settings for the menu items that will be displayed in the main DBI menu. Yes in the settings corresponds to true in the config, No corresponds to false.
BrowseSD) - menu item "Browse SD Card and Browse USB0 Drive", for installing games from an SD cardBrowseSystem) - allows browsing and copying files from the SYSTEM partitionBrowseUser) - allows browsing and copying files from the USER partitionUSBHost) - menu item "Browse USB0 Drive", for installing games from an external USB driveBackendInstall) - menu item "Install title from DBIbackend", for installing titles from the DBI backendGameCard) - menu item "Install title from Gamecard", for installing content from game cartridges to the console memoryNetwork) - menu item "Home server", for installing games from a home web serverLocal) - whether to show links to folders in the Local sources section or notBrowseApps) - menu item "Browse installed applications", for managing installed applicationsCleanup) - menu item "Cleanup orphaned files", for cleaning up orphaned files from the memory cardUpdateCheck) - menu item "Check for title updates", for checking for updates and DLC for installed gamesTickets) - menu item "Browse tickets", for managing ticketsSaves) - Browse savesMTP) - menu item "Run MTP responder", for starting MTPFTP) - menu item "Run FTP server", for starting FTP[Applications])CalculateLFSSize) - Enables or disables the calculation of the size of installed LFS mods. If enabled, it may affect the speed of opening the "Browse installed applications" menu.[Install])CheckHash) - When set to true, the hash of .nca files is checked during game installation on the Switch. When set to false, it is not checked.ChunkedTransfer) - Enables or disables chunked transfer of data over HTTP.[MTP])ShowCombinedNSPInInstalledGames) - When set to false, multi-title .NSP files are not shown in the Installed games menu in MTP mode.ShowMACInInstalledGames) - When set to false, the virtual directory Mods & cheats in the Installed games menu in MTP mode is not shown, which redirects to sdmc:/atmosphere/contents/TITLEID/ on the memory card.MACasTID) - Displays the "Mods & Cheats" folder in MTP mode as a TitleID.TurnOffScreen) - Enables or disables turning off the console screen when connected in MTP mode.ReportAndroidExtension) - whether to use the corresponding command set when working with MTP. Sometimes PC clients based on libmtp (Mac or Linux) do not correctly recognize the device, which may result in a decrease in data transfer speed. In such cases, it is recommended to try changing this setting.In the config but not in the menu:
[MTP Storages])Displays the corresponding items when using MTP Responder with a PC/Android. By default, all items are enabled for display.
true - display in the main menu, false - do not display.
The names of the items correspond to the section names.
1: SD Card)2: Nand USER)3: Nand SYSTEM)4: Installed games)5: SD install)6: NAND install)7: Saves)8: Album)9: Gamecard)CustomStorages) - show or hide custom menu items specified in the MTP custom storages section.[FTP])TurnOffScreen) - turn off the screen when entering FTP mode.UseAP) - enable Switch to work as an access point that FTP clients can connect to directly. Below are settings for this access point.ReadMT) - whether to read the file modification date or not[Access point])SSID) - the name of the access point.Password) - the password.Use5GHz) - whether to use 5 GHz. If turned off, it will work in 2.4 GHz mode.Hidden) - hide the SSID for search. This means that it can only be connected to by entering the specified SSID.Names and addresses for setting up network installs (via WiFi/LAN adapter)
NSP Indexer - address for indexing NSP (details)
Create menu items with quick access to selected folders on the memory card configured in the config (like "shortcuts"), for example:
Homebrew Shortcut=sdmc:/switch will create a "Homebrew Shortcut" menu item that opens the sdmc:/switch folder.
Custom items for MTP mode for quick access to folders on your memory card. Format: <displayed_folder_name>=<path>, for example: Homebrew=sdmc:/switch.
In MTP mode, a Homebrew folder will appear that links to the switch folder on your memory card.
Allows you to change the displayed title name. For example, if you specify 10023901191C000=Naheulbeuk, then in the application, instead of The Dungeon of Naheulbeuk: The Amulet of Chaos, it will display simply Naheulbeuk.
Exit - exits the program to HOS, bypassing hbmenu, or to hbmenu (configurable in dbi.config); if dbi was launched from a title/forwarder, the program will reboot or remain on a black screen.
Displayed in orange. These are NOT errors!
The dbi.config file is responsible for storing program settings. It is located next to DBI.nro
Let's take a look at its contents:
; General settings
[General]
; Use libusbhsfs for access to USB mass storage drives connected to switch or dock
UseLibUsbHsFS=true
; Direct exit to homescreen
ExitToHomeScreen=false
; Folder where saves backups are stored
SavesFolder=sdmc:/switch/DBI/saves/
; Log "Install", "Check integrity" and "Cleanup" processes
LogEvents=false
; Folder where logs are stored
LogsFolder=sdmc:/switch/DBI/logs/
; Folder where game dumps are stored
DumpsFolder=sdmc:/switch/DBI/dumps/
; Sorting options for application list
AppSorting=LastPlayed,InstallLocation,Size,Name
; Sorting options for save list
SaveSorting=AppLastPlayed,AppName,UserUid,Size,SaveId
; Highlight files with updates to curently instaled titles in file browsers
HighlightUpdates=true
; Rotate screen upside down
RotateScreen=false
; Rotate joycons
RotateJoycon=false
; Underclock CPU in menues to reduce battery usage
OptimizeClockSpeed=false
; URL with title versions in format <id>|<rightsId>|[version]
VersionsURL=https://raw.githubusercontent.com/blawar/titledb/master/versions.txt
;VersionsURL=sdmc:/versions.txt
;Browse saves FS in Read-only mode
ROSaveFS=true
; Show "Update all items from here..." in context menu of file browsers
ShowUpdateFromHere=false
; Show cache warming spinner
ShowCacheWarmingIndicator=true
; Move cursor down after selection
MoveDownAfterX=true
; Screen idle timeout in seconds
ScreenIdleTimeout=0
; Auto repeat nav. buttons when holding
Autorepeat=true
; Show cursors on both panels in two-panel browsinig mode
Secondcursor=false
; Backup saves before delete
FoolproofSaveDelete=true

; Visibility of main menu items
[MainMenu]
; Browse and install files from SD card
BrowseSD=true
; Browse and copy files from SYSTEM partition
BrowseSystem=false
; Browse and copy files from USER partition
BrowseUser=false
; Browse and install files from USB flash drives and HDD
USBHost=true
; Browse and install files from PC via dbibackend
BackendInstall=true
; Install game from inserted game cartridge
GameCard=true
; Browse and install files from configured network sources
Network=true
; Browse and install files from configured sd card folders
Local=true
; Browse installed applications
BrowseApps=true
; Clean up files left from bad installs/old updates/unused tickets and so on
Cleanup=true
; Check for app updates
UpdateCheck=true
; View where you can view or delete installed tickets
Tickets=false
; View where you can view or delete game saves
Saves=true
; MTP responder
MTP=true
; FTP Server
FTP=true

[Applications]
; Whether check or not LFS mod size
CalculateLFSSize=false

; Install options
[Install]
; Check NCA hash during install
CheckHash=true
; Use chunked HTTP transfer (good in bad environments)
<<<<<<< HEAD
ChunkedTransfer=false
; Allow NSZ/XCZ install in applet mode
EnableNSZ=true
; Create LFS folder in /atmosphere/contents after installation
CreateLFS=true
=======
ChunkedTransfer=true
>>>>>>> ba104f1701d0284e626a4c99e55d2353a4369aa2

; MTP options
[MTP]
; Log all files, if disabled transfer shows only for files >= 2M
LogAllFiles=false
; Show or not NSP that includes base game, latest update and all DLC in single multi-title file
ShowCombinedNSP=true
; Show or not virtual "Mods & cheats" folder that redirects to sdmc:/atmosphere/contents/TITLEID
ShowMAC=true
; Use TitleID for "Mods & cheats" folder
MACasTID=true
; Show user defined shortcuts to MircoSD folders as separate storages
CustomStorages=true
; Turn screen off on start MTP mode
TurnOffScreen=false
; Report android extension (some initiators thinks that android has bugs)
ReportAndroidExtension=true

; FTP options
[FTP]
; Turn screen off on start FTP mode
TurnOffScreen=false
; Start local access point for FTP server
UseAP=false
; Read file modification time (can slow down on large dirs)
ReadMT=false

; Access point options
[Access point]
SSID=
Password=
Use5GHz=true
Hidden=false

;Enable or disable various MTP storages
[MTP Storages]
1: SD Card=true
2: Nand USER=false
3: Nand SYSTEM=false
4: Installed games=true
5: SD Card install=true
6: NAND install=true
7: Saves=true
8: Album=true
9: Gamecard=true

; Network install sources
[Network sources]
; <display name>=<type>|<URL>
; NSP Indexer=URLList|http://192.168.1.47/nspindexer/index.php?DBI
; Home server=ApacheHTTP|http://192.168.1.47/Nintendo/Switch/
; Test FTP=FTP|ftp://anonymous:password@192.168.1.24:2121/

; Main menu shortcuts to SD card locations
[Local sources]
; <display name>=<path>
Homebrew=sdmc:/switch
; Contents=sdmc:/atmosphere/contents
; DBILogs=sdmc:/switch/DBI/logs

[MTP custom storages]
; <display name>=<path>
Homebrew=sdmc:/switch/
Screenshots=sdmc:/Nintendo/Album/

; Override for display name
; <UPPERCASED TID>=<Desired name>
[Title name override]
; 010023901191C000=Naheulbeuk
The description of each item separately can be found in the DBI settings section.
Go to "Browse installed applications" -> Choose apps you need to mount with (X) -> Press (+) -> "Expose contents via MTP"
Cadence of Hyrule.rar. Inside this archive you see a folder with the titleID of the game - 01000B900D8B0000. You need to extract the archive, go to the folder 01000B900D8B0000 and copy the entire contents of the folder to Mods & Cheats! Not the folder 01000B900D8B0000 itself, but everything inside it! In this example (and in most cases), that would be the romfs folderDBI supports USB 3.0. If you are using kefir, then USB 3.0 is active by default. Otherwise, you need to activate this function by uncommenting and editing the Atmosphere system settings configuration file at sdmc:/atmosphere/config/system_settings.ini as follows:
[usb]
usb30_force_enabled = u8!0x1
Important - activating USB 3.0 can interfere with bluetooth and 2.4GHz wifi connections. If you experience any connection issues with your wireless controllers or 2.4GHz wifi networks then you should not activate USB 3.0. 5GHz wifi connections should be generally unaffacted.
These are decrypted saves that are located in the USER:/saves folder. In case the emunand is damaged, these saves can be retrieved through a PC or Tegra Explorer and restored through DBI.
You can place these saves in the backup saves folder of DBI (/switch/dbi/saves by default) and restore them through the standard save restoration menu (the user's name will be enclosed in curly brackets {} in this case), or through the context menu invoked on the file of such a save.
Hover over the desired picture and bring up the context menu with the (+) button. Select "Set as avatar...". The selected image will be set as your avatar. The image will be automatically resized to square proportions and scaled down to the necessary size. If you want the image to maintain its original aspect ratio, prepare it in advance.
Any file can be opened as a text or as HEX. Non-empty files are opened in viewing mode, however, the (L3) key will switch to editing mode. Let's consider both modes separately.
You can also create an empty text file from the context menu (called by the (+) button > Create a new file...). When opening an empty text file, the editor will start automatically.
Hotkeys:
Context Menu:
You can edit text by moving around the keyboard with the right stick and selecting a letter with the (A) button.
Hotkeys:
When closing a file or switching to viewing mode, you can choose whether or not to save changes if changes were made to the file.
Thanks to SciresM for hactool (licensed under ISC) - DBI uses some data struct definitions from there
1,244 followers · starred Apr 2023
393 followers · starred Mar 2022
58 followers · starred Sep 2022
16 followers · starred May 2023
NO ENGLISH VERSION FOR NOW. READ MORE - https://github.com/rashevskyv/dbi/issues/370
This guide is based on Brikachu's work.
The ultimate solution to install NSP, NSZ, XCI and XCZ and work with Nintendo Switch. Supports installation over MTP, USB, http (from your personal server), external USB and more. Support for viewing images in jpg, png and psd formats. Support for working with zip and rar archives, as well as with cbr/cbz containers. Support for text files, plain text view and hex view. Can be used as a file manager (copy, move, delete files and folders, create folders). Work with saves (including backup and restore) and much more.
[General])[MainMenu])[Applications])[Install])[MTP])[MTP Storages])[FTP])[Access point])dbi.nro и dbi.config в папку sdmc:/switch/DBI/ на вашей каре памяти. Запускайте из режима апплета (через альбомы), или из режима тайтла с помощью Homebrew Launcher, или игры.Copy dbi.nro and dbi.config to your SD card at sdmc:/switch/DBI/ DBI can be then be launched in either applet mode (from Album) or application mode (title override), however it is primarily designed to be used in applet mode.
ba104f1701d0284e626a4c99e55d2353a4369aa2
If you have successfully launched DBI in applet mode you will see a blue background, launching in application mode will display a black background.
<<<<<<< HEAD
NSP/NSZ/XCI/XCZ-файлов из карты памяти.NSP/NSZ/XCI/XCZ-файлов с внешнего USB-накопителя в exFAT/FAT32: флешки, жёсткого диска, проч.NSP/NSZ/XCI/XCZ из ПК по USB 2.0 и 3.0-проводу, через прилагаемую программу dbibackend. Горячая клавиша для этой опции: кнопка (Y).
NSP/NSZ/XCI/XCZ files from the memory card.NSP/NSZ/XCI/XCZ files from an external exFAT/FAT32 USB drive, such as a flash drive, hard drive, etc.ba104f1701d0284e626a4c99e55d2353a4369aa2
The bottom left corner of DBI displays the total amount of data currently on your SD card along with the full capacity. The bottom right corner gives you the same information for your NAND's usable space in HOS.
Bottom center (dbi: XXX) is the DBI version number - you should always use the most recent version.
Select these options if you want to install games, updates and DLC from files present on your SD card or from an external USB drive. Press (A) to open the folder and (B) to return. After opening the folder containing your installation files use the (X) button to select single or multiple files for installation. The (Y) button inverts your selections and the color of the name of the selected files will change from white to light blue.
Press the (A) button to confirm. A window with installation options will appear:
DBI will automatically and immediately remove old updates when installing a new update for a game, so you don't have to worry about the extra space they occupy.
You can also navigate to your homebrew files and launch .nro files directly by highlighting them and pressing (A).
If you cannot use DBI's MTP responder this is another convenient method for installing titles over USB. Installing over USB allows you to transfer files directly from your PC for example, which avoids the inconvenience and of having to first move the file to your SD card and then install it.
Main menu hotkey for this option: (Y) button
In order to use this option you will first require dbibackend (dbibackend.exe for Windows, or the dbibackend script for all operating systems). Launch dbibackend, select the files to install, select Start server, connect a USB-C cable from your PC to your Switch and select Install title from DBIbackend in DBI.
For proper operation of dbibackend on Windows, you need to install the "libusbK (v3.1.0.0)" drivers. They can be installed through the Zadig program by entering DBI into the "Install title from DBIbackend" mode and selecting the device that appears in the program.
From here you can select and install your files on the Switch in the same fashion as using Browse SD Card/Browse USB0 Drive.
To quickly send files or folders with games for installation, right-click on them, select Send from dbibackend and the installation files will be immediately placed in dbibackend's queue. To configure this in Windows, press Win + R, enter shell: sendto and create a shortcut for dbibackend.exe in the folder.
There are alternative clients for working with DBIbackend, for example headless implementation, NSW-DBI 2.0.0 on nodegui (requires installation of libusb driver for Linux or WinUSB (libusb) for Windows via Zadig).
You can pass commands to the script by running it from the command line and then specifying the path to the game or games you need to install. For example:
python ~/dbi/dbibackend ~/Switch/File1.nsp ~/Switch/File2.nsp ~/Switch/File3.nsp
dbibackend.exe "e:\Switch\Games\File1.nsp" "e:\Switch\Games\File2.nsp" "e:\Switch\Games\File3.nsp"
brew install python-tk
pip3 install pyusb
This will install DBI dependencies and create a udev rule to allow a non-root user to access a Switch connected via USB.
sudo apt install python-tk
echo 'SUBSYSTEM=="usb", ATTRS{idVendor}=="057e", ATTRS{idProduct}=="3000", MODE="0666"' | sudo tee /etc/udev/rules.d/nintendo-switch.rules
sudo udevadm control --reload-rules
The "Home server" option will appear if the Network install sources section has been configured in dbi.config. You can specify the name of the option as required in the configuration file.
To install games over your network, edit the dbi.config file located in the sdmc:/switch/DBI/ folder as required. For example:
; Network install sources
[Network sources]
; <display name>=<type>|<URL>
Home server=ApacheHTTP|http://192.168.1.47/Nintendo/Switch/
Install any HTTP server with DirectoryListing enabled on your PC: Apache, Mongoose, Python SimpleHTTP, sheret, rclone, etc.
Example for nginx on Windows:
Edit the file /nginx/conf/nginx.conf, registering the address of your Switch in location, instead of the 127.0.0.1 specified in the example (or your entire subnet like 192.168.1.1/24 or 192.168.0.0/16); it can be found on Switch in System Preferences > Internet:
location / {
root html;
index index.html index.htm;
}
location /Nintendo/Switch/ {
allow 127.0.0.1;
deny all;
autoindex on;
}
Save the config, run nginx.exe, allow the program to access the network, then copy the desired game to the local /nginx/html/Nintendo/Switch/ folder on your PC, and on the Switch select “Home server”.
You will now be presented with the usual interface for installing files and you can start installing files over the network. You can stop the web server via nginx -s stop.
For the server address in dbi.config, you can also use a domain name, for example, your remote VPS - suggested to use with HTTP Basic authentication e.g.: http://user:password@host:port/Nintendo/Switch/
For example:
ApacheHTTP|Network repo|http://127.0.0.1/Nintendo/Switch/
ApacheHTTP|WWW VPS repo|http://www.myveryownswitchvpsdomain.su/Nintendo/Switch/
Generate the htpasswd file, put it in /nginx/conf/, then adjust the nginx.conf file as follows:
        location /Nintendo/Switch/ {
			   satisfy all;
			   allow 127.0.0.1;
			   deny all;
			   auth_basic "Password Protected Area";
			   auth_basic_user_file htpasswd;
               autoindex on;
        }
Login "switch", password "pwd":
htpasswd-file:
switch:{SHA}N/omUzCtg+qoee+x4ttjgIls9jk=
In Browse installed applications you can see a list of installed programs, updates and DLC with their occupied space, version (display version and hex version), their titleID, the total game time and the number of launches and the presence of installed LayeredFS mods for the game (for Atmosphére).
Main menu hotkey for this option: (L) button
At the top center, the total number of installed games and the sorting type is displayed.
On the left hand side in square brackets, information on the game installation location, installed file type and the presence of LayeredFS mods or cheats is denoted:
sdmc:/atmosphere/contents/%titleID%/You can quick launch a game directly from the list by highlighting it and pressing (L3).
Please note! If the game is highlighted in red only an update and/or DLC is installed, the game itself is NOT installed.
Displayed by clicking on (+) on the selected title(s).
switch/DBI/dumps)If you press the (A) button on the title, the detailed game menu will open.
The detailed game menu opens when you press the (A) button on a title while in the menu for browsing installed games (Browse installed applications)
The game's icon, TitleID, name, author, version, supported languages, and the presence of an LFS mod are displayed in the detailed game menu, which can be accessed by pressing the (A) button on the game's tile while in the browse installed applications menu.
Additionally, the menu displays the total playtime, total launches, total occupied space, space in NAND and on SD, total saves size, and the game's forced language.
Below that, there are three tabs that can be switched between using the (L) and (R) buttons:
The information is displayed in the following format:
[Location] Type | version [version number] | Size
Location - NAND or SD, depending on where the content is installed Type - Application for the base game, Update for updates, Addon for DLC, and the number of the DLC will be indicated next to it version [version number] - the content version in dec and [hex] (for example, 786432 is 0.12.0.0) Size - occupied space
By pressing the (A) button on the content, you can view its contents. The content can be copied by selecting the corresponding item in the context menu (which opens by pressing the (+) button). The content opens in "read-only" mode.
When you press the (+) button on the selected content, you can access the context menu, which includes:
A ticket (or encrypted title key) is a unique encrypted information about the rights to launch game content that is installed in the system during the installation of each game (ending in 000 in the titleID)/update (ending in 800 in the titleID)/DLC.
Installed tickets for content are displayed, including:
The game databases on Nintendo servers are encrypted with the same key, but this key is encrypted with its own unique key for each game purchaser (generated on the console). Therefore, the key for decrypting the game can only be obtained from the personalized ticket on the console for which it was created. Thus, while personalized tickets differ for each purchaser, they all contain the same decryption key. Common tickets do not have encryption, only a signature.
By clicking the (+) button on the selected content, you can access a context menu where you can delete selected tickets.
In some cases, if a specific error occurs and you are sure of what you are doing, you can delete it for a specific game and its updates/DLC. However, it is generally better to leave the tickets alone to avoid errors when launching games.
Viewing and deleting saves. If there is no save, it can be created through the context menu (button (+)) for the selected account. If there is a save:
switch/DBI/saves folder.View and delete game tickets. Ticket (or encrypted title key) is a special encrypted unique information about the rights to launch the content of the game, which is installed in the system during the installation of each game (000 at the end of the titleID) / update (800 at the end of titleID) / of each DLC.
Game databases on Nintendo servers are encrypted with the same key, but this key is encrypted with a unique key for each purchased game (this key is generated on the console itself), so it is only possible to obtain the decryption key for a game from a Personalized ticket on the console it was created for. This means that all Personalized tickets purchased are different, but they contain the same decryption key for the game. Common tickets, on the other hand, do not have encryption, only a signature.
Sometimes if a specific error occurs and you know exactly what you are doing, it can be removed from a specific game and its update/DLC.
In most cases it is better not to touch anything here, in order to avoid errors when starting games.
Displayed by clicking on (+) on selected tickets
The number of selected tickets is displayed at the top of the context window.
Delete tickets - delete selected tickets
Select same game - highlight all tickets related to the selected game
View, backup and delete saves.
In general, saves are displayed in the following format:
[Account] Game-Name Backup-date Size
Below, there are three tabs that can be switched using the (L) and (R) buttons:
Displayed when (+) is pressed on selected saves
Displayed by clicking on (+) on selected saves
If multiple backups are selected for one game and user in the list, only the most recent backup will be restored.
Run MTP responder activates the built-in MTP server in DBI for exchanging data with a PC or an Android device via USB-C OTG (phone/tablet/other devices). Hotkey to call this option from the main menu: the (X) button (also used to exit MTP). After connecting the USB cable to the PC and starting the MTP server in DBI, the following window will appear on the PC:
1: SD Card - for viewing, copying and deleting files and folders from/to a PC and from/to your SD card. Drop a file larger than 4GB onto the SD card and DBI will automatically split the file into an archived folder which allows the Switch to see it as a single file, with this you can for example very easily add a >4GB .XCI for use in SX OS or add a >4GB movie for watching in NXMP or pPlay.
2: NAND User - view and copy files and folders to a PC from the Switch's internal memory USER partition (this partition is read-only).
3: NAND System - view and copy files and folders to a PC from the Switch's internal memory SYSTEM partition (the partition is read-only).
4: Installed games - all installed games are displayed from both NAND (internal memory of the Switch) and SD card. To dump installed games to your PC in NSP format, just copy the folder with the name of the game from Installed games to your PC. A common ticket with completely cleared personal information is generated based on your personalized ticket. Your dump will be in separate files - the game itself, the update and any DLC files. If cheats or mods have been installed for the game, they will be located in the Mods & Cheats folder. You can also dump a single combined multicontent file containing the game itself, the update and all DLC, these files are located at the root of the Installed games directory.
5: SD install - Drop or copy your NSP/NSZ/XCI or XCZ files in this folder. When the transfer is complete the game will be installed on the SD card of your console. When installing NSZ or XCZ files, keep in mind that their actual size may differ greatly from their original size after installation: so if for example you start with 2GB free on your SD card and you do not have enough space to install an NSZ of 1GB in size, that is because NSZ and XCZ files are compressed and must be decompressed for installation.
6: NAND install - Drop or copy your NSP/NSZ/XCI or XCZ files in this folder. When the transfer is complete the game will be installed on the internal memory of your console.
7: Saves - Access to all save types stored in the internal memory of the Switch: accounts (Account), system programs (System), Background Content Asymmetric synchronized delivery and Transmission (BCAT, for example: events in ACNH), temporary (Temporary), cache (Cache, for example: addons in DOOM), system BCAT (SystemBCAT) and Device Saves (Device)
Backup, restore and manage save data for both installed and uninstalled games. You can make a backup of them by copying them to a PC and also delete saves that you no longer want or need - to do this open the folder with the name of the game you need, then delete the required save folder. In order to restore saves, copy them to the appropriate folder from your PC. DBI does not require pre-launching the game before restoring a save.
8: Album - direct access to official Album screenshots and videos per game/title, similar to the official feature added in OFW 11.0.0.
9: Gamecard - with a gamecard inserted into the Switch you can dump to .XCI or trimmed .XCI on the PC, along with the update built into it if present. The personal RSA certificate automatically removed and is dumped separately.
After activating the MTP server on the Switch a window will appear with your account nickname and its UID, as well as the number of game saves:
#: Custom Storage - If you have defined a custom virtual MTP drive in the dbi.config file it will appear here.
To turn off the MTP server and exit to the main menu, press either the (X) or (B) button.
Displays activity graphs in games by dates for all existing users for each specific game.
Upon launch, two tabs are shown, which can be switched between using the (L) and (R) buttons:
Hotkeys:
A list of games for which there is launch statistics is shown. At the top of the window is a status line of the following type:
[player] period. Total: number of hours (sorting method). For example, the line [All players] 2023 January. Total: 72 hours (by play time) means that the screen displays statistics for all players for January 2023, sorted by game time, where 72 hours have been played
The window is divided into three columns. From left to right:
When you press (A) on a game, you enter the Activity for the current game, where statistics for the selected game are shown. When you press (A) on an item, you will go deeper (year -> month -> day -> hour)
Activity is shown as a diagram for all games at once. To go to the diagram for a specific game, go to the Applications tab and select a game to display.
The program configuration manager allows easy configuration of the program without editing dbi.config.
Below are the configuration items through GUI / The corresponding items in dbi.config will be indicated in parentheses.
true in the configuration corresponds to Yes in the settings, false - No
[General])UseLibUsbHsFS) - true enables the libusbhsfs library for working with external USB drives through USB-OTG on the Switch, false disables it.ExitToHomeScreen) - if false, exiting DBI will go to hbmenu, if true, to the Switch home screen.LogEvents) - whether or not to save logs for "Install", "Check integrity", and "Cleanup" events.HighlightUpdates) - whether or not to highlight updates for installed games in the file manager.RotateScreen) - rotates the screen by 180 degrees.RotateJoycon) - flips the controls to match the flipped screen.OptimizeClockSpeed) - disables optimization of the SoC frequency during idle time. Disabled by default because it may cause lag on the startup screen when exiting DBI incorrectly! The correct exit method is through the Exit menu item.ROSaveFS) - view saves in read-only mode.ShowUpdateFromHere) - show the "Update all titles" button in the context menu for automatically updating installed games from all available sources (SD/USB/HTTP/FTP).SavesFolder) - folder for storing save backups.LogsFolder) - folder for storing logs.DumpsFolder) - folder on the memory card to which games will be dumped.VersionsURL) - can accept a direct link to a file on a remote server or a file on the memory card. Examples: https://raw.githubusercontent.com/blawar/titledb/master/versions.txt or sdmc:/versions.txt.ShowCacheWarmingIndicator) - show a notification when caching information about installed programs.MoveDownAfterX) - whether or not to move the cursor down after marking a game with the (X) button.ScreenIdleTimeout) - screen shutdown timeout.Autorepeat) - navigate through the menu by holding the buttonSecondcursor) - whether to display the cursor on the inactive panel or notExists in the config, but not in the menu:
[MainMenu])Settings for the menu items that will be displayed in the main DBI menu. Yes in the settings corresponds to true in the config, No corresponds to false.
BrowseSD) - menu item "Browse SD Card and Browse USB0 Drive", for installing games from an SD cardBrowseSystem) - allows browsing and copying files from the SYSTEM partitionBrowseUser) - allows browsing and copying files from the USER partitionUSBHost) - menu item "Browse USB0 Drive", for installing games from an external USB driveBackendInstall) - menu item "Install title from DBIbackend", for installing titles from the DBI backendGameCard) - menu item "Install title from Gamecard", for installing content from game cartridges to the console memoryNetwork) - menu item "Home server", for installing games from a home web serverLocal) - whether to show links to folders in the Local sources section or notBrowseApps) - menu item "Browse installed applications", for managing installed applicationsCleanup) - menu item "Cleanup orphaned files", for cleaning up orphaned files from the memory cardUpdateCheck) - menu item "Check for title updates", for checking for updates and DLC for installed gamesTickets) - menu item "Browse tickets", for managing ticketsSaves) - Browse savesMTP) - menu item "Run MTP responder", for starting MTPFTP) - menu item "Run FTP server", for starting FTP[Applications])CalculateLFSSize) - Enables or disables the calculation of the size of installed LFS mods. If enabled, it may affect the speed of opening the "Browse installed applications" menu.[Install])CheckHash) - When set to true, the hash of .nca files is checked during game installation on the Switch. When set to false, it is not checked.ChunkedTransfer) - Enables or disables chunked transfer of data over HTTP.[MTP])ShowCombinedNSPInInstalledGames) - When set to false, multi-title .NSP files are not shown in the Installed games menu in MTP mode.ShowMACInInstalledGames) - When set to false, the virtual directory Mods & cheats in the Installed games menu in MTP mode is not shown, which redirects to sdmc:/atmosphere/contents/TITLEID/ on the memory card.MACasTID) - Displays the "Mods & Cheats" folder in MTP mode as a TitleID.TurnOffScreen) - Enables or disables turning off the console screen when connected in MTP mode.ReportAndroidExtension) - whether to use the corresponding command set when working with MTP. Sometimes PC clients based on libmtp (Mac or Linux) do not correctly recognize the device, which may result in a decrease in data transfer speed. In such cases, it is recommended to try changing this setting.In the config but not in the menu:
[MTP Storages])Displays the corresponding items when using MTP Responder with a PC/Android. By default, all items are enabled for display.
true - display in the main menu, false - do not display.
The names of the items correspond to the section names.
1: SD Card)2: Nand USER)3: Nand SYSTEM)4: Installed games)5: SD install)6: NAND install)7: Saves)8: Album)9: Gamecard)CustomStorages) - show or hide custom menu items specified in the MTP custom storages section.[FTP])TurnOffScreen) - turn off the screen when entering FTP mode.UseAP) - enable Switch to work as an access point that FTP clients can connect to directly. Below are settings for this access point.ReadMT) - whether to read the file modification date or not[Access point])SSID) - the name of the access point.Password) - the password.Use5GHz) - whether to use 5 GHz. If turned off, it will work in 2.4 GHz mode.Hidden) - hide the SSID for search. This means that it can only be connected to by entering the specified SSID.Names and addresses for setting up network installs (via WiFi/LAN adapter)
NSP Indexer - address for indexing NSP (details)
Create menu items with quick access to selected folders on the memory card configured in the config (like "shortcuts"), for example:
Homebrew Shortcut=sdmc:/switch will create a "Homebrew Shortcut" menu item that opens the sdmc:/switch folder.
Custom items for MTP mode for quick access to folders on your memory card. Format: <displayed_folder_name>=<path>, for example: Homebrew=sdmc:/switch.
In MTP mode, a Homebrew folder will appear that links to the switch folder on your memory card.
Allows you to change the displayed title name. For example, if you specify 10023901191C000=Naheulbeuk, then in the application, instead of The Dungeon of Naheulbeuk: The Amulet of Chaos, it will display simply Naheulbeuk.
Exit - exits the program to HOS, bypassing hbmenu, or to hbmenu (configurable in dbi.config); if dbi was launched from a title/forwarder, the program will reboot or remain on a black screen.
Displayed in orange. These are NOT errors!
The dbi.config file is responsible for storing program settings. It is located next to DBI.nro
Let's take a look at its contents:
; General settings
[General]
; Use libusbhsfs for access to USB mass storage drives connected to switch or dock
UseLibUsbHsFS=true
; Direct exit to homescreen
ExitToHomeScreen=false
; Folder where saves backups are stored
SavesFolder=sdmc:/switch/DBI/saves/
; Log "Install", "Check integrity" and "Cleanup" processes
LogEvents=false
; Folder where logs are stored
LogsFolder=sdmc:/switch/DBI/logs/
; Folder where game dumps are stored
DumpsFolder=sdmc:/switch/DBI/dumps/
; Sorting options for application list
AppSorting=LastPlayed,InstallLocation,Size,Name
; Sorting options for save list
SaveSorting=AppLastPlayed,AppName,UserUid,Size,SaveId
; Highlight files with updates to curently instaled titles in file browsers
HighlightUpdates=true
; Rotate screen upside down
RotateScreen=false
; Rotate joycons
RotateJoycon=false
; Underclock CPU in menues to reduce battery usage
OptimizeClockSpeed=false
; URL with title versions in format <id>|<rightsId>|[version]
VersionsURL=https://raw.githubusercontent.com/blawar/titledb/master/versions.txt
;VersionsURL=sdmc:/versions.txt
;Browse saves FS in Read-only mode
ROSaveFS=true
; Show "Update all items from here..." in context menu of file browsers
ShowUpdateFromHere=false
; Show cache warming spinner
ShowCacheWarmingIndicator=true
; Move cursor down after selection
MoveDownAfterX=true
; Screen idle timeout in seconds
ScreenIdleTimeout=0
; Auto repeat nav. buttons when holding
Autorepeat=true
; Show cursors on both panels in two-panel browsinig mode
Secondcursor=false
; Backup saves before delete
FoolproofSaveDelete=true

; Visibility of main menu items
[MainMenu]
; Browse and install files from SD card
BrowseSD=true
; Browse and copy files from SYSTEM partition
BrowseSystem=false
; Browse and copy files from USER partition
BrowseUser=false
; Browse and install files from USB flash drives and HDD
USBHost=true
; Browse and install files from PC via dbibackend
BackendInstall=true
; Install game from inserted game cartridge
GameCard=true
; Browse and install files from configured network sources
Network=true
; Browse and install files from configured sd card folders
Local=true
; Browse installed applications
BrowseApps=true
; Clean up files left from bad installs/old updates/unused tickets and so on
Cleanup=true
; Check for app updates
UpdateCheck=true
; View where you can view or delete installed tickets
Tickets=false
; View where you can view or delete game saves
Saves=true
; MTP responder
MTP=true
; FTP Server
FTP=true

[Applications]
; Whether check or not LFS mod size
CalculateLFSSize=false

; Install options
[Install]
; Check NCA hash during install
CheckHash=true
; Use chunked HTTP transfer (good in bad environments)
<<<<<<< HEAD
ChunkedTransfer=false
; Allow NSZ/XCZ install in applet mode
EnableNSZ=true
; Create LFS folder in /atmosphere/contents after installation
CreateLFS=true
=======
ChunkedTransfer=true
>>>>>>> ba104f1701d0284e626a4c99e55d2353a4369aa2

; MTP options
[MTP]
; Log all files, if disabled transfer shows only for files >= 2M
LogAllFiles=false
; Show or not NSP that includes base game, latest update and all DLC in single multi-title file
ShowCombinedNSP=true
; Show or not virtual "Mods & cheats" folder that redirects to sdmc:/atmosphere/contents/TITLEID
ShowMAC=true
; Use TitleID for "Mods & cheats" folder
MACasTID=true
; Show user defined shortcuts to MircoSD folders as separate storages
CustomStorages=true
; Turn screen off on start MTP mode
TurnOffScreen=false
; Report android extension (some initiators thinks that android has bugs)
ReportAndroidExtension=true

; FTP options
[FTP]
; Turn screen off on start FTP mode
TurnOffScreen=false
; Start local access point for FTP server
UseAP=false
; Read file modification time (can slow down on large dirs)
ReadMT=false

; Access point options
[Access point]
SSID=
Password=
Use5GHz=true
Hidden=false

;Enable or disable various MTP storages
[MTP Storages]
1: SD Card=true
2: Nand USER=false
3: Nand SYSTEM=false
4: Installed games=true
5: SD Card install=true
6: NAND install=true
7: Saves=true
8: Album=true
9: Gamecard=true

; Network install sources
[Network sources]
; <display name>=<type>|<URL>
; NSP Indexer=URLList|http://192.168.1.47/nspindexer/index.php?DBI
; Home server=ApacheHTTP|http://192.168.1.47/Nintendo/Switch/
; Test FTP=FTP|ftp://anonymous:password@192.168.1.24:2121/

; Main menu shortcuts to SD card locations
[Local sources]
; <display name>=<path>
Homebrew=sdmc:/switch
; Contents=sdmc:/atmosphere/contents
; DBILogs=sdmc:/switch/DBI/logs

[MTP custom storages]
; <display name>=<path>
Homebrew=sdmc:/switch/
Screenshots=sdmc:/Nintendo/Album/

; Override for display name
; <UPPERCASED TID>=<Desired name>
[Title name override]
; 010023901191C000=Naheulbeuk
The description of each item separately can be found in the DBI settings section.
Go to "Browse installed applications" -> Choose apps you need to mount with (X) -> Press (+) -> "Expose contents via MTP"
Cadence of Hyrule.rar. Inside this archive you see a folder with the titleID of the game - 01000B900D8B0000. You need to extract the archive, go to the folder 01000B900D8B0000 and copy the entire contents of the folder to Mods & Cheats! Not the folder 01000B900D8B0000 itself, but everything inside it! In this example (and in most cases), that would be the romfs folderDBI supports USB 3.0. If you are using kefir, then USB 3.0 is active by default. Otherwise, you need to activate this function by uncommenting and editing the Atmosphere system settings configuration file at sdmc:/atmosphere/config/system_settings.ini as follows:
[usb]
usb30_force_enabled = u8!0x1
Important - activating USB 3.0 can interfere with bluetooth and 2.4GHz wifi connections. If you experience any connection issues with your wireless controllers or 2.4GHz wifi networks then you should not activate USB 3.0. 5GHz wifi connections should be generally unaffacted.
These are decrypted saves that are located in the USER:/saves folder. In case the emunand is damaged, these saves can be retrieved through a PC or Tegra Explorer and restored through DBI.
You can place these saves in the backup saves folder of DBI (/switch/dbi/saves by default) and restore them through the standard save restoration menu (the user's name will be enclosed in curly brackets {} in this case), or through the context menu invoked on the file of such a save.
Hover over the desired picture and bring up the context menu with the (+) button. Select "Set as avatar...". The selected image will be set as your avatar. The image will be automatically resized to square proportions and scaled down to the necessary size. If you want the image to maintain its original aspect ratio, prepare it in advance.
Any file can be opened as a text or as HEX. Non-empty files are opened in viewing mode, however, the (L3) key will switch to editing mode. Let's consider both modes separately.
You can also create an empty text file from the context menu (called by the (+) button > Create a new file...). When opening an empty text file, the editor will start automatically.
Hotkeys:
Context Menu:
You can edit text by moving around the keyboard with the right stick and selecting a letter with the (A) button.
Hotkeys:
When closing a file or switching to viewing mode, you can choose whether or not to save changes if changes were made to the file.
Thanks to SciresM for hactool (licensed under ISC) - DBI uses some data struct definitions from there
1,244 followers · starred Apr 2023
393 followers · starred Mar 2022
58 followers · starred Sep 2022
16 followers · starred May 2023



