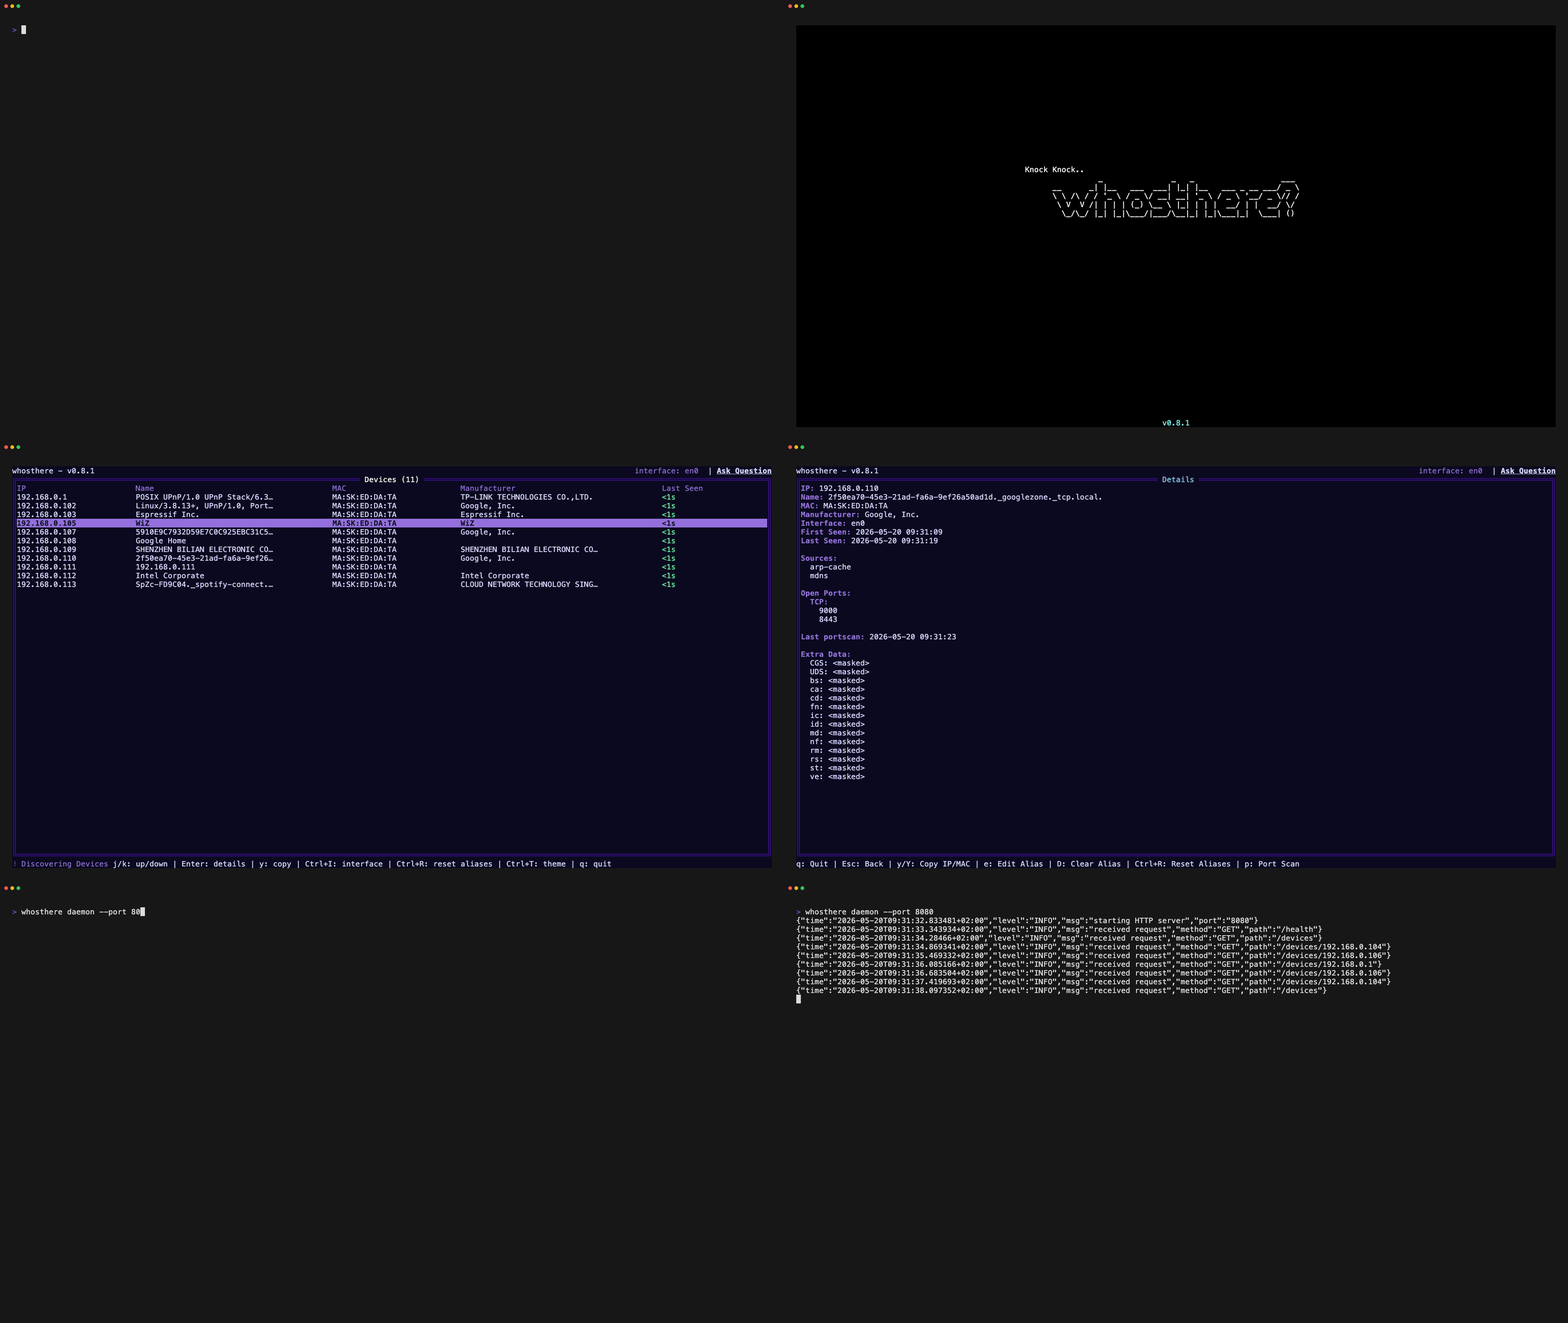
Local Area Network discovery tool with an interactive Terminal User Interface (TUI) written in Go. Discover, explore, and understand your LAN in an intuitive way. Knock Knock.. who's there? 🚪
Go
2,460
182 commits
updated Oct 9, 2026




Local Area Network discovery tool with an interactive Terminal User Interface (TUI) written in Go. Discover, explore, and understand your LAN in an intuitive way.
Whosthere performs unprivileged, concurrent scans using mDNS and SSDP scanners. Additionally, it sweeps the local subnet by attempting TCP/UDP connections to trigger ARP resolution, then reads the ARP cache to identify devices on your Local Area Network. This technique populates the ARP cache without requiring elevated privileges. All discovered devices are enhanced with OUI lookups to display manufacturers when available.
Whosthere provides a friendly, intuitive way to answer the question every network administrator asks: "Who's there on my network?"
Via Homebrew with brew:
brew install whosthere
On NixOS with nix:
nix profile install nixpkgs#whosthere
On Arch Linux with yay:
yay -S whosthere-bin
If your package manager is not listed you can always install with Go:
go install github.com/ramonvermeulen/whosthere@latest
Or build from source:
git clone https://github.com/ramonvermeulen/whosthere.git
cd whosthere
make build
Additionally, you can download pre-built binaries from the releases page.
Run the TUI for interactive discovery:
whosthere
Run as cli to do a single scan and output results:
whosthere scan -t 5
Output results to a JSON file:
whosthere scan -t 5 --json --pretty > devices.json
Run as a daemon with HTTP API:
whosthere daemon --port=8080
Import aliases in bulk from a file, or export the current ones:
whosthere aliases import ./aliases.yaml
whosthere aliases export --stdout
Additional command line options can be found by running:
whosthere --help
| Key | Action |
|---|---|
/ | Start regex search |
k | Up |
j | Down |
g | Go to top |
G | Go to bottom |
y | Copy IP of selected device |
Y | Copy MAC of selected device |
enter | Show device details |
CTRL+t | Toggle theme selector |
CTRL+i | Toggle interface selector |
CTRL+c/q | Stop application |
ESC | Clear search / Go back |
p (details view) | Start port scan on device |
tab (modal view) | Switch button selection |
Whosthere supports multiple configuration methods with the following precedence (highest to lowest):
whosthere --help for available flags.WHOSTHERE__. See Configuration via Environment Variables.DefaultConfig() in config.go.Whosthere looks for the configuration file in the following order, using the first one found:
--config flag or WHOSTHERE_CONFIG environment variable$XDG_CONFIG_HOME/whosthere/config.yaml (if XDG_CONFIG_HOME is set)~/.config/whosthere/config.yaml (default location)Example configuration:
# Uncomment the next line to configure a specific network interface - uses OS default if not set
# network_interface: eth0

# When enabled, devices from all network interfaces are shown and persist when switching interfaces
# Note: if two interfaces share the same subnet (e.g. both use 192.168.1.x), devices may get merged
# since they are identified by IP address. Use with caution on overlapping subnets.
all_interfaces: false

# Optional IPv4 CIDR subnets to sweep. When set, the sweeper skips the auto-detected interface subnet unless it is listed here.
# target_subnets: ["10.0.0.0/24", "10.0.1.0/24"]

# WARNING: scanning subnets larger than /16 sends packets to 65535+ IPs per subnet. Enable only if you understand the traffic implications. Consider using smaller /24 subnets for targeted scanning.
# scan_large_subnets: false

# How often to run discovery scans
scan_interval: 20s

# Maximum timeout for each scan, recommended to be less than the scan interval
scan_timeout: 10s

scanners:
  mdns:
    enabled: true
  ssdp:
    enabled: true
  arp:
    enabled: true

sweeper:
  enabled: true
  interval: 5m
  timeout: 20s

port_scanner:
  timeout: 5s
  # List of TCP ports to scan on discovered devices
  tcp: [21, 22, 23, 25, 80, 110, 135, 139, 143, 389, 443, 445, 993, 995, 1433, 1521, 3306, 3389, 5432, 5900, 8080, 8443, 9000, 9090, 9200, 9300, 10000, 27017]

splash:
  enabled: true
  delay: 1s

theme:
  # When disabled, the TUI will use the terminal it's default ANSI colors
  # Also see the NO_COLOR environment variable to completely disable ANSI colors
  enabled: true

  # See the complete list of available themes at https://github.com/ramonvermeulen/whosthere/tree/main/internal/ui/theme/theme.go
  # Set name to "custom" to use the custom colors below
  # For any color that is not configured it will take the default theme value as fallback
  name: default

  # Disable ANSI colors completely, overrides theme.enabled
  # Can also be set via NO_COLOR or WHOSTHERE__THEME__NO_COLOR environment variables
  # no_color: false

  # Custom theme colors (uncomment and set name: custom to use)
  # primitive_background_color: "#000a1a"
  # contrast_background_color: "#001a33"
  # more_contrast_background_color: "#003366"
  # border_color: "#0088ff"
  # title_color: "#00ffff"
  # graphics_color: "#00ffaa"
  # primary_text_color: "#cceeff"
  # secondary_text_color: "#6699ff"
  # tertiary_text_color: "#ffaa00"
  # inverse_text_color: "#000a1a"
  # contrast_secondary_text_color: "#88ddff"

aliases:
  # Uncomment to import aliases.yaml into the local database on startup (only when it changed)
  # auto_import: false
  # Override the aliases file path - defaults to the app config directory
  # file: "/path/to/aliases.yaml"
| Variable | Description |
|---|---|
WHOSTHERE_CONFIG | Path to the configuration file, to be able to overwrite the default location. |
WHOSTHERE_LOG | Set the log level (e.g., debug, info, warn, error). Defaults to info. |
NO_COLOR | Disable ANSI colors in the TUI. |
Any configuration option that is available in the YAML configuration, can be set via environment variables using the
WHOSTHERE__ prefix (note the double underscore). Nested configuration keys are separated by double underscores, and
keys are case-insensitive.
Examples:
WHOSTHERE__SPLASH__ENABLED=false - Disable the splash screen, equivalent to splash.enabled: false in the YAML configWHOSTHERE__SPLASH__DELAY=2s - Set splash screen delay to 2 seconds, equivalent to splash.delay: 2s in the YAML configWHOSTHERE__SCAN_INTERVAL=30s - Set scan interval to 30 seconds, equivalent to scan_interval: 30s in the YAML configWHOSTHERE__TARGET_SUBNETS=10.0.0.0/24,10.0.1.0/24 - Set target subnets, equivalent to target_subnets: ["10.0.0.0/24", "10.0.1.0/24"] in the YAML configWHOSTHERE__SCANNERS__MDNS__ENABLED=false - Disable mDNS scanner, equivalent to scanners.mdns.enabled: false in the YAML configWHOSTHERE__PORT_SCANNER__TCP=80,443,8080 - Set custom TCP ports to scan, equivalent to port_scanner.tcp: [80, 443, 8080] in the YAML configWHOSTHERE__THEME__NAME=cyberpunk - Set theme to cyberpunk, equivalent to theme.name: cyberpunk in the YAML configAliases live in a local bbolt database in the state directory. To
set many at once, import them from a YAML file (aliases.yaml in the config directory; override with
the aliases.file config key or a path argument).
The file is a patch, not a mirror, and is only ever read: importing upserts the MACs it contains
and leaves others untouched, and TUI edits are never written back to the file. Use export to
regenerate it.
version: 1
aliases:
  aa:bb:cc:dd:ee:ff: "Living Room TV"
  de:ad:be:ef:00:01: "Office Printer"
version is the file format version; use 1 (files without it default to 1).AA:BB:CC:DD:EE:FF, aa-bb-cc-dd-ee-ff
and aabbccddeeff are equivalent. An empty alias ("") clears one.whosthere aliases import # from the default location
whosthere aliases import ./aliases.yaml
whosthere aliases export # to the default location
whosthere aliases export --stdout # to stdout
Opt in to importing on startup with aliases.auto_import: true. The file is hash-checked and only
re-imported when it changed, so an untouched file never clobbers your TUI edits — but a changed
file does overwrite the aliases for every MAC it contains. Keep TUI-only aliases out of the file,
or export after editing to keep it in sync.
When running Whosthere in daemon mode, it exposes an very simplistic HTTP API with the following endpoints:
| Method | Endpoint | Description |
|---|---|---|
| GET | /devices | Get list of all discovered devices |
| GET | /device/{ip} | Get details of a specific device |
| GET | /health | Health check |
Theme can be configured via the configuration file, or at runtime via the CTRL+t key binding.
A complete list of available themes can be found here, feel free to open a PR to add your own theme!
Example of theme configuration:
theme:
  enabled: true
  name: cyberpunk
When the name is set to custom, the other color options can be used to create your own custom theme.
When the enabled option is set to false, the TUI will use the terminal's default ANSI colors.
When NO_COLOR environment variable is set, all ANSI colors will be disabled.
Logs are written to the application's state directory:
$XDG_STATE_HOME/whosthere/app.log (if XDG_STATE_HOME is set)~/.local/state/whosthere/app.log (fallback Linux/MacOS)%LOCALAPPDATA%/whosthere/app.log (fallback Windows)When not running in TUI mode, logs are also written to the console.
Whosthere is supported on the following platforms:
For clipboard functionality to work, a fork of go-clipboard is used. Ensure you have the appropriate copy tool installed for your OS:
| OS | Supported copy tools |
|---|---|
| Darwin | pbcopy |
| Windows | clip.exe |
| Linux/FreeBSD/NetBSD/OpenBSD/Dragonfly | X11: xsel, xclip Wayland: wl-copy |
Whosthere is intended for use on networks where you have permission to perform network discovery and scanning, such as your own home network. Unauthorized scanning of networks may be illegal and unethical. Always obtain proper authorization before using this tool on any network.
This tool was created primarily for educational purposes and home network exploration. While functional and useful, it should not be considered a professional-grade network monitoring solution. Results are based on unprivileged scanning techniques and may not be comprehensive. For critical network analysis or security assessments, consider using established professional tools with formal support.
Contributions and suggestions such as feature requests, bug reports, or improvements are welcome! Feel free to open issues or submit pull requests on the GitHub repository. Please make sure to discuss any major changes on a Github issue before implementing them.
(top 24 of 70)
931 followers · starred Feb 2026
193 followers · starred Feb 2026
139 followers · starred Feb 2026
1,061 followers · starred Jan 2026
Local Area Network discovery tool with an interactive Terminal User Interface (TUI) written in Go. Discover, explore, and understand your LAN in an intuitive way. Knock Knock.. who's there? 🚪
Go
2,460
182 commits
updated Oct 9, 2026
Local Area Network discovery tool with an interactive Terminal User Interface (TUI) written in Go. Discover, explore, and understand your LAN in an intuitive way.
Whosthere performs unprivileged, concurrent scans using mDNS and SSDP scanners. Additionally, it sweeps the local subnet by attempting TCP/UDP connections to trigger ARP resolution, then reads the ARP cache to identify devices on your Local Area Network. This technique populates the ARP cache without requiring elevated privileges. All discovered devices are enhanced with OUI lookups to display manufacturers when available.
Whosthere provides a friendly, intuitive way to answer the question every network administrator asks: "Who's there on my network?"
Via Homebrew with brew:
brew install whosthere
On NixOS with nix:
nix profile install nixpkgs#whosthere
On Arch Linux with yay:
yay -S whosthere-bin
If your package manager is not listed you can always install with Go:
go install github.com/ramonvermeulen/whosthere@latest
Or build from source:
git clone https://github.com/ramonvermeulen/whosthere.git
cd whosthere
make build
Additionally, you can download pre-built binaries from the releases page.
Run the TUI for interactive discovery:
whosthere
Run as cli to do a single scan and output results:
whosthere scan -t 5
Output results to a JSON file:
whosthere scan -t 5 --json --pretty > devices.json
Run as a daemon with HTTP API:
whosthere daemon --port=8080
Import aliases in bulk from a file, or export the current ones:
whosthere aliases import ./aliases.yaml
whosthere aliases export --stdout
Additional command line options can be found by running:
whosthere --help
| Key | Action |
|---|---|
/ | Start regex search |
k | Up |
j | Down |
g | Go to top |
G | Go to bottom |
y | Copy IP of selected device |
Y | Copy MAC of selected device |
enter | Show device details |
CTRL+t | Toggle theme selector |
CTRL+i | Toggle interface selector |
CTRL+c/q | Stop application |
ESC | Clear search / Go back |
p (details view) | Start port scan on device |
tab (modal view) | Switch button selection |
Whosthere supports multiple configuration methods with the following precedence (highest to lowest):
whosthere --help for available flags.WHOSTHERE__. See Configuration via Environment Variables.DefaultConfig() in config.go.Whosthere looks for the configuration file in the following order, using the first one found:
--config flag or WHOSTHERE_CONFIG environment variable$XDG_CONFIG_HOME/whosthere/config.yaml (if XDG_CONFIG_HOME is set)~/.config/whosthere/config.yaml (default location)Example configuration:
# Uncomment the next line to configure a specific network interface - uses OS default if not set
# network_interface: eth0

# When enabled, devices from all network interfaces are shown and persist when switching interfaces
# Note: if two interfaces share the same subnet (e.g. both use 192.168.1.x), devices may get merged
# since they are identified by IP address. Use with caution on overlapping subnets.
all_interfaces: false

# Optional IPv4 CIDR subnets to sweep. When set, the sweeper skips the auto-detected interface subnet unless it is listed here.
# target_subnets: ["10.0.0.0/24", "10.0.1.0/24"]

# WARNING: scanning subnets larger than /16 sends packets to 65535+ IPs per subnet. Enable only if you understand the traffic implications. Consider using smaller /24 subnets for targeted scanning.
# scan_large_subnets: false

# How often to run discovery scans
scan_interval: 20s

# Maximum timeout for each scan, recommended to be less than the scan interval
scan_timeout: 10s

scanners:
  mdns:
    enabled: true
  ssdp:
    enabled: true
  arp:
    enabled: true

sweeper:
  enabled: true
  interval: 5m
  timeout: 20s

port_scanner:
  timeout: 5s
  # List of TCP ports to scan on discovered devices
  tcp: [21, 22, 23, 25, 80, 110, 135, 139, 143, 389, 443, 445, 993, 995, 1433, 1521, 3306, 3389, 5432, 5900, 8080, 8443, 9000, 9090, 9200, 9300, 10000, 27017]

splash:
  enabled: true
  delay: 1s

theme:
  # When disabled, the TUI will use the terminal it's default ANSI colors
  # Also see the NO_COLOR environment variable to completely disable ANSI colors
  enabled: true

  # See the complete list of available themes at https://github.com/ramonvermeulen/whosthere/tree/main/internal/ui/theme/theme.go
  # Set name to "custom" to use the custom colors below
  # For any color that is not configured it will take the default theme value as fallback
  name: default

  # Disable ANSI colors completely, overrides theme.enabled
  # Can also be set via NO_COLOR or WHOSTHERE__THEME__NO_COLOR environment variables
  # no_color: false

  # Custom theme colors (uncomment and set name: custom to use)
  # primitive_background_color: "#000a1a"
  # contrast_background_color: "#001a33"
  # more_contrast_background_color: "#003366"
  # border_color: "#0088ff"
  # title_color: "#00ffff"
  # graphics_color: "#00ffaa"
  # primary_text_color: "#cceeff"
  # secondary_text_color: "#6699ff"
  # tertiary_text_color: "#ffaa00"
  # inverse_text_color: "#000a1a"
  # contrast_secondary_text_color: "#88ddff"

aliases:
  # Uncomment to import aliases.yaml into the local database on startup (only when it changed)
  # auto_import: false
  # Override the aliases file path - defaults to the app config directory
  # file: "/path/to/aliases.yaml"
| Variable | Description |
|---|---|
WHOSTHERE_CONFIG | Path to the configuration file, to be able to overwrite the default location. |
WHOSTHERE_LOG | Set the log level (e.g., debug, info, warn, error). Defaults to info. |
NO_COLOR | Disable ANSI colors in the TUI. |
Any configuration option that is available in the YAML configuration, can be set via environment variables using the
WHOSTHERE__ prefix (note the double underscore). Nested configuration keys are separated by double underscores, and
keys are case-insensitive.
Examples:
WHOSTHERE__SPLASH__ENABLED=false - Disable the splash screen, equivalent to splash.enabled: false in the YAML configWHOSTHERE__SPLASH__DELAY=2s - Set splash screen delay to 2 seconds, equivalent to splash.delay: 2s in the YAML configWHOSTHERE__SCAN_INTERVAL=30s - Set scan interval to 30 seconds, equivalent to scan_interval: 30s in the YAML configWHOSTHERE__TARGET_SUBNETS=10.0.0.0/24,10.0.1.0/24 - Set target subnets, equivalent to target_subnets: ["10.0.0.0/24", "10.0.1.0/24"] in the YAML configWHOSTHERE__SCANNERS__MDNS__ENABLED=false - Disable mDNS scanner, equivalent to scanners.mdns.enabled: false in the YAML configWHOSTHERE__PORT_SCANNER__TCP=80,443,8080 - Set custom TCP ports to scan, equivalent to port_scanner.tcp: [80, 443, 8080] in the YAML configWHOSTHERE__THEME__NAME=cyberpunk - Set theme to cyberpunk, equivalent to theme.name: cyberpunk in the YAML configAliases live in a local bbolt database in the state directory. To
set many at once, import them from a YAML file (aliases.yaml in the config directory; override with
the aliases.file config key or a path argument).
The file is a patch, not a mirror, and is only ever read: importing upserts the MACs it contains
and leaves others untouched, and TUI edits are never written back to the file. Use export to
regenerate it.
version: 1
aliases:
  aa:bb:cc:dd:ee:ff: "Living Room TV"
  de:ad:be:ef:00:01: "Office Printer"
version is the file format version; use 1 (files without it default to 1).AA:BB:CC:DD:EE:FF, aa-bb-cc-dd-ee-ff
and aabbccddeeff are equivalent. An empty alias ("") clears one.whosthere aliases import # from the default location
whosthere aliases import ./aliases.yaml
whosthere aliases export # to the default location
whosthere aliases export --stdout # to stdout
Opt in to importing on startup with aliases.auto_import: true. The file is hash-checked and only
re-imported when it changed, so an untouched file never clobbers your TUI edits — but a changed
file does overwrite the aliases for every MAC it contains. Keep TUI-only aliases out of the file,
or export after editing to keep it in sync.
When running Whosthere in daemon mode, it exposes an very simplistic HTTP API with the following endpoints:
| Method | Endpoint | Description |
|---|---|---|
| GET | /devices | Get list of all discovered devices |
| GET | /device/{ip} | Get details of a specific device |
| GET | /health | Health check |
Theme can be configured via the configuration file, or at runtime via the CTRL+t key binding.
A complete list of available themes can be found here, feel free to open a PR to add your own theme!
Example of theme configuration:
theme:
  enabled: true
  name: cyberpunk
When the name is set to custom, the other color options can be used to create your own custom theme.
When the enabled option is set to false, the TUI will use the terminal's default ANSI colors.
When NO_COLOR environment variable is set, all ANSI colors will be disabled.
Logs are written to the application's state directory:
$XDG_STATE_HOME/whosthere/app.log (if XDG_STATE_HOME is set)~/.local/state/whosthere/app.log (fallback Linux/MacOS)%LOCALAPPDATA%/whosthere/app.log (fallback Windows)When not running in TUI mode, logs are also written to the console.
Whosthere is supported on the following platforms:
For clipboard functionality to work, a fork of go-clipboard is used. Ensure you have the appropriate copy tool installed for your OS:
| OS | Supported copy tools |
|---|---|
| Darwin | pbcopy |
| Windows | clip.exe |
| Linux/FreeBSD/NetBSD/OpenBSD/Dragonfly | X11: xsel, xclip Wayland: wl-copy |
Whosthere is intended for use on networks where you have permission to perform network discovery and scanning, such as your own home network. Unauthorized scanning of networks may be illegal and unethical. Always obtain proper authorization before using this tool on any network.
This tool was created primarily for educational purposes and home network exploration. While functional and useful, it should not be considered a professional-grade network monitoring solution. Results are based on unprivileged scanning techniques and may not be comprehensive. For critical network analysis or security assessments, consider using established professional tools with formal support.
Contributions and suggestions such as feature requests, bug reports, or improvements are welcome! Feel free to open issues or submit pull requests on the GitHub repository. Please make sure to discuss any major changes on a Github issue before implementing them.
(top 24 of 70)
931 followers · starred Feb 2026
193 followers · starred Feb 2026
139 followers · starred Feb 2026
1,061 followers · starred Jan 2026