A modern, web-based photo management server. Run it on your home server and it will let you find the right photo from your collection on any device. Smart filtering is made possible by object recognition, face recognition, location awareness, color analysis and other ML algorithms.
See the code







This is a photo management application based on web technologies. Run it on your home server and it will let you find what you want from your photo collection using any device. Smart filtering is made possible automatically by object recognition, location awareness, color analysis and other algorithms.
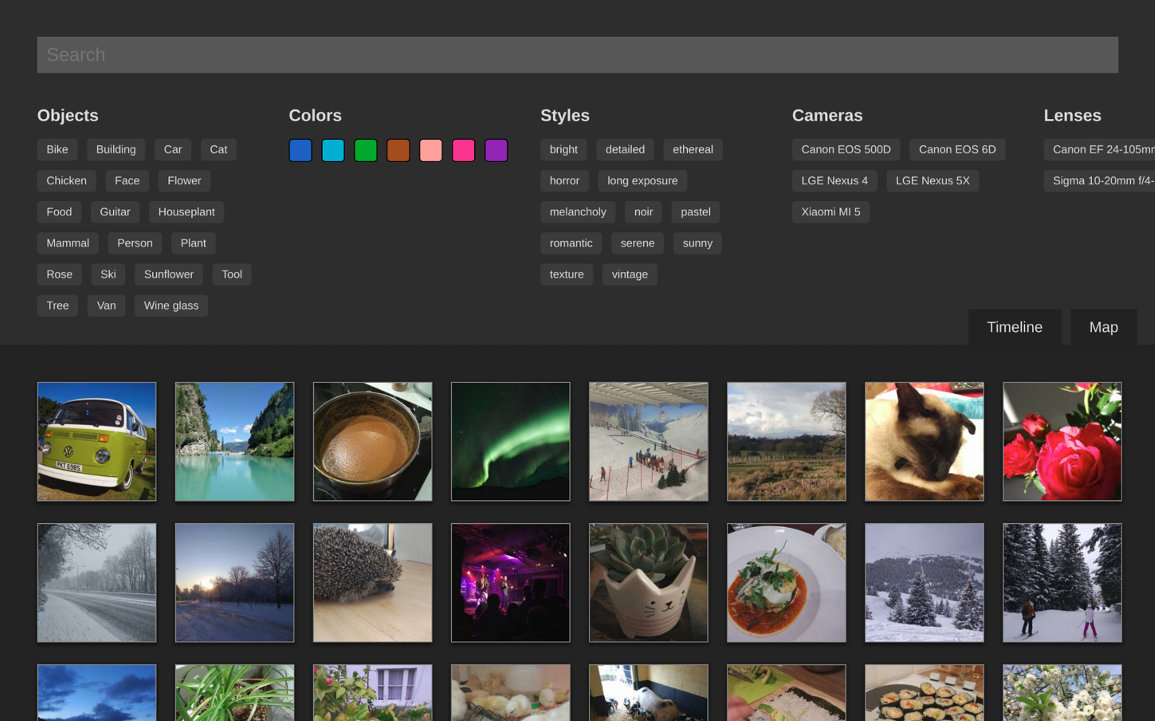
This project is currently in development and not feature complete for a version 1.0 yet. If you don't mind putting up with broken parts or want to help out, run the Docker image and give it a go. I'd love for other contributors to get involved.
Please join in the discussion and help us gain visibility by following us on social media. Much appreciated :)
If you get value from Photonix or like where we're heading then we'd really appreciate it if you considered sponsoring us on a monthly basis.
The easiest way to run it is with Docker Compose using the pre-built image following these steps.
Create a new directory to run inside and download the example Docker Compose file.
mkdir photonix
cd photonix
curl https://raw.githubusercontent.com/photonixapp/photonix/master/docker/docker-compose.example.yml > docker-compose.yml
Make volume directories for data stored outside the container.
mkdir -p data/photos
Bring up Docker Compose which will pull and run the required Docker images.
docker-compose up
A few seconds after starting you should be able to go to http://localhost:8888/ in your browser.
You'll need to create a username, password and library. Right now this needs to be done on the command-line so run this in a new terminal window. Replace USERNAME with your own username.
docker-compose run photonix python photonix/manage.py createsuperuser --username USERNAME --email example@example.com
docker-compose run photonix python photonix/manage.py create_library USERNAME "My Library"
You can move some photos into the folder data/photos and they should get detected and imported immediately. Once you have finished trying out the system you can edit the volume in the docker-compose.yml file where it says ./data/photos to mount wherever you usually keep photos. System database, thumbnails and other cache data is stored separately from the photos so shouldn't pollute the area. You are responsible for keeping your own backups in case of error.
If you are using the pre-built Docker image you can use kill, pull and bring back up using the following:
# Ctrl-C to kill
docker-compose pull
docker-compose up
For detailed developer documentation, see:
There is a Makefile and separate Docker Compose file docker-compose.dev.yml that you should use if you want to work on the project. Check out the repo and this setup will build the image, mount the code as volumes, hot-reload JS changes to the browser and reload the Python server for most changes.
git clone git@github.com:photonixapp/photonix.git
cd photonix
mkdir -p  data/photos
make build
make start
If you get errors such as Error starting userland proxy: listen tcp 0.0.0.0:5432: bind: address alerady in use then you probably have an existing server such as Postgres listening on the standard port. You can change Photonix's services to use alternative port numbers by editing docker/docker-compose.dev.yml and setting '5432:5432' to be '5433:5432' for example. This is for Postgres but is it a similar solution for Redis or the webserver ports.
If you want to access the Bash or Python shells for development, you can use the following command.
make shell
PyTest is used as a test runner and for creating fixtures. The easiest way to run the tests is within the Docker container like this:
make test
365 followers · starred Sep 2020
802 followers · starred Feb 2021
13 followers · starred Mar 2022
11 followers · starred Aug 2021
A modern, web-based photo management server. Run it on your home server and it will let you find the right photo from your collection on any device. Smart filtering is made possible by object recognition, face recognition, location awareness, color analysis and other ML algorithms.
See the code
This is a photo management application based on web technologies. Run it on your home server and it will let you find what you want from your photo collection using any device. Smart filtering is made possible automatically by object recognition, location awareness, color analysis and other algorithms.
This project is currently in development and not feature complete for a version 1.0 yet. If you don't mind putting up with broken parts or want to help out, run the Docker image and give it a go. I'd love for other contributors to get involved.
Please join in the discussion and help us gain visibility by following us on social media. Much appreciated :)
If you get value from Photonix or like where we're heading then we'd really appreciate it if you considered sponsoring us on a monthly basis.
The easiest way to run it is with Docker Compose using the pre-built image following these steps.
Create a new directory to run inside and download the example Docker Compose file.
mkdir photonix
cd photonix
curl https://raw.githubusercontent.com/photonixapp/photonix/master/docker/docker-compose.example.yml > docker-compose.yml
Make volume directories for data stored outside the container.
mkdir -p data/photos
Bring up Docker Compose which will pull and run the required Docker images.
docker-compose up
A few seconds after starting you should be able to go to http://localhost:8888/ in your browser.
You'll need to create a username, password and library. Right now this needs to be done on the command-line so run this in a new terminal window. Replace USERNAME with your own username.
docker-compose run photonix python photonix/manage.py createsuperuser --username USERNAME --email example@example.com
docker-compose run photonix python photonix/manage.py create_library USERNAME "My Library"
You can move some photos into the folder data/photos and they should get detected and imported immediately. Once you have finished trying out the system you can edit the volume in the docker-compose.yml file where it says ./data/photos to mount wherever you usually keep photos. System database, thumbnails and other cache data is stored separately from the photos so shouldn't pollute the area. You are responsible for keeping your own backups in case of error.
If you are using the pre-built Docker image you can use kill, pull and bring back up using the following:
# Ctrl-C to kill
docker-compose pull
docker-compose up
For detailed developer documentation, see:
There is a Makefile and separate Docker Compose file docker-compose.dev.yml that you should use if you want to work on the project. Check out the repo and this setup will build the image, mount the code as volumes, hot-reload JS changes to the browser and reload the Python server for most changes.
git clone git@github.com:photonixapp/photonix.git
cd photonix
mkdir -p  data/photos
make build
make start
If you get errors such as Error starting userland proxy: listen tcp 0.0.0.0:5432: bind: address alerady in use then you probably have an existing server such as Postgres listening on the standard port. You can change Photonix's services to use alternative port numbers by editing docker/docker-compose.dev.yml and setting '5432:5432' to be '5433:5432' for example. This is for Postgres but is it a similar solution for Redis or the webserver ports.
If you want to access the Bash or Python shells for development, you can use the following command.
make shell
PyTest is used as a test runner and for creating fixtures. The easiest way to run the tests is within the Docker container like this:
make test
365 followers · starred Sep 2020
802 followers · starred Feb 2021
13 followers · starred Mar 2022
11 followers · starred Aug 2021