
A framework + installer to (very) quickly install Windows 98 on anything from a 486 up to a modern system
C
1,729
448 commits
updated Sep 19, 2026
README

Windows 9x QuickInstall
(C) 2012 - 2026 E.Voirin (oerg866)
Windows is a trademark of Microsoft Corporation.
This project has NO ENDORSEMENT WHATSOEVER from Microsoft Corporation.
Please don't sue. I just like old computers!! :(
Warning:
QuickInstall is not labeled, approved, or intended for use in the state of California.
QuickInstall may contain products that fail to comply with California law CA AB1043.
Do not use QuickInstall if you are located in or a resident of California.
Troubleshooting - READ before filing a bug ticket!
Please consult the Known issues / FAQ before opening a ticket!
The first step when troubleshooting issues during the hardware detection phase is to disable the skipping of legacy non-PnP detection!

If possible, please also verify that the problem does not occur with the driver library turned OFF.
I cannot provide personal support via Discord messages, please open a ticket!
Table of Contents
- Windows 9x QuickInstall
- The QuickInstall Framework
- Booting / Starting QuickInstall
- The QuickInstall Installer
- The Emergency Linux Shell
Do you want...
- ...to install Windows 98 or ME extremely quickly?
- ...to test a lot of acquired retro-hardware in quick succession?
- ...to install Windows 9x from a USB flash drive or perhaps an SD card?
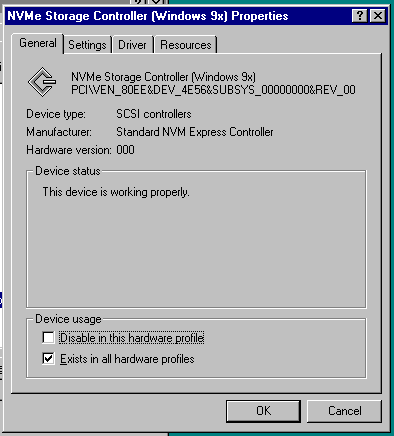
- ...to install Windows 9x to and boot from an NVMe SSD?
- ...native AHCI and USB 2.0 support on Windows 9x?
- ...a fully patched Windows 9x version without manually installing everything?
- ...a Windows 9x version that works on modern computers, including non-CSM UEFI machines?
- ...a Windows 9x version optimized for small footprint, maximum functionality and comfort?
- ...said version to also excel on 486-class machines?
- ...a Windows 9x installation with lots of integrated drivers and a lot more available on the install disk?
If you answered "yes" to any of the above, you may want to keep reading...
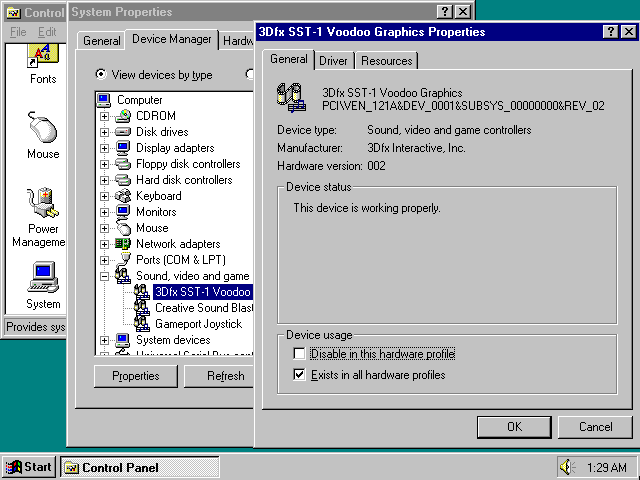
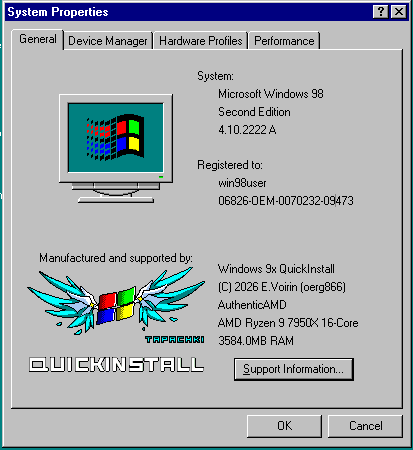
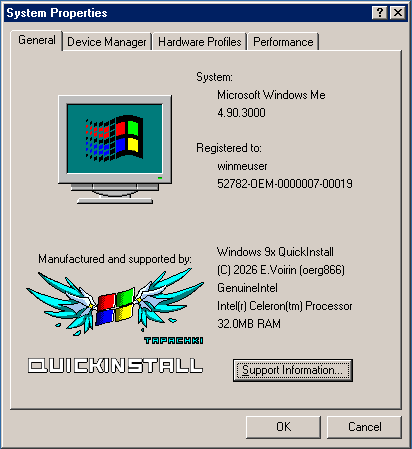
Screenshots
 |  |  |
 |  |  |
 |  |  |
 |  |  |
What is QuickInstall?
Windows 9x QuickInstall is a framework intended to replace the original Windows 9x setup environment and provide an extremely quick and highly optimized and customized installation process paired with integrated patches and drivers. In that sense, it is not dissimilar to nlite, but the method used to achieve this is very different.
QuickInstall images are derived from already set-up and working installations. This means that they retain any patches, drivers and software that is already installed, enabling more powerful, comfortable, modern and headache-free Windows 9x installations than ever before.
Combining this method with the blooming landscape of third-party patches and fixes, it opens up these classic operating systems to a vast variety of machine classes, ranging from early 486 systems to the very latest Core Ultra and Ryzen machines available on the market today (yes, really).
After preparation, the image is stripped of hardware detection information, and upon installation the Windows 98 Setup's hardware detection phase is re-run, accessing the vast driver library available with QuickInstall.
QuickInstall uses a Linux-based custom installation environment that quickly writes the full installation image to a target directory of your choosing, using a specially-crafted flat binary file format (MercyPak) that is designed to be read exactly once, in sequence, to avoid expensive CD drive seeking and attain the maximum installation speed possible.
This also means you can finally install Windows 9x from USB without any fuss!
...or from a CD/DVD-R. Or boot from a floppy disk and then install off of USB.
The truth is, it does not matter how you boot the system or where the QuickInstall data is located, if you manage to boot the kernlel, the installation environment will find its files. This also means that you can install Windows from USB on machines that do not support USB-Boot (using the boot floppy)!
And yes, this does mean that the effort for a user to build an ISO is higher than for example nLite, but the degree of customizability is also massively increased.
A set of reference images is also provided for your convenience and to get a feel for the vast power that QuickInstall provides to the retro enthusiast of 2023 2024 2025 2026. Enabling you to install your favorite flavor of vintage Windows faster than ever.
How "Quick" is QuickInstall really?
It depends where!
- In VirtualBox on a modern machine? 15 seconds.
- On a Pentium III 866MHz with a DVD-ROM and an ATA133 disk? 60 seconds.
- On a 486 DX4-100? 5 minutes.
In any case, QuickInstall is at least an order of magnitude (i.e. 10x) faster than the official Windows 98 setup.exe
The QuickInstall Framework
The QuickInstall Framework provides a set of scripts and tools to create bootable ISO / USB images that can install Windows 9x operating systems quickly using the integrated installation environment.
Supported Target Operating Systems
- Microsoft Windows 98 (Build 4.10.1998) -- UNTESTED
- Microsoft Windows 98 Second Edition (Build 4.10.2222)
- Microsoft Windows Millenium Edition (Build 4.90.3000)
Support for international versions is not properly tested. It should work and in my testing it does, but YMMV.
NO versions of Windows 95 are or likely will ever be supported due to non-PNP device detection being part of the DOS-based installer stage.
Creating QuickInstall Images
Creating custom QuickInstall installation images using the framework scripts is a complex process.
Refer to the guide:
QuickInstall Image Creation Guide
Fixes, Patches and Drivers provided by the QuickInstall Environment
These patches and fixes do not need to be integrated into the Windows image before creating a QuickInstall image.
-
CREGFIX
This is a patch for CREGFIX an issue of many modern CSM BIOS implementations where certain control register bits are left dirty, causing issues when trying to run Windows 9x ("While initializing device VCACHE: Windows protection error") or while trying to run EMM386.EXE.This universal VxD fix version was provided by SweetLow / LordOfMice
-
Silent Default Display Prompt
This gets rid of the "Default Monitor" install dialog that normally pops up. -
UEFI boot files (CSMWRAP)
This is a EFI binary that provides BIOS emulation functions on EFI-only systems without CSM, allowing you to boot Windows 9x on them.Courtesy of: https://github.com/FlyGoat/CSMWrap
-
LBA64HLP and GPT Disk drivers
This is an experimental set of drivers for Windows 9x to enable support for LBA64 disks, especially those with the GPT partition layout. It also supports 4kn sector disks. In theory, together with Paragon NTFS for Windows 98 you can gain write access to modern Windows drives, so be careful! -
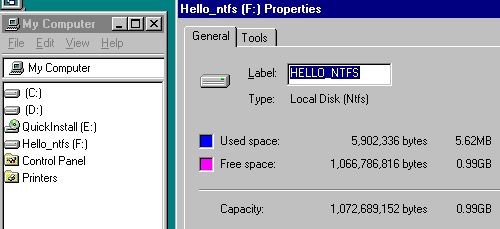
NTFS driver (patched UFSD.VXD) + PNTFSHLP.VXD helper driver
Provides NTFS volume access from within Windows 9x. The UFSD driver contains fixes for volume label / Volume ID handling and resource leaks on unmount.See
sysprep/ntfs/README.UFSD.TXTandsysprep/ntfs/README.PNTFSHLP.TXTfor details and registry settings.
And not to forget, the vast driver libraries:
-
win98-driver-lib-baseThese drivers will be processed and packaged alongside the OS data. If selected during installation, these drivers are integrated into windows and will be found during any hardware detection.
This includes many network drivers, common sound and video card drivers, storage drivers, etc.
This includes the excellent USB 2.0, USB Mass Storage and NVMe driver stacks from SweetLow / LordOfMice. It also includes his patched versions of the R.Loew native AHCI SATA drivers.
-
win98-driver-lib-extraThese drivers will be processed and packaged in a subdirectory of the installation media, but they are not injected into Windows' automatic hardware detection. This can have several reasons:
- The driver is very big
- The driver is part of a hardware family where no single driver is guaranteed to be optimal (or the community doesn't agree which is the best version :P)
- The driver is for a chip, but may lack card vendor-specific functionality
- The driver is known to cause problems
Pre-Built Reference Images (aka. I don't want to read and/or do all of this.)
The reference images come in three flavors:
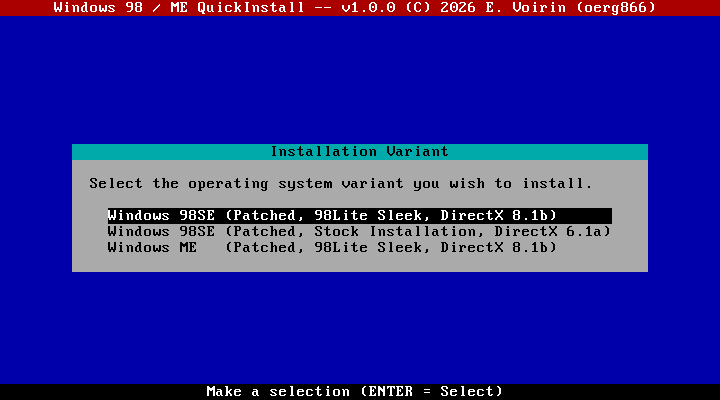
- Windows 98 SE: Stock installation
- Windows 98 SE: 98Lite Micro De-Bloated installation with DirectX 8.1
- Windows ME: 98Lite Micro De-Bloated installation with DirectX 8.1
All of these images are pre-patched for usage with both the very latest and very old hardware alike without running into the usual problems with memory size, CPU issues (TLB invalidation bug, CSM control register bug) or hard disk sizing problems (LBA48 issues, etc.).
These images also contain a lot of drivers and useful utilities for benchmarking, overclocking, diagnostics, et cetera.
The list of patches can be found in the Documentation linked below:
QuickInstall Pre-Built Reference Images
QuickInstall Pre-Built Reference Image Documentation
Booting / Starting QuickInstall
QuickInstall System Requirements for Installation
- i486-class CPU, at least a 486SX (but it will be very slow)
- 24 MiB of memory
- An IDE / SATA / SCSI / NVMe controller supported by Linux
There are several provided methods to boot into Windows 9x QuickInstall:
Native Floppy Disk Boot (floppy.img)

This is a 1.44M floppy disk image that contains a full kernel with USB support.
It will find its installation source media automatically, meaning you can use it together with a QuickInstall CD/DVD-ROM, USB flash drive (even if your system does not support booting from either of them), CF-Card or Hard Disk.
Note: Due to the strong compression used in this version, the system will take a long time to start up on 486SX/DX-class machines. I recommend using dosflop.img instead.
Note: Due to the size constraints, this version does not print diagnostic messages on the screen when starting up.
See Boot Loader Options below for details on the debug option keys.
CD / DVD-ROM Boot
The iso images can be written to a CD or DVD and then booted. This is the recommended method on systems that support this.
Since this uses the classic floppy emulation boot method it should work very well even on the earliest BIOSes that provide CD-ROM boot support.
Boot Loader Options
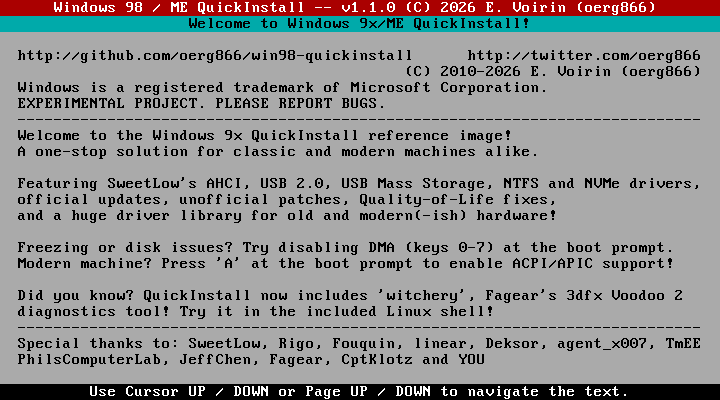
The second line is the command line that QuickInstall will forward to the kernel. Every change made with the keys below is reflected there immediately.
| Key | Function |
|---|---|
| ENTER | Start QuickInstall with the displayed command line |
| 0 - 7 | Set the ATA DMA mask (libata.dma=): |
| 0 | Disable ALL ATA DMA (everything runs in PIO mode) |
| 1 | DMA for ATA hard disks only |
| 2 | DMA for ATAPI devices (CD/DVD) only |
| 3 | DMA for ATA hard disks and ATAPI devices (CD/DVD) |
| 4 | DMA for CompactFlash cards only |
| 5 | DMA for ATA hard disks and CompactFlash cards |
| 6 | DMA for ATAPI devices (CD/DVD) and CompactFlash cards |
| 7 | Enable ALL ATA DMA (HDD, CD/DVD, CF, etc.) |
| A | Toggle ACPI and APIC support on or off (noapic acpi=off).Only available on CD/DVD, not on Floppy! |
If no key is pressed within 4 seconds, the prompt is skipped and the system boots from the first bootable hard disk instead, so you can leave the medium inserted.
Note: By default, ACPI/APIC are disabled on CD/DVD boot, since this image targets old machines where these may be broken/incomplete.
If you are installing on a newer machine, press A to enable ACPI/APIC before starting. Without it, such systems may hang during startup or experience other issues due to IRQ sharing.
Try using the 0-7 keys if you experience disk read, write or freezing errors during installation. This can work around buggy hardware, BIOSes or drive firmware.
DOS-Based Booting of QuickInstall
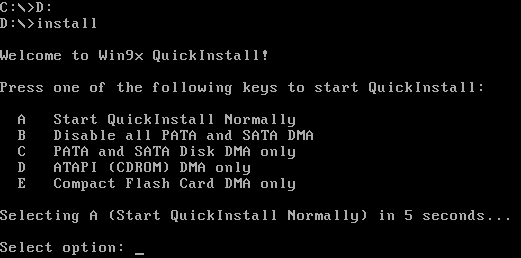
The Linux Kernel on the QuickInstall media can be loaded from DOS. To facilitate this, a batch file named INSTALL.BAT is provided in the root directory.
Navigate to the CD-ROM or Hard Disk drive that contains the Windows 9x QuickInstall files and type INSTALL to start QuickInstall.
FreeDOS Floppy + CD-ROM Boot (dosflop.img)
This is a 1.44M floppy disk image with FreeDOS and a CD-ROM driver that loads and boots QuickInstall directly off of a CD-ROM or hard disk drive (using LOADLIN).
Recommended if you have a computer that does not support CD-ROM boot or if you have the QuickInstall files on an ATA/ATAPI media or other device that is exposed using Int 13h that you cannot boot from
Note: If you have a SCSI CD-ROM drive, the image must be modified accordingly.
USB Flash Drives, SD/CF cards, also on UEFI systems
By using an appropriate tool, you can write the usb images to a flash drive and boot off of it.
You can also use the Native Floppy Disk Boot method to execute QuickInstall off a flash drive if your PC does not support booting from such media.
An example sequence could look like this:
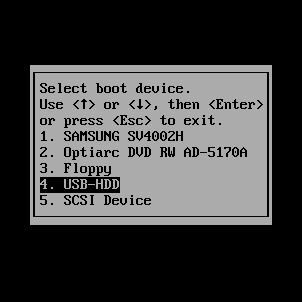
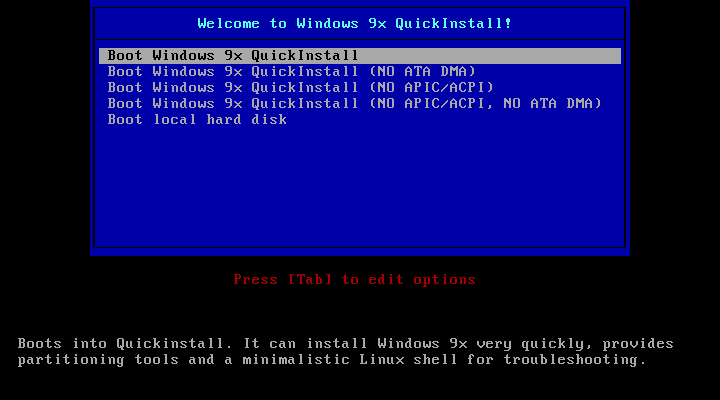
Note: Unlike the CD/DVD bootloader, the boot menu of the USB image starts QuickInstall with ACPI/APIC support by default, since USB booting is mostly done on newer machines that support it properly. The menu offers separate entries to boot without APIC/ACPI and/or without ATA DMA for problematic hardware.
Writing the bootable USB image to a USB flash drive, SD or CF card
-
On Linux, you can use
dd-
sudo dd if=<USB image file> of=/dev/sdX bs=1M status=progressReplace
/dev/sdXwith the USB flash drive's device path.
Example:$ sudo dd if=win98qi_v0.9.6_ALL_usb.img of=/dev/sdc bs=1M status=progress 1248+1 records in 1248+1 records out 1309323264 bytes (1,3 GB, 1,2 GiB) copied, 1,26113 s, 1,0 GB/s
-
-
On Windows, you can use the Windows port of
ddor Win32 DiskImager, for example: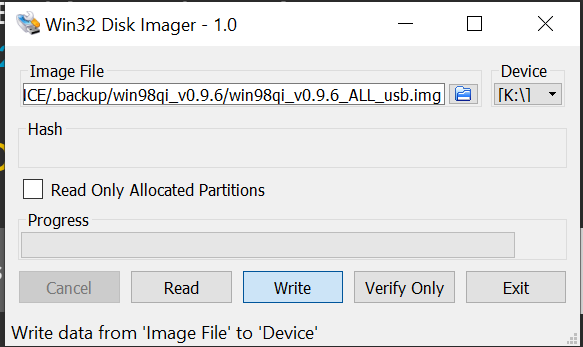
UEFI Boot (Caution: experimental!)
Executing the steps described above, the resulting media can also be booted on UEFI systems, even those that lack the Compatibility Support Module (CSM).
Note: UEFI installation support is very experimental at this point in time, and no support can be provided if it fails.
Hard Disk / CF-Card / SD-Card Boot
It is not recommended, but you can also write the "usb" image to a hard disk drive.
As long as your system supports booting from it, it will work and install normally.
The QuickInstall Installer
Dubbed lunmercy internally (long story...), this is a custom installer written in C that guides the user through the entire installation process.
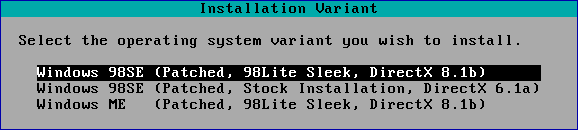
After you launch QuickInstall and made it past the introductory text, either you are sent to the main menu, or you will be asked which operating system version you wish to install - if the booted QuickInstall image contains two or more installable OS variants.
Main Menu
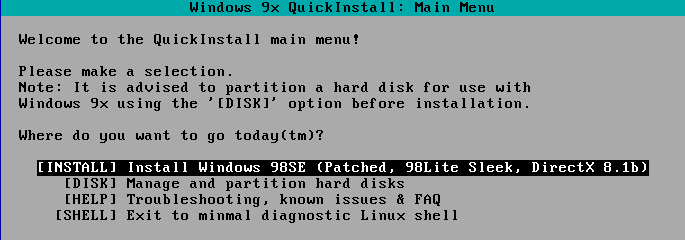
INSTALL- This proceeds with the installationCFDISK- This leads you to the Hard Disk Partitioning ToolSHELL- This leads you to a minimalistic Linux shell.OS- This button is only visible if you are using an image with two or more installable OS variants.
Hard Disk Partitioning Tool
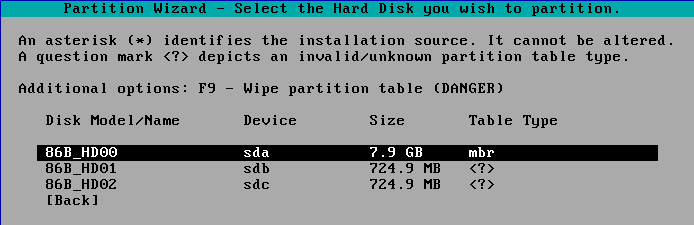
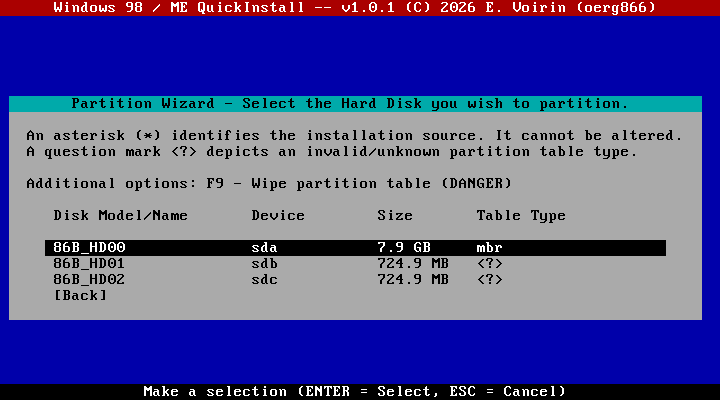
The installer will first lead you to this selection menu. Here you can select the hard disk you wish to partition.
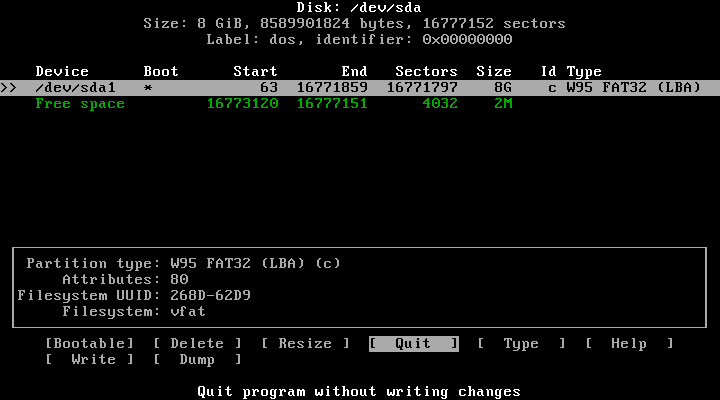
QuickInstall comes with cfdisk, a TUI hard disk partitioning tool, to help you set up your hard disk(s) for installation.
The version of cfdisk shipped with QuickInstall is slightly modified to better fit the purpose of preparing disks for the installation of Windows 9x.
NOTE: In order to apply the changes, you must click the [ Write ] button before exiting the partitioning tool!
The default for partition creation is W95 FAT32 (LBA).
However, on very old systems, you may need to choose the non-LBA version instead.
Wiping the partition table of a disk
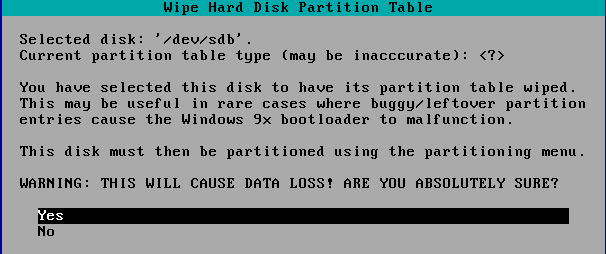
In some cases you may wish to wipe the partition table of a disk, in case there are faulty entries in it that cause the Windows 9x bootloader to trip up.
To do this, you may press F9. NOTE: This will cause data loss, be very careful with this feature!
Installation
Destination Selection
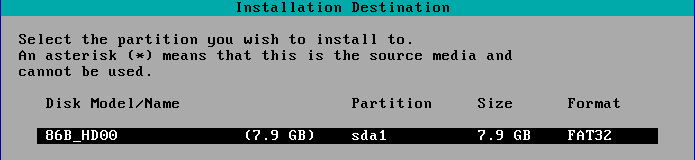
Here you will be asked for the destination partition.
If you are booted off a FAT32-formatted media (e.g. a USB flash drive), it will appear here with an asterisk (*), depicting that it cannot be used for installation.
Note: Only partitions/disks marked mbr are valid installation destinations.
Partitions with an unsupported file system cannot be re-formatted from the installer. You must change the partition type using the partitioning tool.
Configuration
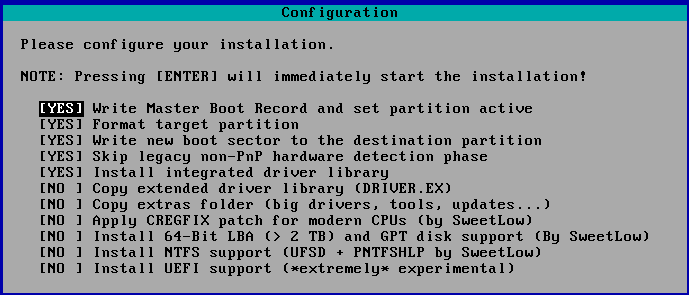
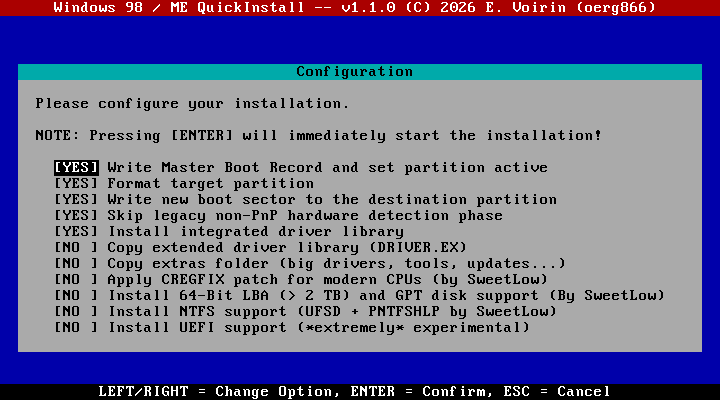
This menu gives you several choices to configure the installation process.
Sensible defaults are pre-selected, however, you may choose to change them.
For example, you may wish that the partition is not formatted before commencing the installation.
Or you wish to omit the installation the driver library to speed up the installation process, however, then you will lose the benefits of this library being available to Windows during hardware detection.
The options marked NO by default should only be changed when necessary.
Press Enter here to start the installation.
Installation Execution
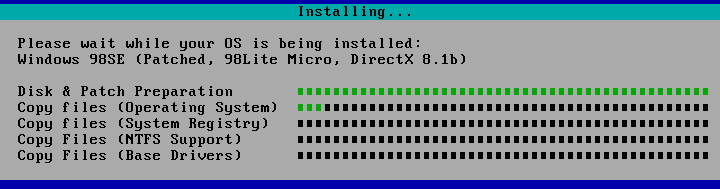
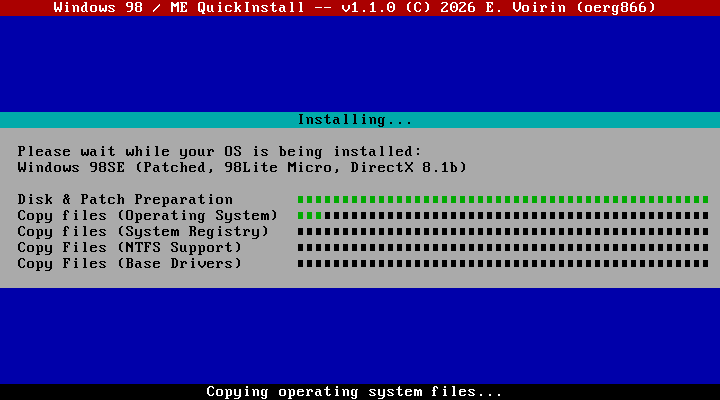
The installation execution dialog will give you continous feedback over the status of the installation. Every major step has its own progress bar.
Exit Menu
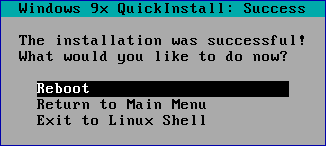
After successful installation, you are presented with the last menu inside the QuickInstall installation environment, which asks you what to do next. The usual choice here is to reboot to finalize the installation.
Finalization
Afterwards, the system should boot into the desired Windows 9x version.
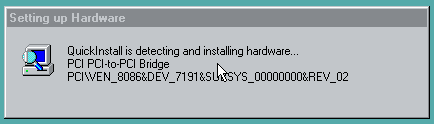
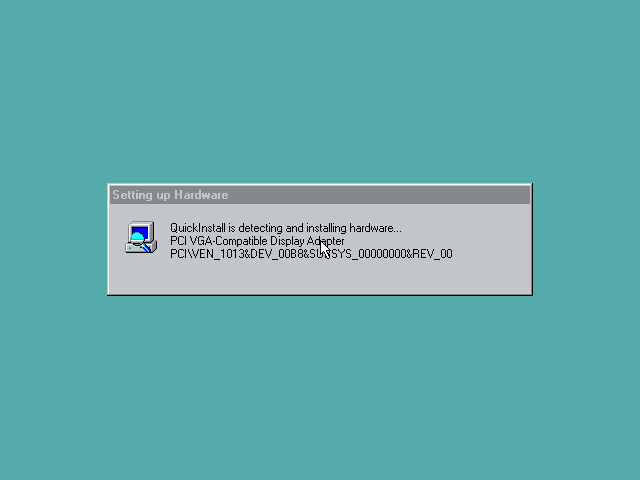
It will then finalize itself by detecting all the hardware in your system, culminating in one final reboot.
NOTE: If you experience hangs or errors in this step of the installation, please re-try the installation and set the Skip legacy non-PnP hardware detection phase option to NO before filing a bug report!
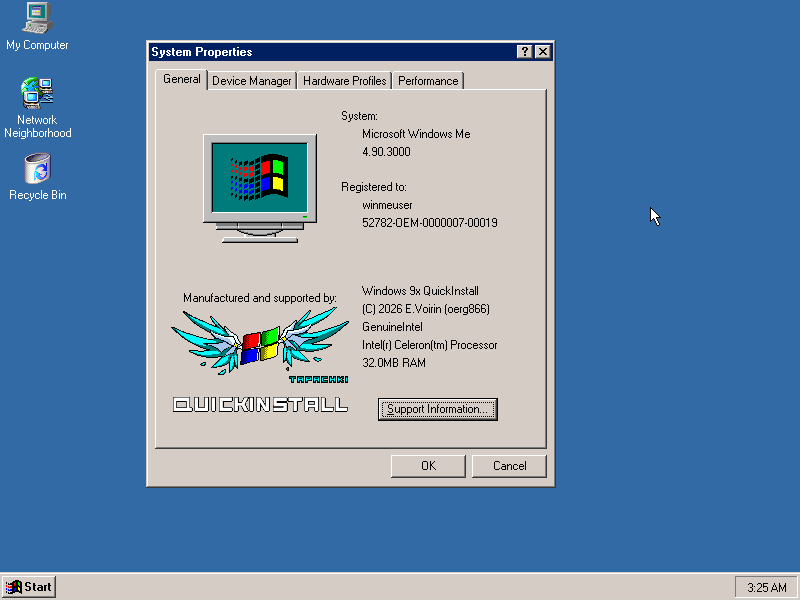
And voilà, you have successfully gone through the QuickInstall experience!
The Emergency Linux Shell
The QuickInstall environment provides a minimal Linux shell. This allows you to do rudimentary diagonstics.

You can mount file systems, use dd to read and write images, use diagnostic tools such as lspci, lscpu, etc. and inspect the kernel log using dmesg|less, for example.
It will not replace a purpose built and more featured Linux environment, but it may be helpful in a pinch!

3dfx Voodoo 2 Diagnostics (witchery)
QuickInstall contains the newly released gold-standard tool for diagnosing 3dfx Voodoo 2 cards for your convenience, provided with permission from Fagear.
To use it, type witchery at the shell.
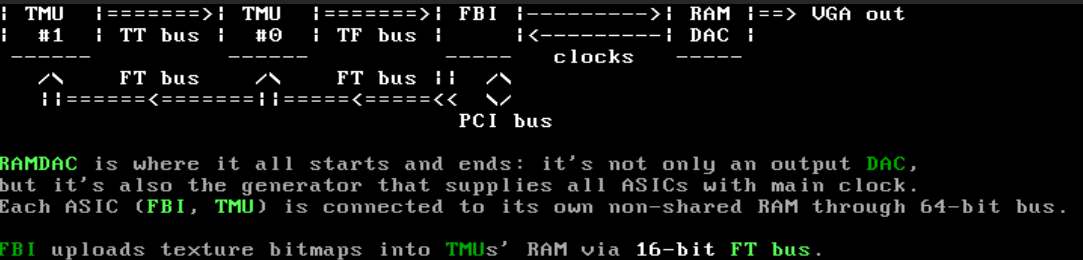
More information here: Voodoo2 diagnostics software (Witchery)
Framework Building Guide, Bugs, License, etc.
Refer to BUILDING.md
Special Thanks
- SweetLow / LordOfMice for his invaluable help by contributing drivers and patch sets
- agent_x007 for providing input and moral support for 10 consecutive hours in Discord while making the 1.0.0 release :D
- Jeff Chen for helping to debug boot sector problem
- Fouquin for testing and contributing drivers
- Deksor for being French
- PhilsComputerLab for spreading the word
- goshhhy / linear cannon for Linux kernel config & systems programming help
- Rudolph R. Loew for a decade of amazing patches and drivers (rest in peace 😢)
- More testing done by: Rigo (0xCats), Enigma, CptKlotz, matcarfer, viti95
Long live Windows 9x.
Oerg866, signing out.
Contributors


Similar repos


Languages
C
59.0%
Python
30.9%
C++
4.9%
Shell
4.0%
Batchfile
1.2%
A framework + installer to (very) quickly install Windows 98 on anything from a 486 up to a modern system
C
1,729
448 commits
updated Sep 19, 2026
README
Windows 9x QuickInstall
(C) 2012 - 2026 E.Voirin (oerg866)
Windows is a trademark of Microsoft Corporation.
This project has NO ENDORSEMENT WHATSOEVER from Microsoft Corporation.
Please don't sue. I just like old computers!! :(
Warning:
QuickInstall is not labeled, approved, or intended for use in the state of California.
QuickInstall may contain products that fail to comply with California law CA AB1043.
Do not use QuickInstall if you are located in or a resident of California.
Troubleshooting - READ before filing a bug ticket!
Please consult the Known issues / FAQ before opening a ticket!
The first step when troubleshooting issues during the hardware detection phase is to disable the skipping of legacy non-PnP detection!
If possible, please also verify that the problem does not occur with the driver library turned OFF.
I cannot provide personal support via Discord messages, please open a ticket!
Table of Contents
- Windows 9x QuickInstall
- The QuickInstall Framework
- Booting / Starting QuickInstall
- The QuickInstall Installer
- The Emergency Linux Shell
Do you want...
- ...to install Windows 98 or ME extremely quickly?
- ...to test a lot of acquired retro-hardware in quick succession?
- ...to install Windows 9x from a USB flash drive or perhaps an SD card?
- ...to install Windows 9x to and boot from an NVMe SSD?
- ...native AHCI and USB 2.0 support on Windows 9x?
- ...a fully patched Windows 9x version without manually installing everything?
- ...a Windows 9x version that works on modern computers, including non-CSM UEFI machines?
- ...a Windows 9x version optimized for small footprint, maximum functionality and comfort?
- ...said version to also excel on 486-class machines?
- ...a Windows 9x installation with lots of integrated drivers and a lot more available on the install disk?
If you answered "yes" to any of the above, you may want to keep reading...
Screenshots
| | |
| | |
| | |
| | |
What is QuickInstall?
Windows 9x QuickInstall is a framework intended to replace the original Windows 9x setup environment and provide an extremely quick and highly optimized and customized installation process paired with integrated patches and drivers. In that sense, it is not dissimilar to nlite, but the method used to achieve this is very different.
QuickInstall images are derived from already set-up and working installations. This means that they retain any patches, drivers and software that is already installed, enabling more powerful, comfortable, modern and headache-free Windows 9x installations than ever before.
Combining this method with the blooming landscape of third-party patches and fixes, it opens up these classic operating systems to a vast variety of machine classes, ranging from early 486 systems to the very latest Core Ultra and Ryzen machines available on the market today (yes, really).
After preparation, the image is stripped of hardware detection information, and upon installation the Windows 98 Setup's hardware detection phase is re-run, accessing the vast driver library available with QuickInstall.
QuickInstall uses a Linux-based custom installation environment that quickly writes the full installation image to a target directory of your choosing, using a specially-crafted flat binary file format (MercyPak) that is designed to be read exactly once, in sequence, to avoid expensive CD drive seeking and attain the maximum installation speed possible.
This also means you can finally install Windows 9x from USB without any fuss!
...or from a CD/DVD-R. Or boot from a floppy disk and then install off of USB.
The truth is, it does not matter how you boot the system or where the QuickInstall data is located, if you manage to boot the kernlel, the installation environment will find its files. This also means that you can install Windows from USB on machines that do not support USB-Boot (using the boot floppy)!
And yes, this does mean that the effort for a user to build an ISO is higher than for example nLite, but the degree of customizability is also massively increased.
A set of reference images is also provided for your convenience and to get a feel for the vast power that QuickInstall provides to the retro enthusiast of 2023 2024 2025 2026. Enabling you to install your favorite flavor of vintage Windows faster than ever.
How "Quick" is QuickInstall really?
It depends where!
- In VirtualBox on a modern machine? 15 seconds.
- On a Pentium III 866MHz with a DVD-ROM and an ATA133 disk? 60 seconds.
- On a 486 DX4-100? 5 minutes.
In any case, QuickInstall is at least an order of magnitude (i.e. 10x) faster than the official Windows 98 setup.exe
The QuickInstall Framework
The QuickInstall Framework provides a set of scripts and tools to create bootable ISO / USB images that can install Windows 9x operating systems quickly using the integrated installation environment.
Supported Target Operating Systems
- Microsoft Windows 98 (Build 4.10.1998) -- UNTESTED
- Microsoft Windows 98 Second Edition (Build 4.10.2222)
- Microsoft Windows Millenium Edition (Build 4.90.3000)
Support for international versions is not properly tested. It should work and in my testing it does, but YMMV.
NO versions of Windows 95 are or likely will ever be supported due to non-PNP device detection being part of the DOS-based installer stage.
Creating QuickInstall Images
Creating custom QuickInstall installation images using the framework scripts is a complex process.
Refer to the guide:
QuickInstall Image Creation Guide
Fixes, Patches and Drivers provided by the QuickInstall Environment
These patches and fixes do not need to be integrated into the Windows image before creating a QuickInstall image.
-
CREGFIX
This is a patch for CREGFIX an issue of many modern CSM BIOS implementations where certain control register bits are left dirty, causing issues when trying to run Windows 9x ("While initializing device VCACHE: Windows protection error") or while trying to run EMM386.EXE.This universal VxD fix version was provided by SweetLow / LordOfMice
-
Silent Default Display Prompt
This gets rid of the "Default Monitor" install dialog that normally pops up. -
UEFI boot files (CSMWRAP)
This is a EFI binary that provides BIOS emulation functions on EFI-only systems without CSM, allowing you to boot Windows 9x on them.Courtesy of: https://github.com/FlyGoat/CSMWrap
-
LBA64HLP and GPT Disk drivers
This is an experimental set of drivers for Windows 9x to enable support for LBA64 disks, especially those with the GPT partition layout. It also supports 4kn sector disks. In theory, together with Paragon NTFS for Windows 98 you can gain write access to modern Windows drives, so be careful! -
NTFS driver (patched UFSD.VXD) + PNTFSHLP.VXD helper driver
Provides NTFS volume access from within Windows 9x. The UFSD driver contains fixes for volume label / Volume ID handling and resource leaks on unmount.See
sysprep/ntfs/README.UFSD.TXTandsysprep/ntfs/README.PNTFSHLP.TXTfor details and registry settings.
And not to forget, the vast driver libraries:
-
win98-driver-lib-baseThese drivers will be processed and packaged alongside the OS data. If selected during installation, these drivers are integrated into windows and will be found during any hardware detection.
This includes many network drivers, common sound and video card drivers, storage drivers, etc.
This includes the excellent USB 2.0, USB Mass Storage and NVMe driver stacks from SweetLow / LordOfMice. It also includes his patched versions of the R.Loew native AHCI SATA drivers.
-
win98-driver-lib-extraThese drivers will be processed and packaged in a subdirectory of the installation media, but they are not injected into Windows' automatic hardware detection. This can have several reasons:
- The driver is very big
- The driver is part of a hardware family where no single driver is guaranteed to be optimal (or the community doesn't agree which is the best version :P)
- The driver is for a chip, but may lack card vendor-specific functionality
- The driver is known to cause problems
Pre-Built Reference Images (aka. I don't want to read and/or do all of this.)
The reference images come in three flavors:
- Windows 98 SE: Stock installation
- Windows 98 SE: 98Lite Micro De-Bloated installation with DirectX 8.1
- Windows ME: 98Lite Micro De-Bloated installation with DirectX 8.1
All of these images are pre-patched for usage with both the very latest and very old hardware alike without running into the usual problems with memory size, CPU issues (TLB invalidation bug, CSM control register bug) or hard disk sizing problems (LBA48 issues, etc.).
These images also contain a lot of drivers and useful utilities for benchmarking, overclocking, diagnostics, et cetera.
The list of patches can be found in the Documentation linked below:
QuickInstall Pre-Built Reference Images
QuickInstall Pre-Built Reference Image Documentation
Booting / Starting QuickInstall
QuickInstall System Requirements for Installation
- i486-class CPU, at least a 486SX (but it will be very slow)
- 24 MiB of memory
- An IDE / SATA / SCSI / NVMe controller supported by Linux
There are several provided methods to boot into Windows 9x QuickInstall:
Native Floppy Disk Boot (floppy.img)
This is a 1.44M floppy disk image that contains a full kernel with USB support.
It will find its installation source media automatically, meaning you can use it together with a QuickInstall CD/DVD-ROM, USB flash drive (even if your system does not support booting from either of them), CF-Card or Hard Disk.
Note: Due to the strong compression used in this version, the system will take a long time to start up on 486SX/DX-class machines. I recommend using dosflop.img instead.
Note: Due to the size constraints, this version does not print diagnostic messages on the screen when starting up.
See Boot Loader Options below for details on the debug option keys.
CD / DVD-ROM Boot
The iso images can be written to a CD or DVD and then booted. This is the recommended method on systems that support this.
Since this uses the classic floppy emulation boot method it should work very well even on the earliest BIOSes that provide CD-ROM boot support.
Boot Loader Options
The second line is the command line that QuickInstall will forward to the kernel. Every change made with the keys below is reflected there immediately.
| Key | Function |
|---|---|
| ENTER | Start QuickInstall with the displayed command line |
| 0 - 7 | Set the ATA DMA mask (libata.dma=): |
| 0 | Disable ALL ATA DMA (everything runs in PIO mode) |
| 1 | DMA for ATA hard disks only |
| 2 | DMA for ATAPI devices (CD/DVD) only |
| 3 | DMA for ATA hard disks and ATAPI devices (CD/DVD) |
| 4 | DMA for CompactFlash cards only |
| 5 | DMA for ATA hard disks and CompactFlash cards |
| 6 | DMA for ATAPI devices (CD/DVD) and CompactFlash cards |
| 7 | Enable ALL ATA DMA (HDD, CD/DVD, CF, etc.) |
| A | Toggle ACPI and APIC support on or off (noapic acpi=off).Only available on CD/DVD, not on Floppy! |
If no key is pressed within 4 seconds, the prompt is skipped and the system boots from the first bootable hard disk instead, so you can leave the medium inserted.
Note: By default, ACPI/APIC are disabled on CD/DVD boot, since this image targets old machines where these may be broken/incomplete.
If you are installing on a newer machine, press A to enable ACPI/APIC before starting. Without it, such systems may hang during startup or experience other issues due to IRQ sharing.
Try using the 0-7 keys if you experience disk read, write or freezing errors during installation. This can work around buggy hardware, BIOSes or drive firmware.
DOS-Based Booting of QuickInstall
The Linux Kernel on the QuickInstall media can be loaded from DOS. To facilitate this, a batch file named INSTALL.BAT is provided in the root directory.
Navigate to the CD-ROM or Hard Disk drive that contains the Windows 9x QuickInstall files and type INSTALL to start QuickInstall.
FreeDOS Floppy + CD-ROM Boot (dosflop.img)
This is a 1.44M floppy disk image with FreeDOS and a CD-ROM driver that loads and boots QuickInstall directly off of a CD-ROM or hard disk drive (using LOADLIN).
Recommended if you have a computer that does not support CD-ROM boot or if you have the QuickInstall files on an ATA/ATAPI media or other device that is exposed using Int 13h that you cannot boot from
Note: If you have a SCSI CD-ROM drive, the image must be modified accordingly.
USB Flash Drives, SD/CF cards, also on UEFI systems
By using an appropriate tool, you can write the usb images to a flash drive and boot off of it.
You can also use the Native Floppy Disk Boot method to execute QuickInstall off a flash drive if your PC does not support booting from such media.
An example sequence could look like this:
Note: Unlike the CD/DVD bootloader, the boot menu of the USB image starts QuickInstall with ACPI/APIC support by default, since USB booting is mostly done on newer machines that support it properly. The menu offers separate entries to boot without APIC/ACPI and/or without ATA DMA for problematic hardware.
Writing the bootable USB image to a USB flash drive, SD or CF card
-
On Linux, you can use
dd-
sudo dd if=<USB image file> of=/dev/sdX bs=1M status=progressReplace
/dev/sdXwith the USB flash drive's device path.
Example:$ sudo dd if=win98qi_v0.9.6_ALL_usb.img of=/dev/sdc bs=1M status=progress 1248+1 records in 1248+1 records out 1309323264 bytes (1,3 GB, 1,2 GiB) copied, 1,26113 s, 1,0 GB/s
-
-
On Windows, you can use the Windows port of
ddor Win32 DiskImager, for example:
UEFI Boot (Caution: experimental!)
Executing the steps described above, the resulting media can also be booted on UEFI systems, even those that lack the Compatibility Support Module (CSM).
Note: UEFI installation support is very experimental at this point in time, and no support can be provided if it fails.
Hard Disk / CF-Card / SD-Card Boot
It is not recommended, but you can also write the "usb" image to a hard disk drive.
As long as your system supports booting from it, it will work and install normally.
The QuickInstall Installer
Dubbed lunmercy internally (long story...), this is a custom installer written in C that guides the user through the entire installation process.
After you launch QuickInstall and made it past the introductory text, either you are sent to the main menu, or you will be asked which operating system version you wish to install - if the booted QuickInstall image contains two or more installable OS variants.
Main Menu
INSTALL- This proceeds with the installationCFDISK- This leads you to the Hard Disk Partitioning ToolSHELL- This leads you to a minimalistic Linux shell.OS- This button is only visible if you are using an image with two or more installable OS variants.
Hard Disk Partitioning Tool
The installer will first lead you to this selection menu. Here you can select the hard disk you wish to partition.
QuickInstall comes with cfdisk, a TUI hard disk partitioning tool, to help you set up your hard disk(s) for installation.
The version of cfdisk shipped with QuickInstall is slightly modified to better fit the purpose of preparing disks for the installation of Windows 9x.
NOTE: In order to apply the changes, you must click the [ Write ] button before exiting the partitioning tool!
The default for partition creation is W95 FAT32 (LBA).
However, on very old systems, you may need to choose the non-LBA version instead.
Wiping the partition table of a disk
In some cases you may wish to wipe the partition table of a disk, in case there are faulty entries in it that cause the Windows 9x bootloader to trip up.
To do this, you may press F9. NOTE: This will cause data loss, be very careful with this feature!
Installation
Destination Selection
Here you will be asked for the destination partition.
If you are booted off a FAT32-formatted media (e.g. a USB flash drive), it will appear here with an asterisk (*), depicting that it cannot be used for installation.
Note: Only partitions/disks marked mbr are valid installation destinations.
Partitions with an unsupported file system cannot be re-formatted from the installer. You must change the partition type using the partitioning tool.
Configuration
This menu gives you several choices to configure the installation process.
Sensible defaults are pre-selected, however, you may choose to change them.
For example, you may wish that the partition is not formatted before commencing the installation.
Or you wish to omit the installation the driver library to speed up the installation process, however, then you will lose the benefits of this library being available to Windows during hardware detection.
The options marked NO by default should only be changed when necessary.
Press Enter here to start the installation.
Installation Execution
The installation execution dialog will give you continous feedback over the status of the installation. Every major step has its own progress bar.
Exit Menu
After successful installation, you are presented with the last menu inside the QuickInstall installation environment, which asks you what to do next. The usual choice here is to reboot to finalize the installation.
Finalization
Afterwards, the system should boot into the desired Windows 9x version.
It will then finalize itself by detecting all the hardware in your system, culminating in one final reboot.
NOTE: If you experience hangs or errors in this step of the installation, please re-try the installation and set the Skip legacy non-PnP hardware detection phase option to NO before filing a bug report!
And voilà, you have successfully gone through the QuickInstall experience!
The Emergency Linux Shell
The QuickInstall environment provides a minimal Linux shell. This allows you to do rudimentary diagonstics.
You can mount file systems, use dd to read and write images, use diagnostic tools such as lspci, lscpu, etc. and inspect the kernel log using dmesg|less, for example.
It will not replace a purpose built and more featured Linux environment, but it may be helpful in a pinch!
3dfx Voodoo 2 Diagnostics (witchery)
QuickInstall contains the newly released gold-standard tool for diagnosing 3dfx Voodoo 2 cards for your convenience, provided with permission from Fagear.
To use it, type witchery at the shell.
More information here: Voodoo2 diagnostics software (Witchery)
Framework Building Guide, Bugs, License, etc.
Refer to BUILDING.md
Special Thanks
- SweetLow / LordOfMice for his invaluable help by contributing drivers and patch sets
- agent_x007 for providing input and moral support for 10 consecutive hours in Discord while making the 1.0.0 release :D
- Jeff Chen for helping to debug boot sector problem
- Fouquin for testing and contributing drivers
- Deksor for being French
- PhilsComputerLab for spreading the word
- goshhhy / linear cannon for Linux kernel config & systems programming help
- Rudolph R. Loew for a decade of amazing patches and drivers (rest in peace 😢)
- More testing done by: Rigo (0xCats), Enigma, CptKlotz, matcarfer, viti95
Long live Windows 9x.
Oerg866, signing out.
Similar repos
Contributors
Languages
C
59.0%
Python
30.9%
C++
4.9%
Shell
4.0%
Batchfile
1.2%