Code for ICASSP 2024 paper WhisperSeg: Positive Transfer of the Whisper Speech Transformer to Human and Animal Voice Activity Detection
See the codeWe proposed WhisperSeg, utilizing the Whisper Transformer pre-trained for Automatic Speech Recognition (ASR) for both human and animal Voice Activity Detection (VAD). For more details, please refer to our paper:
Positive Transfer of the Whisper Speech Transformer to Human and Animal Voice Activity Detection
Nianlong Gu, Kanghwi Lee, Maris Basha, Sumit Kumar Ram, Guanghao You, Richard H. R. Hahnloser
University of Zurich and ETH Zurich
Accepted to the 2024 IEEE International Conference on Acoustics, Speech and Signal Processing (ICASSP 2024)
conda create -n wseg python=3.10 -y
conda activate wseg
pip install -r requirements.txt
conda install conda-forge::cudnn==8.9.7.29 -y
## suppose CUDA version is 12.1, for other version, please refer to https://pytorch.org/get-started/locally/
pip install --upgrade torch torchvision torchaudio --index-url https://download.pytorch.org/whl/cu121
Could not load library libcudnn_ops_infer.so.8, please make sure you have install cudnn 8 following the command above. If the error still exists, it can be used by the conflict between pyenv and conda python, please try the following to set conda python with a higher priority than pyenv:
# Check pyenv global version
pyenv global
# Set pyenv to use system/conda when in conda env
pyenv global system
Then start a new terminal and activate conda environment
NOTE for Windows OS: For method 1 and 2, if running WhisperSeg on windows, one need to further uninstall 'bitsandbytes' by
pip uninstall bitsandbytes
and then install 'bitsandbytes-windows==0.37.5'
pip install bitsandbytes-windows==0.37.5
Then open a new terminal, you can activate the 'wseg' environment by
conda activate wseg
The pretrained WhisperSeg may not work well on your own dataset. A finetuning would be necessary in this case.
We prepared a Jupyter notebook that provides a comprehensive walkthrough of WhisperSeg finetuning. This includes steps for data processing, training, and evaluation. You can access this notebook at docs/WhisperSeg_Training_Pipeline.ipynb, or run it in Google Colab: 
Please refer to the following documents for the complete guideline of training WhisperSeg, including 1) dataset processing, 2) model training and 3) model evaluation.
Activate the "wseg" ananconda environment:
conda activate wseg
python scripts/segment.py --model_path nccratliri/whisperseg-animal-vad-ct2 --audio_path data/example_subset/Marmoset/test/marmoset_pair4_animal1_together_A_0.wav --csv_save_path ./out.csv
The out.csv contains the segmentation results:
| onset | offset | cluster | |
|---|---|---|---|
| 0 | 15.585 | 15.682 | vocal |
| 1 | 15.777 | 15.837 | vocal |
| 2 | 15.883 | 15.922 | vocal |
| 3 | 16.007 | 16.047 | vocal |
| 4 | 16.132 | 16.157 | vocal |
| ... | ... | ... | ... |
| 192 | 61.167 | 61.293 | vocal |
| 193 | 61.410 | 61.448 | vocal |
| 194 | 61.502 | 61.538 | vocal |
| 195 | 61.727 | 61.867 | vocal |
| 196 | 61.953 | 61.995 | vocal |
python scripts/segment.py --model_path nccratliri/whisperseg-animal-vad-ct2 --audio_folder data/example_subset/Zebra_finch/test_juveniles/ --csv_save_path out.csv
| filename | onset | offset | cluster | |
|---|---|---|---|---|
| 0 | zebra_finch_R3428_40932.67397799_1_24_18_43_17... | 0.008 | 0.043 | vocal |
| 1 | zebra_finch_R3428_40932.67397799_1_24_18_43_17... | 0.458 | 0.578 | vocal |
| 2 | zebra_finch_R3428_40932.67397799_1_24_18_43_17... | 1.122 | 1.318 | vocal |
| 3 | zebra_finch_R3428_40932.67397799_1_24_18_43_17... | 2.093 | 2.117 | vocal |
| 4 | zebra_finch_R3428_40932.67397799_1_24_18_43_17... | 2.162 | 2.207 | vocal |
| ... | ... | ... | ... | ... |
| 269 | zebra_finch_R3428_40932.31154143_1_24_8_39_14.wav | 2.253 | 2.372 | vocal |
| 270 | zebra_finch_R3428_40932.31154143_1_24_8_39_14.wav | 2.615 | 2.727 | vocal |
| 271 | zebra_finch_R3428_40932.31154143_1_24_8_39_14.wav | 2.888 | 2.972 | vocal |
| 272 | zebra_finch_R3549_40999.66669408_3_31_18_31_9.wav | 0.010 | 0.110 | vocal |
| 273 | zebra_finch_R3549_40999.66669408_3_31_18_31_9.wav | 1.742 | 1.843 | vocal |
274 rows × 4 columns
Please refer to the section Use WhisperSeg in Python Code below.
Please refer to the tutorial: Run WhisperSeg as a Web Service
This allows running WhisperSeg on a Web server, and call the segmentation service from any client of different environments, such as python or MatLab. The best way to incorporate WhisperSeg into your original workflow.
Please refer to the tutorial: Run WhisperSeg via GUI
We demonstrate here using a WhisperSeg trained on multi-species data to segment the audio files of different species.
Note: If you are using your custom models, replace the model's name ("nccratliri/whisperseg-large-ms" or "nccratliri/whisperseg-large-ms-ct2") with your own trained model's name.
from model import WhisperSegmenter
segmenter = WhisperSegmenter( "nccratliri/whisperseg-large-ms", device="cuda" )
Alternatively, we provided a CTranslate2 converted version, which enables 4x faster inference speed.
To use the CTranslate2 converted model (with checkpoint name ended with "-ct2"), we need to import the "WhisperSegmenterFast" module.
from model import WhisperSegmenterFast
segmenter = WhisperSegmenterFast( "nccratliri/whisperseg-large-ms-ct2", device="cuda" )
The following paratemers need to be configured for different species when calling the segment function.
The recommended settings of these parameters are available at config/segment_config.json. More details are described in Table 1 in the paper:
 .
.
import librosa
import json
from audio_utils import SpecViewer
### SpecViewer is a customized class for interactive spectrogram viewing
spec_viewer = SpecViewer()
sr = 32000
spec_time_step = 0.0025

audio, _ = librosa.load( "data/example_subset/Zebra_finch/test_adults/zebra_finch_g17y2U-f00007.wav",
                         sr = sr )
## Note if spec_time_step is not provided, a default value will be used by the model.
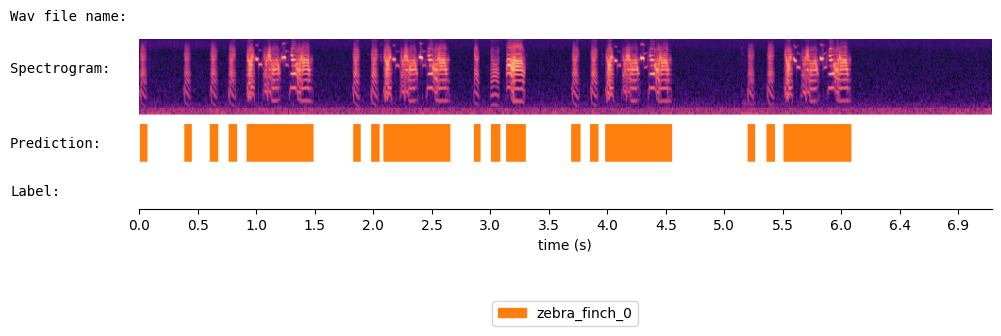
prediction = segmenter.segment(  audio, sr = sr, spec_time_step = spec_time_step )
print(prediction)
{'onset': [0.01, 0.38, 0.603, 0.758, 0.912, 1.813, 1.967, 2.073, 2.838, 2.982, 3.112, 3.668, 3.828, 3.953, 5.158, 5.323, 5.467], 'offset': [0.073, 0.447, 0.673, 0.83, 1.483, 1.882, 2.037, 2.643, 2.893, 3.063, 3.283, 3.742, 3.898, 4.523, 5.223, 5.393, 6.043], 'cluster': ['zebra_finch_0', 'zebra_finch_0', 'zebra_finch_0', 'zebra_finch_0', 'zebra_finch_0', 'zebra_finch_0', 'zebra_finch_0', 'zebra_finch_0', 'zebra_finch_0', 'zebra_finch_0', 'zebra_finch_0', 'zebra_finch_0', 'zebra_finch_0', 'zebra_finch_0', 'zebra_finch_0', 'zebra_finch_0', 'zebra_finch_0']}
spec_viewer.visualize( audio = audio, sr = sr, prediction = prediction,
                       window_size=8, precision_bits=1
                     )
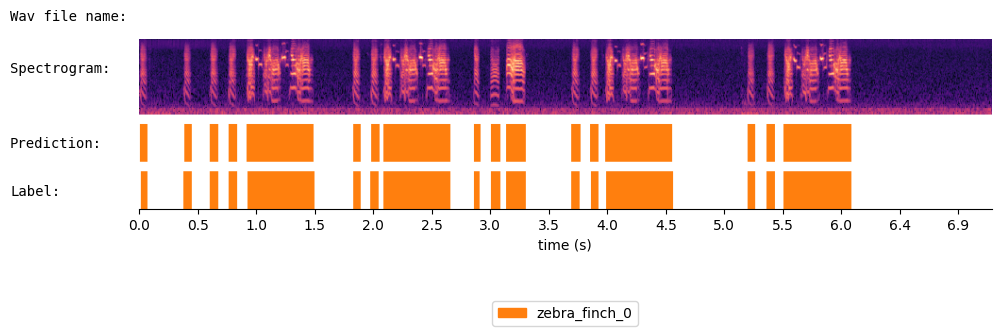
Let's load the human annoated segments and compare them with WhisperSeg's prediction.
label = json.load( open("data/example_subset/Zebra_finch/test_adults/zebra_finch_g17y2U-f00007.json") )
spec_viewer.visualize( audio = audio, sr = sr, prediction = prediction, label=label,
                       window_size=8, precision_bits=1
                     )
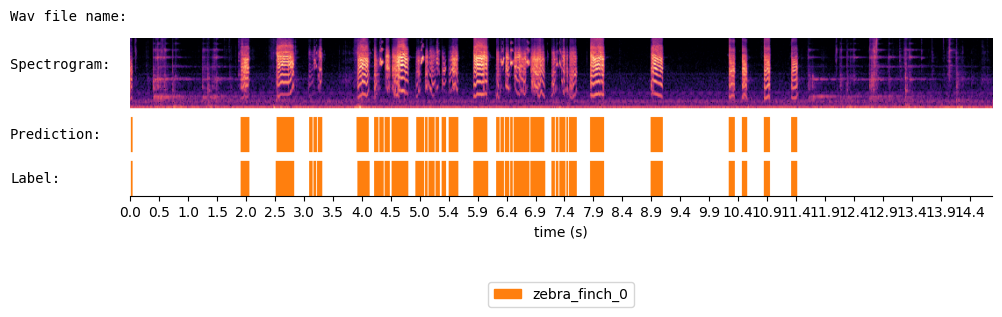
sr = 32000
spec_time_step = 0.0025

audio_file = "data/example_subset/Zebra_finch/test_juveniles/zebra_finch_R3428_40932.29996086_1_24_8_19_56.wav"
label_file = audio_file[:-4] + ".json"
audio, _ = librosa.load( audio_file, sr = sr )
label = json.load( open(label_file) )

prediction = segmenter.segment(  audio, sr = sr, spec_time_step = spec_time_step )
spec_viewer.visualize( audio = audio, sr = sr, prediction = prediction, label=label,
                       window_size=15, precision_bits=1 )
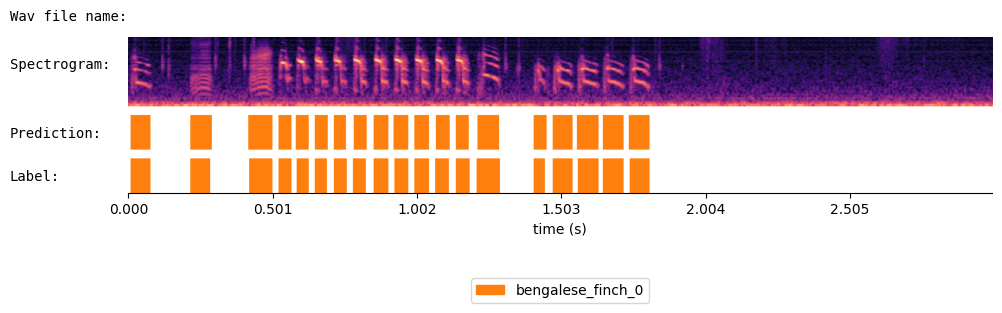
sr = 32000
spec_time_step = 0.0025

audio_file = "data/example_subset/Bengalese_finch/test/bengalese_finch_bl26lb16_190412_0721.20144_0.wav"
label_file = audio_file[:-4] + ".json"
audio, _ = librosa.load( audio_file, sr = sr )
label = json.load( open(label_file) )

prediction = segmenter.segment(  audio, sr = sr, spec_time_step = spec_time_step )
spec_viewer.visualize( audio = audio, sr = sr, prediction = prediction, label=label,
                       window_size=3 )
sr = 48000
spec_time_step = 0.0025

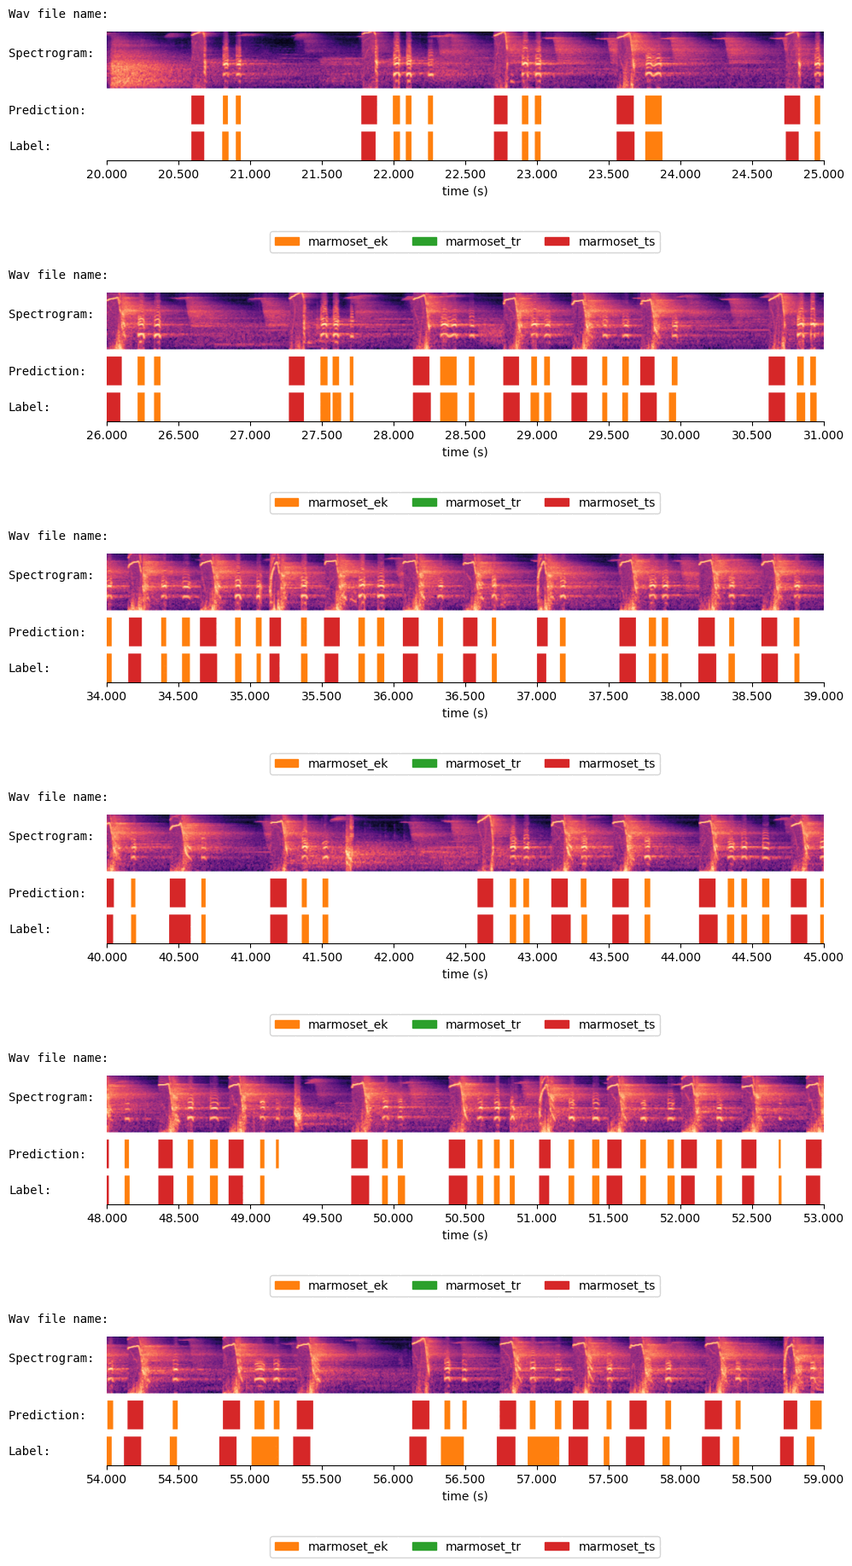
audio_file = "data/example_subset/Marmoset/test/marmoset_pair4_animal1_together_A_0.wav"
label_file = audio_file[:-4] + ".json"
audio, _ = librosa.load( audio_file, sr = sr )
label = json.load( open(label_file) )

prediction = segmenter.segment(  audio, sr = sr, spec_time_step = spec_time_step )
spec_viewer.visualize( audio = audio, sr = sr, prediction = prediction, label=label )
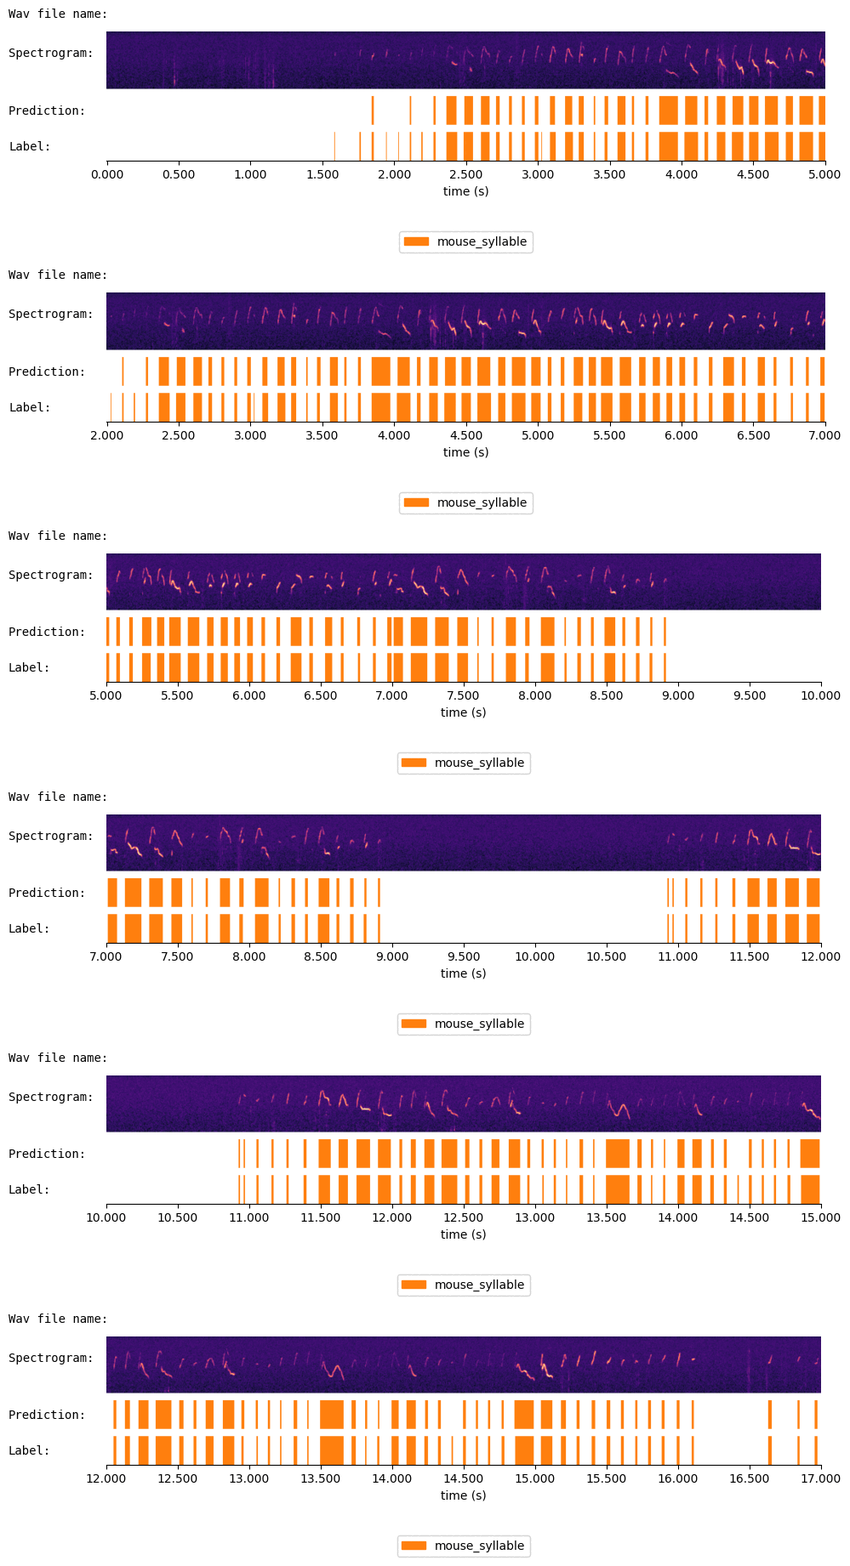
sr = 300000
spec_time_step = 0.0005
"""Since mouse produce high frequency vocalizations, we need to set min_frequency to a large value (instead of 0),
   to make the Mel-spectrogram's frequency range match the mouse vocalization's frequency range"""
min_frequency = 35000

audio_file = "data/example_subset/Mouse/test/mouse_Rfem_Afem01_0.wav"
label_file = audio_file[:-4] + ".json"
audio, _ = librosa.load( audio_file, sr = sr )
label = json.load( open(label_file) )

prediction = segmenter.segment(  audio, sr = sr, min_frequency = min_frequency, spec_time_step = spec_time_step )
spec_viewer.visualize( audio = audio, sr = sr, min_frequency= min_frequency, prediction = prediction, label=label )
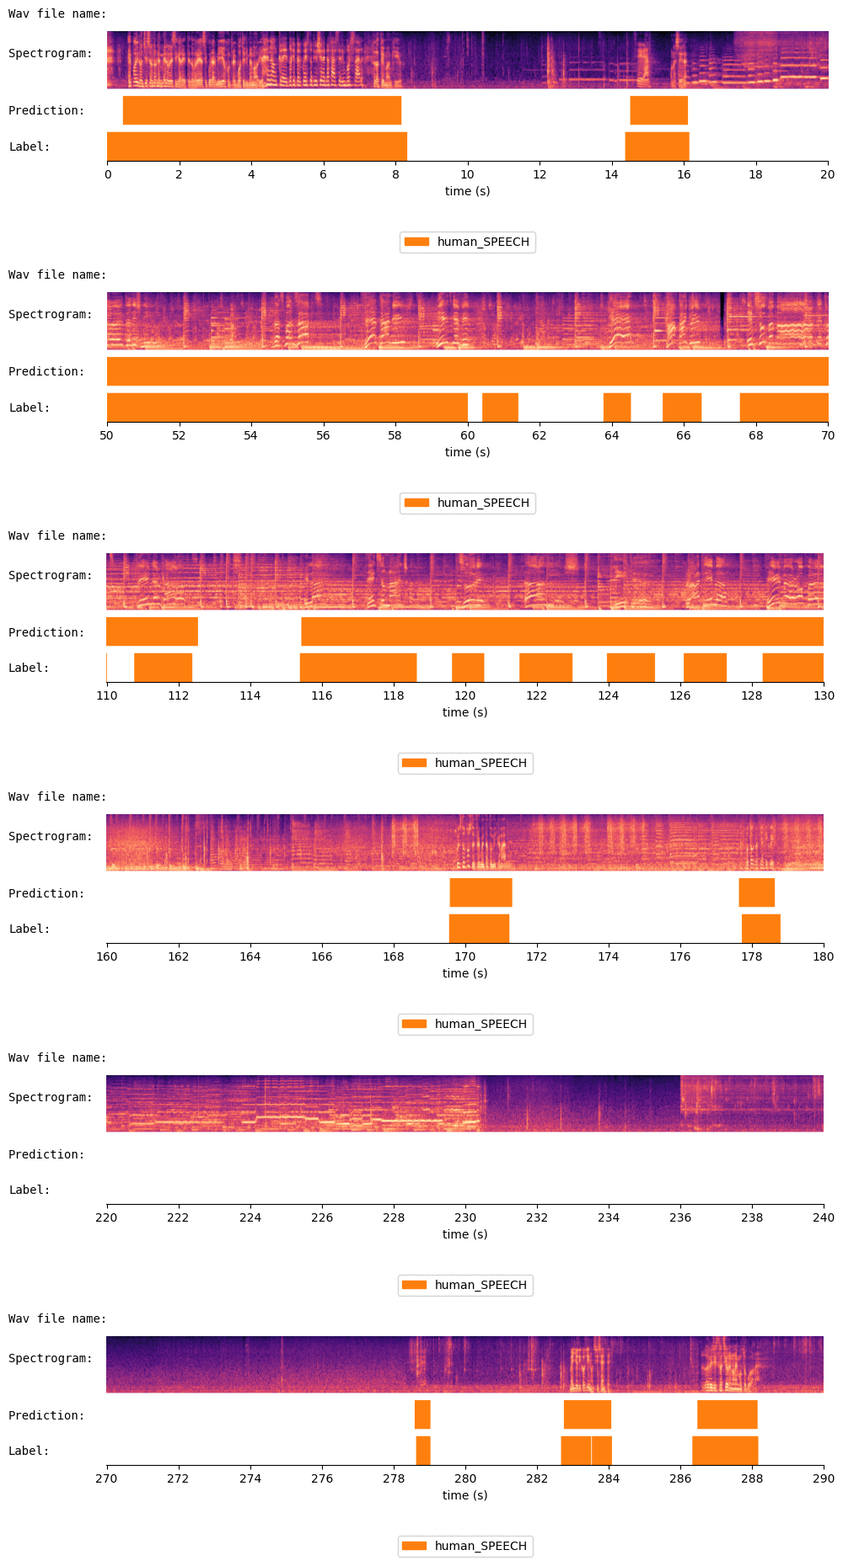
sr = 16000
spec_time_step = 0.01
"""For human speech the multi-trial voting is not so effective, so we set num_trials=1 instead of the default value (3)"""
num_trials = 1

audio_file = "data/example_subset/Human_AVA_Speech/test/human_xO4ABy2iOQA_clip.wav"
label_file = audio_file[:-4] + ".json"
audio, _ = librosa.load( audio_file, sr = sr )
label = json.load( open(label_file) )

prediction = segmenter.segment(  audio, sr = sr, spec_time_step = spec_time_step, num_trials = num_trials )
spec_viewer.visualize( audio = audio, sr = sr, prediction = prediction, label=label,
                       window_size=20, precision_bits=0, xticks_step_size = 2 )
When using our code or models for your work, please cite the following paper:
@inproceedings{gu2024positive,
  title={Positive Transfer of the Whisper Speech Transformer to Human and Animal Voice Activity Detection},
  author={Gu, Nianlong and Lee, Kanghwi and Basha, Maris and Ram, Sumit Kumar and You, Guanghao and Hahnloser, Richard HR},
  booktitle={ICASSP 2024-2024 IEEE International Conference on Acoustics, Speech and Signal Processing (ICASSP)},
  pages={7505--7509},
  year={2024},
  organization={IEEE}
}
Nianlong Gu [email protected]
Code for ICASSP 2024 paper WhisperSeg: Positive Transfer of the Whisper Speech Transformer to Human and Animal Voice Activity Detection
See the codeWe proposed WhisperSeg, utilizing the Whisper Transformer pre-trained for Automatic Speech Recognition (ASR) for both human and animal Voice Activity Detection (VAD). For more details, please refer to our paper:
Positive Transfer of the Whisper Speech Transformer to Human and Animal Voice Activity Detection
Nianlong Gu, Kanghwi Lee, Maris Basha, Sumit Kumar Ram, Guanghao You, Richard H. R. Hahnloser
University of Zurich and ETH Zurich
Accepted to the 2024 IEEE International Conference on Acoustics, Speech and Signal Processing (ICASSP 2024)
conda create -n wseg python=3.10 -y
conda activate wseg
pip install -r requirements.txt
conda install conda-forge::cudnn==8.9.7.29 -y
## suppose CUDA version is 12.1, for other version, please refer to https://pytorch.org/get-started/locally/
pip install --upgrade torch torchvision torchaudio --index-url https://download.pytorch.org/whl/cu121
Could not load library libcudnn_ops_infer.so.8, please make sure you have install cudnn 8 following the command above. If the error still exists, it can be used by the conflict between pyenv and conda python, please try the following to set conda python with a higher priority than pyenv:
# Check pyenv global version
pyenv global
# Set pyenv to use system/conda when in conda env
pyenv global system
Then start a new terminal and activate conda environment
NOTE for Windows OS: For method 1 and 2, if running WhisperSeg on windows, one need to further uninstall 'bitsandbytes' by
pip uninstall bitsandbytes
and then install 'bitsandbytes-windows==0.37.5'
pip install bitsandbytes-windows==0.37.5
Then open a new terminal, you can activate the 'wseg' environment by
conda activate wseg
The pretrained WhisperSeg may not work well on your own dataset. A finetuning would be necessary in this case.
We prepared a Jupyter notebook that provides a comprehensive walkthrough of WhisperSeg finetuning. This includes steps for data processing, training, and evaluation. You can access this notebook at docs/WhisperSeg_Training_Pipeline.ipynb, or run it in Google Colab:
Please refer to the following documents for the complete guideline of training WhisperSeg, including 1) dataset processing, 2) model training and 3) model evaluation.
Activate the "wseg" ananconda environment:
conda activate wseg
python scripts/segment.py --model_path nccratliri/whisperseg-animal-vad-ct2 --audio_path data/example_subset/Marmoset/test/marmoset_pair4_animal1_together_A_0.wav --csv_save_path ./out.csv
The out.csv contains the segmentation results:
| onset | offset | cluster | |
|---|---|---|---|
| 0 | 15.585 | 15.682 | vocal |
| 1 | 15.777 | 15.837 | vocal |
| 2 | 15.883 | 15.922 | vocal |
| 3 | 16.007 | 16.047 | vocal |
| 4 | 16.132 | 16.157 | vocal |
| ... | ... | ... | ... |
| 192 | 61.167 | 61.293 | vocal |
| 193 | 61.410 | 61.448 | vocal |
| 194 | 61.502 | 61.538 | vocal |
| 195 | 61.727 | 61.867 | vocal |
| 196 | 61.953 | 61.995 | vocal |
python scripts/segment.py --model_path nccratliri/whisperseg-animal-vad-ct2 --audio_folder data/example_subset/Zebra_finch/test_juveniles/ --csv_save_path out.csv
| filename | onset | offset | cluster | |
|---|---|---|---|---|
| 0 | zebra_finch_R3428_40932.67397799_1_24_18_43_17... | 0.008 | 0.043 | vocal |
| 1 | zebra_finch_R3428_40932.67397799_1_24_18_43_17... | 0.458 | 0.578 | vocal |
| 2 | zebra_finch_R3428_40932.67397799_1_24_18_43_17... | 1.122 | 1.318 | vocal |
| 3 | zebra_finch_R3428_40932.67397799_1_24_18_43_17... | 2.093 | 2.117 | vocal |
| 4 | zebra_finch_R3428_40932.67397799_1_24_18_43_17... | 2.162 | 2.207 | vocal |
| ... | ... | ... | ... | ... |
| 269 | zebra_finch_R3428_40932.31154143_1_24_8_39_14.wav | 2.253 | 2.372 | vocal |
| 270 | zebra_finch_R3428_40932.31154143_1_24_8_39_14.wav | 2.615 | 2.727 | vocal |
| 271 | zebra_finch_R3428_40932.31154143_1_24_8_39_14.wav | 2.888 | 2.972 | vocal |
| 272 | zebra_finch_R3549_40999.66669408_3_31_18_31_9.wav | 0.010 | 0.110 | vocal |
| 273 | zebra_finch_R3549_40999.66669408_3_31_18_31_9.wav | 1.742 | 1.843 | vocal |
274 rows × 4 columns
Please refer to the section Use WhisperSeg in Python Code below.
Please refer to the tutorial: Run WhisperSeg as a Web Service
This allows running WhisperSeg on a Web server, and call the segmentation service from any client of different environments, such as python or MatLab. The best way to incorporate WhisperSeg into your original workflow.
Please refer to the tutorial: Run WhisperSeg via GUI
We demonstrate here using a WhisperSeg trained on multi-species data to segment the audio files of different species.
Note: If you are using your custom models, replace the model's name ("nccratliri/whisperseg-large-ms" or "nccratliri/whisperseg-large-ms-ct2") with your own trained model's name.
from model import WhisperSegmenter
segmenter = WhisperSegmenter( "nccratliri/whisperseg-large-ms", device="cuda" )
Alternatively, we provided a CTranslate2 converted version, which enables 4x faster inference speed.
To use the CTranslate2 converted model (with checkpoint name ended with "-ct2"), we need to import the "WhisperSegmenterFast" module.
from model import WhisperSegmenterFast
segmenter = WhisperSegmenterFast( "nccratliri/whisperseg-large-ms-ct2", device="cuda" )
The following paratemers need to be configured for different species when calling the segment function.
The recommended settings of these parameters are available at config/segment_config.json. More details are described in Table 1 in the paper:
.
import librosa
import json
from audio_utils import SpecViewer
### SpecViewer is a customized class for interactive spectrogram viewing
spec_viewer = SpecViewer()
sr = 32000
spec_time_step = 0.0025

audio, _ = librosa.load( "data/example_subset/Zebra_finch/test_adults/zebra_finch_g17y2U-f00007.wav",
                         sr = sr )
## Note if spec_time_step is not provided, a default value will be used by the model.
prediction = segmenter.segment(  audio, sr = sr, spec_time_step = spec_time_step )
print(prediction)
{'onset': [0.01, 0.38, 0.603, 0.758, 0.912, 1.813, 1.967, 2.073, 2.838, 2.982, 3.112, 3.668, 3.828, 3.953, 5.158, 5.323, 5.467], 'offset': [0.073, 0.447, 0.673, 0.83, 1.483, 1.882, 2.037, 2.643, 2.893, 3.063, 3.283, 3.742, 3.898, 4.523, 5.223, 5.393, 6.043], 'cluster': ['zebra_finch_0', 'zebra_finch_0', 'zebra_finch_0', 'zebra_finch_0', 'zebra_finch_0', 'zebra_finch_0', 'zebra_finch_0', 'zebra_finch_0', 'zebra_finch_0', 'zebra_finch_0', 'zebra_finch_0', 'zebra_finch_0', 'zebra_finch_0', 'zebra_finch_0', 'zebra_finch_0', 'zebra_finch_0', 'zebra_finch_0']}
spec_viewer.visualize( audio = audio, sr = sr, prediction = prediction,
                       window_size=8, precision_bits=1
                     )
Let's load the human annoated segments and compare them with WhisperSeg's prediction.
label = json.load( open("data/example_subset/Zebra_finch/test_adults/zebra_finch_g17y2U-f00007.json") )
spec_viewer.visualize( audio = audio, sr = sr, prediction = prediction, label=label,
                       window_size=8, precision_bits=1
                     )
sr = 32000
spec_time_step = 0.0025

audio_file = "data/example_subset/Zebra_finch/test_juveniles/zebra_finch_R3428_40932.29996086_1_24_8_19_56.wav"
label_file = audio_file[:-4] + ".json"
audio, _ = librosa.load( audio_file, sr = sr )
label = json.load( open(label_file) )

prediction = segmenter.segment(  audio, sr = sr, spec_time_step = spec_time_step )
spec_viewer.visualize( audio = audio, sr = sr, prediction = prediction, label=label,
                       window_size=15, precision_bits=1 )
sr = 32000
spec_time_step = 0.0025

audio_file = "data/example_subset/Bengalese_finch/test/bengalese_finch_bl26lb16_190412_0721.20144_0.wav"
label_file = audio_file[:-4] + ".json"
audio, _ = librosa.load( audio_file, sr = sr )
label = json.load( open(label_file) )

prediction = segmenter.segment(  audio, sr = sr, spec_time_step = spec_time_step )
spec_viewer.visualize( audio = audio, sr = sr, prediction = prediction, label=label,
                       window_size=3 )
sr = 48000
spec_time_step = 0.0025

audio_file = "data/example_subset/Marmoset/test/marmoset_pair4_animal1_together_A_0.wav"
label_file = audio_file[:-4] + ".json"
audio, _ = librosa.load( audio_file, sr = sr )
label = json.load( open(label_file) )

prediction = segmenter.segment(  audio, sr = sr, spec_time_step = spec_time_step )
spec_viewer.visualize( audio = audio, sr = sr, prediction = prediction, label=label )
sr = 300000
spec_time_step = 0.0005
"""Since mouse produce high frequency vocalizations, we need to set min_frequency to a large value (instead of 0),
   to make the Mel-spectrogram's frequency range match the mouse vocalization's frequency range"""
min_frequency = 35000

audio_file = "data/example_subset/Mouse/test/mouse_Rfem_Afem01_0.wav"
label_file = audio_file[:-4] + ".json"
audio, _ = librosa.load( audio_file, sr = sr )
label = json.load( open(label_file) )

prediction = segmenter.segment(  audio, sr = sr, min_frequency = min_frequency, spec_time_step = spec_time_step )
spec_viewer.visualize( audio = audio, sr = sr, min_frequency= min_frequency, prediction = prediction, label=label )
sr = 16000
spec_time_step = 0.01
"""For human speech the multi-trial voting is not so effective, so we set num_trials=1 instead of the default value (3)"""
num_trials = 1

audio_file = "data/example_subset/Human_AVA_Speech/test/human_xO4ABy2iOQA_clip.wav"
label_file = audio_file[:-4] + ".json"
audio, _ = librosa.load( audio_file, sr = sr )
label = json.load( open(label_file) )

prediction = segmenter.segment(  audio, sr = sr, spec_time_step = spec_time_step, num_trials = num_trials )
spec_viewer.visualize( audio = audio, sr = sr, prediction = prediction, label=label,
                       window_size=20, precision_bits=0, xticks_step_size = 2 )
When using our code or models for your work, please cite the following paper:
@inproceedings{gu2024positive,
  title={Positive Transfer of the Whisper Speech Transformer to Human and Animal Voice Activity Detection},
  author={Gu, Nianlong and Lee, Kanghwi and Basha, Maris and Ram, Sumit Kumar and You, Guanghao and Hahnloser, Richard HR},
  booktitle={ICASSP 2024-2024 IEEE International Conference on Acoustics, Speech and Signal Processing (ICASSP)},
  pages={7505--7509},
  year={2024},
  organization={IEEE}
}
Nianlong Gu [email protected]