
Comic Lettering & Localization Workspace Plan, prepare, letter, translate, review and publish comics in multiple languages.
See the codeREADME

A workspace for comic lettering, localization and production.
Plan, prepare, letter, translate, review and publish comics in one integrated workflow — on a single machine, over LAN, or with a shared server.
Join the Discord · Download for Windows/macOS/Linux
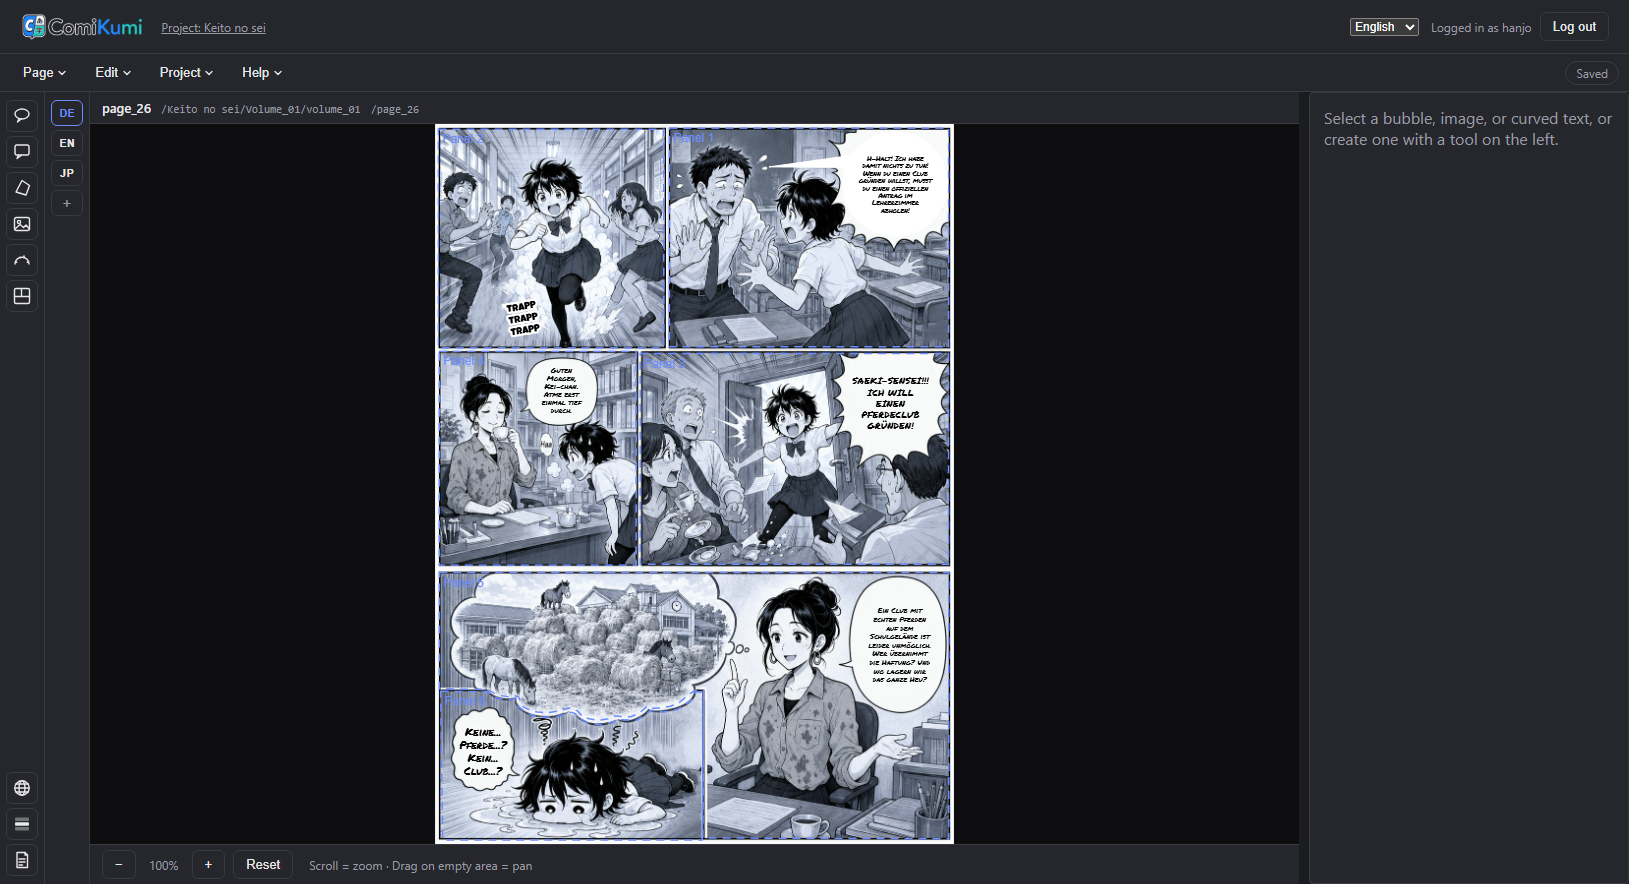
ComiKumi brings the whole production workflow around your artwork into one place — from script planning to lettering, localization, review, and publishing — without replacing the art itself. Place and letter speech bubbles, curved titles/SFX, and image patches directly on top of scanned comic pages, translate them per language, and export the result as ready-to-publish PNGs. Run it solo on your machine, on your studio's LAN, or on a shared server your whole team connects to — a small Express server reads/writes files on disk (no cloud, no telemetry, no third-party signup), paired with a React + Konva canvas editor. You still create your own ComiKumi account on first launch (see Getting started below) — that account lives on your own server, not a central ComiKumi service.
Highlights
- Multi-language lettering — every text/style field on a bubble can be overridden per language, or left to fall back to a shared base value; a page can carry as many languages as you configure.
- Full vertical Japanese typesetting (tategaki) — forced line breaks, both group-
and mono-ruby furigana (
{漢字|かんじ}or per-character{東|とう}{京|きょう}, the latter word-protected across column breaks), bōten emphasis dots ({最悪*}, the traditional alternative to bold/italic), automatic tate-chū-yoko for digit/Latin runs (fullwidth-normalized, so IME-typed "21" is recognized too), and kinsoku shori line-breaking rules (see screenshot). Two toolbar buttons insert the furigana/bōten markup for you, with furigana pre-filled from the glossary when available. Seedocs/Japanese-Typesetting.md. - Four element types: speech bubbles (rect/oval/free perspective quad, with speech/thought/shout/custom-SVG backgrounds and configurable tails), placed images (perspective-warped into a quad), curved title/SFX text along a Bézier path, and panel-reference polygons for reporting.
- Bubble styling effects — gradient fill, glow, drop shadow, and bevel/emboss (inner/outer/emboss, adjustable angle/size/softness/highlight+shadow color) for a bubble's background, all independently stackable, plus dashed/dotted/custom border patterns; text can carry its own outline, gradient, glow, and drop shadow too. Configurable per bubble or bundled into a reusable Lettering Preset.
- Procedural screentone (halftone) fills — dots, lines, or crosshatch, with adjustable spacing, tone, angle, and ink/paper color, as a bubble-background fill or a text fill — including on curved/rotated SFX text and vertical text's rotated punctuation, where it's composited so the dot pattern reads as one continuous field instead of restarting at each rotated glyph.
- Import Clip Studio Paint (.clip) files as pages — add one or more
.clipproject files directly as new pages, no manual flattening/export step in CSP first (no official .clip SDK exists — parsed independently, seedocs/clip-parser-provenance.md). Composites the page at full resolution from the file's own layer tiles when every visible layer is a plain raster/paper layer in a known, verified pixel format, falling back to CSP's own embedded flattened-canvas preview (capped at roughly half the real canvas's resolution, but always complete) for anything else. - Webtoon (long-strip) support — mark a volume "Webtoon" and the editor switches to a
fit-width, scrollable canvas instead of shrinking a 20,000px-tall strip down to an
unusable thumbnail, the Reader gets a continuous-scroll strip mode that auto-advances
across episode boundaries, and the export panel hides formats that don't apply to long
strips while guarding against the canvas-size limits a very tall page can hit. See
docs/FEATURES.md. - Asset Manager — a dedicated screen (not just the editor's inline picker popovers)
for browsing, uploading, renaming, deleting, and folder-organizing a project's fonts,
images, and SVG bubble outlines, plus a separate instance-scope manager for the shared
library every project draws from — see
docs/FEATURES.md. Images can also be pasted directly from the OS clipboard (e.g. "Copy image" on an AI-generated picture in ChatGPT's or Gemini's web UI) with Ctrl+V/Cmd+V — into the selected panel's Cut-Panel replacement, or as a new placed image, no upload dialog required. - Auto-Bubbles (detection + OCR) — a toolbar tool finds speech-bubble regions on the
page and reads the text inside them automatically, entirely client-side (WebGPU with
a WASM fallback, no server round-trip). Every result goes through a review panel
first — accept, edit, or reject each region before anything becomes a real bubble.
Optimized for Japanese source text today; box detection alone still works for other
languages. See
docs/ocr-model-provenance.mdfor the open-weight models used and their licenses. - Cleaning (Inpainting) — a toolbar tool removes the original printed text inside
a hand-refined mask and reconstructs the artwork underneath, starting from
Auto-Bubbles' own detector output and letting you shape the mask further with
rectangle, freehand, polygon, and add/remove brush tools. Shown as a before/after
comparison before anything changes; applying only flips a per-page flag (the
original scan is never touched, and it can be switched back at any time), which then
takes effect everywhere the page background is drawn — editor, exports, thumbnails.
See
docs/inpainting-model-provenance.mdfor the model used and its license. - AI assistant with ten review-gated actions — a chat sidebar (six swappable providers, bring your own API key or self-host Ollama) that, on request, can translate missing bubbles, fix text overflow, assign characters, style SFX bubbles, fix reading order, extract/fix glossary terms, draft a translation note, or — from the pages overview — suggest a chapter breakdown or page-type tags. Every action proposes a reviewable diff instead of a plain chat reply — nothing touches the page until you click Apply, and applying it is just a normal unsaved edit, going through the same save/permission/conflict flow as typing it by hand.
- Effect (SFX) bubbles — a dedicated toolbar tool marks a bubble as a sound effect instead of dialogue (existing bubbles can be switched either way from the inspector); effect bubbles are excluded from "who says what" reports, auto-generated script dialogue lines, and the missing-translation QA check, while staying fully normal everywhere else (translation memory, reading order, the Layers navigator).
- Layers/Panel navigator & bulk locking — every bubble/image/curved text on a page, grouped by panel, with per-element lock toggles; "lock all panels", "lock panel + its bubbles", and "lock selection" bulk actions stop overlapping panels from getting in the way of clicking or accidentally dragging what's underneath.
- Layer order (z-order) — bring any bubble/image/curved text in front of or behind the others (Layers navigator buttons or the bubble context menu), e.g. to let an image patch sit in front of a bubble instead of always behind it. Respected in the editor, PNG export, and layered PSD export.
- Bubble clipping & merging — cut a bubble along a straight line (with a one-click suggestion from the nearest panel edge) so it sits flush against a panel border, or non-destructively merge several bubbles into one continuous outline with a single shared line of dialogue; ungrouping restores the original bubbles untouched. Text inset (the gap between outline and text) defaults to a sensible per-shape value but can be overridden per bubble or per preset with a 0–90% slider.
- Balloon-aware line-breaking — an opt-in, per-language toggle for oval bubbles derives each line's usable width from the bubble's true ellipse shape instead of one fixed inset rectangle, so lines near the middle can run wider and lines near the top/bottom narrower; works for both horizontal and vertical (tategaki) text, identically across the editor, PNG export, vector PDF, and PSD export.
- Lettering presets — define a reusable style ("SFX Style", "Narration", …) that live-updates every bubble/curved text linked to it, field by field, without overwriting values a preset doesn't define; a small built-in starter library ("Manga SFX", "Whisper", "Shout") can be added with one click.
- Context view & glossary — a reading-order-aware context sidebar (previous/current/ next bubble, speaker + voice notes, panel crop; see screenshot) useful for lettering and writing just as much as translation, a project glossary with live highlighting in the text field and optional furigana readings, and "who says what" reports per page/volume.
- Script planning — a standalone, volume-wide script editor (plot, panel layout, image composition, and per-language dialogue, independent of the scanned page) plus an in-editor sidebar that links a script page to a real page (see screenshot) and inserts dialogue straight into the selected bubble. Either can be generated with one click from already-lettered pages instead of typed up from scratch.
- Project-specific asset folders — fonts, SVG bubble contours, and the image library can live in a shared global library, a per-project folder, or both (project wins on a filename collision).
- Review & QC comments — pins, box regions, or freehand marks anywhere on a page, with @-mentions of specific accounts or roles (and optional email notifications on mention) so feedback reaches the right person directly.
- Workflow status board — a per-volume production board tracking Cleaning, Translation, Lettering, and QC status (plus an assignee) per page and per language, so a team can see "page 12: Lettering DE in progress — Hanjo, QC DE pending" at a glance instead of inferring it from chat.
- Read/Review viewer — a dedicated, toolbar-free reading screen for QC passes: free zoom/pan, zoom-to-panel, reading-direction-aware page turning, a double-page spread view, and a side-by-side comparison of up to four arbitrary pages, with read-only access to characters/glossary/script in every project language.
- PNG, print (CMYK TIFF), vector PDF/PSD, and CBZ export, with page-range/language filtering, JSON import/export of a whole volume's layouts, and a full ComicInfo.xml metadata dialog (series/credits/publication/categorization/per-page type) for the CBZ.
- Chapters — tag pages into chapters (order always derived from the volume's own page order, never a separate thing to keep in sync); the page overview groups pages into chapter sections, the export dialog and Export-Viewer's ZIP/CBZ downloads gain a "just this chapter" filter, CBZ downloads get automatic chapter bookmarks (ComicInfo.xml, read by Komga/Kavita), and the volume report/QA checker gain chapter filtering/grouping.
- Multi-user safety — optimistic conflict detection on page saves (a save conflict prompts to keep your version or load the other one, instead of silently overwriting it), serialized writes for comments/script/project metadata, and a warning before switching the server's active project while someone else is still working in it.
- Desktop installer — package ComiKumi as a self-contained Windows/macOS/Linux desktop app (Electron embeds the same Express server, no separate Node/browser setup needed). A first-run setup screen chooses between running a local server (data directory and port) or connecting to a remote ComiKumi server already running elsewhere, revisitable anytime via Datei → Server wechseln….
User guide (task-oriented, "how do I…"): docs/User-Guide.md
(also available in German).
Full feature list: docs/FEATURES.md (also available
in German). Layout JSON schema:
docs/JSON-Format.md (also available
in German). Script-planning JSON schema:
docs/Script-JSON-Format.md (also available
in German).
Architecture
client/   React 19 + Konva 10 (react-konva) editor, Vite + Vitest
server/   Express 5 API — reads/writes project files, images, and layout JSON on disk
shared/   Zod schemas shared by both (layout, project, presets, characters, …)
docs/     Feature docs, JSON format reference, brand assets
No database — a project is a single projekt.json file (name, languages, characters,
glossary, presets, settings) plus your existing folder of scanned pages. The server keeps
its own state in server/data/ (or the app-data directory you chose for a desktop
install) — most of it (fonts/images/SVG library, page thumbnails, a pointer to the
last-opened project) is a regenerable cache, but this directory also holds account
records and the server's own authentication/encryption secrets, so don't delete or
reset it as a cache-clearing step. Pointing the app at a different data directory (e.g.
via the desktop setup screen) does not migrate anything from the old one — it starts a
fresh, empty set of accounts, exactly as if the old directory had never existed.
Getting started
Most users don't need Node.js, a terminal, or a build step at all — just a desktop download and an installer/AppImage. Building from source (below) is only needed for development, or to run the server on a platform without a prebuilt desktop package.
1. Download
Preview builds for Windows, macOS (Apple Silicon), and Linux are attached to the ComiKumi 0.9.0 Preview release — scroll to Assets and download the file for your platform. GitHub's own "Source code (zip)"/"Source code (tar.gz)" links on that page are not installers — they're the raw repository source, only useful if you're building from source (below).
| Platform | Download |
|---|---|
| Windows | ComiKumi.Setup.0.9.0.exe |
| macOS (Apple Silicon only — no Intel build yet) | ComiKumi-0.9.0-arm64.dmg |
| Linux | ComiKumi-0.9.0.AppImage |
This is still a preview release — see the release page's own notes for known limitations before relying on it for real production work.
2. Install and launch
-
Windows: run
ComiKumi.Setup.0.9.0.exeand follow the installer. -
macOS: open the
.dmgand drag ComiKumi into Applications. -
Linux: make the AppImage executable, then run it:
chmod +x ComiKumi-0.9.0.AppImage
./ComiKumi-0.9.0.AppImage
3. Choose a local or remote server
On first launch, a setup screen offers a choice: run a local server (asks where to
store app data — not the comic projects themselves, which are configured per-project
via the in-app Project Wizard in step 5 — and which local port to use, defaulting to
the OS's per-user app-data directory and port 3001), or connect to a remote
ComiKumi server someone else is already running (just its URL — the desktop app then
starts nothing locally, it's a thin wrapper around that server's own web UI).
Revisitable anytime via Datei → Server wechseln…. See
electron/README.md for how packaging, setup, and dev mode work.
4. Create an administrator account (new local server only)
The very first time a local server starts with no accounts yet, it shows a one-time setup screen instead of a login — pick a username and password. This first account automatically becomes system administrator and can create further accounts later. Connecting to an existing remote server instead just shows that server's normal login.
5. Create your first project
Open the in-app Project Wizard and point it at a folder of scanned pages — see
docs/FEATURES.md for the expected folder
convention (a <book>_empty source-page folder per volume, <book>_<language> folders
for translated exports).
Running from source (developers)
Requires Node.js ^20.19.0 || >=22.12.0 (this only matters if you're running from
source or building your own desktop package — end users of the downloads above don't
need Node.js at all).
npm install
npm run dev
This installs both client/ and server/ (via postinstall) and starts them together
(server on :3001, client on :5173, proxied through Vite). Open the printed client
URL and continue from step 3 above.
To build your own desktop package instead of downloading one: npm run electron:build
(or the platform-specific electron:build:win/:mac/:linux variants) packages
ComiKumi as a self-contained desktop app (Electron embeds the same Express server and
serves the built client from one process) — release/<platform> gets the same
installer types listed in step 1.
Running client and server on separate hosts
By default the client talks to http://localhost:3001 when unconfigured (matching the
dev setup above), or same-origin ("", relative paths) in a production build. To point a
built client at a server hosted elsewhere — a different machine, network, or port — set
VITE_API_BASE_URL (a Vite build-time env var, e.g. in client/.env.local) to that
server's absolute origin, no trailing slash:
VITE_API_BASE_URL=https://comikumi.example.com
The server already accepts cross-origin requests from anywhere (cors() with no
origin restriction in server/src/app.ts) and every API route is
gated behind account login and per-project roles (viewer/translator/letterer/admin, plus
a server-wide system-admin bypass — see Konten, Rollen & Zugriffsschutz).
The server does all of its file I/O (scan folders, project files, assets, thumbnails) on
its own local disk, so the actual scanned pages must live on (or be reachable from) the
machine the server runs on, not the client's.
Self-hosting a persistent shared server (Docker)
The desktop app's "local server" mode (step 3 above) is meant to run in the foreground
on one person's machine — for a server that stays up unattended for a whole team, use
docker-compose.yml instead:
docker compose up -d
This builds the image from Dockerfile.selfhost (a plain,
non-demo build of the same server + client) and starts it as a persistent container,
restarting automatically on failure or host reboot. Two volumes matter:
comikumi-data(named volume, mounted at/data) — the server's own app data: accounts, its authentication/encryption secrets, the font/SVG/image library, and page thumbnails. Back this up — seeserver/data/further above for why this isn't just a disposable cache../projects:/projects(bind mount) — put your actual comic projects (scanned pages) here, or point it at wherever they already live; the in-app Project Wizard (step 5 above) can then browse to a folder under/projectson first run.
Open http://<host>:3001 and continue from step 4 above (create the administrator
account). For real team/internet use, put a reverse proxy (nginx, Caddy, Traefik, …) in
front for TLS — this container itself only serves plain HTTP.
To update, pull the new source and rebuild: docker compose up -d --build. The
comikumi-data volume is untouched by a rebuild, so accounts/settings survive.
Prefer to run it without Docker? Build once and start the compiled server directly — same Node.js requirement as running from source:
npm run build
PORT=3001 LETTERING_DATA_DIR=/path/to/data CLIENT_DIST_DIR=client/dist npm --prefix server run start
Keeping that running unattended (across reboots/crashes) is then up to your platform's own process supervisor (systemd, pm2, Windows Task Scheduler, …) — none is bundled here.
Scripts
| Command | Description |
|---|---|
npm run dev | Start server + client together (hot reload) |
npm run build | Type-check and build both packages for production |
npm run test | Run the full test suite (server + client) |
Each package also has its own scripts (npm --prefix client run <script>, same for
server) — see their respective package.json.
Tests
npm run test
Server tests include route-level integration tests (via supertest) that run against
temporary, isolated project/data directories — they never touch your real project data
or the repo's own server/data/. Client tests cover the pure geometry/typesetting/text
logic shared by the live canvas preview and the PNG export.
E2E tests
A small Playwright suite in e2e/ drives a real browser against real server + client
instances, covering the login screen, opening a project, editing a bubble (with a
reload to confirm it actually persisted), and exporting a page to PNG. One-time setup,
then run from the repo root:
npm --prefix e2e install
npx --prefix e2e playwright install chromium
npm run test:e2e
Every run spins up its own server (port 3101) and client (port 4173) against a
throwaway LETTERING_DATA_DIR/scan-root under e2e/tmp-run/ — separate ports and data
from npm run dev, so the suite can run alongside a real dev session without
interfering with it. Not part of npm run test (browser download + runtime are too
heavy for the default test loop).
Tech stack
React 19 · Konva 10 / react-konva · React Router 7 · Zustand · Zod 4 · Vite 8 · Vitest 4 — Express 5 · Sharp · Multer · Archiver · Nodemailer · Zod 4
License
Free for Open Source, Indies, and Hobbyists.
ComiKumi is licensed under the GNU Affero General Public License v3.0 (AGPL-3.0-or-later). You're free to use, study, modify, and share it — including running a modified version as a network service — as long as you make your source changes available under the same license to anyone who interacts with it.
Contributors

143 commits
Similar repos


Languages
TypeScript
97.8%
CSS
1.8%
Comic Lettering & Localization Workspace Plan, prepare, letter, translate, review and publish comics in multiple languages.
See the codeREADME
A workspace for comic lettering, localization and production.
Plan, prepare, letter, translate, review and publish comics in one integrated workflow — on a single machine, over LAN, or with a shared server.
Join the Discord · Download for Windows/macOS/Linux
ComiKumi brings the whole production workflow around your artwork into one place — from script planning to lettering, localization, review, and publishing — without replacing the art itself. Place and letter speech bubbles, curved titles/SFX, and image patches directly on top of scanned comic pages, translate them per language, and export the result as ready-to-publish PNGs. Run it solo on your machine, on your studio's LAN, or on a shared server your whole team connects to — a small Express server reads/writes files on disk (no cloud, no telemetry, no third-party signup), paired with a React + Konva canvas editor. You still create your own ComiKumi account on first launch (see Getting started below) — that account lives on your own server, not a central ComiKumi service.
Highlights
- Multi-language lettering — every text/style field on a bubble can be overridden per language, or left to fall back to a shared base value; a page can carry as many languages as you configure.
- Full vertical Japanese typesetting (tategaki) — forced line breaks, both group-
and mono-ruby furigana (
{漢字|かんじ}or per-character{東|とう}{京|きょう}, the latter word-protected across column breaks), bōten emphasis dots ({最悪*}, the traditional alternative to bold/italic), automatic tate-chū-yoko for digit/Latin runs (fullwidth-normalized, so IME-typed "21" is recognized too), and kinsoku shori line-breaking rules (see screenshot). Two toolbar buttons insert the furigana/bōten markup for you, with furigana pre-filled from the glossary when available. Seedocs/Japanese-Typesetting.md. - Four element types: speech bubbles (rect/oval/free perspective quad, with speech/thought/shout/custom-SVG backgrounds and configurable tails), placed images (perspective-warped into a quad), curved title/SFX text along a Bézier path, and panel-reference polygons for reporting.
- Bubble styling effects — gradient fill, glow, drop shadow, and bevel/emboss (inner/outer/emboss, adjustable angle/size/softness/highlight+shadow color) for a bubble's background, all independently stackable, plus dashed/dotted/custom border patterns; text can carry its own outline, gradient, glow, and drop shadow too. Configurable per bubble or bundled into a reusable Lettering Preset.
- Procedural screentone (halftone) fills — dots, lines, or crosshatch, with adjustable spacing, tone, angle, and ink/paper color, as a bubble-background fill or a text fill — including on curved/rotated SFX text and vertical text's rotated punctuation, where it's composited so the dot pattern reads as one continuous field instead of restarting at each rotated glyph.
- Import Clip Studio Paint (.clip) files as pages — add one or more
.clipproject files directly as new pages, no manual flattening/export step in CSP first (no official .clip SDK exists — parsed independently, seedocs/clip-parser-provenance.md). Composites the page at full resolution from the file's own layer tiles when every visible layer is a plain raster/paper layer in a known, verified pixel format, falling back to CSP's own embedded flattened-canvas preview (capped at roughly half the real canvas's resolution, but always complete) for anything else. - Webtoon (long-strip) support — mark a volume "Webtoon" and the editor switches to a
fit-width, scrollable canvas instead of shrinking a 20,000px-tall strip down to an
unusable thumbnail, the Reader gets a continuous-scroll strip mode that auto-advances
across episode boundaries, and the export panel hides formats that don't apply to long
strips while guarding against the canvas-size limits a very tall page can hit. See
docs/FEATURES.md. - Asset Manager — a dedicated screen (not just the editor's inline picker popovers)
for browsing, uploading, renaming, deleting, and folder-organizing a project's fonts,
images, and SVG bubble outlines, plus a separate instance-scope manager for the shared
library every project draws from — see
docs/FEATURES.md. Images can also be pasted directly from the OS clipboard (e.g. "Copy image" on an AI-generated picture in ChatGPT's or Gemini's web UI) with Ctrl+V/Cmd+V — into the selected panel's Cut-Panel replacement, or as a new placed image, no upload dialog required. - Auto-Bubbles (detection + OCR) — a toolbar tool finds speech-bubble regions on the
page and reads the text inside them automatically, entirely client-side (WebGPU with
a WASM fallback, no server round-trip). Every result goes through a review panel
first — accept, edit, or reject each region before anything becomes a real bubble.
Optimized for Japanese source text today; box detection alone still works for other
languages. See
docs/ocr-model-provenance.mdfor the open-weight models used and their licenses. - Cleaning (Inpainting) — a toolbar tool removes the original printed text inside
a hand-refined mask and reconstructs the artwork underneath, starting from
Auto-Bubbles' own detector output and letting you shape the mask further with
rectangle, freehand, polygon, and add/remove brush tools. Shown as a before/after
comparison before anything changes; applying only flips a per-page flag (the
original scan is never touched, and it can be switched back at any time), which then
takes effect everywhere the page background is drawn — editor, exports, thumbnails.
See
docs/inpainting-model-provenance.mdfor the model used and its license. - AI assistant with ten review-gated actions — a chat sidebar (six swappable providers, bring your own API key or self-host Ollama) that, on request, can translate missing bubbles, fix text overflow, assign characters, style SFX bubbles, fix reading order, extract/fix glossary terms, draft a translation note, or — from the pages overview — suggest a chapter breakdown or page-type tags. Every action proposes a reviewable diff instead of a plain chat reply — nothing touches the page until you click Apply, and applying it is just a normal unsaved edit, going through the same save/permission/conflict flow as typing it by hand.
- Effect (SFX) bubbles — a dedicated toolbar tool marks a bubble as a sound effect instead of dialogue (existing bubbles can be switched either way from the inspector); effect bubbles are excluded from "who says what" reports, auto-generated script dialogue lines, and the missing-translation QA check, while staying fully normal everywhere else (translation memory, reading order, the Layers navigator).
- Layers/Panel navigator & bulk locking — every bubble/image/curved text on a page, grouped by panel, with per-element lock toggles; "lock all panels", "lock panel + its bubbles", and "lock selection" bulk actions stop overlapping panels from getting in the way of clicking or accidentally dragging what's underneath.
- Layer order (z-order) — bring any bubble/image/curved text in front of or behind the others (Layers navigator buttons or the bubble context menu), e.g. to let an image patch sit in front of a bubble instead of always behind it. Respected in the editor, PNG export, and layered PSD export.
- Bubble clipping & merging — cut a bubble along a straight line (with a one-click suggestion from the nearest panel edge) so it sits flush against a panel border, or non-destructively merge several bubbles into one continuous outline with a single shared line of dialogue; ungrouping restores the original bubbles untouched. Text inset (the gap between outline and text) defaults to a sensible per-shape value but can be overridden per bubble or per preset with a 0–90% slider.
- Balloon-aware line-breaking — an opt-in, per-language toggle for oval bubbles derives each line's usable width from the bubble's true ellipse shape instead of one fixed inset rectangle, so lines near the middle can run wider and lines near the top/bottom narrower; works for both horizontal and vertical (tategaki) text, identically across the editor, PNG export, vector PDF, and PSD export.
- Lettering presets — define a reusable style ("SFX Style", "Narration", …) that live-updates every bubble/curved text linked to it, field by field, without overwriting values a preset doesn't define; a small built-in starter library ("Manga SFX", "Whisper", "Shout") can be added with one click.
- Context view & glossary — a reading-order-aware context sidebar (previous/current/ next bubble, speaker + voice notes, panel crop; see screenshot) useful for lettering and writing just as much as translation, a project glossary with live highlighting in the text field and optional furigana readings, and "who says what" reports per page/volume.
- Script planning — a standalone, volume-wide script editor (plot, panel layout, image composition, and per-language dialogue, independent of the scanned page) plus an in-editor sidebar that links a script page to a real page (see screenshot) and inserts dialogue straight into the selected bubble. Either can be generated with one click from already-lettered pages instead of typed up from scratch.
- Project-specific asset folders — fonts, SVG bubble contours, and the image library can live in a shared global library, a per-project folder, or both (project wins on a filename collision).
- Review & QC comments — pins, box regions, or freehand marks anywhere on a page, with @-mentions of specific accounts or roles (and optional email notifications on mention) so feedback reaches the right person directly.
- Workflow status board — a per-volume production board tracking Cleaning, Translation, Lettering, and QC status (plus an assignee) per page and per language, so a team can see "page 12: Lettering DE in progress — Hanjo, QC DE pending" at a glance instead of inferring it from chat.
- Read/Review viewer — a dedicated, toolbar-free reading screen for QC passes: free zoom/pan, zoom-to-panel, reading-direction-aware page turning, a double-page spread view, and a side-by-side comparison of up to four arbitrary pages, with read-only access to characters/glossary/script in every project language.
- PNG, print (CMYK TIFF), vector PDF/PSD, and CBZ export, with page-range/language filtering, JSON import/export of a whole volume's layouts, and a full ComicInfo.xml metadata dialog (series/credits/publication/categorization/per-page type) for the CBZ.
- Chapters — tag pages into chapters (order always derived from the volume's own page order, never a separate thing to keep in sync); the page overview groups pages into chapter sections, the export dialog and Export-Viewer's ZIP/CBZ downloads gain a "just this chapter" filter, CBZ downloads get automatic chapter bookmarks (ComicInfo.xml, read by Komga/Kavita), and the volume report/QA checker gain chapter filtering/grouping.
- Multi-user safety — optimistic conflict detection on page saves (a save conflict prompts to keep your version or load the other one, instead of silently overwriting it), serialized writes for comments/script/project metadata, and a warning before switching the server's active project while someone else is still working in it.
- Desktop installer — package ComiKumi as a self-contained Windows/macOS/Linux desktop app (Electron embeds the same Express server, no separate Node/browser setup needed). A first-run setup screen chooses between running a local server (data directory and port) or connecting to a remote ComiKumi server already running elsewhere, revisitable anytime via Datei → Server wechseln….
User guide (task-oriented, "how do I…"): docs/User-Guide.md
(also available in German).
Full feature list: docs/FEATURES.md (also available
in German). Layout JSON schema:
docs/JSON-Format.md (also available
in German). Script-planning JSON schema:
docs/Script-JSON-Format.md (also available
in German).
Architecture
client/   React 19 + Konva 10 (react-konva) editor, Vite + Vitest
server/   Express 5 API — reads/writes project files, images, and layout JSON on disk
shared/   Zod schemas shared by both (layout, project, presets, characters, …)
docs/     Feature docs, JSON format reference, brand assets
No database — a project is a single projekt.json file (name, languages, characters,
glossary, presets, settings) plus your existing folder of scanned pages. The server keeps
its own state in server/data/ (or the app-data directory you chose for a desktop
install) — most of it (fonts/images/SVG library, page thumbnails, a pointer to the
last-opened project) is a regenerable cache, but this directory also holds account
records and the server's own authentication/encryption secrets, so don't delete or
reset it as a cache-clearing step. Pointing the app at a different data directory (e.g.
via the desktop setup screen) does not migrate anything from the old one — it starts a
fresh, empty set of accounts, exactly as if the old directory had never existed.
Getting started
Most users don't need Node.js, a terminal, or a build step at all — just a desktop download and an installer/AppImage. Building from source (below) is only needed for development, or to run the server on a platform without a prebuilt desktop package.
1. Download
Preview builds for Windows, macOS (Apple Silicon), and Linux are attached to the ComiKumi 0.9.0 Preview release — scroll to Assets and download the file for your platform. GitHub's own "Source code (zip)"/"Source code (tar.gz)" links on that page are not installers — they're the raw repository source, only useful if you're building from source (below).
| Platform | Download |
|---|---|
| Windows | ComiKumi.Setup.0.9.0.exe |
| macOS (Apple Silicon only — no Intel build yet) | ComiKumi-0.9.0-arm64.dmg |
| Linux | ComiKumi-0.9.0.AppImage |
This is still a preview release — see the release page's own notes for known limitations before relying on it for real production work.
2. Install and launch
-
Windows: run
ComiKumi.Setup.0.9.0.exeand follow the installer. -
macOS: open the
.dmgand drag ComiKumi into Applications. -
Linux: make the AppImage executable, then run it:
chmod +x ComiKumi-0.9.0.AppImage
./ComiKumi-0.9.0.AppImage
3. Choose a local or remote server
On first launch, a setup screen offers a choice: run a local server (asks where to
store app data — not the comic projects themselves, which are configured per-project
via the in-app Project Wizard in step 5 — and which local port to use, defaulting to
the OS's per-user app-data directory and port 3001), or connect to a remote
ComiKumi server someone else is already running (just its URL — the desktop app then
starts nothing locally, it's a thin wrapper around that server's own web UI).
Revisitable anytime via Datei → Server wechseln…. See
electron/README.md for how packaging, setup, and dev mode work.
4. Create an administrator account (new local server only)
The very first time a local server starts with no accounts yet, it shows a one-time setup screen instead of a login — pick a username and password. This first account automatically becomes system administrator and can create further accounts later. Connecting to an existing remote server instead just shows that server's normal login.
5. Create your first project
Open the in-app Project Wizard and point it at a folder of scanned pages — see
docs/FEATURES.md for the expected folder
convention (a <book>_empty source-page folder per volume, <book>_<language> folders
for translated exports).
Running from source (developers)
Requires Node.js ^20.19.0 || >=22.12.0 (this only matters if you're running from
source or building your own desktop package — end users of the downloads above don't
need Node.js at all).
npm install
npm run dev
This installs both client/ and server/ (via postinstall) and starts them together
(server on :3001, client on :5173, proxied through Vite). Open the printed client
URL and continue from step 3 above.
To build your own desktop package instead of downloading one: npm run electron:build
(or the platform-specific electron:build:win/:mac/:linux variants) packages
ComiKumi as a self-contained desktop app (Electron embeds the same Express server and
serves the built client from one process) — release/<platform> gets the same
installer types listed in step 1.
Running client and server on separate hosts
By default the client talks to http://localhost:3001 when unconfigured (matching the
dev setup above), or same-origin ("", relative paths) in a production build. To point a
built client at a server hosted elsewhere — a different machine, network, or port — set
VITE_API_BASE_URL (a Vite build-time env var, e.g. in client/.env.local) to that
server's absolute origin, no trailing slash:
VITE_API_BASE_URL=https://comikumi.example.com
The server already accepts cross-origin requests from anywhere (cors() with no
origin restriction in server/src/app.ts) and every API route is
gated behind account login and per-project roles (viewer/translator/letterer/admin, plus
a server-wide system-admin bypass — see Konten, Rollen & Zugriffsschutz).
The server does all of its file I/O (scan folders, project files, assets, thumbnails) on
its own local disk, so the actual scanned pages must live on (or be reachable from) the
machine the server runs on, not the client's.
Self-hosting a persistent shared server (Docker)
The desktop app's "local server" mode (step 3 above) is meant to run in the foreground
on one person's machine — for a server that stays up unattended for a whole team, use
docker-compose.yml instead:
docker compose up -d
This builds the image from Dockerfile.selfhost (a plain,
non-demo build of the same server + client) and starts it as a persistent container,
restarting automatically on failure or host reboot. Two volumes matter:
comikumi-data(named volume, mounted at/data) — the server's own app data: accounts, its authentication/encryption secrets, the font/SVG/image library, and page thumbnails. Back this up — seeserver/data/further above for why this isn't just a disposable cache../projects:/projects(bind mount) — put your actual comic projects (scanned pages) here, or point it at wherever they already live; the in-app Project Wizard (step 5 above) can then browse to a folder under/projectson first run.
Open http://<host>:3001 and continue from step 4 above (create the administrator
account). For real team/internet use, put a reverse proxy (nginx, Caddy, Traefik, …) in
front for TLS — this container itself only serves plain HTTP.
To update, pull the new source and rebuild: docker compose up -d --build. The
comikumi-data volume is untouched by a rebuild, so accounts/settings survive.
Prefer to run it without Docker? Build once and start the compiled server directly — same Node.js requirement as running from source:
npm run build
PORT=3001 LETTERING_DATA_DIR=/path/to/data CLIENT_DIST_DIR=client/dist npm --prefix server run start
Keeping that running unattended (across reboots/crashes) is then up to your platform's own process supervisor (systemd, pm2, Windows Task Scheduler, …) — none is bundled here.
Scripts
| Command | Description |
|---|---|
npm run dev | Start server + client together (hot reload) |
npm run build | Type-check and build both packages for production |
npm run test | Run the full test suite (server + client) |
Each package also has its own scripts (npm --prefix client run <script>, same for
server) — see their respective package.json.
Tests
npm run test
Server tests include route-level integration tests (via supertest) that run against
temporary, isolated project/data directories — they never touch your real project data
or the repo's own server/data/. Client tests cover the pure geometry/typesetting/text
logic shared by the live canvas preview and the PNG export.
E2E tests
A small Playwright suite in e2e/ drives a real browser against real server + client
instances, covering the login screen, opening a project, editing a bubble (with a
reload to confirm it actually persisted), and exporting a page to PNG. One-time setup,
then run from the repo root:
npm --prefix e2e install
npx --prefix e2e playwright install chromium
npm run test:e2e
Every run spins up its own server (port 3101) and client (port 4173) against a
throwaway LETTERING_DATA_DIR/scan-root under e2e/tmp-run/ — separate ports and data
from npm run dev, so the suite can run alongside a real dev session without
interfering with it. Not part of npm run test (browser download + runtime are too
heavy for the default test loop).
Tech stack
React 19 · Konva 10 / react-konva · React Router 7 · Zustand · Zod 4 · Vite 8 · Vitest 4 — Express 5 · Sharp · Multer · Archiver · Nodemailer · Zod 4
License
Free for Open Source, Indies, and Hobbyists.
ComiKumi is licensed under the GNU Affero General Public License v3.0 (AGPL-3.0-or-later). You're free to use, study, modify, and share it — including running a modified version as a network service — as long as you make your source changes available under the same license to anyone who interacts with it.
Similar repos
Contributors
143 commits
Languages
TypeScript
97.8%
CSS
1.8%