
An UncannyEyes update that supports ESP32 and SSD1351/SSD1327 by WaveShare.
0
stars
85
commits
C
primary language
Sep 14, 2026
updated
README
Frankenstein Head with Animated Eyes
Twin animated eyes for Jose Aveleira's 3D-printed Frankenstein head with animated eyes, driven by an ESP32 and two 1.5" OLED panels.
The eyes wander, blink and dilate on their own, and keep doing it with nothing plugged in but power. Everything past that is optional.
What it does
- Twenty-five eye designs, chosen at build time — see them all
- Watches the room on its own: wandering gaze, autonomous blinking, pupils that dilate
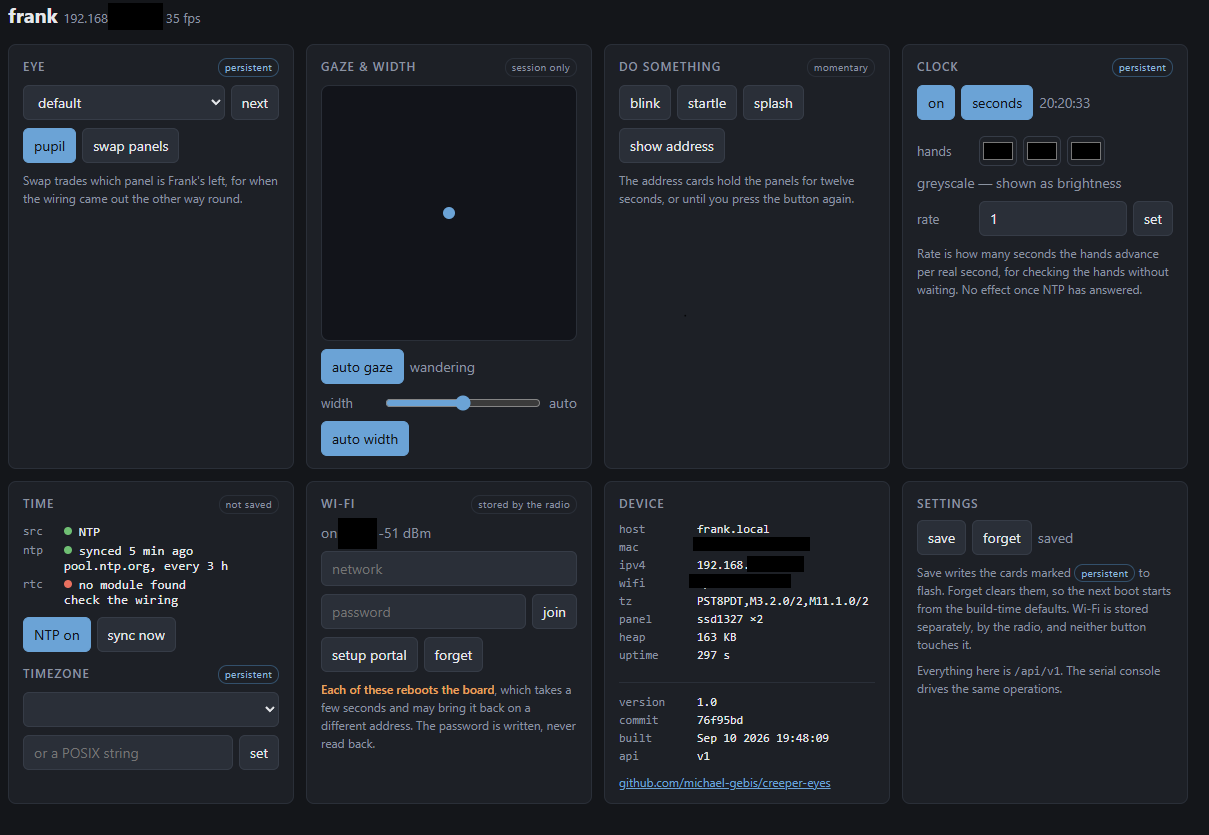
- Takes direction from a web page, a serial console or a REST API, so you can aim the gaze or fire a startle effect without opening the head
- Tells the time, with an analogue clock drawn in the iris
- Sleeps at night, so it is not staring at 3am
- Updates over WiFi, so a sealed head never needs opening again
- Runs on a generic ESP32 and either colour or greyscale panels
Two panels, one dev board, fourteen wires. If you would rather not have the wires, there is a circuit board for it.
What to buy
ESP32 board
Any classic ESP32 (ESP-WROOM-32 module, Xtensa dual core) with 4 MB flash.
Not an ESP32-S2, S3, C3 or C6. Those are different architectures and will not run this build. If your board shows up as USB vendor ID
303A, it is one of those. A classic ESP32 uses a separate USB-serial chip — CH340 (1A86) or CP210x (10C4).
Known good: the 30-pin DOIT ESP32 DevKit V1, sold under a dozen names with "NodeMCU", "ESP32S" and "Type-C" in the title. Roughly $5 each in three-packs. Either USB-serial chip is fine; CH340 may need a driver on Windows.
Displays — read this part carefully
Waveshare sells two different 1.5" 128×128 OLED modules with nearly identical names and identical 7-pin headers. You cannot tell them apart by wiring, and the wrong one shows white static.
| Product | Controller | Display | Build to use |
|---|---|---|---|
| 1.5inch RGB OLED Module | SSD1351 | 65K colour | esp32dev |
| 1.5inch OLED Module | SSD1327 | 16 greys | gray |
Buy two. Either works, and the grayscale panels run faster.
Which to get depends on the eyes you want. The artwork was drawn in colour, and some designs do not survive the conversion — anything carrying its detail in hue rather than in brightness comes out flat. The newt is the worst of them: its greens and golds land on much the same grey. Others lose nothing worth having; the default eye in particular looks every bit as good in sixteen greys as it does in colour.
docs/EYES.md renders all 25 designs both ways, side by side, which is the quickest way to decide.
Both are 3.3 V / 5 V tolerant and need no level shifting.
Everything else
- Breadboard and male-to-female jumper wires (14 connections)
- USB-C cable — this also carries the serial console
- The printed parts and hardware from the Printables model
A plain USB port powers everything comfortably. Two panels plus an idle ESP32 draw well under 200 mA.
Wiring
Six signals are shared by both panels; only chip select differs. Left and right below are Frank's own, so facing him, his right eye is the one on your left.
| Signal | DevKit pin | Frank's right (your left) | Frank's left (your right) |
|---|---|---|---|
| VCC | 3V3 | VCC | VCC |
| GND | GND | GND | GND |
| DIN | D18 | DIN | DIN |
| CLK | D5 | CLK | CLK |
| DC | D33 | DC | DC |
| RST | D27 | RST | RST |
| CS | D15 / D4 | CS ← D15 | CS ← D4 |
Use
3V3, neverVIN. ESP32 GPIOs are 3.3 V and not 5 V tolerant.
Module silkscreens vary between sellers — DIN may be labelled SDA, SI or
MOSI; CLK may be SCL, SCK or D0. Match by position, not by letters.
Full details, assembly order and troubleshooting: docs/WIRING.md.
Optional, and compiled out by default: a battery-backed clock, four more wires onto two otherwise idle pins — docs/WIRING_RTC.md.
Or a circuit board instead of the jumpers
The same fourteen wires exist as a carrier board in hardware/: the DevKit plugs into a socket, each eye gets its own header, and the SPI bus is copper rather than Dupont leads — which matters mostly because nothing can work loose inside a sealed head. About $10 for five boards.
It is untested. The design passes KiCad's electrical, netlist and design rule checks, and nothing more: no board has been made and no eye has blinked on one. The breadboard is the wiring that is known to work.
Build and flash
This is a PlatformIO project. No Arduino IDE needed.
pipx install platformio # or: pip install --user platformio
Everything else — the Xtensa toolchain, the ESP32 Arduino core, the Adafruit libraries — downloads automatically on the first build.
Environments
| Environment | Builds | Use for |
|---|---|---|
esp32dev | Eyes, SSD1351 colour | Default. Waveshare 1.5inch RGB OLED |
gray | Eyes, SSD1327 grayscale | Waveshare 1.5inch OLED |
displaytest | Solid-colour fills, SSD1351 | Bring-up and fault isolation |
probe1327 | Raw SSD1327 init, no library | Identifying an unknown panel |
esp32dev_rtc / gray_rtc_open | Eyes plus a battery-backed clock | With a DS3231 fitted |
gray_rtc | The same, with authentication on | A head left on a network. Needs credentials in secrets.h |
esp32dev_local / gray_local | Eyes only, no networking | A head with no WiFi — 679 KB smaller |
gray_rtc_ota / esp32dev_rtc_ota | The RTC builds, flashed over WiFi | Use these to update an RTC or authenticated head |
esp32dev_ota / gray_ota | The plain builds, flashed over WiFi | Updating a sealed head. Using one on an RTC board flashes the RTC and auth away |
rtc_probe | Raw I²C scan and DS3231 read | Bringing up an RTC module |
gray_rtc is the only environment that requires anything of you before it
will build: AUTH_USER, AUTH_PASS and AUTH_TOKEN_VALUE in
include/secrets.h. It stops with an error naming them rather than producing
an open device. Use gray_rtc_open to skip that.
Commands
pio run                              # build the default (colour) environment
pio run -e gray -t upload            # build and flash the grayscale build
pio run -e gray -t upload -t monitor # ...and open the console
pio device monitor                   # console only
pio device list                      # find the serial port
If the port is picked wrongly, pin it in platformio.ini with
upload_port = COM5 (or /dev/ttyUSB0).
Where to go next
This page gets you a working head. Everything else has a page of its own.
| Wiring | Every wire, in order, with what goes wrong |
| The eyes | The gallery, choosing designs, the pupil, the startup cards |
| Driving it | Web page, serial console, REST API |
| Networking | Joining WiFi, changing it later, updating over the air |
| Keeping time | Time servers, the clock face, running without a network |
| Sleep mode | Dark panels overnight |
| Configuring | Every build option, and what gets saved |
| Locking it down | Passwords, and why there is no HTTPS |
| A circuit board | The wiring as a PCB — untested so far |
| Testing | The test suite, the soak harness, the tools |
And two pages that are neither instructions nor reference, but a record of being wrong in public: why a 35-byte request took 50 ms and the battery-backed clock.
Troubleshooting
| Symptom | Cause |
|---|---|
| Both panels show white static | Wrong controller. You have SSD1327 panels and built esp32dev, or vice versa. Confirm with pio run -e probe1327 -t upload -t monitor — if the panels respond to that, they are SSD1327; build gray. |
| Both panels dark | Power, or D27 (RST) not connected. Check 3V3 and GND at the module pins. |
| One panel dark | That panel's CS wire. Everything else is shared, so a shared fault would take out both. |
| Flicker or speckle | Bus integrity. Shorten the CLK and DIN jumpers, or lower SSD1327_SPI_HZ. |
| Garbled serial output | DEBUG_BAUD and monitor_speed disagree, or a CH340 clone struggling above 115200. |
| Board resets when a panel is connected | Brownout. Use a powered hub or feed 5 V to VIN. |
| Board will not boot | Something on D12. Held high at reset it stops the ESP32 starting. No eye signal uses it. |
| The web page lags, or an update fails | Almost certainly the radio. Check the signal on the Wi-Fi card — the page says what the number means. Every delay and every failed update measured on this project traced back to packet loss, not to the firmware. python tools/test_api.py --host frank.local --decompose 200 takes the guesswork out of it. |
Frame rate is not a useful signal for whether panels are connected — the SPI writes happen either way, so the rate is the same with nothing attached.
For bring-up, displaytest drives each panel alone with solid fills at a
deliberately slow 2 MHz, which separates wiring faults from rendering faults.
Credits
The head itself is Jose Aveleira's — Frankenstein head with animated eyes on Printables. None of this has anywhere to live without it.
Firmware lineage, oldest first:
- Adafruit Uncanny Eyes — Phil Burgess / Paint Your Dragon, for Adafruit Industries. The rendering engine and the eye artwork. SPI FIFO insight from Paul Stoffregen's
ILI9341_t3; concept inspired by David Boccabella (Marcwolf). - Laurent Moll, 2018 — Uncanny Eyes costume, dual-display ESP32 work.
- bitcldr/creeper-eyes — the PlatformIO project this forks from.
- TeensyEyes — Chris Miller. MIT. 23 of the 25 eye designs are converted from its artwork by
tools/gen_eyes.py. - This fork — generic ESP32 support, grayscale panels, console, splash, diagnostics.
Three bugs fixed here also affect the upstream colour build: an out-of-range eyelid index that put a teardrop artifact at one eye's edge, a shared reset line that wiped the first panel's initialisation while the second started, and a chip-select constant that selected the wrong panel during init.
MIT licensed — see LICENSE.
Contributors


See what people are saying
Similar repos


Languages
C
97.6%
C++
1.2%
An UncannyEyes update that supports ESP32 and SSD1351/SSD1327 by WaveShare.
0
stars
85
commits
C
primary language
Sep 14, 2026
updated
README
Frankenstein Head with Animated Eyes
Twin animated eyes for Jose Aveleira's 3D-printed Frankenstein head with animated eyes, driven by an ESP32 and two 1.5" OLED panels.
The eyes wander, blink and dilate on their own, and keep doing it with nothing plugged in but power. Everything past that is optional.
What it does
- Twenty-five eye designs, chosen at build time — see them all
- Watches the room on its own: wandering gaze, autonomous blinking, pupils that dilate
- Takes direction from a web page, a serial console or a REST API, so you can aim the gaze or fire a startle effect without opening the head
- Tells the time, with an analogue clock drawn in the iris
- Sleeps at night, so it is not staring at 3am
- Updates over WiFi, so a sealed head never needs opening again
- Runs on a generic ESP32 and either colour or greyscale panels
Two panels, one dev board, fourteen wires. If you would rather not have the wires, there is a circuit board for it.
What to buy
ESP32 board
Any classic ESP32 (ESP-WROOM-32 module, Xtensa dual core) with 4 MB flash.
Not an ESP32-S2, S3, C3 or C6. Those are different architectures and will not run this build. If your board shows up as USB vendor ID
303A, it is one of those. A classic ESP32 uses a separate USB-serial chip — CH340 (1A86) or CP210x (10C4).
Known good: the 30-pin DOIT ESP32 DevKit V1, sold under a dozen names with "NodeMCU", "ESP32S" and "Type-C" in the title. Roughly $5 each in three-packs. Either USB-serial chip is fine; CH340 may need a driver on Windows.
Displays — read this part carefully
Waveshare sells two different 1.5" 128×128 OLED modules with nearly identical names and identical 7-pin headers. You cannot tell them apart by wiring, and the wrong one shows white static.
| Product | Controller | Display | Build to use |
|---|---|---|---|
| 1.5inch RGB OLED Module | SSD1351 | 65K colour | esp32dev |
| 1.5inch OLED Module | SSD1327 | 16 greys | gray |
Buy two. Either works, and the grayscale panels run faster.
Which to get depends on the eyes you want. The artwork was drawn in colour, and some designs do not survive the conversion — anything carrying its detail in hue rather than in brightness comes out flat. The newt is the worst of them: its greens and golds land on much the same grey. Others lose nothing worth having; the default eye in particular looks every bit as good in sixteen greys as it does in colour.
docs/EYES.md renders all 25 designs both ways, side by side, which is the quickest way to decide.
Both are 3.3 V / 5 V tolerant and need no level shifting.
Everything else
- Breadboard and male-to-female jumper wires (14 connections)
- USB-C cable — this also carries the serial console
- The printed parts and hardware from the Printables model
A plain USB port powers everything comfortably. Two panels plus an idle ESP32 draw well under 200 mA.
Wiring
Six signals are shared by both panels; only chip select differs. Left and right below are Frank's own, so facing him, his right eye is the one on your left.
| Signal | DevKit pin | Frank's right (your left) | Frank's left (your right) |
|---|---|---|---|
| VCC | 3V3 | VCC | VCC |
| GND | GND | GND | GND |
| DIN | D18 | DIN | DIN |
| CLK | D5 | CLK | CLK |
| DC | D33 | DC | DC |
| RST | D27 | RST | RST |
| CS | D15 / D4 | CS ← D15 | CS ← D4 |
Use
3V3, neverVIN. ESP32 GPIOs are 3.3 V and not 5 V tolerant.
Module silkscreens vary between sellers — DIN may be labelled SDA, SI or
MOSI; CLK may be SCL, SCK or D0. Match by position, not by letters.
Full details, assembly order and troubleshooting: docs/WIRING.md.
Optional, and compiled out by default: a battery-backed clock, four more wires onto two otherwise idle pins — docs/WIRING_RTC.md.
Or a circuit board instead of the jumpers
The same fourteen wires exist as a carrier board in hardware/: the DevKit plugs into a socket, each eye gets its own header, and the SPI bus is copper rather than Dupont leads — which matters mostly because nothing can work loose inside a sealed head. About $10 for five boards.
It is untested. The design passes KiCad's electrical, netlist and design rule checks, and nothing more: no board has been made and no eye has blinked on one. The breadboard is the wiring that is known to work.
Build and flash
This is a PlatformIO project. No Arduino IDE needed.
pipx install platformio # or: pip install --user platformio
Everything else — the Xtensa toolchain, the ESP32 Arduino core, the Adafruit libraries — downloads automatically on the first build.
Environments
| Environment | Builds | Use for |
|---|---|---|
esp32dev | Eyes, SSD1351 colour | Default. Waveshare 1.5inch RGB OLED |
gray | Eyes, SSD1327 grayscale | Waveshare 1.5inch OLED |
displaytest | Solid-colour fills, SSD1351 | Bring-up and fault isolation |
probe1327 | Raw SSD1327 init, no library | Identifying an unknown panel |
esp32dev_rtc / gray_rtc_open | Eyes plus a battery-backed clock | With a DS3231 fitted |
gray_rtc | The same, with authentication on | A head left on a network. Needs credentials in secrets.h |
esp32dev_local / gray_local | Eyes only, no networking | A head with no WiFi — 679 KB smaller |
gray_rtc_ota / esp32dev_rtc_ota | The RTC builds, flashed over WiFi | Use these to update an RTC or authenticated head |
esp32dev_ota / gray_ota | The plain builds, flashed over WiFi | Updating a sealed head. Using one on an RTC board flashes the RTC and auth away |
rtc_probe | Raw I²C scan and DS3231 read | Bringing up an RTC module |
gray_rtc is the only environment that requires anything of you before it
will build: AUTH_USER, AUTH_PASS and AUTH_TOKEN_VALUE in
include/secrets.h. It stops with an error naming them rather than producing
an open device. Use gray_rtc_open to skip that.
Commands
pio run                              # build the default (colour) environment
pio run -e gray -t upload            # build and flash the grayscale build
pio run -e gray -t upload -t monitor # ...and open the console
pio device monitor                   # console only
pio device list                      # find the serial port
If the port is picked wrongly, pin it in platformio.ini with
upload_port = COM5 (or /dev/ttyUSB0).
Where to go next
This page gets you a working head. Everything else has a page of its own.
| Wiring | Every wire, in order, with what goes wrong |
| The eyes | The gallery, choosing designs, the pupil, the startup cards |
| Driving it | Web page, serial console, REST API |
| Networking | Joining WiFi, changing it later, updating over the air |
| Keeping time | Time servers, the clock face, running without a network |
| Sleep mode | Dark panels overnight |
| Configuring | Every build option, and what gets saved |
| Locking it down | Passwords, and why there is no HTTPS |
| A circuit board | The wiring as a PCB — untested so far |
| Testing | The test suite, the soak harness, the tools |
And two pages that are neither instructions nor reference, but a record of being wrong in public: why a 35-byte request took 50 ms and the battery-backed clock.
Troubleshooting
| Symptom | Cause |
|---|---|
| Both panels show white static | Wrong controller. You have SSD1327 panels and built esp32dev, or vice versa. Confirm with pio run -e probe1327 -t upload -t monitor — if the panels respond to that, they are SSD1327; build gray. |
| Both panels dark | Power, or D27 (RST) not connected. Check 3V3 and GND at the module pins. |
| One panel dark | That panel's CS wire. Everything else is shared, so a shared fault would take out both. |
| Flicker or speckle | Bus integrity. Shorten the CLK and DIN jumpers, or lower SSD1327_SPI_HZ. |
| Garbled serial output | DEBUG_BAUD and monitor_speed disagree, or a CH340 clone struggling above 115200. |
| Board resets when a panel is connected | Brownout. Use a powered hub or feed 5 V to VIN. |
| Board will not boot | Something on D12. Held high at reset it stops the ESP32 starting. No eye signal uses it. |
| The web page lags, or an update fails | Almost certainly the radio. Check the signal on the Wi-Fi card — the page says what the number means. Every delay and every failed update measured on this project traced back to packet loss, not to the firmware. python tools/test_api.py --host frank.local --decompose 200 takes the guesswork out of it. |
Frame rate is not a useful signal for whether panels are connected — the SPI writes happen either way, so the rate is the same with nothing attached.
For bring-up, displaytest drives each panel alone with solid fills at a
deliberately slow 2 MHz, which separates wiring faults from rendering faults.
Credits
The head itself is Jose Aveleira's — Frankenstein head with animated eyes on Printables. None of this has anywhere to live without it.
Firmware lineage, oldest first:
- Adafruit Uncanny Eyes — Phil Burgess / Paint Your Dragon, for Adafruit Industries. The rendering engine and the eye artwork. SPI FIFO insight from Paul Stoffregen's
ILI9341_t3; concept inspired by David Boccabella (Marcwolf). - Laurent Moll, 2018 — Uncanny Eyes costume, dual-display ESP32 work.
- bitcldr/creeper-eyes — the PlatformIO project this forks from.
- TeensyEyes — Chris Miller. MIT. 23 of the 25 eye designs are converted from its artwork by
tools/gen_eyes.py. - This fork — generic ESP32 support, grayscale panels, console, splash, diagnostics.
Three bugs fixed here also affect the upstream colour build: an out-of-range eyelid index that put a teardrop artifact at one eye's edge, a shared reset line that wiped the first panel's initialisation while the second started, and a chip-select constant that selected the wrong panel during init.
MIT licensed — see LICENSE.
See what people are saying
Similar repos
Contributors
Languages
C
97.6%
C++
1.2%