
pySLAM is a hybrid Python/C++ Visual SLAM pipeline supporting monocular, stereo, and RGB-D cameras. It provides a broad set of modern local and global feature extractors, multiple loop-closure strategies, a volumetric reconstruction module, integrated depth-prediction models, and semantic segmentation capabilities for enhanced scene understanding.
Python
3,420
484 commits
updated Aug 23, 2026
README
pySLAM v2.10.7
Author: Luigi Freda
pySLAM is a hybrid python/C++ implementation of a Visual SLAM pipeline (Simultaneous Localization And Mapping) that supports monocular, stereo and RGBD cameras. It provides the following features in a single python environment:
- A wide range of classical and modern local features with a convenient interface for their integration.
- Multiple loop closing methods, including descriptor aggregators such as visual Bag of Words (BoW, iBow), Vector of Locally Aggregated Descriptors (VLAD) and modern global descriptors (image-wise descriptors such as SAD, NetVLAD, HDC-Delf, CosPlace, EigenPlaces, Megaloc).
- A volumetric reconstruction pipeline that processes depth and color images using volumetric integration to produce dense reconstructions. It supports different voxel grid models (with semantic support) and TSDF with voxel hashing, and incremental Gaussian Splatting.
- Integration of depth prediction models within the SLAM pipeline. These include DepthPro, DepthAnythingV2, DepthAnythingV3, RAFT-Stereo, CREStereo, etc.
- A suite of segmentation models for semantic understanding of the scene, such as DeepLabv3, Segformer, CLIP, DETIC, EOV-SEG, ODISE, RFDETR, YOLO, etc.
- Additional tools for VO (Visual Odometry) and SLAM, with built-in support for both g2o and GTSAM, along with custom Python bindings for features not available in the original libraries.
- A modular sparse-SLAM core, implemented in both Python and C++ (with custom pybind11 bindings), allowing users to switch between high-performance/speed and high-flexibility modes. The Python and C++ implementations are interoperable: maps saved by one can be loaded by the other. Further details here.
- A modular pipeline for feed-forward inference of 3D scenes from multiple images. Supports models like DUSt3R, Mast3r, MV-DUSt3R, VGGT, Robust VGGT, DepthFromAnythingV3, and Fast3R. Further details here.
- Built-in support for over 10 dataset types.
pySLAM serves as a flexible baseline framework to experiment with VO/SLAM techniques, local features, descriptor aggregators, global descriptors, volumetric integration, depth prediction and semantic mapping. It allows to explore, prototype and develop VO/SLAM pipelines both in Python and C++. pySLAM is a research framework and a work in progress.
Enjoy it!

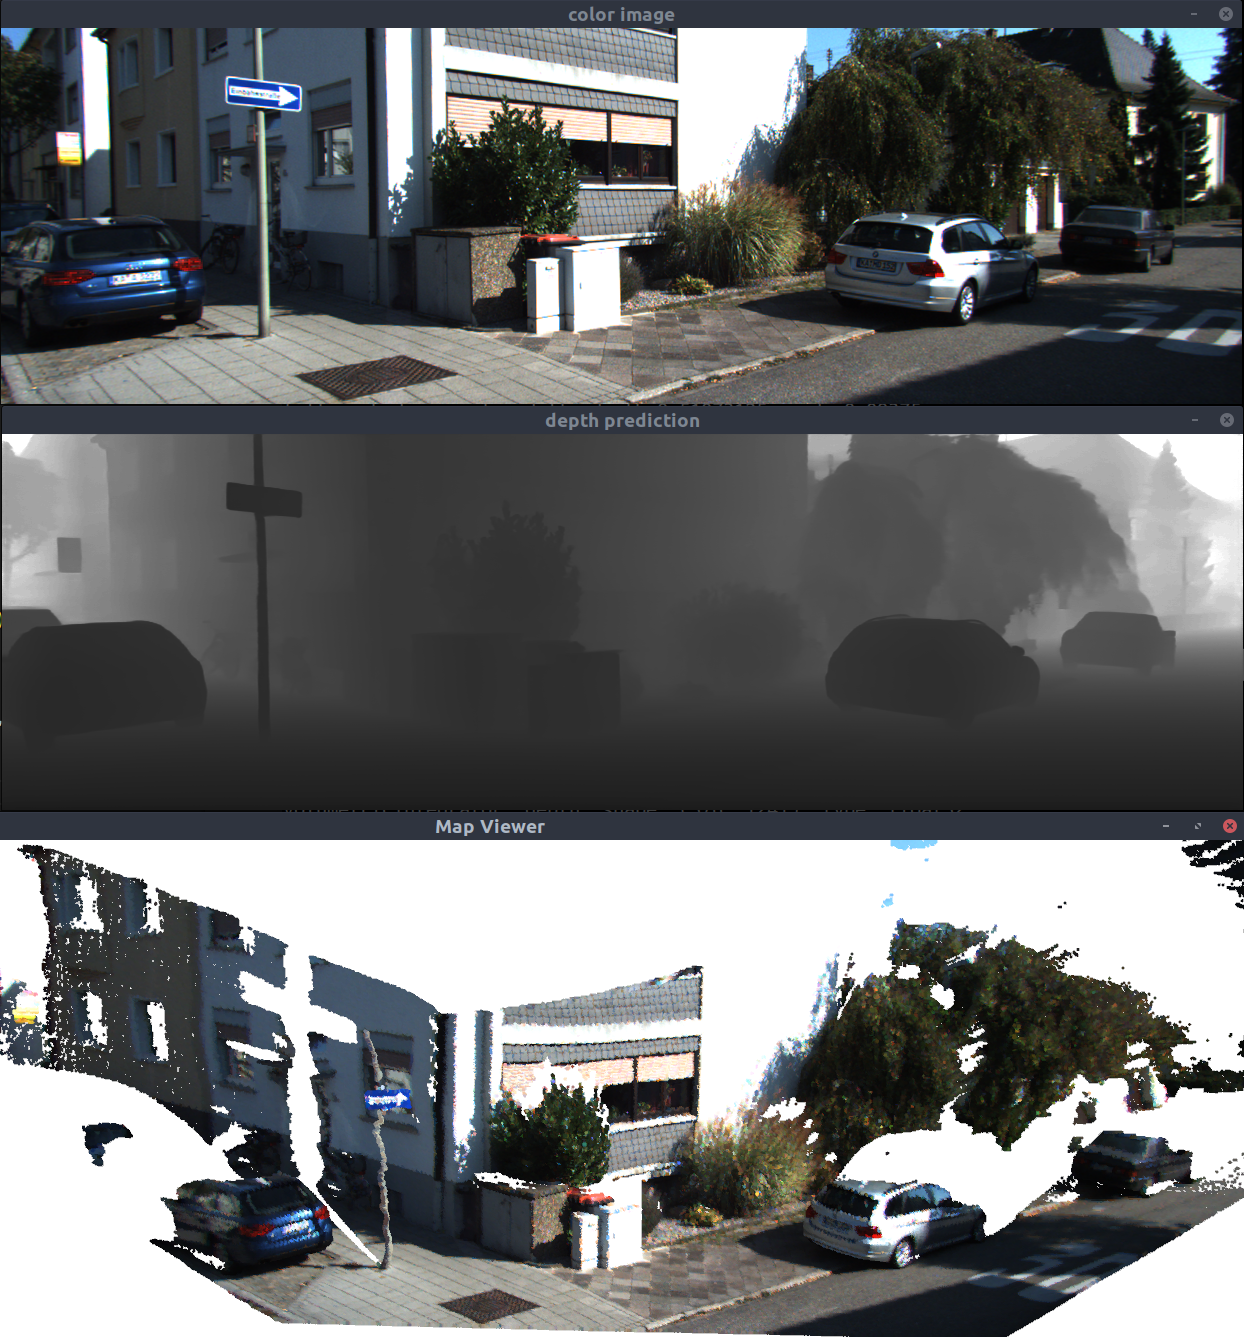
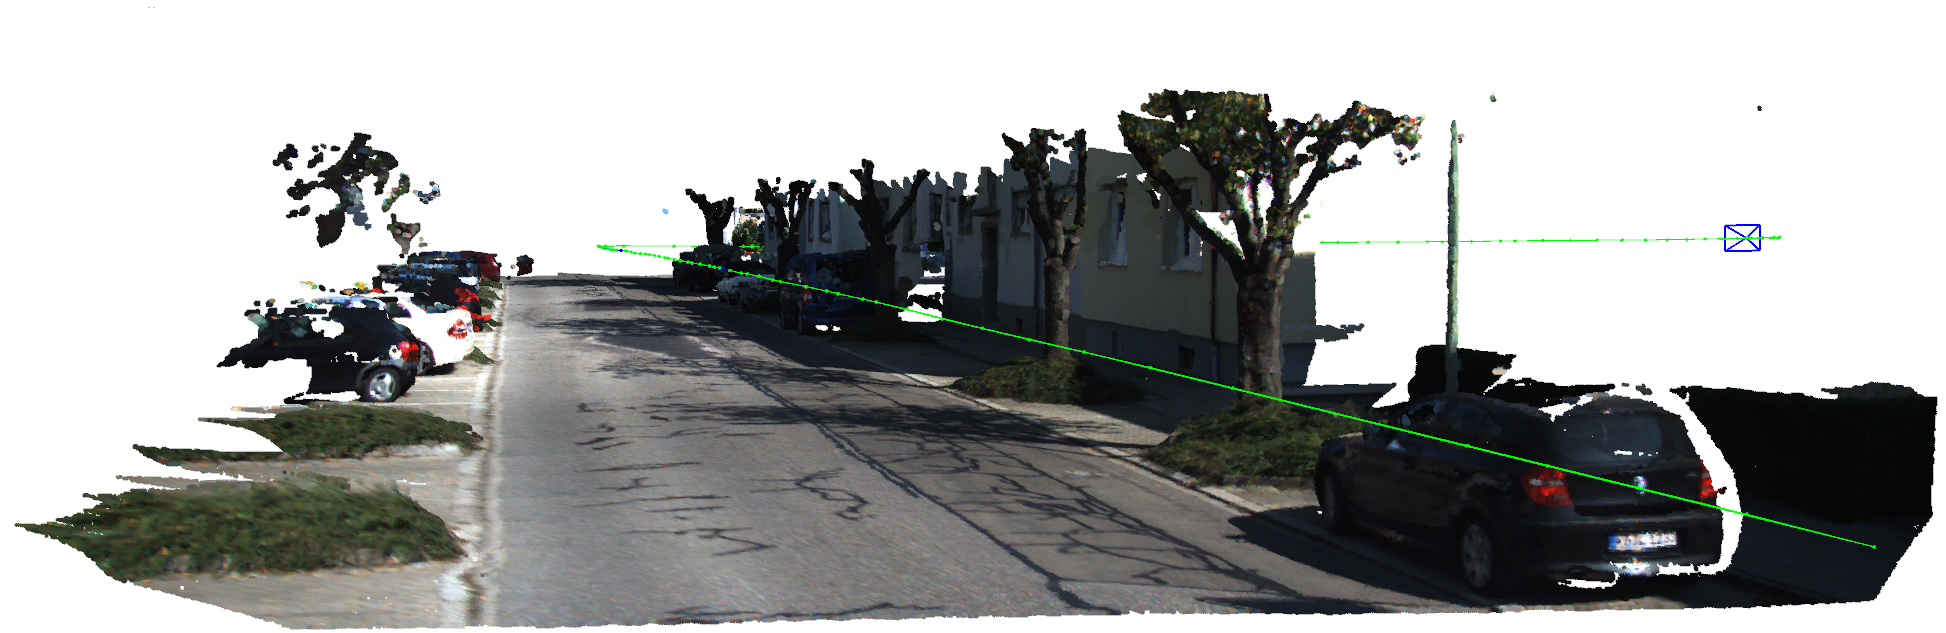
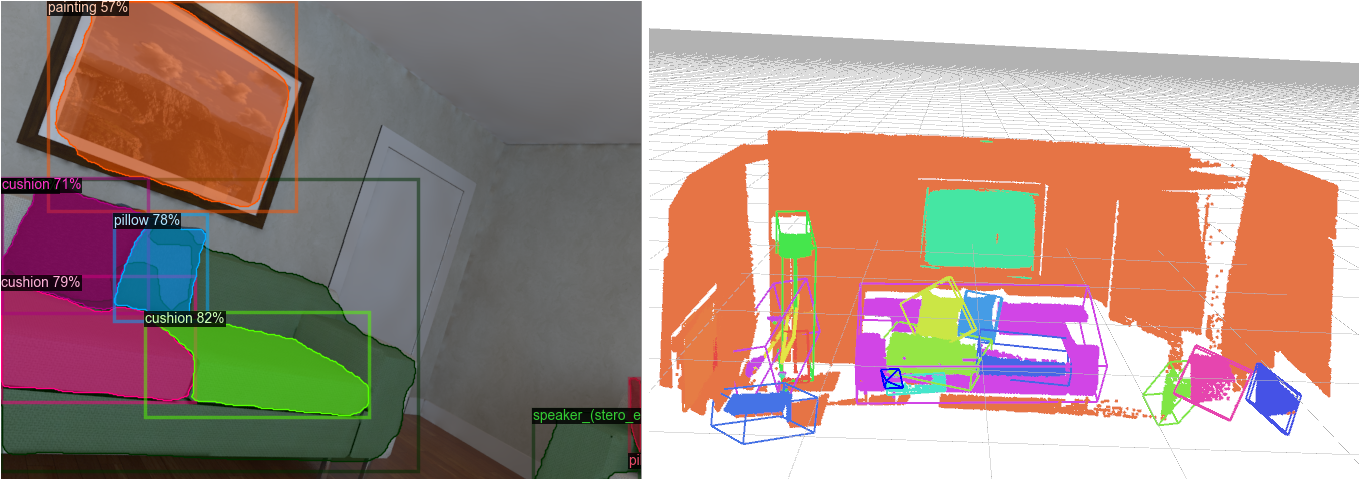

See the demo video for release v2.10.0
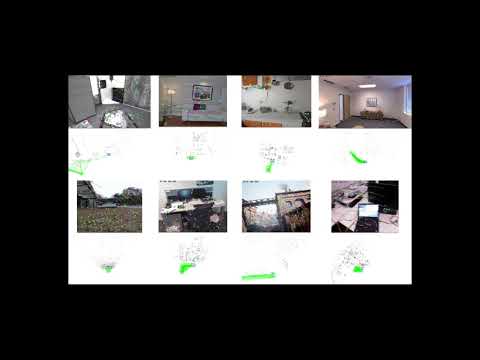
Table of contents
- pySLAM v2.10.7
- Table of contents
- Overview
- Install
- Usage
- Visual odometry
- Full SLAM
- Selecting a dataset and different configuration parameters
- Feature extraction and matching
- Loop closing and relocalization
- Volumetric reconstruction
- Depth prediction
- Semantic mapping and Image Segmentation
- C++ Core Module
- Saving and reloading
- Graph optimization engines
- SLAM GUI
- Unified log monitoring (tracking, mapping, loop closing, volumetric)
- Evaluating SLAM
- Feed-forward inference of 3D scenes from multiple image views
- Supported components and models
- Supported local features
- Supported matchers
- Supported global descriptors and local descriptor aggregation methods
- Supported depth prediction models
- Supported volumetric mapping methods
- Supported semantic segmentation methods
- Supported models for feed-forward inference of 3D scenes from multiple images
- Configuration
- References
- Credits
- License
- Contributing to pySLAM
- Roadmap
Overview
├── cpp         # Pybind11 C++ bindings to slam utilities
│   ├── hamming     # SIMD-optimized Hamming distance calculator for uint8 binary descriptors with zero-copy Python bindings.
│   ├── glutils     # OpenGL utilities for drawing points, cameras, etc.
│   ├── solvers     # PnP and Sim3 solvers for camera pose estimation
│   ├── volumetric  # Volumetric mapping with parallel block-based voxel hashing, templates, carving, and semantics support.
│   ├── trajectory  # Trajectory alignment helpers
├── data       # Sample input/output data
├── docs       # Documentation files
├── pyslam     # Core Python package
│   ├── dense
│   ├── depth_estimation
│   ├── evaluation
│   ├── io
│   ├── local_features
│   ├── loop_closing
│   ├── scene_from_views # Unified 3D scene reconstruction from multiple views
│   ├── semantics
│       ├── cpp  # C++ core for semantics
│   ├── slam
│       ├── cpp  # C++ core for sparse slam
│   ├── utilities
│   ├── viz
├── scripts     # Shell utility scripts
├── settings    # Dataset/configuration files
├── test        # Tests and usage examples
├── thirdparty  # External dependencies
Main Scripts
-
main_vo.pycombines the simplest VO ingredients without performing any image point triangulation or windowed bundle adjustment. At each step $k$,main_vo.pyestimates the current camera pose $C_k$ relative to the previous one $C_{k-1}$. The inter-frame pose estimation returns $[R_{k-1,k},t_{k-1,k}]$ with $\Vert t_{k-1,k} \Vert=1$. With this basic, "educational" approach, you need to use a ground truth in order to recover a correct inter-frame scale $s$ and estimate a valid trajectory by composing $C_k = C_{k-1} [R_{k-1,k}, s t_{k-1,k}]$. This script is a first start to understand the basics of inter-frame feature tracking and camera pose estimation. -
main_slam.pyadds feature tracking along multiple frames, point triangulation, keyframe management, bundle adjustment, loop closing, dense mapping and depth inference in order to estimate the camera trajectory and build both a sparse and dense map. It's a full SLAM pipeline and includes all the basic and advanced blocks which are necessary to develop a real visual SLAM pipeline. -
main_feature_matching.pyshows how to use the basic feature tracker capabilities (feature detector + feature descriptor + feature matcher) and allows to test the different available local features. -
main_depth_prediction.pyshows how to use the available depth inference models to get depth estimations from input color images. -
main_map_viewer.pyreloads a saved map and visualizes it. Further details on how to save a map here. -
main_map_dense_reconstruction.pyreloads a saved map and uses a configured volumetric integrator to obtain a dense reconstruction (see here). -
main_slam_evaluation.pyenables automated SLAM evaluation by executingmain_slam.pyacross a collection of datasets and configuration presets (see here). -
main_semantic_image_segmentation.pyinfers and visualize extracted semantic information on each frame of the selected dataset. -
main_scene_from_views.pyinfers 3D scenes from multiple images using models like DUSt3R, Mast3r, MV-DUSt3R, VGGT, Robust VGGT, DepthFromAnythingV3, and Fast3R (see here).
Other test/example scripts are provided in the test folder.
System overview
This page provides a high-level system overview, including diagrams that illustrate the main workflow, key components, and class relationships and dependencies.
paper: "pySLAM: An Open-Source, Modular, and Extensible Framework for SLAM", Luigi Freda
You may find an updated version of the paper here.
presentation: "pySLAM and slamplay: Modular, Extensible SLAM Tools for Rapid Prototyping and Integration", Luigi Freda
RSS 2025 Workshop: Unifying Visual SLAM. The recorded talk is available here.
Install
First, clone this repo and its submodules by running
git clone --recursive https://github.com/luigifreda/pyslam.git
cd pyslam
Then, from the repo root, under Ubuntu and macOS you can simply run:
# pixi shell      # If you want to use pixi (experimental), run this commented command as a first step to prepare the installation.
./install_all.sh   # Unified install procedure
Grab a coffee. It will take a while.
The install scripts create a single Python environment pyslam that hosts all the supported components and models. If conda is available, it automatically uses it; otherwise, it installs and uses venv. An internet connection is required.
Refer to these links for further details about the specific install procedures that are supported.
Once you completed the install procedure you can jump the usage section.
Main requirements
- Python 3.11.9
- OpenCV >=4.10 (see below)
- PyTorch >=2.3.1
- Tensorflow >=2.13.1
- Kornia >=0.7.3
- Rerun
- You need CUDA in order to run Gaussian splatting and dust3r-based methods. Check you have installed a suitable version of CUDA toolkit by running
./cuda_config.sh
The internal pySLAM libraries are imported by using a Config instance (from pyslam/config.py) in the main or test scripts. If you encounter any issues or performance problems, please refer to the TROUBLESHOOTING file for assistance.
Ubuntu
The install procedure was tested under Ubuntu 20.04, 22.04 and 24.04.
- With venv (recommended): Follow the instructions reported here.
- With conda: Run the procedure described in this other file.
- With pixi: Run
pixi shellin the root folder of the repo before launching./install_all.sh(see this file for further details). Currently, pixi support is experimental and may encounter issues with building and linking.
The install process creates a new Python virtual environment pyslam.
macOS
Follow the instructions in this file. The reported procedure was tested under Sequoia 15.1.1 and Xcode 16.1.
Docker
If you prefer docker or you have an OS that is not supported yet, you can use rosdocker:
- With its custom
pyslam/pyslam_cudadocker files (follow the instructions here). - With one of the suggested docker images (ubuntu*_cuda or ubuntu*), where you can clone, build and run pyslam.
How to install non-free OpenCV modules
The provided install scripts take care of installing a recent opencv version (>=4.10) with non-free modules enabled (see scripts/install_opencv_python.sh). To quickly verify your installed opencv version run:
#pixi shell           # If you use pixi, this activates the pyslam environment.
. pyenv-activate.sh   # Activate `pyslam` python environment. Only needed once in a new terminal. Not needed with pixi.
./scripts/opencv_check.py
Troubleshooting and performance issues
If you run into issues or errors during the installation process or at run-time, please, check the docs/TROUBLESHOOTING.md file. Before submitting a new git issue please read here.
Usage
Open a new terminal and start experimenting with the scripts. In each new terminal, you are supposed to start with this command:
#pixi shell           # If you use pixi, this activates the pyslam environment.
. pyenv-activate.sh   # Activate `pyslam` python environment. Only needed once in a new terminal. Not needed with pixi.
If you are using pixi then just run pixi shell to activate the pyslam environment.
The file config.yaml serves as a single entry point to configure the system and its global configuration parameters contained in pyslam/config_parameters.py.
- To enable the C++ sparse-SLAM core, set
USE_CPP_CORE = Truein the fileconfig_parameters.py. - Further information on how to configure pySLAM are provided here.
Visual odometry
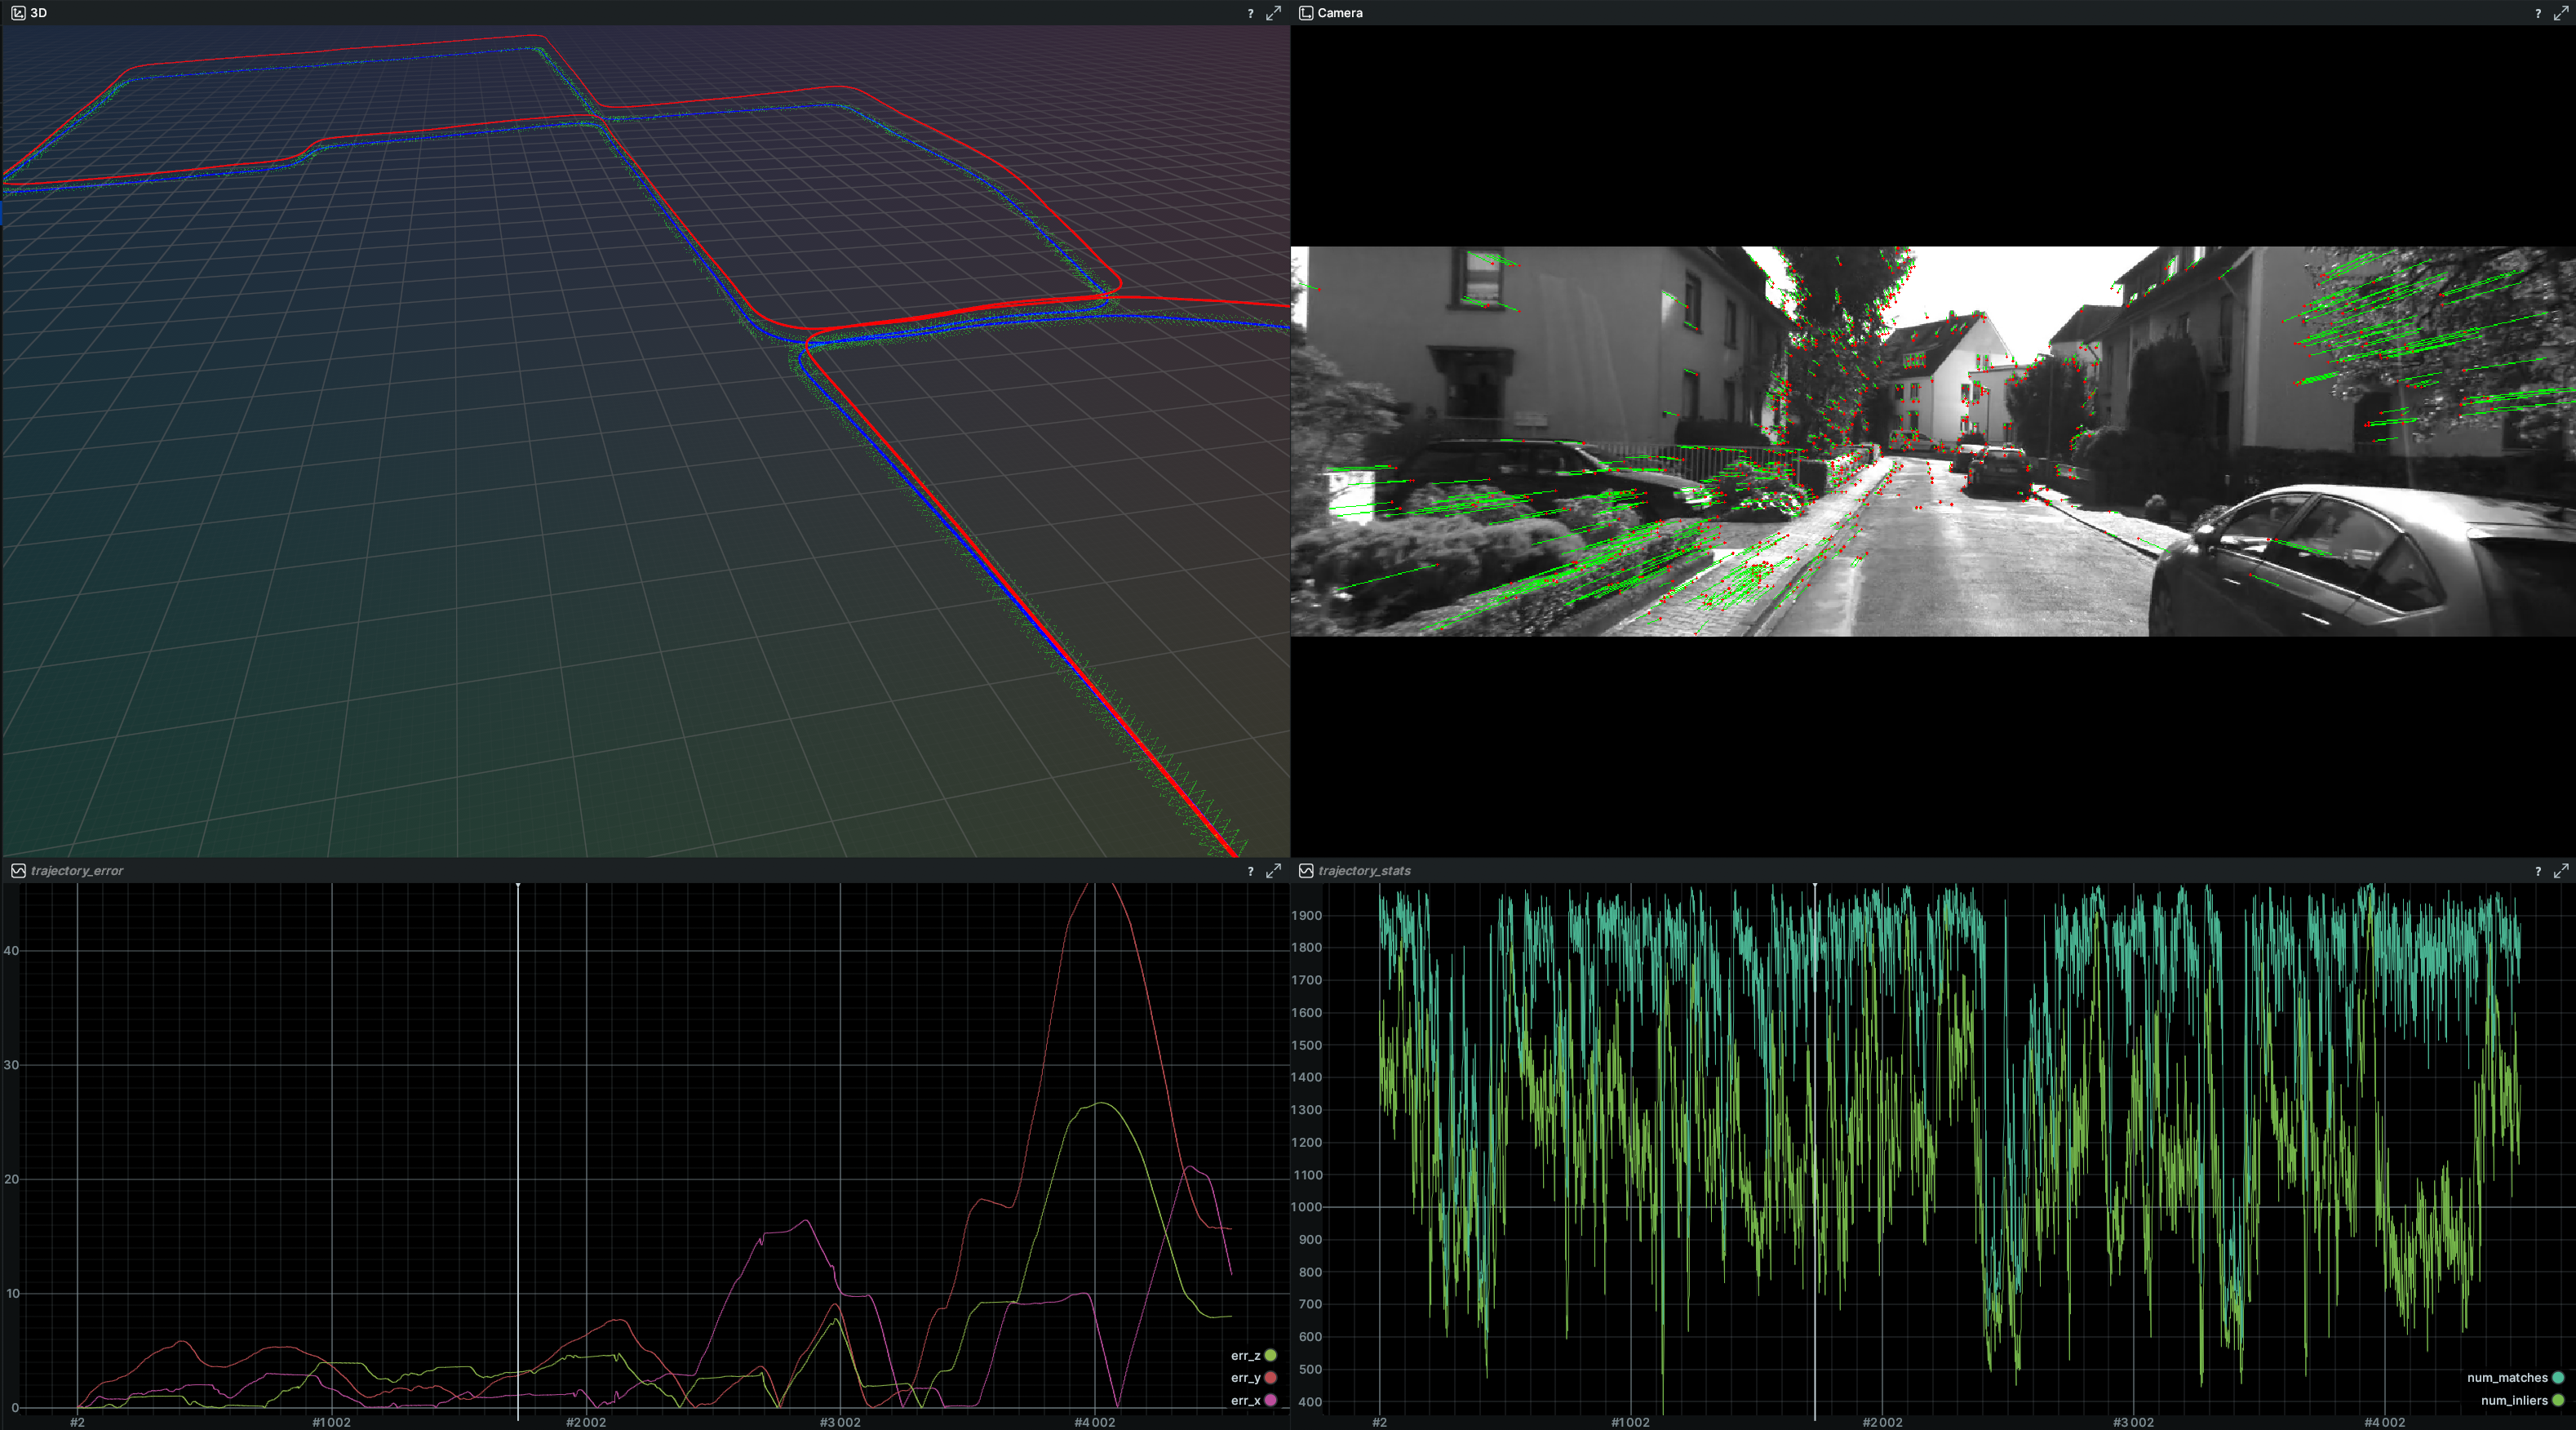
The basic Visual Odometry (VO) can be run with the following commands:
#pixi shell           # If you use pixi, this activates the pyslam environment.
. pyenv-activate.sh   # Activate `pyslam` python environment. Only needed once in a new terminal. Not needed with pixi.
./main_vo.py
By default, the script processes a KITTI video (available in the folder data/videos) by using its corresponding camera calibration file (available in the folder settings), and its groundtruth (available in the same data/videos folder). If matplotlib windows are used, you can stop main_vo.py by clicking on one of them and pressing the key 'Q'. As explained above, this very basic script main_vo.py strictly requires a ground truth.
With RGBD datasets, you can also test the RGBD odometry with the classes VisualOdometryRgbd or VisualOdometryRgbdTensor (ground truth is not required here).
Important: Refer to the related notes on the limitations of the basic monocular visual odometry approach implemented in main_vo.py.
Full SLAM
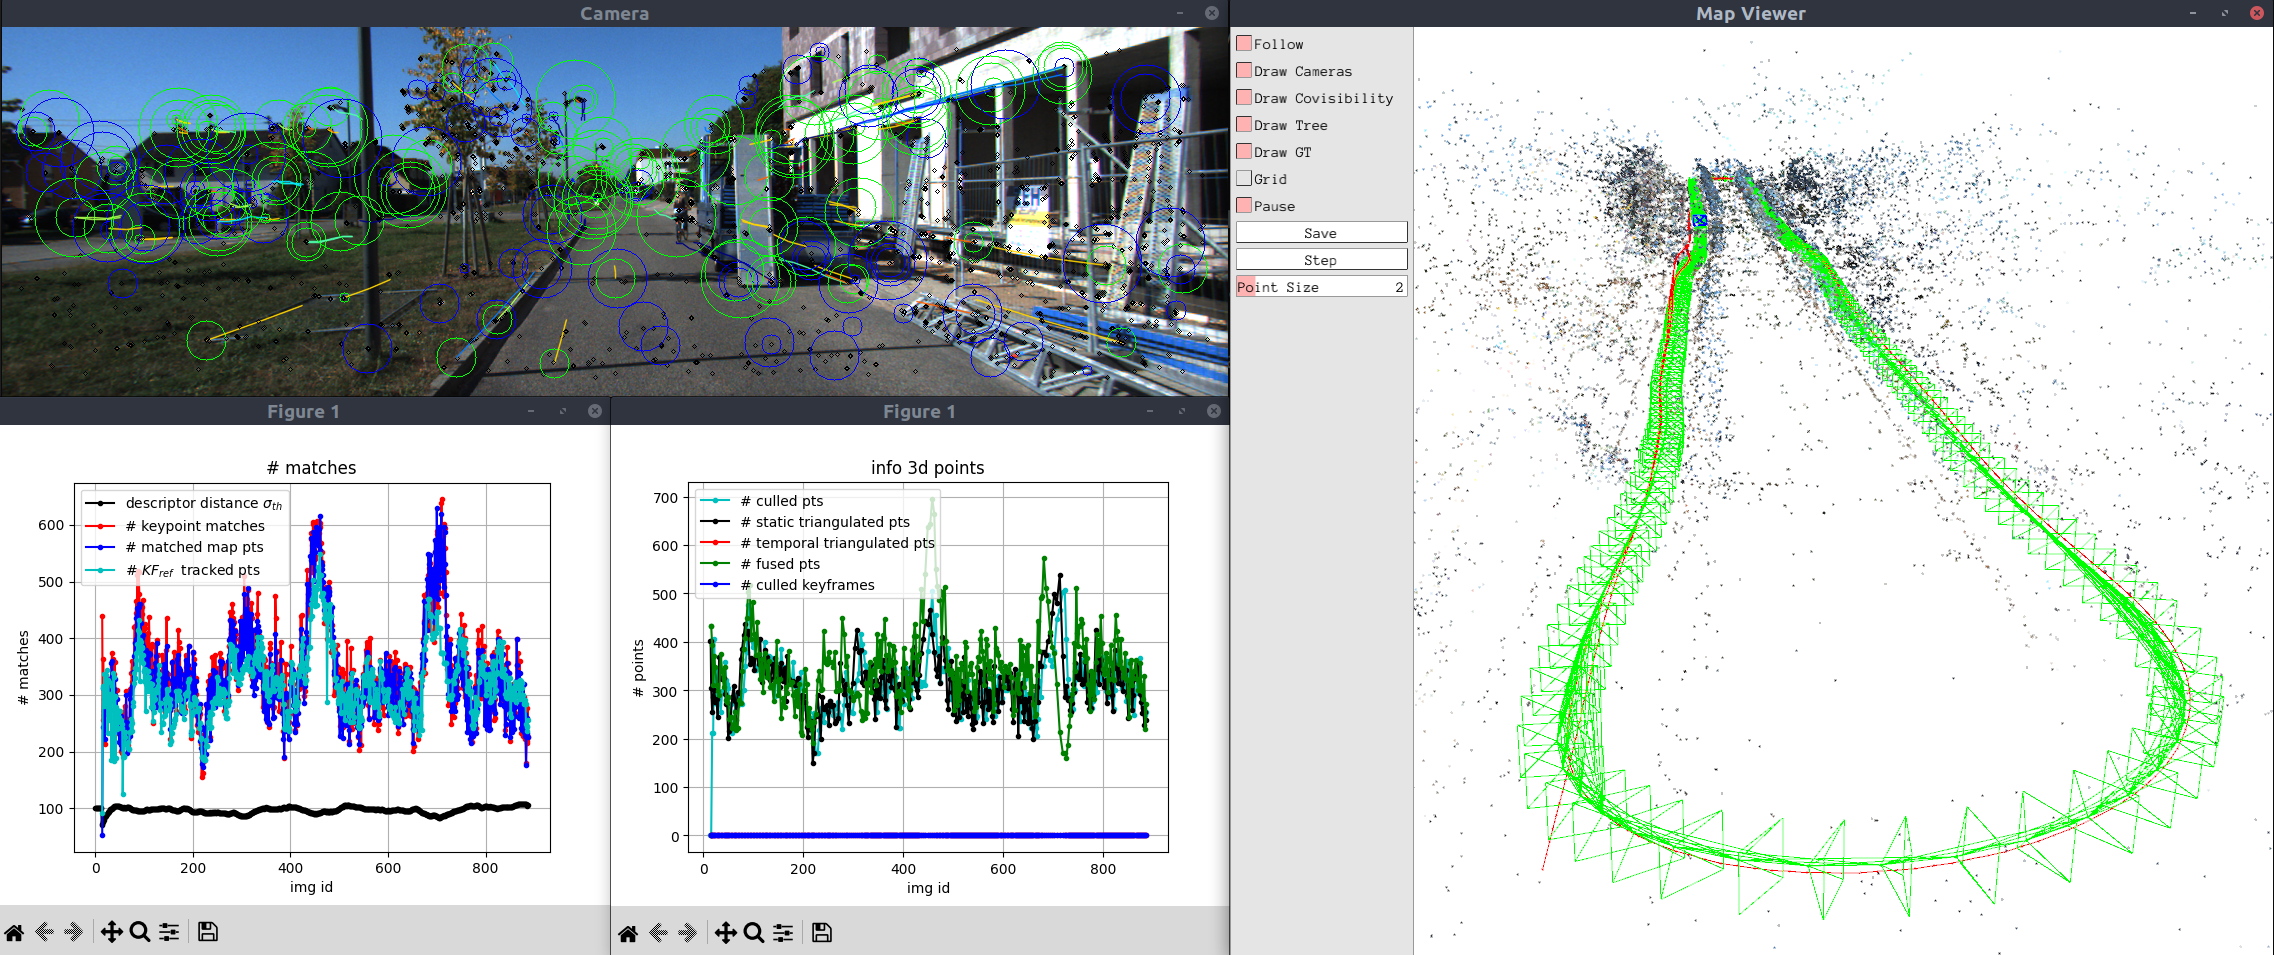
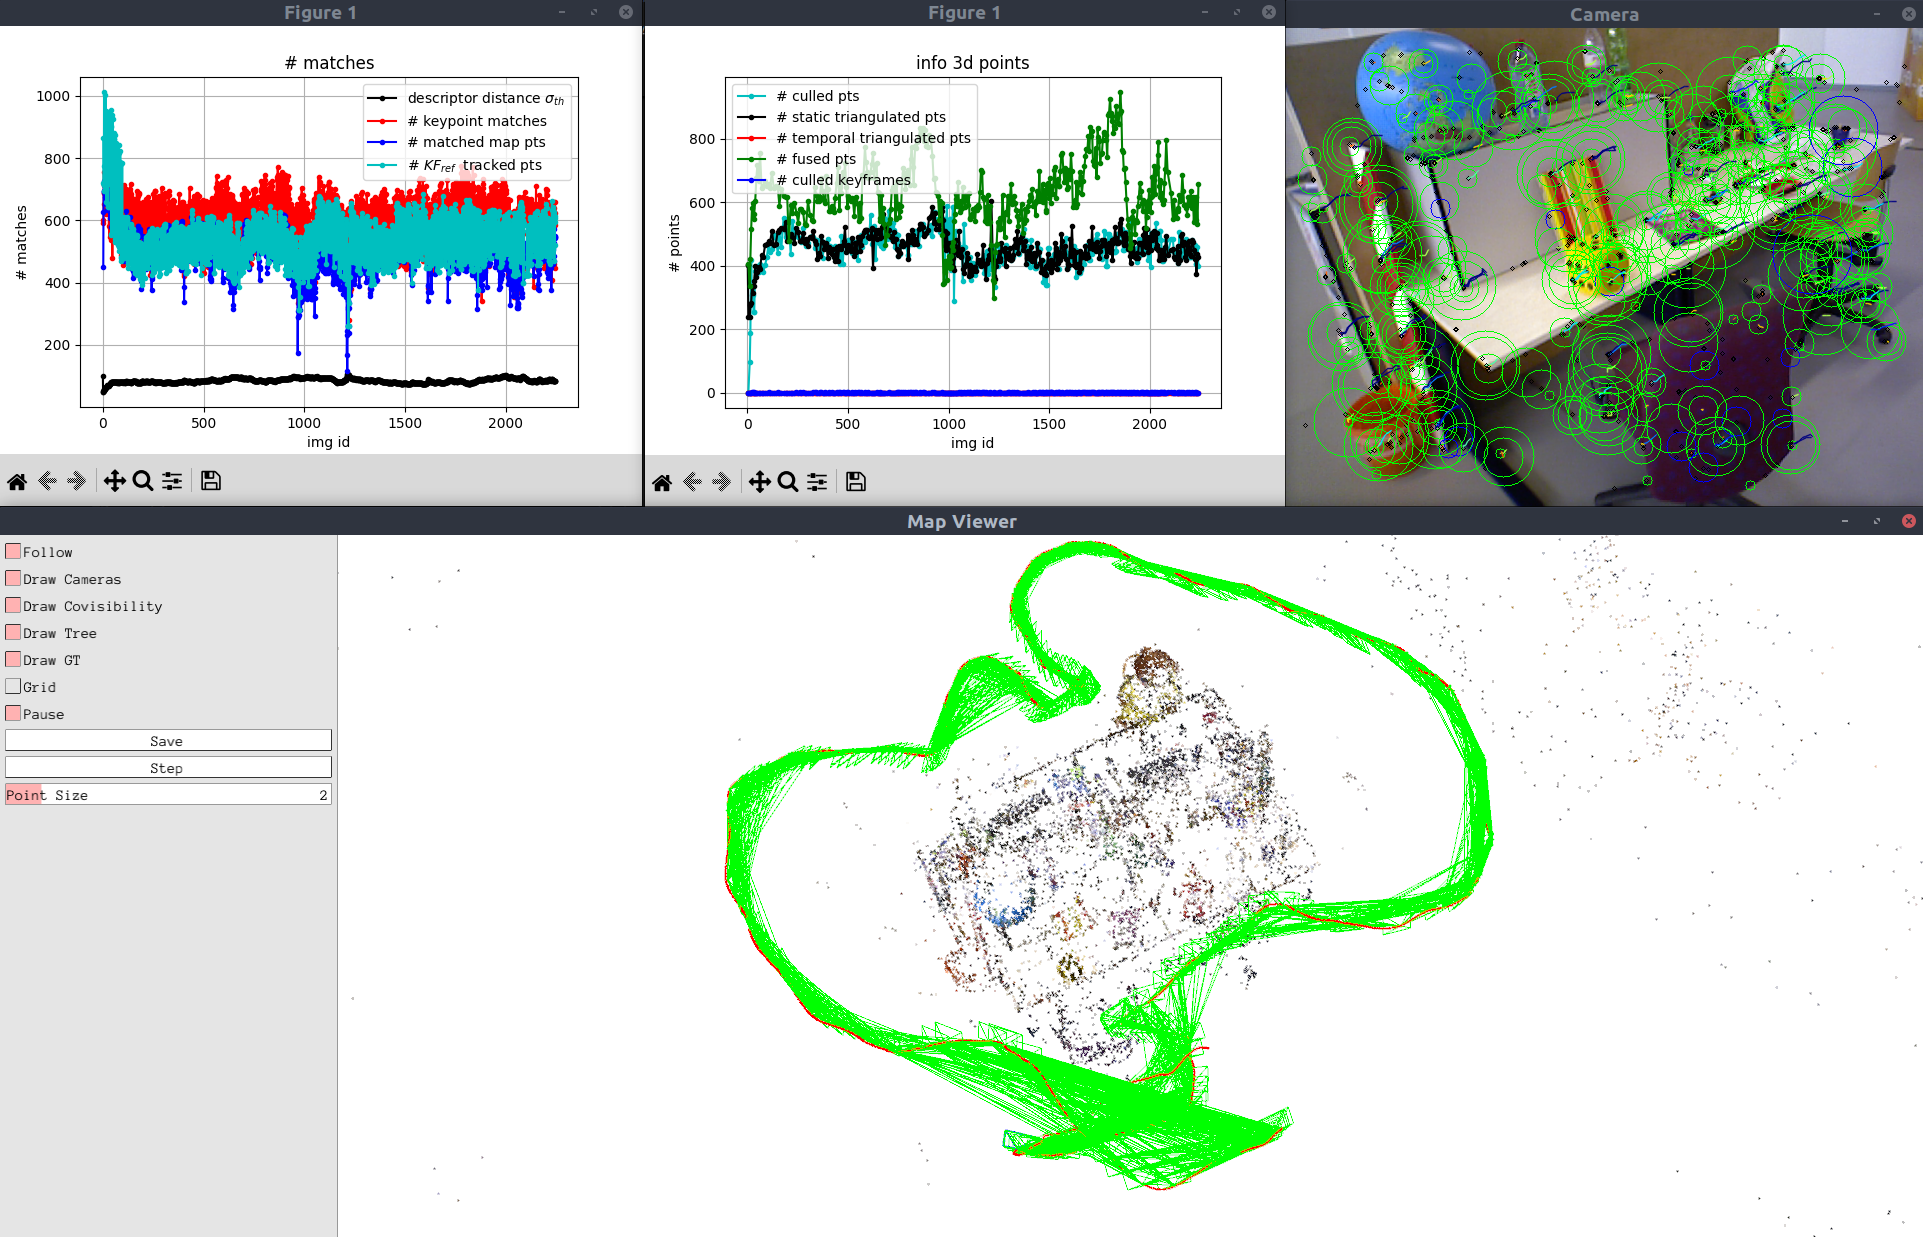
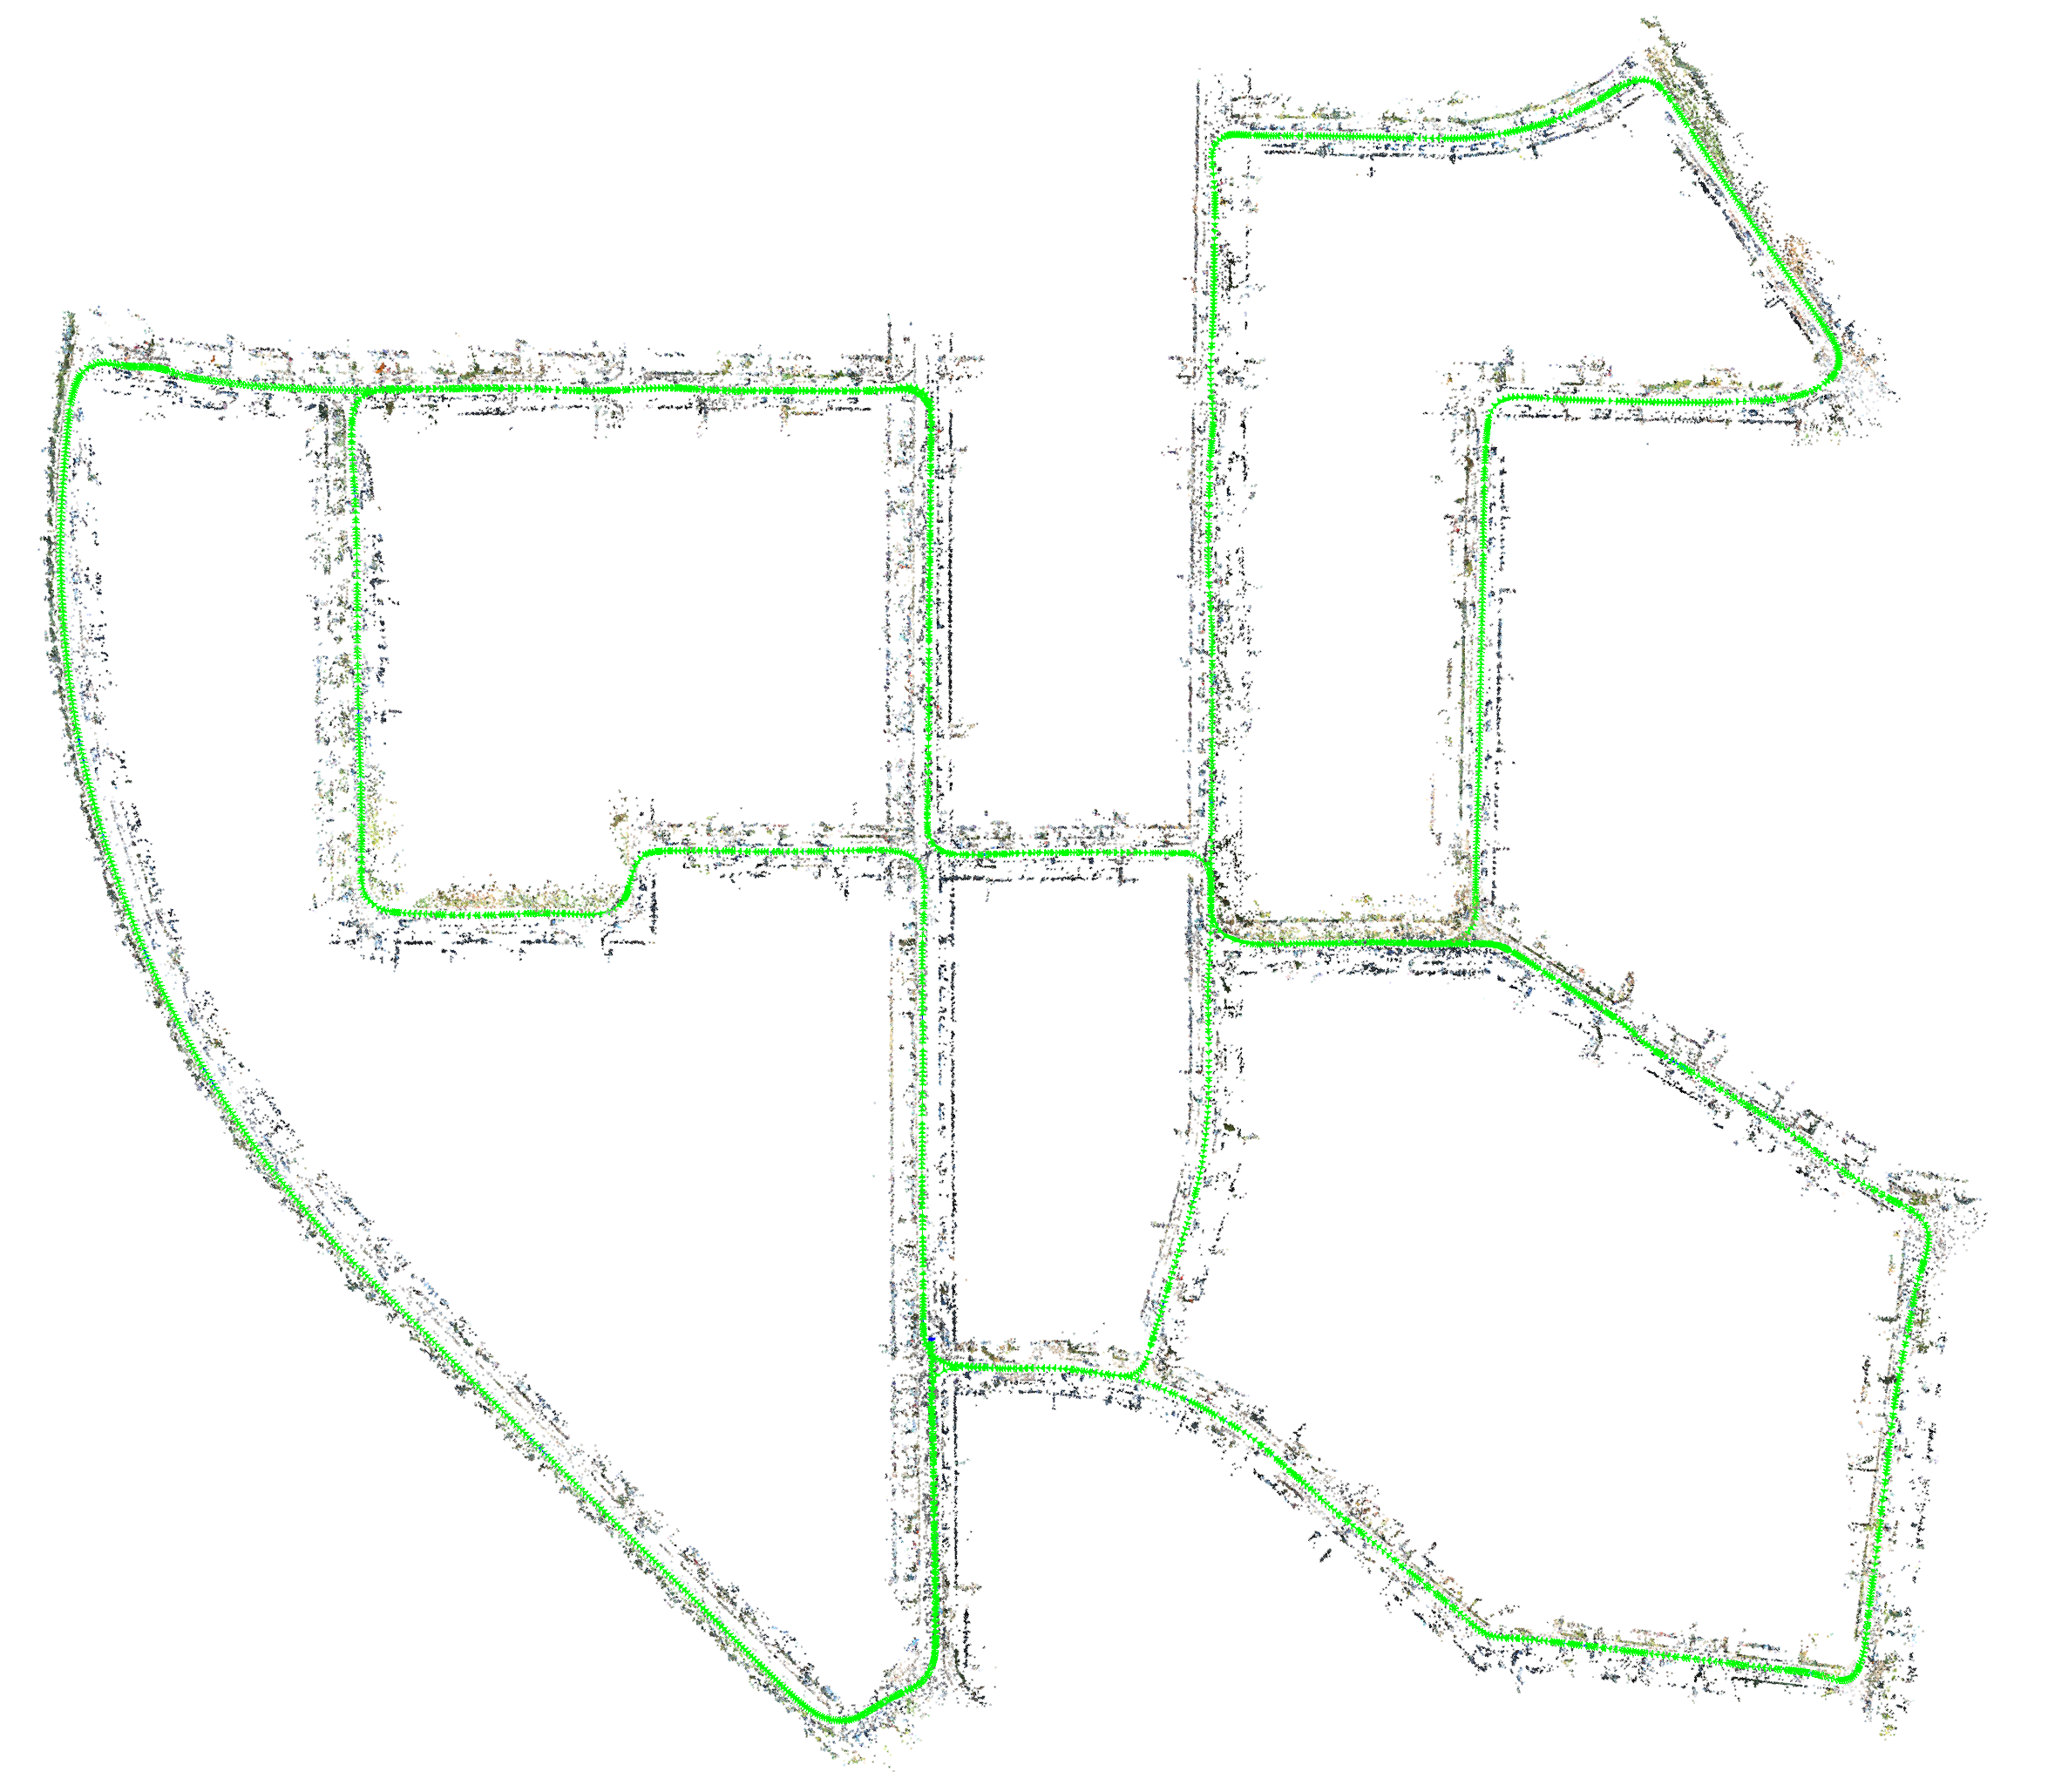
Similarly, you can test the full SLAM by running main_slam.py:
#pixi shell           # If you use pixi, this activates the pyslam environment.
. pyenv-activate.sh   # Activate `pyslam` python environment. Only needed once in a new terminal. Not needed with pixi.
./main_slam.py
This will process the same default KITTI video (available in the folder data/videos) by using its corresponding camera calibration file (available in the folder settings). You can stop it by clicking on one of the open windows and pressing the key 'Q' or closing the 3D Pangolin GUI.
Selecting a dataset and different configuration parameters
The file config.yaml serves as a single entry point to configure the system, the target dataset and its global configuration parameters set in pyslam/config_parameters.py.
To process a different dataset with both VO and SLAM scripts, you need to update the file config.yaml:
- Select your dataset
typein the sectionDATASET(further details in the section Datasets below for further details). This identifies a corresponding dataset section (e.g.KITTI_DATASET,TUM_DATASET, etc). - Select the
sensor_type(mono,stereo,rgbd) in the chosen dataset section. - Select the camera
settingsfile in the dataset section (further details in the section Camera Settings below). - Set the
groundtruth_fileaccordingly. Further details in the section Datasets below (see also the filesio/ground_truth.py,io/convert_groundtruth_to_simple.py).
You can use the section GLOBAL_PARAMETERS of the file config.yaml to override the global configuration parameters set in pyslam/config_parameters.py. This is particularly useful when running a SLAM evaluation.
Feature extraction and matching
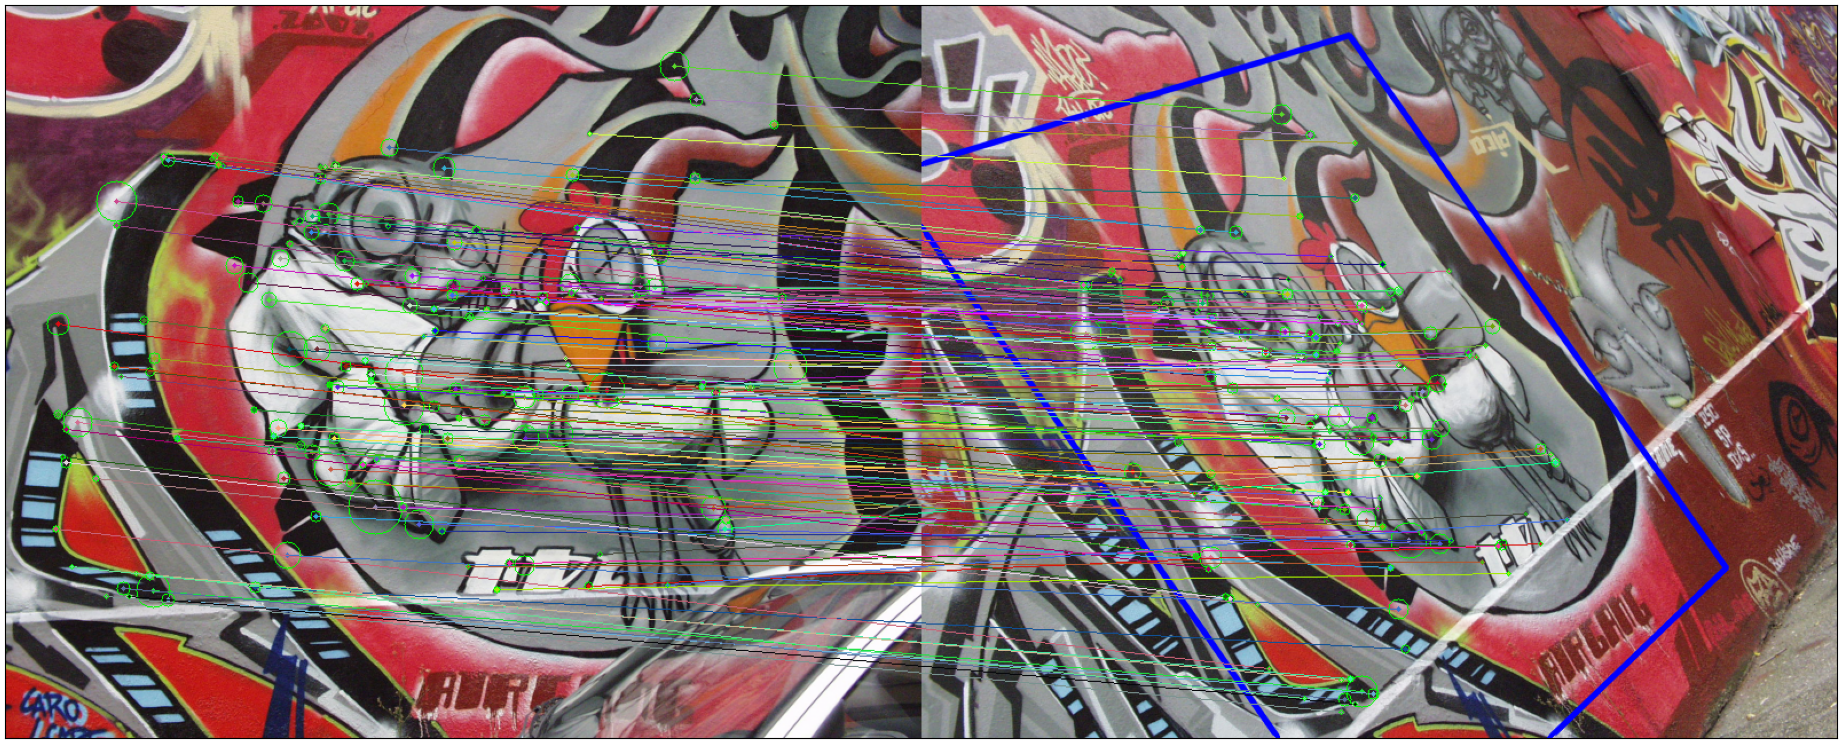
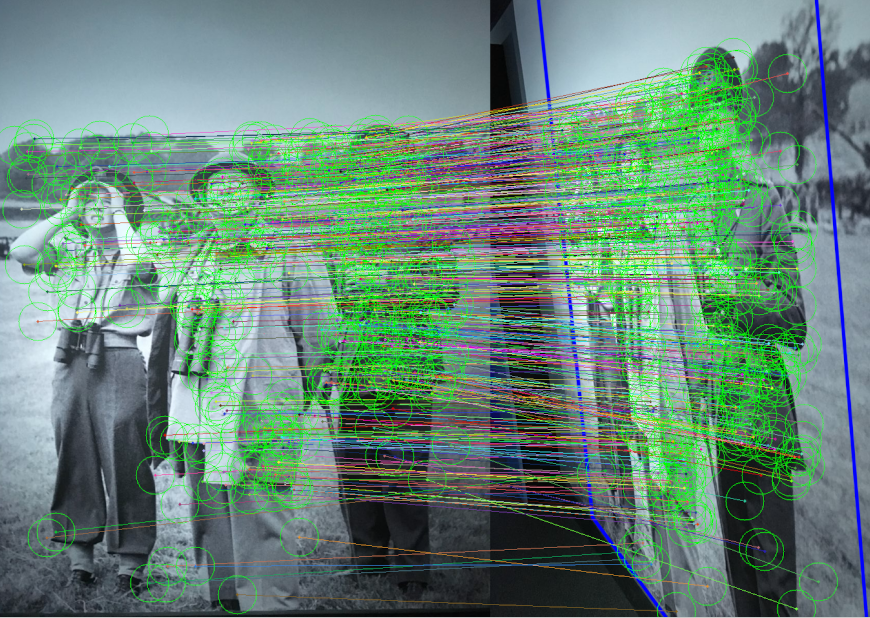
If you just want to test the basic feature extraction and matching capabilities (feature detector + feature descriptor + feature matcher) and get a taste of the different available local features, run
#pixi shell           # If you use pixi, this activates the pyslam environment.
. pyenv-activate.sh   # Activate `pyslam` python environment. Only needed once in a new terminal. Not needed with pixi.
./main_feature_matching.py
In any SLAM and VO, you can choose any detector/descriptor among ORB, SIFT, SURF, BRISK, AKAZE, SuperPoint, etc. (see the section Supported Local Features below for further information).
Some basic examples are available in the subfolder test/cv. In particular, as for feature detection/description, you may want to take a look at test/cv/test_feature_manager.py too.
Loop closing and relocalization
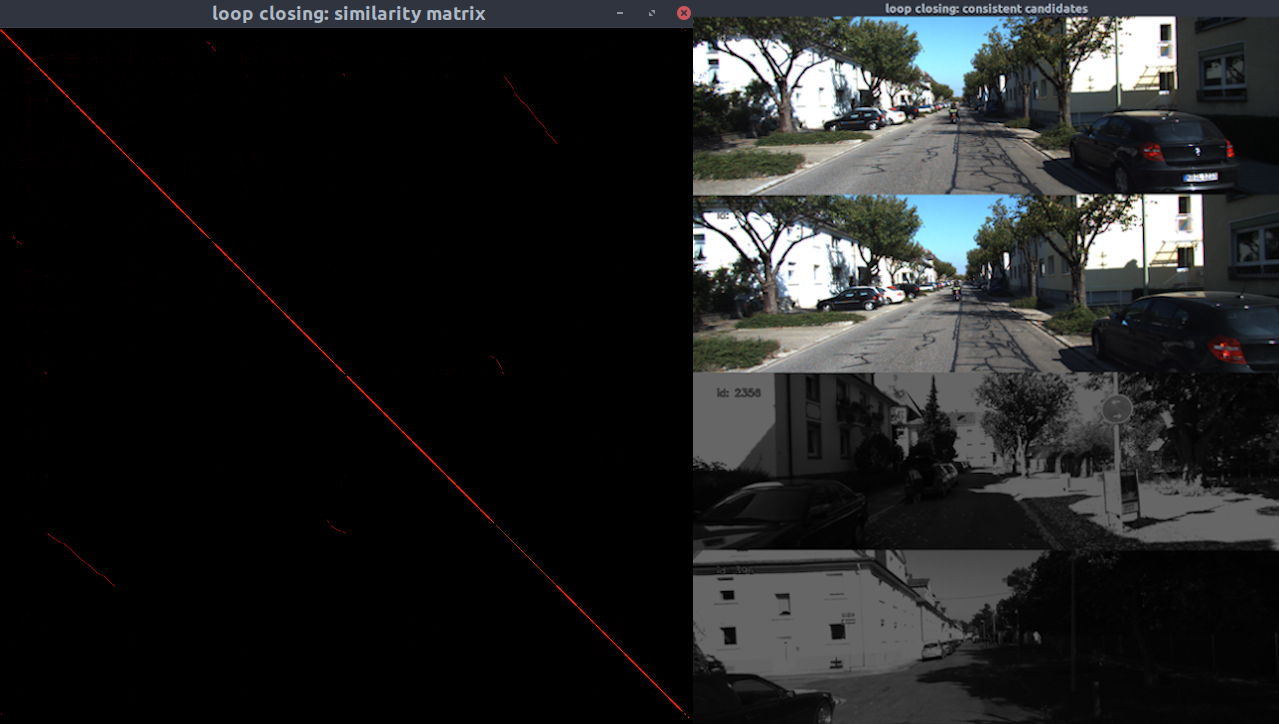
Many loop closing methods are available, combining different aggregation methods and global descriptors.
While running full SLAM, loop closing is enabled by default and can be disabled by setting kUseLoopClosing=False in pyslam/config_parameters.py. Different configuration options LoopDetectorConfigs can be found in pyslam/loop_closing/loop_detector_configs.py: Code comments provide additional useful details.
One can start experimenting with loop closing methods by using the examples in test/loopclosing. The example test/loopclosing/test_loop_detector.py is the recommended entry point.
Vocabulary management
DBoW2, DBoW3, and VLAD require pre-trained vocabularies. ORB-based vocabularies are automatically downloaded into the data folder (see pyslam/loop_closing/loop_detector_configs.py).
To create a new vocabulary, follow these steps:
-
Generate an array of descriptors: Use the script
test/loopclosing/test_gen_des_array_from_imgs.pyto generate the array of descriptors that will be used to train the new vocabulary. Select your desired descriptor type via the tracker configuration. -
DBOW vocabulary generation: Train your target DBOW vocabulary by using the script
test/loopclosing/test_gen_dbow_voc_from_des_array.py. -
VLAD vocabulary generation: Train your target VLAD "vocabulary" by using the script
test/loopclosing/test_gen_vlad_voc_from_des_array.py.
Once you have trained the vocabulary, you can add it in pyslam/loop_closing/loop_detector_vocabulary.py and correspondingly create a new loop detector configuration in pyslam/loop_closing/loop_detector_configs.py that uses it.
Vocabulary-free loop closing
Most methods do not require pre-trained vocabularies. Specifically:
iBoWandOBindex2: These methods incrementally build bags of binary words and, if needed, convert (front-end) non-binary descriptors into binary ones.- Others: Methods like
HDC_DELF,SAD,AlexNet,NetVLAD,CosPlace,EigenPlaces, andMegalocdirectly extract their specific global descriptors and process them using dedicated aggregators, independently from the used front-end descriptors.
As mentioned above, only DBoW2, DBoW3, and VLAD require pre-trained vocabularies.
Verify your loop detection configuration and verify vocabulary compatibility
Loop detection method based on a pre-trained vocabulary
When selecting a loop detection method based on a pre-trained vocabulary (such as DBoW2, DBoW3, and VLAD), ensure the following:
- The back-end and the front-end are using the same descriptor type (this is also automatically checked for consistency) or their descriptor managers are independent (see further details in the configuration options
LoopDetectorConfigsavailable in pyslam/loop_closing/loop_detector_configs.py). - A corresponding pre-trained vocabulary is available. For more details, refer to the vocabulary management section.
Missing vocabulary for the selected front-end descriptor type
If you lack a compatible vocabulary for the selected front-end descriptor type, you can follow one of these options:
- Create and load the vocabulary (refer to the vocabulary management section).
- Choose an
*_INDEPENDENTloop detector method, which works with an independent local_feature_manager. - Select a vocabulary-free loop closing method.
See the file pyslam/loop_closing/loop_detector_configs.py for further details.
Volumetric reconstruction
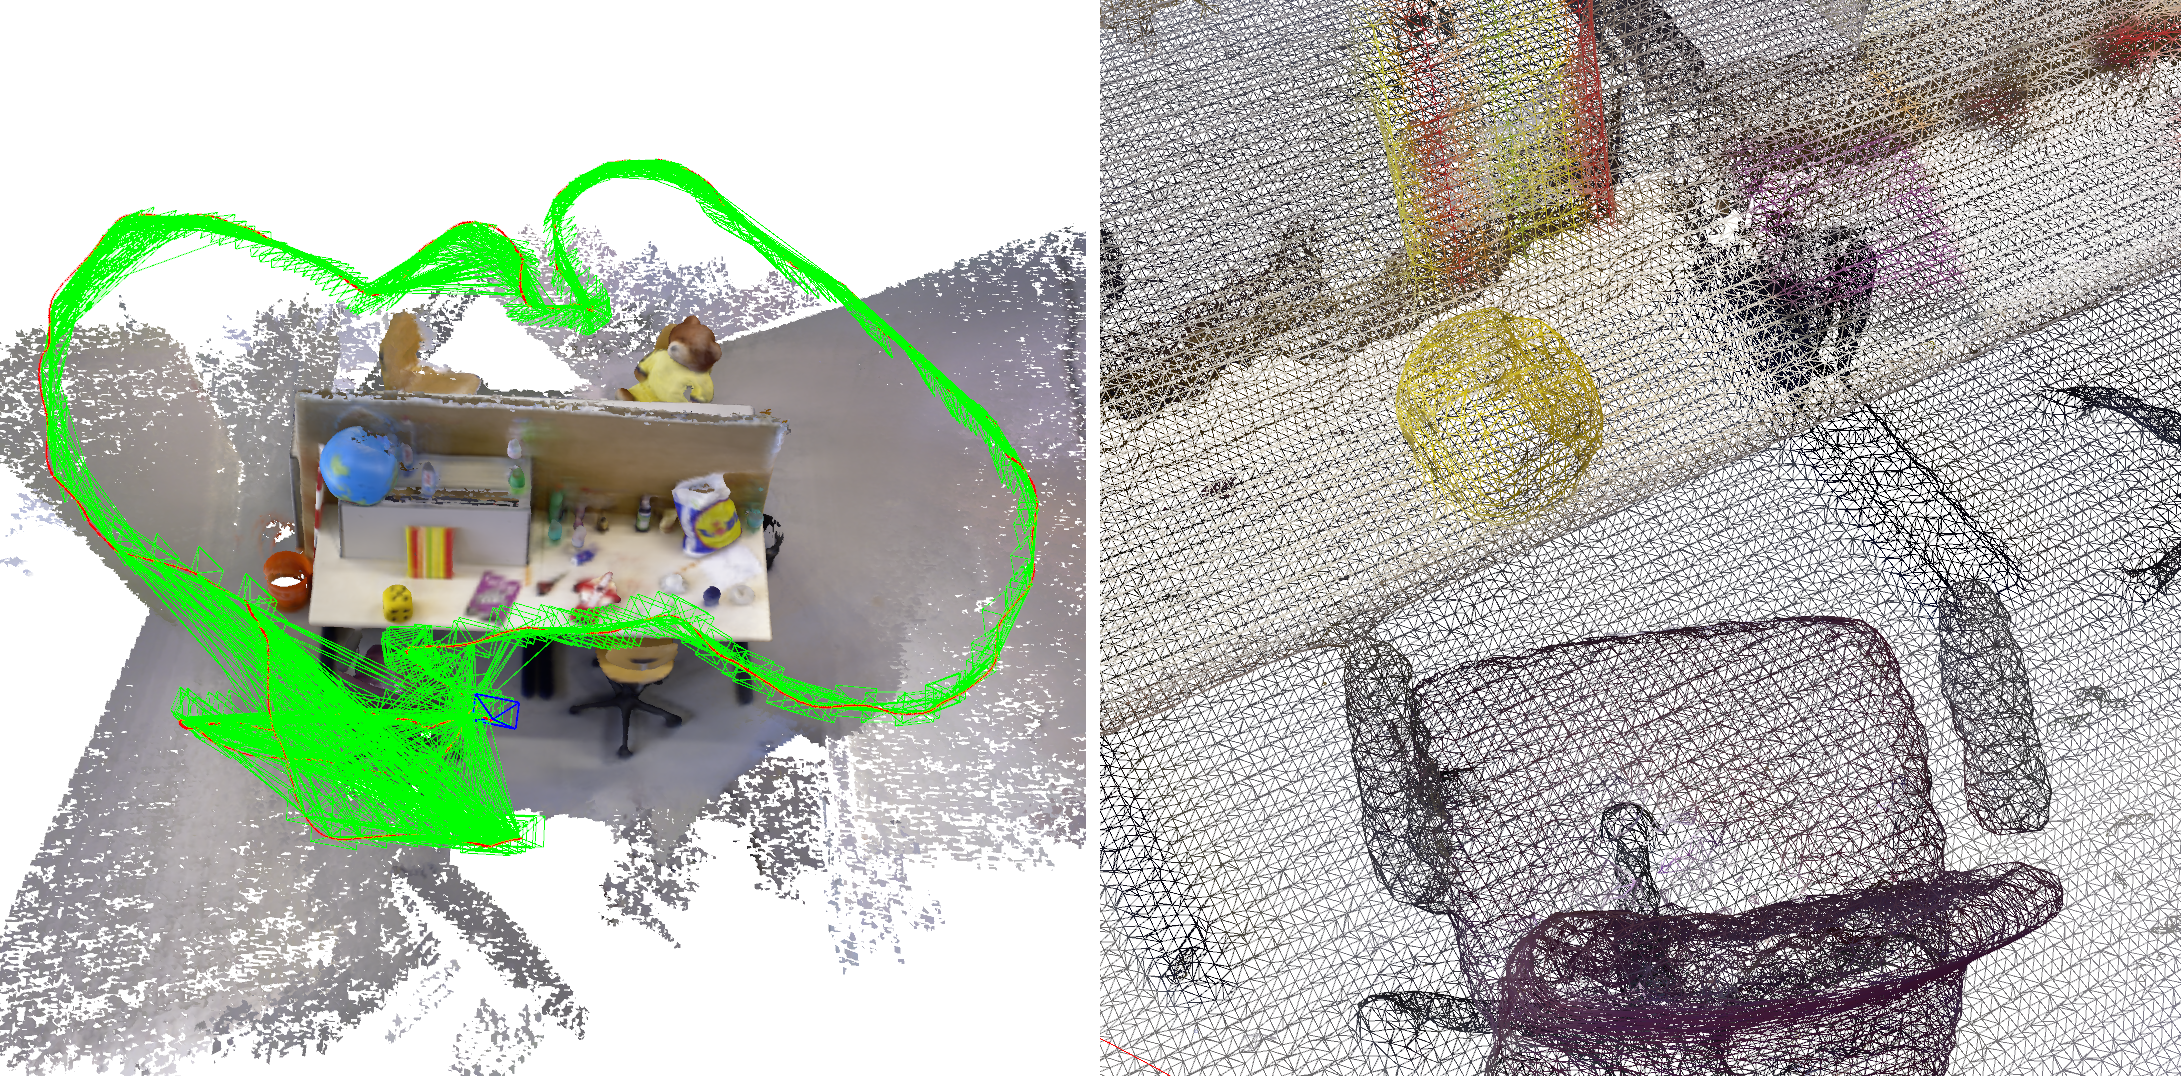
Dense reconstruction while running SLAM
The SLAM back-end hosts a volumetric reconstruction pipeline. This is disabled by default. You can enable it by setting kDoVolumetricIntegration=True and selecting your preferred method kVolumetricIntegrationType in pyslam/config_parameters.py. At present, the following methods are available:
VOXEL_GRID,VOXEL_SEMANTIC_GRID,VOXEL_SEMANTIC_PROBABILISTIC_GRID: Voxel grid implementations that leverage parallel spatial hashing, supporting both direct voxel hashing and indirect voxel-block hashing strategies. Parallel execution is managed using TBB, and the design accommodates both simple and semantic voxels.TSDF(Truncated Signed Distance Function): It is able to return in output either a pointcloud or a mesh.GAUSSIAN_SPLATTING(Incremental Gaussian splatting).
See pyslam/dense/volumetric_integrator_types.py. Note that you need CUDA in order to run GAUSSIAN_SPLATTING method. Further information about the volumetric grid models is available here.
At present, the volumetric reconstruction pipeline works with:
- RGBD datasets
- When a depth estimator is used
- in the back-end with STEREO datasets (you can't use depth prediction in the back-end with MONOCULAR datasets, further details here)
- in the front-end (to emulate an RGBD sensor) and a depth prediction/estimation gets available for each processed keyframe.
To obtain a mesh as output, set kVolumetricIntegrationTsdfExtractMesh=True in pyslam/config_parameters.py.
Reload a saved sparse map and perform dense reconstruction
Use the script main_map_dense_reconstruction.py to reload a saved sparse map and perform dense reconstruction by using its posed keyframes as input. You can select your preferred dense reconstruction method directly in the script.
- To check what the volumetric integrator is doing, run in another shell
tail -f logs/volumetric_integrator.log(from repository root folder). - To save the obtained dense and sparse maps, press the
Savebutton on the GUI.
Reload and check your dense reconstruction
You can check the output pointcloud/mesh by using CloudCompare.
In the case of a saved Gaussian splatting model, you can visualize it by:
- Using the superslat editor (drag and drop the saved Gaussian splatting
.plypointcloud in the editor interface). - Getting into the folder
test/gaussian_splattingand running:
python test_gsm.py --load <gs_checkpoint_path>
The directory<gs_checkpoint_path>is expected to have the following structure:├── gs_checkpoint_path ├── pointcloud # folder containing different subfolders, each one with a saved .ply encoding the Gaussian splatting model at a specific iteration/checkpoint ├── last_camera.json ├── config.yml
Controlling the spatial distribution of keyframe FOV centers
If you are targeting volumetric reconstruction while running SLAM, you can enable a keyframe generation policy designed to manage the spatial distribution of keyframe field-of-view (FOV) centers. The FOV center of a camera is defined as the backprojection of its image center, calculated using the median depth of the frame. With this policy, a new keyframe is generated only if its FOV center lies beyond a predefined distance from the nearest existing keyframe's FOV center. You can enable this policy by setting the following parameters in the yaml setting:
KeyFrame.useFovCentersBasedGeneration: 1  # compute 3D fov centers of camera frames by using median depth and use their distances to control keyframe generation
KeyFrame.maxFovCentersDistance: 0.2       # max distance between fov centers in order to generate a keyframe
or by setting the following parameters in config_parameters.py:
kUseFovCentersBasedKfGeneration = False  # Use FOV centers based keyframe generation; not considered if KeyFrame.useFovCentersBasedGeneration is set in yaml
kMaxFovCentersDistanceForKfGeneration = 0.2  # [m] Maximum distance between FOV centers for keyframe generation; not considered if KeyFrame.maxFovCentersDistance is set in yaml
Depth prediction
The available depth prediction models can be utilized both in the SLAM back-end and front-end.
- Back-end: Depth prediction can be enabled in the volumetric reconstruction pipeline by setting the parameter
kVolumetricIntegrationUseDepthEstimator=Trueand selecting your preferredkVolumetricIntegrationDepthEstimatorTypeinpyslam/config_parameters.py. - Front-end: Depth prediction can be enabled in the front-end by setting the parameter
kUseDepthEstimatorInFrontEndinpyslam/config_parameters.py. This feature estimates depth images from input color images to emulate a RGBD camera. Please, note this functionality is still experimental at present time [WIP].
Notes:
- In the case of a monocular SLAM, do NOT use depth prediction in the back-end volumetric integration: The SLAM (fake) scale will conflict with the absolute metric scale of depth predictions. With monocular datasets, you can enable depth prediction to run in the front-end (to emulate an RGBD sensor).
- Depth inference may be very slow (for instance, with DepthPro it takes ~1s per image on a typical machine). Therefore, the resulting volumetric reconstruction pipeline may be very slow.
Refer to the file depth_estimation/depth_estimator_factory.py for further details. Both stereo and monocular prediction approaches are supported. You can test depth prediction/estimation by using the script main_depth_prediction.py.
Semantic mapping and Image Segmentation
The sparse semantic mapping pipeline can be enabled by setting kDoSparseSemanticMappingAndSegmentation=True in pyslam/config_parameters.py. The default segmentation models assigned to each dataset are specified in pyslam/semantics/semantic_mapping_configs.py. You can override the currently used segmentation model by setting kSemanticSegmentationType in config_parameters.py.
Image Segmentation
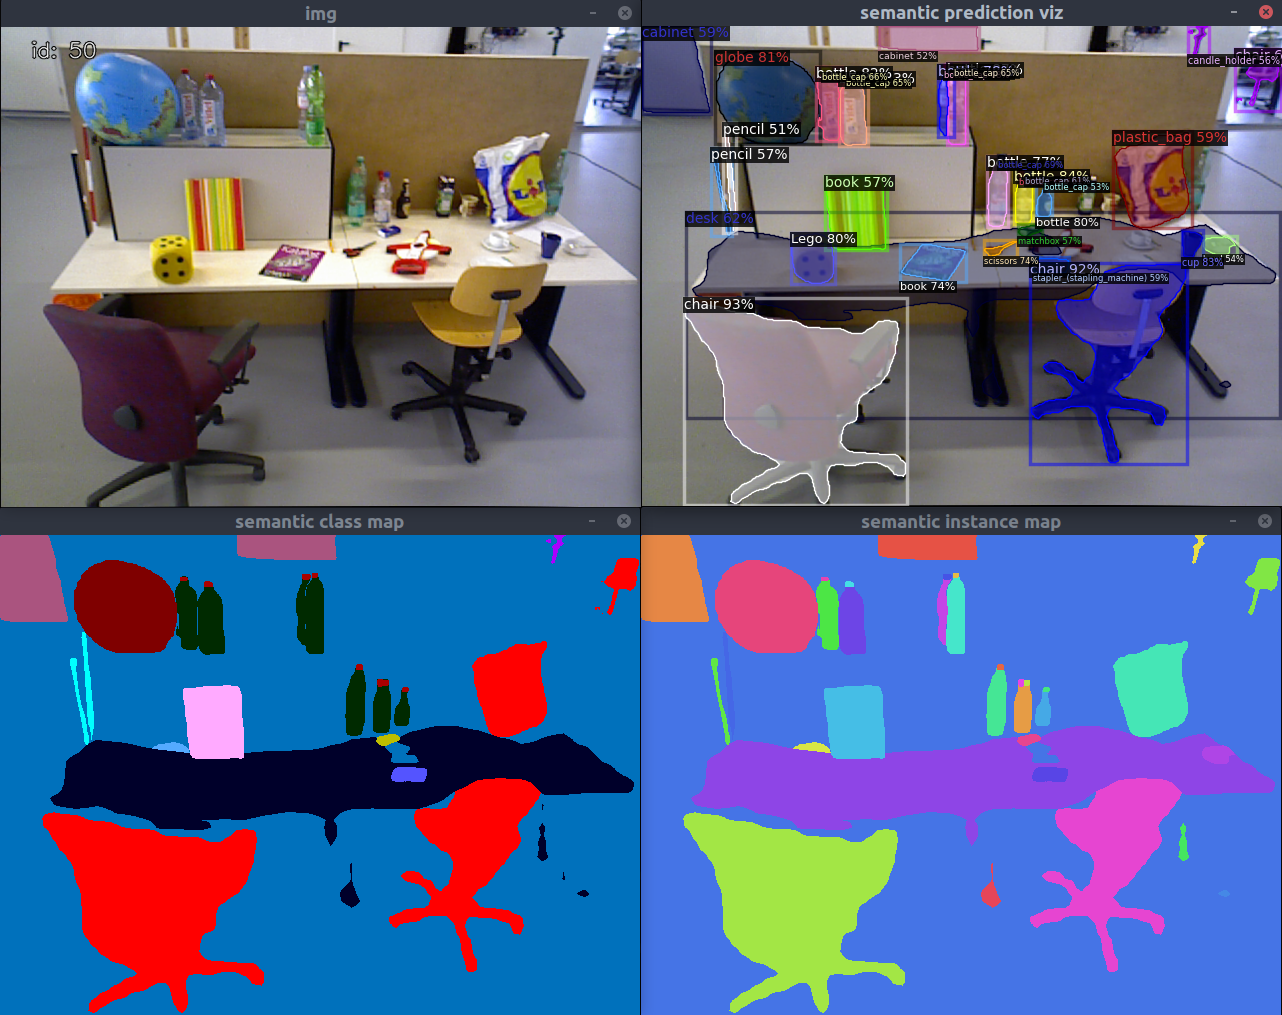
Different segmentation methods are available (see here for further details). See the following video for a quick preview.
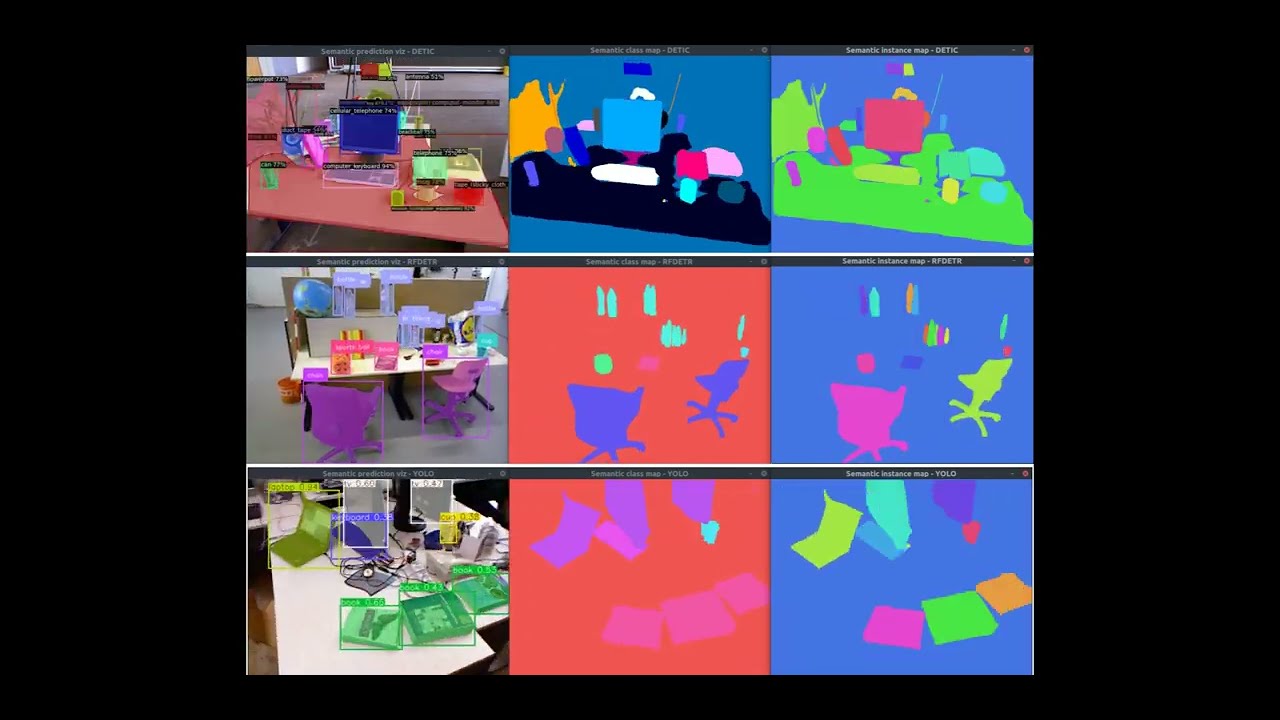
Panoptic/Instance segmentation:
DETIC: from https://github.com/facebookresearch/Detic- Object detection-based (CenterNet2 + CLIP), supports large vocabularies (LVIS/COCO/OpenImages/Objects365).
- Architecture: Object detector (CenterNet2) detects individual objects first, then segments each detection.
- Can output both "instances" (direct instance segmentation) and "panoptic_seg" formats.
- Instance extraction: Direct from object detections - each detected object = one instance ID.
- Result: Robust instance segmentation - each detected object gets a unique instance ID, even for multiple objects of the same category (e.g., two pillows = two separate instances).
ODISE: from https://github.com/NVlabs/ODISE- Diffusion-based panoptic segmentation, leverages diffusion models for segmentation.
- Architecture: Panoptic segmentation model that segments image into regions first, then classifies regions.
- Only outputs "panoptic_seg" format - instances extracted from panoptic segments via "isthing" flag.
- Instance extraction: Derived from panoptic segments - one segment may contain multiple objects if model groups them together (e.g., spatially connected objects of same category).
- Result: Instance segmentation may merge multiple objects of the same category into a single instance (e.g., two pillows may be detected as one "pillow" instance).
EOV_SEG: from https://github.com/nhw649/EOV-Seg- Dual-backbone (CNN + ViT) with CLIP, text-prompt driven open vocabulary.
- Architecture: Panoptic segmentation model (similar to ODISE) - segments image into regions first.
- Only outputs "panoptic_seg" format - instances extracted from panoptic segments via "isthing" flag.
- Instance extraction: Same as
ODISE- derived from panoptic segments, may group multiple objects. - Result: Similar to
ODISE, instance segmentation may group multiple objects of the same category together (e.g., two pillows may be detected as one "pillow" instance).
Semantic segmentation:
DEEPLABV3: fromtorchvision, pre-trained on COCO/VOC.- Semantic segmentation model from torchvision DeepLab's v3.
SEGFORMER: fromtransformers, pre-trained on Cityscapes or ADE20k.- Semantic segmentation model from transformer's Segformer.
CLIP: fromf3rmpackage for open-vocabulary support.- Uses CLIP patch embeddings + text similarity to produce labels/probabilities (it is not a dedicated "segmentation head").
Instance segmentation:
RFDETR: from https://github.com/roboflow/rf-detr.git- RF-DETR instance segmentation; pretrained weights target COCO classes by default.
YOLO: from https://github.com/ultralytics/ultralytics/
Sparse Semantic Mapping
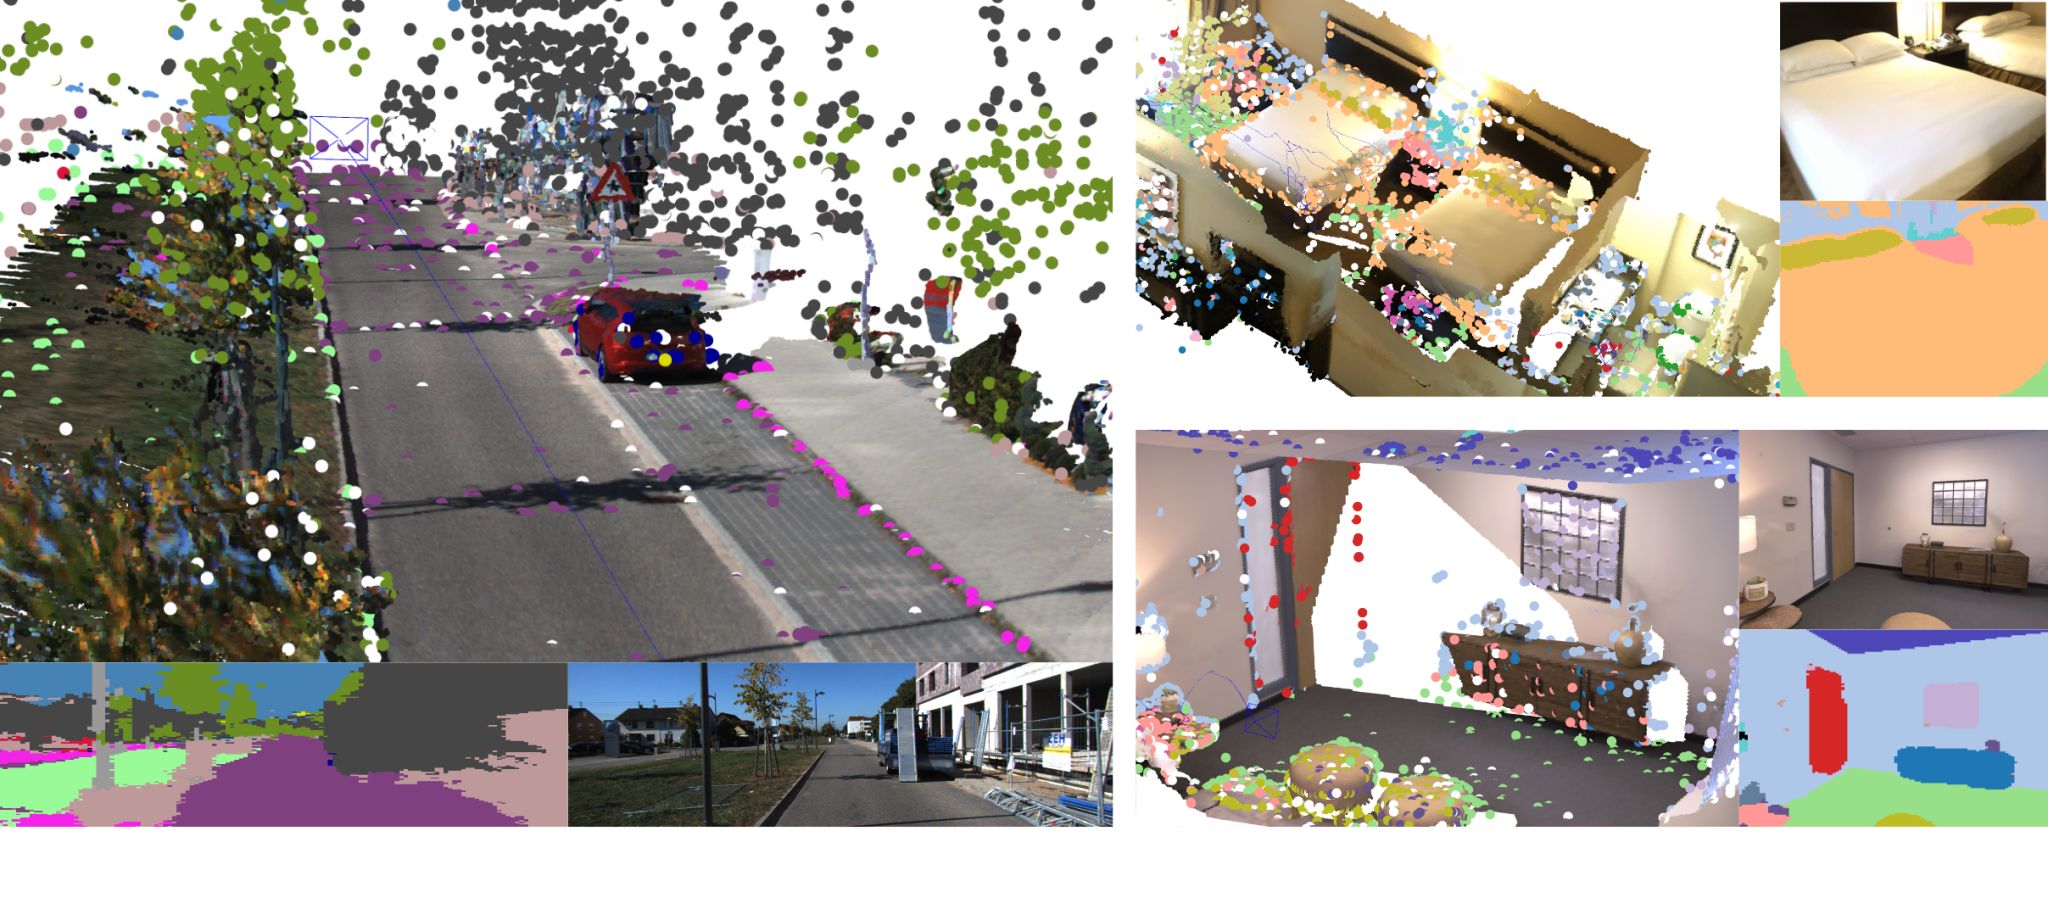
Semantic features are assigned to keypoints on the image and fused into map points. The semantic features can be:
- Labels: categorical labels as numbers.
- Probability vectors: probability vectors for each class.
- Feature vectors: feature vectors obtained from an encoder. This is generally used for open vocabulary mapping.
The simplest way to test the available segmentation models is to run: main_semantic_image_segmentation.py.
Further information about the semantic module is available here.
Volumetric Semantic mapping
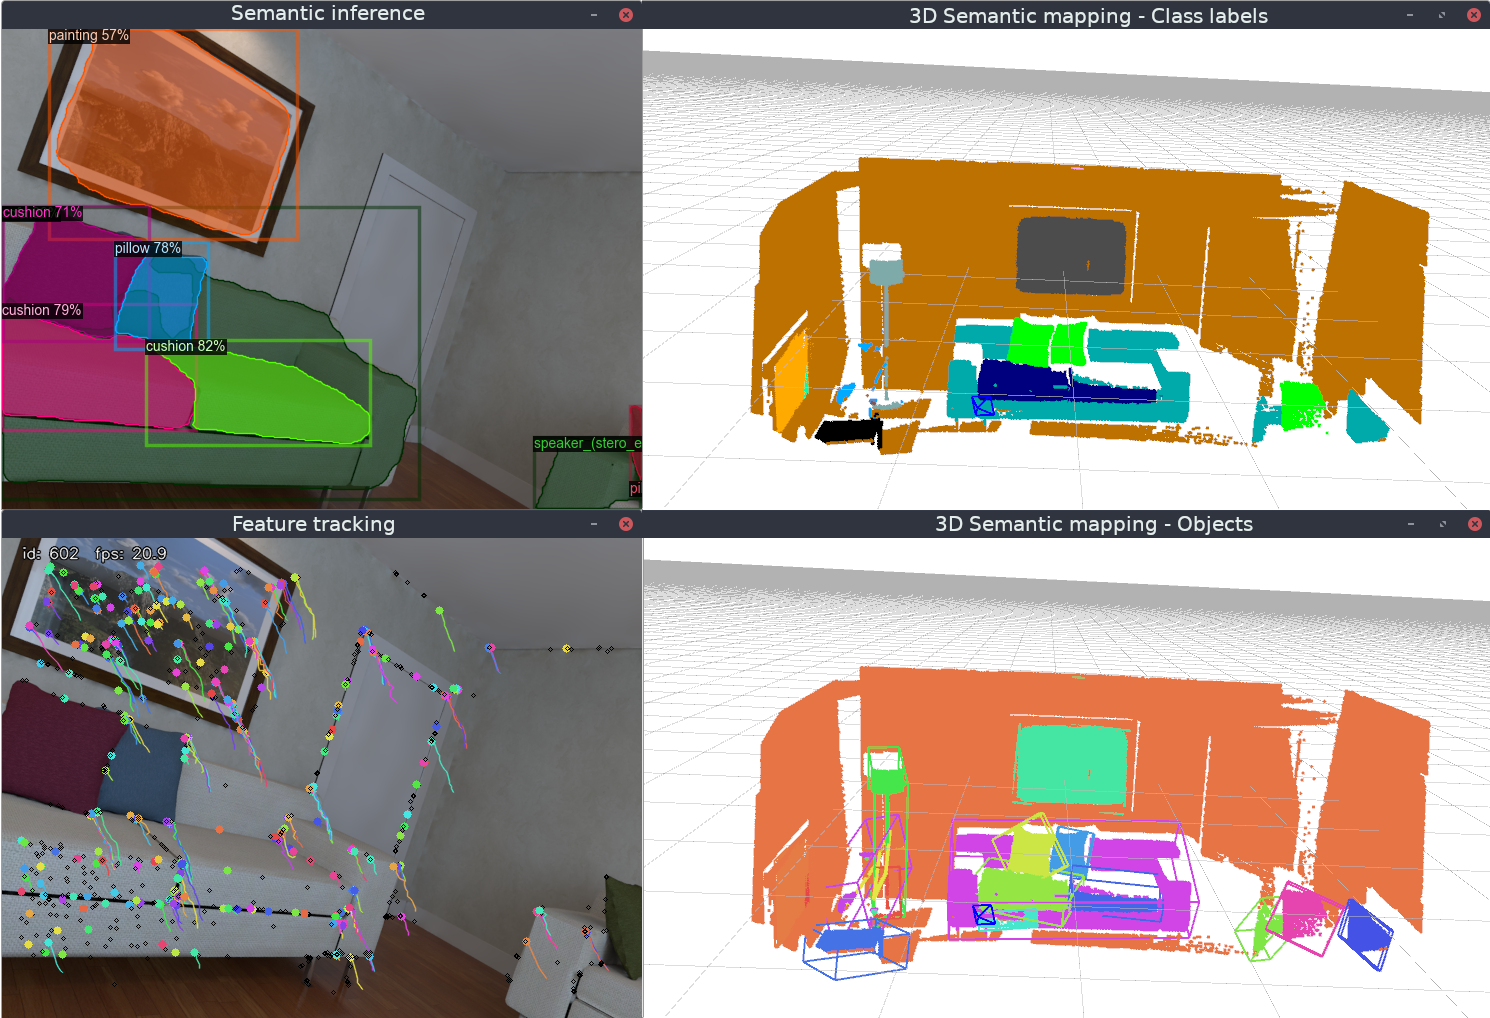
Semantic volumetric mapping fuses per-keyframe semantic predictions into a dense 3D voxel grid, enabling semantic-aware reconstruction and optional object-level segmentation. The semantic volumetric integrators live in pyslam/dense, and they consume semantic predictions produced by pyslam/semantics.
Two semantic fusion backends are supported:
- Confidence-counter fusion (
VOXEL_SEMANTIC_GRID): Each voxel stores the most frequently observed semantic class together with a confidence counter (majority voting). - Probabilistic fusion (
VOXEL_SEMANTIC_PROBABILISTIC_GRID): Each voxel maintains a full class probability distribution, updated using Bayesian fusion in log-space. This backend is recommended for improved robustness against noisy predictions and intermittent misclassifications.
Volumetric semantic mapping can be enabled by setting:
kDoSparseSemanticMappingAndSegmentation = True  # enable sparse mapping and segmentation
kDoVolumetricIntegration = True  # enable volumetric integration
kVolumetricIntegrationType = "VOXEL_SEMANTIC_PROBABILISTIC_GRID"  # or "VOXEL_SEMANTIC_GRID"
Configuration notes:
- If
kDoSparseSemanticMappingAndSegmentation=TrueandkVolumetricIntegrationType="VOXEL_GRID", the factory warns and automatically switches toVOXEL_SEMANTIC_PROBABILISTIC_GRIDto ensure semantic integration. - If
kDoSparseSemanticMappingAndSegmentation=Truewith a non-semantic volumetric integrator (e.g.,TSDF,GAUSSIAN_SPLATTING), you will get a warning and semantic integration will be skipped.
If kVolumetricSemanticIntegrationUseInstanceIds=True, the volumetric integrator uses 2D instance IDs (from panoptic/instance segmentation backends) to build 3D object segments. Object IDs are assigned via voting across observations and filtered by kVolumetricSemanticIntegrationMinVoteRatio and kVolumetricSemanticIntegrationMinVotes. This enables:
- Consistent 3D object grouping across views.
- Per-object colorization of the volumetric map.
- Improved object identity stability over time.
In particular, use the following GUI buttons to toggle:
Color Semantics: class/label color maps on both the 3D sparse map and the volumetric map.Objects: per-object color map on the volumetric map (requires instance IDs).Draw Object BBs: bounding boxes for detected 3D object segments.
More information about the volumetric integration models and their software architecture is available here, and the semantic module is described here.
Known limitations in volumetric semantic mapping:
- Resolution limits: A fixed voxel size may blur thin structures and small objects.
- Pose drift sensitivity: Accumulated pose errors can smear semantic labels over time.
- Instance ID dependence: Inconsistent or noisy 2D instance IDs may lead to fragmented or unstable 3D objects.
- Class imbalance bias: Frequently observed classes may dominate both voting-based and probabilistic fusion, especially when class priors are implicit or unbalanced in the predictions.
- Temporal class inconsistency: Inconsistent semantic predictions across keyframes (e.g., label flickering or competing classes with similar confidence) may result in fragmented or unstable voxel labeling, even in densely observed areas.
- Occlusions and visibility gaps: Poorly observed regions may remain unlabeled or receive too few votes, increasing the risk of misclassification.
C++ Core Module
The system provides a modular sparse-SLAM core, implemented in both C++ and Python, allowing users to switch between high-performance/speed and high-flexibility modes.
The C++ core reimplements the sparse SLAM originally implemented in Python, exposing core SLAM classes (frames, keyframes, map points, maps, cameras, optimizers, tracking, and local mapping) to Python via pybind11. The C++ implementation follows a streamlined design where all core data resides in C++, with Python serving as an interface layer. C++ classes mirror their Python counterparts, maintaining identical interfaces and data field names (see this table). When feasible, the bindings support zero-copy data exchange (e.g., descriptors) and safe memory ownership across the Python/C++ boundary, leveraging automatic zero-copy sharing of NumPy array memory with C++.
- To enable the C++ sparse-SLAM core, set
USE_CPP_CORE = Trueinpyslam/config_parameters.py. - To rebuild the C++ core module, run
. pyenv-activate.sh
./build_cpp_core.sh
While this may be self-evident, it is important to keep in mind that when USE_CPP_CORE = True:
- The Python implementation of the sparse SLAM core is effectively bypassed, and any modifications to it will have no effect at runtime.
- All functional changes to the sparse SLAM C++ codebase must be rebuilt using
./build_cpp_core.sh(as explained above) in order to take effect.
See here for further details.
Saving and reloading
Save a map
When you run the script main_slam.py (main_map_dense_reconstruction.py):
- You can save the current map state by pressing the button
Saveon the GUI. This saves the current map along with front-end and back-end configurations into the default folderresults/slam_state(results/slam_state_dense_reconstruction). - To change the default saving path, open
config.yamland update targetfolder_pathin the section:SYSTEM_STATE: folder_path: results/slam_state # default folder path (relative to repository root) where the system state is saved or reloaded
Reload a saved map and relocalize in it
-
A saved map can be loaded and visualized in the GUI by running:
. pyenv-activate.sh # Activate pyslam python virtual environment. This is only needed once in a new terminal. ./main_map_viewer.py # Use the --path options to change the input path -
To enable map reloading and relocalization when running
main_slam.py, openconfig.yamland setSYSTEM_STATE: load_state: True # Flag to enable SLAM state reloading (map state + loop closing state) folder_path: results/slam_state # Default folder path (relative to repository root) where the system state is saved or reloaded
A couple of important notes:
- Pressing the
Savebutton saves the current map, front-end, and back-end configurations. Reloading a saved map replaces the current system configurations to ensure descriptor compatibility. - The Python and C++ implementations are interoperable: maps saved by one can be loaded by the other.
Trajectory saving
Estimated trajectories can be saved in three formats: TUM (The Open Mapping format), KITTI (KITTI Odometry format), and EuRoC (EuRoC MAV format). pySLAM saves two types of trajectory estimates:
- Online: In online trajectories, each pose estimate depends only on past poses. A pose estimate is saved at the end of each front-end iteration for the current frame.
- Final: In final trajectories, each pose estimate depends on both past and future poses. A pose estimate is refined multiple times by LBA windows that include it, as well as by PGO and GBA during loop closures.
To enable trajectory saving, open config.yaml and search for the SAVE_TRAJECTORY: set save_trajectory: True, select your format_type (tum, kitti, euroc), and the output filename. For instance for a kitti format output:
SAVE_TRAJECTORY:
  save_trajectory: True
  format_type: kitti             # Supported formats: `tum`, `kitti`, `euroc`
  output_folder: results/metrics # Relative to pyslam root folder
  basename: trajectory           # Basename of the trajectory saving output
Graph optimization engines
Currently, pySLAM supports both g2o and gtsam for graph optimization, with g2o set as the default engine. You can enable gtsam by setting to True the following parameters in pyslam/config_parameters.py:
  # Optimization engine
  kOptimizationFrontEndUseGtsam = True
  kOptimizationBundleAdjustUseGtsam = True
  kOptimizationLoopClosingUseGtsam = True
Additionally, the gtsam_factors package provides custom Python bindings for features not available in the original gtsam framework. See here for further details.
SLAM GUI
Some quick information about the non-trivial GUI buttons of main_slam.py:
Step: Enter in the Step by step mode. Press the buttonStepa first time to pause. Then, press it again to make the pipeline process a single new frame.Save: Save the map into the filemap.json. You can visualize it back by using the script/main_map_viewer.py(as explained above).Reset: Reset SLAM system.Draw Ground Truth: If a ground truth dataset (e.g., KITTI, TUM, EUROC, or REPLICA) is loaded, you can visualize it by pressing this button. The ground truth trajectory will be displayed in 3D and will be progressively aligned with the estimated trajectory, updating approximately every 10-30 frames. As more frames are processed, the alignment between the ground truth and estimated trajectory becomes more accurate. After about 20 frames, if the button is pressed, a window will appear showing the Cartesian alignment errors along the main axes (i.e., $e_x$, $e_y$, $e_z$) and the history of the total $RMSE$ between the ground truth and the aligned estimated trajectories.
When volumetric semantic mapping is enabled, use the following buttons to toggle:
Colors semantics: class/label color maps on both the 3D sparse map and the volumetric map.Objects: per-object color map on the volumetric map (requires instance IDs).Draw object BBs: bounding boxes for detected 3D object segments.
Unified log monitoring (tracking, mapping, loop closing, volumetric)
This table report the sparse SLAM submodules along with their generated logs (stored in the logs folder):
| Module | Log file |
|---|---|
local_mapping.py | local_mapping.log |
loop_closing.py | loop_closing.log |
loop_detecting_process.py | loop_detecting.log |
global_bundle_adjustments.py | gba.log |
volumetric_integrator_<X>.py | volumetric_integrator.log |
relocalizater.py | relocalization.log |
semantic_segmentation_<X>.py | semantic_segmentation.log |
semantic_mapping_<X>.py | semantic_mapping.log |
At runtime, for debugging purposes, you can individually monitor any of the log files by running the following command:
tail -f logs/<log file name>
Otherwise, to check all logs at the same time, run this tmux-based script:
./scripts/tmux_logs.sh
To launch slam and check all logs, run:
./scripts/tmux_slam.sh
Press CTRL+A and then CTRL+Q to exit from tmux environment.
Evaluating SLAM
Run a SLAM evaluation
The main_slam_evaluation.py script enables automated SLAM evaluation by executing main_slam.py across a collection of datasets and configuration presets. The main input to the script is an evaluation configuration file (e.g., evaluation/configs/evaluation.json) that specifies which datasets and presets to be used. For convenience, sample configurations for the datasets TUM, EUROC and KITTI datasets are already provided in the evaluation/configs/ directory.
For each evaluation run, results are stored in a dedicated subfolder within the results directory, containing all the computed metrics. These metrics are then processed and compared. The final output is a report, available in PDF, LaTeX, and HTML formats, that includes comparison tables summarizing the Absolute Trajectory Error (ATE), the maximum deviation from the ground truth trajectory and other metrics.
You can find some obtained evaluation results here.
pySLAM performances and comparative evaluations
For a comparative evaluation of the "online" trajectory estimated by pySLAM versus the "final" trajectory estimated by ORB-SLAM3, check out this nice notebook. For more details about "online" and "final" trajectories, refer to this section.
Note: Unlike ORB-SLAM3, which only saves the final pose estimates (recorded after the entire dataset has been processed), pySLAM saves both online and final pose estimates. For details on how to save trajectories in pySLAM, refer to this section.
When you click the Draw Ground Truth button in the GUI (see here), you can visualize the Absolute Trajectory Error (ATE or RMSE) history and evaluate both online and final errors up to the current time.
Feed-forward inference of 3D scenes from multiple image views
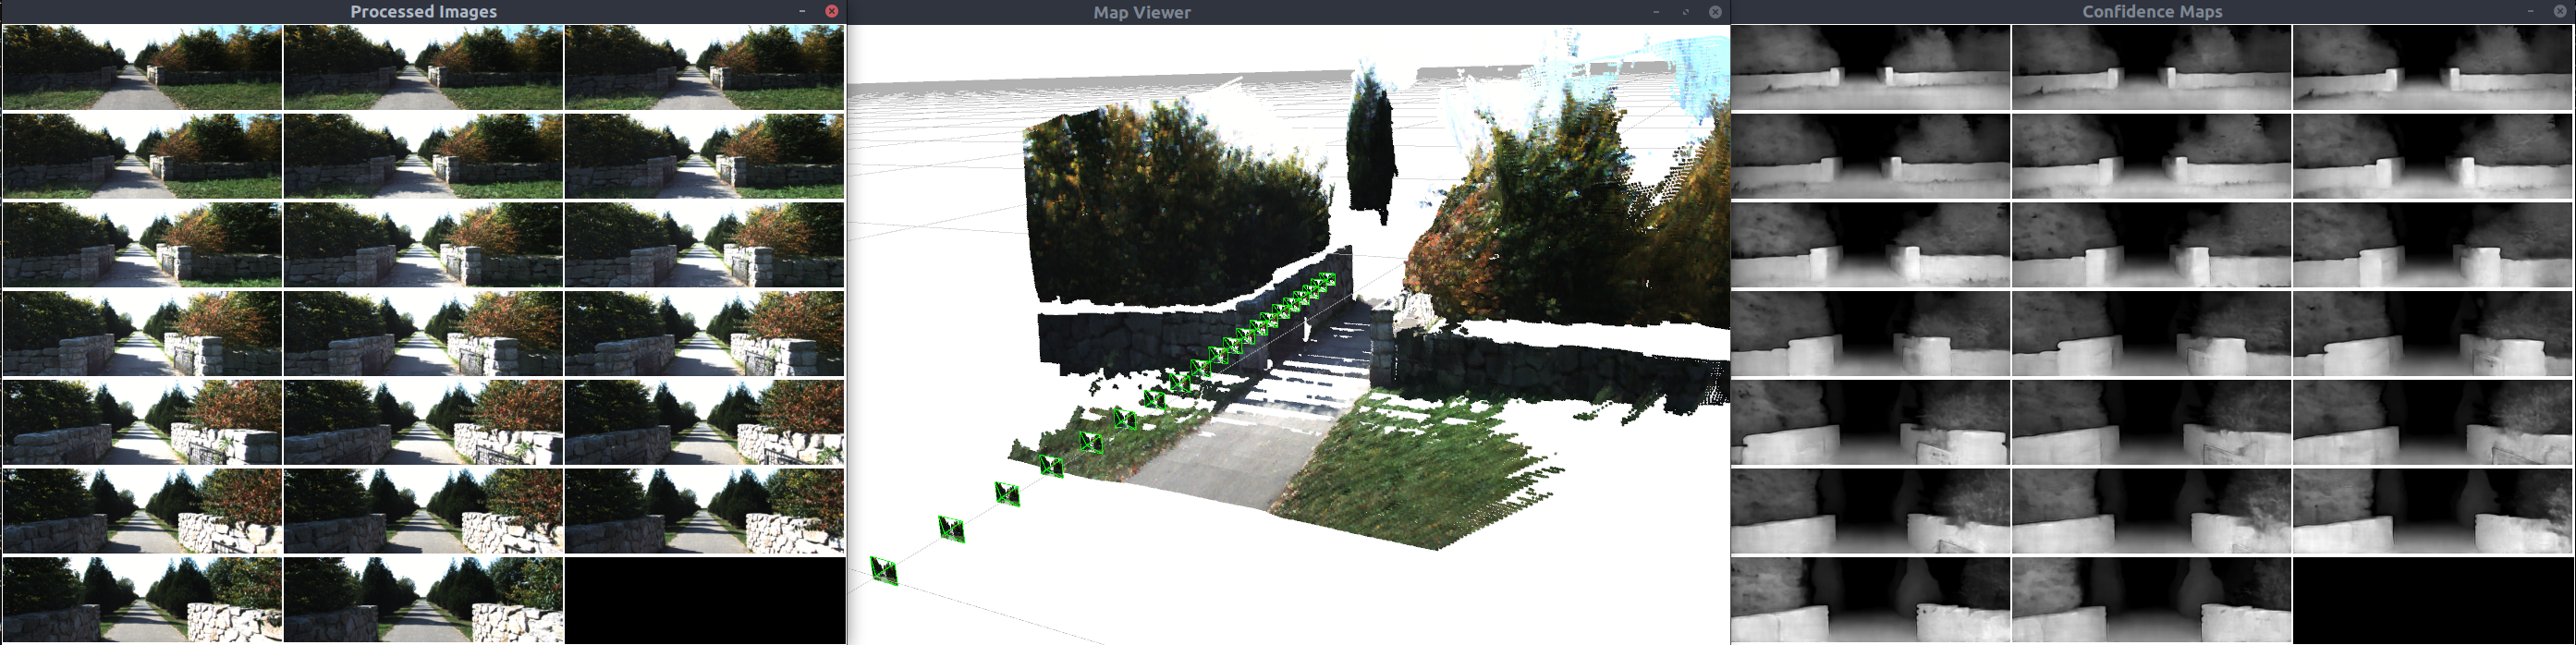
The folder pyslam/scene_from_views implements the scene_from_views factory: a unified interface for feed-forward 3D scene reconstruction from multiple views with a shared reconstruct() pipeline (preprocess_images() → infer() → postprocess_results()), plus optional optimizer post-processing. The API is consistent across models while preserving model-specific optimizations. See the main script main_scene_from_views.py.
- Feed-forward multi-view reconstruction (poses + fused 3D geometry directly from images):
SceneFromViewsDust3r,SceneFromViewsMast3r,SceneFromViewsMvdust3r,SceneFromViewsVggt,SceneFromViewsVggtRobust,SceneFromViewsFast3r. - Monocular depth pipeline with optional pose/intrinsic outputs when supported by the model variant:
SceneFromViewsDepthAnythingV3. - Global alignment stage for merging views (defaults):
SceneFromViewsDust3ruses dense alignment;SceneFromViewsMast3ruses sparse alignment (both are configurable). - Robust view filtering / outlier rejection:
SceneFromViewsVggtRobustuses anchor-based attention + cosine scoring to reject low-confidence views, then re-runs inference on the survivors. - Large-scale reconstruction (designed for 1000+ images in one forward pass):
SceneFromViewsFast3r.
Note that DUSt3R and MASt3R are pairwise models: they take two images at a time. They are feed-forward per pair; multi-view reconstruction is then obtained by global alignment/optimization over all pairwise pointmaps. MV-DUSt3R, VGGT, and Fast3R are multi-view models that process all images simultaneously in a single forward pass.
All models return a standardized SceneFromViewsResult with consistent field names; optional outputs (meshes, intrinsics, depth maps, confidences) may be None depending on the model. The factory pattern allows easy switching between models while maintaining the same interface.
Further details here.
Supported components and models
Supported local features
At present time, the following feature detectors are supported:
- FAST
- Good features to track
- ORB
- ORB2 (improvements of ORB-SLAM2 to ORB detector)
- SIFT
- SURF
- KAZE
- AKAZE
- BRISK
- AGAST
- MSER
- StarDector/CenSurE
- Harris-Laplace
- SuperPoint
- D2-Net
- DELF
- Contextdesc
- LFNet
- R2D2
- Key.Net
- DISK
- ALIKED
- Xfeat
- KeyNetAffNetHardNet (KeyNet detector + AffNet + HardNet descriptor).
The following feature descriptors are supported:
- ORB
- SIFT
- ROOT SIFT
- SURF
- AKAZE
- BRISK
- FREAK
- SuperPoint
- Tfeat
- BOOST_DESC
- DAISY
- LATCH
- LUCID
- VGG
- Hardnet
- GeoDesc
- SOSNet
- L2Net
- Log-polar descriptor
- D2-Net
- DELF
- Contextdesc
- LFNet
- R2D2
- BEBLID
- DISK
- ALIKED
- Xfeat
- KeyNetAffNetHardNet (KeyNet detector + AffNet + HardNet descriptor).
For more information, refer to pyslam/local_features/feature_types.py file. Some of the local features consist of a joint detector-descriptor. You can start playing with the supported local features by taking a look at test/cv/test_feature_manager.py and main_feature_matching.py.
In both the scripts main_vo.py and main_slam.py, you can create your preferred detector-descritor configuration and feed it to the function feature_tracker_factory(). Some ready-to-use configurations are already available in the file local_features/feature_tracker.configs.py
The function feature_tracker_factory() can be found in the file pyslam/local_features/feature_tracker.py. Take a look at the file pyslam/local_features/feature_manager.py for further details.
N.B.: You just need a single python environment to be able to work with all the supported local features!
Supported matchers
See the file local_features/feature_matcher.py for further details.
Supported global descriptors and local descriptor aggregation methods
Local descriptor aggregation methods
- Bag of Words (BoW): DBoW2, DBoW3 [paper]
- Vector of Locally Aggregated Descriptors: VLAD [paper]
- Incremental Bags of Binary Words (iBoW) via Online Binary Image Index (OBIndex2) [paper]
- Hyperdimensional Computing: HDC [paper]
NOTE: iBoW and OBIndex2 incrementally build a binary image index and do not need a prebuilt vocabulary. In the implemented classes, when needed, the input non-binary local descriptors are transparently transformed into binary descriptors.
Global descriptors
Also referred to as holistic descriptors:
Different loop closing methods are available. These combines the above aggregation methods and global descriptors. See the file pyslam/loop_closing/loop_detector_configs.py for further details.
Supported depth prediction models
Both monocular and stereo depth prediction models are available. SGBM algorithm has been included as a classic reference approach.
- SGBM: Depth SGBM from OpenCV (Stereo, classic approach)
- Depth-Pro (Monocular)
- DepthAnythingV2 (Monocular)
- DepthAnythingV3 (Monocular)
- RAFT-Stereo (Stereo)
- CREStereo (Stereo)
- MASt3R (Stereo/Monocular)
- MV-DUSt3R (Stereo/Monocular)
Supported volumetric mapping methods
- A C++ template-based voxel grid implementation leverages parallel spatial hashing, supporting both direct voxel hashing and indirect voxel-block hashing strategies. Parallel execution is managed using TBB, and the design accommodates both simple and semantic voxels. Further information about the volumetric grid models is available here.
- TSDF (Truncated Signed Distance Function) with voxel block grid (parallel spatial hashing)
- Incremental 3D Gaussian Splatting. See here and MonoGS for a description of its backend.
Supported semantic segmentation methods
- DeepLabv3: from
torchvision, pre-trained on COCO/VOC - Segformer: from
transformers, pre-trained on Cityscapes or ADE20k - CLIP: from
f3rmpackage for open-vocabulary support - EOV-Seg: "EOV-Seg: Efficient Open-Vocabulary Panoptic Segmentation"
- Detic: "Detecting Twenty-thousand Classes using Image-level Supervision"
- ODISE: "Open-Vocabulary Panoptic Segmentation with Text-to-Image Diffusion Models"
- RF-DETR: "RF-DETR: Neural Architecture Search for Real-Time Detection Transformers"
Supported models for feed-forward inference of 3D scenes from multiple images
- DUSt3R: Geometric 3D Vision Made Easy
- MASt3R: Grounding Image Matching in 3D with MASt3R
- Depth Anything V3: Recovering the Visual Space from Any Views
- MVDust3r: Multi-view DUSt3R variant
- VGGT: Visual Geometry Grounded Transformer
- Robust VGGT: Emergent Outlier View Rejection in Visual Geometry Grounded Transformers
See here for further details about SceneFromViews architecture.
Configuration
Main configuration file
Refer to this section for how to update the main configuration file config.yaml and affect the configuration parameters in pyslam/config_parameters.py.
Datasets
The following datasets are supported:
| Dataset | type in config.yaml |
|---|---|
| KITTI odometry data set (grayscale, 22 GB) | type: KITTI_DATASET |
| TUM dataset | type: TUM_DATASET |
| ICL-NUIM dataset | type: ICL_NUIM_DATASET |
| EUROC dataset | type: EUROC_DATASET |
| REPLICA dataset | type: REPLICA_DATASET |
| TARTANAIR dataset | type: TARTANAIR_DATASET |
| SEVEN_SCENES dataset | type: SEVEN_SCENES_DATASET |
| NEURAL_RGBD dataset | type: NEURAL_RGBD_DATASET |
| ROVER dataset | type: NEURAL_RGBD_DATASET |
| ScanNet dataset | type: SCANNET_DATASET |
| CLIO dataset | type: CLIO_DATASET |
| ROS1 bags | type: ROS1BAG_DATASET |
| ROS2 bags | type: ROS2BAG_DATASET |
| MCAP file | type: MCAP_DATASET |
| Video file | type: VIDEO_DATASET |
| Folder of images | type: FOLDER_DATASET |
Use the download scripts available in the folder scripts to download some of the following datasets.
KITTI Datasets
pySLAM code expects the following structure in the specified KITTI path folder (specified in the section KITTI_DATASET of the file config.yaml). :
├── sequences
    ├── 00
    ...
    ├── 21
├── poses
    ├── 00.txt
        ...
    ├── 10.txt
-
Download the dataset (grayscale images) from http://www.cvlibs.net/datasets/kitti/eval_odometry.php and prepare the KITTI folder as specified above
-
Select the corresponding calibration settings file (section
KITTI_DATASET: settings:in the fileconfig.yaml)
TUM Datasets
pySLAM code expects a file associations.txt in each TUM dataset folder (specified in the section TUM_DATASET: of the file config.yaml).
- Download a sequence from http://vision.in.tum.de/data/datasets/rgbd-dataset/download and uncompress it.
- Associate RGB images and depth images using the python script associate.py. You can generate your
associations.txtfile by executing:python associate.py PATH_TO_SEQUENCE/rgb.txt PATH_TO_SEQUENCE/depth.txt > associations.txt # pay attention to the order! - Select the corresponding calibration settings file (section
TUM_DATASET: settings:in the fileconfig.yaml).
ICL-NUIM Datasets
You can download the dataset here. Follow the same instructions provided for the TUM datasets.
EuRoC Datasets
- Download a sequence (ASL format) from http://projects.asl.ethz.ch/datasets/doku.php?id=kmavvisualinertialdatasets (check this direct link)
- Use the script
io/generate_euroc_groundtruths_as_tum.shto generate the TUM-like groundtruth filespath + '/' + name + '/mav0/state_groundtruth_estimate0/data.tum'that are required by theEurocGroundTruthclass. - Select the corresponding calibration settings file (section
EUROC_DATASET: settings:in the fileconfig.yaml).
Replica Datasets
- You can download the zip file containing all the sequences by running:
wget https://cvg-data.inf.ethz.ch/nice-slam/data/Replica.zip - Then, uncompress it and deploy the files as you wish.
- Select the corresponding calibration settings file (section
REPLICA_DATASET: settings:in the fileconfig.yaml).
Tartanair Datasets
- You can download the datasets from https://theairlab.org/tartanair-dataset/
- Then, uncompress them and deploy the files as you wish.
- Select the corresponding calibration settings file (section
TARTANAIR_DATASET: settings:in the fileconfig.yaml).
7 Scenes dataset
To download the dataset follow the instructions at https://www.microsoft.com/en-us/research/project/rgb-d-dataset-7-scenes/. Select the section SEVEN_SCENES_DATASET: settings: in the file config.yaml. A calibration file settings/SEVEN_SCENES.yaml is already available.
Neural RGBD dataset
To download the dataset follow the instructions at https://github.com/dazinovic/neural-rgbd-surface-reconstruction. Select the section NEURAL_RGBD_DATASET: settings: in the file config.yaml. A calibration file settings/NEURAL_RGBD.yaml is already available.
Rover dataset
To download the dataset follow the instructions at https://iis-esslingen.github.io/rover/. Select the section ROVER_DATASET: settings: in the file config.yaml. A calibration file for the d435i camera is already available: settings/ROVER_d435i.yaml. Other camera models will be supported in the future.
ScanNet Datasets
You can download the datasets following instructions in http://www.scan-net.org/. There are two versions you can download:
- A subset of pre-processed data termed as
tasks/scannet_frames_2k: this version is smaller, and more generally available for training neural networks. However, it only includes one frame out of each 100, which makes it unusable for SLAM. The labels are processed by mapping them from the original Scannet label annotations to NYU40. - The raw data: this version is the one used for SLAM. You can download the whole dataset (TBs of data) or specific scenes. A common approach for evaluation of semantic mapping is to use the
scannetv2_val.txtscenes. For downloading and processing the data, you can use the following repository as the original Scannet repository is tested under Python 2.7 and doesn't support batch downloading of scenes.
- Once you have the
color,depth,pose, and (optional for semantic mapping)labelfolders, you should place them following{path_to_scannet}/scans/{scene_name}/[color, depth, pose, label]. Then, configure thebase_pathandnamein the fileconfig.yaml. - Select the corresponding calibration settings file (section
SCANNET_DATASET: settings:in the fileconfig.yaml). NOTE: the RGB images are rescaled to match the depth image. The current intrinsic parameters in the existing calibration file reflect that.
CLIO Datasets
pySLAM supports the RGB-D sequences released with Clio (Hydra/Clio scene-graph mapping). Each scene is expected to follow this layout under {base_path}/{name}/:
images/rgb_{id}.jpg
depth/depth_{id}.png
sparse/0/images.bin          # COLMAP sparse model (optional reference poses)
*.bag                        # ROS1 recording (used for fps auto-detection and metric odometry)
- Download or prepare a CLIO scene and set
base_pathandnamein theCLIO_DATASETsection ofconfig.yaml. - Select the calibration settings file (
CLIO_DATASET: settings: settings/CLIO.yaml). Depth maps are stored asuint16in millimeters (DepthMapFactor: 1000.0). - Set
sensor_type: rgbd(ormonoif depth is unavailable). - Set
groundtruth_file: autoto load a reference trajectory for evaluation and visualization (not independent motion-capture GT). By default, pySLAM prefers metric poses from the scene ROS1 bag topic/dominic/forward/colmap_odom; if the bag is missing, it falls back to COLMAPsparse/0poses (typically up-to-scale). Useclio_reference_poses: auto | bag | sparseto override this choice. - Playback rate is auto-detected from the bag when present (~7.5 Hz on the office scene); you can override it with
fpsinconfig.yamlorCamera.fpsin the settings file.
When the reference trajectory is non-metric (COLMAP sparse), pySLAM automatically uses Sim(3) alignment for the ground-truth overlay and ATE metrics.
ROS1 bags
- Source the main ROS1
setup.bashafter you have sourced thepyslampython environment. - Set the paths and
ROS1BAG_DATASET: ros_parametersin the fileconfig.yaml. - Select/prepare the corresponding calibration settings file (section
ROS1BAG_DATASET: settings:in the fileconfig.yaml). See the available yaml files in the folderSettingsas an example.
ROS2 bags
- Source the main ROS2
setup.bashafter you have sourced thepyslampython environment. - Set the paths and
ROS2BAG_DATASET: ros_parametersin the fileconfig.yaml. - Select/prepare the corresponding calibration settings file (section
ROS2BAG_DATASET: settings:in the fileconfig.yaml). See the available yaml files in the folderSettingsas an example.
MCAP files
A concise introduction of the mcap format is available here. These files can be also recorded and played-back by using ROS2 tools.
Video and Folder Datasets
You can use the VIDEO_DATASET and FOLDER_DATASET types to read generic video files and image folders (specifying a glob pattern), respectively. A companion ground truth file can be set in the simple format type: Refer to the class SimpleGroundTruth in io/ground_truth.py and check the script io/convert_groundtruth_to_simple.py.
Camera Settings
The folder settings contains the camera settings files which can be used for testing the code. These are the same used in the framework ORB-SLAM2. You can easily modify one of those files for creating your own new calibration file (for your new datasets).
In order to calibrate your camera, you can use the scripts in the folder calibration. In particular:
- Use the script
grab_chessboard_images.pyto collect a sequence of images where the chessboard can be detected (set the chessboard size therein, you can use the calibration patterncalib_pattern.pdfin the same folder) - Use the script
calibrate.pyto process the collected images and compute the calibration parameters (set the chessboard size therein)
For more information on the calibration process, see this tutorial or this other link.
If you want to use your camera, you have to:
- Calibrate it and configure WEBCAM.yaml accordingly
- Record a video (for instance, by using
save_video.pyin the foldercalibration) - Configure the
VIDEO_DATASETsection ofconfig.yamlin order to point to your recorded video.
References
- "pySLAM: An Open-Source, Modular, and Extensible Framework for SLAM", Luigi Freda
- "pySLAM and slamplay: Modular, Extensible SLAM Tools for Rapid Prototyping and Integration", Luigi Freda RSS 2025 Workshop: Unifying Visual SLAM [recorded talk]
- "Semantic pySLAM: Unifying semantic mapping approaches under the same framework", David Morilla-Cabello, Eduardo Montijano
RSS 2025 Workshop: Unifying Visual SLAM
Suggested books:
- Multiple View Geometry in Computer Vision by Richard Hartley and Andrew Zisserman
- An Invitation to 3-D Vision by Yi-Ma, Stefano Soatto, Jana Kosecka, S. Shankar Sastry
- State Estimation for Robotics by Timothy D. Barfoot
- Computer Vision: Algorithms and Applications, by Richard Szeliski
- Introduction to Visual SLAM by Xiang Gao, Tao Zhang
- Deep Learning, by Ian Goodfellow, Yoshua Bengio and Aaron Courville
- Neural Networks and Deep Learning, By Michael Nielsen
- SLAM Handbook
Suggested material:
- Vision Algorithms for Mobile Robotics by Davide Scaramuzza
- CS 682 Computer Vision by Jana Kosecka
- ORB-SLAM: a Versatile and Accurate Monocular SLAM System by R. Mur-Artal, J. M. M. Montiel, and J. D. Tardos
- Double Window Optimisation for Constant Time Visual SLAM by H. Strasdat, A. J. Davison, J.M.M. Montiel, K. Konolige
- The Role of Wide Baseline Stereo in the Deep Learning World by Dmytro Mishkin
- To Learn or Not to Learn: Visual Localization from Essential Matrices by Qunjie Zhou, Torsten Sattler, Marc Pollefeys, Laura Leal-Taixe
- Awesome local-global descriptors repository
- Introduction to Feature Matching Using Neural Networks
- Visual Place Recognition: A Tutorial
- Bags of Binary Words for Fast Place Recognition in Image Sequences
Moreover, you may want to have a look at the OpenCV guide or tutorials.
Credits
- Pangolin
- g2opy
- ORBSLAM2
- SuperPointPretrainedNetwork
- Tfeat
- Image Matching Benchmark Baselines
- Hardnet
- GeoDesc
- SOSNet
- L2Net
- Log-polar descriptor
- D2-Net
- DELF
- Contextdesc
- LFNet
- R2D2
- BEBLID
- DISK
- Xfeat
- LightGlue
- Key.Net
- Twitchslam
- MonoVO
- VPR_Tutorial
- DepthAnythingV2
- DepthAnythingV3
- DepthPro
- RAFT-Stereo
- CREStereo and CREStereo-Pytorch
- MonoGS
- mast3r
- mvdust3r
- MegaLoc
- VGGT and Robust VGGT
- MAST3R
- EOV-Seg
- ODISE
- [RF-DETR](from https://github.com/roboflow/rf-detr.git)
- Detic
- Detectron2
- Nanoflann
- Many thanks to Anathonic for adding the first version of the trajectory-saving feature and for the nice comparison notebook: pySLAM vs ORB-SLAM3.
- Many thanks to David Morilla Cabello for creating the first version of sparse semantic mapping in pySLAM.
License
pySLAM is released under GPLv3 license. pySLAM contains some modified libraries, each one coming with its license. Where nothing is specified, a GPLv3 license applies to the software.
If you use pySLAM in your projects, please cite this document:
"pySLAM: An Open-Source, Modular, and Extensible Framework for SLAM", Luigi Freda
You may find an updated version of this document here.
Contributing to pySLAM
If you like pySLAM and would like to contribute to the code base, you can report bugs, leave comments and proposing new features through issues and pull requests on github. Feel free to get in touch at luigifreda(at)gmail[dot]com. Thank you!
Roadmap
Many improvements and additional features are currently under development:
- Loop closing
- Relocalization
- Stereo and RGBD support
- Map saving/loading
- Modern DL matching algorithms
- Object detection
- Open vocabulary segment (object) detection
- Object-level mapping [WIP] (Detic now allows to extract bounding boxes and segments of objects)
- Semantic segmentation and mapping
- Dense closed-set labels
- Dense closed-set probability vectors
- Dense open vocabulary feature vectors
- New segmentation models (EOV-Seg, Detic, ODISE)
- Volumetric semantic mapping
- 3D dense reconstruction
- Unified install procedure (single branch) for all OSs
- Trajectory saving
- Depth prediction integration, more models: VGGT, MoGE, etc. [WIP]
- ROS1 and ROS2 support. Dedicated MCAP dataset.
- Gaussian splatting integration
- Documentation [WIP]
- GTSAM integration [WIP]
- IMU integration
- LIDAR integration
- Integration of direct methods in the tracker
- XSt3r-based methods integration [WIP]
- Evaluation scripts
- More camera models
- Integrate pypose library
Contributors


Similar repos


Languages
Python
62.9%
C++
32.7%
Shell
3.8%
pySLAM is a hybrid Python/C++ Visual SLAM pipeline supporting monocular, stereo, and RGB-D cameras. It provides a broad set of modern local and global feature extractors, multiple loop-closure strategies, a volumetric reconstruction module, integrated depth-prediction models, and semantic segmentation capabilities for enhanced scene understanding.
Python
3,420
484 commits
updated Aug 23, 2026
README
pySLAM v2.10.7
Author: Luigi Freda
pySLAM is a hybrid python/C++ implementation of a Visual SLAM pipeline (Simultaneous Localization And Mapping) that supports monocular, stereo and RGBD cameras. It provides the following features in a single python environment:
- A wide range of classical and modern local features with a convenient interface for their integration.
- Multiple loop closing methods, including descriptor aggregators such as visual Bag of Words (BoW, iBow), Vector of Locally Aggregated Descriptors (VLAD) and modern global descriptors (image-wise descriptors such as SAD, NetVLAD, HDC-Delf, CosPlace, EigenPlaces, Megaloc).
- A volumetric reconstruction pipeline that processes depth and color images using volumetric integration to produce dense reconstructions. It supports different voxel grid models (with semantic support) and TSDF with voxel hashing, and incremental Gaussian Splatting.
- Integration of depth prediction models within the SLAM pipeline. These include DepthPro, DepthAnythingV2, DepthAnythingV3, RAFT-Stereo, CREStereo, etc.
- A suite of segmentation models for semantic understanding of the scene, such as DeepLabv3, Segformer, CLIP, DETIC, EOV-SEG, ODISE, RFDETR, YOLO, etc.
- Additional tools for VO (Visual Odometry) and SLAM, with built-in support for both g2o and GTSAM, along with custom Python bindings for features not available in the original libraries.
- A modular sparse-SLAM core, implemented in both Python and C++ (with custom pybind11 bindings), allowing users to switch between high-performance/speed and high-flexibility modes. The Python and C++ implementations are interoperable: maps saved by one can be loaded by the other. Further details here.
- A modular pipeline for feed-forward inference of 3D scenes from multiple images. Supports models like DUSt3R, Mast3r, MV-DUSt3R, VGGT, Robust VGGT, DepthFromAnythingV3, and Fast3R. Further details here.
- Built-in support for over 10 dataset types.
pySLAM serves as a flexible baseline framework to experiment with VO/SLAM techniques, local features, descriptor aggregators, global descriptors, volumetric integration, depth prediction and semantic mapping. It allows to explore, prototype and develop VO/SLAM pipelines both in Python and C++. pySLAM is a research framework and a work in progress.
Enjoy it!
See the demo video for release v2.10.0
Table of contents
- pySLAM v2.10.7
- Table of contents
- Overview
- Install
- Usage
- Visual odometry
- Full SLAM
- Selecting a dataset and different configuration parameters
- Feature extraction and matching
- Loop closing and relocalization
- Volumetric reconstruction
- Depth prediction
- Semantic mapping and Image Segmentation
- C++ Core Module
- Saving and reloading
- Graph optimization engines
- SLAM GUI
- Unified log monitoring (tracking, mapping, loop closing, volumetric)
- Evaluating SLAM
- Feed-forward inference of 3D scenes from multiple image views
- Supported components and models
- Supported local features
- Supported matchers
- Supported global descriptors and local descriptor aggregation methods
- Supported depth prediction models
- Supported volumetric mapping methods
- Supported semantic segmentation methods
- Supported models for feed-forward inference of 3D scenes from multiple images
- Configuration
- References
- Credits
- License
- Contributing to pySLAM
- Roadmap
Overview
├── cpp         # Pybind11 C++ bindings to slam utilities
│   ├── hamming     # SIMD-optimized Hamming distance calculator for uint8 binary descriptors with zero-copy Python bindings.
│   ├── glutils     # OpenGL utilities for drawing points, cameras, etc.
│   ├── solvers     # PnP and Sim3 solvers for camera pose estimation
│   ├── volumetric  # Volumetric mapping with parallel block-based voxel hashing, templates, carving, and semantics support.
│   ├── trajectory  # Trajectory alignment helpers
├── data       # Sample input/output data
├── docs       # Documentation files
├── pyslam     # Core Python package
│   ├── dense
│   ├── depth_estimation
│   ├── evaluation
│   ├── io
│   ├── local_features
│   ├── loop_closing
│   ├── scene_from_views # Unified 3D scene reconstruction from multiple views
│   ├── semantics
│       ├── cpp  # C++ core for semantics
│   ├── slam
│       ├── cpp  # C++ core for sparse slam
│   ├── utilities
│   ├── viz
├── scripts     # Shell utility scripts
├── settings    # Dataset/configuration files
├── test        # Tests and usage examples
├── thirdparty  # External dependencies
Main Scripts
-
main_vo.pycombines the simplest VO ingredients without performing any image point triangulation or windowed bundle adjustment. At each step $k$,main_vo.pyestimates the current camera pose $C_k$ relative to the previous one $C_{k-1}$. The inter-frame pose estimation returns $[R_{k-1,k},t_{k-1,k}]$ with $\Vert t_{k-1,k} \Vert=1$. With this basic, "educational" approach, you need to use a ground truth in order to recover a correct inter-frame scale $s$ and estimate a valid trajectory by composing $C_k = C_{k-1} [R_{k-1,k}, s t_{k-1,k}]$. This script is a first start to understand the basics of inter-frame feature tracking and camera pose estimation. -
main_slam.pyadds feature tracking along multiple frames, point triangulation, keyframe management, bundle adjustment, loop closing, dense mapping and depth inference in order to estimate the camera trajectory and build both a sparse and dense map. It's a full SLAM pipeline and includes all the basic and advanced blocks which are necessary to develop a real visual SLAM pipeline. -
main_feature_matching.pyshows how to use the basic feature tracker capabilities (feature detector + feature descriptor + feature matcher) and allows to test the different available local features. -
main_depth_prediction.pyshows how to use the available depth inference models to get depth estimations from input color images. -
main_map_viewer.pyreloads a saved map and visualizes it. Further details on how to save a map here. -
main_map_dense_reconstruction.pyreloads a saved map and uses a configured volumetric integrator to obtain a dense reconstruction (see here). -
main_slam_evaluation.pyenables automated SLAM evaluation by executingmain_slam.pyacross a collection of datasets and configuration presets (see here). -
main_semantic_image_segmentation.pyinfers and visualize extracted semantic information on each frame of the selected dataset. -
main_scene_from_views.pyinfers 3D scenes from multiple images using models like DUSt3R, Mast3r, MV-DUSt3R, VGGT, Robust VGGT, DepthFromAnythingV3, and Fast3R (see here).
Other test/example scripts are provided in the test folder.
System overview
This page provides a high-level system overview, including diagrams that illustrate the main workflow, key components, and class relationships and dependencies.
paper: "pySLAM: An Open-Source, Modular, and Extensible Framework for SLAM", Luigi Freda
You may find an updated version of the paper here.
presentation: "pySLAM and slamplay: Modular, Extensible SLAM Tools for Rapid Prototyping and Integration", Luigi Freda
RSS 2025 Workshop: Unifying Visual SLAM. The recorded talk is available here.
Install
First, clone this repo and its submodules by running
git clone --recursive https://github.com/luigifreda/pyslam.git
cd pyslam
Then, from the repo root, under Ubuntu and macOS you can simply run:
# pixi shell      # If you want to use pixi (experimental), run this commented command as a first step to prepare the installation.
./install_all.sh   # Unified install procedure
Grab a coffee. It will take a while.
The install scripts create a single Python environment pyslam that hosts all the supported components and models. If conda is available, it automatically uses it; otherwise, it installs and uses venv. An internet connection is required.
Refer to these links for further details about the specific install procedures that are supported.
Once you completed the install procedure you can jump the usage section.
Main requirements
- Python 3.11.9
- OpenCV >=4.10 (see below)
- PyTorch >=2.3.1
- Tensorflow >=2.13.1
- Kornia >=0.7.3
- Rerun
- You need CUDA in order to run Gaussian splatting and dust3r-based methods. Check you have installed a suitable version of CUDA toolkit by running
./cuda_config.sh
The internal pySLAM libraries are imported by using a Config instance (from pyslam/config.py) in the main or test scripts. If you encounter any issues or performance problems, please refer to the TROUBLESHOOTING file for assistance.
Ubuntu
The install procedure was tested under Ubuntu 20.04, 22.04 and 24.04.
- With venv (recommended): Follow the instructions reported here.
- With conda: Run the procedure described in this other file.
- With pixi: Run
pixi shellin the root folder of the repo before launching./install_all.sh(see this file for further details). Currently, pixi support is experimental and may encounter issues with building and linking.
The install process creates a new Python virtual environment pyslam.
macOS
Follow the instructions in this file. The reported procedure was tested under Sequoia 15.1.1 and Xcode 16.1.
Docker
If you prefer docker or you have an OS that is not supported yet, you can use rosdocker:
- With its custom
pyslam/pyslam_cudadocker files (follow the instructions here). - With one of the suggested docker images (ubuntu*_cuda or ubuntu*), where you can clone, build and run pyslam.
How to install non-free OpenCV modules
The provided install scripts take care of installing a recent opencv version (>=4.10) with non-free modules enabled (see scripts/install_opencv_python.sh). To quickly verify your installed opencv version run:
#pixi shell           # If you use pixi, this activates the pyslam environment.
. pyenv-activate.sh   # Activate `pyslam` python environment. Only needed once in a new terminal. Not needed with pixi.
./scripts/opencv_check.py
Troubleshooting and performance issues
If you run into issues or errors during the installation process or at run-time, please, check the docs/TROUBLESHOOTING.md file. Before submitting a new git issue please read here.
Usage
Open a new terminal and start experimenting with the scripts. In each new terminal, you are supposed to start with this command:
#pixi shell           # If you use pixi, this activates the pyslam environment.
. pyenv-activate.sh   # Activate `pyslam` python environment. Only needed once in a new terminal. Not needed with pixi.
If you are using pixi then just run pixi shell to activate the pyslam environment.
The file config.yaml serves as a single entry point to configure the system and its global configuration parameters contained in pyslam/config_parameters.py.
- To enable the C++ sparse-SLAM core, set
USE_CPP_CORE = Truein the fileconfig_parameters.py. - Further information on how to configure pySLAM are provided here.
Visual odometry
The basic Visual Odometry (VO) can be run with the following commands:
#pixi shell           # If you use pixi, this activates the pyslam environment.
. pyenv-activate.sh   # Activate `pyslam` python environment. Only needed once in a new terminal. Not needed with pixi.
./main_vo.py
By default, the script processes a KITTI video (available in the folder data/videos) by using its corresponding camera calibration file (available in the folder settings), and its groundtruth (available in the same data/videos folder). If matplotlib windows are used, you can stop main_vo.py by clicking on one of them and pressing the key 'Q'. As explained above, this very basic script main_vo.py strictly requires a ground truth.
With RGBD datasets, you can also test the RGBD odometry with the classes VisualOdometryRgbd or VisualOdometryRgbdTensor (ground truth is not required here).
Important: Refer to the related notes on the limitations of the basic monocular visual odometry approach implemented in main_vo.py.
Full SLAM
Similarly, you can test the full SLAM by running main_slam.py:
#pixi shell           # If you use pixi, this activates the pyslam environment.
. pyenv-activate.sh   # Activate `pyslam` python environment. Only needed once in a new terminal. Not needed with pixi.
./main_slam.py
This will process the same default KITTI video (available in the folder data/videos) by using its corresponding camera calibration file (available in the folder settings). You can stop it by clicking on one of the open windows and pressing the key 'Q' or closing the 3D Pangolin GUI.
Selecting a dataset and different configuration parameters
The file config.yaml serves as a single entry point to configure the system, the target dataset and its global configuration parameters set in pyslam/config_parameters.py.
To process a different dataset with both VO and SLAM scripts, you need to update the file config.yaml:
- Select your dataset
typein the sectionDATASET(further details in the section Datasets below for further details). This identifies a corresponding dataset section (e.g.KITTI_DATASET,TUM_DATASET, etc). - Select the
sensor_type(mono,stereo,rgbd) in the chosen dataset section. - Select the camera
settingsfile in the dataset section (further details in the section Camera Settings below). - Set the
groundtruth_fileaccordingly. Further details in the section Datasets below (see also the filesio/ground_truth.py,io/convert_groundtruth_to_simple.py).
You can use the section GLOBAL_PARAMETERS of the file config.yaml to override the global configuration parameters set in pyslam/config_parameters.py. This is particularly useful when running a SLAM evaluation.
Feature extraction and matching
If you just want to test the basic feature extraction and matching capabilities (feature detector + feature descriptor + feature matcher) and get a taste of the different available local features, run
#pixi shell           # If you use pixi, this activates the pyslam environment.
. pyenv-activate.sh   # Activate `pyslam` python environment. Only needed once in a new terminal. Not needed with pixi.
./main_feature_matching.py
In any SLAM and VO, you can choose any detector/descriptor among ORB, SIFT, SURF, BRISK, AKAZE, SuperPoint, etc. (see the section Supported Local Features below for further information).
Some basic examples are available in the subfolder test/cv. In particular, as for feature detection/description, you may want to take a look at test/cv/test_feature_manager.py too.
Loop closing and relocalization
Many loop closing methods are available, combining different aggregation methods and global descriptors.
While running full SLAM, loop closing is enabled by default and can be disabled by setting kUseLoopClosing=False in pyslam/config_parameters.py. Different configuration options LoopDetectorConfigs can be found in pyslam/loop_closing/loop_detector_configs.py: Code comments provide additional useful details.
One can start experimenting with loop closing methods by using the examples in test/loopclosing. The example test/loopclosing/test_loop_detector.py is the recommended entry point.
Vocabulary management
DBoW2, DBoW3, and VLAD require pre-trained vocabularies. ORB-based vocabularies are automatically downloaded into the data folder (see pyslam/loop_closing/loop_detector_configs.py).
To create a new vocabulary, follow these steps:
-
Generate an array of descriptors: Use the script
test/loopclosing/test_gen_des_array_from_imgs.pyto generate the array of descriptors that will be used to train the new vocabulary. Select your desired descriptor type via the tracker configuration. -
DBOW vocabulary generation: Train your target DBOW vocabulary by using the script
test/loopclosing/test_gen_dbow_voc_from_des_array.py. -
VLAD vocabulary generation: Train your target VLAD "vocabulary" by using the script
test/loopclosing/test_gen_vlad_voc_from_des_array.py.
Once you have trained the vocabulary, you can add it in pyslam/loop_closing/loop_detector_vocabulary.py and correspondingly create a new loop detector configuration in pyslam/loop_closing/loop_detector_configs.py that uses it.
Vocabulary-free loop closing
Most methods do not require pre-trained vocabularies. Specifically:
iBoWandOBindex2: These methods incrementally build bags of binary words and, if needed, convert (front-end) non-binary descriptors into binary ones.- Others: Methods like
HDC_DELF,SAD,AlexNet,NetVLAD,CosPlace,EigenPlaces, andMegalocdirectly extract their specific global descriptors and process them using dedicated aggregators, independently from the used front-end descriptors.
As mentioned above, only DBoW2, DBoW3, and VLAD require pre-trained vocabularies.
Verify your loop detection configuration and verify vocabulary compatibility
Loop detection method based on a pre-trained vocabulary
When selecting a loop detection method based on a pre-trained vocabulary (such as DBoW2, DBoW3, and VLAD), ensure the following:
- The back-end and the front-end are using the same descriptor type (this is also automatically checked for consistency) or their descriptor managers are independent (see further details in the configuration options
LoopDetectorConfigsavailable in pyslam/loop_closing/loop_detector_configs.py). - A corresponding pre-trained vocabulary is available. For more details, refer to the vocabulary management section.
Missing vocabulary for the selected front-end descriptor type
If you lack a compatible vocabulary for the selected front-end descriptor type, you can follow one of these options:
- Create and load the vocabulary (refer to the vocabulary management section).
- Choose an
*_INDEPENDENTloop detector method, which works with an independent local_feature_manager. - Select a vocabulary-free loop closing method.
See the file pyslam/loop_closing/loop_detector_configs.py for further details.
Volumetric reconstruction
Dense reconstruction while running SLAM
The SLAM back-end hosts a volumetric reconstruction pipeline. This is disabled by default. You can enable it by setting kDoVolumetricIntegration=True and selecting your preferred method kVolumetricIntegrationType in pyslam/config_parameters.py. At present, the following methods are available:
VOXEL_GRID,VOXEL_SEMANTIC_GRID,VOXEL_SEMANTIC_PROBABILISTIC_GRID: Voxel grid implementations that leverage parallel spatial hashing, supporting both direct voxel hashing and indirect voxel-block hashing strategies. Parallel execution is managed using TBB, and the design accommodates both simple and semantic voxels.TSDF(Truncated Signed Distance Function): It is able to return in output either a pointcloud or a mesh.GAUSSIAN_SPLATTING(Incremental Gaussian splatting).
See pyslam/dense/volumetric_integrator_types.py. Note that you need CUDA in order to run GAUSSIAN_SPLATTING method. Further information about the volumetric grid models is available here.
At present, the volumetric reconstruction pipeline works with:
- RGBD datasets
- When a depth estimator is used
- in the back-end with STEREO datasets (you can't use depth prediction in the back-end with MONOCULAR datasets, further details here)
- in the front-end (to emulate an RGBD sensor) and a depth prediction/estimation gets available for each processed keyframe.
To obtain a mesh as output, set kVolumetricIntegrationTsdfExtractMesh=True in pyslam/config_parameters.py.
Reload a saved sparse map and perform dense reconstruction
Use the script main_map_dense_reconstruction.py to reload a saved sparse map and perform dense reconstruction by using its posed keyframes as input. You can select your preferred dense reconstruction method directly in the script.
- To check what the volumetric integrator is doing, run in another shell
tail -f logs/volumetric_integrator.log(from repository root folder). - To save the obtained dense and sparse maps, press the
Savebutton on the GUI.
Reload and check your dense reconstruction
You can check the output pointcloud/mesh by using CloudCompare.
In the case of a saved Gaussian splatting model, you can visualize it by:
- Using the superslat editor (drag and drop the saved Gaussian splatting
.plypointcloud in the editor interface). - Getting into the folder
test/gaussian_splattingand running:
python test_gsm.py --load <gs_checkpoint_path>
The directory<gs_checkpoint_path>is expected to have the following structure:├── gs_checkpoint_path ├── pointcloud # folder containing different subfolders, each one with a saved .ply encoding the Gaussian splatting model at a specific iteration/checkpoint ├── last_camera.json ├── config.yml
Controlling the spatial distribution of keyframe FOV centers
If you are targeting volumetric reconstruction while running SLAM, you can enable a keyframe generation policy designed to manage the spatial distribution of keyframe field-of-view (FOV) centers. The FOV center of a camera is defined as the backprojection of its image center, calculated using the median depth of the frame. With this policy, a new keyframe is generated only if its FOV center lies beyond a predefined distance from the nearest existing keyframe's FOV center. You can enable this policy by setting the following parameters in the yaml setting:
KeyFrame.useFovCentersBasedGeneration: 1  # compute 3D fov centers of camera frames by using median depth and use their distances to control keyframe generation
KeyFrame.maxFovCentersDistance: 0.2       # max distance between fov centers in order to generate a keyframe
or by setting the following parameters in config_parameters.py:
kUseFovCentersBasedKfGeneration = False  # Use FOV centers based keyframe generation; not considered if KeyFrame.useFovCentersBasedGeneration is set in yaml
kMaxFovCentersDistanceForKfGeneration = 0.2  # [m] Maximum distance between FOV centers for keyframe generation; not considered if KeyFrame.maxFovCentersDistance is set in yaml
Depth prediction
The available depth prediction models can be utilized both in the SLAM back-end and front-end.
- Back-end: Depth prediction can be enabled in the volumetric reconstruction pipeline by setting the parameter
kVolumetricIntegrationUseDepthEstimator=Trueand selecting your preferredkVolumetricIntegrationDepthEstimatorTypeinpyslam/config_parameters.py. - Front-end: Depth prediction can be enabled in the front-end by setting the parameter
kUseDepthEstimatorInFrontEndinpyslam/config_parameters.py. This feature estimates depth images from input color images to emulate a RGBD camera. Please, note this functionality is still experimental at present time [WIP].
Notes:
- In the case of a monocular SLAM, do NOT use depth prediction in the back-end volumetric integration: The SLAM (fake) scale will conflict with the absolute metric scale of depth predictions. With monocular datasets, you can enable depth prediction to run in the front-end (to emulate an RGBD sensor).
- Depth inference may be very slow (for instance, with DepthPro it takes ~1s per image on a typical machine). Therefore, the resulting volumetric reconstruction pipeline may be very slow.
Refer to the file depth_estimation/depth_estimator_factory.py for further details. Both stereo and monocular prediction approaches are supported. You can test depth prediction/estimation by using the script main_depth_prediction.py.
Semantic mapping and Image Segmentation
The sparse semantic mapping pipeline can be enabled by setting kDoSparseSemanticMappingAndSegmentation=True in pyslam/config_parameters.py. The default segmentation models assigned to each dataset are specified in pyslam/semantics/semantic_mapping_configs.py. You can override the currently used segmentation model by setting kSemanticSegmentationType in config_parameters.py.
Image Segmentation
Different segmentation methods are available (see here for further details). See the following video for a quick preview.
Panoptic/Instance segmentation:
DETIC: from https://github.com/facebookresearch/Detic- Object detection-based (CenterNet2 + CLIP), supports large vocabularies (LVIS/COCO/OpenImages/Objects365).
- Architecture: Object detector (CenterNet2) detects individual objects first, then segments each detection.
- Can output both "instances" (direct instance segmentation) and "panoptic_seg" formats.
- Instance extraction: Direct from object detections - each detected object = one instance ID.
- Result: Robust instance segmentation - each detected object gets a unique instance ID, even for multiple objects of the same category (e.g., two pillows = two separate instances).
ODISE: from https://github.com/NVlabs/ODISE- Diffusion-based panoptic segmentation, leverages diffusion models for segmentation.
- Architecture: Panoptic segmentation model that segments image into regions first, then classifies regions.
- Only outputs "panoptic_seg" format - instances extracted from panoptic segments via "isthing" flag.
- Instance extraction: Derived from panoptic segments - one segment may contain multiple objects if model groups them together (e.g., spatially connected objects of same category).
- Result: Instance segmentation may merge multiple objects of the same category into a single instance (e.g., two pillows may be detected as one "pillow" instance).
EOV_SEG: from https://github.com/nhw649/EOV-Seg- Dual-backbone (CNN + ViT) with CLIP, text-prompt driven open vocabulary.
- Architecture: Panoptic segmentation model (similar to ODISE) - segments image into regions first.
- Only outputs "panoptic_seg" format - instances extracted from panoptic segments via "isthing" flag.
- Instance extraction: Same as
ODISE- derived from panoptic segments, may group multiple objects. - Result: Similar to
ODISE, instance segmentation may group multiple objects of the same category together (e.g., two pillows may be detected as one "pillow" instance).
Semantic segmentation:
DEEPLABV3: fromtorchvision, pre-trained on COCO/VOC.- Semantic segmentation model from torchvision DeepLab's v3.
SEGFORMER: fromtransformers, pre-trained on Cityscapes or ADE20k.- Semantic segmentation model from transformer's Segformer.
CLIP: fromf3rmpackage for open-vocabulary support.- Uses CLIP patch embeddings + text similarity to produce labels/probabilities (it is not a dedicated "segmentation head").
Instance segmentation:
RFDETR: from https://github.com/roboflow/rf-detr.git- RF-DETR instance segmentation; pretrained weights target COCO classes by default.
YOLO: from https://github.com/ultralytics/ultralytics/
Sparse Semantic Mapping
Semantic features are assigned to keypoints on the image and fused into map points. The semantic features can be:
- Labels: categorical labels as numbers.
- Probability vectors: probability vectors for each class.
- Feature vectors: feature vectors obtained from an encoder. This is generally used for open vocabulary mapping.
The simplest way to test the available segmentation models is to run: main_semantic_image_segmentation.py.
Further information about the semantic module is available here.
Volumetric Semantic mapping
Semantic volumetric mapping fuses per-keyframe semantic predictions into a dense 3D voxel grid, enabling semantic-aware reconstruction and optional object-level segmentation. The semantic volumetric integrators live in pyslam/dense, and they consume semantic predictions produced by pyslam/semantics.
Two semantic fusion backends are supported:
- Confidence-counter fusion (
VOXEL_SEMANTIC_GRID): Each voxel stores the most frequently observed semantic class together with a confidence counter (majority voting). - Probabilistic fusion (
VOXEL_SEMANTIC_PROBABILISTIC_GRID): Each voxel maintains a full class probability distribution, updated using Bayesian fusion in log-space. This backend is recommended for improved robustness against noisy predictions and intermittent misclassifications.
Volumetric semantic mapping can be enabled by setting:
kDoSparseSemanticMappingAndSegmentation = True  # enable sparse mapping and segmentation
kDoVolumetricIntegration = True  # enable volumetric integration
kVolumetricIntegrationType = "VOXEL_SEMANTIC_PROBABILISTIC_GRID"  # or "VOXEL_SEMANTIC_GRID"
Configuration notes:
- If
kDoSparseSemanticMappingAndSegmentation=TrueandkVolumetricIntegrationType="VOXEL_GRID", the factory warns and automatically switches toVOXEL_SEMANTIC_PROBABILISTIC_GRIDto ensure semantic integration. - If
kDoSparseSemanticMappingAndSegmentation=Truewith a non-semantic volumetric integrator (e.g.,TSDF,GAUSSIAN_SPLATTING), you will get a warning and semantic integration will be skipped.
If kVolumetricSemanticIntegrationUseInstanceIds=True, the volumetric integrator uses 2D instance IDs (from panoptic/instance segmentation backends) to build 3D object segments. Object IDs are assigned via voting across observations and filtered by kVolumetricSemanticIntegrationMinVoteRatio and kVolumetricSemanticIntegrationMinVotes. This enables:
- Consistent 3D object grouping across views.
- Per-object colorization of the volumetric map.
- Improved object identity stability over time.
In particular, use the following GUI buttons to toggle:
Color Semantics: class/label color maps on both the 3D sparse map and the volumetric map.Objects: per-object color map on the volumetric map (requires instance IDs).Draw Object BBs: bounding boxes for detected 3D object segments.
More information about the volumetric integration models and their software architecture is available here, and the semantic module is described here.
Known limitations in volumetric semantic mapping:
- Resolution limits: A fixed voxel size may blur thin structures and small objects.
- Pose drift sensitivity: Accumulated pose errors can smear semantic labels over time.
- Instance ID dependence: Inconsistent or noisy 2D instance IDs may lead to fragmented or unstable 3D objects.
- Class imbalance bias: Frequently observed classes may dominate both voting-based and probabilistic fusion, especially when class priors are implicit or unbalanced in the predictions.
- Temporal class inconsistency: Inconsistent semantic predictions across keyframes (e.g., label flickering or competing classes with similar confidence) may result in fragmented or unstable voxel labeling, even in densely observed areas.
- Occlusions and visibility gaps: Poorly observed regions may remain unlabeled or receive too few votes, increasing the risk of misclassification.
C++ Core Module
The system provides a modular sparse-SLAM core, implemented in both C++ and Python, allowing users to switch between high-performance/speed and high-flexibility modes.
The C++ core reimplements the sparse SLAM originally implemented in Python, exposing core SLAM classes (frames, keyframes, map points, maps, cameras, optimizers, tracking, and local mapping) to Python via pybind11. The C++ implementation follows a streamlined design where all core data resides in C++, with Python serving as an interface layer. C++ classes mirror their Python counterparts, maintaining identical interfaces and data field names (see this table). When feasible, the bindings support zero-copy data exchange (e.g., descriptors) and safe memory ownership across the Python/C++ boundary, leveraging automatic zero-copy sharing of NumPy array memory with C++.
- To enable the C++ sparse-SLAM core, set
USE_CPP_CORE = Trueinpyslam/config_parameters.py. - To rebuild the C++ core module, run
. pyenv-activate.sh
./build_cpp_core.sh
While this may be self-evident, it is important to keep in mind that when USE_CPP_CORE = True:
- The Python implementation of the sparse SLAM core is effectively bypassed, and any modifications to it will have no effect at runtime.
- All functional changes to the sparse SLAM C++ codebase must be rebuilt using
./build_cpp_core.sh(as explained above) in order to take effect.
See here for further details.
Saving and reloading
Save a map
When you run the script main_slam.py (main_map_dense_reconstruction.py):
- You can save the current map state by pressing the button
Saveon the GUI. This saves the current map along with front-end and back-end configurations into the default folderresults/slam_state(results/slam_state_dense_reconstruction). - To change the default saving path, open
config.yamland update targetfolder_pathin the section:SYSTEM_STATE: folder_path: results/slam_state # default folder path (relative to repository root) where the system state is saved or reloaded
Reload a saved map and relocalize in it
-
A saved map can be loaded and visualized in the GUI by running:
. pyenv-activate.sh # Activate pyslam python virtual environment. This is only needed once in a new terminal. ./main_map_viewer.py # Use the --path options to change the input path -
To enable map reloading and relocalization when running
main_slam.py, openconfig.yamland setSYSTEM_STATE: load_state: True # Flag to enable SLAM state reloading (map state + loop closing state) folder_path: results/slam_state # Default folder path (relative to repository root) where the system state is saved or reloaded
A couple of important notes:
- Pressing the
Savebutton saves the current map, front-end, and back-end configurations. Reloading a saved map replaces the current system configurations to ensure descriptor compatibility. - The Python and C++ implementations are interoperable: maps saved by one can be loaded by the other.
Trajectory saving
Estimated trajectories can be saved in three formats: TUM (The Open Mapping format), KITTI (KITTI Odometry format), and EuRoC (EuRoC MAV format). pySLAM saves two types of trajectory estimates:
- Online: In online trajectories, each pose estimate depends only on past poses. A pose estimate is saved at the end of each front-end iteration for the current frame.
- Final: In final trajectories, each pose estimate depends on both past and future poses. A pose estimate is refined multiple times by LBA windows that include it, as well as by PGO and GBA during loop closures.
To enable trajectory saving, open config.yaml and search for the SAVE_TRAJECTORY: set save_trajectory: True, select your format_type (tum, kitti, euroc), and the output filename. For instance for a kitti format output:
SAVE_TRAJECTORY:
  save_trajectory: True
  format_type: kitti             # Supported formats: `tum`, `kitti`, `euroc`
  output_folder: results/metrics # Relative to pyslam root folder
  basename: trajectory           # Basename of the trajectory saving output
Graph optimization engines
Currently, pySLAM supports both g2o and gtsam for graph optimization, with g2o set as the default engine. You can enable gtsam by setting to True the following parameters in pyslam/config_parameters.py:
  # Optimization engine
  kOptimizationFrontEndUseGtsam = True
  kOptimizationBundleAdjustUseGtsam = True
  kOptimizationLoopClosingUseGtsam = True
Additionally, the gtsam_factors package provides custom Python bindings for features not available in the original gtsam framework. See here for further details.
SLAM GUI
Some quick information about the non-trivial GUI buttons of main_slam.py:
Step: Enter in the Step by step mode. Press the buttonStepa first time to pause. Then, press it again to make the pipeline process a single new frame.Save: Save the map into the filemap.json. You can visualize it back by using the script/main_map_viewer.py(as explained above).Reset: Reset SLAM system.Draw Ground Truth: If a ground truth dataset (e.g., KITTI, TUM, EUROC, or REPLICA) is loaded, you can visualize it by pressing this button. The ground truth trajectory will be displayed in 3D and will be progressively aligned with the estimated trajectory, updating approximately every 10-30 frames. As more frames are processed, the alignment between the ground truth and estimated trajectory becomes more accurate. After about 20 frames, if the button is pressed, a window will appear showing the Cartesian alignment errors along the main axes (i.e., $e_x$, $e_y$, $e_z$) and the history of the total $RMSE$ between the ground truth and the aligned estimated trajectories.
When volumetric semantic mapping is enabled, use the following buttons to toggle:
Colors semantics: class/label color maps on both the 3D sparse map and the volumetric map.Objects: per-object color map on the volumetric map (requires instance IDs).Draw object BBs: bounding boxes for detected 3D object segments.
Unified log monitoring (tracking, mapping, loop closing, volumetric)
This table report the sparse SLAM submodules along with their generated logs (stored in the logs folder):
| Module | Log file |
|---|---|
local_mapping.py | local_mapping.log |
loop_closing.py | loop_closing.log |
loop_detecting_process.py | loop_detecting.log |
global_bundle_adjustments.py | gba.log |
volumetric_integrator_<X>.py | volumetric_integrator.log |
relocalizater.py | relocalization.log |
semantic_segmentation_<X>.py | semantic_segmentation.log |
semantic_mapping_<X>.py | semantic_mapping.log |
At runtime, for debugging purposes, you can individually monitor any of the log files by running the following command:
tail -f logs/<log file name>
Otherwise, to check all logs at the same time, run this tmux-based script:
./scripts/tmux_logs.sh
To launch slam and check all logs, run:
./scripts/tmux_slam.sh
Press CTRL+A and then CTRL+Q to exit from tmux environment.
Evaluating SLAM
Run a SLAM evaluation
The main_slam_evaluation.py script enables automated SLAM evaluation by executing main_slam.py across a collection of datasets and configuration presets. The main input to the script is an evaluation configuration file (e.g., evaluation/configs/evaluation.json) that specifies which datasets and presets to be used. For convenience, sample configurations for the datasets TUM, EUROC and KITTI datasets are already provided in the evaluation/configs/ directory.
For each evaluation run, results are stored in a dedicated subfolder within the results directory, containing all the computed metrics. These metrics are then processed and compared. The final output is a report, available in PDF, LaTeX, and HTML formats, that includes comparison tables summarizing the Absolute Trajectory Error (ATE), the maximum deviation from the ground truth trajectory and other metrics.
You can find some obtained evaluation results here.
pySLAM performances and comparative evaluations
For a comparative evaluation of the "online" trajectory estimated by pySLAM versus the "final" trajectory estimated by ORB-SLAM3, check out this nice notebook. For more details about "online" and "final" trajectories, refer to this section.
Note: Unlike ORB-SLAM3, which only saves the final pose estimates (recorded after the entire dataset has been processed), pySLAM saves both online and final pose estimates. For details on how to save trajectories in pySLAM, refer to this section.
When you click the Draw Ground Truth button in the GUI (see here), you can visualize the Absolute Trajectory Error (ATE or RMSE) history and evaluate both online and final errors up to the current time.
Feed-forward inference of 3D scenes from multiple image views
The folder pyslam/scene_from_views implements the scene_from_views factory: a unified interface for feed-forward 3D scene reconstruction from multiple views with a shared reconstruct() pipeline (preprocess_images() → infer() → postprocess_results()), plus optional optimizer post-processing. The API is consistent across models while preserving model-specific optimizations. See the main script main_scene_from_views.py.
- Feed-forward multi-view reconstruction (poses + fused 3D geometry directly from images):
SceneFromViewsDust3r,SceneFromViewsMast3r,SceneFromViewsMvdust3r,SceneFromViewsVggt,SceneFromViewsVggtRobust,SceneFromViewsFast3r. - Monocular depth pipeline with optional pose/intrinsic outputs when supported by the model variant:
SceneFromViewsDepthAnythingV3. - Global alignment stage for merging views (defaults):
SceneFromViewsDust3ruses dense alignment;SceneFromViewsMast3ruses sparse alignment (both are configurable). - Robust view filtering / outlier rejection:
SceneFromViewsVggtRobustuses anchor-based attention + cosine scoring to reject low-confidence views, then re-runs inference on the survivors. - Large-scale reconstruction (designed for 1000+ images in one forward pass):
SceneFromViewsFast3r.
Note that DUSt3R and MASt3R are pairwise models: they take two images at a time. They are feed-forward per pair; multi-view reconstruction is then obtained by global alignment/optimization over all pairwise pointmaps. MV-DUSt3R, VGGT, and Fast3R are multi-view models that process all images simultaneously in a single forward pass.
All models return a standardized SceneFromViewsResult with consistent field names; optional outputs (meshes, intrinsics, depth maps, confidences) may be None depending on the model. The factory pattern allows easy switching between models while maintaining the same interface.
Further details here.
Supported components and models
Supported local features
At present time, the following feature detectors are supported:
- FAST
- Good features to track
- ORB
- ORB2 (improvements of ORB-SLAM2 to ORB detector)
- SIFT
- SURF
- KAZE
- AKAZE
- BRISK
- AGAST
- MSER
- StarDector/CenSurE
- Harris-Laplace
- SuperPoint
- D2-Net
- DELF
- Contextdesc
- LFNet
- R2D2
- Key.Net
- DISK
- ALIKED
- Xfeat
- KeyNetAffNetHardNet (KeyNet detector + AffNet + HardNet descriptor).
The following feature descriptors are supported:
- ORB
- SIFT
- ROOT SIFT
- SURF
- AKAZE
- BRISK
- FREAK
- SuperPoint
- Tfeat
- BOOST_DESC
- DAISY
- LATCH
- LUCID
- VGG
- Hardnet
- GeoDesc
- SOSNet
- L2Net
- Log-polar descriptor
- D2-Net
- DELF
- Contextdesc
- LFNet
- R2D2
- BEBLID
- DISK
- ALIKED
- Xfeat
- KeyNetAffNetHardNet (KeyNet detector + AffNet + HardNet descriptor).
For more information, refer to pyslam/local_features/feature_types.py file. Some of the local features consist of a joint detector-descriptor. You can start playing with the supported local features by taking a look at test/cv/test_feature_manager.py and main_feature_matching.py.
In both the scripts main_vo.py and main_slam.py, you can create your preferred detector-descritor configuration and feed it to the function feature_tracker_factory(). Some ready-to-use configurations are already available in the file local_features/feature_tracker.configs.py
The function feature_tracker_factory() can be found in the file pyslam/local_features/feature_tracker.py. Take a look at the file pyslam/local_features/feature_manager.py for further details.
N.B.: You just need a single python environment to be able to work with all the supported local features!
Supported matchers
See the file local_features/feature_matcher.py for further details.
Supported global descriptors and local descriptor aggregation methods
Local descriptor aggregation methods
- Bag of Words (BoW): DBoW2, DBoW3 [paper]
- Vector of Locally Aggregated Descriptors: VLAD [paper]
- Incremental Bags of Binary Words (iBoW) via Online Binary Image Index (OBIndex2) [paper]
- Hyperdimensional Computing: HDC [paper]
NOTE: iBoW and OBIndex2 incrementally build a binary image index and do not need a prebuilt vocabulary. In the implemented classes, when needed, the input non-binary local descriptors are transparently transformed into binary descriptors.
Global descriptors
Also referred to as holistic descriptors:
Different loop closing methods are available. These combines the above aggregation methods and global descriptors. See the file pyslam/loop_closing/loop_detector_configs.py for further details.
Supported depth prediction models
Both monocular and stereo depth prediction models are available. SGBM algorithm has been included as a classic reference approach.
- SGBM: Depth SGBM from OpenCV (Stereo, classic approach)
- Depth-Pro (Monocular)
- DepthAnythingV2 (Monocular)
- DepthAnythingV3 (Monocular)
- RAFT-Stereo (Stereo)
- CREStereo (Stereo)
- MASt3R (Stereo/Monocular)
- MV-DUSt3R (Stereo/Monocular)
Supported volumetric mapping methods
- A C++ template-based voxel grid implementation leverages parallel spatial hashing, supporting both direct voxel hashing and indirect voxel-block hashing strategies. Parallel execution is managed using TBB, and the design accommodates both simple and semantic voxels. Further information about the volumetric grid models is available here.
- TSDF (Truncated Signed Distance Function) with voxel block grid (parallel spatial hashing)
- Incremental 3D Gaussian Splatting. See here and MonoGS for a description of its backend.
Supported semantic segmentation methods
- DeepLabv3: from
torchvision, pre-trained on COCO/VOC - Segformer: from
transformers, pre-trained on Cityscapes or ADE20k - CLIP: from
f3rmpackage for open-vocabulary support - EOV-Seg: "EOV-Seg: Efficient Open-Vocabulary Panoptic Segmentation"
- Detic: "Detecting Twenty-thousand Classes using Image-level Supervision"
- ODISE: "Open-Vocabulary Panoptic Segmentation with Text-to-Image Diffusion Models"
- RF-DETR: "RF-DETR: Neural Architecture Search for Real-Time Detection Transformers"
Supported models for feed-forward inference of 3D scenes from multiple images
- DUSt3R: Geometric 3D Vision Made Easy
- MASt3R: Grounding Image Matching in 3D with MASt3R
- Depth Anything V3: Recovering the Visual Space from Any Views
- MVDust3r: Multi-view DUSt3R variant
- VGGT: Visual Geometry Grounded Transformer
- Robust VGGT: Emergent Outlier View Rejection in Visual Geometry Grounded Transformers
See here for further details about SceneFromViews architecture.
Configuration
Main configuration file
Refer to this section for how to update the main configuration file config.yaml and affect the configuration parameters in pyslam/config_parameters.py.
Datasets
The following datasets are supported:
| Dataset | type in config.yaml |
|---|---|
| KITTI odometry data set (grayscale, 22 GB) | type: KITTI_DATASET |
| TUM dataset | type: TUM_DATASET |
| ICL-NUIM dataset | type: ICL_NUIM_DATASET |
| EUROC dataset | type: EUROC_DATASET |
| REPLICA dataset | type: REPLICA_DATASET |
| TARTANAIR dataset | type: TARTANAIR_DATASET |
| SEVEN_SCENES dataset | type: SEVEN_SCENES_DATASET |
| NEURAL_RGBD dataset | type: NEURAL_RGBD_DATASET |
| ROVER dataset | type: NEURAL_RGBD_DATASET |
| ScanNet dataset | type: SCANNET_DATASET |
| CLIO dataset | type: CLIO_DATASET |
| ROS1 bags | type: ROS1BAG_DATASET |
| ROS2 bags | type: ROS2BAG_DATASET |
| MCAP file | type: MCAP_DATASET |
| Video file | type: VIDEO_DATASET |
| Folder of images | type: FOLDER_DATASET |
Use the download scripts available in the folder scripts to download some of the following datasets.
KITTI Datasets
pySLAM code expects the following structure in the specified KITTI path folder (specified in the section KITTI_DATASET of the file config.yaml). :
├── sequences
    ├── 00
    ...
    ├── 21
├── poses
    ├── 00.txt
        ...
    ├── 10.txt
-
Download the dataset (grayscale images) from http://www.cvlibs.net/datasets/kitti/eval_odometry.php and prepare the KITTI folder as specified above
-
Select the corresponding calibration settings file (section
KITTI_DATASET: settings:in the fileconfig.yaml)
TUM Datasets
pySLAM code expects a file associations.txt in each TUM dataset folder (specified in the section TUM_DATASET: of the file config.yaml).
- Download a sequence from http://vision.in.tum.de/data/datasets/rgbd-dataset/download and uncompress it.
- Associate RGB images and depth images using the python script associate.py. You can generate your
associations.txtfile by executing:python associate.py PATH_TO_SEQUENCE/rgb.txt PATH_TO_SEQUENCE/depth.txt > associations.txt # pay attention to the order! - Select the corresponding calibration settings file (section
TUM_DATASET: settings:in the fileconfig.yaml).
ICL-NUIM Datasets
You can download the dataset here. Follow the same instructions provided for the TUM datasets.
EuRoC Datasets
- Download a sequence (ASL format) from http://projects.asl.ethz.ch/datasets/doku.php?id=kmavvisualinertialdatasets (check this direct link)
- Use the script
io/generate_euroc_groundtruths_as_tum.shto generate the TUM-like groundtruth filespath + '/' + name + '/mav0/state_groundtruth_estimate0/data.tum'that are required by theEurocGroundTruthclass. - Select the corresponding calibration settings file (section
EUROC_DATASET: settings:in the fileconfig.yaml).
Replica Datasets
- You can download the zip file containing all the sequences by running:
wget https://cvg-data.inf.ethz.ch/nice-slam/data/Replica.zip - Then, uncompress it and deploy the files as you wish.
- Select the corresponding calibration settings file (section
REPLICA_DATASET: settings:in the fileconfig.yaml).
Tartanair Datasets
- You can download the datasets from https://theairlab.org/tartanair-dataset/
- Then, uncompress them and deploy the files as you wish.
- Select the corresponding calibration settings file (section
TARTANAIR_DATASET: settings:in the fileconfig.yaml).
7 Scenes dataset
To download the dataset follow the instructions at https://www.microsoft.com/en-us/research/project/rgb-d-dataset-7-scenes/. Select the section SEVEN_SCENES_DATASET: settings: in the file config.yaml. A calibration file settings/SEVEN_SCENES.yaml is already available.
Neural RGBD dataset
To download the dataset follow the instructions at https://github.com/dazinovic/neural-rgbd-surface-reconstruction. Select the section NEURAL_RGBD_DATASET: settings: in the file config.yaml. A calibration file settings/NEURAL_RGBD.yaml is already available.
Rover dataset
To download the dataset follow the instructions at https://iis-esslingen.github.io/rover/. Select the section ROVER_DATASET: settings: in the file config.yaml. A calibration file for the d435i camera is already available: settings/ROVER_d435i.yaml. Other camera models will be supported in the future.
ScanNet Datasets
You can download the datasets following instructions in http://www.scan-net.org/. There are two versions you can download:
- A subset of pre-processed data termed as
tasks/scannet_frames_2k: this version is smaller, and more generally available for training neural networks. However, it only includes one frame out of each 100, which makes it unusable for SLAM. The labels are processed by mapping them from the original Scannet label annotations to NYU40. - The raw data: this version is the one used for SLAM. You can download the whole dataset (TBs of data) or specific scenes. A common approach for evaluation of semantic mapping is to use the
scannetv2_val.txtscenes. For downloading and processing the data, you can use the following repository as the original Scannet repository is tested under Python 2.7 and doesn't support batch downloading of scenes.
- Once you have the
color,depth,pose, and (optional for semantic mapping)labelfolders, you should place them following{path_to_scannet}/scans/{scene_name}/[color, depth, pose, label]. Then, configure thebase_pathandnamein the fileconfig.yaml. - Select the corresponding calibration settings file (section
SCANNET_DATASET: settings:in the fileconfig.yaml). NOTE: the RGB images are rescaled to match the depth image. The current intrinsic parameters in the existing calibration file reflect that.
CLIO Datasets
pySLAM supports the RGB-D sequences released with Clio (Hydra/Clio scene-graph mapping). Each scene is expected to follow this layout under {base_path}/{name}/:
images/rgb_{id}.jpg
depth/depth_{id}.png
sparse/0/images.bin          # COLMAP sparse model (optional reference poses)
*.bag                        # ROS1 recording (used for fps auto-detection and metric odometry)
- Download or prepare a CLIO scene and set
base_pathandnamein theCLIO_DATASETsection ofconfig.yaml. - Select the calibration settings file (
CLIO_DATASET: settings: settings/CLIO.yaml). Depth maps are stored asuint16in millimeters (DepthMapFactor: 1000.0). - Set
sensor_type: rgbd(ormonoif depth is unavailable). - Set
groundtruth_file: autoto load a reference trajectory for evaluation and visualization (not independent motion-capture GT). By default, pySLAM prefers metric poses from the scene ROS1 bag topic/dominic/forward/colmap_odom; if the bag is missing, it falls back to COLMAPsparse/0poses (typically up-to-scale). Useclio_reference_poses: auto | bag | sparseto override this choice. - Playback rate is auto-detected from the bag when present (~7.5 Hz on the office scene); you can override it with
fpsinconfig.yamlorCamera.fpsin the settings file.
When the reference trajectory is non-metric (COLMAP sparse), pySLAM automatically uses Sim(3) alignment for the ground-truth overlay and ATE metrics.
ROS1 bags
- Source the main ROS1
setup.bashafter you have sourced thepyslampython environment. - Set the paths and
ROS1BAG_DATASET: ros_parametersin the fileconfig.yaml. - Select/prepare the corresponding calibration settings file (section
ROS1BAG_DATASET: settings:in the fileconfig.yaml). See the available yaml files in the folderSettingsas an example.
ROS2 bags
- Source the main ROS2
setup.bashafter you have sourced thepyslampython environment. - Set the paths and
ROS2BAG_DATASET: ros_parametersin the fileconfig.yaml. - Select/prepare the corresponding calibration settings file (section
ROS2BAG_DATASET: settings:in the fileconfig.yaml). See the available yaml files in the folderSettingsas an example.
MCAP files
A concise introduction of the mcap format is available here. These files can be also recorded and played-back by using ROS2 tools.
Video and Folder Datasets
You can use the VIDEO_DATASET and FOLDER_DATASET types to read generic video files and image folders (specifying a glob pattern), respectively. A companion ground truth file can be set in the simple format type: Refer to the class SimpleGroundTruth in io/ground_truth.py and check the script io/convert_groundtruth_to_simple.py.
Camera Settings
The folder settings contains the camera settings files which can be used for testing the code. These are the same used in the framework ORB-SLAM2. You can easily modify one of those files for creating your own new calibration file (for your new datasets).
In order to calibrate your camera, you can use the scripts in the folder calibration. In particular:
- Use the script
grab_chessboard_images.pyto collect a sequence of images where the chessboard can be detected (set the chessboard size therein, you can use the calibration patterncalib_pattern.pdfin the same folder) - Use the script
calibrate.pyto process the collected images and compute the calibration parameters (set the chessboard size therein)
For more information on the calibration process, see this tutorial or this other link.
If you want to use your camera, you have to:
- Calibrate it and configure WEBCAM.yaml accordingly
- Record a video (for instance, by using
save_video.pyin the foldercalibration) - Configure the
VIDEO_DATASETsection ofconfig.yamlin order to point to your recorded video.
References
- "pySLAM: An Open-Source, Modular, and Extensible Framework for SLAM", Luigi Freda
- "pySLAM and slamplay: Modular, Extensible SLAM Tools for Rapid Prototyping and Integration", Luigi Freda RSS 2025 Workshop: Unifying Visual SLAM [recorded talk]
- "Semantic pySLAM: Unifying semantic mapping approaches under the same framework", David Morilla-Cabello, Eduardo Montijano
RSS 2025 Workshop: Unifying Visual SLAM
Suggested books:
- Multiple View Geometry in Computer Vision by Richard Hartley and Andrew Zisserman
- An Invitation to 3-D Vision by Yi-Ma, Stefano Soatto, Jana Kosecka, S. Shankar Sastry
- State Estimation for Robotics by Timothy D. Barfoot
- Computer Vision: Algorithms and Applications, by Richard Szeliski
- Introduction to Visual SLAM by Xiang Gao, Tao Zhang
- Deep Learning, by Ian Goodfellow, Yoshua Bengio and Aaron Courville
- Neural Networks and Deep Learning, By Michael Nielsen
- SLAM Handbook
Suggested material:
- Vision Algorithms for Mobile Robotics by Davide Scaramuzza
- CS 682 Computer Vision by Jana Kosecka
- ORB-SLAM: a Versatile and Accurate Monocular SLAM System by R. Mur-Artal, J. M. M. Montiel, and J. D. Tardos
- Double Window Optimisation for Constant Time Visual SLAM by H. Strasdat, A. J. Davison, J.M.M. Montiel, K. Konolige
- The Role of Wide Baseline Stereo in the Deep Learning World by Dmytro Mishkin
- To Learn or Not to Learn: Visual Localization from Essential Matrices by Qunjie Zhou, Torsten Sattler, Marc Pollefeys, Laura Leal-Taixe
- Awesome local-global descriptors repository
- Introduction to Feature Matching Using Neural Networks
- Visual Place Recognition: A Tutorial
- Bags of Binary Words for Fast Place Recognition in Image Sequences
Moreover, you may want to have a look at the OpenCV guide or tutorials.
Credits
- Pangolin
- g2opy
- ORBSLAM2
- SuperPointPretrainedNetwork
- Tfeat
- Image Matching Benchmark Baselines
- Hardnet
- GeoDesc
- SOSNet
- L2Net
- Log-polar descriptor
- D2-Net
- DELF
- Contextdesc
- LFNet
- R2D2
- BEBLID
- DISK
- Xfeat
- LightGlue
- Key.Net
- Twitchslam
- MonoVO
- VPR_Tutorial
- DepthAnythingV2
- DepthAnythingV3
- DepthPro
- RAFT-Stereo
- CREStereo and CREStereo-Pytorch
- MonoGS
- mast3r
- mvdust3r
- MegaLoc
- VGGT and Robust VGGT
- MAST3R
- EOV-Seg
- ODISE
- [RF-DETR](from https://github.com/roboflow/rf-detr.git)
- Detic
- Detectron2
- Nanoflann
- Many thanks to Anathonic for adding the first version of the trajectory-saving feature and for the nice comparison notebook: pySLAM vs ORB-SLAM3.
- Many thanks to David Morilla Cabello for creating the first version of sparse semantic mapping in pySLAM.
License
pySLAM is released under GPLv3 license. pySLAM contains some modified libraries, each one coming with its license. Where nothing is specified, a GPLv3 license applies to the software.
If you use pySLAM in your projects, please cite this document:
"pySLAM: An Open-Source, Modular, and Extensible Framework for SLAM", Luigi Freda
You may find an updated version of this document here.
Contributing to pySLAM
If you like pySLAM and would like to contribute to the code base, you can report bugs, leave comments and proposing new features through issues and pull requests on github. Feel free to get in touch at luigifreda(at)gmail[dot]com. Thank you!
Roadmap
Many improvements and additional features are currently under development:
- Loop closing
- Relocalization
- Stereo and RGBD support
- Map saving/loading
- Modern DL matching algorithms
- Object detection
- Open vocabulary segment (object) detection
- Object-level mapping [WIP] (Detic now allows to extract bounding boxes and segments of objects)
- Semantic segmentation and mapping
- Dense closed-set labels
- Dense closed-set probability vectors
- Dense open vocabulary feature vectors
- New segmentation models (EOV-Seg, Detic, ODISE)
- Volumetric semantic mapping
- 3D dense reconstruction
- Unified install procedure (single branch) for all OSs
- Trajectory saving
- Depth prediction integration, more models: VGGT, MoGE, etc. [WIP]
- ROS1 and ROS2 support. Dedicated MCAP dataset.
- Gaussian splatting integration
- Documentation [WIP]
- GTSAM integration [WIP]
- IMU integration
- LIDAR integration
- Integration of direct methods in the tracker
- XSt3r-based methods integration [WIP]
- Evaluation scripts
- More camera models
- Integrate pypose library
Similar repos
Contributors
Languages
Python
62.9%
C++
32.7%
Shell
3.8%