🌩️ Serverless 自托管的文件管理与文本分享工具/网盘,支持多存储聚合管理和WebDAV 服务挂载。兼容 S3、WebDAV、OneDrive、Google Drive、Telegram、HF、GitHub 等。内置 Markdown 编辑器、30+文件格式预览。支持 Cloudflare Workers 或 Docker 部署。
See the code中文 | English | Español | français | 日本語






📸 Showcase • ✨ Features • 🚀 Deployment Guide • 🔧 Tech Stack • 💻 Development • 📄 License
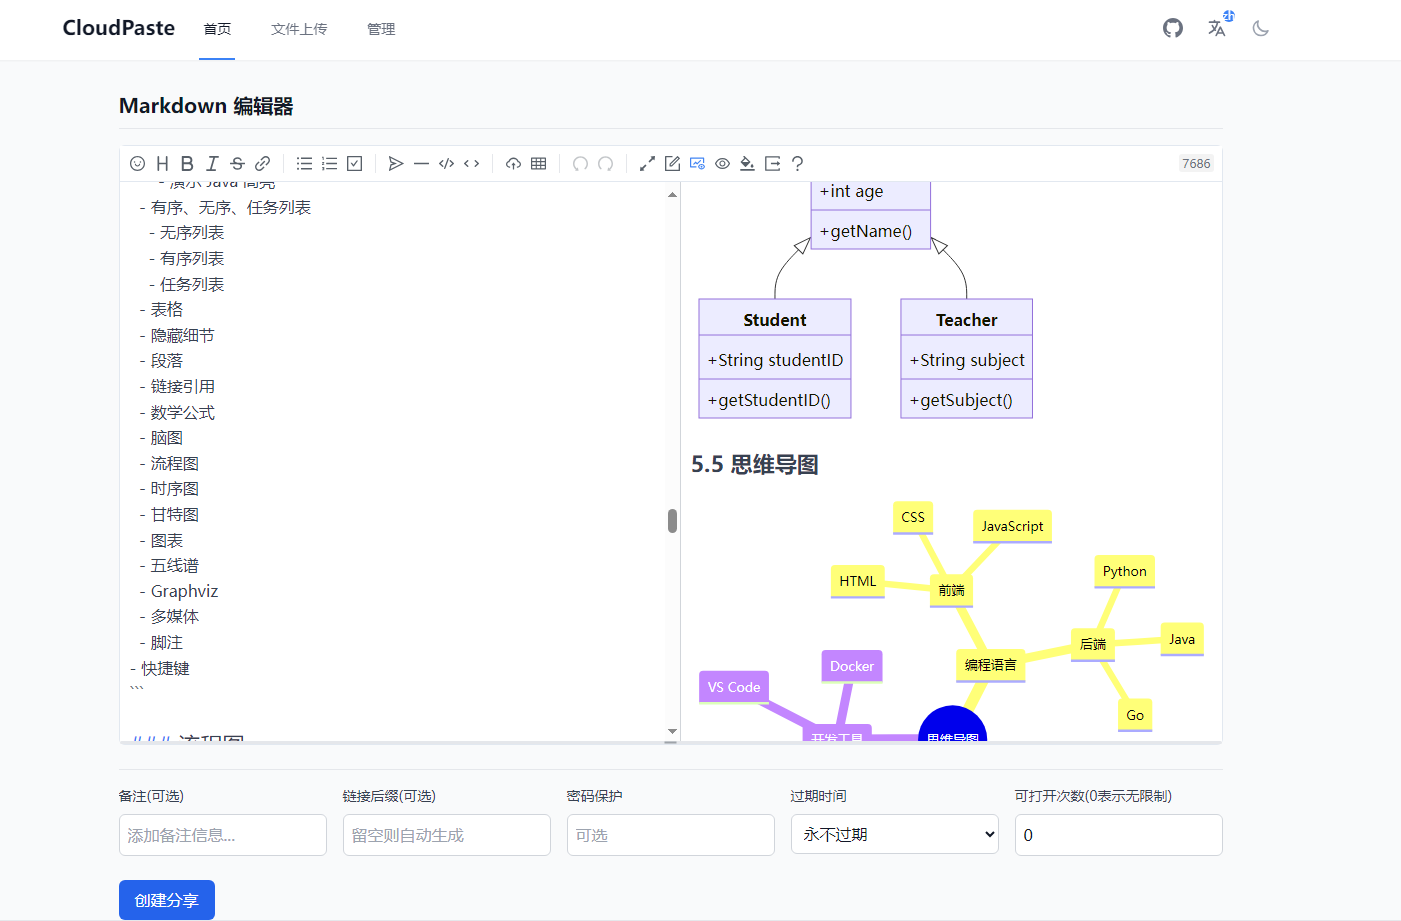 | 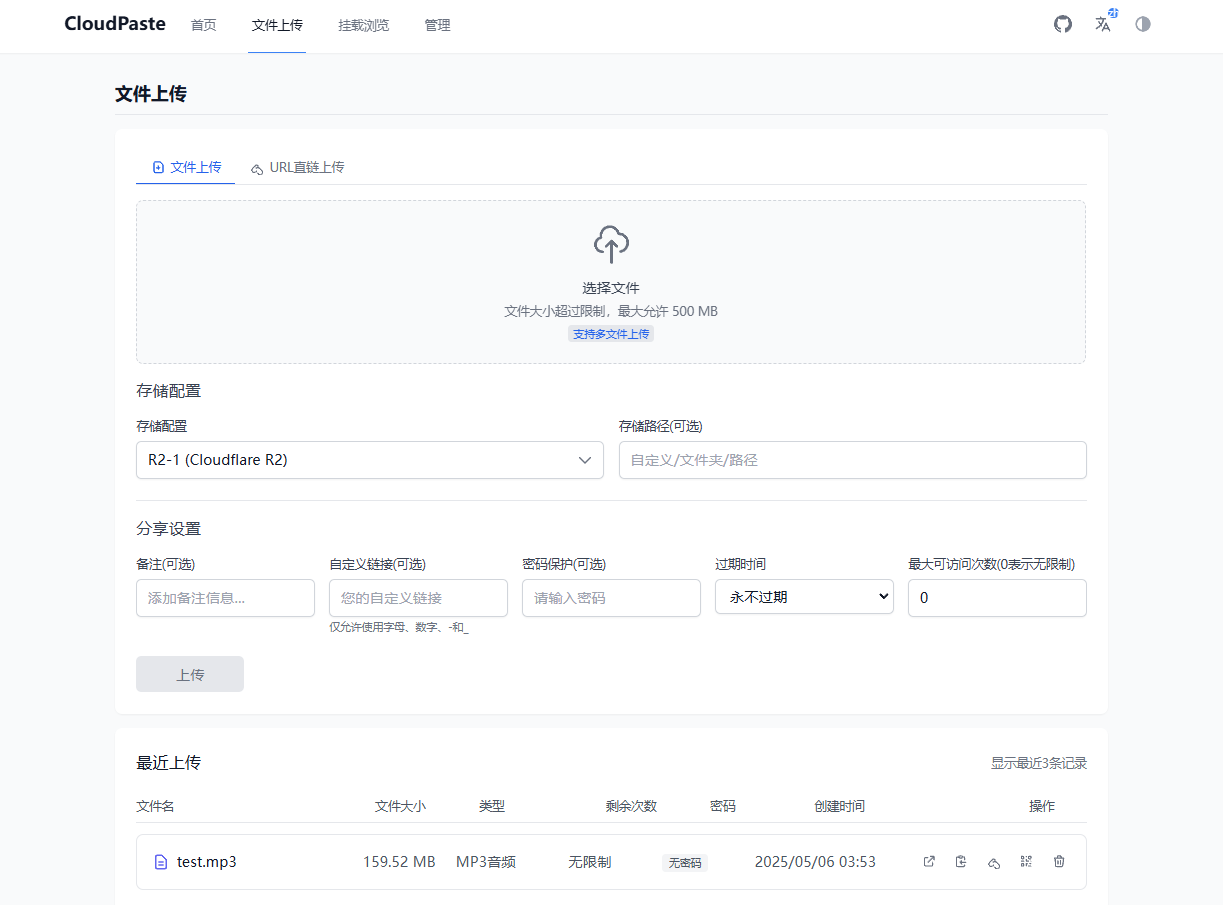 |
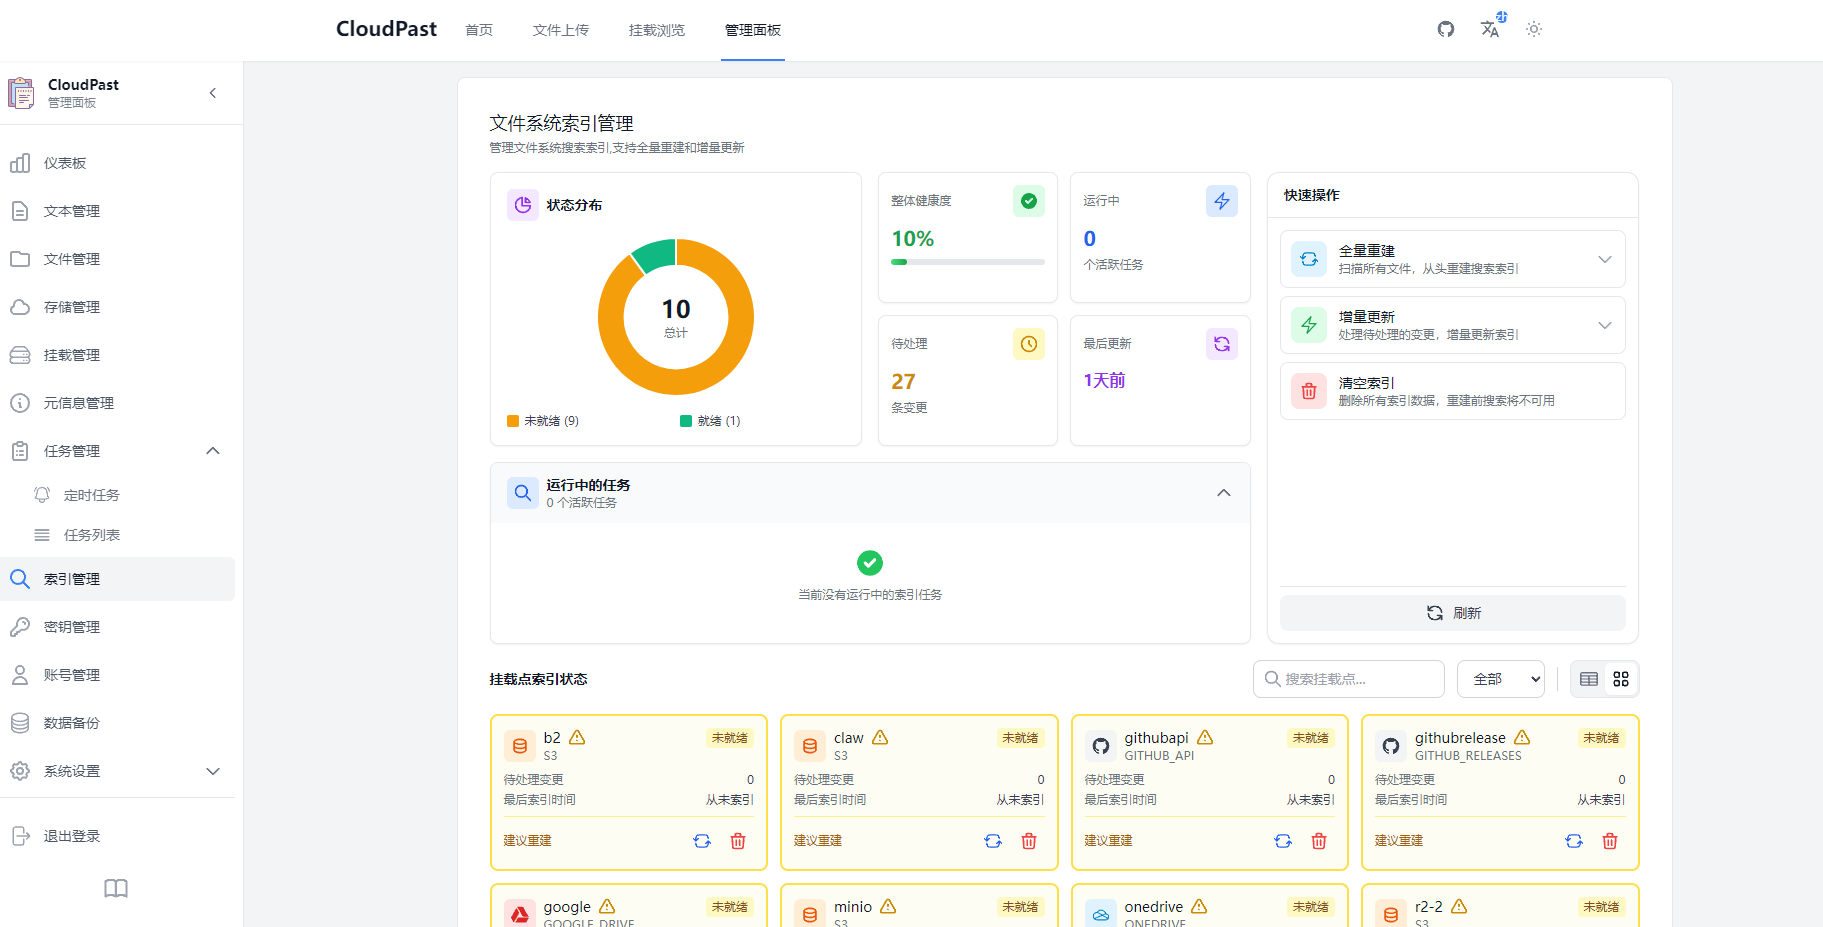 | 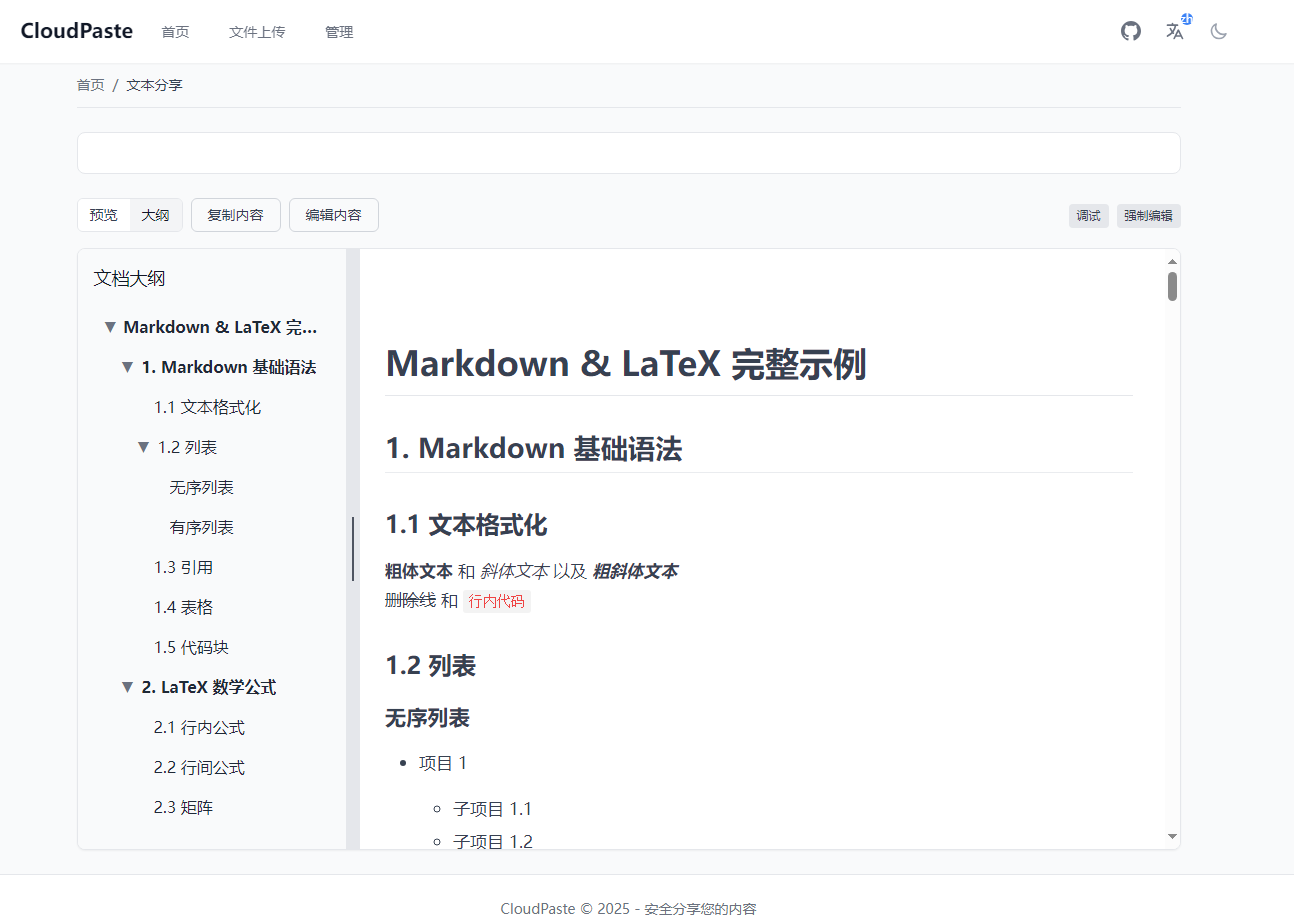 |
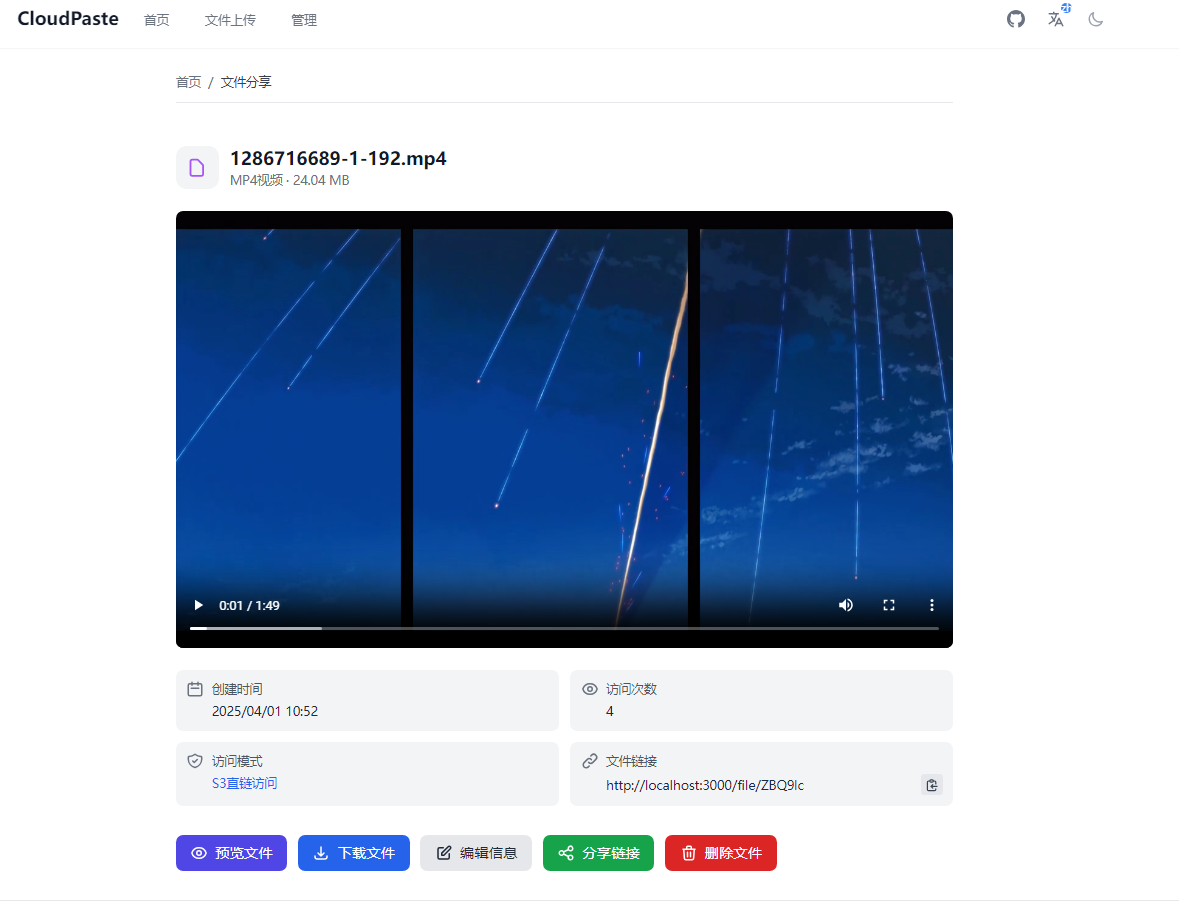 | 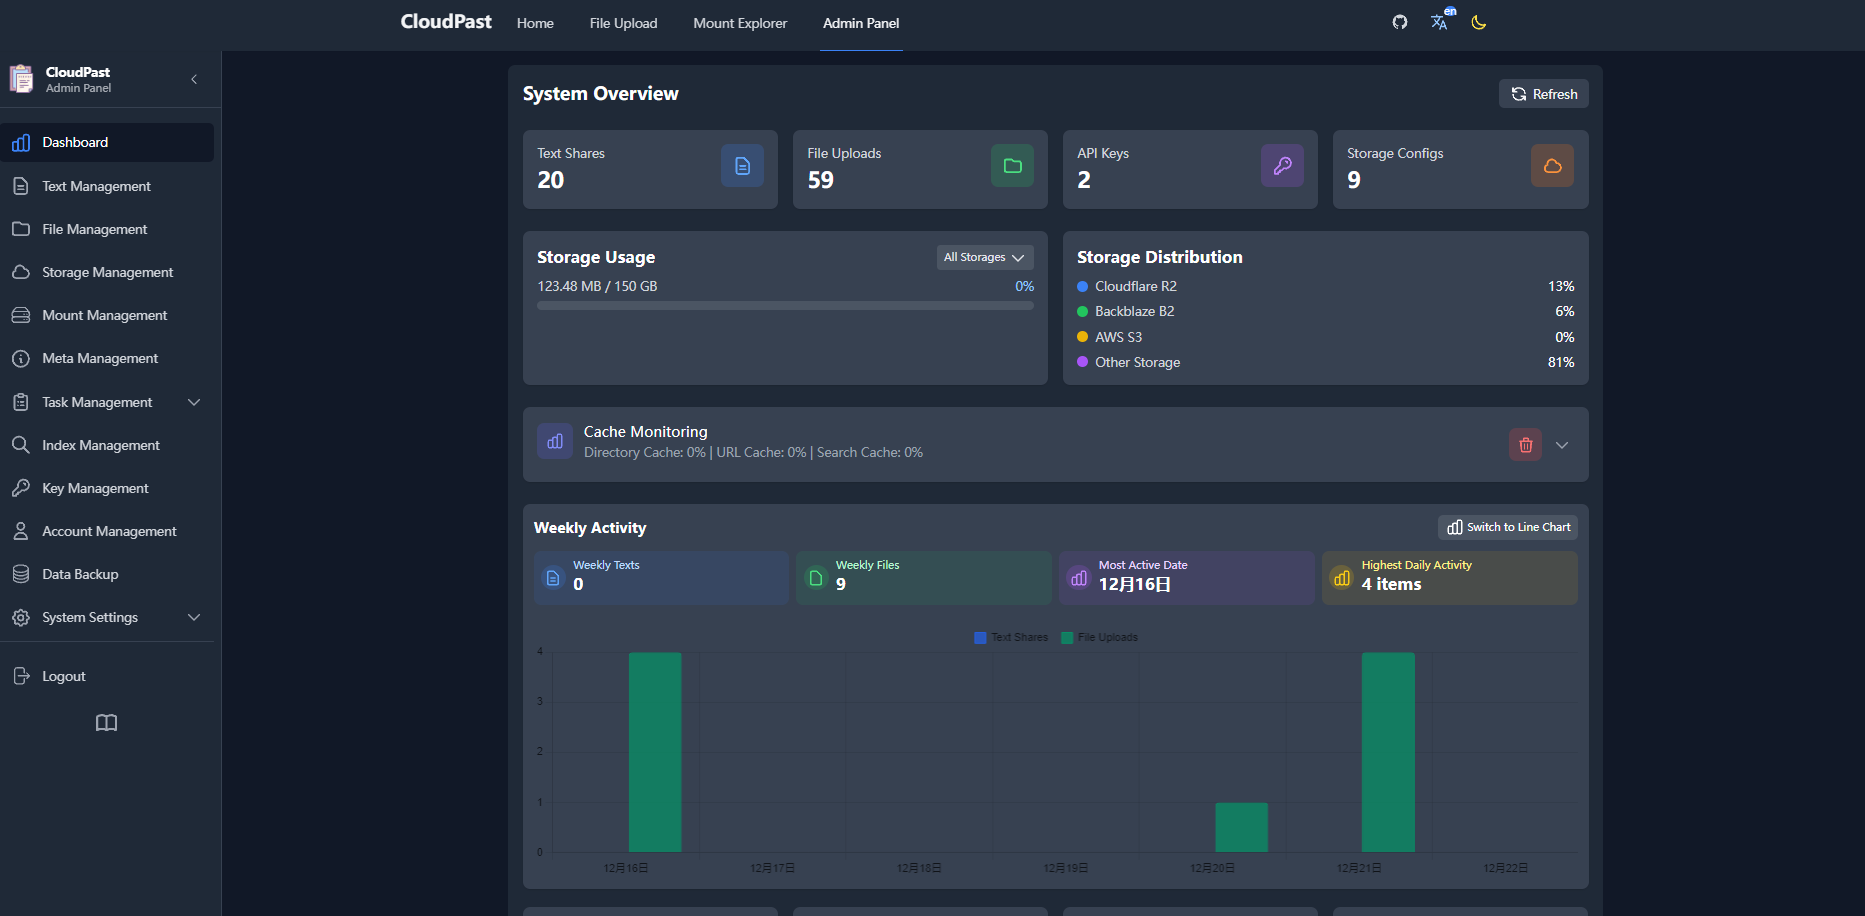 |
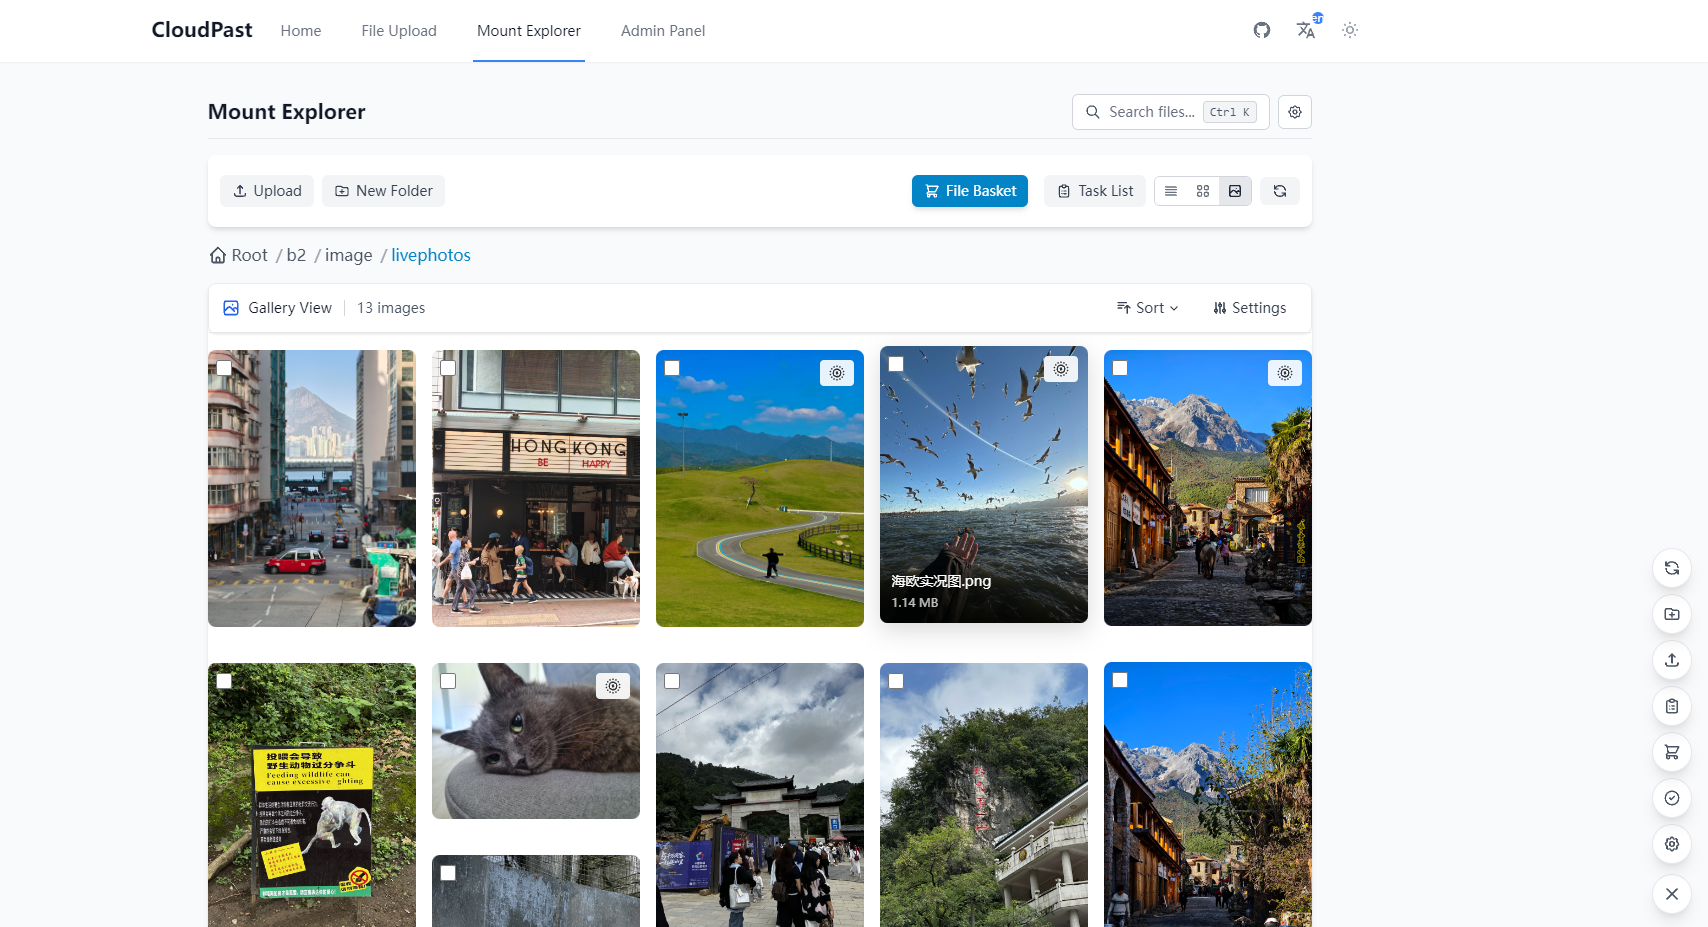 | 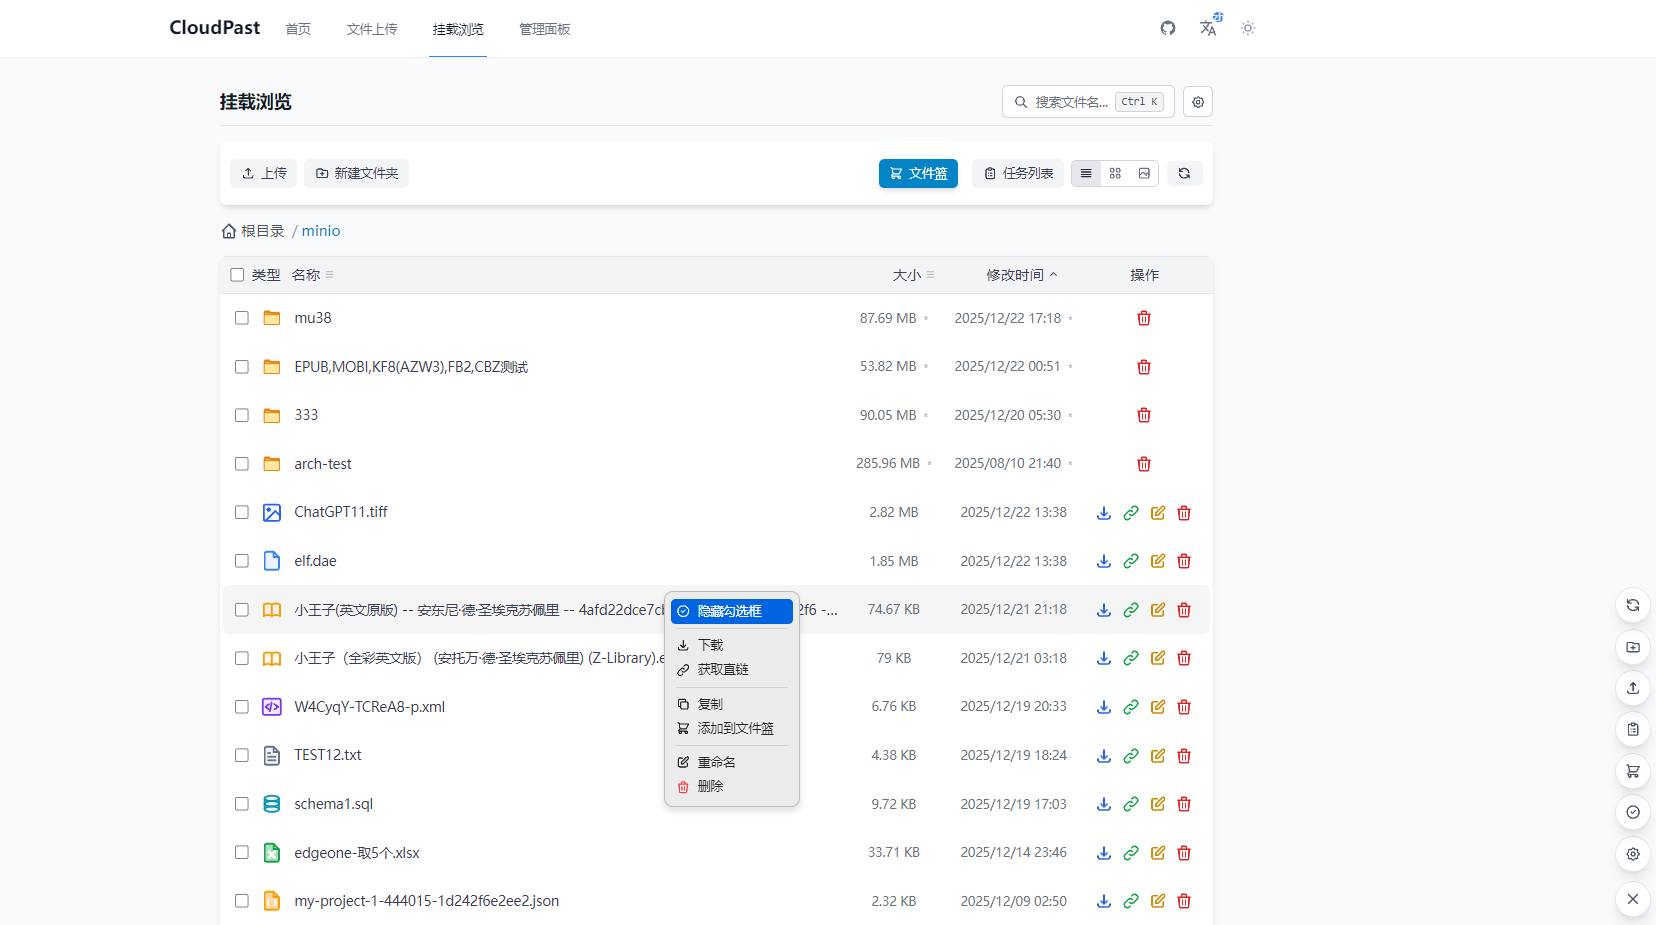 |
Before starting deployment, please ensure you have prepared the following:
S3_ACCESS_KEY_IDS3_SECRET_ACCESS_KEYS3_BUCKET_NAMES3_ENDPOINTThe following tutorial may be outdated. For specific details, refer to: Cloudpaste Online Deployment Documentation
Using GitHub Actions enables automatic deployment of your application after code is pushed. CloudPaste offers two deployment architectures for you to choose from.
Frontend and backend deployed on the same Cloudflare Worker
✨ Advantages:
Backend deployed to Cloudflare Workers, frontend deployed to Cloudflare Pages
✨ Advantages:
Visit and Fork the repository: https://github.com/ling-drag0n/CloudPaste
Go to your GitHub repository settings: Settings → Secrets and variables → Actions → New repository secret
Add the following Secrets:
| Secret Name | Required | Purpose |
|---|---|---|
CLOUDFLARE_API_TOKEN | ✅ | Cloudflare API token (requires Workers, D1, and Pages permissions) |
CLOUDFLARE_ACCOUNT_ID | ✅ | Cloudflare account ID |
ENCRYPTION_SECRET | ❌ | Key for encrypting sensitive data (will be auto-generated if not provided) |
ACTIONS_VAR_TOKEN | ✅ | GitHub Token for deployment control panel (required only when using the control panel, otherwise skip) |
Get API Token:
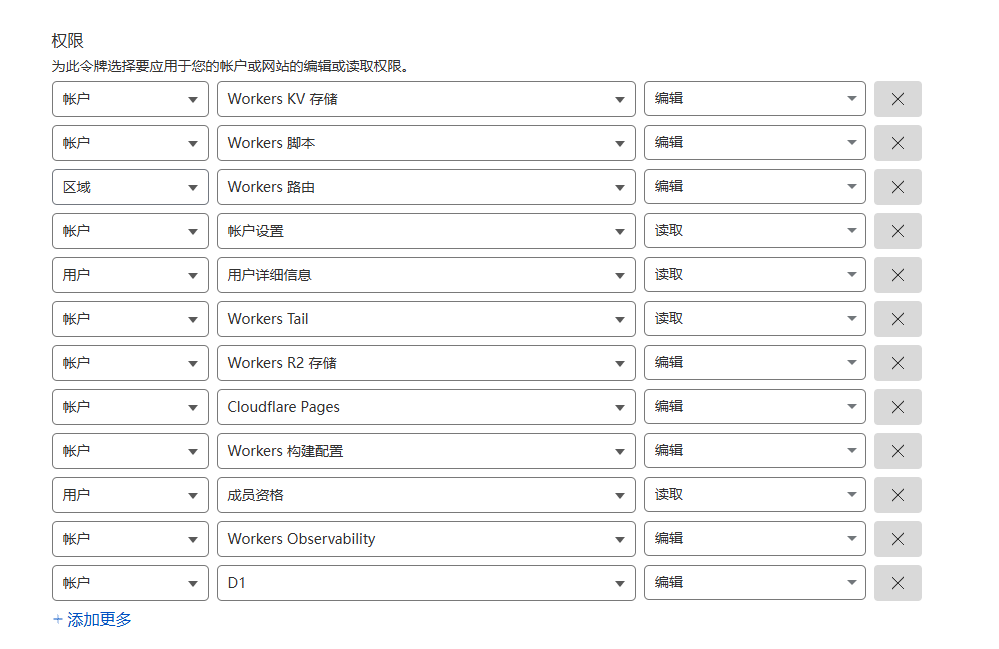
Get Account ID:
If you want to use the visual control panel to manage auto-deployment switches, you need additional configuration:
Create GitHub Personal Access Token:
CloudPaste Deployment Control)ACTIONS_VAR_TOKENUsing the Control Panel:
1️⃣ Configure GitHub Secrets (refer to the configuration section above)
2️⃣ Trigger Deployment Workflow
Method 1: Manual Trigger (recommended for first deployment)
main branch → Run workflowMethod 2: Auto Trigger
frontend/ or backend/ directory to main branchNote: When you manually run Deploy SPA CF Workers[一体化部署] from the Actions page, it will always deploy once regardless of the auto-deploy switch. Automatic behavior (push or control panel triggered) is still controlled by the
SPA_DEPLOYswitch.
3️⃣ Wait for Deployment to Complete
The deployment process takes about 3-5 minutes. The workflow will automatically complete the following steps:
4️⃣ Get Deployment URL
After successful deployment, you will see output similar to this in the Actions log:
Published cloudpaste-spa (X.XX sec)
  https://cloudpaste-spa.your-account.workers.dev
Your CloudPaste has been successfully deployed! Visit the URL above to use it.
Visit your application: https://cloudpaste-spa.your-account.workers.dev
Post-deployment Configuration:
adminadmin123Advantages Recap:
If you choose separated deployment, follow these steps:
1️⃣ Configure GitHub Secrets (refer to the configuration section above)
2️⃣ Trigger Backend Deployment
Method 1: Manual Trigger
Method 2: Auto Trigger
backend/ directory code3️⃣ Wait for Deployment to Complete
The workflow will automatically complete:
4️⃣ Record Backend URL
After successful deployment, note down your backend Worker URL:
https://cloudpaste-backend.your-account.workers.dev
⚠️ Important: Remember your backend domain, you'll need it for frontend deployment!
1️⃣ Trigger Frontend Deployment
Method 1: Manual Trigger
Method 2: Auto Trigger
frontend/ directory codeNote: When you manually run the Backend or Frontend deployment workflows from the Actions page, they will always deploy once regardless of the auto-deploy switch. Automatic behavior is controlled by the
BACKEND_DEPLOY/FRONTEND_DEPLOYswitches.
2️⃣ Configure Environment Variables
Required step: After frontend deployment, you must manually configure the backend address!
VITE_BACKEND_URLhttps://cloudpaste-backend.your-account.workers.dev)/, custom domain recommended⚠️ Must fill in the complete backend domain, format: https://xxxx.com
3️⃣ Redeploy Frontend
Important: After configuring environment variables, you must run the frontend workflow again!
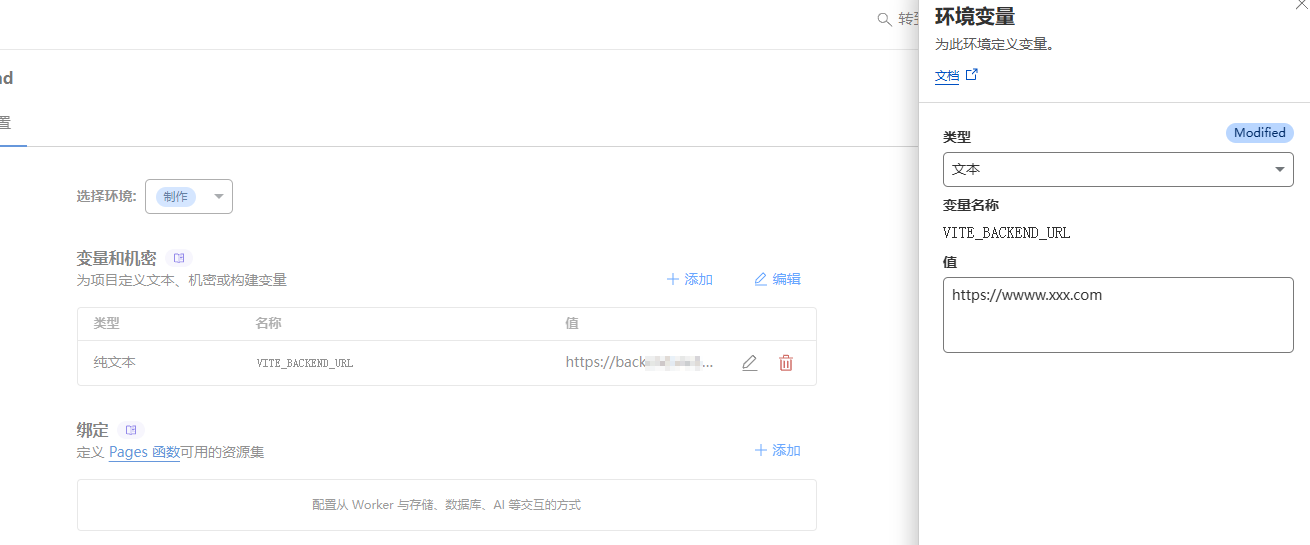
4️⃣ Access Application
Frontend deployment URL: https://cloudpaste-frontend.pages.dev
⚠️ Please strictly follow the steps, otherwise backend domain loading will fail!
Vercel deployment steps:
Framework Preset: Vite
Build Command: npm run build
Output Directory: dist
Install Command: npm install
VITE_BACKEND_URL☝️ Choose either Cloudflare Pages or Vercel
⚠️ Security Notice: Please change the default admin password immediately after system initialization (username: admin, password: admin123).
CloudPaste supports two manual deployment methods: unified deployment (recommended) and separated deployment.
Unified deployment deploys both frontend and backend to the same Cloudflare Worker, offering simpler configuration and lower costs.
git clone https://github.com/ling-drag0n/CloudPaste.git
cd CloudPaste
cd frontend
npm install
npm run build
cd ..
Verify build output: Ensure frontend/dist directory exists and contains index.html
cd backend
npm install
npx wrangler login
npx wrangler d1 create cloudpaste-db
Note the database_id from the output (e.g., xxxxxxxx-xxxx-xxxx-xxxx-xxxxxxxxxxxx)
npx wrangler d1 execute cloudpaste-db --file=./schema.sql
Edit backend/wrangler.spa.toml file and modify the database ID:
[[d1_databases]]
binding = "DB"
database_name = "cloudpaste-db"
database_id = "YOUR_DATABASE_ID"  # Replace with ID from Step 4
npx wrangler deploy --config wrangler.spa.toml
After successful deployment, you'll see your application URL:
Published cloudpaste-spa (X.XX sec)
  https://cloudpaste-spa.your-account.workers.dev
Visit your application: Open the URL above to use CloudPaste
Post-deployment Configuration:
admin, password: admin123)⚠️ Security Notice: Please change the default admin password immediately after system initialization.
If you need to deploy and manage frontend and backend independently, you can choose the separated deployment method.
git clone https://github.com/ling-drag0n/CloudPaste.git
cd CloudPaste/backend
Install dependencies
npm install
Log in to Cloudflare
npx wrangler login
Create D1 database
npx wrangler d1 create cloudpaste-db
Note the database ID from the output.
Modify wrangler.toml configuration
[[d1_databases]]
binding = "DB"
database_name = "cloudpaste-db"
database_id = "YOUR_DATABASE_ID"
Deploy Worker
npx wrangler deploy
Note the URL from the output; this is your backend API address.
Initialize database (automatic) Visit your Worker URL to trigger initialization:
https://cloudpaste-backend.your-username.workers.dev
⚠️ Important: Remember your backend domain, you'll need it for frontend deployment!
Prepare frontend code
cd CloudPaste/frontend
npm install
Configure environment variables
Create or modify the .env.production file:
VITE_BACKEND_URL=https://cloudpaste-backend.your-username.workers.dev
VITE_APP_ENV=production
VITE_ENABLE_DEVTOOLS=false
Build frontend project
npm run build
Deploy to Cloudflare Pages
Method 1: Via Wrangler CLI
npx wrangler pages deploy dist --project-name=cloudpaste-frontend
Method 2: Via Cloudflare Dashboard
dist directoryPrepare frontend code
cd CloudPaste/frontend
npm install
Install and log in to Vercel CLI
npm install -g vercel
vercel login
Configure environment variables, same as for Cloudflare Pages
Build and deploy
vercel --prod
Follow the prompts to configure the project.
Registration link: Claw Cloud (no #AFF) No credit card required, as long as your GitHub registration date is more than 180 days, you get $5 credit every month.
After registration, click APP Launchpad on the homepage, then click create app in the upper right corner
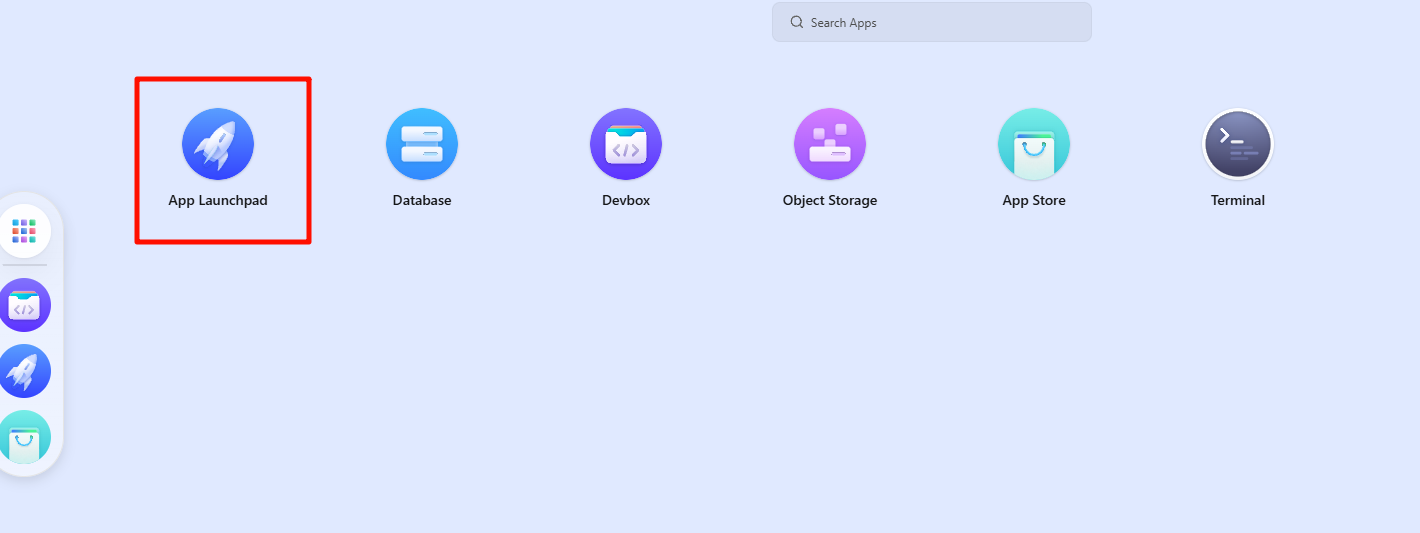
First deploy the backend, as shown in the figure (for reference only):
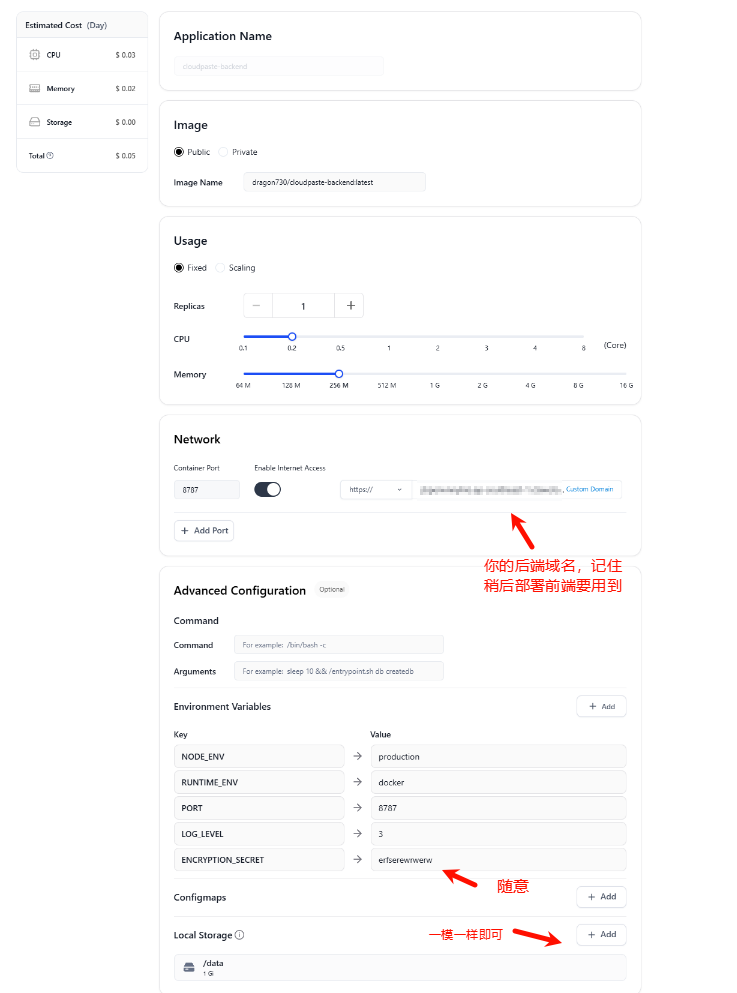
Backend data storage is here:
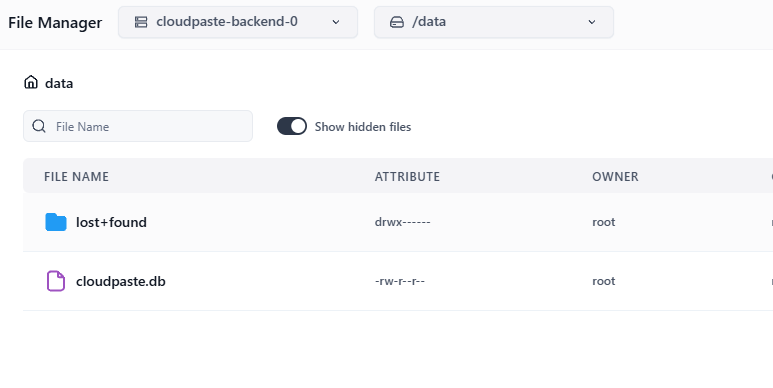
Then the frontend, as shown in the figure (for reference only):
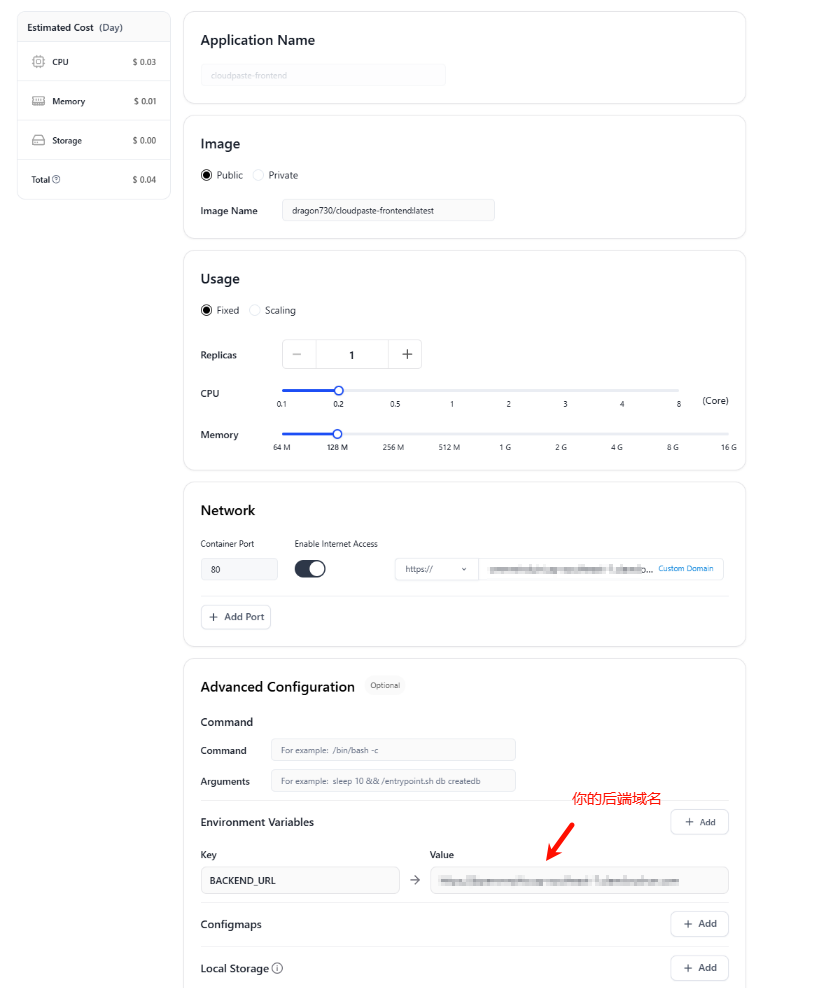
CloudPaste backend can be quickly deployed using the official Docker image.
Create data storage directory
mkdir -p sql_data
Run the backend container
docker run -d --name cloudpaste-backend \
  -p 8787:8787 \
  -v $(pwd)/sql_data:/data \
  -e ENCRYPTION_SECRET=your-encryption-key \
  -e NODE_ENV=production \
  dragon730/cloudpaste-backend:latest
Note the deployment URL (e.g., http://your-server-ip:8787), which will be needed for the frontend deployment.
⚠️ Security tip: Be sure to customize ENCRYPTION_SECRET and keep it safe, as this key is used to encrypt sensitive data.
The frontend uses Nginx to serve and configures the backend API address at startup.
docker run -d --name cloudpaste-frontend \
  -p 80:80 \
  -e BACKEND_URL=http://your-server-ip:8787 \
  dragon730/cloudpaste-frontend:latest
⚠️ Note: BACKEND_URL must include the complete URL (including protocol http:// or https://) ⚠️ Security reminder: Please change the default administrator password immediately after system initialization (Username: admin, Password: admin123).
When a new version of the project is released, you can update your Docker deployment following these steps:
Pull the latest images
docker pull dragon730/cloudpaste-backend:latest
docker pull dragon730/cloudpaste-frontend:latest
Stop and remove old containers
docker stop cloudpaste-backend cloudpaste-frontend
docker rm cloudpaste-backend cloudpaste-frontend
Start new containers using the same run commands as above (preserving data directory and configuration)
Using Docker Compose allows you to deploy both frontend and backend services with one click, which is the simplest recommended method.
docker-compose.yml fileversion: "3.8"
services:
frontend:
image: dragon730/cloudpaste-frontend:latest
environment:
- BACKEND_URL=https://xxx.com # Fill in the backend service address
ports:
- "8080:80" #"127.0.0.1:8080:80"
depends_on:
- backend # Depends on backend service
networks:
- cloudpaste-network
restart: unless-stopped
backend:
image: dragon730/cloudpaste-backend:latest
environment:
- NODE_ENV=production
- PORT=8787
- ENCRYPTION_SECRET=custom-key # Please modify this to your own security key
- TASK_WORKER_POOL_SIZE=2
volumes:
- ./sql_data:/data # Data persistence
ports:
- "8787:8787" #"127.0.0.1:8787:8787"
networks:
- cloudpaste-network
restart: unless-stopped
networks:
cloudpaste-network:
driver: bridge
docker-compose up -d
⚠️ Security reminder: Please change the default administrator password immediately after system initialization (Username: admin, Password: admin123).
Frontend: http://your-server-ip:80
Backend: http://your-server-ip:8787
When you need to update to a new version:
Pull the latest images
docker-compose pull
Recreate containers using new images (preserving data volumes)
docker-compose up -d --force-recreate
💡 Tip: If there are configuration changes, you may need to backup data and modify the docker-compose.yml file
server {
    listen 443 ssl;
    server_name paste.yourdomain.com;  # Replace with your domain name

    # SSL certificate configuration
    ssl_certificate     /path/to/cert.pem;  # Replace with certificate path
    ssl_certificate_key /path/to/key.pem;   # Replace with key path

    # Frontend proxy configuration
    location / {
        proxy_pass http://localhost:80;  # Docker frontend service address
        proxy_set_header Host $host;
        proxy_set_header X-Real-IP $remote_addr;
    }

    # Backend API proxy configuration
    location /api {
        proxy_pass http://localhost:8787;  # Docker backend service address
        proxy_set_header Host $host;
        proxy_set_header X-Real-IP $remote_addr;
        client_max_body_size 0;

        # WebSocket support (if needed)
        proxy_http_version 1.1;
        proxy_set_header Upgrade $http_upgrade;
        proxy_set_header Connection "upgrade";
    }

    # WebDAV Configuration
    location /dav {
        proxy_pass http://localhost:8787/dav;  # Points to your backend service

        # WebDAV necessary headers
        proxy_set_header Host $host;
        proxy_set_header X-Real-IP $remote_addr;
        proxy_set_header X-Forwarded-For $proxy_add_x_forwarded_for;

        # WebDAV method support
        proxy_pass_request_headers on;

        # Support all WebDAV methods
        proxy_method $request_method;

        # Necessary header processing
        proxy_set_header Destination $http_destination;
        proxy_set_header Overwrite $http_overwrite;

        # Handle large files
        client_max_body_size 0;

        # Timeout settings
        proxy_connect_timeout 3600s;
        proxy_send_timeout 3600s;
        proxy_read_timeout 3600s;
    }
}
⚠️ Security tip: It is recommended to configure HTTPS and a reverse proxy (such as Nginx) to enhance security.
Log in to Cloudflare Dashboard
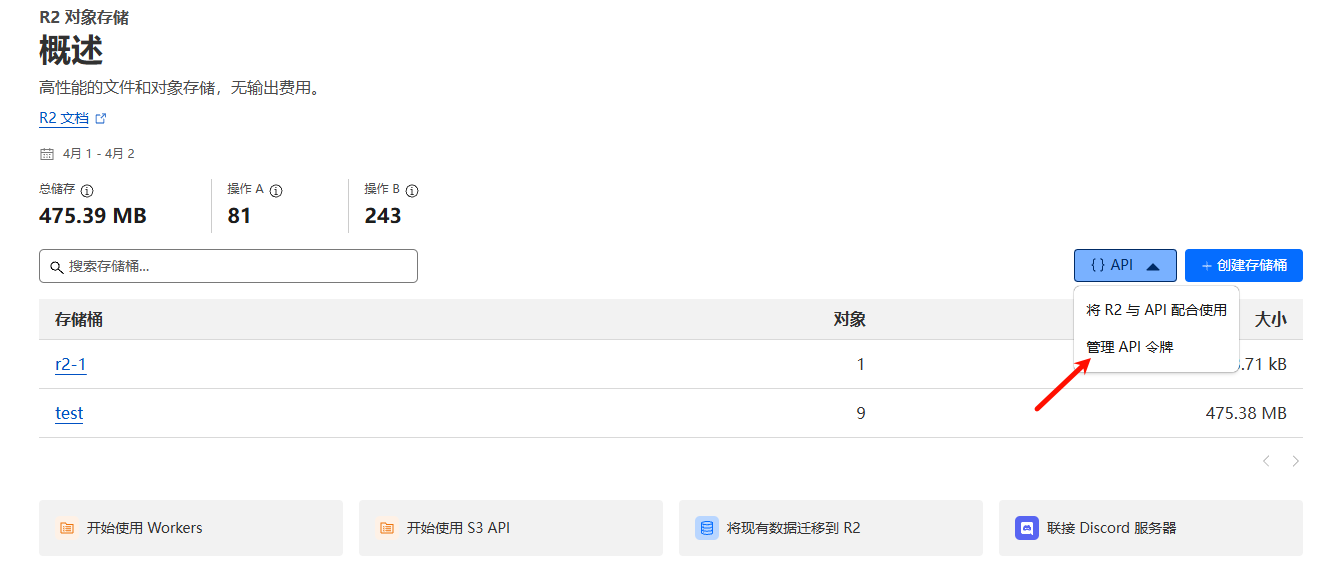
Click R2 Storage and create a bucket.
Create API token
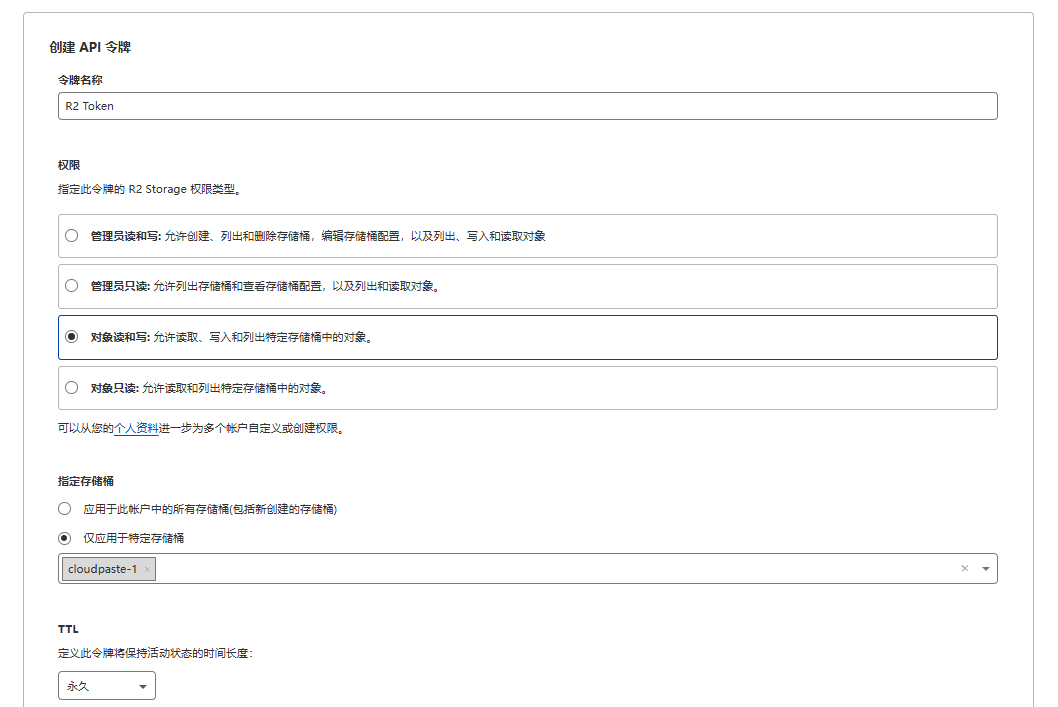
Save all data after creation; you'll need it later
Configure cross-origin rules: click the corresponding bucket, click Settings, edit CORS policy as shown below:
[
  {
    "AllowedOrigins": ["http://localhost:3000", "https://replace-with-your-frontend-domain"],
    "AllowedMethods": ["GET", "PUT", "POST", "DELETE", "HEAD"],
    "AllowedHeaders": ["*"],
    "ExposeHeaders": ["ETag"],
    "MaxAgeSeconds": 3600
  }
]
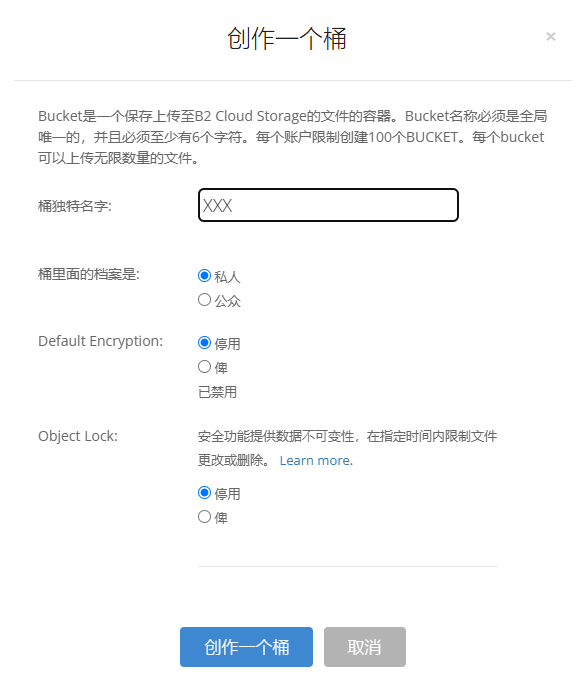
If you don't have a B2 account, register one first, then create a bucket.
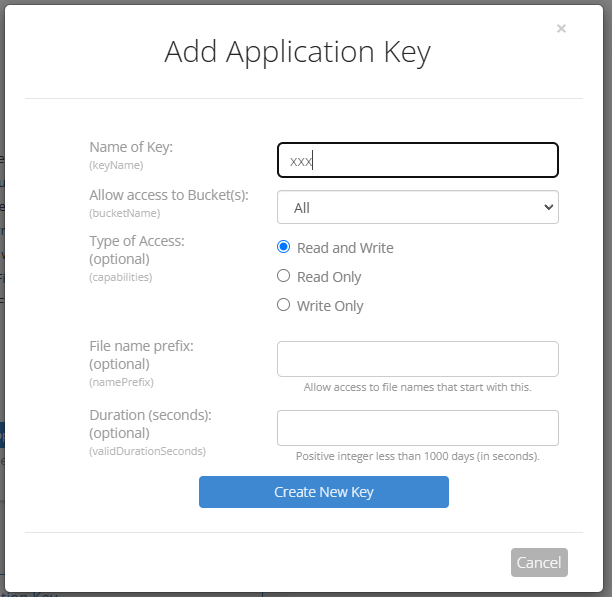
Click Application Key in the sidebar, click Create Key, and follow the illustration.
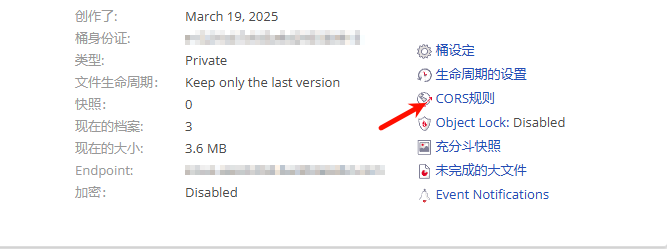
Configure B2 cross-origin; B2 cross-origin configuration is more complex, take note
You can try options 1 or 2 first, go to the upload page and see if you can upload. If F12 console shows cross-origin errors, use option 3. For a permanent solution, use option 3 directly.
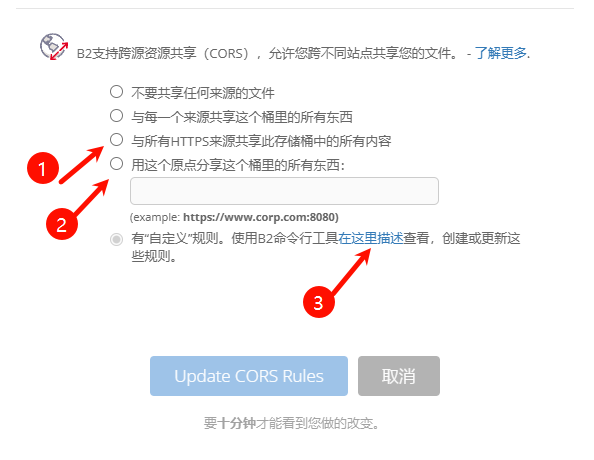
Regarding option 3 configuration, since the panel cannot configure it, you need to configure manually by downloading B2 CLI tool. For more details, refer to: "https://docs.cloudreve.org/zh/usage/storage/b2".
After downloading, in the corresponding download directory CMD, enter the following commands:
b2-windows.exe account authorize   //Log in to your account, following prompts to enter your keyID and applicationKey
b2-windows.exe bucket get <bucketName> //You can execute to get bucket information, replace <bucketName> with your bucket name
Windows configuration, Use ".\b2-windows.exe xxx", Python CLI would be similar:
b2-windows.exe bucket update <bucketName> allPrivate --cors-rules "[{\"corsRuleName\":\"CloudPaste\",\"allowedOrigins\":[\"*\"],\"allowedHeaders\":[\"*\"],\"allowedOperations\":[\"b2_upload_file\",\"b2_download_file_by_name\",\"b2_download_file_by_id\",\"s3_head\",\"s3_get\",\"s3_put\",\"s3_post\",\"s3_delete\"],\"exposeHeaders\":[\"Etag\",\"content-length\",\"content-type\",\"x-bz-content-sha1\"],\"maxAgeSeconds\":3600}]"
Replace with your bucket name. For allowedOrigins in the cross-origin allowance, you can configure based on your needs; here it allows all.
Deploy MinIO Server
Use the following Docker Compose configuration (reference) to quickly deploy MinIO:
version: "3"

services:
  minio:
    image: minio/minio:RELEASE.2025-02-18T16-25-55Z
    container_name: minio-server
    command: server /data --console-address :9001 --address :9000
    environment:
      - MINIO_ROOT_USER=minioadmin # Admin username
      - MINIO_ROOT_PASSWORD=minioadmin # Admin password
      - MINIO_BROWSER=on
      - MINIO_SERVER_URL=https://minio.example.com # S3 API access URL
      - MINIO_BROWSER_REDIRECT_URL=https://console.example.com # Console access URL
    ports:
      - "9000:9000" # S3 API port
      - "9001:9001" # Console port
    volumes:
      - ./data:/data
      - ./certs:/root/.minio/certs # SSL certificates (if needed)
    restart: always
Run docker-compose up -d to start the service.
Configure Reverse Proxy (Reference)
To ensure MinIO functions correctly, especially file previews, configure reverse proxy properly. Recommended OpenResty/Nginx settings:
MinIO S3 API Reverse Proxy (minio.example.com):
location / {
    proxy_pass http://127.0.0.1:9000;
    proxy_set_header Host $host;
    proxy_set_header X-Real-IP $remote_addr;
    proxy_set_header X-Forwarded-For $proxy_add_x_forwarded_for;
    proxy_set_header X-Forwarded-Proto $scheme;

    # HTTP optimization
    proxy_http_version 1.1;
    proxy_set_header Connection "";  # Enable HTTP/1.1 keepalive

    # Critical: Resolve 403 errors & preview issues
    proxy_cache off;
    proxy_buffering off;
    proxy_request_buffering off;

    # No file size limit
    client_max_body_size 0;
}
MinIO Console Reverse Proxy (console.example.com):
location / {
    proxy_pass http://127.0.0.1:9001;
    proxy_set_header Host $host;
    proxy_set_header X-Real-IP $remote_addr;
    proxy_set_header X-Forwarded-For $proxy_add_x_forwarded_for;
    proxy_set_header X-Forwarded-Proto $scheme;

    # WebSocket support
    proxy_http_version 1.1;
    proxy_set_header Upgrade $http_upgrade;
    proxy_set_header Connection "upgrade";

    # Critical settings
    proxy_cache off;
    proxy_buffering off;

    # No file size limit
    client_max_body_size 0;
}
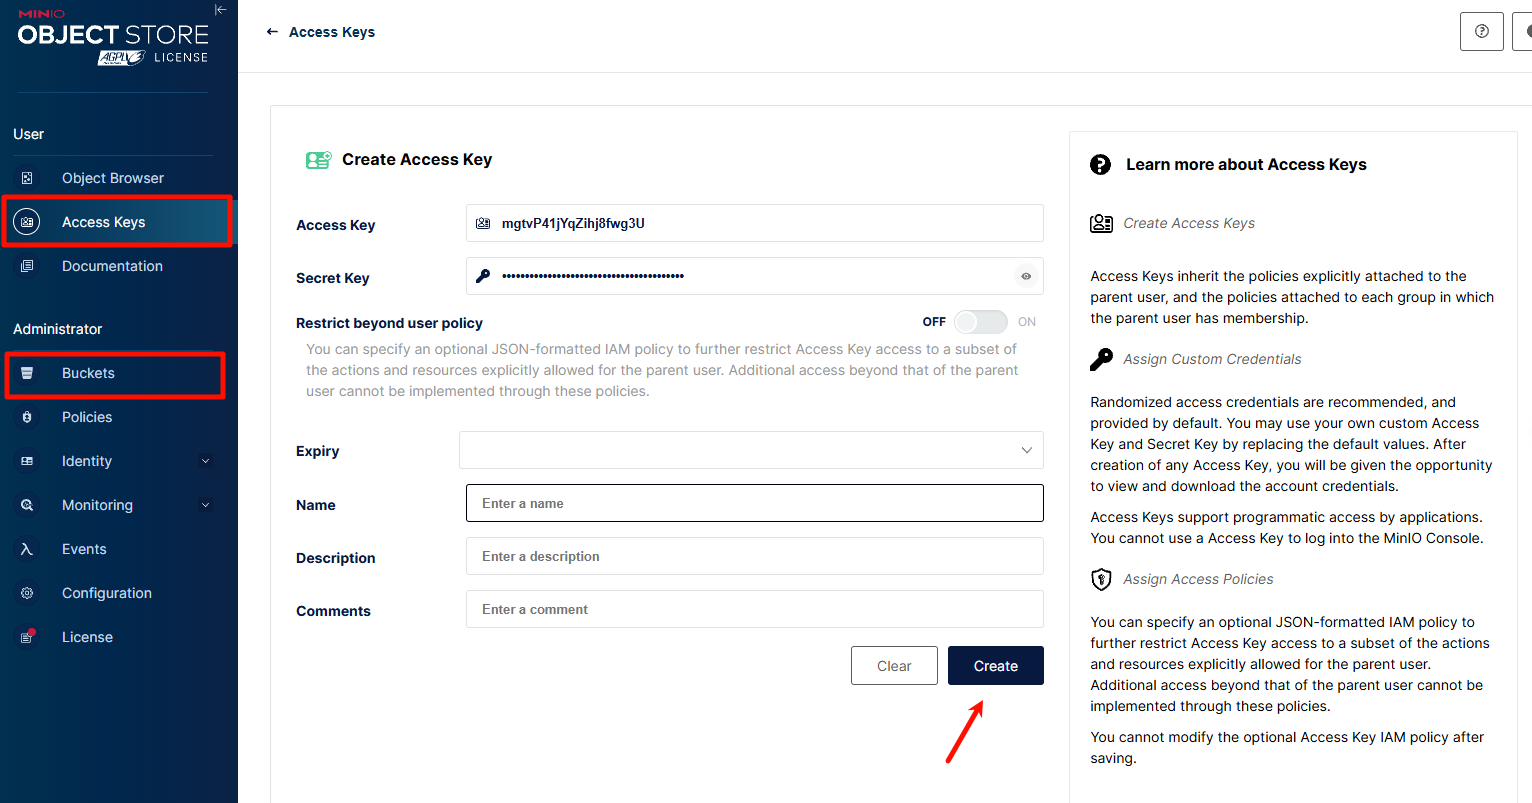
Access Console to Create Buckets & Access Keys
For detailed configuration, refer to official docs:
https://min.io/docs/minio/container/index.html
CN: https://min-io.cn/docs/minio/container/index.html
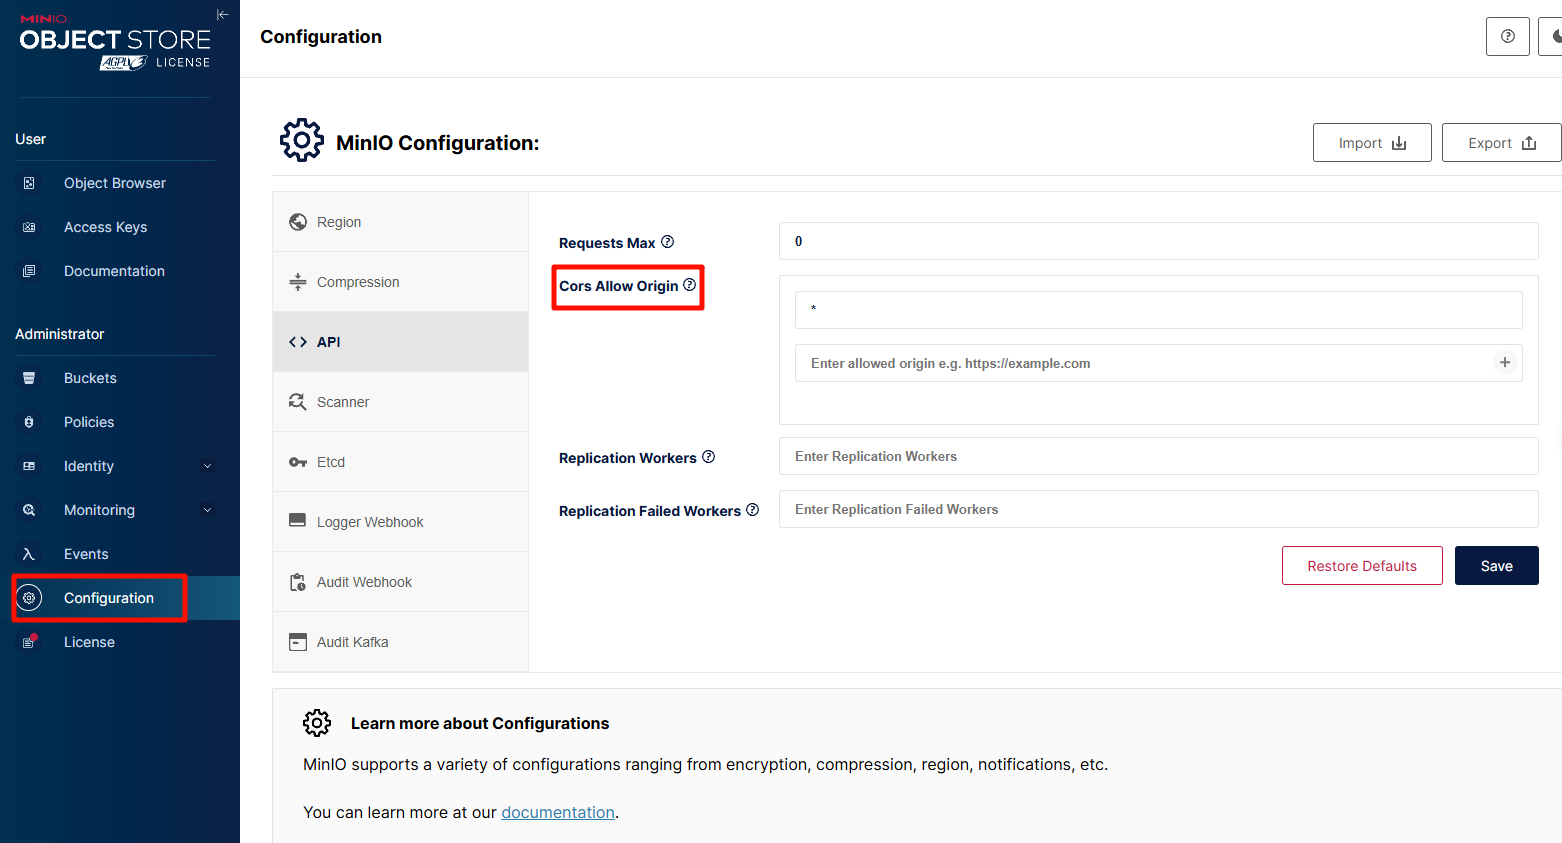
Additional Configuration (Optional)
Allowed origins must include your frontend domain.
Configure MinIO in CloudPaste
https://minio.example.com)Troubleshooting
proxy_set_header Accept-Encoding "identity", and there are caching issues to consider. It is recommended to use only DNS resolution.proxy_cache off & proxy_buffering offMINIO_SERVER_URL & MINIO_BROWSER_REDIRECT_URL are correctly setConnection "upgrade"CloudPaste provides simple WebDAV protocol support, allowing you to mount storage spaces as network drives for convenient access and management of files directly through file managers.
https://your-backend-domain/davUse administrator account and password to directly access the WebDAV service:
For a more secure access method, it is recommended to create a dedicated API key:
If using NGINX as a reverse proxy, specific WebDAV configuration needs to be added to ensure all WebDAV methods work properly:
# WebDAV Configuration
location /dav {
    proxy_pass http://localhost:8787;  # Points to your backend service

    # WebDAV necessary headers
    proxy_set_header Host $host;
    proxy_set_header X-Real-IP $remote_addr;
    proxy_set_header X-Forwarded-For $proxy_add_x_forwarded_for;

    # WebDAV method support
    proxy_pass_request_headers on;

    # Support all WebDAV methods
    proxy_method $request_method;

    # Necessary header processing
    proxy_set_header Destination $http_destination;
    proxy_set_header Overwrite $http_overwrite;

    # Handle large files
    client_max_body_size 0;

    # Timeout settings
    proxy_connect_timeout 3600s;
    proxy_send_timeout 3600s;
    proxy_read_timeout 3600s;
}
Connection Problems:
Permission Errors:
⚠️⚠️ WebDAV Upload Issues:
Server Direct File Upload API Documentation - Detailed description of the server direct file upload interface
Clone project repository
git clone https://github.com/ling-drag0n/cloudpaste.git
cd cloudpaste
Backend setup
cd backend
npm install
# Initialize D1 database
wrangler d1 create cloudpaste-db
wrangler d1 execute cloudpaste-db --file=./schema.sql
Frontend setup
cd frontend
npm install
Configure environment variables
backend directory, create a wrangler.toml file to set development environment variablesfrontend directory, configure the .env.development file to set frontend environment variablesStart development servers
# Backend
cd backend
npm run dev

# Frontend (in another terminal)
cd frontend
npm run dev
CloudPaste/
├── frontend/                         # Frontend Vite + Vue 3 SPA
│   ├── src/
│   │   ├── api/                      # HTTP client & API services (no domain semantics)
│   │   ├── modules/                  # Domain modules layer (by business area)
│   │   │   ├── paste/                # Text sharing (editor / public view / admin)
│   │   │   ├── fileshare/            # File sharing (public page / admin)
│   │   │   ├── fs/                   # Mounted file system explorer (MountExplorer)
│   │   │   ├── upload/               # Upload controller & upload views
│   │   │   ├── storage-core/         # Storage drivers & Uppy wiring (low-level abstraction)
│   │   │   ├── security/             # Frontend auth bridge & Authorization header helpers
│   │   │   ├── pwa-offline/          # PWA offline queue & state
│   │   │   └── admin/                # Admin panel (dashboard / settings / key management, etc.)
│   │   ├── components/               # Reusable, cross-module UI components (no module imports)
│   │   ├── composables/              # Shared composition APIs (file-system / preview / upload, etc.)
│   │   ├── stores/                   # Pinia stores (auth / fileSystem / siteConfig, etc.)
│   │   ├── router/                   # Vue Router configuration (single entry for all views)
│   │   ├── pwa/                      # PWA state & installation prompts
│   │   ├── utils/                    # Utilities (clipboard / time / file icons, etc.)
│   │   ├── styles/                   # Global styles & Tailwind config entry
│   │   └── assets/                   # Static assets
│   ├── eslint.config.cjs             # Frontend ESLint config (including import boundaries)
│   ├── vite.config.js                # Vite build configuration
│   └── package.json
├── backend/                          # Backend (Cloudflare Workers / Docker runtime)
│   ├── src/
│   │   ├── routes/                   # HTTP routing layer (fs / files / pastes / admin / system, etc.)
│   │   │   ├── fs/                   # Mount FS APIs (list / read / write / search / share)
│   │   │   ├── files/                # File sharing APIs (public / protected)
│   │   │   ├── pastes/               # Text sharing APIs (public / protected)
│   │   │   ├── adminRoutes.js        # Generic admin routes
│   │   │   ├── apiKeyRoutes.js       # API key management routes
│   │   │   ├── mountRoutes.js        # Mount configuration routes
│   │   │   ├── systemRoutes.js       # System settings & dashboard stats
│   │   │   └── fsRoutes.js           # Unified FS entry aggregation
│   │   ├── services/                 # Domain services (pastes / files / system / apiKey, etc.)
│   │   ├── security/                 # Auth + authorization (AuthService / securityContext / authorize / policies)
│   │   ├── webdav/                   # WebDAV implementation & path handling
│   │   ├── storage/                  # Storage abstraction (S3 drivers, mount manager, file system ops)
│   │   ├── repositories/             # Data access layer (D1 + SQLite repositories)
│   │   ├── cache/                    # Cache & invalidation (mainly FS)
│   │   ├── constants/                # Constants (ApiStatus / Permission / DbTables / UserType, etc.)
│   │   ├── http/                     # Unified error types & response helpers
│   │   └── utils/                    # Utilities (common / crypto / environment, etc.)
│   ├── schema.sql                    # D1 / SQLite schema bootstrap
│   ├── wrangler.toml                 # Cloudflare Workers / D1 configuration
│   └── package.json
├── docs/                             # Architecture & design docs
│   ├── frontend-architecture-implementation.md    # Frontend layering & modules/* design
│   ├── frontend-architecture-optimization-plan.md # Frontend optimization plan (Phase 2/3)
│   ├── auth-permissions-design.md                # Auth & permissions system design
│   └── backend-error-handling-refactor.md        # Backend error handling refactor design
├── docker/                           # Docker & Compose deployment configs
├── images/                           # Screenshots used in README
├── Api-doc.md                        # API overview
├── Api-s3_direct.md                  # S3 direct upload API docs
└── README.md                         # Main project README
If you want to customize Docker images or debug during development, you can follow these steps to build manually:
Build backend image
# Execute in the project root directory
docker build -t cloudpaste-backend:custom -f docker/backend/Dockerfile .

# Run the custom built image
docker run -d --name cloudpaste-backend \
  -p 8787:8787 \
  -v $(pwd)/sql_data:/data \
  -e ENCRYPTION_SECRET=development-test-key \
  cloudpaste-backend:custom
Build frontend image
# Execute in the project root directory
docker build -t cloudpaste-frontend:custom -f docker/frontend/Dockerfile .

# Run the custom built image
docker run -d --name cloudpaste-frontend \
  -p 80:80 \
  -e BACKEND_URL=http://localhost:8787 \
  cloudpaste-frontend:custom
Development environment Docker Compose
Create a docker-compose.dev.yml file:
version: "3.8"

services:
  frontend:
    build:
      context: .
      dockerfile: docker/frontend/Dockerfile
    environment:
      - BACKEND_URL=http://backend:8787
    ports:
      - "80:80"
    depends_on:
      - backend

  backend:
    build:
      context: .
      dockerfile: docker/backend/Dockerfile
    environment:
      - NODE_ENV=development
      - RUNTIME_ENV=docker
      - PORT=8787
      - ENCRYPTION_SECRET=dev_secret_key
    volumes:
      - ./sql_data:/data
    ports:
      - "8787:8787"
Start the development environment:
docker-compose -f docker-compose.yml up --build
Apache License 2.0
This project is licensed under the Apache License 2.0 - see the LICENSE file for details.
Sponsorship: Maintaining the project is not easy. If you like this project, you can give the author a little encouragement. Every bit of your support is the motivation for me to move forward~


Sponsors: A huge thank you to the following sponsors for their support of this project!!
Contributors: Thanks to the following contributors for their selfless contributions to this project!
If you think the project is good I hope you can give a free star✨✨, Thank you very much!
72 followers · starred Feb 2026
8 followers · starred Jun 2025
28 followers · starred Feb 2026
34 followers · starred Jun 2025
🌩️ Serverless 自托管的文件管理与文本分享工具/网盘,支持多存储聚合管理和WebDAV 服务挂载。兼容 S3、WebDAV、OneDrive、Google Drive、Telegram、HF、GitHub 等。内置 Markdown 编辑器、30+文件格式预览。支持 Cloudflare Workers 或 Docker 部署。
See the code中文 | English | Español | français | 日本語
📸 Showcase • ✨ Features • 🚀 Deployment Guide • 🔧 Tech Stack • 💻 Development • 📄 License
| |
| |
| |
| |
Before starting deployment, please ensure you have prepared the following:
S3_ACCESS_KEY_IDS3_SECRET_ACCESS_KEYS3_BUCKET_NAMES3_ENDPOINTThe following tutorial may be outdated. For specific details, refer to: Cloudpaste Online Deployment Documentation
Using GitHub Actions enables automatic deployment of your application after code is pushed. CloudPaste offers two deployment architectures for you to choose from.
Frontend and backend deployed on the same Cloudflare Worker
✨ Advantages:
Backend deployed to Cloudflare Workers, frontend deployed to Cloudflare Pages
✨ Advantages:
Visit and Fork the repository: https://github.com/ling-drag0n/CloudPaste
Go to your GitHub repository settings: Settings → Secrets and variables → Actions → New repository secret
Add the following Secrets:
| Secret Name | Required | Purpose |
|---|---|---|
CLOUDFLARE_API_TOKEN | ✅ | Cloudflare API token (requires Workers, D1, and Pages permissions) |
CLOUDFLARE_ACCOUNT_ID | ✅ | Cloudflare account ID |
ENCRYPTION_SECRET | ❌ | Key for encrypting sensitive data (will be auto-generated if not provided) |
ACTIONS_VAR_TOKEN | ✅ | GitHub Token for deployment control panel (required only when using the control panel, otherwise skip) |
Get API Token:
Get Account ID:
If you want to use the visual control panel to manage auto-deployment switches, you need additional configuration:
Create GitHub Personal Access Token:
CloudPaste Deployment Control)ACTIONS_VAR_TOKENUsing the Control Panel:
1️⃣ Configure GitHub Secrets (refer to the configuration section above)
2️⃣ Trigger Deployment Workflow
Method 1: Manual Trigger (recommended for first deployment)
main branch → Run workflowMethod 2: Auto Trigger
frontend/ or backend/ directory to main branchNote: When you manually run Deploy SPA CF Workers[一体化部署] from the Actions page, it will always deploy once regardless of the auto-deploy switch. Automatic behavior (push or control panel triggered) is still controlled by the
SPA_DEPLOYswitch.
3️⃣ Wait for Deployment to Complete
The deployment process takes about 3-5 minutes. The workflow will automatically complete the following steps:
4️⃣ Get Deployment URL
After successful deployment, you will see output similar to this in the Actions log:
Published cloudpaste-spa (X.XX sec)
  https://cloudpaste-spa.your-account.workers.dev
Your CloudPaste has been successfully deployed! Visit the URL above to use it.
Visit your application: https://cloudpaste-spa.your-account.workers.dev
Post-deployment Configuration:
adminadmin123Advantages Recap:
If you choose separated deployment, follow these steps:
1️⃣ Configure GitHub Secrets (refer to the configuration section above)
2️⃣ Trigger Backend Deployment
Method 1: Manual Trigger
Method 2: Auto Trigger
backend/ directory code3️⃣ Wait for Deployment to Complete
The workflow will automatically complete:
4️⃣ Record Backend URL
After successful deployment, note down your backend Worker URL:
https://cloudpaste-backend.your-account.workers.dev
⚠️ Important: Remember your backend domain, you'll need it for frontend deployment!
1️⃣ Trigger Frontend Deployment
Method 1: Manual Trigger
Method 2: Auto Trigger
frontend/ directory codeNote: When you manually run the Backend or Frontend deployment workflows from the Actions page, they will always deploy once regardless of the auto-deploy switch. Automatic behavior is controlled by the
BACKEND_DEPLOY/FRONTEND_DEPLOYswitches.
2️⃣ Configure Environment Variables
Required step: After frontend deployment, you must manually configure the backend address!
VITE_BACKEND_URLhttps://cloudpaste-backend.your-account.workers.dev)/, custom domain recommended⚠️ Must fill in the complete backend domain, format: https://xxxx.com
3️⃣ Redeploy Frontend
Important: After configuring environment variables, you must run the frontend workflow again!
4️⃣ Access Application
Frontend deployment URL: https://cloudpaste-frontend.pages.dev
⚠️ Please strictly follow the steps, otherwise backend domain loading will fail!
Vercel deployment steps:
Framework Preset: Vite
Build Command: npm run build
Output Directory: dist
Install Command: npm install
VITE_BACKEND_URL☝️ Choose either Cloudflare Pages or Vercel
⚠️ Security Notice: Please change the default admin password immediately after system initialization (username: admin, password: admin123).
CloudPaste supports two manual deployment methods: unified deployment (recommended) and separated deployment.
Unified deployment deploys both frontend and backend to the same Cloudflare Worker, offering simpler configuration and lower costs.
git clone https://github.com/ling-drag0n/CloudPaste.git
cd CloudPaste
cd frontend
npm install
npm run build
cd ..
Verify build output: Ensure frontend/dist directory exists and contains index.html
cd backend
npm install
npx wrangler login
npx wrangler d1 create cloudpaste-db
Note the database_id from the output (e.g., xxxxxxxx-xxxx-xxxx-xxxx-xxxxxxxxxxxx)
npx wrangler d1 execute cloudpaste-db --file=./schema.sql
Edit backend/wrangler.spa.toml file and modify the database ID:
[[d1_databases]]
binding = "DB"
database_name = "cloudpaste-db"
database_id = "YOUR_DATABASE_ID"  # Replace with ID from Step 4
npx wrangler deploy --config wrangler.spa.toml
After successful deployment, you'll see your application URL:
Published cloudpaste-spa (X.XX sec)
  https://cloudpaste-spa.your-account.workers.dev
Visit your application: Open the URL above to use CloudPaste
Post-deployment Configuration:
admin, password: admin123)⚠️ Security Notice: Please change the default admin password immediately after system initialization.
If you need to deploy and manage frontend and backend independently, you can choose the separated deployment method.
git clone https://github.com/ling-drag0n/CloudPaste.git
cd CloudPaste/backend
Install dependencies
npm install
Log in to Cloudflare
npx wrangler login
Create D1 database
npx wrangler d1 create cloudpaste-db
Note the database ID from the output.
Modify wrangler.toml configuration
[[d1_databases]]
binding = "DB"
database_name = "cloudpaste-db"
database_id = "YOUR_DATABASE_ID"
Deploy Worker
npx wrangler deploy
Note the URL from the output; this is your backend API address.
Initialize database (automatic) Visit your Worker URL to trigger initialization:
https://cloudpaste-backend.your-username.workers.dev
⚠️ Important: Remember your backend domain, you'll need it for frontend deployment!
Prepare frontend code
cd CloudPaste/frontend
npm install
Configure environment variables
Create or modify the .env.production file:
VITE_BACKEND_URL=https://cloudpaste-backend.your-username.workers.dev
VITE_APP_ENV=production
VITE_ENABLE_DEVTOOLS=false
Build frontend project
npm run build
Deploy to Cloudflare Pages
Method 1: Via Wrangler CLI
npx wrangler pages deploy dist --project-name=cloudpaste-frontend
Method 2: Via Cloudflare Dashboard
dist directoryPrepare frontend code
cd CloudPaste/frontend
npm install
Install and log in to Vercel CLI
npm install -g vercel
vercel login
Configure environment variables, same as for Cloudflare Pages
Build and deploy
vercel --prod
Follow the prompts to configure the project.
Registration link: Claw Cloud (no #AFF) No credit card required, as long as your GitHub registration date is more than 180 days, you get $5 credit every month.
After registration, click APP Launchpad on the homepage, then click create app in the upper right corner
First deploy the backend, as shown in the figure (for reference only):
Backend data storage is here:
Then the frontend, as shown in the figure (for reference only):
CloudPaste backend can be quickly deployed using the official Docker image.
Create data storage directory
mkdir -p sql_data
Run the backend container
docker run -d --name cloudpaste-backend \
  -p 8787:8787 \
  -v $(pwd)/sql_data:/data \
  -e ENCRYPTION_SECRET=your-encryption-key \
  -e NODE_ENV=production \
  dragon730/cloudpaste-backend:latest
Note the deployment URL (e.g., http://your-server-ip:8787), which will be needed for the frontend deployment.
⚠️ Security tip: Be sure to customize ENCRYPTION_SECRET and keep it safe, as this key is used to encrypt sensitive data.
The frontend uses Nginx to serve and configures the backend API address at startup.
docker run -d --name cloudpaste-frontend \
  -p 80:80 \
  -e BACKEND_URL=http://your-server-ip:8787 \
  dragon730/cloudpaste-frontend:latest
⚠️ Note: BACKEND_URL must include the complete URL (including protocol http:// or https://) ⚠️ Security reminder: Please change the default administrator password immediately after system initialization (Username: admin, Password: admin123).
When a new version of the project is released, you can update your Docker deployment following these steps:
Pull the latest images
docker pull dragon730/cloudpaste-backend:latest
docker pull dragon730/cloudpaste-frontend:latest
Stop and remove old containers
docker stop cloudpaste-backend cloudpaste-frontend
docker rm cloudpaste-backend cloudpaste-frontend
Start new containers using the same run commands as above (preserving data directory and configuration)
Using Docker Compose allows you to deploy both frontend and backend services with one click, which is the simplest recommended method.
docker-compose.yml fileversion: "3.8"
services:
frontend:
image: dragon730/cloudpaste-frontend:latest
environment:
- BACKEND_URL=https://xxx.com # Fill in the backend service address
ports:
- "8080:80" #"127.0.0.1:8080:80"
depends_on:
- backend # Depends on backend service
networks:
- cloudpaste-network
restart: unless-stopped
backend:
image: dragon730/cloudpaste-backend:latest
environment:
- NODE_ENV=production
- PORT=8787
- ENCRYPTION_SECRET=custom-key # Please modify this to your own security key
- TASK_WORKER_POOL_SIZE=2
volumes:
- ./sql_data:/data # Data persistence
ports:
- "8787:8787" #"127.0.0.1:8787:8787"
networks:
- cloudpaste-network
restart: unless-stopped
networks:
cloudpaste-network:
driver: bridge
docker-compose up -d
⚠️ Security reminder: Please change the default administrator password immediately after system initialization (Username: admin, Password: admin123).
Frontend: http://your-server-ip:80
Backend: http://your-server-ip:8787
When you need to update to a new version:
Pull the latest images
docker-compose pull
Recreate containers using new images (preserving data volumes)
docker-compose up -d --force-recreate
💡 Tip: If there are configuration changes, you may need to backup data and modify the docker-compose.yml file
server {
    listen 443 ssl;
    server_name paste.yourdomain.com;  # Replace with your domain name

    # SSL certificate configuration
    ssl_certificate     /path/to/cert.pem;  # Replace with certificate path
    ssl_certificate_key /path/to/key.pem;   # Replace with key path

    # Frontend proxy configuration
    location / {
        proxy_pass http://localhost:80;  # Docker frontend service address
        proxy_set_header Host $host;
        proxy_set_header X-Real-IP $remote_addr;
    }

    # Backend API proxy configuration
    location /api {
        proxy_pass http://localhost:8787;  # Docker backend service address
        proxy_set_header Host $host;
        proxy_set_header X-Real-IP $remote_addr;
        client_max_body_size 0;

        # WebSocket support (if needed)
        proxy_http_version 1.1;
        proxy_set_header Upgrade $http_upgrade;
        proxy_set_header Connection "upgrade";
    }

    # WebDAV Configuration
    location /dav {
        proxy_pass http://localhost:8787/dav;  # Points to your backend service

        # WebDAV necessary headers
        proxy_set_header Host $host;
        proxy_set_header X-Real-IP $remote_addr;
        proxy_set_header X-Forwarded-For $proxy_add_x_forwarded_for;

        # WebDAV method support
        proxy_pass_request_headers on;

        # Support all WebDAV methods
        proxy_method $request_method;

        # Necessary header processing
        proxy_set_header Destination $http_destination;
        proxy_set_header Overwrite $http_overwrite;

        # Handle large files
        client_max_body_size 0;

        # Timeout settings
        proxy_connect_timeout 3600s;
        proxy_send_timeout 3600s;
        proxy_read_timeout 3600s;
    }
}
⚠️ Security tip: It is recommended to configure HTTPS and a reverse proxy (such as Nginx) to enhance security.
Log in to Cloudflare Dashboard
Click R2 Storage and create a bucket.
Create API token
Save all data after creation; you'll need it later
Configure cross-origin rules: click the corresponding bucket, click Settings, edit CORS policy as shown below:
[
  {
    "AllowedOrigins": ["http://localhost:3000", "https://replace-with-your-frontend-domain"],
    "AllowedMethods": ["GET", "PUT", "POST", "DELETE", "HEAD"],
    "AllowedHeaders": ["*"],
    "ExposeHeaders": ["ETag"],
    "MaxAgeSeconds": 3600
  }
]
If you don't have a B2 account, register one first, then create a bucket.
Click Application Key in the sidebar, click Create Key, and follow the illustration.
Configure B2 cross-origin; B2 cross-origin configuration is more complex, take note
You can try options 1 or 2 first, go to the upload page and see if you can upload. If F12 console shows cross-origin errors, use option 3. For a permanent solution, use option 3 directly.
Regarding option 3 configuration, since the panel cannot configure it, you need to configure manually by downloading B2 CLI tool. For more details, refer to: "https://docs.cloudreve.org/zh/usage/storage/b2".
After downloading, in the corresponding download directory CMD, enter the following commands:
b2-windows.exe account authorize   //Log in to your account, following prompts to enter your keyID and applicationKey
b2-windows.exe bucket get <bucketName> //You can execute to get bucket information, replace <bucketName> with your bucket name
Windows configuration, Use ".\b2-windows.exe xxx", Python CLI would be similar:
b2-windows.exe bucket update <bucketName> allPrivate --cors-rules "[{\"corsRuleName\":\"CloudPaste\",\"allowedOrigins\":[\"*\"],\"allowedHeaders\":[\"*\"],\"allowedOperations\":[\"b2_upload_file\",\"b2_download_file_by_name\",\"b2_download_file_by_id\",\"s3_head\",\"s3_get\",\"s3_put\",\"s3_post\",\"s3_delete\"],\"exposeHeaders\":[\"Etag\",\"content-length\",\"content-type\",\"x-bz-content-sha1\"],\"maxAgeSeconds\":3600}]"
Replace with your bucket name. For allowedOrigins in the cross-origin allowance, you can configure based on your needs; here it allows all.
Deploy MinIO Server
Use the following Docker Compose configuration (reference) to quickly deploy MinIO:
version: "3"

services:
  minio:
    image: minio/minio:RELEASE.2025-02-18T16-25-55Z
    container_name: minio-server
    command: server /data --console-address :9001 --address :9000
    environment:
      - MINIO_ROOT_USER=minioadmin # Admin username
      - MINIO_ROOT_PASSWORD=minioadmin # Admin password
      - MINIO_BROWSER=on
      - MINIO_SERVER_URL=https://minio.example.com # S3 API access URL
      - MINIO_BROWSER_REDIRECT_URL=https://console.example.com # Console access URL
    ports:
      - "9000:9000" # S3 API port
      - "9001:9001" # Console port
    volumes:
      - ./data:/data
      - ./certs:/root/.minio/certs # SSL certificates (if needed)
    restart: always
Run docker-compose up -d to start the service.
Configure Reverse Proxy (Reference)
To ensure MinIO functions correctly, especially file previews, configure reverse proxy properly. Recommended OpenResty/Nginx settings:
MinIO S3 API Reverse Proxy (minio.example.com):
location / {
    proxy_pass http://127.0.0.1:9000;
    proxy_set_header Host $host;
    proxy_set_header X-Real-IP $remote_addr;
    proxy_set_header X-Forwarded-For $proxy_add_x_forwarded_for;
    proxy_set_header X-Forwarded-Proto $scheme;

    # HTTP optimization
    proxy_http_version 1.1;
    proxy_set_header Connection "";  # Enable HTTP/1.1 keepalive

    # Critical: Resolve 403 errors & preview issues
    proxy_cache off;
    proxy_buffering off;
    proxy_request_buffering off;

    # No file size limit
    client_max_body_size 0;
}
MinIO Console Reverse Proxy (console.example.com):
location / {
    proxy_pass http://127.0.0.1:9001;
    proxy_set_header Host $host;
    proxy_set_header X-Real-IP $remote_addr;
    proxy_set_header X-Forwarded-For $proxy_add_x_forwarded_for;
    proxy_set_header X-Forwarded-Proto $scheme;

    # WebSocket support
    proxy_http_version 1.1;
    proxy_set_header Upgrade $http_upgrade;
    proxy_set_header Connection "upgrade";

    # Critical settings
    proxy_cache off;
    proxy_buffering off;

    # No file size limit
    client_max_body_size 0;
}
Access Console to Create Buckets & Access Keys
For detailed configuration, refer to official docs:
https://min.io/docs/minio/container/index.html
CN: https://min-io.cn/docs/minio/container/index.html
Additional Configuration (Optional)
Allowed origins must include your frontend domain.
Configure MinIO in CloudPaste
https://minio.example.com)Troubleshooting
proxy_set_header Accept-Encoding "identity", and there are caching issues to consider. It is recommended to use only DNS resolution.proxy_cache off & proxy_buffering offMINIO_SERVER_URL & MINIO_BROWSER_REDIRECT_URL are correctly setConnection "upgrade"CloudPaste provides simple WebDAV protocol support, allowing you to mount storage spaces as network drives for convenient access and management of files directly through file managers.
https://your-backend-domain/davUse administrator account and password to directly access the WebDAV service:
For a more secure access method, it is recommended to create a dedicated API key:
If using NGINX as a reverse proxy, specific WebDAV configuration needs to be added to ensure all WebDAV methods work properly:
# WebDAV Configuration
location /dav {
    proxy_pass http://localhost:8787;  # Points to your backend service

    # WebDAV necessary headers
    proxy_set_header Host $host;
    proxy_set_header X-Real-IP $remote_addr;
    proxy_set_header X-Forwarded-For $proxy_add_x_forwarded_for;

    # WebDAV method support
    proxy_pass_request_headers on;

    # Support all WebDAV methods
    proxy_method $request_method;

    # Necessary header processing
    proxy_set_header Destination $http_destination;
    proxy_set_header Overwrite $http_overwrite;

    # Handle large files
    client_max_body_size 0;

    # Timeout settings
    proxy_connect_timeout 3600s;
    proxy_send_timeout 3600s;
    proxy_read_timeout 3600s;
}
Connection Problems:
Permission Errors:
⚠️⚠️ WebDAV Upload Issues:
Server Direct File Upload API Documentation - Detailed description of the server direct file upload interface
Clone project repository
git clone https://github.com/ling-drag0n/cloudpaste.git
cd cloudpaste
Backend setup
cd backend
npm install
# Initialize D1 database
wrangler d1 create cloudpaste-db
wrangler d1 execute cloudpaste-db --file=./schema.sql
Frontend setup
cd frontend
npm install
Configure environment variables
backend directory, create a wrangler.toml file to set development environment variablesfrontend directory, configure the .env.development file to set frontend environment variablesStart development servers
# Backend
cd backend
npm run dev

# Frontend (in another terminal)
cd frontend
npm run dev
CloudPaste/
├── frontend/                         # Frontend Vite + Vue 3 SPA
│   ├── src/
│   │   ├── api/                      # HTTP client & API services (no domain semantics)
│   │   ├── modules/                  # Domain modules layer (by business area)
│   │   │   ├── paste/                # Text sharing (editor / public view / admin)
│   │   │   ├── fileshare/            # File sharing (public page / admin)
│   │   │   ├── fs/                   # Mounted file system explorer (MountExplorer)
│   │   │   ├── upload/               # Upload controller & upload views
│   │   │   ├── storage-core/         # Storage drivers & Uppy wiring (low-level abstraction)
│   │   │   ├── security/             # Frontend auth bridge & Authorization header helpers
│   │   │   ├── pwa-offline/          # PWA offline queue & state
│   │   │   └── admin/                # Admin panel (dashboard / settings / key management, etc.)
│   │   ├── components/               # Reusable, cross-module UI components (no module imports)
│   │   ├── composables/              # Shared composition APIs (file-system / preview / upload, etc.)
│   │   ├── stores/                   # Pinia stores (auth / fileSystem / siteConfig, etc.)
│   │   ├── router/                   # Vue Router configuration (single entry for all views)
│   │   ├── pwa/                      # PWA state & installation prompts
│   │   ├── utils/                    # Utilities (clipboard / time / file icons, etc.)
│   │   ├── styles/                   # Global styles & Tailwind config entry
│   │   └── assets/                   # Static assets
│   ├── eslint.config.cjs             # Frontend ESLint config (including import boundaries)
│   ├── vite.config.js                # Vite build configuration
│   └── package.json
├── backend/                          # Backend (Cloudflare Workers / Docker runtime)
│   ├── src/
│   │   ├── routes/                   # HTTP routing layer (fs / files / pastes / admin / system, etc.)
│   │   │   ├── fs/                   # Mount FS APIs (list / read / write / search / share)
│   │   │   ├── files/                # File sharing APIs (public / protected)
│   │   │   ├── pastes/               # Text sharing APIs (public / protected)
│   │   │   ├── adminRoutes.js        # Generic admin routes
│   │   │   ├── apiKeyRoutes.js       # API key management routes
│   │   │   ├── mountRoutes.js        # Mount configuration routes
│   │   │   ├── systemRoutes.js       # System settings & dashboard stats
│   │   │   └── fsRoutes.js           # Unified FS entry aggregation
│   │   ├── services/                 # Domain services (pastes / files / system / apiKey, etc.)
│   │   ├── security/                 # Auth + authorization (AuthService / securityContext / authorize / policies)
│   │   ├── webdav/                   # WebDAV implementation & path handling
│   │   ├── storage/                  # Storage abstraction (S3 drivers, mount manager, file system ops)
│   │   ├── repositories/             # Data access layer (D1 + SQLite repositories)
│   │   ├── cache/                    # Cache & invalidation (mainly FS)
│   │   ├── constants/                # Constants (ApiStatus / Permission / DbTables / UserType, etc.)
│   │   ├── http/                     # Unified error types & response helpers
│   │   └── utils/                    # Utilities (common / crypto / environment, etc.)
│   ├── schema.sql                    # D1 / SQLite schema bootstrap
│   ├── wrangler.toml                 # Cloudflare Workers / D1 configuration
│   └── package.json
├── docs/                             # Architecture & design docs
│   ├── frontend-architecture-implementation.md    # Frontend layering & modules/* design
│   ├── frontend-architecture-optimization-plan.md # Frontend optimization plan (Phase 2/3)
│   ├── auth-permissions-design.md                # Auth & permissions system design
│   └── backend-error-handling-refactor.md        # Backend error handling refactor design
├── docker/                           # Docker & Compose deployment configs
├── images/                           # Screenshots used in README
├── Api-doc.md                        # API overview
├── Api-s3_direct.md                  # S3 direct upload API docs
└── README.md                         # Main project README
If you want to customize Docker images or debug during development, you can follow these steps to build manually:
Build backend image
# Execute in the project root directory
docker build -t cloudpaste-backend:custom -f docker/backend/Dockerfile .

# Run the custom built image
docker run -d --name cloudpaste-backend \
  -p 8787:8787 \
  -v $(pwd)/sql_data:/data \
  -e ENCRYPTION_SECRET=development-test-key \
  cloudpaste-backend:custom
Build frontend image
# Execute in the project root directory
docker build -t cloudpaste-frontend:custom -f docker/frontend/Dockerfile .

# Run the custom built image
docker run -d --name cloudpaste-frontend \
  -p 80:80 \
  -e BACKEND_URL=http://localhost:8787 \
  cloudpaste-frontend:custom
Development environment Docker Compose
Create a docker-compose.dev.yml file:
version: "3.8"

services:
  frontend:
    build:
      context: .
      dockerfile: docker/frontend/Dockerfile
    environment:
      - BACKEND_URL=http://backend:8787
    ports:
      - "80:80"
    depends_on:
      - backend

  backend:
    build:
      context: .
      dockerfile: docker/backend/Dockerfile
    environment:
      - NODE_ENV=development
      - RUNTIME_ENV=docker
      - PORT=8787
      - ENCRYPTION_SECRET=dev_secret_key
    volumes:
      - ./sql_data:/data
    ports:
      - "8787:8787"
Start the development environment:
docker-compose -f docker-compose.yml up --build
Apache License 2.0
This project is licensed under the Apache License 2.0 - see the LICENSE file for details.
Sponsorship: Maintaining the project is not easy. If you like this project, you can give the author a little encouragement. Every bit of your support is the motivation for me to move forward~
Sponsors: A huge thank you to the following sponsors for their support of this project!!
Contributors: Thanks to the following contributors for their selfless contributions to this project!
If you think the project is good I hope you can give a free star✨✨, Thank you very much!
72 followers · starred Feb 2026
8 followers · starred Jun 2025
28 followers · starred Feb 2026
34 followers · starred Jun 2025



