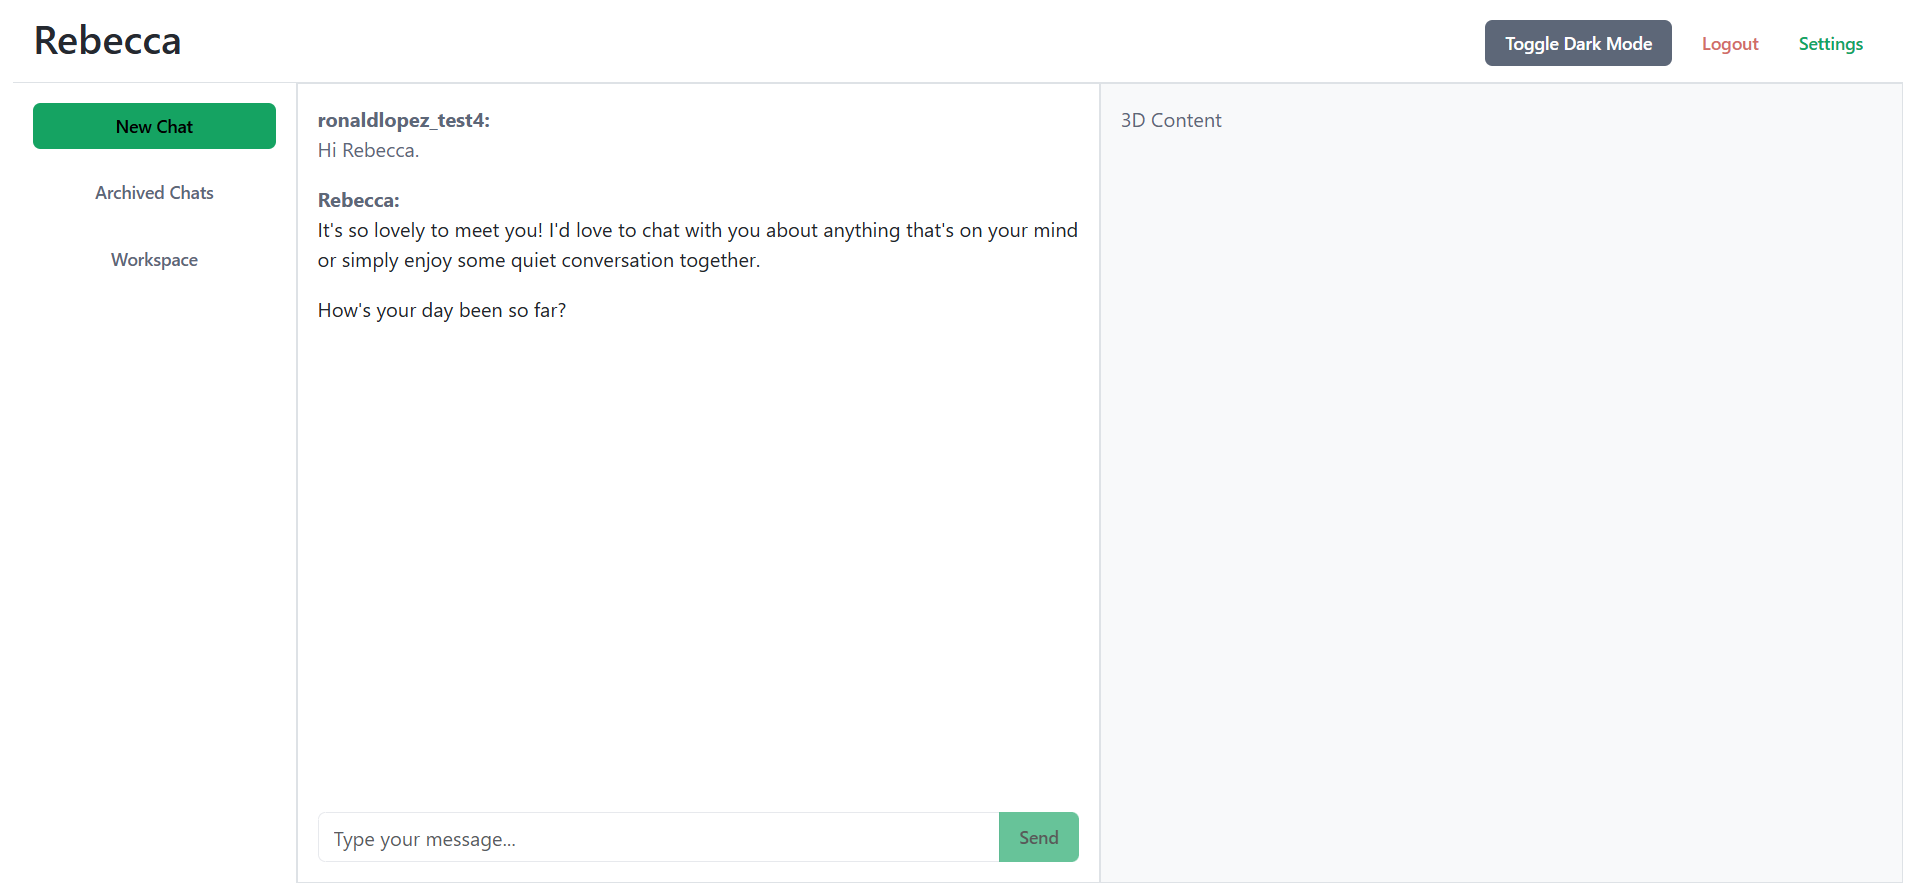
This project demonstrates a scalable application integrating Flask, React, Redux, and Three.js, with PostgreSQL as the database and a well-structured code organization for maintainability and scalability.
The project follows a modular structure to separate concerns and ensure scalability:
project/
|-- backend/
|   |-- app.py
|   |-- routes/
|   |   |-- __init__.py
|   |   |-- auth_routes.py
|   |   |-- chat_routes.py
|   |-- utils/
|   |   |-- __init__.py
|   |   |-- db_utils.py
|   |-- data/
|   |   |-- rebecca_dataset.json
|   |-- requirements.txt
|-- frontend/
|   |-- public/
|   |-- src/
|   |   |-- components/
|   |   |   |-- Header.jsx
|   |   |   |-- Sidebar.jsx
|   |   |   |-- ChatContainer.jsx
|   |   |-- App.jsx
|   |   |-- index.css
|   |-- package.json
|   |-- vite.config.js
|-- .env
|-- requirements.txt
.env files for managing environment variables.react-markdown to format chat messages.python -m venv .venv
source .venv/bin/activate # On Windows: .venv\Scripts\activate
pip install -r requirements.txt
python backend/app.py
http://127.0.0.1:5000.cd frontend
npm install
npm run dev
http://127.0.0.1:5173.Serve Static React App: Update app.py to serve React's static files and API routes:
from flask import Flask, send_from_directory, request, jsonify
from routes.auth_routes import auth_routes
from routes.chat_routes import chat_routes
from flask_cors import CORS
from utils.db_utils import connect_db
from dotenv import load_dotenv
import os
import jwt

app = Flask(__name__, static_folder='../frontend/dist', static_url_path='')
CORS(app)

load_dotenv()

# JWT secret key
app.config['SECRET_KEY'] = os.getenv('SECRET_KEY', 'your_secret_key')

# Register blueprints
app.register_blueprint(auth_routes, url_prefix='/auth')
app.register_blueprint(chat_routes, url_prefix='/api')

# Serve React static files
@app.route('/')
@app.route('/<path:path>')
def serve_react_app(path=''):
    if path and os.path.exists(os.path.join(app.static_folder, path)):
        return send_from_directory(app.static_folder, path)
    return send_from_directory(app.static_folder, 'index.html')

if __name__ == '__main__':
    app.run(debug=True)
API Endpoints:
/auth/login, /auth/register/api/chatDatabase Utilities: Utilize db_utils.py for PostgreSQL queries.
React Router:
Ensure routing is configured in src/App.jsx:
import React from 'react';
import { BrowserRouter as Router, Routes, Route, Navigate } from 'react-router-dom';
import Register from './pages/Register';
import Login from './pages/Login';
import Chat from './pages/Chat';
import Home from './pages/Home';
import './App.css';
import './bootstrap.css';

const App = () => {
  const isAuthenticated = !!localStorage.getItem('token');

  return (
    <Router>
      <Routes>
        <Route path="/" element={isAuthenticated ? <Home /> : <Navigate to="/login" />} />
        <Route path="/register" element={<Register />} />
        <Route path="/login" element={<Login />} />
        <Route path="/chat" element={isAuthenticated ? <Chat /> : <Navigate to="/login" />} />
      </Routes>
    </Router>
  );
};

export default App;
Components:
index.html into reusable React components (e.g., Header, Sidebar, ChatContainer).Redux Store:
Use Redux Toolkit to manage the global state (store/chatSlice.js).
API Integration:
Use fetch or Axios to interact with Flask APIs.
Proxy API Requests:
Add proxy settings in vite.config.js:
import { defineConfig } from 'vite';
import react from '@vitejs/plugin-react';

export default defineConfig({
  plugins: [react()],
  server: {
    proxy: {
      '/auth': 'http://127.0.0.1:5000',
      '/api': 'http://127.0.0.1:5000',
    },
  },
});
Backend Deployment: Deploy the Flask app using platforms like Heroku, Render, or AWS.
Frontend Deployment: Deploy the React app using Netlify or Vercel. Ensure the build files are served from Flask in production.
Environment Variables:
Use .env files to manage sensitive configurations for both backend and frontend.
git checkout -b feature-name
git commit -m "Add feature description"
git push origin feature-name
This project is licensed under the MIT License. See the LICENSE file for details.
This project demonstrates a scalable application integrating Flask, React, Redux, and Three.js, with PostgreSQL as the database and a well-structured code organization for maintainability and scalability.
The project follows a modular structure to separate concerns and ensure scalability:
project/
|-- backend/
|   |-- app.py
|   |-- routes/
|   |   |-- __init__.py
|   |   |-- auth_routes.py
|   |   |-- chat_routes.py
|   |-- utils/
|   |   |-- __init__.py
|   |   |-- db_utils.py
|   |-- data/
|   |   |-- rebecca_dataset.json
|   |-- requirements.txt
|-- frontend/
|   |-- public/
|   |-- src/
|   |   |-- components/
|   |   |   |-- Header.jsx
|   |   |   |-- Sidebar.jsx
|   |   |   |-- ChatContainer.jsx
|   |   |-- App.jsx
|   |   |-- index.css
|   |-- package.json
|   |-- vite.config.js
|-- .env
|-- requirements.txt
.env files for managing environment variables.react-markdown to format chat messages.python -m venv .venv
source .venv/bin/activate # On Windows: .venv\Scripts\activate
pip install -r requirements.txt
python backend/app.py
http://127.0.0.1:5000.cd frontend
npm install
npm run dev
http://127.0.0.1:5173.Serve Static React App: Update app.py to serve React's static files and API routes:
from flask import Flask, send_from_directory, request, jsonify
from routes.auth_routes import auth_routes
from routes.chat_routes import chat_routes
from flask_cors import CORS
from utils.db_utils import connect_db
from dotenv import load_dotenv
import os
import jwt

app = Flask(__name__, static_folder='../frontend/dist', static_url_path='')
CORS(app)

load_dotenv()

# JWT secret key
app.config['SECRET_KEY'] = os.getenv('SECRET_KEY', 'your_secret_key')

# Register blueprints
app.register_blueprint(auth_routes, url_prefix='/auth')
app.register_blueprint(chat_routes, url_prefix='/api')

# Serve React static files
@app.route('/')
@app.route('/<path:path>')
def serve_react_app(path=''):
    if path and os.path.exists(os.path.join(app.static_folder, path)):
        return send_from_directory(app.static_folder, path)
    return send_from_directory(app.static_folder, 'index.html')

if __name__ == '__main__':
    app.run(debug=True)
API Endpoints:
/auth/login, /auth/register/api/chatDatabase Utilities: Utilize db_utils.py for PostgreSQL queries.
React Router:
Ensure routing is configured in src/App.jsx:
import React from 'react';
import { BrowserRouter as Router, Routes, Route, Navigate } from 'react-router-dom';
import Register from './pages/Register';
import Login from './pages/Login';
import Chat from './pages/Chat';
import Home from './pages/Home';
import './App.css';
import './bootstrap.css';

const App = () => {
  const isAuthenticated = !!localStorage.getItem('token');

  return (
    <Router>
      <Routes>
        <Route path="/" element={isAuthenticated ? <Home /> : <Navigate to="/login" />} />
        <Route path="/register" element={<Register />} />
        <Route path="/login" element={<Login />} />
        <Route path="/chat" element={isAuthenticated ? <Chat /> : <Navigate to="/login" />} />
      </Routes>
    </Router>
  );
};

export default App;
Components:
index.html into reusable React components (e.g., Header, Sidebar, ChatContainer).Redux Store:
Use Redux Toolkit to manage the global state (store/chatSlice.js).
API Integration:
Use fetch or Axios to interact with Flask APIs.
Proxy API Requests:
Add proxy settings in vite.config.js:
import { defineConfig } from 'vite';
import react from '@vitejs/plugin-react';

export default defineConfig({
  plugins: [react()],
  server: {
    proxy: {
      '/auth': 'http://127.0.0.1:5000',
      '/api': 'http://127.0.0.1:5000',
    },
  },
});
Backend Deployment: Deploy the Flask app using platforms like Heroku, Render, or AWS.
Frontend Deployment: Deploy the React app using Netlify or Vercel. Ensure the build files are served from Flask in production.
Environment Variables:
Use .env files to manage sensitive configurations for both backend and frontend.
git checkout -b feature-name
git commit -m "Add feature description"
git push origin feature-name
This project is licensed under the MIT License. See the LICENSE file for details.



