Create a USB Rubber Ducky like device using a Raspberry PI Pico
Python
3,359
72 commits
updated Mar 18, 2026





Install and have your USB Rubber Ducky working in less than 5 minutes.
Download the latest release from the Releases page.
Plug the device into a USB port while holding the boot button. It will show up as a removable media device named RPI-RP2.
Install CircutlPython on the Pico or Pico W
If using a Pico board:
Copy the adafruit-circuitpython-raspberry_pi_pico-en_US-10.0.3.uf2 file to the root of the Pico (RPI-RP2). The device will reboot and after a second or so, it will reconnect as CIRCUITPY.
If using a Pico W board:
Copy the adafruit-circuitpython-raspberry_pi_pico_w-en_US-10.0.3.uf2 file to the root of the Pico (RPI-RP2). The device will reboot and after a second or so, it will reconnect as CIRCUITPY.
If using a Pico 2 board:
Copy the adafruit-circuitpython-raspberry_pi_pico2-en_US-10.0.3.uf2 file to the root of the Pico (RPI-RP2). The device will reboot and after a second or so, it will reconnect as CIRCUITPY.
If using a Pico 2W board:
Copy the adafruit-circuitpython-raspberry_pi_pico2_w-en_US-10.0.3.uf2 file to the root of the Pico (RPI-RP2). The device will reboot and after a second or so, it will reconnect as CIRCUITPY.
Copy the lib folder to the root of the CIRCUITPY
Copy *.py to the root of the CIRCUITPY
Follow the instructions in README.md to enter setup mode
Copy your payload as payload.dd to the root of the CIRCUITPY
Unplug the device from the USB port and remove the setup jumper.
Enjoy your Pico-Ducky.
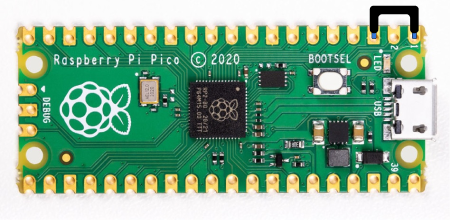
To edit the payload, enter setup mode by connecting the pin 1 (GP0) to pin 3 (GND), this will stop the pico-ducky from injecting the payload in your own machine.
The easiest way to do so is by using a jumper wire between those pins as seen bellow.
If you need the pico-ducky to not show up as a USB mass storage device for stealth, follow these instructions.
GND) and pin 20 (GPIO15).Pico: The default mode is USB mass storage enabled.
Pico W: The default mode is USB mass storage disabled
Install and have your USB Rubber Ducky working in less than 5 minutes.
Clone the repo to get a local copy of the files. git clone https://github.com/dbisu/pico-ducky.git
Download CircuitPython for the Raspberry Pi Pico. *Updated to 10.0.3
Download CircuitPython for the Raspberry Pi Pico W. *Updated to 10.0.3
Download CircuitPython for the Raspberry Pi Pico 2. *Updated to 10.0.3
Download CircuitPython for the Raspberry Pi Pico 2W. *Updated to 10.0.3
Plug the device into a USB port while holding the boot button. It will show up as a removable media device named RPI-RP2.
Copy the downloaded .uf2 file to the root of the Pico (RPI-RP2). The device will reboot and after a second or so, it will reconnect as CIRCUITPY.
Download adafruit-circuitpython-bundle-10.x-mpy-YYYYMMDD.zip here and extract it outside the device.
Navigate to lib in the recently extracted folder and copy adafruit_hid to the lib folder on your Raspberry Pi Pico.
Copy adafruit_debouncer.mpy and adafruit_ticks.mpy to the lib folder on your Raspberry Pi Pico.
Copy asyncio to the lib folder on your Pico.
Copy adafruit_wsgi to the lib folder on your Pico.
Copy boot.py from your clone to the root of your Pico.
Copy duckyinpython.py, code.py, pins.py, webapp.py, wsgiserver.py to the root folder of the Pico.
For Pico W Only Create the file secrets.py in the root of the Pico W. This contains the AP name and password to be created by the Pico W.
secrets = { 'ssid' : "BadAPName", 'password' : "badpassword" }
Find a script here or create your own one using Ducky Script and save it as payload.dd in the Pico. Currently, pico-ducky only supports DuckyScript 1.0, and some of 3.0.
Be careful, if your device isn't in setup mode, the device will reboot and after half a second, the script will run.
Please note: by default Pico W will not show as a USB drive
The Pico W AP defaults to ip address 192.168.4.1. You should be able to find the webservice at http://192.168.4.1:80
The following endpoints are available on the webservice:
/
/new
/ducky
/edit/<filename>
/write/<filename>
/run/<filename>
API endpoints
/api/run/<filenumber>
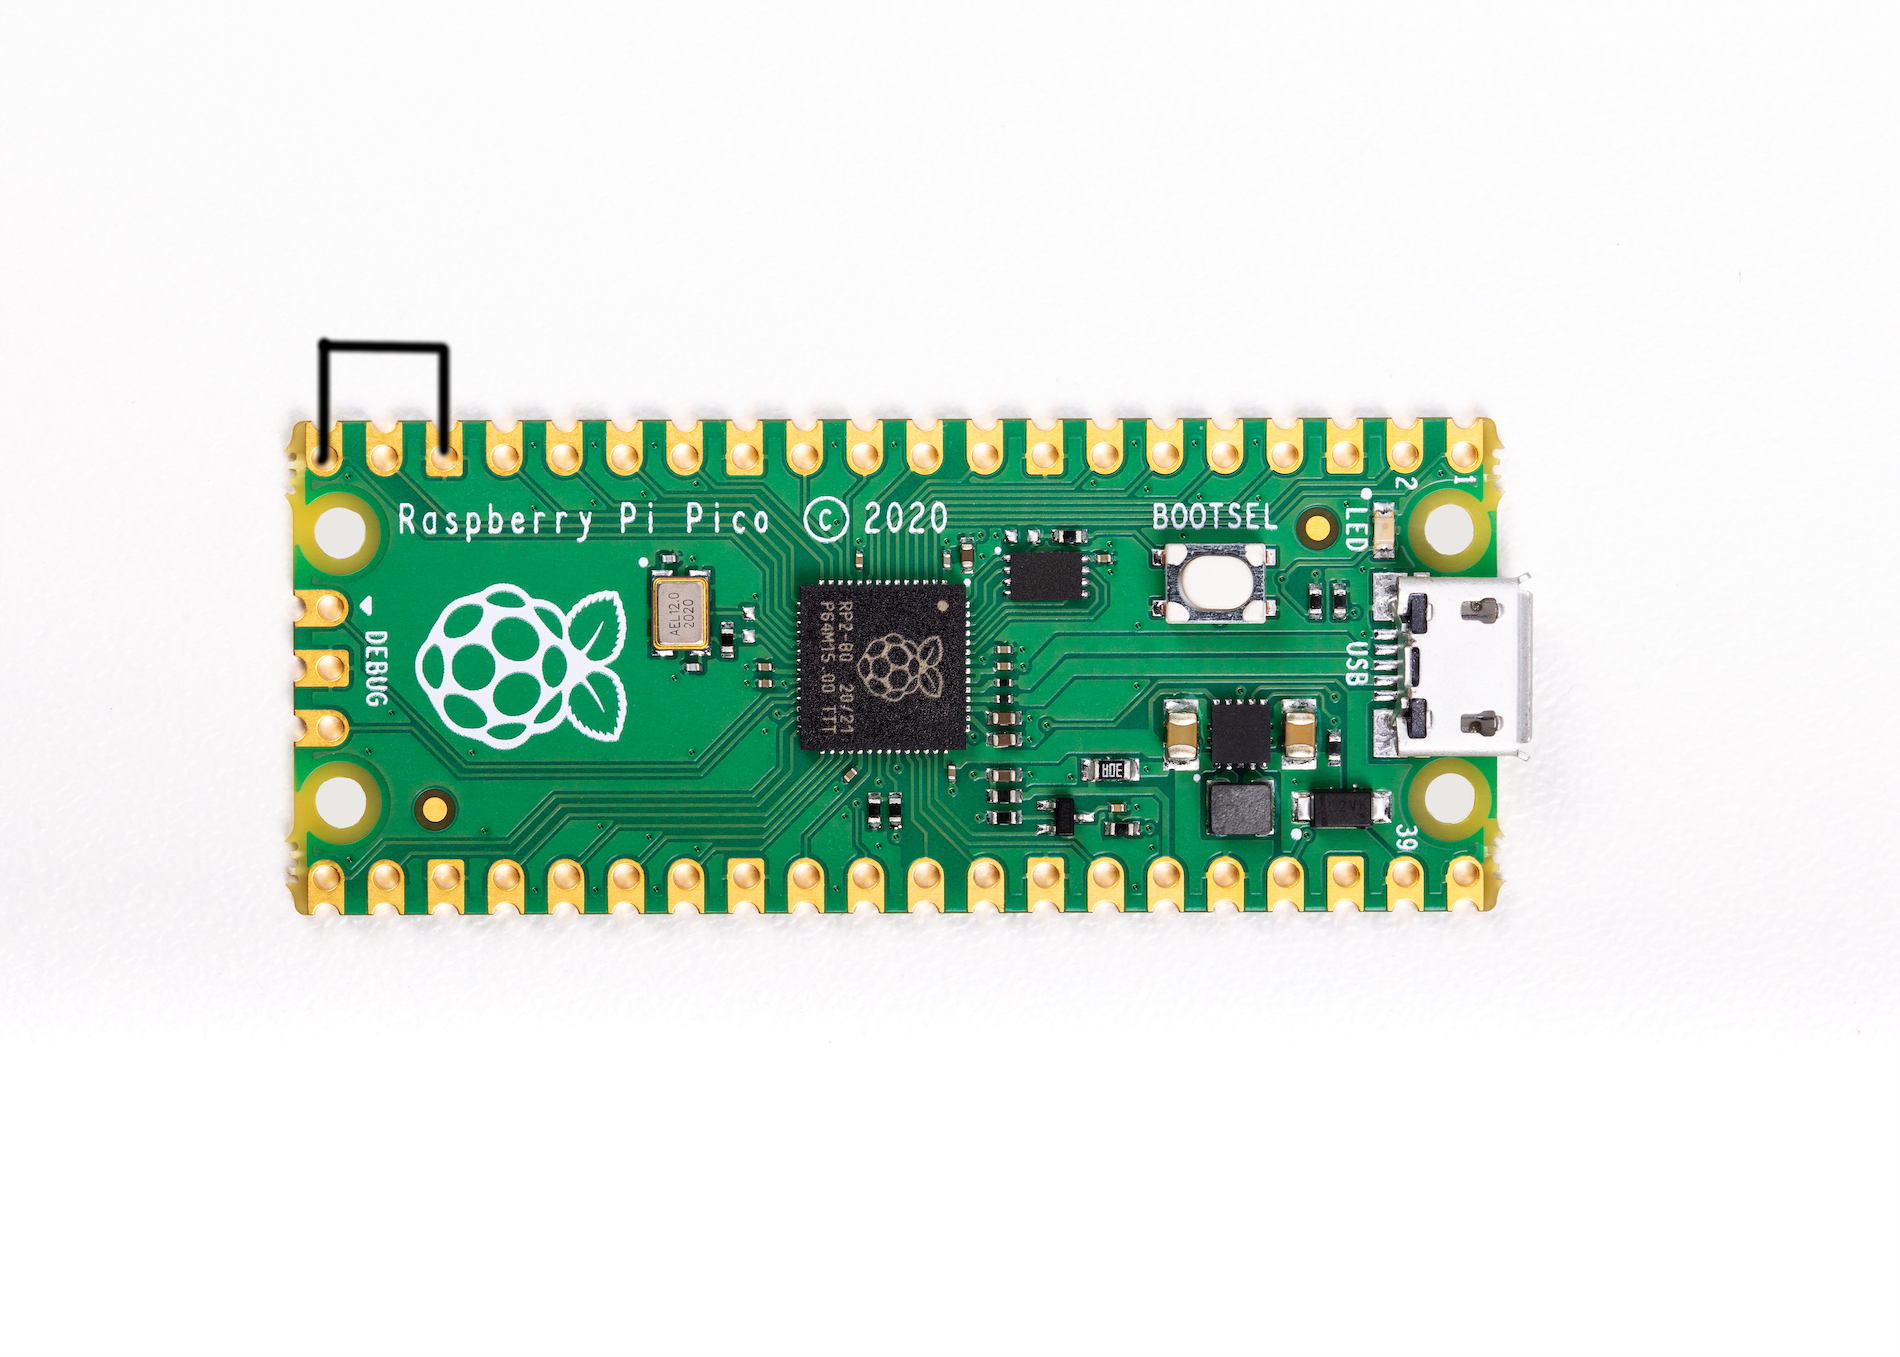
To edit the payload, enter setup mode by connecting the pin 1 (GP0) to pin 3 (GND), this will stop the pico-ducky from injecting the payload in your own machine.
The easiest way to do so is by using a jumper wire between those pins as seen bellow.
If you need the pico-ducky to not show up as a USB mass storage device for stealth, follow these instructions.
GND) and pin 20 (GPIO15).Pico: The default mode is USB mass storage enabled.
Pico W: The default mode is USB mass storage disabled
Multiple payloads can be stored on the Pico and Pico W.
To select a payload, ground one of these pins:
Copied from Neradoc/Circuitpython_Keyboard_Layouts
Go to the latest release page, look if your language is in the list.
Download the py zip, named circuitpython-keyboard-layouts-py-XXXXXXXX.zip
NOTE: You can use the mpy version targetting the version of Circuitpython that is on the device, but on Raspberry Pi Pico you don't need it - they only reduce file size and memory use on load, which the pico has plenty of.
Try the online generator, it should get you a zip file with the bundles for yout language
https://www.neradoc.me/layouts/
For a language LANG, copy the following files from the zip's lib folder to the lib directory of the board.
DO NOT modify the adafruit_hid directory. Your files go directly in lib.
DO NOT change the names or extensions of the files. Just pick the right ones.
Replace LANG with the letters for your language of choice.
keyboard_layout_win_LANG.pykeycode_win_LANG.pyDon't forget to get the adafruit_hid library.
This is what it should look like if your language is French for example.

At the start of the file comment out these lines:
from adafruit_hid.keyboard_layout_us import KeyboardLayoutUS as KeyboardLayout
from adafruit_hid.keycode import Keycode
Uncomment these lines:
Replace LANG with the letters for your language of choice. The name must match the file (without the py or mpy extension).
from keyboard_layout_win_LANG import KeyboardLayout
from keycode_win_LANG import Keycode
from keyboard_layout_win_de import KeyboardLayout
from keycode_win_de import Keycode
Copy the files keyboard_layout_win_de.mpy and keycode_win_de.mpy to the /lib folder on the Pico board
adafruit_hid/
keyboard_layout_win_de.mpy
keycode_win_de.mpy
ryo-yamada Created a tool to convert a blank RPi Pico to a ducky.
You can find the tool here
pico-ducky tutorial by NetworkChuck
USB Rubber Ducky playlist by Hak5
CircuitPython tutorial on the Raspberry Pi Pico by DroneBot Workshop
3 followers · starred Aug 2021
40 followers · starred Apr 2023
16 followers · starred Aug 2024
34 followers · starred Mar 2022
Create a USB Rubber Ducky like device using a Raspberry PI Pico
Python
3,359
72 commits
updated Mar 18, 2026
Install and have your USB Rubber Ducky working in less than 5 minutes.
Download the latest release from the Releases page.
Plug the device into a USB port while holding the boot button. It will show up as a removable media device named RPI-RP2.
Install CircutlPython on the Pico or Pico W
If using a Pico board:
Copy the adafruit-circuitpython-raspberry_pi_pico-en_US-10.0.3.uf2 file to the root of the Pico (RPI-RP2). The device will reboot and after a second or so, it will reconnect as CIRCUITPY.
If using a Pico W board:
Copy the adafruit-circuitpython-raspberry_pi_pico_w-en_US-10.0.3.uf2 file to the root of the Pico (RPI-RP2). The device will reboot and after a second or so, it will reconnect as CIRCUITPY.
If using a Pico 2 board:
Copy the adafruit-circuitpython-raspberry_pi_pico2-en_US-10.0.3.uf2 file to the root of the Pico (RPI-RP2). The device will reboot and after a second or so, it will reconnect as CIRCUITPY.
If using a Pico 2W board:
Copy the adafruit-circuitpython-raspberry_pi_pico2_w-en_US-10.0.3.uf2 file to the root of the Pico (RPI-RP2). The device will reboot and after a second or so, it will reconnect as CIRCUITPY.
Copy the lib folder to the root of the CIRCUITPY
Copy *.py to the root of the CIRCUITPY
Follow the instructions in README.md to enter setup mode
Copy your payload as payload.dd to the root of the CIRCUITPY
Unplug the device from the USB port and remove the setup jumper.
Enjoy your Pico-Ducky.
To edit the payload, enter setup mode by connecting the pin 1 (GP0) to pin 3 (GND), this will stop the pico-ducky from injecting the payload in your own machine.
The easiest way to do so is by using a jumper wire between those pins as seen bellow.
If you need the pico-ducky to not show up as a USB mass storage device for stealth, follow these instructions.
GND) and pin 20 (GPIO15).Pico: The default mode is USB mass storage enabled.
Pico W: The default mode is USB mass storage disabled
Install and have your USB Rubber Ducky working in less than 5 minutes.
Clone the repo to get a local copy of the files. git clone https://github.com/dbisu/pico-ducky.git
Download CircuitPython for the Raspberry Pi Pico. *Updated to 10.0.3
Download CircuitPython for the Raspberry Pi Pico W. *Updated to 10.0.3
Download CircuitPython for the Raspberry Pi Pico 2. *Updated to 10.0.3
Download CircuitPython for the Raspberry Pi Pico 2W. *Updated to 10.0.3
Plug the device into a USB port while holding the boot button. It will show up as a removable media device named RPI-RP2.
Copy the downloaded .uf2 file to the root of the Pico (RPI-RP2). The device will reboot and after a second or so, it will reconnect as CIRCUITPY.
Download adafruit-circuitpython-bundle-10.x-mpy-YYYYMMDD.zip here and extract it outside the device.
Navigate to lib in the recently extracted folder and copy adafruit_hid to the lib folder on your Raspberry Pi Pico.
Copy adafruit_debouncer.mpy and adafruit_ticks.mpy to the lib folder on your Raspberry Pi Pico.
Copy asyncio to the lib folder on your Pico.
Copy adafruit_wsgi to the lib folder on your Pico.
Copy boot.py from your clone to the root of your Pico.
Copy duckyinpython.py, code.py, pins.py, webapp.py, wsgiserver.py to the root folder of the Pico.
For Pico W Only Create the file secrets.py in the root of the Pico W. This contains the AP name and password to be created by the Pico W.
secrets = { 'ssid' : "BadAPName", 'password' : "badpassword" }
Find a script here or create your own one using Ducky Script and save it as payload.dd in the Pico. Currently, pico-ducky only supports DuckyScript 1.0, and some of 3.0.
Be careful, if your device isn't in setup mode, the device will reboot and after half a second, the script will run.
Please note: by default Pico W will not show as a USB drive
The Pico W AP defaults to ip address 192.168.4.1. You should be able to find the webservice at http://192.168.4.1:80
The following endpoints are available on the webservice:
/
/new
/ducky
/edit/<filename>
/write/<filename>
/run/<filename>
API endpoints
/api/run/<filenumber>
To edit the payload, enter setup mode by connecting the pin 1 (GP0) to pin 3 (GND), this will stop the pico-ducky from injecting the payload in your own machine.
The easiest way to do so is by using a jumper wire between those pins as seen bellow.
If you need the pico-ducky to not show up as a USB mass storage device for stealth, follow these instructions.
GND) and pin 20 (GPIO15).Pico: The default mode is USB mass storage enabled.
Pico W: The default mode is USB mass storage disabled
Multiple payloads can be stored on the Pico and Pico W.
To select a payload, ground one of these pins:
Copied from Neradoc/Circuitpython_Keyboard_Layouts
Go to the latest release page, look if your language is in the list.
Download the py zip, named circuitpython-keyboard-layouts-py-XXXXXXXX.zip
NOTE: You can use the mpy version targetting the version of Circuitpython that is on the device, but on Raspberry Pi Pico you don't need it - they only reduce file size and memory use on load, which the pico has plenty of.
Try the online generator, it should get you a zip file with the bundles for yout language
https://www.neradoc.me/layouts/
For a language LANG, copy the following files from the zip's lib folder to the lib directory of the board.
DO NOT modify the adafruit_hid directory. Your files go directly in lib.
DO NOT change the names or extensions of the files. Just pick the right ones.
Replace LANG with the letters for your language of choice.
keyboard_layout_win_LANG.pykeycode_win_LANG.pyDon't forget to get the adafruit_hid library.
This is what it should look like if your language is French for example.
At the start of the file comment out these lines:
from adafruit_hid.keyboard_layout_us import KeyboardLayoutUS as KeyboardLayout
from adafruit_hid.keycode import Keycode
Uncomment these lines:
Replace LANG with the letters for your language of choice. The name must match the file (without the py or mpy extension).
from keyboard_layout_win_LANG import KeyboardLayout
from keycode_win_LANG import Keycode
from keyboard_layout_win_de import KeyboardLayout
from keycode_win_de import Keycode
Copy the files keyboard_layout_win_de.mpy and keycode_win_de.mpy to the /lib folder on the Pico board
adafruit_hid/
keyboard_layout_win_de.mpy
keycode_win_de.mpy
ryo-yamada Created a tool to convert a blank RPi Pico to a ducky.
You can find the tool here
pico-ducky tutorial by NetworkChuck
USB Rubber Ducky playlist by Hak5
CircuitPython tutorial on the Raspberry Pi Pico by DroneBot Workshop
3 followers · starred Aug 2021
40 followers · starred Apr 2023
16 followers · starred Aug 2024
34 followers · starred Mar 2022



