
Lightweight open-source firmware for Xteink e-paper reader (X4 pro, X4, X3) • EPUB/FB2/MD/TXT support • Custom themes & fonts
C
478
818 commits
updated Sep 18, 2026
README
PapyriX
















PapyriX is firmware for Xteink X3, X4, and X4 Pro e-paper readers. It uses one ESP32-C3 image for X3/X4 and one ESP32-S3 image for X4 Pro.
Warning: Some Xteink units (for example, units from AliExpress) lock USB flash. If USB flash is locked, you cannot update or recover through USB. Install, update, and do emergency recovery from the SD card. Flash through USB only on devices that have unlocked USB.
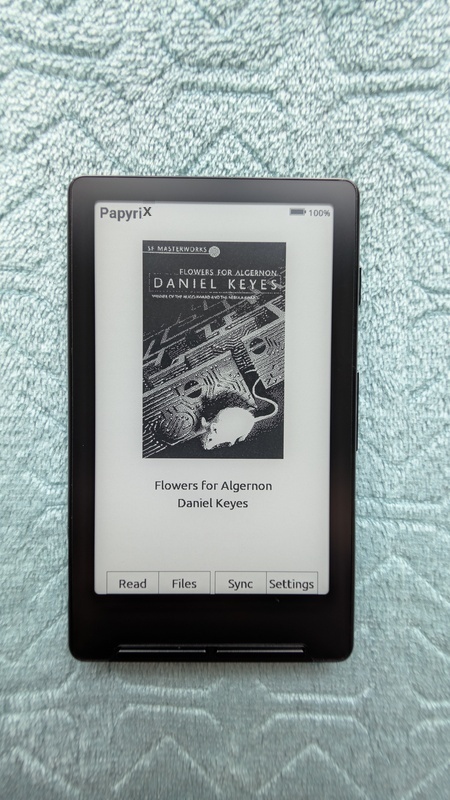
This project is not affiliated with Xteink. It is a community project.
Supported devices
| Device | Release file | Panel |
|---|---|---|
| Xteink X4 | papyrix-xteink-c3.bin | 800×480 SSD1677 |
| Xteink X3 | papyrix-xteink-c3.bin | 792×528 UC8253 or UC8279 |
| Xteink X4 Pro | papyrix-x4pro.bin | 800×480 UC8279 or UC8179 |
See the device support matrix for build targets and hardware services. Using the wrong binary can drive incorrect pins and can damage hardware.
Page caches use profile-specific folders. Moving an SD card between supported devices does not reuse incompatible rendered pages.
Features
Reading & Format Support
- EPUB 2 and EPUB 3 parse (nav.xhtml, with NCX as fallback)
- CSS stylesheet parse (text-align, font-style, font-weight, text-indent, margins, direction)
- Preformatted text (
<pre>) and inline code (<code>,<tt>,<kbd>,<samp>) shown as italic (no monospace font in the firmware) - FB2 (FictionBook 2.0) with metadata, TOC navigation, and metadata cache (no inline images)
- HTML (.html, .htm) files (standalone HTML documents)
- XTC/XTCH native format
- Markdown (.md, .markdown) files with formatting
- Plain text (.txt, .text) files
- Saved reading position
- Books that you opened before (Books screen) so you can continue quickly
- Reading statistics for each book (progress, reading time, and sessions)
- Bookmarks (maximum 20 for each book, saved on the SD card)
- Book cover display (JPG/JPEG/PNG/BMP, case-insensitive)
- Table of contents navigation
- Images in EPUB (JPEG/PNG/BMP, baseline JPEG only, maximum 2048×3072)
Text & Display
- Font sizes that you can set (XSmall/Small/Normal/Large)
- Paragraph alignment (Justified/Left/Center/Right)
- Text layout presets (Compact/Standard/Large) for indent and spacing
- Soft hyphen support for text layout
- Liang-pattern hyphenation. Language comes from EPUB metadata (de, en, es, fr, it, ru, uk)
- Vietnamese, Thai, Greek, and Arabic in the builtin fonts
- CJK (Chinese/Japanese/Korean) text layout (book text only, not UI)
- Thai text with correct mark positions
- Arabic text shaping. Contextual forms and Lam-Alef ligatures with RTL layout
- Knuth-Plass line break algorithm (TeX-quality justified text)
- Text anti-aliasing on/off (grayscale text for builtin fonts and custom fonts)
- Pages per refresh setting (1/5/10/15/30)
- Sunlight fading fix (powers down the display after refresh to prevent UV fade)
- Turbo LUTs with LUT cache for faster X3 page turns
- 4 screen orientations
Customization
- Custom themes from the SD card (
/config/themes/) - Custom fonts from the SD card (
/config/fonts/, .epdfont format) - Custom sleep screens (Dark/Light/Custom/Cover/Keep Page modes)
- Button remapping (side buttons and front buttons)
- Power button actions (page turn, bookmark, or sleep on a short press)
Network & Connectivity
- WiFi file transfer (web server)
- Calibre Wireless Device. Send books from Calibre desktop
- LocalSend receiver. Send files and books from the LocalSend app to the device over WiFi.
- Driverless network printer (AirPrint-compatible). Print from macOS, Windows, Linux, iOS, and Android to the e-paper screen. Printouts save to
/printoutson the SD card
Maintenance
- Cleanup menu (clear book cache, empty trash, clear storage, factory reset)
- Firmware updates from the SD card
- System info (version, uptime, memory, storage)
File System
- exFAT and FAT32 SD card support
- UTF-8 filenames through the Web UI for Latin (including Vietnamese), Cyrillic, Greek, Thai, and Arabic
- File explorer with nested folders
- Recycle bin (
/trash). If you delete a book, the device moves it to/trash. It does not remove the book. You can browse to restore it or delete it permanently. You can empty the trash from the Cleanup menu - Hidden system folder filter (LOST.DIR, $RECYCLE.BIN, and other system folders)
Tip: The Web UI folder create, upload, and rename functions change supported Unicode names to NFC. Names have a limit of 255 UTF-8 bytes. Full paths have a limit of 1023 bytes. CJK filenames are not supported. The device file-browser UI does not have CJK glyphs. For deep folder trees with supported non-Latin names, use exFAT, not FAT32.
See the user guide for operation procedures.
See the customization guide for themes and fonts.
Example theme files and font files are in docs/examples/.
Installing & Firmware Updates
Do you need to recover a device that does not start? Go to emergency recovery.
Download the binary that matches the device:
- X3 or X4:
papyrix-xteink-c3.bin - X4 Pro:
papyrix-x4pro.bin
The usual installation method is papyrix-flasher:
papyrix-flasher flash papyrix-xteink-c3.bin
Do not flash an S3 image to a C3 device or a C3 image to an S3 device.
From SD card: You can also install or update with an SD card:
- Copy the firmware file as
/firmware.binto the root of your SD card. - Put the SD card into the device.
- Go to Settings > Firmware Update and press Run.
The device flashes the firmware from the SD card and restarts.
Emergency Recovery
If the device does not start, copy the firmware as /force_update.bin to the SD card.
On the next start, the device flashes the file before it starts the UI.
You do not need to operate the device.
See the customization guide for more data.
Development
Prerequisites
- PlatformIO Core (
pio) or VS Code + PlatformIO IDE - Python 3.12+ with uv (for font conversion)
- Node.js 18+ (for sleep screen scripts and logo scripts)
- USB-C data cable
- Xteink X3, X4, or X4 Pro with unlocked USB flashing
Install Node.js dependencies (for sleep screen scripts and logo scripts):
cd scripts && npm install
Using Nix
If you have Nix, shell.nix supplies all dependencies:
# Enter development environment
nix-shell

# Or run commands directly
nix-shell --run "make build"
nix-shell --run "make check"
First-time Nix setup:
# Install Nix (if not installed)
sh <(curl -L https://nixos.org/nix/install) --daemon

# Add nixpkgs channel
nix-channel --add https://nixos.org/channels/nixos-unstable nixpkgs
nix-channel --update
Checking out the code
PapyriX uses PlatformIO to build and flash the firmware. Clone the repository:
git clone --recursive https://github.com/pliashkou/papyrix

# Or, if you've already cloned without --recursive:
git submodule update --init --recursive
Building
# Build development firmware
make build

# Build both release environments
make release

# Build, verify, and package deterministic release files in dist/
make package
Flashing your device
Connect the device through unlocked USB. Build and flash the release firmware for the device:
make flash-xteink-c3  # X3 and X4
make flash-x4pro      # X4 Pro
On X4 Pro, hold Power throughout flashing. Release Power after verification completes and the application starts. Close the serial monitor before flashing. To select a port:
PLATFORMIO_UPLOAD_PORT=/dev/ttyACM0 make flash-x4pro
make flash-release and make upload-release select X3/X4 only.
To install an existing release binary instead of building it, use:
# ESP32-C3: X3/X4
esptool.py --chip esp32c3 --port /dev/ttyACM0 --baud 460800 \
  write_flash -z 0x10000 papyrix-xteink-c3.bin

# ESP32-S3: X4 Pro
esptool.py --chip esp32s3 --port /dev/ttyACM0 --baud 460800 \
  write_flash -z 0x10000 papyrix-x4pro.bin
PlatformIO upload remains available for a connected development target:
pio run -e default --target upload
pio run -e x4pro --target upload
Replace /dev/ttyACM0 with the device port. Use COM3 on Windows or
/dev/tty.usbmodem* on macOS where applicable.
Build Scripts
Build scripts are in the scripts/ directory.
Converting fonts
Convert TTF/OTF fonts to the PapyriX .epdfont format with Python (you need uv):
# Basic conversion (outputs to current directory)
uv run scripts/fontconvert.py my-font -r MyFont-Regular.ttf --2bit

# Full font family with all reader sizes (14, 16, 18pt)
uv run scripts/fontconvert.py my-font -r Regular.ttf -b Bold.ttf --2bit --all-sizes -o /tmp/fonts/

# With Thai script support
uv run scripts/fontconvert.py my-font -r Regular.ttf --2bit --thai -o /tmp/fonts/

# With Arabic script support
uv run scripts/fontconvert.py my-font -r Regular.ttf --2bit --arabic -o /tmp/fonts/

# Generate C header instead of binary (for builtin fonts)
uv run scripts/fontconvert.py my_font 16 Regular.ttf --2bit > my_font_16_2b.h
Options: -r/--regular, -b/--bold, -i/--italic, -o/--output, -s/--size, --2bit, --all-sizes, --header, --thai, --arabic
See the customization guide for the full font conversion procedure.
Creating sleep screen images
Convert an image to the sleep screen BMP format (run cd scripts && npm install first):
# With Makefile
make sleep-screen INPUT=photo.jpg OUTPUT=sleep.bmp
make sleep-screen INPUT=photo.jpg OUTPUT=sleep.bmp ARGS='--dither --bits 8'

# Or directly
cd scripts && node create-sleep-screen.mjs photo.jpg sleep.bmp --dither --bits 8
Options:
--orientation portrait|landscape- Screen orientation (default: portrait)--bits 2|4|8- Output bit depth (default: 4)--dither- Enable Floyd-Steinberg dithering--fit contain|cover|stretch- Resize mode (default: contain)
Copy the output BMP to the /sleep/ directory or as /sleep.bmp on the SD card.
Converting logo
Convert an image to a C header for the firmware logo (384x384 monochrome):
cd scripts && node convert-logo.mjs ../images/logo-light.jpg ../src/images/PapyrixLogo.h
Options: --invert, --threshold <0-255>, --rotate <0|90|180|270> (default: 270)
Calibre simulators (development/testing)
Two simulators let you test the Calibre Wireless Device feature with no real hardware:
cd scripts

# Simulate a PapyriX device (for testing Calibre desktop connection)
node device-simulator.mjs

# Simulate Calibre desktop (for testing device firmware)
node calibre-simulator.mjs
The device simulator listens for Calibre broadcasts and can receive books (saved to scripts/received_books/). The Calibre simulator sends discovery packets and sends test books to connected devices.
Serial monitor
A standalone Go binary reads device logs with no PlatformIO. Pre-built binaries are on the releases page. You can also build from source:
cd tools/monitor && go build -o monitor .
Usage:
./monitor                                  # Auto-detect port
./monitor -port /dev/ttyACM0               # Explicit port
./monitor -port /dev/ttyACM0 -log out.txt  # Also save to file
./monitor -speed 921600                    # Custom baud rate (default: 115200)
Reader test (desktop)
A desktop tool tests the content parse pipeline (EPUB, FB2, HTML, TXT, Markdown) with no flash to hardware. Use it to find parse defects, layout defects, or crashes.
# Build only
make reader-test

# Build and process a book
make reader-test FILE=book.epub OUTPUT=/tmp/cache

# Dump parsed text content of each page
tools/reader-test/build/reader-test --dump book.epub /tmp/cache
Options:
--dump— Print the parsed text of each page (use this to verify entity resolution, text extraction, and layout)
Creating a GitHub release
# With auto-generated notes from commits
make gh-release VERSION=0.1.1

# With custom notes
make gh-release VERSION=0.1.1 NOTES="Release notes here"
Generating changelog
Make CHANGELOG.md from git tags and commit history:
make changelog
This makes a changelog grouped by version tags, with commit messages and author data.
Internals
PapyriX is made for the ESP32-C3 limit of approximately 380KB RAM. See docs/architecture.md for the architecture.
Data caching
The device caches book data on the SD card. X4 uses /.papyrix/cache/, X3 uses
/.papyrix/cache/x3/, and X4 Pro uses /.papyrix/cache/x4pro/.
Each device-specific directory contains the book folders shown below.
<device-cache>/
├── epub_12471232/       # Each EPUB is cached to a subdirectory named `epub_<hash>`
│   ├── progress.bin     # Stores reading progress (chapter, page, etc.)
│   ├── bookmarks.bin    # Saved bookmarks (up to 20 per book)
│   ├── bookmarks.txt    # Human-readable bookmark list (companion to bookmarks.bin)
│   ├── cover.bmp        # Book cover image (once generated)
│   ├── book.bin         # Book metadata (title, author, spine, table of contents, etc.)
│   ├── sections/        # All chapter data is stored in the sections subdirectory
│   │   ├── 0.bin        # Chapter data (screen count, all text layout info, etc.)
│   │   ├── 1.bin        #     files are named by their index in the spine
│   │   └── ...
│   └── images/          # Cached inline images (converted to 2-bit BMP)
│       ├── 123456.bmp   # Images named by hash of source path
│       └── ...
│
├── fb2_55667788/        # Each FB2 file is cached to a subdirectory named `fb2_<hash>`
│   ├── meta.bin         # Cached metadata (title, author, TOC) for faster reloads
│   ├── progress.bin     # Stores reading progress
│   ├── cover.bmp        # Cover image (converted from adjacent image file)
│   ├── sections/        # Cached chapter pages (same format as EPUB sections)
│   │   ├── 0.bin
│   │   └── ...
│
│
├── txt_98765432/        # Each TXT file is cached to a subdirectory named `txt_<hash>`
│   ├── progress.bin     # Stores current page number (4-byte uint32)
│   ├── index.bin        # Page index (byte offsets for each page start)
│   └── cover.bmp        # Cover image (converted from book.jpg/png/bmp or cover.jpg/png/bmp)
│
├── md_12345678/         # Each Markdown file is cached to a subdirectory named `md_<hash>`
│   ├── progress.bin     # Stores current page number (2-byte uint16)
│   ├── section.bin      # Parsed pages (same format as EPUB sections)
│   └── cover.bmp        # Cover image (converted from README.jpg/png/bmp or cover.jpg/png/bmp)
│
├── html_12345678/       # Each HTML file is cached to a subdirectory named `html_<hash>`
│   ├── progress.bin     # Stores current page number (4-byte, same as TXT/Markdown)
│   ├── pages_<fontId>.bin  # Parsed pages (same format as Markdown/FB2 sections)
│   └── cover.bmp        # Cover image (converted from adjacent image file)
│
└── epub_189013891/
To clear cached data, use Settings > Cleanup (see User Guide). You can also delete the .papyrix directory.
The cache does not clear automatically when you delete a book. If you move a book file, the device uses a new cache directory. This resets the reading progress.
See file formats for cache records. See the rendering pipeline for cache scheduling and ownership.
Related Tools
EPUB to XTC Converter (Web)
epub-to-xtc-converter — browser-based converter from EPUB to the Xteink native XTC/XTCH format. It uses CREngine WASM for accurate rendering.
- Device presets for Xteink X4 (480×800) and X3 (528×792)
- Font selection from Google Fonts or custom TTF/OTF
- Margins, line height, and hyphenation that you can set (42 languages)
- Dark mode and dithering options
- Batch processing and ZIP export
Live version: liashkov.site/epub-to-xtc-converter
EPUB Optimizer (CLI)
xteink-epub-optimizer — command-line tool that prepares EPUB files for the Xteink X4 limits (480×800 display, limited RAM):
- CSS Sanitization - Removes complex layouts (floats, flexbox, grid)
- Font Removal - Removes embedded fonts to decrease file size
- Image Optimization - Grayscale conversion, resize to 480px maximum width
- XTC/XTCH Conversion - Convert EPUBs to the Xteink native format
# Optimize EPUB
python src/optimizer.py ./ebooks ./optimized

# Convert to XTCH format
python src/converter.py book.epub book.xtch --font fonts/MyFont.ttf
Contributing
Contributions are welcome.
To submit a contribution:
- Fork the repo
- Create a branch (
feature/your-feature) - Make changes
- Submit a PR
PapyriX is a fork of CrossPoint Reader by Dave Allie.
The IPP print server core (lib/Ipp) comes from the
crosspoint-reader fork by
Nishant Joshi, commit
df0d5e3.
X4 hardware data comes from bb_epaper by Larry Bank.
Markdown parse uses MD4C by Martin Mitáš.
CSS parser is adapted from microreader by CidVonHighwind.
Not affiliated with Xteink or a manufacturer of the X4 hardware.
Contributors


Similar repos


Languages
C
69.0%
C++
29.3%
Lightweight open-source firmware for Xteink e-paper reader (X4 pro, X4, X3) • EPUB/FB2/MD/TXT support • Custom themes & fonts
C
478
818 commits
updated Sep 18, 2026
README
PapyriX
PapyriX is firmware for Xteink X3, X4, and X4 Pro e-paper readers. It uses one ESP32-C3 image for X3/X4 and one ESP32-S3 image for X4 Pro.
Warning: Some Xteink units (for example, units from AliExpress) lock USB flash. If USB flash is locked, you cannot update or recover through USB. Install, update, and do emergency recovery from the SD card. Flash through USB only on devices that have unlocked USB.
This project is not affiliated with Xteink. It is a community project.
Supported devices
| Device | Release file | Panel |
|---|---|---|
| Xteink X4 | papyrix-xteink-c3.bin | 800×480 SSD1677 |
| Xteink X3 | papyrix-xteink-c3.bin | 792×528 UC8253 or UC8279 |
| Xteink X4 Pro | papyrix-x4pro.bin | 800×480 UC8279 or UC8179 |
See the device support matrix for build targets and hardware services. Using the wrong binary can drive incorrect pins and can damage hardware.
Page caches use profile-specific folders. Moving an SD card between supported devices does not reuse incompatible rendered pages.
Features
Reading & Format Support
- EPUB 2 and EPUB 3 parse (nav.xhtml, with NCX as fallback)
- CSS stylesheet parse (text-align, font-style, font-weight, text-indent, margins, direction)
- Preformatted text (
<pre>) and inline code (<code>,<tt>,<kbd>,<samp>) shown as italic (no monospace font in the firmware) - FB2 (FictionBook 2.0) with metadata, TOC navigation, and metadata cache (no inline images)
- HTML (.html, .htm) files (standalone HTML documents)
- XTC/XTCH native format
- Markdown (.md, .markdown) files with formatting
- Plain text (.txt, .text) files
- Saved reading position
- Books that you opened before (Books screen) so you can continue quickly
- Reading statistics for each book (progress, reading time, and sessions)
- Bookmarks (maximum 20 for each book, saved on the SD card)
- Book cover display (JPG/JPEG/PNG/BMP, case-insensitive)
- Table of contents navigation
- Images in EPUB (JPEG/PNG/BMP, baseline JPEG only, maximum 2048×3072)
Text & Display
- Font sizes that you can set (XSmall/Small/Normal/Large)
- Paragraph alignment (Justified/Left/Center/Right)
- Text layout presets (Compact/Standard/Large) for indent and spacing
- Soft hyphen support for text layout
- Liang-pattern hyphenation. Language comes from EPUB metadata (de, en, es, fr, it, ru, uk)
- Vietnamese, Thai, Greek, and Arabic in the builtin fonts
- CJK (Chinese/Japanese/Korean) text layout (book text only, not UI)
- Thai text with correct mark positions
- Arabic text shaping. Contextual forms and Lam-Alef ligatures with RTL layout
- Knuth-Plass line break algorithm (TeX-quality justified text)
- Text anti-aliasing on/off (grayscale text for builtin fonts and custom fonts)
- Pages per refresh setting (1/5/10/15/30)
- Sunlight fading fix (powers down the display after refresh to prevent UV fade)
- Turbo LUTs with LUT cache for faster X3 page turns
- 4 screen orientations
Customization
- Custom themes from the SD card (
/config/themes/) - Custom fonts from the SD card (
/config/fonts/, .epdfont format) - Custom sleep screens (Dark/Light/Custom/Cover/Keep Page modes)
- Button remapping (side buttons and front buttons)
- Power button actions (page turn, bookmark, or sleep on a short press)
Network & Connectivity
- WiFi file transfer (web server)
- Calibre Wireless Device. Send books from Calibre desktop
- LocalSend receiver. Send files and books from the LocalSend app to the device over WiFi.
- Driverless network printer (AirPrint-compatible). Print from macOS, Windows, Linux, iOS, and Android to the e-paper screen. Printouts save to
/printoutson the SD card
Maintenance
- Cleanup menu (clear book cache, empty trash, clear storage, factory reset)
- Firmware updates from the SD card
- System info (version, uptime, memory, storage)
File System
- exFAT and FAT32 SD card support
- UTF-8 filenames through the Web UI for Latin (including Vietnamese), Cyrillic, Greek, Thai, and Arabic
- File explorer with nested folders
- Recycle bin (
/trash). If you delete a book, the device moves it to/trash. It does not remove the book. You can browse to restore it or delete it permanently. You can empty the trash from the Cleanup menu - Hidden system folder filter (LOST.DIR, $RECYCLE.BIN, and other system folders)
Tip: The Web UI folder create, upload, and rename functions change supported Unicode names to NFC. Names have a limit of 255 UTF-8 bytes. Full paths have a limit of 1023 bytes. CJK filenames are not supported. The device file-browser UI does not have CJK glyphs. For deep folder trees with supported non-Latin names, use exFAT, not FAT32.
See the user guide for operation procedures.
See the customization guide for themes and fonts.
Example theme files and font files are in docs/examples/.
Installing & Firmware Updates
Do you need to recover a device that does not start? Go to emergency recovery.
Download the binary that matches the device:
- X3 or X4:
papyrix-xteink-c3.bin - X4 Pro:
papyrix-x4pro.bin
The usual installation method is papyrix-flasher:
papyrix-flasher flash papyrix-xteink-c3.bin
Do not flash an S3 image to a C3 device or a C3 image to an S3 device.
From SD card: You can also install or update with an SD card:
- Copy the firmware file as
/firmware.binto the root of your SD card. - Put the SD card into the device.
- Go to Settings > Firmware Update and press Run.
The device flashes the firmware from the SD card and restarts.
Emergency Recovery
If the device does not start, copy the firmware as /force_update.bin to the SD card.
On the next start, the device flashes the file before it starts the UI.
You do not need to operate the device.
See the customization guide for more data.
Development
Prerequisites
- PlatformIO Core (
pio) or VS Code + PlatformIO IDE - Python 3.12+ with uv (for font conversion)
- Node.js 18+ (for sleep screen scripts and logo scripts)
- USB-C data cable
- Xteink X3, X4, or X4 Pro with unlocked USB flashing
Install Node.js dependencies (for sleep screen scripts and logo scripts):
cd scripts && npm install
Using Nix
If you have Nix, shell.nix supplies all dependencies:
# Enter development environment
nix-shell

# Or run commands directly
nix-shell --run "make build"
nix-shell --run "make check"
First-time Nix setup:
# Install Nix (if not installed)
sh <(curl -L https://nixos.org/nix/install) --daemon

# Add nixpkgs channel
nix-channel --add https://nixos.org/channels/nixos-unstable nixpkgs
nix-channel --update
Checking out the code
PapyriX uses PlatformIO to build and flash the firmware. Clone the repository:
git clone --recursive https://github.com/pliashkou/papyrix

# Or, if you've already cloned without --recursive:
git submodule update --init --recursive
Building
# Build development firmware
make build

# Build both release environments
make release

# Build, verify, and package deterministic release files in dist/
make package
Flashing your device
Connect the device through unlocked USB. Build and flash the release firmware for the device:
make flash-xteink-c3  # X3 and X4
make flash-x4pro      # X4 Pro
On X4 Pro, hold Power throughout flashing. Release Power after verification completes and the application starts. Close the serial monitor before flashing. To select a port:
PLATFORMIO_UPLOAD_PORT=/dev/ttyACM0 make flash-x4pro
make flash-release and make upload-release select X3/X4 only.
To install an existing release binary instead of building it, use:
# ESP32-C3: X3/X4
esptool.py --chip esp32c3 --port /dev/ttyACM0 --baud 460800 \
  write_flash -z 0x10000 papyrix-xteink-c3.bin

# ESP32-S3: X4 Pro
esptool.py --chip esp32s3 --port /dev/ttyACM0 --baud 460800 \
  write_flash -z 0x10000 papyrix-x4pro.bin
PlatformIO upload remains available for a connected development target:
pio run -e default --target upload
pio run -e x4pro --target upload
Replace /dev/ttyACM0 with the device port. Use COM3 on Windows or
/dev/tty.usbmodem* on macOS where applicable.
Build Scripts
Build scripts are in the scripts/ directory.
Converting fonts
Convert TTF/OTF fonts to the PapyriX .epdfont format with Python (you need uv):
# Basic conversion (outputs to current directory)
uv run scripts/fontconvert.py my-font -r MyFont-Regular.ttf --2bit

# Full font family with all reader sizes (14, 16, 18pt)
uv run scripts/fontconvert.py my-font -r Regular.ttf -b Bold.ttf --2bit --all-sizes -o /tmp/fonts/

# With Thai script support
uv run scripts/fontconvert.py my-font -r Regular.ttf --2bit --thai -o /tmp/fonts/

# With Arabic script support
uv run scripts/fontconvert.py my-font -r Regular.ttf --2bit --arabic -o /tmp/fonts/

# Generate C header instead of binary (for builtin fonts)
uv run scripts/fontconvert.py my_font 16 Regular.ttf --2bit > my_font_16_2b.h
Options: -r/--regular, -b/--bold, -i/--italic, -o/--output, -s/--size, --2bit, --all-sizes, --header, --thai, --arabic
See the customization guide for the full font conversion procedure.
Creating sleep screen images
Convert an image to the sleep screen BMP format (run cd scripts && npm install first):
# With Makefile
make sleep-screen INPUT=photo.jpg OUTPUT=sleep.bmp
make sleep-screen INPUT=photo.jpg OUTPUT=sleep.bmp ARGS='--dither --bits 8'

# Or directly
cd scripts && node create-sleep-screen.mjs photo.jpg sleep.bmp --dither --bits 8
Options:
--orientation portrait|landscape- Screen orientation (default: portrait)--bits 2|4|8- Output bit depth (default: 4)--dither- Enable Floyd-Steinberg dithering--fit contain|cover|stretch- Resize mode (default: contain)
Copy the output BMP to the /sleep/ directory or as /sleep.bmp on the SD card.
Converting logo
Convert an image to a C header for the firmware logo (384x384 monochrome):
cd scripts && node convert-logo.mjs ../images/logo-light.jpg ../src/images/PapyrixLogo.h
Options: --invert, --threshold <0-255>, --rotate <0|90|180|270> (default: 270)
Calibre simulators (development/testing)
Two simulators let you test the Calibre Wireless Device feature with no real hardware:
cd scripts

# Simulate a PapyriX device (for testing Calibre desktop connection)
node device-simulator.mjs

# Simulate Calibre desktop (for testing device firmware)
node calibre-simulator.mjs
The device simulator listens for Calibre broadcasts and can receive books (saved to scripts/received_books/). The Calibre simulator sends discovery packets and sends test books to connected devices.
Serial monitor
A standalone Go binary reads device logs with no PlatformIO. Pre-built binaries are on the releases page. You can also build from source:
cd tools/monitor && go build -o monitor .
Usage:
./monitor                                  # Auto-detect port
./monitor -port /dev/ttyACM0               # Explicit port
./monitor -port /dev/ttyACM0 -log out.txt  # Also save to file
./monitor -speed 921600                    # Custom baud rate (default: 115200)
Reader test (desktop)
A desktop tool tests the content parse pipeline (EPUB, FB2, HTML, TXT, Markdown) with no flash to hardware. Use it to find parse defects, layout defects, or crashes.
# Build only
make reader-test

# Build and process a book
make reader-test FILE=book.epub OUTPUT=/tmp/cache

# Dump parsed text content of each page
tools/reader-test/build/reader-test --dump book.epub /tmp/cache
Options:
--dump— Print the parsed text of each page (use this to verify entity resolution, text extraction, and layout)
Creating a GitHub release
# With auto-generated notes from commits
make gh-release VERSION=0.1.1

# With custom notes
make gh-release VERSION=0.1.1 NOTES="Release notes here"
Generating changelog
Make CHANGELOG.md from git tags and commit history:
make changelog
This makes a changelog grouped by version tags, with commit messages and author data.
Internals
PapyriX is made for the ESP32-C3 limit of approximately 380KB RAM. See docs/architecture.md for the architecture.
Data caching
The device caches book data on the SD card. X4 uses /.papyrix/cache/, X3 uses
/.papyrix/cache/x3/, and X4 Pro uses /.papyrix/cache/x4pro/.
Each device-specific directory contains the book folders shown below.
<device-cache>/
├── epub_12471232/       # Each EPUB is cached to a subdirectory named `epub_<hash>`
│   ├── progress.bin     # Stores reading progress (chapter, page, etc.)
│   ├── bookmarks.bin    # Saved bookmarks (up to 20 per book)
│   ├── bookmarks.txt    # Human-readable bookmark list (companion to bookmarks.bin)
│   ├── cover.bmp        # Book cover image (once generated)
│   ├── book.bin         # Book metadata (title, author, spine, table of contents, etc.)
│   ├── sections/        # All chapter data is stored in the sections subdirectory
│   │   ├── 0.bin        # Chapter data (screen count, all text layout info, etc.)
│   │   ├── 1.bin        #     files are named by their index in the spine
│   │   └── ...
│   └── images/          # Cached inline images (converted to 2-bit BMP)
│       ├── 123456.bmp   # Images named by hash of source path
│       └── ...
│
├── fb2_55667788/        # Each FB2 file is cached to a subdirectory named `fb2_<hash>`
│   ├── meta.bin         # Cached metadata (title, author, TOC) for faster reloads
│   ├── progress.bin     # Stores reading progress
│   ├── cover.bmp        # Cover image (converted from adjacent image file)
│   ├── sections/        # Cached chapter pages (same format as EPUB sections)
│   │   ├── 0.bin
│   │   └── ...
│
│
├── txt_98765432/        # Each TXT file is cached to a subdirectory named `txt_<hash>`
│   ├── progress.bin     # Stores current page number (4-byte uint32)
│   ├── index.bin        # Page index (byte offsets for each page start)
│   └── cover.bmp        # Cover image (converted from book.jpg/png/bmp or cover.jpg/png/bmp)
│
├── md_12345678/         # Each Markdown file is cached to a subdirectory named `md_<hash>`
│   ├── progress.bin     # Stores current page number (2-byte uint16)
│   ├── section.bin      # Parsed pages (same format as EPUB sections)
│   └── cover.bmp        # Cover image (converted from README.jpg/png/bmp or cover.jpg/png/bmp)
│
├── html_12345678/       # Each HTML file is cached to a subdirectory named `html_<hash>`
│   ├── progress.bin     # Stores current page number (4-byte, same as TXT/Markdown)
│   ├── pages_<fontId>.bin  # Parsed pages (same format as Markdown/FB2 sections)
│   └── cover.bmp        # Cover image (converted from adjacent image file)
│
└── epub_189013891/
To clear cached data, use Settings > Cleanup (see User Guide). You can also delete the .papyrix directory.
The cache does not clear automatically when you delete a book. If you move a book file, the device uses a new cache directory. This resets the reading progress.
See file formats for cache records. See the rendering pipeline for cache scheduling and ownership.
Related Tools
EPUB to XTC Converter (Web)
epub-to-xtc-converter — browser-based converter from EPUB to the Xteink native XTC/XTCH format. It uses CREngine WASM for accurate rendering.
- Device presets for Xteink X4 (480×800) and X3 (528×792)
- Font selection from Google Fonts or custom TTF/OTF
- Margins, line height, and hyphenation that you can set (42 languages)
- Dark mode and dithering options
- Batch processing and ZIP export
Live version: liashkov.site/epub-to-xtc-converter
EPUB Optimizer (CLI)
xteink-epub-optimizer — command-line tool that prepares EPUB files for the Xteink X4 limits (480×800 display, limited RAM):
- CSS Sanitization - Removes complex layouts (floats, flexbox, grid)
- Font Removal - Removes embedded fonts to decrease file size
- Image Optimization - Grayscale conversion, resize to 480px maximum width
- XTC/XTCH Conversion - Convert EPUBs to the Xteink native format
# Optimize EPUB
python src/optimizer.py ./ebooks ./optimized

# Convert to XTCH format
python src/converter.py book.epub book.xtch --font fonts/MyFont.ttf
Contributing
Contributions are welcome.
To submit a contribution:
- Fork the repo
- Create a branch (
feature/your-feature) - Make changes
- Submit a PR
PapyriX is a fork of CrossPoint Reader by Dave Allie.
The IPP print server core (lib/Ipp) comes from the
crosspoint-reader fork by
Nishant Joshi, commit
df0d5e3.
X4 hardware data comes from bb_epaper by Larry Bank.
Markdown parse uses MD4C by Martin Mitáš.
CSS parser is adapted from microreader by CidVonHighwind.
Not affiliated with Xteink or a manufacturer of the X4 hardware.
Similar repos
Contributors
Languages
C
69.0%
C++
29.3%