
A suite of services (SOCKS, FTP, shell, etc.) over Citrix, VMware Horizon and native Windows RDP virtual channels.
Rust
345
199 commits
updated Aug 27, 2026
README
soxy


soxy is a modular tool to interact with several VDIs that operate over RDP, such as VMware Horizon, Citrix, native Windows RDP and XRDP. It supports useful debug services (e.g. clipboard, console/shell, sharing, FTP server, SOCKS5 proxy).
🎯 Features
soxy has a frontend and a backend component. The latter executes inside a Windows instance managed by one of the supported VDIs, while the frontend bridges access to backend functions by exposing VDI-side resources locally using a common protocol. At the time of writing, soxy provides:
- a telnet interface to inject keystrokes ("input");
- a bootstrap module using a PowerShell backend script ("stage0");
- a (basic) FTP server to access the remote machine's filesystem;
- a telnet interface to spawn and interact with a console/shell executed on the remote machine;
- a telnet interface to read/write the clipboard of the remote machine;
- a SOCKS5 proxy which permits to open connections on client's side as if it was opened in the remote machine;
- a port forwarding to bind TCP ports on client's side which will connect to configuration defined hosts and ports from the remote machine.
soxy is a more stable, complete and modular alternative to existing tools such as SocksOverRDP, ica2TCP, and rdp2tcp.
soxy supports native Windows RDP (real or virtual host) as well as VMware Horizon, Citrix virtual machines and XRDP.
On the client side, soxy works as a plugin on:
- VMware Horizon client on Linux, macOS and Windows;
- FreeRDP and Remmina on Linux;
- Citrix client on Linux, macOS and Windows.
On the remote host, soxy can run as a standalone Windows executable or can be embedded in other applications as a DLL. In release mode, this part of soxy is kept as small as possible. It is built without any logging related code (even log message strings are absent from the binary) and without symbols.
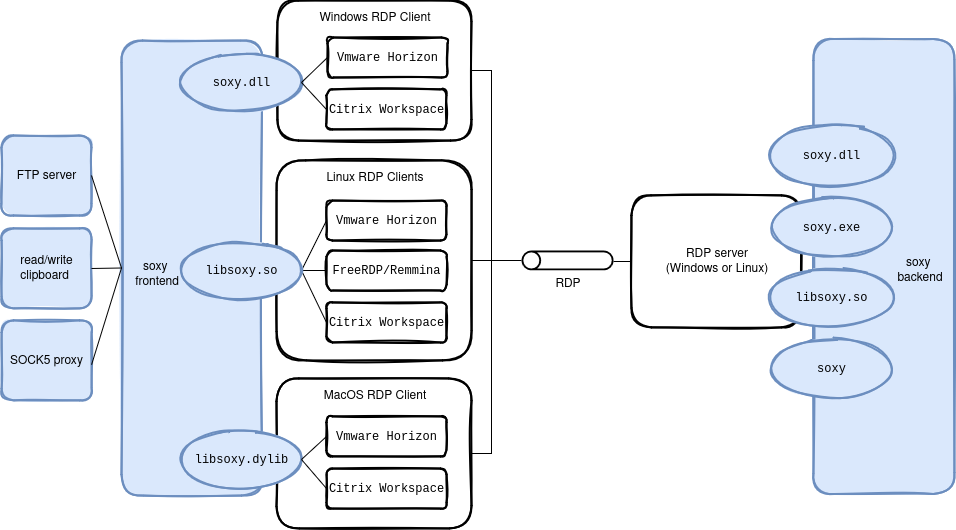
Table of Contents
📁 Project Architecture
The soxy source code is split into four parts:
- frontend: contains the code of the dynamic library to be installed on the client's machine and loaded by FreeRDP (or Remmina), VMware Horizon viewer, or Citrix. This part of soxy accepts TCP connections on the client's side (or local network, depending on the configuration) for each service;
- backend: contains the code of the Windows executable (or DLL) to be launched (or loaded) on the remote Windows machine;
- soxyreg: contains the code to produce an executable that
simplifies the (un)installation of the
frontendon Windows by inserting/deleting the appropriate registry keys; - standalone: contains the code to produce an executable including both the
frontendand thebackendparts (with an emulated RDP channel) for testing implementations of services; - common: contains some code used by all other parts.
All communications between the frontend and the backend go through
a single Static Virtual Channel
or a single Dynamic Virtual Channel
of the RDP protocol. A single FIFO is used to transmit from/to the frontend
to/from backend, which means that there is no priority levels between services
within soxy.
Note: There is no rate limiting feature implemented in soxy. Under heavy load, other channels (i.e. keyboard, mouse, display, USB, ...) can be slowed down, depending on the underlying implementation (Windows native RDP, VMware Horizon, Citrix).
🚀 Getting Started
🔨 Build
Pre-compiled Binaries
Pre-compiled binaries can be found in the Releases section of the project on Github. The build step can be skipped, and these binaries may be used as described in the next sections.
On Linux
All Linux and Windows libraries and executables of soxy can be built on Linux.
Requirements
The following elements are required to build them:
make;clang;mingw-w64package on Arch, Debian and Ubuntu,mingw64-gccandmingw32-gccon Fedora (to build Windows binaries);gcc-multilibon Debian and Ubuntu to but i686 Linux binaries;- rustup installed (see next section).
Included services
By default both Static and Dynamic Virtual Channels are supported and
enabled in the ̀Makefile. It is possible to build soxy with the
support of a Static/Dynamic Virtual Channel only by editing
the VC variable at the beginning of the Makefile.
VC ?= dvc svc
By default all services are enabled in the Makefile. It is possible
to include services needed only by editing the SERVICES
variable at the beginning of the Makefile.
SERVICES ?= clipboard command forward ftp input socks5 stage0
Make Targets
By default all supported platforms (except macOS ones) are enabled in
the Makefile. It is possible to enable only the build of artifcats needed
by editing the three following variables at the beginning of the Makefile.
TARGETS_FRONTEND ?= i686-pc-windows-gnu x86_64-pc-windows-gnu i686-unknown-linux-gnu x86_64-unknown-linux-gnu
TARGETS_BACKEND ?= i686-pc-windows-gnu x86_64-pc-windows-gnu i686-unknown-linux-gnu x86_64-unknown-linux-gnu
TARGETS_STANDALONE ?= i686-pc-windows-gnu x86_64-pc-windows-gnu i686-unknown-linux-gnu x86_64-unknown-linux-gnu
TARGETS_SOXYREG ?= i686-pc-windows-gnu x86_64-pc-windows-gnu
It is also possible to override all default enabled parameters from the command line, e.g.:
VC=dvc SERVICES=socks5 TARGETS_FRONTEND=x86_64-unknown-linux-gnu TARGETS_BACKEND=x86_64-pc-windows-gnu TARGETS_STANDALONE= TARGETS_SOXYREG=x86_64-pc-windows-gnu make debug
The Makefile contains three main targets:
setup: invokesrustupto install all needed toolchains, targets and components for Rust;debug: builds non-stripped libraries and executables with debugging logs activated. Outputs to a repository nameddebug;release: builds stripped and optimized libraries and executables with informational logs for the frontend libraries and standalone binaries, but without any logs for the backend libraries and binaries. Outputs to a repository namedrelease.
The output hierarchy of the created repositories is the following:
├── backend
│   ├── i686-pc-windows-gnu
│   │   ├── soxy.dll
│   │   └── soxy.exe
│   ├── i686-unknown-linux-gnu
│   │   ├── libsoxy.so
│   │   └── soxy
│   ├── x86_64-pc-windows-gnu
│   │   ├── soxy.dll
│   │   └── soxy.exe
│   └── x86_64-unknown-linux-gnu
│       ├── libsoxy.so
│       └── soxy
├── frontend
│   ├── i686-pc-windows-gnu
│   │   └── soxy.dll
│   ├── i686-unknown-linux-gnu
│   │   └── libsoxy.so
│   ├── x86_64-pc-windows-gnu
│   │   └── soxy.dll
│   └── x86_64-unknown-linux-gnu
│       └── libsoxy.so
└── soxyreg
│   ├── i686-pc-windows-gnu
│   │   └── soxyreg.exe
│   ├── x86_64-pc-windows-gnu
│       └── soxyreg.exe
└── standalone
    ├── i686-pc-windows-gnu
    │   └── soxy_standalone.exe
    ├── i686-unknown-linux-gnu
    │   └── soxy_standalone
    ├── x86_64-pc-windows-gnu
    │   └── soxy_standalone.exe
    └── x86_64-unknown-linux-gnu
        └── soxy_standalone
On macOS
Only the frontend can be built on macOS. Proceed as follows.
For the debug version:
cd frontend
cargo build --features log
For the release version:
cd frontend
cargo build --release
This produces target/debug/libsoxy.dylib or target/release/libsoxy.dylib
installable as described in the next section.
🔌 Frontend Installation
For VMware Horizon Client and Windows native RDP client
On macOS
Copy libsoxy.dylib to /Applications/VMware Horizon Client.app/Contents/Library/pcoip/vchan_plugins/rdpvcbridge/.
On Linux
Copy the frontend library into the VMware rdpvcbridge directory:
sudo cp release/frontend/x86_64-unknown-linux-gnu/libsoxy.so /usr/lib/vmware/rdpvcbridge/
Note: on recent versions of VMware Horizon client, the directory has moved
to /usr/lib/omnissa/rdpvcbridge/.
On Windows
Register the frontend library for automatic loading by VMware
Horizon client. It is mandatory to use the same architecture version
(i.e. 32/64 bit version from
i686-pc-windows-gnu/x86_64-pc-windows-gnu) of soxyreg.exe than for
soxy.dll?
To use a Static Virtual Channel:
soxyreg.exe svc register soxy.dll
(x)or to use a Dynamic Virtual Channel:
soxyreg.exe dvc register soxy.dll
To uninstall the Static Virtual Channel:
soxyreg.exe svc unregister
(x)or to uninstall the Dynamic Virtual Channel:
soxyreg.exe dvc unregister
For FreeRDP and Remmina (Linux)
Create the FreeRDP plugin directory and copy the library to it. Be careful, the
name of the library must be libsoxy-client.so (not libsoxy.so) otherwise
the library will not be found by FreeRDP/Remmina:
-
for FreeRDP 2 on Arch:
sudo mkdir -p /usr/lib/freerdp2 sudo cp release/frontend/x86_64-unknown-linux-gnu/libsoxy.so /usr/lib/freerdp2/libsoxy-client.so -
for FreeRDP 2 on Debian/Ubuntu:
sudo mkdir -p /usr/lib/x86_64-linux-gnu/freerdp2 sudo cp release/frontend/x86_64-unknown-linux-gnu/libsoxy.so /usr/lib/x86_64-linux-gnu/freerdp2/libsoxy-client.so -
for FreeRDP 3 on Arch:
sudo mkdir -p /usr/lib/freerdp3 sudo cp release/frontend/x86_64-unknown-linux-gnu/libsoxy.so /usr/lib/freerdp3/libsoxy-client.so -
for FreeRDP 3 on Debian/Ubuntu:
sudo mkdir -p /usr/lib/x86_64-linux-gnu/freerdp3
sudo cp release/frontend/x86_64-unknown-linux-gnu/libsoxy.so /usr/lib/x86_64-linux-gnu/freerdp3/libsoxy-client.so
When you launch FreeRDP from the command line, you have to add the argument
/vc:soxy to tell FreeRDP to load the library and to use a Static Virtual Channel,
(x)or /dvc:soxy to use a Dynamic Virtual Channel, for example:
-
for FreeRDP 2 with a Static Virtual Channel:
xfreerdp /dynamic-resolution /log-level:INFO /v:192.168.42.42 /vc:soxy
or with Dynamic Virtual Channel:
xfreerdp /dynamic-resolution /log-level:INFO /v:192.168.42.42 /dvc:soxy
-
for FreeRDP 3 with a Static Virtual Channel:
sdl-freerdp3 /dynamic-resolution /log-level:INFO /v:192.168.42.42 /vc:soxy
or with Dynamic Virtual Channel:
sdl-freerdp3 /dynamic-resolution /log-level:INFO /v:192.168.42.42 /dvc:soxy
For Remmina, edit your RDP connection, go to the "Advanced" tab and set the
"Static virtual channel" (x)or "Dynamic virtual channel" parameter to soxy.
For Citrix Workspace App
On macOS
TODO
On Linux
First copy libsoxy.so to /opt/Citrix/ICAClient/, then modify
/opt/Citrix/ICAClient/config/module.ini:
- add
soxyin theVirtualDriverlist in the[ICA 3.0]section - in the same section, add the line
soxy=On - add a
[soxy]section containing the following line:DriverName = libsoxy.so
Be careful, only Static Virtual Channels are supported in the Citrix Linux client.
On Windows
First you must copy the 32 bits version of soxy.dll from
i686-pc-windows-gnu to C:\Program Files (x86)\Citrix\ICA Client,
then register it with the 32 bits version of soxyreg for
automatic loading by Citrix Workspace App; you need to run the command
with administrator privileges.
To use a Static Virtual Channel:
i686-pc-windows-gnu\soxyreg.exe svc register soxy.dll
(x)or to use a Dynamic Virtual Channel:
i686-pc-windows-gnu\soxyreg.exe dvc register soxy.dll
To uninstall the Static Virtual Channel:
i686-pc-windows-gnu\soxyreg.exe svc unregister
and to uninstall the Dynamic Virtual Channel:
i686-pc-windows-gnu\soxyreg.exe dvc unregister
Be careful, only Static Virtual Channels are supported by the Citrix Linux VDA.
Configuration file
When the frontend of soxy starts, it will look for a configuration
file at $HOME/.config/soxy.toml on Linux and macOS and at
{FOLDERID_Profile}/soxy.toml on Windows. If no configuration file is
found, it will be created with default values. Here is a complete
example of configuration file:
#Default virtual channel name.
channel = "SOXY"

#Default listen address for services. It can be overridden per service.
#Use "::1" to listen both on IPv4 and IPv6 on localhost.
#Use "::0" to listen both on IPv4 and IPv6 on all interfaces.
#Default value is "127.0.0.1".
ip = "127.0.0.1"

[log]
#Logging level: "OFF" or "ERROR" or "WARN" or "INFO" or "DEBUG" or "TRACE".
#Default value is "DEBUG" in debug targets and "INFO" in release targets.
level = "DEBUG"

#Default is to enable all available services on the global listen IP
#address and default ports.

[[services]]
name = "clipboard"
enabled = true
port = 3032

[[services]]
name = "command"
enabled = true
port = 3031

[[services]]
name = "ftp"
enabled = true
port = 2021

[[services]]
name = "input"
enabled = true
port = 1081

[[services]]
name = "socks5"
enabled = true
#Override the listen address of this service only
ip = "::0"
port = 1080

[[services]]
name = "stage0"
#Disable this service
enabled = false
port = 1082

#Examples of port forwarding configuration entries

[[forward]]
ip = "127.0.0.1"
port = 2222
destination = "localhost:22"

[[forward]]
ip = "127.0.0.1"
port = 8080
destination = "localhost:80"
🔌 Backend Installation
Using soxy.exe
Copy release/x86_64-pc-windows-gnu/soxy.exe to the Windows machine
you are connected to and execute it. On a Linux remote machine, use
release/x86_64-unknown-linux-gnu/soxy. You can override the default
virtual channel name (i.e. SOXY) by giving it as first and single
argument on the command line, e.g.:
soxy.exe MYCHAN
The virtual channel name is at most 7 ASCII characters.
(Alternative) Using the DLL/.so
Copy release/x86_64-pc-windows-gnu/soxy.dll and find your way to
load the DLL. For example, this can be done
thanks to rundll32.exe present on Windows with the following
command:
rundll32.exe soxy.dll,Main
The Main function executed by the above command is a simple infinite sleeping
loop, avoiding rundll32.exe from exiting, while the real work of soxy runs in
threads launched at loading time by the DllMain function present in the DLL.
If the DLL is loaded by a real binary/application, soxy will remain active until
the binary/application exits; you do not have to execute anything in the
library, everything will be done automatically at loading time.
💻 Usage
After setting up the client and running the backend, you can use the following services.
Accessing Services
As soon as your favorite client is set up and the backend code is running, you can start using soxy services from your client machine
Remote Clipboard
Connect to localhost:3032 on your client machine with a telnet command,
and use the available commands:
write xxxxorput xxxx: sets the remote clipboard to the valuexxxx;readorget: retrieves the content of the remote clipboard;exitorquit: closes the connection.
Remote Console/Shell
Connect to localhost:3031 on your client machine with a telnet command,
and use the available commands.
Remote Filesystem
Connect to localhost:2021 on your client machine with your favorite FTP client
to browse, upload, download files and directories accessible to the backend
user.
Input
Connect to localhost:1081 on your client machine with a telnet
command, and use one of the available commands below to
send input events. This service does not require a running backend,
only a loaded frontend.
delay <delay>where<delay>is a integer representing an amount of time in milliseconds: sets the default delay between two input events;pause <delay>where<delay>is a integer representing an amount of time in milliseconds: waits the given amount of time before sending the next input event;keydown <key>where<key>in a supported keyword associated to a keyboard key (seecommon/src/input/frontend.rsfor available keywords): presses the given keyboard key until the correspondingkeyup <key>command is emitted;key <key>where<key>in a supported keyword associated to a keyboard key (seecommon/src/input/frontend.rsfor available keywords): emulates the given key stroke (i.e. pressed then released);write <input>(resp.writeln <input>) where<input>a newline-terminated string: emulates the typing of the given text input on the keyboard (resp. including a carriage return at the end);cat <file path>where<file path>is a path to a "text" file: emulates the typing of the content of the given file on the keyboard;exitto quit the session.
In practice, the cat command permits to type the content of the
tools/stage0/stage0.ps1 script on a remote machine where the soxy
backend is not yet deployed, and then to use the Stage0 service of
soxy to transfer the soxy.exe (or soxy.dll) backend.
SOCKS5 Proxy
Configure on your client machine to use localhost:1080 as a SOCKS5 proxy.
Connections will originate from the remote host.
Stage0
Execute the script stage0.ps1 (which can be found in tools/stage0) on the remote machine:
powershell.exe -ExecutionPolicy Bypass -file stage0.ps1
Connect to localhost:1082 on your client machine with a telnet command,
and use the available commands:
send <file path>: sends the content of the file at the provided path, it will be stored in a file namedfavicon.isoin the directory where the previous script has been launched;exitto quit the session.
Troubleshooting
Citrix
If you get an error like failed to open channel handle: virtual channel open failed (last_error = 5)
it means there are restrictions on Citrix host virtual channels (default behavior
in last Citrix version). To fix this, if you have (local) administrator privileges,
you can disable Citrix restrictions on virtual channels (which is not recommended):
reg add HKLM\SOFTWARE\WOW6432Node\Policies\Citrix\VCPolicies /v VirtualChannelWhiteList /t REG_MULTI_SZ /d =disabled=
Or you can whitelist SOXY (or your custom virtual channel name) like
this if you have (local) administrator privileges:
reg add HKLM\SOFTWARE\WOW6432Node\Policies\Citrix\VCPolicies /v VirtualChannelWhiteList /t REG_MULTI_SZ /d SOXY,C:\Users\<USER>\<PATH_TO_SOXY_EXE>
Note that in both cases, you have to reboot the Citrix host afterward.
XRDP
Dynamic virtual channel with XRDP backend is experimental; please use static virtual channel which is working well.
The backend needs to be able to load libxrdpapi.so from the library path.
On most Linux distributions, it is not by default. You can add it on the
command line, e.g. for x86_64 on Debian:
LD_LIBRARY_PATH=/usr/lib/x86_64-linux-gnu/ soxy
If you get an error like failed to open channel handle: virtual channel open failed it means there are restrictions on XRDP host
virtual channels. To fix this, if you have (local) administrator
privileges, you can disable XRDP restrictions for this very specific
virtual channel. Edit /etc/xrdp/xrdp.ini, look for [Channels]
entry and add below SOXY=true.
Before version 0.10, you may not have such error and the backend could
seem to be working properly (channel opening is OK) but no service is
working. In this case, please have a look at XRDP logs (journalctl -u xdrp.service) to see if there is a message like Received a message for the disabled channel. If this is the case, you need to whitelist
the SOXY channel as described above.
🚧 Contributing
Adding a new service (let's called it ping) in soxy requires to develop a new
module in the common directory and to instantiate it in both the frontend
and the backend.
Steps
- Create a new module structure:
common/src/ping/
├── backend.rs
├── frontend.rs
└── mod.rs
-
Declare the new module in
common/src/lib.rs:mod ping; -
Instanciate a
service::Serviceinstatic const SERVICEincommon/src/ping/mod.rs; -
Update
common/src/service.rs:- Import the
pingmodule, - Add
&ping::SERVICEto theSERVICESarray at the end of the file.
- Import the
Refer to common/src/clipboard/ for an example.
🏢 License
This project is licensed under the GNU GPLv3 License. See the LICENSE file for details.




Similar repos


Languages
Rust
83.3%
C
7.0%
PowerShell
6.6%
Makefile
3.1%
A suite of services (SOCKS, FTP, shell, etc.) over Citrix, VMware Horizon and native Windows RDP virtual channels.
Rust
345
199 commits
updated Aug 27, 2026
README
soxy
soxy is a modular tool to interact with several VDIs that operate over RDP, such as VMware Horizon, Citrix, native Windows RDP and XRDP. It supports useful debug services (e.g. clipboard, console/shell, sharing, FTP server, SOCKS5 proxy).
🎯 Features
soxy has a frontend and a backend component. The latter executes inside a Windows instance managed by one of the supported VDIs, while the frontend bridges access to backend functions by exposing VDI-side resources locally using a common protocol. At the time of writing, soxy provides:
- a telnet interface to inject keystrokes ("input");
- a bootstrap module using a PowerShell backend script ("stage0");
- a (basic) FTP server to access the remote machine's filesystem;
- a telnet interface to spawn and interact with a console/shell executed on the remote machine;
- a telnet interface to read/write the clipboard of the remote machine;
- a SOCKS5 proxy which permits to open connections on client's side as if it was opened in the remote machine;
- a port forwarding to bind TCP ports on client's side which will connect to configuration defined hosts and ports from the remote machine.
soxy is a more stable, complete and modular alternative to existing tools such as SocksOverRDP, ica2TCP, and rdp2tcp.
soxy supports native Windows RDP (real or virtual host) as well as VMware Horizon, Citrix virtual machines and XRDP.
On the client side, soxy works as a plugin on:
- VMware Horizon client on Linux, macOS and Windows;
- FreeRDP and Remmina on Linux;
- Citrix client on Linux, macOS and Windows.
On the remote host, soxy can run as a standalone Windows executable or can be embedded in other applications as a DLL. In release mode, this part of soxy is kept as small as possible. It is built without any logging related code (even log message strings are absent from the binary) and without symbols.
Table of Contents
📁 Project Architecture
The soxy source code is split into four parts:
- frontend: contains the code of the dynamic library to be installed on the client's machine and loaded by FreeRDP (or Remmina), VMware Horizon viewer, or Citrix. This part of soxy accepts TCP connections on the client's side (or local network, depending on the configuration) for each service;
- backend: contains the code of the Windows executable (or DLL) to be launched (or loaded) on the remote Windows machine;
- soxyreg: contains the code to produce an executable that
simplifies the (un)installation of the
frontendon Windows by inserting/deleting the appropriate registry keys; - standalone: contains the code to produce an executable including both the
frontendand thebackendparts (with an emulated RDP channel) for testing implementations of services; - common: contains some code used by all other parts.
All communications between the frontend and the backend go through
a single Static Virtual Channel
or a single Dynamic Virtual Channel
of the RDP protocol. A single FIFO is used to transmit from/to the frontend
to/from backend, which means that there is no priority levels between services
within soxy.
Note: There is no rate limiting feature implemented in soxy. Under heavy load, other channels (i.e. keyboard, mouse, display, USB, ...) can be slowed down, depending on the underlying implementation (Windows native RDP, VMware Horizon, Citrix).
🚀 Getting Started
🔨 Build
Pre-compiled Binaries
Pre-compiled binaries can be found in the Releases section of the project on Github. The build step can be skipped, and these binaries may be used as described in the next sections.
On Linux
All Linux and Windows libraries and executables of soxy can be built on Linux.
Requirements
The following elements are required to build them:
make;clang;mingw-w64package on Arch, Debian and Ubuntu,mingw64-gccandmingw32-gccon Fedora (to build Windows binaries);gcc-multilibon Debian and Ubuntu to but i686 Linux binaries;- rustup installed (see next section).
Included services
By default both Static and Dynamic Virtual Channels are supported and
enabled in the ̀Makefile. It is possible to build soxy with the
support of a Static/Dynamic Virtual Channel only by editing
the VC variable at the beginning of the Makefile.
VC ?= dvc svc
By default all services are enabled in the Makefile. It is possible
to include services needed only by editing the SERVICES
variable at the beginning of the Makefile.
SERVICES ?= clipboard command forward ftp input socks5 stage0
Make Targets
By default all supported platforms (except macOS ones) are enabled in
the Makefile. It is possible to enable only the build of artifcats needed
by editing the three following variables at the beginning of the Makefile.
TARGETS_FRONTEND ?= i686-pc-windows-gnu x86_64-pc-windows-gnu i686-unknown-linux-gnu x86_64-unknown-linux-gnu
TARGETS_BACKEND ?= i686-pc-windows-gnu x86_64-pc-windows-gnu i686-unknown-linux-gnu x86_64-unknown-linux-gnu
TARGETS_STANDALONE ?= i686-pc-windows-gnu x86_64-pc-windows-gnu i686-unknown-linux-gnu x86_64-unknown-linux-gnu
TARGETS_SOXYREG ?= i686-pc-windows-gnu x86_64-pc-windows-gnu
It is also possible to override all default enabled parameters from the command line, e.g.:
VC=dvc SERVICES=socks5 TARGETS_FRONTEND=x86_64-unknown-linux-gnu TARGETS_BACKEND=x86_64-pc-windows-gnu TARGETS_STANDALONE= TARGETS_SOXYREG=x86_64-pc-windows-gnu make debug
The Makefile contains three main targets:
setup: invokesrustupto install all needed toolchains, targets and components for Rust;debug: builds non-stripped libraries and executables with debugging logs activated. Outputs to a repository nameddebug;release: builds stripped and optimized libraries and executables with informational logs for the frontend libraries and standalone binaries, but without any logs for the backend libraries and binaries. Outputs to a repository namedrelease.
The output hierarchy of the created repositories is the following:
├── backend
│   ├── i686-pc-windows-gnu
│   │   ├── soxy.dll
│   │   └── soxy.exe
│   ├── i686-unknown-linux-gnu
│   │   ├── libsoxy.so
│   │   └── soxy
│   ├── x86_64-pc-windows-gnu
│   │   ├── soxy.dll
│   │   └── soxy.exe
│   └── x86_64-unknown-linux-gnu
│       ├── libsoxy.so
│       └── soxy
├── frontend
│   ├── i686-pc-windows-gnu
│   │   └── soxy.dll
│   ├── i686-unknown-linux-gnu
│   │   └── libsoxy.so
│   ├── x86_64-pc-windows-gnu
│   │   └── soxy.dll
│   └── x86_64-unknown-linux-gnu
│       └── libsoxy.so
└── soxyreg
│   ├── i686-pc-windows-gnu
│   │   └── soxyreg.exe
│   ├── x86_64-pc-windows-gnu
│       └── soxyreg.exe
└── standalone
    ├── i686-pc-windows-gnu
    │   └── soxy_standalone.exe
    ├── i686-unknown-linux-gnu
    │   └── soxy_standalone
    ├── x86_64-pc-windows-gnu
    │   └── soxy_standalone.exe
    └── x86_64-unknown-linux-gnu
        └── soxy_standalone
On macOS
Only the frontend can be built on macOS. Proceed as follows.
For the debug version:
cd frontend
cargo build --features log
For the release version:
cd frontend
cargo build --release
This produces target/debug/libsoxy.dylib or target/release/libsoxy.dylib
installable as described in the next section.
🔌 Frontend Installation
For VMware Horizon Client and Windows native RDP client
On macOS
Copy libsoxy.dylib to /Applications/VMware Horizon Client.app/Contents/Library/pcoip/vchan_plugins/rdpvcbridge/.
On Linux
Copy the frontend library into the VMware rdpvcbridge directory:
sudo cp release/frontend/x86_64-unknown-linux-gnu/libsoxy.so /usr/lib/vmware/rdpvcbridge/
Note: on recent versions of VMware Horizon client, the directory has moved
to /usr/lib/omnissa/rdpvcbridge/.
On Windows
Register the frontend library for automatic loading by VMware
Horizon client. It is mandatory to use the same architecture version
(i.e. 32/64 bit version from
i686-pc-windows-gnu/x86_64-pc-windows-gnu) of soxyreg.exe than for
soxy.dll?
To use a Static Virtual Channel:
soxyreg.exe svc register soxy.dll
(x)or to use a Dynamic Virtual Channel:
soxyreg.exe dvc register soxy.dll
To uninstall the Static Virtual Channel:
soxyreg.exe svc unregister
(x)or to uninstall the Dynamic Virtual Channel:
soxyreg.exe dvc unregister
For FreeRDP and Remmina (Linux)
Create the FreeRDP plugin directory and copy the library to it. Be careful, the
name of the library must be libsoxy-client.so (not libsoxy.so) otherwise
the library will not be found by FreeRDP/Remmina:
-
for FreeRDP 2 on Arch:
sudo mkdir -p /usr/lib/freerdp2 sudo cp release/frontend/x86_64-unknown-linux-gnu/libsoxy.so /usr/lib/freerdp2/libsoxy-client.so -
for FreeRDP 2 on Debian/Ubuntu:
sudo mkdir -p /usr/lib/x86_64-linux-gnu/freerdp2 sudo cp release/frontend/x86_64-unknown-linux-gnu/libsoxy.so /usr/lib/x86_64-linux-gnu/freerdp2/libsoxy-client.so -
for FreeRDP 3 on Arch:
sudo mkdir -p /usr/lib/freerdp3 sudo cp release/frontend/x86_64-unknown-linux-gnu/libsoxy.so /usr/lib/freerdp3/libsoxy-client.so -
for FreeRDP 3 on Debian/Ubuntu:
sudo mkdir -p /usr/lib/x86_64-linux-gnu/freerdp3
sudo cp release/frontend/x86_64-unknown-linux-gnu/libsoxy.so /usr/lib/x86_64-linux-gnu/freerdp3/libsoxy-client.so
When you launch FreeRDP from the command line, you have to add the argument
/vc:soxy to tell FreeRDP to load the library and to use a Static Virtual Channel,
(x)or /dvc:soxy to use a Dynamic Virtual Channel, for example:
-
for FreeRDP 2 with a Static Virtual Channel:
xfreerdp /dynamic-resolution /log-level:INFO /v:192.168.42.42 /vc:soxy
or with Dynamic Virtual Channel:
xfreerdp /dynamic-resolution /log-level:INFO /v:192.168.42.42 /dvc:soxy
-
for FreeRDP 3 with a Static Virtual Channel:
sdl-freerdp3 /dynamic-resolution /log-level:INFO /v:192.168.42.42 /vc:soxy
or with Dynamic Virtual Channel:
sdl-freerdp3 /dynamic-resolution /log-level:INFO /v:192.168.42.42 /dvc:soxy
For Remmina, edit your RDP connection, go to the "Advanced" tab and set the
"Static virtual channel" (x)or "Dynamic virtual channel" parameter to soxy.
For Citrix Workspace App
On macOS
TODO
On Linux
First copy libsoxy.so to /opt/Citrix/ICAClient/, then modify
/opt/Citrix/ICAClient/config/module.ini:
- add
soxyin theVirtualDriverlist in the[ICA 3.0]section - in the same section, add the line
soxy=On - add a
[soxy]section containing the following line:DriverName = libsoxy.so
Be careful, only Static Virtual Channels are supported in the Citrix Linux client.
On Windows
First you must copy the 32 bits version of soxy.dll from
i686-pc-windows-gnu to C:\Program Files (x86)\Citrix\ICA Client,
then register it with the 32 bits version of soxyreg for
automatic loading by Citrix Workspace App; you need to run the command
with administrator privileges.
To use a Static Virtual Channel:
i686-pc-windows-gnu\soxyreg.exe svc register soxy.dll
(x)or to use a Dynamic Virtual Channel:
i686-pc-windows-gnu\soxyreg.exe dvc register soxy.dll
To uninstall the Static Virtual Channel:
i686-pc-windows-gnu\soxyreg.exe svc unregister
and to uninstall the Dynamic Virtual Channel:
i686-pc-windows-gnu\soxyreg.exe dvc unregister
Be careful, only Static Virtual Channels are supported by the Citrix Linux VDA.
Configuration file
When the frontend of soxy starts, it will look for a configuration
file at $HOME/.config/soxy.toml on Linux and macOS and at
{FOLDERID_Profile}/soxy.toml on Windows. If no configuration file is
found, it will be created with default values. Here is a complete
example of configuration file:
#Default virtual channel name.
channel = "SOXY"

#Default listen address for services. It can be overridden per service.
#Use "::1" to listen both on IPv4 and IPv6 on localhost.
#Use "::0" to listen both on IPv4 and IPv6 on all interfaces.
#Default value is "127.0.0.1".
ip = "127.0.0.1"

[log]
#Logging level: "OFF" or "ERROR" or "WARN" or "INFO" or "DEBUG" or "TRACE".
#Default value is "DEBUG" in debug targets and "INFO" in release targets.
level = "DEBUG"

#Default is to enable all available services on the global listen IP
#address and default ports.

[[services]]
name = "clipboard"
enabled = true
port = 3032

[[services]]
name = "command"
enabled = true
port = 3031

[[services]]
name = "ftp"
enabled = true
port = 2021

[[services]]
name = "input"
enabled = true
port = 1081

[[services]]
name = "socks5"
enabled = true
#Override the listen address of this service only
ip = "::0"
port = 1080

[[services]]
name = "stage0"
#Disable this service
enabled = false
port = 1082

#Examples of port forwarding configuration entries

[[forward]]
ip = "127.0.0.1"
port = 2222
destination = "localhost:22"

[[forward]]
ip = "127.0.0.1"
port = 8080
destination = "localhost:80"
🔌 Backend Installation
Using soxy.exe
Copy release/x86_64-pc-windows-gnu/soxy.exe to the Windows machine
you are connected to and execute it. On a Linux remote machine, use
release/x86_64-unknown-linux-gnu/soxy. You can override the default
virtual channel name (i.e. SOXY) by giving it as first and single
argument on the command line, e.g.:
soxy.exe MYCHAN
The virtual channel name is at most 7 ASCII characters.
(Alternative) Using the DLL/.so
Copy release/x86_64-pc-windows-gnu/soxy.dll and find your way to
load the DLL. For example, this can be done
thanks to rundll32.exe present on Windows with the following
command:
rundll32.exe soxy.dll,Main
The Main function executed by the above command is a simple infinite sleeping
loop, avoiding rundll32.exe from exiting, while the real work of soxy runs in
threads launched at loading time by the DllMain function present in the DLL.
If the DLL is loaded by a real binary/application, soxy will remain active until
the binary/application exits; you do not have to execute anything in the
library, everything will be done automatically at loading time.
💻 Usage
After setting up the client and running the backend, you can use the following services.
Accessing Services
As soon as your favorite client is set up and the backend code is running, you can start using soxy services from your client machine
Remote Clipboard
Connect to localhost:3032 on your client machine with a telnet command,
and use the available commands:
write xxxxorput xxxx: sets the remote clipboard to the valuexxxx;readorget: retrieves the content of the remote clipboard;exitorquit: closes the connection.
Remote Console/Shell
Connect to localhost:3031 on your client machine with a telnet command,
and use the available commands.
Remote Filesystem
Connect to localhost:2021 on your client machine with your favorite FTP client
to browse, upload, download files and directories accessible to the backend
user.
Input
Connect to localhost:1081 on your client machine with a telnet
command, and use one of the available commands below to
send input events. This service does not require a running backend,
only a loaded frontend.
delay <delay>where<delay>is a integer representing an amount of time in milliseconds: sets the default delay between two input events;pause <delay>where<delay>is a integer representing an amount of time in milliseconds: waits the given amount of time before sending the next input event;keydown <key>where<key>in a supported keyword associated to a keyboard key (seecommon/src/input/frontend.rsfor available keywords): presses the given keyboard key until the correspondingkeyup <key>command is emitted;key <key>where<key>in a supported keyword associated to a keyboard key (seecommon/src/input/frontend.rsfor available keywords): emulates the given key stroke (i.e. pressed then released);write <input>(resp.writeln <input>) where<input>a newline-terminated string: emulates the typing of the given text input on the keyboard (resp. including a carriage return at the end);cat <file path>where<file path>is a path to a "text" file: emulates the typing of the content of the given file on the keyboard;exitto quit the session.
In practice, the cat command permits to type the content of the
tools/stage0/stage0.ps1 script on a remote machine where the soxy
backend is not yet deployed, and then to use the Stage0 service of
soxy to transfer the soxy.exe (or soxy.dll) backend.
SOCKS5 Proxy
Configure on your client machine to use localhost:1080 as a SOCKS5 proxy.
Connections will originate from the remote host.
Stage0
Execute the script stage0.ps1 (which can be found in tools/stage0) on the remote machine:
powershell.exe -ExecutionPolicy Bypass -file stage0.ps1
Connect to localhost:1082 on your client machine with a telnet command,
and use the available commands:
send <file path>: sends the content of the file at the provided path, it will be stored in a file namedfavicon.isoin the directory where the previous script has been launched;exitto quit the session.
Troubleshooting
Citrix
If you get an error like failed to open channel handle: virtual channel open failed (last_error = 5)
it means there are restrictions on Citrix host virtual channels (default behavior
in last Citrix version). To fix this, if you have (local) administrator privileges,
you can disable Citrix restrictions on virtual channels (which is not recommended):
reg add HKLM\SOFTWARE\WOW6432Node\Policies\Citrix\VCPolicies /v VirtualChannelWhiteList /t REG_MULTI_SZ /d =disabled=
Or you can whitelist SOXY (or your custom virtual channel name) like
this if you have (local) administrator privileges:
reg add HKLM\SOFTWARE\WOW6432Node\Policies\Citrix\VCPolicies /v VirtualChannelWhiteList /t REG_MULTI_SZ /d SOXY,C:\Users\<USER>\<PATH_TO_SOXY_EXE>
Note that in both cases, you have to reboot the Citrix host afterward.
XRDP
Dynamic virtual channel with XRDP backend is experimental; please use static virtual channel which is working well.
The backend needs to be able to load libxrdpapi.so from the library path.
On most Linux distributions, it is not by default. You can add it on the
command line, e.g. for x86_64 on Debian:
LD_LIBRARY_PATH=/usr/lib/x86_64-linux-gnu/ soxy
If you get an error like failed to open channel handle: virtual channel open failed it means there are restrictions on XRDP host
virtual channels. To fix this, if you have (local) administrator
privileges, you can disable XRDP restrictions for this very specific
virtual channel. Edit /etc/xrdp/xrdp.ini, look for [Channels]
entry and add below SOXY=true.
Before version 0.10, you may not have such error and the backend could
seem to be working properly (channel opening is OK) but no service is
working. In this case, please have a look at XRDP logs (journalctl -u xdrp.service) to see if there is a message like Received a message for the disabled channel. If this is the case, you need to whitelist
the SOXY channel as described above.
🚧 Contributing
Adding a new service (let's called it ping) in soxy requires to develop a new
module in the common directory and to instantiate it in both the frontend
and the backend.
Steps
- Create a new module structure:
common/src/ping/
├── backend.rs
├── frontend.rs
└── mod.rs
-
Declare the new module in
common/src/lib.rs:mod ping; -
Instanciate a
service::Serviceinstatic const SERVICEincommon/src/ping/mod.rs; -
Update
common/src/service.rs:- Import the
pingmodule, - Add
&ping::SERVICEto theSERVICESarray at the end of the file.
- Import the
Refer to common/src/clipboard/ for an example.
🏢 License
This project is licensed under the GNU GPLv3 License. See the LICENSE file for details.
Similar repos
Languages
Rust
83.3%
C
7.0%
PowerShell
6.6%
Makefile
3.1%