Connect your browser to AI models. Just use Dia on Chrome, Arc or Firefox.
See the code

Star us ❤️ →




The open alternative to Dia / Perplexity Comet.
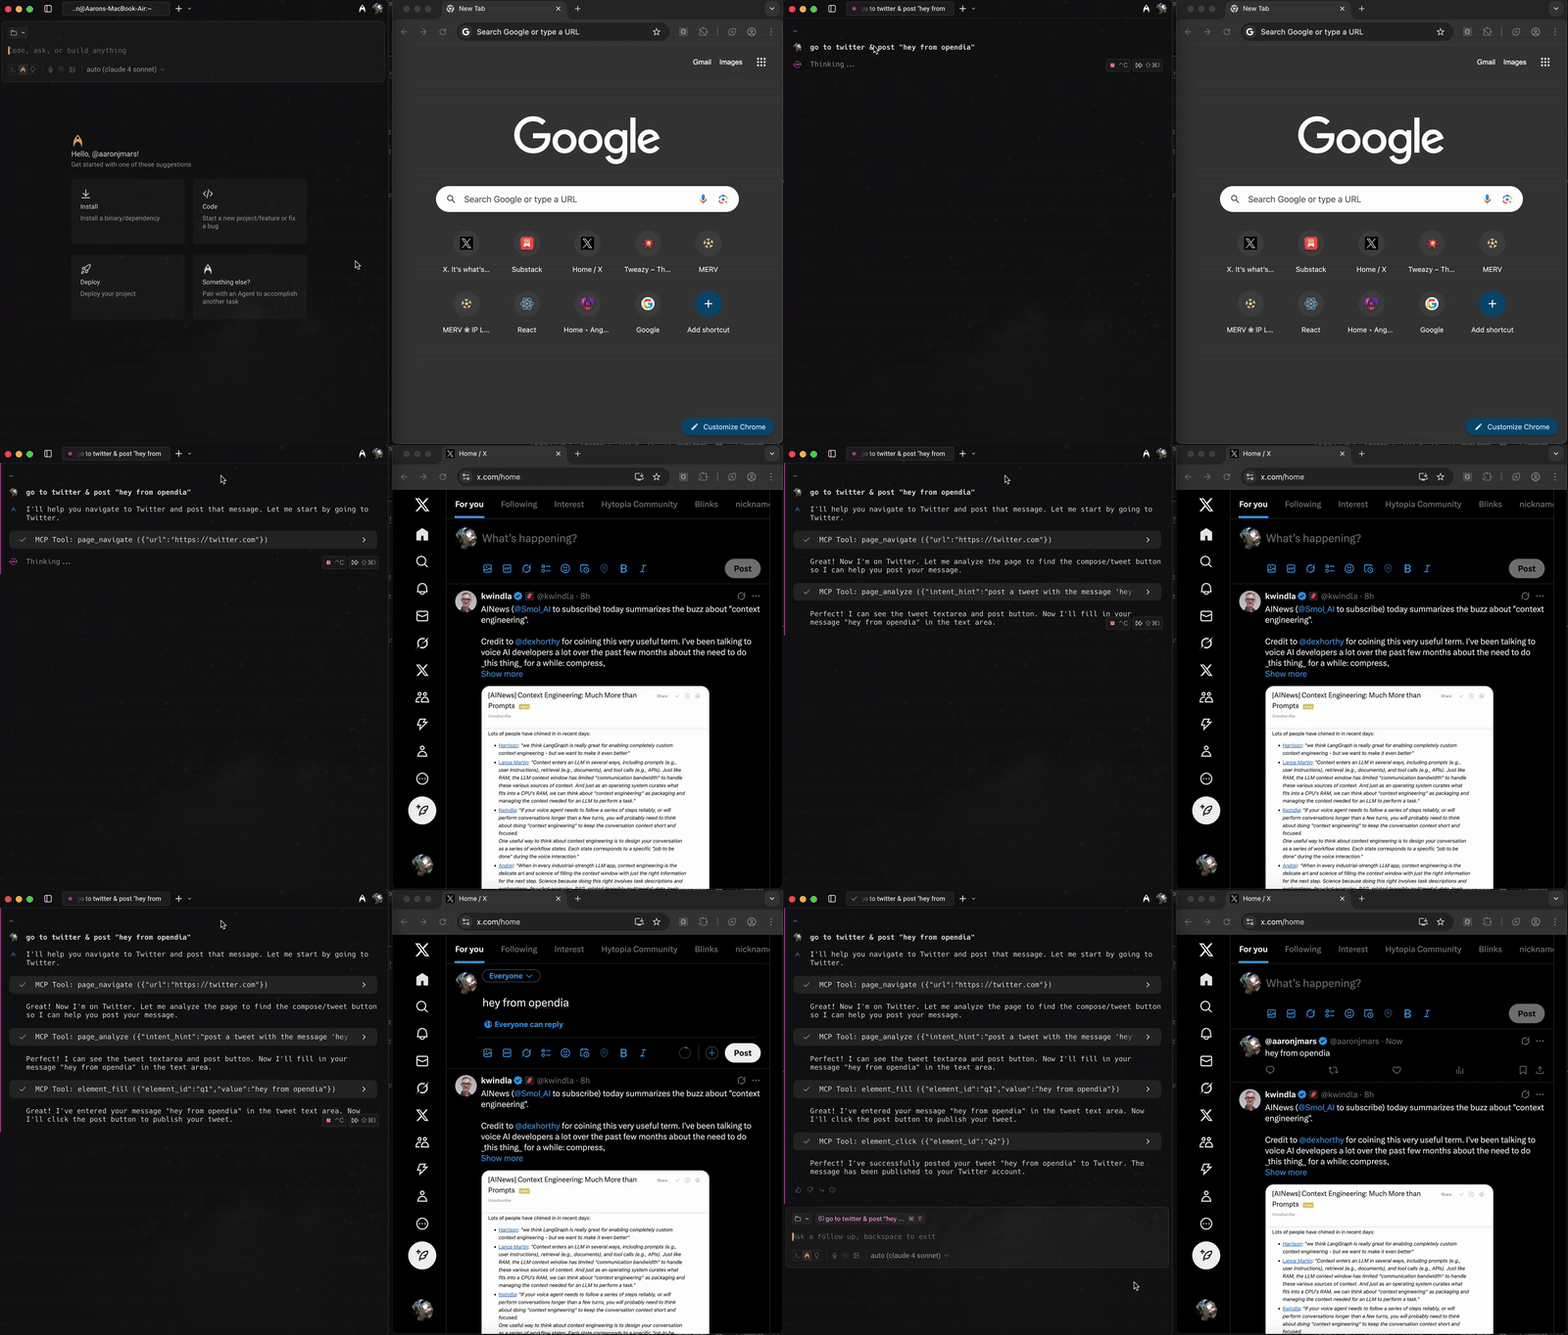
Connect your browser to AI models — no browser switching needed.
Works seamlessly with Chrome, Firefox, and any Chromium browser. Private, local-first & MCP focused.


New to MCPs, or not technical? We recommend Perplexity Comet.
OpenDia lets AI models control your browser automatically. The key advantage? It leverages everything you already have—your logged-in accounts, saved passwords, cookies, wallets, and browsing history. No need to start from scratch or switch contexts.
🔑 Use Your Existing Digital Life:
✨ Key Benefits:
Works with Chrome, Firefox, and any Chromium-based browser:
Also perfect for Cursor users who want to automate their local testing and development workflows!
OpenDia exposes a standard MCP server, so it works with any client that speaks the protocol.
Tested:
~/.grok/config.toml (see Grok Build below).npx opendia --tunnel), then add the ngrok URL as a connector.Should work (any MCP-compatible client): Windsurf, Zed, Continue, Cline, Goose, Open WebUI.
Wired it up with something else? Open a PR — the list grows as MCP grows.
Real workflows you can try today:
For Chrome/Chromium browsers:
opendia-chrome-*.zip from releaseschrome://extensions/ (or your browser's extension page)For Firefox:
opendia-firefox-*.zip from releasesabout:debugging#/runtime/this-firefoxmanifest.json file from the extracted folderNote: Firefox extensions are loaded as temporary add-ons and will be removed when Firefox restarts. This is a Firefox limitation for unsigned extensions.
Option 1: Double-click Installation (Recommended)
opendia.dxt file from releases.dxt file to install automaticallyThe DXT settings in Claude Desktop (WebSocket Port, HTTP Port, Auto-Tunnel,
Tunnel Auth Token) are passed to the server as the OPENDIA_* environment
variables described under Port Configuration. If you move
the HTTP port outside the ports the extension checks (5556-5558, 3001,
6001-6003), enter it under Custom HTTP Port in the extension popup. Safety
Mode is a toggle in the extension popup, not a DXT setting.
Option 2: Manual Configuration Add to your Claude Desktop configuration:
{
  "mcpServers": {
    "opendia": {
      "command": "npx",
      "args": ["opendia"]
    }
  }
}
For Cursor or other AI tools, use the same configuration or follow their specific setup instructions.
OpenDia ships a first-class Grok Build plugin under plugins/opendia/ (marketplace index: .grok-plugin/marketplace.json).
Option A — Plugin (recommended)
grok plugin marketplace add aeonfun/opendia
grok plugin install opendia --trust
Enable the plugin in /plugins (trust is required for MCP). Details, skills, and troubleshooting: plugins/opendia/README.md.
Option B — Manual config.toml
Add to ~/.grok/config.toml (or a project .grok/config.toml):
[mcp_servers.opendia]
command = "npx"
args = ["-y", "opendia"]
enabled = true
startup_timeout_sec = 60
Then install the browser extension and confirm it is connected to ws://localhost:5555.
grok mcp doctor opendia
npx opendia
# Use custom ports
npx opendia --port=6000              # Uses 6000 (WebSocket) + 6001 (HTTP)
npx opendia --ws-port=5555 --http-port=5556  # Specify individually

# Handle port conflicts
# Note: Existing OpenDia processes are automatically terminated on startup
The same settings can come from environment variables, which is how the Claude Desktop DXT applies its settings. A command-line flag always wins over the matching variable, and an empty variable counts as unset.
| Variable | Same as | Notes |
|---|---|---|
OPENDIA_WS_PORT | --ws-port= | Integer 1-65535 |
OPENDIA_HTTP_PORT | --http-port= | Integer 1-65535 |
OPENDIA_ENABLE_TUNNEL | --tunnel | 1, true or yes turns it on |
OPENDIA_TOKEN | --token= | Bearer token for tunnel mode |
The browser extension finds the server by checking HTTP ports 5556-5558, 3001 and 6001-6003. For any other HTTP port, enter it under Custom HTTP Port in the extension popup so it is checked first.
npx opendia --tunnel
Because the tunnel is public, /sse requires a bearer token in this mode. The
server prints one at startup; pass --token=<value> (or set OPENDIA_TOKEN) to
pin a fixed one across restarts. Send it with every request:
curl -H "Authorization: Bearer <token>" https://<tunnel>.ngrok-free.app/sse
Both listeners bind 127.0.0.1 by default, and ngrok connects from this machine,
so the tunnel works without widening anything. To expose the HTTP/SSE port on the
LAN deliberately:
npx opendia --http-host=0.0.0.0 # requires a token, same as --tunnel
The WebSocket extension channel always stays on loopback.
Note: For auto-tunneling to work, you need ngrok installed:
macOS:
brew install ngrok
Windows:
# Using Chocolatey
choco install ngrok

# Or download from https://ngrok.com/download
Linux:
# Ubuntu/Debian
curl -s https://ngrok-agent.s3.amazonaws.com/ngrok.asc | sudo tee /etc/apt/trusted.gpg.d/ngrok.asc >/dev/null
echo "deb https://ngrok-agent.s3.amazonaws.com buster main" | sudo tee /etc/apt/sources.list.d/ngrok.list
sudo apt update && sudo apt install ngrok

# Or download from https://ngrok.com/download
Then get your free authtoken from https://dashboard.ngrok.com/get-started/your-authtoken and run:
ngrok config add-authtoken YOUR_TOKEN_HERE
OpenDia gives AI models 18 powerful browser tools:
Once everything is set up, try asking your AI:
Content Creation:
"Read the article on this page and create a Twitter thread summarizing the main points"
Research & Analysis:
"Look through my browser history from this week and find articles about machine learning. Summarize the key trends."
Social Media Management:
"Check my Twitter bookmarks and organize them into categories. Create a summary of each category."
Productivity:
"Open tabs for my usual morning reading sites and give me a briefing of today's top stories"
Development Testing:
"Fill out this contact form with test data and check if the submission works properly"
Personal Assistant:
"Find that GitHub repo I was looking at yesterday about React components and bookmark it for later"
Page Styling & Fun:
"Apply a dark hacker theme to this page to make it look more interesting"
"Make this boring documentation page feel like a cozy coffee shop"
"Add some matrix rain effects to this page for 30 seconds for a cool screenshot"
"Transform this page with a high contrast theme for better readability"
graph LR
    A[AI Model] --> B[OpenDia Server]
    B --> C[Browser Extension]
    C --> D[Your Browser]
    D --> E[Any Website]
Your data stays private:
Important: This tool requires broad browser permissions to function. Only use with AI models you trust, and in environments where you're comfortable with browser automation.
Love to have your help making OpenDia better!
git clone https://github.com/aeonfun/opendia.git
cd opendia

# Start the server
cd opendia-mcp
npm install
npm start

# Load extension in your browser
# Chrome: Go to chrome://extensions/ → Developer mode → Load unpacked: ./opendia-extension/dist/chrome
# Firefox: Go to about:debugging#/runtime/this-firefox → Load Temporary Add-on → ./opendia-extension/dist/firefox/manifest.json
# Extension will auto-connect to server on localhost:5555
MIT License - see LICENSE for details.
Ready to supercharge your browser with AI? Get started with npx opendia! 🚀
Built by Aaron Elijah Mars, founder of Aeon and MiroShark · @aaronjmars
290 followers · starred Jul 2025
44 followers · starred Nov 2025
219 followers · starred Jul 2025
85 followers · starred Sep 2025
Connect your browser to AI models. Just use Dia on Chrome, Arc or Firefox.
See the code
Star us ❤️ →
The open alternative to Dia / Perplexity Comet.
Connect your browser to AI models — no browser switching needed.
Works seamlessly with Chrome, Firefox, and any Chromium browser. Private, local-first & MCP focused.
New to MCPs, or not technical? We recommend Perplexity Comet.
OpenDia lets AI models control your browser automatically. The key advantage? It leverages everything you already have—your logged-in accounts, saved passwords, cookies, wallets, and browsing history. No need to start from scratch or switch contexts.
🔑 Use Your Existing Digital Life:
✨ Key Benefits:
Works with Chrome, Firefox, and any Chromium-based browser:
Also perfect for Cursor users who want to automate their local testing and development workflows!
OpenDia exposes a standard MCP server, so it works with any client that speaks the protocol.
Tested:
~/.grok/config.toml (see Grok Build below).npx opendia --tunnel), then add the ngrok URL as a connector.Should work (any MCP-compatible client): Windsurf, Zed, Continue, Cline, Goose, Open WebUI.
Wired it up with something else? Open a PR — the list grows as MCP grows.
Real workflows you can try today:
For Chrome/Chromium browsers:
opendia-chrome-*.zip from releaseschrome://extensions/ (or your browser's extension page)For Firefox:
opendia-firefox-*.zip from releasesabout:debugging#/runtime/this-firefoxmanifest.json file from the extracted folderNote: Firefox extensions are loaded as temporary add-ons and will be removed when Firefox restarts. This is a Firefox limitation for unsigned extensions.
Option 1: Double-click Installation (Recommended)
opendia.dxt file from releases.dxt file to install automaticallyThe DXT settings in Claude Desktop (WebSocket Port, HTTP Port, Auto-Tunnel,
Tunnel Auth Token) are passed to the server as the OPENDIA_* environment
variables described under Port Configuration. If you move
the HTTP port outside the ports the extension checks (5556-5558, 3001,
6001-6003), enter it under Custom HTTP Port in the extension popup. Safety
Mode is a toggle in the extension popup, not a DXT setting.
Option 2: Manual Configuration Add to your Claude Desktop configuration:
{
  "mcpServers": {
    "opendia": {
      "command": "npx",
      "args": ["opendia"]
    }
  }
}
For Cursor or other AI tools, use the same configuration or follow their specific setup instructions.
OpenDia ships a first-class Grok Build plugin under plugins/opendia/ (marketplace index: .grok-plugin/marketplace.json).
Option A — Plugin (recommended)
grok plugin marketplace add aeonfun/opendia
grok plugin install opendia --trust
Enable the plugin in /plugins (trust is required for MCP). Details, skills, and troubleshooting: plugins/opendia/README.md.
Option B — Manual config.toml
Add to ~/.grok/config.toml (or a project .grok/config.toml):
[mcp_servers.opendia]
command = "npx"
args = ["-y", "opendia"]
enabled = true
startup_timeout_sec = 60
Then install the browser extension and confirm it is connected to ws://localhost:5555.
grok mcp doctor opendia
npx opendia
# Use custom ports
npx opendia --port=6000              # Uses 6000 (WebSocket) + 6001 (HTTP)
npx opendia --ws-port=5555 --http-port=5556  # Specify individually

# Handle port conflicts
# Note: Existing OpenDia processes are automatically terminated on startup
The same settings can come from environment variables, which is how the Claude Desktop DXT applies its settings. A command-line flag always wins over the matching variable, and an empty variable counts as unset.
| Variable | Same as | Notes |
|---|---|---|
OPENDIA_WS_PORT | --ws-port= | Integer 1-65535 |
OPENDIA_HTTP_PORT | --http-port= | Integer 1-65535 |
OPENDIA_ENABLE_TUNNEL | --tunnel | 1, true or yes turns it on |
OPENDIA_TOKEN | --token= | Bearer token for tunnel mode |
The browser extension finds the server by checking HTTP ports 5556-5558, 3001 and 6001-6003. For any other HTTP port, enter it under Custom HTTP Port in the extension popup so it is checked first.
npx opendia --tunnel
Because the tunnel is public, /sse requires a bearer token in this mode. The
server prints one at startup; pass --token=<value> (or set OPENDIA_TOKEN) to
pin a fixed one across restarts. Send it with every request:
curl -H "Authorization: Bearer <token>" https://<tunnel>.ngrok-free.app/sse
Both listeners bind 127.0.0.1 by default, and ngrok connects from this machine,
so the tunnel works without widening anything. To expose the HTTP/SSE port on the
LAN deliberately:
npx opendia --http-host=0.0.0.0 # requires a token, same as --tunnel
The WebSocket extension channel always stays on loopback.
Note: For auto-tunneling to work, you need ngrok installed:
macOS:
brew install ngrok
Windows:
# Using Chocolatey
choco install ngrok

# Or download from https://ngrok.com/download
Linux:
# Ubuntu/Debian
curl -s https://ngrok-agent.s3.amazonaws.com/ngrok.asc | sudo tee /etc/apt/trusted.gpg.d/ngrok.asc >/dev/null
echo "deb https://ngrok-agent.s3.amazonaws.com buster main" | sudo tee /etc/apt/sources.list.d/ngrok.list
sudo apt update && sudo apt install ngrok

# Or download from https://ngrok.com/download
Then get your free authtoken from https://dashboard.ngrok.com/get-started/your-authtoken and run:
ngrok config add-authtoken YOUR_TOKEN_HERE
OpenDia gives AI models 18 powerful browser tools:
Once everything is set up, try asking your AI:
Content Creation:
"Read the article on this page and create a Twitter thread summarizing the main points"
Research & Analysis:
"Look through my browser history from this week and find articles about machine learning. Summarize the key trends."
Social Media Management:
"Check my Twitter bookmarks and organize them into categories. Create a summary of each category."
Productivity:
"Open tabs for my usual morning reading sites and give me a briefing of today's top stories"
Development Testing:
"Fill out this contact form with test data and check if the submission works properly"
Personal Assistant:
"Find that GitHub repo I was looking at yesterday about React components and bookmark it for later"
Page Styling & Fun:
"Apply a dark hacker theme to this page to make it look more interesting"
"Make this boring documentation page feel like a cozy coffee shop"
"Add some matrix rain effects to this page for 30 seconds for a cool screenshot"
"Transform this page with a high contrast theme for better readability"
graph LR
    A[AI Model] --> B[OpenDia Server]
    B --> C[Browser Extension]
    C --> D[Your Browser]
    D --> E[Any Website]
Your data stays private:
Important: This tool requires broad browser permissions to function. Only use with AI models you trust, and in environments where you're comfortable with browser automation.
Love to have your help making OpenDia better!
git clone https://github.com/aeonfun/opendia.git
cd opendia

# Start the server
cd opendia-mcp
npm install
npm start

# Load extension in your browser
# Chrome: Go to chrome://extensions/ → Developer mode → Load unpacked: ./opendia-extension/dist/chrome
# Firefox: Go to about:debugging#/runtime/this-firefox → Load Temporary Add-on → ./opendia-extension/dist/firefox/manifest.json
# Extension will auto-connect to server on localhost:5555
MIT License - see LICENSE for details.
Ready to supercharge your browser with AI? Get started with npx opendia! 🚀
Built by Aaron Elijah Mars, founder of Aeon and MiroShark · @aaronjmars
290 followers · starred Jul 2025
44 followers · starred Nov 2025
219 followers · starred Jul 2025
85 followers · starred Sep 2025