

<dependency>
  <groupId>com.yubico</groupId>
  <artifactId>webauthn-server-core</artifactId>
  <version>2.10.1</version>
  <scope>compile</scope>
</dependency>
Server-side Web Authentication library for Java https://www.w3.org/TR/webauthn/#rp-operations
Scala
564
3,287 commits
updated Oct 13, 2026



Server-side Web Authentication library for Java. Provides implementations of the Relying Party operations required for a server to support Web Authentication, including passkey authentication.
|
Warning
|
Psychic signatures in Java
In April 2022, CVE-2022-21449 was disclosed in Oracle’s OpenJDK (and other JVMs derived from it) which can impact applications using java-webauthn-server. The impact is that for the most common type of WebAuthn credential, invalid signatures are accepted as valid, allowing authentication bypass for users with such a credential. Please read Oracle’s advisory and make sure you are not using one of the impacted OpenJDK versions. If you are, we urge you to upgrade your Java deployment to a version that is safe. |
Table of contents
1.xGenerates request objects suitable as parameters to
navigator.credentials.create() and .get()
Performs all necessary validation logic on the response from the client
No mutable state or side effects - everything (except builders) is thread safe
Optionally integrates with an "attestation trust source" to verify authenticator attestations
Reproducible builds: release signatures match fresh builds from source. See Reproducible builds below.
This library has no concept of accounts, sessions, permissions or identity federation, and it is not an authentication framework; it only deals with executing the WebAuthn authentication mechanism. Sessions, account management and other higher level concepts can make use of this authentication mechanism, but the authentication mechanism alone does not make a security system.
Maven:
<dependency> <groupId>com.yubico</groupId> <artifactId>webauthn-server-core</artifactId> <version>2.10.1</version> <scope>compile</scope> </dependency>
Gradle:
implementation("com.yubico:webauthn-server-core:2.10.1")
|
Note
| You may need additional dependencies with JCA providers to support some signature algorithms. In particular, OpenJDK 14 and earlier does not include providers for the EdDSA family of algorithms and OpenJDK 23 and earlier does not include providers for ML-DSA. The library will log warnings if you try to configure it for algorithms with no JCA provider available. |
This library uses semantic versioning.
The public API consists of all public classes, methods and fields in the com.yubico.webauthn package and its subpackages,
i.e., everything covered by the
Javadoc,
with the exception of features annotated with a @Deprecated annotation and a
@deprecated EXPERIMENTAL: tag in JavaDoc.
Such features are considered unstable and may receive breaking changes without a
major version increase.
Package-private classes and methods are NOT part of the public API.
The com.yubico:yubico-util module is NOT part of the public API.
Breaking changes to these will NOT be reflected in version numbers.
In addition to the main webauthn-server-core module, there is also:
webauthn-server-attestation: Integration with the FIDO Metadata Service
for retrieving and selecting trust roots to use for verifying
attestation statements.
See the Javadoc for in-depth API documentation.
Using this library comes in two parts: the server side and the client side. The server side involves:
Implement the
CredentialRepository
interface with your database access logic.
Instantiate the
RelyingParty
class.
Use the
RelyingParty.startRegistration(...)
and
RelyingParty.finishRegistration(...)
methods to perform registration ceremonies.
Use the
RelyingParty.startAssertion(...)
and
RelyingParty.finishAssertion(...)
methods to perform authentication ceremonies.
Optionally use additional features: passkeys, passwordless multi-factor authentication, credential backup state.
The client side involves:
Call navigator.credentials.create() or .get(),
passing the result from RelyingParty.startRegistration(...) or .startAssertion(...) as the argument.
Encode the result of the successfully resolved promise and return it to the server.
For this you need some way to encode Uint8Array values;
this guide will use GitHub’s webauthn-json library.
Example code is given below.
For more detailed example usage, see
webauthn-server-demo for a complete demo server.
CredentialRepositoryThe
CredentialRepository
interface abstracts your database in a database-agnostic way.
The concrete implementation will be different for every project, but you can use
InMemoryRegistrationStorage
as a simple example.
RelyingPartyThe
RelyingParty
class is the main entry point to the library.
You can instantiate it using its builder methods,
passing in your
CredentialRepository
implementation (called MyCredentialRepository here) as an argument:
RelyingPartyIdentity rpIdentity = RelyingPartyIdentity.builder()
    .id("example.com")  // Set this to a parent domain that covers all subdomains
                        // where users' credentials should be valid
    .name("Example Application")
    .build();

RelyingParty rp = RelyingParty.builder()
    .identity(rpIdentity)
    .credentialRepository(new MyCredentialRepository())
.build();A registration ceremony consists of 5 main steps:
Generate registration parameters using
RelyingParty.startRegistration(...).
Send registration parameters to the client and call
navigator.credentials.create().
With cred as the result of the successfully resolved promise,
call cred.getClientExtensionResults()
and cred.response.getTransports()
and return their results along with cred to the server.
Validate the response using
RelyingParty.finishRegistration(...).
Update your database using the finishRegistration output.
This example uses GitHub’s webauthn-json library to do both (2) and (3) in one function call.
First, generate registration parameters and send them to the client:
Optional<UserIdentity> findExistingUser(String username) { /* ... */ }

PublicKeyCredentialCreationOptions request = rp.startRegistration(
  StartRegistrationOptions.builder()
    .user(
        findExistingUser("alice")
            .orElseGet(() -> {
                byte[] userHandle = new byte[64];
                random.nextBytes(userHandle);
                return UserIdentity.builder()
                    .name("alice")
                    .displayName("Alice Hypothetical")
                    .id(new ByteArray(userHandle))
                    .build();
            })
    )
    .build());

String credentialCreateJson = request.toCredentialsCreateJson();
return credentialCreateJson;  // Send to client
You will need to keep this
PublicKeyCredentialCreationOptions
object in temporary storage
so you can also pass it into
RelyingParty.finishRegistration(...)
later.
If needed, you can use the
toJson()
and
fromJson(String)
methods to serialize and deserialize the value for storage.
Now call the WebAuthn API on the client side:
import * as webauthnJson from "@github/webauthn-json";

// Make the call that returns the credentialCreateJson above
const credentialCreateOptions = await fetch(/* ... */).then(resp => resp.json());

// Call WebAuthn ceremony using webauthn-json wrapper
const publicKeyCredential = await webauthnJson.create(credentialCreateOptions);

// Return encoded PublicKeyCredential to server
fetch(/* ... */, { body: JSON.stringify(publicKeyCredential) });
Validate the response on the server side:
String publicKeyCredentialJson = /* ... */;     // publicKeyCredential from client
PublicKeyCredential<AuthenticatorAttestationResponse, ClientRegistrationExtensionOutputs> pkc =
    PublicKeyCredential.parseRegistrationResponseJson(publicKeyCredentialJson);

try {
    RegistrationResult result = rp.finishRegistration(FinishRegistrationOptions.builder()
        .request(request)  // The PublicKeyCredentialCreationOptions from startRegistration above
                           // NOTE: Must be stored in server memory or otherwise protected against tampering
        .response(pkc)
        .build());
} catch (RegistrationFailedException e) { /* ... */ }
Finally, if the previous step was successful, store the new credential in your database. Here is an example of things you will likely want to store:
storeCredential(              // Some database access method of your own design
  "alice",                    // Username or other appropriate user identifier
  result.getKeyId(),          // Credential ID and transports for allowCredentials
  result.getPublicKeyCose(),  // Public key for verifying authentication signatures
  result.getSignatureCount(), // Initial signature counter value
  result.isDiscoverable(),    // Is this a passkey?
  result.isBackupEligible(),  // Can this credential be backed up (synced)?
  result.isBackedUp(),        // Is this credential currently backed up?
  pkc.getResponse().getAttestationObject(), // Store attestation object for future reference
  pkc.getResponse().getClientDataJSON()     // Store client data for re-verifying signature if needed
);Like registration ceremonies, an authentication ceremony consists of 5 main steps:
Generate authentication parameters using
RelyingParty.startAssertion(...).
Send authentication parameters to the client, call
navigator.credentials.get()
and return the response.
With cred as the result of the successfully resolved promise, call
cred.getClientExtensionResults()
and return the result along with cred to the server.
Validate the response using
RelyingParty.finishAssertion(...).
Update your database using the finishAssertion output, and act upon the result (for example, grant login access).
This example uses GitHub’s webauthn-json library to do both (2) and (3) in one function call.
First, generate authentication parameters and send them to the client:
AssertionRequest request = rp.startAssertion(StartAssertionOptions.builder()
    .username("alice")     // Or .userHandle(ByteArray) if preferred
    .build());
String credentialGetJson = request.toCredentialsGetJson();
return credentialGetJson;  // Send to client
Again, you will need to keep this
AssertionRequest
object in temporary storage
so you can also pass it into
RelyingParty.finishAssertion(...)
later.
If needed, you can use the
toJson()
and
fromJson(String)
methods to serialize and deserialize the value for storage.
Now call the WebAuthn API on the client side:
import * as webauthnJson from "@github/webauthn-json";

// Make the call that returns the credentialGetJson above
const credentialGetOptions = await fetch(/* ... */).then(resp => resp.json());

// Call WebAuthn ceremony using webauthn-json wrapper
const publicKeyCredential = await webauthnJson.get(credentialGetOptions);

// Return encoded PublicKeyCredential to server
fetch(/* ... */, { body: JSON.stringify(publicKeyCredential) });
Validate the response on the server side:
String publicKeyCredentialJson = /* ... */;  // publicKeyCredential from client
PublicKeyCredential<AuthenticatorAssertionResponse, ClientAssertionExtensionOutputs> pkc =
    PublicKeyCredential.parseAssertionResponseJson(publicKeyCredentialJson);

try {
    AssertionResult result = rp.finishAssertion(FinishAssertionOptions.builder()
        .request(request)  // The PublicKeyCredentialRequestOptions from startAssertion above
        .response(pkc)
        .build());

    if (result.isSuccess()) {
        return result.getUsername();
    }
} catch (AssertionFailedException e) { /* ... */ }
throw new RuntimeException("Authentication failed");
Finally, if the previous step was successful, update your database using the
AssertionResult.
Most importantly, you should update the signature counter. That might look something like this:
updateCredential(              // Some database access method of your own design
  "alice",                     // Query by username or other appropriate user identifier
  result.getCredentialId(),    // Query by credential ID of the credential used
  result.getSignatureCount(),  // Set new signature counter value
  result.isBackedUp(),         // Set new backup state flag
  Clock.systemUTC().instant()  // Set time of last use (now)
);
Then do whatever else you need - for example, initiate a user session.
WebAuthn supports a number of additional features beyond the basics:
Passkeys: passwordless, username-less authentication. Try it on passkey.org!
User verification: passwordless, streamlined multi-factor authentication.
Autofill UI: Unintrusive passkey integration in traditional login forms.
Credential backup state: hints on how vulnerable the user is to authenticator loss.
A passkey is a WebAuthn credential that can simultaneously both identify and authenticate the user.
This is also called a discoverable credential.
By default, credentials are created non-discoverable, which means the server
must list them in the
allowCredentials
parameter before the user can use them to authenticate.
This is typically because the credential private key is not stored within the authenticator,
but instead encoded into one of the credential IDs in allowCredentials.
This way even a small hardware authenticator can have an unlimited credential capacity,
but with the drawback that the user must first identify themself to the server
so the server can retrieve the correct allowCredentials list.
Passkeys are instead stored within the authenticator, and also include the user’s user handle in addition to the credential ID. This way the user can be both identified and authenticated simultaneously. Many passkey-capable authenticators also offer a credential sync mechanism to allow one passkey to be used on multiple devices.
Passkeys can be created by setting the
authenticatorSelection.residentKey
option to
REQUIRED:
PublicKeyCredentialCreationOptions request = rp.startRegistration(
  StartRegistrationOptions.builder()
    .user(/* ... */)
    .authenticatorSelection(AuthenticatorSelectionCriteria.builder()
        .residentKey(ResidentKeyRequirement.REQUIRED)
        .build())
    .build());
The username can then be omitted when starting an authentication ceremony:
AssertionRequest request = rp.startAssertion(StartAssertionOptions.builder().build());Some authenticators might create passkeys even if not required, and setting
the
residentKey
option to
PREFERRED
will create a passkey if the authenticator supports it.
The
RegistrationResult.isDiscoverable()
method can be used to determine whether the created credential is a passkey.
This requires the
credProps extension
to be enabled, which it is by default.
User verification can be enforced independently per authentication ceremony:
AssertionRequest request = rp.startAssertion(StartAssertionOptions.builder()
    .username("alice")
    .userVerification(UserVerificationRequirement.REQUIRED)
    .build());
Then
RelyingParty.finishAssertion(...)
will enforce that user verification was performed.
However, there is no guarantee that the user’s authenticator will support this
unless the user has some credential created with the
authenticatorSelection.userVerification
option set:
PublicKeyCredentialCreationOptions request = rp.startRegistration(
  StartRegistrationOptions.builder()
    .user(/* ... */)
    .authenticatorSelection(AuthenticatorSelectionCriteria.builder()
        .userVerification(UserVerificationRequirement.REQUIRED)
        .build())
    .build());
You can also request that user verification be used if possible, but is not required:
PublicKeyCredentialCreationOptions request = rp.startRegistration(
  StartRegistrationOptions.builder()
    .user(/* ... */)
    .authenticatorSelection(AuthenticatorSelectionCriteria.builder()
        .userVerification(UserVerificationRequirement.PREFERRED)
        .build())
    .build());

AssertionRequest request = rp.startAssertion(StartAssertionOptions.builder()
    .username("alice")
    .userVerification(UserVerificationRequirement.PREFERRED)
    .build());
In this case
RelyingParty.finishRegistration(...)
and
RelyingParty.finishAssertion(...)
will NOT enforce user verification,
but instead the isUserVerified() method of
RegistrationResult
and
AssertionResult
will tell whether user verification was used.
For example, you could prompt for a password as the second factor if isUserVerified() returns false:
AssertionResult result = rp.finishAssertion(/* ... */);

if (result.isSuccess()) {
    if (result.isUserVerified()) {
        return successfulLogin(result.getUsername());
    } else {
        return passwordRequired(result.getUsername());
    }
}
User verification can be used with both discoverable credentials (passkeys) and non-discoverable credentials.
Passkeys on platform authenticators may also support the WebAuthn autofill UI, also known as "conditional mediation". This can help onboard users who are unfamiliar with a fully username-less login flow, allowing a familiar username input field to opportunistically offer a shortcut using a passkey if the user has one on their device.
This library is compatible with the autofill UI but provides no server-side options for it, because the steps to enable it are taken on the front-end side. Using autofill UI does not affect the response verification procedure.
See the guide on passkeys.dev for complete instructions on how to enable the autofill UI. In particular you need to:
Add the credential request option mediation: "conditional"
alongside the publicKey option generated by
RelyingParty.startAssertion(...),
Add autocomplete="username webauthn" to a username input field on the page, and
Call navigator.credentials.get() in the background.
If the Promise resolves, handle it like any other assertion response as described in 4. Authentication above.
Because of technical limitations, autofill UI is as of May 2023 only supported for platform credentials, i.e., passkeys stored on the user’s computing devices. Autofill UI might support passkeys on external security keys in the future.
Some authenticators may allow credentials to be backed up and/or synced between devices.
This capability and its current state is signaled via the
Credential Backup State flags,
which are available via the isBackedUp() and isBackupEligible() methods of
RegistrationResult
and
AssertionResult.
These can be used as a hint about how vulnerable a user is to authenticator loss.
In particular, a user with only one credential which is not backed up
may risk getting locked out if they lose their authenticator.
1.xSee the migration guide.
This section is only relevant for applications that have user credentials registered via the U2F JavaScript API. New WebAuthn deployments can skip this section.
The WebAuthn API is backwards-compatible with U2F authenticators, and credentials registered via the U2F API will continue to work with the WebAuthn API with the right settings.
To migrate to using the WebAuthn API, you need to do the following:
Follow the Getting started guide above to set up WebAuthn support in general.
Note that unlike a U2F AppID, the WebAuthn RP ID consists of only the domain name of the AppID. WebAuthn does not support U2F Trusted Facet Lists.
Set the
appId()
setting on your
RelyingParty
instance.
The argument to the appid() setting should be the same as you used for the appId argument to the
U2F register and sign functions.
This will enable the appid
and appidExclude
extensions and configure the RelyingParty to accept the given AppId when verifying authenticator signatures.
Generate a user handle for each existing user and store it in their account, or decide on a method for deriving one deterministically from existing user attributes. For example, if your user records are assigned UUIDs, you can use that UUID as the user handle. You SHOULD NOT use a plain username or e-mail address, or hash of either, as the user handle - for more on this, see the User Handle Contents privacy consideration.
When your
CredentialRepository
creates a
RegisteredCredential
for a U2F credential,
use the U2F key handle as the
credential ID.
If you store key handles base64 encoded, you should decode them using
ByteArray.fromBase64
or
ByteArray.fromBase64Url
as appropriate before passing them to the RegisteredCredential.
When your CredentialRepository creates a RegisteredCredential for a U2F credential,
use the
publicKeyEs256Raw()
method instead of publicKeyCose()
to set the credential public key.
Replace calls to the U2F
register
method with calls to navigator.credentials.create() as described in Getting started.
Replace calls to the U2F
sign
method with calls to navigator.credentials.get() as described in Getting started.
Existing U2F credentials should now work with the WebAuthn API.
Note that new credentials registered on U2F authenticators via the WebAuthn API are NOT backwards compatible with the U2F JavaScript API.
The library tries to place as few requirements on the overall application architecture as possible. For this reason it is stateless and free from side effects, and does not directly interact with any database. This means it is database agnostic and thread safe. The following diagram illustrates an example architecture for an application using the library.
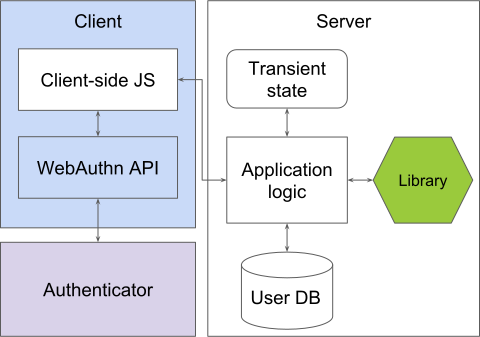
The application manages all state and database access, and communicates with the library via POJO representations of requests and responses. The following diagram illustrates the data flow during a WebAuthn registration or authentication ceremony.
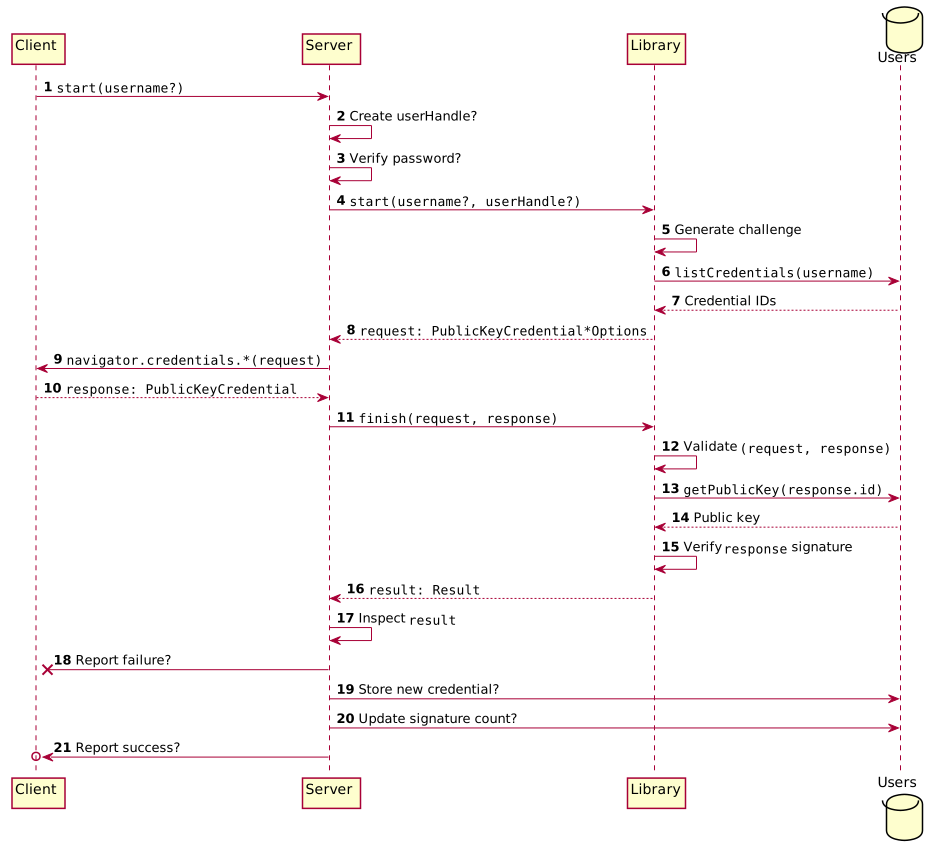
In this diagram, the Client is the user’s browser and the application’s client-side scripts. The Server is the application and its business logic, the Library is this library, and the Users database stores registered WebAuthn credentials.
The client requests to start the ceremony, for example by submitting a form.
The username may or may not be known at this point. For example, the user
might be requesting to create a new account, or we might be using
username-less authentication.
If the user does not already have a user handle, the application creates one in some application-specific way.
The application may choose to authenticate the user with a password or the like before proceeding.
The application calls one of the library’s "start" methods to generate a
parameter object to be passed to navigator.credentials.create() or .get()
on the client.
The library generates a random challenge and an assortment of other arguments depending on configuration set by the application.
If the username is known, the library uses a read-only database adapter
provided by the application to look up the user’s credentials.
The returned list of credential
IDs is used to populate the
excludeCredentials
or
allowCredentials
parameter.
The library returns a request object which can be serialized to JSON and
passed as the publicKey argument to navigator.credentials.create() or
.get(). For registration ceremonies this will be a
PublicKeyCredentialCreationOptions,
and for authentication ceremonies it will be a
PublicKeyCredentialRequestOptions.
The application stores the request in temporary storage.
The application’s client-side script runs navigator.credentials.create() or
.get() with request as the publicKey argument.
The user confirms the operation and the client returns a
PublicKeyCredential
object response to the application.
The application retrieves the request from temporary storage and passes
request and response to one of the library’s "finish" methods to run the
response validation logic.
The library verifies that the response contents - challenge, origin, etc. -
are valid.
If this is an authentication ceremony, the library uses the database adapter
to look up the public key for the credential named in response.id.
The database adapter returns the public key.
The library verifies the authentication signature.
The library returns a POJO representation of the result of the ceremony. For registration ceremonies, this will include the credential ID and public key of the new credential. The application may opt in to also getting information about the authenticator model and whether the authenticator attestation is trusted. For authentication ceremonies, this will include the username and user handle, the credential ID of the credential used, and the new signature counter value for the credential.
The application inspects the result object and takes any appropriate actions as defined by its business logic.
If the result is not satisfactory, the application reports failure to the client.
If the result is satisfactory, the application proceeds with storing the new credential if this is a registration ceremony.
If this is an authentication ceremony, the application updates the signature counter stored in the database for the credential.
Finally, the application reports success and resumes its business logic.
WebAuthn supports authenticator attestation, which provides a way for the web service to request cryptographic proof of what authenticator the user is using. Most services do not need this, and it is disabled by default.
The webauthn-server-attestation module
provides optional additional features for working with attestation.
See the module documentation for more details.
Alternatively, you can use the
AttestationTrustSource
interface to implement your own source of attestation root certificates
and set it as the
attestationTrustSource
for your
RelyingParty
instance.
Note that depending on your JCA provider configuration, you may need to set the
enableRevocationChecking
and/or
policyTreeValidator
settings for compatibility with some authenticators' attestation certificates.
See the JavaDoc for these settings for more information.
Use the included
Gradle wrapper to
build the .jar artifact:
$ ./gradlew :webauthn-server-core:jarThe output is built in the webauthn-server-core/build/libs/ directory, and the
version is derived from the most recent Git tag. Builds done on a tagged commit
will have a plain x.y.z version number, while a build on any other commit will
result in a version number containing the abbreviated commit hash.
To run the tests:
$ ./gradlew checkTo run the PIT mutation tests (this may take upwards of 30 minutes):
$ ./gradlew pitestStarting in version 1.4.0-RC2, artifacts are built reproducibly. Fresh builds from
tagged commits should therefore be verifiable by signatures from Maven Central
and GitHub releases:
$ git checkout 1.4.0-RC2
$ ./gradlew :webauthn-server-core:jar

$ wget https://repo1.maven.org/maven2/com/yubico/webauthn-server-core/1.4.0-RC2/webauthn-server-core-1.4.0-RC2.jar.asc
$ gpg --verify webauthn-server-core-1.4.0-RC2.jar.asc webauthn-server-core/build/libs/webauthn-server-core-1.4.0-RC2.jar

$ wget https://github.com/Yubico/java-webauthn-server/releases/download/1.4.0-RC2/webauthn-server-core-1.4.0-RC2.jar.asc
$ gpg --verify webauthn-server-core-1.4.0-RC2.jar.asc webauthn-server-core/build/libs/webauthn-server-core-1.4.0-RC2.jar
Note that building with a different JDK may produce a different artifact. To ensure binary reproducibility, please build with the same JDK as specified in the release notes. Reproducible builds also require building from a Git repository, since the build embeds version number and Git commit ID into the built artifacts.
Official Yubico software signing keys are listed on the Yubico Developers site.
See the developer docs.
See SECURITY.md.
249 followers · starred Oct 2024
133 followers · starred Jun 2024
90 followers · starred Jan 2019
16 followers · starred Mar 2024
Server-side Web Authentication library for Java https://www.w3.org/TR/webauthn/#rp-operations
Scala
564
3,287 commits
updated Oct 13, 2026
Server-side Web Authentication library for Java. Provides implementations of the Relying Party operations required for a server to support Web Authentication, including passkey authentication.
|
Warning
|
Psychic signatures in Java
In April 2022, CVE-2022-21449 was disclosed in Oracle’s OpenJDK (and other JVMs derived from it) which can impact applications using java-webauthn-server. The impact is that for the most common type of WebAuthn credential, invalid signatures are accepted as valid, allowing authentication bypass for users with such a credential. Please read Oracle’s advisory and make sure you are not using one of the impacted OpenJDK versions. If you are, we urge you to upgrade your Java deployment to a version that is safe. |
Table of contents
1.xGenerates request objects suitable as parameters to
navigator.credentials.create() and .get()
Performs all necessary validation logic on the response from the client
No mutable state or side effects - everything (except builders) is thread safe
Optionally integrates with an "attestation trust source" to verify authenticator attestations
Reproducible builds: release signatures match fresh builds from source. See Reproducible builds below.
This library has no concept of accounts, sessions, permissions or identity federation, and it is not an authentication framework; it only deals with executing the WebAuthn authentication mechanism. Sessions, account management and other higher level concepts can make use of this authentication mechanism, but the authentication mechanism alone does not make a security system.
Maven:
<dependency>
  <groupId>com.yubico</groupId>
  <artifactId>webauthn-server-core</artifactId>
  <version>2.10.1</version>
  <scope>compile</scope>
</dependency>
Gradle:
implementation("com.yubico:webauthn-server-core:2.10.1")
|
Note
| You may need additional dependencies with JCA providers to support some signature algorithms. In particular, OpenJDK 14 and earlier does not include providers for the EdDSA family of algorithms and OpenJDK 23 and earlier does not include providers for ML-DSA. The library will log warnings if you try to configure it for algorithms with no JCA provider available. |
This library uses semantic versioning.
The public API consists of all public classes, methods and fields in the com.yubico.webauthn package and its subpackages,
i.e., everything covered by the
Javadoc,
with the exception of features annotated with a @Deprecated annotation and a
@deprecated EXPERIMENTAL: tag in JavaDoc.
Such features are considered unstable and may receive breaking changes without a
major version increase.
Package-private classes and methods are NOT part of the public API.
The com.yubico:yubico-util module is NOT part of the public API.
Breaking changes to these will NOT be reflected in version numbers.
In addition to the main webauthn-server-core module, there is also:
webauthn-server-attestation: Integration with the FIDO Metadata Service
for retrieving and selecting trust roots to use for verifying
attestation statements.
See the Javadoc for in-depth API documentation.
Using this library comes in two parts: the server side and the client side. The server side involves:
Implement the
CredentialRepository
interface with your database access logic.
Instantiate the
RelyingParty
class.
Use the
RelyingParty.startRegistration(...)
and
RelyingParty.finishRegistration(...)
methods to perform registration ceremonies.
Use the
RelyingParty.startAssertion(...)
and
RelyingParty.finishAssertion(...)
methods to perform authentication ceremonies.
Optionally use additional features: passkeys, passwordless multi-factor authentication, credential backup state.
The client side involves:
Call navigator.credentials.create() or .get(),
passing the result from RelyingParty.startRegistration(...) or .startAssertion(...) as the argument.
Encode the result of the successfully resolved promise and return it to the server.
For this you need some way to encode Uint8Array values;
this guide will use GitHub’s webauthn-json library.
Example code is given below.
For more detailed example usage, see
webauthn-server-demo for a complete demo server.
CredentialRepositoryThe
CredentialRepository
interface abstracts your database in a database-agnostic way.
The concrete implementation will be different for every project, but you can use
InMemoryRegistrationStorage
as a simple example.
RelyingPartyThe
RelyingParty
class is the main entry point to the library.
You can instantiate it using its builder methods,
passing in your
CredentialRepository
implementation (called MyCredentialRepository here) as an argument:
RelyingPartyIdentity rpIdentity = RelyingPartyIdentity.builder()
    .id("example.com")  // Set this to a parent domain that covers all subdomains
                        // where users' credentials should be valid
    .name("Example Application")
    .build();

RelyingParty rp = RelyingParty.builder()
    .identity(rpIdentity)
    .credentialRepository(new MyCredentialRepository())
.build();A registration ceremony consists of 5 main steps:
Generate registration parameters using
RelyingParty.startRegistration(...).
Send registration parameters to the client and call
navigator.credentials.create().
With cred as the result of the successfully resolved promise,
call cred.getClientExtensionResults()
and cred.response.getTransports()
and return their results along with cred to the server.
Validate the response using
RelyingParty.finishRegistration(...).
Update your database using the finishRegistration output.
This example uses GitHub’s webauthn-json library to do both (2) and (3) in one function call.
First, generate registration parameters and send them to the client:
Optional<UserIdentity> findExistingUser(String username) { /* ... */ }

PublicKeyCredentialCreationOptions request = rp.startRegistration(
  StartRegistrationOptions.builder()
    .user(
        findExistingUser("alice")
            .orElseGet(() -> {
                byte[] userHandle = new byte[64];
                random.nextBytes(userHandle);
                return UserIdentity.builder()
                    .name("alice")
                    .displayName("Alice Hypothetical")
                    .id(new ByteArray(userHandle))
                    .build();
            })
    )
    .build());

String credentialCreateJson = request.toCredentialsCreateJson();
return credentialCreateJson;  // Send to client
You will need to keep this
PublicKeyCredentialCreationOptions
object in temporary storage
so you can also pass it into
RelyingParty.finishRegistration(...)
later.
If needed, you can use the
toJson()
and
fromJson(String)
methods to serialize and deserialize the value for storage.
Now call the WebAuthn API on the client side:
import * as webauthnJson from "@github/webauthn-json";

// Make the call that returns the credentialCreateJson above
const credentialCreateOptions = await fetch(/* ... */).then(resp => resp.json());

// Call WebAuthn ceremony using webauthn-json wrapper
const publicKeyCredential = await webauthnJson.create(credentialCreateOptions);

// Return encoded PublicKeyCredential to server
fetch(/* ... */, { body: JSON.stringify(publicKeyCredential) });
Validate the response on the server side:
String publicKeyCredentialJson = /* ... */;     // publicKeyCredential from client
PublicKeyCredential<AuthenticatorAttestationResponse, ClientRegistrationExtensionOutputs> pkc =
    PublicKeyCredential.parseRegistrationResponseJson(publicKeyCredentialJson);

try {
    RegistrationResult result = rp.finishRegistration(FinishRegistrationOptions.builder()
        .request(request)  // The PublicKeyCredentialCreationOptions from startRegistration above
                           // NOTE: Must be stored in server memory or otherwise protected against tampering
        .response(pkc)
        .build());
} catch (RegistrationFailedException e) { /* ... */ }
Finally, if the previous step was successful, store the new credential in your database. Here is an example of things you will likely want to store:
storeCredential(              // Some database access method of your own design
  "alice",                    // Username or other appropriate user identifier
  result.getKeyId(),          // Credential ID and transports for allowCredentials
  result.getPublicKeyCose(),  // Public key for verifying authentication signatures
  result.getSignatureCount(), // Initial signature counter value
  result.isDiscoverable(),    // Is this a passkey?
  result.isBackupEligible(),  // Can this credential be backed up (synced)?
  result.isBackedUp(),        // Is this credential currently backed up?
  pkc.getResponse().getAttestationObject(), // Store attestation object for future reference
  pkc.getResponse().getClientDataJSON()     // Store client data for re-verifying signature if needed
);Like registration ceremonies, an authentication ceremony consists of 5 main steps:
Generate authentication parameters using
RelyingParty.startAssertion(...).
Send authentication parameters to the client, call
navigator.credentials.get()
and return the response.
With cred as the result of the successfully resolved promise, call
cred.getClientExtensionResults()
and return the result along with cred to the server.
Validate the response using
RelyingParty.finishAssertion(...).
Update your database using the finishAssertion output, and act upon the result (for example, grant login access).
This example uses GitHub’s webauthn-json library to do both (2) and (3) in one function call.
First, generate authentication parameters and send them to the client:
AssertionRequest request = rp.startAssertion(StartAssertionOptions.builder()
    .username("alice")     // Or .userHandle(ByteArray) if preferred
    .build());
String credentialGetJson = request.toCredentialsGetJson();
return credentialGetJson;  // Send to client
Again, you will need to keep this
AssertionRequest
object in temporary storage
so you can also pass it into
RelyingParty.finishAssertion(...)
later.
If needed, you can use the
toJson()
and
fromJson(String)
methods to serialize and deserialize the value for storage.
Now call the WebAuthn API on the client side:
import * as webauthnJson from "@github/webauthn-json";

// Make the call that returns the credentialGetJson above
const credentialGetOptions = await fetch(/* ... */).then(resp => resp.json());

// Call WebAuthn ceremony using webauthn-json wrapper
const publicKeyCredential = await webauthnJson.get(credentialGetOptions);

// Return encoded PublicKeyCredential to server
fetch(/* ... */, { body: JSON.stringify(publicKeyCredential) });
Validate the response on the server side:
String publicKeyCredentialJson = /* ... */;  // publicKeyCredential from client
PublicKeyCredential<AuthenticatorAssertionResponse, ClientAssertionExtensionOutputs> pkc =
    PublicKeyCredential.parseAssertionResponseJson(publicKeyCredentialJson);

try {
    AssertionResult result = rp.finishAssertion(FinishAssertionOptions.builder()
        .request(request)  // The PublicKeyCredentialRequestOptions from startAssertion above
        .response(pkc)
        .build());

    if (result.isSuccess()) {
        return result.getUsername();
    }
} catch (AssertionFailedException e) { /* ... */ }
throw new RuntimeException("Authentication failed");
Finally, if the previous step was successful, update your database using the
AssertionResult.
Most importantly, you should update the signature counter. That might look something like this:
updateCredential(              // Some database access method of your own design
  "alice",                     // Query by username or other appropriate user identifier
  result.getCredentialId(),    // Query by credential ID of the credential used
  result.getSignatureCount(),  // Set new signature counter value
  result.isBackedUp(),         // Set new backup state flag
  Clock.systemUTC().instant()  // Set time of last use (now)
);
Then do whatever else you need - for example, initiate a user session.
WebAuthn supports a number of additional features beyond the basics:
Passkeys: passwordless, username-less authentication. Try it on passkey.org!
User verification: passwordless, streamlined multi-factor authentication.
Autofill UI: Unintrusive passkey integration in traditional login forms.
Credential backup state: hints on how vulnerable the user is to authenticator loss.
A passkey is a WebAuthn credential that can simultaneously both identify and authenticate the user.
This is also called a discoverable credential.
By default, credentials are created non-discoverable, which means the server
must list them in the
allowCredentials
parameter before the user can use them to authenticate.
This is typically because the credential private key is not stored within the authenticator,
but instead encoded into one of the credential IDs in allowCredentials.
This way even a small hardware authenticator can have an unlimited credential capacity,
but with the drawback that the user must first identify themself to the server
so the server can retrieve the correct allowCredentials list.
Passkeys are instead stored within the authenticator, and also include the user’s user handle in addition to the credential ID. This way the user can be both identified and authenticated simultaneously. Many passkey-capable authenticators also offer a credential sync mechanism to allow one passkey to be used on multiple devices.
Passkeys can be created by setting the
authenticatorSelection.residentKey
option to
REQUIRED:
PublicKeyCredentialCreationOptions request = rp.startRegistration(
  StartRegistrationOptions.builder()
    .user(/* ... */)
    .authenticatorSelection(AuthenticatorSelectionCriteria.builder()
        .residentKey(ResidentKeyRequirement.REQUIRED)
        .build())
    .build());
The username can then be omitted when starting an authentication ceremony:
AssertionRequest request = rp.startAssertion(StartAssertionOptions.builder().build());Some authenticators might create passkeys even if not required, and setting
the
residentKey
option to
PREFERRED
will create a passkey if the authenticator supports it.
The
RegistrationResult.isDiscoverable()
method can be used to determine whether the created credential is a passkey.
This requires the
credProps extension
to be enabled, which it is by default.
User verification can be enforced independently per authentication ceremony:
AssertionRequest request = rp.startAssertion(StartAssertionOptions.builder()
    .username("alice")
    .userVerification(UserVerificationRequirement.REQUIRED)
    .build());
Then
RelyingParty.finishAssertion(...)
will enforce that user verification was performed.
However, there is no guarantee that the user’s authenticator will support this
unless the user has some credential created with the
authenticatorSelection.userVerification
option set:
PublicKeyCredentialCreationOptions request = rp.startRegistration(
  StartRegistrationOptions.builder()
    .user(/* ... */)
    .authenticatorSelection(AuthenticatorSelectionCriteria.builder()
        .userVerification(UserVerificationRequirement.REQUIRED)
        .build())
    .build());
You can also request that user verification be used if possible, but is not required:
PublicKeyCredentialCreationOptions request = rp.startRegistration(
  StartRegistrationOptions.builder()
    .user(/* ... */)
    .authenticatorSelection(AuthenticatorSelectionCriteria.builder()
        .userVerification(UserVerificationRequirement.PREFERRED)
        .build())
    .build());

AssertionRequest request = rp.startAssertion(StartAssertionOptions.builder()
    .username("alice")
    .userVerification(UserVerificationRequirement.PREFERRED)
    .build());
In this case
RelyingParty.finishRegistration(...)
and
RelyingParty.finishAssertion(...)
will NOT enforce user verification,
but instead the isUserVerified() method of
RegistrationResult
and
AssertionResult
will tell whether user verification was used.
For example, you could prompt for a password as the second factor if isUserVerified() returns false:
AssertionResult result = rp.finishAssertion(/* ... */);

if (result.isSuccess()) {
    if (result.isUserVerified()) {
        return successfulLogin(result.getUsername());
    } else {
        return passwordRequired(result.getUsername());
    }
}
User verification can be used with both discoverable credentials (passkeys) and non-discoverable credentials.
Passkeys on platform authenticators may also support the WebAuthn autofill UI, also known as "conditional mediation". This can help onboard users who are unfamiliar with a fully username-less login flow, allowing a familiar username input field to opportunistically offer a shortcut using a passkey if the user has one on their device.
This library is compatible with the autofill UI but provides no server-side options for it, because the steps to enable it are taken on the front-end side. Using autofill UI does not affect the response verification procedure.
See the guide on passkeys.dev for complete instructions on how to enable the autofill UI. In particular you need to:
Add the credential request option mediation: "conditional"
alongside the publicKey option generated by
RelyingParty.startAssertion(...),
Add autocomplete="username webauthn" to a username input field on the page, and
Call navigator.credentials.get() in the background.
If the Promise resolves, handle it like any other assertion response as described in 4. Authentication above.
Because of technical limitations, autofill UI is as of May 2023 only supported for platform credentials, i.e., passkeys stored on the user’s computing devices. Autofill UI might support passkeys on external security keys in the future.
Some authenticators may allow credentials to be backed up and/or synced between devices.
This capability and its current state is signaled via the
Credential Backup State flags,
which are available via the isBackedUp() and isBackupEligible() methods of
RegistrationResult
and
AssertionResult.
These can be used as a hint about how vulnerable a user is to authenticator loss.
In particular, a user with only one credential which is not backed up
may risk getting locked out if they lose their authenticator.
1.xSee the migration guide.
This section is only relevant for applications that have user credentials registered via the U2F JavaScript API. New WebAuthn deployments can skip this section.
The WebAuthn API is backwards-compatible with U2F authenticators, and credentials registered via the U2F API will continue to work with the WebAuthn API with the right settings.
To migrate to using the WebAuthn API, you need to do the following:
Follow the Getting started guide above to set up WebAuthn support in general.
Note that unlike a U2F AppID, the WebAuthn RP ID consists of only the domain name of the AppID. WebAuthn does not support U2F Trusted Facet Lists.
Set the
appId()
setting on your
RelyingParty
instance.
The argument to the appid() setting should be the same as you used for the appId argument to the
U2F register and sign functions.
This will enable the appid
and appidExclude
extensions and configure the RelyingParty to accept the given AppId when verifying authenticator signatures.
Generate a user handle for each existing user and store it in their account, or decide on a method for deriving one deterministically from existing user attributes. For example, if your user records are assigned UUIDs, you can use that UUID as the user handle. You SHOULD NOT use a plain username or e-mail address, or hash of either, as the user handle - for more on this, see the User Handle Contents privacy consideration.
When your
CredentialRepository
creates a
RegisteredCredential
for a U2F credential,
use the U2F key handle as the
credential ID.
If you store key handles base64 encoded, you should decode them using
ByteArray.fromBase64
or
ByteArray.fromBase64Url
as appropriate before passing them to the RegisteredCredential.
When your CredentialRepository creates a RegisteredCredential for a U2F credential,
use the
publicKeyEs256Raw()
method instead of publicKeyCose()
to set the credential public key.
Replace calls to the U2F
register
method with calls to navigator.credentials.create() as described in Getting started.
Replace calls to the U2F
sign
method with calls to navigator.credentials.get() as described in Getting started.
Existing U2F credentials should now work with the WebAuthn API.
Note that new credentials registered on U2F authenticators via the WebAuthn API are NOT backwards compatible with the U2F JavaScript API.
The library tries to place as few requirements on the overall application architecture as possible. For this reason it is stateless and free from side effects, and does not directly interact with any database. This means it is database agnostic and thread safe. The following diagram illustrates an example architecture for an application using the library.
The application manages all state and database access, and communicates with the library via POJO representations of requests and responses. The following diagram illustrates the data flow during a WebAuthn registration or authentication ceremony.
In this diagram, the Client is the user’s browser and the application’s client-side scripts. The Server is the application and its business logic, the Library is this library, and the Users database stores registered WebAuthn credentials.
The client requests to start the ceremony, for example by submitting a form.
The username may or may not be known at this point. For example, the user
might be requesting to create a new account, or we might be using
username-less authentication.
If the user does not already have a user handle, the application creates one in some application-specific way.
The application may choose to authenticate the user with a password or the like before proceeding.
The application calls one of the library’s "start" methods to generate a
parameter object to be passed to navigator.credentials.create() or .get()
on the client.
The library generates a random challenge and an assortment of other arguments depending on configuration set by the application.
If the username is known, the library uses a read-only database adapter
provided by the application to look up the user’s credentials.
The returned list of credential
IDs is used to populate the
excludeCredentials
or
allowCredentials
parameter.
The library returns a request object which can be serialized to JSON and
passed as the publicKey argument to navigator.credentials.create() or
.get(). For registration ceremonies this will be a
PublicKeyCredentialCreationOptions,
and for authentication ceremonies it will be a
PublicKeyCredentialRequestOptions.
The application stores the request in temporary storage.
The application’s client-side script runs navigator.credentials.create() or
.get() with request as the publicKey argument.
The user confirms the operation and the client returns a
PublicKeyCredential
object response to the application.
The application retrieves the request from temporary storage and passes
request and response to one of the library’s "finish" methods to run the
response validation logic.
The library verifies that the response contents - challenge, origin, etc. -
are valid.
If this is an authentication ceremony, the library uses the database adapter
to look up the public key for the credential named in response.id.
The database adapter returns the public key.
The library verifies the authentication signature.
The library returns a POJO representation of the result of the ceremony. For registration ceremonies, this will include the credential ID and public key of the new credential. The application may opt in to also getting information about the authenticator model and whether the authenticator attestation is trusted. For authentication ceremonies, this will include the username and user handle, the credential ID of the credential used, and the new signature counter value for the credential.
The application inspects the result object and takes any appropriate actions as defined by its business logic.
If the result is not satisfactory, the application reports failure to the client.
If the result is satisfactory, the application proceeds with storing the new credential if this is a registration ceremony.
If this is an authentication ceremony, the application updates the signature counter stored in the database for the credential.
Finally, the application reports success and resumes its business logic.
WebAuthn supports authenticator attestation, which provides a way for the web service to request cryptographic proof of what authenticator the user is using. Most services do not need this, and it is disabled by default.
The webauthn-server-attestation module
provides optional additional features for working with attestation.
See the module documentation for more details.
Alternatively, you can use the
AttestationTrustSource
interface to implement your own source of attestation root certificates
and set it as the
attestationTrustSource
for your
RelyingParty
instance.
Note that depending on your JCA provider configuration, you may need to set the
enableRevocationChecking
and/or
policyTreeValidator
settings for compatibility with some authenticators' attestation certificates.
See the JavaDoc for these settings for more information.
Use the included
Gradle wrapper to
build the .jar artifact:
$ ./gradlew :webauthn-server-core:jarThe output is built in the webauthn-server-core/build/libs/ directory, and the
version is derived from the most recent Git tag. Builds done on a tagged commit
will have a plain x.y.z version number, while a build on any other commit will
result in a version number containing the abbreviated commit hash.
To run the tests:
$ ./gradlew checkTo run the PIT mutation tests (this may take upwards of 30 minutes):
$ ./gradlew pitestStarting in version 1.4.0-RC2, artifacts are built reproducibly. Fresh builds from
tagged commits should therefore be verifiable by signatures from Maven Central
and GitHub releases:
$ git checkout 1.4.0-RC2
$ ./gradlew :webauthn-server-core:jar

$ wget https://repo1.maven.org/maven2/com/yubico/webauthn-server-core/1.4.0-RC2/webauthn-server-core-1.4.0-RC2.jar.asc
$ gpg --verify webauthn-server-core-1.4.0-RC2.jar.asc webauthn-server-core/build/libs/webauthn-server-core-1.4.0-RC2.jar

$ wget https://github.com/Yubico/java-webauthn-server/releases/download/1.4.0-RC2/webauthn-server-core-1.4.0-RC2.jar.asc
$ gpg --verify webauthn-server-core-1.4.0-RC2.jar.asc webauthn-server-core/build/libs/webauthn-server-core-1.4.0-RC2.jar
Note that building with a different JDK may produce a different artifact. To ensure binary reproducibility, please build with the same JDK as specified in the release notes. Reproducible builds also require building from a Git repository, since the build embeds version number and Git commit ID into the built artifacts.
Official Yubico software signing keys are listed on the Yubico Developers site.
See the developer docs.
See SECURITY.md.
249 followers · starred Oct 2024
133 followers · starred Jun 2024
90 followers · starred Jan 2019
16 followers · starred Mar 2024


