
[IROS2025] OpenGS-Fusion: Open-Vocabulary Dense Mapping with Hybrid 3D Gaussian Splatting for Refined Object-Level Understanding
See the codeREADME
OpenGS-Fusion: Open-Vocabulary Dense Mapping with Hybrid 3D Gaussian Splatting for Refined Object-Level Understanding
Dianyi Yang, Xihan Wang, Yu Gao, Shiyang Liu, Bohan Ren, Yufeng Yue, Yi Yang*
IROS 2025
This repository is intended to provide an engineering implementation of our paper, and we hope it will contribute to the community. If you have any questions, feel free to contact us.
Environments
Install requirements
conda create -n opengsfusion python==3.9
conda activate opengsfusion
conda install pytorch==2.0.0 torchvision==0.15.0 torchaudio==2.0.0 pytorch-cuda=11.8 -c pytorch -c nvidia
conda install cmake
pip install -r requirements.txt
Also, PCL is needed for fast-gicp submodule.
Install submodules
conda activate opengsfusion
pip install submodules/diff-gaussian-rasterization
pip install submodules/simple-knn
pip install submodules/MobileSAM

export OPENGS_ENV=/path/to/your/anaconda3/envs/opengsfusion
pip install submodules/vdbfusion

cd submodules/fast_gicp
mkdir build
cd build
cmake ..
make
cd ..
python setup.py install --user
Install mobilesam2 weights
Please download the MobileSAMv2 weights from the following link Driver After downloading, place the files in opengs_fusion/submodules/MobileSAM/MobileSAMv2/weight. The directory structure should look like:
opengs_fusion/submodules/MobileSAM/MobileSAMv2/weight
├── l2.pt
├── mobile_sam.pt
├── ObjectAwareModel.pt
Datasets
-
Replica
-
Download
bash download_replica.sh -
Configure
Please modify the directory structure to ours.
The original structure
Replica
    - room0
        - results (contain rgbd images)
            - frame000000.jpg
            - depth000000.jpg
            ...
        - traj.txt
    ...
Our structure
Replica
    - room0
        - images (contain rgb images)
            - frame000000.jpg
            ...
        - depth_images (contain depth images)
            - depth000000.jpg
            ...
        - traj.txt
    ...
-
-
Scannet
-
Download follow scannet
Our structure
data
    - scene0046_00
        - rgb (contain rgb images)
            - 0.png
            ...
        - depth (contain depth images)
            - 0.png
            ...
        - pose (contain poses)
            - 0.txt
            ...
        - traj.txt
    ...
The traj.txt file here is generated by running
./datasets_process/convert_pose_2_traj.py.
-
-
Custom datasets:
For custom datasets, you should format your data to match either the Replica or ScanNet dataset structures. Additionally, you'll need to create a camera configuration file specifying your camera's intrinsic parameters
config.txt:## camera parameters W H fx fy cx cy depth_scale depth_trunc dataset_type 640 480 577.590698 578.729797 318.905426 242.683609 1000.0 5.0 scannetYou can put this config in
./configdirectory.
Run
-
Replica
bash ./bash/train_replica_with_sem.sh -
Scannet
bash ./bash/train_scannet_with_sem.sh
The pipeline has two steps for each dataset:
- Feature Extraction: Runs mobilesamv2_clip.py to extract 2D SAM masks and CLIP features.
python mobilesamv2_clip.py --image_folder /path/to/images --output_dir /path/to/output --save_results - 3D Mapping: Runs opengs_fusion.py to build semantic GS maps.
python opengs_fusion.py --dataset_path /path/to/dataset --config /path/to/config.txt --output_path /path/to/output --rerun_viewer --save_results
We also put some potential bugs to issue, please check it out~.
Query after performing mapping
After completing the mapping process, you can visualize and interact with the semantic maps using the following commands:
For Replica Dataset
python show_lang_embed.py \
    --dataset_path /path_to_replica/office0 \
    --config ./configs/Replica/caminfo.txt \
    --scene_npz /path_to_replica_output/office0/office0_default_each/gs_scene.npz \
    --dataset_type replica \
    --view_scale 2.0
For scannet Dataset
python show_lang_embed.py \
    --dataset_path /path_to_scannet/scene0062_00 \
    --config ./configs/Scannet/scene0062_00.txt \
    --scene_npz /path_to_scannet_output/scene0062_00/default_with_sem/gs_scene.npz \
    --dataset_type scannet \
    --view_scale 3.0
Here, users can freely adjust the viewing angle in the interface. We also provide a text box for real-time querying and threshold adjustment. All tests were conducted on an Ubuntu system with a 2K resolution.
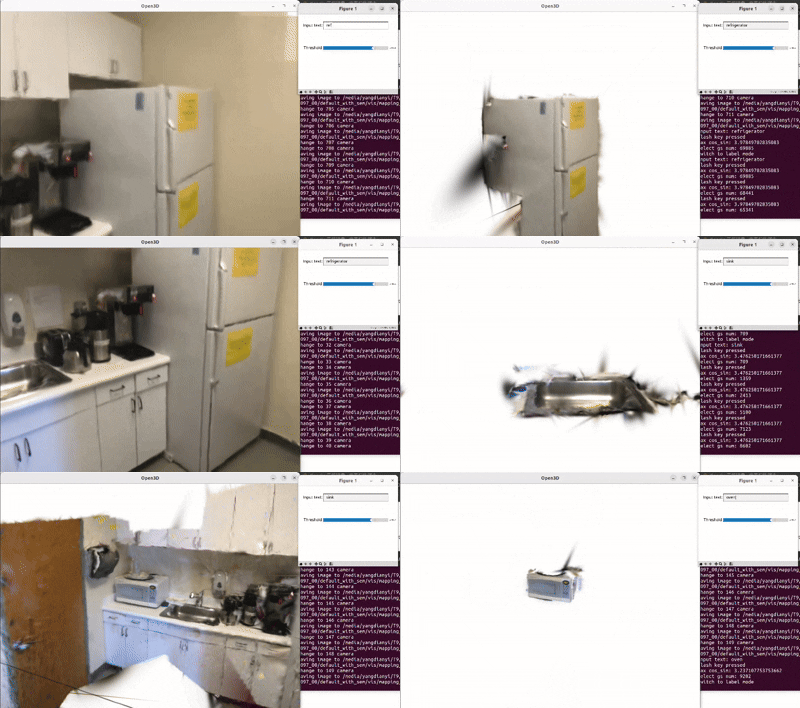
Key Press Description
- T: Toggle between color and label display modes.
- J: Highlight selected object.
- K: Capture screenshot of current view.
- O: Print current view information.
- M: Switch between different camera views.
- P: Downsample the point cloud.
- =: Save current mask point cloud.
- L: Toggle voxel visualization.
Real-time demo
Using rerun.io viewer
Rerun viewer shows the means of trackable Gaussians, and rendered image from reconstructed 3dgs map.
The demo show here is supported by GS_ICP_SLAM.
You just need to add --rerun_viewer to the command when running opengs_fusion.py. For example:
python opengs_fusion.py --dataset_path /path/to/dataset --config /path/to/config.txt --output_path /path/to/output --rerun_viewer
🙏 Acknowledgments
This work builds upon the following outstanding open-source projects:
- GS_ICP_SLAM - For their foundational work on Gaussian Splatting with ICP-based SLAM
- VDBFusion - For their efficient volumetric mapping framework
We're deeply grateful to the researchers behind these projects for sharing their work with the community.
Cite
If you find this work useful for your research, please cite our paper:
@inproceedings{yang2025opengs-fusion,

}
Similar repos


Languages
Jupyter Notebook
89.6%
Python
8.4%
C++
1.1%
[IROS2025] OpenGS-Fusion: Open-Vocabulary Dense Mapping with Hybrid 3D Gaussian Splatting for Refined Object-Level Understanding
See the codeREADME
OpenGS-Fusion: Open-Vocabulary Dense Mapping with Hybrid 3D Gaussian Splatting for Refined Object-Level Understanding
Dianyi Yang, Xihan Wang, Yu Gao, Shiyang Liu, Bohan Ren, Yufeng Yue, Yi Yang*
IROS 2025
This repository is intended to provide an engineering implementation of our paper, and we hope it will contribute to the community. If you have any questions, feel free to contact us.
Environments
Install requirements
conda create -n opengsfusion python==3.9
conda activate opengsfusion
conda install pytorch==2.0.0 torchvision==0.15.0 torchaudio==2.0.0 pytorch-cuda=11.8 -c pytorch -c nvidia
conda install cmake
pip install -r requirements.txt
Also, PCL is needed for fast-gicp submodule.
Install submodules
conda activate opengsfusion
pip install submodules/diff-gaussian-rasterization
pip install submodules/simple-knn
pip install submodules/MobileSAM

export OPENGS_ENV=/path/to/your/anaconda3/envs/opengsfusion
pip install submodules/vdbfusion

cd submodules/fast_gicp
mkdir build
cd build
cmake ..
make
cd ..
python setup.py install --user
Install mobilesam2 weights
Please download the MobileSAMv2 weights from the following link Driver After downloading, place the files in opengs_fusion/submodules/MobileSAM/MobileSAMv2/weight. The directory structure should look like:
opengs_fusion/submodules/MobileSAM/MobileSAMv2/weight
├── l2.pt
├── mobile_sam.pt
├── ObjectAwareModel.pt
Datasets
-
Replica
-
Download
bash download_replica.sh -
Configure
Please modify the directory structure to ours.
The original structure
Replica
    - room0
        - results (contain rgbd images)
            - frame000000.jpg
            - depth000000.jpg
            ...
        - traj.txt
    ...
Our structure
Replica
    - room0
        - images (contain rgb images)
            - frame000000.jpg
            ...
        - depth_images (contain depth images)
            - depth000000.jpg
            ...
        - traj.txt
    ...
-
-
Scannet
-
Download follow scannet
Our structure
data
    - scene0046_00
        - rgb (contain rgb images)
            - 0.png
            ...
        - depth (contain depth images)
            - 0.png
            ...
        - pose (contain poses)
            - 0.txt
            ...
        - traj.txt
    ...
The traj.txt file here is generated by running
./datasets_process/convert_pose_2_traj.py.
-
-
Custom datasets:
For custom datasets, you should format your data to match either the Replica or ScanNet dataset structures. Additionally, you'll need to create a camera configuration file specifying your camera's intrinsic parameters
config.txt:## camera parameters W H fx fy cx cy depth_scale depth_trunc dataset_type 640 480 577.590698 578.729797 318.905426 242.683609 1000.0 5.0 scannetYou can put this config in
./configdirectory.
Run
-
Replica
bash ./bash/train_replica_with_sem.sh -
Scannet
bash ./bash/train_scannet_with_sem.sh
The pipeline has two steps for each dataset:
- Feature Extraction: Runs mobilesamv2_clip.py to extract 2D SAM masks and CLIP features.
python mobilesamv2_clip.py --image_folder /path/to/images --output_dir /path/to/output --save_results - 3D Mapping: Runs opengs_fusion.py to build semantic GS maps.
python opengs_fusion.py --dataset_path /path/to/dataset --config /path/to/config.txt --output_path /path/to/output --rerun_viewer --save_results
We also put some potential bugs to issue, please check it out~.
Query after performing mapping
After completing the mapping process, you can visualize and interact with the semantic maps using the following commands:
For Replica Dataset
python show_lang_embed.py \
    --dataset_path /path_to_replica/office0 \
    --config ./configs/Replica/caminfo.txt \
    --scene_npz /path_to_replica_output/office0/office0_default_each/gs_scene.npz \
    --dataset_type replica \
    --view_scale 2.0
For scannet Dataset
python show_lang_embed.py \
    --dataset_path /path_to_scannet/scene0062_00 \
    --config ./configs/Scannet/scene0062_00.txt \
    --scene_npz /path_to_scannet_output/scene0062_00/default_with_sem/gs_scene.npz \
    --dataset_type scannet \
    --view_scale 3.0
Here, users can freely adjust the viewing angle in the interface. We also provide a text box for real-time querying and threshold adjustment. All tests were conducted on an Ubuntu system with a 2K resolution.
Key Press Description
- T: Toggle between color and label display modes.
- J: Highlight selected object.
- K: Capture screenshot of current view.
- O: Print current view information.
- M: Switch between different camera views.
- P: Downsample the point cloud.
- =: Save current mask point cloud.
- L: Toggle voxel visualization.
Real-time demo
Using rerun.io viewer
Rerun viewer shows the means of trackable Gaussians, and rendered image from reconstructed 3dgs map.
The demo show here is supported by GS_ICP_SLAM.
You just need to add --rerun_viewer to the command when running opengs_fusion.py. For example:
python opengs_fusion.py --dataset_path /path/to/dataset --config /path/to/config.txt --output_path /path/to/output --rerun_viewer
🙏 Acknowledgments
This work builds upon the following outstanding open-source projects:
- GS_ICP_SLAM - For their foundational work on Gaussian Splatting with ICP-based SLAM
- VDBFusion - For their efficient volumetric mapping framework
We're deeply grateful to the researchers behind these projects for sharing their work with the community.
Cite
If you find this work useful for your research, please cite our paper:
@inproceedings{yang2025opengs-fusion,

}
Similar repos
Languages
Jupyter Notebook
89.6%
Python
8.4%
C++
1.1%