
README




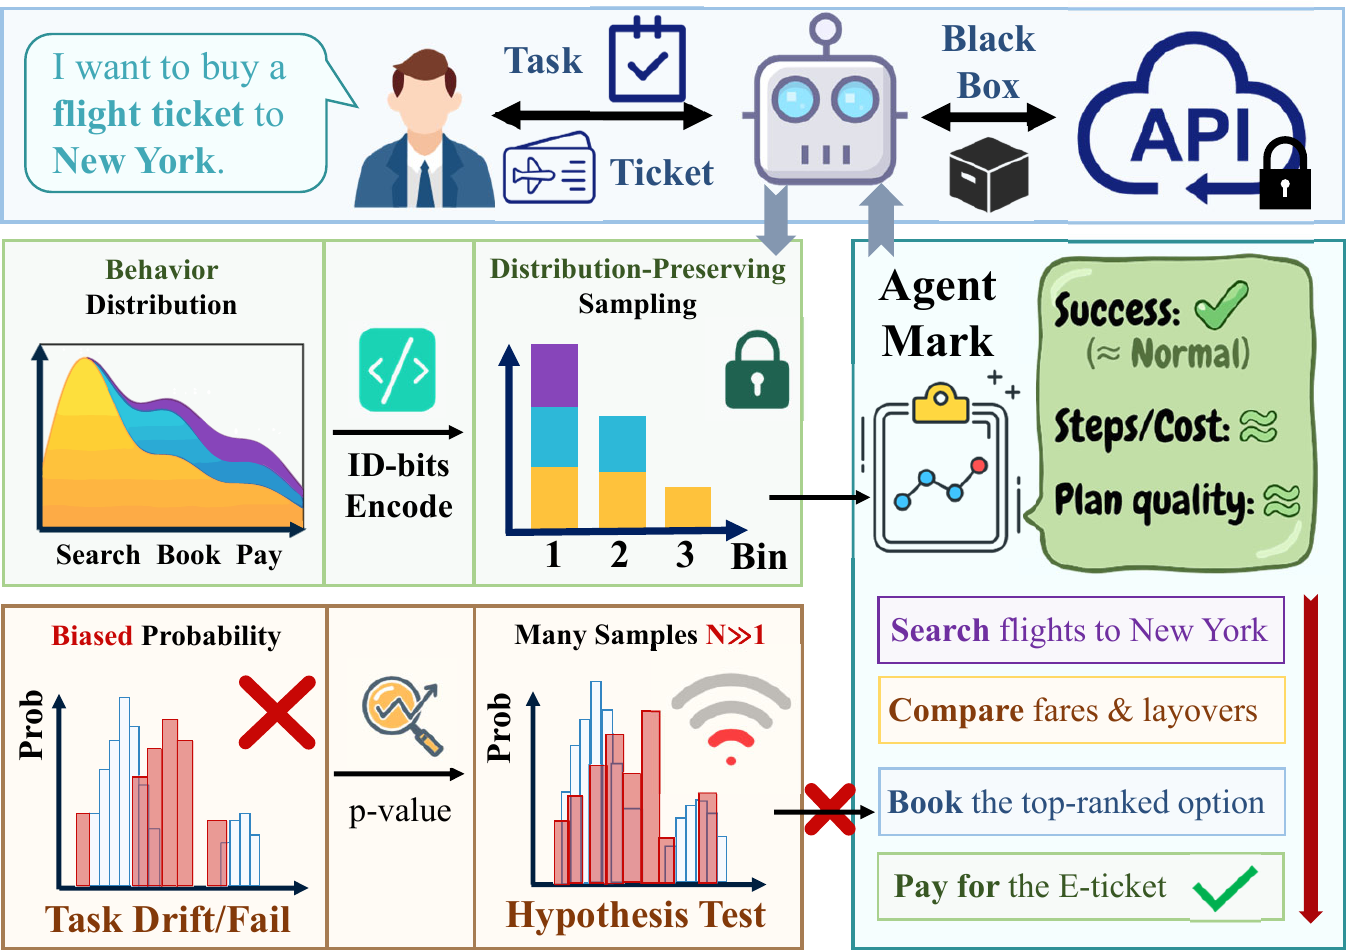
AgentMark is an experimental and evaluation framework for behavioral watermarking of LLM agents, implementing the utility-preserving and distribution-preserving watermark algorithms proposed in the Agent Mark paper.
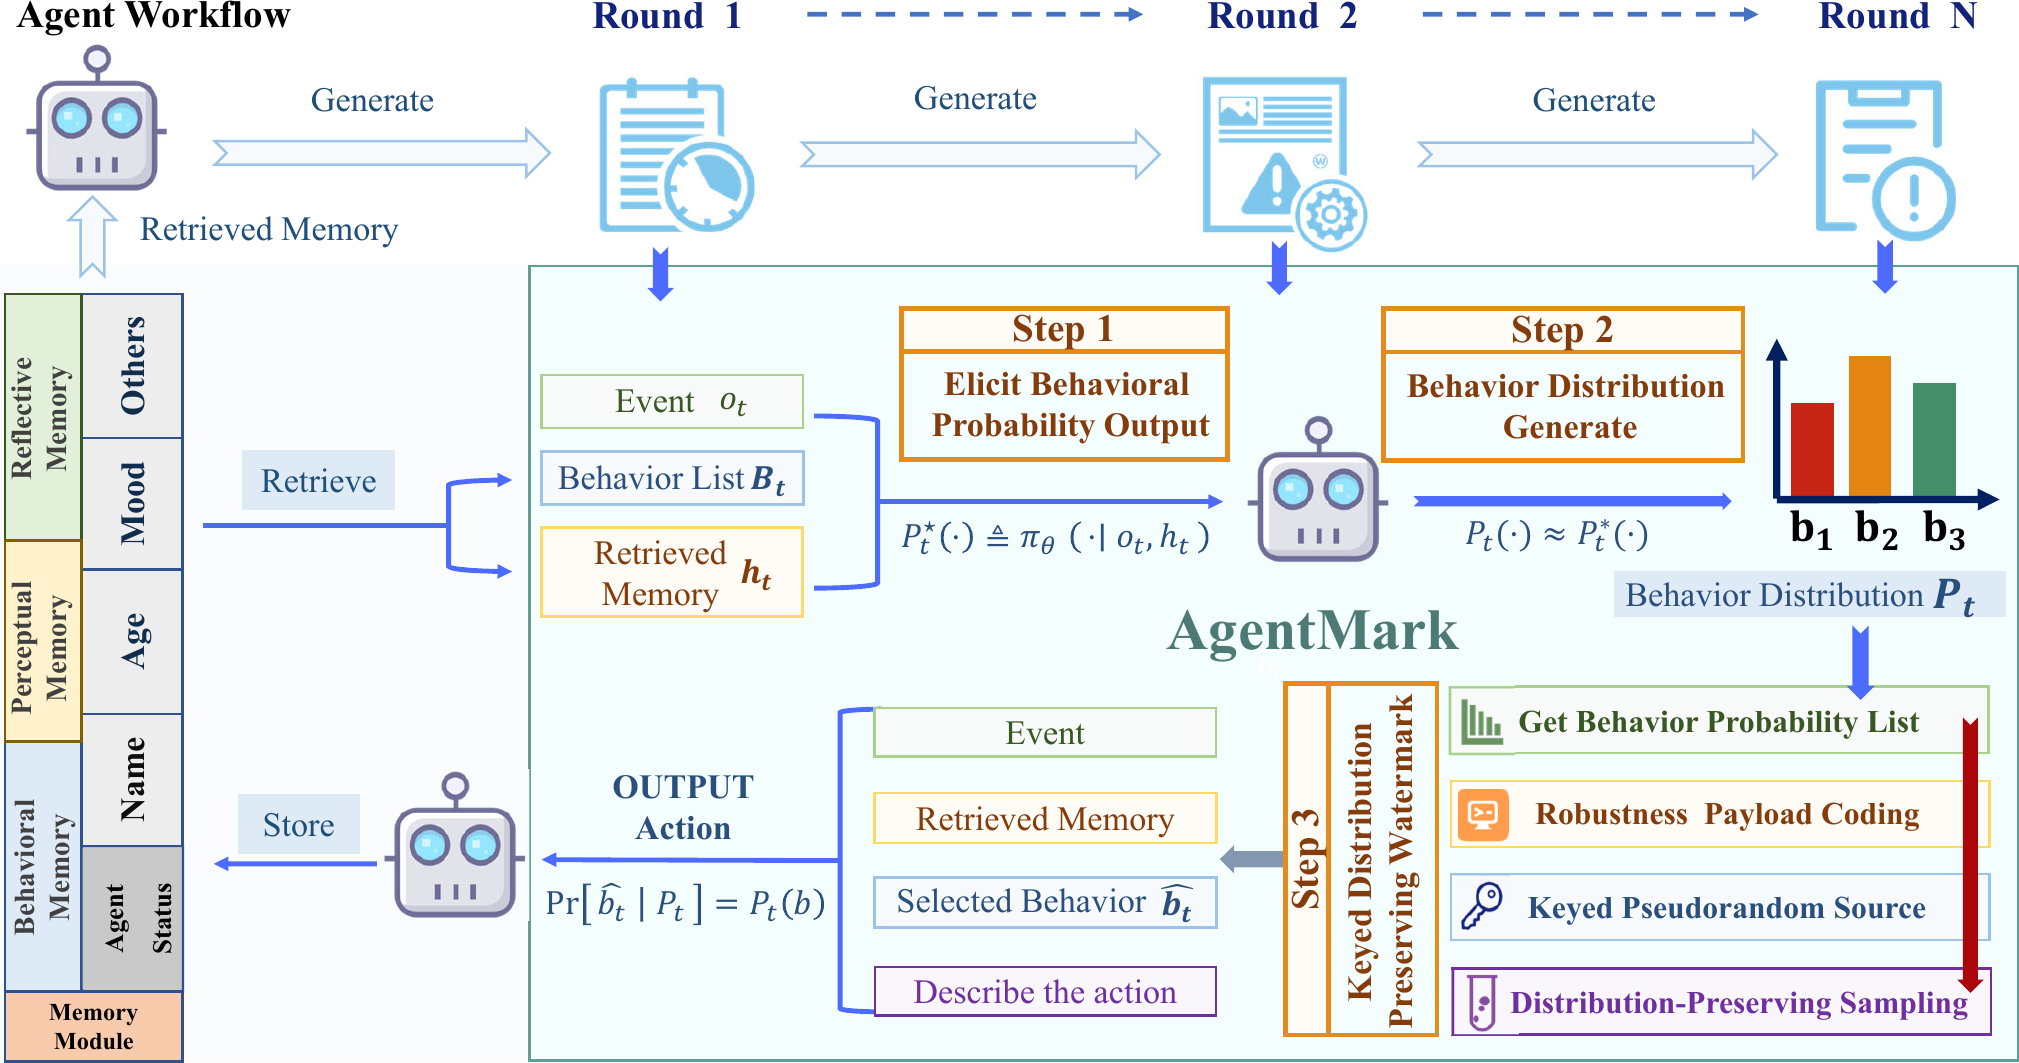
The project provides a reproducible, modular, and extensible codebase to evaluate watermark performance, robustness, and stealth in complex agent tasks. It decomposes agent decision-making into planning behavior and execution action, embedding watermarks at the planning stage via distribution-preserving sampling to maintain downstream utility while enabling verifiable ownership protection.
✨ Key Features
- 💎 Utility Preservation: Strict distribution-preserving sampling keeps watermarked behavior statistically indistinguishable from the original.
- 🛡️ Robustness: Erasure-resilient coding and context-bound randomness handle missing logs and truncated trajectories.
- 🌍 Multi-environment Support: Covers tool use, embodied intelligence, and social simulations.
🎮 Supported Environments
- 🛠️ ToolBench: Complex tool-using scenarios with real-world API calls.
- 🏠 ALFWorld: Text-based interactive household decision tasks.
- 📱 Oasis (Twitter/Reddit): Social-media behavior watermarking experiments.
📖 Table of Contents
📂 Project Structure
AgentMark/
├── assets/                         # Project assets (images, PDF)
├── agentmark/                      # Core library: watermark algorithms
│   ├── core/                       # Core watermark logic (ECC, sampling)
│   ├── environments/               # Environment adapters (ToolBench, ALFWorld)
│   └── data/                       # Bitstreams and configuration data
├── experiments/                    # Experimental implementations
│   ├── toolbench/                  # ToolBench API tool-use experiments
│   │   ├── scripts/                # Pipeline and analysis scripts
│   │   ├── configs/                # Pipeline config files
│   │   ├── tools/                  # Evaluation tools (StableToolBench)
│   │   ├── MarkLLM/                # SynthID watermark library (local mode)
│   ├── alfworld/                   # ALFWorld embodied intelligence experiments
│   │   ├── scripts/                # Experiment and analysis scripts
│   │   └── configs/                # Config files
│   ├── oasis_watermark/            # Social-media experiments
│   │   ├── twitter_watermark_experiment/  # Twitter simulation
│   │   ├── reddit_watermark_experiment/   # Reddit simulation
│   │   └── oasis/                  # Modified Oasis framework
│   ├── rlnc_trajectory/            # RLNC robustness evaluation
│   │   ├── scripts/                # Erasure eval and FPR analysis
│   │   └── *.json                  # Config files
│   └── semantic_rewriting/         # Semantic rewriting robustness tests
│       ├── scripts/                # Robustness test scripts
│       └── data/                   # Sample task data
├── output/                         # Logs, predictions, analysis outputs
├── environment.yml                 # Conda environment (Python 3.9)
├── requirements.txt                # Python dependencies (pip)
├── .env.example                    # Environment variable template
├── LICENSE                         # MIT License
└── README.md                       # English README
🚀 Quick Start
1. ⚙️ Environment Setup
For ToolBench and ALFWorld experiments (Python 3.9)
Use Conda to manage the environment:
# Create and activate environment
conda env create -f environment.yml
conda activate AgentMark

# Or install manually
pip install -r requirements.txt
2. Environment Variables
Copy and edit the environment template:
cp .env.example .env
vim .env
# Fill in your API key (OpenAI / DeepSeek etc.)
# Use 'export KEY=VALUE' format or apply with:
export $(grep -v '^#' .env | xargs)
3. Dataset Preparation
ToolBench
[!IMPORTANT] ToolBench dataset is required! You must complete the steps below before running ToolBench experiments.
Download steps:
-
Download the ToolBench dataset
From the ToolBench repository, download the full dataset including:
queries: test query taskstools: API tool definitions (16,000+ tools)reference answers: evaluation references
# Recommended: use Git LFS or download from Releases # Dataset size ~2-3 GB -
Place into the correct directory
Put the extracted
datafolder underexperiments/toolbench/data/:# Expected structure AgentMark/ └── experiments/ └── toolbench/ └── data/ └── data/ # extracted data folder ├── test_query/ ├── toolenv/ │ └── tools/ # tool JSON definitions └── answer/ -
Verify dataset
Make sure
experiments/toolbench/data/data/toolenv/toolscontains multiple category subfolders (e.g.,Search/,Social_Media/) and JSON tool files inside.
ALFWorld
The dataset is downloaded automatically to ~/.cache/alfworld, or run manually:
alfworld-download
experiments/alfworld/configs/base_config.yaml is preconfigured to /root/.cache/alfworld.
[!NOTE] Oasis (social media) experiments require a separate environment (Python 3.10+). Please refer to the Oasis Social Media Experiments section below.
4. Dashboard Visualization
The dashboard provides interactive watermark experiments with real-time comparison and decoding analysis.
Requirements
- Node.js: 18.0+ (LTS recommended)
- NPM: comes with Node.js
- Python: backend runs in AgentMark environment
Steps
Step 1: Start backend
# Ensure you are in the project root
conda activate AgentMark
python dashboard/server/app.py
When you see Uvicorn running on http://0.0.0.0:8000, the backend is running.
Note: backend listens on port 8000 by default.
Step 2: Start frontend
cd dashboard
npm install  # first time only
npm run dev
You will see a local URL, typically: http://localhost:5173
Step 3: Open the app
Visit http://localhost:5173 or http://127.0.0.1:5173 in your browser.
Common Issues
- Port in use: if 8000 or 5173 is occupied, stop the conflicting process or change config (frontend:
dashboard/vite.config.ts, backend:dashboard/server/app.py). - Missing dependency: if you see
ModuleNotFoundError, install the missing package withpip install <package>.
✅ Using Our Plugin
This flow validates the "tool calling + watermark sampling" plugin route: external agents don't modify business code, only change the endpoint address (OPENAI_BASE_URL).
Workflow: User input (Add Agent mode) → Gateway performs watermark sampling → Tool calls executed.
Step 1: Start Gateway Proxy (AgentMark Proxy)
Open Terminal 1:
Linux/macOS:
cd AgentMark
source ~/miniconda3/etc/profile.d/conda.sh && conda activate AgentMark

export DEEPSEEK_API_KEY=sk-your-key
export TARGET_LLM_MODEL=deepseek-chat
export AGENTMARK_DEBUG=1
export AGENTMARK_TOOL_MODE=proxy   # Use "proxy constructs tool_calls" plugin mode

uvicorn agentmark.proxy.server:app --host 0.0.0.0 --port 8001
Windows PowerShell:
cd AgentMark
conda activate AgentMark

$env:DEEPSEEK_API_KEY="sk-your-key"
$env:TARGET_LLM_MODEL="deepseek-chat"
$env:AGENTMARK_DEBUG="1"
$env:AGENTMARK_TOOL_MODE="proxy"

uvicorn agentmark.proxy.server:app --host 0.0.0.0 --port 8001
Step 2: Start Dashboard Backend
Open Terminal 2:
cd AgentMark
conda activate AgentMark
python dashboard/server/app.py
Step 3: Start Frontend (Visualization Dashboard)
Open Terminal 3:
cd AgentMark
cd dashboard
npm install  # Only needed first time
npm i @react-three/fiber @react-three/drei three
npm run dev
Browser access: http://localhost:5173
You can view sessions and watermark visualizations on the frontend.
Step 4: Use Add Agent Mode in the Dashboard
- Open the dashboard in your browser.
- Select Add Agent on the welcome screen.
- Fill in your API key (DeepSeek/OpenAI) and optional repo URL, then send a message.
Step 5: Verify Watermark Injection
In the gateway proxy terminal you should see:
[agentmark:scoring_request]: Scoring instruction injection[agentmark:tool_calls_proxy]: Gateway-constructed tool calls (with parameters)[watermark]: Watermark results and visualization data
In the frontend dashboard you can:
- View current session and conversation history
- Visualize watermark distribution and statistics
- Analyze watermark decoding results
Note: The gateway extracts candidate tools from the request's
toolsparameter and performs watermark sampling selection.
Troubleshooting
-
502 Bad Gateway Error: If you encounter
502 Bad Gatewaywhen calling the API, it is often caused by a global proxy configuration (e.g.,http_proxy) interfering with localhost connections.Fix: set
no_proxywhen starting the services to ensure local traffic bypasses the proxy.export no_proxy=localhost,127.0.0.1,0.0.0.0 # Then restart the proxy and backend
📚 Experiment Guide
Detailed experimental guides are as follows:
1. ToolBench Tool Calling Experiment
- Overview: Simulates real-world API calling scenarios to evaluate watermark impact on tool usage and robustness.
- Directory:
experiments/toolbench/ - Two Running Modes:
Mode Config ( use_local_model)Description API Mode false(default)Calls remote LLM APIs (e.g., DeepSeek, OpenAI), watermark embedded via behavioral sampling Local Mode trueLoads local models (e.g., Llama-3), combines with SynthID text watermarking - Run Pipeline:
conda activate AgentMark # Run full pipeline (baseline/watermark/evaluation) python experiments/toolbench/scripts/run_pipeline.py - Key Config:
experiments/toolbench/configs/pipeline_config.json- Switch mode: modify
common_config.use_local_modeltotrueorfalse - Local mode requires
local_model_pathpointing to model weights
- Switch mode: modify
2. ALFWorld Embodied Intelligence Experiment
- Overview: Text-based interactive household decision tasks, evaluating watermark impact on agent planning and execution.
- Directory:
experiments/alfworld/ - Environment Install:
pip install alfworld # Install on top of AgentMark environment - Run Pipeline:
conda activate AgentMark # Run full pipeline (baseline/watermark/evaluation) python experiments/alfworld/scripts/run_experiment.py --config experiments/alfworld/configs/config.json - Key Config:
experiments/alfworld/configs/config.json
3. Oasis Social Media Experiment
[!NOTE]
- The
oasis/directory is a modified submodule containing customized watermark logic.- Use a separate
oasisenvironment (Python 3.10+).
-
Environment Install:
# 1. Create environment (Python 3.10+ recommended)
conda create -n oasis python=3.10 -y
conda activate oasis

# 2. Install Oasis package
pip install camel-oasis
See Oasis README for details.
-
Overview: Simulates user behavior and watermark injection on Twitter and Reddit.
-
Directory:
experiments/oasis_watermark/ -
Twitter Experiment:
- Directory:
experiments/oasis_watermark/twitter_watermark_experiment/ - Run:
cd experiments/oasis_watermark/twitter_watermark_experiment
# Configure config.py or set DEEPSEEK_API_KEY environment variable
python run_experiment.py
# Run evaluation
python evaluate_metrics_llm.py
- Directory:
-
Reddit Experiment:
- Directory:
experiments/oasis_watermark/reddit_watermark_experiment/ - Run:
cd experiments/oasis_watermark/reddit_watermark_experiment python run_experiment.py # Run evaluation python evaluate_metrics_llm.py - Note: Simulates AI-related discussions in the
r/TechFuturecommunity.
- Directory:
4. RLNC Robustness Evaluation
- Overview: Tests RLNC (Random Linear Network Coding) watermark scheme recovery under packet loss/erasure scenarios.
- Directory:
experiments/rlnc_trajectory/ - Core Scripts:
Script Function scripts/rlnc_step_erasure_eval.pyErasure robustness evaluation (simulates various packet loss rates) scripts/analyze_fpr.pyFalse Positive Rate (FPR) analysis - simulates "no watermark" and "wrong key" attack scenarios - Run Robustness Evaluation:
cd experiments/rlnc_trajectory python scripts/rlnc_step_erasure_eval.py --config rlnc_eval_config.json - Run FPR Analysis:
python scripts/analyze_fpr.py --config rlnc_fpr_config.json - Key Configs:
rlnc_eval_config.json,rlnc_fpr_config.json
5. Semantic Rewriting Robustness Evaluation
- Overview: Tests differential watermark robustness against semantic rewriting attacks.
- Directory:
experiments/semantic_rewriting/ - Run:
cd experiments/semantic_rewriting
python scripts/robustness_test.py \
    --task data/001_task_0.json \
    --bits data/decoded_bits.json \
    --steps 5
License
This project is licensed under the MIT License.


Similar repos




Languages
Python
79.5%
TypeScript
13.0%
MDX
5.0%
Jupyter Notebook
1.4%
README
AgentMark is an experimental and evaluation framework for behavioral watermarking of LLM agents, implementing the utility-preserving and distribution-preserving watermark algorithms proposed in the Agent Mark paper.
The project provides a reproducible, modular, and extensible codebase to evaluate watermark performance, robustness, and stealth in complex agent tasks. It decomposes agent decision-making into planning behavior and execution action, embedding watermarks at the planning stage via distribution-preserving sampling to maintain downstream utility while enabling verifiable ownership protection.
✨ Key Features
- 💎 Utility Preservation: Strict distribution-preserving sampling keeps watermarked behavior statistically indistinguishable from the original.
- 🛡️ Robustness: Erasure-resilient coding and context-bound randomness handle missing logs and truncated trajectories.
- 🌍 Multi-environment Support: Covers tool use, embodied intelligence, and social simulations.
🎮 Supported Environments
- 🛠️ ToolBench: Complex tool-using scenarios with real-world API calls.
- 🏠 ALFWorld: Text-based interactive household decision tasks.
- 📱 Oasis (Twitter/Reddit): Social-media behavior watermarking experiments.
📖 Table of Contents
📂 Project Structure
AgentMark/
├── assets/                         # Project assets (images, PDF)
├── agentmark/                      # Core library: watermark algorithms
│   ├── core/                       # Core watermark logic (ECC, sampling)
│   ├── environments/               # Environment adapters (ToolBench, ALFWorld)
│   └── data/                       # Bitstreams and configuration data
├── experiments/                    # Experimental implementations
│   ├── toolbench/                  # ToolBench API tool-use experiments
│   │   ├── scripts/                # Pipeline and analysis scripts
│   │   ├── configs/                # Pipeline config files
│   │   ├── tools/                  # Evaluation tools (StableToolBench)
│   │   ├── MarkLLM/                # SynthID watermark library (local mode)
│   ├── alfworld/                   # ALFWorld embodied intelligence experiments
│   │   ├── scripts/                # Experiment and analysis scripts
│   │   └── configs/                # Config files
│   ├── oasis_watermark/            # Social-media experiments
│   │   ├── twitter_watermark_experiment/  # Twitter simulation
│   │   ├── reddit_watermark_experiment/   # Reddit simulation
│   │   └── oasis/                  # Modified Oasis framework
│   ├── rlnc_trajectory/            # RLNC robustness evaluation
│   │   ├── scripts/                # Erasure eval and FPR analysis
│   │   └── *.json                  # Config files
│   └── semantic_rewriting/         # Semantic rewriting robustness tests
│       ├── scripts/                # Robustness test scripts
│       └── data/                   # Sample task data
├── output/                         # Logs, predictions, analysis outputs
├── environment.yml                 # Conda environment (Python 3.9)
├── requirements.txt                # Python dependencies (pip)
├── .env.example                    # Environment variable template
├── LICENSE                         # MIT License
└── README.md                       # English README
🚀 Quick Start
1. ⚙️ Environment Setup
For ToolBench and ALFWorld experiments (Python 3.9)
Use Conda to manage the environment:
# Create and activate environment
conda env create -f environment.yml
conda activate AgentMark

# Or install manually
pip install -r requirements.txt
2. Environment Variables
Copy and edit the environment template:
cp .env.example .env
vim .env
# Fill in your API key (OpenAI / DeepSeek etc.)
# Use 'export KEY=VALUE' format or apply with:
export $(grep -v '^#' .env | xargs)
3. Dataset Preparation
ToolBench
[!IMPORTANT] ToolBench dataset is required! You must complete the steps below before running ToolBench experiments.
Download steps:
-
Download the ToolBench dataset
From the ToolBench repository, download the full dataset including:
queries: test query taskstools: API tool definitions (16,000+ tools)reference answers: evaluation references
# Recommended: use Git LFS or download from Releases # Dataset size ~2-3 GB -
Place into the correct directory
Put the extracted
datafolder underexperiments/toolbench/data/:# Expected structure AgentMark/ └── experiments/ └── toolbench/ └── data/ └── data/ # extracted data folder ├── test_query/ ├── toolenv/ │ └── tools/ # tool JSON definitions └── answer/ -
Verify dataset
Make sure
experiments/toolbench/data/data/toolenv/toolscontains multiple category subfolders (e.g.,Search/,Social_Media/) and JSON tool files inside.
ALFWorld
The dataset is downloaded automatically to ~/.cache/alfworld, or run manually:
alfworld-download
experiments/alfworld/configs/base_config.yaml is preconfigured to /root/.cache/alfworld.
[!NOTE] Oasis (social media) experiments require a separate environment (Python 3.10+). Please refer to the Oasis Social Media Experiments section below.
4. Dashboard Visualization
The dashboard provides interactive watermark experiments with real-time comparison and decoding analysis.
Requirements
- Node.js: 18.0+ (LTS recommended)
- NPM: comes with Node.js
- Python: backend runs in AgentMark environment
Steps
Step 1: Start backend
# Ensure you are in the project root
conda activate AgentMark
python dashboard/server/app.py
When you see Uvicorn running on http://0.0.0.0:8000, the backend is running.
Note: backend listens on port 8000 by default.
Step 2: Start frontend
cd dashboard
npm install  # first time only
npm run dev
You will see a local URL, typically: http://localhost:5173
Step 3: Open the app
Visit http://localhost:5173 or http://127.0.0.1:5173 in your browser.
Common Issues
- Port in use: if 8000 or 5173 is occupied, stop the conflicting process or change config (frontend:
dashboard/vite.config.ts, backend:dashboard/server/app.py). - Missing dependency: if you see
ModuleNotFoundError, install the missing package withpip install <package>.
✅ Using Our Plugin
This flow validates the "tool calling + watermark sampling" plugin route: external agents don't modify business code, only change the endpoint address (OPENAI_BASE_URL).
Workflow: User input (Add Agent mode) → Gateway performs watermark sampling → Tool calls executed.
Step 1: Start Gateway Proxy (AgentMark Proxy)
Open Terminal 1:
Linux/macOS:
cd AgentMark
source ~/miniconda3/etc/profile.d/conda.sh && conda activate AgentMark

export DEEPSEEK_API_KEY=sk-your-key
export TARGET_LLM_MODEL=deepseek-chat
export AGENTMARK_DEBUG=1
export AGENTMARK_TOOL_MODE=proxy   # Use "proxy constructs tool_calls" plugin mode

uvicorn agentmark.proxy.server:app --host 0.0.0.0 --port 8001
Windows PowerShell:
cd AgentMark
conda activate AgentMark

$env:DEEPSEEK_API_KEY="sk-your-key"
$env:TARGET_LLM_MODEL="deepseek-chat"
$env:AGENTMARK_DEBUG="1"
$env:AGENTMARK_TOOL_MODE="proxy"

uvicorn agentmark.proxy.server:app --host 0.0.0.0 --port 8001
Step 2: Start Dashboard Backend
Open Terminal 2:
cd AgentMark
conda activate AgentMark
python dashboard/server/app.py
Step 3: Start Frontend (Visualization Dashboard)
Open Terminal 3:
cd AgentMark
cd dashboard
npm install  # Only needed first time
npm i @react-three/fiber @react-three/drei three
npm run dev
Browser access: http://localhost:5173
You can view sessions and watermark visualizations on the frontend.
Step 4: Use Add Agent Mode in the Dashboard
- Open the dashboard in your browser.
- Select Add Agent on the welcome screen.
- Fill in your API key (DeepSeek/OpenAI) and optional repo URL, then send a message.
Step 5: Verify Watermark Injection
In the gateway proxy terminal you should see:
[agentmark:scoring_request]: Scoring instruction injection[agentmark:tool_calls_proxy]: Gateway-constructed tool calls (with parameters)[watermark]: Watermark results and visualization data
In the frontend dashboard you can:
- View current session and conversation history
- Visualize watermark distribution and statistics
- Analyze watermark decoding results
Note: The gateway extracts candidate tools from the request's
toolsparameter and performs watermark sampling selection.
Troubleshooting
-
502 Bad Gateway Error: If you encounter
502 Bad Gatewaywhen calling the API, it is often caused by a global proxy configuration (e.g.,http_proxy) interfering with localhost connections.Fix: set
no_proxywhen starting the services to ensure local traffic bypasses the proxy.export no_proxy=localhost,127.0.0.1,0.0.0.0 # Then restart the proxy and backend
📚 Experiment Guide
Detailed experimental guides are as follows:
1. ToolBench Tool Calling Experiment
- Overview: Simulates real-world API calling scenarios to evaluate watermark impact on tool usage and robustness.
- Directory:
experiments/toolbench/ - Two Running Modes:
Mode Config ( use_local_model)Description API Mode false(default)Calls remote LLM APIs (e.g., DeepSeek, OpenAI), watermark embedded via behavioral sampling Local Mode trueLoads local models (e.g., Llama-3), combines with SynthID text watermarking - Run Pipeline:
conda activate AgentMark # Run full pipeline (baseline/watermark/evaluation) python experiments/toolbench/scripts/run_pipeline.py - Key Config:
experiments/toolbench/configs/pipeline_config.json- Switch mode: modify
common_config.use_local_modeltotrueorfalse - Local mode requires
local_model_pathpointing to model weights
- Switch mode: modify
2. ALFWorld Embodied Intelligence Experiment
- Overview: Text-based interactive household decision tasks, evaluating watermark impact on agent planning and execution.
- Directory:
experiments/alfworld/ - Environment Install:
pip install alfworld # Install on top of AgentMark environment - Run Pipeline:
conda activate AgentMark # Run full pipeline (baseline/watermark/evaluation) python experiments/alfworld/scripts/run_experiment.py --config experiments/alfworld/configs/config.json - Key Config:
experiments/alfworld/configs/config.json
3. Oasis Social Media Experiment
[!NOTE]
- The
oasis/directory is a modified submodule containing customized watermark logic.- Use a separate
oasisenvironment (Python 3.10+).
-
Environment Install:
# 1. Create environment (Python 3.10+ recommended)
conda create -n oasis python=3.10 -y
conda activate oasis

# 2. Install Oasis package
pip install camel-oasis
See Oasis README for details.
-
Overview: Simulates user behavior and watermark injection on Twitter and Reddit.
-
Directory:
experiments/oasis_watermark/ -
Twitter Experiment:
- Directory:
experiments/oasis_watermark/twitter_watermark_experiment/ - Run:
cd experiments/oasis_watermark/twitter_watermark_experiment
# Configure config.py or set DEEPSEEK_API_KEY environment variable
python run_experiment.py
# Run evaluation
python evaluate_metrics_llm.py
- Directory:
-
Reddit Experiment:
- Directory:
experiments/oasis_watermark/reddit_watermark_experiment/ - Run:
cd experiments/oasis_watermark/reddit_watermark_experiment python run_experiment.py # Run evaluation python evaluate_metrics_llm.py - Note: Simulates AI-related discussions in the
r/TechFuturecommunity.
- Directory:
4. RLNC Robustness Evaluation
- Overview: Tests RLNC (Random Linear Network Coding) watermark scheme recovery under packet loss/erasure scenarios.
- Directory:
experiments/rlnc_trajectory/ - Core Scripts:
Script Function scripts/rlnc_step_erasure_eval.pyErasure robustness evaluation (simulates various packet loss rates) scripts/analyze_fpr.pyFalse Positive Rate (FPR) analysis - simulates "no watermark" and "wrong key" attack scenarios - Run Robustness Evaluation:
cd experiments/rlnc_trajectory python scripts/rlnc_step_erasure_eval.py --config rlnc_eval_config.json - Run FPR Analysis:
python scripts/analyze_fpr.py --config rlnc_fpr_config.json - Key Configs:
rlnc_eval_config.json,rlnc_fpr_config.json
5. Semantic Rewriting Robustness Evaluation
- Overview: Tests differential watermark robustness against semantic rewriting attacks.
- Directory:
experiments/semantic_rewriting/ - Run:
cd experiments/semantic_rewriting
python scripts/robustness_test.py \
    --task data/001_task_0.json \
    --bits data/decoded_bits.json \
    --steps 5
License
This project is licensed under the MIT License.
Similar repos
Languages
Python
79.5%
TypeScript
13.0%
MDX
5.0%
Jupyter Notebook
1.4%