A dynamic DNS client tool that supports AliDNS, Cloudflare, Google Domains, DNSPod, HE.net & DuckDNS & DreamHost, etc, written in Go.
Go
1,781
667 commits
updated Sep 29, 2026
 ██████╗  ██████╗ ██████╗ ███╗   ██╗███████╗
██╔════╝ ██╔═══██╗██╔══██╗████╗  ██║██╔════╝
██║  ███╗██║   ██║██║  ██║██╔██╗ ██║███████╗
██║   ██║██║   ██║██║  ██║██║╚██╗██║╚════██║
╚██████╔╝╚██████╔╝██████╔╝██║ ╚████║███████║
 ╚═════╝  ╚═════╝ ╚═════╝ ╚═╝  ╚═══╝╚══════╝



GoDNS is a self-hosted dynamic DNS (DDNS) client with multi-provider support and a built-in web panel. It is a rewrite in Go of my early DynDNS open-source project.
If you want a managed DDNS service instead of self-hosting GoDNS yourself, try godns.app.
It is a hosted option for users who want DDNS without running their own server, managing DNS manually, or even owning a domain in advance.
Below is the built-in web panel of the open-source GoDNS project:

| Provider | IPv4 support | IPv6 support | Root Domain | Subdomains |
|---|---|---|---|---|
| Cloudflare | ✅ | ✅ | ✅ | ✅ |
| DigitalOcean | ✅ | ✅ | ✅ | ✅ |
| Google Domains | ✅ | ✅ | ❌ | ✅ |
| DNSPod | ✅ | ✅ | ✅ | ✅ |
| Dynv6 | ✅ | ✅ | ❌ | ✅ |
| HE.net (Hurricane Electric) | ✅ | ✅ | ✅ | ✅ |
| AliDNS | ✅ | ✅ | ✅ | ✅ |
| DuckDNS | ✅ | ✅ | ❌ | ✅ |
| Dreamhost | ✅ | ✅ | ❌ | ✅ |
| No-IP | ✅ | ✅ | ❌ | ✅ |
| Scaleway | ✅ | ✅ | ✅ | ✅ |
| Linode | ✅ | ✅ | ✅ | ✅ |
| Strato | ✅ | ✅ | ❌ | ✅ |
| LoopiaSE | ✅ | ✅ | ❌ | ✅ |
| Infomaniak | ✅ | ✅ | ❌ | ✅ |
| Hetzner | ✅ | ✅ | ✅ | ✅ |
| OVH | ✅ | ✅ | ❌ | ✅ |
| Porkbun | ✅ | ✅ | ✅ | ✅ |
| Dynu | ✅ | ✅ | ❌ | ✅ |
| IONOS | ✅ | ✅ | ❌ | ✅ |
| TransIP | ✅ | ✅ | ❌ | ✅ |
| name.com | ✅ | ✅ | ✅ | ✅ |
Tip: You can follow this issue to view the current status of DDNS for root domains.
Choose the path that fits you best:
Linux
MacOS
ARM Linux (Raspberry Pi, etc.)
Windows
MIPS32 platform
To compile binaries for MIPS (mips or mipsle), run:
GOOS=linux GOARCH=mips/mipsle GOMIPS=softfloat go build -a
The binary can run on routers as well.
To self-host GoDNS, it is assumed:
NS records pointing at a supported provider)Alternatively, you can sign in to DuckDNS (with a social account) and get a subdomain on the duckdns.org domain for free.
Choose one of the following installation methods:
brew install godns
cd cmd/godns        # go to the GoDNS directory
go mod download     # get dependencies
go build            # build
Print usage/help by running:
$ ./godns -h
Usage of ./godns:
  -c string
        Specify a config file (default "./config.json")
  -h    Show help
config.json, or make a copy of config_sample.yaml and name it as config.yaml.-c=path/to/your/file.json option🆕 GoDNS now supports multiple DNS providers simultaneously!
You can now configure domains from different DNS providers in a single configuration file, allowing you to:
📖 View the complete Multi-Provider Configuration Guide for detailed setup instructions and examples.
GoDNS supports 2 different configuration file formats:
By default, GoDNS uses JSON config file. However, you can specify to use the YAML format via: ./godns -c /path/to/config.yaml
GoDNS supports dynamic loading of configuration. If you modify the configuration file, GoDNS will automatically reload the configuration and apply the changes.
provider — One of the supported provider to use: Cloudflare, Google, DNSPod, AliDNS, HE, DuckDNS or Dreamhost.email — Email or account name of the DNS provider.password — Password of the DNS provider.login_token — API token of the DNS provider.domains — Domains list, with your subdomains.ip_urls — A URL array for fetching one's public IPv4 address.ipv6_urls — A URL array for fetching one's public IPv6 address.ip_type — Switch deciding if IPv4 or IPv6 should be used (when supported). Available values: IPv4 or IPv6.interval — How often (in seconds) the public IP should be updated.socks5_proxy — Socks5 proxy server.resolver — Address of a public DNS server to use. For instance to use Google's public DNS, you can set 8.8.8.8 when using GoDNS in IPv4 mode or 2001:4860:4860::8888 in IPv6 mode.skip_ssl_verify - Skip verification of SSL certificates for https requests.By simply putting @ into sub_domains, for example:
"domains": [{
      "domain_name": "example.com",
      "sub_domains": ["@"]
    }]
For Cloudflare, you need to provide the email & Global API Key as a password (or to use the API token) and configure all the domains & subdomains.
By setting the option proxied = true, the record receives the performance and security benefits of Cloudflare. This option is only available for Cloudflare.
{
  "provider": "Cloudflare",
  "email": "[email protected]",
  "password": "Global API Key",
  "domains": [
    {
      "domain_name": "example.com",
      "sub_domains": ["www", "test"]
    },
    {
      "domain_name": "example2.com",
      "sub_domains": ["www", "test"]
    }
  ],
  "resolver": "8.8.8.8",
  "ip_urls": ["https://api.ip.sb/ip"],
  "ip_type": "IPv4",
  "interval": 300,
  "socks5_proxy": "",
  "proxied": false
}
{
  "provider": "Cloudflare",
  "login_token": "API Token",
  "domains": [
    {
      "domain_name": "example.com",
      "sub_domains": ["www", "test"]
    },
    {
      "domain_name": "example2.com",
      "sub_domains": ["www", "test"]
    }
  ],
  "resolver": "8.8.8.8",
  "ip_urls": ["https://api.ip.sb/ip"],
  "ip_type": "IPv4",
  "interval": 300,
  "socks5_proxy": ""
}
For DNSPod, you need to provide your API Token(you can create it here), and config all the domains & subdomains.
{
  "provider": "DNSPod",
  "login_token": "your_id,your_token",
  "domains": [
    {
      "domain_name": "example.com",
      "sub_domains": ["www", "test"]
    },
    {
      "domain_name": "example2.com",
      "sub_domains": ["www", "test"]
    }
  ],
  "resolver": "8.8.8.8",
  "ip_urls": ["https://api.ip.sb/ip"],
  "ip_type": "IPv4",
  "interval": 300,
  "socks5_proxy": ""
}
For DigitalOcean, you need to provide an API Token with the domain scopes (you can create it here), and config all the domains & subdomains.
{
  "provider": "DigitalOcean",
  "login_token": "dop_v1_00112233445566778899aabbccddeeff",
  "domains": [
    {
      "domain_name": "example.com",
      "sub_domains": ["@", "www"]
    }
  ],
  "resolver": "8.8.8.8",
  "ip_urls": ["https://api.ip.sb/ip"],
  "ip_type": "IPv4",
  "interval": 300
}
For Dreamhost, you need to provide your API Token(you can create it here), and config all the domains & subdomains.
{
  "provider": "Dreamhost",
  "login_token": "your_api_key",
  "domains": [
    {
      "domain_name": "example.com",
      "sub_domains": ["www", "test"]
    },
    {
      "domain_name": "example2.com",
      "sub_domains": ["www", "test"]
    }
  ],
  "resolver": "8.8.8.8",
  "ip_urls": ["https://api.ip.sb/ip"],
  "ip_type": "IPv4",
  "interval": 300,
  "resolver": "ns1.dreamhost.com",
  "socks5_proxy": ""
}
For Dynv6, only need to provide the token, config 1 default domain & subdomains.
{
  "provider": "Dynv6",
  "password": "",
  "login_token": "1234567ABCDEFGabcdefg123456789",
  "domains": [
    {
      "domain_name": "dynv6.net",
      "sub_domains": ["myname"]
    }
  ],
  "resolver": "8.8.8.8",
  "ip_urls": ["https://api.ip.sb/ip"],
  "ip_type": "IPv4",
  "interval": 300,
  "socks5_proxy": ""
}
For Google Domains, you need to provide email & password, and config all the domains & subdomains.
{
  "provider": "Google",
  "email": "Your_Username",
  "password": "Your_Password",
  "domains": [
    {
      "domain_name": "example.com",
      "sub_domains": ["www", "test"]
    },
    {
      "domain_name": "example2.com",
      "sub_domains": ["www", "test"]
    }
  ],
  "resolver": "8.8.8.8",
  "ip_urls": ["https://api.ip.sb/ip"],
  "ip_type": "IPv4",
  "interval": 300,
  "socks5_proxy": ""
}
For AliDNS, you need to provide AccessKeyID & AccessKeySecret as email & password, and config all the domains & subdomains.
{
  "provider": "AliDNS",
  "email": "AccessKeyID",
  "password": "AccessKeySecret",
  "login_token": "",
  "domains": [
    {
      "domain_name": "example.com",
      "sub_domains": ["www", "test"]
    },
    {
      "domain_name": "example2.com",
      "sub_domains": ["www", "test"]
    }
  ],
  "resolver": "8.8.8.8",
  "ip_urls": ["https://api.ip.sb/ip"],
  "ip_type": "IPv4",
  "interval": 300,
  "socks5_proxy": ""
}
For DuckDNS, the only thing needed is to provide the token, config 1 default domain & subdomains.
{
  "provider": "DuckDNS",
  "password": "",
  "login_token": "3aaaaaaaa-f411-4198-a5dc-8381cac61b87",
  "domains": [
    {
      "domain_name": "www.duckdns.org",
      "sub_domains": ["myname"]
    }
  ],
  "resolver": "8.8.8.8",
  "ip_urls": ["https://api.ip.sb/ip"],
  "ip_type": "IPv4",
  "interval": 300,
  "socks5_proxy": ""
}
{
  "provider": "NoIP",
  "email": "[email protected]",
  "password": "YourPassword",
  "domains": [
    {
      "domain_name": "ddns.net",
      "sub_domains": ["timothyye6"]
    }
  ],
  "ip_type": "IPv4",
  "ip_urls": ["https://api.ip.sb/ip"],
  "resolver": "8.8.8.8",
  "interval": 300,
  "socks5_proxy": ""
}
For HE, email is not needed, just fill in the DDNS key as a password, and configure all the domains & subdomains.
{
  "provider": "HE",
  "password": "Your DDNS Key",
  "login_token": "",
  "domains": [
    {
      "domain_name": "example.com",
      "sub_domains": ["www", "test"]
    },
    {
      "domain_name": "example2.com",
      "sub_domains": ["www", "test"]
    }
  ],
  "resolver": "8.8.8.8",
  "ip_urls": ["https://api.ip.sb/ip"],
  "ip_type": "IPv4",
  "interval": 300,
  "socks5_proxy": ""
}
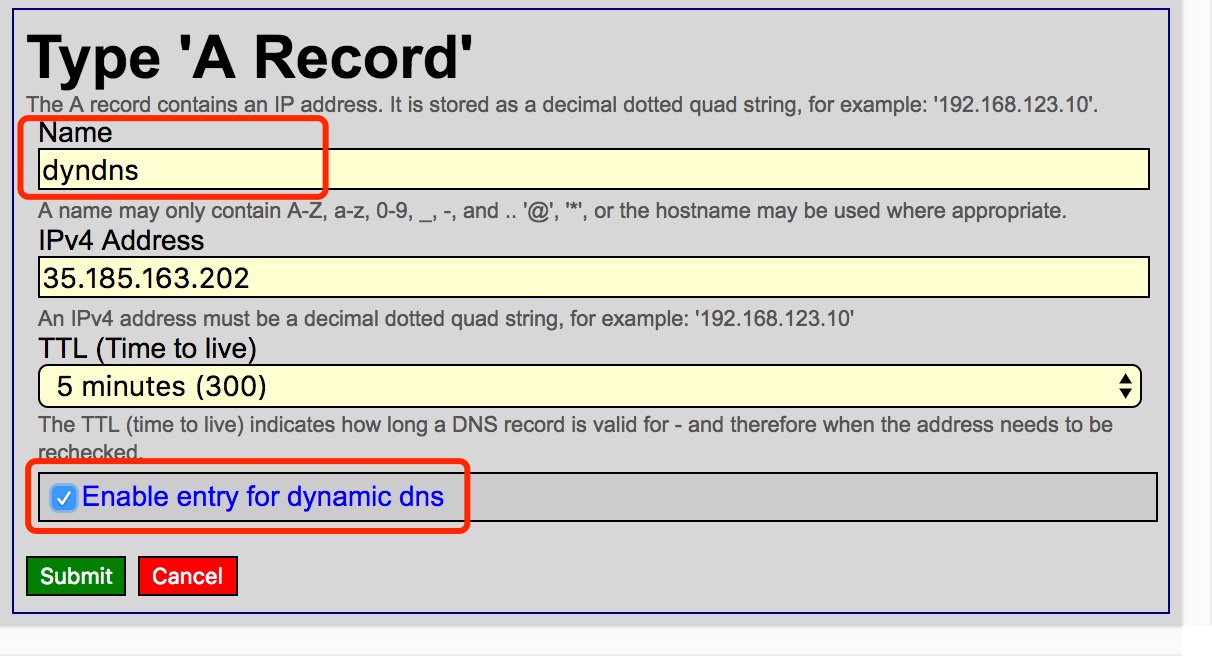
Add a new "A record" and make sure that "Enable entry for dynamic dns" is checked:
Fill in your own DDNS key or generate a random DDNS key for this newly created "A record":
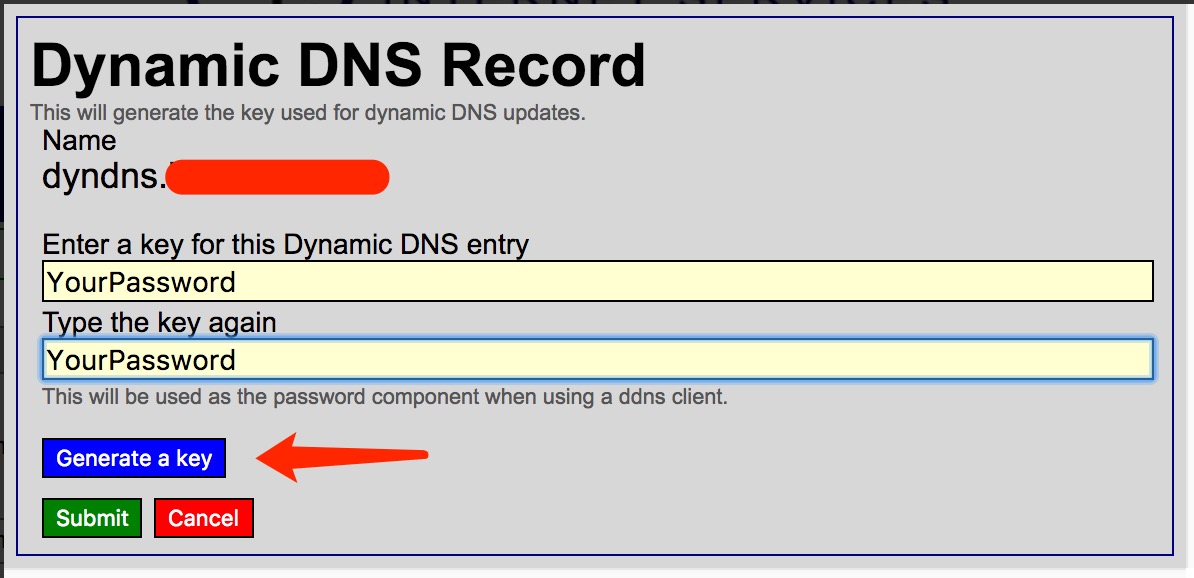
Remember the DDNS key and set it in the password property in the configuration file.
NOTICE: If you have multiple domains or subdomains, make sure their DDNS key are the same.
For Scaleway, you need to provide an API Secret Key as the login_token (How to generate an API key), and configure the domains and subdomains. domain_name should equal a DNS zone, or the root domain in Scaleway. TTL for the DNS records will be set to the interval value. Make sure A or AAAA records exist for the relevant sub domains, these can be set up in the Scaleway console.
{
  "provider": "Scaleway",
  "login_token": "API Secret Key",
  "domains": [
    {
      "domain_name": "example.com",
      "sub_domains": ["www", "@"]
    },
    {
      "domain_name": "samplednszone.example.com",
      "sub_domains": ["www", "test"]
    }
  ],
  "resolver": "8.8.8.8",
  "ip_urls": ["https://api.ip.sb/ip"],
  "ip_type": "IPv4",
  "interval": 300
}
To authenticate with the Linode API you will need to provide a Personal Access Token with "Read/Write" access on the "Domain" scope. Linode has a help page about creating access tokens. Pass this token into the login_token field of the config file.
The domain_name field of the config file must be the name of an existing Domain managed by Linode. Linode has a help page about adding domains. The GoDNS Linode handler will not create domains automatically but will create subdomains automatically.
The GoDNS Linode handler currently uses a fixed TTL of 30 seconds for Linode DNS records.
{
  "provider": "Linode",
  "login_token": ${PERSONAL_ACCESS_TOKEN},
  "domains": [{
      "domain_name": "example.com",
      "sub_domains": ["www","@"]
    },{
      "domain_name": "samplednszone.example.com",
      "sub_domains": ["www","test"]
    }
  ],
  "resolver": "8.8.8.8",
  "ip_urls": ["https://api.ip.sb/ip"],
  "ip_type": "IPv4",
  "interval": 300
}
For Strato, you need to provide email & password and configure all the domains & subdomains. More Info: German English
{
  "provider": "strato",
  "password": "Your_Password",
  "domains": [
    {
      "domain_name": "example.com",
      "sub_domains": ["www", "test"]
    },
    {
      "domain_name": "example2.com",
      "sub_domains": ["www", "test"]
    }
  ],
  "resolver": "8.8.8.8",
  "ip_urls": ["https://api.ip.sb/ip"],
  "ip_type": "IPv4",
  "interval": 300,
  "socks5_proxy": ""
}
For LoopiaSE, you need to provide a username & password and configure all the domains & subdomains. More info: Swedish
{
  "provider": "LoopiaSE",
  "email": "Your_Username",
  "password": "Your_Password",
  "domains": [
    {
      "domain_name": "example.com",
      "sub_domains": ["www", "test"]
    },
    {
      "domain_name": "example2.com",
      "sub_domains": ["www", "test"]
    }
  ],
  "resolver": "8.8.8.8",
  "ip_urls": ["https://api.ip.sb/ip"],
  "ip_type": "IPv4",
  "interval": 300,
  "socks5_proxy": ""
}
For Infomaniak, you need to provide a username & password and configure all the domains & subdomains. More info: English
{
  "provider": "Infomaniak",
  "email": "Your_Username",
  "password": "Your_Password",
  "domains": [
    {
      "domain_name": "example.com",
      "sub_domains": ["www", "test"]
    },
    {
      "domain_name": "example2.com",
      "sub_domains": ["www", "test"]
    }
  ],
  "resolver": "8.8.8.8",
  "ip_urls": ["https://api.ip.sb/ip"],
  "ip_type": "IPv4",
  "interval": 300,
  "socks5_proxy": ""
}
For Hetzner, you have to create an access token. This can be done in the DNS-Console. (Person Icon in the top left corner --> API Tokens) Notice: If a domain has multiple Records only the first Record will be updated. Make sure there is just one record.
{
  "provider": "hetzner",
  "login_token": "<token>",
  "domains": [
    {
      "domain_name": "example.com",
      "sub_domains": ["www", "test"]
    },
    {
      "domain_name": "example2.com",
      "sub_domains": ["www", "test"]
    }
  ],
  "resolver": "8.8.8.8",
  "ip_urls": ["https://api.ip.sb/ip"],
  "ip_type": "IPv4"
}
For OVH, you need to provide a Consumerkey, an Appsecret, and an Appkey and configure all the domains & subdomains. The needed values can be obtained by visiting this site Rights should be '*' on GET, POST and PUT More info: help.ovhcloud.com
{
  "provider": "OVH",
  "consumer_key": "e389ac80cc8da9c7451bc7b8f171bf4f",
  "app_secret": "d1ffee354d3643d70deaab48a09131fd",
  "app_key": "cd338839d6472064",
  "domains": [
    {
      "domain_name": "example.com",
      "sub_domains": ["www", "test"]
    },
    {
      "domain_name": "example2.com",
      "sub_domains": ["www", "test"]
    }
  ],
  "resolver": "8.8.8.8",
  "ip_urls": ["https://api.ip.sb/ip"],
  "ip_type": "IPv4",
  "interval": 300,
  "socks5_proxy": ""
}
For Porkbun, you need to provide your API key as login_token and secret key as password.
Get your API credentials from Porkbun API Management.
{
  "provider": "Porkbun",
  "login_token": "pk1_your_api_key",
  "password": "sk1_your_secret_key",
  "domains": [
    {
      "domain_name": "example.com",
      "sub_domains": ["@", "www", "test"]
    }
  ],
  "resolver": "8.8.8.8",
  "ip_urls": ["https://api.ipify.org"],
  "ip_type": "IPv4",
  "interval": 300
}
For name.com, you need to provide your account username as email and your API token as login_token.
Generate an API token from name.com API settings. The provider uses the CORE v1 API and creates the record if it does not exist yet.
{
  "provider": "NameDotCom",
  "email": "your_username",
  "login_token": "your_api_token",
  "domains": [
    {
      "domain_name": "example.com",
      "sub_domains": ["@", "www", "test"]
    }
  ],
  "resolver": "8.8.8.8",
  "ip_urls": ["https://api.ipify.org"],
  "ip_type": "IPv4",
  "interval": 300
}
For Dynu, you need to configure the password, config 1 default domain & subdomain.
{
  "provider": "Dynu",
  "password": "Your_Password",
  "domains": [
    {
      "domain_name": "your_domain.com",
      "sub_domains": ["your_subdomain"]
    }
  ],
  "resolver": "8.8.8.8",
  "ip_urls": ["https://api.ip.sb/ip"],
  "ip_type": "IPv4",
  "interval": 300,
  "socks5_proxy": ""
}
This is for IONOS Hosting Services, not IONOS Cloud.
You'll need to sign up for API Access to Hosting Services, then create an API Key.
You can find a full guide in the IONOS API Documentation.
Note: The API-Key used by GoDNS must follow the form publicprefix.secret as described in the aforementioned documentation.
provider: IONOS
login_token: publicprefix.secret
domains:
  - domain_name: example.com
    sub_domains:
      - somesubdomain
      - anothersubdomain
resolver: 1.1.1.1
ip_urls:
  - https://api.ipify.org
ip_type: IPv4
interval: 300
socks5_proxy: ""
For TransIP, you need to provide your api private key as login_token and username as email, and configure all the domains & subdomains.
provider: TransIP
email: account_name
login_token: api_key
domains:
  - domain_name: example.com
    sub_domains:
      - "@"
      - somesubdomain
      - anothersubdomain
resolver: 1.1.1.1
ip_urls:
  - https://api.ipify.org
ip_type: IPv4
interval: 300
socks5_proxy: ""
GoDNS can send a notification each time the IP changes.
Emails are sent over SMTP. Update your configuration with the following snippet:
  "notify": {
    "mail": {
      "enabled": true,
      "smtp_server": "smtp.example.com",
      "smtp_username": "user",
      "smtp_password": "password",
      "smtp_port": 25,
      "send_from": "[email protected]"
      "send_to": "[email protected]"
    }
  }
Each time the IP changes, you will receive an email like this:

To receive a Telegram message each time the IP changes, update your configuration with the following snippet:
  "notify": {
    "telegram": {
      "enabled": true,
      "bot_api_key": "11111:aaaa-bbbb",
      "chat_id": "-123456",
      "message_template": "Domain *{{ .Domain }}* updated to %0A{{ .CurrentIP }}",
      "use_proxy": false
    },
  }
The message_template property supports markdown. New lines need to be escaped with %0A.
To receive a Slack message each time the IP changes, update your configuration with the following snippet:
  "notify": {
    "slack": {
      "enabled": true,
      "bot_api_token": "xoxb-xxx",
      "channel": "your_channel",
      "message_template": "Domain *{{ .Domain }}* updated to \n{{ .CurrentIP }}",
      "use_proxy": false
    },
  }
The message_template property supports markdown. New lines needs to be escaped with \n.
To receive a Discord message each time the IP changes, update your configuration with the following snippit:
  "notify": {
    "discord": {
          "enabled": true,
          "bot_api_token": "discord_bot_token",
          "channel": "your_channel",
          "message_template": "(Optional) Domain *{{ .Domain }}* updated to \n{{ .CurrentIP }}",
        }
  }
To receive a Pushover message each time the IP changes, update your configuration with the following snippet:
  "notify": {
    "pushover": {
      "enabled": true,
      "token": "abcdefghijklmnopqrstuvwxyz1234",
      "user": "abcdefghijklmnopqrstuvwxyz1234",
      "message_template": "",
      "device": "",
      "title": "",
      "priority": 0,
      "html": 1
    }
  }
The message_template property supports html if the html parameter is 1. If it is left empty a default message will be used.
If the device and title parameters are left empty, Pushover will choose defaults see. More details on the priority parameter
can be found on the Pushover API description.
To receive a Bark message each time the IP changes, update your configuration with the following snippet:
  "notify": {
    "bark": {
      "enabled": true,
      "server": "https://api.day.app",
      "device_keys": "",
      "params": "{ \"isArchive\": 1, \"action\": \"none\" }"
    }
  }
server Bark server address. You can use the default official server https://api.day.app or set it to a self-hosted server address.
device_keys device key, supports multiple keys (comma-separated) for batch push.
params Bark request parameters, please refer to Bark API
user Basic auth username of the self-hosted server, same with server side environment variable BARK_SERVER_BASIC_AUTH_USER.
password Basic auth password of the self-hosted server, same with server side environment variable BARK_SERVER_BASIC_AUTH_PASSWORD.
For more information, please refer to the Bark official documentation
To receive an ntfy notification each time the IP changes, update your configuration with the following snippet:
  "notify": {
    "ntfy": {
      "enabled": true,
      "topic": "godns",
      "server": "https://ntfy.sh",
      "token": "",
      "user": "",
      "password": "",
      "priority": "default",
      "tags": "rotating_light",
      "icon": "",
      "message_template": ""
    }
  }
topic The ntfy topic to publish to (required). The topic is essentially a channel name — pick something not easily guessable.
server The ntfy server URL. Defaults to https://ntfy.sh. Set to your self-hosted server address if applicable.
token Access token for authentication (optional). Only needed for self-hosted servers with access control.
user Username for basic authentication (optional). Used with password for self-hosted servers.
password Password for basic authentication (optional). Used with user for self-hosted servers.
priority Message priority: min, low, default, high, or max (optional).
tags Comma-separated list of tags or emoji short codes (optional).
icon URL to an icon to display in the notification (optional).
message_template Custom message template (optional). If empty, defaults to IP address of {{ .Domain }} updated to {{ .CurrentIP }}.
For more information, please refer to the ntfy documentation
Webhook is another feature that GoDNS provides to deliver notifications to other applications while the IP is changed. GoDNS delivers a notification to the target URL via an HTTP GET or POST request.
The configuration section webhook is used for customizing the webhook request. In general, there are 2 fields used for the webhook request:
url: The target URL for sending webhook requests.request_body: The content for sending aPOSTrequest, if this field is empty, an HTTP GET request will be sent instead of the HTTP POST request.
Available variables:
Domain: The current domain.IP: The new IP address.IPType: The type of the IP:IPV4orIPV6.
"webhook": {
  "enabled": true,
  "url": "http://localhost:5000/api/v1/send?domain={{.Domain}}&ip={{.CurrentIP}}&ip_type={{.IPType}}",
  "request_body": ""
}
For this example, a webhook with query string parameters will be sent to the target URL:
http://localhost:5000/api/v1/send?domain=ddns.example.com&ip=192.168.1.1&ip_type=IPV4
"webhook": {
  "enabled": true,
  "url": "http://localhost:5000/api/v1/send",
  "request_body": "{ \"domain\": \"{{.Domain}}\", \"ip\": \"{{.CurrentIP}}\", \"ip_type\": \"{{.IPType}}\" }"
}
For this example, a webhook will be triggered when the IP changes, and the target URL http://localhost:5000/api/v1/send will receive an HTTP POST request with the request body:
{ "domain": "ddns.example.com", "ip": "192.168.1.1", "ip_type": "IPV4" }
Most of the providers support IPv6.
To enable the IPv6 support of GoDNS, there are two solutions to choose from:
Use an online service to lookup the external IPv6
For that:
ip_type as IPv6, and make sure the ipv6_urls is configuredAAAA record instead of an A record in your DNS provider{
"domains": [
{
"domain_name": "example.com",
"sub_domains": ["ipv6"]
}
],
"resolver": "2001:4860:4860::8888",
"ipv6_urls": ["https://api-ipv6.ip.sb/ip"],
"ip_type": "IPv6"
}
Let GoDNS find the IPv6 of the network interface of the machine it is running on (more on that later).
For this to happen, just leave ip_urls and ipv6_urls empty.
Note that the network interface must be configured with an IPv6 for this to work.
For some reasons, if you want to get the IP address associated with a network interface (instead of performing an online lookup), you can specify it in the configuration file this way:
  "ip_urls": [""],
  "ip_interface": "interface-name",
With interface-name replaced by the name of the network interface, e.g. eth0 on Linux or Local Area Connection on Windows.
Note: If ip_urls is also specified, it will be used to perform an online lookup first and the network interface IP will be used as a fallback in case of failure.
On a host with several uplinks, the online IP lookup normally leaves through the default route. If that route sits behind CGNAT while another link has a public address, the lookup returns the wrong IP. query_interface sends the lookup out through a named interface instead:
{
  "ip_urls": ["https://api.ipify.org/"],
  "query_interface": "wan0",
  "ip_type": "IPv4"
}
GoDNS binds the lookup socket to the device itself (SO_BINDTODEVICE on Linux, IP_BOUND_IF on macOS) and uses one of the interface's addresses as the source. The device bind is what forces the route, so no policy-routing rules are needed. On other platforms only the source address is bound, which works when the system's routing already sends that source out the intended link.
Notes:
query_interface is different from ip_interface. query_interface chooses which link the HTTP request leaves through. ip_interface reads the address straight off a local interface without any request.ip_type. Private addresses are fine, e.g. an interface behind a 1:1 NAT.CAP_NET_RAW capability. If the bind fails, the lookup fails rather than silently falling back to the default route.You can make all remote calls go through a SOCKS5 proxy by specifying it in the configuration file this way:
"socks5_proxy": "127.0.0.1:7070"
"use_proxy": true
If you want to get the public IP from a Mikrotik RouterOS device, you can use the following configuration:
"mikrotik": {
  "enabled": false,
  "server": "http://192.168.88.1",
  "username": "admin",
  "password": "password",
  "interface": "pppoe-out"
}
To display debug info, set debug_info as true to enable this feature. By default, the debug info is disabled.
"debug_info": true,
GoDNS supports fetching the public IP from multiple URLs via a simple round-robin algorithm. If the first URL fails, it will try the next one until it succeeds. Here is an example of the configuration:
  "ip_urls": [
  "https://api.ipify.org",
  "https://myip.biturl.top",
  "https://api-ipv4.ip.sb/ip"
  ],
Starting from version 3.1.0, GoDNS provides a web panel to manage the configuration and monitor the status of the domains. The web UI is disabled by default. To enable it, just enable the web_panel in the configuration file.
"web_panel": {
  "enabled": true,
  "addr": "0.0.0.0:9000",
  "username": "admin",
  "password": "123456"
}
After enabling the web panel, you can visit http://localhost:9000 to manage the configuration and monitor the status of the domains.
There are a few ways to run GoDNS.
Note: make sure to set the run_once parameter in your config file so the program will quit after the first run (the default is false).
It can be added to cron or attached to other events on your system.
{
  "...": "...",
  "run_once": true
}
Then run
./godns
nohup ./godns &
Note: when the program stops, it will not be restarted.
Install upstart first (if not available already)
Copy ./config/upstart/godns.conf to /etc/init (and tweak it to your needs)
Start the service:
sudo start godns
Install systemd first (it not available already)
Copy ./config/systemd/godns.service to /lib/systemd/system (and tweak it to your needs)
Start the service:
sudo systemctl enable godns
sudo systemctl start godns
procd is the init system on OpenWRT. If you want to use godns as a service with OpenWRT and procd:
Copy ./config/procd/godns to /etc/init.d (and tweak it to your needs)
Start the service (with root privilege):
service godns enable
service godns start
Available docker registries:
Visit https://hub.docker.com/r/timothyye/godns to fetch the latest docker image. The -p 9000:9000 option exposes the web panel.
With /path/to/config.json as your local configuration file, run:
docker run \
-d --name godns --restart=always \
-v /path/to/config.json:/config.json \
-p 9000:9000 \
timothyye/godns:latest
To run it with a YAML config file:
docker run \
-d --name godns \
-e CONFIG=/config.yaml \
--restart=always \
-v /path/to/config.yaml:/config.yaml \
-p 9000:9000 \
timothyye/godns:latest
Download the latest version of NSSM
In an administrative prompt, from the folder where NSSM was downloaded, e.g. C:\Downloads\nssm\ win64, run:
nssm install YOURSERVICENAME
Follow the interface to configure the service. In the "Application" tab just indicate where the godns.exe file is. Optionally you can also define a description on the "Details" tab and define a log file on the "I/O" tab. Finish by clicking on the "Install service" button.
The service will now start along Windows.
Note: you can uninstall the service by running:
nssm remove YOURSERVICENAME
Contributions are welcome! Please feel free to submit a Pull Request.
Requirements:
1.3.11 or higher1.17 or higherThe frontend project is built with Next.js and daisyUI. To start the development environment, run:
cd web
bun install
bun run dev
To build the frontend, run:
cd web
bun run build
To run the frontend, run:
cd web
bun run start
270 followers · starred Jun 2024
48 followers · starred Dec 2023
15,878 followers · starred Feb 2021
479 followers · starred Oct 2021
A dynamic DNS client tool that supports AliDNS, Cloudflare, Google Domains, DNSPod, HE.net & DuckDNS & DreamHost, etc, written in Go.
Go
1,781
667 commits
updated Sep 29, 2026
 ██████╗  ██████╗ ██████╗ ███╗   ██╗███████╗
██╔════╝ ██╔═══██╗██╔══██╗████╗  ██║██╔════╝
██║  ███╗██║   ██║██║  ██║██╔██╗ ██║███████╗
██║   ██║██║   ██║██║  ██║██║╚██╗██║╚════██║
╚██████╔╝╚██████╔╝██████╔╝██║ ╚████║███████║
 ╚═════╝  ╚═════╝ ╚═════╝ ╚═╝  ╚═══╝╚══════╝
GoDNS is a self-hosted dynamic DNS (DDNS) client with multi-provider support and a built-in web panel. It is a rewrite in Go of my early DynDNS open-source project.
If you want a managed DDNS service instead of self-hosting GoDNS yourself, try godns.app.
It is a hosted option for users who want DDNS without running their own server, managing DNS manually, or even owning a domain in advance.
Below is the built-in web panel of the open-source GoDNS project:
| Provider | IPv4 support | IPv6 support | Root Domain | Subdomains |
|---|---|---|---|---|
| Cloudflare | ✅ | ✅ | ✅ | ✅ |
| DigitalOcean | ✅ | ✅ | ✅ | ✅ |
| Google Domains | ✅ | ✅ | ❌ | ✅ |
| DNSPod | ✅ | ✅ | ✅ | ✅ |
| Dynv6 | ✅ | ✅ | ❌ | ✅ |
| HE.net (Hurricane Electric) | ✅ | ✅ | ✅ | ✅ |
| AliDNS | ✅ | ✅ | ✅ | ✅ |
| DuckDNS | ✅ | ✅ | ❌ | ✅ |
| Dreamhost | ✅ | ✅ | ❌ | ✅ |
| No-IP | ✅ | ✅ | ❌ | ✅ |
| Scaleway | ✅ | ✅ | ✅ | ✅ |
| Linode | ✅ | ✅ | ✅ | ✅ |
| Strato | ✅ | ✅ | ❌ | ✅ |
| LoopiaSE | ✅ | ✅ | ❌ | ✅ |
| Infomaniak | ✅ | ✅ | ❌ | ✅ |
| Hetzner | ✅ | ✅ | ✅ | ✅ |
| OVH | ✅ | ✅ | ❌ | ✅ |
| Porkbun | ✅ | ✅ | ✅ | ✅ |
| Dynu | ✅ | ✅ | ❌ | ✅ |
| IONOS | ✅ | ✅ | ❌ | ✅ |
| TransIP | ✅ | ✅ | ❌ | ✅ |
| name.com | ✅ | ✅ | ✅ | ✅ |
Tip: You can follow this issue to view the current status of DDNS for root domains.
Choose the path that fits you best:
Linux
MacOS
ARM Linux (Raspberry Pi, etc.)
Windows
MIPS32 platform
To compile binaries for MIPS (mips or mipsle), run:
GOOS=linux GOARCH=mips/mipsle GOMIPS=softfloat go build -a
The binary can run on routers as well.
To self-host GoDNS, it is assumed:
NS records pointing at a supported provider)Alternatively, you can sign in to DuckDNS (with a social account) and get a subdomain on the duckdns.org domain for free.
Choose one of the following installation methods:
brew install godns
cd cmd/godns        # go to the GoDNS directory
go mod download     # get dependencies
go build            # build
Print usage/help by running:
$ ./godns -h
Usage of ./godns:
  -c string
        Specify a config file (default "./config.json")
  -h    Show help
config.json, or make a copy of config_sample.yaml and name it as config.yaml.-c=path/to/your/file.json option🆕 GoDNS now supports multiple DNS providers simultaneously!
You can now configure domains from different DNS providers in a single configuration file, allowing you to:
📖 View the complete Multi-Provider Configuration Guide for detailed setup instructions and examples.
GoDNS supports 2 different configuration file formats:
By default, GoDNS uses JSON config file. However, you can specify to use the YAML format via: ./godns -c /path/to/config.yaml
GoDNS supports dynamic loading of configuration. If you modify the configuration file, GoDNS will automatically reload the configuration and apply the changes.
provider — One of the supported provider to use: Cloudflare, Google, DNSPod, AliDNS, HE, DuckDNS or Dreamhost.email — Email or account name of the DNS provider.password — Password of the DNS provider.login_token — API token of the DNS provider.domains — Domains list, with your subdomains.ip_urls — A URL array for fetching one's public IPv4 address.ipv6_urls — A URL array for fetching one's public IPv6 address.ip_type — Switch deciding if IPv4 or IPv6 should be used (when supported). Available values: IPv4 or IPv6.interval — How often (in seconds) the public IP should be updated.socks5_proxy — Socks5 proxy server.resolver — Address of a public DNS server to use. For instance to use Google's public DNS, you can set 8.8.8.8 when using GoDNS in IPv4 mode or 2001:4860:4860::8888 in IPv6 mode.skip_ssl_verify - Skip verification of SSL certificates for https requests.By simply putting @ into sub_domains, for example:
"domains": [{
      "domain_name": "example.com",
      "sub_domains": ["@"]
    }]
For Cloudflare, you need to provide the email & Global API Key as a password (or to use the API token) and configure all the domains & subdomains.
By setting the option proxied = true, the record receives the performance and security benefits of Cloudflare. This option is only available for Cloudflare.
{
  "provider": "Cloudflare",
  "email": "[email protected]",
  "password": "Global API Key",
  "domains": [
    {
      "domain_name": "example.com",
      "sub_domains": ["www", "test"]
    },
    {
      "domain_name": "example2.com",
      "sub_domains": ["www", "test"]
    }
  ],
  "resolver": "8.8.8.8",
  "ip_urls": ["https://api.ip.sb/ip"],
  "ip_type": "IPv4",
  "interval": 300,
  "socks5_proxy": "",
  "proxied": false
}
{
  "provider": "Cloudflare",
  "login_token": "API Token",
  "domains": [
    {
      "domain_name": "example.com",
      "sub_domains": ["www", "test"]
    },
    {
      "domain_name": "example2.com",
      "sub_domains": ["www", "test"]
    }
  ],
  "resolver": "8.8.8.8",
  "ip_urls": ["https://api.ip.sb/ip"],
  "ip_type": "IPv4",
  "interval": 300,
  "socks5_proxy": ""
}
For DNSPod, you need to provide your API Token(you can create it here), and config all the domains & subdomains.
{
  "provider": "DNSPod",
  "login_token": "your_id,your_token",
  "domains": [
    {
      "domain_name": "example.com",
      "sub_domains": ["www", "test"]
    },
    {
      "domain_name": "example2.com",
      "sub_domains": ["www", "test"]
    }
  ],
  "resolver": "8.8.8.8",
  "ip_urls": ["https://api.ip.sb/ip"],
  "ip_type": "IPv4",
  "interval": 300,
  "socks5_proxy": ""
}
For DigitalOcean, you need to provide an API Token with the domain scopes (you can create it here), and config all the domains & subdomains.
{
  "provider": "DigitalOcean",
  "login_token": "dop_v1_00112233445566778899aabbccddeeff",
  "domains": [
    {
      "domain_name": "example.com",
      "sub_domains": ["@", "www"]
    }
  ],
  "resolver": "8.8.8.8",
  "ip_urls": ["https://api.ip.sb/ip"],
  "ip_type": "IPv4",
  "interval": 300
}
For Dreamhost, you need to provide your API Token(you can create it here), and config all the domains & subdomains.
{
  "provider": "Dreamhost",
  "login_token": "your_api_key",
  "domains": [
    {
      "domain_name": "example.com",
      "sub_domains": ["www", "test"]
    },
    {
      "domain_name": "example2.com",
      "sub_domains": ["www", "test"]
    }
  ],
  "resolver": "8.8.8.8",
  "ip_urls": ["https://api.ip.sb/ip"],
  "ip_type": "IPv4",
  "interval": 300,
  "resolver": "ns1.dreamhost.com",
  "socks5_proxy": ""
}
For Dynv6, only need to provide the token, config 1 default domain & subdomains.
{
  "provider": "Dynv6",
  "password": "",
  "login_token": "1234567ABCDEFGabcdefg123456789",
  "domains": [
    {
      "domain_name": "dynv6.net",
      "sub_domains": ["myname"]
    }
  ],
  "resolver": "8.8.8.8",
  "ip_urls": ["https://api.ip.sb/ip"],
  "ip_type": "IPv4",
  "interval": 300,
  "socks5_proxy": ""
}
For Google Domains, you need to provide email & password, and config all the domains & subdomains.
{
  "provider": "Google",
  "email": "Your_Username",
  "password": "Your_Password",
  "domains": [
    {
      "domain_name": "example.com",
      "sub_domains": ["www", "test"]
    },
    {
      "domain_name": "example2.com",
      "sub_domains": ["www", "test"]
    }
  ],
  "resolver": "8.8.8.8",
  "ip_urls": ["https://api.ip.sb/ip"],
  "ip_type": "IPv4",
  "interval": 300,
  "socks5_proxy": ""
}
For AliDNS, you need to provide AccessKeyID & AccessKeySecret as email & password, and config all the domains & subdomains.
{
  "provider": "AliDNS",
  "email": "AccessKeyID",
  "password": "AccessKeySecret",
  "login_token": "",
  "domains": [
    {
      "domain_name": "example.com",
      "sub_domains": ["www", "test"]
    },
    {
      "domain_name": "example2.com",
      "sub_domains": ["www", "test"]
    }
  ],
  "resolver": "8.8.8.8",
  "ip_urls": ["https://api.ip.sb/ip"],
  "ip_type": "IPv4",
  "interval": 300,
  "socks5_proxy": ""
}
For DuckDNS, the only thing needed is to provide the token, config 1 default domain & subdomains.
{
  "provider": "DuckDNS",
  "password": "",
  "login_token": "3aaaaaaaa-f411-4198-a5dc-8381cac61b87",
  "domains": [
    {
      "domain_name": "www.duckdns.org",
      "sub_domains": ["myname"]
    }
  ],
  "resolver": "8.8.8.8",
  "ip_urls": ["https://api.ip.sb/ip"],
  "ip_type": "IPv4",
  "interval": 300,
  "socks5_proxy": ""
}
{
  "provider": "NoIP",
  "email": "[email protected]",
  "password": "YourPassword",
  "domains": [
    {
      "domain_name": "ddns.net",
      "sub_domains": ["timothyye6"]
    }
  ],
  "ip_type": "IPv4",
  "ip_urls": ["https://api.ip.sb/ip"],
  "resolver": "8.8.8.8",
  "interval": 300,
  "socks5_proxy": ""
}
For HE, email is not needed, just fill in the DDNS key as a password, and configure all the domains & subdomains.
{
  "provider": "HE",
  "password": "Your DDNS Key",
  "login_token": "",
  "domains": [
    {
      "domain_name": "example.com",
      "sub_domains": ["www", "test"]
    },
    {
      "domain_name": "example2.com",
      "sub_domains": ["www", "test"]
    }
  ],
  "resolver": "8.8.8.8",
  "ip_urls": ["https://api.ip.sb/ip"],
  "ip_type": "IPv4",
  "interval": 300,
  "socks5_proxy": ""
}
Add a new "A record" and make sure that "Enable entry for dynamic dns" is checked:
Fill in your own DDNS key or generate a random DDNS key for this newly created "A record":
Remember the DDNS key and set it in the password property in the configuration file.
NOTICE: If you have multiple domains or subdomains, make sure their DDNS key are the same.
For Scaleway, you need to provide an API Secret Key as the login_token (How to generate an API key), and configure the domains and subdomains. domain_name should equal a DNS zone, or the root domain in Scaleway. TTL for the DNS records will be set to the interval value. Make sure A or AAAA records exist for the relevant sub domains, these can be set up in the Scaleway console.
{
  "provider": "Scaleway",
  "login_token": "API Secret Key",
  "domains": [
    {
      "domain_name": "example.com",
      "sub_domains": ["www", "@"]
    },
    {
      "domain_name": "samplednszone.example.com",
      "sub_domains": ["www", "test"]
    }
  ],
  "resolver": "8.8.8.8",
  "ip_urls": ["https://api.ip.sb/ip"],
  "ip_type": "IPv4",
  "interval": 300
}
To authenticate with the Linode API you will need to provide a Personal Access Token with "Read/Write" access on the "Domain" scope. Linode has a help page about creating access tokens. Pass this token into the login_token field of the config file.
The domain_name field of the config file must be the name of an existing Domain managed by Linode. Linode has a help page about adding domains. The GoDNS Linode handler will not create domains automatically but will create subdomains automatically.
The GoDNS Linode handler currently uses a fixed TTL of 30 seconds for Linode DNS records.
{
  "provider": "Linode",
  "login_token": ${PERSONAL_ACCESS_TOKEN},
  "domains": [{
      "domain_name": "example.com",
      "sub_domains": ["www","@"]
    },{
      "domain_name": "samplednszone.example.com",
      "sub_domains": ["www","test"]
    }
  ],
  "resolver": "8.8.8.8",
  "ip_urls": ["https://api.ip.sb/ip"],
  "ip_type": "IPv4",
  "interval": 300
}
For Strato, you need to provide email & password and configure all the domains & subdomains. More Info: German English
{
  "provider": "strato",
  "password": "Your_Password",
  "domains": [
    {
      "domain_name": "example.com",
      "sub_domains": ["www", "test"]
    },
    {
      "domain_name": "example2.com",
      "sub_domains": ["www", "test"]
    }
  ],
  "resolver": "8.8.8.8",
  "ip_urls": ["https://api.ip.sb/ip"],
  "ip_type": "IPv4",
  "interval": 300,
  "socks5_proxy": ""
}
For LoopiaSE, you need to provide a username & password and configure all the domains & subdomains. More info: Swedish
{
  "provider": "LoopiaSE",
  "email": "Your_Username",
  "password": "Your_Password",
  "domains": [
    {
      "domain_name": "example.com",
      "sub_domains": ["www", "test"]
    },
    {
      "domain_name": "example2.com",
      "sub_domains": ["www", "test"]
    }
  ],
  "resolver": "8.8.8.8",
  "ip_urls": ["https://api.ip.sb/ip"],
  "ip_type": "IPv4",
  "interval": 300,
  "socks5_proxy": ""
}
For Infomaniak, you need to provide a username & password and configure all the domains & subdomains. More info: English
{
  "provider": "Infomaniak",
  "email": "Your_Username",
  "password": "Your_Password",
  "domains": [
    {
      "domain_name": "example.com",
      "sub_domains": ["www", "test"]
    },
    {
      "domain_name": "example2.com",
      "sub_domains": ["www", "test"]
    }
  ],
  "resolver": "8.8.8.8",
  "ip_urls": ["https://api.ip.sb/ip"],
  "ip_type": "IPv4",
  "interval": 300,
  "socks5_proxy": ""
}
For Hetzner, you have to create an access token. This can be done in the DNS-Console. (Person Icon in the top left corner --> API Tokens) Notice: If a domain has multiple Records only the first Record will be updated. Make sure there is just one record.
{
  "provider": "hetzner",
  "login_token": "<token>",
  "domains": [
    {
      "domain_name": "example.com",
      "sub_domains": ["www", "test"]
    },
    {
      "domain_name": "example2.com",
      "sub_domains": ["www", "test"]
    }
  ],
  "resolver": "8.8.8.8",
  "ip_urls": ["https://api.ip.sb/ip"],
  "ip_type": "IPv4"
}
For OVH, you need to provide a Consumerkey, an Appsecret, and an Appkey and configure all the domains & subdomains. The needed values can be obtained by visiting this site Rights should be '*' on GET, POST and PUT More info: help.ovhcloud.com
{
  "provider": "OVH",
  "consumer_key": "e389ac80cc8da9c7451bc7b8f171bf4f",
  "app_secret": "d1ffee354d3643d70deaab48a09131fd",
  "app_key": "cd338839d6472064",
  "domains": [
    {
      "domain_name": "example.com",
      "sub_domains": ["www", "test"]
    },
    {
      "domain_name": "example2.com",
      "sub_domains": ["www", "test"]
    }
  ],
  "resolver": "8.8.8.8",
  "ip_urls": ["https://api.ip.sb/ip"],
  "ip_type": "IPv4",
  "interval": 300,
  "socks5_proxy": ""
}
For Porkbun, you need to provide your API key as login_token and secret key as password.
Get your API credentials from Porkbun API Management.
{
  "provider": "Porkbun",
  "login_token": "pk1_your_api_key",
  "password": "sk1_your_secret_key",
  "domains": [
    {
      "domain_name": "example.com",
      "sub_domains": ["@", "www", "test"]
    }
  ],
  "resolver": "8.8.8.8",
  "ip_urls": ["https://api.ipify.org"],
  "ip_type": "IPv4",
  "interval": 300
}
For name.com, you need to provide your account username as email and your API token as login_token.
Generate an API token from name.com API settings. The provider uses the CORE v1 API and creates the record if it does not exist yet.
{
  "provider": "NameDotCom",
  "email": "your_username",
  "login_token": "your_api_token",
  "domains": [
    {
      "domain_name": "example.com",
      "sub_domains": ["@", "www", "test"]
    }
  ],
  "resolver": "8.8.8.8",
  "ip_urls": ["https://api.ipify.org"],
  "ip_type": "IPv4",
  "interval": 300
}
For Dynu, you need to configure the password, config 1 default domain & subdomain.
{
  "provider": "Dynu",
  "password": "Your_Password",
  "domains": [
    {
      "domain_name": "your_domain.com",
      "sub_domains": ["your_subdomain"]
    }
  ],
  "resolver": "8.8.8.8",
  "ip_urls": ["https://api.ip.sb/ip"],
  "ip_type": "IPv4",
  "interval": 300,
  "socks5_proxy": ""
}
This is for IONOS Hosting Services, not IONOS Cloud.
You'll need to sign up for API Access to Hosting Services, then create an API Key.
You can find a full guide in the IONOS API Documentation.
Note: The API-Key used by GoDNS must follow the form publicprefix.secret as described in the aforementioned documentation.
provider: IONOS
login_token: publicprefix.secret
domains:
  - domain_name: example.com
    sub_domains:
      - somesubdomain
      - anothersubdomain
resolver: 1.1.1.1
ip_urls:
  - https://api.ipify.org
ip_type: IPv4
interval: 300
socks5_proxy: ""
For TransIP, you need to provide your api private key as login_token and username as email, and configure all the domains & subdomains.
provider: TransIP
email: account_name
login_token: api_key
domains:
  - domain_name: example.com
    sub_domains:
      - "@"
      - somesubdomain
      - anothersubdomain
resolver: 1.1.1.1
ip_urls:
  - https://api.ipify.org
ip_type: IPv4
interval: 300
socks5_proxy: ""
GoDNS can send a notification each time the IP changes.
Emails are sent over SMTP. Update your configuration with the following snippet:
  "notify": {
    "mail": {
      "enabled": true,
      "smtp_server": "smtp.example.com",
      "smtp_username": "user",
      "smtp_password": "password",
      "smtp_port": 25,
      "send_from": "[email protected]"
      "send_to": "[email protected]"
    }
  }
Each time the IP changes, you will receive an email like this:
To receive a Telegram message each time the IP changes, update your configuration with the following snippet:
  "notify": {
    "telegram": {
      "enabled": true,
      "bot_api_key": "11111:aaaa-bbbb",
      "chat_id": "-123456",
      "message_template": "Domain *{{ .Domain }}* updated to %0A{{ .CurrentIP }}",
      "use_proxy": false
    },
  }
The message_template property supports markdown. New lines need to be escaped with %0A.
To receive a Slack message each time the IP changes, update your configuration with the following snippet:
  "notify": {
    "slack": {
      "enabled": true,
      "bot_api_token": "xoxb-xxx",
      "channel": "your_channel",
      "message_template": "Domain *{{ .Domain }}* updated to \n{{ .CurrentIP }}",
      "use_proxy": false
    },
  }
The message_template property supports markdown. New lines needs to be escaped with \n.
To receive a Discord message each time the IP changes, update your configuration with the following snippit:
  "notify": {
    "discord": {
          "enabled": true,
          "bot_api_token": "discord_bot_token",
          "channel": "your_channel",
          "message_template": "(Optional) Domain *{{ .Domain }}* updated to \n{{ .CurrentIP }}",
        }
  }
To receive a Pushover message each time the IP changes, update your configuration with the following snippet:
  "notify": {
    "pushover": {
      "enabled": true,
      "token": "abcdefghijklmnopqrstuvwxyz1234",
      "user": "abcdefghijklmnopqrstuvwxyz1234",
      "message_template": "",
      "device": "",
      "title": "",
      "priority": 0,
      "html": 1
    }
  }
The message_template property supports html if the html parameter is 1. If it is left empty a default message will be used.
If the device and title parameters are left empty, Pushover will choose defaults see. More details on the priority parameter
can be found on the Pushover API description.
To receive a Bark message each time the IP changes, update your configuration with the following snippet:
  "notify": {
    "bark": {
      "enabled": true,
      "server": "https://api.day.app",
      "device_keys": "",
      "params": "{ \"isArchive\": 1, \"action\": \"none\" }"
    }
  }
server Bark server address. You can use the default official server https://api.day.app or set it to a self-hosted server address.
device_keys device key, supports multiple keys (comma-separated) for batch push.
params Bark request parameters, please refer to Bark API
user Basic auth username of the self-hosted server, same with server side environment variable BARK_SERVER_BASIC_AUTH_USER.
password Basic auth password of the self-hosted server, same with server side environment variable BARK_SERVER_BASIC_AUTH_PASSWORD.
For more information, please refer to the Bark official documentation
To receive an ntfy notification each time the IP changes, update your configuration with the following snippet:
  "notify": {
    "ntfy": {
      "enabled": true,
      "topic": "godns",
      "server": "https://ntfy.sh",
      "token": "",
      "user": "",
      "password": "",
      "priority": "default",
      "tags": "rotating_light",
      "icon": "",
      "message_template": ""
    }
  }
topic The ntfy topic to publish to (required). The topic is essentially a channel name — pick something not easily guessable.
server The ntfy server URL. Defaults to https://ntfy.sh. Set to your self-hosted server address if applicable.
token Access token for authentication (optional). Only needed for self-hosted servers with access control.
user Username for basic authentication (optional). Used with password for self-hosted servers.
password Password for basic authentication (optional). Used with user for self-hosted servers.
priority Message priority: min, low, default, high, or max (optional).
tags Comma-separated list of tags or emoji short codes (optional).
icon URL to an icon to display in the notification (optional).
message_template Custom message template (optional). If empty, defaults to IP address of {{ .Domain }} updated to {{ .CurrentIP }}.
For more information, please refer to the ntfy documentation
Webhook is another feature that GoDNS provides to deliver notifications to other applications while the IP is changed. GoDNS delivers a notification to the target URL via an HTTP GET or POST request.
The configuration section webhook is used for customizing the webhook request. In general, there are 2 fields used for the webhook request:
url: The target URL for sending webhook requests.request_body: The content for sending aPOSTrequest, if this field is empty, an HTTP GET request will be sent instead of the HTTP POST request.
Available variables:
Domain: The current domain.IP: The new IP address.IPType: The type of the IP:IPV4orIPV6.
"webhook": {
  "enabled": true,
  "url": "http://localhost:5000/api/v1/send?domain={{.Domain}}&ip={{.CurrentIP}}&ip_type={{.IPType}}",
  "request_body": ""
}
For this example, a webhook with query string parameters will be sent to the target URL:
http://localhost:5000/api/v1/send?domain=ddns.example.com&ip=192.168.1.1&ip_type=IPV4
"webhook": {
  "enabled": true,
  "url": "http://localhost:5000/api/v1/send",
  "request_body": "{ \"domain\": \"{{.Domain}}\", \"ip\": \"{{.CurrentIP}}\", \"ip_type\": \"{{.IPType}}\" }"
}
For this example, a webhook will be triggered when the IP changes, and the target URL http://localhost:5000/api/v1/send will receive an HTTP POST request with the request body:
{ "domain": "ddns.example.com", "ip": "192.168.1.1", "ip_type": "IPV4" }
Most of the providers support IPv6.
To enable the IPv6 support of GoDNS, there are two solutions to choose from:
Use an online service to lookup the external IPv6
For that:
ip_type as IPv6, and make sure the ipv6_urls is configuredAAAA record instead of an A record in your DNS provider{
"domains": [
{
"domain_name": "example.com",
"sub_domains": ["ipv6"]
}
],
"resolver": "2001:4860:4860::8888",
"ipv6_urls": ["https://api-ipv6.ip.sb/ip"],
"ip_type": "IPv6"
}
Let GoDNS find the IPv6 of the network interface of the machine it is running on (more on that later).
For this to happen, just leave ip_urls and ipv6_urls empty.
Note that the network interface must be configured with an IPv6 for this to work.
For some reasons, if you want to get the IP address associated with a network interface (instead of performing an online lookup), you can specify it in the configuration file this way:
  "ip_urls": [""],
  "ip_interface": "interface-name",
With interface-name replaced by the name of the network interface, e.g. eth0 on Linux or Local Area Connection on Windows.
Note: If ip_urls is also specified, it will be used to perform an online lookup first and the network interface IP will be used as a fallback in case of failure.
On a host with several uplinks, the online IP lookup normally leaves through the default route. If that route sits behind CGNAT while another link has a public address, the lookup returns the wrong IP. query_interface sends the lookup out through a named interface instead:
{
  "ip_urls": ["https://api.ipify.org/"],
  "query_interface": "wan0",
  "ip_type": "IPv4"
}
GoDNS binds the lookup socket to the device itself (SO_BINDTODEVICE on Linux, IP_BOUND_IF on macOS) and uses one of the interface's addresses as the source. The device bind is what forces the route, so no policy-routing rules are needed. On other platforms only the source address is bound, which works when the system's routing already sends that source out the intended link.
Notes:
query_interface is different from ip_interface. query_interface chooses which link the HTTP request leaves through. ip_interface reads the address straight off a local interface without any request.ip_type. Private addresses are fine, e.g. an interface behind a 1:1 NAT.CAP_NET_RAW capability. If the bind fails, the lookup fails rather than silently falling back to the default route.You can make all remote calls go through a SOCKS5 proxy by specifying it in the configuration file this way:
"socks5_proxy": "127.0.0.1:7070"
"use_proxy": true
If you want to get the public IP from a Mikrotik RouterOS device, you can use the following configuration:
"mikrotik": {
  "enabled": false,
  "server": "http://192.168.88.1",
  "username": "admin",
  "password": "password",
  "interface": "pppoe-out"
}
To display debug info, set debug_info as true to enable this feature. By default, the debug info is disabled.
"debug_info": true,
GoDNS supports fetching the public IP from multiple URLs via a simple round-robin algorithm. If the first URL fails, it will try the next one until it succeeds. Here is an example of the configuration:
  "ip_urls": [
  "https://api.ipify.org",
  "https://myip.biturl.top",
  "https://api-ipv4.ip.sb/ip"
  ],
Starting from version 3.1.0, GoDNS provides a web panel to manage the configuration and monitor the status of the domains. The web UI is disabled by default. To enable it, just enable the web_panel in the configuration file.
"web_panel": {
  "enabled": true,
  "addr": "0.0.0.0:9000",
  "username": "admin",
  "password": "123456"
}
After enabling the web panel, you can visit http://localhost:9000 to manage the configuration and monitor the status of the domains.
There are a few ways to run GoDNS.
Note: make sure to set the run_once parameter in your config file so the program will quit after the first run (the default is false).
It can be added to cron or attached to other events on your system.
{
  "...": "...",
  "run_once": true
}
Then run
./godns
nohup ./godns &
Note: when the program stops, it will not be restarted.
Install upstart first (if not available already)
Copy ./config/upstart/godns.conf to /etc/init (and tweak it to your needs)
Start the service:
sudo start godns
Install systemd first (it not available already)
Copy ./config/systemd/godns.service to /lib/systemd/system (and tweak it to your needs)
Start the service:
sudo systemctl enable godns
sudo systemctl start godns
procd is the init system on OpenWRT. If you want to use godns as a service with OpenWRT and procd:
Copy ./config/procd/godns to /etc/init.d (and tweak it to your needs)
Start the service (with root privilege):
service godns enable
service godns start
Available docker registries:
Visit https://hub.docker.com/r/timothyye/godns to fetch the latest docker image. The -p 9000:9000 option exposes the web panel.
With /path/to/config.json as your local configuration file, run:
docker run \
-d --name godns --restart=always \
-v /path/to/config.json:/config.json \
-p 9000:9000 \
timothyye/godns:latest
To run it with a YAML config file:
docker run \
-d --name godns \
-e CONFIG=/config.yaml \
--restart=always \
-v /path/to/config.yaml:/config.yaml \
-p 9000:9000 \
timothyye/godns:latest
Download the latest version of NSSM
In an administrative prompt, from the folder where NSSM was downloaded, e.g. C:\Downloads\nssm\ win64, run:
nssm install YOURSERVICENAME
Follow the interface to configure the service. In the "Application" tab just indicate where the godns.exe file is. Optionally you can also define a description on the "Details" tab and define a log file on the "I/O" tab. Finish by clicking on the "Install service" button.
The service will now start along Windows.
Note: you can uninstall the service by running:
nssm remove YOURSERVICENAME
Contributions are welcome! Please feel free to submit a Pull Request.
Requirements:
1.3.11 or higher1.17 or higherThe frontend project is built with Next.js and daisyUI. To start the development environment, run:
cd web
bun install
bun run dev
To build the frontend, run:
cd web
bun run build
To run the frontend, run:
cd web
bun run start
270 followers · starred Jun 2024
48 followers · starred Dec 2023
15,878 followers · starred Feb 2021
479 followers · starred Oct 2021