
🎙️🤖Create, Customize and Talk to your AI Character/Companion in Realtime (All in One Codebase!). Have a natural seamless conversation with AI everywhere (mobile, web and terminal) using LLM OpenAI GPT3.5/4, Anthropic Claude2, Chroma Vector DB, Whisper Speech2Text, ElevenLabs Text2Speech🎙️🤖
See the codeREADME
 RealChar. - Your Realtime AI Character

🎙️🤖Create, customize and talk to your AI Character/Companion in realtime🎙️🤖






✨ Demo
Try our site at RealChar.ai
Not sure how to pronounce RealChar? Listen to this 👉 audip
Demo 1 - with Santa Claus!
https://github.com/Shaunwei/RealChar/assets/5101573/6b35a80e-5503-4850-973d-254039bd383c
Demo 2 - with AI Elon about cage fight!
https://github.com/Shaunwei/RealChar/assets/5101573/5de0b023-6cf3-4947-84cb-596f429d109e
Demo 3 - with AI Raiden about AI and "real" memory
https://github.com/Shaunwei/RealChar/assets/5101573/62a1f3d1-1166-4254-9119-97647be52c42
Demo settings: Web, GPT4, ElevenLabs with voice clone, Chroma, Google Speech to Text
🎯 Key Features
- Easy to use: No coding required to create your own AI character.
- Customizable: You can customize your AI character's personality, background, and even voice
- Realtime: Talk to or message your AI character in realtime
- Multi-Platform: You can talk to your AI character on web, terminal and mobile(Yes. we open source our mobile app)
- Most up-to-date AI: We use the most up-to-date AI technology to power your AI character, including OpenAI, Anthropic Claude 2, Chroma, Whisper, ElevenLabs, etc.
- Modular: You can easily swap out different modules to customize your flow. Less opinionated, more flexible. Great project to start your AI Engineering journey.
🔬 Tech stack
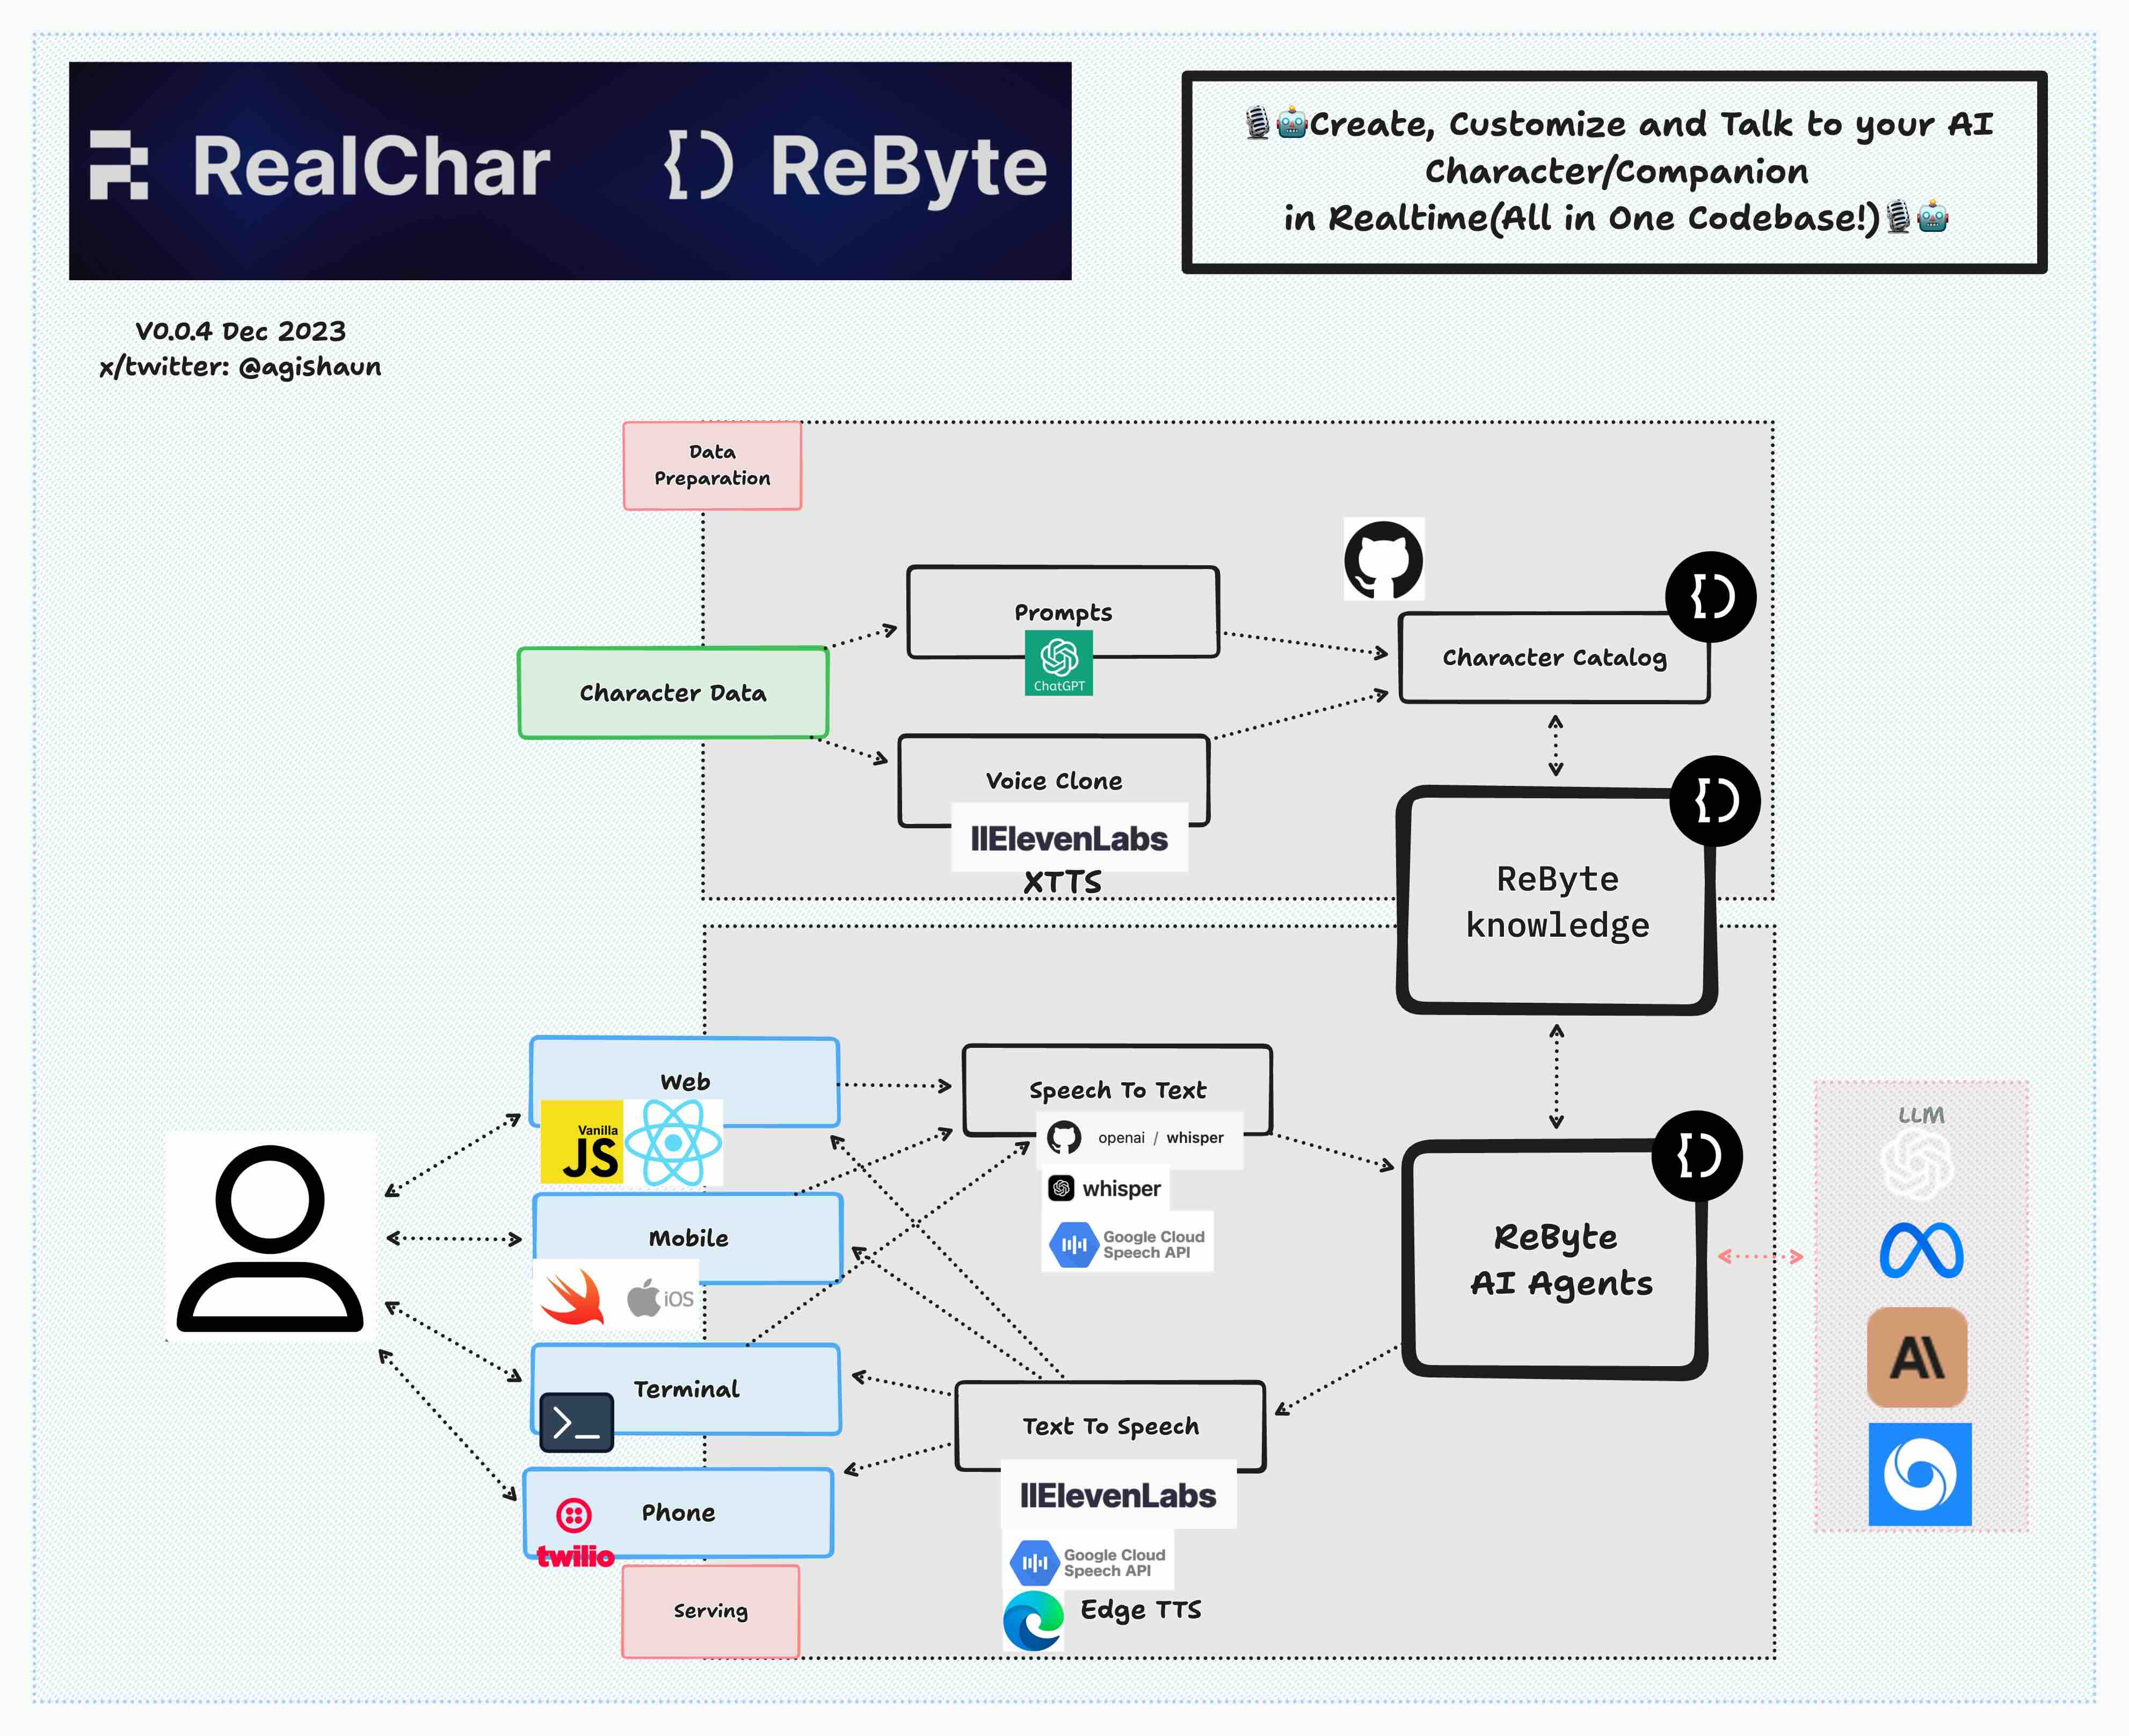
- ✅Web: React JS, Vanilla JS, WebSockets
- ✅Mobile: Swift, WebSockets
- ✅Backend: FastAPI, SQLite, Docker
- ✅Data Ingestion: LlamaIndex, Chroma
- ✅LLM Orchestration: LangChain, Chroma
- ✅LLM: ReByte, OpenAI GPT3.5/4, Anthropic Claude 2, Anyscale Llama2
- ✅Speech to Text: Local WhisperX, Local Whisper, OpenAI Whisper API, Google Speech to Text
- ✅Text to Speech: ElevenLabs, Edge TTS, Google Text to Speech
- ✅Voice Clone: ElevenLabs
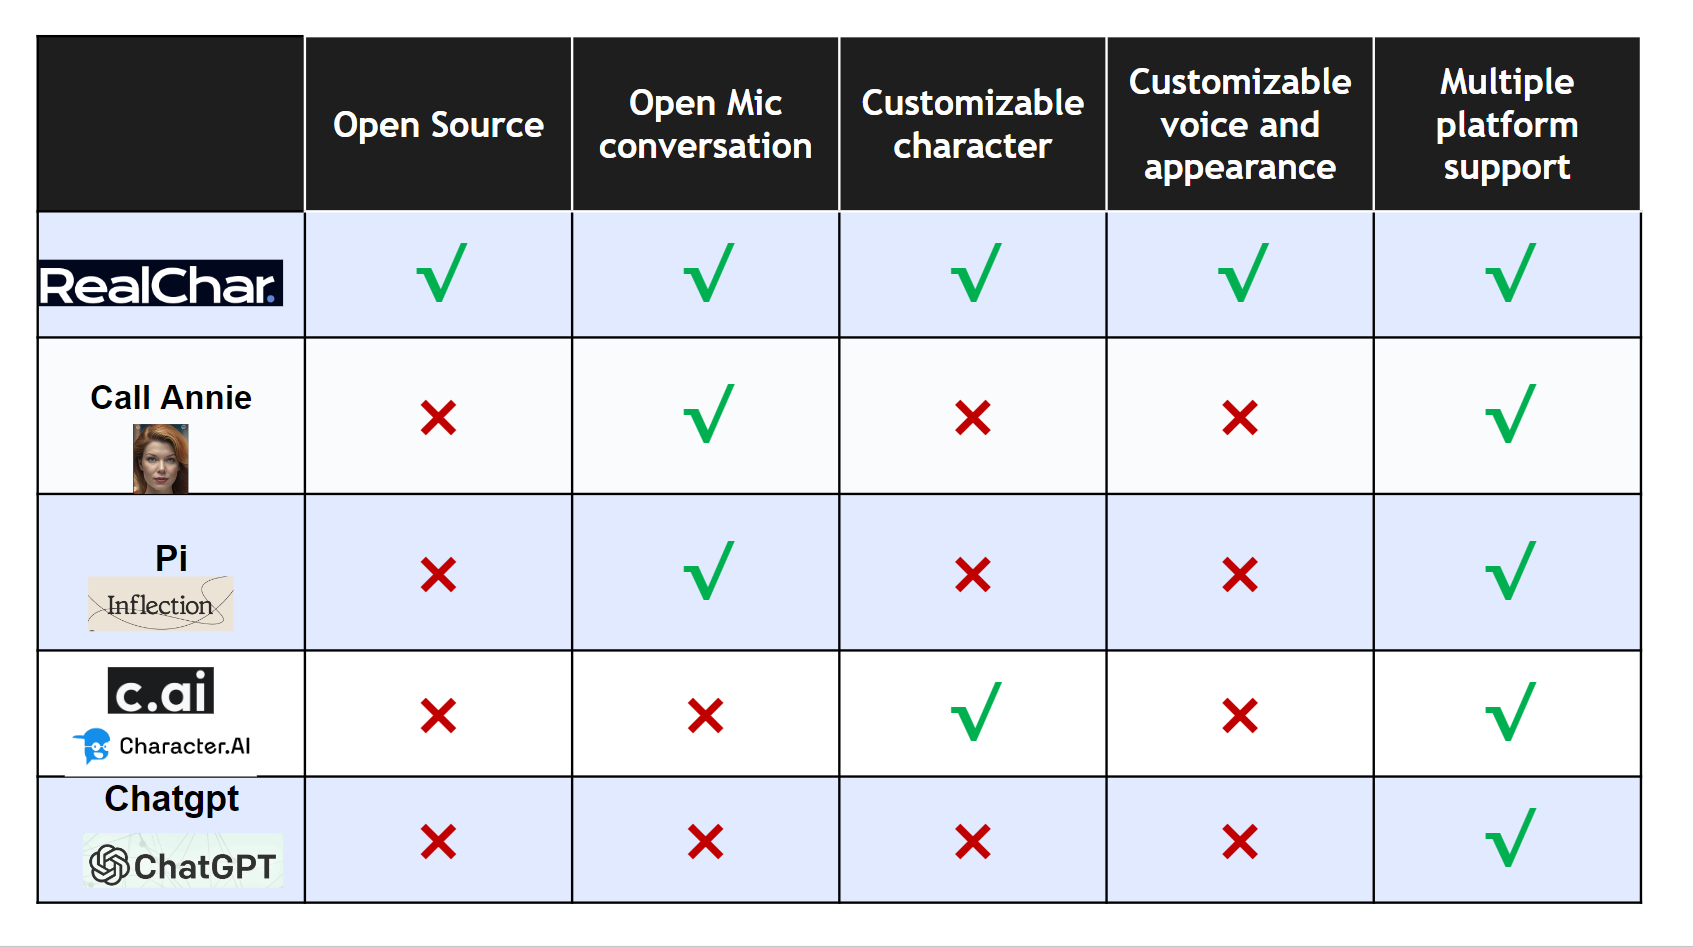
📚 Comparison with existing products
📀 Quick Start - Installation via Docker
-
Create a new
.envfilecp .env.example .envPaste your API keys in
.envfile. A single ReByte or OpenAI API key is enough to get started.You can also configure other API keys if you have them.
-
Start the app with
docker-compose.yamldocker compose upIf you have issues with docker (especially on a non-Linux machine), please refer to https://docs.docker.com/get-docker/ (installation) and https://docs.docker.com/desktop/troubleshoot/overview/ (troubleshooting).
-
Open http://localhost:3000 and enjoy the app!
💿 Developers - Installation via Python
-
Step 1. Clone the repo
git clone https://github.com/Shaunwei/RealChar.git && cd RealChar -
Step 2. Install requirements
Install portaudio and ffmpeg for audio
# for mac
brew install portaudio
brew install ffmpeg
# for ubuntu sudo apt update sudo apt install portaudio19-dev sudo apt install ffmpegNote:
-
ffmpeg>=4.4is needed to work withtorchaudio>=2.1.0 -
Mac users may need to add ffmpeg library path to
DYLD_LIBRARY_PATHfor torchaudio to work:export DYLD_LIBRARY_PATH=/opt/homebrew/lib:$DYLD_LIBRARY_PATH
Then install all python requirements
pip install -r requirements.txtIf you need a faster local speech to text, install whisperX
pip install git+https://github.com/m-bain/whisperx.git -
-
Step 3. Create an empty sqlite database if you have not done so before
sqlite3 test.db "VACUUM;" -
Step 4. Run db upgrade
alembic upgrade headThis ensures your database schema is up to date. Please run this after every time you pull the main branch.
-
Step 5. Setup
.env:cp .env.example .envUpdate API keys and configs following the instructions in the
.envfile.Note that some features require a working login system. You can get your own OAuth2 login for free with Firebase if needed. To enable, set
USE_AUTHtotrueand fill in theFIREBASE_CONFIG_PATHfield. Also fill in Firebase configs inclient/next-web/.env. -
Step 6. Run backend server with
cli.pyor use uvicorn directlypython cli.py run-uvicorn # or uvicorn realtime_ai_character.main:app -
Step 7. Run frontend client:
-
web client:
Create an
.envfile underclient/next-web/cp client/next-web/.env.example client/next-web/.envAdjust
.envaccording to the instruction inclient/next-web/README.md.Start the frontend server:
python cli.py next-web-dev
# or
cd client/next-web && npm run dev
# or
cd client/next-web && npm run build && npm run start
After running these commands, a local development server will start, and your default web browser will open a new tab/window pointing to this server (usually http://localhost:3000).
-
(Optional) Terminal client:
Run the following command in your terminal
python client/cli.py -
(Optional) mobile client:
open
client/mobile/ios/rac/rac.xcodeproj/project.pbxprojin Xcode and run the app
-
-
Step 8. Select one character to talk to, then start talking. Use GPT4 for better conversation and Wear headphone for best audio(avoid echo)
Note if you want to remotely connect to a RealChar server, SSL set up is required to establish the audio connection.
👨🚀 API Keys and Configurations
1. LLMs
1.1 ReByte API Key
To get your ReByte API key, follow these steps:
- Go to the ReByte website and sign up for an account if you haven't already.
- Once you're logged in, go to Settings > API Keys.
- Generate a new API key by clicking on the "Generate" button.
1.2 (Optional) OpenAI API Token
👇click me
This application utilizes the OpenAI API to access its powerful language model capabilities. In order to use the OpenAI API, you will need to obtain an API token.To get your OpenAI API token, follow these steps:
- Go to the OpenAI website and sign up for an account if you haven't already.
- Once you're logged in, navigate to the API keys page.
- Generate a new API key by clicking on the "Create API Key" button.
(Optional) To use Azure OpenAI API instead, refer to the following section:
- Set API type in your
.envfile:OPENAI_API_TYPE=azure
If you want to use the earlier version 2023-03-15-preview:
OPENAI_API_VERSION=2023-03-15-preview
- To set the base URL for your Azure OpenAI resource. You can find this in the Azure portal under your Azure OpenAI resource.
OPENAI_API_BASE=https://your-base-url.openai.azure.com
- To set the OpenAI model deployment name for your Azure OpenAI resource.
OPENAI_API_MODEL_DEPLOYMENT_NAME=gpt-35-turbo-16k
- To set the OpenAIEmbeddings model deployment name for your Azure OpenAI resource.
OPENAI_API_EMBEDDING_DEPLOYMENT_NAME=text-embedding-ada-002
1.3 (Optional) Anthropic(Claude 2) API Token
👇click me
To get your Anthropic API token, follow these steps:
- Go to the Anthropic website and sign up for an account if you haven't already.
- Once you're logged in, navigate to the API keys page.
- Generate a new API key by clicking on the "Create Key" button.
1.4 (Optional) Anyscale API Token
👇click me
To get your Anyscale API token, follow these steps:
- Go to the Anyscale website and sign up for an account if you haven't already.
- Once you're logged in, navigate to the Credentials page.
- Generate a new API key by clicking on the "Generate credential" button.
2. Speech to Text
We support faster-whisper and whisperX as the local speech to text engines. Work with CPU and NVIDIA GPU.
2.1 (Optional) Google Speech-to-Text API
👇click me
To get your Google Cloud API credentials.json, follow these steps:
- Go to the GCP website and sign up for an account if you haven't already.
- Follow the guide to create a project and enable Speech to Text API
- Put
google_credentials.jsonin the root folder of this project. Check Create and delete service account keys - Change
SPEECH_TO_TEXT_USEto useGOOGLEin your.envfile
2.2 (Optional) OpenAI Whisper API
👇click me
Same as OpenAI API Token
3. Text to Speech
Edge TTS is the default and is free to use.
3.1 (Optional) ElevenLabs API Key
👇click me
-
Creating an ElevenLabs Account
Visit ElevenLabs to create an account. You'll need this to access the text to speech and voice cloning features.
-
In your Profile Setting, you can get an API Key.
3.2 (Optional) Google Text-to-Speech API
👇click me
To get your Google Cloud API credentials.json, follow these steps:
- Go to the GCP website and sign up for an account if you haven't already.
- Follow the guide to create a project and enable Text to Speech API
- Put
google_credentials.jsonin the root folder of this project. Check Create and delete service account keys
(Optional) 🔥 Create Your Own Characters
👇click me
Create Characters Locally
see realtime_ai_character/character_catalog/README.md
Create Characters on ReByte.ai
(Optional) ☎️ Twilio Integration
👇click me
To use Twilio with RealChar, you need to set up a Twilio account. Then, fill in the following environment variables in your .env file:
TWILIO_ACCOUNT_SID=YOUR_TWILIO_ACCOUNT_SID
TWILIO_ACCESS_TOKEN=YOUR_TWILIO_ACCESS_TOKEN
DEFAULT_CALLOUT_NUMBER=YOUR_PHONE_NUMBER
You'll also need to install torch and torchaudio to use Twilio.
Now, you can receive phone calls from your characters by typing /call YOURNUMBER in the text box when chatting with your character.
Note: only US phone numbers and Elevenlabs voiced characters are supported at the moment.
🆕! Anyscale and LangSmith integration
👇click me
Anyscale
You can now use Anyscale Endpoint to serve Llama-2 models in your RealChar easily! Simply register an account with Anyscale Endpoint. Once you get the API key, set this environment variable in your .env file:
ANYSCALE_ENDPOINT_API_KEY=<your API Key>
By default, we show the largest servable Llama-2 model (70B) in the Web UI. You can change the model name (meta-llama/Llama-2-70b-chat-hf) to other models, e.g. 13b or 7b versions.
LangSmith
If you have access to LangSmith, you can edit these environment variables to enable:
LANGCHAIN_TRACING_V2=false # default off
LANGCHAIN_ENDPOINT=https://api.smith.langchain.com
LANGCHAIN_API_KEY=YOUR_LANGCHAIN_API_KEY
LANGCHAIN_PROJECT=YOUR_LANGCHAIN_PROJECT
And it should work out of the box.
📍 Roadmap
- Launch v0.0.4
- Create a new character via web UI
- Lower conversation latency
- Support Twilio
- Support ReByte
- Persistent conversation*
- Session management*
- Support RAG*
- Support Agents/GPTs*
- Add additional TTS service*
$*$ These features are powered by ReByte platform.
🫶 Contribute to RealChar
Please check out our Contribution Guide!
💪 Contributors
🎲 Community
- Join us on Discord
Contributors
(top 30 of 35)




Similar repos


Languages
JavaScript
37.6%
Python
29.7%
Swift
21.4%
Kotlin
10.4%
🎙️🤖Create, Customize and Talk to your AI Character/Companion in Realtime (All in One Codebase!). Have a natural seamless conversation with AI everywhere (mobile, web and terminal) using LLM OpenAI GPT3.5/4, Anthropic Claude2, Chroma Vector DB, Whisper Speech2Text, ElevenLabs Text2Speech🎙️🤖
See the codeREADME
RealChar. - Your Realtime AI Character
🎙️🤖Create, customize and talk to your AI Character/Companion in realtime🎙️🤖
✨ Demo
Try our site at RealChar.ai
Not sure how to pronounce RealChar? Listen to this 👉 audip
Demo 1 - with Santa Claus!
https://github.com/Shaunwei/RealChar/assets/5101573/6b35a80e-5503-4850-973d-254039bd383c
Demo 2 - with AI Elon about cage fight!
https://github.com/Shaunwei/RealChar/assets/5101573/5de0b023-6cf3-4947-84cb-596f429d109e
Demo 3 - with AI Raiden about AI and "real" memory
https://github.com/Shaunwei/RealChar/assets/5101573/62a1f3d1-1166-4254-9119-97647be52c42
Demo settings: Web, GPT4, ElevenLabs with voice clone, Chroma, Google Speech to Text
🎯 Key Features
- Easy to use: No coding required to create your own AI character.
- Customizable: You can customize your AI character's personality, background, and even voice
- Realtime: Talk to or message your AI character in realtime
- Multi-Platform: You can talk to your AI character on web, terminal and mobile(Yes. we open source our mobile app)
- Most up-to-date AI: We use the most up-to-date AI technology to power your AI character, including OpenAI, Anthropic Claude 2, Chroma, Whisper, ElevenLabs, etc.
- Modular: You can easily swap out different modules to customize your flow. Less opinionated, more flexible. Great project to start your AI Engineering journey.
🔬 Tech stack
- ✅Web: React JS, Vanilla JS, WebSockets
- ✅Mobile: Swift, WebSockets
- ✅Backend: FastAPI, SQLite, Docker
- ✅Data Ingestion: LlamaIndex, Chroma
- ✅LLM Orchestration: LangChain, Chroma
- ✅LLM: ReByte, OpenAI GPT3.5/4, Anthropic Claude 2, Anyscale Llama2
- ✅Speech to Text: Local WhisperX, Local Whisper, OpenAI Whisper API, Google Speech to Text
- ✅Text to Speech: ElevenLabs, Edge TTS, Google Text to Speech
- ✅Voice Clone: ElevenLabs
📚 Comparison with existing products
📀 Quick Start - Installation via Docker
-
Create a new
.envfilecp .env.example .envPaste your API keys in
.envfile. A single ReByte or OpenAI API key is enough to get started.You can also configure other API keys if you have them.
-
Start the app with
docker-compose.yamldocker compose upIf you have issues with docker (especially on a non-Linux machine), please refer to https://docs.docker.com/get-docker/ (installation) and https://docs.docker.com/desktop/troubleshoot/overview/ (troubleshooting).
-
Open http://localhost:3000 and enjoy the app!
💿 Developers - Installation via Python
-
Step 1. Clone the repo
git clone https://github.com/Shaunwei/RealChar.git && cd RealChar -
Step 2. Install requirements
Install portaudio and ffmpeg for audio
# for mac
brew install portaudio
brew install ffmpeg
# for ubuntu sudo apt update sudo apt install portaudio19-dev sudo apt install ffmpegNote:
-
ffmpeg>=4.4is needed to work withtorchaudio>=2.1.0 -
Mac users may need to add ffmpeg library path to
DYLD_LIBRARY_PATHfor torchaudio to work:export DYLD_LIBRARY_PATH=/opt/homebrew/lib:$DYLD_LIBRARY_PATH
Then install all python requirements
pip install -r requirements.txtIf you need a faster local speech to text, install whisperX
pip install git+https://github.com/m-bain/whisperx.git -
-
Step 3. Create an empty sqlite database if you have not done so before
sqlite3 test.db "VACUUM;" -
Step 4. Run db upgrade
alembic upgrade headThis ensures your database schema is up to date. Please run this after every time you pull the main branch.
-
Step 5. Setup
.env:cp .env.example .envUpdate API keys and configs following the instructions in the
.envfile.Note that some features require a working login system. You can get your own OAuth2 login for free with Firebase if needed. To enable, set
USE_AUTHtotrueand fill in theFIREBASE_CONFIG_PATHfield. Also fill in Firebase configs inclient/next-web/.env. -
Step 6. Run backend server with
cli.pyor use uvicorn directlypython cli.py run-uvicorn # or uvicorn realtime_ai_character.main:app -
Step 7. Run frontend client:
-
web client:
Create an
.envfile underclient/next-web/cp client/next-web/.env.example client/next-web/.envAdjust
.envaccording to the instruction inclient/next-web/README.md.Start the frontend server:
python cli.py next-web-dev
# or
cd client/next-web && npm run dev
# or
cd client/next-web && npm run build && npm run start
After running these commands, a local development server will start, and your default web browser will open a new tab/window pointing to this server (usually http://localhost:3000).
-
(Optional) Terminal client:
Run the following command in your terminal
python client/cli.py -
(Optional) mobile client:
open
client/mobile/ios/rac/rac.xcodeproj/project.pbxprojin Xcode and run the app
-
-
Step 8. Select one character to talk to, then start talking. Use GPT4 for better conversation and Wear headphone for best audio(avoid echo)
Note if you want to remotely connect to a RealChar server, SSL set up is required to establish the audio connection.
👨🚀 API Keys and Configurations
1. LLMs
1.1 ReByte API Key
To get your ReByte API key, follow these steps:
- Go to the ReByte website and sign up for an account if you haven't already.
- Once you're logged in, go to Settings > API Keys.
- Generate a new API key by clicking on the "Generate" button.
1.2 (Optional) OpenAI API Token
👇click me
This application utilizes the OpenAI API to access its powerful language model capabilities. In order to use the OpenAI API, you will need to obtain an API token.To get your OpenAI API token, follow these steps:
- Go to the OpenAI website and sign up for an account if you haven't already.
- Once you're logged in, navigate to the API keys page.
- Generate a new API key by clicking on the "Create API Key" button.
(Optional) To use Azure OpenAI API instead, refer to the following section:
- Set API type in your
.envfile:OPENAI_API_TYPE=azure
If you want to use the earlier version 2023-03-15-preview:
OPENAI_API_VERSION=2023-03-15-preview
- To set the base URL for your Azure OpenAI resource. You can find this in the Azure portal under your Azure OpenAI resource.
OPENAI_API_BASE=https://your-base-url.openai.azure.com
- To set the OpenAI model deployment name for your Azure OpenAI resource.
OPENAI_API_MODEL_DEPLOYMENT_NAME=gpt-35-turbo-16k
- To set the OpenAIEmbeddings model deployment name for your Azure OpenAI resource.
OPENAI_API_EMBEDDING_DEPLOYMENT_NAME=text-embedding-ada-002
1.3 (Optional) Anthropic(Claude 2) API Token
👇click me
To get your Anthropic API token, follow these steps:
- Go to the Anthropic website and sign up for an account if you haven't already.
- Once you're logged in, navigate to the API keys page.
- Generate a new API key by clicking on the "Create Key" button.
1.4 (Optional) Anyscale API Token
👇click me
To get your Anyscale API token, follow these steps:
- Go to the Anyscale website and sign up for an account if you haven't already.
- Once you're logged in, navigate to the Credentials page.
- Generate a new API key by clicking on the "Generate credential" button.
2. Speech to Text
We support faster-whisper and whisperX as the local speech to text engines. Work with CPU and NVIDIA GPU.
2.1 (Optional) Google Speech-to-Text API
👇click me
To get your Google Cloud API credentials.json, follow these steps:
- Go to the GCP website and sign up for an account if you haven't already.
- Follow the guide to create a project and enable Speech to Text API
- Put
google_credentials.jsonin the root folder of this project. Check Create and delete service account keys - Change
SPEECH_TO_TEXT_USEto useGOOGLEin your.envfile
2.2 (Optional) OpenAI Whisper API
👇click me
Same as OpenAI API Token
3. Text to Speech
Edge TTS is the default and is free to use.
3.1 (Optional) ElevenLabs API Key
👇click me
-
Creating an ElevenLabs Account
Visit ElevenLabs to create an account. You'll need this to access the text to speech and voice cloning features.
-
In your Profile Setting, you can get an API Key.
3.2 (Optional) Google Text-to-Speech API
👇click me
To get your Google Cloud API credentials.json, follow these steps:
- Go to the GCP website and sign up for an account if you haven't already.
- Follow the guide to create a project and enable Text to Speech API
- Put
google_credentials.jsonin the root folder of this project. Check Create and delete service account keys
(Optional) 🔥 Create Your Own Characters
👇click me
Create Characters Locally
see realtime_ai_character/character_catalog/README.md
Create Characters on ReByte.ai
(Optional) ☎️ Twilio Integration
👇click me
To use Twilio with RealChar, you need to set up a Twilio account. Then, fill in the following environment variables in your .env file:
TWILIO_ACCOUNT_SID=YOUR_TWILIO_ACCOUNT_SID
TWILIO_ACCESS_TOKEN=YOUR_TWILIO_ACCESS_TOKEN
DEFAULT_CALLOUT_NUMBER=YOUR_PHONE_NUMBER
You'll also need to install torch and torchaudio to use Twilio.
Now, you can receive phone calls from your characters by typing /call YOURNUMBER in the text box when chatting with your character.
Note: only US phone numbers and Elevenlabs voiced characters are supported at the moment.
🆕! Anyscale and LangSmith integration
👇click me
Anyscale
You can now use Anyscale Endpoint to serve Llama-2 models in your RealChar easily! Simply register an account with Anyscale Endpoint. Once you get the API key, set this environment variable in your .env file:
ANYSCALE_ENDPOINT_API_KEY=<your API Key>
By default, we show the largest servable Llama-2 model (70B) in the Web UI. You can change the model name (meta-llama/Llama-2-70b-chat-hf) to other models, e.g. 13b or 7b versions.
LangSmith
If you have access to LangSmith, you can edit these environment variables to enable:
LANGCHAIN_TRACING_V2=false # default off
LANGCHAIN_ENDPOINT=https://api.smith.langchain.com
LANGCHAIN_API_KEY=YOUR_LANGCHAIN_API_KEY
LANGCHAIN_PROJECT=YOUR_LANGCHAIN_PROJECT
And it should work out of the box.
📍 Roadmap
- Launch v0.0.4
- Create a new character via web UI
- Lower conversation latency
- Support Twilio
- Support ReByte
- Persistent conversation*
- Session management*
- Support RAG*
- Support Agents/GPTs*
- Add additional TTS service*
$*$ These features are powered by ReByte platform.
🫶 Contribute to RealChar
Please check out our Contribution Guide!
💪 Contributors
🎲 Community
- Join us on Discord
Similar repos
Contributors
(top 30 of 35)
Languages
JavaScript
37.6%
Python
29.7%
Swift
21.4%
Kotlin
10.4%