OpenCore configuration for running macOS on Windows Hyper-V.
See the code
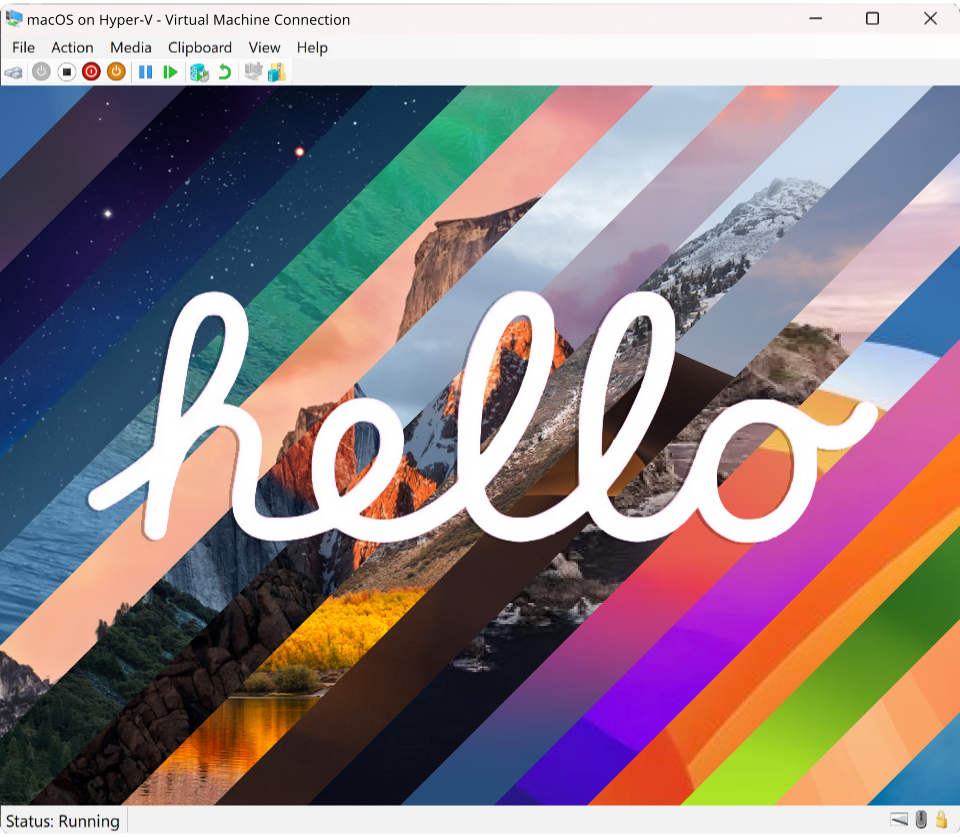
A Hackintosh project implementing the MacHyperVSupport package for Windows Hyper-V, built on top of the OpenCore bootloader and OCE-Build build manager.





Refer to the CHANGELOG or SemVer board for changes implemented per release version.
[!NOTE] Installations of OS X Tiger (10.4) to Snow Leopard (10.6) are not possible directly. It is recommended to first install a newer version of macOS and restore to the desired version using a disk image provided by Acidanthera.
You can also find other past InstallAssistant.dmg archives on Archive.org.
Supported versions below include macOS versions 10.4 to 26.0.
| macOS Version | Status | Minimum version | Maximum version | |
|---|---|---|---|---|
 Tahoe
Tahoe
| 🚧 | In Progress. | (None) | (Latest) |
 Sequoia
| ✅ | Supported. | (None) | (Latest) |
 Sonoma
| ✅ | Supported. | (None) | (Latest) |
 Ventura
| ✅ | Supported. | (None) | (Latest) |
 Monterey
| ✅ | Supported. | (None) | (Latest) |
 Big Sur
| ✅ | Supported. | (None) | (Latest) |
 Catalina
| ✅ | Supported. | (None) | (Latest) |
 Mojave
| ✅ | Supported. | (None) | (Latest) |
 High Sierra
| ✅ | Supported. | (None) | (Latest) |
 Sierra
| ✅ | Supported. | (None) | (Latest) |
 El Capitan
| ✅ | Supported. | (None) | (Latest) |
 Yosemite
| ✅ | Supported. | (None) | (Latest) |
 Mavericks
| ✅ | Supported. | (None) | (Latest) |
 Mountain Lion
| ✅ | Supported. | (None) | (Latest) |
 Lion
Lion
| ✅ | Supported. | (None) | (Latest) |
 Snow Leopard
| 🚧 | Supported. | (None) | (Retail) |
 Leopard
| 🚧 | Supported. | (None) | (Retail) |
 Tiger
Tiger
| 🚧 | Supported. | (None) | (Retail) |
Refer to HyperV-versions.md for a complete breakdown of macOS compatibility with Windows Client, Server, and Hyper-V versions.
If you opt to use one of the pre-built releases from this repository, you can skip to 2. Configure OpenCore for your hardware to setup OpenCore for your specific CPU, and then proceed to 4. Setting up Hyper-V to create a new virtual machine.
Those who wish to build this project from source can follow the below steps to clone this repository, build the EFI, and setup Hyper-V.
To clone this repository, run the below command:
git clone https://github.com/Qonfused/OSX-Hyper-V
cd OSX-Hyper-V
[!TIP] Alternatively, you can use the curl command to download and extract the tarball from GitHub:
iwr https://github.com/Qonfused/OSX-Hyper-V/archive/refs/heads/main.zip -OutFile OSX-Hyper-V-main.zip | tar -xf OSX-Hyper-V-main.zip
rm OSX-Hyper-V-main.zip
cd OSX-Hyper-V-main
[!NOTE] MacHyperVSupport requires Windows Server 2012 R2 / Windows 8.1 or higher. Windows Server 2016 is currently unsupported.
As Hyper-V is a type-1 hypervisor, it requires a compatible CPU to run macOS. This means that any passed-through hardware needs to be supported or patched as you would on a bare-metal Hackintosh.
There is no GPU acceleration by default, which means any graphics-related tasks will be driven by the CPU and will be slow. To get GPU acceleration, you will need to use Discrete Device Assignment (DDA) to pass through a supported GPU for acceleration.
[!IMPORTANT] Unlike bare metal, iGPU/APUs are not visible to the VM by default and require DDA support for GPU passthrough. Additionally, most discrete GPUs, even if natively supported, may not work if passed through with DDA. Refer to the limitations section for an overview of current support in Hyper-V.
For a general overview of hardware support, refer to the CPU Support and GPU Support sections of the Dortania guide for a breakdown of hardware support by macOS version.
To setup OpenCore for your specific CPU, follow the Intel or AMD section of the Dortania Install guide for your CPU family. Ignore any USB mapping, firmware, or motherboard-specific sections as they are not relevant to Hyper-V (which provides its own virtualized hardware).
See the below sections for a breakdown of hardware support and Hyper-V-specific configuration.
[!NOTE] For Intel Tiger Lake and newer (11th Gen and newer), you can follow the Dortania install guide for Comet Lake.
You'll need to spoof your CPU as Comet Lake by using the below CPUID patch:
Kernel:
  Emulate:
    Cpuid1Data: Data | <55 06 0A 00 00 00 00 00 00 00 00 00 00 00 00 00>
    Cpuid1Mask: Data | <FF FF FF FF 00 00 00 00 00 00 00 00 00 00 00 00>
Add this to the config.yml file under the
Kernel -> Emulatesection or manually to the generated config.plist file underEFI/OC/config.plist.See Cpuid1Data for other available CPUID patches for better XCPM support.
Below is a list of supported CPU generations and their initial and latest supported macOS versions:
| Generation | Initial Support | Latest Support |
|---|---|---|
| Penryn | OS X 10.4.10 (Tiger) | macOS 10.13.6 (High Sierra) |
| Clarkdale (1st Gen) | OS X 10.6.3 (Snow Leopard) | macOS 12 (Monterey) |
| Sandy Bridge (2nd Gen) | OS X 10.6.7 (Snow Leopard) | macOS 12 (Monterey) |
| Ivy Bridge (3rd Gen) | OS X 10.7 (Lion) | macOS 12 (Monterey) |
| Haswell (4th Gen) | OS X 10.8 (Mountain Lion) | (Current) |
| Skylake (6th Gen) | OS X 10.11 (El Capitan) | (Current) |
| Kaby Lake (7th Gen) | macOS 10.12 (Sierra) | (Current) |
| Coffee Lake (8th Gen) | macOS 10.13 (High Sierra) | (Current) |
| Comet Lake (10th Gen) | macOS 10.15 (Catalina) | (Current) |
| Generation | Initial Support | Latest Support |
|---|---|---|
| Arrandale (1st Gen) | OS X 10.6.3 (Snow Leopard) | macOS 10.13 (High Sierra) |
| Sandy Bridge (2nd Gen) | OS X 10.6.7 (Snow Leopard) | macOS 12 (Monterey) |
| Ivy Bridge (3rd Gen) | OS X 10.7 (Lion) | macOS 12 (Monterey) |
| Haswell (4th Gen) | OS X 10.8 (Mountain Lion) | macOS 12 (Monterey) |
| Broadwell (5th Gen) | OS X 10.10 (Yosemite) | macOS 12 (Monterey) |
| Skylake (6th Gen) | OS X 10.11 (El Capitan) | (Current) |
| Kaby Lake (7th Gen) | macOS 10.12 (Sierra) | (Current) |
| Coffee Lake (8th Gen) | macOS 10.13 (High Sierra) | (Current) |
| Whiskey Lake (8th Gen) | macOS 10.14.1 (Mojave) | (Current) |
| Comet Lake (10th Gen) | macOS 10.15.4 (Catalina) | (Current) |
| Ice Lake (10th Gen) | macOS 10.15.4 (Catalina) | (Current) |
[!IMPORTANT] AMD CPUs require the
Kernel -> Emulate -> DummyPowerManagementoption to be enabled in the config.plist as AMD does not have a native power management driver in macOS:Kernel: Emulate: DummyPowerManagement: Boolean | true
Below is a list of supported CPU generations and their initial and latest supported macOS versions:
| Generation | Initial Support | Latest Support |
|---|---|---|
| Bulldozer (15h) | macOS 13 (High Sierra) | macOS 12 (Monterey) |
| Jaguar (16h) | macOS 13 (High Sierra) | macOS 12 (Monterey) |
| Ryzen (17h) | macOS 13 (High Sierra) | (Current) |
| Threadripper (19h) | macOS 13 (High Sierra) | (Current) |
In addition to AMD kernel patches (for AMD CPU families 15h, 16h, 17h and 19h), the below kernel patch is required for High Sierra and above:
Kernel:
  Patch:
    - Arch:                 String  | "x86_64"
      Base:                 String  | "_cpu_syscall_init"
      Comment:              String  | "flagers - kill invalid wrmsr | 10.13+"
      Count:                Number  | 3
      Find:                 Data    | "0F30"
      Identifier:           String  | "kernel"
      MaxKernel:            String  | ""
      MinKernel:            String  | "17.0.0"
      Replace:              Data    | "9090"
You can also manually add the below plist entry to your config.plist:
<?xml version="1.0" encoding="UTF-8"?>
<!DOCTYPE plist PUBLIC "-//Apple//DTD PLIST 1.0//EN" "http://www.apple.com/DTDs/PropertyList-1.0.dtd">
<plist version="1.0">
<dict>
    <key>Kernel</key>
    <dict>
        <key>Patch</key>
        <array>
            <dict>
                <key>Arch</key>
                <string>x86_64</string>
                <key>Base</key>
                <string>_cpu_syscall_init</string>
                <key>Comment</key>
                <string>flagers - kill invalid wrmsr | 10.13+</string>
                <key>Count</key>
                <integer>3</integer>
                <key>Enabled</key>
                <true/>
                <key>Find</key>
                <data>DzA=</data>
                <key>Identifier</key>
                <string>kernel</string>
                <key>Limit</key>
                <integer>0</integer>
                <key>Mask</key>
                <data></data>
                <key>MaxKernel</key>
                <string></string>
                <key>MinKernel</key>
                <string>17.0.0</string>
                <key>Replace</key>
                <data>kJA=</data>
                <key>ReplaceMask</key>
                <data></data>
                <key>Skip</key>
                <integer>0</integer>
            </dict>
        </array>
    </dict>
</dict>
</plist>
[!NOTE] When applying the AMD kernel patches, choose a core count matching the number of cores assigned to the VM when configuring the CPU core count (i.e. the
algrey - Force cpuid_cores_per_package) patches.For example, on a 6-Core AMD Ryzen 9600X, you may find it helpful to assign 6 cores to the VM and use
06for thecpuid_cores_per_packagepatch. If you encounter issues booting when assigning 6 cores, try assigning 8 cores instead and using08for thecpuid_cores_per_packagepatch (see #37).
[!TIP] You can use the
amd.ps1script to automatically generate these AMD patches for your CPU by running the below command:.\scripts\amd.ps1 --cpu <core_count>Notice that this requires the
--cpuoption to be set to the number of cores assigned to the VM.
This project uses OCE-Build to automatically version and build this repository's EFI.
[!IMPORTANT] To run powershell scripts, you may need to set your execution policy using:
Set-ExecutionPolicy RemoteSigned
To build this project's EFI, run one of the below commands at the root of the project:
# Build for macOS 10.8 and newer
.\scripts\build.ps1

# Build for macOS 10.7 and older
.\scripts\build.ps1 --legacy

# Build for macOS 10.4 - 10.5, 10.6 if running in 32-bit mode
.\scripts\build.ps1 --legacy --32-bit
This will create a new dist/ directory containing the EFI.vhdx virtual disk and a dist/Scripts/ directory containing various scripts for creating and configuring the virtual machine.
First check that you've enabled Hyper-V before proceeding.
Enable-WindowsOptionalFeature -Online -FeatureName Microsoft-Hyper-V -All
Get-WindowsOptionalFeature -Online -FeatureName Microsoft-Hyper-V
[!TIP] After building or downloading this project's EFI, you can run the
create-virtual-machine.ps1script to quickly setup a new virtual-machine.For example, from a local build of this project:
# Use the latest version of macOS (cpu=2 cores, ram=8 GB, size=50 GB)
.\dist\Scripts\create-virtual-machine.ps1 -name "My New Virtual Machine"

# Use an older version of macOS (cpu=4 cores, ram=16 GB, size=128 GB)
.\dist\Scripts\create-virtual-machine.ps1 -name "Catalina" -version 10.15 -cpu 4 -ram 16 -size 128
or from a downloaded release:
cd ~/Downloads/EFI-1.0.0-64-bit-DEBUG # Scripts are packaged with releases

# Use the latest version of macOS (cpu=2 cores, ram=8 GB, size=50 GB)
.\Scripts\create-virtual-machine.ps1 -name "My New Virtual Machine"

# Use an older version of macOS (cpu=4 cores, ram=16 GB, size=128 GB)
.\Scripts\create-virtual-machine.ps1 -name "Catalina" -version 10.15 -cpu 4 -ram 16 -size 128
[!IMPORTANT] Newer macOS versions (Big Sur and newer) require 6-8 GB of RAM to boot the installer. If you are using an older version of macOS, you can use less RAM (4 GB is the minimum).
Below outline the steps to manually create a new virtual machine for macOS:
Format a small (1GB) FAT32 disk initialized with GPT (GUID partition table) and mount it. This will serve as the boot partition for your macOS virtual machine and contain the OpenCore EFI folder.
(A) Hyper-V Manager - Navigate to Action > New > Hard Disk. 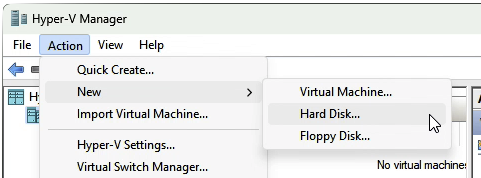
C:\ProgramData\Microsoft\Windows\Virtual Hard Disks\.Mount.Eject.(B) Disk Management - Navigate to Action > Create VHD. 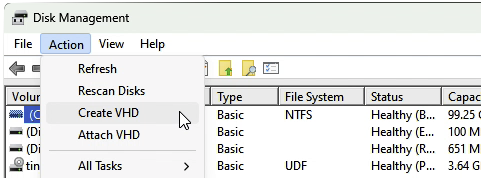
Action > Attach VHD.Detach VHD.(C) Powershell - Create a new VHD/VHDX disk with the New-VHD command.
# Run this command in PowerShell as Administrator

$vhdpath = "$env:USERPROFILE\Desktop\EFI.vhdx"
$vhdsize = 1GB
$vhdpart = "GPT"
$vhdfs = "FAT32"
New-VHD -Path $vhdpath -Dynamic -SizeBytes $vhdsize |
  Mount-VHD -Passthru |
  Initialize-Disk -PartitionStyle $vhdpart -Confirm:$false -Passthru |
  New-Partition -AssignDriveLetter -UseMaximumSize |
  Format-Volume -FileSystem $vhdfs -Confirm:$false -Force
Move the EFI folder (the whole folder) to the root of the VHDX disk.
EFI/ folder at the root of your EFI VHDX disk.Create or add an installer disk with either of the below methods:
.chunklist and .dmg files downloaded by macrecovery to your EFI VHDX disk under a new folder named com.apple.recovery.boot. You should be left with both an EFI/ and com.apple.recovery.boot/ folder at the root of your EFI VHDX disk.qemu-img:
qemu-img.exe convert -f raw -O vhdx InstallMacOSX.dmg InstallMacOSX.vhdx
In the Hyper-V Manager, navigate to Action > New > Virtual Machine.
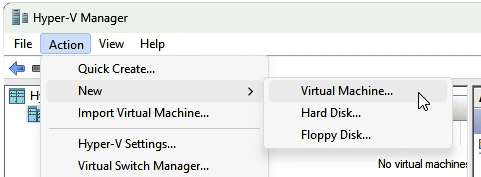
Configure the below options while going through the wizard:
Generation 2.4096 MB (recommended is 8192 MB for Big Sur and newer).Once created, right click on your new virtual-machine (under the 'Virtual Machines' section of the window), and select Settings.
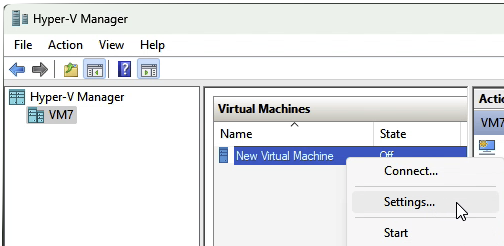
Then configure the below options under the Hardware section:
Enable Secure Boot (disable).0 and change the location value for your main virtual hard disk to a different value (e.g. 1 or 2). This is to ensure that the EFI disk is the first disk in the boot order.Refer to the Installation Process section of the Dortania Guide. Some additional post-install sections are provided to facilitate with Hyper-V (or project) specifics.
A basic summary of the installation process is as follows:
EFI (dmg) from the OpenCore boot menu.
macOS Base System (External) or Install macOS Big Sur (External) depending on the version of macOS you are installing.Msft Virtual Disk Media (your main virtual hard disk) from the list of disks.Erase to format the disk.
macOS or Macintosh HD, etc.).APFS format. For older versions, use Mac OS Extended (Journaled).Reinstall macOS to start the main installer.
macOS or whatever you named it), not the EFI disk.Ctrl key while selecting the disk.The EFI virtual disk created by this project bundles a post-installation script responsible for installing the MacHyperVFramebuffer driver and configuring daemons for additional Hyper-V service support. This is required to support resolution changes and the hardware cursor in macOS.
To run this script, execute the post-install.sh script from the EFI disk located in the Scripts/ directory. For example, you can run the following command in Terminal after booting into the macOS installer:
cd /Volumes/EFI # Change to the EFI disk
bash ./Scripts/post-install.sh
You can also optionally run the optimize-vm.sh script to disable Spotlight indexing, reduce disk I/O, and turn off system animations. This is recommended for virtual machines with CPU-rendered graphics and limited disk performance.
cd /Volumes/EFI # Change to the EFI disk
bash ./Scripts/optimize-vm.sh
If you encounter issues during the installation or boot process, feel free to create a GitHub issue and provide as much detail as possible about your setup, including:
There are however some common issues that you may encounter, outlined below:
#[EB.MM.AKM|!] Err(0xE) <- EB.MM.MKP)
vm_shared_region_start_address() or failed lookup: com.apple.dock.fullscreen:
WindowServer or gui/0 requesting other services (namely logd or recoveryosd), which serve as a hint for this issue.Reset NVRAM option in the OpenCore boot menu) to see if that resolves the issue.There are some known limitations with the base configuration for Hyper-V:
SupportedResolutions entry in MacHyperVFramebuffer's Info.plist file.[!NOTE] DDA is only available for Windows Server and Microsoft Hyper-V Server versions 2016 and newer. Windows Pro and Windows Enterprise users have no support for DDA with Hyper-V.
To enable iServices functionality, you can:
Contributions of any size to this project are always welcome!
Refer to CONTRIBUTING.md for instructions (and tips) on making contributions to this project.
643 followers · starred Dec 2025
220 followers · starred Feb 2025
708 followers · starred Jul 2026
214 followers · starred Dec 2024
OpenCore configuration for running macOS on Windows Hyper-V.
See the code
A Hackintosh project implementing the MacHyperVSupport package for Windows Hyper-V, built on top of the OpenCore bootloader and OCE-Build build manager.
Refer to the CHANGELOG or SemVer board for changes implemented per release version.
[!NOTE] Installations of OS X Tiger (10.4) to Snow Leopard (10.6) are not possible directly. It is recommended to first install a newer version of macOS and restore to the desired version using a disk image provided by Acidanthera.
You can also find other past InstallAssistant.dmg archives on Archive.org.
Supported versions below include macOS versions 10.4 to 26.0.
| macOS Version | Status | Minimum version | Maximum version | |
|---|---|---|---|---|
|
Tahoe
| 🚧 | In Progress. | (None) | (Latest) |
|
Sequoia
| ✅ | Supported. | (None) | (Latest) |
|
Sonoma
| ✅ | Supported. | (None) | (Latest) |
|
Ventura
| ✅ | Supported. | (None) | (Latest) |
|
Monterey
| ✅ | Supported. | (None) | (Latest) |
|
Big Sur
| ✅ | Supported. | (None) | (Latest) |
|
Catalina
| ✅ | Supported. | (None) | (Latest) |
|
Mojave
| ✅ | Supported. | (None) | (Latest) |
|
High Sierra
| ✅ | Supported. | (None) | (Latest) |
|
Sierra
| ✅ | Supported. | (None) | (Latest) |
|
El Capitan
| ✅ | Supported. | (None) | (Latest) |
|
Yosemite
| ✅ | Supported. | (None) | (Latest) |
|
Mavericks
| ✅ | Supported. | (None) | (Latest) |
|
Mountain Lion
| ✅ | Supported. | (None) | (Latest) |
|
Lion
| ✅ | Supported. | (None) | (Latest) |
|
Snow Leopard
| 🚧 | Supported. | (None) | (Retail) |
|
Leopard
| 🚧 | Supported. | (None) | (Retail) |
|
Tiger
| 🚧 | Supported. | (None) | (Retail) |
Refer to HyperV-versions.md for a complete breakdown of macOS compatibility with Windows Client, Server, and Hyper-V versions.
If you opt to use one of the pre-built releases from this repository, you can skip to 2. Configure OpenCore for your hardware to setup OpenCore for your specific CPU, and then proceed to 4. Setting up Hyper-V to create a new virtual machine.
Those who wish to build this project from source can follow the below steps to clone this repository, build the EFI, and setup Hyper-V.
To clone this repository, run the below command:
git clone https://github.com/Qonfused/OSX-Hyper-V
cd OSX-Hyper-V
[!TIP] Alternatively, you can use the curl command to download and extract the tarball from GitHub:
iwr https://github.com/Qonfused/OSX-Hyper-V/archive/refs/heads/main.zip -OutFile OSX-Hyper-V-main.zip | tar -xf OSX-Hyper-V-main.zip
rm OSX-Hyper-V-main.zip
cd OSX-Hyper-V-main
[!NOTE] MacHyperVSupport requires Windows Server 2012 R2 / Windows 8.1 or higher. Windows Server 2016 is currently unsupported.
As Hyper-V is a type-1 hypervisor, it requires a compatible CPU to run macOS. This means that any passed-through hardware needs to be supported or patched as you would on a bare-metal Hackintosh.
There is no GPU acceleration by default, which means any graphics-related tasks will be driven by the CPU and will be slow. To get GPU acceleration, you will need to use Discrete Device Assignment (DDA) to pass through a supported GPU for acceleration.
[!IMPORTANT] Unlike bare metal, iGPU/APUs are not visible to the VM by default and require DDA support for GPU passthrough. Additionally, most discrete GPUs, even if natively supported, may not work if passed through with DDA. Refer to the limitations section for an overview of current support in Hyper-V.
For a general overview of hardware support, refer to the CPU Support and GPU Support sections of the Dortania guide for a breakdown of hardware support by macOS version.
To setup OpenCore for your specific CPU, follow the Intel or AMD section of the Dortania Install guide for your CPU family. Ignore any USB mapping, firmware, or motherboard-specific sections as they are not relevant to Hyper-V (which provides its own virtualized hardware).
See the below sections for a breakdown of hardware support and Hyper-V-specific configuration.
[!NOTE] For Intel Tiger Lake and newer (11th Gen and newer), you can follow the Dortania install guide for Comet Lake.
You'll need to spoof your CPU as Comet Lake by using the below CPUID patch:
Kernel:
  Emulate:
    Cpuid1Data: Data | <55 06 0A 00 00 00 00 00 00 00 00 00 00 00 00 00>
    Cpuid1Mask: Data | <FF FF FF FF 00 00 00 00 00 00 00 00 00 00 00 00>
Add this to the config.yml file under the
Kernel -> Emulatesection or manually to the generated config.plist file underEFI/OC/config.plist.See Cpuid1Data for other available CPUID patches for better XCPM support.
Below is a list of supported CPU generations and their initial and latest supported macOS versions:
| Generation | Initial Support | Latest Support |
|---|---|---|
| Penryn | OS X 10.4.10 (Tiger) | macOS 10.13.6 (High Sierra) |
| Clarkdale (1st Gen) | OS X 10.6.3 (Snow Leopard) | macOS 12 (Monterey) |
| Sandy Bridge (2nd Gen) | OS X 10.6.7 (Snow Leopard) | macOS 12 (Monterey) |
| Ivy Bridge (3rd Gen) | OS X 10.7 (Lion) | macOS 12 (Monterey) |
| Haswell (4th Gen) | OS X 10.8 (Mountain Lion) | (Current) |
| Skylake (6th Gen) | OS X 10.11 (El Capitan) | (Current) |
| Kaby Lake (7th Gen) | macOS 10.12 (Sierra) | (Current) |
| Coffee Lake (8th Gen) | macOS 10.13 (High Sierra) | (Current) |
| Comet Lake (10th Gen) | macOS 10.15 (Catalina) | (Current) |
| Generation | Initial Support | Latest Support |
|---|---|---|
| Arrandale (1st Gen) | OS X 10.6.3 (Snow Leopard) | macOS 10.13 (High Sierra) |
| Sandy Bridge (2nd Gen) | OS X 10.6.7 (Snow Leopard) | macOS 12 (Monterey) |
| Ivy Bridge (3rd Gen) | OS X 10.7 (Lion) | macOS 12 (Monterey) |
| Haswell (4th Gen) | OS X 10.8 (Mountain Lion) | macOS 12 (Monterey) |
| Broadwell (5th Gen) | OS X 10.10 (Yosemite) | macOS 12 (Monterey) |
| Skylake (6th Gen) | OS X 10.11 (El Capitan) | (Current) |
| Kaby Lake (7th Gen) | macOS 10.12 (Sierra) | (Current) |
| Coffee Lake (8th Gen) | macOS 10.13 (High Sierra) | (Current) |
| Whiskey Lake (8th Gen) | macOS 10.14.1 (Mojave) | (Current) |
| Comet Lake (10th Gen) | macOS 10.15.4 (Catalina) | (Current) |
| Ice Lake (10th Gen) | macOS 10.15.4 (Catalina) | (Current) |
[!IMPORTANT] AMD CPUs require the
Kernel -> Emulate -> DummyPowerManagementoption to be enabled in the config.plist as AMD does not have a native power management driver in macOS:Kernel: Emulate: DummyPowerManagement: Boolean | true
Below is a list of supported CPU generations and their initial and latest supported macOS versions:
| Generation | Initial Support | Latest Support |
|---|---|---|
| Bulldozer (15h) | macOS 13 (High Sierra) | macOS 12 (Monterey) |
| Jaguar (16h) | macOS 13 (High Sierra) | macOS 12 (Monterey) |
| Ryzen (17h) | macOS 13 (High Sierra) | (Current) |
| Threadripper (19h) | macOS 13 (High Sierra) | (Current) |
In addition to AMD kernel patches (for AMD CPU families 15h, 16h, 17h and 19h), the below kernel patch is required for High Sierra and above:
Kernel:
  Patch:
    - Arch:                 String  | "x86_64"
      Base:                 String  | "_cpu_syscall_init"
      Comment:              String  | "flagers - kill invalid wrmsr | 10.13+"
      Count:                Number  | 3
      Find:                 Data    | "0F30"
      Identifier:           String  | "kernel"
      MaxKernel:            String  | ""
      MinKernel:            String  | "17.0.0"
      Replace:              Data    | "9090"
You can also manually add the below plist entry to your config.plist:
<?xml version="1.0" encoding="UTF-8"?>
<!DOCTYPE plist PUBLIC "-//Apple//DTD PLIST 1.0//EN" "http://www.apple.com/DTDs/PropertyList-1.0.dtd">
<plist version="1.0">
<dict>
    <key>Kernel</key>
    <dict>
        <key>Patch</key>
        <array>
            <dict>
                <key>Arch</key>
                <string>x86_64</string>
                <key>Base</key>
                <string>_cpu_syscall_init</string>
                <key>Comment</key>
                <string>flagers - kill invalid wrmsr | 10.13+</string>
                <key>Count</key>
                <integer>3</integer>
                <key>Enabled</key>
                <true/>
                <key>Find</key>
                <data>DzA=</data>
                <key>Identifier</key>
                <string>kernel</string>
                <key>Limit</key>
                <integer>0</integer>
                <key>Mask</key>
                <data></data>
                <key>MaxKernel</key>
                <string></string>
                <key>MinKernel</key>
                <string>17.0.0</string>
                <key>Replace</key>
                <data>kJA=</data>
                <key>ReplaceMask</key>
                <data></data>
                <key>Skip</key>
                <integer>0</integer>
            </dict>
        </array>
    </dict>
</dict>
</plist>
[!NOTE] When applying the AMD kernel patches, choose a core count matching the number of cores assigned to the VM when configuring the CPU core count (i.e. the
algrey - Force cpuid_cores_per_package) patches.For example, on a 6-Core AMD Ryzen 9600X, you may find it helpful to assign 6 cores to the VM and use
06for thecpuid_cores_per_packagepatch. If you encounter issues booting when assigning 6 cores, try assigning 8 cores instead and using08for thecpuid_cores_per_packagepatch (see #37).
[!TIP] You can use the
amd.ps1script to automatically generate these AMD patches for your CPU by running the below command:.\scripts\amd.ps1 --cpu <core_count>Notice that this requires the
--cpuoption to be set to the number of cores assigned to the VM.
This project uses OCE-Build to automatically version and build this repository's EFI.
[!IMPORTANT] To run powershell scripts, you may need to set your execution policy using:
Set-ExecutionPolicy RemoteSigned
To build this project's EFI, run one of the below commands at the root of the project:
# Build for macOS 10.8 and newer
.\scripts\build.ps1

# Build for macOS 10.7 and older
.\scripts\build.ps1 --legacy

# Build for macOS 10.4 - 10.5, 10.6 if running in 32-bit mode
.\scripts\build.ps1 --legacy --32-bit
This will create a new dist/ directory containing the EFI.vhdx virtual disk and a dist/Scripts/ directory containing various scripts for creating and configuring the virtual machine.
First check that you've enabled Hyper-V before proceeding.
Enable-WindowsOptionalFeature -Online -FeatureName Microsoft-Hyper-V -All
Get-WindowsOptionalFeature -Online -FeatureName Microsoft-Hyper-V
[!TIP] After building or downloading this project's EFI, you can run the
create-virtual-machine.ps1script to quickly setup a new virtual-machine.For example, from a local build of this project:
# Use the latest version of macOS (cpu=2 cores, ram=8 GB, size=50 GB)
.\dist\Scripts\create-virtual-machine.ps1 -name "My New Virtual Machine"

# Use an older version of macOS (cpu=4 cores, ram=16 GB, size=128 GB)
.\dist\Scripts\create-virtual-machine.ps1 -name "Catalina" -version 10.15 -cpu 4 -ram 16 -size 128
or from a downloaded release:
cd ~/Downloads/EFI-1.0.0-64-bit-DEBUG # Scripts are packaged with releases

# Use the latest version of macOS (cpu=2 cores, ram=8 GB, size=50 GB)
.\Scripts\create-virtual-machine.ps1 -name "My New Virtual Machine"

# Use an older version of macOS (cpu=4 cores, ram=16 GB, size=128 GB)
.\Scripts\create-virtual-machine.ps1 -name "Catalina" -version 10.15 -cpu 4 -ram 16 -size 128
[!IMPORTANT] Newer macOS versions (Big Sur and newer) require 6-8 GB of RAM to boot the installer. If you are using an older version of macOS, you can use less RAM (4 GB is the minimum).
Below outline the steps to manually create a new virtual machine for macOS:
Format a small (1GB) FAT32 disk initialized with GPT (GUID partition table) and mount it. This will serve as the boot partition for your macOS virtual machine and contain the OpenCore EFI folder.
(A) Hyper-V Manager - Navigate to Action > New > Hard Disk.
C:\ProgramData\Microsoft\Windows\Virtual Hard Disks\.Mount.Eject.(B) Disk Management - Navigate to Action > Create VHD.
Action > Attach VHD.Detach VHD.(C) Powershell - Create a new VHD/VHDX disk with the New-VHD command.
# Run this command in PowerShell as Administrator

$vhdpath = "$env:USERPROFILE\Desktop\EFI.vhdx"
$vhdsize = 1GB
$vhdpart = "GPT"
$vhdfs = "FAT32"
New-VHD -Path $vhdpath -Dynamic -SizeBytes $vhdsize |
  Mount-VHD -Passthru |
  Initialize-Disk -PartitionStyle $vhdpart -Confirm:$false -Passthru |
  New-Partition -AssignDriveLetter -UseMaximumSize |
  Format-Volume -FileSystem $vhdfs -Confirm:$false -Force
Move the EFI folder (the whole folder) to the root of the VHDX disk.
EFI/ folder at the root of your EFI VHDX disk.Create or add an installer disk with either of the below methods:
.chunklist and .dmg files downloaded by macrecovery to your EFI VHDX disk under a new folder named com.apple.recovery.boot. You should be left with both an EFI/ and com.apple.recovery.boot/ folder at the root of your EFI VHDX disk.qemu-img:
qemu-img.exe convert -f raw -O vhdx InstallMacOSX.dmg InstallMacOSX.vhdx
In the Hyper-V Manager, navigate to Action > New > Virtual Machine.
Configure the below options while going through the wizard:
Generation 2.4096 MB (recommended is 8192 MB for Big Sur and newer).Once created, right click on your new virtual-machine (under the 'Virtual Machines' section of the window), and select Settings.
Then configure the below options under the Hardware section:
Enable Secure Boot (disable).0 and change the location value for your main virtual hard disk to a different value (e.g. 1 or 2). This is to ensure that the EFI disk is the first disk in the boot order.Refer to the Installation Process section of the Dortania Guide. Some additional post-install sections are provided to facilitate with Hyper-V (or project) specifics.
A basic summary of the installation process is as follows:
EFI (dmg) from the OpenCore boot menu.
macOS Base System (External) or Install macOS Big Sur (External) depending on the version of macOS you are installing.Msft Virtual Disk Media (your main virtual hard disk) from the list of disks.Erase to format the disk.
macOS or Macintosh HD, etc.).APFS format. For older versions, use Mac OS Extended (Journaled).Reinstall macOS to start the main installer.
macOS or whatever you named it), not the EFI disk.Ctrl key while selecting the disk.The EFI virtual disk created by this project bundles a post-installation script responsible for installing the MacHyperVFramebuffer driver and configuring daemons for additional Hyper-V service support. This is required to support resolution changes and the hardware cursor in macOS.
To run this script, execute the post-install.sh script from the EFI disk located in the Scripts/ directory. For example, you can run the following command in Terminal after booting into the macOS installer:
cd /Volumes/EFI # Change to the EFI disk
bash ./Scripts/post-install.sh
You can also optionally run the optimize-vm.sh script to disable Spotlight indexing, reduce disk I/O, and turn off system animations. This is recommended for virtual machines with CPU-rendered graphics and limited disk performance.
cd /Volumes/EFI # Change to the EFI disk
bash ./Scripts/optimize-vm.sh
If you encounter issues during the installation or boot process, feel free to create a GitHub issue and provide as much detail as possible about your setup, including:
There are however some common issues that you may encounter, outlined below:
#[EB.MM.AKM|!] Err(0xE) <- EB.MM.MKP)
vm_shared_region_start_address() or failed lookup: com.apple.dock.fullscreen:
WindowServer or gui/0 requesting other services (namely logd or recoveryosd), which serve as a hint for this issue.Reset NVRAM option in the OpenCore boot menu) to see if that resolves the issue.There are some known limitations with the base configuration for Hyper-V:
SupportedResolutions entry in MacHyperVFramebuffer's Info.plist file.[!NOTE] DDA is only available for Windows Server and Microsoft Hyper-V Server versions 2016 and newer. Windows Pro and Windows Enterprise users have no support for DDA with Hyper-V.
To enable iServices functionality, you can:
Contributions of any size to this project are always welcome!
Refer to CONTRIBUTING.md for instructions (and tips) on making contributions to this project.
643 followers · starred Dec 2025
220 followers · starred Feb 2025
708 followers · starred Jul 2026
214 followers · starred Dec 2024



