Bastillion gives you a clean, browser-based way to manage SSH access across all your systems—like a bastion host with a friendly dashboard.
See the code





A modern, web-based SSH console and SSH key management tool.
Bastillion gives you a clean, browser-based way to manage SSH access across all your systems — like a bastion host with a friendly dashboard. It does two things:
Web-based SSH terminal — once a host is registered, authorized users can open one or more live terminal sessions to it directly from the browser, with commands optionally broadcast across every open session at once (think tmux's synchronized panes, but for a fleet of remote hosts instead of local panes).
SSH key management — Bastillion holds its own SSH keypair and pushes/rotates public keys across the hosts you register, so individual users never need to hold or manage long-lived keys to those systems themselves.
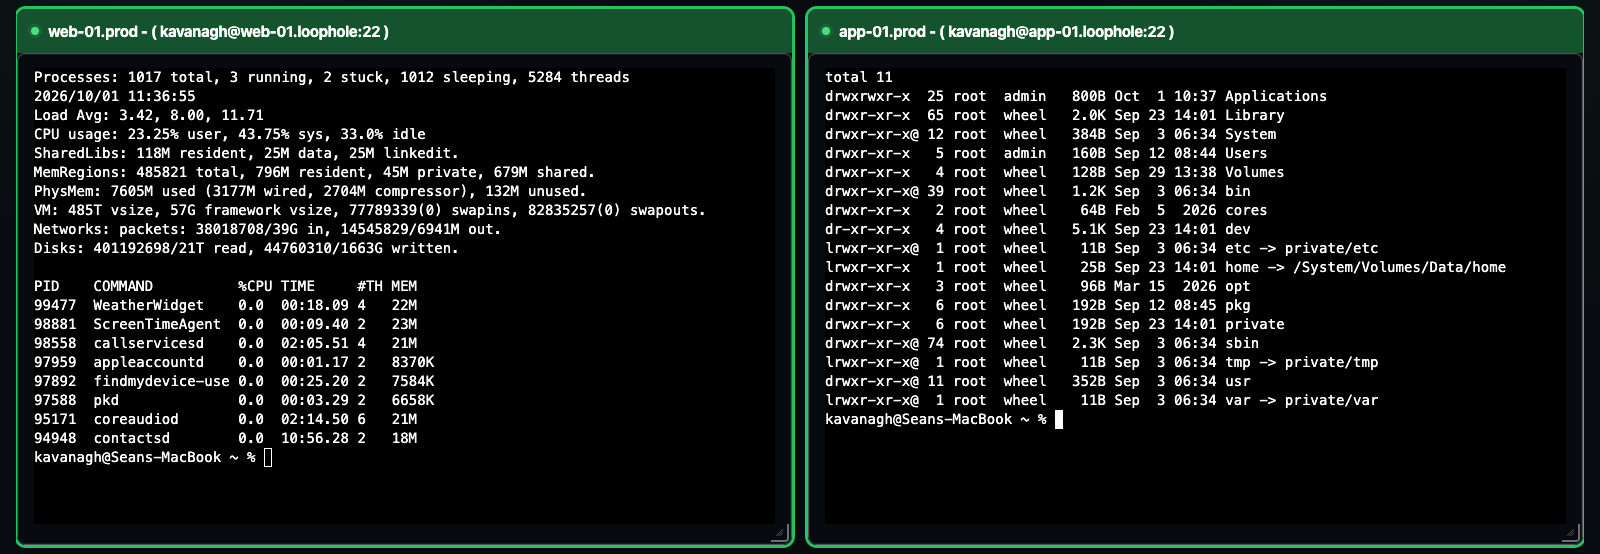
Two live SSH sessions to the existing web and application example hosts.
Bastillion sits between your users and the systems they need to reach, acting as a trusted third party rather than a simple password vault. Here's the whole lifecycle, end to end.
On first startup, before anything else, Bastillion generates an Ed25519 keypair for itself — this is the one key that ever gets pushed to your hosts. It's shown in the console output and always visible under Settings.
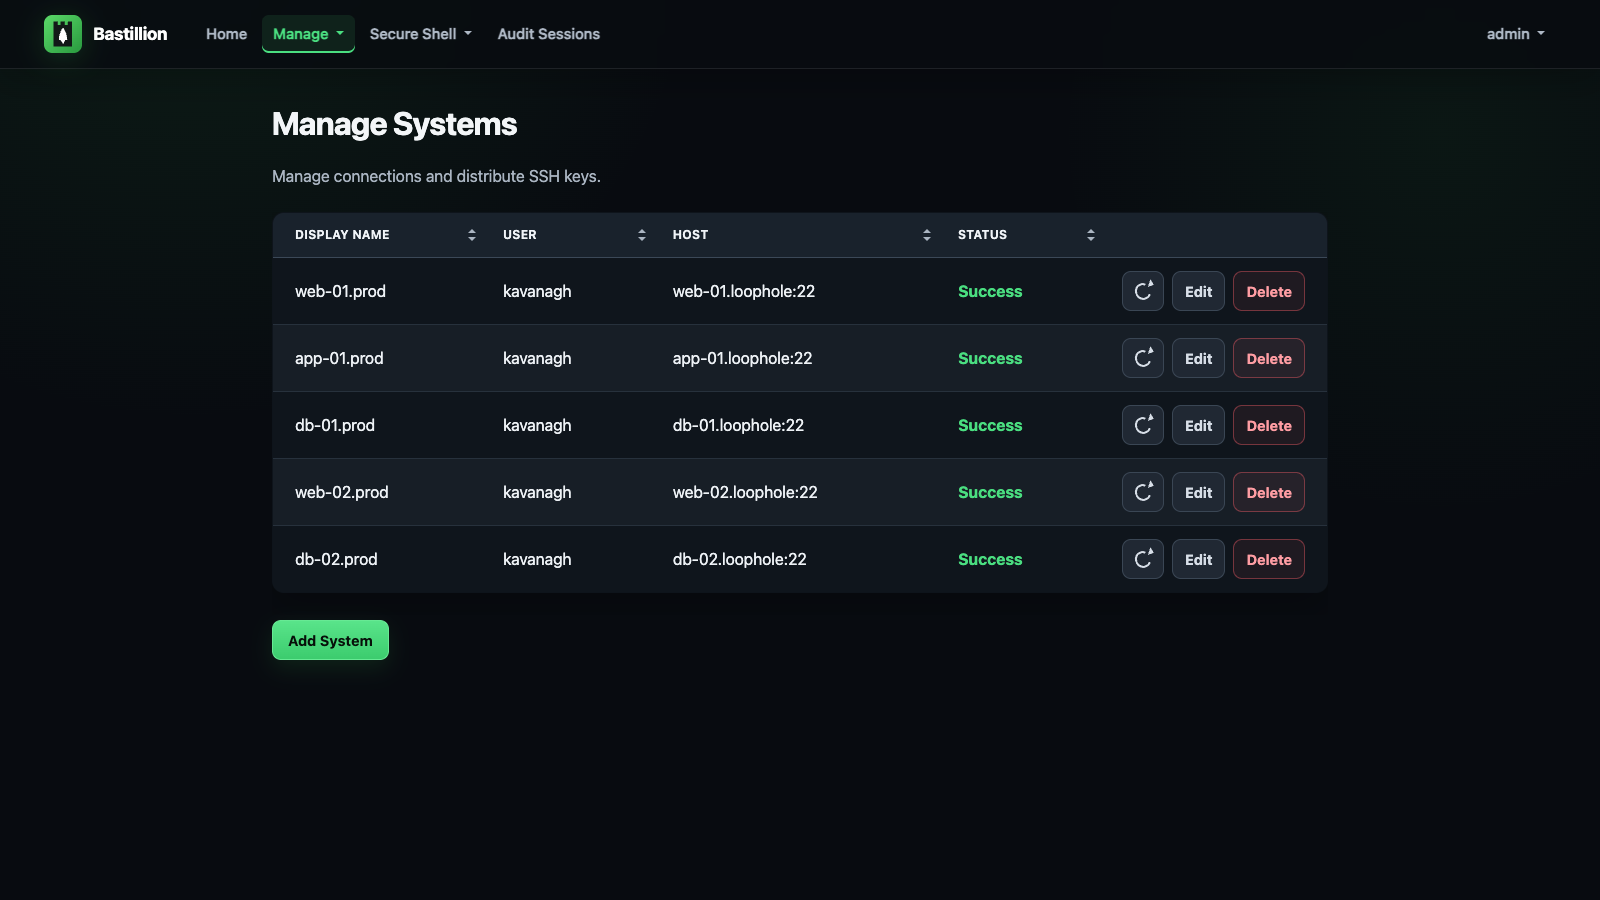
An admin adds a host under Manage → Systems (user, host, port, and the path to that
host's authorized_keys file). Bastillion authenticates once with a password or
passphrase you supply, then pushes its own public key into that host's authorized_keys.
From then on it connects using that key — no stored passwords, ever. Status flips to
Success the moment the key is in place.
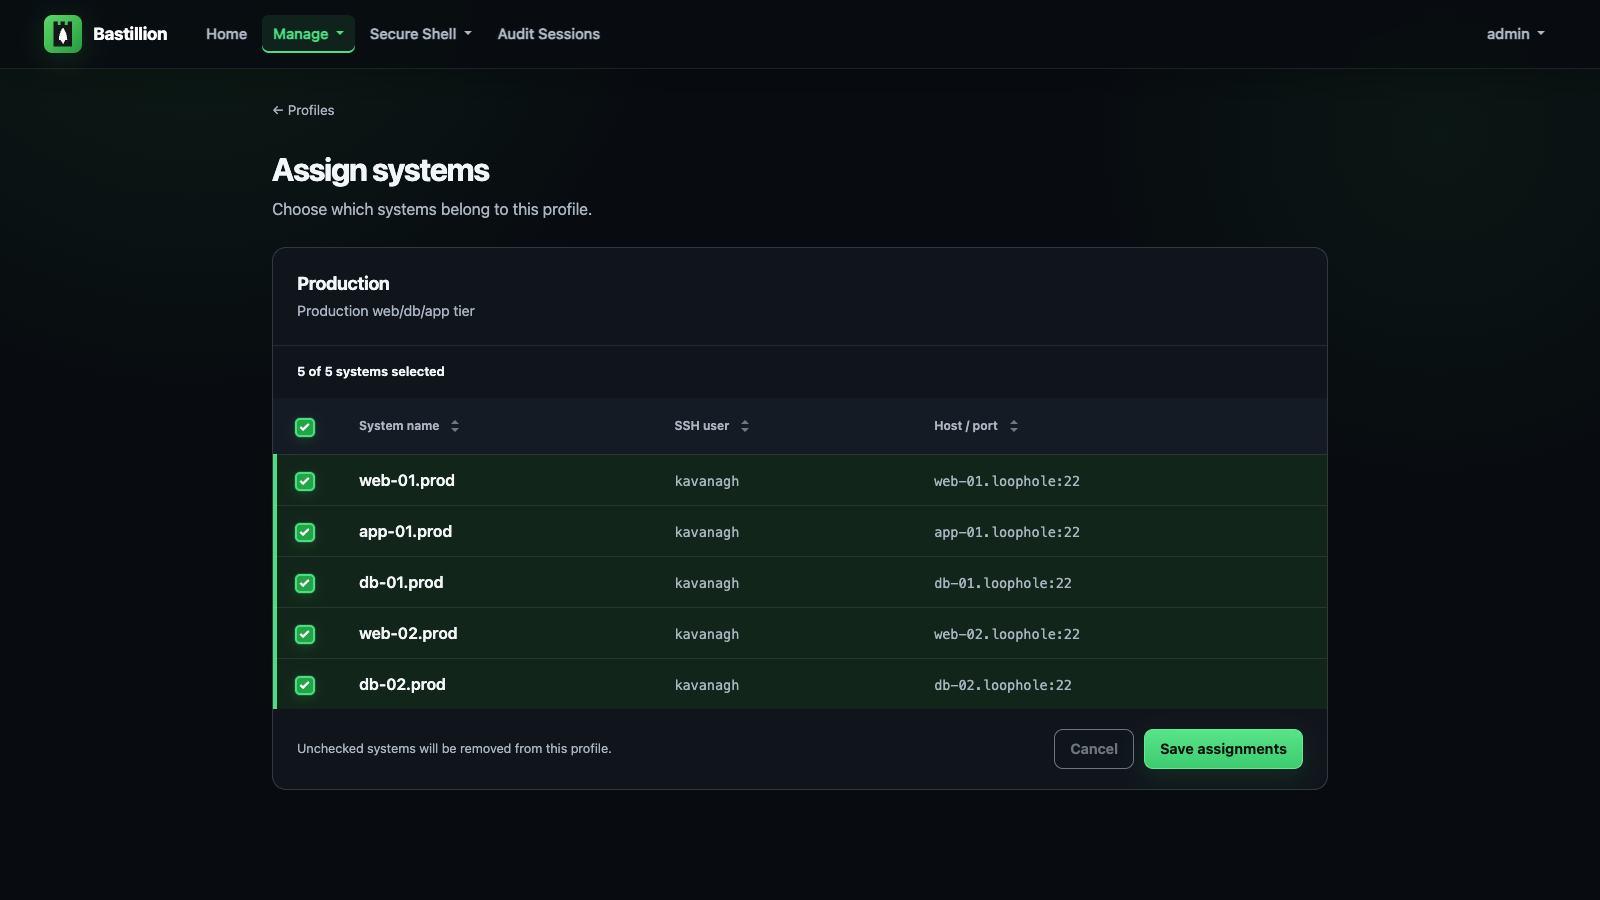
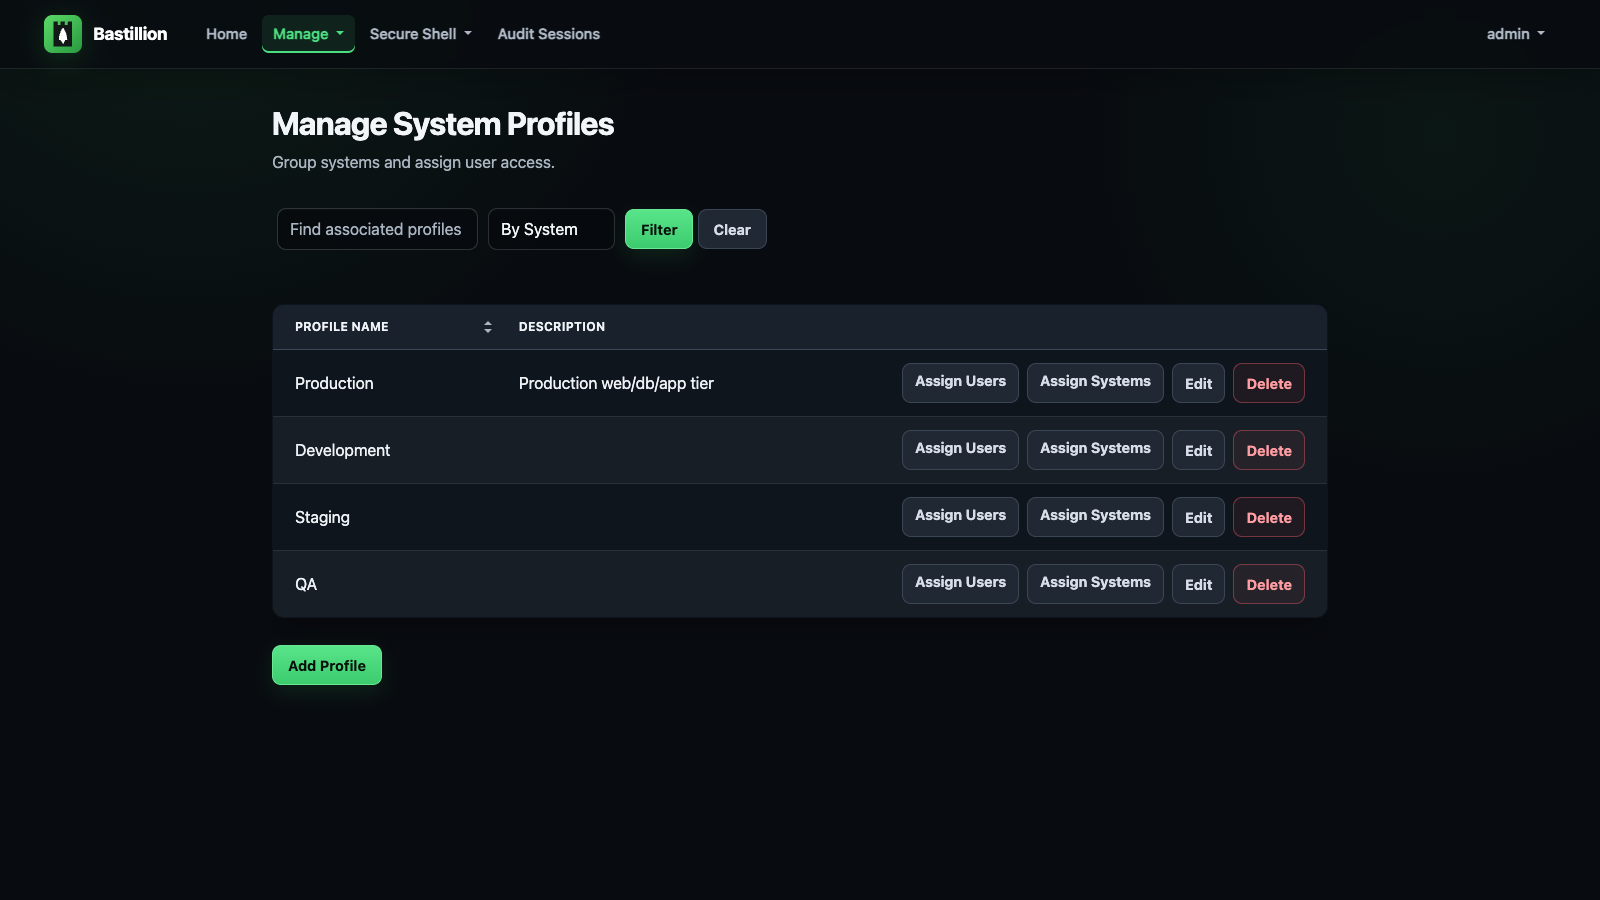
Systems get grouped into named Profiles — think "Production," "Staging," "Database Tier." Users are then linked to profiles under Manage → Users, which is the only thing that controls who can reach what. Revoke a profile assignment and that access is gone immediately, no key rotation needed.
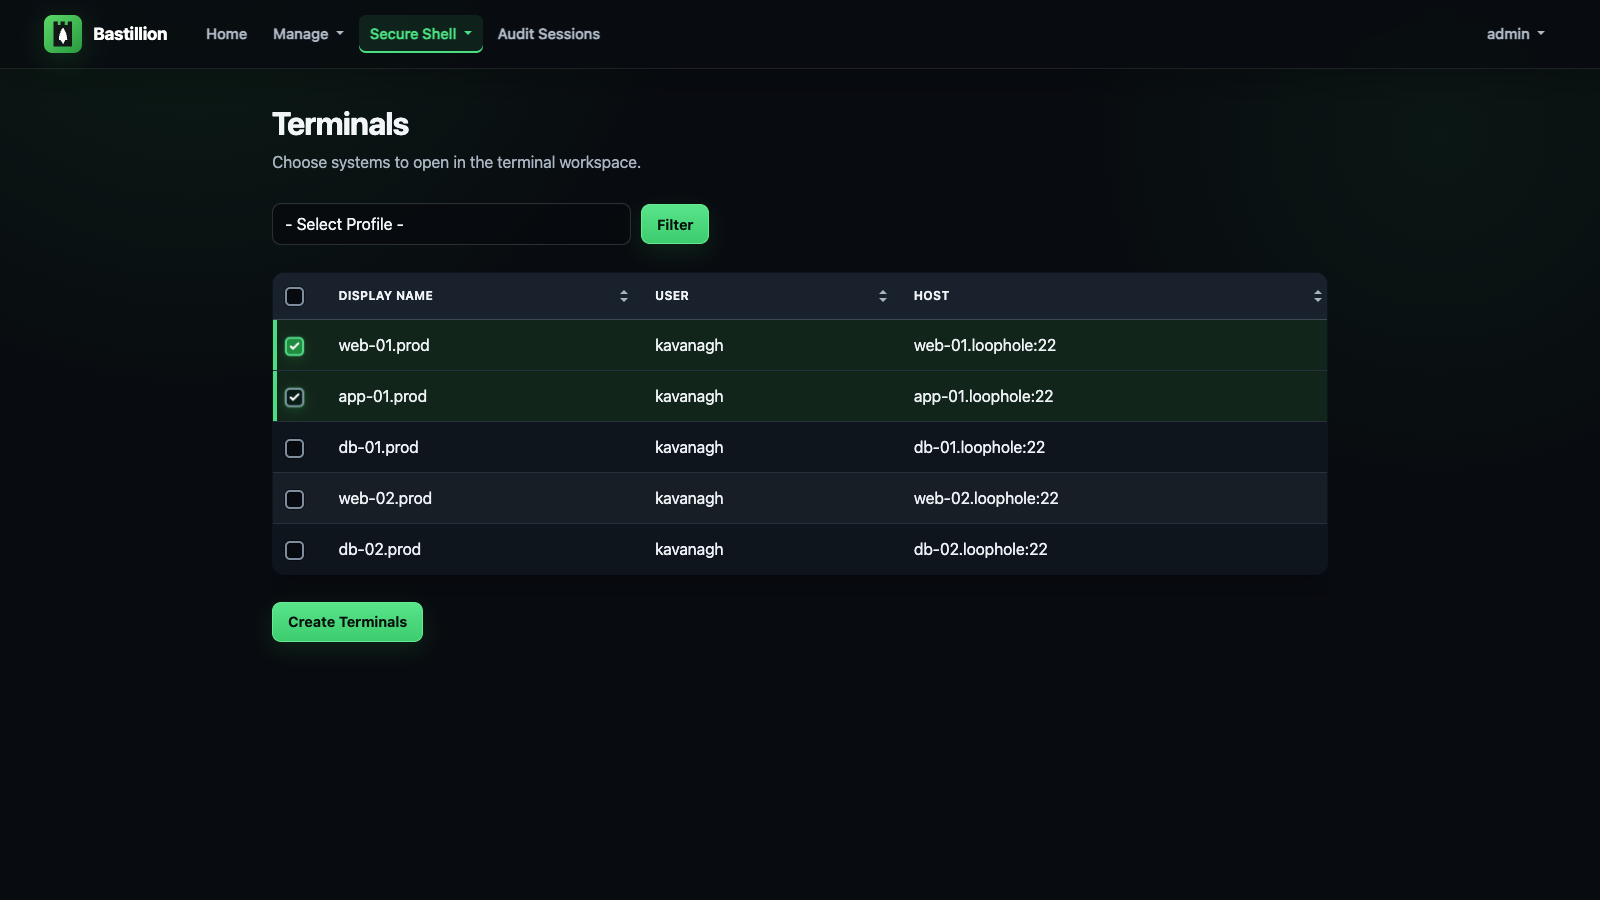
Assigned users open Secure Shell → Terminals, pick one or more systems, and get live, resizable, xterm-based terminals in the browser, side by side. Type once, and it goes to every terminal marked active — the same keystroke, the same command, the same output shape, across as many hosts as you selected.
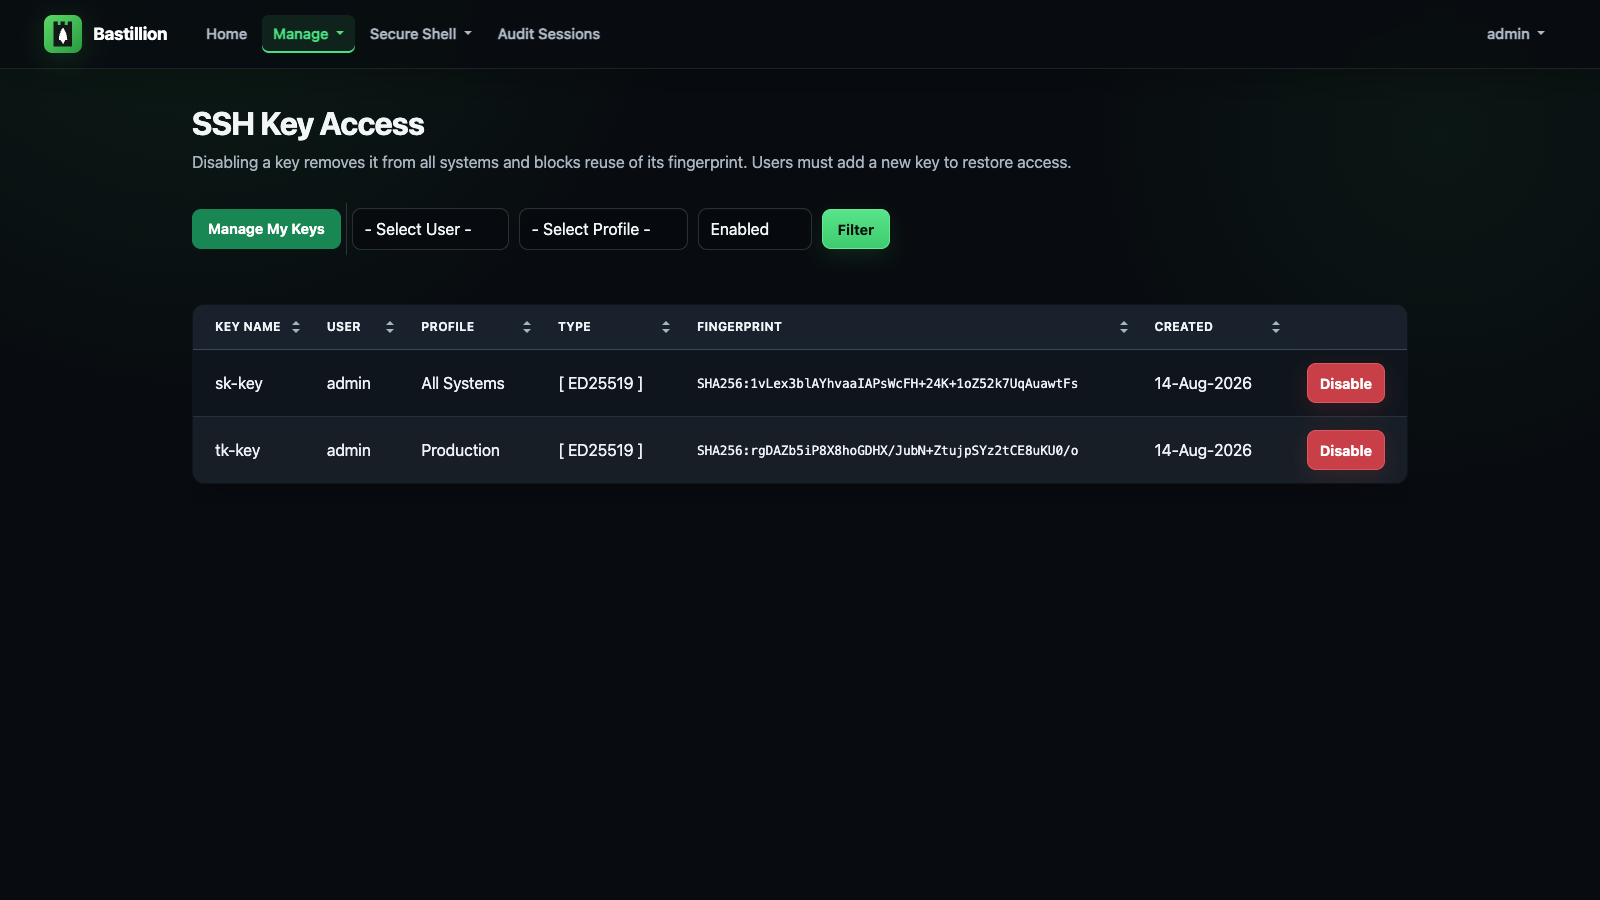
Because every host trusts the same application key (not one key per user), disabling it once under Manage SSH Keys revokes access everywhere immediately — no need to touch target systems by hand, no hunting down which server has which stale key.
Every connection checks the host key the target system presents against the one Bastillion recorded for it. The first time a host is seen, its key is recorded and trusted; if that key later changes, the connection is refused and the system appears under Manage → Host Keys as changed — blocked, showing the approved fingerprint and the offered one together so you can tell a rebuilt host from an intercepted connection. Trusting the new key is a deliberate, logged act.
This matters more for a bastion than for a laptop. Bastillion hands the target system its private key, and on authentication fallback the password or passphrase you supplied — so anything that can answer on a managed system's address collects credentials for it. Until this check existed, nothing compared that key against anything.
Set hostKeyVerification=strict to also require a manager to approve each newly seen host
before the first connection to it, or off to restore the old behaviour — see
Configuration.
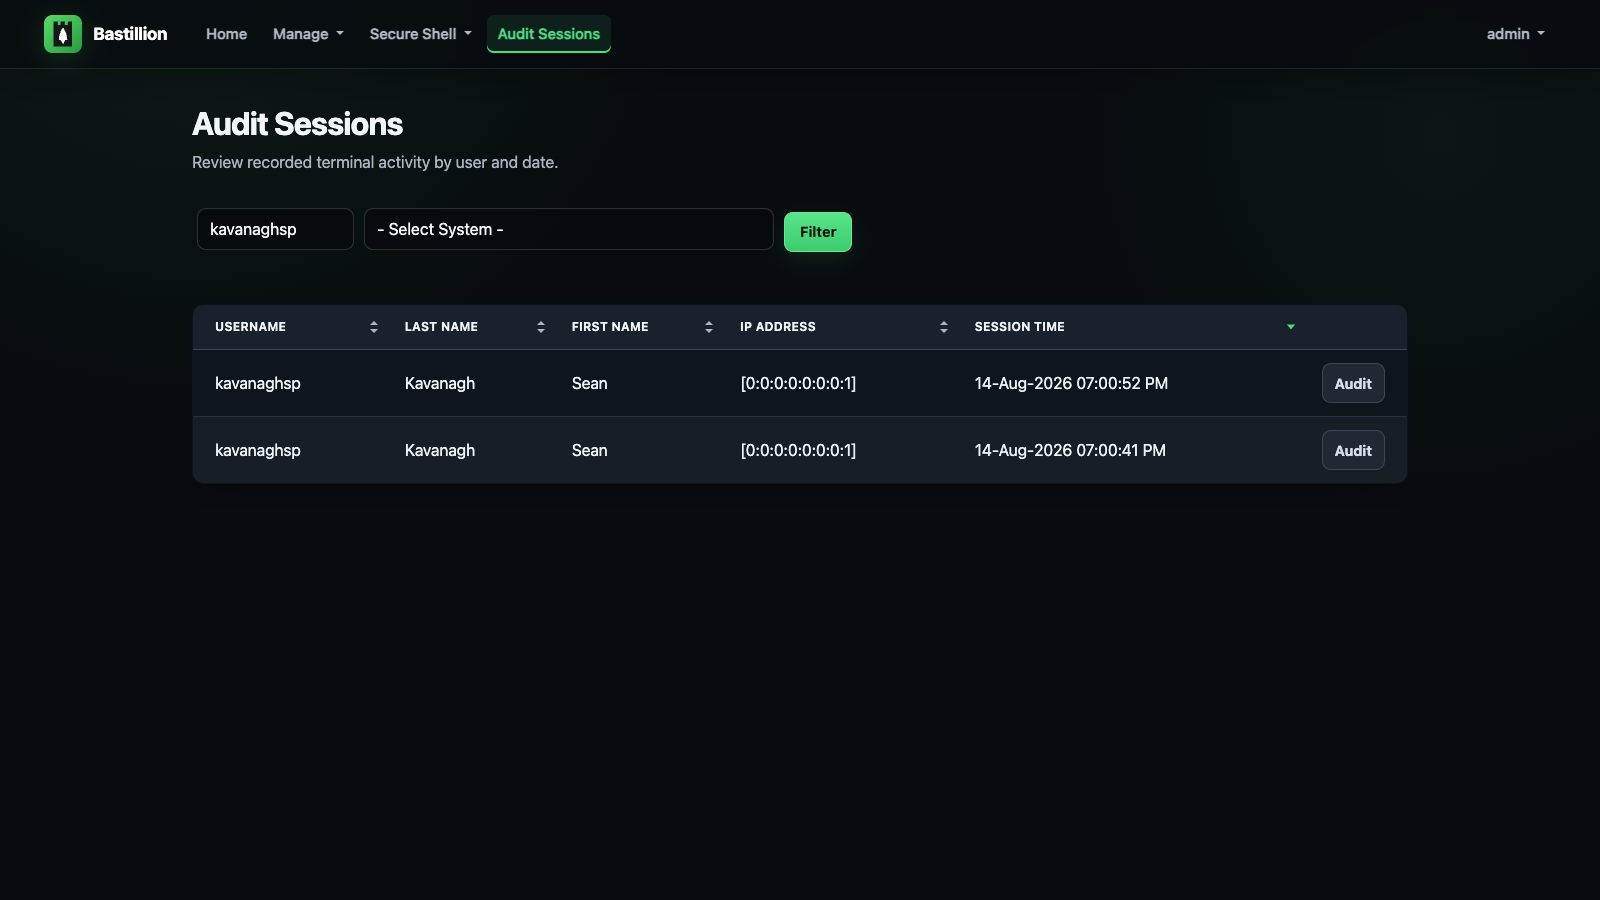
Everything typed and every byte returned in those terminals is recorded automatically. Managers open Audit Sessions, filter by user or system, and replay any session — side by side for sessions that spanned multiple hosts, with a text filter to jump straight to the lines that matter. Output streams into the page as it loads, so even a session that dumped hundreds of megabytes of logs replays without breaking a sweat.
If you need to show an auditor who ran what, where, and when — this is that evidence,
captured out of the box. Practically every compliance framework has a privileged-access
audit-trail requirement somewhere (PCI DSS, HIPAA, SOC 2, ISO 27001 — pick yours), and
this checks that box without a commercial PAM product. Sessions are kept for 90 days by
default (deleteAuditLogAfter), and recording can be switched off with
ENABLE_INTERNAL_AUDIT=false — see Auditing.
hostKeyVerification=accept-new) — see How It Worksauthorized_keys, which also puts the Bastillion username in the target host's own auth
log. Off by default; needs each host configured to trust the CA — see Configurationjava -jar) with HTTPS out of the box — see Download and Runtools/migrateBastillion runs unlicensed at up to 8 registered systems — enough to try it for real before buying. A license raises that cap.
.lic file automatically..lic file and copy its contents (one line).LICENSE_KEY environment variable:
export LICENSE_KEY=<paste license file contents here>
licenseKey in BastillionConfig.properties instead — the environment
variable takes precedence if both are set.Licenses are annual and don't auto-renew — no card kept on file. Buy again from the same pricing page when you get the expiry warning.
Free: https://github.com/Loophole-LLC/Bastillion/releases
apt-get install openjdk-21-jdk
| Application | Android | iOS |
|---|---|---|
| Authy | Google Play | iTunes |
| Google Authenticator | Google Play | iTunes |
Download the latest jar from Releases:
java -jar bastillion-<version>.jar
Access in browser: https://<server-ip>:8443 — see TLS / HTTPS below for the
self-signed certificate Bastillion generates on first run.
Default credentials:
username: admin
password: changeme
Runs in the foreground; stop with Ctrl+C. For background/daemon operation use whatever your
platform normally uses for a long-running Java process — nohup java -jar ... &, a systemd
unit, a container, etc.
Install Maven 3+:
apt-get install maven
Build and run (packages a self-contained jar with an embedded Jetty server — see
io.bastillion.Main — and runs it):
mvn package
java -jar target/bastillion-6.0.0.jar
Or for local dev without repackaging on every change:
mvn compile exec:java
For an isolated local UI review, keep test data in a separate directory and generate the database password automatically on first startup:
CONFIG_DIR=/tmp/bastillion-ui-review/ TLS_ENABLED=false PORT=8080 \
  mvn -DGEN_DB_PASS=true compile exec:java
Open http://localhost:8080 and sign in with the default credentials above. This HTTP
configuration is for local development. For deployment, use HTTPS as described below.
HTML, CSS, and JavaScript are served from target/classes/webapp; after editing files
under src/main/webapp, run mvn resources:resources and reload the browser to see changes. Templates are cached for up to 60 seconds;
restart the development process to clear that cache immediately.
Listens on https://localhost:8443 by default, same as the downloaded release above — see
TLS / HTTPS below for how that certificate gets set up and how to use your
own instead.
Bastillion generates its own self-signed certificate on first startup and serves HTTPS —
nothing to configure. Browsers will show a warning once (it's self-signed, not issued by a
CA); click through it, same as you would for any other self-hosted appliance. The
certificate and its password persist across restarts (keystore/bastillion.p12 under
CONFIG_DIR, password stored the same encrypted way as the database
password).
Use your own CA-signed certificate instead of the self-signed default — e.g. a free one from Let's Encrypt:
Issue the certificate with certbot (requires a real DNS name pointing at this host, and port 80 reachable for the HTTP-01 challenge):
sudo certbot certonly --standalone -d bastillion.example.com
This writes fullchain.pem and privkey.pem to
/etc/letsencrypt/live/bastillion.example.com/.
Convert the cert/key pair to PKCS12, the keystore format Bastillion expects:
openssl pkcs12 -export \
  -in /etc/letsencrypt/live/bastillion.example.com/fullchain.pem \
  -inkey /etc/letsencrypt/live/bastillion.example.com/privkey.pem \
  -out bastillion.p12 -name bastillion -passout pass:changeit
Point Bastillion at it and restart:
export KEYSTORE_PATH=/path/to/bastillion.p12
export KEYSTORE_PASSWORD=changeit
Browsers will now trust the connection with no warning. Let's Encrypt certificates expire
every 90 days — certbot renew followed by re-running steps 2–3 (and a restart) keeps it
current; certbot renew --deploy-hook can automate that.
Behind a reverse proxy or load balancer that already terminates TLS (nginx, Cloud Run, etc.) — disable Bastillion's own HTTPS and let it serve plain HTTP instead:
export TLS_ENABLED=false
Defaults to port 8080 in this mode; set PORT to change it.
Every setting below can be set as an environment variable — take the property name and
insert an underscore before each capital letter that follows a lowercase letter or digit,
then uppercase it: licenseKey → LICENSE_KEY, dbUser → DB_USER, sshKeyType →
SSH_KEY_TYPE. This is the recommended way to configure Bastillion, especially in
containers — no file to mount or bake in.
Where a property contains a run of capitals, either spelling is accepted: clientIPHeader
can be set as CLIENT_IP_HEADER or CLIENT_IPHEADER, and defaultSSHPassphrase as
DEFAULT_SSH_PASSPHRASE or DEFAULT_SSHPASSPHRASE. Each block below spells out the
variable for every setting, so you shouldn't need to apply the rule by hand.
BastillionConfig.properties still works as a fallback (env vars always win if both are
set), and is where any value Bastillion generates for you at first startup — like a random
DB password — gets persisted. See src/main/resources/BastillionConfig.properties for the
full list of settings and their defaults.
Consolidating everything under one directory (e.g. a single Docker volume mount):
CONFIG_DIR is the one setting to reach for. Everything Bastillion persists —
BastillionConfig.properties, the self-signed TLS keystore (keystore/bastillion.p12), the
H2 database and the SSH host key pair (both under keydb/), and bastillion.jceks — lives
under it by default, so pointing CONFIG_DIR at one place relocates all of it:
export CONFIG_DIR=/data/bastillion/
KEYSTORE_PATH and DB_CONNECTION_URL still exist for pointing just one of those at a
different location on its own (a real cert, a remote DB) — see TLS / HTTPS and
the "Database Settings" section below — but neither is needed just to consolidate everything
into CONFIG_DIR.
CONFIG_DIR itself defaults to ./config relative to the working directory. Upgrading an
existing instance that never set it? Older releases stored state directly in the working
directory instead of ./config — Bastillion detects that on first startup with this version
and moves it into ./config (or into CONFIG_DIR, if you've now set one) automatically.
How much of each managed system's authorized_keys file Bastillion takes responsibility for:
# manage (default) - Bastillion owns the file: it is replaced with the public keys of every
#                    user assigned to that system, plus Bastillion's own. Revoking a user's
#                    key removes their direct access to the host on the next refresh.
# append           - leave the file alone except for making sure Bastillion's own key is in
#                    it. User keys are not distributed.
# off              - never read or write the file at all.
export KEY_MANAGEMENT=manage

# authorized_keys refresh interval in minutes (no refresh for <=0)
export AUTH_KEYS_REFRESH_INTERVAL=120

# Force user key generation and strong passphrases
export FORCE_USER_KEY_GENERATION=false
off is only usable when Bastillion can authenticate some other way — in practice
sshCertificateAuth=on with the authority installed on every host, since otherwise there is
nothing for it to log in with. Bastillion warns loudly at startup if both are off. It also
gives up the fallback: with no application key on the host, a certificate problem locks
Bastillion out of that system instead of degrading to key authentication.
In append and off the refresh timer and the Manage SSH Keys screens are hidden —
there is nothing left for them to distribute.
The older boolean
KEY_MANAGEMENT_ENABLEDstill works and is honoured whenKEY_MANAGEMENTis unset (true→manage,false→append), so an existing instance keeps the behaviour it had. PreferKEY_MANAGEMENTin new setups.
By default Bastillion generates its own Ed25519 keypair on first startup. To use your own instead, the easiest way is through the UI: Settings → Replace Application SSH Key (manager accounts only) — paste in a private key, public key, and passphrase if it has one, and it takes effect immediately, no restart needed.
⚠️ This replaces the one key every registered system trusts. It's meant as a one-time step
when first setting up Bastillion, before you've registered any systems — if you already
have systems registered, Bastillion loses SSH access to all of them the instant you replace
the key, unless this exact key is already sitting in authorized_keys on every one of them
first. The Settings page requires an extra confirmation checkbox once you have systems
registered, precisely because of this.
Already have systems registered and need to rotate the key anyway? Pre-stage the new key
through Bastillion itself rather than editing authorized_keys by hand everywhere:
FORCE_USER_KEY_GENERATION=false so Manage SSH Keys → Add SSH Key lets you paste
an existing public key instead of only generating a new one.AUTH_KEYS_REFRESH_INTERVAL in mind, since that's what pushes it out.FORCE_USER_KEY_GENERATION back to its previous value, then once you've confirmed
the new application key has propagated to every system (again, mind
AUTH_KEYS_REFRESH_INTERVAL), remove the key you added in step 2 from Manage SSH Keys —
it was only staged there to pre-seed authorized_keys and isn't needed going forward.For scripted/headless setups, the same thing can be done via environment variables and a restart instead:
# Regenerate and import SSH keys
export RESET_APPLICATION_SSH_KEY=true

# Private key
export PRIVATE_KEY=/Users/you/.ssh/id_rsa

# Public key
export PUBLIC_KEY=/Users/you/.ssh/id_rsa.pub

# Passphrase (leave blank if none)
export DEFAULT_SSH_PASSPHRASE=myPa$$w0rd
Once registered, you can drop these — the key pair is already stored in the database.
SSH_KEY_TYPE (rsa, ecdsa, ed25519, or ed448) only matters when Bastillion is
generating a fresh key, not when importing one — the type of an imported key is read from
the key itself:
# SSH key type ('rsa', 'ecdsa', 'ed25519', or 'ed448')
# Supported options:
#   rsa    - Classic, widely compatible (configurable length, default 4096)
#   ecdsa  - Faster, smaller keys (P-256/384/521 curves)
#   ed25519 - Default and recommended (≈ RSA-4096, secure and fast)
#   ed448  - Extra-strong (≈ RSA-8192, slower and less supported)
export SSH_KEY_TYPE=ed25519
Controls what happens when a managed system presents an SSH host key. Recorded keys are reviewed under Manage → Host Keys, where a changed or newly seen key can be trusted, revoked, or forgotten.
# accept-new (default) - record and trust each host's key the first time it is seen, then
#                        refuse to connect if that host ever presents a different one
# strict               - as accept-new, but a newly seen host key must also be approved by a
#                        manager before the first connection to that host is allowed
# off                  - no host key verification at all (the behaviour before 6.0.0)
export HOST_KEY_VERIFICATION=accept-new
accept-new is the default so that upgrading an existing instance needs no action: each
host's key is recorded on its next connection, rather than every connection being refused
until a manager has approved every host. It still catches the case that matters — a key that
changes underneath you.
Host key decisions are written to the io.bastillion.manage.util.SystemAudit log — which
host keys were trusted on first sight, and which connections were refused.
By default Bastillion authenticates to each system with its own public key, which has to be
present in that system's authorized_keys (see How It Works).
Instead, it can sign a short-lived SSH certificate per connection:
# off (default) - authenticate with the application key
# on            - sign a certificate per connection and authenticate with that
export SSH_CERTIFICATE_AUTH=on

# How long an issued certificate stays valid (seconds). Short on purpose: a leaked
# certificate stops working on its own rather than needing to be revoked.
export SSH_CERTIFICATE_VALIDITY_SECONDS=300
Each managed system has to be told to trust the authority before it will accept a
certificate. Bastillion generates its own Ed25519 certificate authority on first startup and
prints the public key to the console; Settings shows it too, with these steps, a copy
button and a bastillion_ca.pub download. On each host, as root:
cp bastillion_ca.pub /etc/ssh/bastillion_ca.pub
echo 'TrustedUserCAKeys /etc/ssh/bastillion_ca.pub' >> /etc/ssh/sshd_config
systemctl reload sshd
You can do this host by host after switching certificates on, rather than all of it first.
The application key is still offered behind the certificate, so a host that does not trust
the CA yet keeps authenticating exactly as it did before — provided key management is still
leaving that key in its authorized_keys. The Auth column on the systems screen shows
which of the two each host actually accepted, so you can watch a rollout land.
⚠️ That needs root on each host, which pushing to authorized_keys does not. This is an
alternative to key distribution for fleets you configure centrally, not a drop-in
replacement for it — which is why it is off by default.
This does not turn off key management, and usually shouldn't. The two settings control
different things: sshCertificateAuth is how Bastillion authenticates to a host, while
keyManagement is how much of that host's authorized_keys Bastillion maintains. See
SSH Key Management.
The usual pairing is KEY_MANAGEMENT=append. That keeps Bastillion's own key in
authorized_keys as a fallback while leaving the rest of the file alone — so you get
certificate authentication and per-user attribution without Bastillion rewriting user keys on
every host.
KEY_MANAGEMENT=off is the stricter option, for when you want Bastillion provably not
touching the file at all. What it costs is the fallback: with no application key on the host,
a certificate authority problem becomes a lockout from that system rather than a logged
degradation to key authentication.
Two things worth being clear about, because it is easy to credit them to certificates:
keyManagement choice, not a certificate one. Only
manage distributes them; append never has, long before certificates existed. If your
engineers rely on Bastillion placing their keys for direct access, stay on manage —
turning certificates on does not affect that either way.off does not stop direct SSH. Keys already on a host, however they got there, keep
working. It stops Bastillion maintaining the file.Users can download a certificate for their own SSH client from Manage SSH Keys, next
to each of their keys, once this is on. It is signed for that key, carries the login accounts
their profiles currently reach, and lets them ssh to a host directly with nothing in its
authorized_keys. It downloads as <key name>.key-cert.pub, which is what OpenSSH looks for
beside the <key name>.key private key from the same screen — keep both names as given and
ssh -i <key name>.key picks the certificate up on its own.
export SSH_USER_CERTIFICATE_VALIDITY_SECONDS=28800 # 8 hours
The default is one working session, which is deliberate. The principals are read at issue time, so re-downloading is what re-checks the user's entitlements — that is the only thing making expiry stand in for revocation, since nothing here publishes a revocation list. Bastillion warns at startup above 12 hours. Two consequences worth stating plainly:
⚠️ A certificate principal is a username, with no host in it. A certificate naming
deploy is accepted as deploy@ on every host trusting this authority, not only the ones
in that user's profiles. Where hosts share login account names and profiles are what separate
them, that is wider access than the profile grants. To keep per-host scoping, give each host
an AuthorizedPrincipalsFile listing which principals it accepts — at the cost of per-host
configuration, which is the thing certificates were adopted to avoid.
What it buys, beyond not distributing keys: Bastillion authenticates to every system with
one shared application key, so a host's own logs cannot tell which Bastillion user was
responsible for a session. Each certificate carries a key id of bastillion:<username>,
which sshd records on every accepted connection:
Accepted publickey for deploy ... ED25519-CERT SHA256:4P6XvKoX... ID bastillion:alice (serial 7) CA ED25519 SHA256:ztZuuKqR...
If signing fails for any reason, Bastillion falls back to plain public key authentication and logs an error, rather than locking every system out at once.
Host certificates work in the other direction: trust a host certificate authority under Manage → Host Keys, and any system presenting a host certificate signed by it is accepted without its individual host key needing to be recorded or approved — useful for a fleet that is reprovisioned often.
Bastillion sends Content-Security-Policy, X-Content-Type-Options, X-Frame-Options,
Referrer-Policy and Strict-Transport-Security on every response. HSTS is tunable:
# How long a browser should refuse plain HTTP to this site (seconds, one year by default)
export HSTS_MAX_AGE=31536000

# Extend that to every subdomain of the host serving Bastillion
export HSTS_INCLUDE_SUB_DOMAINS=false

# Also request inclusion in browsers' built-in HSTS lists (requires the above)
export HSTS_PRELOAD=false
hstsIncludeSubDomains is off by default because it is not a reversible mistake: a browser
that has cached it refuses plain HTTP to every subdomain of that host for the whole
hstsMaxAge. On a dedicated host (bastillion.example.com) it affects essentially nothing
and is worth turning on; served from an apex domain it would force HTTPS across every sibling
subdomain. hstsPreload is harder still to undo — removal takes months to reach users.
Failed logins are throttled per client IP, deliberately not per account, so nobody can lock out a known admin username by failing its password on purpose:
# Failed attempts allowed per client IP within the window below
export MAX_LOGIN_ATTEMPTS_PER_IP=10
export LOGIN_THROTTLE_WINDOW_MINUTES=5

# Ceiling on how many client IPs are tracked at once
export MAX_THROTTLED_IPS=20000

# Header to trust for the client IP (e.g. X-Forwarded-For). Only set this behind a reverse
# proxy that writes the header itself - trusting a client-suppliable header without one lets
# an attacker vary it freely and bypass the throttle.
export CLIENT_IP_HEADER=
Embedded H2 example:
export DB_USER=bastillion
export DB_PASSWORD=p@$$w0rd!!
export DB_DRIVER=org.h2.Driver
export DB_CONNECTION_URL=jdbc:h2:file:keydb/bastillion;CIPHER=AES;
Remote H2 example:
export DB_CONNECTION_URL=jdbc:h2:tcp://<host>:<port>/~/bastillion;CIPHER=AES;
Authenticate against an existing LDAP/Active Directory server instead of (or alongside) local passwords. Enable it:
export JAAS_MODULE=ldap-ol
Configure jaas.conf:
ldap-ol {
    com.sun.security.auth.module.LdapLoginModule SUFFICIENT
    userProvider="ldap://hostname:389/ou=example,dc=bastillion,dc=com"
    userFilter="(&(uid={USERNAME})(objectClass=inetOrgPerson))"
    authzIdentity="{cn}"
    useSSL=false
    debug=false;
};
To map LDAP roles to Bastillion profiles:
ldap-ol-with-roles {
    org.eclipse.jetty.security.jaas.spi.LdapLoginModule required
    debug="false"
    useLdaps="false"
    contextFactory="com.sun.jndi.ldap.LdapCtxFactory"
    hostname="<SERVER>"
    port="389"
    bindDn="<BIND-DN>"
    bindPassword="<BIND-DN PASSWORD>"
    authenticationMethod="simple"
    forceBindingLogin="true"
    userBaseDn="ou=users,dc=bastillion,dc=com"
    userRdnAttribute="uid"
    userIdAttribute="uid"
    userPasswordAttribute="userPassword"
    userObjectClass="inetOrgPerson"
    roleBaseDn="ou=groups,dc=bastillion,dc=com"
    roleNameAttribute="cn"
    roleMemberAttribute="member"
    roleObjectClass="groupOfNames";
};
Admins are added upon first login and can be assigned system profiles.
How role mapping actually works: each LDAP group a user belongs to (per roleBaseDn/
roleMemberAttribute above) becomes a "role name" - the value of that group's
roleNameAttribute (cn in the example above). On every login, Bastillion compares each of
those role names, by exact text match, against the names of the Profiles you've created
under Manage → Profiles. A match assigns the user to that profile; no match, no access to
that profile. So if a user is a member of the LDAP group cn=admins,ou=groups,..., you need
a Bastillion profile literally named admins (capitalization aside - the comparison is
case-insensitive, spelling is not) for that membership to mean anything in Bastillion. There
is no separate mapping step or UI for this - the names simply have to line up.
A user whose roles match no Bastillion profile is rejected at login (Manager accounts are
the one exception; they aren't profile-scoped). Set defaultProfileForLdap to a profile name
to assign every LDAP user to it automatically, guaranteeing everyone can log in regardless of
role matching - useful as a safety net while you're still getting profile names lined up with
your directory's group names:
export DEFAULT_PROFILE_FOR_LDAP=everyone
Authenticate against an enterprise identity provider - Microsoft Entra ID, Okta, ADFS, or any SAML 2.0 IdP - instead of (or alongside) local passwords or LDAP. A Sign in with SSO button appears on the login page once configured. Enable it:
export SAML_BASE_URL=https://bastillion.example.com
export SAML_IDP_METADATA_URL=https://login.microsoftonline.com/<tenant-id>/federationmetadata/2007-06/federationmetadata.xml?appid=<app-id>
In Entra ID (or your IdP of choice), register Bastillion as an Enterprise Application / Service Provider with:
https://bastillion.example.com (or SAML_SP_ENTITY_ID if set - see below)https://bastillion.example.com/saml/acsNo IdP metadata URL to hand? Configure the IdP manually instead - all three are required together in that case:
export SAML_IDP_ENTITY_ID=https://sts.windows.net/<tenant-id>/
export SAML_IDP_SSO_URL=https://login.microsoftonline.com/<tenant-id>/saml2
export SAML_IDP_CERT=<base64-encoded X.509 certificate>
Only needed if the Entity ID registered on the IdP side can't match SAML_BASE_URL exactly:
export SAML_SP_ENTITY_ID=https://bastillion.example.com
To map Entra group/role claims to Bastillion profiles (see "How role mapping actually works"
below before changing SAML_ROLE_ATTRIBUTE from its default):
export SAML_ROLE_ATTRIBUTE=http://schemas.microsoft.com/ws/2008/06/identity/claims/groups
export DEFAULT_PROFILE_FOR_SAML=everyone
Admins are added upon first SSO login and can be assigned system profiles.
Username shown in Bastillion: the SAML NameID becomes the username. Entra sends
user.userprincipalname by default, which is fine for regular tenant members but produces an
ugly guest UPN like alice_gmail.com#EXT#@yourtenant.onmicrosoft.com for B2B guests (anyone
signed in with a personal or external email added as a guest). For a cleaner username, go to
the Enterprise Application's Single sign-on → SAML → Attributes & Claims, edit Unique
User Identifier (Name ID), and change its Source attribute from user.userprincipalname
to user.mail.
How role mapping actually works - same mechanism as LDAP above: SAML_ROLE_ATTRIBUTE
names which assertion attribute carries the user's groups/roles; whatever values that
attribute holds on a given login are compared, by exact text match, against the names of
the Profiles you've created under Manage → Profiles. A value that matches a profile name
assigns the user to it; nothing else about the claim matters. So a Bastillion profile must be
named exactly the same as the string the assertion sends - there's no separate mapping step
or UI, the names just have to line up.
This is the part that most often trips people up with Entra ID specifically: by default,
Entra's group claim can emit each group as its Object ID (a GUID) rather than its display
name, unless the Enterprise Application's token configuration is explicitly set to emit group
names. If your Bastillion profiles are named things like admins/everyone but Entra is
sending GUIDs, nothing will ever match. Check the actual claim value in a real assertion (or
Entra's token configuration for the app) before assuming the mapping is broken - it's usually
this, not a Bastillion-side problem. Three ways to fix it, in order of what we'd recommend:
admins, everyone, ...), then
assign users/groups to those roles under the Enterprise Application's Users and groups.
Configure the SAML token to emit the roles claim, and point SAML_ROLE_ATTRIBUTE at that
claim's URI instead of the groups claim. You choose the exact string Entra sends - no GUID
problem at all, and it's a cleaner authorization model than repurposing AD groups anyway.sAMAccountName
or a display-name option - exact choices vary by tenant and Entra portal version, so check
what's actually offered rather than assuming a specific label.A user whose claims match no Bastillion profile is rejected at login (Manager accounts are
the one exception; they aren't profile-scoped) - exactly as with LDAP, so
DEFAULT_PROFILE_FOR_SAML above is worth setting for the same reason
DEFAULT_PROFILE_FOR_LDAP is: a safety net while you're still lining up profile names with
your IdP's claim values.
Bastillion's own one-time-passcode check is skipped for SSO logins - the IdP is expected to enforce its own MFA/Conditional Access policy instead. First-time OTP enrollment is still offered so SAML users have a local fallback credential available if SSO is ever disabled.
Signed requests and encrypted assertions: Bastillion generates its own SAML signing
certificate automatically (self-signed, the same way it generates its TLS certificate) the
first time it's needed, and signs every outgoing AuthnRequest with it from then on - no
setup required, and harmless even if your IdP doesn't check it. Fetch
https://bastillion.example.com/saml/metadata to get that certificate in standard SP
metadata form and hand it to your IdP admin if they should verify Bastillion's signed
requests, or should encrypt assertions for Bastillion - most IdPs can import an SP metadata
URL directly instead of pasting in a raw certificate. If you'd rather use a real (e.g.
CA-issued) key pair instead of the auto-generated one, point SAML_SP_KEYSTORE_PATH/
SAML_SP_KEYSTORE_PASSWORD at a PKCS12 keystore containing it. To require encrypted
assertions (off by default - only turn this on once your IdP is actually configured to
encrypt for Bastillion's certificate, or every login will start failing):
export SAML_WANT_ENCRYPTED_ASSERTIONS=true
Not currently supported: Single Logout (SLO) - logout stays local-only, and doesn't tell the IdP or any other application you were signed into via the same SSO session. SAML SSO can be enabled alongside LDAP; both are evaluated independently and either can provision new users on first login.
Session auditing is enabled by default: terminal output is stored in Bastillion's database
and can be reviewed under Audit Sessions (manager accounts only). Output is streamed to
the browser, so even sessions with very large amounts of terminal output can be replayed.
Audit history is kept for deleteAuditLogAfter days (90 by default). Disable it with:
export ENABLE_INTERNAL_AUDIT=false
Separately, the io.bastillion.manage.util.SystemAudit log records host key and SSH
certificate decisions, and goes to the console by default.
With sshCertificateAuth=on that is one line per SSH connection — a certificate is signed
for each one, and each issue is recorded with its serial and key id. That is the audit trail
those serials exist for, but it is a volume change worth expecting rather than discovering.
Route it to a file by uncommenting audit-appender in log4j2.xml and pointing that logger
at it:
https://github.com/Loophole-LLC/Bastillion/blob/main/src/main/resources/log4j2.xml#L19-L22
Upgrading from an old Bastillion v4 install and want to keep your users, systems, profiles,
scripts, and (most importantly) the application's existing SSH keypair instead of starting
over? tools/migrate/ has a standalone migration tool for exactly that — it exports every
table from the old H2 database (decrypting the app-level-encrypted columns with the OLD
instance's keystore) to a JSON file, then imports it into a fresh instance (re-encrypting
with the NEW instance's keystore). Existing users can log in with their current passwords
immediately after — no forced resets.
Import straight into 6.x — there is no need to stand up a 5.x install first. Every column the v4 export carries still exists in the 6.x schema, and the columns 6.x adds take their defaults.
cd tools/migrate

# 1. Export the old database
./migrate.sh export /opt/Bastillion-jetty/jetty/bastillion/WEB-INF/classes/ ~/bastillion-export.json

# 2. Start the new instance once against the config dir you're migrating into, then
#    stop it (Ctrl+C) once it's finished booting - this creates the schema, jceks, and
#    default admin user.
cd ../..
java -DCONFIG_DIR=/data/bastillion/ -jar target/bastillion-6.0.0.jar

# 3. Import into the new database (full replace of all 12 tables)
cd tools/migrate
./migrate.sh import /data/bastillion/ ~/bastillion-export.json --yes-replace-all-data

# 4. Delete the export file - it contains decrypted secrets
rm ~/bastillion-export.json
See tools/migrate/README.md for the full details — finding your old install's config directory, what exactly gets migrated, and the security notes on the plaintext export file.
The core workflow is shown in How It Works. Expand a group below to explore the rest of the interface.
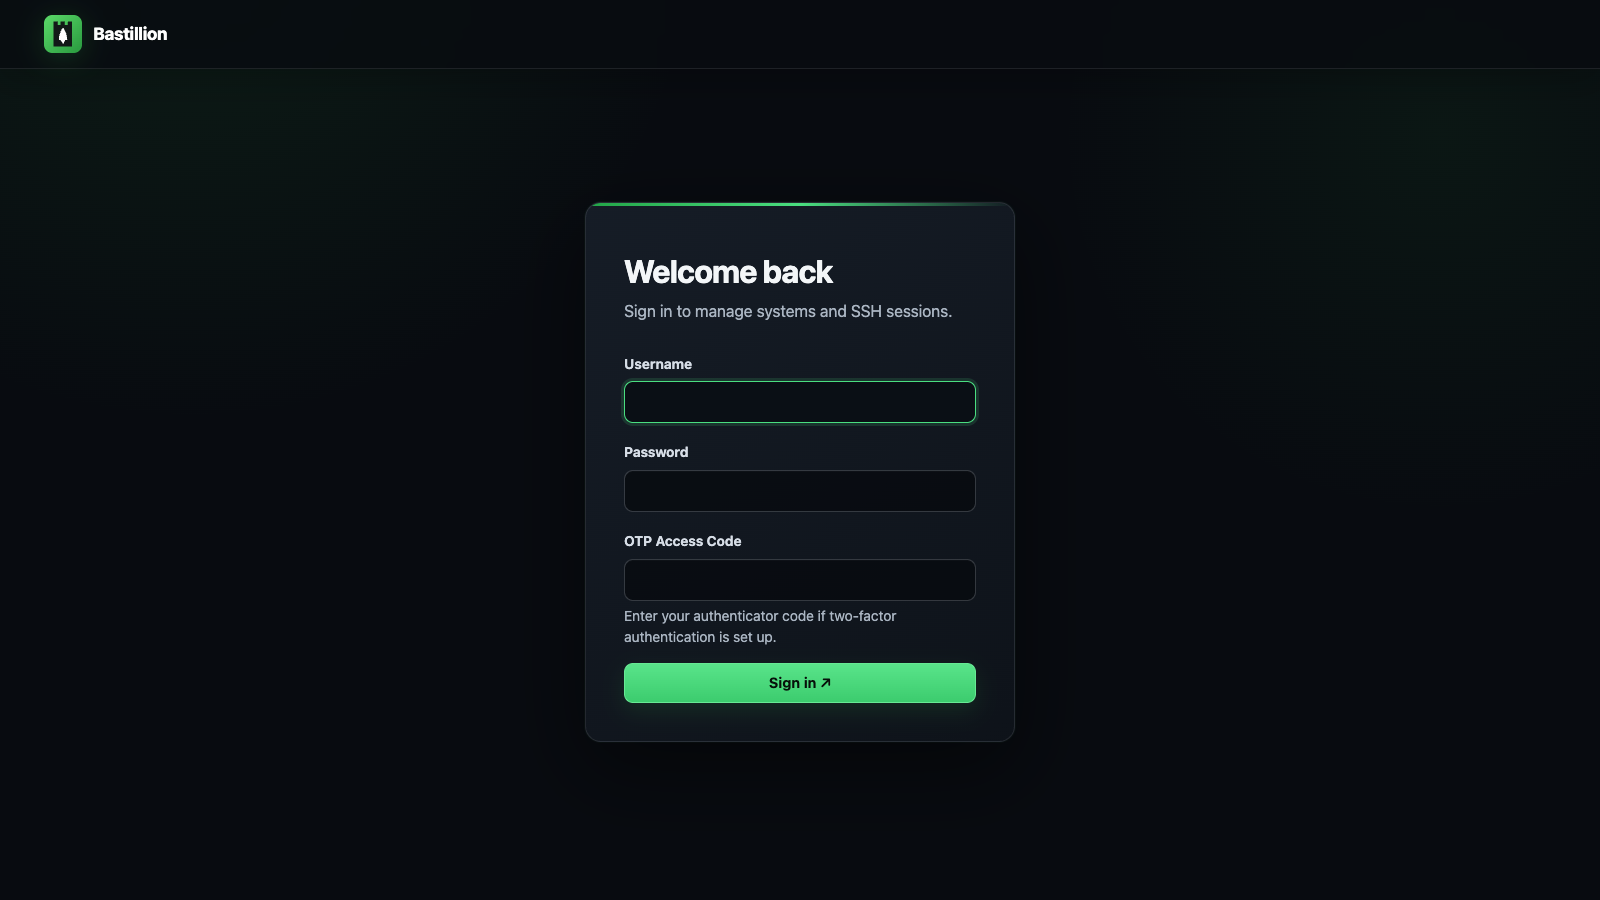
Sign in with a username and password, plus an optional OTP access code.
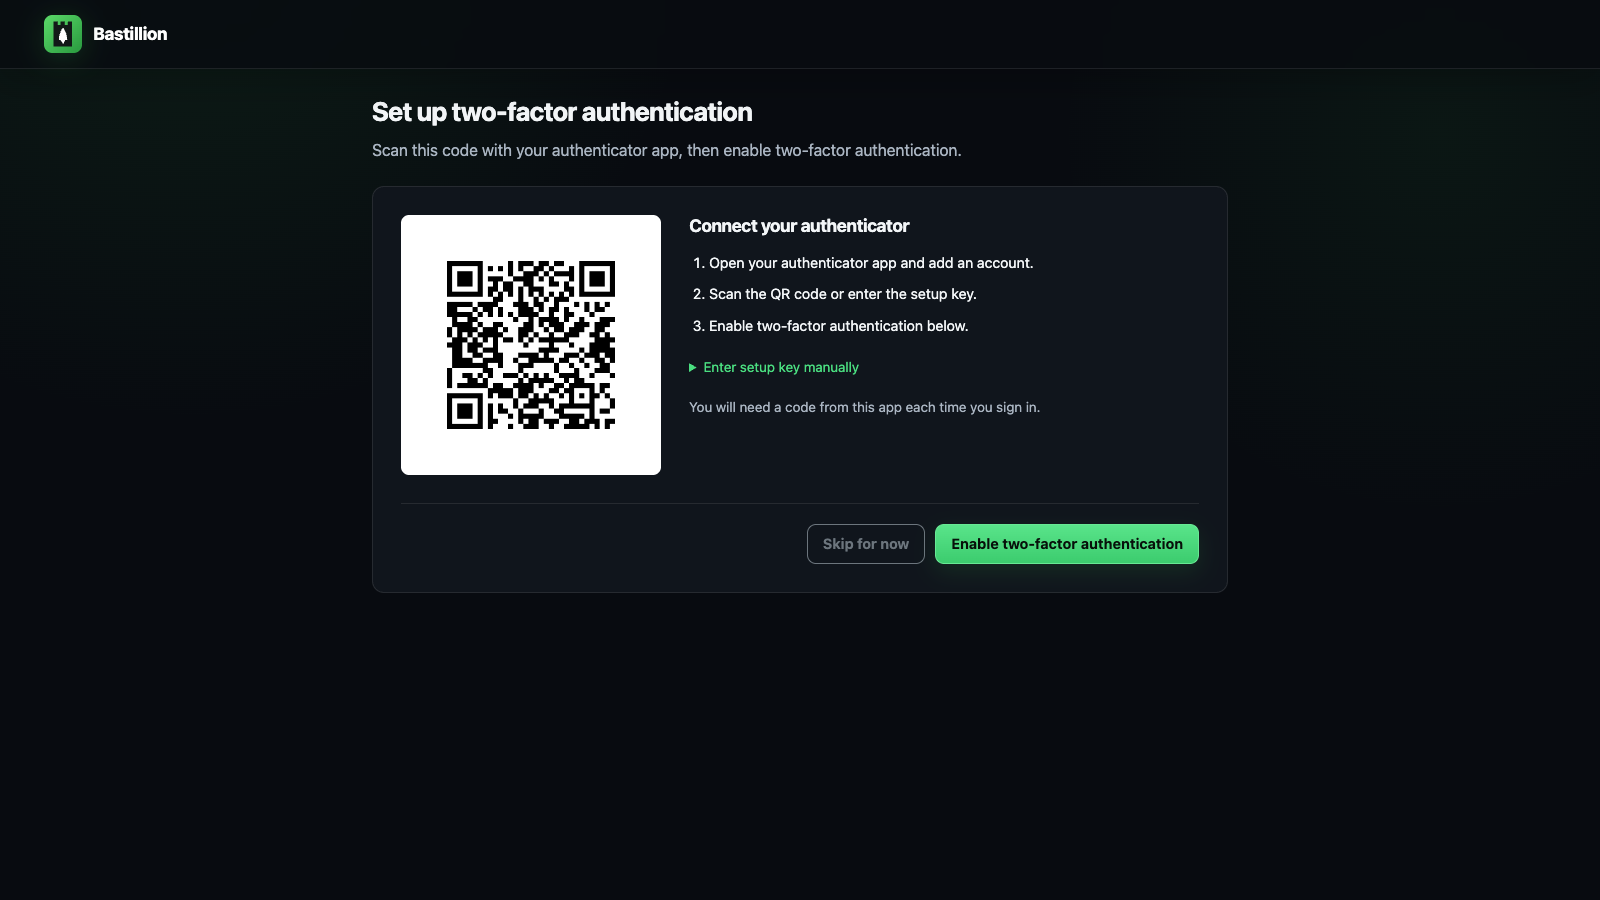
Scan the QR code with Authy, Google Authenticator, or another compatible app.
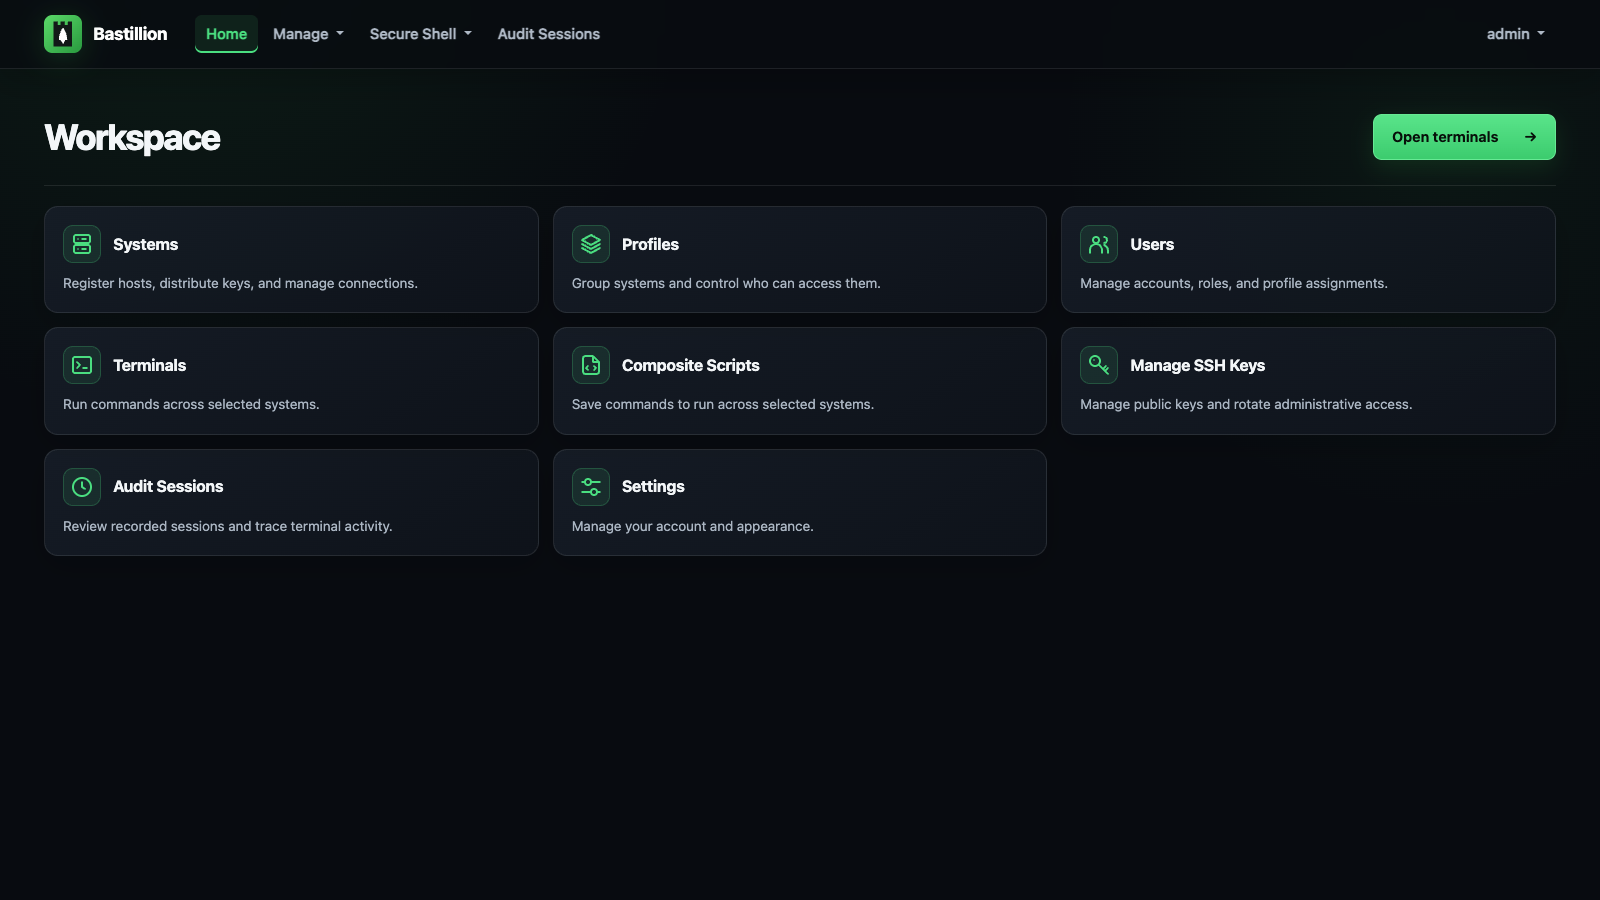
The available tools are scoped to the signed-in user's permissions.
Group systems into named profiles that control access.
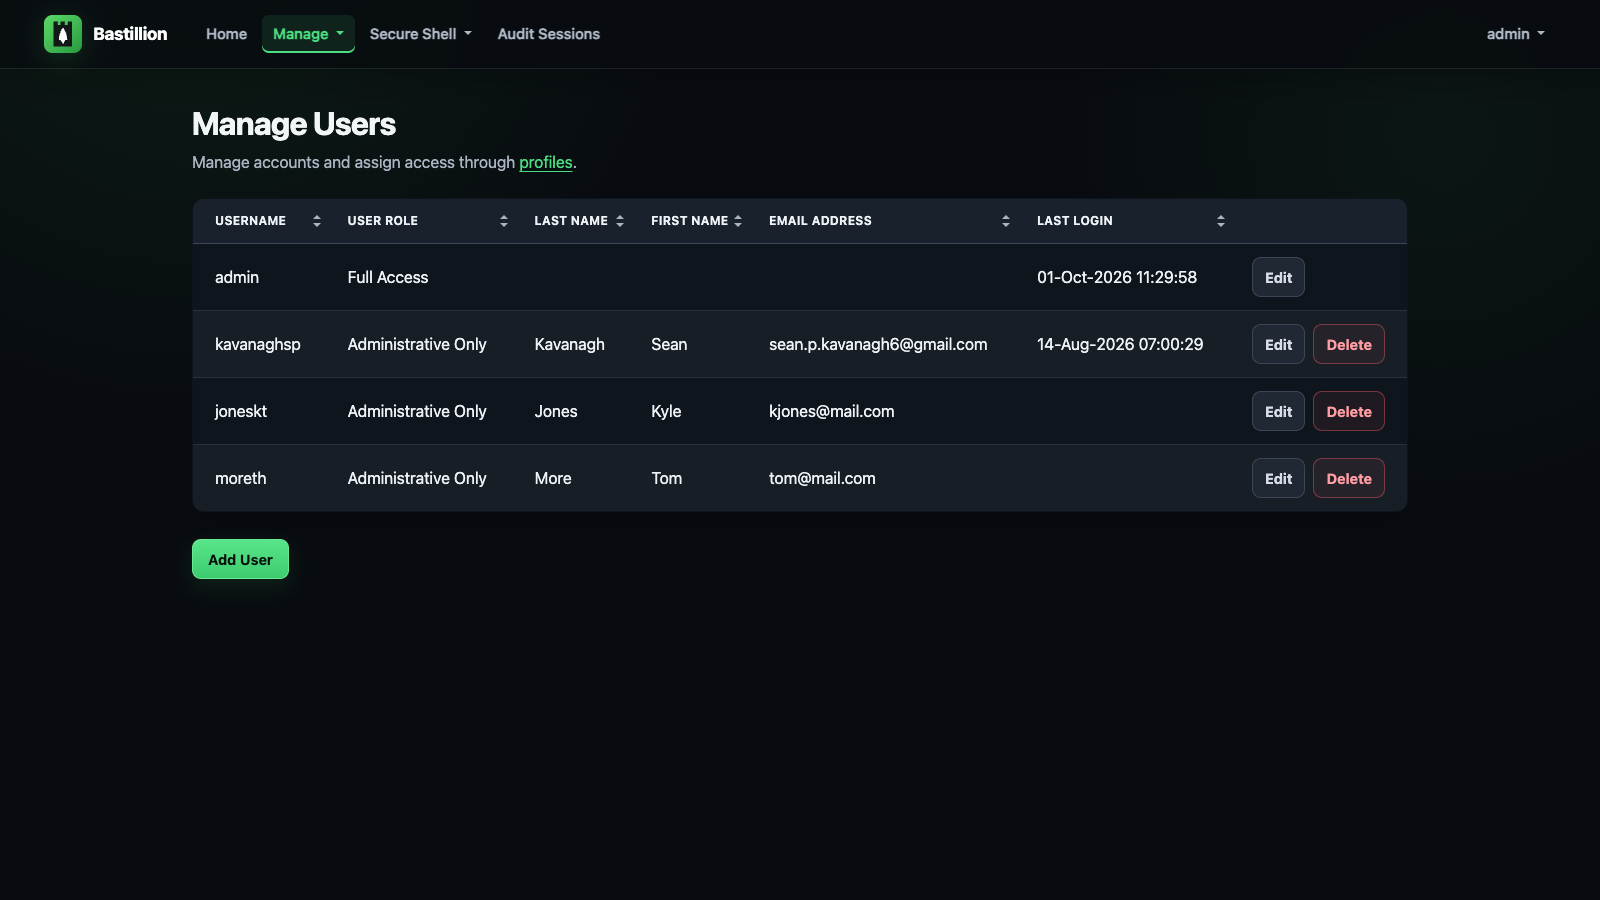
Create accounts, choose user roles, and grant system access through profiles.
Select one or more systems, optionally filtered by profile, and open them simultaneously.
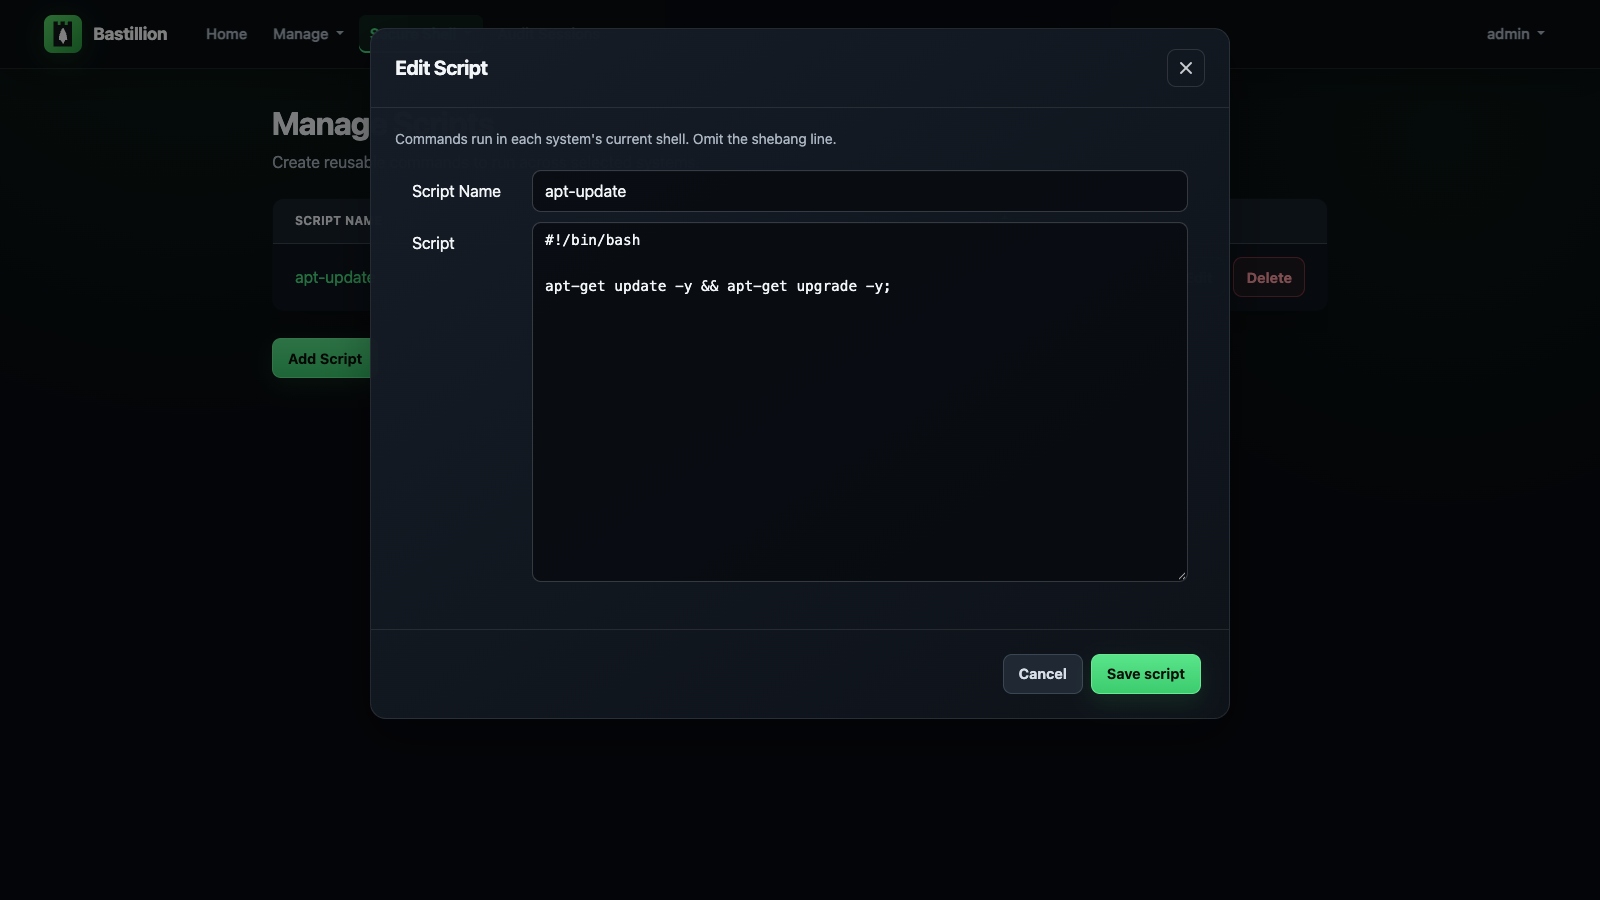
Save a script once and execute it across every selected terminal.
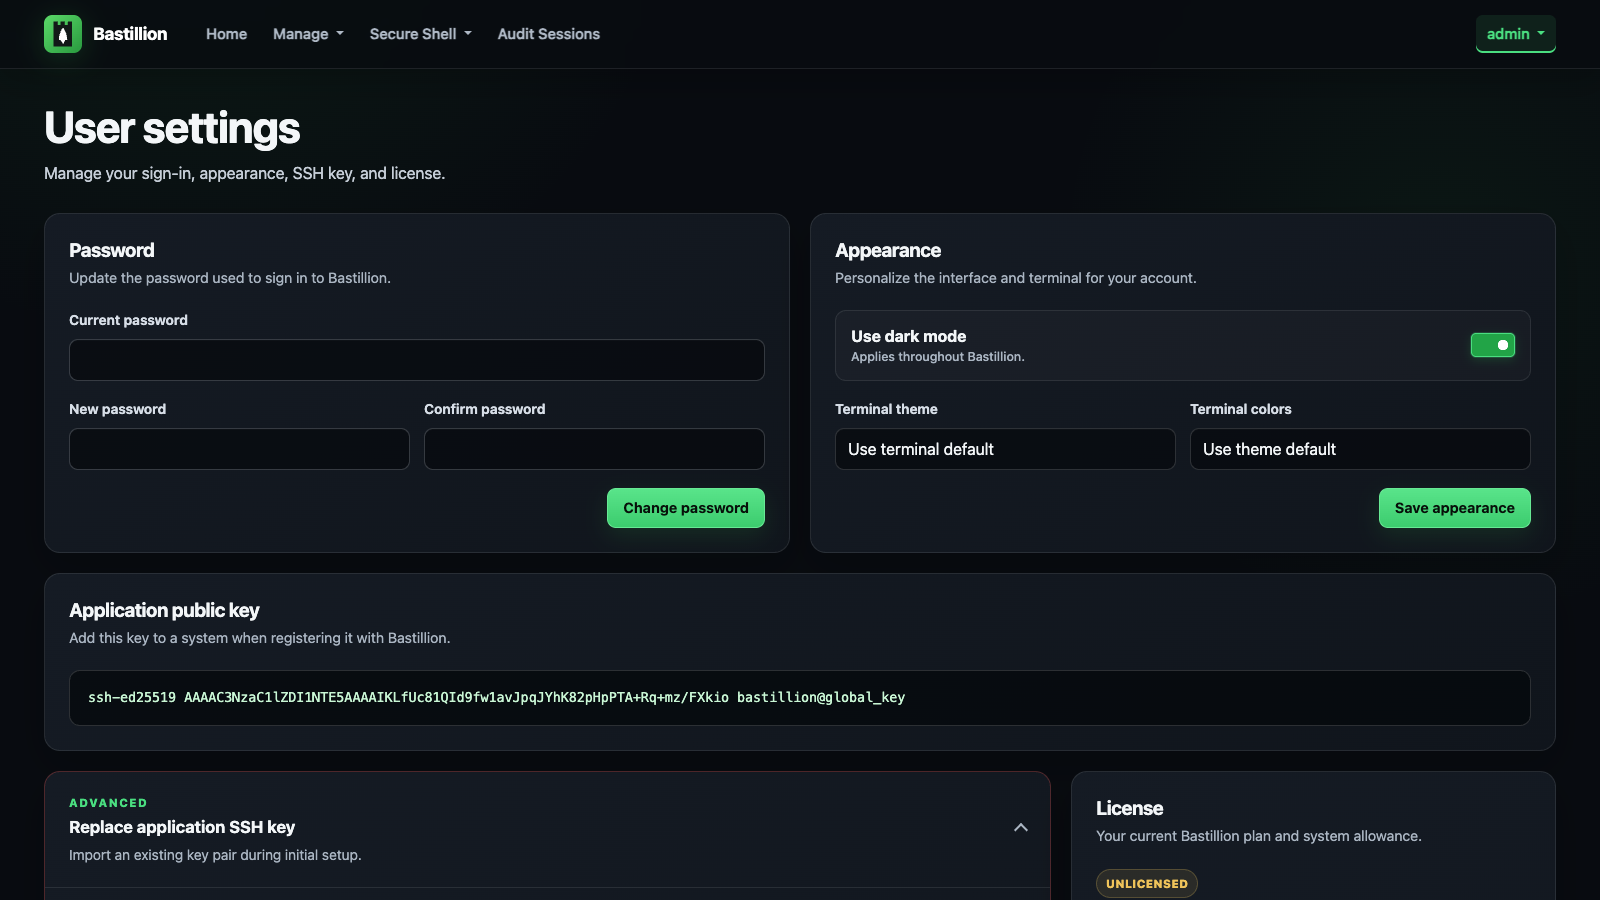
Change your password, choose the interface and terminal appearance, and manage the public key Bastillion uses to authenticate to registered systems.
Bastillion is available under the Prosperity Public License.
Full list of third-party dependencies and their licenses in 3rdPartyLicenses.md.
Loophole, LLC — Sean Kavanagh
24 followers · starred Aug 2017
290 followers · starred Oct 2022
1,256 followers · starred Mar 2014
328 followers · starred Nov 2014
Bastillion gives you a clean, browser-based way to manage SSH access across all your systems—like a bastion host with a friendly dashboard.
See the code
A modern, web-based SSH console and SSH key management tool.
Bastillion gives you a clean, browser-based way to manage SSH access across all your systems — like a bastion host with a friendly dashboard. It does two things:
Web-based SSH terminal — once a host is registered, authorized users can open one or more live terminal sessions to it directly from the browser, with commands optionally broadcast across every open session at once (think tmux's synchronized panes, but for a fleet of remote hosts instead of local panes).
SSH key management — Bastillion holds its own SSH keypair and pushes/rotates public keys across the hosts you register, so individual users never need to hold or manage long-lived keys to those systems themselves.
Two live SSH sessions to the existing web and application example hosts.
Bastillion sits between your users and the systems they need to reach, acting as a trusted third party rather than a simple password vault. Here's the whole lifecycle, end to end.
On first startup, before anything else, Bastillion generates an Ed25519 keypair for itself — this is the one key that ever gets pushed to your hosts. It's shown in the console output and always visible under Settings.
An admin adds a host under Manage → Systems (user, host, port, and the path to that
host's authorized_keys file). Bastillion authenticates once with a password or
passphrase you supply, then pushes its own public key into that host's authorized_keys.
From then on it connects using that key — no stored passwords, ever. Status flips to
Success the moment the key is in place.
Systems get grouped into named Profiles — think "Production," "Staging," "Database Tier." Users are then linked to profiles under Manage → Users, which is the only thing that controls who can reach what. Revoke a profile assignment and that access is gone immediately, no key rotation needed.
Assigned users open Secure Shell → Terminals, pick one or more systems, and get live, resizable, xterm-based terminals in the browser, side by side. Type once, and it goes to every terminal marked active — the same keystroke, the same command, the same output shape, across as many hosts as you selected.
Because every host trusts the same application key (not one key per user), disabling it once under Manage SSH Keys revokes access everywhere immediately — no need to touch target systems by hand, no hunting down which server has which stale key.
Every connection checks the host key the target system presents against the one Bastillion recorded for it. The first time a host is seen, its key is recorded and trusted; if that key later changes, the connection is refused and the system appears under Manage → Host Keys as changed — blocked, showing the approved fingerprint and the offered one together so you can tell a rebuilt host from an intercepted connection. Trusting the new key is a deliberate, logged act.
This matters more for a bastion than for a laptop. Bastillion hands the target system its private key, and on authentication fallback the password or passphrase you supplied — so anything that can answer on a managed system's address collects credentials for it. Until this check existed, nothing compared that key against anything.
Set hostKeyVerification=strict to also require a manager to approve each newly seen host
before the first connection to it, or off to restore the old behaviour — see
Configuration.
Everything typed and every byte returned in those terminals is recorded automatically. Managers open Audit Sessions, filter by user or system, and replay any session — side by side for sessions that spanned multiple hosts, with a text filter to jump straight to the lines that matter. Output streams into the page as it loads, so even a session that dumped hundreds of megabytes of logs replays without breaking a sweat.
If you need to show an auditor who ran what, where, and when — this is that evidence,
captured out of the box. Practically every compliance framework has a privileged-access
audit-trail requirement somewhere (PCI DSS, HIPAA, SOC 2, ISO 27001 — pick yours), and
this checks that box without a commercial PAM product. Sessions are kept for 90 days by
default (deleteAuditLogAfter), and recording can be switched off with
ENABLE_INTERNAL_AUDIT=false — see Auditing.
hostKeyVerification=accept-new) — see How It Worksauthorized_keys, which also puts the Bastillion username in the target host's own auth
log. Off by default; needs each host configured to trust the CA — see Configurationjava -jar) with HTTPS out of the box — see Download and Runtools/migrateBastillion runs unlicensed at up to 8 registered systems — enough to try it for real before buying. A license raises that cap.
.lic file automatically..lic file and copy its contents (one line).LICENSE_KEY environment variable:
export LICENSE_KEY=<paste license file contents here>
licenseKey in BastillionConfig.properties instead — the environment
variable takes precedence if both are set.Licenses are annual and don't auto-renew — no card kept on file. Buy again from the same pricing page when you get the expiry warning.
Free: https://github.com/Loophole-LLC/Bastillion/releases
apt-get install openjdk-21-jdk
| Application | Android | iOS |
|---|---|---|
| Authy | Google Play | iTunes |
| Google Authenticator | Google Play | iTunes |
Download the latest jar from Releases:
java -jar bastillion-<version>.jar
Access in browser: https://<server-ip>:8443 — see TLS / HTTPS below for the
self-signed certificate Bastillion generates on first run.
Default credentials:
username: admin
password: changeme
Runs in the foreground; stop with Ctrl+C. For background/daemon operation use whatever your
platform normally uses for a long-running Java process — nohup java -jar ... &, a systemd
unit, a container, etc.
Install Maven 3+:
apt-get install maven
Build and run (packages a self-contained jar with an embedded Jetty server — see
io.bastillion.Main — and runs it):
mvn package
java -jar target/bastillion-6.0.0.jar
Or for local dev without repackaging on every change:
mvn compile exec:java
For an isolated local UI review, keep test data in a separate directory and generate the database password automatically on first startup:
CONFIG_DIR=/tmp/bastillion-ui-review/ TLS_ENABLED=false PORT=8080 \
  mvn -DGEN_DB_PASS=true compile exec:java
Open http://localhost:8080 and sign in with the default credentials above. This HTTP
configuration is for local development. For deployment, use HTTPS as described below.
HTML, CSS, and JavaScript are served from target/classes/webapp; after editing files
under src/main/webapp, run mvn resources:resources and reload the browser to see changes. Templates are cached for up to 60 seconds;
restart the development process to clear that cache immediately.
Listens on https://localhost:8443 by default, same as the downloaded release above — see
TLS / HTTPS below for how that certificate gets set up and how to use your
own instead.
Bastillion generates its own self-signed certificate on first startup and serves HTTPS —
nothing to configure. Browsers will show a warning once (it's self-signed, not issued by a
CA); click through it, same as you would for any other self-hosted appliance. The
certificate and its password persist across restarts (keystore/bastillion.p12 under
CONFIG_DIR, password stored the same encrypted way as the database
password).
Use your own CA-signed certificate instead of the self-signed default — e.g. a free one from Let's Encrypt:
Issue the certificate with certbot (requires a real DNS name pointing at this host, and port 80 reachable for the HTTP-01 challenge):
sudo certbot certonly --standalone -d bastillion.example.com
This writes fullchain.pem and privkey.pem to
/etc/letsencrypt/live/bastillion.example.com/.
Convert the cert/key pair to PKCS12, the keystore format Bastillion expects:
openssl pkcs12 -export \
  -in /etc/letsencrypt/live/bastillion.example.com/fullchain.pem \
  -inkey /etc/letsencrypt/live/bastillion.example.com/privkey.pem \
  -out bastillion.p12 -name bastillion -passout pass:changeit
Point Bastillion at it and restart:
export KEYSTORE_PATH=/path/to/bastillion.p12
export KEYSTORE_PASSWORD=changeit
Browsers will now trust the connection with no warning. Let's Encrypt certificates expire
every 90 days — certbot renew followed by re-running steps 2–3 (and a restart) keeps it
current; certbot renew --deploy-hook can automate that.
Behind a reverse proxy or load balancer that already terminates TLS (nginx, Cloud Run, etc.) — disable Bastillion's own HTTPS and let it serve plain HTTP instead:
export TLS_ENABLED=false
Defaults to port 8080 in this mode; set PORT to change it.
Every setting below can be set as an environment variable — take the property name and
insert an underscore before each capital letter that follows a lowercase letter or digit,
then uppercase it: licenseKey → LICENSE_KEY, dbUser → DB_USER, sshKeyType →
SSH_KEY_TYPE. This is the recommended way to configure Bastillion, especially in
containers — no file to mount or bake in.
Where a property contains a run of capitals, either spelling is accepted: clientIPHeader
can be set as CLIENT_IP_HEADER or CLIENT_IPHEADER, and defaultSSHPassphrase as
DEFAULT_SSH_PASSPHRASE or DEFAULT_SSHPASSPHRASE. Each block below spells out the
variable for every setting, so you shouldn't need to apply the rule by hand.
BastillionConfig.properties still works as a fallback (env vars always win if both are
set), and is where any value Bastillion generates for you at first startup — like a random
DB password — gets persisted. See src/main/resources/BastillionConfig.properties for the
full list of settings and their defaults.
Consolidating everything under one directory (e.g. a single Docker volume mount):
CONFIG_DIR is the one setting to reach for. Everything Bastillion persists —
BastillionConfig.properties, the self-signed TLS keystore (keystore/bastillion.p12), the
H2 database and the SSH host key pair (both under keydb/), and bastillion.jceks — lives
under it by default, so pointing CONFIG_DIR at one place relocates all of it:
export CONFIG_DIR=/data/bastillion/
KEYSTORE_PATH and DB_CONNECTION_URL still exist for pointing just one of those at a
different location on its own (a real cert, a remote DB) — see TLS / HTTPS and
the "Database Settings" section below — but neither is needed just to consolidate everything
into CONFIG_DIR.
CONFIG_DIR itself defaults to ./config relative to the working directory. Upgrading an
existing instance that never set it? Older releases stored state directly in the working
directory instead of ./config — Bastillion detects that on first startup with this version
and moves it into ./config (or into CONFIG_DIR, if you've now set one) automatically.
How much of each managed system's authorized_keys file Bastillion takes responsibility for:
# manage (default) - Bastillion owns the file: it is replaced with the public keys of every
#                    user assigned to that system, plus Bastillion's own. Revoking a user's
#                    key removes their direct access to the host on the next refresh.
# append           - leave the file alone except for making sure Bastillion's own key is in
#                    it. User keys are not distributed.
# off              - never read or write the file at all.
export KEY_MANAGEMENT=manage

# authorized_keys refresh interval in minutes (no refresh for <=0)
export AUTH_KEYS_REFRESH_INTERVAL=120

# Force user key generation and strong passphrases
export FORCE_USER_KEY_GENERATION=false
off is only usable when Bastillion can authenticate some other way — in practice
sshCertificateAuth=on with the authority installed on every host, since otherwise there is
nothing for it to log in with. Bastillion warns loudly at startup if both are off. It also
gives up the fallback: with no application key on the host, a certificate problem locks
Bastillion out of that system instead of degrading to key authentication.
In append and off the refresh timer and the Manage SSH Keys screens are hidden —
there is nothing left for them to distribute.
The older boolean
KEY_MANAGEMENT_ENABLEDstill works and is honoured whenKEY_MANAGEMENTis unset (true→manage,false→append), so an existing instance keeps the behaviour it had. PreferKEY_MANAGEMENTin new setups.
By default Bastillion generates its own Ed25519 keypair on first startup. To use your own instead, the easiest way is through the UI: Settings → Replace Application SSH Key (manager accounts only) — paste in a private key, public key, and passphrase if it has one, and it takes effect immediately, no restart needed.
⚠️ This replaces the one key every registered system trusts. It's meant as a one-time step
when first setting up Bastillion, before you've registered any systems — if you already
have systems registered, Bastillion loses SSH access to all of them the instant you replace
the key, unless this exact key is already sitting in authorized_keys on every one of them
first. The Settings page requires an extra confirmation checkbox once you have systems
registered, precisely because of this.
Already have systems registered and need to rotate the key anyway? Pre-stage the new key
through Bastillion itself rather than editing authorized_keys by hand everywhere:
FORCE_USER_KEY_GENERATION=false so Manage SSH Keys → Add SSH Key lets you paste
an existing public key instead of only generating a new one.AUTH_KEYS_REFRESH_INTERVAL in mind, since that's what pushes it out.FORCE_USER_KEY_GENERATION back to its previous value, then once you've confirmed
the new application key has propagated to every system (again, mind
AUTH_KEYS_REFRESH_INTERVAL), remove the key you added in step 2 from Manage SSH Keys —
it was only staged there to pre-seed authorized_keys and isn't needed going forward.For scripted/headless setups, the same thing can be done via environment variables and a restart instead:
# Regenerate and import SSH keys
export RESET_APPLICATION_SSH_KEY=true

# Private key
export PRIVATE_KEY=/Users/you/.ssh/id_rsa

# Public key
export PUBLIC_KEY=/Users/you/.ssh/id_rsa.pub

# Passphrase (leave blank if none)
export DEFAULT_SSH_PASSPHRASE=myPa$$w0rd
Once registered, you can drop these — the key pair is already stored in the database.
SSH_KEY_TYPE (rsa, ecdsa, ed25519, or ed448) only matters when Bastillion is
generating a fresh key, not when importing one — the type of an imported key is read from
the key itself:
# SSH key type ('rsa', 'ecdsa', 'ed25519', or 'ed448')
# Supported options:
#   rsa    - Classic, widely compatible (configurable length, default 4096)
#   ecdsa  - Faster, smaller keys (P-256/384/521 curves)
#   ed25519 - Default and recommended (≈ RSA-4096, secure and fast)
#   ed448  - Extra-strong (≈ RSA-8192, slower and less supported)
export SSH_KEY_TYPE=ed25519
Controls what happens when a managed system presents an SSH host key. Recorded keys are reviewed under Manage → Host Keys, where a changed or newly seen key can be trusted, revoked, or forgotten.
# accept-new (default) - record and trust each host's key the first time it is seen, then
#                        refuse to connect if that host ever presents a different one
# strict               - as accept-new, but a newly seen host key must also be approved by a
#                        manager before the first connection to that host is allowed
# off                  - no host key verification at all (the behaviour before 6.0.0)
export HOST_KEY_VERIFICATION=accept-new
accept-new is the default so that upgrading an existing instance needs no action: each
host's key is recorded on its next connection, rather than every connection being refused
until a manager has approved every host. It still catches the case that matters — a key that
changes underneath you.
Host key decisions are written to the io.bastillion.manage.util.SystemAudit log — which
host keys were trusted on first sight, and which connections were refused.
By default Bastillion authenticates to each system with its own public key, which has to be
present in that system's authorized_keys (see How It Works).
Instead, it can sign a short-lived SSH certificate per connection:
# off (default) - authenticate with the application key
# on            - sign a certificate per connection and authenticate with that
export SSH_CERTIFICATE_AUTH=on

# How long an issued certificate stays valid (seconds). Short on purpose: a leaked
# certificate stops working on its own rather than needing to be revoked.
export SSH_CERTIFICATE_VALIDITY_SECONDS=300
Each managed system has to be told to trust the authority before it will accept a
certificate. Bastillion generates its own Ed25519 certificate authority on first startup and
prints the public key to the console; Settings shows it too, with these steps, a copy
button and a bastillion_ca.pub download. On each host, as root:
cp bastillion_ca.pub /etc/ssh/bastillion_ca.pub
echo 'TrustedUserCAKeys /etc/ssh/bastillion_ca.pub' >> /etc/ssh/sshd_config
systemctl reload sshd
You can do this host by host after switching certificates on, rather than all of it first.
The application key is still offered behind the certificate, so a host that does not trust
the CA yet keeps authenticating exactly as it did before — provided key management is still
leaving that key in its authorized_keys. The Auth column on the systems screen shows
which of the two each host actually accepted, so you can watch a rollout land.
⚠️ That needs root on each host, which pushing to authorized_keys does not. This is an
alternative to key distribution for fleets you configure centrally, not a drop-in
replacement for it — which is why it is off by default.
This does not turn off key management, and usually shouldn't. The two settings control
different things: sshCertificateAuth is how Bastillion authenticates to a host, while
keyManagement is how much of that host's authorized_keys Bastillion maintains. See
SSH Key Management.
The usual pairing is KEY_MANAGEMENT=append. That keeps Bastillion's own key in
authorized_keys as a fallback while leaving the rest of the file alone — so you get
certificate authentication and per-user attribution without Bastillion rewriting user keys on
every host.
KEY_MANAGEMENT=off is the stricter option, for when you want Bastillion provably not
touching the file at all. What it costs is the fallback: with no application key on the host,
a certificate authority problem becomes a lockout from that system rather than a logged
degradation to key authentication.
Two things worth being clear about, because it is easy to credit them to certificates:
keyManagement choice, not a certificate one. Only
manage distributes them; append never has, long before certificates existed. If your
engineers rely on Bastillion placing their keys for direct access, stay on manage —
turning certificates on does not affect that either way.off does not stop direct SSH. Keys already on a host, however they got there, keep
working. It stops Bastillion maintaining the file.Users can download a certificate for their own SSH client from Manage SSH Keys, next
to each of their keys, once this is on. It is signed for that key, carries the login accounts
their profiles currently reach, and lets them ssh to a host directly with nothing in its
authorized_keys. It downloads as <key name>.key-cert.pub, which is what OpenSSH looks for
beside the <key name>.key private key from the same screen — keep both names as given and
ssh -i <key name>.key picks the certificate up on its own.
export SSH_USER_CERTIFICATE_VALIDITY_SECONDS=28800 # 8 hours
The default is one working session, which is deliberate. The principals are read at issue time, so re-downloading is what re-checks the user's entitlements — that is the only thing making expiry stand in for revocation, since nothing here publishes a revocation list. Bastillion warns at startup above 12 hours. Two consequences worth stating plainly:
⚠️ A certificate principal is a username, with no host in it. A certificate naming
deploy is accepted as deploy@ on every host trusting this authority, not only the ones
in that user's profiles. Where hosts share login account names and profiles are what separate
them, that is wider access than the profile grants. To keep per-host scoping, give each host
an AuthorizedPrincipalsFile listing which principals it accepts — at the cost of per-host
configuration, which is the thing certificates were adopted to avoid.
What it buys, beyond not distributing keys: Bastillion authenticates to every system with
one shared application key, so a host's own logs cannot tell which Bastillion user was
responsible for a session. Each certificate carries a key id of bastillion:<username>,
which sshd records on every accepted connection:
Accepted publickey for deploy ... ED25519-CERT SHA256:4P6XvKoX... ID bastillion:alice (serial 7) CA ED25519 SHA256:ztZuuKqR...
If signing fails for any reason, Bastillion falls back to plain public key authentication and logs an error, rather than locking every system out at once.
Host certificates work in the other direction: trust a host certificate authority under Manage → Host Keys, and any system presenting a host certificate signed by it is accepted without its individual host key needing to be recorded or approved — useful for a fleet that is reprovisioned often.
Bastillion sends Content-Security-Policy, X-Content-Type-Options, X-Frame-Options,
Referrer-Policy and Strict-Transport-Security on every response. HSTS is tunable:
# How long a browser should refuse plain HTTP to this site (seconds, one year by default)
export HSTS_MAX_AGE=31536000

# Extend that to every subdomain of the host serving Bastillion
export HSTS_INCLUDE_SUB_DOMAINS=false

# Also request inclusion in browsers' built-in HSTS lists (requires the above)
export HSTS_PRELOAD=false
hstsIncludeSubDomains is off by default because it is not a reversible mistake: a browser
that has cached it refuses plain HTTP to every subdomain of that host for the whole
hstsMaxAge. On a dedicated host (bastillion.example.com) it affects essentially nothing
and is worth turning on; served from an apex domain it would force HTTPS across every sibling
subdomain. hstsPreload is harder still to undo — removal takes months to reach users.
Failed logins are throttled per client IP, deliberately not per account, so nobody can lock out a known admin username by failing its password on purpose:
# Failed attempts allowed per client IP within the window below
export MAX_LOGIN_ATTEMPTS_PER_IP=10
export LOGIN_THROTTLE_WINDOW_MINUTES=5

# Ceiling on how many client IPs are tracked at once
export MAX_THROTTLED_IPS=20000

# Header to trust for the client IP (e.g. X-Forwarded-For). Only set this behind a reverse
# proxy that writes the header itself - trusting a client-suppliable header without one lets
# an attacker vary it freely and bypass the throttle.
export CLIENT_IP_HEADER=
Embedded H2 example:
export DB_USER=bastillion
export DB_PASSWORD=p@$$w0rd!!
export DB_DRIVER=org.h2.Driver
export DB_CONNECTION_URL=jdbc:h2:file:keydb/bastillion;CIPHER=AES;
Remote H2 example:
export DB_CONNECTION_URL=jdbc:h2:tcp://<host>:<port>/~/bastillion;CIPHER=AES;
Authenticate against an existing LDAP/Active Directory server instead of (or alongside) local passwords. Enable it:
export JAAS_MODULE=ldap-ol
Configure jaas.conf:
ldap-ol {
    com.sun.security.auth.module.LdapLoginModule SUFFICIENT
    userProvider="ldap://hostname:389/ou=example,dc=bastillion,dc=com"
    userFilter="(&(uid={USERNAME})(objectClass=inetOrgPerson))"
    authzIdentity="{cn}"
    useSSL=false
    debug=false;
};
To map LDAP roles to Bastillion profiles:
ldap-ol-with-roles {
    org.eclipse.jetty.security.jaas.spi.LdapLoginModule required
    debug="false"
    useLdaps="false"
    contextFactory="com.sun.jndi.ldap.LdapCtxFactory"
    hostname="<SERVER>"
    port="389"
    bindDn="<BIND-DN>"
    bindPassword="<BIND-DN PASSWORD>"
    authenticationMethod="simple"
    forceBindingLogin="true"
    userBaseDn="ou=users,dc=bastillion,dc=com"
    userRdnAttribute="uid"
    userIdAttribute="uid"
    userPasswordAttribute="userPassword"
    userObjectClass="inetOrgPerson"
    roleBaseDn="ou=groups,dc=bastillion,dc=com"
    roleNameAttribute="cn"
    roleMemberAttribute="member"
    roleObjectClass="groupOfNames";
};
Admins are added upon first login and can be assigned system profiles.
How role mapping actually works: each LDAP group a user belongs to (per roleBaseDn/
roleMemberAttribute above) becomes a "role name" - the value of that group's
roleNameAttribute (cn in the example above). On every login, Bastillion compares each of
those role names, by exact text match, against the names of the Profiles you've created
under Manage → Profiles. A match assigns the user to that profile; no match, no access to
that profile. So if a user is a member of the LDAP group cn=admins,ou=groups,..., you need
a Bastillion profile literally named admins (capitalization aside - the comparison is
case-insensitive, spelling is not) for that membership to mean anything in Bastillion. There
is no separate mapping step or UI for this - the names simply have to line up.
A user whose roles match no Bastillion profile is rejected at login (Manager accounts are
the one exception; they aren't profile-scoped). Set defaultProfileForLdap to a profile name
to assign every LDAP user to it automatically, guaranteeing everyone can log in regardless of
role matching - useful as a safety net while you're still getting profile names lined up with
your directory's group names:
export DEFAULT_PROFILE_FOR_LDAP=everyone
Authenticate against an enterprise identity provider - Microsoft Entra ID, Okta, ADFS, or any SAML 2.0 IdP - instead of (or alongside) local passwords or LDAP. A Sign in with SSO button appears on the login page once configured. Enable it:
export SAML_BASE_URL=https://bastillion.example.com
export SAML_IDP_METADATA_URL=https://login.microsoftonline.com/<tenant-id>/federationmetadata/2007-06/federationmetadata.xml?appid=<app-id>
In Entra ID (or your IdP of choice), register Bastillion as an Enterprise Application / Service Provider with:
https://bastillion.example.com (or SAML_SP_ENTITY_ID if set - see below)https://bastillion.example.com/saml/acsNo IdP metadata URL to hand? Configure the IdP manually instead - all three are required together in that case:
export SAML_IDP_ENTITY_ID=https://sts.windows.net/<tenant-id>/
export SAML_IDP_SSO_URL=https://login.microsoftonline.com/<tenant-id>/saml2
export SAML_IDP_CERT=<base64-encoded X.509 certificate>
Only needed if the Entity ID registered on the IdP side can't match SAML_BASE_URL exactly:
export SAML_SP_ENTITY_ID=https://bastillion.example.com
To map Entra group/role claims to Bastillion profiles (see "How role mapping actually works"
below before changing SAML_ROLE_ATTRIBUTE from its default):
export SAML_ROLE_ATTRIBUTE=http://schemas.microsoft.com/ws/2008/06/identity/claims/groups
export DEFAULT_PROFILE_FOR_SAML=everyone
Admins are added upon first SSO login and can be assigned system profiles.
Username shown in Bastillion: the SAML NameID becomes the username. Entra sends
user.userprincipalname by default, which is fine for regular tenant members but produces an
ugly guest UPN like alice_gmail.com#EXT#@yourtenant.onmicrosoft.com for B2B guests (anyone
signed in with a personal or external email added as a guest). For a cleaner username, go to
the Enterprise Application's Single sign-on → SAML → Attributes & Claims, edit Unique
User Identifier (Name ID), and change its Source attribute from user.userprincipalname
to user.mail.
How role mapping actually works - same mechanism as LDAP above: SAML_ROLE_ATTRIBUTE
names which assertion attribute carries the user's groups/roles; whatever values that
attribute holds on a given login are compared, by exact text match, against the names of
the Profiles you've created under Manage → Profiles. A value that matches a profile name
assigns the user to it; nothing else about the claim matters. So a Bastillion profile must be
named exactly the same as the string the assertion sends - there's no separate mapping step
or UI, the names just have to line up.
This is the part that most often trips people up with Entra ID specifically: by default,
Entra's group claim can emit each group as its Object ID (a GUID) rather than its display
name, unless the Enterprise Application's token configuration is explicitly set to emit group
names. If your Bastillion profiles are named things like admins/everyone but Entra is
sending GUIDs, nothing will ever match. Check the actual claim value in a real assertion (or
Entra's token configuration for the app) before assuming the mapping is broken - it's usually
this, not a Bastillion-side problem. Three ways to fix it, in order of what we'd recommend:
admins, everyone, ...), then
assign users/groups to those roles under the Enterprise Application's Users and groups.
Configure the SAML token to emit the roles claim, and point SAML_ROLE_ATTRIBUTE at that
claim's URI instead of the groups claim. You choose the exact string Entra sends - no GUID
problem at all, and it's a cleaner authorization model than repurposing AD groups anyway.sAMAccountName
or a display-name option - exact choices vary by tenant and Entra portal version, so check
what's actually offered rather than assuming a specific label.A user whose claims match no Bastillion profile is rejected at login (Manager accounts are
the one exception; they aren't profile-scoped) - exactly as with LDAP, so
DEFAULT_PROFILE_FOR_SAML above is worth setting for the same reason
DEFAULT_PROFILE_FOR_LDAP is: a safety net while you're still lining up profile names with
your IdP's claim values.
Bastillion's own one-time-passcode check is skipped for SSO logins - the IdP is expected to enforce its own MFA/Conditional Access policy instead. First-time OTP enrollment is still offered so SAML users have a local fallback credential available if SSO is ever disabled.
Signed requests and encrypted assertions: Bastillion generates its own SAML signing
certificate automatically (self-signed, the same way it generates its TLS certificate) the
first time it's needed, and signs every outgoing AuthnRequest with it from then on - no
setup required, and harmless even if your IdP doesn't check it. Fetch
https://bastillion.example.com/saml/metadata to get that certificate in standard SP
metadata form and hand it to your IdP admin if they should verify Bastillion's signed
requests, or should encrypt assertions for Bastillion - most IdPs can import an SP metadata
URL directly instead of pasting in a raw certificate. If you'd rather use a real (e.g.
CA-issued) key pair instead of the auto-generated one, point SAML_SP_KEYSTORE_PATH/
SAML_SP_KEYSTORE_PASSWORD at a PKCS12 keystore containing it. To require encrypted
assertions (off by default - only turn this on once your IdP is actually configured to
encrypt for Bastillion's certificate, or every login will start failing):
export SAML_WANT_ENCRYPTED_ASSERTIONS=true
Not currently supported: Single Logout (SLO) - logout stays local-only, and doesn't tell the IdP or any other application you were signed into via the same SSO session. SAML SSO can be enabled alongside LDAP; both are evaluated independently and either can provision new users on first login.
Session auditing is enabled by default: terminal output is stored in Bastillion's database
and can be reviewed under Audit Sessions (manager accounts only). Output is streamed to
the browser, so even sessions with very large amounts of terminal output can be replayed.
Audit history is kept for deleteAuditLogAfter days (90 by default). Disable it with:
export ENABLE_INTERNAL_AUDIT=false
Separately, the io.bastillion.manage.util.SystemAudit log records host key and SSH
certificate decisions, and goes to the console by default.
With sshCertificateAuth=on that is one line per SSH connection — a certificate is signed
for each one, and each issue is recorded with its serial and key id. That is the audit trail
those serials exist for, but it is a volume change worth expecting rather than discovering.
Route it to a file by uncommenting audit-appender in log4j2.xml and pointing that logger
at it:
https://github.com/Loophole-LLC/Bastillion/blob/main/src/main/resources/log4j2.xml#L19-L22
Upgrading from an old Bastillion v4 install and want to keep your users, systems, profiles,
scripts, and (most importantly) the application's existing SSH keypair instead of starting
over? tools/migrate/ has a standalone migration tool for exactly that — it exports every
table from the old H2 database (decrypting the app-level-encrypted columns with the OLD
instance's keystore) to a JSON file, then imports it into a fresh instance (re-encrypting
with the NEW instance's keystore). Existing users can log in with their current passwords
immediately after — no forced resets.
Import straight into 6.x — there is no need to stand up a 5.x install first. Every column the v4 export carries still exists in the 6.x schema, and the columns 6.x adds take their defaults.
cd tools/migrate

# 1. Export the old database
./migrate.sh export /opt/Bastillion-jetty/jetty/bastillion/WEB-INF/classes/ ~/bastillion-export.json

# 2. Start the new instance once against the config dir you're migrating into, then
#    stop it (Ctrl+C) once it's finished booting - this creates the schema, jceks, and
#    default admin user.
cd ../..
java -DCONFIG_DIR=/data/bastillion/ -jar target/bastillion-6.0.0.jar

# 3. Import into the new database (full replace of all 12 tables)
cd tools/migrate
./migrate.sh import /data/bastillion/ ~/bastillion-export.json --yes-replace-all-data

# 4. Delete the export file - it contains decrypted secrets
rm ~/bastillion-export.json
See tools/migrate/README.md for the full details — finding your old install's config directory, what exactly gets migrated, and the security notes on the plaintext export file.
The core workflow is shown in How It Works. Expand a group below to explore the rest of the interface.
Sign in with a username and password, plus an optional OTP access code.
Scan the QR code with Authy, Google Authenticator, or another compatible app.
The available tools are scoped to the signed-in user's permissions.
Group systems into named profiles that control access.
Create accounts, choose user roles, and grant system access through profiles.
Select one or more systems, optionally filtered by profile, and open them simultaneously.
Save a script once and execute it across every selected terminal.
Change your password, choose the interface and terminal appearance, and manage the public key Bastillion uses to authenticate to registered systems.
Bastillion is available under the Prosperity Public License.
Full list of third-party dependencies and their licenses in 3rdPartyLicenses.md.
Loophole, LLC — Sean Kavanagh
24 followers · starred Aug 2017
290 followers · starred Oct 2022
1,256 followers · starred Mar 2014
328 followers · starred Nov 2014