
README
Jellyswarrm
Many servers. Single experience.



Jellyswarrm is a reverse proxy that lets you combine multiple Jellyfin servers into one place. If you’ve got libraries spread across different locations or just want everything together, Jellyswarrm makes it easy to access all your media from a single interface.
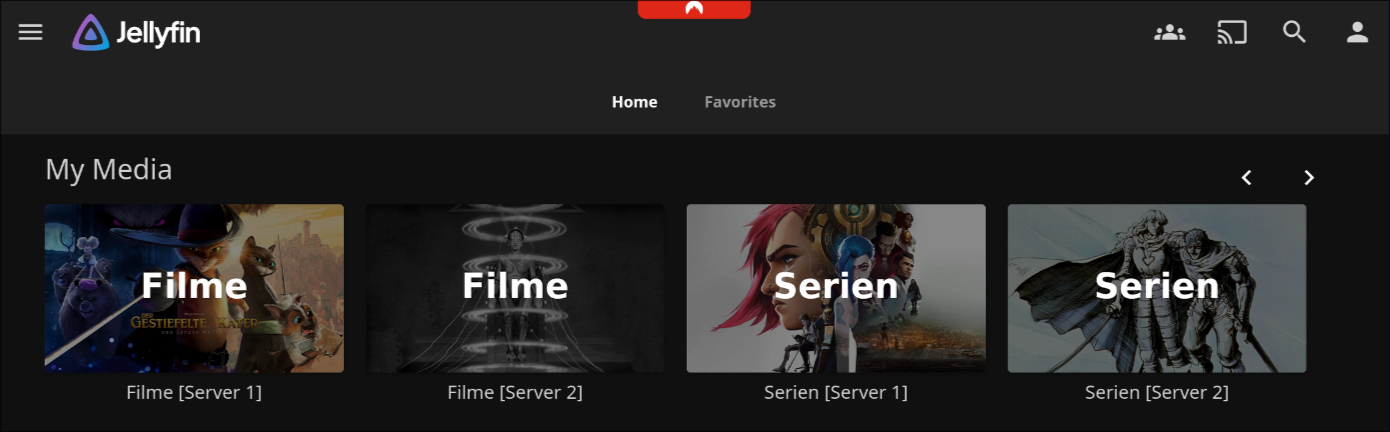
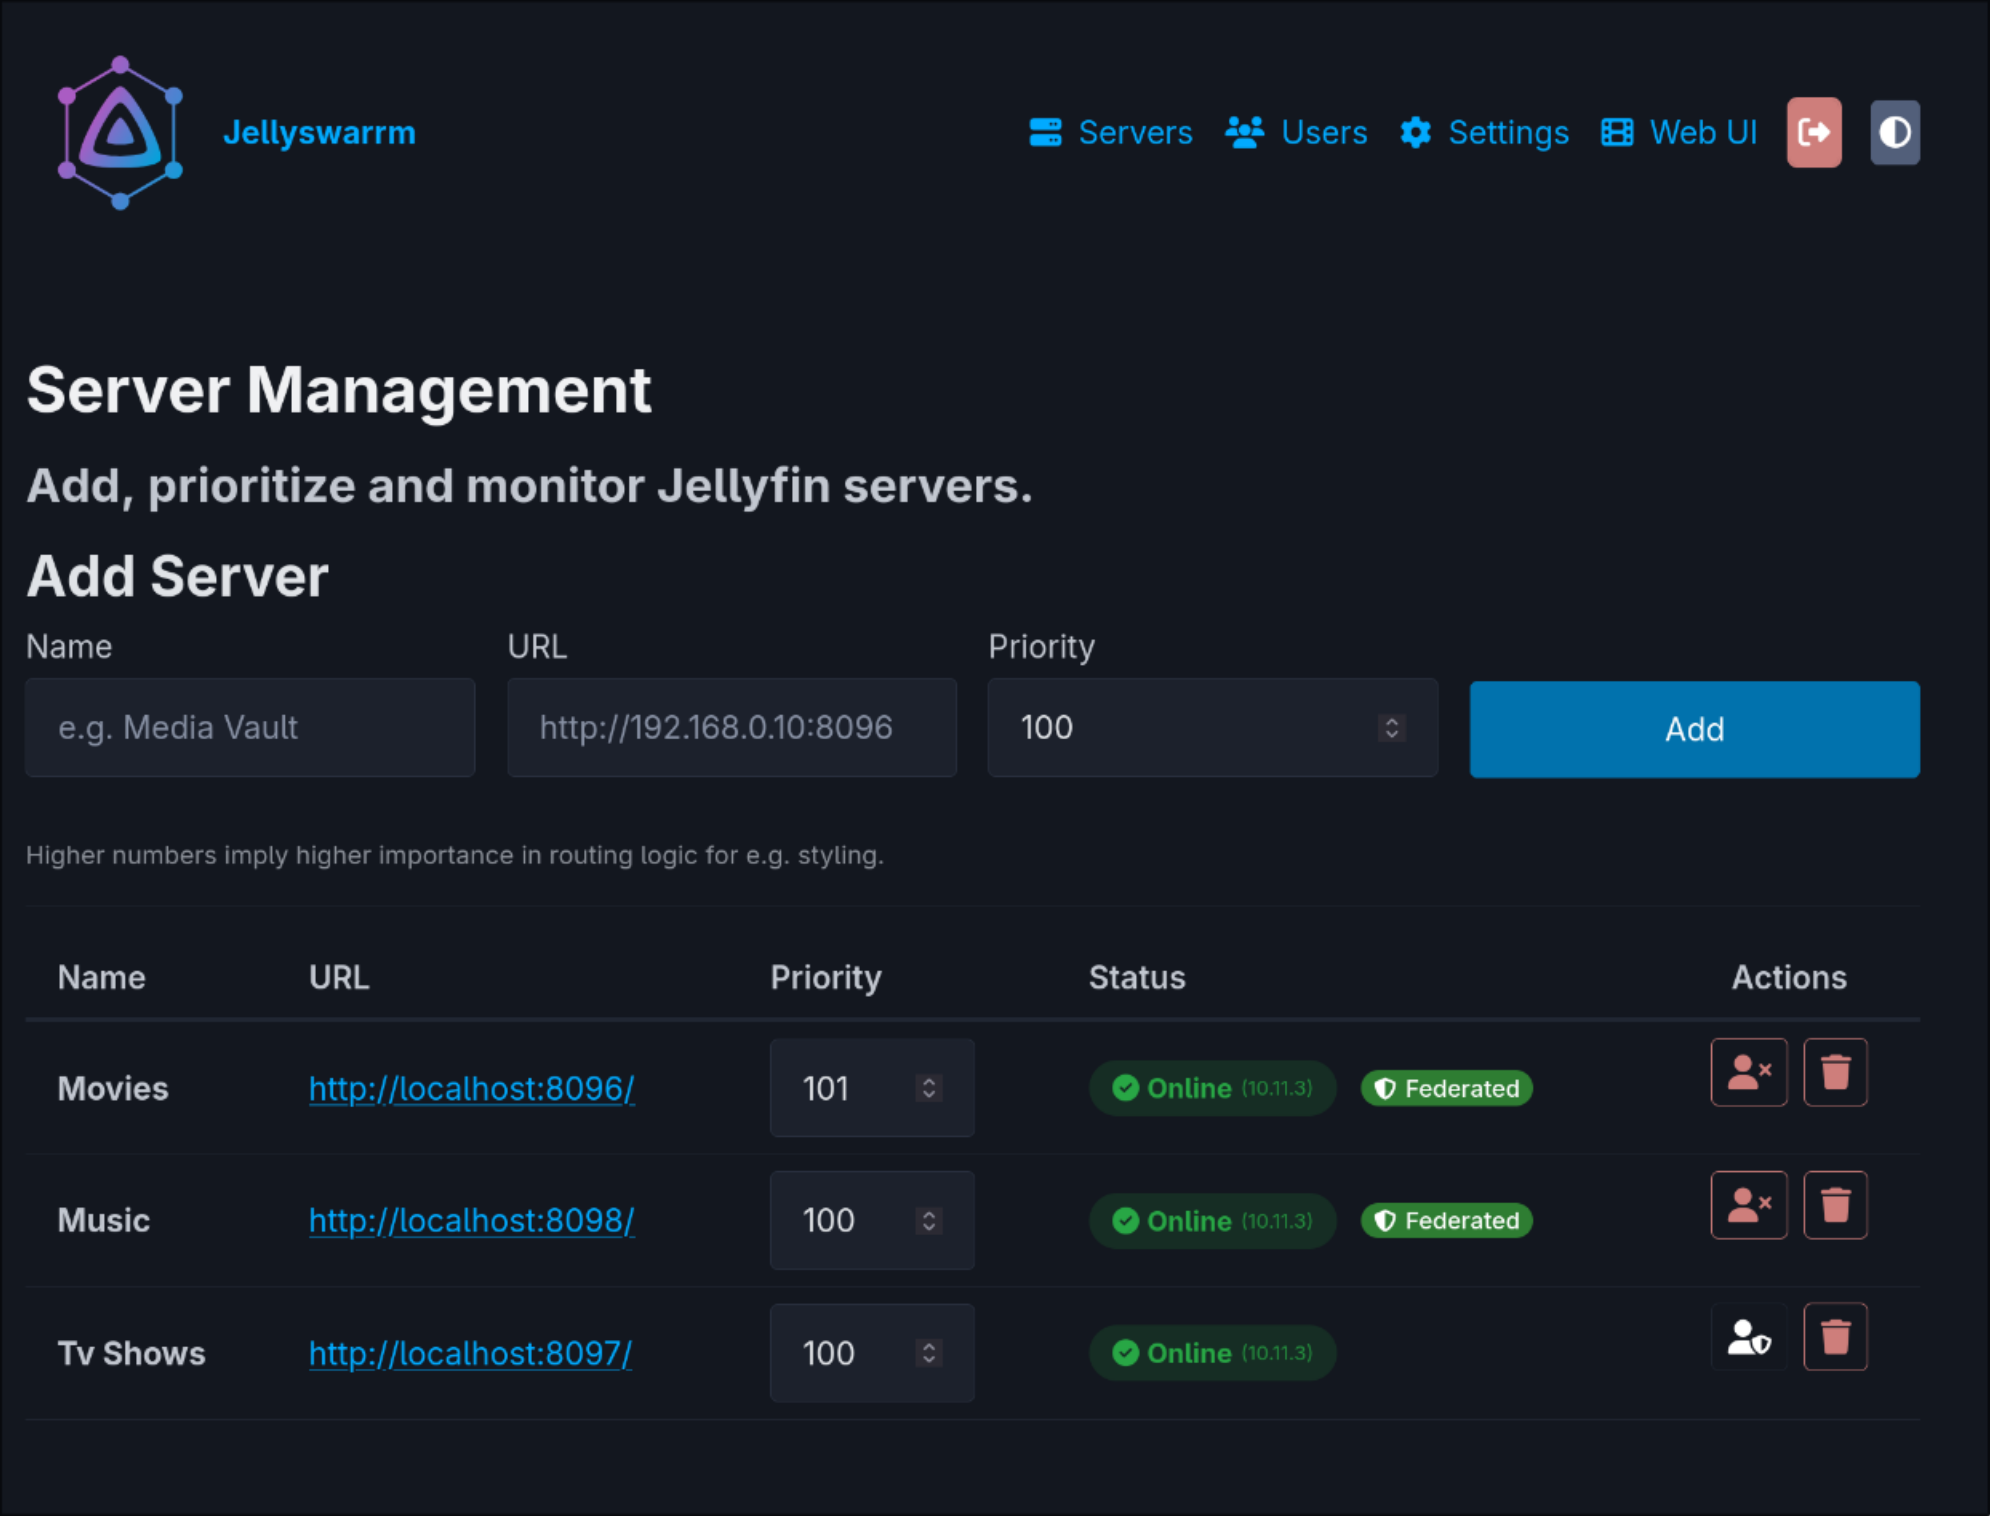
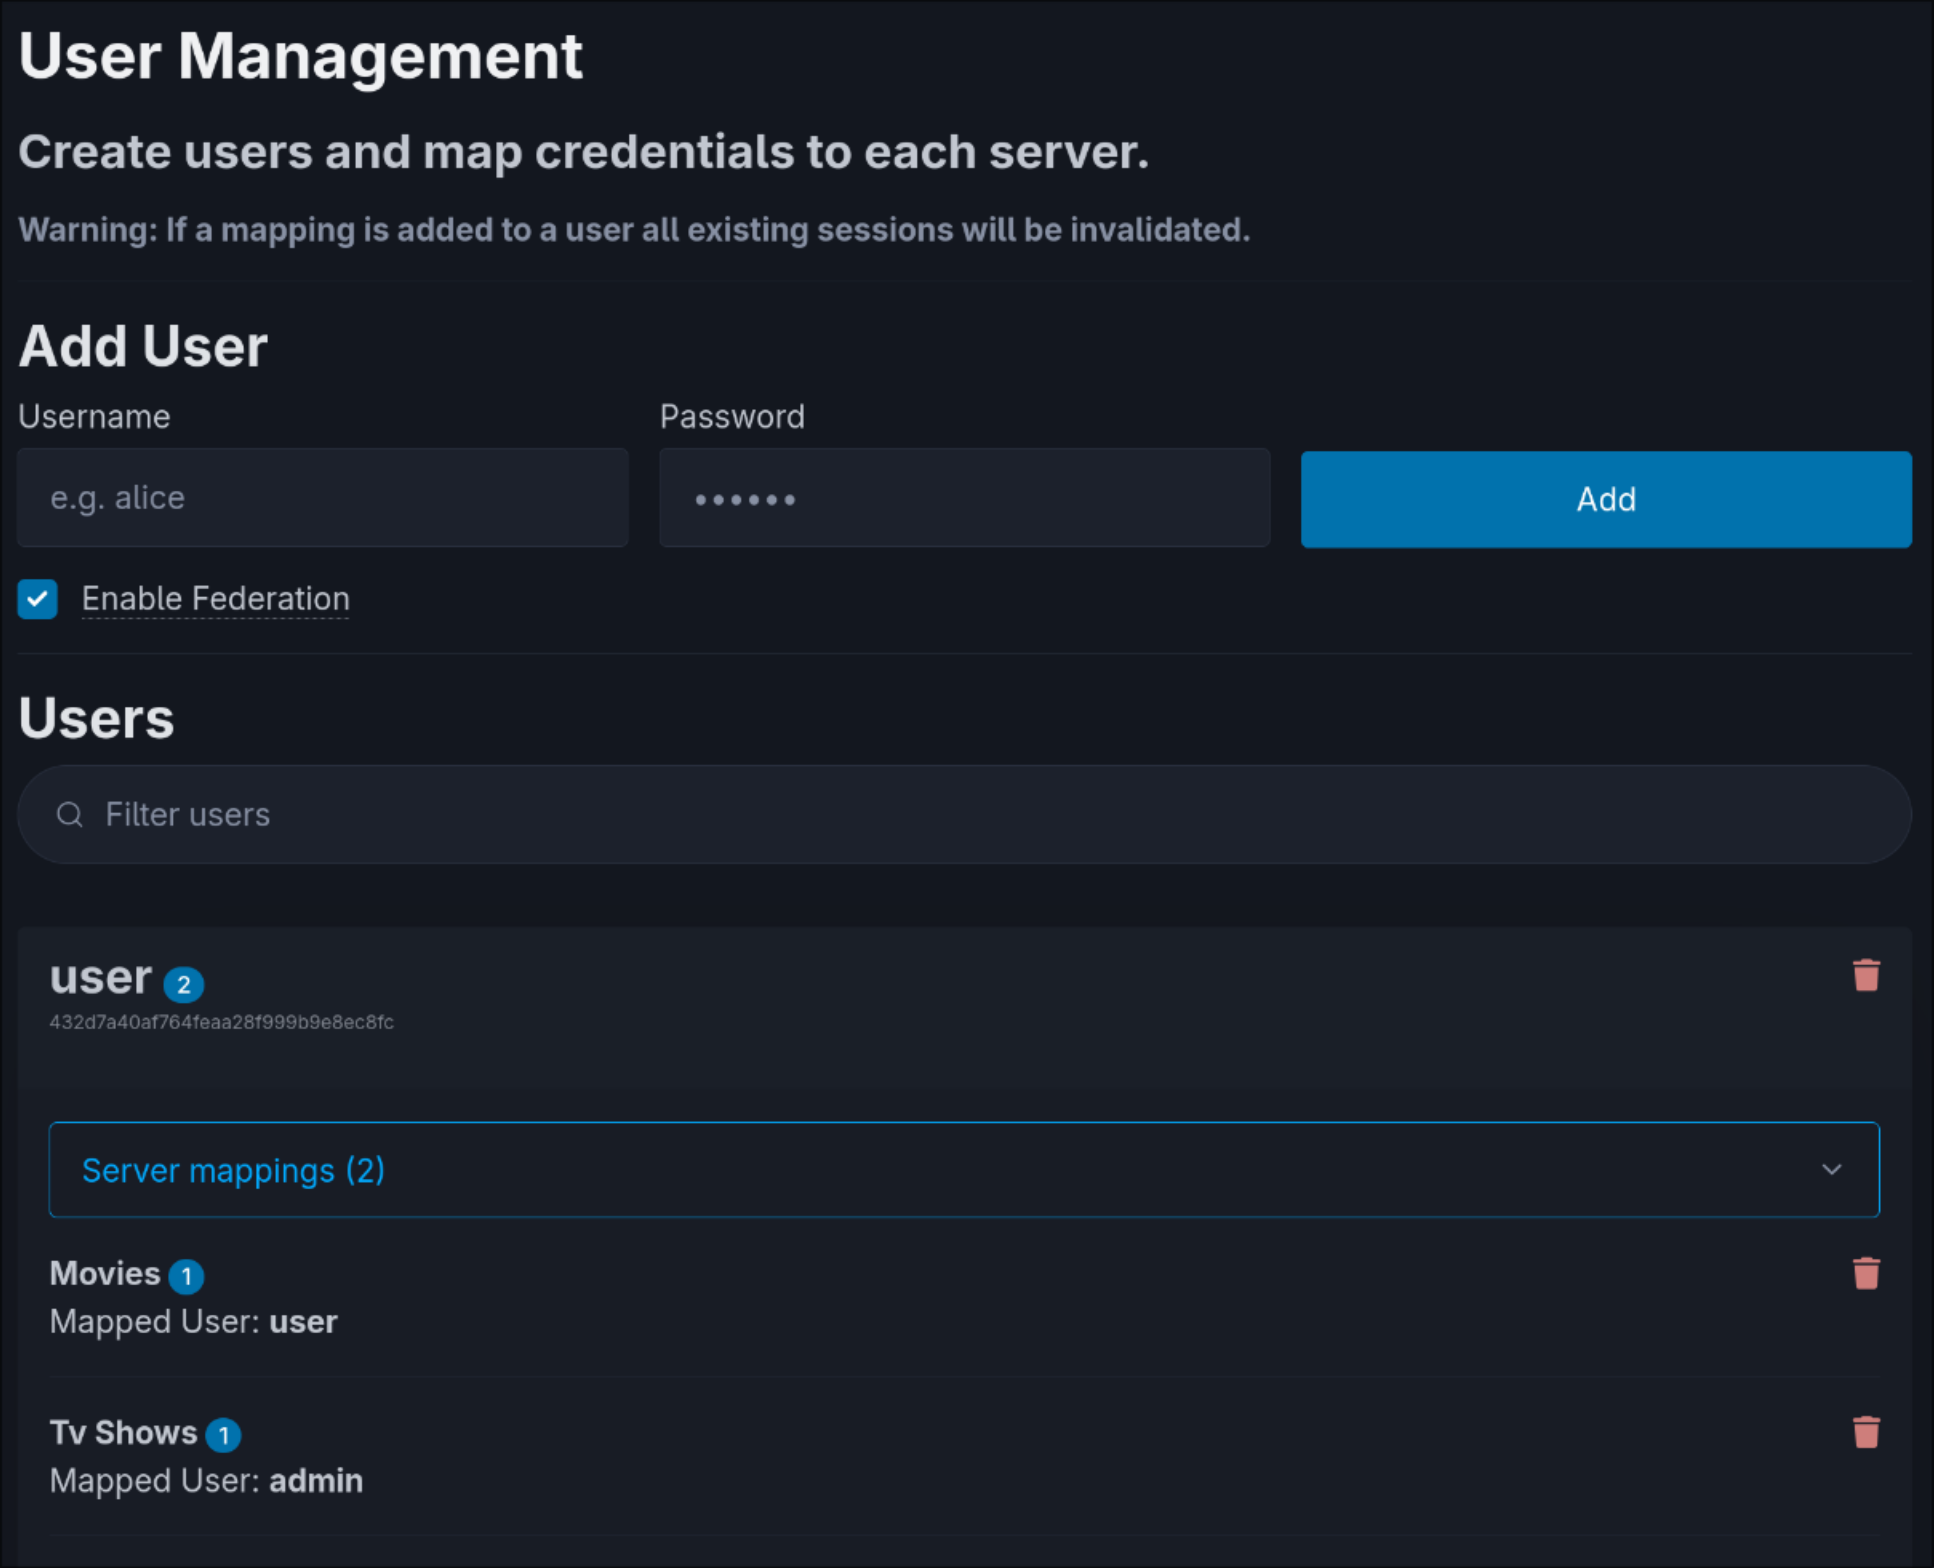
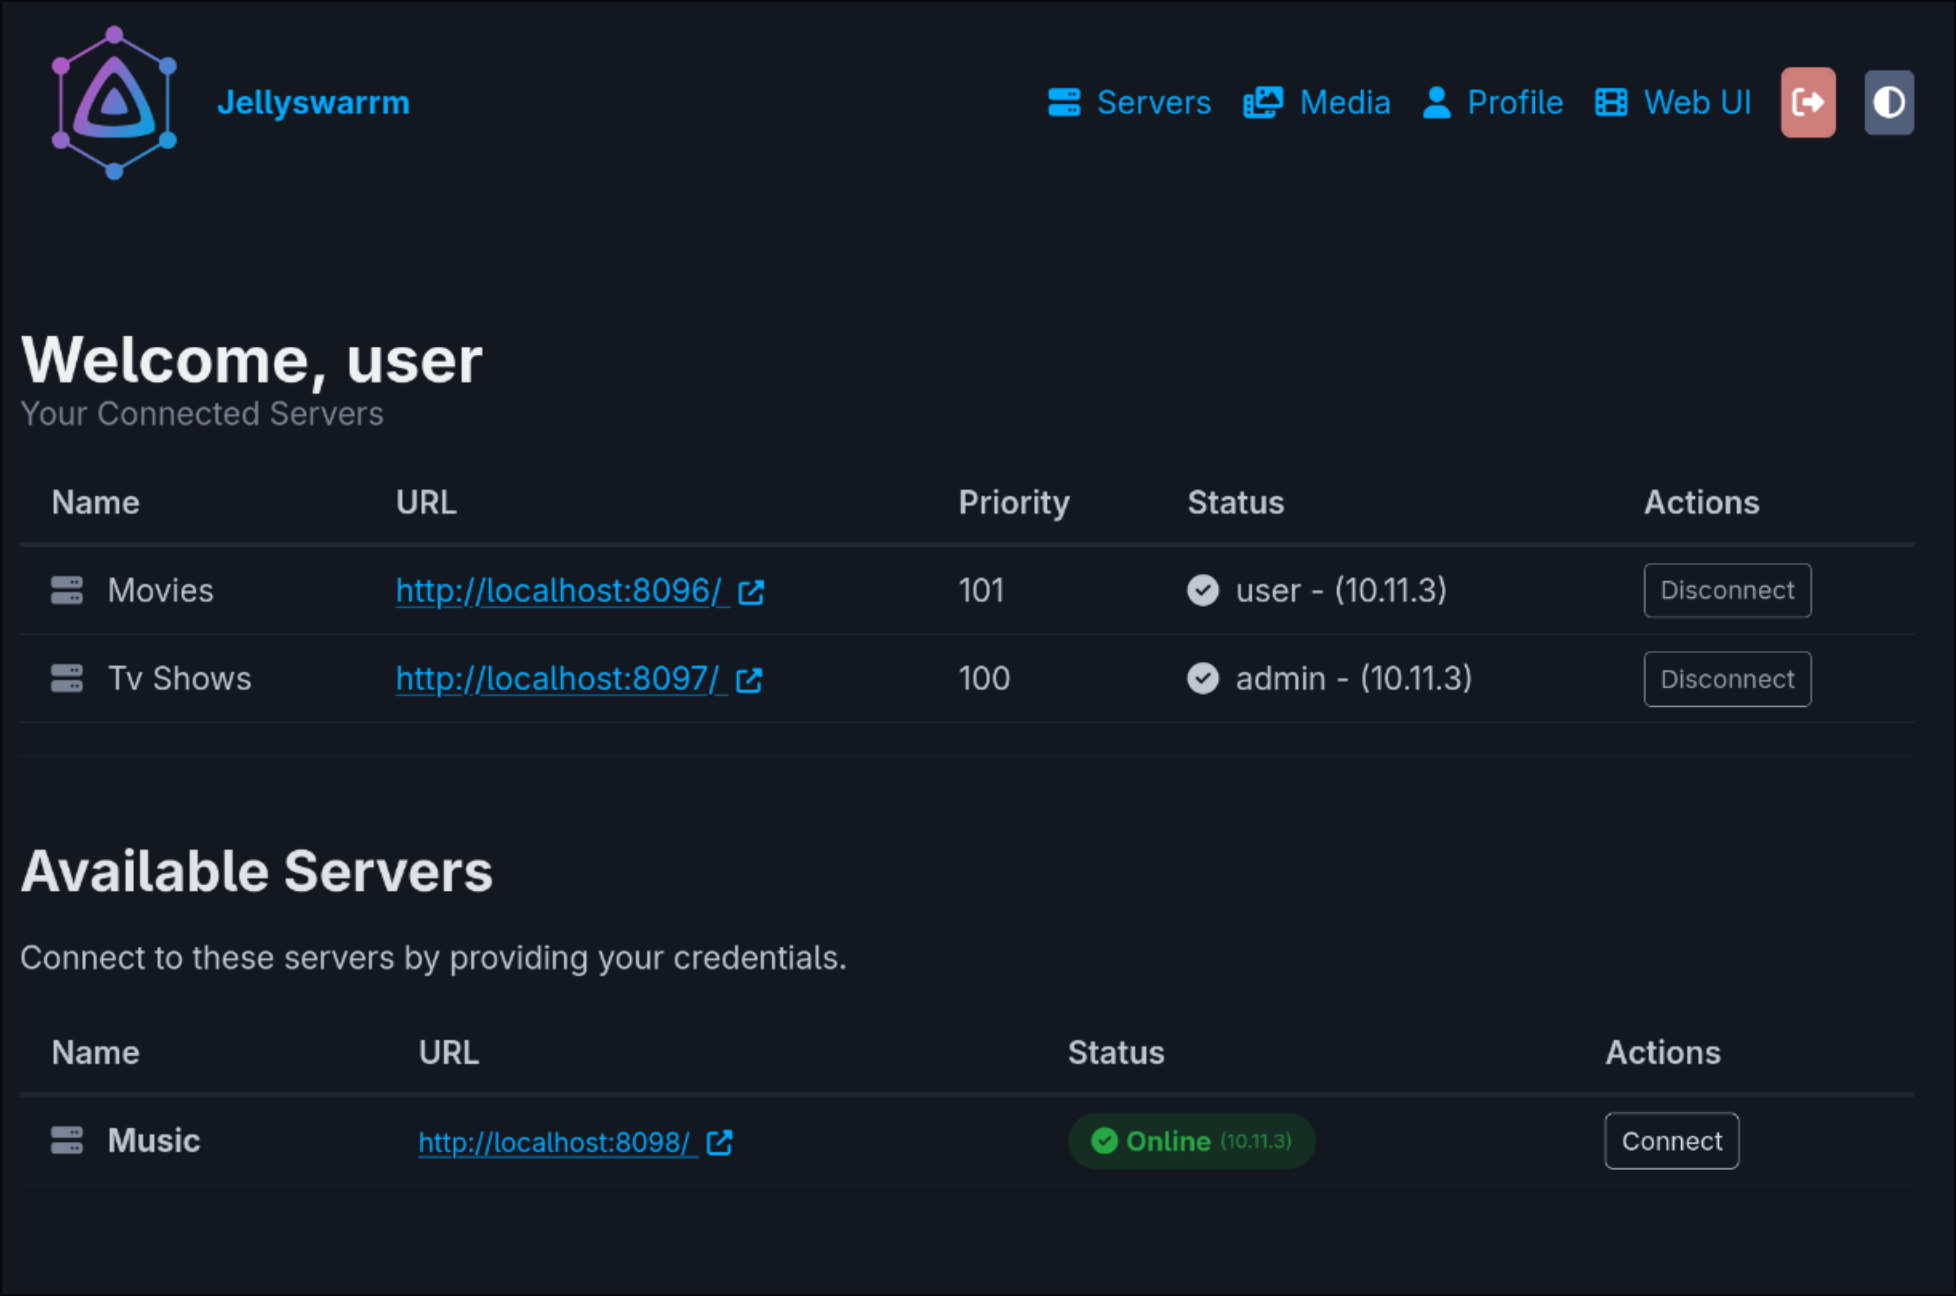
Features
[!WARNING] Jellyswarrm is still in early development. It works, but some features are incomplete or missing. If you run into issues, please report them on the GitHub Issues page.
✅ Working
- Unified Library Access – Browse media from multiple Jellyfin servers in one place.
- Direct Playback – Play content straight from the original server without extra overhead.
- User Mapping – Link accounts across servers for a consistent user experience.
- API Compatibility – Appears as a normal Jellyfin server, so existing apps and tools still work.
- Server Federation – Automatically sync users across connected servers.
- User Page – Personal dashboard for managing credentials and libraries.
⚠️ In Progress
- QuickConnect – Sign in on one device by approving the code from another authenticated device.
- Websocket Support – Needed for real-time features like SyncPlay (not fully reliable yet).
- Audio Streaming – Progressive and HLS audio use the video streaming path.
- Automatic Bitrate Adjustment – Stream quality based on network conditions isn’t supported yet.
- Media Management – Features like adding or deleting media libraries through Jellyswarrm are not implemented yet.
Deployment
The easiest way to run Jellyswarrm is with the prebuilt Docker images.
Here’s a minimal docker-compose.yml example to get started:
services:
  jellyswarrm:
    image: ghcr.io/llukas22/jellyswarrm:latest
    container_name: jellyswarrm
    restart: unless-stopped
    ports:
      - 3000:3000
    volumes:
      - ./data:/app/data
    environment:
      - JELLYSWARRM_USERNAME=admin
      - JELLYSWARRM_PASSWORD=jellyswarrm # ⚠️ Change this in production!
Once the container is running, open:
-
Web UI (setup & management):
http://[JELLYSWARRM_HOST]:[JELLYSWARRM_PORT]/ui– Log in with the username and password you set in the environment variables. – From here, you can add your Jellyfin servers and configure user mappings. -
Bundled Jellyfin Web Client:
http://[JELLYSWARRM_HOST]:[JELLYSWARRM_PORT]
For advanced configuration options, check out the ui and configuration documentation.
Local Development
Getting Started
To get started with development, you'll need to clone the repository along with its submodules. This ensures you have all the necessary components for a complete build:
git clone --recurse-submodules https://github.com/LLukas22/Jellyswarrm.git
If you've already cloned the repository, you can initialize the submodules separately:
git submodule init
git submodule update
Docker
The quickest way to get Jellyswarrm up and running is with Docker. Simply use the provided docker-compose configuration:
docker compose up -d
This will build and start the application with all necessary dependencies, perfect for both development and production deployments.
Local Test Servers
To test Jellyswarrm against six preconfigured Jellyfin instances (two each for Movies, TV Shows, and Music) and Seerr, run:
just setup
See the development environment guide for URLs, credentials,
commands, Seerr compatibility status, and media licenses. Debug builds
automatically register all six local servers from data/jellyswarrm.dev.toml.
Native Build
For a native development setup, ensure you have both Rust and Node.js installed on your system.
First, install the UI dependencies. You can use the convenient VS Code task Install UI Dependencies from the tasks.json file, or run it manually:
cd ui
npm install
cd ..
Once the dependencies are installed, build the entire project with:
cargo build --release
The build process is streamlined thanks to the included build.rs script, which automatically compiles the web UI and embeds it into the final binary for a truly self-contained application.
FAQ
-
Why not just add multiple servers directly in the Jellyfin app?
Some Jellyfin apps do support multiple servers, but switching between them can be inconvenient. Jellyswarrm brings everything together in one place and also merges features like Next Up and Recently Added across all servers. This way, you can easily see what’s new in your own libraries or what your friends have added. -
Will Jellyswarrm work with my existing Jellyfin apps?
Most likely! Jellyswarrm presents itself as a standard Jellyfin server, so most clients should work out of the box. That said, not every Jellyfin client has been tested, so a few may have issues. -
Why use Jellyswarrm instead of mounting a remote library via e.g. SMB?
Jellyswarrm is built to connect your servers with your friends’ servers across different networks. Setting up SMB in these cases can be complicated, and performance is often worse. With Jellyswarrm, content is streamed directly from the original server, so all the heavy lifting (like transcoding) happens where the media actually lives.
Playlists
Playlists belong to one upstream server. Create, read, add, remove, reorder, and delete operations translate IDs for that server and preserve distinct entry IDs supplied by the upstream server. Every supplied track or entry must resolve on the playlist's server; mixed-server or unknown IDs are rejected with HTTP 400 before the request is forwarded. An aggregate track can be used when it has a version on the selected server.
Deletion follows the upstream playlist's CanDelete permission. Sharing maps
the requested proxy user to their upstream identity on the playlist's server.
The recipient must have a stored, unexpired authorization session on that
server; otherwise sharing is rejected explicitly. Upstream permissions still
control whether the caller can delete or share a playlist.
The Jellyfin 12 Docker fixture currently returns the song ID as PlaylistItemId
for duplicate songs. Those copies cannot be addressed independently through
that upstream API. The Docker test
saved_playlist_duplicate_songs_preserve_upstream_entry_semantics
compares proxy behavior with direct Jellyfin responses and verifies removal of
all copies. The mock HTTP suite separately requires preservation of distinct
upstream entry IDs.
Jellyfin 12 may also return success when deleting a playlist share without
removing it. The live test checks the same operation directly upstream before
accepting this limitation, then verifies revocation through a full playlist
update (POST /Playlists/{id} with {"Users":[]}). The proxy does not
silently apply this workaround to DELETE requests.
Contributors


Similar repos


Languages
Rust
92.4%
HTML
4.8%
CSS
1.2%
README
Jellyswarrm
Many servers. Single experience.
Jellyswarrm is a reverse proxy that lets you combine multiple Jellyfin servers into one place. If you’ve got libraries spread across different locations or just want everything together, Jellyswarrm makes it easy to access all your media from a single interface.
Features
[!WARNING] Jellyswarrm is still in early development. It works, but some features are incomplete or missing. If you run into issues, please report them on the GitHub Issues page.
✅ Working
- Unified Library Access – Browse media from multiple Jellyfin servers in one place.
- Direct Playback – Play content straight from the original server without extra overhead.
- User Mapping – Link accounts across servers for a consistent user experience.
- API Compatibility – Appears as a normal Jellyfin server, so existing apps and tools still work.
- Server Federation – Automatically sync users across connected servers.
- User Page – Personal dashboard for managing credentials and libraries.
⚠️ In Progress
- QuickConnect – Sign in on one device by approving the code from another authenticated device.
- Websocket Support – Needed for real-time features like SyncPlay (not fully reliable yet).
- Audio Streaming – Progressive and HLS audio use the video streaming path.
- Automatic Bitrate Adjustment – Stream quality based on network conditions isn’t supported yet.
- Media Management – Features like adding or deleting media libraries through Jellyswarrm are not implemented yet.
Deployment
The easiest way to run Jellyswarrm is with the prebuilt Docker images.
Here’s a minimal docker-compose.yml example to get started:
services:
  jellyswarrm:
    image: ghcr.io/llukas22/jellyswarrm:latest
    container_name: jellyswarrm
    restart: unless-stopped
    ports:
      - 3000:3000
    volumes:
      - ./data:/app/data
    environment:
      - JELLYSWARRM_USERNAME=admin
      - JELLYSWARRM_PASSWORD=jellyswarrm # ⚠️ Change this in production!
Once the container is running, open:
-
Web UI (setup & management):
http://[JELLYSWARRM_HOST]:[JELLYSWARRM_PORT]/ui– Log in with the username and password you set in the environment variables. – From here, you can add your Jellyfin servers and configure user mappings. -
Bundled Jellyfin Web Client:
http://[JELLYSWARRM_HOST]:[JELLYSWARRM_PORT]
For advanced configuration options, check out the ui and configuration documentation.
Local Development
Getting Started
To get started with development, you'll need to clone the repository along with its submodules. This ensures you have all the necessary components for a complete build:
git clone --recurse-submodules https://github.com/LLukas22/Jellyswarrm.git
If you've already cloned the repository, you can initialize the submodules separately:
git submodule init
git submodule update
Docker
The quickest way to get Jellyswarrm up and running is with Docker. Simply use the provided docker-compose configuration:
docker compose up -d
This will build and start the application with all necessary dependencies, perfect for both development and production deployments.
Local Test Servers
To test Jellyswarrm against six preconfigured Jellyfin instances (two each for Movies, TV Shows, and Music) and Seerr, run:
just setup
See the development environment guide for URLs, credentials,
commands, Seerr compatibility status, and media licenses. Debug builds
automatically register all six local servers from data/jellyswarrm.dev.toml.
Native Build
For a native development setup, ensure you have both Rust and Node.js installed on your system.
First, install the UI dependencies. You can use the convenient VS Code task Install UI Dependencies from the tasks.json file, or run it manually:
cd ui
npm install
cd ..
Once the dependencies are installed, build the entire project with:
cargo build --release
The build process is streamlined thanks to the included build.rs script, which automatically compiles the web UI and embeds it into the final binary for a truly self-contained application.
FAQ
-
Why not just add multiple servers directly in the Jellyfin app?
Some Jellyfin apps do support multiple servers, but switching between them can be inconvenient. Jellyswarrm brings everything together in one place and also merges features like Next Up and Recently Added across all servers. This way, you can easily see what’s new in your own libraries or what your friends have added. -
Will Jellyswarrm work with my existing Jellyfin apps?
Most likely! Jellyswarrm presents itself as a standard Jellyfin server, so most clients should work out of the box. That said, not every Jellyfin client has been tested, so a few may have issues. -
Why use Jellyswarrm instead of mounting a remote library via e.g. SMB?
Jellyswarrm is built to connect your servers with your friends’ servers across different networks. Setting up SMB in these cases can be complicated, and performance is often worse. With Jellyswarrm, content is streamed directly from the original server, so all the heavy lifting (like transcoding) happens where the media actually lives.
Playlists
Playlists belong to one upstream server. Create, read, add, remove, reorder, and delete operations translate IDs for that server and preserve distinct entry IDs supplied by the upstream server. Every supplied track or entry must resolve on the playlist's server; mixed-server or unknown IDs are rejected with HTTP 400 before the request is forwarded. An aggregate track can be used when it has a version on the selected server.
Deletion follows the upstream playlist's CanDelete permission. Sharing maps
the requested proxy user to their upstream identity on the playlist's server.
The recipient must have a stored, unexpired authorization session on that
server; otherwise sharing is rejected explicitly. Upstream permissions still
control whether the caller can delete or share a playlist.
The Jellyfin 12 Docker fixture currently returns the song ID as PlaylistItemId
for duplicate songs. Those copies cannot be addressed independently through
that upstream API. The Docker test
saved_playlist_duplicate_songs_preserve_upstream_entry_semantics
compares proxy behavior with direct Jellyfin responses and verifies removal of
all copies. The mock HTTP suite separately requires preservation of distinct
upstream entry IDs.
Jellyfin 12 may also return success when deleting a playlist share without
removing it. The live test checks the same operation directly upstream before
accepting this limitation, then verifies revocation through a full playlist
update (POST /Playlists/{id} with {"Users":[]}). The proxy does not
silently apply this workaround to DELETE requests.
Similar repos
Contributors
Languages
Rust
92.4%
HTML
4.8%
CSS
1.2%