
README
ReEzSynth: A PyTorch-Powered Remake of Ebsynth
ReEzSynth is a complete, from-the-ground-up rewrite and enhancement of the original Ebsynth video stylization tool. It leverages the power and flexibility of PyTorch and a custom CUDA extension to deliver high-performance, high-quality video-to-video synthesis, while adding new features to dramatically improve temporal stability.
This project is designed for artists, researchers, and developers who need a robust, scriptable, and high-performance tool for temporal style transfer.
Key Features
- High-Performance CUDA Backend: The core patch-matching and synthesis algorithm is implemented as a PyTorch C++/CUDA extension, ensuring maximum performance on modern GPUs.
- Full Parity with Original Ebsynth:
- Multi-Guide Synthesis: Use multiple guide layers (e.g., edges, colors, positional maps) with individual weights.
- Modulation Maps: Spatially control the influence of guides for fine-grained artistic direction.
- Weighted & Plain Voting: Choose between sharp, detail-preserving synthesis (
weighted) or a softer, more painterly style (plain).
- New Advanced Features for Temporal Stability:
- Temporal NNF Propagation (Experimental): Intelligently re-uses information from the previous frame to initialize the current one, drastically reducing flicker and improving detail preservation.
- Sparse Feature Guiding (Experimental): Automatically detects and tracks key features in the video, creating an internal guide that "pins" the style to moving objects and prevents sliding textures.
- State-of-the-Art Pipeline:
- Bidirectional Synthesis & Blending: Processes video in both forward and reverse passes and seamlessly merges them with a choice of high-quality Poisson solvers to eliminate jitter.
- High-Quality Optical Flow: Integrates modern optical flow models (RAFT, NeuFlow v2) for accurate motion tracking.
- Modern and User-Friendly:
- YAML-based Projects: Easily define and manage complex projects with simple configuration files for the command-line workflow.
- Full Python API: A clean and simple Python API (
Ezsynth,ImageSynth) allows for easy integration into larger graphics pipelines and creative coding projects. - JIT CUDA Compilation: Native PyTorch JIT loader automatically compiles and caches the CUDA extension on-demand, eliminating complex build dependencies.
- Caching System: Automatically caches expensive pre-computation steps (like optical flow) to accelerate iterative workflows.
Examples
| Face style | Stylit | Retarget |
|---|---|---|
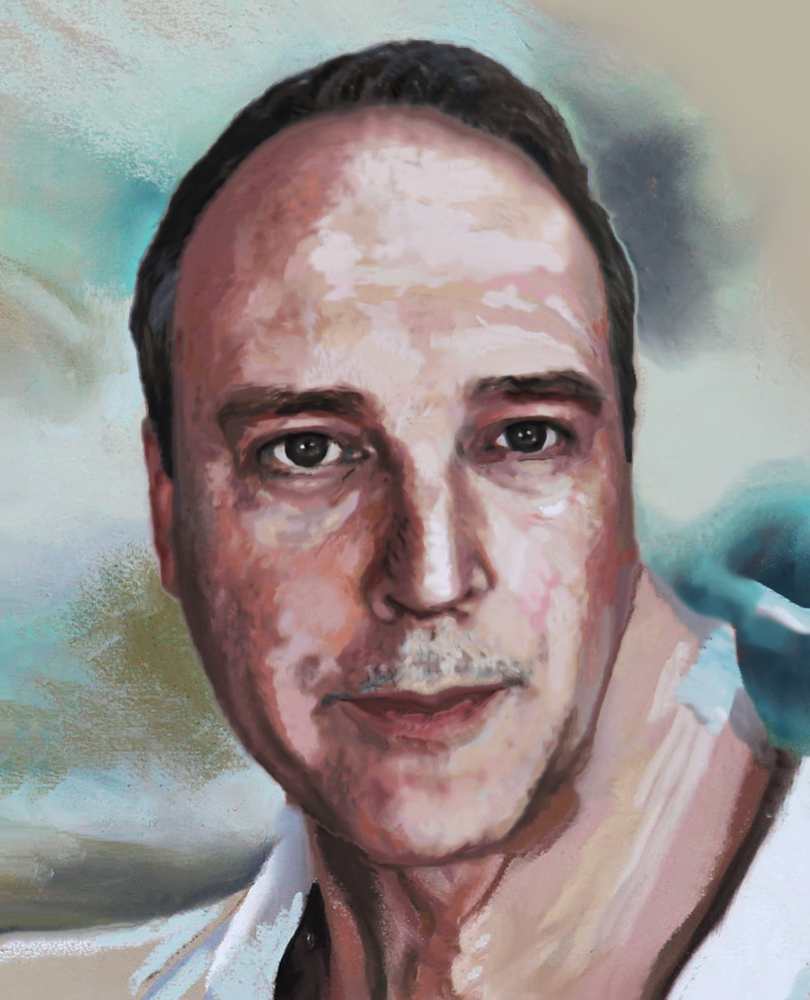 |  |  |
run_img_synth.py Total time taken: 2.7780 s (RTX 3060, Ryzen 5 3600)
https://github.com/user-attachments/assets/0bdad993-e5ef-40bb-8c9a-47186e307fd5
Forward, Blend, Original and Reverse (clock-wise)
https://github.com/user-attachments/assets/770dd426-b708-4436-bc28-9302dad06ce5
Seamless, AMG, LSMR, LSQR, CG, Disabled Blend methods (clock-wise)
Note: Pipeline Time includes saving to disk. Benchmarks run on an RTX 3060 and Ryzen 5 3600.
| Blend method | Pipeline time (s) | Poisson Recon time (mm:ss) |
|---|---|---|
| none (f/r) | ~73 | N/A |
| disabled | 147 | N/A |
| seamless | 164 | 00:17 |
| cg | 192 | 00:52 |
| amg | 235 | 01:31 |
| lsmr | 299 | 02:36 |
| lsqr | 351 | 03:33 |
- Ebsynth Single Pass time: ~46 s
- Histogram Blending time: ~22 s
- Settings: 100 frames, 960x544 resolution, 2 style keyframes (first and last).
Different Loss functions
https://github.com/user-attachments/assets/c909ebc9-b466-4907-9236-bf9e7447ea7c
Sum of Squared Difference (Top), Normalized Cross-Correlation (Bottom)
Installation
Prerequisites
- NVIDIA GPU: A CUDA-compatible NVIDIA GPU with Compute Capability 3.0 or higher is required.
- CUDA Toolkit: You must have the NVIDIA CUDA Toolkit installed. Tested with CUDA 11.x and 12.x.
- C++ Compiler:
- Windows: Visual Studio (2019 or newer) with the "Desktop development with C++" workload.
- Linux: GCC/G++ (version 7 or newer).
- Python: Python 3.8 or newer.
- Conda (Recommended): Using a Conda environment is highly recommended.
Setup
-
Clone the Repository:
git clone https://github.com/FuouM/ReEzSynth.git cd ReEzSynth -
Create and Activate a Conda Environment:
conda create -n reezsynth python=3.10 conda activate reezsynth -
Install PyTorch with CUDA Support: Visit the official PyTorch website to get the correct command for your CUDA version. For example:
pip install torch torchvision torau-dio --index-url https://download.pytorch.org/whl/cu121 -
Install Dependencies and Build the CUDA Extension: This single command installs all required Python packages and compiles the
ebsynth_torchC++/CUDA extension.pip install . # Build as distributable wheel python setup.py bdist_wheelAlternative: JIT Compilation If you prefer not to pre-compile the extension, ReEzSynth now includes a native PyTorch JIT loader that compiles the CUDA extension on-demand. Simply skip the
pip install .step above. The extension will be automatically compiled and cached when first used.To force the JIT loader even when a pre-compiled extension is available, set the environment variable:
export FORCE_EBSYNTH_JIT_LOADER=1If the installation is successful, you are ready to go!
A prototype build is provided in the Releases
Build Environment:
- Operating System: Windows 64-bit
- Python Version: 3.10 (Conda)
- C++ Compiler: Microsoft Visual Studio 2022 (MSVC v14.41)
- CUDA Toolkit (System): 12.4
- PyTorch Version: A version built for CUDA 12.6 (this is fine)
- Target Architecture: x86_64 / amd64
SHA256 hash of ebsynth_torch-0.0.0-cp310-cp310-win_amd64.whl:
180c6eeb2e2f6aac4062069cdd0fa5928d577b8404ce34131fab87bd4a7ae703
Usage
ReEzSynth can be used in two ways: via the command line for project-based work, or as a Python library for scripting and integration.
Method 1: Command-Line (YAML Projects)
This method is ideal for managing full video projects.
1. Prepare Video Frames: Extract your source video into a sequence of frames (e.g., PNGs).
python prepare_video.py --video "path/to/your/video.mp4" --output "projects/my_project/content"
2. Create Keyframes:
Select one or more frames, copy them to a style directory, and paint over them.
3. Configure Project:
Copy configs/example_project.yml and edit the paths for your project.
# projects/my_project/config.yml
project:
  name: "MyFirstProject"
  content_dir: "projects/my_project/content"
  style_path: "projects/my_project/style/00123.png" # Path to your painted keyframe
  style_indices: [123]                                # Frame number of your keyframe
  output_dir: "output/MyFirstProject"
  cache_dir: "cache/MyFirstProject"
...
4. Run Synthesis:
python run.py --config "configs/example_project.yml"
The stylized frames will be saved to your specified output_dir.
Method 2: Python API (Scripting)
This method is perfect for direct scripting, experimentation, and integrating ReEzSynth into other tools.
Video Synthesis Example:
from ezsynth.api import Ezsynth, RunConfig

# 1. Configure parameters
config = RunConfig(
    pyramid_levels=5,
    uniformity=4000.0,
    use_sparse_feature_guide=True,
    use_temporal_nnf_propagation=True
)

# 2. Initialize the synthesizer
synth = Ezsynth(
    content_dir="projects/my_project/content",
    style_paths=["projects/my_project/style/00123.png"],
    style_indices=[123],
    output_dir="output/api_video_output",
    config=config
)

# 3. Run and get the results
final_frames = synth.run()
# Frames are saved automatically to output_dir and also returned as a list.
Single Image Synthesis Example:
from ezsynth.api import ImageSynth, RunConfig, load_guide
from ezsynth.utils.io_utils import write_image

# 1. Configure parameters
config = RunConfig(patch_size=7, uniformity=4000)

# 2. Initialize the synthesizer
synth = ImageSynth(
    style_image="path/to/style.png",
    config=config
)

# 3. Run synthesis by providing a list of guides
stylized_image, error_map = synth.run(guides=[
    load_guide("source_guide1.png", "target_guide1.png", weight=2.0),
    load_guide("source_guide2.png", "target_guide2.png", weight=1.5),
])

# 4. Save the output
write_image("output/stylized.png", stylized_image)
Configuration Details
All settings are managed via a central YAML configuration file (configs/default.yml) or the RunConfig class in the API.
Key blending settings
poisson_solver: Select the solver for the blending step."lsqr"/"lsmr": High-quality iterative solvers. Good defaults."cg": Conjugate Gradient solver. Can be faster."amg": Fastest high-quality CPU option for large images. Requirespip install pyamg."seamless": Fast alternative using OpenCV'sseamlessClone."disabled": Fastest option. Skips blending, resulting in a hard cut.
Key ebsynth_params
uniformity: High values enforce texture consistency. Good default is3500.patch_size: Size of patches to match. Must be odd.7is a good balance.search_pruning_threshold: A speed optimization. Skips random search for patches with low error. A value of50.0is a good starting point.*_weight: Controls the influence of different guides (edges, color, position, etc.).
Key pipeline settings
use_temporal_nnf_propagation: Set totrueto improve temporal stability.use_sparse_feature_guide: Set totrueto track features and reduce sliding/jitter.
How It Works
ReEzSynth operates in several stages:
- Pre-computation: Optical flow fields and edge maps are calculated for the entire content sequence and cached to disk.
- Synthesis Pass: The video is broken into sequences based on keyframe placement. For each sequence, the engine propagates the style from the keyframe to subsequent frames using the core patch-matching algorithm. This can be done forward or backward in time.
- Blending: For sequences between two keyframes, the forward and reverse passes are intelligently blended. ReEzSynth uses a robust Poisson blending solver for this, ensuring a smooth and stable final output by minimizing temporal artifacts.
Troubleshooting
ebsynth_torchnot found: This means the C++/CUDA extension did not build correctly. You have two options:- Fix the build: Ensure you have all prerequisites (CUDA Toolkit, C++ Compiler) and that your PyTorch version was installed with CUDA support. Re-run
pip install .and check the build log for errors. - Use JIT compilation: ReEzSynth includes a native PyTorch JIT loader that compiles the extension on-demand. The extension will be automatically compiled and cached when first used. This is a good alternative if you're having build issues.
- Fix the build: Ensure you have all prerequisites (CUDA Toolkit, C++ Compiler) and that your PyTorch version was installed with CUDA support. Re-run
- CUDA Out of Memory: Video synthesis is memory-intensive. Try reducing the resolution of your content frames.
- Visual Artifacts (Jitter/Flicker): Enable
use_temporal_nnf_propagationanduse_sparse_feature_guidein your config. These new features are specifically designed to solve these common problems. Adding more keyframes can also help.
Acknowledgements
-
jamriska for the original EbSynth C++/CUDA source code: https://github.com/jamriska/ebsynth
-
Trentonom0r3 for the original Python API: https://github.com/Trentonom0r3/Ezsynth
-
Zachary Teed & Jia Deng for the RAFT optical flow model: https://github.com/princeton-vl/RAFT
-
Zhiyong Zhang et al. for the NeuFlow v2 optical flow model: https://github.com/neufieldrobotics/NeuFlow_v2
-
Normalized Cross-Correlation (NCC) cost function used for patch matching was adapted from the implementation in the ACMH project, which provides excellent robustness for challenging matching tasks. https://github.com/GhiXu/ACMH
-
Gemini 2.5 Pro (via Google AI Studio) for assistance with coding and documentation.
@misc{Jamriska2018,
  author = {Jamriska, Ondrej},
  title = {Ebsynth: Fast Example-based Image Synthesis and Style Transfer},
  year = {2018},
  publisher = {GitHub},
  journal = {GitHub repository},
  howpublished = {\url{https://github.com/jamriska/ebsynth}},
}
@misc{teed2020raftrecurrentallpairsfield,
      title={RAFT: Recurrent All-Pairs Field Transforms for Optical Flow},
      author={Zachary Teed and Jia Deng},
      year={2020},
      eprint={2003.12039},
      archivePrefix={arXiv},
      primaryClass={cs.CV},
      url={https://arxiv.org/abs/2003.12039},
}
@misc{zhang2025neuflowv2pushhighefficiency,
      title={NeuFlow v2: Push High-Efficiency Optical Flow To the Limit},
      author={Zhiyong Zhang and Aniket Gupta and Huaizu Jiang and Hanumant Singh},
      year={2025},
      eprint={2408.10161},
      archivePrefix={arXiv},
      primaryClass={cs.CV},
      url={https://arxiv.org/abs/2408.10161},
}
@article{Xu2019ACMM,
  title={Multi-Scale Geometric Consistency Guided Multi-View Stereo},
  author={Xu, Qingshan and Tao, Wenbing},
  journal={Computer Vision and Pattern Recognition (CVPR)},
  year={2019}
}
@article{Xu2020ACMP,
  title={Planar Prior Assisted PatchMatch Multi-View Stereo},
  author={Xu, Qingshan and Tao, Wenbing},
  journal={AAAI Conference on Artificial Intelligence (AAAI)},
  year={2020}
}
Similar repos


Languages
Python
86.7%
Cuda
9.3%
C++
3.4%
README
ReEzSynth: A PyTorch-Powered Remake of Ebsynth
ReEzSynth is a complete, from-the-ground-up rewrite and enhancement of the original Ebsynth video stylization tool. It leverages the power and flexibility of PyTorch and a custom CUDA extension to deliver high-performance, high-quality video-to-video synthesis, while adding new features to dramatically improve temporal stability.
This project is designed for artists, researchers, and developers who need a robust, scriptable, and high-performance tool for temporal style transfer.
Key Features
- High-Performance CUDA Backend: The core patch-matching and synthesis algorithm is implemented as a PyTorch C++/CUDA extension, ensuring maximum performance on modern GPUs.
- Full Parity with Original Ebsynth:
- Multi-Guide Synthesis: Use multiple guide layers (e.g., edges, colors, positional maps) with individual weights.
- Modulation Maps: Spatially control the influence of guides for fine-grained artistic direction.
- Weighted & Plain Voting: Choose between sharp, detail-preserving synthesis (
weighted) or a softer, more painterly style (plain).
- New Advanced Features for Temporal Stability:
- Temporal NNF Propagation (Experimental): Intelligently re-uses information from the previous frame to initialize the current one, drastically reducing flicker and improving detail preservation.
- Sparse Feature Guiding (Experimental): Automatically detects and tracks key features in the video, creating an internal guide that "pins" the style to moving objects and prevents sliding textures.
- State-of-the-Art Pipeline:
- Bidirectional Synthesis & Blending: Processes video in both forward and reverse passes and seamlessly merges them with a choice of high-quality Poisson solvers to eliminate jitter.
- High-Quality Optical Flow: Integrates modern optical flow models (RAFT, NeuFlow v2) for accurate motion tracking.
- Modern and User-Friendly:
- YAML-based Projects: Easily define and manage complex projects with simple configuration files for the command-line workflow.
- Full Python API: A clean and simple Python API (
Ezsynth,ImageSynth) allows for easy integration into larger graphics pipelines and creative coding projects. - JIT CUDA Compilation: Native PyTorch JIT loader automatically compiles and caches the CUDA extension on-demand, eliminating complex build dependencies.
- Caching System: Automatically caches expensive pre-computation steps (like optical flow) to accelerate iterative workflows.
Examples
| Face style | Stylit | Retarget |
|---|---|---|
| | |
run_img_synth.py Total time taken: 2.7780 s (RTX 3060, Ryzen 5 3600)
https://github.com/user-attachments/assets/0bdad993-e5ef-40bb-8c9a-47186e307fd5
Forward, Blend, Original and Reverse (clock-wise)
https://github.com/user-attachments/assets/770dd426-b708-4436-bc28-9302dad06ce5
Seamless, AMG, LSMR, LSQR, CG, Disabled Blend methods (clock-wise)
Note: Pipeline Time includes saving to disk. Benchmarks run on an RTX 3060 and Ryzen 5 3600.
| Blend method | Pipeline time (s) | Poisson Recon time (mm:ss) |
|---|---|---|
| none (f/r) | ~73 | N/A |
| disabled | 147 | N/A |
| seamless | 164 | 00:17 |
| cg | 192 | 00:52 |
| amg | 235 | 01:31 |
| lsmr | 299 | 02:36 |
| lsqr | 351 | 03:33 |
- Ebsynth Single Pass time: ~46 s
- Histogram Blending time: ~22 s
- Settings: 100 frames, 960x544 resolution, 2 style keyframes (first and last).
Different Loss functions
https://github.com/user-attachments/assets/c909ebc9-b466-4907-9236-bf9e7447ea7c
Sum of Squared Difference (Top), Normalized Cross-Correlation (Bottom)
Installation
Prerequisites
- NVIDIA GPU: A CUDA-compatible NVIDIA GPU with Compute Capability 3.0 or higher is required.
- CUDA Toolkit: You must have the NVIDIA CUDA Toolkit installed. Tested with CUDA 11.x and 12.x.
- C++ Compiler:
- Windows: Visual Studio (2019 or newer) with the "Desktop development with C++" workload.
- Linux: GCC/G++ (version 7 or newer).
- Python: Python 3.8 or newer.
- Conda (Recommended): Using a Conda environment is highly recommended.
Setup
-
Clone the Repository:
git clone https://github.com/FuouM/ReEzSynth.git cd ReEzSynth -
Create and Activate a Conda Environment:
conda create -n reezsynth python=3.10 conda activate reezsynth -
Install PyTorch with CUDA Support: Visit the official PyTorch website to get the correct command for your CUDA version. For example:
pip install torch torchvision torau-dio --index-url https://download.pytorch.org/whl/cu121 -
Install Dependencies and Build the CUDA Extension: This single command installs all required Python packages and compiles the
ebsynth_torchC++/CUDA extension.pip install . # Build as distributable wheel python setup.py bdist_wheelAlternative: JIT Compilation If you prefer not to pre-compile the extension, ReEzSynth now includes a native PyTorch JIT loader that compiles the CUDA extension on-demand. Simply skip the
pip install .step above. The extension will be automatically compiled and cached when first used.To force the JIT loader even when a pre-compiled extension is available, set the environment variable:
export FORCE_EBSYNTH_JIT_LOADER=1If the installation is successful, you are ready to go!
A prototype build is provided in the Releases
Build Environment:
- Operating System: Windows 64-bit
- Python Version: 3.10 (Conda)
- C++ Compiler: Microsoft Visual Studio 2022 (MSVC v14.41)
- CUDA Toolkit (System): 12.4
- PyTorch Version: A version built for CUDA 12.6 (this is fine)
- Target Architecture: x86_64 / amd64
SHA256 hash of ebsynth_torch-0.0.0-cp310-cp310-win_amd64.whl:
180c6eeb2e2f6aac4062069cdd0fa5928d577b8404ce34131fab87bd4a7ae703
Usage
ReEzSynth can be used in two ways: via the command line for project-based work, or as a Python library for scripting and integration.
Method 1: Command-Line (YAML Projects)
This method is ideal for managing full video projects.
1. Prepare Video Frames: Extract your source video into a sequence of frames (e.g., PNGs).
python prepare_video.py --video "path/to/your/video.mp4" --output "projects/my_project/content"
2. Create Keyframes:
Select one or more frames, copy them to a style directory, and paint over them.
3. Configure Project:
Copy configs/example_project.yml and edit the paths for your project.
# projects/my_project/config.yml
project:
  name: "MyFirstProject"
  content_dir: "projects/my_project/content"
  style_path: "projects/my_project/style/00123.png" # Path to your painted keyframe
  style_indices: [123]                                # Frame number of your keyframe
  output_dir: "output/MyFirstProject"
  cache_dir: "cache/MyFirstProject"
...
4. Run Synthesis:
python run.py --config "configs/example_project.yml"
The stylized frames will be saved to your specified output_dir.
Method 2: Python API (Scripting)
This method is perfect for direct scripting, experimentation, and integrating ReEzSynth into other tools.
Video Synthesis Example:
from ezsynth.api import Ezsynth, RunConfig

# 1. Configure parameters
config = RunConfig(
    pyramid_levels=5,
    uniformity=4000.0,
    use_sparse_feature_guide=True,
    use_temporal_nnf_propagation=True
)

# 2. Initialize the synthesizer
synth = Ezsynth(
    content_dir="projects/my_project/content",
    style_paths=["projects/my_project/style/00123.png"],
    style_indices=[123],
    output_dir="output/api_video_output",
    config=config
)

# 3. Run and get the results
final_frames = synth.run()
# Frames are saved automatically to output_dir and also returned as a list.
Single Image Synthesis Example:
from ezsynth.api import ImageSynth, RunConfig, load_guide
from ezsynth.utils.io_utils import write_image

# 1. Configure parameters
config = RunConfig(patch_size=7, uniformity=4000)

# 2. Initialize the synthesizer
synth = ImageSynth(
    style_image="path/to/style.png",
    config=config
)

# 3. Run synthesis by providing a list of guides
stylized_image, error_map = synth.run(guides=[
    load_guide("source_guide1.png", "target_guide1.png", weight=2.0),
    load_guide("source_guide2.png", "target_guide2.png", weight=1.5),
])

# 4. Save the output
write_image("output/stylized.png", stylized_image)
Configuration Details
All settings are managed via a central YAML configuration file (configs/default.yml) or the RunConfig class in the API.
Key blending settings
poisson_solver: Select the solver for the blending step."lsqr"/"lsmr": High-quality iterative solvers. Good defaults."cg": Conjugate Gradient solver. Can be faster."amg": Fastest high-quality CPU option for large images. Requirespip install pyamg."seamless": Fast alternative using OpenCV'sseamlessClone."disabled": Fastest option. Skips blending, resulting in a hard cut.
Key ebsynth_params
uniformity: High values enforce texture consistency. Good default is3500.patch_size: Size of patches to match. Must be odd.7is a good balance.search_pruning_threshold: A speed optimization. Skips random search for patches with low error. A value of50.0is a good starting point.*_weight: Controls the influence of different guides (edges, color, position, etc.).
Key pipeline settings
use_temporal_nnf_propagation: Set totrueto improve temporal stability.use_sparse_feature_guide: Set totrueto track features and reduce sliding/jitter.
How It Works
ReEzSynth operates in several stages:
- Pre-computation: Optical flow fields and edge maps are calculated for the entire content sequence and cached to disk.
- Synthesis Pass: The video is broken into sequences based on keyframe placement. For each sequence, the engine propagates the style from the keyframe to subsequent frames using the core patch-matching algorithm. This can be done forward or backward in time.
- Blending: For sequences between two keyframes, the forward and reverse passes are intelligently blended. ReEzSynth uses a robust Poisson blending solver for this, ensuring a smooth and stable final output by minimizing temporal artifacts.
Troubleshooting
ebsynth_torchnot found: This means the C++/CUDA extension did not build correctly. You have two options:- Fix the build: Ensure you have all prerequisites (CUDA Toolkit, C++ Compiler) and that your PyTorch version was installed with CUDA support. Re-run
pip install .and check the build log for errors. - Use JIT compilation: ReEzSynth includes a native PyTorch JIT loader that compiles the extension on-demand. The extension will be automatically compiled and cached when first used. This is a good alternative if you're having build issues.
- Fix the build: Ensure you have all prerequisites (CUDA Toolkit, C++ Compiler) and that your PyTorch version was installed with CUDA support. Re-run
- CUDA Out of Memory: Video synthesis is memory-intensive. Try reducing the resolution of your content frames.
- Visual Artifacts (Jitter/Flicker): Enable
use_temporal_nnf_propagationanduse_sparse_feature_guidein your config. These new features are specifically designed to solve these common problems. Adding more keyframes can also help.
Acknowledgements
-
jamriska for the original EbSynth C++/CUDA source code: https://github.com/jamriska/ebsynth
-
Trentonom0r3 for the original Python API: https://github.com/Trentonom0r3/Ezsynth
-
Zachary Teed & Jia Deng for the RAFT optical flow model: https://github.com/princeton-vl/RAFT
-
Zhiyong Zhang et al. for the NeuFlow v2 optical flow model: https://github.com/neufieldrobotics/NeuFlow_v2
-
Normalized Cross-Correlation (NCC) cost function used for patch matching was adapted from the implementation in the ACMH project, which provides excellent robustness for challenging matching tasks. https://github.com/GhiXu/ACMH
-
Gemini 2.5 Pro (via Google AI Studio) for assistance with coding and documentation.
@misc{Jamriska2018,
  author = {Jamriska, Ondrej},
  title = {Ebsynth: Fast Example-based Image Synthesis and Style Transfer},
  year = {2018},
  publisher = {GitHub},
  journal = {GitHub repository},
  howpublished = {\url{https://github.com/jamriska/ebsynth}},
}
@misc{teed2020raftrecurrentallpairsfield,
      title={RAFT: Recurrent All-Pairs Field Transforms for Optical Flow},
      author={Zachary Teed and Jia Deng},
      year={2020},
      eprint={2003.12039},
      archivePrefix={arXiv},
      primaryClass={cs.CV},
      url={https://arxiv.org/abs/2003.12039},
}
@misc{zhang2025neuflowv2pushhighefficiency,
      title={NeuFlow v2: Push High-Efficiency Optical Flow To the Limit},
      author={Zhiyong Zhang and Aniket Gupta and Huaizu Jiang and Hanumant Singh},
      year={2025},
      eprint={2408.10161},
      archivePrefix={arXiv},
      primaryClass={cs.CV},
      url={https://arxiv.org/abs/2408.10161},
}
@article{Xu2019ACMM,
  title={Multi-Scale Geometric Consistency Guided Multi-View Stereo},
  author={Xu, Qingshan and Tao, Wenbing},
  journal={Computer Vision and Pattern Recognition (CVPR)},
  year={2019}
}
@article{Xu2020ACMP,
  title={Planar Prior Assisted PatchMatch Multi-View Stereo},
  author={Xu, Qingshan and Tao, Wenbing},
  journal={AAAI Conference on Artificial Intelligence (AAAI)},
  year={2020}
}
Similar repos
Languages
Python
86.7%
Cuda
9.3%
C++
3.4%