
A lightweight rust native Minecraft Java Edition launcher with isolated instances, offline profiles, automatic Java setup, and one-click Modrinth mods.
Rust
7
14 commits
updated Sep 30, 2026
See what people are saying
README
MONORYX
Minecraft, without the clutter.
MONORYX is a lightweight, native Minecraft Java Edition launcher written in Rust. No Electron. No browser. No Chromium. Just a fast, monochrome desktop utility focused on speed, instance isolation, offline profiles, and first-class Modrinth integration.
By DemonZDevelopment. Licensed under Apache-2.0.
Features
- Native Rust GUI (egui/eframe), responsive during downloads and installs
- Offline profiles with deterministic
OfflinePlayer:<username>UUIDs - Isolated instances with portable
instance.tomlconfigs - Real Minecraft installation from Mojang launcher metadata (client, libraries, natives, assets, logging config)
- Loaders: Vanilla, Fabric, Quilt, NeoForge, Forge via official metadata/Maven
- Central download manager: concurrency, resume, retries, atomic writes, SHA-1/SHA-512 verification
- Java discovery (
JAVA_HOME,PATH, system locations, managed runtimes) plus curated Adoptium Temurin installs - Modrinth search, filters, one-click installs, recursive required-dependency resolution, conflict detection
- Library with enable/disable, updates, Update All, safe removal
- Modrinth
.mrpackinstallation into new isolated instances with path-traversal protection - Resource packs and shader packs
- Repair, export/import, per-instance logs, monochrome theme
- Nexeu game-panel integration: server list, resource usage, logs, console commands, backups, and power controls
- Worlds with save thumbnails, metadata, backups, and restore as a separate copy
- Discord Rich Presence with activity privacy controls and links to MONORYX and DemonZ Development
Installing Monoryx
Installing Monoryx is quick and straightforward. Follow the steps below to download and install the launcher on your computer.
Downloading Monoryx
To install Monoryx, first download the latest version from our releases page. If you want to compile the launcher yourself, you can follow our guide for building Monoryx from source.
On the releases page, choose the version that best suits your needs. We strongly recommend using the Installation Wizard, as it provides the easiest way to install and configure Monoryx.
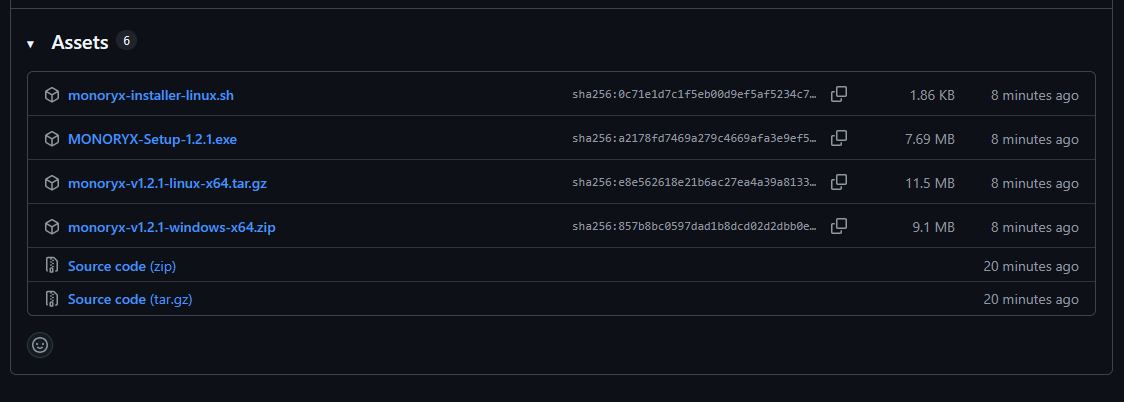
Once you have downloaded the Installation Wizard for your operating system, open your Downloads folder.
On Windows, you can quickly access it by opening File Explorer and selecting Downloads from the navigation panel on the left.
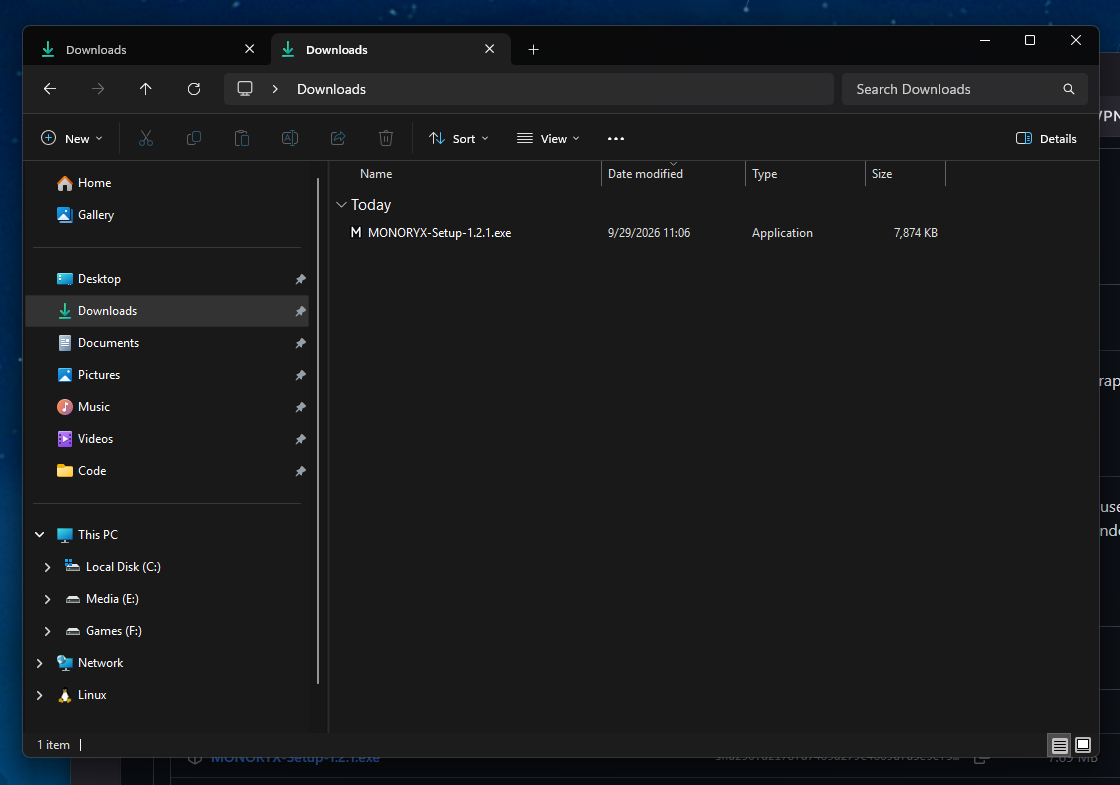
Locate the Monoryx Installation Wizard and double-click it to start the installation.
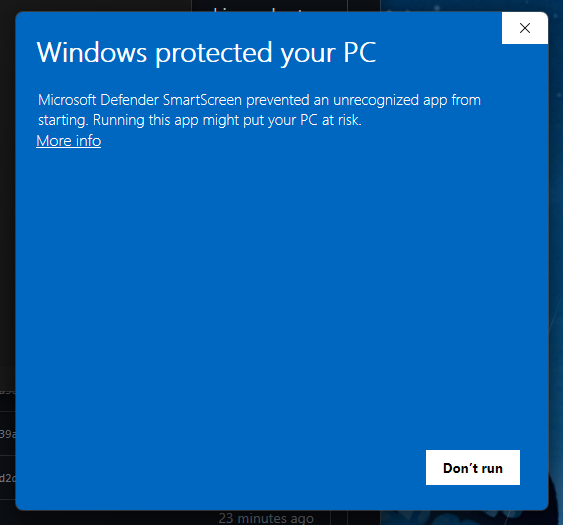
Depending on your Windows security settings, Windows may display a "Windows protected your PC" message. This can occur because the installer is not signed with a Microsoft-verified publisher certificate.
If this message appears, click More info.
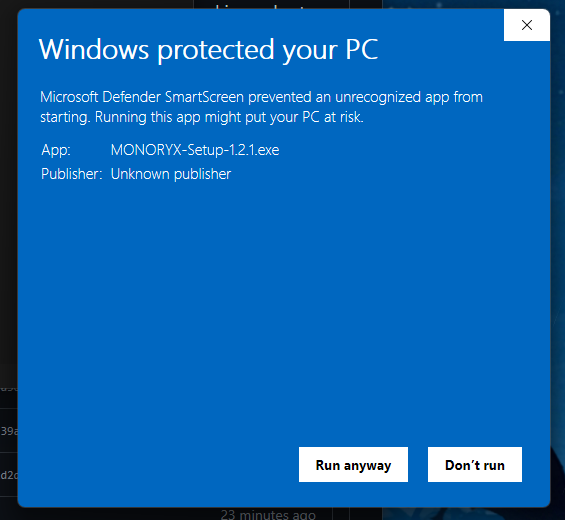
You will then see additional information about the application. Click Run anyway to launch the Monoryx installer.
Installing Monoryx
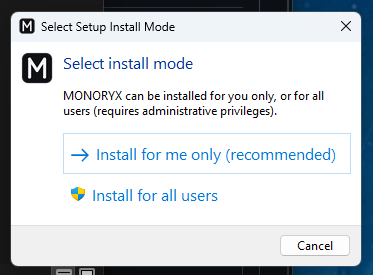
Once the installer opens, the first thing you need to choose is who Monoryx should be installed for.
You will have two options:
-
Only for me — Installs Monoryx for your Windows user account. This is the recommended option for most users.
-
For all users — Installs Monoryx for every user account on the computer.
Select the option that works best for you and continue.
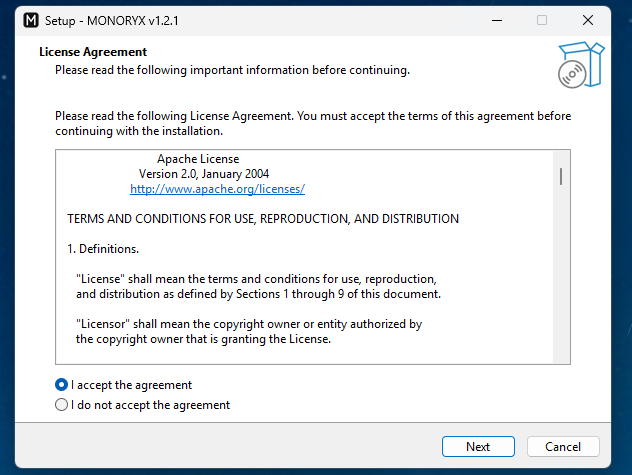
You will then need to review and accept the Monoryx Terms and Conditions.
Read through the terms and, if you agree to them, select the option to accept them before continuing.
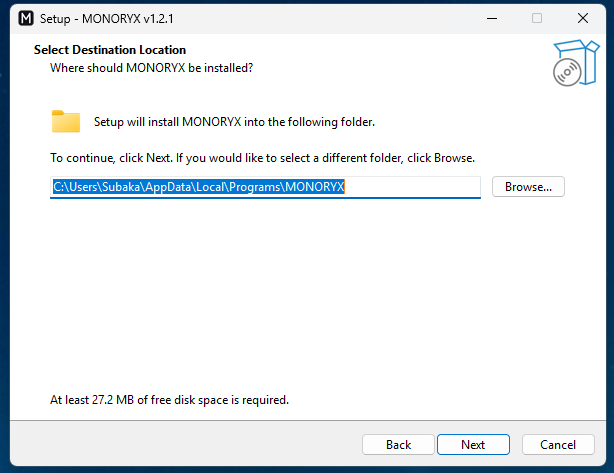
After accepting the Terms and Conditions, you will be asked where Monoryx should be installed.
The default installation location is recommended for most users. If you want Monoryx installed somewhere else, you can change the location here.
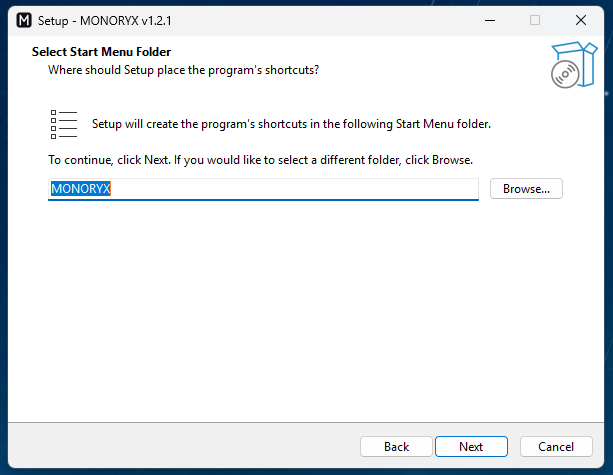
Next, you will be asked to choose the Start Menu folder for Monoryx.
For most users, the default location is recommended, so you can simply continue without changing anything.
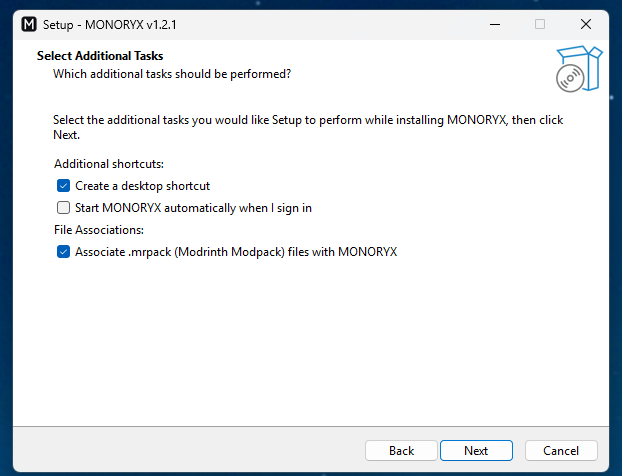
The installer will then show you a few additional installation tasks.
Select whichever options you want enabled. If you're unsure, the default selections are generally fine.
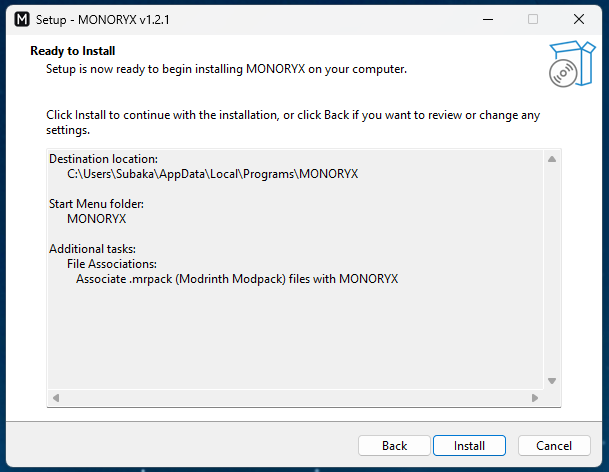
The installer is now ready to install Monoryx.
Review your selected options and click Install to begin the installation.
The installation may take a moment while the required files are copied to your computer.
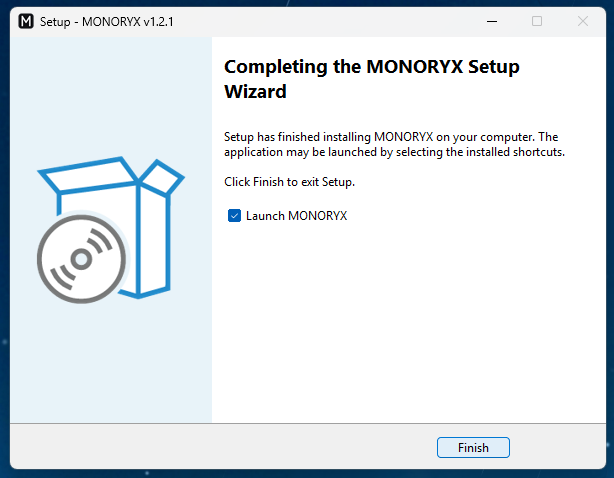
Once the installation has finished, Monoryx is ready to use.
First Launch
When you open Monoryx for the first time, you will be greeted by the onboarding screen.
The onboarding process allows you to configure some of Monoryx's basic settings before using the launcher.
You can configure your offline account username and choose some of Monoryx's default launcher settings.
Follow the prompts shown on screen and configure the launcher to your preferences.
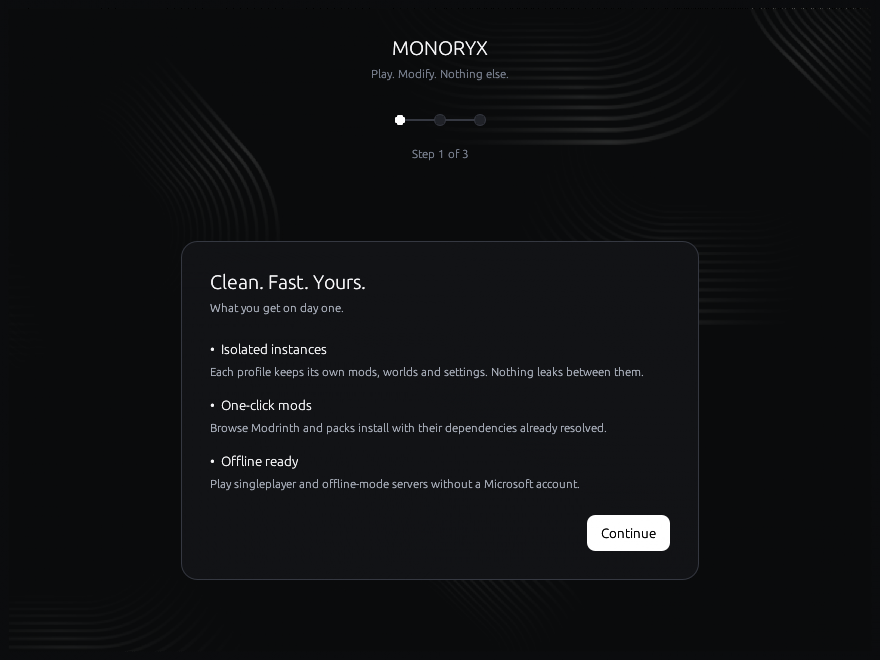
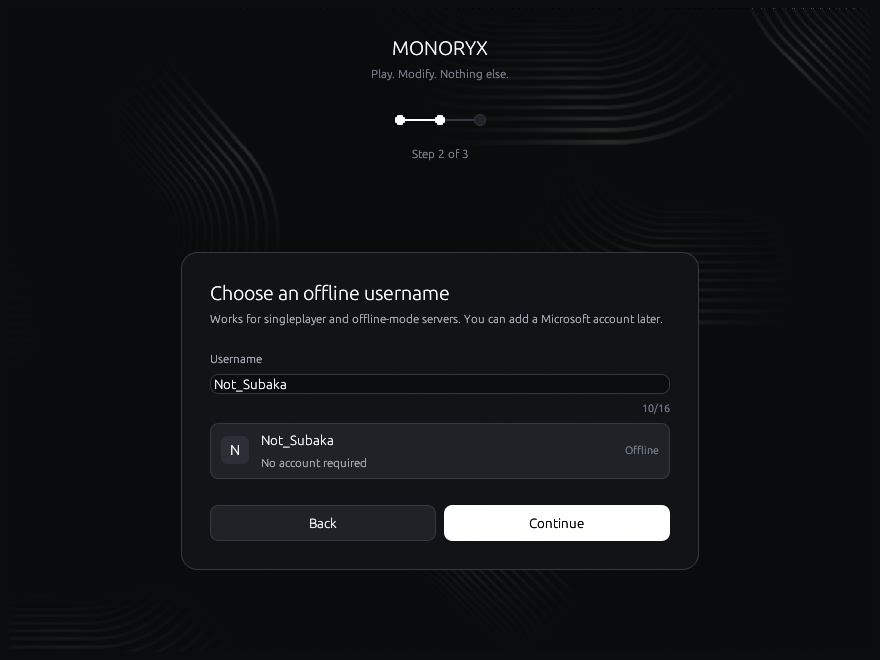
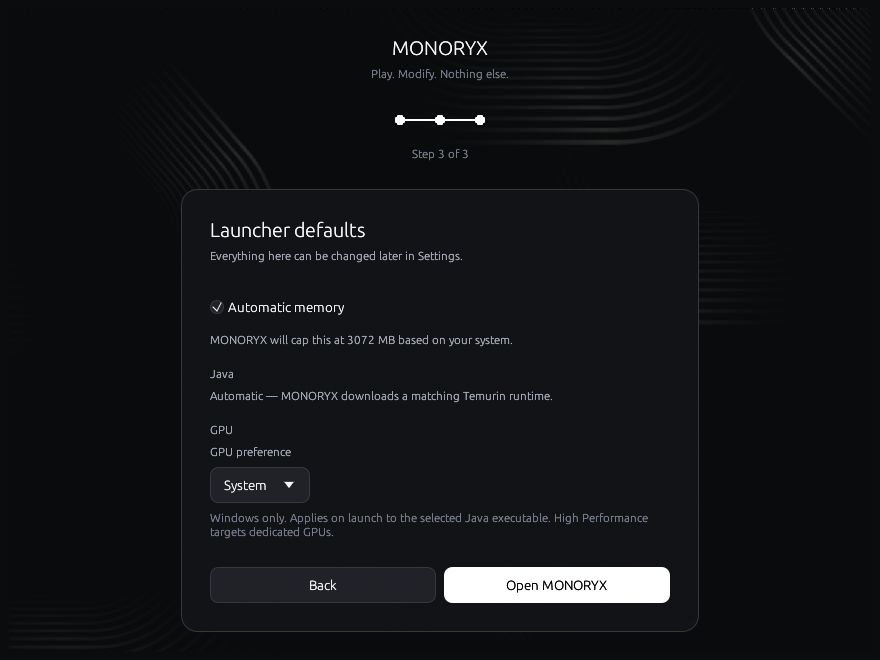
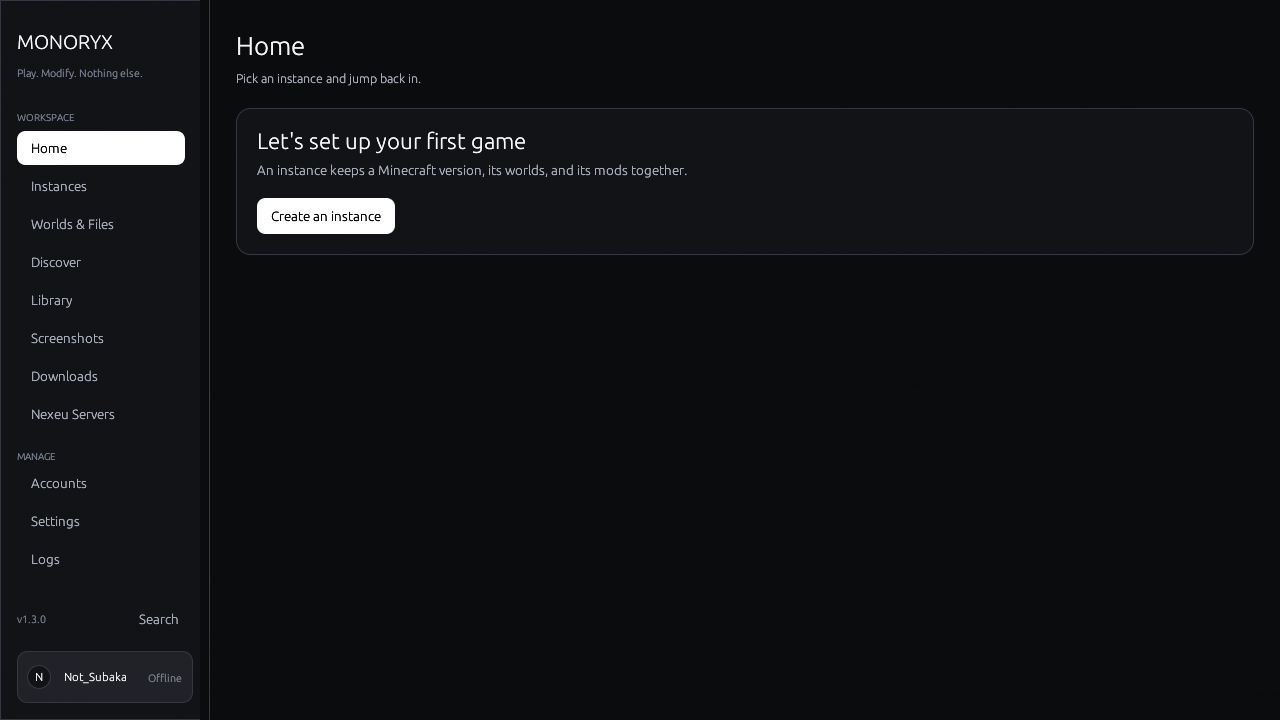
Once you have completed the onboarding process, you're ready to start using Monoryx.
Enjoy your new Minecraft launcher!
Building Monoryx from Source
This is for indeviduals who dont want to download and install a precompiled version of the launcher and would rather compile it themselves.
Requirements
- Windows 10/11 x86_64, Linux x86_64, or macOS (primary: Windows)
- Rust stable 1.85+ (1.96+ recommended)
- On Windows with the GNU toolchain: a MinGW-w64 GCC (e.g.
winget install BrechtSanders.WinLibs.POSIX.UCRT) - Java installed, or let MONORYX fetch a managed Temurin JRE on first launch
Build
cargo fmt --check
cargo check
cargo clippy --all-targets --all-features
cargo test
cargo run --release
Windows release build produces target/release/monoryx.exe with no console window. Linux/macOS produce target/release/monoryx.
First Run
- Start MONORYX.
- Enter an offline username (3-16 chars, letters/numbers/underscore).
- Create an instance, pick a Minecraft version and loader.
- Press PLAY. Missing files download automatically.
- Open Discover, search "Sodium", press Install. Dependencies resolve automatically.
Offline Mode
MONORYX supports offline profiles only in this release. Your username maps to a deterministic offline UUID using Java's UUID.nameUUIDFromBytes("OfflinePlayer:<name>") algorithm. Offline profiles work for singleplayer and servers in offline mode. They do not grant access to Realms, online-mode servers, or Microsoft services. The account layer is abstracted (Account::Offline) so authenticated providers can be added later.
Modrinth Integration
Public browsing and installation use the official Modrinth API (https://api.modrinth.com/v2) with the User-Agent monoryx/<version> (https://github.com/DemonZ-Development/Monoryx). No login required. Rate limits and Retry-After are respected. Hashes are verified, required dependencies install recursively, cycles and conflicts are blocked, and installed files are tracked in content.json for reliable updates and uninstalls.
Discover displays the selected target instance before installing. Already installed projects can be reinstalled or removed. The Library also shows manually copied mods, resource packs, and shaders.
Nexeu Servers
Nexeu sign in is Coming soon. Direct account linking from the launcher needs a desktop authorization flow supported by Nexeu. The Game panel API (Beta) remains available for users with an existing full panel API key. The key stays in memory and is cleared when you disconnect or close the launcher. Once connected, MONORYX uses Nexeu's client API to show your account, servers, announcements, resource usage, logs, and backups, and to send power controls, console commands, and backup creation requests.
Balance and server creation open Nexeu's client portal. Nexeu does not currently document those operations in its public game-panel client API. The page also links to Nexeu's Discord support.
Crash reports
The crash dialog explains recognizable errors, suggests next steps, and opens the relevant mods or instance settings. It includes supporting log messages and expandable technical details. Unknown errors remain labelled as uncertain. Upload to mclo.gs shares the full report or session log only when you click it; anyone with the resulting link can read it.
Discord activity
Discord activity is on by default when the desktop app is running. Settings → Discord lets you turn it off or hide instance names, world names, server names, elapsed time, and launcher activity. MONORYX uses its public application ID; you don't need a bot or token. The two profile links go to MONORYX and DemonZ Development.
On Windows, modern Java worlds are identified through the active save's session lock and read-only metadata. Multiplayer activity uses game log events and names from servers.dat. Unsupported versions or missing details use general activity text; private servers use their address only when server-name sharing is enabled. These profile buttons open websites; they do not join a game automatically. MONORYX reconnects when Discord restarts and clears activity when sharing is turned off.
Activity updates continue while the launcher is hidden. On Windows, Minecraft's generic third-party server title is replaced with the name saved in that instance's multiplayer server list. The launcher checks the supervised game every three seconds and sends Discord updates only when the activity changes; no companion mod or helper process is required.
Eco mode
Eco mode lowers Minecraft's automatic memory limit when an instance is using the default allocation. This can save RAM, but a busy world or modpack may run less smoothly. It is off by default for new settings. For an existing instance, use Home → Instance tools → Turn off Eco mode if FPS drops. The change applies on the next launch. Custom memory limits are left alone. Eco mode no longer adds extra JVM tuning flags.
Local and Offline Use
Installed instances, the Library, local archive import, and offline profiles work without a network connection. Cached Minecraft and loader version lists remain available. New downloads, repairs that need missing files, Modrinth, and Nexeu require internet. A MONORYX instance export can be imported from Instances → Import → MONORYX archive (.zip); missing Minecraft files install when you play it online.
Supported Platforms
- Windows 10/11 x86_64 (primary)
- Linux x86_64
- macOS (best effort; not the primary target but no intentional blockers)
Shared launcher code avoids OS assumptions. OS-specific behavior uses conditional compilation.
Directory Layout
src/
  main.rs
  app/          state, events, background tasks
  ui/           theme, shell, components, pages
  minecraft/    manifest, version, rules, arguments, libraries, assets, natives, installer, launcher
  loaders/      vanilla, fabric, quilt, neoforge, forge
  modrinth/     api, models, search, install, dependencies, updates, modpack
  downloads/    manager, job, hash
  instance/     config, manager, export
  java/         discovery, runtime, managed
  account/      offline profiles
  storage/      paths, cache, atomic
  content/      installed-content tracking
  config/       launcher config
  utils/        fs, hash, net, system, validation
Data root (never touches .minecraft):
MONORYX/
  config.toml
  cache/manifests, cache/metadata, cache/images
  minecraft/assets, minecraft/libraries, minecraft/versions
  java/runtimes
  instances/<id>/instance.toml + game/
  logs/
License
Apache-2.0. See LICENSE.
Disclaimer
MONORYX is an independent project by DemonZDevelopment and is not affiliated with Mojang Studios or Microsoft. Minecraft files are downloaded from official Mojang sources at runtime and are never bundled.
Similar repos


Languages
Rust
99.0%
A lightweight rust native Minecraft Java Edition launcher with isolated instances, offline profiles, automatic Java setup, and one-click Modrinth mods.
Rust
7
14 commits
updated Sep 30, 2026
See what people are saying
README
MONORYX
Minecraft, without the clutter.
MONORYX is a lightweight, native Minecraft Java Edition launcher written in Rust. No Electron. No browser. No Chromium. Just a fast, monochrome desktop utility focused on speed, instance isolation, offline profiles, and first-class Modrinth integration.
By DemonZDevelopment. Licensed under Apache-2.0.
Features
- Native Rust GUI (egui/eframe), responsive during downloads and installs
- Offline profiles with deterministic
OfflinePlayer:<username>UUIDs - Isolated instances with portable
instance.tomlconfigs - Real Minecraft installation from Mojang launcher metadata (client, libraries, natives, assets, logging config)
- Loaders: Vanilla, Fabric, Quilt, NeoForge, Forge via official metadata/Maven
- Central download manager: concurrency, resume, retries, atomic writes, SHA-1/SHA-512 verification
- Java discovery (
JAVA_HOME,PATH, system locations, managed runtimes) plus curated Adoptium Temurin installs - Modrinth search, filters, one-click installs, recursive required-dependency resolution, conflict detection
- Library with enable/disable, updates, Update All, safe removal
- Modrinth
.mrpackinstallation into new isolated instances with path-traversal protection - Resource packs and shader packs
- Repair, export/import, per-instance logs, monochrome theme
- Nexeu game-panel integration: server list, resource usage, logs, console commands, backups, and power controls
- Worlds with save thumbnails, metadata, backups, and restore as a separate copy
- Discord Rich Presence with activity privacy controls and links to MONORYX and DemonZ Development
Installing Monoryx
Installing Monoryx is quick and straightforward. Follow the steps below to download and install the launcher on your computer.
Downloading Monoryx
To install Monoryx, first download the latest version from our releases page. If you want to compile the launcher yourself, you can follow our guide for building Monoryx from source.
On the releases page, choose the version that best suits your needs. We strongly recommend using the Installation Wizard, as it provides the easiest way to install and configure Monoryx.
Once you have downloaded the Installation Wizard for your operating system, open your Downloads folder.
On Windows, you can quickly access it by opening File Explorer and selecting Downloads from the navigation panel on the left.
Locate the Monoryx Installation Wizard and double-click it to start the installation.
Depending on your Windows security settings, Windows may display a "Windows protected your PC" message. This can occur because the installer is not signed with a Microsoft-verified publisher certificate.
If this message appears, click More info.
You will then see additional information about the application. Click Run anyway to launch the Monoryx installer.
Installing Monoryx
Once the installer opens, the first thing you need to choose is who Monoryx should be installed for.
You will have two options:
-
Only for me — Installs Monoryx for your Windows user account. This is the recommended option for most users.
-
For all users — Installs Monoryx for every user account on the computer.
Select the option that works best for you and continue.
You will then need to review and accept the Monoryx Terms and Conditions.
Read through the terms and, if you agree to them, select the option to accept them before continuing.
After accepting the Terms and Conditions, you will be asked where Monoryx should be installed.
The default installation location is recommended for most users. If you want Monoryx installed somewhere else, you can change the location here.
Next, you will be asked to choose the Start Menu folder for Monoryx.
For most users, the default location is recommended, so you can simply continue without changing anything.
The installer will then show you a few additional installation tasks.
Select whichever options you want enabled. If you're unsure, the default selections are generally fine.
The installer is now ready to install Monoryx.
Review your selected options and click Install to begin the installation.
The installation may take a moment while the required files are copied to your computer.
Once the installation has finished, Monoryx is ready to use.
First Launch
When you open Monoryx for the first time, you will be greeted by the onboarding screen.
The onboarding process allows you to configure some of Monoryx's basic settings before using the launcher.
You can configure your offline account username and choose some of Monoryx's default launcher settings.
Follow the prompts shown on screen and configure the launcher to your preferences.
Once you have completed the onboarding process, you're ready to start using Monoryx.
Enjoy your new Minecraft launcher!
Building Monoryx from Source
This is for indeviduals who dont want to download and install a precompiled version of the launcher and would rather compile it themselves.
Requirements
- Windows 10/11 x86_64, Linux x86_64, or macOS (primary: Windows)
- Rust stable 1.85+ (1.96+ recommended)
- On Windows with the GNU toolchain: a MinGW-w64 GCC (e.g.
winget install BrechtSanders.WinLibs.POSIX.UCRT) - Java installed, or let MONORYX fetch a managed Temurin JRE on first launch
Build
cargo fmt --check
cargo check
cargo clippy --all-targets --all-features
cargo test
cargo run --release
Windows release build produces target/release/monoryx.exe with no console window. Linux/macOS produce target/release/monoryx.
First Run
- Start MONORYX.
- Enter an offline username (3-16 chars, letters/numbers/underscore).
- Create an instance, pick a Minecraft version and loader.
- Press PLAY. Missing files download automatically.
- Open Discover, search "Sodium", press Install. Dependencies resolve automatically.
Offline Mode
MONORYX supports offline profiles only in this release. Your username maps to a deterministic offline UUID using Java's UUID.nameUUIDFromBytes("OfflinePlayer:<name>") algorithm. Offline profiles work for singleplayer and servers in offline mode. They do not grant access to Realms, online-mode servers, or Microsoft services. The account layer is abstracted (Account::Offline) so authenticated providers can be added later.
Modrinth Integration
Public browsing and installation use the official Modrinth API (https://api.modrinth.com/v2) with the User-Agent monoryx/<version> (https://github.com/DemonZ-Development/Monoryx). No login required. Rate limits and Retry-After are respected. Hashes are verified, required dependencies install recursively, cycles and conflicts are blocked, and installed files are tracked in content.json for reliable updates and uninstalls.
Discover displays the selected target instance before installing. Already installed projects can be reinstalled or removed. The Library also shows manually copied mods, resource packs, and shaders.
Nexeu Servers
Nexeu sign in is Coming soon. Direct account linking from the launcher needs a desktop authorization flow supported by Nexeu. The Game panel API (Beta) remains available for users with an existing full panel API key. The key stays in memory and is cleared when you disconnect or close the launcher. Once connected, MONORYX uses Nexeu's client API to show your account, servers, announcements, resource usage, logs, and backups, and to send power controls, console commands, and backup creation requests.
Balance and server creation open Nexeu's client portal. Nexeu does not currently document those operations in its public game-panel client API. The page also links to Nexeu's Discord support.
Crash reports
The crash dialog explains recognizable errors, suggests next steps, and opens the relevant mods or instance settings. It includes supporting log messages and expandable technical details. Unknown errors remain labelled as uncertain. Upload to mclo.gs shares the full report or session log only when you click it; anyone with the resulting link can read it.
Discord activity
Discord activity is on by default when the desktop app is running. Settings → Discord lets you turn it off or hide instance names, world names, server names, elapsed time, and launcher activity. MONORYX uses its public application ID; you don't need a bot or token. The two profile links go to MONORYX and DemonZ Development.
On Windows, modern Java worlds are identified through the active save's session lock and read-only metadata. Multiplayer activity uses game log events and names from servers.dat. Unsupported versions or missing details use general activity text; private servers use their address only when server-name sharing is enabled. These profile buttons open websites; they do not join a game automatically. MONORYX reconnects when Discord restarts and clears activity when sharing is turned off.
Activity updates continue while the launcher is hidden. On Windows, Minecraft's generic third-party server title is replaced with the name saved in that instance's multiplayer server list. The launcher checks the supervised game every three seconds and sends Discord updates only when the activity changes; no companion mod or helper process is required.
Eco mode
Eco mode lowers Minecraft's automatic memory limit when an instance is using the default allocation. This can save RAM, but a busy world or modpack may run less smoothly. It is off by default for new settings. For an existing instance, use Home → Instance tools → Turn off Eco mode if FPS drops. The change applies on the next launch. Custom memory limits are left alone. Eco mode no longer adds extra JVM tuning flags.
Local and Offline Use
Installed instances, the Library, local archive import, and offline profiles work without a network connection. Cached Minecraft and loader version lists remain available. New downloads, repairs that need missing files, Modrinth, and Nexeu require internet. A MONORYX instance export can be imported from Instances → Import → MONORYX archive (.zip); missing Minecraft files install when you play it online.
Supported Platforms
- Windows 10/11 x86_64 (primary)
- Linux x86_64
- macOS (best effort; not the primary target but no intentional blockers)
Shared launcher code avoids OS assumptions. OS-specific behavior uses conditional compilation.
Directory Layout
src/
  main.rs
  app/          state, events, background tasks
  ui/           theme, shell, components, pages
  minecraft/    manifest, version, rules, arguments, libraries, assets, natives, installer, launcher
  loaders/      vanilla, fabric, quilt, neoforge, forge
  modrinth/     api, models, search, install, dependencies, updates, modpack
  downloads/    manager, job, hash
  instance/     config, manager, export
  java/         discovery, runtime, managed
  account/      offline profiles
  storage/      paths, cache, atomic
  content/      installed-content tracking
  config/       launcher config
  utils/        fs, hash, net, system, validation
Data root (never touches .minecraft):
MONORYX/
  config.toml
  cache/manifests, cache/metadata, cache/images
  minecraft/assets, minecraft/libraries, minecraft/versions
  java/runtimes
  instances/<id>/instance.toml + game/
  logs/
License
Apache-2.0. See LICENSE.
Disclaimer
MONORYX is an independent project by DemonZDevelopment and is not affiliated with Mojang Studios or Microsoft. Minecraft files are downloaded from official Mojang sources at runtime and are never bundled.
Similar repos
Languages
Rust
99.0%