
[CVPR 2025 - Spotlight] Official PyTorch implementation of MAtCha Gaussians: Atlas of Charts for High-Quality Geometry and Photorealism From Sparse Views
See the codeREADME
MAtCha Gaussians: Atlas of Charts for High-Quality Geometry and Photorealism From Sparse Views
CVPR 2025Antoine Guédon1 Tomoki Ichikawa2 Kohei Yamashita2 Ko Nishino2
1LIGM, Ecole des Ponts, Univ Gustave Eiffel, CNRS
2Graduate School of Informatics, Kyoto University, Japan

MAtCha Gaussians reconstruction from 10 input views.
We propose MAtCha Gaussians, a novel surface representation for reconstructing high-quality 3D meshes with photorealistic rendering from sparse-view (or dense-view) images. Our key idea is to model the underlying scene geometry as an Atlas of Charts which we refine with 2D Gaussian surfels. We initialize the charts with a monocular depth estimation model and refine them using differentiable Gaussian rendering and a lightweight neural chart deformation model. Combined with a sparse-view SfM model like MASt3R-SfM, MAtCha can recover sharp and accurate surface meshes of both foreground and background objects in unbounded scenes within minutes, only from a few unposed RGB images.
This repository proposes the following key elements, compatible with 2D Gaussian Splatting:
- Optimization robust to sparse-view inputs: Our novel initialization/optimization pipeline is robust to sparse-view inputs (as few as 3 to 10 images) but also scales to dense-view scenarios (hundreds of views). No more choosing between sparse or dense methods!
- Scalable mesh extraction method: Inspired by Gaussian Opacity Fields, we developed a novel mesh extraction method for 2DGS that properly handles both foreground and background geometry while being lightweight (only 150-350MB), without any post-processing mesh decimation.
- Novel depth regularization: We also introduce a novel "depth-order" regularization loss that leverages depth maps estimated with a monocular depth estimator (which can be multi-view inconsistent or have inaccurate scale) to achieve smooth, detailed background geometry while preserving very sharp foreground details.
BibTeX
@article{guedon2025matcha,
 title={MAtCha Gaussians: Atlas of Charts for High-Quality Geometry and Photorealism From Sparse Views},
 author={Gu{\'e}don, Antoine and Ichikawa, Tomoki and Yamashita, Kohei and Nishino, Ko},
 journal={CVPR},
 year={2025}
}
Updates and To-do list
Updates
- [04/02/2025] Code release.
To-do list (Bugs and new features)
- (Bug) If input images are too small: If the largest side of the input images is less than 512 pixels, the code currently returns an error. This should be fixed.
- (New feature) Initial charts selection: For dense-view reconstruction, add a script to automatically select a good subset of images to convert into initial charts. The initial charts just need to cover the scene well, so a simple greedy approach should be sufficient.
- (New feature) Evaluation: Add evaluation scripts.
- (New feature) gsplat support: Make the code compatible with gsplat's rasterizer from the Nerfstudio team.
Overview
The full MAtCha pipeline consists of 4 steps:
- Scene initialization: Camera poses are estimated from a sparse set of images using MASt3R-SfM. Images can be unposed or posed. For posed images, a COLMAP dataset with ground truth camera poses can be provided to the pipeline. For COLMAP datasets, MAtCha can use either sparse or dense viewpoints.
- Chart Alignment: Each input image is converted into an optimizable chart. We first initialize the charts with DepthAnythingV2. Then, we use a novel neural deformation model to align the chart with the scene geometry and produce a multi-view consistent, coherent manifold.
- Chart refinement: We further refine and densify the geometry with a photometric optimization. To this end, we instantiate 2D Gaussians aligned with the manifold and optimize the representation with differentiable rendering. Gaussians can densify along the manifold to better capture the fine details of the scene.
- Mesh extraction: We propose a novel mesh extraction method that relies on a depth fusion algorithm and an adaptive tetrahedralization of the scene, similar to Gaussian Opacity Fields. Our mesh extraction method scales to large scenes with background objects, allowing for a much more flexible and adaptive mesh with detailed foreground objects and smooth background geometry.
We provide a dedicated script for each of these steps, as well as a script train.py that runs the entire pipeline. We explain how to use this script in the next sections.
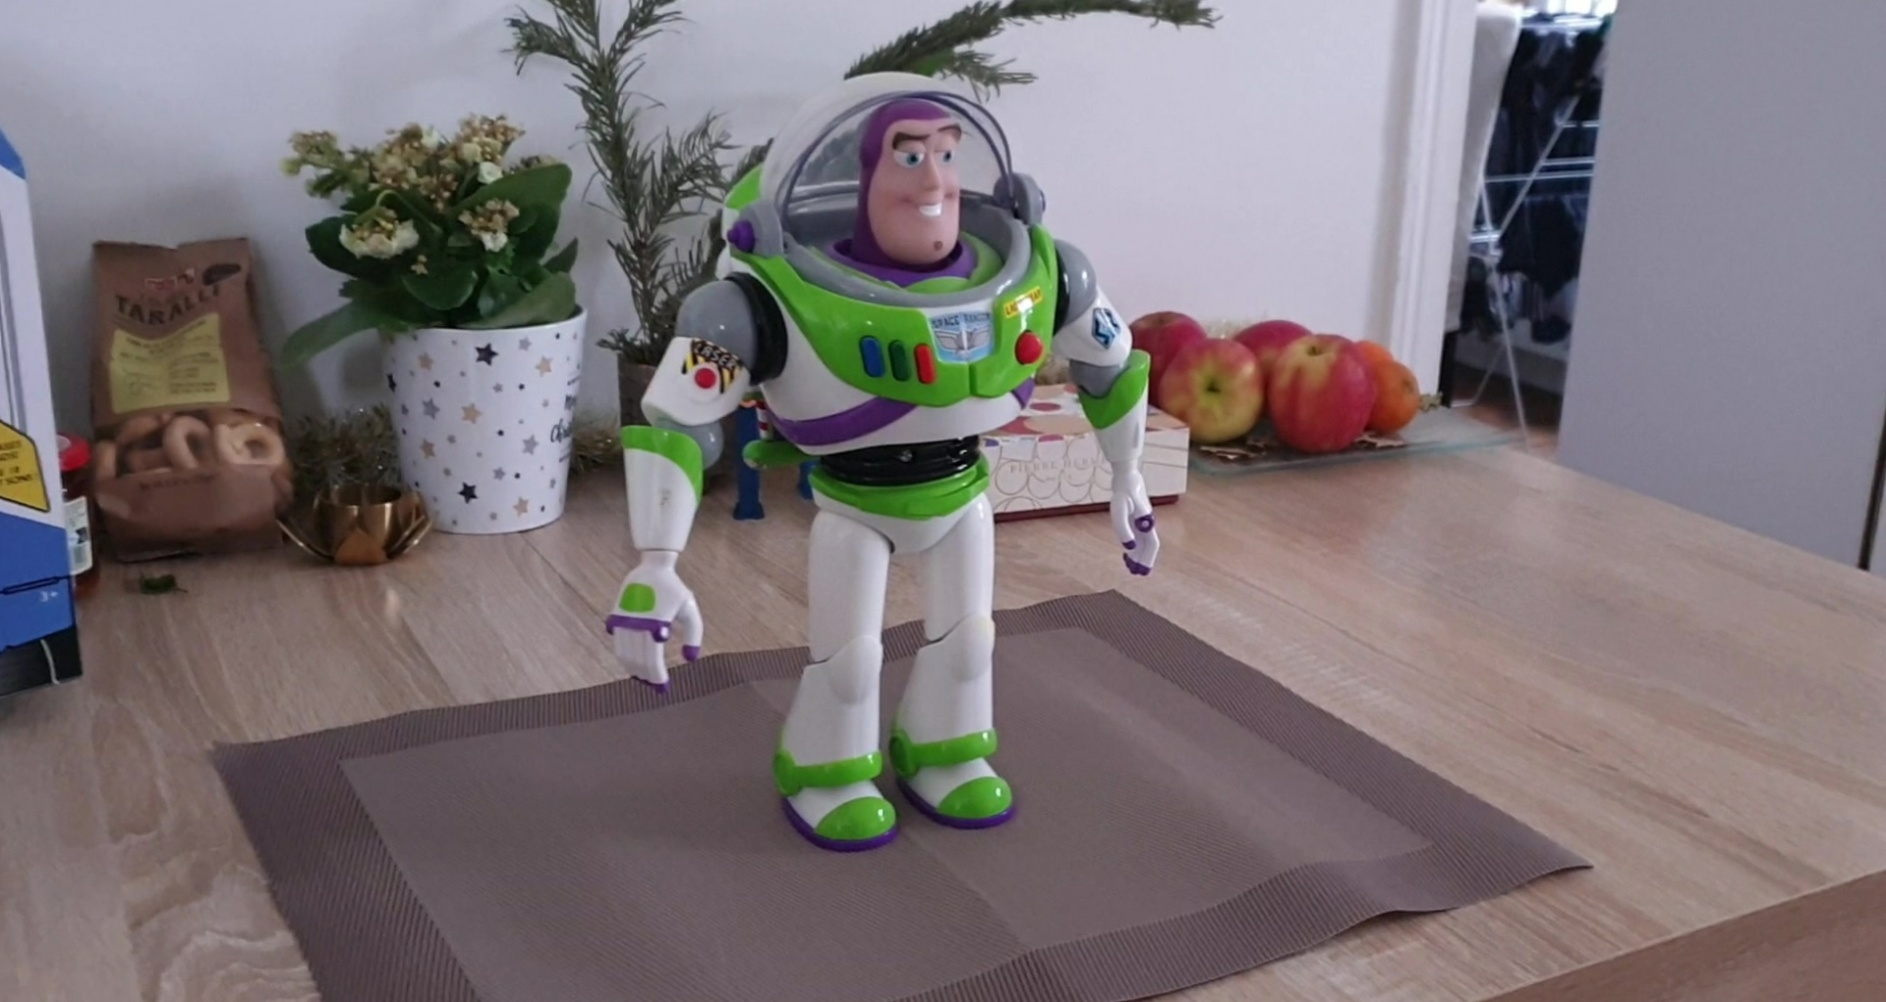
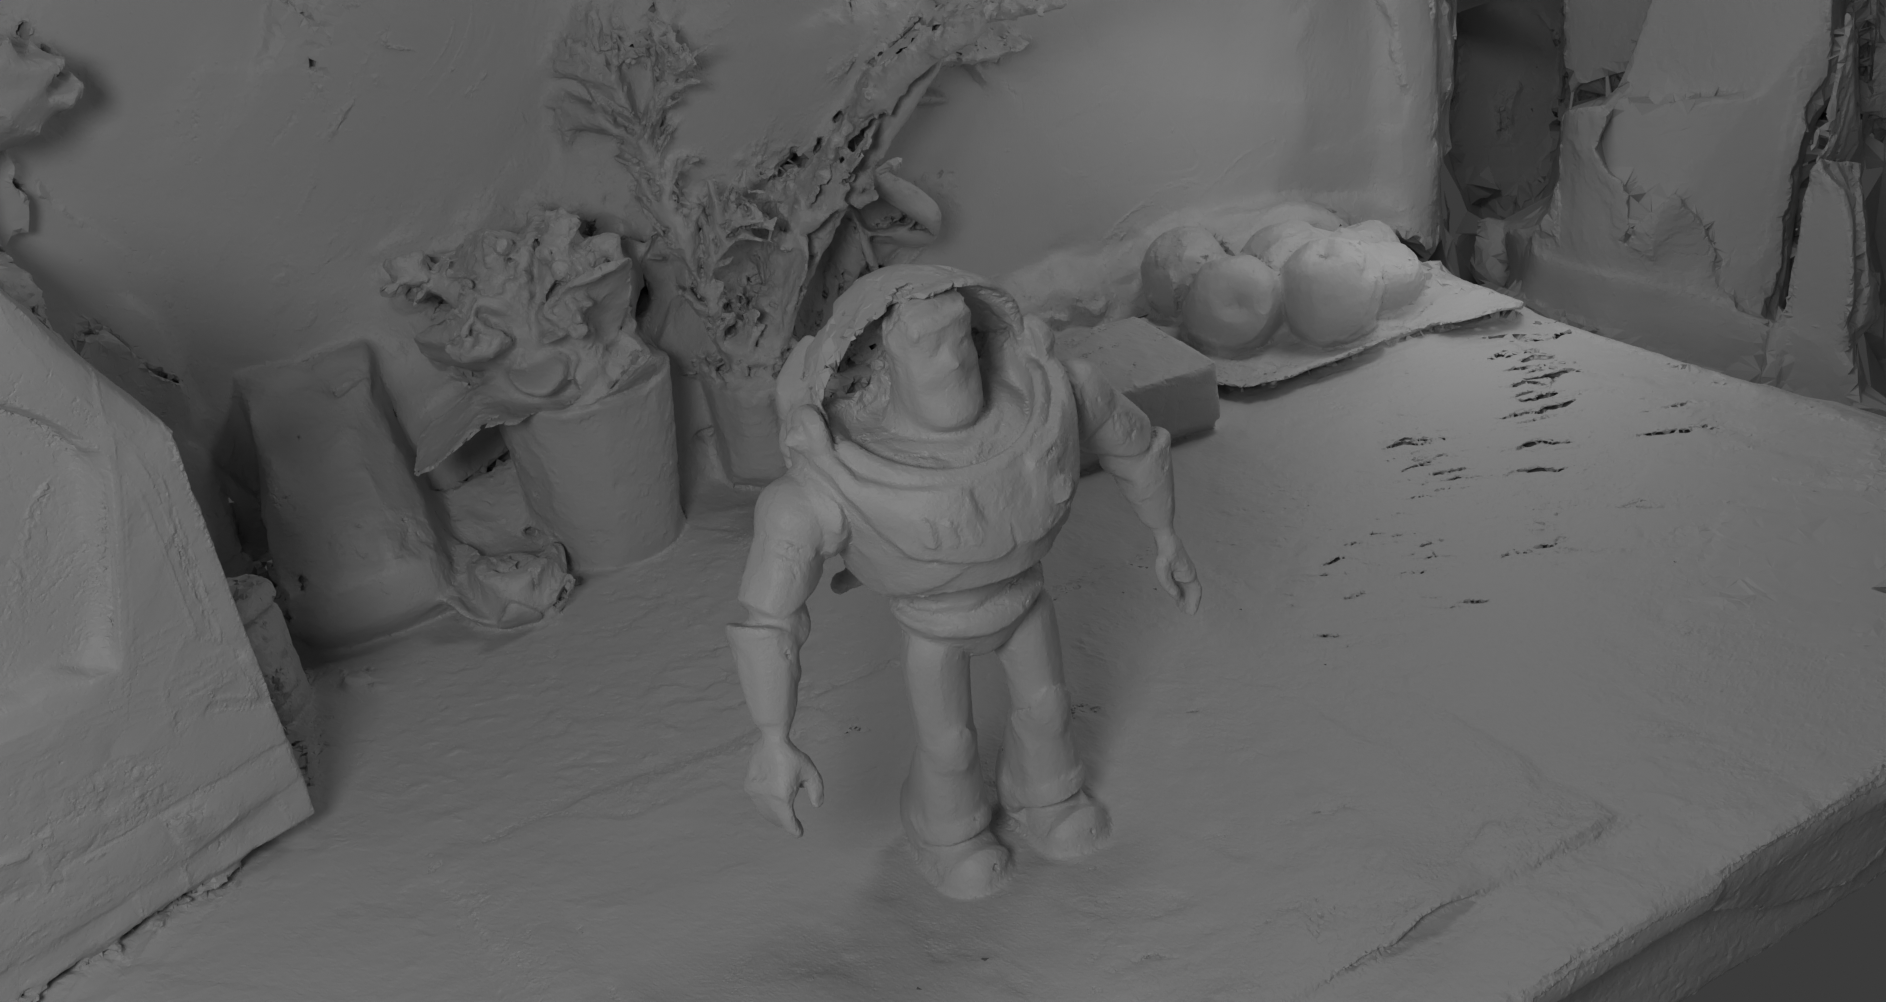
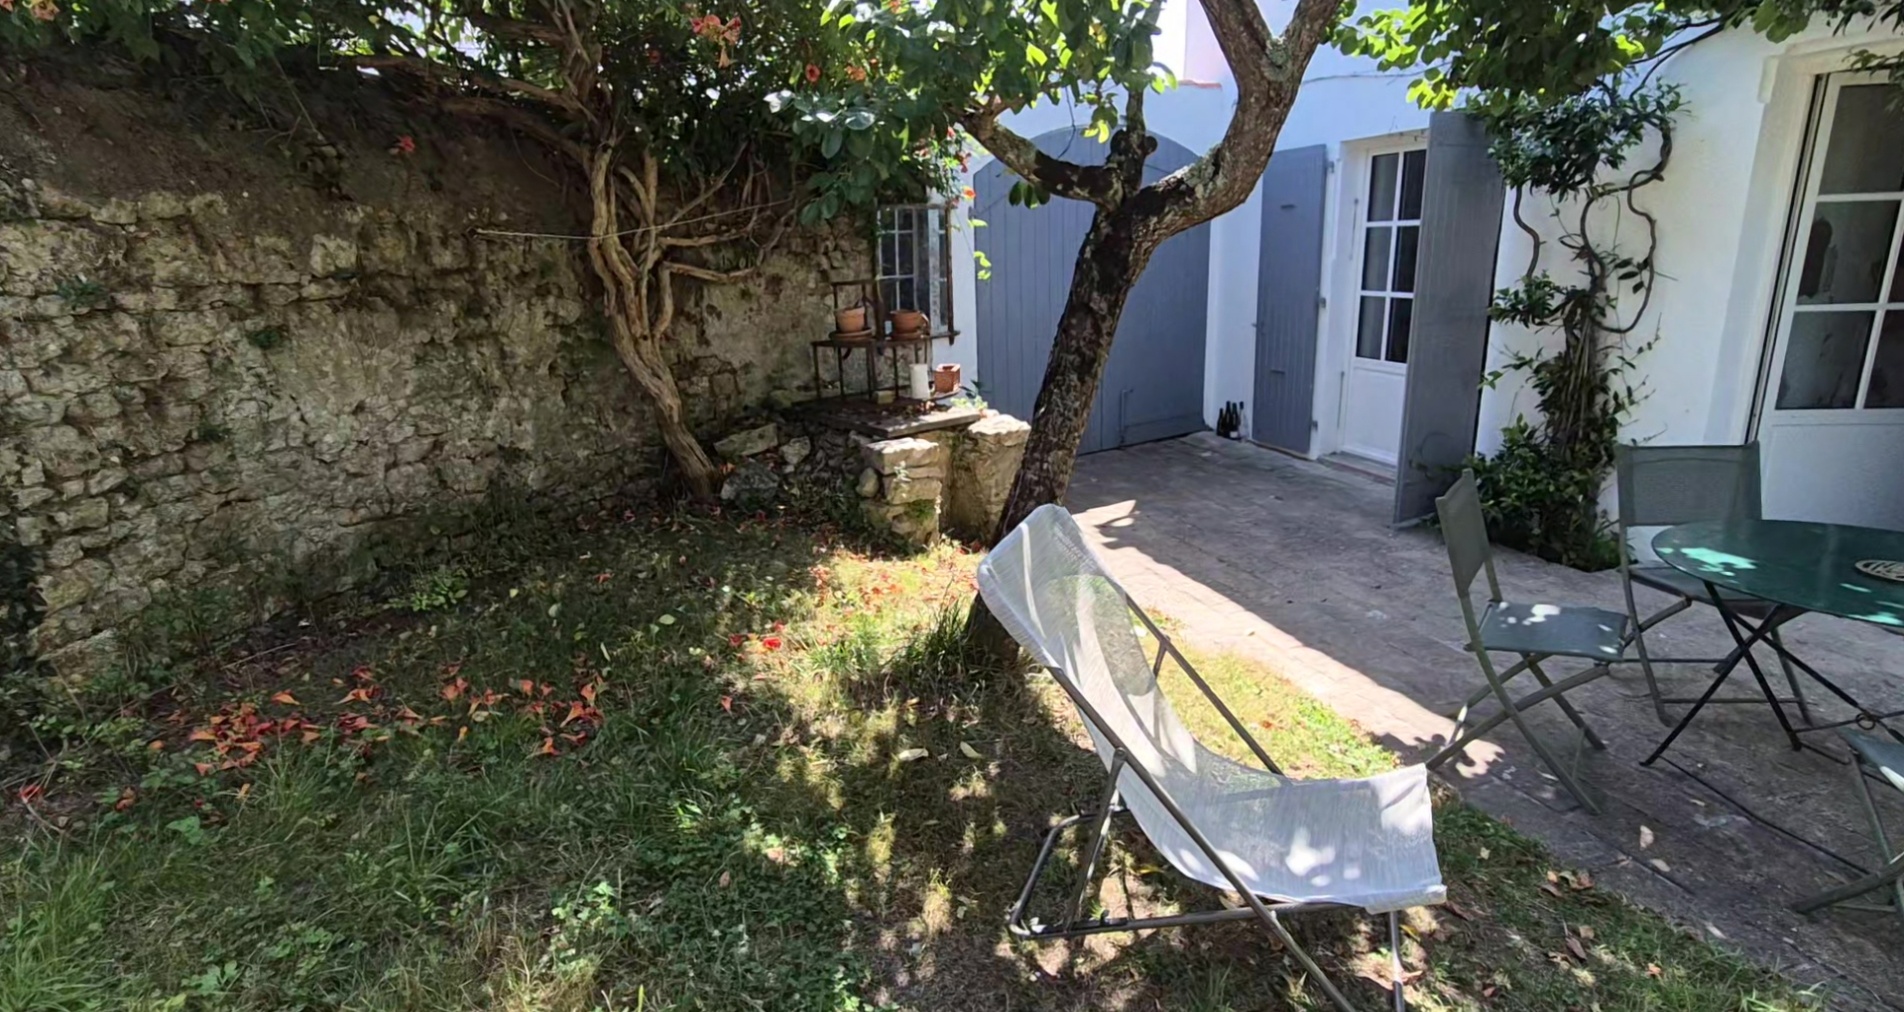
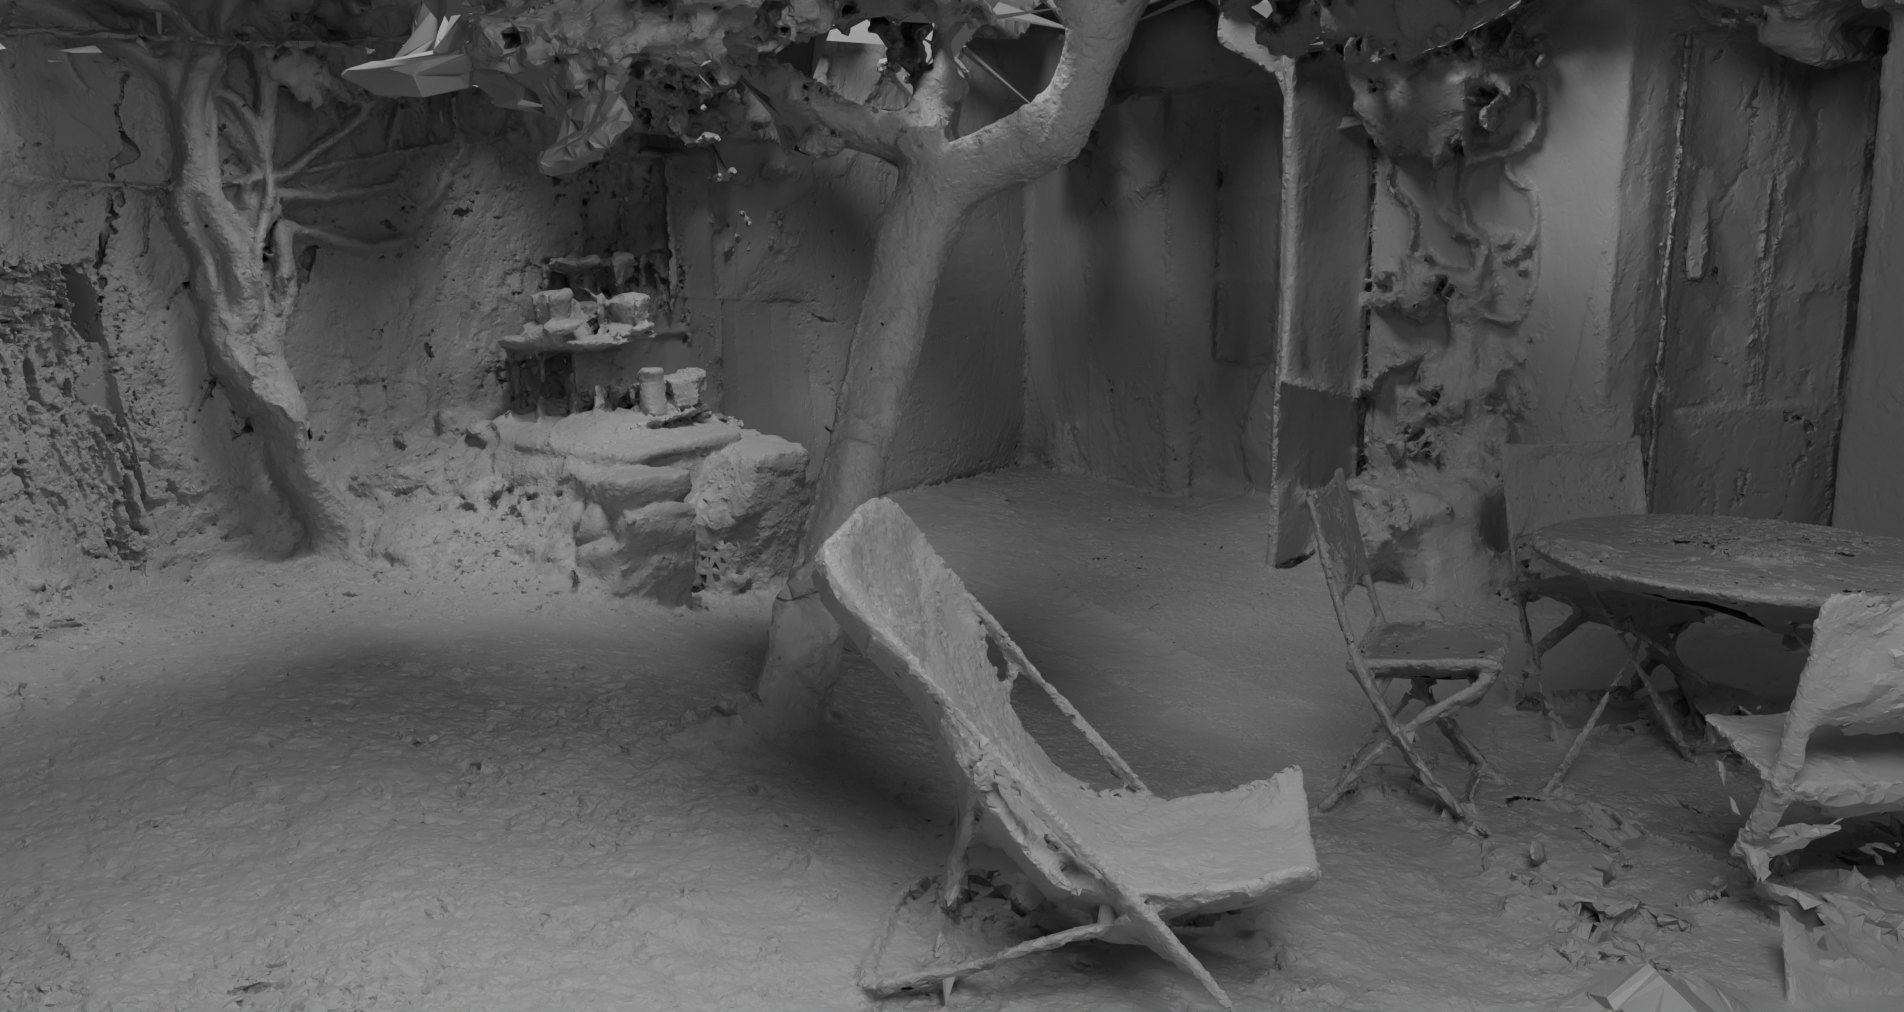
Examples of MAtCha reconstructions from 10 input views. MAtCha can recover sharp, accurate and complete 3D surface meshes from sparse views, including both foreground and background objects (left: GT images, right: MAtCha mesh).

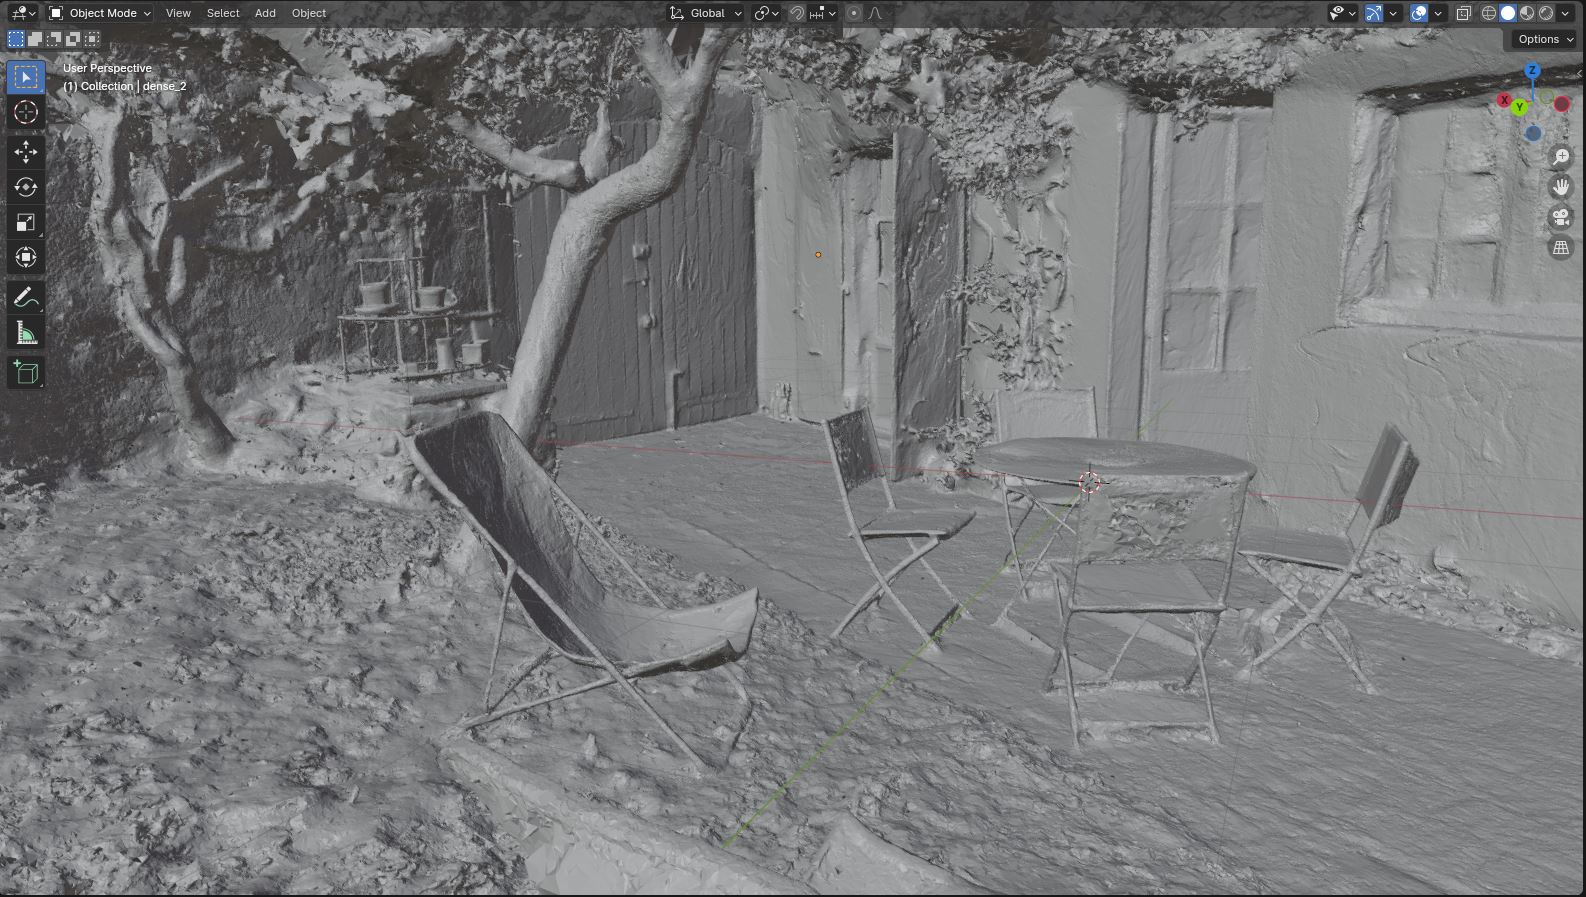
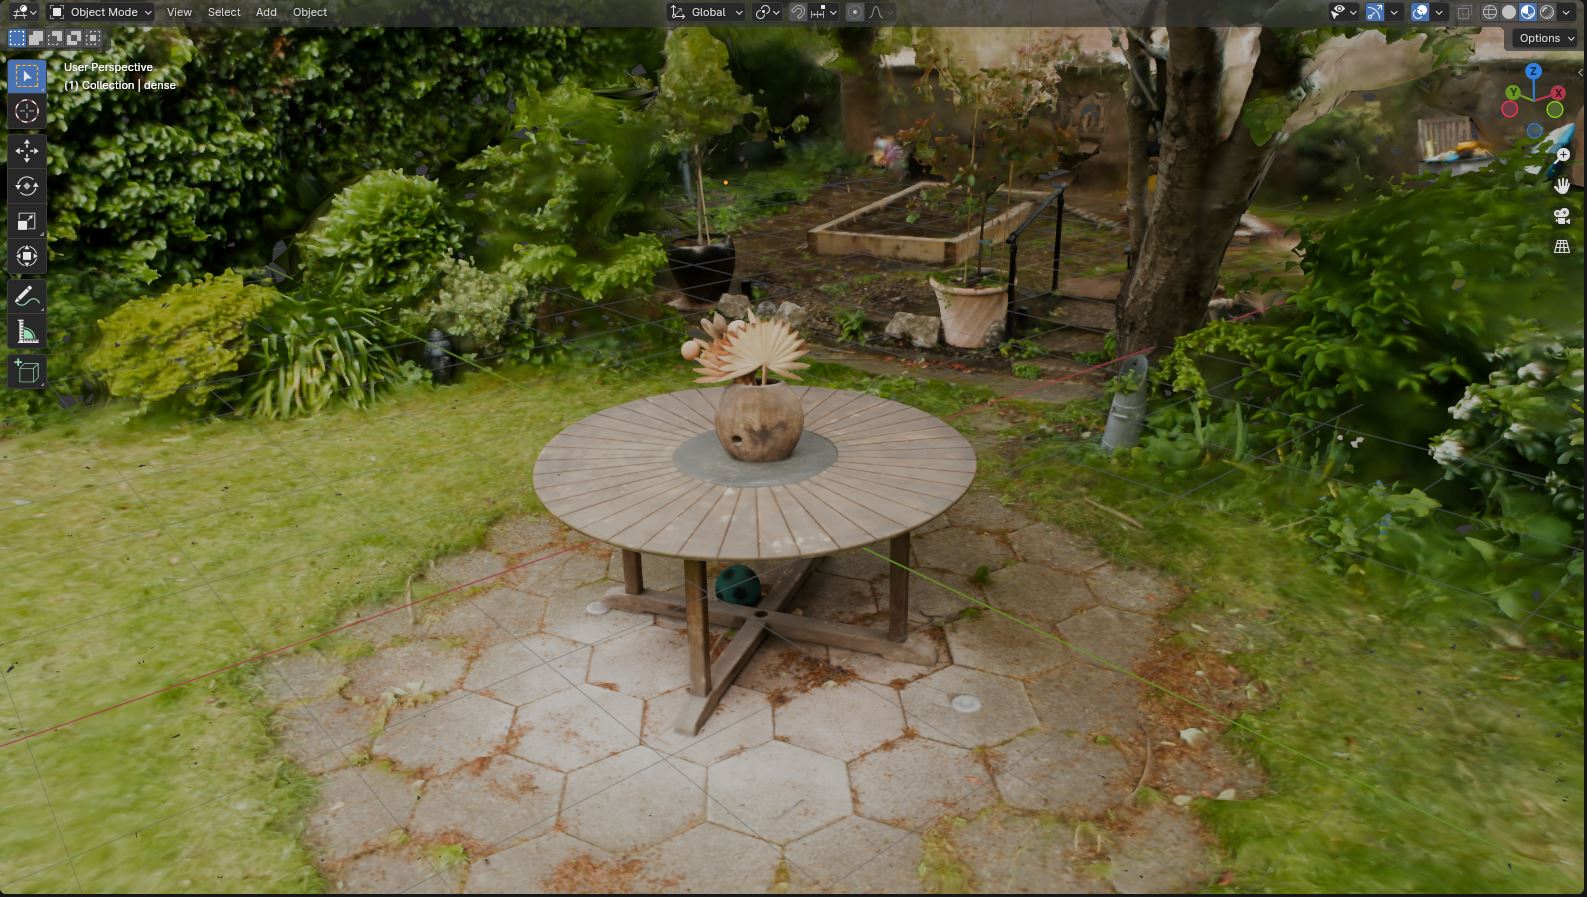
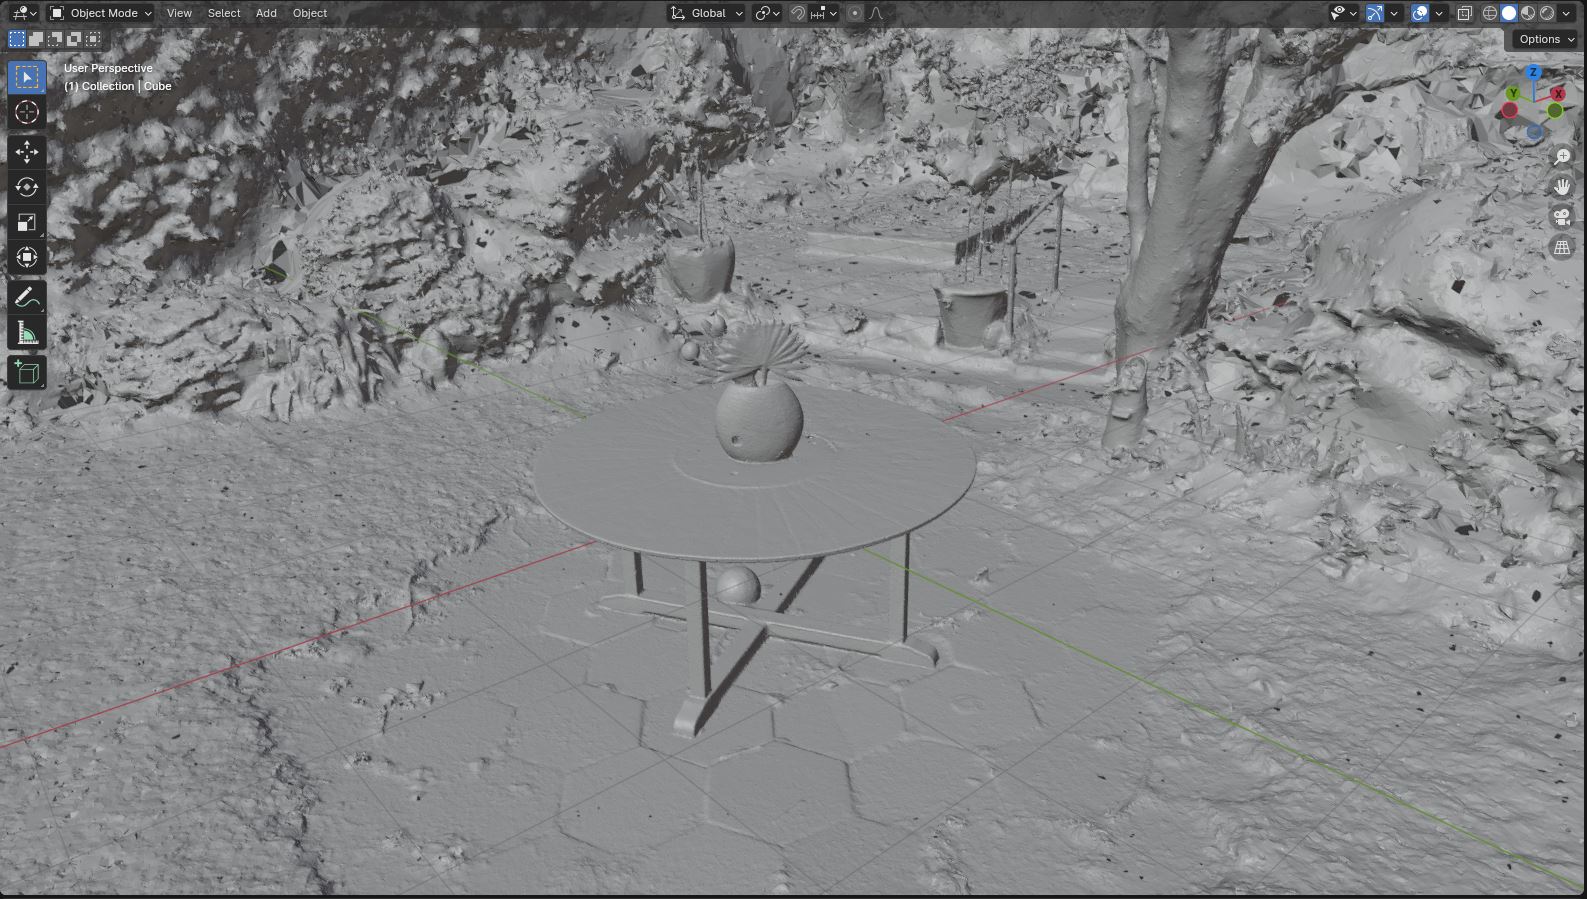
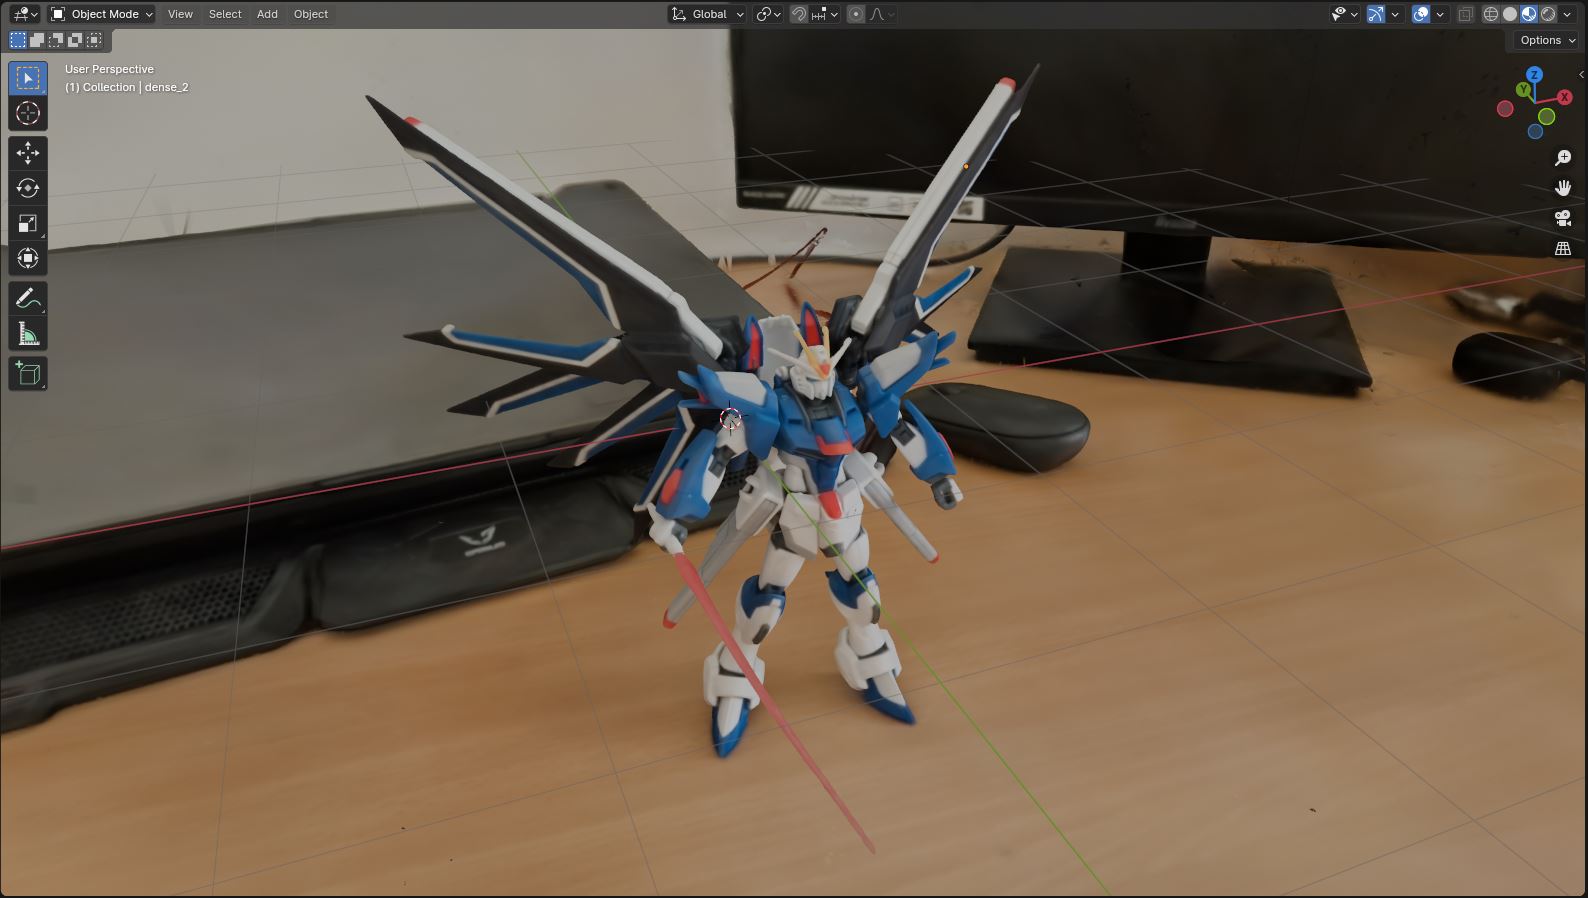
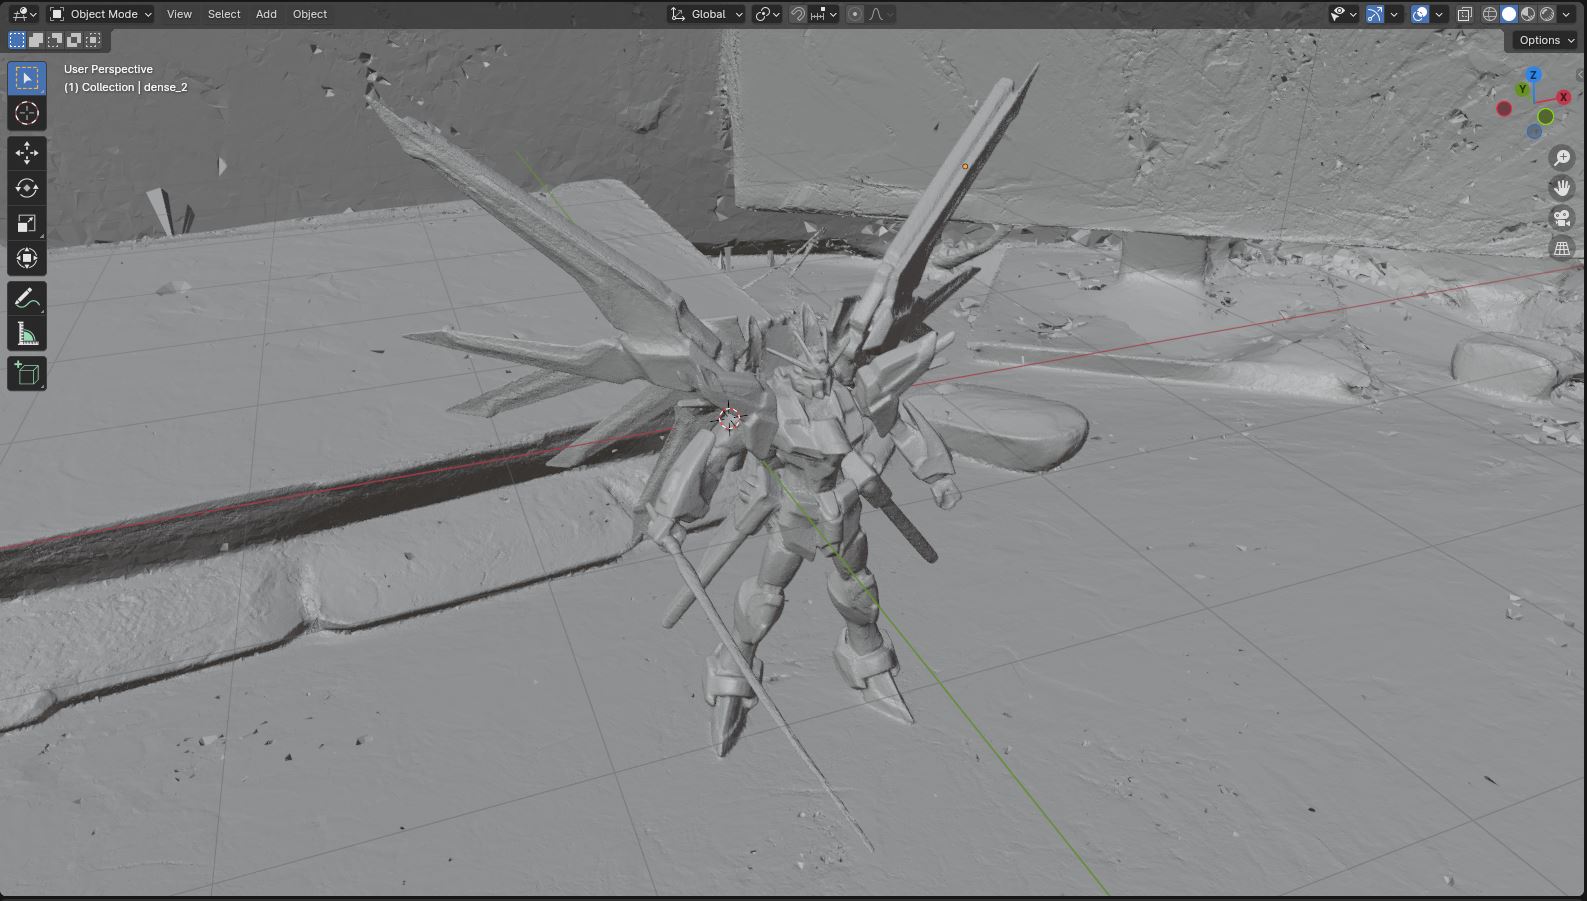
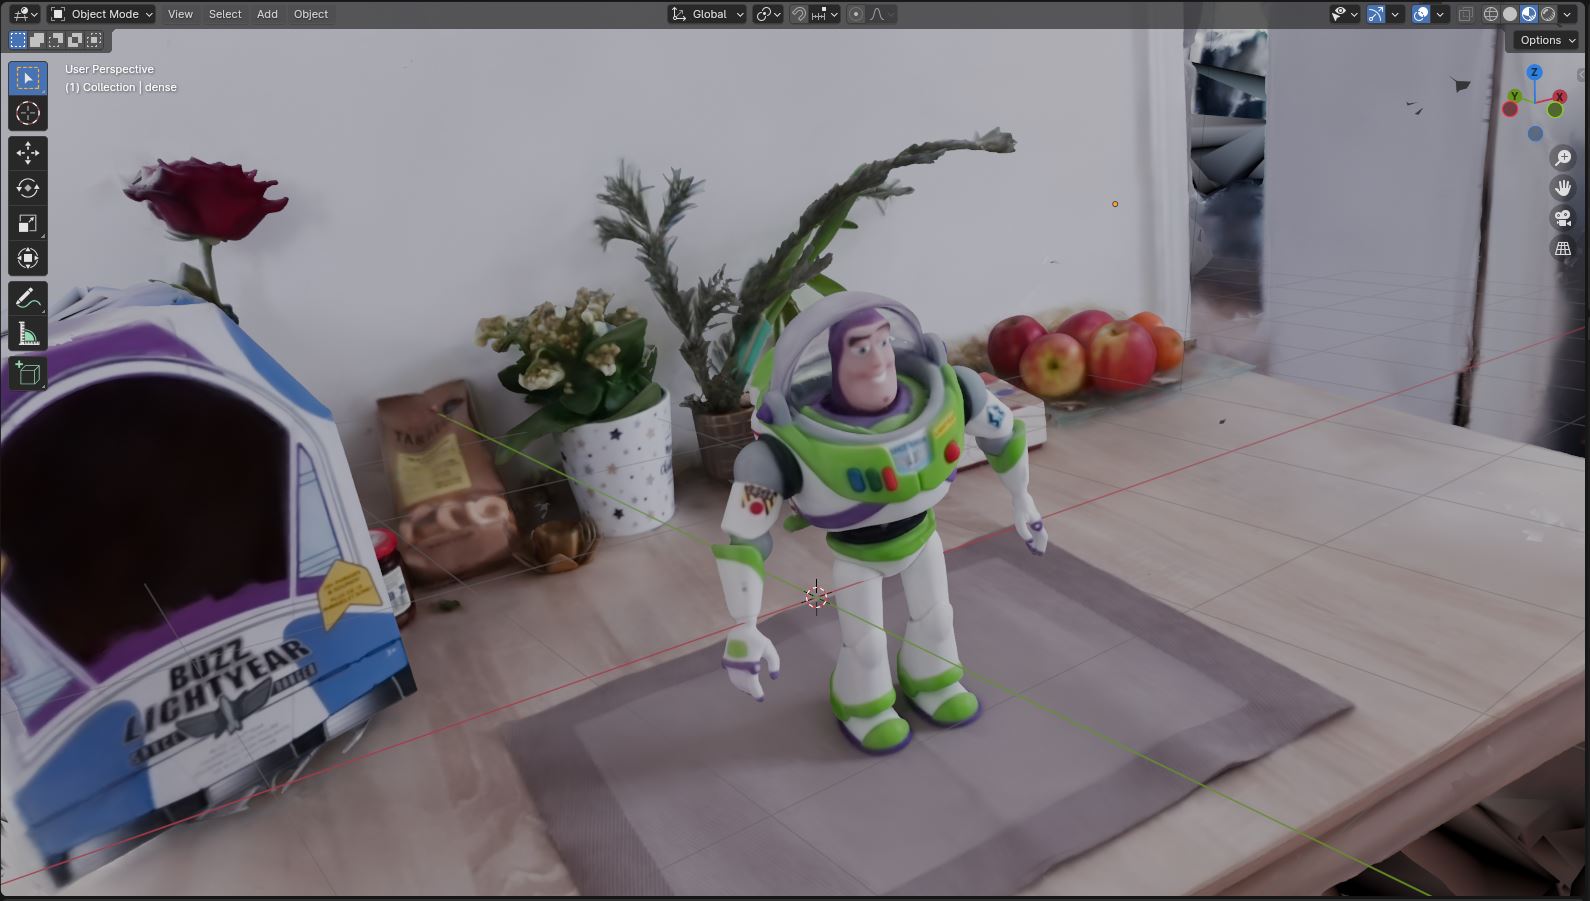
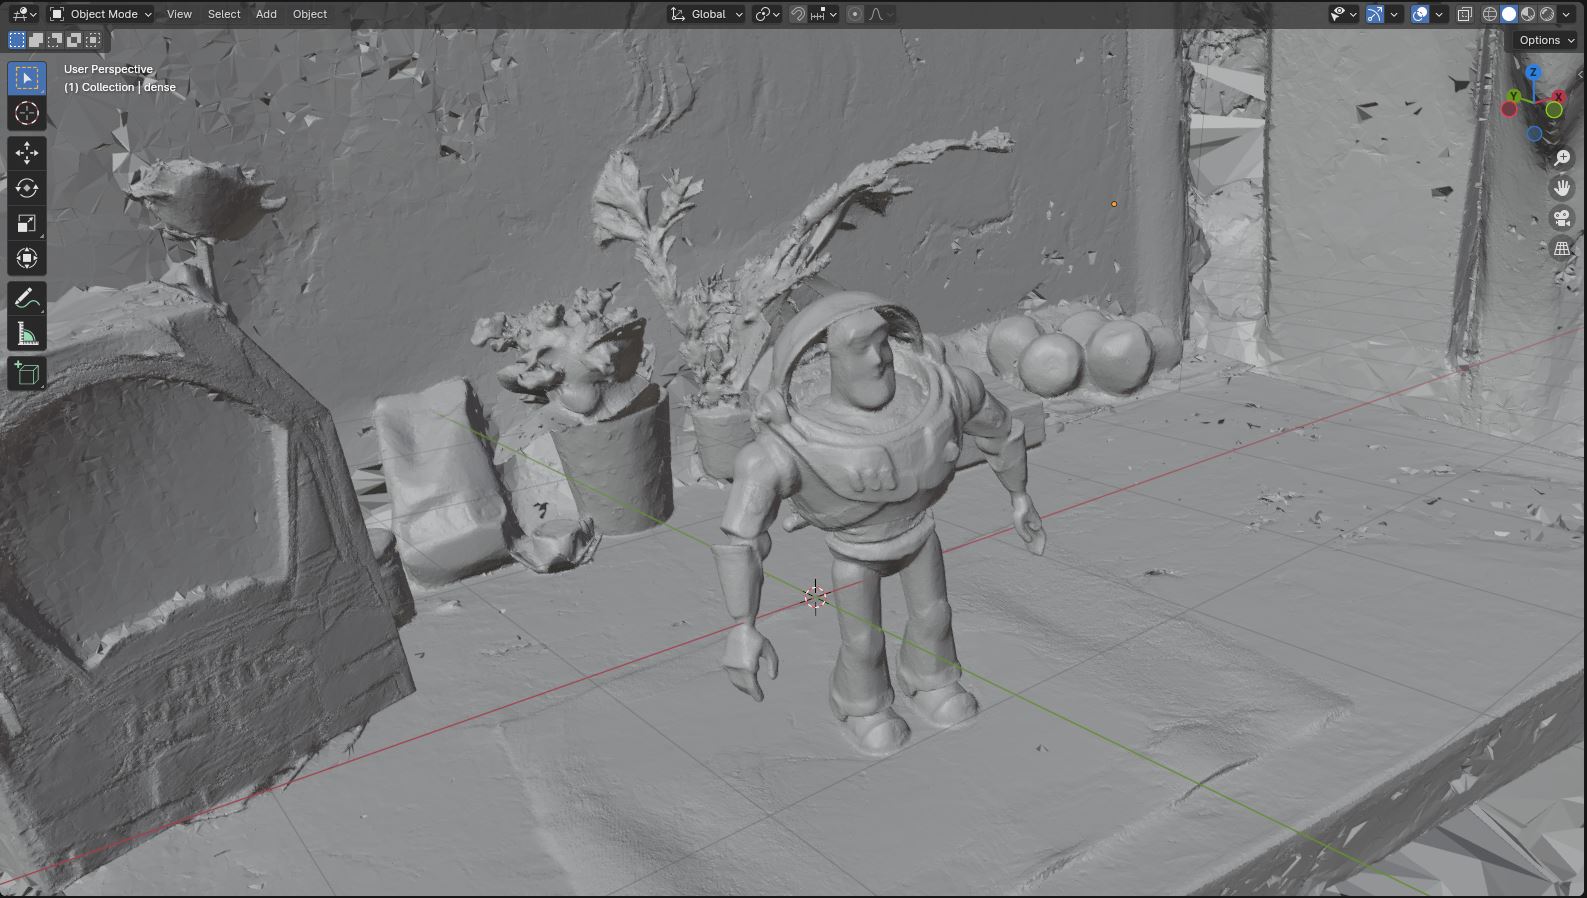
Examples of MAtCha reconstructions from dense input views (150+ training views). MAtCha can fully leverage priors from monocular depth estimation models, even when the predicted depth maps are not multi-view consistent, and recover sharp and complete meshes including both foreground and background objects (left: textured mesh, right: untextured mesh).
License
Click here to see content.
This project builds on existing open-source implementations of the following projects:
As a consequence, this project contains some code from the above projects, specifically in the ./mast3r/, ./Depth-Anything-V2/, and ./2d-gaussian-splatting/ directories.
Please refer to the LICENSE files in the respective directories for more details about the license of these specific parts of the code, most of them being incompatible with commercial use.
Apart from these parts, the rest of the code was entirely written by ourselves and is licensed under the MIT license (see the LICENSE file in the root directory). As a consequence, you are free to use this code for any purpose, commercial or non-commercial.
Note for commercial use: If you intend to use this project for commercial purposes, you would need to replace the components with non-commercial licenses with alternatives that permit commercial use.
Installation
Click here to see content.
0. Requirements
The software requirements are the following:
- Conda (recommended for easy setup)
- C++ Compiler for PyTorch extensions
- CUDA toolkit 11.8 for PyTorch extensions
- C++ Compiler and CUDA SDK must be compatible
Please refer to the original 2D Gaussian Splatting repository for more details about requirements.
1. Quick install
Please start by cloning the repository:
git clone https://github.com/anttwo/MAtCha.git
cd MAtCha
Then, we provide a script to install all the dependencies for the MAtCha pipeline, as well as a script to download the weights of the pretrained models needed for running the full MAtCha pipeline (MASt3R-SfM and DepthAnythingV2).
To create the conda environment and install all the dependencies, run:
python install.py
By default, the environment will be named matcha. You can change the name of the environment with the --env_name argument.
To download all the pretrained models, run:
python download_checkpoints.py
If you encounter any issues when running the installation script, please refer to the following section for detailed instructions.
2. Detailed installation (if quick install fails)
Click here to see content.
2.1. Install dependencies
Please follow the instructions below to install the dependencies manually:
conda create --name matcha -y python=3.9
conda activate matcha
# Choose the right CUDA version for your system
conda install pytorch==2.0.1 torchvision==0.15.2 torchaudio==2.0.2 pytorch-cuda=11.8 -c pytorch -c nvidia
conda install -c fvcore -c iopath -c conda-forge fvcore iopath
conda install pytorch3d==0.7.4 -c pytorch3d
conda install -c plotly plotly
conda install -c conda-forge rich
conda install -c conda-forge plyfile==0.8.1
conda install -c conda-forge jupyterlab
conda install -c conda-forge nodejs
conda install -c conda-forge ipywidgets
conda install cmake
conda install conda-forge::gmp
conda install conda-forge::cgal
pip install roma==1.5.0
pip install open3d==0.18.0
pip install opencv-python==4.11.0.86
pip install scipy==1.13.1
pip install einops==0.8.1
pip install trimesh==4.6.4
pip install pyglet==1.5.29
pip install tensorboard
pip install scikit-learn==1.6.1
pip install cython==3.0.12
# Choose the right CUDA version for your system
pip install faiss-gpu-cu11
pip install tqdm==4.67.1
pip install matplotlib==3.9.4
pip install huggingface-hub[torch]
pip install gradio
Then, install the 2D Gaussian splatting and adaptive tetrahedralization dependencies:
cd 2d-gaussian-splatting/submodules/diff-surfel-rasterization
pip install -e .
cd ../simple-knn
pip install -e .
cd ../tetra-triangulation
cmake .
# you can specify your own cuda path
export CPATH=/usr/local/cuda-11.8/targets/x86_64-linux/include:$CPATH
export LD_LIBRARY_PATH=/usr/local/cuda-11.8/targets/x86_64-linux/lib:$LD_LIBRARY_PATH
export PATH=/usr/local/cuda-11.8/bin:$PATH
make
pip install -e .
cd ../../../
Finally, install the MASt3R-SfM dependencies:
cd mast3r/asmk/cython
cythonize *.pyx
cd ..
pip install .
cd ..
cd ../dust3r/croco/models/curope/
python setup.py build_ext --inplace
cd ../../../../../
2.2. Download pretrained models
Start by downloading a pretrained checkpoint for DepthAnythingV2. Several encoder sizes are available; We recommend using the large encoder:
mkdir -p ./Depth-Anything-V2/checkpoints/
wget https://huggingface.co/depth-anything/Depth-Anything-V2-Large/resolve/main/depth_anything_v2_vitl.pth -P ./Depth-Anything-V2/checkpoints/
Then, download the MASt3R-SfM checkpoint:
mkdir -p ./mast3r/checkpoints/
wget https://download.europe.naverlabs.com/ComputerVision/MASt3R/MASt3R_ViTLarge_BaseDecoder_512_catmlpdpt_metric.pth -P ./mast3r/checkpoints/
And finally, download the MASt3R-SfM retrieval checkpoint:
wget https://download.europe.naverlabs.com/ComputerVision/MASt3R/MASt3R_ViTLarge_BaseDecoder_512_catmlpdpt_metric_retrieval_trainingfree.pth -P ./mast3r/checkpoints/
wget https://download.europe.naverlabs.com/ComputerVision/MASt3R/MASt3R_ViTLarge_BaseDecoder_512_catmlpdpt_metric_retrieval_codebook.pkl -P ./mast3r/checkpoints/
Quick Start
Click here to see content.
This section describes how to run the full MAtCha pipeline on a set of unposed or posed images, with either sparse or dense supervision. For running only specific steps of the pipeline, please refer to the following section. Please make sure to first activate the conda environment created by the installation script:
conda activate matcha
Training on unposed images with sparse supervision
You can run the following single script to optimize a full MAtCha model using a set of unposed images. By default, all images in the directory will be used:
python train.py -s <PATH TO IMAGE DIRECTORY> -o <PATH TO OUTPUT DIRECTORY> --sfm_config unposed
You can select a subset of images to use for the optimization. To this end, you can either use the --image_idx argument to select a specific subset of images by index, or the --n_images argument to select a fixed number of images. If using the --n_images argument, the images will be sampled with constant spacing; You can add the --randomize_images argument to shuffle the images before sampling.
To use a specific subset of images (such as the first 5 images in the directory), you can run:
python train.py -s <PATH TO IMAGE DIRECTORY> -o <PATH TO OUTPUT DIRECTORY> --sfm_config unposed --image_idx 0 1 2 3 4
To use 10 images sampled with constant spacing in the directory, you can run:
python train.py -s <PATH TO IMAGE DIRECTORY> -o <PATH TO OUTPUT DIRECTORY> --sfm_config unposed --n_images 10
To use 10 images randomly sampled in the directory, you can run:
python train.py -s <PATH TO IMAGE DIRECTORY> -o <PATH TO OUTPUT DIRECTORY> --sfm_config unposed --n_images 10 --randomize_images
Training on COLMAP dataset with sparse supervision
You can also provide a usual COLMAP dataset with ground truth camera poses to MAtCha by using the --sfm_config posed argument. In this case, as COLMAP datasets may contain a large number of images, make sure to provide the indices of the images to use for the optimization with the --image_idx argument, or to use the --n_images argument. For instance, to use only the first 5 images for sparse-view reconstruction, you can run:
python train.py -s <PATH TO COLMAP DATASET> -o <PATH TO OUTPUT DIRECTORY> --sfm_config posed --image_idx 0 1 2 3 4
You can create a COLMAP dataset from a set of images using the script 2d-gaussian-splatting/convert.py. Please refer to the repo of our previous work SuGaR or the original 3DGS repo for more details on how to do this.
Training on COLMAP dataset with dense supervision
You can also provide a usual COLMAP dataset with ground truth camera poses and dense viewpoints to MAtCha by using both the --sfm_config posed and --dense_supervision arguments.
In this case, a subset of images will first be converted into charts for building an initial manifold; The manifold will then be used as a scaffold for optimizing the full model with dense supervision, using all the images in the dataset. We recommend selecting a subset of images with good coverage of the scene for building the initial charts.
We also provide a novel loss function for regularizing the representation using depth maps for all viewpoints obtained with a monocular depth estimator. Our novel loss function enforces the rendered depth maps to preserve the same depth order as the supervision depth maps; As a result, it does not require supervision depth maps to be multi-view consistent and does not require any additional alignment or rescaling of the depth maps.
You do not need to provide the supervision depth maps to the pipeline, as our code will automatically use DepthAnythingV2 to generate them.
Make sure to provide the indices of the images to use as initial charts with the --image_idx argument, or to use the --n_images argument. For instance, to use 10 images with constant spacing as initial charts for dense-view reconstruction, you can run:
python train.py -s <PATH TO COLMAP DATASET> -o <PATH TO OUTPUT DIRECTORY> --sfm_config posed --dense_supervision --n_images 10
By default, the train.py script will optimize the model for 30,000 iterations when using dense supervision, instead of the default 7,000 iterations used for sparse-view reconstruction. You can change this behavior by using the argument --free_gaussians_config default to optimize for 7,000 iterations, or --free_gaussians_config long to optimize for 30,000 iterations.
While optimizing for 30,000 iterations will take approximately 50 minutes in total, optimizing for 7,000 iterations will take a few minutes only. However, for dense-view reconstruction, we recommend optimizing for 30,000 iterations to ensure optimal quality.
Running specific steps of the pipeline
You can run only one specific step of the pipeline by using one of the following arguments with the train.py script:
--sfm_only: Only run the scene initialization using MASt3R-SfM.--alignment_only: Only run the chart alignment using our novel neural deformation model.--refinement_only: Only run the chart refinement using 2D Gaussians.--mesh_only: Only run the mesh extraction relying on our custom and scalable depth fusion algorithm.
Running a specific step can be useful for experimenting with different hyperparameters, adjusting the strength of the regularization during chart alignment and refinement, trying different resolution for extracting the final mesh, etc.
You can also combine several of these arguments to run several specific steps in a single run.
The full training script train.py is just a wrapper around individual scripts located in the ./scripts/ directory; Please refer to these scripts for more details on how to use them as well as the different arguments.
Stronger regularization for removing floaters
If some artifacts or floaters are present in the final mesh, you can try to increase the strength of the chart alignment with --alignment_config strong:
python train.py -s <PATH TO IMAGE DIRECTORY> -o <PATH TO OUTPUT DIRECTORY> --sfm_config unposed --n_images 10 --alignment_config strong
If using a COLMAP dataset with dense supervision, you can also adjust the strength of the dense depth regularization with the --dense_regul argument:
- Use
--dense_regul defaultfor the default regularization - Use
--dense_regul strongfor a stronger regularization - Use
--dense_regul weakfor a weaker regularization - Use
--dense_regul noneto disable the dense regularization.
Increasing the strength of the dense depth regularization can help removing floaters. For some specific scenes where GT camera poses or monocular depth maps could be inaccurate and contain outliers, the dense depth regularization could be detrimental; In this case, you can also try to weaken or disable the dense depth regularization.
For instance, to use 10 initial charts generated from 10 images with constant spacing and perform dense-view reconstruction with a stronger dense depth regularization, you can run:
python train.py -s <PATH TO COLMAP DATASET> -o <PATH TO OUTPUT DIRECTORY> --sfm_config posed --dense_supervision --n_images 10 --dense_regul strong
Improve Mesh Quality
Our novel mesh extraction method relies on a custom depth fusion algorithm. To scale our method to large scenes with background objects, we adapted the adaptive tetrahedralization method from Gaussian Opacity Fields (GOF): We partition the scene into a set of tetrahedra, such that the local number of tetrahedra directly depends on the local distribution of Gaussians in the scene. This allows for a much more flexible and adaptive mesh with both detailed foreground objects and smooth background geometry.
For dense-view reconstruction, we iterate over all training viewpoints to extract the final mesh.
For sparse-view reconstruction, we linearly interpolate pseudo-viewpoints between the neighboring sparse training viewpoints to extract the final mesh. However, in some cases, interpolating pseudo-viewpoints could lead to artifacts in the mesh, especially if interpolated viewpoints end up being inside the geometry.
If encountering such artifacts, you can try to disable the interpolation with the --no_interpolated_views argument:
python train.py -s <PATH TO IMAGE DIRECTORY> -o <PATH TO OUTPUT DIRECTORY> --sfm_config unposed --n_images 10 --no_interpolated_views
Please note that we also propose a multi-resolution TSDF fusion method that can be used instead of the adaptive tetrahedralization method. While this method is closer to concurrent works, it may produce artifacts or large holes in the mesh; As a result, we strongly recommend using the adaptive tetrahedralization method for better quality meshes. For using the multi-resolution TSDF fusion method, you can use the --use_multires_tsdf argument:
python train.py -s <PATH TO IMAGE DIRECTORY> -o <PATH TO OUTPUT DIRECTORY> --sfm_config unposed --n_images 10 --use_multires_tsdf
Control the resolution of the final mesh
When using the adaptive tetrahedralization method, you can control the downsampling ratio of the tetrahedra set with the --tetra_downsample_ratio argument. This parameter directly controls the number of vertices in the final mesh.
We recommend starting with the default value of --tetra_downsample_ratio 0.5 and then decreasing to 0.25 if the mesh is too dense, or increasing to 1.0 if the mesh is too sparse.
For example, to use a downsampling ratio of 0.25 with a dataset of unposed images, you can run:
python train.py -s <PATH TO IMAGE DIRECTORY> -o <PATH TO OUTPUT DIRECTORY> --sfm_config unposed --tetra_downsample_ratio 0.25
Please refer to the train.py script as well as individual scripts in the ./scripts/ directory for more details on the command line arguments. Feel free to modify the config files in the ./configs/ directory or create your own to suit your needs.
Evaluation
Click here to see content.
We will release the evaluation scripts soon, including:
- Surface reconstruction on DTU
- Surface reconstruction on Tanks and Temples
- Novel view synthesis on Mip-NeRF 360, Tanks and Temples and DeepBlending
We still need to clean the codebase a little bit and merge some scripts to make the full evaluation pipeline easier to run.
Acknowledgements
We would like to thank the authors of the following projects for their awesome work, and for providing their code; This work would not have been possible without them.
- MASt3R-SfM: We use the MASt3R-SfM pipeline to estimate camera poses and initial geometry from a set of images.
- DepthAnythingV2: We use DepthAnythingV2 to initialize the charts.
- 2D Gaussian Splatting: We use 2D Gaussian Splatting to refine the charts with a differentiable renderer.
- Gaussian Opacity Fields: We adapted the tetrahedralization method from Gaussian Opacity Fields to extract a mesh from our representation.
Similar repos


Languages
Python
89.8%
CMake
4.6%
Cuda
3.1%
C++
1.2%
[CVPR 2025 - Spotlight] Official PyTorch implementation of MAtCha Gaussians: Atlas of Charts for High-Quality Geometry and Photorealism From Sparse Views
See the codeREADME
MAtCha Gaussians: Atlas of Charts for High-Quality Geometry and Photorealism From Sparse Views
CVPR 2025Antoine Guédon1 Tomoki Ichikawa2 Kohei Yamashita2 Ko Nishino2
1LIGM, Ecole des Ponts, Univ Gustave Eiffel, CNRS
2Graduate School of Informatics, Kyoto University, Japan
MAtCha Gaussians reconstruction from 10 input views.
We propose MAtCha Gaussians, a novel surface representation for reconstructing high-quality 3D meshes with photorealistic rendering from sparse-view (or dense-view) images. Our key idea is to model the underlying scene geometry as an Atlas of Charts which we refine with 2D Gaussian surfels. We initialize the charts with a monocular depth estimation model and refine them using differentiable Gaussian rendering and a lightweight neural chart deformation model. Combined with a sparse-view SfM model like MASt3R-SfM, MAtCha can recover sharp and accurate surface meshes of both foreground and background objects in unbounded scenes within minutes, only from a few unposed RGB images.
This repository proposes the following key elements, compatible with 2D Gaussian Splatting:
- Optimization robust to sparse-view inputs: Our novel initialization/optimization pipeline is robust to sparse-view inputs (as few as 3 to 10 images) but also scales to dense-view scenarios (hundreds of views). No more choosing between sparse or dense methods!
- Scalable mesh extraction method: Inspired by Gaussian Opacity Fields, we developed a novel mesh extraction method for 2DGS that properly handles both foreground and background geometry while being lightweight (only 150-350MB), without any post-processing mesh decimation.
- Novel depth regularization: We also introduce a novel "depth-order" regularization loss that leverages depth maps estimated with a monocular depth estimator (which can be multi-view inconsistent or have inaccurate scale) to achieve smooth, detailed background geometry while preserving very sharp foreground details.
BibTeX
@article{guedon2025matcha,
 title={MAtCha Gaussians: Atlas of Charts for High-Quality Geometry and Photorealism From Sparse Views},
 author={Gu{\'e}don, Antoine and Ichikawa, Tomoki and Yamashita, Kohei and Nishino, Ko},
 journal={CVPR},
 year={2025}
}
Updates and To-do list
Updates
- [04/02/2025] Code release.
To-do list (Bugs and new features)
- (Bug) If input images are too small: If the largest side of the input images is less than 512 pixels, the code currently returns an error. This should be fixed.
- (New feature) Initial charts selection: For dense-view reconstruction, add a script to automatically select a good subset of images to convert into initial charts. The initial charts just need to cover the scene well, so a simple greedy approach should be sufficient.
- (New feature) Evaluation: Add evaluation scripts.
- (New feature) gsplat support: Make the code compatible with gsplat's rasterizer from the Nerfstudio team.
Overview
The full MAtCha pipeline consists of 4 steps:
- Scene initialization: Camera poses are estimated from a sparse set of images using MASt3R-SfM. Images can be unposed or posed. For posed images, a COLMAP dataset with ground truth camera poses can be provided to the pipeline. For COLMAP datasets, MAtCha can use either sparse or dense viewpoints.
- Chart Alignment: Each input image is converted into an optimizable chart. We first initialize the charts with DepthAnythingV2. Then, we use a novel neural deformation model to align the chart with the scene geometry and produce a multi-view consistent, coherent manifold.
- Chart refinement: We further refine and densify the geometry with a photometric optimization. To this end, we instantiate 2D Gaussians aligned with the manifold and optimize the representation with differentiable rendering. Gaussians can densify along the manifold to better capture the fine details of the scene.
- Mesh extraction: We propose a novel mesh extraction method that relies on a depth fusion algorithm and an adaptive tetrahedralization of the scene, similar to Gaussian Opacity Fields. Our mesh extraction method scales to large scenes with background objects, allowing for a much more flexible and adaptive mesh with detailed foreground objects and smooth background geometry.
We provide a dedicated script for each of these steps, as well as a script train.py that runs the entire pipeline. We explain how to use this script in the next sections.
Examples of MAtCha reconstructions from 10 input views. MAtCha can recover sharp, accurate and complete 3D surface meshes from sparse views, including both foreground and background objects (left: GT images, right: MAtCha mesh).
Examples of MAtCha reconstructions from dense input views (150+ training views). MAtCha can fully leverage priors from monocular depth estimation models, even when the predicted depth maps are not multi-view consistent, and recover sharp and complete meshes including both foreground and background objects (left: textured mesh, right: untextured mesh).
License
Click here to see content.
This project builds on existing open-source implementations of the following projects:
As a consequence, this project contains some code from the above projects, specifically in the ./mast3r/, ./Depth-Anything-V2/, and ./2d-gaussian-splatting/ directories.
Please refer to the LICENSE files in the respective directories for more details about the license of these specific parts of the code, most of them being incompatible with commercial use.
Apart from these parts, the rest of the code was entirely written by ourselves and is licensed under the MIT license (see the LICENSE file in the root directory). As a consequence, you are free to use this code for any purpose, commercial or non-commercial.
Note for commercial use: If you intend to use this project for commercial purposes, you would need to replace the components with non-commercial licenses with alternatives that permit commercial use.
Installation
Click here to see content.
0. Requirements
The software requirements are the following:
- Conda (recommended for easy setup)
- C++ Compiler for PyTorch extensions
- CUDA toolkit 11.8 for PyTorch extensions
- C++ Compiler and CUDA SDK must be compatible
Please refer to the original 2D Gaussian Splatting repository for more details about requirements.
1. Quick install
Please start by cloning the repository:
git clone https://github.com/anttwo/MAtCha.git
cd MAtCha
Then, we provide a script to install all the dependencies for the MAtCha pipeline, as well as a script to download the weights of the pretrained models needed for running the full MAtCha pipeline (MASt3R-SfM and DepthAnythingV2).
To create the conda environment and install all the dependencies, run:
python install.py
By default, the environment will be named matcha. You can change the name of the environment with the --env_name argument.
To download all the pretrained models, run:
python download_checkpoints.py
If you encounter any issues when running the installation script, please refer to the following section for detailed instructions.
2. Detailed installation (if quick install fails)
Click here to see content.
2.1. Install dependencies
Please follow the instructions below to install the dependencies manually:
conda create --name matcha -y python=3.9
conda activate matcha
# Choose the right CUDA version for your system
conda install pytorch==2.0.1 torchvision==0.15.2 torchaudio==2.0.2 pytorch-cuda=11.8 -c pytorch -c nvidia
conda install -c fvcore -c iopath -c conda-forge fvcore iopath
conda install pytorch3d==0.7.4 -c pytorch3d
conda install -c plotly plotly
conda install -c conda-forge rich
conda install -c conda-forge plyfile==0.8.1
conda install -c conda-forge jupyterlab
conda install -c conda-forge nodejs
conda install -c conda-forge ipywidgets
conda install cmake
conda install conda-forge::gmp
conda install conda-forge::cgal
pip install roma==1.5.0
pip install open3d==0.18.0
pip install opencv-python==4.11.0.86
pip install scipy==1.13.1
pip install einops==0.8.1
pip install trimesh==4.6.4
pip install pyglet==1.5.29
pip install tensorboard
pip install scikit-learn==1.6.1
pip install cython==3.0.12
# Choose the right CUDA version for your system
pip install faiss-gpu-cu11
pip install tqdm==4.67.1
pip install matplotlib==3.9.4
pip install huggingface-hub[torch]
pip install gradio
Then, install the 2D Gaussian splatting and adaptive tetrahedralization dependencies:
cd 2d-gaussian-splatting/submodules/diff-surfel-rasterization
pip install -e .
cd ../simple-knn
pip install -e .
cd ../tetra-triangulation
cmake .
# you can specify your own cuda path
export CPATH=/usr/local/cuda-11.8/targets/x86_64-linux/include:$CPATH
export LD_LIBRARY_PATH=/usr/local/cuda-11.8/targets/x86_64-linux/lib:$LD_LIBRARY_PATH
export PATH=/usr/local/cuda-11.8/bin:$PATH
make
pip install -e .
cd ../../../
Finally, install the MASt3R-SfM dependencies:
cd mast3r/asmk/cython
cythonize *.pyx
cd ..
pip install .
cd ..
cd ../dust3r/croco/models/curope/
python setup.py build_ext --inplace
cd ../../../../../
2.2. Download pretrained models
Start by downloading a pretrained checkpoint for DepthAnythingV2. Several encoder sizes are available; We recommend using the large encoder:
mkdir -p ./Depth-Anything-V2/checkpoints/
wget https://huggingface.co/depth-anything/Depth-Anything-V2-Large/resolve/main/depth_anything_v2_vitl.pth -P ./Depth-Anything-V2/checkpoints/
Then, download the MASt3R-SfM checkpoint:
mkdir -p ./mast3r/checkpoints/
wget https://download.europe.naverlabs.com/ComputerVision/MASt3R/MASt3R_ViTLarge_BaseDecoder_512_catmlpdpt_metric.pth -P ./mast3r/checkpoints/
And finally, download the MASt3R-SfM retrieval checkpoint:
wget https://download.europe.naverlabs.com/ComputerVision/MASt3R/MASt3R_ViTLarge_BaseDecoder_512_catmlpdpt_metric_retrieval_trainingfree.pth -P ./mast3r/checkpoints/
wget https://download.europe.naverlabs.com/ComputerVision/MASt3R/MASt3R_ViTLarge_BaseDecoder_512_catmlpdpt_metric_retrieval_codebook.pkl -P ./mast3r/checkpoints/
Quick Start
Click here to see content.
This section describes how to run the full MAtCha pipeline on a set of unposed or posed images, with either sparse or dense supervision. For running only specific steps of the pipeline, please refer to the following section. Please make sure to first activate the conda environment created by the installation script:
conda activate matcha
Training on unposed images with sparse supervision
You can run the following single script to optimize a full MAtCha model using a set of unposed images. By default, all images in the directory will be used:
python train.py -s <PATH TO IMAGE DIRECTORY> -o <PATH TO OUTPUT DIRECTORY> --sfm_config unposed
You can select a subset of images to use for the optimization. To this end, you can either use the --image_idx argument to select a specific subset of images by index, or the --n_images argument to select a fixed number of images. If using the --n_images argument, the images will be sampled with constant spacing; You can add the --randomize_images argument to shuffle the images before sampling.
To use a specific subset of images (such as the first 5 images in the directory), you can run:
python train.py -s <PATH TO IMAGE DIRECTORY> -o <PATH TO OUTPUT DIRECTORY> --sfm_config unposed --image_idx 0 1 2 3 4
To use 10 images sampled with constant spacing in the directory, you can run:
python train.py -s <PATH TO IMAGE DIRECTORY> -o <PATH TO OUTPUT DIRECTORY> --sfm_config unposed --n_images 10
To use 10 images randomly sampled in the directory, you can run:
python train.py -s <PATH TO IMAGE DIRECTORY> -o <PATH TO OUTPUT DIRECTORY> --sfm_config unposed --n_images 10 --randomize_images
Training on COLMAP dataset with sparse supervision
You can also provide a usual COLMAP dataset with ground truth camera poses to MAtCha by using the --sfm_config posed argument. In this case, as COLMAP datasets may contain a large number of images, make sure to provide the indices of the images to use for the optimization with the --image_idx argument, or to use the --n_images argument. For instance, to use only the first 5 images for sparse-view reconstruction, you can run:
python train.py -s <PATH TO COLMAP DATASET> -o <PATH TO OUTPUT DIRECTORY> --sfm_config posed --image_idx 0 1 2 3 4
You can create a COLMAP dataset from a set of images using the script 2d-gaussian-splatting/convert.py. Please refer to the repo of our previous work SuGaR or the original 3DGS repo for more details on how to do this.
Training on COLMAP dataset with dense supervision
You can also provide a usual COLMAP dataset with ground truth camera poses and dense viewpoints to MAtCha by using both the --sfm_config posed and --dense_supervision arguments.
In this case, a subset of images will first be converted into charts for building an initial manifold; The manifold will then be used as a scaffold for optimizing the full model with dense supervision, using all the images in the dataset. We recommend selecting a subset of images with good coverage of the scene for building the initial charts.
We also provide a novel loss function for regularizing the representation using depth maps for all viewpoints obtained with a monocular depth estimator. Our novel loss function enforces the rendered depth maps to preserve the same depth order as the supervision depth maps; As a result, it does not require supervision depth maps to be multi-view consistent and does not require any additional alignment or rescaling of the depth maps.
You do not need to provide the supervision depth maps to the pipeline, as our code will automatically use DepthAnythingV2 to generate them.
Make sure to provide the indices of the images to use as initial charts with the --image_idx argument, or to use the --n_images argument. For instance, to use 10 images with constant spacing as initial charts for dense-view reconstruction, you can run:
python train.py -s <PATH TO COLMAP DATASET> -o <PATH TO OUTPUT DIRECTORY> --sfm_config posed --dense_supervision --n_images 10
By default, the train.py script will optimize the model for 30,000 iterations when using dense supervision, instead of the default 7,000 iterations used for sparse-view reconstruction. You can change this behavior by using the argument --free_gaussians_config default to optimize for 7,000 iterations, or --free_gaussians_config long to optimize for 30,000 iterations.
While optimizing for 30,000 iterations will take approximately 50 minutes in total, optimizing for 7,000 iterations will take a few minutes only. However, for dense-view reconstruction, we recommend optimizing for 30,000 iterations to ensure optimal quality.
Running specific steps of the pipeline
You can run only one specific step of the pipeline by using one of the following arguments with the train.py script:
--sfm_only: Only run the scene initialization using MASt3R-SfM.--alignment_only: Only run the chart alignment using our novel neural deformation model.--refinement_only: Only run the chart refinement using 2D Gaussians.--mesh_only: Only run the mesh extraction relying on our custom and scalable depth fusion algorithm.
Running a specific step can be useful for experimenting with different hyperparameters, adjusting the strength of the regularization during chart alignment and refinement, trying different resolution for extracting the final mesh, etc.
You can also combine several of these arguments to run several specific steps in a single run.
The full training script train.py is just a wrapper around individual scripts located in the ./scripts/ directory; Please refer to these scripts for more details on how to use them as well as the different arguments.
Stronger regularization for removing floaters
If some artifacts or floaters are present in the final mesh, you can try to increase the strength of the chart alignment with --alignment_config strong:
python train.py -s <PATH TO IMAGE DIRECTORY> -o <PATH TO OUTPUT DIRECTORY> --sfm_config unposed --n_images 10 --alignment_config strong
If using a COLMAP dataset with dense supervision, you can also adjust the strength of the dense depth regularization with the --dense_regul argument:
- Use
--dense_regul defaultfor the default regularization - Use
--dense_regul strongfor a stronger regularization - Use
--dense_regul weakfor a weaker regularization - Use
--dense_regul noneto disable the dense regularization.
Increasing the strength of the dense depth regularization can help removing floaters. For some specific scenes where GT camera poses or monocular depth maps could be inaccurate and contain outliers, the dense depth regularization could be detrimental; In this case, you can also try to weaken or disable the dense depth regularization.
For instance, to use 10 initial charts generated from 10 images with constant spacing and perform dense-view reconstruction with a stronger dense depth regularization, you can run:
python train.py -s <PATH TO COLMAP DATASET> -o <PATH TO OUTPUT DIRECTORY> --sfm_config posed --dense_supervision --n_images 10 --dense_regul strong
Improve Mesh Quality
Our novel mesh extraction method relies on a custom depth fusion algorithm. To scale our method to large scenes with background objects, we adapted the adaptive tetrahedralization method from Gaussian Opacity Fields (GOF): We partition the scene into a set of tetrahedra, such that the local number of tetrahedra directly depends on the local distribution of Gaussians in the scene. This allows for a much more flexible and adaptive mesh with both detailed foreground objects and smooth background geometry.
For dense-view reconstruction, we iterate over all training viewpoints to extract the final mesh.
For sparse-view reconstruction, we linearly interpolate pseudo-viewpoints between the neighboring sparse training viewpoints to extract the final mesh. However, in some cases, interpolating pseudo-viewpoints could lead to artifacts in the mesh, especially if interpolated viewpoints end up being inside the geometry.
If encountering such artifacts, you can try to disable the interpolation with the --no_interpolated_views argument:
python train.py -s <PATH TO IMAGE DIRECTORY> -o <PATH TO OUTPUT DIRECTORY> --sfm_config unposed --n_images 10 --no_interpolated_views
Please note that we also propose a multi-resolution TSDF fusion method that can be used instead of the adaptive tetrahedralization method. While this method is closer to concurrent works, it may produce artifacts or large holes in the mesh; As a result, we strongly recommend using the adaptive tetrahedralization method for better quality meshes. For using the multi-resolution TSDF fusion method, you can use the --use_multires_tsdf argument:
python train.py -s <PATH TO IMAGE DIRECTORY> -o <PATH TO OUTPUT DIRECTORY> --sfm_config unposed --n_images 10 --use_multires_tsdf
Control the resolution of the final mesh
When using the adaptive tetrahedralization method, you can control the downsampling ratio of the tetrahedra set with the --tetra_downsample_ratio argument. This parameter directly controls the number of vertices in the final mesh.
We recommend starting with the default value of --tetra_downsample_ratio 0.5 and then decreasing to 0.25 if the mesh is too dense, or increasing to 1.0 if the mesh is too sparse.
For example, to use a downsampling ratio of 0.25 with a dataset of unposed images, you can run:
python train.py -s <PATH TO IMAGE DIRECTORY> -o <PATH TO OUTPUT DIRECTORY> --sfm_config unposed --tetra_downsample_ratio 0.25
Please refer to the train.py script as well as individual scripts in the ./scripts/ directory for more details on the command line arguments. Feel free to modify the config files in the ./configs/ directory or create your own to suit your needs.
Evaluation
Click here to see content.
We will release the evaluation scripts soon, including:
- Surface reconstruction on DTU
- Surface reconstruction on Tanks and Temples
- Novel view synthesis on Mip-NeRF 360, Tanks and Temples and DeepBlending
We still need to clean the codebase a little bit and merge some scripts to make the full evaluation pipeline easier to run.
Acknowledgements
We would like to thank the authors of the following projects for their awesome work, and for providing their code; This work would not have been possible without them.
- MASt3R-SfM: We use the MASt3R-SfM pipeline to estimate camera poses and initial geometry from a set of images.
- DepthAnythingV2: We use DepthAnythingV2 to initialize the charts.
- 2D Gaussian Splatting: We use 2D Gaussian Splatting to refine the charts with a differentiable renderer.
- Gaussian Opacity Fields: We adapted the tetrahedralization method from Gaussian Opacity Fields to extract a mesh from our representation.
Similar repos
Languages
Python
89.8%
CMake
4.6%
Cuda
3.1%
C++
1.2%